

Page 1
GM Series
User’s manual
PRODUCED BY GTT CO., LTD.
GTT CO., LTD.
Suite 408, Pungsan Apt. Factory, 1141-2, Baeksuk-dong,
Ilsan-gu, Koyang-shi, Kyounggi-do, Korea
Tel : 82 31 903 9780, Fax : 82 31 903 9787
E-mail : [email protected]
URL : http://www.gtt.co.kr
Page 2

CONTENTS
1. Package Contents
2. Monitor Parts
3. Connecting to PC
4. Features
5. OSD Menu functions
6. Dimension
7. Specification
8. AV OSD function
9. USB function
10. Pivot function
11. Recommended Use
12. Troubleshooting
1
Thank you for your selection of new TFT LCD Monitor.
Please take a few minutes to read this User’s manual for the best
performance of this monitor.
Information in this manual is subject to change without prior notice
for improving design, function and etc.
IBM, DOS, PC and VGA are trademarks of International Business
Machines Corporation.
Page 3
32
Package Contents
Your TFT-LCD monitor box should contain the following :
Monitor Parts
STANDARD PARTS
• TFT-LCD monitor
• DC Power adapter
- Connects to DC IN port on the base of monitor
• Power cord
- Connects wall outlet to DC Power adapter
• D-SUB 15pin video cable
- Connects PC to LCD monitor
• USB upstream cable
- Connects PC to USB ports on the base of monitor
• Stereo audio cable
- Connects PC sound card to audio input port on the base
of monitor
• User's manual
• Installation CD-ROM
OPTIONAL PARTS
•
Video cables (Composite, S-video)
• Audio cable for AV monitor
• Pivot software
- Must be installed to use the monitor in Portrait mode
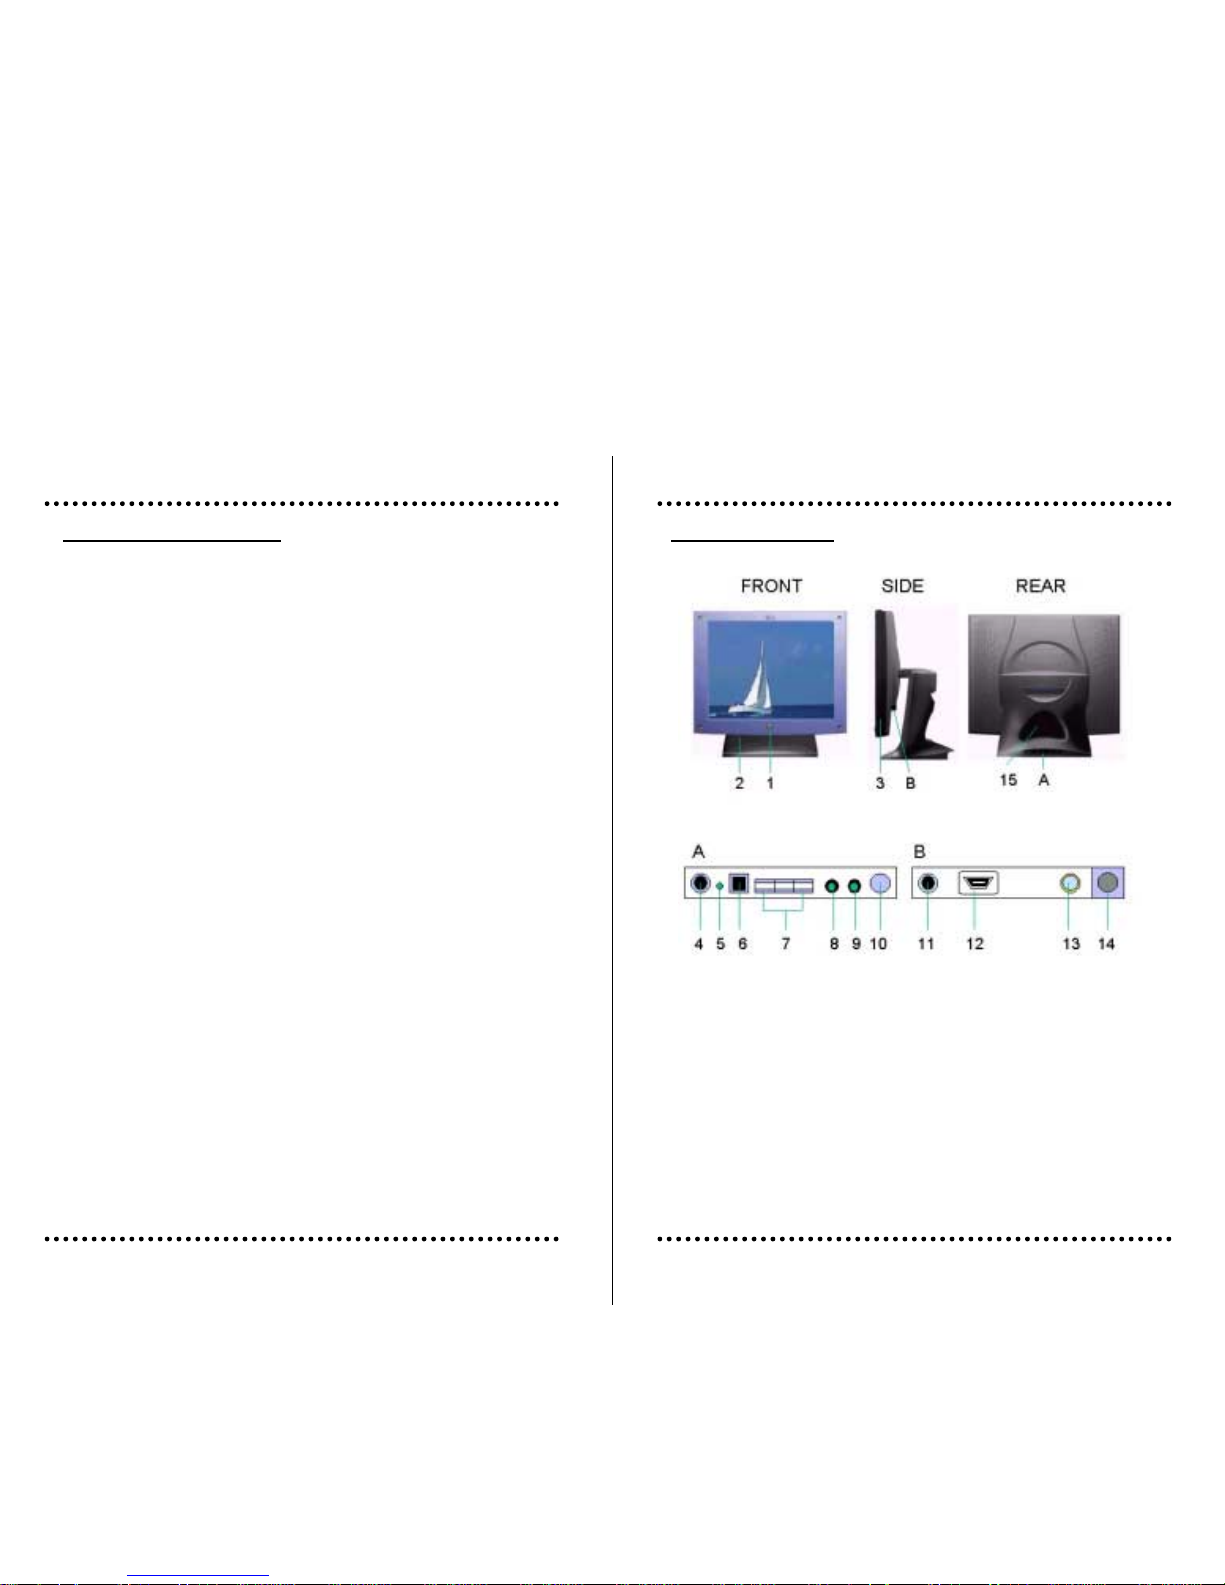
9. Audio IN port
10. Volume control
11. Power input connect
12. VGA input connector
13. Composite input connector (Optional)
14. S-Video input connector (Optional)
15. Cable hole
1. Power switch
2. Speaker hole
3. OSD button
4. Power input connector
5. LED indicator
6. USB Up stream connector
7. USB Down stream connectors
8. Audio OUT port
Page 4

54
Connecting to PC
To attach your TFT-LCD monitor to your system, follow
the instructions hereunder
1. Connect the small DC power cord from the base of the
monitor to the head (For first time installation, this step
will be completed by the factory)
2. Connect 15-pin D-SUB cable to the connector or display
card of your computersystem. Tighten all the screws
3. Connect 15-pin D-SUB cable to the appropriate
connectors on the back of the monitor head
4. Connect AC adapter cable to the power input connectors
on the back of the monitor base
5. Connect one end of the power cord to the AC adapter
and the other end to the power outlet
6. Turn on the monitor
7. To complete the setup
• Adjustment of the H/V Position and Image Adjust H.
Size controls may be required to complete setup of your
TFT- LCD monitor. For a full description of these OSD
controls, refer to OSD menu functions
• Your monitor has two 2 Watt speakers with amplifier.
Please connect the speaker jack to the Line out jack of
your PC's sound card
A. set up your computer system to :
1024 x 768 resolution @ 60Hz.
B. Use the following OSD controls
- Auto adjust control
- Coase or Clock Phase control
Page 5
6
Features
TFT-LCD (Thin film transistor - liquid crystal display)
The 13.3/14.1/15.1 inch panel and hard coating(3H),anti-glare
treatment of the front polarizer enables low reflection, anti-
static, high-resolution and high-contrast characteristics.
Plug-and-Play Compatible
This TFT-LCD monitor conforms to the VESA(Video Electronics
Standards Association) standard and DDC1/DDC2B. A picture
adjustment function makes it possible to adjust the image quality
to match the input signal.
An automatic size adjustment function is provided.
Auto-setup control on OSD screen adjust image position,
horizontal size or fine settings
Environmentally Friendly
The power consumption can be reduced by using this TFT-LCD
monitor in combination of a computer that conforms to the VESA
DPMS(Display Power Management Signaling) standard.
Desk space can be used effectively due to the 20 cm depth.
VESA standard wall mounting
This TFT-LCD monitor has the VESA (Video Electronics
Standards Association) standard wall mounting holes Monitor
head can be mounted on the wall using a VESA-compliant wall
mount
OSD menu functions
7
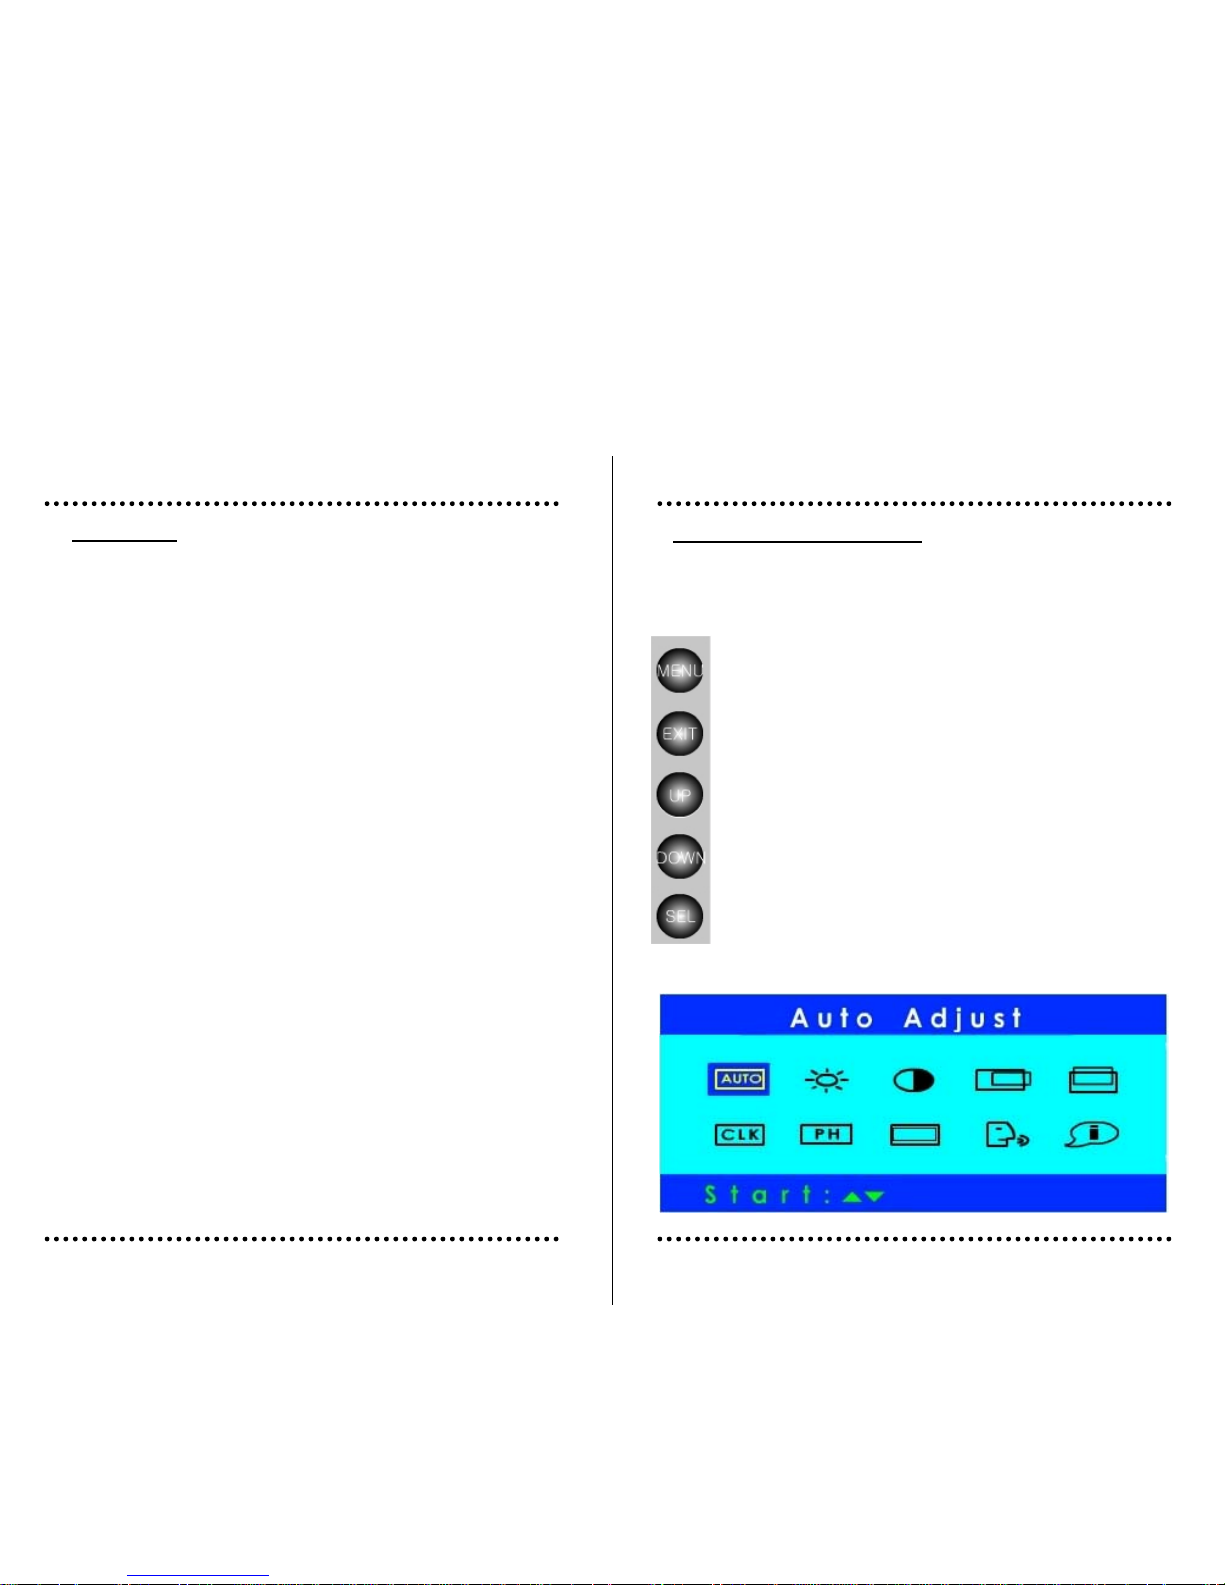
SEL : Input select button (available in AV monitor)
- Allows the user to select the current signal from the
following choice : analog RGB input, Composite video
input, S-video input
MENU : Menu on/move button
- Show OSD menu on the screen. Moves the highlighted
area down to select one of the functions
EXIT : Menu off button
- Exit from OSD menu. Exit to main menu from sub menu.
UP : Adjust button
- Moves the bar left to decrease the adjustment. Start auto
adjust.
DOWN : Adjust button
- Moves the bar right to increase the adjustment. Start auto
adjust.
OSD (On-Screen-Display) control buttons functions as follows :
To access OSD Menu, press MENU button
[ MAIN MENU DISPLAY ]
Page 6
98
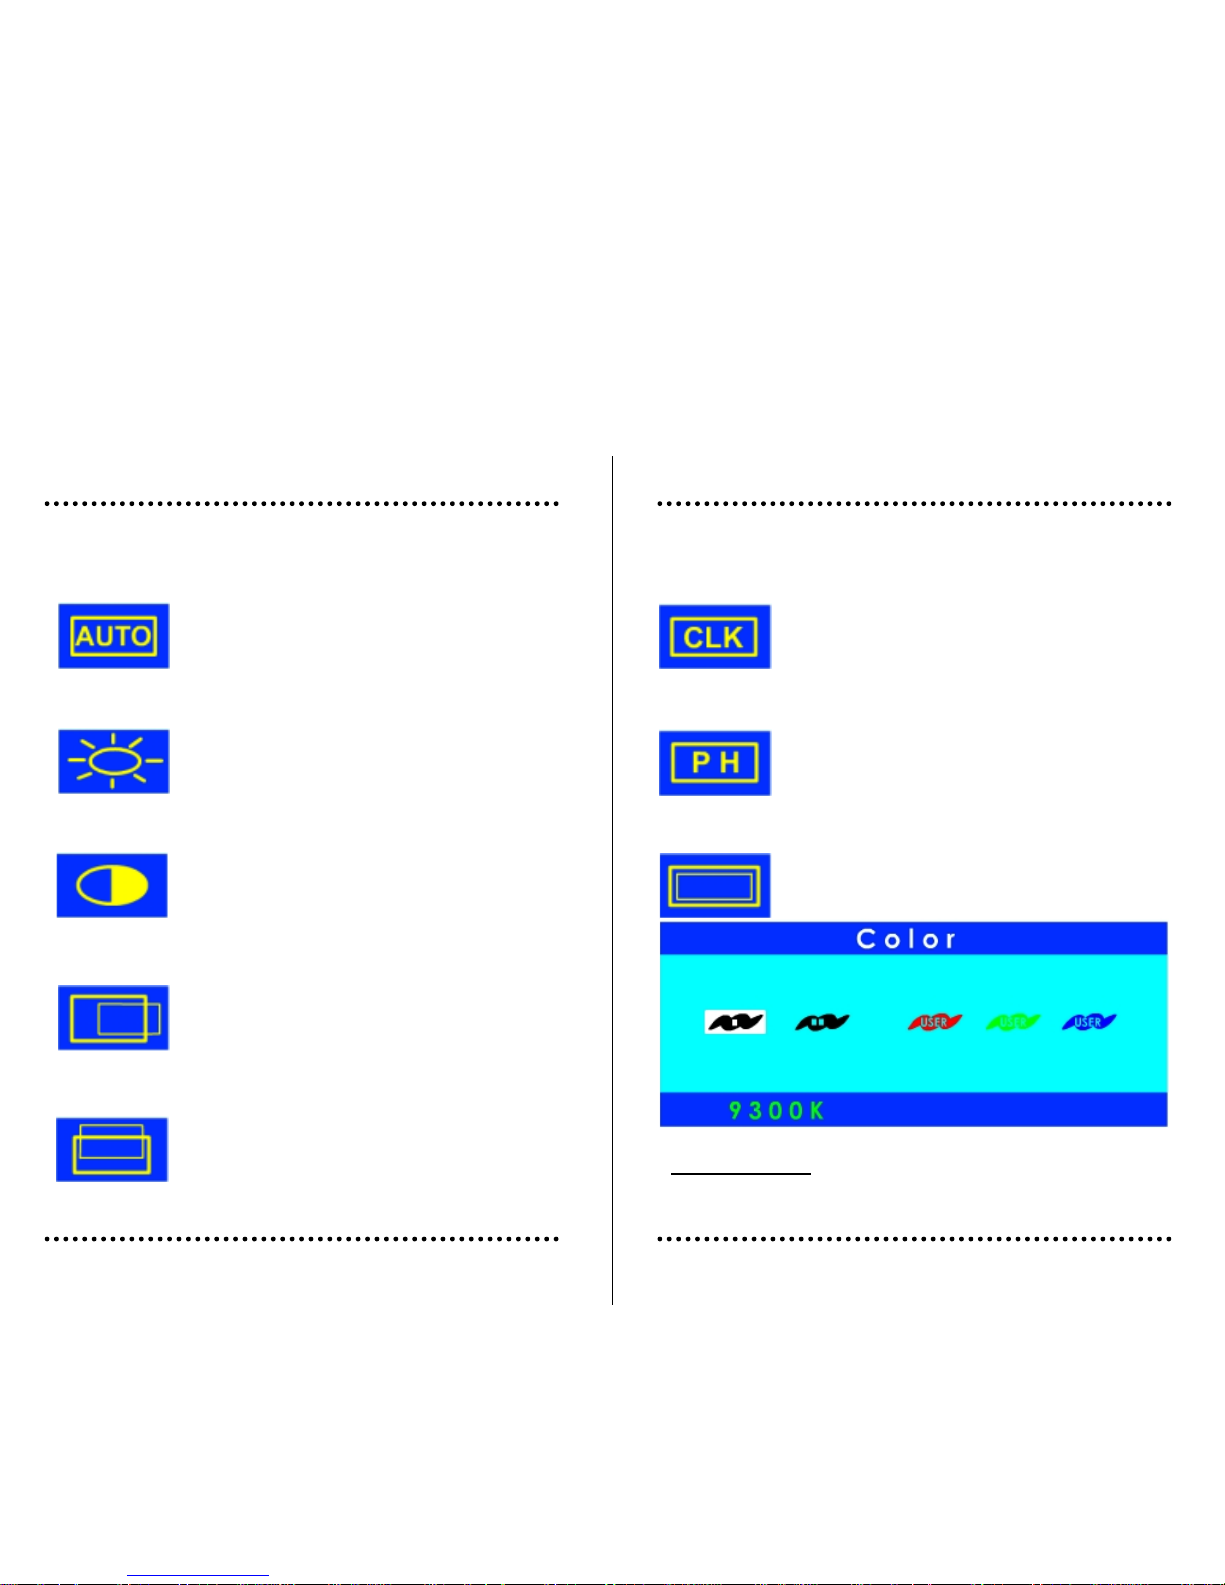
Control s the brightness of the LCD
Use UP or DOWN button to increase or decrease
the settin
g
Controls the contrast of the LCD
Use UP or DOWN button to increase or decrease
the setting
Controls the horizontal image position within the
display of the LCD Use the UP or DOWN button
to move the image right or left
Controls the vertical image position within the
display of the LCD
Use the UP or DOWN button to move the image
up or down
Automatically adjust Image Position, Horizontal
Size or Fine setting Press UP or DOWN button
to adjust the settings automatically
• AUT O ADJU ST
• BRIGHTNESS
•CONTRAST
•IMAGE HORI. POSITION
•MAGE VERT. POSITION
Improves focus, clarity and image stability
Use UP or DOWN button to increase or decrease
the setting
Improves focus, clarity and image stability
Use UP or DOWN button to increase or decrease
the setting
•COASE ( Coarse Tuning)
•CLOCK PHASE (Fine Tuning)
Press the UP or DOWN button to enter into the
following submenu
•COLOR
Press the MENU button to select the item you wish to change
Color temperature
Provides two preset color adjustment : 9300K and 6500
Select the preset by using MENU button and press EXIT button
Page 7
1110
To exits to the OSD main menu, press the EXIT button
RGB Adjustment
Increases or decreases Red, Green or blue color selected
Use UP or DOWN button to increase or decrease the setting
•LANGUAGE
Provides Five languages for OSD menu.
Select language by using UP or DOWN button
Show the horizontal and vertical frequency
•INFORMATION
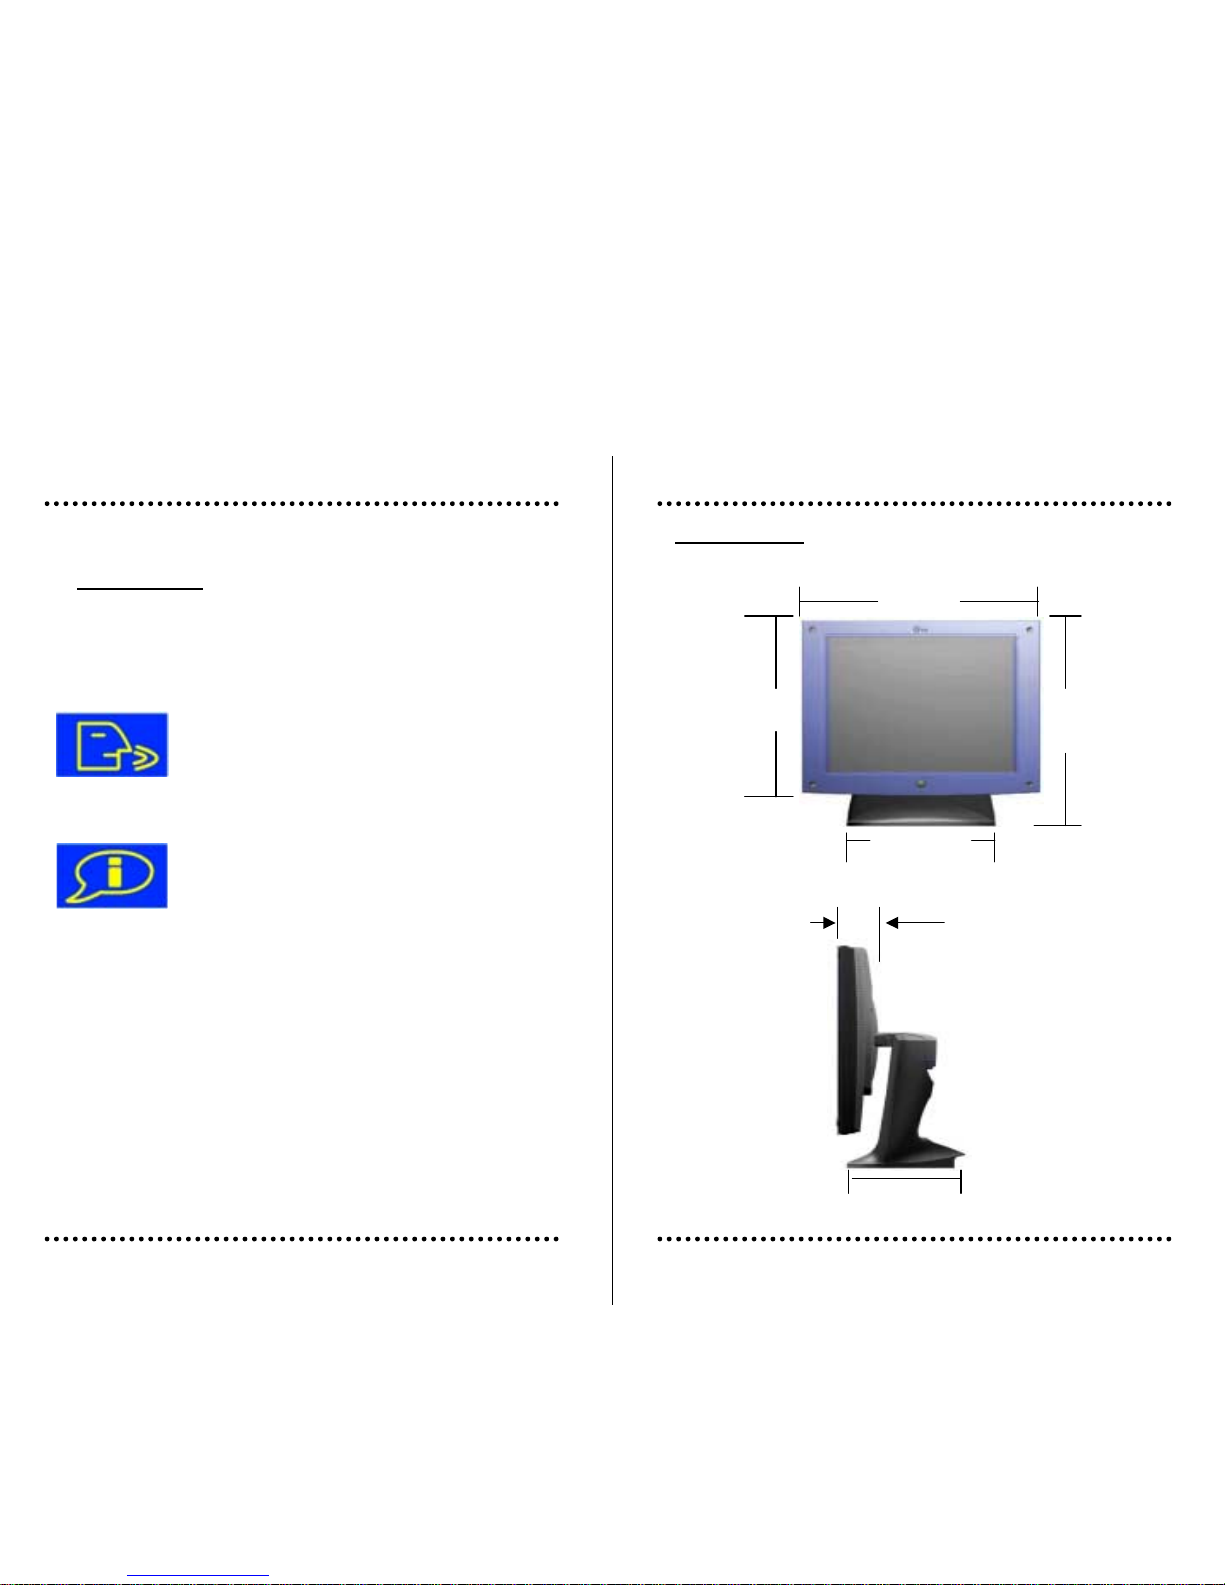
Dimension
78mm
199mm
250mm
378mm
400mm
322mm
Page 8
1312
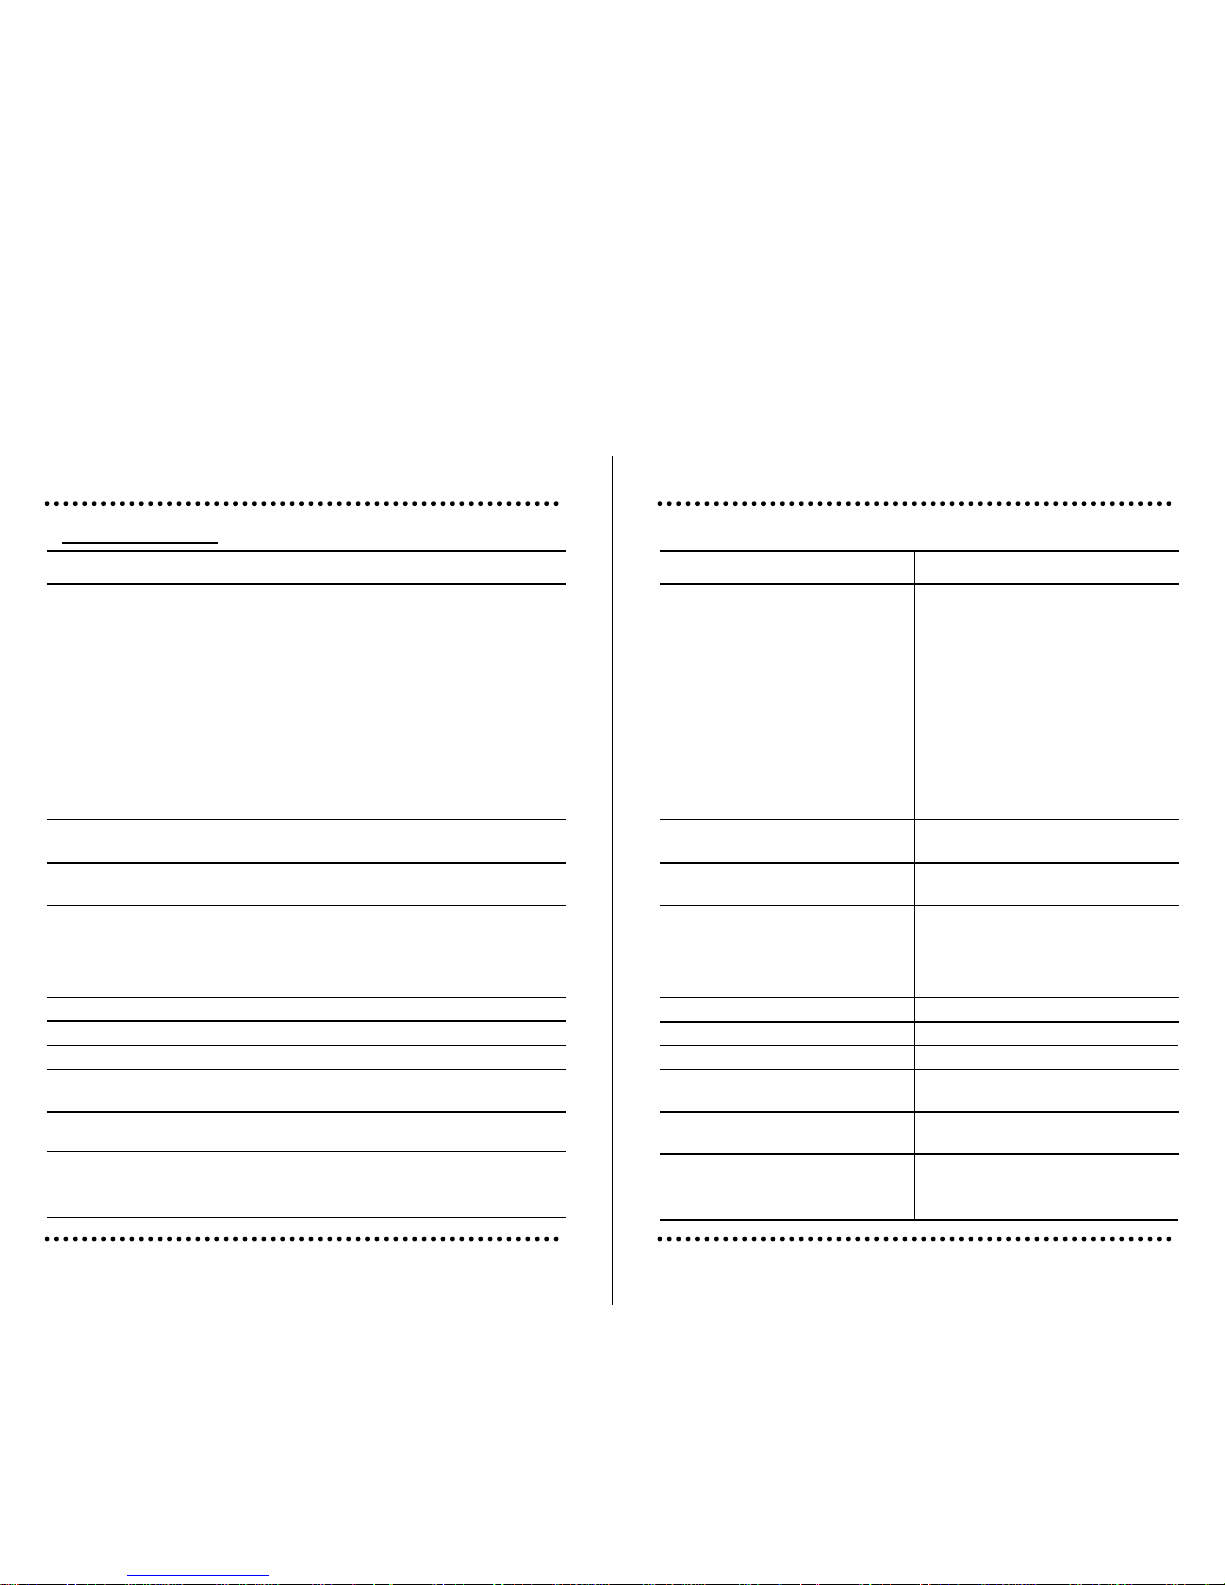
Specification
RESOLUTION
SUPPORT
POWER
CONSUMPTION
<30 watt
<4 watt
POWER SUPPLY
ADAPTER
AC 100V~240V, 50~60Hz
12VDC
STANDARD
ACCESSORIES
POWER SAVING
PANEL
Audio
Plug & Play
XGA 1024 X 768(max)
On working
Off
Function
OSD CONTROL
DDC1/DDC2B
VESA DPMS
Speakers
3W x 2 with AMP on stand
Input
Output
15-PIN VGA cable, AC adapter,
Power cord, User's guide
OPTION
Touch screen
A/V
Pivot software
Resistive type
Composite, S-Video input
Landscape / Portrait
MODEL
14.1”
<30 watt
<4 watt
AC 100V~240V, 50~60Hz
12VDC
XGA 1024 X 768(max)
DDC1/DDC2B
VESA DPMS
15-PIN VGA cable, AC adapter,
Power cord, User's guide
15.1”
Amorphous active matrix
TFT-LCD
14.1”diagonal
1024(H) x 768(V)
0.279mm x 0.279mm
6 bit
16M colors by dithering)
200 : 1(Typ.)
150cd/
!!!!
285.696 X 214.272
U/D: 10
"""" / 30"""" , R/L: 45"""" / 45""""
1CCFT
LVDS
Amorphous active matrix
TFT-LCD
15.1” diagonal
1024(H) x 768(V)
0.30mm x 0.30mm
6 bit, 262,144 colors
(16M colors by dithering)
200 : 1(Typ.)
200cd/!!!!
307.2 X 230.4
U/D: 45"""" / 45"""" , R/L: 60"""" / 60""""
2CCFT
TTL
Type
Active area
Pixel format
Pixel pitch
Color depth
Contrast ratio
Brightness
Display size
Viewing angle
Backlight
Interface
Brightness, Contrast, Tuning,
Color, Image position(H.V),
Language select, Information, Input
select, Auto adjust, Information, AV
control (Optional)
Brightness, Contrast, Tuning,
Color, Image position(H.V),
Language select, Information, Input
select, Auto adjust, Information, AV
control (Optional)
3W x 2 with AMP on stand
Resistive type
Composite, S-Video input
Landscape / Portrait
<30 watt
<4 watt
AC 100V~240V, 50~60Hz
12VDC
XGA 1024 X 768(max)
DDC1/DDC2B
VESA DPMS
15-PIN VGA cable, AC adapter,
Power cord, User's guide
Brightness, Contrast, Tuning,
Color, Image position(H.V),
Language select, Information, Input
select, Auto adjust, Information, AV
control (Optional)
3W x 2 with AMP on stand
Resistive type
Composite, S-Video input
Landscape / Portrait
Amorphous active matrix
TFT-LCD
15.0” diagonal
1024(H) x 768(V)
0.297mm x 0.297mm
8 bit
16M colors
200 : 1(Typ.)
200cd/!!!!
304.128 X 228.096
U/D: 30"""" / 55"""" , R/L: 55"""" / 55""""
4CCFT
TTL
15.0”
Page 9
1514
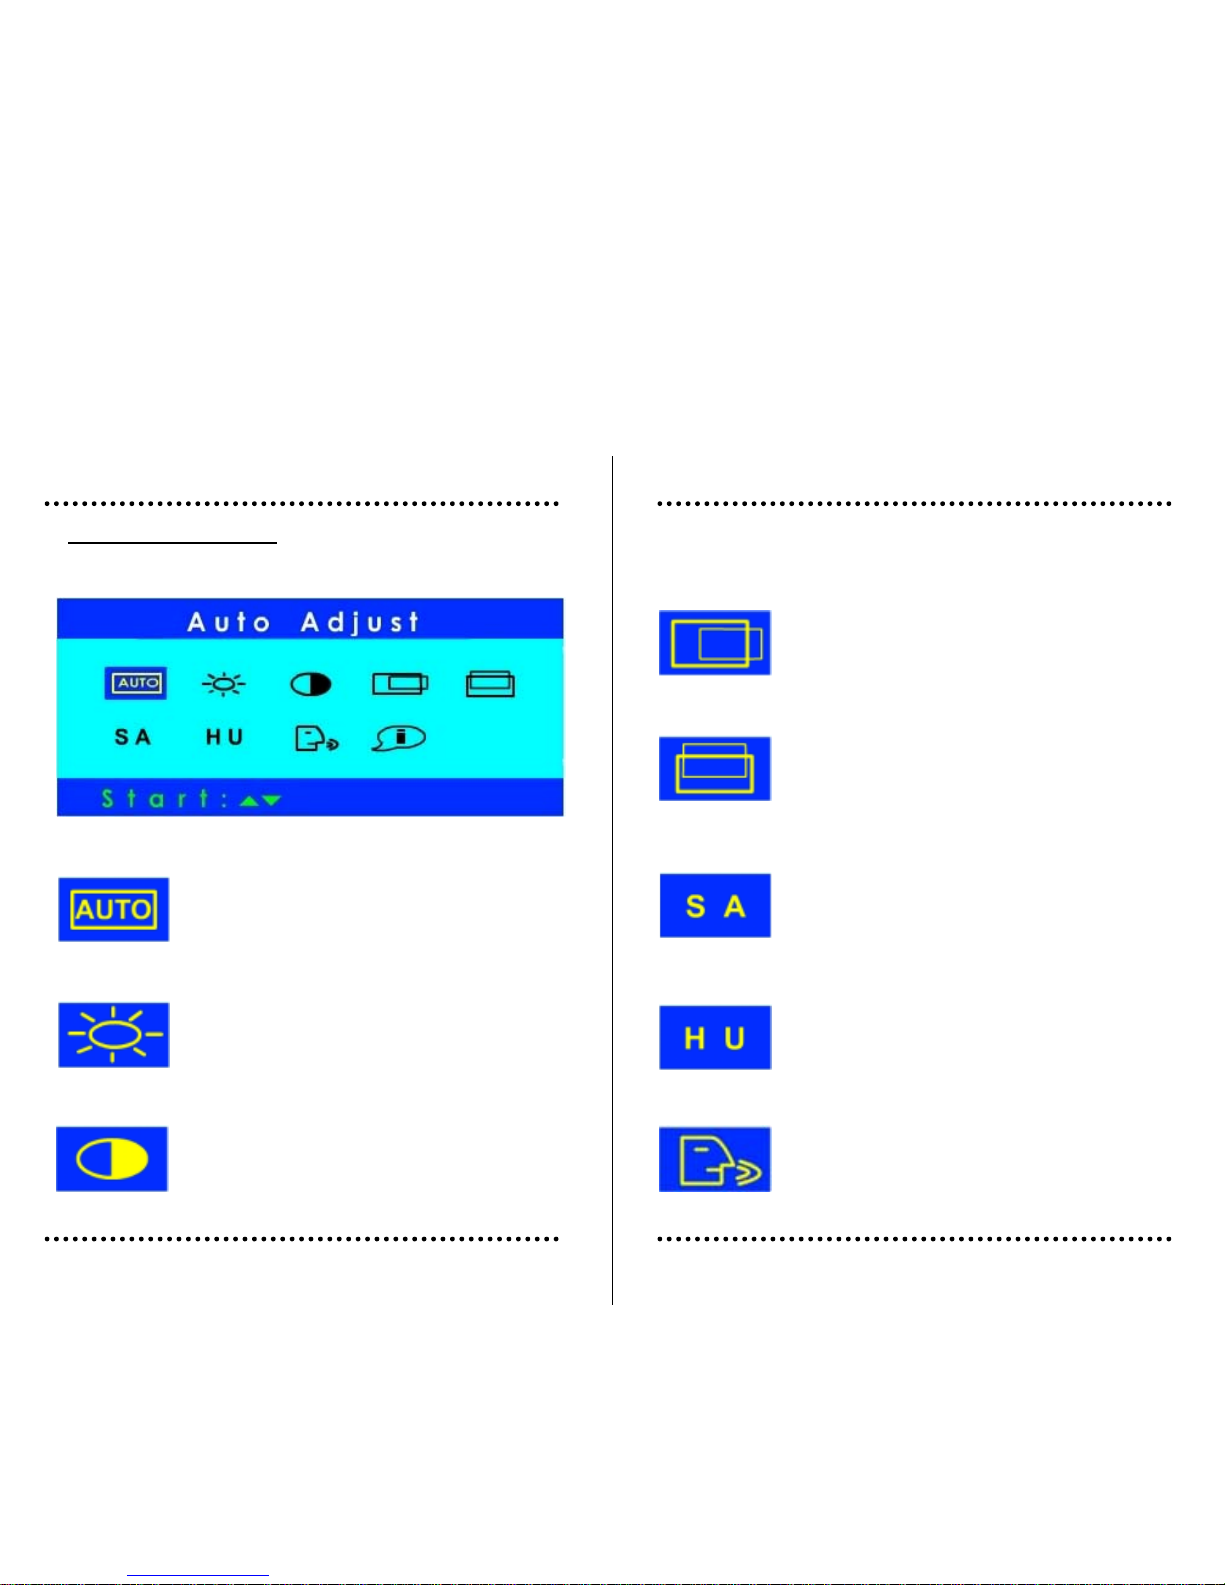
AV OSD Function
[ MAIN MENU DISPLAY ]
Control s the brightness of the LCD
Use UP or DOWN button to increase or decrease
the settin
g
Controls the contrast of the LCD
Use UP or DOWN button to increase or decrease
the setting
Automatically adjust Image Position, Horizontal
Size or Fine setting Press UP or DOWN button
to adjust the settings automatically
• AUT O ADJU ST
• BRIGHTNESS
•CONTRAST
Controls the vertical image position within the
display of the LCD
Use the UP or DOWN button to move the image
up or down
•MAGE VERT. POSITION
Controls the horizontal image position within the
display of the LCD Use the UP or DOWN button
to move the image right or left
•IMAGE HORI. POSITION
Adjusts the depth of the video color
Use UP or DOWN button to increase or decrease
the setting
•SATURATION
Adjusts the lightness of the video color
Use UP or DOWN button to increase or decrease
the setting
•HUE
•LANGUAGE
Provides Five languages for OSD menu.
Select language by using UP or DOWN button
Page 10
1716
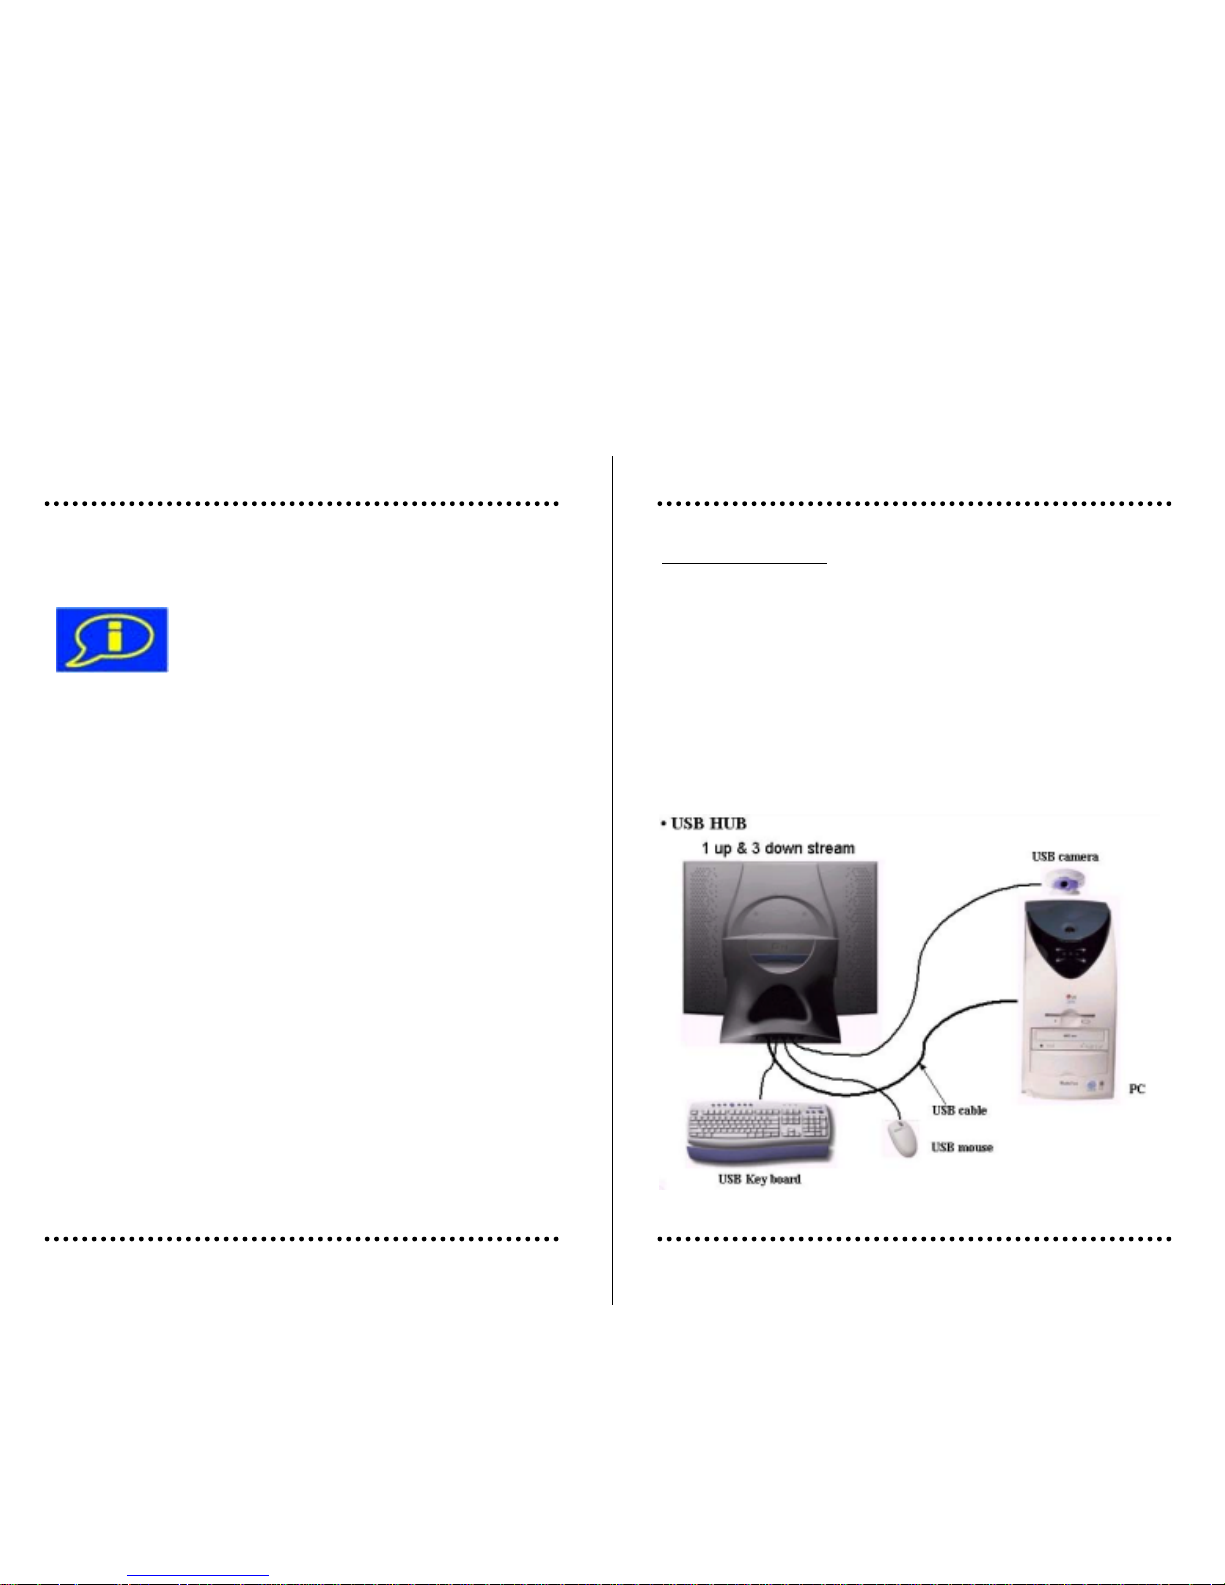
You can attach USB peripheral devices (mouse, keyboard,
etc.) To complete the USB installation, do the following:
1. Connect the USB c able from the computer to the USB IN
jack on the rear of the base.
2. Plug the USB peripheral devices into any downstream port
on the rear of the base
USB Function
Show the type of video input signal
•INFORMATION
Page 11
1918
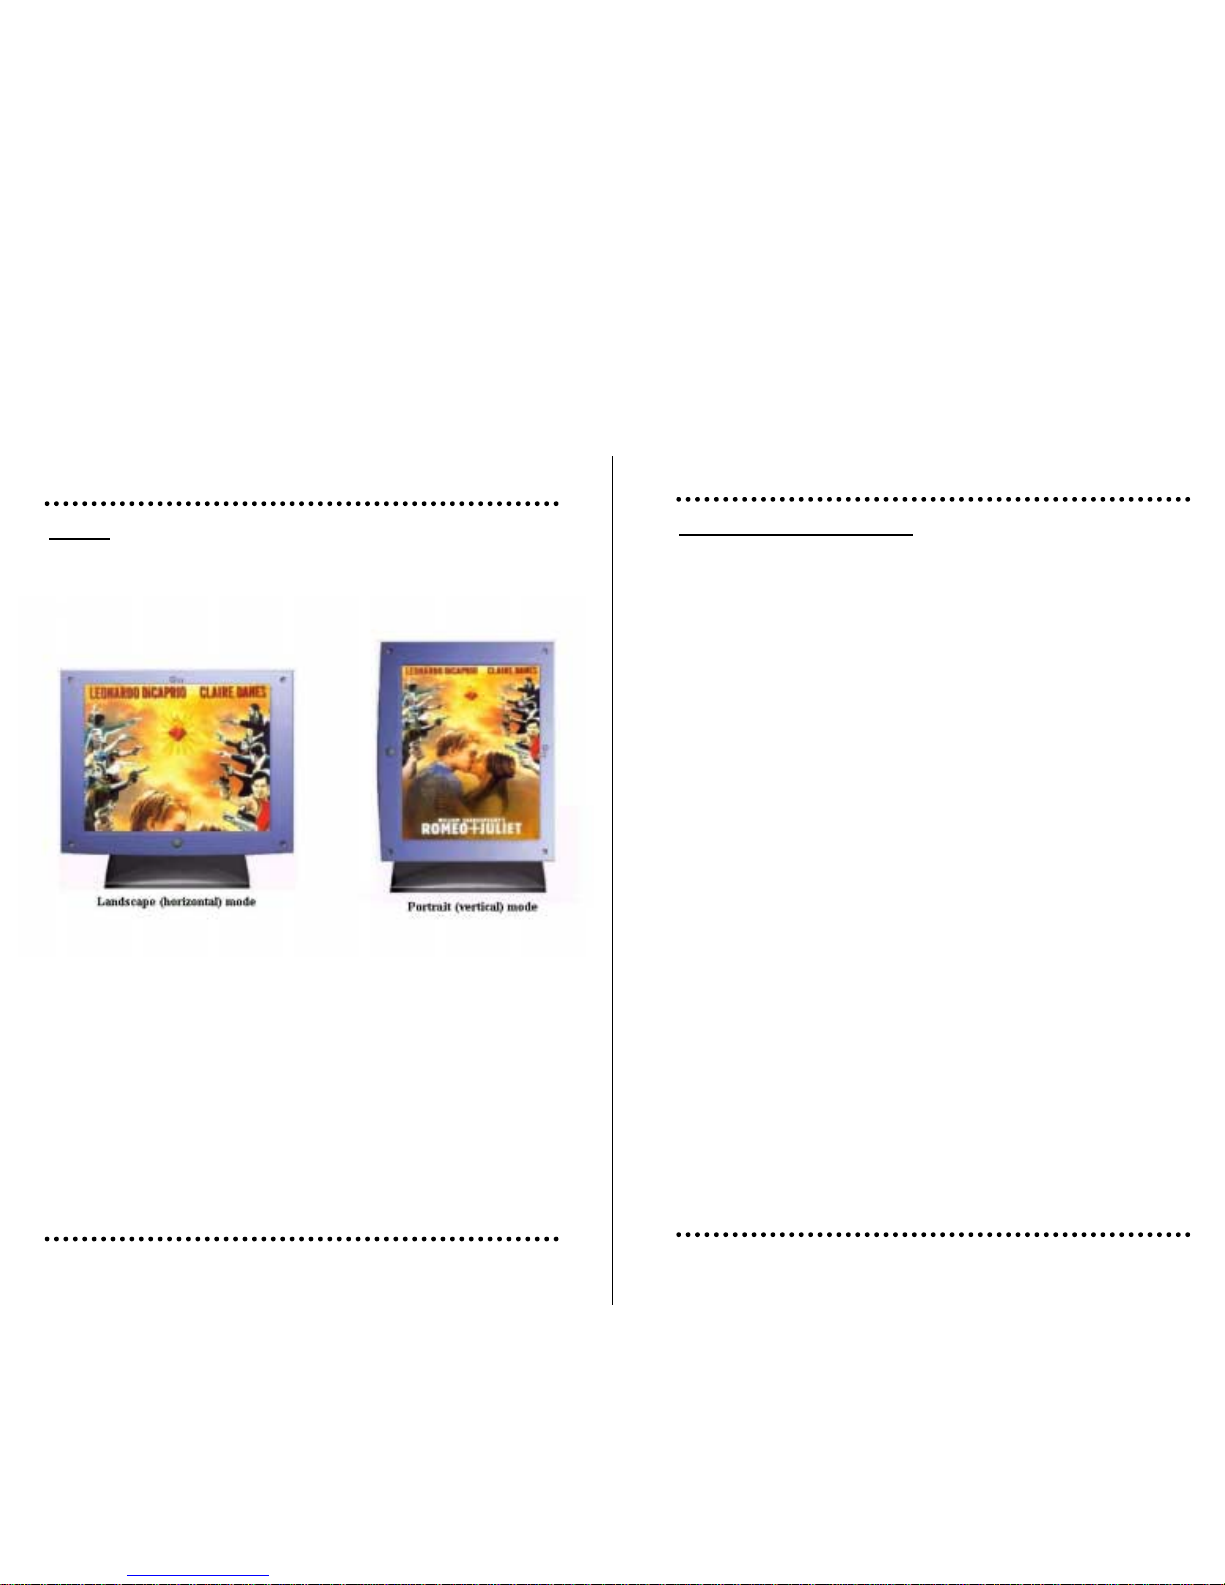
Pivot
- Landscape (horizontal) mode, like on most existing monitors,
is great for spread sheets or computer games.
- Portrait (vertica l) mode is the form factor of most documents
we use daily in the office and on the Internet.
To switch from landscape (default) to Portrait modes, do the
following:
1. Face front of the monitor
2. Pull bottom of the monitor toward you to tilt bottom away
from base.
3. After tilting the monitor, manually rotate the monitor
clockwise 90#
To switch from Portrait to Landscape mode, follow steps 1 - 3
above, but manually rotate the monitor head counterclockwise 90#
Note : Before using the portrait display mode, you must
first install the pivot software(optional) included with
your monitor. Follow the instructions that accompany
the pivot software.
FOR OPTIMUM PERFORMANCE, PLEASE NOTE
THE FOLLOWING WHEN SETTING UP AND
USING THE TFT-LCD MONITOR.
•
DO NOT OPEN THE MONITOR
DO NOT OPEN THE MONITOR. Opening or removing covers
may expose you to dangerous shock hazards or other risks.
Once you open it the warranty voids.
• Do not put anything on top of the monitor.
• Do not spill any liquids into the cabinet or use your monitor
near water.
• Do not place this product on a sloping or unstable cart, stand
or table, as the monitor may fall, causing serious damage to
the monitor.
• If you connect or disconnect the VGA cable while both of PC’s
and LCD monitor’s power is turned on, the monitor might show
some garbage on the screen or could be damaged. Please turn
off the TFT-LCD monitor’s power before connect or disconnect
VGA cable
• Handle with care when transporting. Save packaging for
transporting.
• Do not touch or press the surface of the LCD panel, it will
cause a permanent damage. Use only soft cloth with nonammonia glass cleaner to clean the panel.
Recommended Use
Page 12

Troubleshooting
No image on the screen
• The signal cable should be completely connected to the display
card/computer.
• The display card should be completely seated in its slot.
• Power switch and computer power switch should be in the ON
position.
• Check to make sure that a supported mode has been selected
on the display card or system being used. (Please consult
display card or system manual to change graphics mode.)
• Check to make su re th at the refresh rate is 60Hz.
• Check the monitor and display card with respect to compatibility
and recommended settings.
• Check the signal cable connector for bent or pushed-in pins.
Power button does not respond
• Simultaneously press Power buttons.
• Unplug the power cord of the monitor from the AC outlet, wait 10
to 20 minutes, then plug the power cord into the AC outlet. This
will reset the monitor and power supply.
LED on monitor is AMBER (with no image on the screen)
• The signal cable should be completely connected to the display
card/computer.
• Make sure the computer is not in a power-saving mode (touch
the keyboard or mouse)
2120
Image is unstable, unfocused or swimming is apparent
• Signal cable should be completely attached to the computer
• Use OSD Image Adjust controls to focus and adjust display by
increasing or decreasing the Tuning control. - When display
mode is changed, the OSD Image Adjust settings may need to
be re-adjusted.
• Check the monitor and display card with respect to compatibility
and recommended signal timings. If your text is garbled, change
the video mode to non-interlaced and use 60Hz refresh rate.
Display is not sized properly
• Use OSD Image size horizontal controls to increase or decrease
the H. Size.
• Check to make sure that a supported mode and signal timing
has been selected on the display card and system being used.
(Please consult display card or system manual to change
graphics mode or refresh rate.)
 Loading...