

GTrek II User Manual
User Manual
Version 5.4.0

© GTrek Ltd. 2013 Page 1 of 62 Version 5.4.0
Contents
1. Welcome ................................................................................................................................ 3
1.1 Notes and Warnings ......................................................................................................... 5
1.2 Software Installation ........................................................................................................ 5
1.4 Installation Configuration ................................................................................................ 8
1.5 GTrek Device Driver Installation .................................................................................... 8
1.6 How to use your GTrek .................................................................................................. 10
1.7 What's New .................................................................................................................... 11
2. Quick Start Tutorial ............................................................................................................. 16
2.1 GTrek guide for Dummies ............................................................................................. 18
3. GTrek II ............................................................................................................................... 20
3.1 File Splitter ..................................................................................................................... 22
3.2 Manual Connect ............................................................................................................. 23
3.3 Quick Stastics................................................................................................................. 23
3.4 GeoTagging.................................................................................................................... 25
3.5 Configure GTrek ............................................................................................................ 28
3.6 AGPS ............................................................................................................................. 29
3.7 Download ....................................................................................................................... 30
3.7.1 Clear GTrek ............................................................................................................ 31
4. Position ................................................................................................................................ 31
5. Analyse ................................................................................................................................ 32
5.1 Route .............................................................................................................................. 39
5.2 Altitude .......................................................................................................................... 39
5.3 Velocity .......................................................................................................................... 40
5.4 Profile Display ............................................................................................................... 41
5.5 Rotate Displayed Route ................................................................................................. 42
5.6 Route Summary ............................................................................................................. 42
5.7 Google Earth Tours ........................................................................................................ 44
5.8 Google Earth .................................................................................................................. 46
5.9 Export Google Earth file to Servers ............................................................................... 48
5.10 Trim Data Stream ......................................................................................................... 49
5.11 Delete Data Segment.................................................................................................... 50
5.12 Delete Inactive Data ..................................................................................................... 50
5.13 Animation & POI ......................................................................................................... 51
5.14 Trip Details .................................................................................................................. 53
5.15 GTrek-Track Utility ..................................................................................................... 53
5.16 Select Trace Data ......................................................................................................... 55
6. The GTrek Image Viewer .................................................................................................... 55

© GTrek Ltd. 2013 Page 2 of 62 Version 5.4.0
7. Support ................................................................................................................................. 57
Appendix .................................................................................................................................. 58
Appendix A – Specifications ............................................................................................... 58
Appendix B – Certification .................................................................................................. 59
Appendix C – Warranty Information ................................................................................... 61
© GTrek Ltd. 2013 Page 3 of 62 Version 5.4.0
GTrek Help Files
1. Welcome
Getting acquainted with your GTrek
Your GTrek comes to you ready to use but before you do it is
advisable to read the following.
Your GTrek is simple to use but there are a few minor points which
you should be aware of when using it to ensure accurate data is
available for maps and routes to be produced.
1.
Your GTrek data logger receives data from orbiting
satellites and converts the meaningless data streams into
useful information. It then saves this data until it is
transferred from the device into the GTrek program where
meaningful information is produced.
2.
On the left hand side there is a three position switch, the functions are as follows:-
1.
OFF - In this position the unit is in the off position, no data will be collected in this
state.
2.
NAV - In this position the blue Bluetooth light will illuminate and an attempt will be
made to communicate and connect with another Bluetooth device. If such a device is
found and can be paired with GTrek it will assume the roll of a slave device supplying
data, the Bluetooth light will also flash. In this position GTrek can be used as a data
source for third party programs such as TomTom or Google Maps for Mobiles
etc. and can function as a GPS receiver for a satellite navigation systems. If after
about 60 seconds GTrek is not paired with another device then the Bluetooth
communications will be shut down to conserve battery power. Data logging will also
cease, the Bluetooth light will start to flash very slowly. It will however wakeup if a
Bluetooth can be connect with at a later time, in this sleep mode the battery will
remain active for approximately 350 hours.
Note: If a device ID code is requested when pairing GTrek then use 0000 (4 zeros)
3.
LOG - This is the normal position and when switched to this position the data log will
automatically start recording data at the preset rate until switched off as long as an
active satellite lock is obtainable. Bluetooth communications will also function in this
position and provide services as detailed in (2) above but will not shut down if the
Bluetooth is subsequent disconnected.
3.
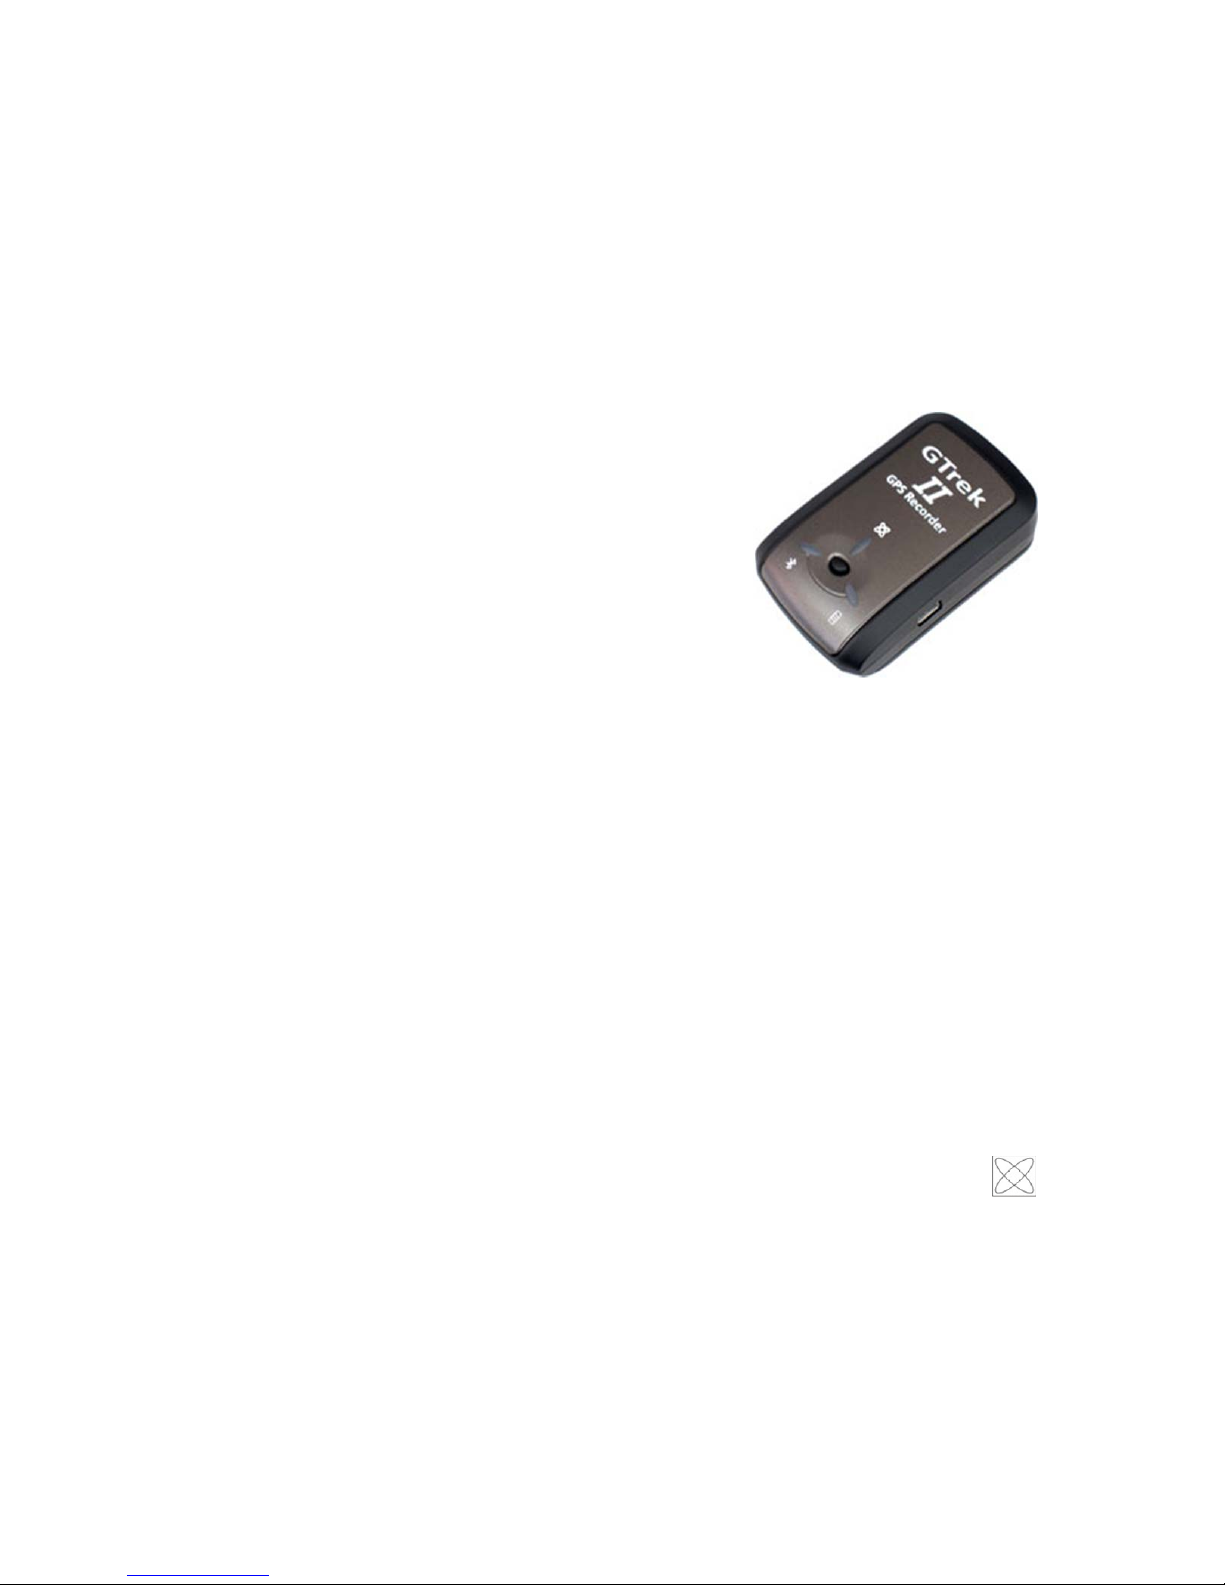
On the top surface of the device you will find three lights and a push button
1.
The satellite fix light is multi-function and multi-colour (amber and red)
1.
An amber light on - satellite fix not obtained and no data is not being
collected
2.
An amber light flashing - satellite fix obtained and useful data is being
collected.
3.
A red and amber light on - data not being collected, internal memory is full
and has stopped logging and needs to be downloaded and then cleared.
4.
A red light off - normal operation condition.
5.
A red light flashing slowly - internal memory is more than 90% full and needs
to be downloaded as soon as possible.
6.
A red light on - see 3 above.
2.
The green power light

© GTrek Ltd. 2013 Page 4 of 62 Version 5.4.0
1.
A green light on - this is a charging indication
2.
A green light off - the unit is fully charged, this light may flicker when
fully charged if downloading data
3.
A red light on if the battery power level is very low. In this situation the battery
should be recharged without delay.
3.
The blue Bluetooth light
1.
A blue light off - Bluetooth is disabled or is not paired
2.
A blue light on - GTrek has not yet paired with a Bluetooth device
3.
A blue light flashing - GTrek is connected and ready to transfer data
4.
A blue light flashing slowly - No Bluetooth connection, GTrek has entered a
low power sleep mode.
4.
The push button
1.
This button when pushed will log additional data points and the amber
Satellite light will flash amber and red three times. Routes when viewed by
the data analyzer will add small blue circles indicating where on the route the
button was pressed. Routes viewed in Google Earth will have location
markers positioned at locations where the button was pressed alon g with
additional information. This button can be used as often as required
4.
On the right is a mini USB socket used for transferring data and for charging the battery.
Note
When your GTrek is first switched on it will need to establish its bearings and calculate its location. If
the location is close to where it was when it was switch off then a warm start up sequence will be
initiated.
If the new location is some distance from the last one then a cold start is initiated as any information it
has acquired will not match data it is receiving now. This requires more data to be downloaded and
can take a little longer to obtain a 3D fix. During this time your GTrek may not communicate with
the GTrek program. If this is the case position your GTrek where it can be seen by the satellites and
try again after a couple of minutes. If the satellite light starts to flash then a satellite fix has been
obtained and you are ready to go. In this situation it is more difficult to obtain a satellite lock if the
device is moving ie. in a car and may take longer to get the information required. The number of
satellites in view also has a bearing.
Alternatively use the “Update AGPS” utility in the “Settings” menu to jump start the data acquisition
phase. Using this utility a time to first fix (TTFF) can be as low as 15 seconds.
Bluetooth pairing with your smart phone is an easy process, switch on the GTrek (NAV or LOG) and
follow the instructions provided with your hand held device. Your GTrek identification is “iBT A+ GPS”.
If a pass key is requested when pairing your GTrek with a Bluetooth device use 0000 (4 zeros).

© GTrek Ltd. 2013 Page 5 of 62 Version 5.4.0
1.1 Notes and Warnings
1.
GTrek uses a Lithium-ion battery. If your GTrek is used in temperatures lower than -10ºC or
higher than 60ºC its battery charge capability will decrease. A pocket is a good place as body
heat will maintain temperature. Please keep your GTrek data logger away from particularly
low or high temperature environments. In addition, do not expose your GTrek data logger to
temperatures higher than 140ºF/60ºC. If you do not follow these rules the battery
inside your GTrek may overheat, explode or ignite, and this will lead to serious damage. The
Lithium-ion battery inside the GTrek should be recycled in a proper way and should neve r be
thrown into normal refuse or disposed of in an incinerator.
2.
Your GTrek should not be used in prohibited locations such as on-board airplanes and
in hospitals so turning off your GTrek is recommended. Wireless GPS receivers and
BlueTooth communications may interfere with sensitive equipment which use radio frequency.
3.
If your GTrek data logger is not to be used for long periods it is recommended that the
battery be removed and stored separately in a dry and cool place. Re-charging periodically is
also recommended (by periodically we mean recharge your battery every two to three
months).
4.
For safety keep your GTrek and all accessories out of children's reach. Th e GTrek system is
a useful tool and is not a toy, though we do hope you have a lot of fun with it.
5.
The manufacturer of GTrek and related products assumes no responsibility for any
damage or loss resulting from the use of this manual, or from deletion of data as a result of
malfunction, dead battery, or from misuse or use of the product in any way.
6.
Use only the supplied and approved accessories. Unauthorized accessories, modifications or
attachments could damage your GTrek and may violate regulations governing radio devices.
7.
None of the above detract from your statutory rights under European law, however if you have
a problem please call us first.
1.2 Software Installation
PLEASE READ THIS SECTION FIRST
Install Software Prior to Connecting GTrek
Prior to connecting your GTrek to your PC you are required to install the application software and
device drivers. However it's quite acceptable to connect your GTrek without switching it on just to
charge the battery. If your GTrek is switched on and connected then Microsoft Windows will attempt
to load appropriate drivers. Without the correct software pre-installed your GTrek may be installed
incorrectly. Undoing this is possible but not within the scope of this manual.
The installation instructions that follow assume your operating system platform is Windows XP with at
least Service Pack 2. This is considered the minimum. For Vista or Windows 7 please refer to
additional installation instructions provided on the installations disk.
The installation is a simple automated process which should take just a couple of minutes. The
application requires that Google Earth be installed prior to the main installation, if it is not found the
user is automatically referred to Googles website to download and install a copy. A connection to the
internet is required for this process.
Google can be installed at any time prior to the application installation by going to
http://earth.google.com and clicking the button labeled "Download Google Earth 5.0" and following
the instructions provided.
At the end of the installation of the application GTrek device drivers are installed this
needs to be accepted before the process completes. If nothing changes for any length
of time then check for dialogue boxes that may be covered. Look for this icon on the
© GTrek Ltd. 2013 Page 6 of 62 Version 5.4.0
task bar
The installation should proceed as follows.
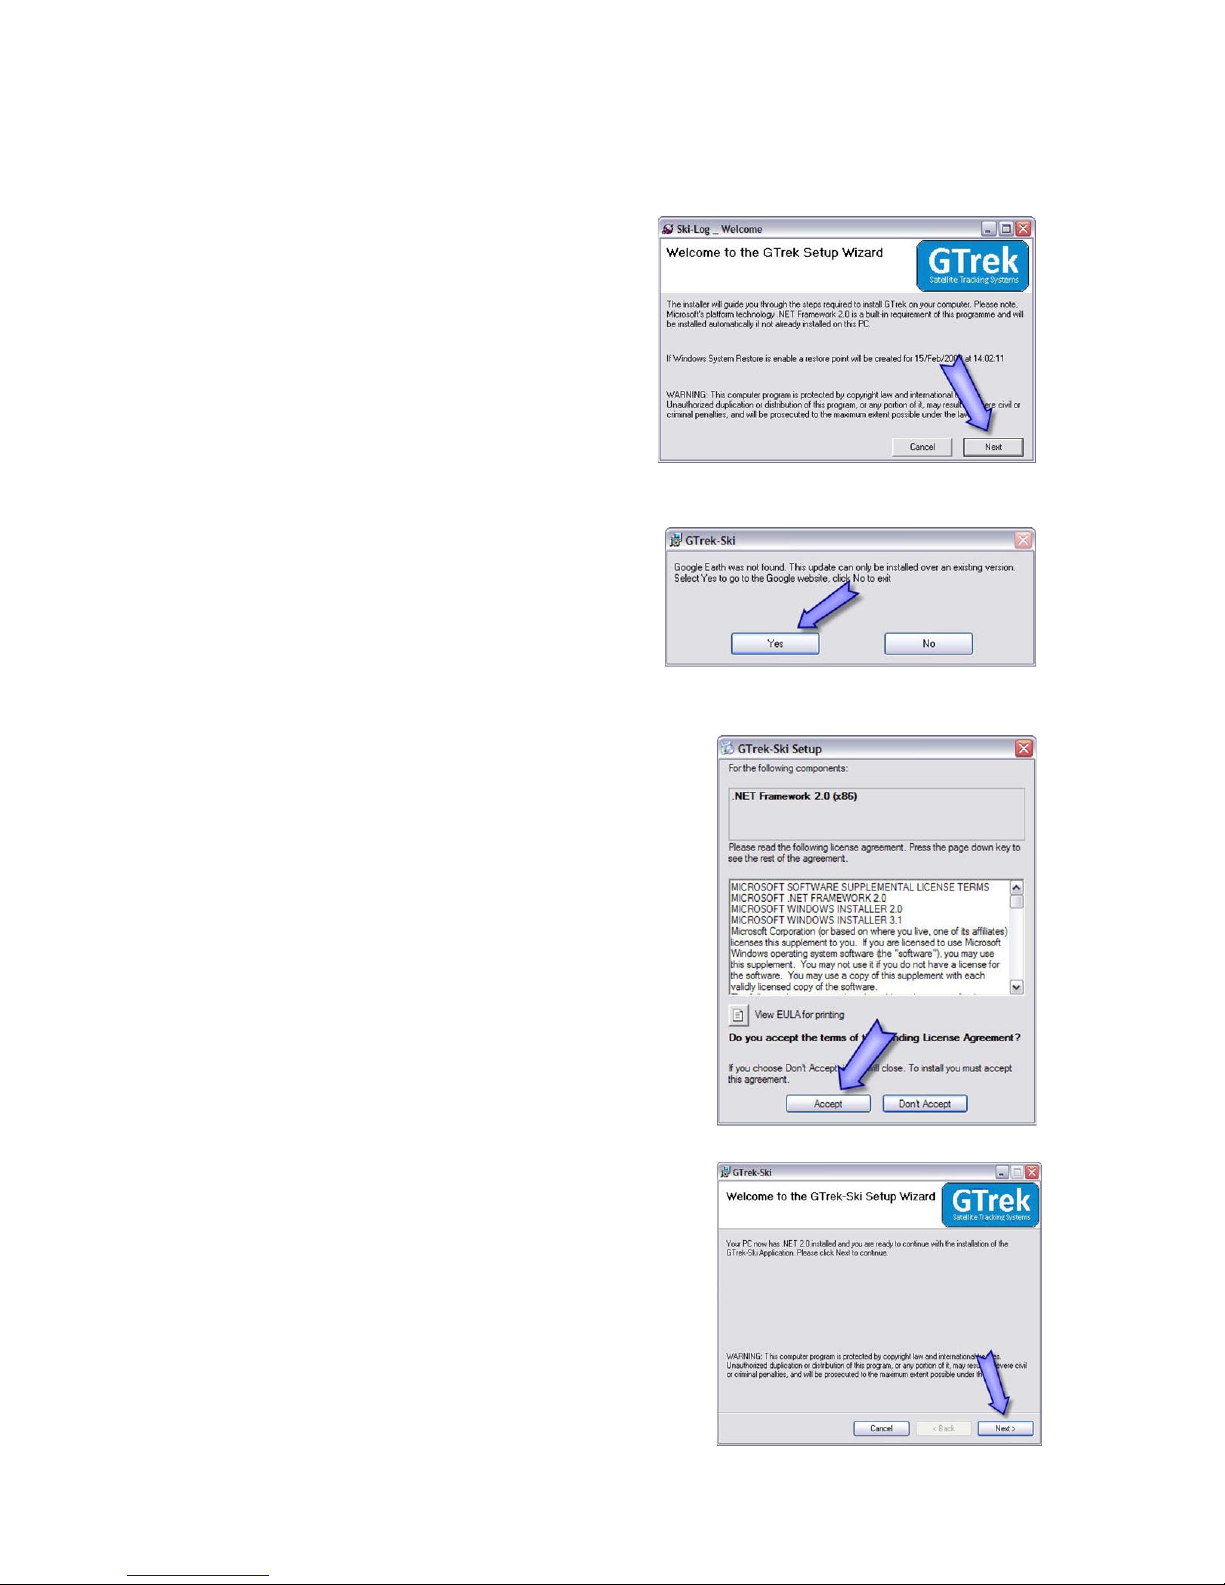
1.
After inserting the installation disk into your CDROM drive the installation program should run
automatically. If not, open "My Computer" and
double click startUp.exe on the installation CD.
If "The publisher could not be verified"
message appears select Run . The Welcome
box will be displayed, Click next.
2.
Google Earth is a required component for the
GTrek application, If already installed this step
will be skipped. If not found this dialog box will
be displayed. Clicking Yes will open the Google
Earth webpage where the "Download Google
Earth" button should be clicked. A connection to
the internet is required. Follow the instructions
provided. Once complete restart the installation procedure.
3.
The GTrek program requires a Microsoft system
extension called ".Net Framework 2.0" and needs to
be installed next. Click Accept and the installation will
proceed. ”.Net” may already be installed, if so this step
will be skipped. If required this may take a couple of
minutes to complete.
4.
The Welcome Screen is now displayed. Click Next to
continue.
© GTrek Ltd. 2013 Page 7 of 62 Version 5.4.0
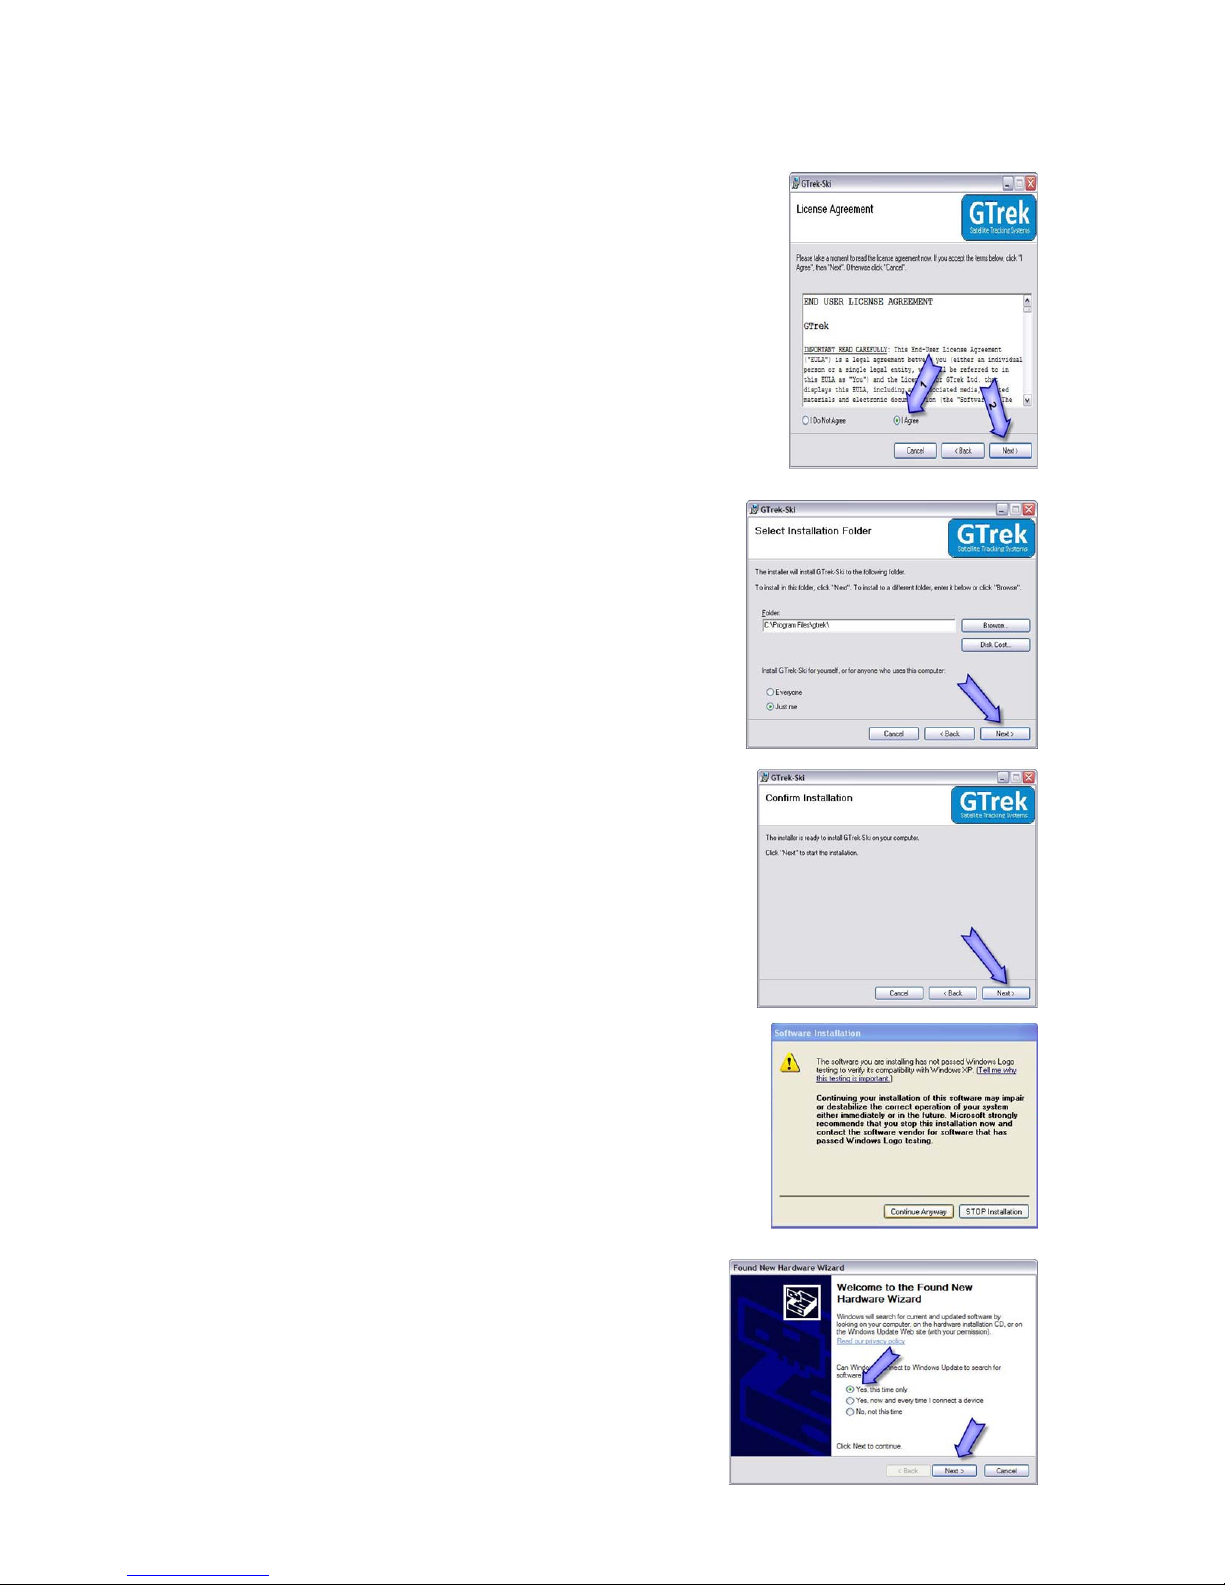
5.
The GTrek End User License Agreement is displayed
next and the user needs to click I Agree and Next to continue.
You should actually read it, but we can't make you.
6.
GTrek is normally installed in the default folder. It can be
changed if necessary, although the default folder is
recommended.
Microsoft Windows XP and Vista provide support for more
than one user; this program can be installed for a single
user (default) or can be accessed by all users. This
selection can also be made here.
Click Next to continue.
7.
Confirm installation, Click Next to continue. The installation
stage normally takes less than a minute.
8.
If the Windows Logo Testing message is displayed click
Continue Anyway. This is a Windows security message and
is not always automatically displayed. It is also not always
displayed above all other items currently being displayed and
hence the installation process may appear to hang. At no
time during the installation process should there be any
length of time where no update process is being displayed.
9.
GTrek will now commence the installation. When the
installation has finished click Close to complete the
task. That concludes the installation and the CD can be
removed.
10.
Insert the battery into Your GTrek data logger aligning
the battery terminals with the contacts, replace the
© GTrek Ltd. 2013 Page 8 of 62 Version 5.4.0
cover and connect your GTrek to the PC with the mini USB cable supplied and set the power
switch to the LOG position.
A message will be displayed stating that New Hardware has been detected and the Hardware
Wizard will be launched.
A Dialog box will be displayed requesting directions to install the new hardware, click Yes,
this time only and Next and Next again .
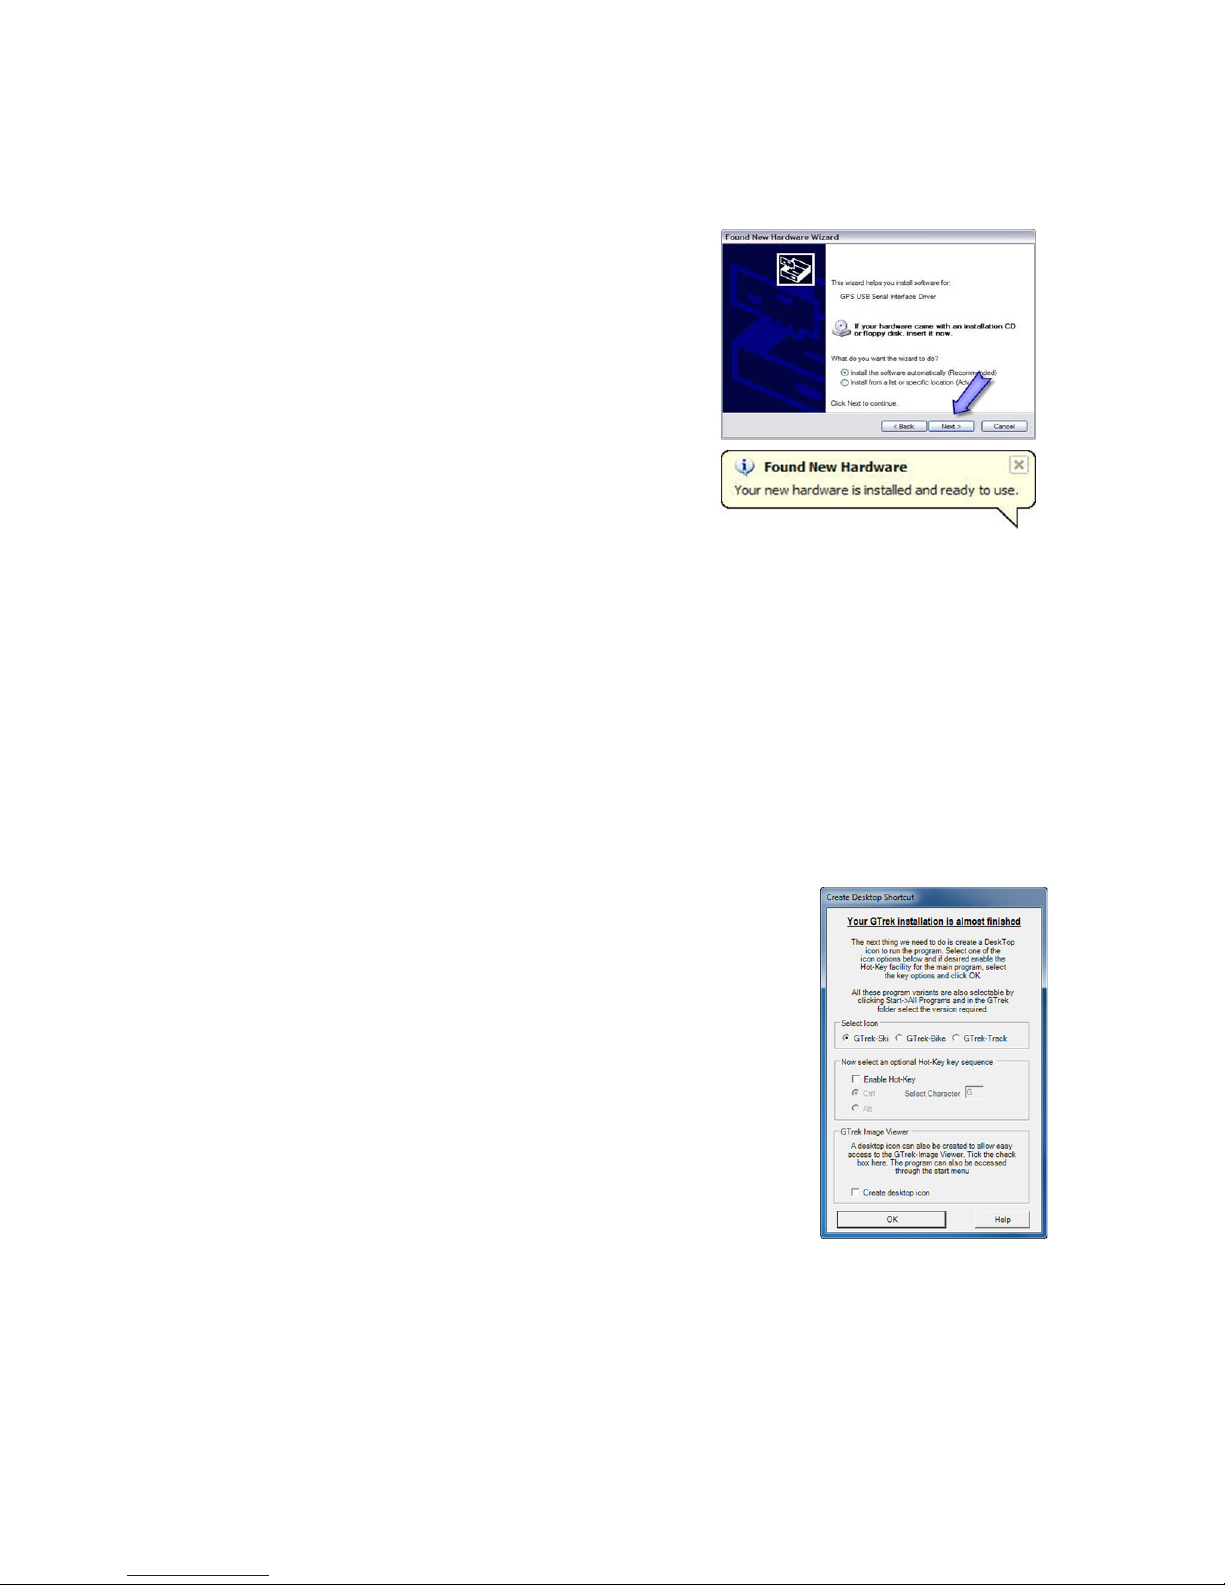
11. The installation process will start by searching for the
information required. When found the drivers will be
installed. Click Finish to complete the process.
12. An information balloon will be displayed indicating that
the process has completed without errors.
It is recommended that prior to first use, your GTrek data logger should be configured and initialized.
Switch on your GTrek and launch the GTrek application by double clicking the icon that is now on
your desktop, if you have a connection to the internet then select Settings->Update AGPS and preload the satellite data. Allow it to synchronize with the satellites. From the Settings menu select
Configure GTrek, select the desired data logging rate and click Save . Your GTrek will be configured
for use and the on-board memory will be cleared.
The battery should be fully charged before use. The green light being switched off indicates the
charging process is complete. Your GTrek is now ready to go. Use your GTrek and get familiar with it.
Don't forget to register your GTrek system, if you do, we will notify you when there are updates
available.
1.4 Installation Configuration
After the software installation has completed the default configuration can
be setup here. Select the default icon which is placed on the desktop,
either Ski, Bike or Track
Next enable the program Hot-Key if required and select the key
combination, the default is Ctrl+G.
Next click the "Create Desktop Icon" for the GTrek-Image Viewer if a
desktop Icon is required for this utility.
After the installation is completed all 4 versions of the GTrek programs
along with the user manual can be accessed from the Start->All
Programs->GTrek menu.
No matter which program is used to download the data from your GTrek it is compatible with all the
others.
1.5 GTrek Device Driver Installation
Once the main software has been installed and configured the GTrek device drivers, that allow the
operating system (XP, Vista or Windows 7) to communicate with the GTrek Data Logger, have to be
installed and configured.
© GTrek Ltd. 2013 Page 9 of 62 Version 5.4.0
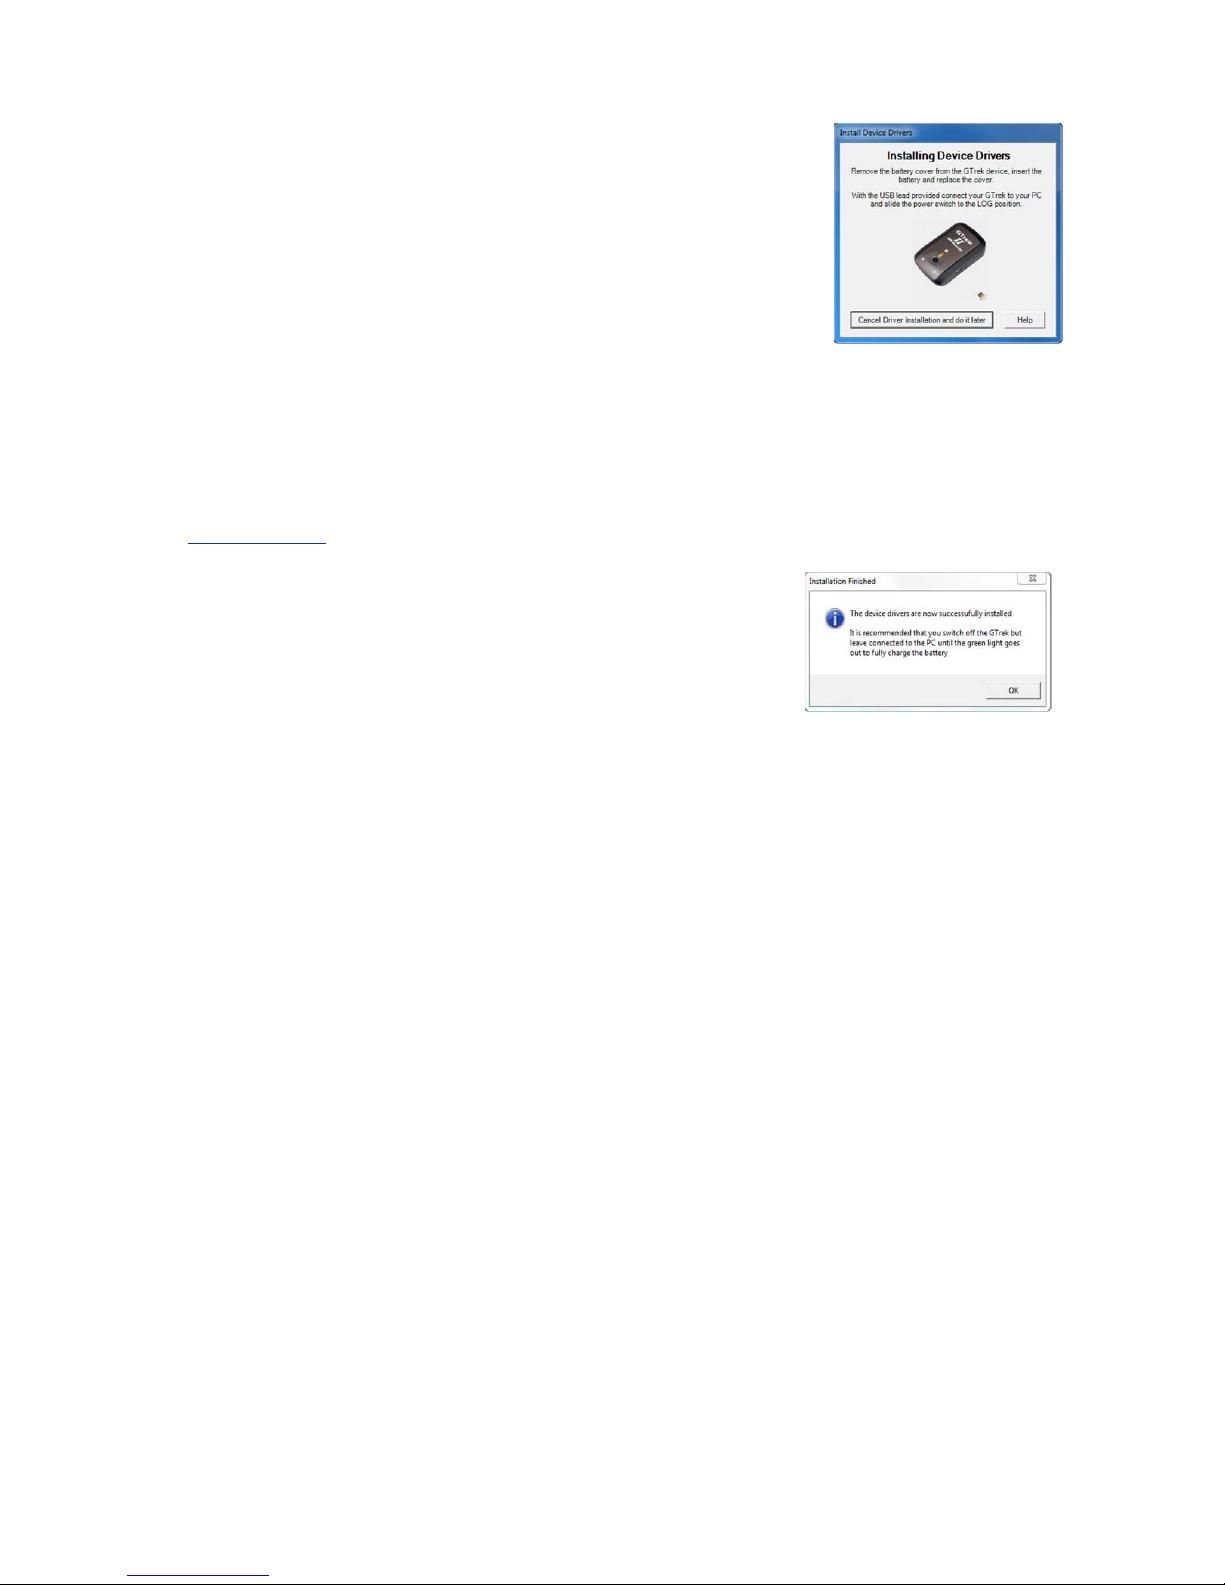
Remove the GTrek from it's packaging and remove the battery cover, insert
the battery lining up the battery terminals and replace the cover. Connect
the GTrek Data Logger to your PC with the supplied USB data cable and
the green charging indicator will illuminate. Slide the power switch to the
LOG position and the yellow satellite indicator will illuminate. This indicates
that the GTrek is on and no satellites have yet been detected, when later a
satellite lock has been established this indicator starts to flash. If indoors
the building may shield the satellite signals.
This process only needs to be done once.
If you wish to perform this process later click the "Cancel" button. This "driver Installation" procedure
will proceed without the GTrek program running and will be done the first time the GTrek Data Logger
is connected automatically.
We have had a small number of instances where the device drivers have not been installed correctly
on the first try. If you receive a message that indicates this then switch off the GTrek and after a few
seconds switch it on again. If the message is displayed again plea se get in touch through the website
www.gtrek.co.uk either by email or phone (UK office hours).
An information bubble should be displayed indicating that a new USB
device has been detected and that the device drivers are being
installed. If installing on Windows XP a dialogue box will appear, select
"Yes, this time only" and in the next box select the recommended
option.
Once the process has been completed a message is displayed. Click
OK and the process will finish.
Slide the power switch to the off position and leave it connected until the green indicator turns off to
indicate the battery is fully charged.
If your GTrek is not used for extended periods we recommend that the battery is removed and stored
in a cool dry location (don't forget where you put it). It should be recharged at least once every 4
months.
Additional or replacement hi-capacity batteries are available from GTrek Ltd. The battery is similar to
a standard Nokia Phone battery and these can be used but they have only about half the power of the
original and will only give about 12 hours of use.

© GTrek Ltd. 2013 Page 10 of 62 Version 5.4.0
1.6 How to use your GTrek
Your GTrek has been designed to provide ease of use from the start to getting the results. However
some simple preparation is always of use and some simple tips are included here
1. Charge your battery. There are some additional notes . Your GTrek data logger can be
charged in any one of three ways as follows:-
1. From the mains supply with the optional supplied charger. This charger is dual
voltage, 50 or 60hz and will work anywhere with a suitable adaptor. Do not use a
charger from another device as this may damage your GTrek. Inspect the charger
before use and do not use it if it looks damaged. Replacements can be obtained from
the web site www.gtrek.co.uk.
2. Your GTrek can be charged by plugging it into a car power socket with the supplied
charging cable, again use nothing other than the supplied charger as damage may
result.
3.
Through a connection to a laptop or desktop PC by the USB cable. Your GTrek is
supplied with a standard mini-USB cable which is used to transfer data between
your GTrek and a computer. It also re-charges the battery when connected to the PC.
2. At the start of your day's activities switch your GTrek on. If it's not switched on it won't record
anything, however it's never too late. On the side of your GTrek there is a three position
switch labelled OFF-NAV-LOG, be sure to switch it to the LOG position. From cold it can take
from a few tens of seconds to a few minutes to get a satellite fix, it depends on the number of
satellites in view. If you are inside a car or bus it may never get a fix at all, moving at high
speed also does not help. A fix is indicated by the satellite light (yellow) blinking. Once a fix is
obtained it's a lot easier to maintain synchronization. Place your GTrek in a pocket or pack
where it can get a good unimpeded view of the sky. Covering it with a tin box for instance is
not a good idea.
3. When your days activities finish switch your GTrek data logger off otherwise you may collect
unwanted data and waste battery energy.
4. On return to your residence download the data and save it and/or e-mail it to yourself at home
and analyse the results.
5. Clear down the memory ready for the next day (don't forget item 1 above)!
6. Once data has been downloaded the Analysis screen is automatically loaded. View your
route, distances and speeds, view the profile. Select the Google Earth Tour button to replay
the route or load Google Earth and view your route in 3D.
Special Note
If the Data Analysis screen is closed without saving new or modified data the user is prompted to
save that data. If it's still not been saved however or the application terminates unexpectedly then that
data can be retrieved manually. Once the data download has been completed a copy of the data is
temporarily saved to the default location (normally MyDocuments\Ski-Log Data Files) with the name
Auto-Save.gbf. Copy and paste this file and rename it for your use.

© GTrek Ltd. 2013 Page 11 of 62 Version 5.4.0
1.7 What's New
Ski-Log was originally designed as a device for skiers and boarders alike but we could see
applications for other sporting and outdoor leisure activities and we were going to end up with a
number of slightly different devices with different names. So GTrek has been created, this allows us to
create GTrek - Ski, GTrek - Bike GTrek - Track and other applications we are working on. Watch the
website for new products. It doesn't matter which version you purchase as each version contains the
other two, only the desktop icon is different.
If you have registered your GTrek then we will inform you when updates and downloads are available.
You will also be notified automatically when new updates are available.
So what's really new for version 2 ?
We have added many new features and improved the way the program is used, some of the new
items are as follows:-
1. Export not only to Google Earth™ but to Google Maps™ and export files for MemoryMap,
data exported to Google Maps can also be imported into Google Maps for Mobil es.
2. Double click on a .GBF or .GSF file and GTrek will run and load the file automatically
3. The "Configure GTrek" facility now has 3 options giving you the option of :-
1. 1 second update with storage for 16 hours
2. 4 second update with 60 hours of storage
3. 6 second update with over 100 hours of storage
4. The Analysis screen now has a tab page format providing easy access to the Route Display,
Altitude Display and Speed Display.
5. The Route display has a North pointing compass and the display is rotatable, it has an
overlaid grid with a measured scale
6. The Altitude and Speed displays have height or speed and Time scales
7. All three screens can have Point Of Interest labels inserted. A POI inserted on the Route
screen also displays on the other screens as well.
8. A "Trip Details" facility has been added to allow additional information to be save with the
.GBF file to provide a reminder of the trip or journey.
9. A profile page has been added showing height and speed on the same graph. This page also
displays data entered on the Trip Details. POI data can also be displayed.
10.
The "Route Summary" has been extended to include Up, Down and Level distance data along
with average ski (travelling down) speed.
11. A Quick Statistics page has been added to allow for a compa rison between several days
activities.
12. A facility to quickly remove POI's and My Place markers.
13.
A facility to import Points Of Interest (POI’s) into a file from another
14. A Quick Statistics page has been added to allow for a compa rison between several days
activities.
15. A facility to remove erroneous data in the middle of a data stream.
16. The time information stored by the GTrek is always in UTC (the same as GMT). Data
recorded can come from any time zone which can be corrected for when it's downloaded. A
facility has been included to correct any time errors after it has been downloaded.
17. Additional functionality to support GTrek-Bike including an ability to display the Altitude and
Speed displays by distance.
So what's new for version 3 ?
1. Automatic update notification when new versions become available.

© GTrek Ltd. 2013 Page 12 of 62 Version 5.4.0
2. Support for exporting Google Earth/Maps files in ZIP'ed format making them very much
smaller.
3. Changes to the data download algorithm to make the process more immune to missi ng data.
A problem that may occur on older and slower PC's
4. Provision for a selectable 'Y' axis on the Altitude display
5. Modifications to the Profile page to allow either of the two graphs Altitude and Speed to be
independently switch off and a fill facility. Go take a look you'll get the idea.
6. In Google Earth 4.1 the process of running the tours to create a virtual fly through were
changed. To accommodate this the export process now provides two options:-
1. If the data gathered was on the ground ie. skiing or biking then select the Track on
Ground option.
2. If the data gathered was in the air then select the Track not on ground option.
7. In the original version only a single analysis screen could be displayed, now many screens
can be opened simultaneously.
8.
In the Position screen where the visible satellites can be viewed a satellite trail feature has
been added so the satellite paths can be seen. Beware this is a bit like watching paint dry.
9. The standard data logging intervals of 1, 4 and 6 seconds has been extended to log every
200m/s thus providing an update 5 time a second for application where speed is of an issue.
10. A fully featured digital picture GeoTagging facility has been added. Users track t heir routes
and take pictures for much the same reasons, to provide a record of where there have bee n
and what they have seen. It therefore makes sense to combine these two technologies. The
GeoTagging features download and save the GTrek routes, Download your digital pictures
from your camera and merge the two into a single file that not only show's your pictures but
tells you when the picture was taken and where you were when you took the picture. The
resulting file can be loaded into Google Earth so it can be shared with friend and family.
Version 3.2
1. Added Export to .CSV file format
Version 3.3
1. Minor bug fixes to the Analyse screen and Trim function
2. Corrections for globalization errors (ie '.' instead of ',' in numbers)
3.
Bug fix in GTrek device detection logic.
4.
Bug fix in lift and hill count logic
5. Remove "Exit GTrek, are you sure"
6.
Tab order in Trip details changed
7. Changes to Download screen
8.
Added Save File Name on Quick Statistics screen
Version 3.4
1. Driver installation process changed.
2. AGPS download system added to improve time to first fix (TTFF)
3. Added globe image on Position screen
So what's new for version 4 ?
Well version 4 brings a complete makeover and the release of GTrek-Track a completely new
application based on the GTrek-Bike version. GTrek-Track brings multi-route displays and
calculated G force displays on the speed screen.
1. Creation of GTrek-Track
2.
Multiple route file display

© GTrek Ltd. 2013 Page 13 of 62 Version 5.4.0
3. Calculated G force on speed display
Version 4.1
1. Minor bug fixes
Version 4.2
1. A change in the way Time Zones are handled to make it easier to synchronize your camera
time with the downloaded data time used to GeoTag digital pictures
Version 4.4
1. Correction to the Rotate function when displaying downloaded routes
2. Improved panning function on the route display with mouse click and drag.
3.
Increased accuracy on the Lap extraction utility. Lap times are now calculated to 0.001
seconds
Version 4.5
1. Fix an error in the track data calculation of lap times.
2. Added Right-Click function in Route Summary box to copy contents to the Clipboard
3. Single Click to start download of data from GTrek when switch on
4. When exporting data to Google Earth when in GTrek-Track the default Smoothing value
defaults to 1 and 4 in GTrek-Bike and GTrek-Ski
5. When the Trim sliders are selected on the Trim-Data page selection indicators are displayed
Version 4.6
1. A new facility in the View menu on the Analyse screen "Trace Data Selection" to
select/deselect traces in a multi trace view and select the default trace.
2. A new facility in the Settings menu on the Analyse screen "Delete Inactive Data" to
automatically identify and remove and data deemed to be inactive.
Version 4.8
1. Error in track colour when exporting multiple tracks to Google Earth.
2. A "Most Recent File" listing added to the File menu on the mail screen
3. A simplified multi-track selection utility added in the Analysis screen of the GTrek-Track
program.
4. An error was found in the vertical assent and decent calculation, this has been fixed.
5. The Longitudinal G force calculation has been altered with the addition of a thumb wheel to
select the sample rate.
6. The "Configure GTrek" screen now has additional control features. Logging is no longer
restricted to 4 set time periods and can now be set from 0.2s to 99.9s and a new feature to
log by distance and speed.
7. With logging rates that not exactly one second apart require additional time data.
8. The data download time has been reduced from 12 minutes for a full GTrek to about 60
seconds (PC dependant).
9. GTrek is now fully Windows 7 compliant.

© GTrek Ltd. 2013 Page 14 of 62 Version 5.4.0
So what's new for version 5 ?
Version 5 has had a complete makeover, the main areas affected are anywhere that GTrek interacts
with Google Earth. Google Earth as a Google product has been much improved lately and this version
exploits these changes to the full.
Most Google Earth users view GE as a means to view images of the ground taken from NASA
satellites, few comprehend that just under the surface of the program there is whole programming
language that can be exploited to provide a rich content and to enable imagery and functionality not
previously available.
GTrek prior to Version 5 was capable of providing Google Earth tours but required GE to be selecte d
and manipulated. These tours were played out at a constant speed no matter what the route data
called for. Now in version 5 tours are easy, they run at real time speed and include realistic models
that follow the recorded route exactly either on the ground or in the air.
The program has gone through beta testing and the initial release if V5.0.11.
Version 5.0.11
1. The main Analyse screen loaded when download completes now has a fourth page which
displays the route, altitude, speed and essential statistical data together.
2. There are now two Google Earth button on the data Analyse screen, the standard Google
Earth button and a new Google Earth Tour button.
3. The digital picture GeoTagging screen has been re-written to use the updated of Google
Earth.
4. Addition of the Google Earth screen where the terrain and imagery can be controlled, where
models can be loaded and snap shots of the view can be taken and saved.
5. Changes to the Position screen now show the signal strength of the satellites in view.
Version 5.1 has had some significant updates and some minor bug fixes as follows: -
1. Changes to the Tilt, Rotate and Scale functions in the Google Tour to allow greater resolution
and control.
2.
Additional models added to the Google Tour screen
3. Updates associated with Google Earth API version 6
4.
There was a problem during the installation procedure where the GTrek device driver
installation completion screen could get lost behind other screens giving the impression that
the installation process had stopped. This screen is now independent of the rest of the
installation process.
5. Fix minor bug in the Speed Bars display.
6. Additional functions added to the Statistics display screen:-
1. New data for the Ski/Bike/Track applicable to the versions
2. If files that have been added to the Quick Statistics are subsequently changed you
will be prompted to update the display with the new data. Only applied to data added
on or after Version 5.1.0.
3. Option to set the distance data resolution to 1 to 4 decimal places.
7. Changes in the way altitude changes are detected to make the system more responsive and
to add a blue line colour to indicate no or minimal altitude change on the Google Tour screen.
8. Changes to the Configure GTrek screen to allow the selection of the maximum logging rate to
be set to 5hz or 1hz
9. Ability to export Google Earth data in either KML (normal data) or KMZ (compressed) file
format.
10. When data is downloaded the user is prompted to automatically set t he time zone for the data
to that set on the PC.

© GTrek Ltd. 2013 Page 15 of 62 Version 5.4.0
11. The GTrek Track utility (available only in the GTrek-Track version) has the ability to set a
Start and/or Stop line for the extraction of the lap data. These lines are normally set
perpendicular the track data but can now be rotated independently.
12. Fix bug in Analyser screen where the animation marks don't always get cleared correctly.
Version 5.1.1 Changes mainly to the Geo-Tagging utility
1. Corrected problem where no route would be displayed if the number of records or data points
exceeded 32,000
2. Thumbnail pictures adjusted for landscape and portrait and for picture aspect ratios that are
not standard 4:3
3. Changed the Set Camera Time screen to make it easier to use,
4. Changed the Geo-Tagging utility to cater for off-line support
Version 5.1.2 Minor bug fixes
Version 5.1.4 Enhancements to the Geo-Tagger utility
1. Added ability to add textural information to geo-tagged images which is displayed when the
data is exported to Google Earth
2. Corrected screen display to cater for the display zoom option on Windows 7
Version 5.2 Major enhancements to the Geo-Tagger utility
1. Changes to cater for additional file types to include not only .JPG but .BMP, Canon file types
.CR2 and Nikon File types .NEF and several common other file types.
2. Included the new GTrek-Image Viewer utility, this is a separate program designed to view
images, geo-Tag data and to provide slide shows. It's compatible with all the major image file
type available today.
3. Added functionality for “All User” installation option
4. Added a Search function to find locations in the GeoTagg page in the GTrek program and a
similar utility in the GTrek-IV image viewer.
5. Added “Device Serial Number” to statistical data screen
6. Added a utility to upload route files to the GTrek web servers that can be view an PC’s,
MAC’s and many smart devices
Version 5.3.0 Minor updates and additional features
1. Additional facility to import .GPX file from the main screen
2. When moving from one image to the next in the GeoTagger the view angle and range are
now maintained.
3. Error in GeoTagger when tagging images from multiple routes
4. GeoTagger not updating all layers in Google Earth
5. Right-click menu in data summary on main screen fixed.
6. GTrek option selection screen added to make the installation program universal
7. Install GTrek device driver now part of the installation process
Version 5.3.2 Minor updates and additions
1. Historical image view added to Google Tour display
2. Changed to the Delete Segment screen to speed up the process
3. Changes to the Analyse screen to display total duration and time spent going Down, Up and
Flat.

© GTrek Ltd. 2013 Page 16 of 62 Version 5.4.0
Version 5.3.9 Minor updates and additions
1. Right click menu on summary now able to copy to the clipboard data in .CSV format
2. Export data formats extended to Flight format files types of .GPX data as Waypoints and IGC
format
3. Additions to Quick Stats:-
a) New columns for Down/Up/Flat times
b) New columns for User desi gnated data (see below)
c) Support for Miles and Km
d) Export data in .CSV format
e) Option to reset columns to default order
f) Most Resent Used files facility added to File menu
g) Quick Stats when opened automatically o pens most resent Stats file
h) File menu Save and SaveAs
4. Trip Details screen now has upto four selectable additional titles and data fields that can be
saved and restored. This data impacts the Data Summary, Profile and Quick Stats screens
5. Extensive re-write of the Profile screen which is now much faster.
6. Profile screen now has a slideable transparency function to allow the back image to show
through the trip data.
7. Profile option facility to allow user to select which data is displayed as statistical data in the
top boxes.
8. Data can now be added to Quick Stats data base from the Analyse Screen
Version 5.3.13 Minor bug fixes and changed to presentation
1. Fix in GeoTagger for non-JPG images
2. Error in uploading KMZ files where the file name exists.
3. Error in the GeoTagger Sync-Time utility due to changes in US Navy time-port website
4. Error in Delete Inactive Data utility, delete button was missing.
Version 5.3.23 Minor bug fixes and changes to the main analyser screen and printable images
1. Addition of Date/Time on Google Tour screen
2. Changes to the Uninstall procedure to remove all traces of the program but leave saved
routes intact
3. Bug fix on the Speed and Altitude screens where the X axis displayed data tended to
overwrite adjacent labels
4. Changed to the data displayed in the first Analyser screen to incorporate Google Maps with
Terrain or Satellite view options. This requires an internet connection, if one is not available
then the display reverts to the normal graphical display.
5. Changes Analyse screen view printouts to resemble the screen display
6. Improvements to the Analyser Print functions to increase quality and functionality
7. It has been found that the current version of Google Earth Version 7.0 has significant bugs in
it and a trap has been incorporated into the program to detect this version and advice on a
solution
8. Fix a problem with the Time Server when synchronising the PC time in the GeoTagging
screen
9. Updated version to support Windows 8
10. Added additional models to model list
11. Addition of Smooth Line feature to analyse screen and performance improvements when
updating display
12. Animation screen to imperial or metric data as selected.
Version 5.4.0 Consolidation of latest changes and updates
1. This version sees the consolidation of the latest changes and updates
2. The animation screen has be changed to reflect either imperial or metric instead of a mixture
of both
3. A drag and drop feature of the main screen added to open files dropped onto it

© GTrek Ltd. 2013 Page 17 of 62 Version 5.4.0
4. Performance increase on the analyse screen
5. Fixed an error in the update notification screen where some useres were not being notified of
updates
© GTrek Ltd. 2013 Page 18 of 62 Version 5.4.0
2. Quick Start Tutorial
2.1 GTrek guide for Dummies
There are a few things that need to be done before you can view any data. The major sections don't
need to be carried out in the order below but they do need to be done. The list is not so much an
instruction sheet, more of a list of bullet points and links to where more information can be found.
1.
Install the software
1.
Open the package and scan down the installation instruction sheet. If your version of
Microsoft Windows is not the same as the installation instructions enclosed in the
package then there are other versions on the installation CD.
2.
Insert the disk into your PC
3.
Install the software and device drivers
4.
Fit battery, connect to your PC and switch on your GTrek
5.
Device configuration (automatic)
2.
Charge the battery
1.
Go out and record some data.
3.
Download the data from your GTrek
1.
Trim the data stream, there is always more data (unless your very careful) than is
useful and informative. This data is collected by your GTrek after it's been switched
on but before your journey starts and after it's finished but before you switch it off.
Use the Trim function here.
2.
Inspect the data, view the altitude and speed.
3.
Export to Google Earth Tour or Google Earth.
4.
Save your data for future use.
This by no means an exhausted list of functions. Explore the program. If you have any queries,
comment or suggestions then let us know support@gtrek.co.uk and we'll try and help.
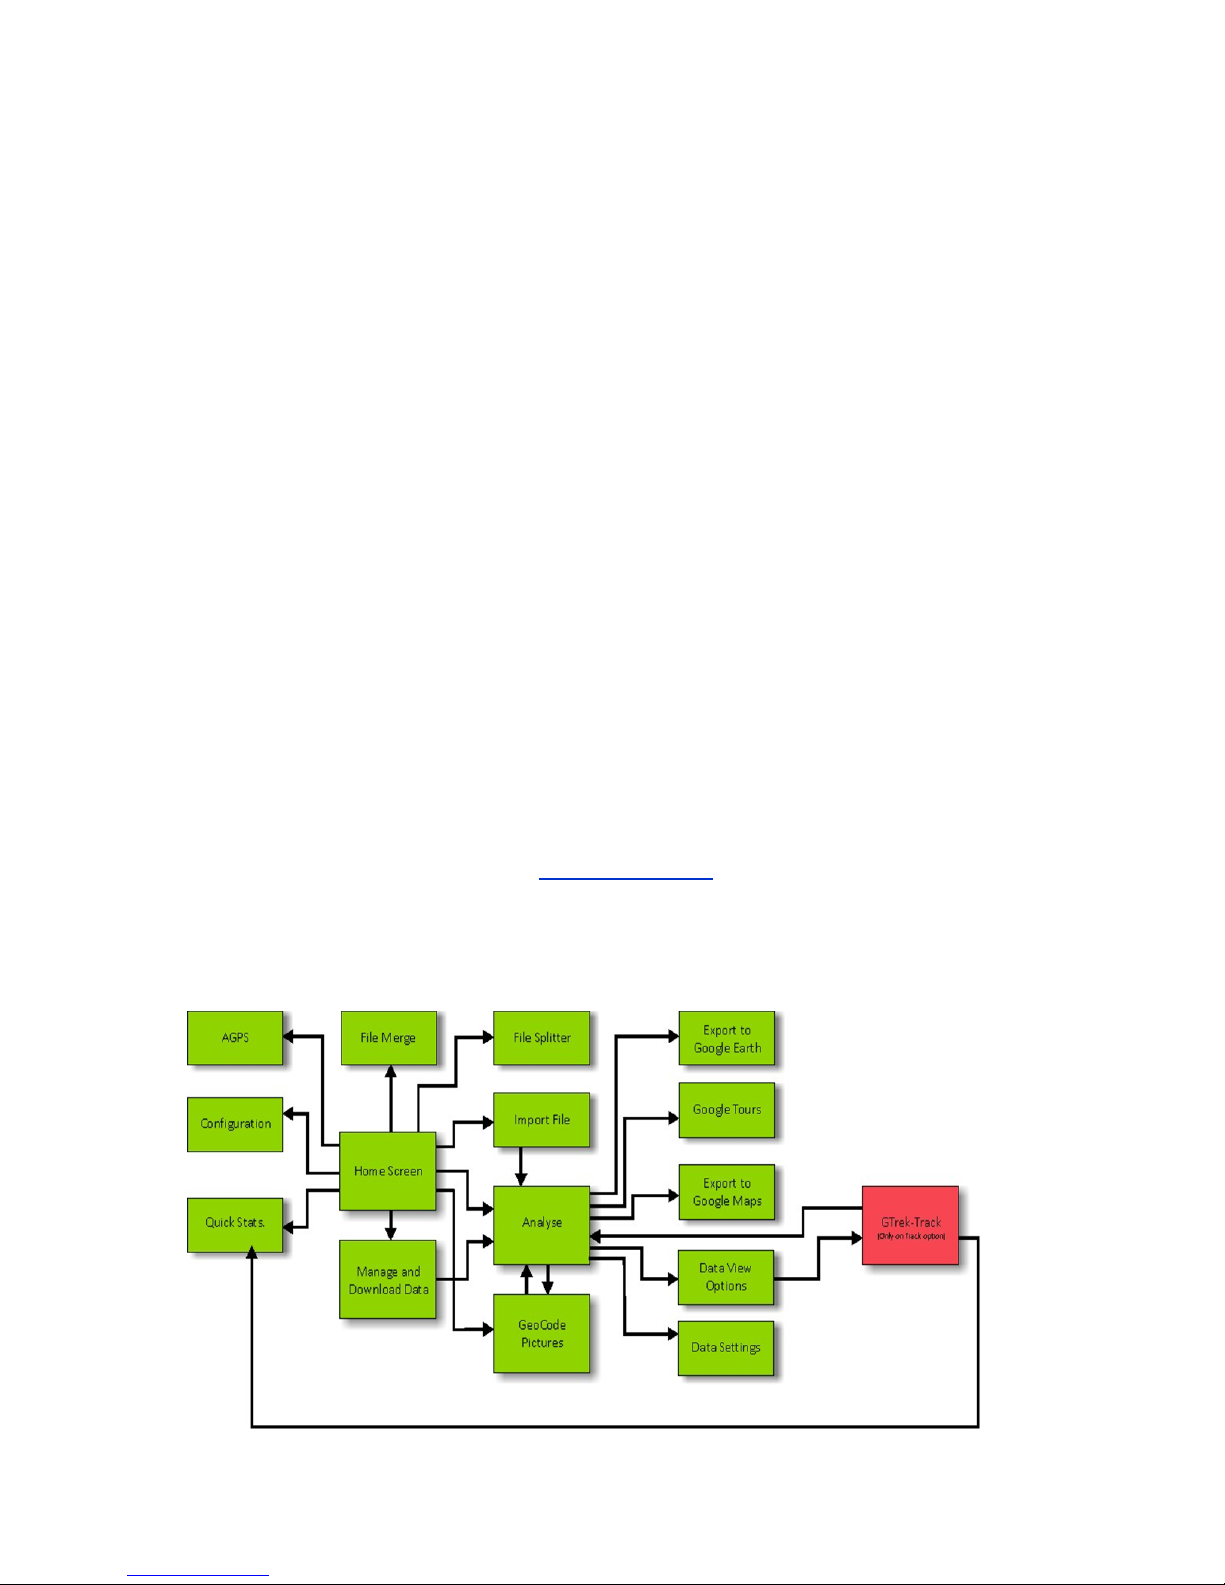
Program Map
 Loading...