

Page 1
English
USER MANUAL
V7 TT
Page 2

SAFETY INSTRUCTIONS
This STB has been manufactured to satisfy the international safety
standards. Please read the following safety precautions carefully.
1.MAINS SUPPLY: 100-240V AC 50/60Hz,Operate the unit only under
the power source specified in "Specifications".
2.OVERLOADING: Do not overload wall outlet, extension cord or
adapter as this may result in fire or electric shock.
3.LIQUIDS: Keep liquids away from the STB. The apparatus should not
be exposed to dripping or splashing and no objects filled with liquids,
such as vases, shall be placed on the apparatus.
4.CLEANING: Disconnect the STB from the wall outlet before cleaning.
Use a light damp cloth (no solvents) to dust the STB.
5.VENTILATION: The slots on top of the STB must be left uncovered to
allow proper airflow to the unit. Do not stand the STB on soft
furnishings or carpets. Do not expose the STB to direct sunlight or do
not place it near a heater. Do not stack electronic equipment on top of
the STB.
6.ATTACHMENTS: Do not use any attachments that are not recommended as these may cause hazard or damage the STB.
7.CONNECTION TO THE SATELLITE DISH LNB: Disconnect the STB
from the mains before connecting or disconnecting the cable from the
satellite dish.
FAILURE TO DO SO CAN DAMAGE THE LNB.
8.CONNECTION TO THE TV: Disconnect the STB from the mains
before connecting or disconnecting the cable from the satellite dish.
FAILURE TO DO SO CAN DAMAGE THE TV.
9.EARTHING: The LNB cable MUST BE EARTHED to the system earth
for the satellite dish. Unplug the apparatus during lightning storms or
when unused for long periods of time.
10.LOCATION: Place the STB indoors in order not to expose to
lightening, rain or sunlight.
Page 3
11.WARNING: For the terminals marked with symbol of " " may be of
sufficient magnitude to constitute a risk of electric shock. The external
wiring connected to the terminals requires installation by an instructed
person or the used of ready-made leads or cords.
Explanation of symbol, marking, signal lamp or similar means indicate
that apparatus is completely disconnected from the mains. This
equipment is a Class Il or double insulated electrical appliance. It has
been designed in such a way that it does not require a safety
connection to electrical earth.
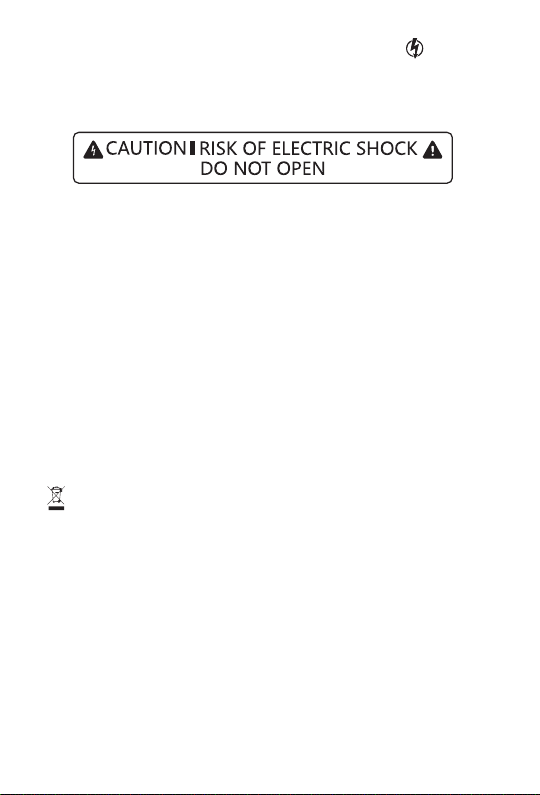
This lightning flash with arrowhead symbol within an equilateral
triangle is intended to alert the user to the presence of non-insulated
“dangerous voltage”within the product's enclosure that may be of
sufficient magnitude to constitute a risk of electric shock.
Warning: To reduce the risk of electric shock, do not remove cover (or
back) as there are no user-serviceable parts inside. Refer servicing to
qualified personnel.
The exclamation point within an equilateral triangle is intended to alert
the user to the presence of important operating and maintenance
instructions in the literature accompanying the appliance.
12. Correct Disposal of this product. This marking indicates that this
product should not be disposed with other household wastes
throughout the EU. To prevent possible harm to the environment or
human health from uncontrolled waste disposal, recycle it responsibly
to promote the sustainable reuse of material resources. To return your
used device, please use the return and collection systems or contact
the retailer where the product was purchased. They can take this
product for environmental safe recycling. Environment Temperature:
0~35C.
Page 4
Features
High Definition STB decoder, Full HD 1080P output via HD
Under 1 Watt Standby power consumable
Hybrid tuner for DVB-T/T2/Cable
RJ45 for 100Mbps Ethernet interface
2*USB 2.0 Host, USB-WIFI and 3G dongle supported
Video Decoding: MPEG-4/H.265, MP@ML, MP@HL, [email protected], XVID,
DIVX
Audio Decoding: LPCM, AAC-LC, HE-AAC, MP3, Dolby
Automatic PAL/NTSC conversion
6000+ channel (TV and Radio) programs
16 different favorite groups selection
Electronic Program Guide (EPG)
Subtitle supported
Teletext supported by VBI insertion and software emulation
PVR Ready, Recording and Time Shift
Auto scan, Fast scan and LCN function
Parental lock facility by channel and program event
Multilingual menu text supported
Software upgrade via USB, and RS232
Statement:
Specifications are subject to change without further notice.
The manufacturer does not assume any responsibility regarding any
errors or mistakes in printing.
Please note that new software may change the features of the receiver.
The manufacture holds the rights of changes without any further notice.
The image shown here is indicative only. The actual product may differ.
Page 5
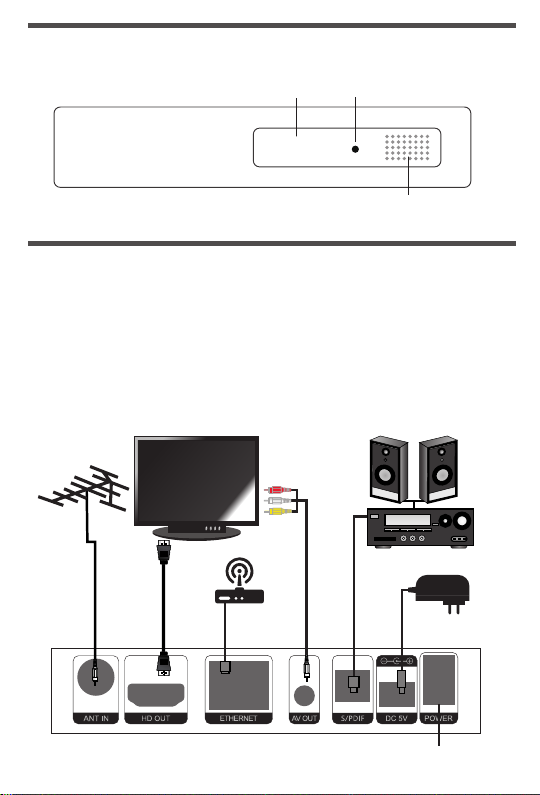
Front Panel
POWER IndicatorDisplay (Green)
0008
Remote Sensor
Connection TV
AV Connection:Connect the AV cable of the 3 color (Red/White/Yellow)
to the TV’s AV output interface, the other end to TV set AV input interface.
Connect by color, and TV’s set to AV input mode.
HD OUT Connection: Connect HDTV cable into the product interface,
the other side into a TV set. TV’s set to HD input mode.
Connection TV Diagram:
Amplifler
OPTICAL Cable
AC/DC Adapter
Adapter cable
Antenna cable
Television
Router
HDTV Cable
Network
Cable
AV Cable
POWER Switch
Page 6
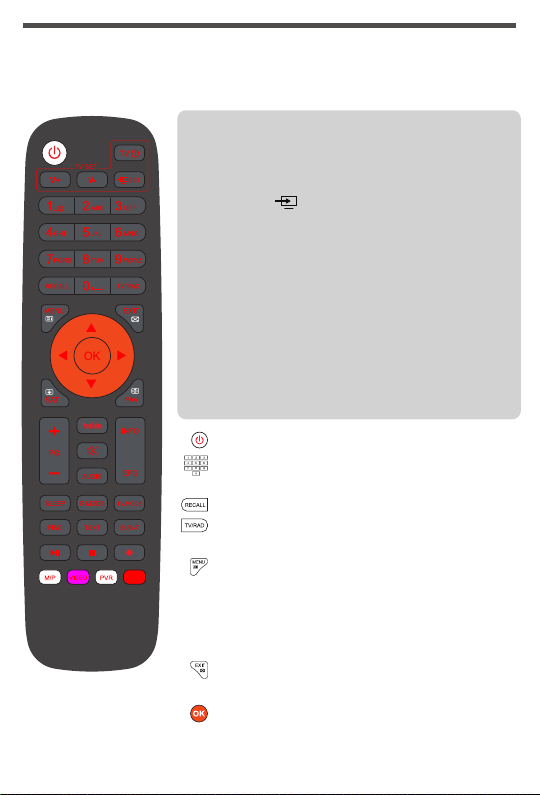
Remote Control
You can power on/off the receiver, operate on screen menu, and use a
variety of hot key function.
Control TV
Learning steps operation guide:
1. Make sure the two emitters are aligned and kept
around 1-3cm;
2. Press the " /SET" button for 5 seconds until
the indicator changes from blinking to long light,
enter the learning state;
3. Press the button you want to learn, the indicator
blinks slowly, enter the learning receiving state;
4. Press the learning button for around 1 second
and release, after learning, the indicator change
from blinking to long light. To learn other
buttons, repeat steps No.3-No.4;
5. Finish learning, press any other key to save
automatically and exit the learning state, the
indicator goes off.
POWER: Standby On/Off.
0-9 Keys: Used to select channels or enter
programming parameters.
RECALL: Return to previous channel.
TV/RAD: Receiver switches between TV and
Radio mode.
MENU: Displays the Main Menu on the
screen, or return to the previous menu or
status.!When DVB is started, press
continuously to enter the forced upgrade
mode.
! The picture is only
for reference; please
make the object as the
standard.
EXIT: Cancel the user selection and return to
the viewing mode from a menu.
OK: Select menu option, or to updated on
entry.
Page 7
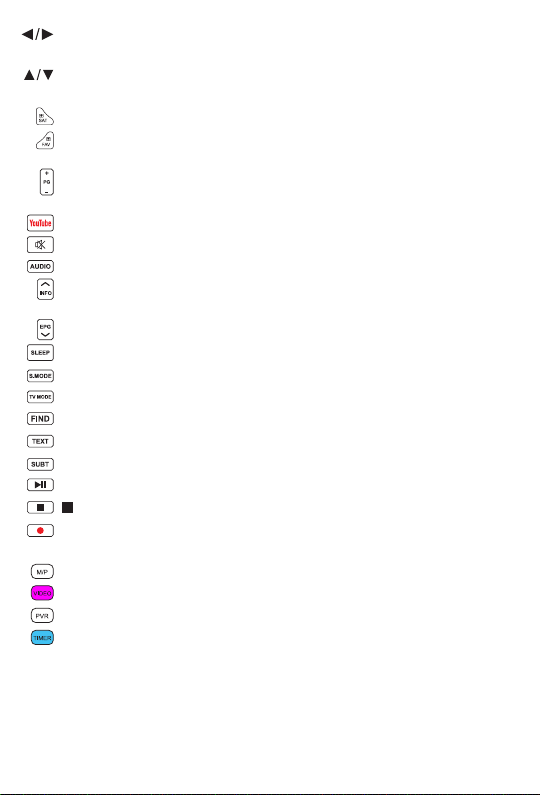
◄/► VOL+/-: To adjust volume level, or to move cursor left or right in
the menu.
▲/▼ CH+/-: To change channels, or to move cursor up or down in
the menu.
SAT : Display the satellite list at normal picture, or switch satellites.
FAV: To set receiver to the favorite server mode, display the favorite
channel.
PAGE +/-: To move up the cursor to the next or previous page in the
channel list.
YouTube: Quick enter You Tube list.
MUTE: Mute the sound.
AUDIO: Audio channel setup: Left, Right, Stereo, and Mono.
INFO: To display channel status or various program information of
current service.
EPG: Display the programs guide on screen when available.
SLEEP:Press sleep key you can setup up the Standby time.
S.MODE: Switching output resolution.
TV MODE: (Menu Mode) Switch TV mode is PAL or NTSC.
FIND: Use to prompt find channels sort by character.
TEXT: Shows teletext information of the current channel supports.
SUBT: Subtitle Display.
►ǁ/Play/Pause: Multimedia playback and pause.
STOP: To stop the Time Shift, recording, or MP3/JPEG player.
● REC: Record the currently playing program, Press again to set the
duration of recording.
M/P (Red Key): (Multifunction key).
Video (Green Key): Quick enter custom Video list (Multifunction key).
PVR LIST (Yellow Key): Quick enter PVR LIST (Multifunction key).
TIMER (Blue Key): Press this button to display Time Shift info bar
(Multifunction key).
Page 8
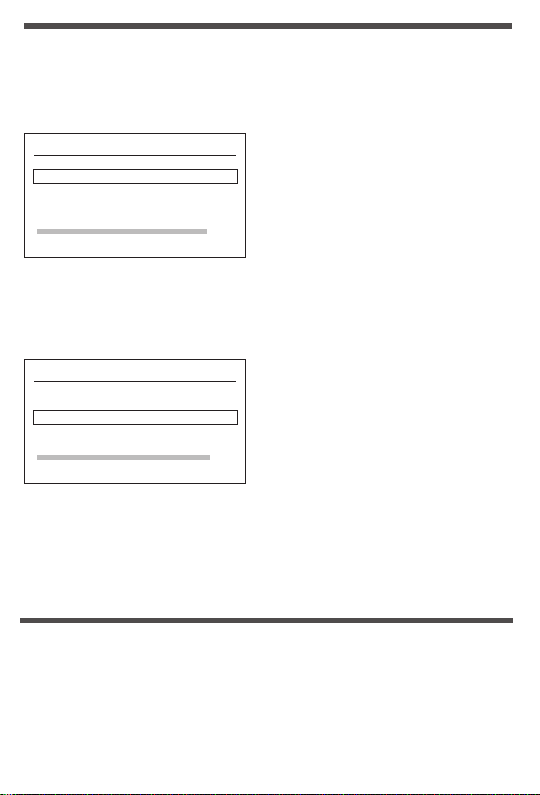
USB Upgrade and USB Backup
Move to “USB Upgrade”. →Upgrade By USB → Upgrade Mode: All
Code → Start.
USB Upgrade
USB Upgrade All Code
USB File MP_GTmeida V7 TT.bin
Start
3. Press OK button on start key to start receiving the data from USB device.
When the USB device is not connected, this item is grey, you cannot edit it now.
Move to “USB Backup”. →Backup Mode: All Code or User
DB → Start
USB Backup
Backup Mode User DB
Start
Insert U disk, with update USB interface (please make sure the upgrade file on
the USB flash drive’s root directory), click the Start, the system will automatically run to upgrade the program and restart after the upgrade is completed
(Note: in the process of system upgrades do not power outages; Additionally,
research and development of different companies is different, So don’t upgrade
is not our company’s software, in order to avoid system damage).
1. All code: update the firmware to box.
Main code: update the system main
function to box.
User DB: update the user DB to box.
2. Upgrade File: Show the Upgrade File
Note: Please choose the right model
0%
software upgrades,Wrong software can
cause the machine to not work properly.
1. All Modes: Backup the firmware to U
disk,User DB: Backup the User DB to U
disk
2. Press OK button on start key to start
send the data to USB device, Note the
backup success prompt.When the USB
0%
device is not connected, this item is grey,
you cannot edit it now.
Troubleshooting
Warning! Under no circumstances attempt to repair the receiver your self.
Tampering with the receiver may result in fatal electric shock and will
invalidate your warranty.
Note: More support guidelines, please contact the official website:
http://www.freesat.cn.
 Loading...