

Page 1

Contents English - 1
EnglishContents
Wirelessmouse ....................................................................... 3
System requirements .. .. ............................................................ 3
Safetyinformation ................................................................... 3
CEmarking ......................................................................... 3
Limitedworldwidewarranty .......................................................... 3
Connecting the receiver and the mouse . . . . ............................................ 4
Connecting the receiver . . . . . . ........................................................... 4
Preparing the mouse and establishing the wireless connection . ............................. 5
Usingthemouse ....................................................................... 6
Installingthesoftware ................................................................... 7
Thebuttonsonthemouse ............................................................... 8
LED ................................................................................... 9
Settingthescanningsensitivity ........................................................... 9
Switchingthemouseonandoff .......................................................... 10
Stateofchargeofthebatteryin themouse ................................................ 10
Mobiletransport ........................................................................ 11
Using the mouse wheel .................................................................. 11
Workingenvironments ................................................................. 12
Cleaning ............................................................................... 12
Storingthebattery ...................................................................... 12
Troubleshootingandtips .............................................................. 13
The mouse is not detected or does not function . . . ........................................ 13
Connection problems with mouse . ....................................................... 13
Technicaldata ......................................................................... 14
Environmental conditions ................................................................ 14
Fujitsu Technology Solutions 17
Page 2

2 - English Contents
18 Fujitsu Technology Solutions
Page 3
Wireless mouse English - 3
Wireless mouse
The wireless mouse works with digital radio technology and without the need for disruptive cables.
You can use the mouse on any computer th at has a free USB po rt which
meets the system requirements specified below.
The sections below describe how to set up the mouse ready for use.
System requiremen ts
• Computer with Windows 7 or Windows Vista
• At least one free USB port
• CD/DVD drive for installing the software
Safety information
Please observe the safety information supplied.
Use only type AA batteries for the mouse.
CE marking
The shipped v ersion of this device complies with the requirements of the EC
directives 2004/108/EC "Electromagnetic compatibility", 2006/95/EC "Low
voltage directive" and 2009/125/EC "Ecodesign directive".
Limited worldwide warranty
Fujitsu Tec
worldwide w
partner of
which the s
desks for d
"
http://
Fujitsu Technology Solutions 19
hnology Solutions provides a warranty for this device. This warranty can be asserted
herever Fujitsu Technology Solutions maintains a service office or an authorised service
Fujitsu Technology Solutions is present. Such claims can be made to the extent to
ervice concerned is available in the particular country. Please contact one of our help
etails of the availability of the services and the response time, or visit our website at
ts.fujitsu.com/service" before you make any warranty claims in the particular country.
Page 4
4 - English Connecting the receiver a
nd the mouse
Connecting the receiver and th
► Switch on your PC.
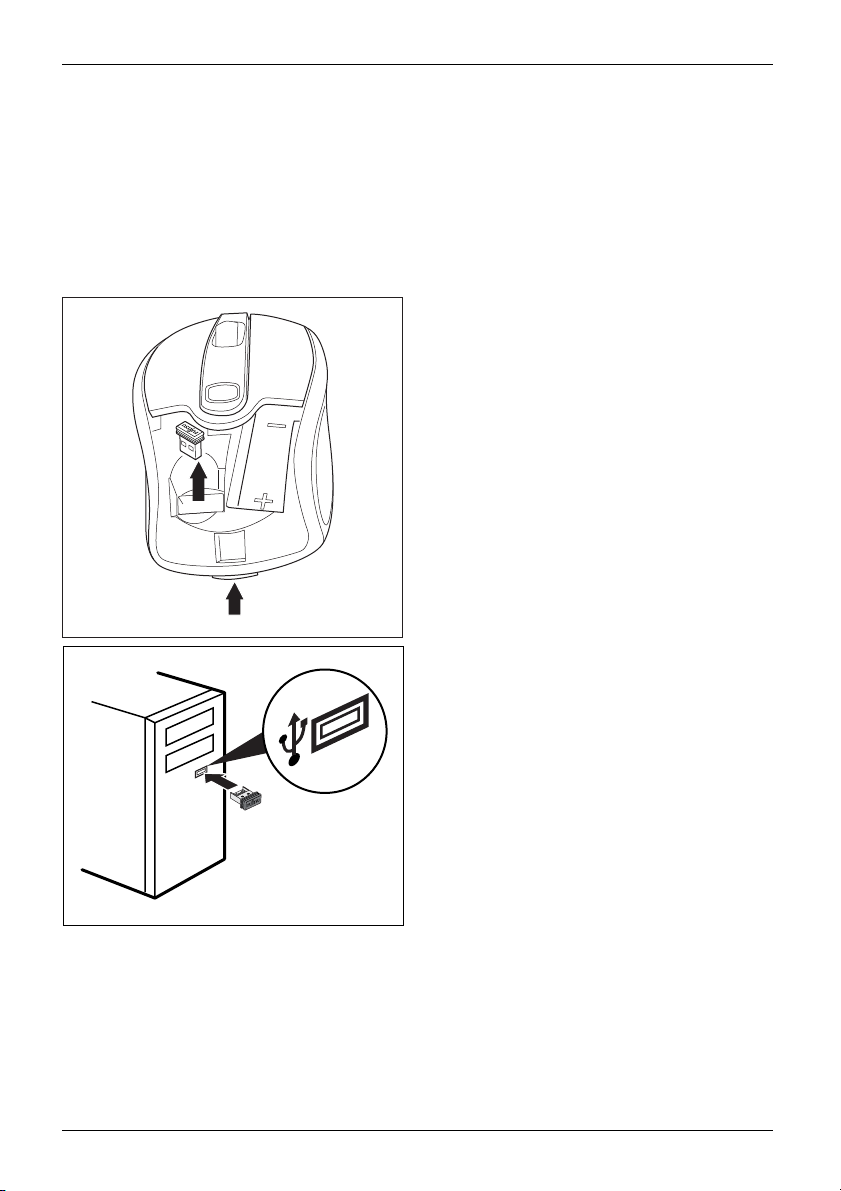
Connecting the receiver
The receiver is housed directly in the mouse.
► Open the cover of the battery compartment
on the top of the mouse by pressing the
button (1) and remove the cover.
► Remove the receiver from the mouse in
the direction of the arrow (2).
► Replace the cover on the battery
compartment.
2
1
► Connect the receiver to a spare USB
port on the computer and follow the
on-screen instructions.
e mouse
20 Fujitsu Technology Solutions
Page 5
Connecting the receiver and the mous
e English - 5
Preparing the mouse and establi
wireless connection
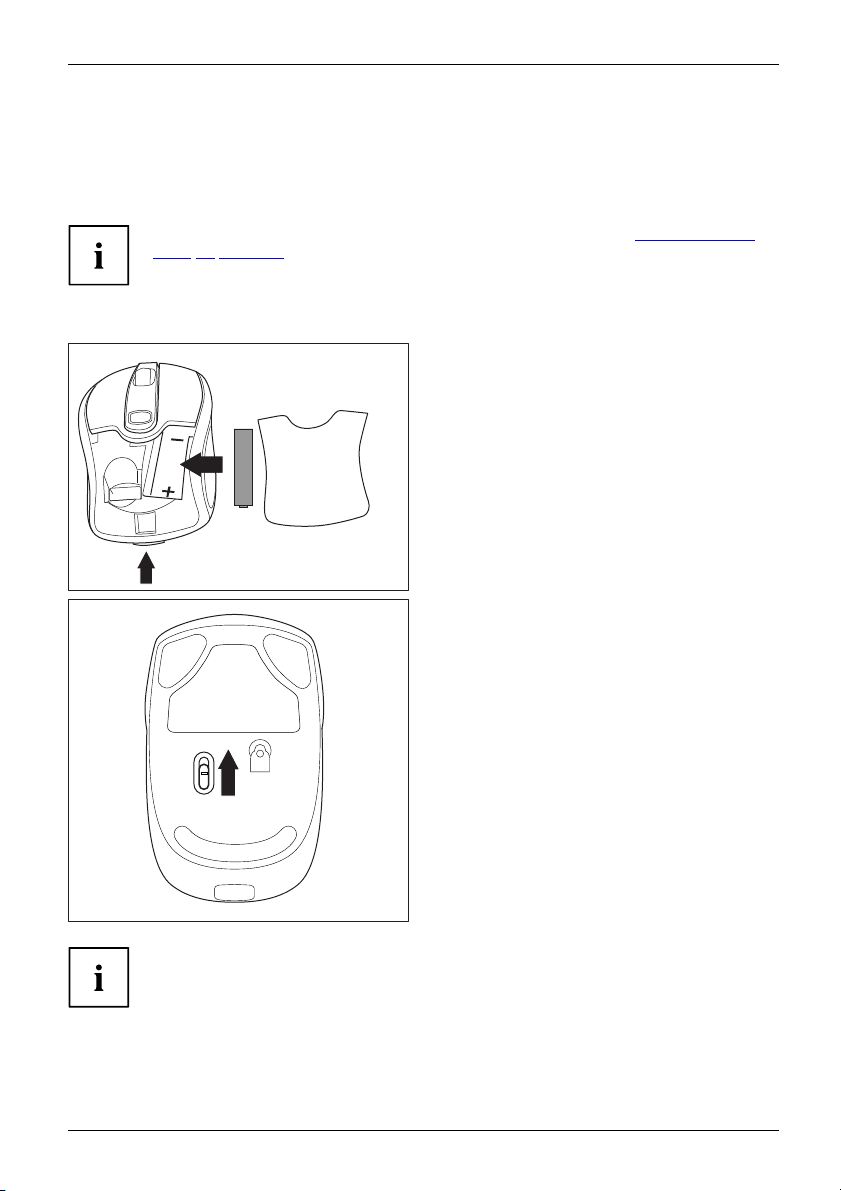
Before you can use your new mous
When inserting the battery, f
Page 14 - English.UseonlyAAty
not used for longer period
The mouse requires one AA battery.
1
e, you must make the following preparations.
ollow the safety notes and the chapter "
pe batteries. Switch off the mouse when it is
s. This extends the service life of the ba ttery.
► Open the cover of the battery compartment
on the top of the mouse by pressing the
button (1) and remove the cover.
► Insert the battery into the battery
compartment. The illustration in the battery
compartment shows how to insert the
battery in the correct orientation.
► Close the battery compartment.
► Set the switch on the bottom of
themouseto"On".
shing the
Technical data",
OFF ON
The wireless connection between the mouse and the receiver is established
automatically and you can start using the mouse immediately.
Fujitsu Technology Solutions 21
Page 6

6 - English Using the mouse
Using the mouse
If the s oftware is not installed, you cannot use all mouse functions.
22 Fujitsu Technology Solutions
Page 7

Using the mouse English - 7
Installing the software
The supplied software must be installed in order to be able to configure the programmable
keys on the mouse and use its full range of functions.
► Insert the supplied software CD in the CD/DVD drive for the PC.
The CD will start automatically.
► If the CD does not start automatically, double c lick on the file Setup.exe in
the CD folder in Win dows Explorer.
► Follow the instructions on the screen.
The installed software allows you to call up the fo llowing configuration menu either via th e
installed programme group or via the mouse icon created in the task bar.
Fujitsu Technology Solutions 23
Page 8

8 - English Using the mouse
The buttons on the mouse
1
4
5
2
3
Mouse button
Right mouse button Function as right mou
Left mouse button Function as left mouse button
DPI button
1 (centre button
1 (centre button)
turn mouse wheel
forwards
1 (centre button)
turn mouse wheel
backwards
2(forwards
3 (backwar
4(mousew
towards
5 (mouse wheel
towards right)
button)
ds button)
heel
left)
Assignment without
software
Increase/decrease the resolution
(scanning sensitivity)
)
Depending on the active application, you ca n use
this button to navigate forwards or scroll forwards
can use this button to navigate backw ards
No functi
Windows
Windows
conten
left)
No function (under
Windows Vista /
Windows 7: screen
content is shifted to the
right)
Function as centre button Freely programmable
Depending on the active application, you
or scroll backwards
on (under
Vista /
7: screen
t is shifted to the
Default assignment
with installed softwa
se button
Scroll up
Scroll down
Screen co
shifted
Screen content is
shifted to the right
ntent is
to the left
Optional with install
re
software
-
-
-
-
-
Freely programmable
Freely programmable
Freely programmable
y programmable
Freel
ed
24 Fujitsu Technology Solutions
Page 9

Using the mouse English - 9
LED
The LED provides information on the state of charge/operating statu s and on the scanning sensitivity.
Status indicators Description
The LED lights up red
The LED flashes red
Power-on indicator
• The mouse is operative.
State of charge indicator a
Duringtheswitch-onproc
the state of charge of the b
• The LED flashes 1x: The bat
• The LED flash es up to 5x: The battery is fully charged.
State of charg e indicat
During operation, the L
in the mouse becomes lo
in the mouse", Page 10 - E
DPI indicator
While the resolutio
on the level set (se
English).
n (DPI) is being adjusted, the LED flashes depending
e chapter "
s the mouse is being switched on
ess of the mouse, the LED flashes depending on
attery.
tery is nearly discharged.
or in mouse operating mode
ED flashes red if the state of charge of the battery
wer (see c hapter "
nglish).
Setting the scanning sensitivity", Page 9 -
State of charge of the battery
Setting the scanning sensitivity
The m ouse supports a resolution (scanning
sensitivity) of 1000, 1500 and 2000 dpi.
The default setting is 1500 dpi.
► To switch the scanning sensitivity from one
level to the next highest level, press the DPI
LED
DPI
button once in each case.
After the highest level of 2000 dpi has
been reached, the next press of the DPI
button begins again with the lowest level
of 1000 dpi.
The higher the scann ing sensitivity, the
faster the mouse reacts.
The LED flashes with the individual levels as follows:
• 1000 to 1500 dpi: flashes 2x red
• 1500 to 2000 dpi: flashes 3x red
• 2000 to 1000 dpi: flashes 1x red
Fujitsu Technology Solutions 25
Page 10

10 - English Using the mouse
Switching the mouse on and off
If you are not intending to use the mouse for a long time, you can s witch it off to save power.
Set the switch on the bottom of the mouse to "Off".
If you wish to resume work with the mouse, do not forget to switch it on again.
Stateofchargeoftheba
Please note that the battery status indicator can no longer light if the
battery is completely discharged.
LED
ttery in the mouse
If the charge of t he battery in the mouse
becomes low, the LED on the mouse flashes
red.
► Replace the battery in the near future.
26 Fujitsu Technology Solutions
Page 11

Using the mouse English - 11
Mobile transport
The receiver can be housed directly in the mouse.
► Slide the receiver into th e opening in the
mouse casing, in the direction of the arrow.
► To remove the receiver, withdraw it
upwards with the fingers.
Using the mouse wheel
In addition to two buttons, the mouse also has a wheel that can be used as follows:
► Press the on the wheel to use the third mouse button.
► Turn the wheel forwards or backwards to scroll, for example in documents or on Internet pages.
Depending on your operating system, you may be able to move the screen content horizontally:
► Press the wheel to the left or right.
Fujitsu Technology Solutions 27
Page 12

12 - English Working environments
Working environments
During signal transmission, interference can be caused by other radio
devices which use the same freq uency range.
• The mouse can be used on nearly all s urface s. To ensure optimum
performance, it is recommended that the mouse be used on a relatively
light-coloured but non-refl ect ive surface.
• The mouse switches to energy-saving mode if it is not used for a certain period of time.
Move the mouse or press one of the mouse buttons to "wake up" the mouse again.
Cleaning
Switch off all equipment concerned.
Do not use any cleaning agents that contain abrasives or which may dissolve plastic.
Ensure that no liquid enters the inside of the device.
The casing surfaces may be cleaned with a dry cloth. If particularly dirty, use a cloth
that has been moistened in mild domestic detergent and then carefully wrung out,
you can also clean the keyboard using disinfectant wipes.
Storing the battery
Ifyoudonotwa
battery and st
nt to use y our mouse for a considerable period of time, remove the
ore it in a dry place at room temperature.
28 Fujitsu Technology Solutions
Page 13

Troubleshooting and tips English - 1
Troubleshooting and tips
If a fault occurs, try to eliminate it with the measures described in this chapter.
If you cannot resolve the fault, contact your local sales office or computer dealer.
If you need to exchange the device, please note that you must return it to your dealer
in its original packaging and also a produce proof of purchase (receipt). Keep your
receipt and the original packaging in a safe place after purchase.
3
The mouse is not detecte
► Check that the mouse is switched on (on/off switch on bottom of mouse)
► Check that the mouse battery is properly inserted.
► Disconnect the receiver from the computer and reconnect it.
► If the table top is made of glass or of a reflective material, this can interfere with t he mouse
sensor. In this case use an ordinary mouse pad or move to a more favourable desk.
► The receiver may be too far from the mouse.
► Check whether the USB port on your computer is correctly configured.
► Restart your computer.
d or does not function
Connection problems with mouse
The connection can be disturbed by other radio devices in the surrounding
area that use the same radio frequency.
► Insert the receiver into another USB port of your computer.
On systems with a USB 3.0 port, conn ection problems may occur
because of technical reasons.
► Do not connect the receiver to a USB port which is very close to a USB 3.0 port which has
a U SB 3.0 end device connected (e.g. immediately adjacent USB ports).
► Where ap
propriate, use a USB extension cable to increase the separation.
Fujitsu Technology Solutions 29
Page 14

14 - English Technical data
Technical data
Safety regulations complied with
Interface Compatible with USB 2.0 and 1.1
Frequency band
Modulation
Number of channels
Report rate max. 125
Mouse
• Power supply
• Current consumption
paper)
•Batterylife
• Resolution
Receiver
• Power supply
• Power consumpt
(on white
ion
EN 60950
2.4 GHz
GFSK
77
• 1x AA alkaline battery, 1,5 V
• Active mode: 7,5 mA,
sleep mode: 2,29 mA -
• about 6 months for normal office use
• 1000 dpi / 1500 dpi
(selectable via the DPI button of the mouse)
• USB mode: 5 V
• Active mode: < 40 mA, sleep mode: 2,5 mA
0,11 mA
/ 2000 dpi
Environmental conditions
Operating temperature 0 °C – 40 °C
Mouse/Keyboard range Up to 10 m (depending on ambient interference)
30 Fujitsu Technology Solutions
Page 15

FCC Notice English - 1
Federal Communications Commission (FCC) Notice:
Changes or modifications not expressly approved by the party
responsible for compliance could void the user's authority to operate the equipment
NOTE: THE MANUFACTURER IS NOT RESPONSIBLE FOR ANY RADIO OR TV INTERFERENCE
CAUSED BY UNAUTHORIZED MODIFICATIONS TO THIS EQUIPMENT. SUCH MODIFICATIONS
COULD VOID THE USER’S AUTHORITY TO OPERATE THE EQUIPMENT.
NOTE: This equipment has been tested and found to comply with the limits for a Class B digital
device, pursuant to Part 15 of the FCC Rules. These limits are designed to provide reasonable
protection against harmful interference in a residential installation. This equipment generates, uses
and can radiate radio frequency energy and, if not installed and used in accordance with the
instructions, may cause harmful interference to radio communications. However, there is no
guarantee that interference will not occur in a particular installation. If this equipment does cause
harmful interference to radio or television reception, which can be determined by turning the
equipment off and on, the user is enco uraged to tr y to corr ect the inter ference b y one or mor e of the
following measures:
-- Reorient or relocate the receiving antenna.
-- Increase the separation between the equi pme nt an d rec eiver.
-- Connect the equipment into an outlet on a circuit different
from that to which the receiver is connected.
-- Consult the dealer or an experienced radio/TV technician for help.
This device complies with Part 15 of the FCC Rules. Operation
is subject to the following two condi tions: (1 ) this dev ice may not cause harmful interference, and (2)
this device must accept any interference received, including interference that may cause undesired
operation.
3
F ujitsu Technology Solut ions 31
 Loading...