

Page 1
RF Wireless Slim Keyboard and Mouse Desktop
Instruction Manual
Version: GT3.0
The wireless keyboard and optical mouse operate with digital radio technology. There is no
connecting cable to pile up desktop. The keyboard and mouse use radio frequencies to
send data to the receiver, which forwards these to your computer. You can use the
keyboard and mouse on any computer equipped with a free USB interface. There are two
channels, CH1 and CH2 for your selection.
CE marking
This equipment complies with the requirements of Directive 1999/5/EC of the European
Parliament and Commission from 9 March 1999 governing Radio and Telecommunications
Equipment and mutual recognition of conformity.
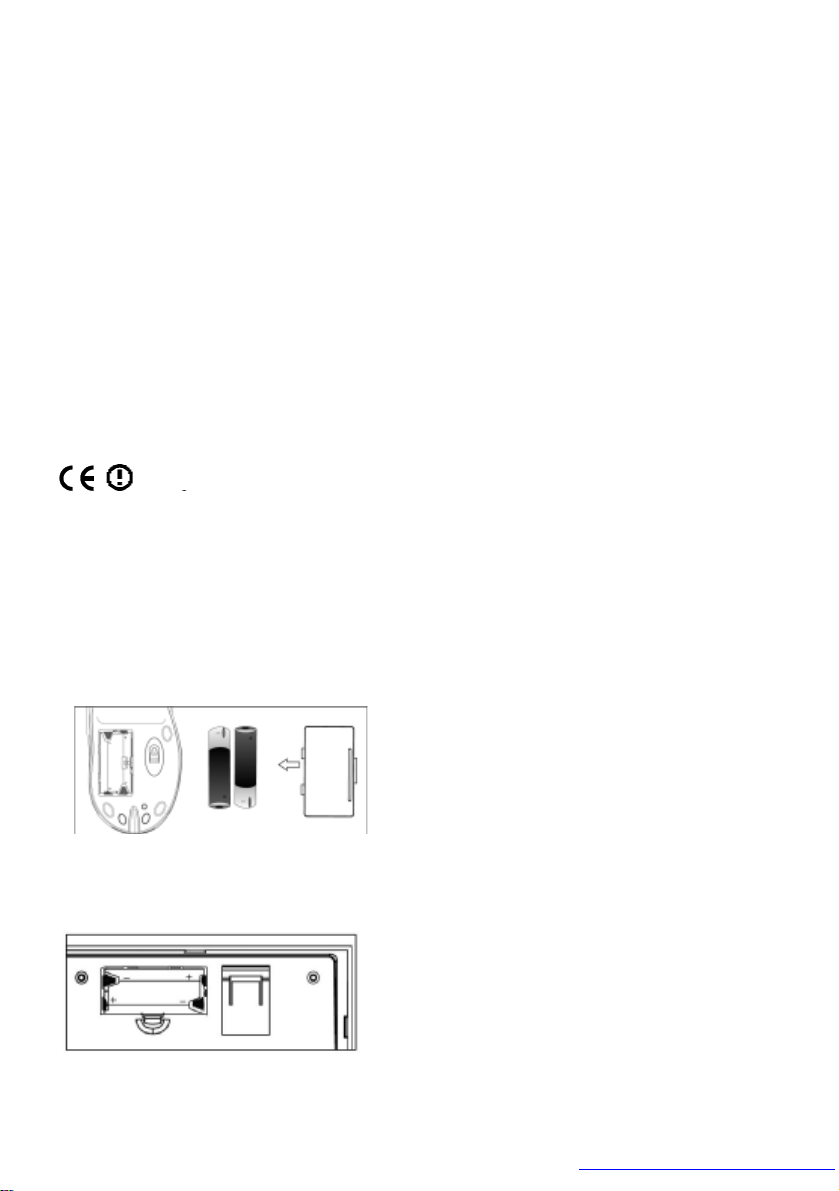
BATTERY INSTALLATION
The cordless optical mouse uses two AAA rechargeable batteries.
1. Press the tab to remove the battery
compartment cover on the bottom of the
mouse.
2. Insert two supplied AAA rechargeable
batteries in the battery compartment
according to the polarity marked inside.
3. Replace the cover.
pic.1
The cordless keyboard uses two AAA batteries.
1. Press the tab to remove the battery
compartment cover on the bottom of the
cordless keyboard.
2. Insert two AAA batteries according to the
polarity marked inside.
pic.2
3. Replace the cover.
- 1-
PDF created with FinePrint pdfFactory trial version http://www.fineprint.com
Page 2

BATTERY NOTES
l Dispose of old batteries promptly and properly.
l Do not burn or bury batteries.
l Use only fresh batteries of the required size and recommended type.
l Do not mix old and new batteries, different types of batteries (standard, alkaline or
rechargeable), or rechargeable batteries of different capacities.
l If you do not plan to use the mouse or the keyboard for more than a week, remove
the batteries. Batteries can leak chemicals that may damage electronic parts.
l Each time you replace the batteries, repeat the mouse or keyboard setup by following
“setting up the ID wireless link.”
CONNECTING TO AC POWER
Power the receiver using the supplied 7.5V, 300mA AC/DC adapter.
CAUTION:
!
You must use a Class 2 power source that supplies 7.5V DC and delivers at least
300mA. Its center tip must be set to positive and its plug must fit the receiver’s DC 7.5V
jack. The supplied adapter meets these specifications. Using an adapter that does not
meet these specifications could damage the receiver or the adapter.
CONNECTING THE RECEIVER
1. Make sure your computer is turn off.
2. Connect the receiver's cable to the USB port of your computer .
3. Connect the adapter to a standard AC outlet.
4. Turn on your computer.
Set up the receiver at least 20 cm away from other electronic devices, such as the
computer monitor or external storage drives, to achieve optimum performance.
Note: Maintain a distance - even in office environments - with the keyboard, mouse and
receiver of at least five meters from other radio devices to prevent interference during
transmission of the signals. The receiver has two lights “ lA ” and “ II ” indicating the state
of Caps lock and numeral keys.
1
PDF created with FinePrint pdfFactory trial version http://www.fineprint.com
Page 3
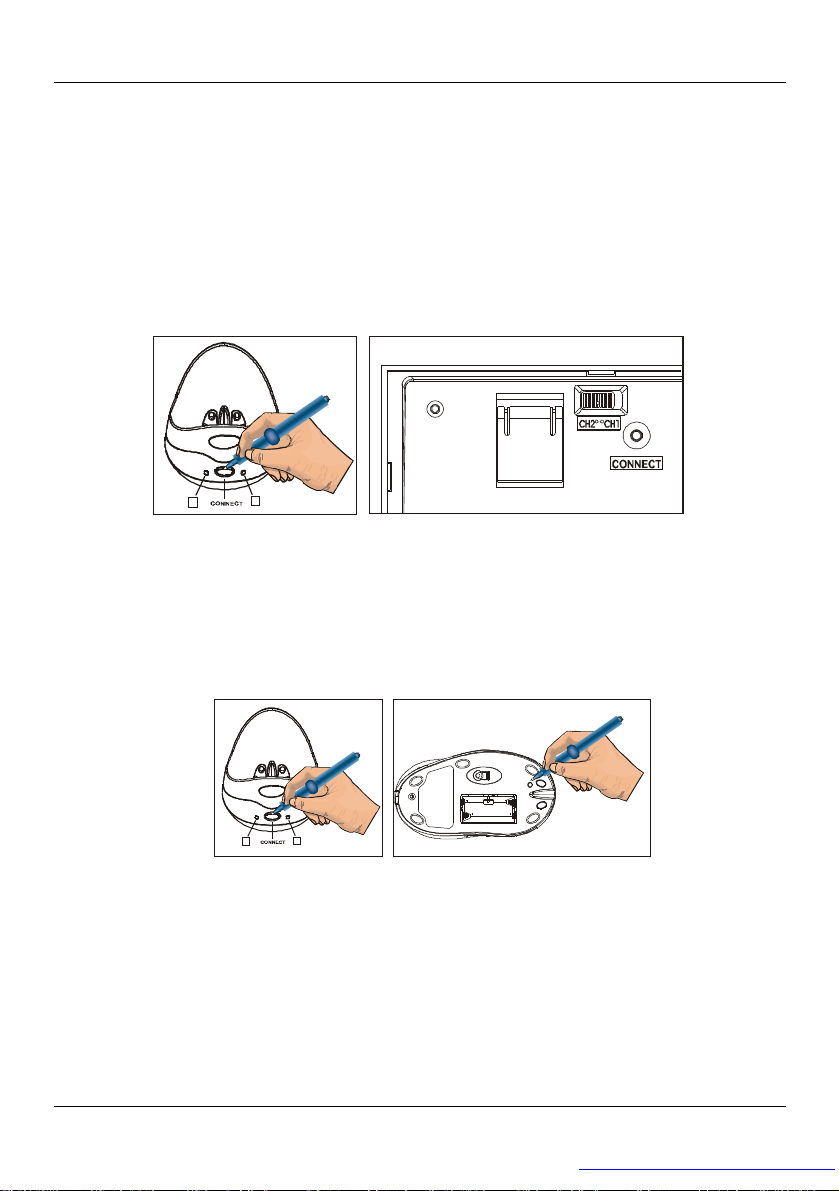
SETTING UP THE ID WIRELESS LINK
Set up your Keyboard and Mouse ID wireless link separately.
Slim Keyboard
1. Press CONNECT key on the receiver after booting the system. The green LED inside
the connect key will light on.
2. To set up the keyboard wireless link, press CONNECT key on the bottom of
the slim keyboard. The green LED will go off.
A
1
pic.3
Optical mouse
1. Press CONNECT key on the receiver after booting the system. The green LED inside
the connect key will light on.
2. To set up the mouse wireless link, press CONNECT key on the bottom of the mouse.
The green LED will go off.
1
A
pic4
Note: The setup must be completed within one minute. If the setup time exceeds one
minute, repeat the procedure.
SETTING CHANNEL
The wireless optical mouse and multimedia keyboard offer 2 channels, CH1 and CH2.
Interference can be removed by adjusting the channels. The operation of setting channels
PDF created with FinePrint pdfFactory trial version http://www.fineprint.com
2
Page 4
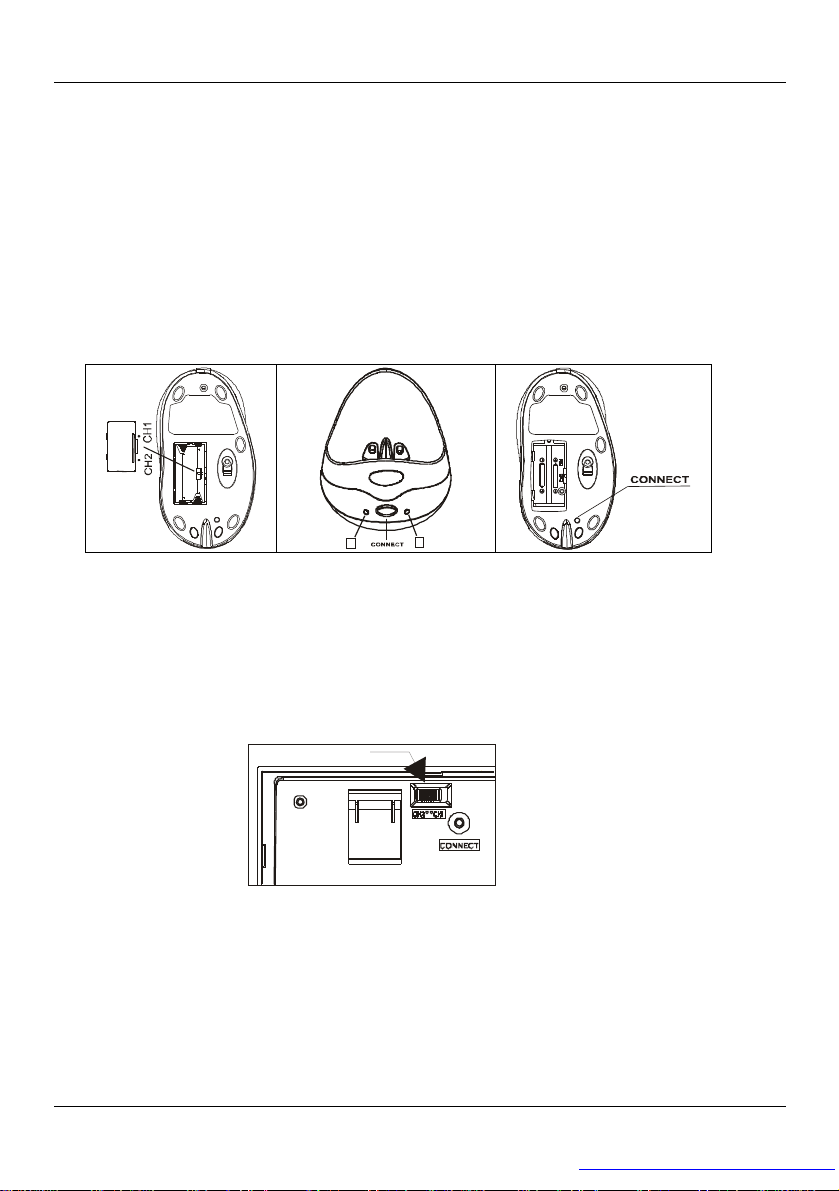
is as bellows:
For mouse to set channel
If you decide to use “CH 1” for mouse,
1. Remove the battery compartment cover on the mouse, turn the button inside the
compartment to “ CH 1 “ and replace and close the cover.
2. Press the “ CONNECT “ key on the receiver.
3. Press the “CONNECT” key on the bottom of the mouse.
Then the CH1 can be set successfully.
Note: the same way for “ CH 2 “ setting.
Pic5
1
A
For keyboard to set channel
The channel of keyboard can be detected automatically. If you decide to use “ CH 1 “ for
keyboard, you just turn the button on the bottom of the keyboard to “ CH 1 “, then the CH1
can be set successfully. If you want to change to “ CH 2 “ , you just turn the button to “ CH 2
“, then the keyboard can be changed to “ CH 2 “.
Pic6
CHANGING COMMUNICATION CODE
The desktop has a communication code to the computer to avoid interference with other
desktops. Change the code if there is any interference. The interference only exists when
more than one mouse and keyboard are used at the same time.
It need you reset the ID wireless link
PDF created with FinePrint pdfFactory trial version http://www.fineprint.com
3
Page 5

The operation is same as that SETTING UP THE ID WIRELESS LINK
Low power indicator
BATTERY LOW WARNING
On the Mouse
The mouse has a battery-low indicator, which will light RED when battery has low power.
On the Keyboard
When you press any key, the power indicator & on the keyboard lights RED to show the
keyboard batteries are out of power.
Pic7
Pic8
Charging the Batteries on the Mouse
Charging the rechargeable batteries of the mouse for the first time, place it in the charging
unit of the receiver for approximately 12 hours to 16 hours to
charge the batteries.
For the later use, it will take only 2 hours to realize quickly
charge.
Make sure the adapter is connected to the power.
1. Put the mouse on the charging-stand as shown.
2. The mouse power indicator will light RED, indicating charging has begun, and light
GREEN when finished. If the batteries not installed or full-power battery is used for
pic7
pic.9
PDF created with FinePrint pdfFactory trial version http://www.fineprint.com
4
Page 6

charging, the mouse power indicator will also light green.
Notes:
l Do not use non-rechargeable batteries; only use rechargeable batteries.
l The recharge power is available while the computer is powered off if the input
electricity is available.
l Be sure the indicator lights red when charging the batteries.
SOFTWARE INSTALLATION
Note: Before installing the software, in order to achieve a successful installation, please uninstall other
wireless mouse and keyboard drivers first.
To take advantage of all the features of your mouse and keyboard, please install the
software that comes with the product.
The software provided offers you several advantages:
l Activation of the multimedia keys on your keyboard, and operating display on the
screen when the multimedia keys are pressed
l Various functions for the mouse
l Icons in the taskbar
1. Turn on your computer and start Windows.
2. Insert the CD in the CD drive. If the CD does not start automatically, start the “Setup”
program from the CD.
3. Follow the on-screen instructions.
Displaying Keyboard Modes
In the Windows taskbar icons, indicate which keyboard mode is active. They match the
displays on ordinary keyboards. The symbol is green when the respective mode is
activated and light grey when it is deactivated.
Uppercase mode (Caps Lock)
A
Virtual numeric keypad (Num Lock)
1
PDF created with FinePrint pdfFactory trial version http://www.fineprint.com
5
Page 7

Stop screen output (Scroll Lock)
Right button
4 button
5 button
nd
Using Your Mouse
The mouse has five buttons: left button, right button, mid-button, fourth and fifth buttons.
The mid-button (wheel) functions both as a wheel and a button, which can be used as a
button or for scrolling, e. g. in documents or on Internet pages.
l For scrolling in documents, roll the wheel forward
or backward.
rd
3 button
2 buttonWheel button
l To use the wheel like a standard mouse button,
click on the wheel.
Left button
st
1 button
The fourth and fifth buttons are programmable and
pic.10
can be defined for different functions with the help of the included driver.
You can specify more settings in the mouse software.
Note:
1. If you do not use the mouse for several minutes, it will default to a
suspended state. To use the mouse again, move the mouse or press one of
the mouse buttons.
2. If your tabletop is red or mirrored which performance of reflecting light is bad,
which will interfere with the optical sensor of the mouse and the mouse may
not work or work worse, in this case, please use a mouse pad.
Multimedia keys
The keyboard has several additional function keys.
1. For Windows 98, you must install the software provided for the keyboard, if you want
to use the multimedia keys.
2. For Windows ME, NT, 2000 and XP, you can achieve the function without a driver.
3. The keys F2 - F12 are available for operating the Internet browser. The keys are active
as soon as the Internet browser is in the active window. You can display certain
PDF created with FinePrint pdfFactory trial version http://www.fineprint.com
6
Page 8

Internet pages, which are organized into categories including Shopping, Finance, etc.
Information on the key assignment and how you can configure the keys is contained in
the software’s online help. Outside the Internet browser, the keys have the standard
functions.
Increasing the volume
This key increases the volume of the connected loudspeakers.
Decreasing the volume
This key decreases the volume of the connected loudspeakers.
Switching the loudspeakers on/off
Use this key to switch on/off the connected loudspeakers.
Calculator
If the PC fails to react to these keys, you must activate the corresponding keyboard
settings in the operating system.
Low Power Indication
CLEANING THE KEYBOARD AND THE MOUSE
Use disinfectant wipes to clean the keyboard and the mouse.
Note: Turn off the computer or disconnect the cable between the receiver and the
computer before cleaning. Remove the batteries from your mouse before you clean it.
The optical mouse normally does not need to be cleaned. If you have problems with the
pointer movement, check to see if the mouse is dusty or dirty. If so, clean the lens with a
cotton swab. Do not use a solvent or cleaning agent.
Use this key to active the calculator software in your system.
E-Mail
Use this key to start the standard e-mail programme for your system.
WWW Browser
With this key you can start the standard browser for your system.
Battery Low
If the battery has low power, the red LED will light red when you press any
key of the keyboard.
TROUBLESHOOTING & TIPS
7
PDF created with FinePrint pdfFactory trial version http://www.fineprint.com
Page 9

Mouse or Keyboard Not Detected
1. Make sure you have installed the batteries correctly, See BATTERY INSTALLATION.
2. Make sure the batteries have enough power, See BATTERY LOW WARNING.
3. Make sure the receiver is correctly connected. See CONNECTING THE RECEIVER.
Set the communication code once more See SETTING UP THE ID WIRELESS LINK.
4. Disconnect the cable between the receiver and the computer, and then reconnect it.
Mouse Not Detected
1. For optimal performance, place the receiver at least eight inches away from other
electronic devices, such as the computer monitor or external storage drives.
2. Shorten the distance between the mouse and receiver
3. Keep the mouse above eight inches away from keyboard to avoid interference.
4. If your tabletop is red or mirrored, this may interfere with the optical sensor of the
mouse. In this case, use an ordinary mouse pad or move to a different area.
Keyboard Missing Keys
1. Make sure the batteries are out of power or expired. See BATTERY INSTALLATION.
2. Place the receiver at least eight inches away from other electronic devices, such as a
computer monitor or external storage drives.
3. Shorten the distance between the keyboard and receiver.
Mouse and Keyboard Problems
Your mouse and keyboard should always work properly because a unique code
automatically sets after batteries are installed. If your computer is operated by others,
change the communication code or change the channel. See CHANGING
COMMUNICATION CODE. And SETTING CHANNEL.
Operation is subject to the following two conditions: (1) this device may not cause
interference, and (2) this device must accept any interference, including interference that
may cause undesired operation of the device.
8
PDF created with FinePrint pdfFactory trial version http://www.fineprint.com
Page 10

CAUTION
To avoid interference with an aircraft's electronic systems, do not use your wireless
desktop during a flight. Make sure you have removed the batteries from your wireless
keyboard and mouse
UL CAUTION
9
PDF created with FinePrint pdfFactory trial version http://www.fineprint.com
Page 11

10
PDF created with FinePrint pdfFactory trial version http://www.fineprint.com
 Loading...