

Page 1
User's Guide
Page 2
Contents Contents
Contents
P01-02
P03
P04
P05-08
P09
P10-14
Accessories Details
Package Content
Quick Start Guide
User Guide
Mouse Technical Parameters
Driver Introduction
Page 3

l
n
Mid-but
Accessories Details
s
urfa
ouse
Breathing light for wheel
Breathing light for whee
DPI up button
DPI up butto
DPI down button
Breathing light switch
Battery capacity indicator
Programmable side buttons
IR sensor
USB cable lock
Laser sensor
Mouse charging connect points
Magnet fix point
Charging dock connect point
Mode switch button for wireless
Wired mode USB port
Mid-button
IR Power Saving
Scrolling wheel
Breathing light
Top surface
of the mouse
e
s
a
r
L
5
0
g
4
n
i
0
d
m
p
a
i
G
Charging dock (receiver function)
0201
Long-lasting foot pad
Turbo-click Left/Right button
Charging dock/receiver
Q
Bottom surface
ce
of the mouse
Q
USB port
Page 4
u
1* X3
Cable
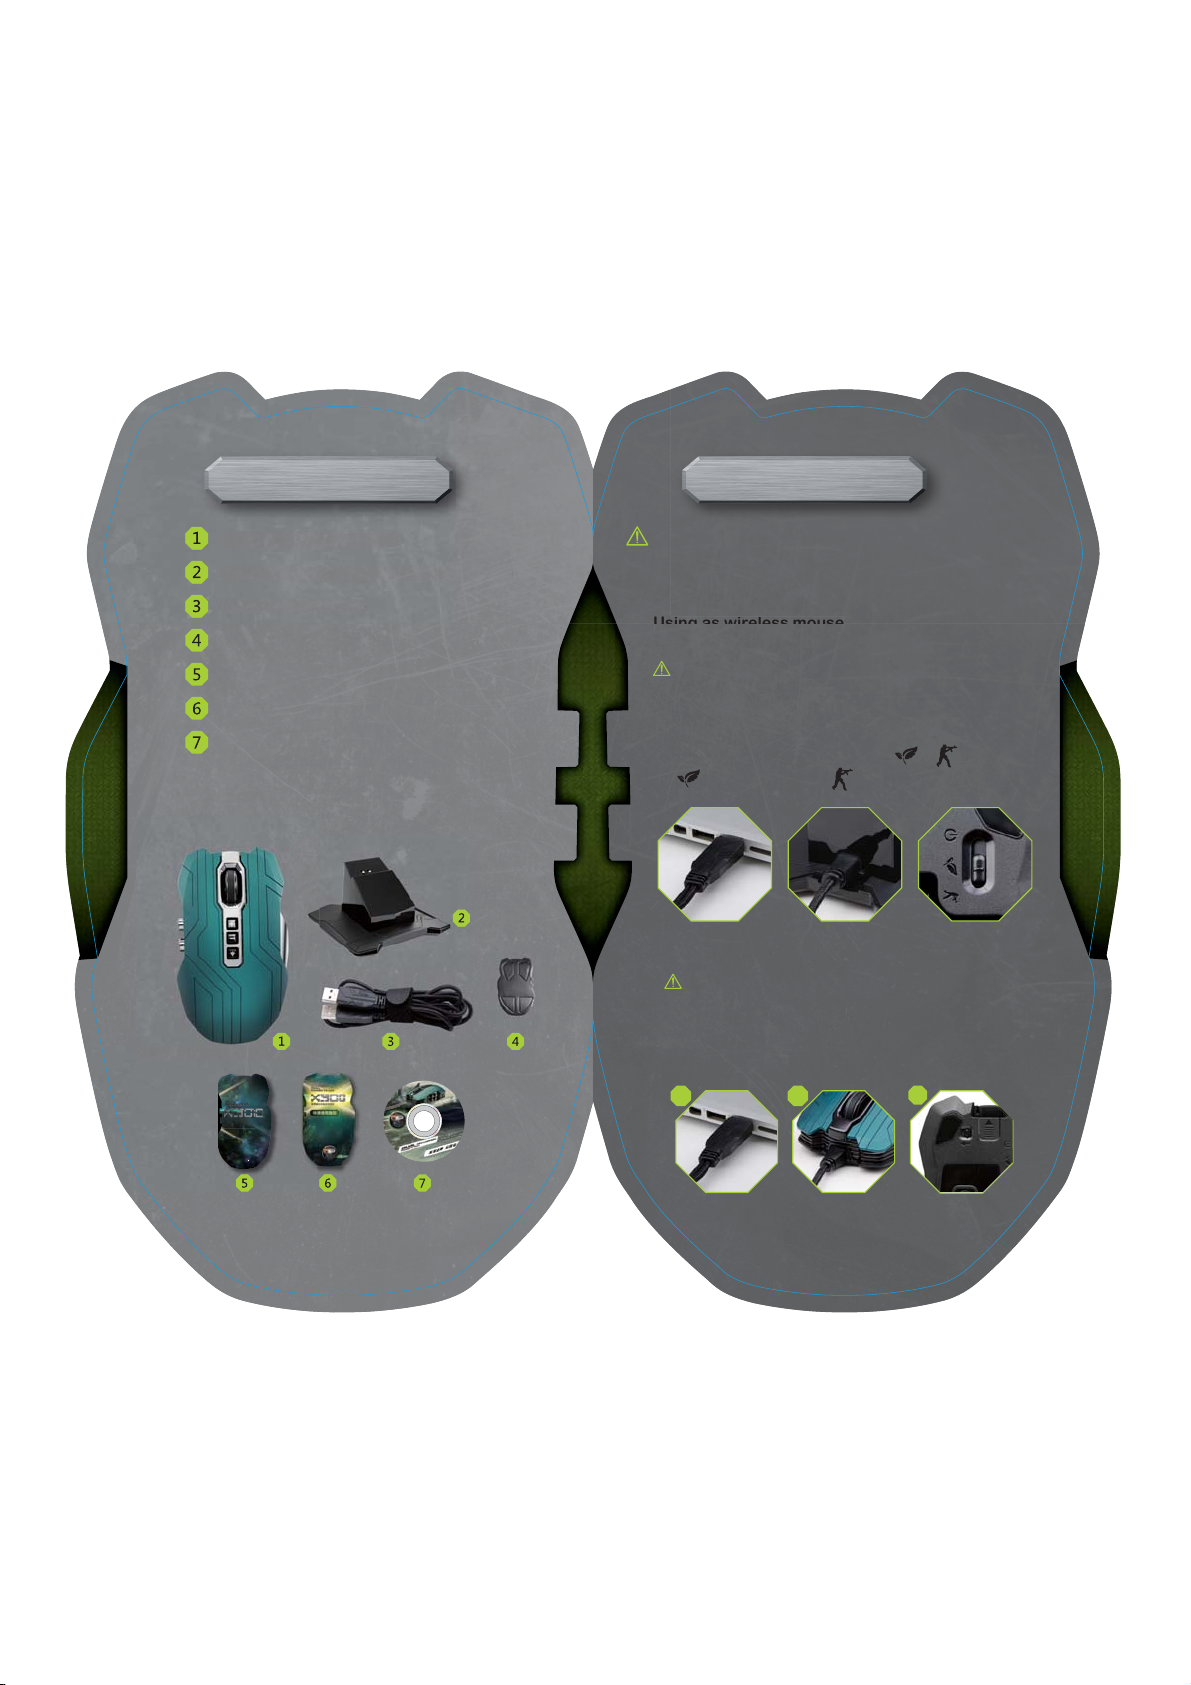
Package Content
Quick Start Guide
03
1* Gaming Mouse X300
1* Gaming Mouse X300
1* Charging Dock (Receiver Function)
1* Charging Dock (Receiver F
1* X300 USB Cable
00 USB
nction)
2* X300 Spare Foot Pads
1* X300 Manual
1* X300 Quick Start Guide
1* X300 Driver CD
Please check if the accessories are complete, and read this
manual carefully before use.
Dual Power Train X300 Gaming Mouse can be used as not only
wireless mouse but also wired mouse by dual powered.
Using as wireless mouse
(1) Insert the USB cable into free USB port of PC
Caution: The master cable is for data transfer and only the master cable can
activate the mouse, the assistant cable is only for charge help, if you connect
the both USB ports to your PC, the charging time will be shorten.
(2) Connect the trapezoid USB port to the charging dock
which is also acted as the receiver.
(3) To start using, switch on/off button to or
Energy-saving mode Gaming mode
04
Using as wired mouse
(1)Insert the USB cable into available USB port of PC
Caution: The master cable is for data transfer and only the master cable can activate
the mouse, the assistant cable is only for charging help, if you connect the both USB
ports to your PC, the charging time will be shorten.
(2)To start using, please connect the trapezoid USB port to the mouse .
(3)If you want to pull out the cable, please push the USB cable wedge
switch to release the cable before that.
1
2
3
Remark: After USB cable connected with the mouse, the
wireless mode would be invalid automatically, and the
mouse would be switched into wired mode accordingly
Page 5

User Guide
Button function
Left/Right button —— Turbo-click
Unique Turbo-Click technology reaches 1ms reports
period and 8-times faster than common wired mouse, to
bring you a good enjoy in gaming.
Breathing wheel light
All in one breathing light for wheel, combine the functions of
scrolling wheel, mid-button and breathing light.
Scrolling wheel function:
The wheel is adopted high grade ABS material to assure its
resist-abrasion for a long time when scrolling
Mid-button function:
Click the mid-button, move the screen by mouse pointer,
mid-button
also could be customized by self defined after installing driver.
Breathing light: different colours for distinguishing modes
Breathing Light Colour Mode
Red Wireless Gaming Mode
Blue Wireless Energy-saving Mode
Red Wired Mode
By different lighting ways, breathing light could be used for indications of
power-on, using, binding, charging, intelligent recognizing, DPI switching
Action
under using
use when the
breathing light turn off
hold mouse
switch DPI
put on charging dock
put on charging dock
Lighting way
long-time lighting
light off
light fade in
flash
long-time lighting
fade in/out by circle
Mouse status
normal use
normal use
wake up at once
switch DPI
Auto-bind successfully
charging
Programmable side-buttons
The four side-buttons with fault functions: volume up, volume
down, forward and backward, they also could be self defined
after installing the driver.
Top lighting buttons
Three top lighting buttons: DPI up button, DPI down button,
lighting-switch button
Switch DPI: The mouse has three levels DPI, and could be
switched by dpi switch button.
Click DPI + by once, the dpi will increases one level, there is
no change after biggest level; click DPI – by once, the dpi will
decrease one level, there is no change after smallest level.
You may also customize the dpi by the driver.
Default DPI:
Different factory settings of default dpi would be set under
different mode, breathing light flashes different times
0605
according to its dpi
If you change the DPI by driver, breathing light would indicate DPI value after the latest status.
Lighting switch button:
Breathing light, charging indicator and top lighting buttons will be
long-time lighting when mouse is working, and you can switch the
light off by the button if you want the light off.
Instructions for wireless mode
Mode switch button
Under wireless mode
1. Switch the button to , the mouse power is cut off.
2. Switch the button to , the mouse is switched to
Wireless Energy-saving Mode
3. Switch the button to , the mouse is switched to
Wireless Gaming Mode
Page 6

G
a
m
i
n
g
L
a
s
e
r
5
0
4
0
d
p
i
Dual-sensor switch
Under wireless gaming mode, the mouse will switch to laser sensor
automatically with accurate location and satisfied performance.
Under wireless energy-saving mode, the mouse will switch to IR optical
sensor of low power consumption automatically for long battery life.
Breathing wheel light
Under wireless energy-saving mode, it shows blue; under wireless
gaming mode, it shows red; under wired mode, it shows red too.
Charging dock
1. The charging dock combines the functions of mouse charging,
acting as a receiver and auto- binding
2. To start using, connect the cable to the charging dock
3. The design of the dock is with magnet, it is available to fix the
mouse to the dock.
4. The indicator at the bottom of charging dock will flash or light on
according to different status. If you want to switch the light off, you
can close the light by self setting from the driver.
Dual antenna technology
Under wireless modes, the charging dock is also used a receiver. Dual
antenna technology ensure all directional data transmission up to 50
meters.
Mouse charging:
There is lithium battery inside the mouse. You can put the mouse to
the dock and charge the mouse directly.
Automatic binding:
The mouse and dock will be paired as long as you put the mouse to the
dock. During the pairing, the blue light will flash, when the blue lights
on, it means the pairing is finished successfully.
Remark: mouse will be paired firstly for the first use and then run into
charging mode
Charging dock indicator
Working status Charging dock indicator Mouse breathing light
Normal connection
Long-time lighting /
(no mouse)
Mouse binding Flash several times Long-time lighting
Charging Fade in/out by circle Fade in/out by circle
Mouse charging indicator
Battery capacity indicator
Battery power Battery indicator (blue)
100%~80% 3 indicators long-time light
80%~50%
50%~20% The bottom indicator long-time light
<20% Low power, the bottom indicator flashes
The bottom and middle indicators
long-time light
Function
1. It shows the battery charging status when mouse is charging
2. It is available for you to know battery power balance in use.
Intelligent touch-on technology
The mouse is adopted intelligent touch-on technology: The mouse
will go into sleep down after stopping use for 2 seconds, and will
be wake up immediately when hand detected.
Powerful lithium battery
There is powerful lithium battery inside the mouse. The lithium
battery is non-memory charging mode for free using. It can works
up to 25 hours with no pause under wireless gaming mode with all
lights on if the battery capacity is full.
Instructions for wired mouse
USB cable
When you connect the cable with the mouse, which will work
as a wired mouse. Its report rate could run up to 1000RPS
which reaches the level of expert gaming mouse.
There is a cable wedge switch which is for lock the USB
cable; you have to push the wedge switch when pulling out
the USB cable.
Caution: to avoid unnecessary damage, please use the
original cable in the package.
0807
Page 7

G
s
Technical Parameters
Gaming-grade specifications
aming-grade specification
Tracking
Resolution
Frame rate
Max acceleration
Max speed
Responsiveness
USB data format
USB report rate
Sleep mode
Glide
Dynamic coefficient of
friction-Mu(k)
Static coefficient of
friction-Mu(s)
Durability
Buttons(Left/Right)
Foot pad
90-5040DPI
11750fps
30G
150ips(up to 150
inches(3.81m)/second)
16bits/axis
1000RPS (up to 1’000
reports/second)
Intelligent hand
-recognize
4
.09
4
.14
10 million clicks
250kilometers
Driver Introduction
D
Mouse Model. Reversion No.
Mouse buttons setting: change functions by
clicking accordant button
Battery capacity: shows latest battery capacity
Setting switching: record switching of
different settings
Setting: property setting for mouse
Reset: reset factory settings
Confirm: driver window will hide after
confirming settings
Cancel: cancel all unconfirmed settings
Apply: go on other settings after confirmation
1009
Page 8

Computer status bar
There are two icons in status bar after driver installed
Battery icon: when mouse pointer moved here, it will show the
battery capacity.
Mouse icon: double click it by left button, the window of driver
would appear
Single click by right button, two switchable modes arise (refer to
1 in below picture) Click “open”, driver window would appear;
click “quit”, close the driver (refer to 2 in below picture)
1
2
Button settings
Click the button you want to customize, there is a dialog box -
Advanced settings, it contains two options: basic setting and
advanced setting
In basic setting: you may make a quick setting of left button,
right, button, mid-button, double click, 4 key, 5 key, left moving,
right moving
Advanced setting contains:
Macros settings steps:
click start input characte click over
Macros settings could support 3 characters at most
Macros using
1. Click the button for Macros settings
2. Macros setting data arise at the accordant place
1211
Basic commands Additional commands
Media functions
Page 9

Accuracy settings
Click setting, there is a dialog box
Speed settings for double click: This is for speed of
2
double click, you may take a test with it.
1
2
1
Needle settings for scrolling wheel: This is for needle
speed and vertical wheel speed.
3
DPI settings: This is for customizing DPI. It could be
3
any 90-multiple value between 90-5040.
4
5
DPI settings by driver is only valid under wired mode
and wireless gaming mode, and could not be changed
under wireless energy-saving mode.
Report Rate Showing
4
This is for showing USB report rate. Wired mode is
1000Hz, wireless gaming mouse mode is 500Hz, and
wireless energy-saving mode is 250Hz
Other settings
5
This is for on/off settings of charging dock indicator,
and needle or focus mode of scrolling wheel
1413
Page 10

Setting switching
Driver could reserve two modes, different button functions
and dpi content could be set under different modes
The name of mode could be revised as per your favorite by
double clicking, as below:
If you want to back to reset mode, click “reset” button, then
click “apply” or “confirm”.
How to switch:
1. Single click mouse icon by right button, the name of
modes arise
Settings steps:
Driver settings steps:
1. Set the contents by your demand
2. Click “apply” or “confirm”
3. Leave your hand from mouse for 3-5 seconds
4. Once the light of the mouse is off, the settings are valid
Remark:
1. The mouse has function of reserving profiles. You can still use the
activated set profiles when quit driver or change computer
2. After settings, you must leave your hand from the mouse for 3-5
seconds, otherwise, the settings data could not be sent to mouse, and
the setting would fail.
1615
2. Under driver window, click the accordant name, then
click “apply” or “confirm”
Page 11

1, Changes o r mo di fi ca ti on s not expressly app roved by t he
par ty responsib le f or c om pl ia nce could void th e us er 's
authorit y to ope ra te t he e qu ip me nt
,
2 NOTE: T hi s eq ui pm en t has been tested and fou nd t o
comply wit h th e li mi ts f or a C lass B digita l de vi ce , pu rsuant
to Part 15 of t he F CC R ul es . Th es e li mits are
designed to provide reason ab le p ro te ct io n ag ai ns t harmful
interf er en ce i n a re si de nt ia l installat io n. T hi s eq ui pment
generates, u se s an d ca n ra di at e ra dio freq uency
energ y and, if not i ns ta ll ed a nd u se d in accordance wit h th e
instruct io ns , ma y ca us e harmful inter fe re nc e to r ad io
communic at io ns . Ho we ve r, th ere is n o gu ar an te e
that inter fe re nc e wi ll n ot occur in a par ti cu la r install at io n. I f
this equip me nt d oe s ca us e harmful inter fe re nc e to r ad io o r
tel evision recep ti on , wh ic h ca n be d etermined
by turning t he e qu ip me nt o ff a nd o n, t he u ser is
encourag ed t o tr y to correct the in terf er en ce b y on e or
more of t he f ol lo wing measures:
-- Re or ie nt o r re lo ca te t he r ec ei ving antenna.
-- Increase the separati on b et we en t he
equipmen t an d re ce iv er.
-- Connect the e qu ip me nt i nt o an o utlet on a
circu it different
fro m th at t o wh ich the re ceiver is con ne ct ed .
-- Consult the d ea le r or a n ex pe rienced r ad io /T V
tec hnician f or h el p.
1817
 Loading...