

Page 1
g
G-PLAY Installation Guide
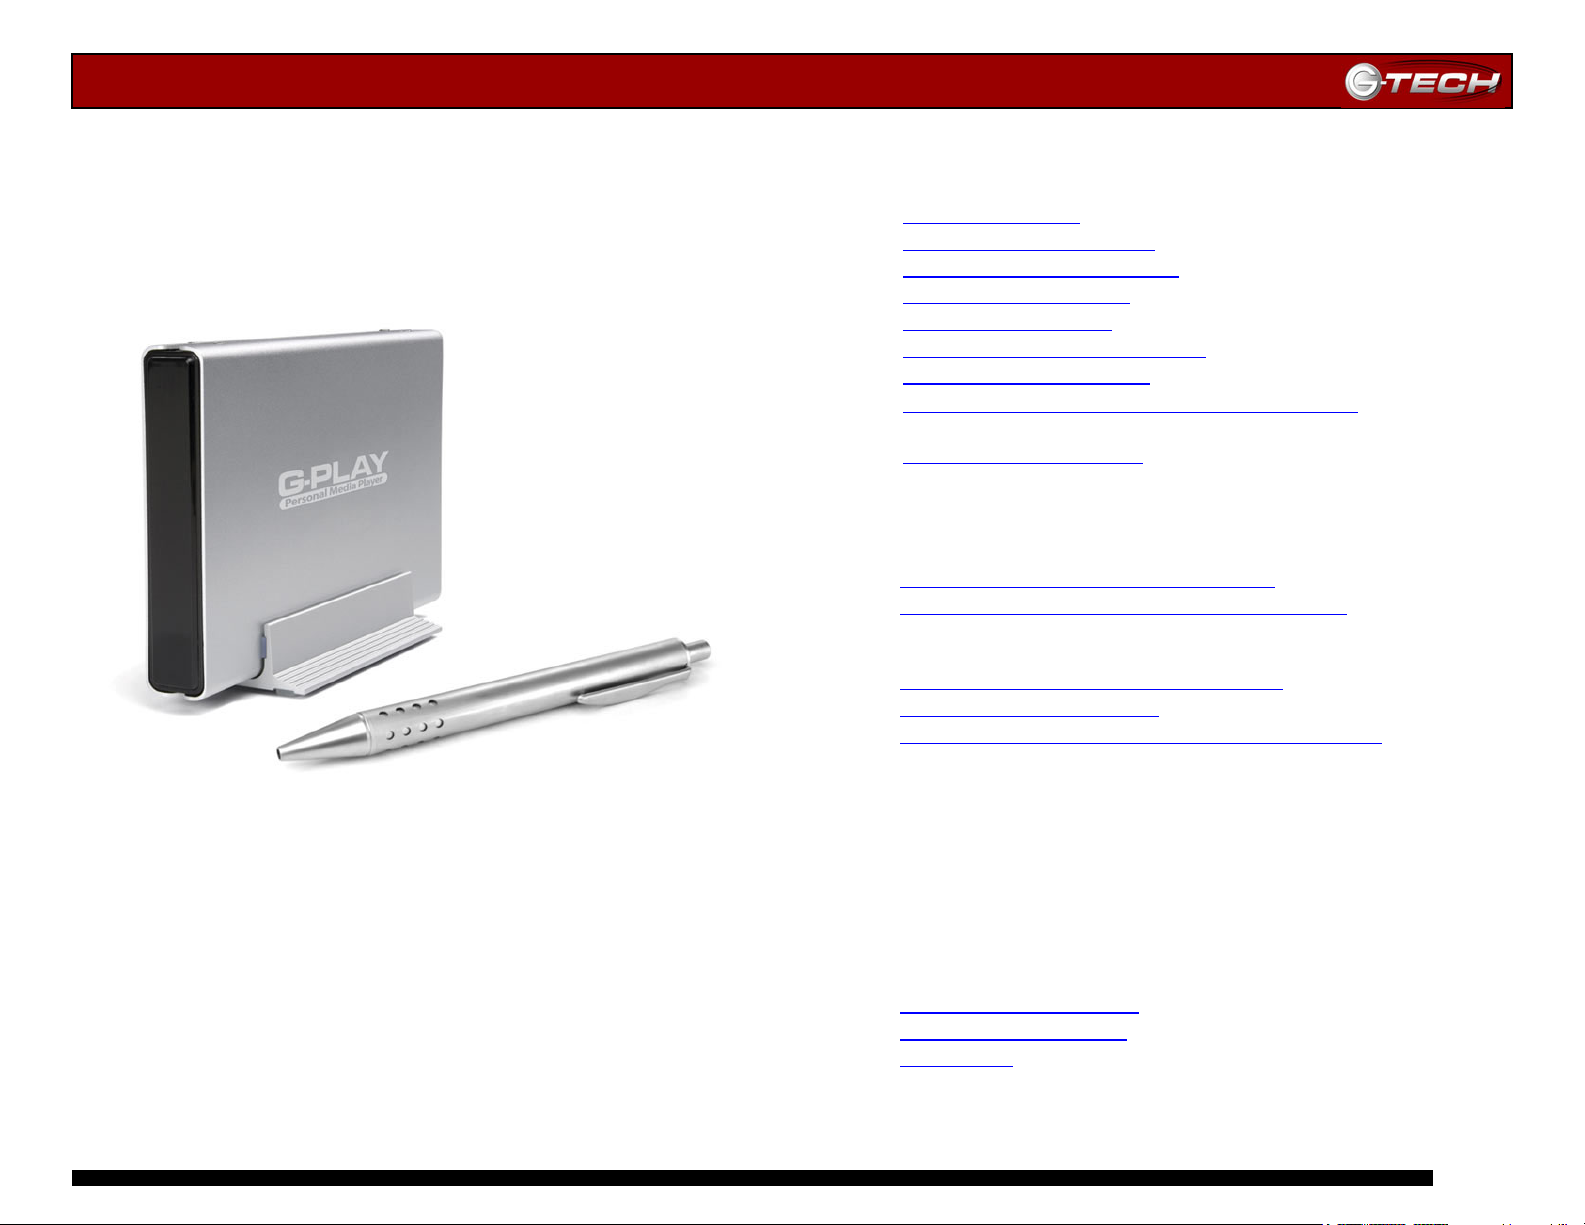
G-PLAY™
Installation Guide
G-Technology Inc.
Tel: (310) 449-4599
Fax: (310) 449-4670
P/N GP0605 RevA
TABLE OF CONTENTS
1. INTRODUCTION
2. SAFETY PRECAUTIONS
3. SYSTEM REQUIREMENTS
4. WHAT’S IN THE BOX
5. G-PLAY OVERVIEW
6. SUPPORTED FILE FORMATS
7. SUPPORTED OUTPUTS
8. ATTACHING G-PLAY TO YOUR COMPUTER
8.1 Connecting the Power Boost Adapter
9. INITIALIZING G-PLAY
9.1 Mac OSX (10.4)
9.2 Creating the Required File Folders on G-PLAY – Mac OSX
9.3 Windows 2000/XP
9.4 Creating the Required File Folders on G-PLAY – Windows
10.LOADING G-PLAY WITH CONTENT
11.UNMOUNTING/DISCONNECTING G-PLAY
11.1 Mac OSX Computers
11.2 Windows Computers
12.CONNECTING G-PLAY TO YOUR TV
13.THE REMOTE CONTROL
14.NAVIGATING THE G-PLAY USER INTERFACE
14.1 Movies Menu
14.2 Music Menu
14.3 Pictures Menu
14.4 Language Settings Menu
14.5 Audio Settings Menu
14.6 Video Settings Manu
14.7 TV Type Menu
14.8 Screen Saver Menu
14.9 Firmware Update Menu
14.10 DivX VOD Menu
15.TECHNICAL SUPPORT
16.LIMITED WARRANTY
17.APPENDIX
e 1
Pa
Page 2
g
G-PLAY Installation Guide
e 2
Pa
Page 3
g
G-PLAY Installation Guide
e 3
Pa
Page 4
g
G-PLAY Installation Guide
1. INTRODUCTION
Thank you for purchasing G-PLAY™ from G-Technology, Inc.
(G-Tech)! G-PLAY from G-Tech enables you to enjoy your
favorite movies, personal videos, music and digital photos
wherever you go. Simply copy content from your computer to
G-PLAY via the built-in USB interface and instantly play it on
any TV! With G-PLAY you can create your own virtual DVD,
music and photo libraries*. G-PLAY also doubles as a USB
hard drive for your data files.
*Respect intellectual property rights. Don’t steal music or movies!
2. SAFETY PRECAUTIONS
The disk drive contained in your G-PLAY is a delicate
electronic instrument and is susceptible to damage due to
excessive physical shock. Place the unit in a vented area away
from moisture or liquids. Please handle the unit with care. Do
not open the case. Doing so will void the warranty. If the
product is returned with damage caused by improper
handling, the warranty will be void and liability will rest with
the user.
3. SYSTEM REQUIREMENTS
USB 1.1/2.0 equipped computer
• Mac OS 9.x or OS X
• Windows 2000 or Windows XP
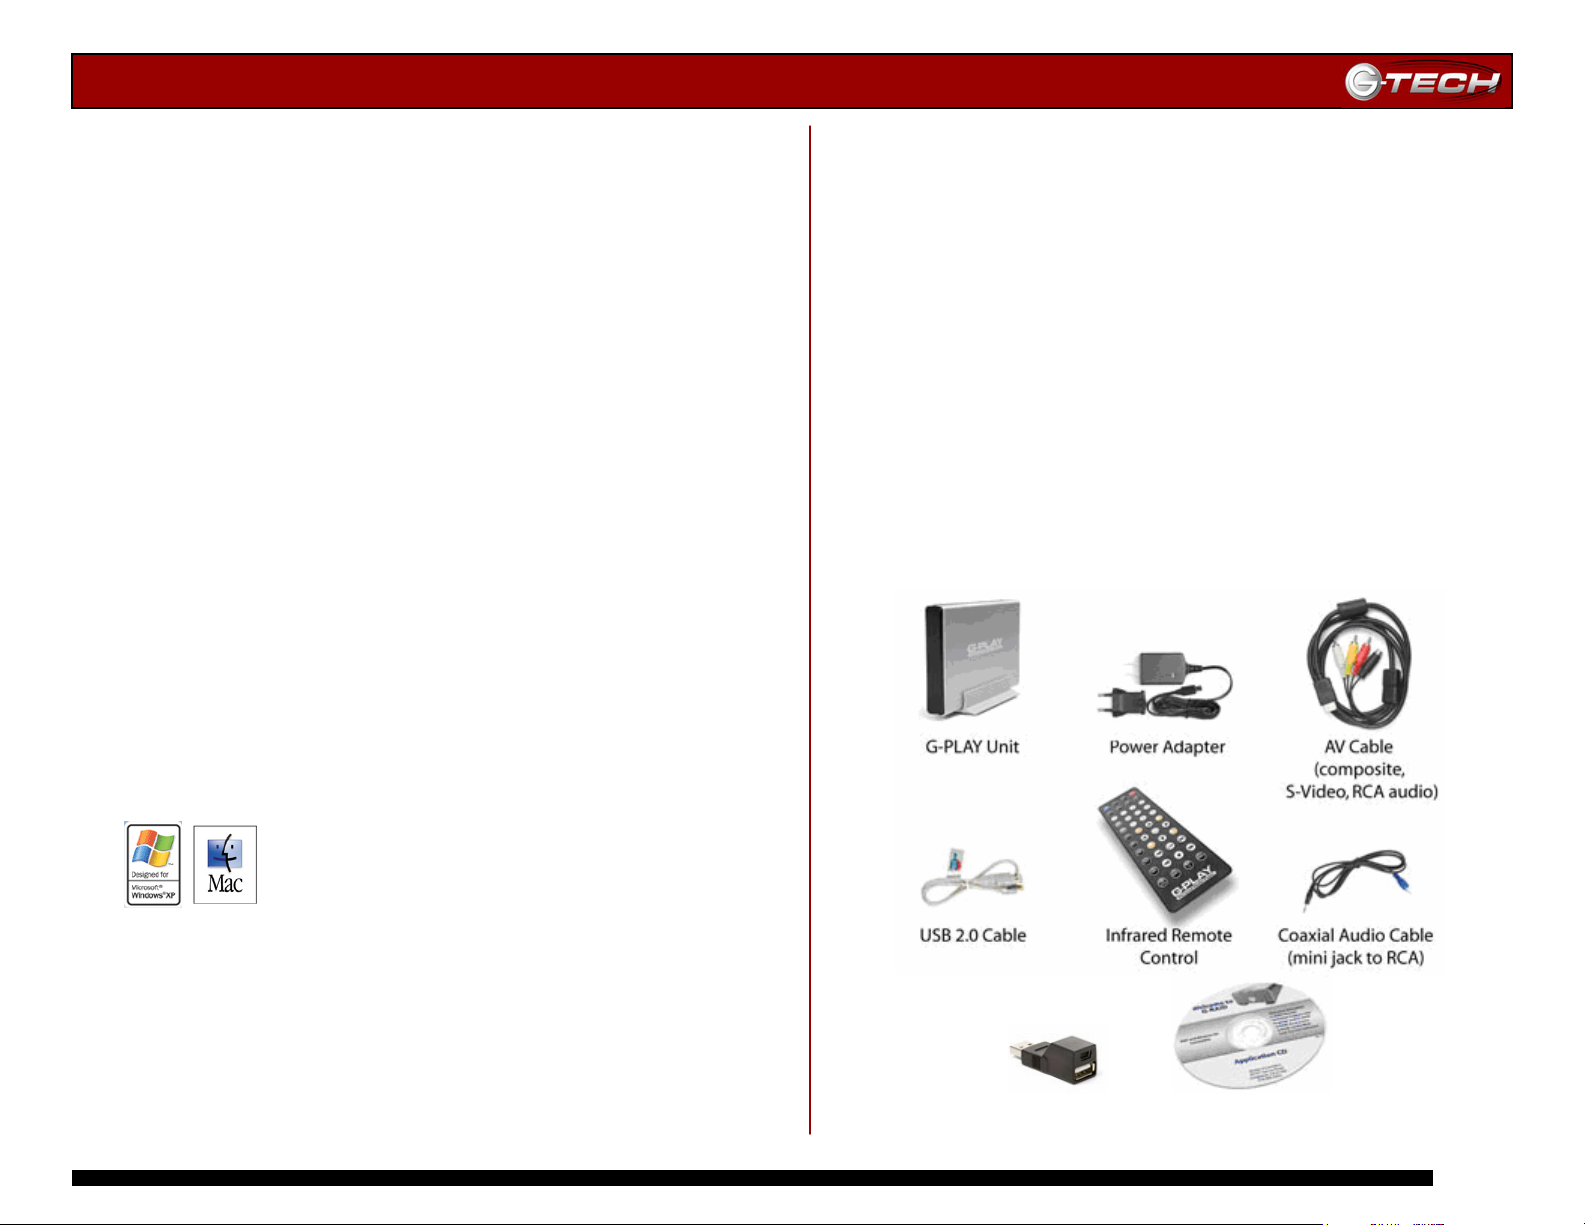
4. WHAT’S IN THE BOX
Take a moment to ensure that the following items are
included in the box. If anything is missing, please call G-Tech
at (310) 449-4599. Please keep the shipping container and
packing materials. In the unlikely event that you need to
return G-PLAY to us for any reason, you must use the
G-Tech shipping container. If the product is returned
damaged caused by improper packaging, the warranty will be
void and liability will rest with the user.
G-PLAY:
• G-PLAY personal media player
• Power adapter
• AV cable
• USB cable
• Infrared remote control
• Coaxial audio cable
• USB power boost adapter
• CD installation guide
USB Power Boost
Adapter
CD Installation Guide
e 4
Pa
Page 5
g
G-PLAY Installation Guide
5. G-PLAY OVERVIEW
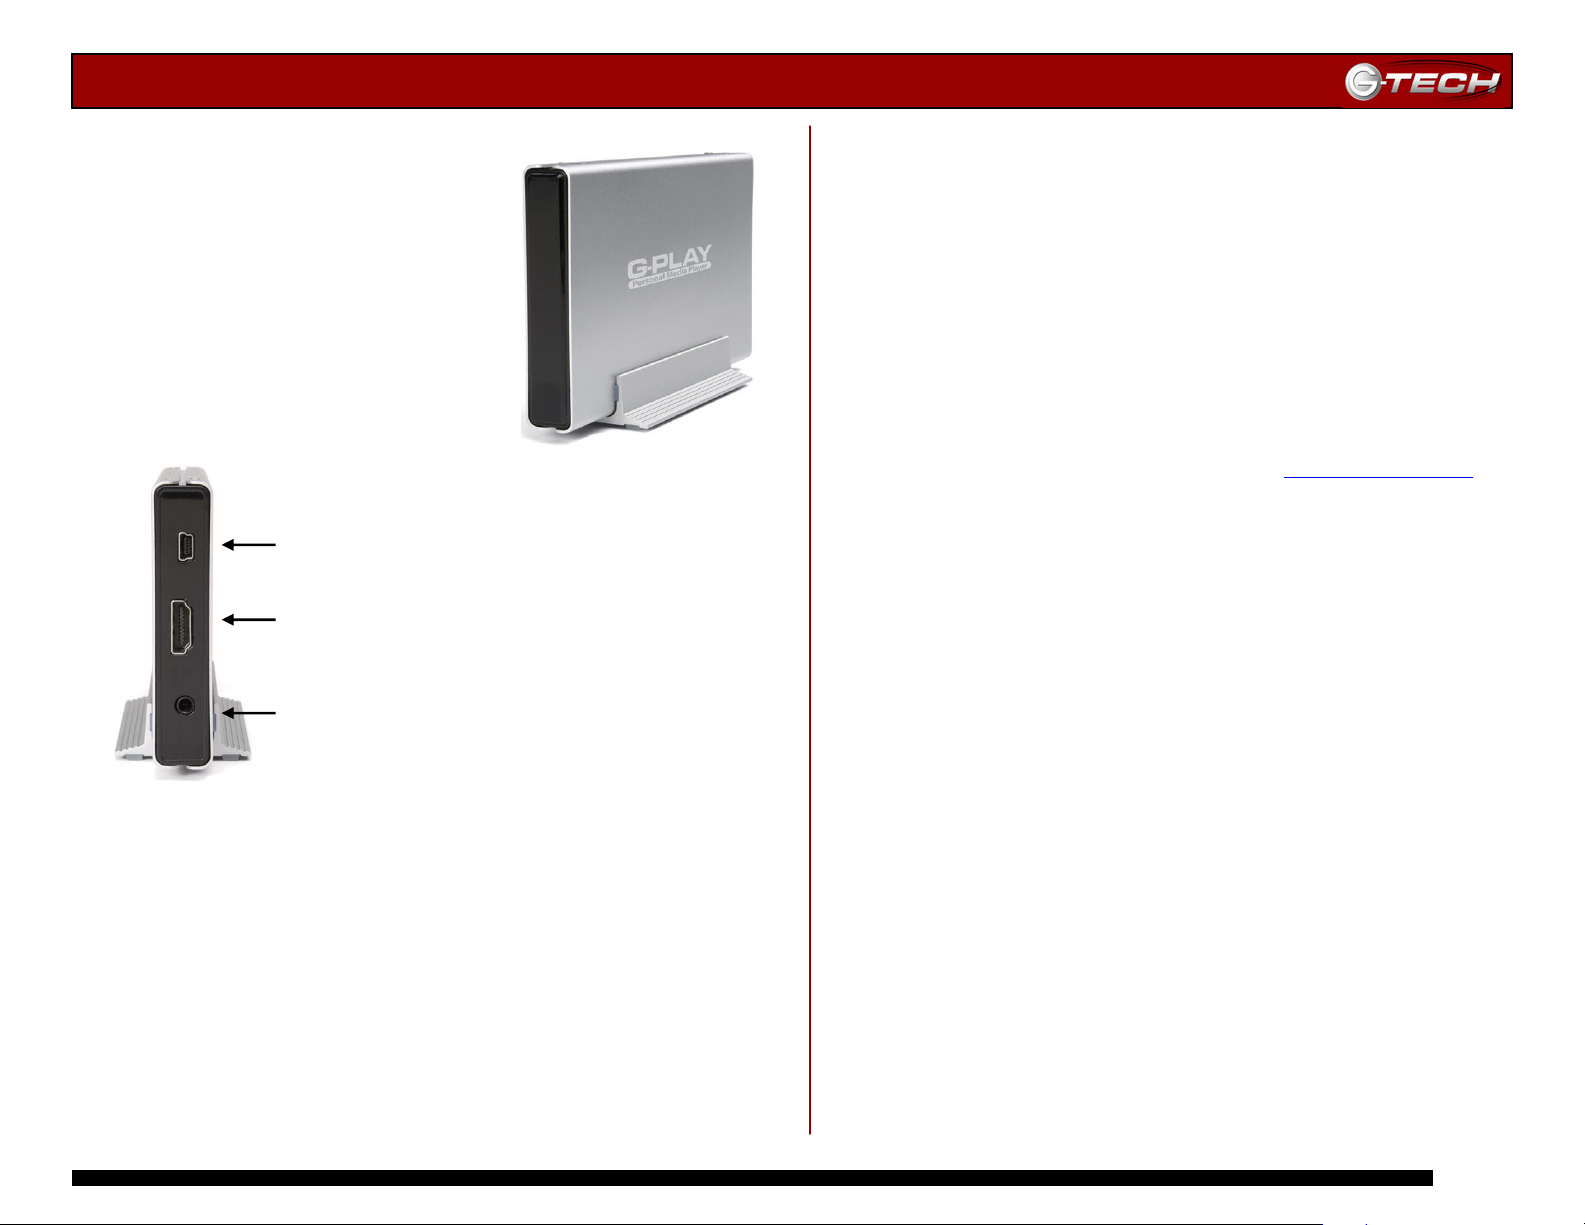
Behind the front panel of G-PLAY are
an infrared receiver and Bi-Color LED.
When attached to a computer via the
USB port, this LED is green to
indicate power and green/yellow
when media is being transferred to
the unit. When attached to a TV, the
LED is green to indicate power and
flashes yellow when receiving a
command from the remote control.
USB 2.0 Port
AV Multi-Connector
Optional SPDIF Connector
USB 2.0 Port – When connected to your Mac or PC, this
port provides power to G-PLAY and is used to transfer
media (audio, video, DVDs and images) to the unit. This
port is also used to power G-PLAY when playing back
content on a TV/Monitor.
AV Multi-Connector – This connector provides the video
and audio output signals to your TV/Monitor. The
standard AV cable that ships with G-PLAY provides
Composite and S-Video output and analog stereo audio.
SPDIF – Optional digital audio connector
The following optional AV cables are available for
purchase:
Component – YPbPr connection to high-end TV/HDTV’s
VGA – for connection to CRT/Flat Panel monitors
SPDIF – digital audio cable for Dolby Digital or DTS home
theater systems
SCART – for connection to European TV’s
You can purchase any of the cables described above by contacting
G-Tech Sales at (310) 449-4599 or online at www.g-technology.com
.
6. Supported File Formats
Video: MPEG-1 (AVI, MPG), MPEG-2 (AVI,VOB), ISO*,
MPEG-4 (AVI, DivX, DivX VOD, XviD)
*Your personal DVDs can be copied to G-PLAY in ISO format. These files
can be played from G-PLAY at full DVD quality and with full DVD functions
including:Menus, Chapter selection, Audio stream selection, Subtitles, Fast
Forward, Fast Rewind, Slow, Pause, Step Forward, Repeat, and Search.
Audio:WAV, MP3, MPEG-4 (AAC),WMA,AC3,Ogg Vorbis
7. Supported Outputs
Video: NTSC/PAL Composite and S-Video, Analog YPbPr
(progressive or interlaced) scalable up to 1920x1080i or
1280x720p, SCART RGB,VGA (up to 1024x768)
Audio: Dual Stereo analog audio, coaxial and optical SPDIF
digital audio (supports compressed Dolby Digital 5.1 and
DTS pass through)
e 5
Pa
Page 6
g
G-PLAY Installation Guide
8. Attaching G-PLAY to Your Computer
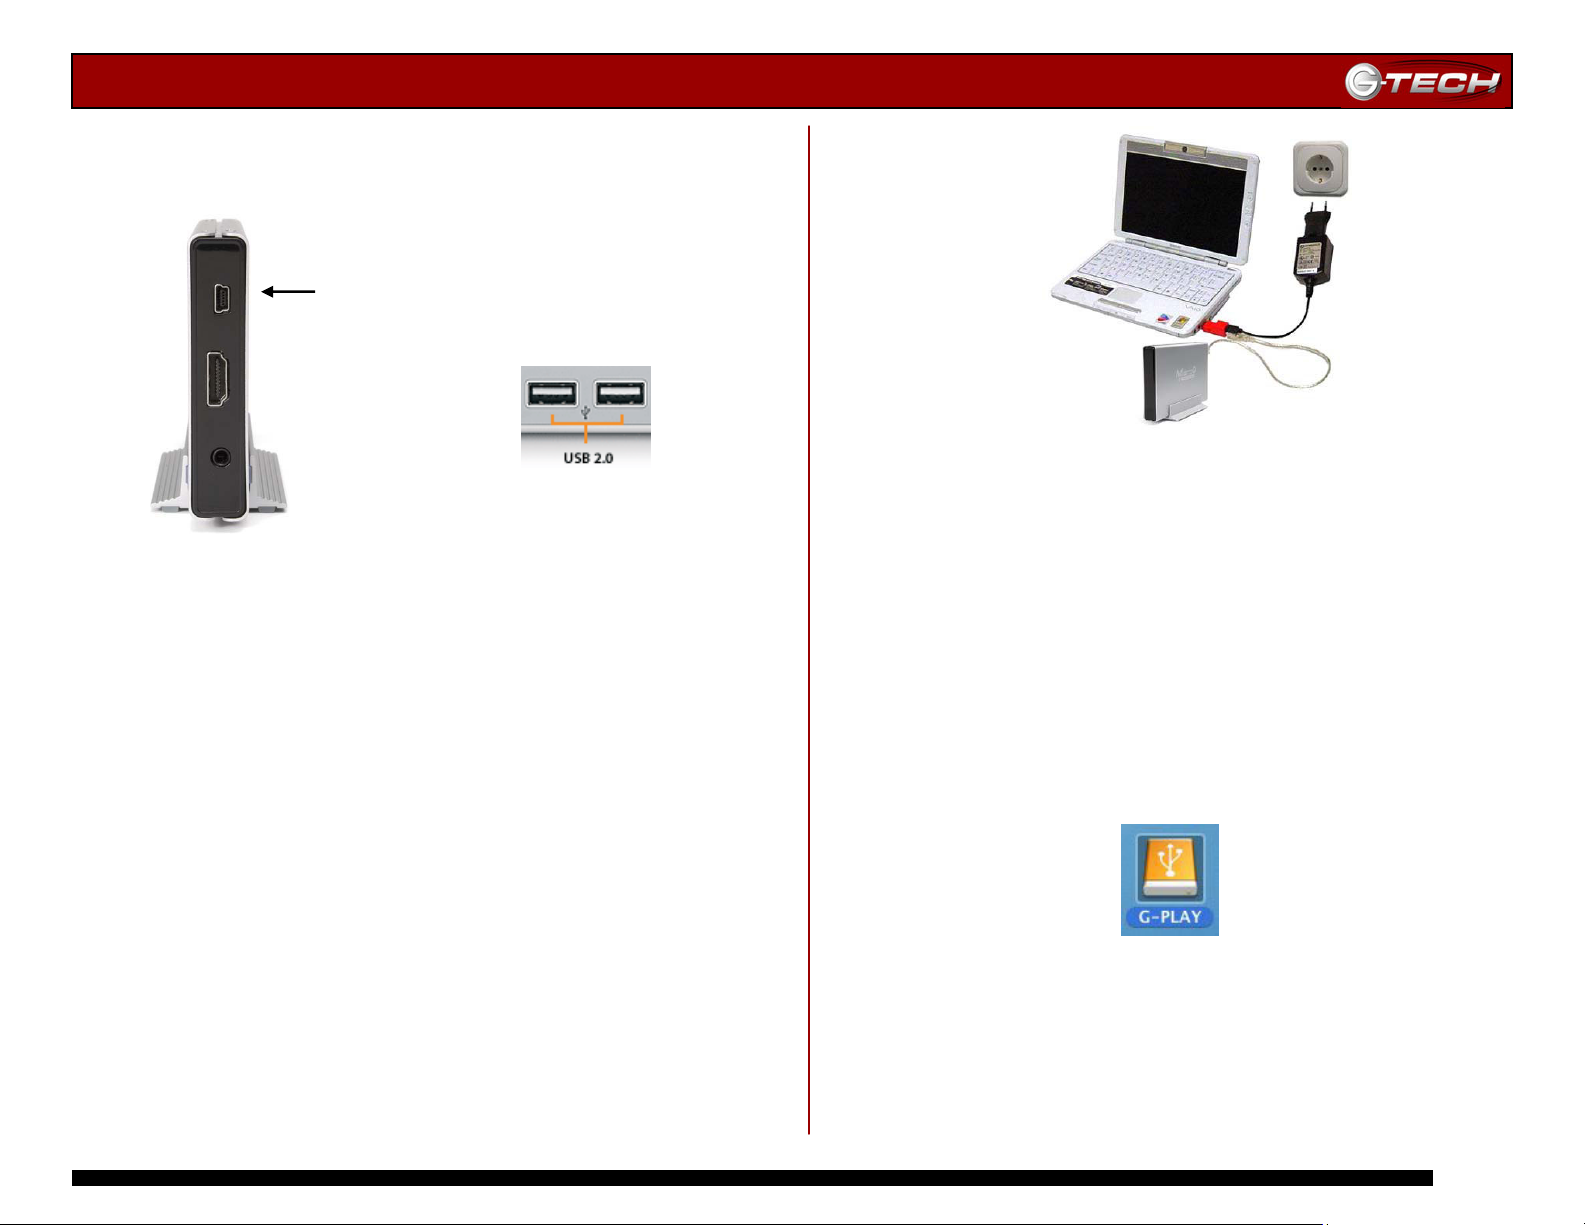
1. Attach the supplied USB cable to USB port located on the
back of G-PLAY as shown below.
USB 1.1/2.0 Port
2. Attach the other end of the cable to a USB 1.1/2.0 port
on your computer as shown above.
8.1 Connecting the Power Boost Adapter
G-PLAY should power on automatically after the USB cable is
connected. If G-PLAY does not power on, follow the directions
below to utilize the included USB Power Boost Adapter.
1. Connect the Power Boost adapter to an available USB
port on your computer.
2. Connect G-PLAY to the Power Boost Adapter using the
included USB cable.
3. Plug the USB power adapter in to an electrical outlet and
then connect it to the Power Boost Adapter.
Connection diagram for the optional Power Boost Adapter
9. INITIALIZING G-PLAY
Now that G-PLAY is connected to your computer, it must be
initialized for use with your operating system.
• For Mac OS X installations, follow the instructions below
• For Windows 2000/XP installations, proceed to
9.1 Mac OS X (10.4)
G-PLAY is initialized at the factory as an HFS+ Mac OS X
volume. Power on G-PLAY. G-PLAY will mount on the
desktop as shown below.
Section 9.3
e 6
Pa
Page 7
g
G-PLAY Installation Guide
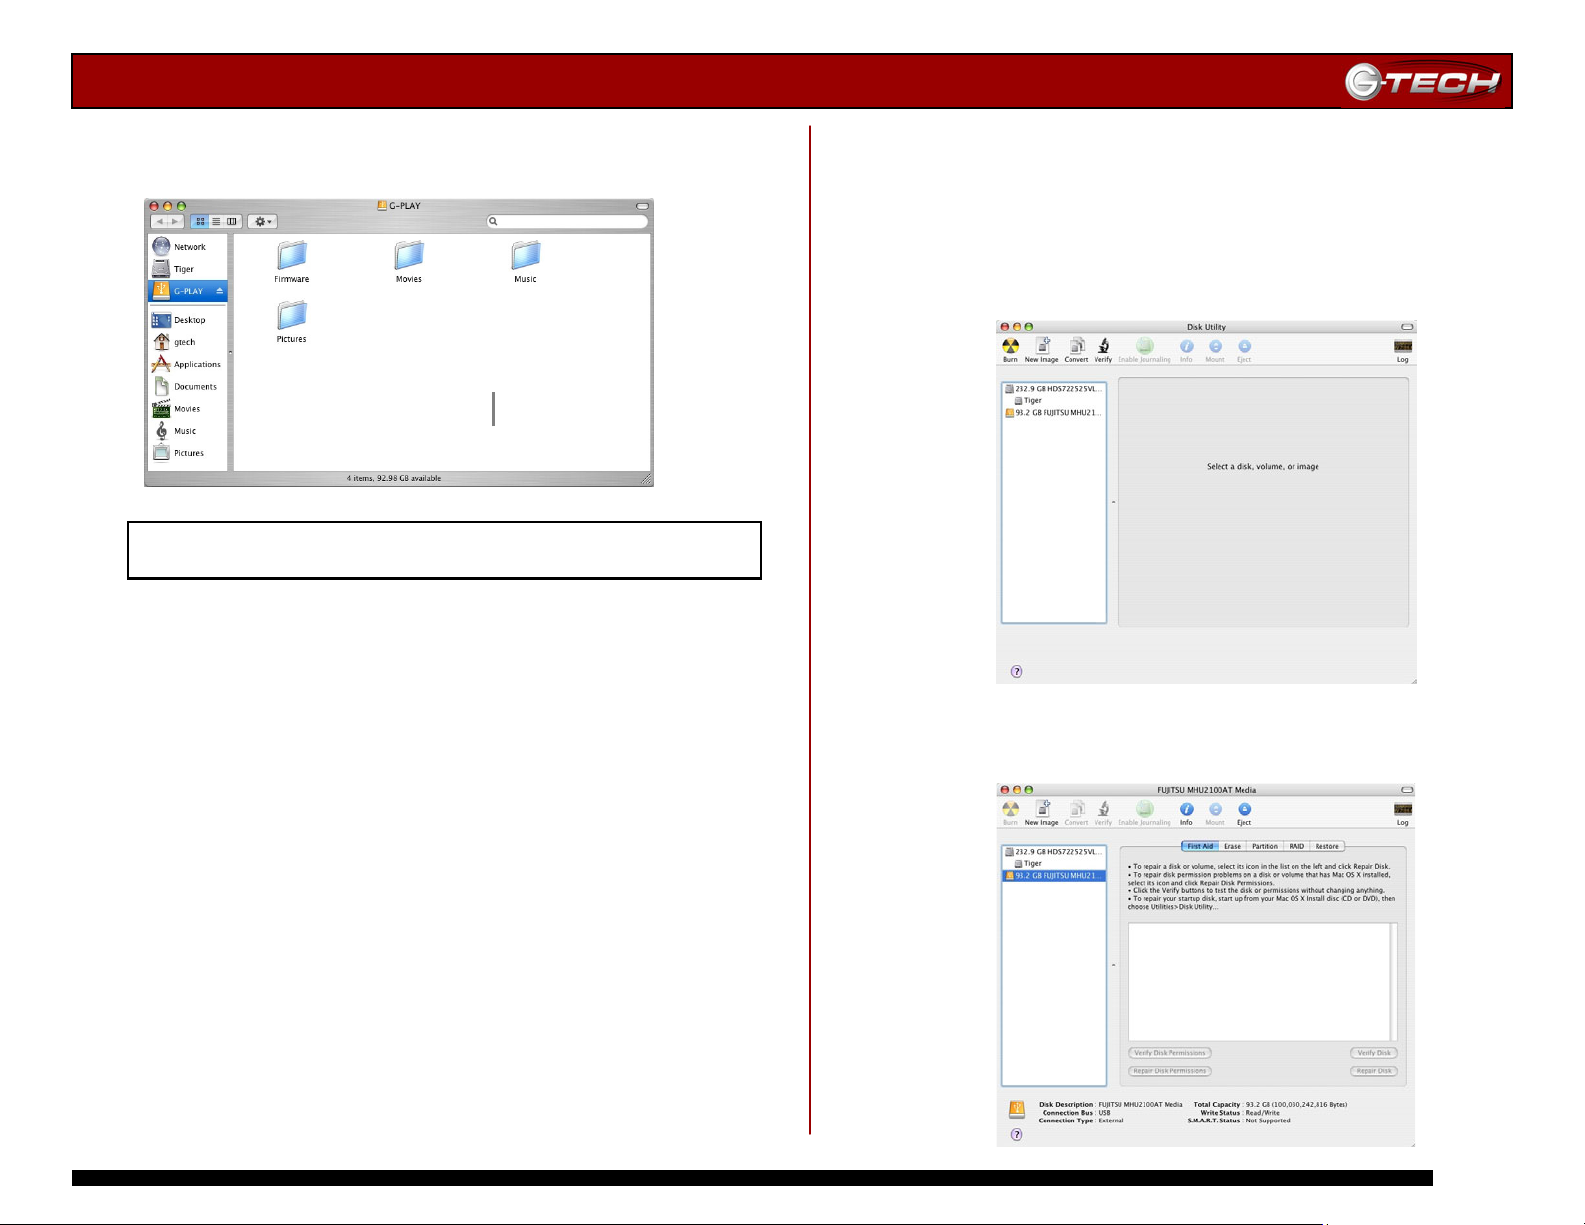
Four folders have been created on G-PLAY at the factory.
These folders are shown below:
Proceed to Section 10 – Loading G-PLAY with Content
If it becomes necessary to re-initialize G-PLAY for
Mac OS X, follow the instructions below.
1. Open the Apple Disk Utility. The Apple Disk Utility is in
the Utilities Folder located in the Applications Folder on
the Macintosh HD. A window like the following will appear.
G-PLAY will be displayed in the left-hand column.
2. Select G-PLAY by clicking on the entry in the
left-hand column as shown below.
e 7
Pa
Page 8
g
G-PLAY Installation Guide
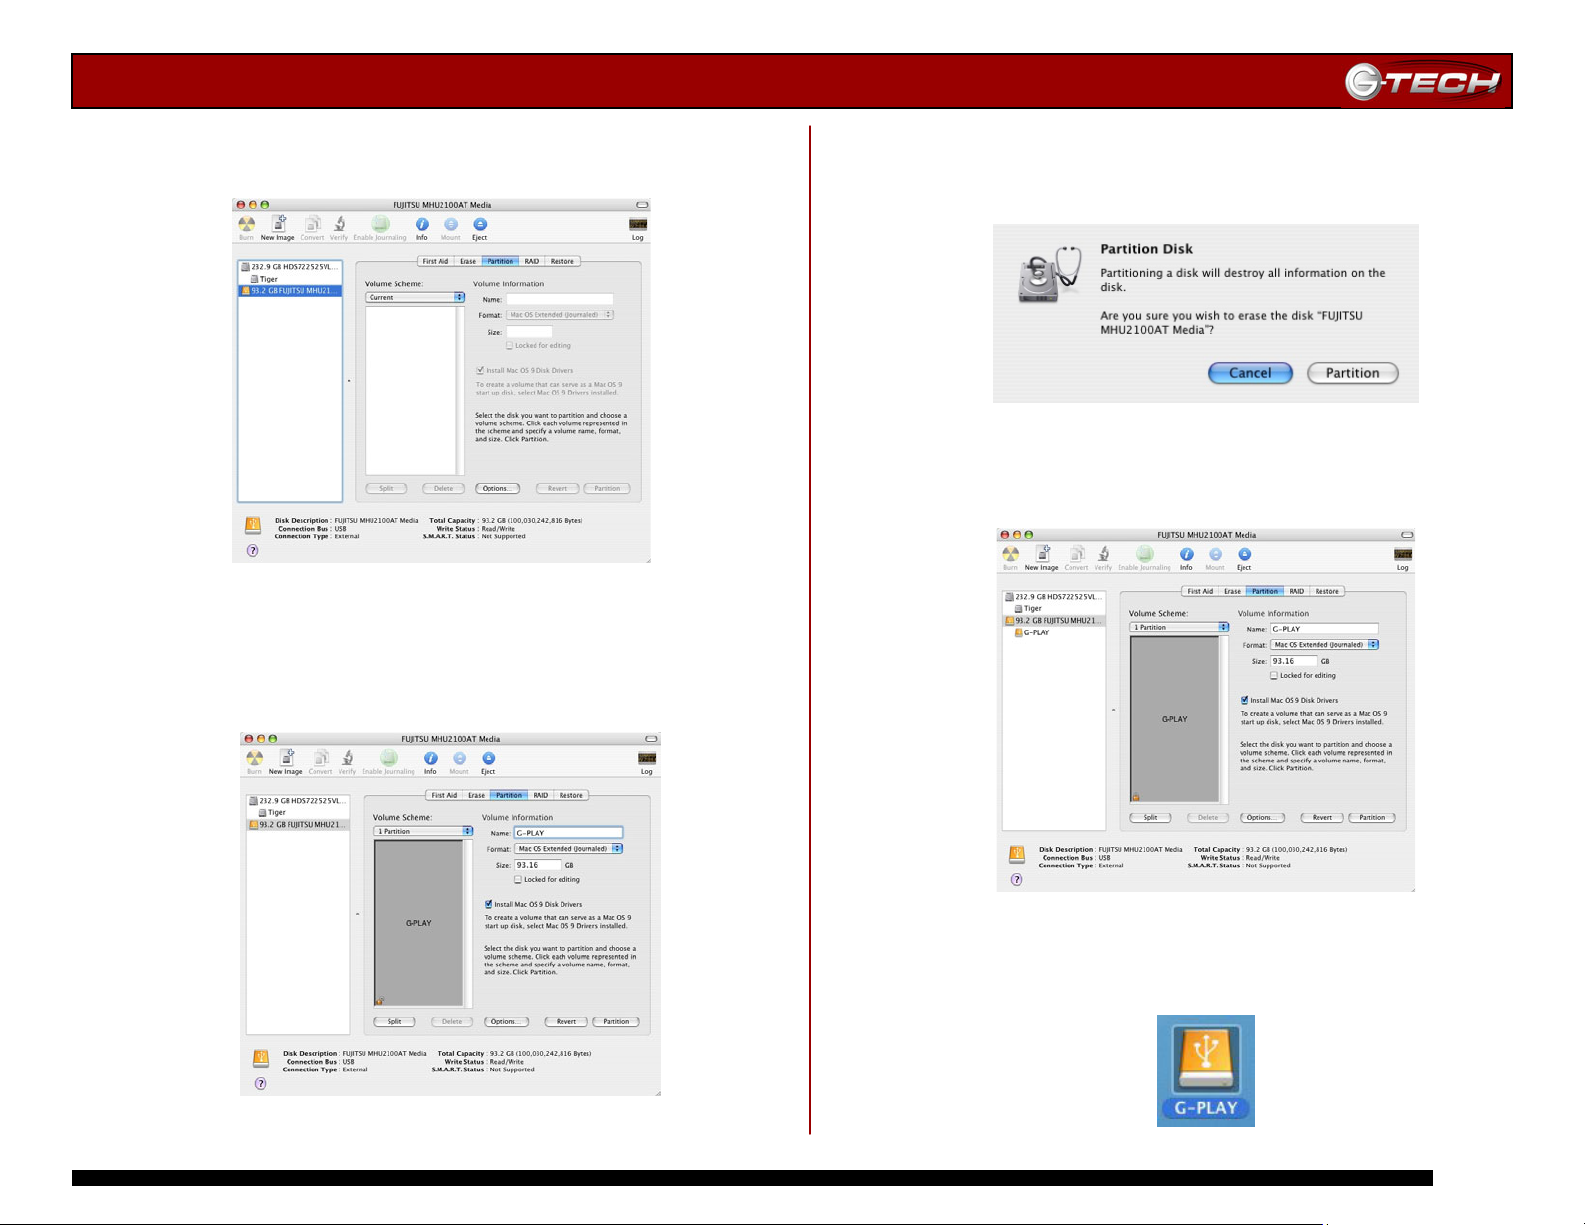
3. Select the Partition tab to view the partition options as
shown below.
4. Set the Volume Scheme: to 1 Partition. Enter a Volume
Name: under Volume Information (in this example,
G-PLAY) and set format to Mac OS Extended as shown
below.
5. Click on the <Partition> button. The dialog box shown
below will appear. Click on the <Partition> button to
continue.
6. When partitioning is complete, G-PLAY will be displayed
in the left-hand panel as shown below.
7. Exit the Apple Disk Utility.
8. G-PLAY will be displayed on the desktop as shown below.
e 8
Pa
Page 9
g
G-PLAY Installation Guide
9.2 Creating the Required File Folders on G-PLAY
Mac OS X
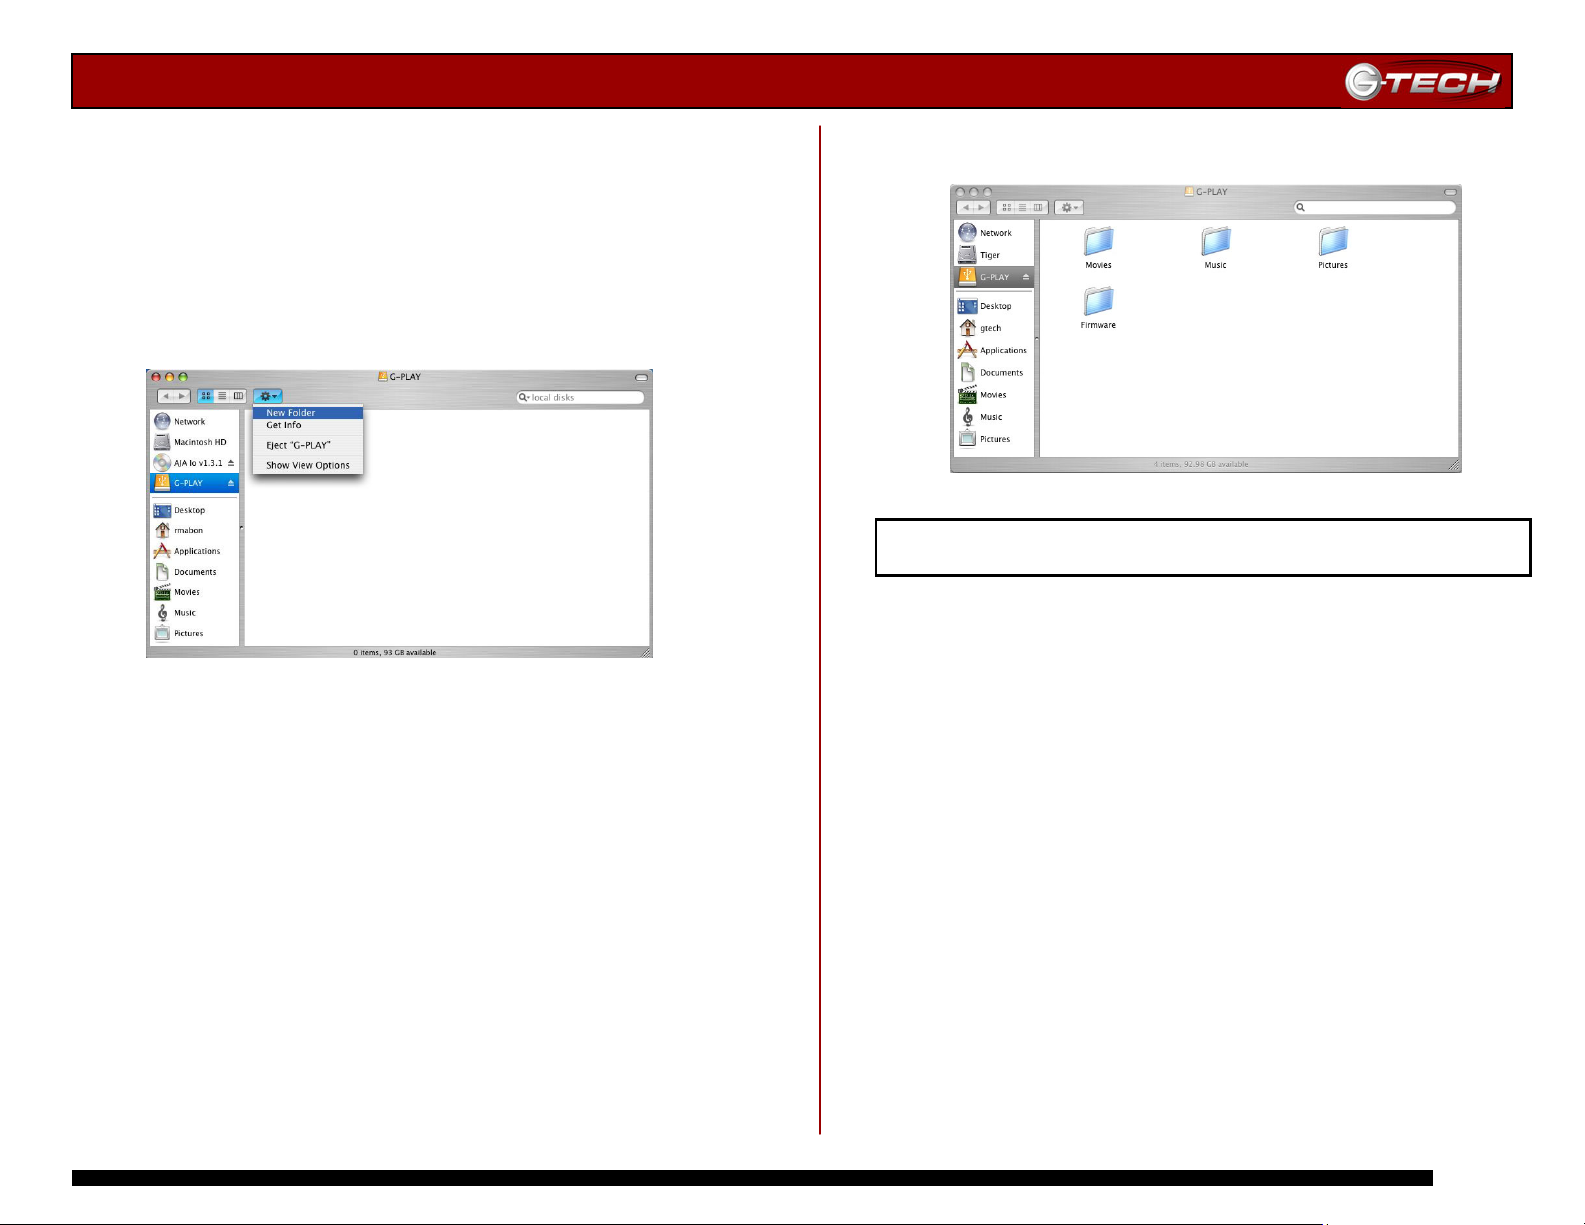
Now that G-PLAY is initialized, four folders must be created
to store the various types of media files.
1. Double click on the G-PLAY icon.
2. Click on the “Gear” symbol and select New Folder as
shown below.
3. Name the new folder Firmware.
4. Repeat the above steps and create three additional new
folders with the following names…
• Movies
• Music
• Pictures
Note: DO NOT change the names of these folders. G-PLAY uses
these exact names to locate files. These folders can be
customized. For example, the Movies folder can be spilt into
sub-directories with names such as “Action”, “Adventure”, etc.
The Music folder can be spilt into “Rock”, “Classical”, etc.
Note: G-PLAY can also double as a standard USB hard drive. You
can create another folder (“Data” for example) to store your data
files. This folder will only be visible and accessible when G-PLAY is
attached to your computer.
5. Your G-PLAY should now have the following folders:
Proceed to Section 10 – Loading G-PLAY with Content
e 9
Pa
Page 10
g
G-PLAY Installation Guide
9.3 Windows 2000/XP Systems
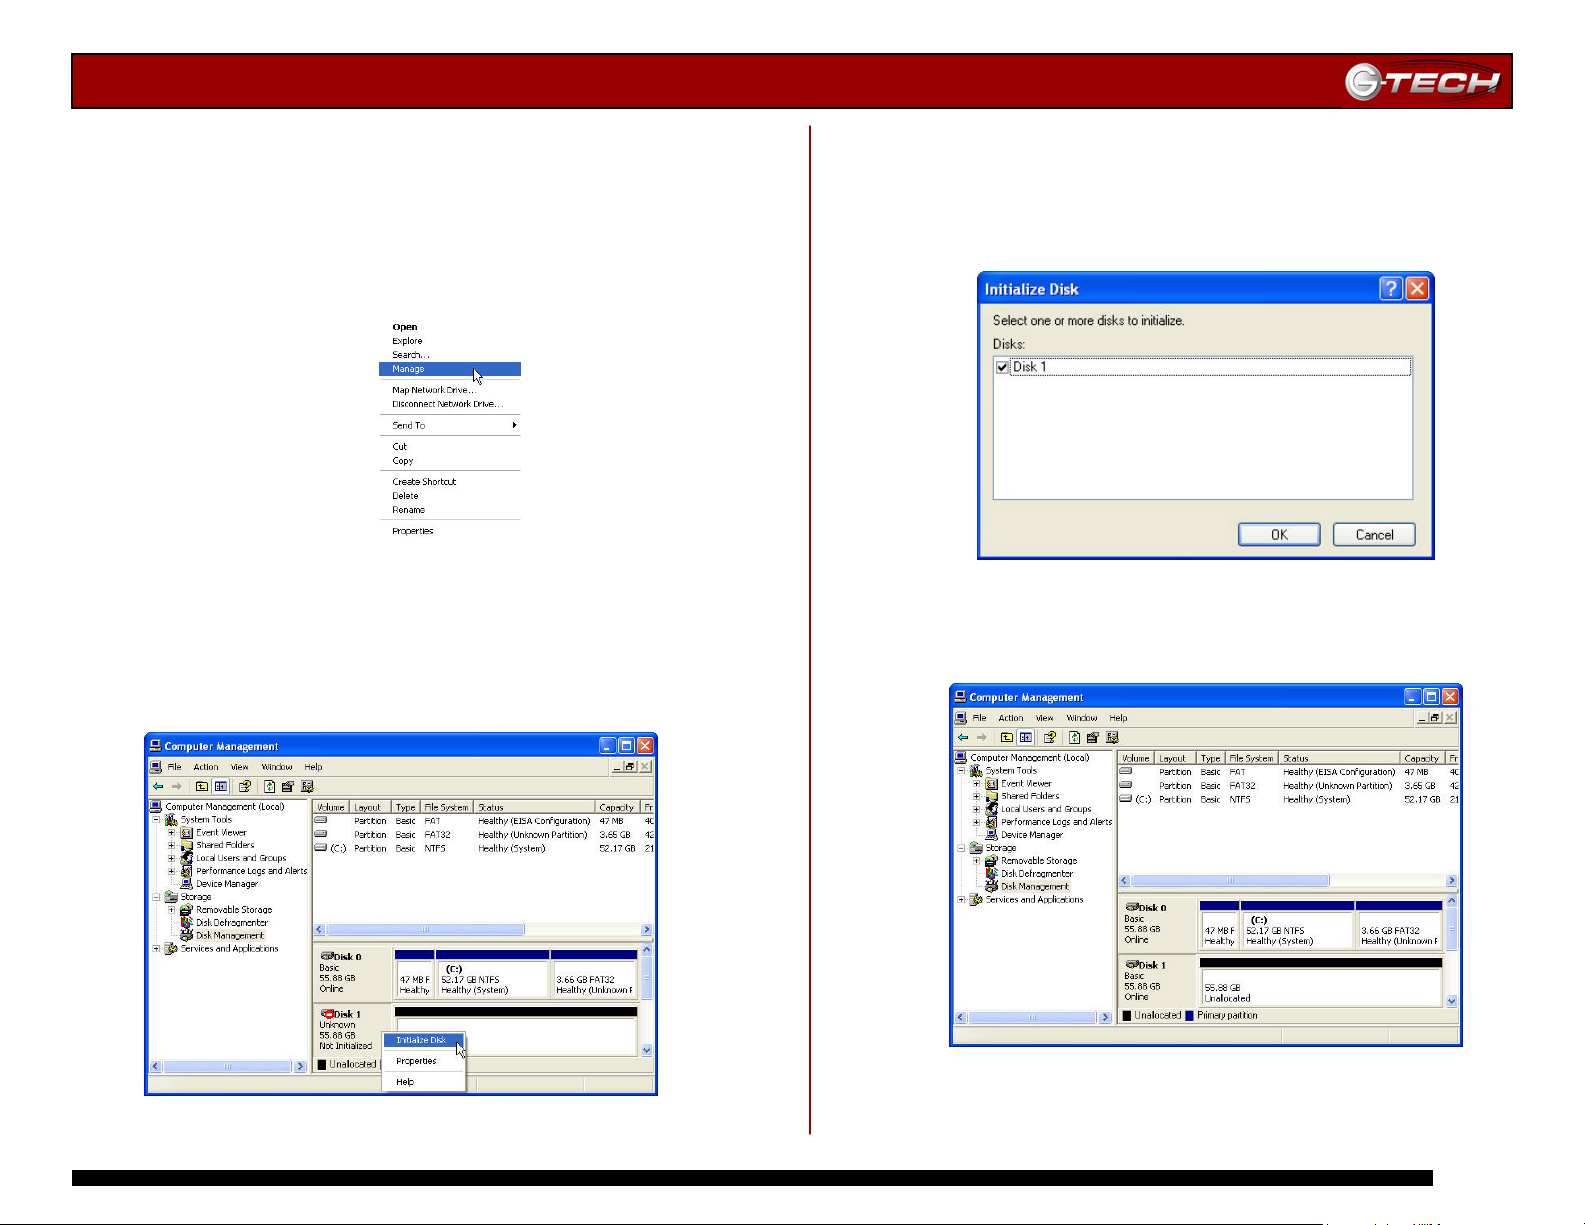
1. Power on G-PLAY, wait 10 seconds, then power on your
computer.
2. Open the Disk Management utility by right-clicking on
the My Computer icon on the desktop and selecting
“Manage” from the drop down menu as shown below.
3. The Computer Management console will appear as shown
below. Click on “Disk Management” in the left-hand panel.
G-PLAY is identified as Disk 1 in this example.
Right click on Disk 1 and select Initialize Disk from the
pull-down menu as shown. The window shown on the next
page will appear.
4. Click on the <OK> button to continue.
5. The following window will appear. G-PLAY (Disk 1) is now
identified as Basic and Online.
e 10
Pa
Page 11
g
G-PLAY Installation Guide
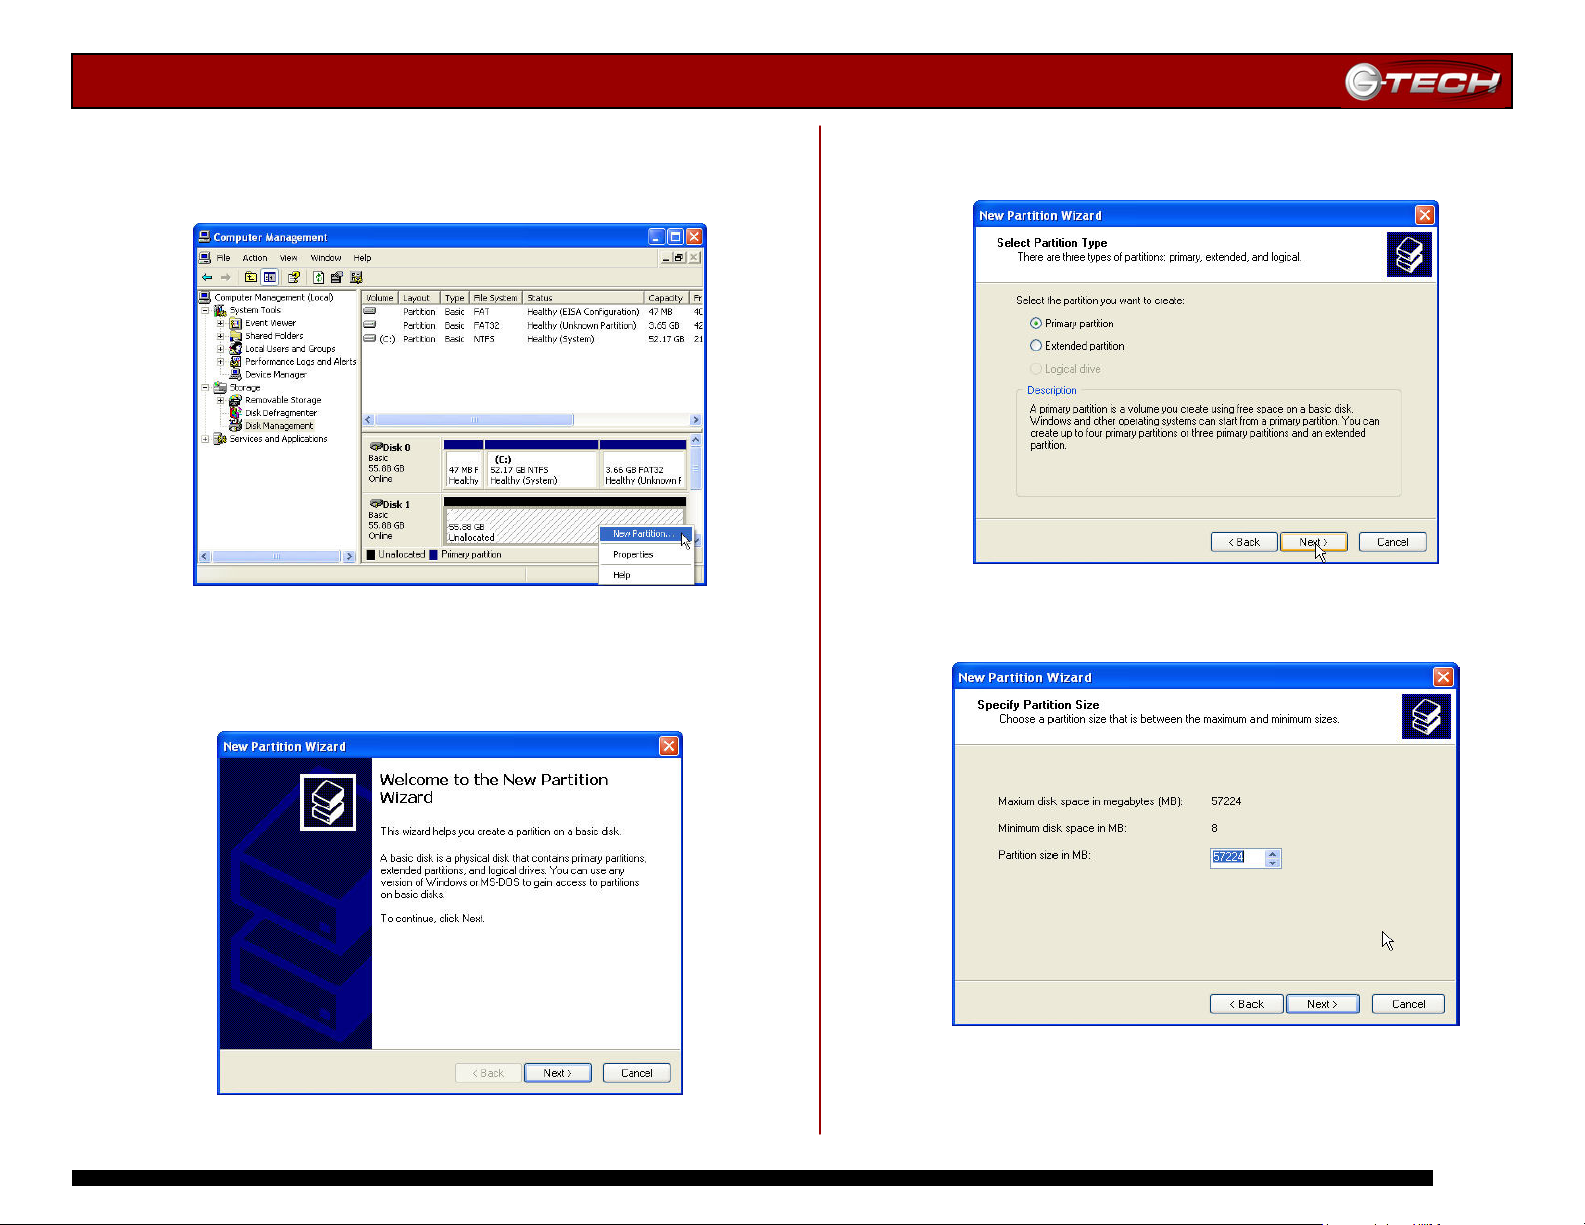
6. Right-click on the Disk 1 “Unallocated” bar entry and
select New Partition… from the pull-down menu as
shown below.
8. The following window will appear. Click on the <Next>
button to continue.
7. The window shown below will appear. Click on the
<Next> button to continue.
9. The window shown below will appear. Click on the
<Next> button to continue.
e 11
Pa
Page 12
g
G-PLAY Installation Guide
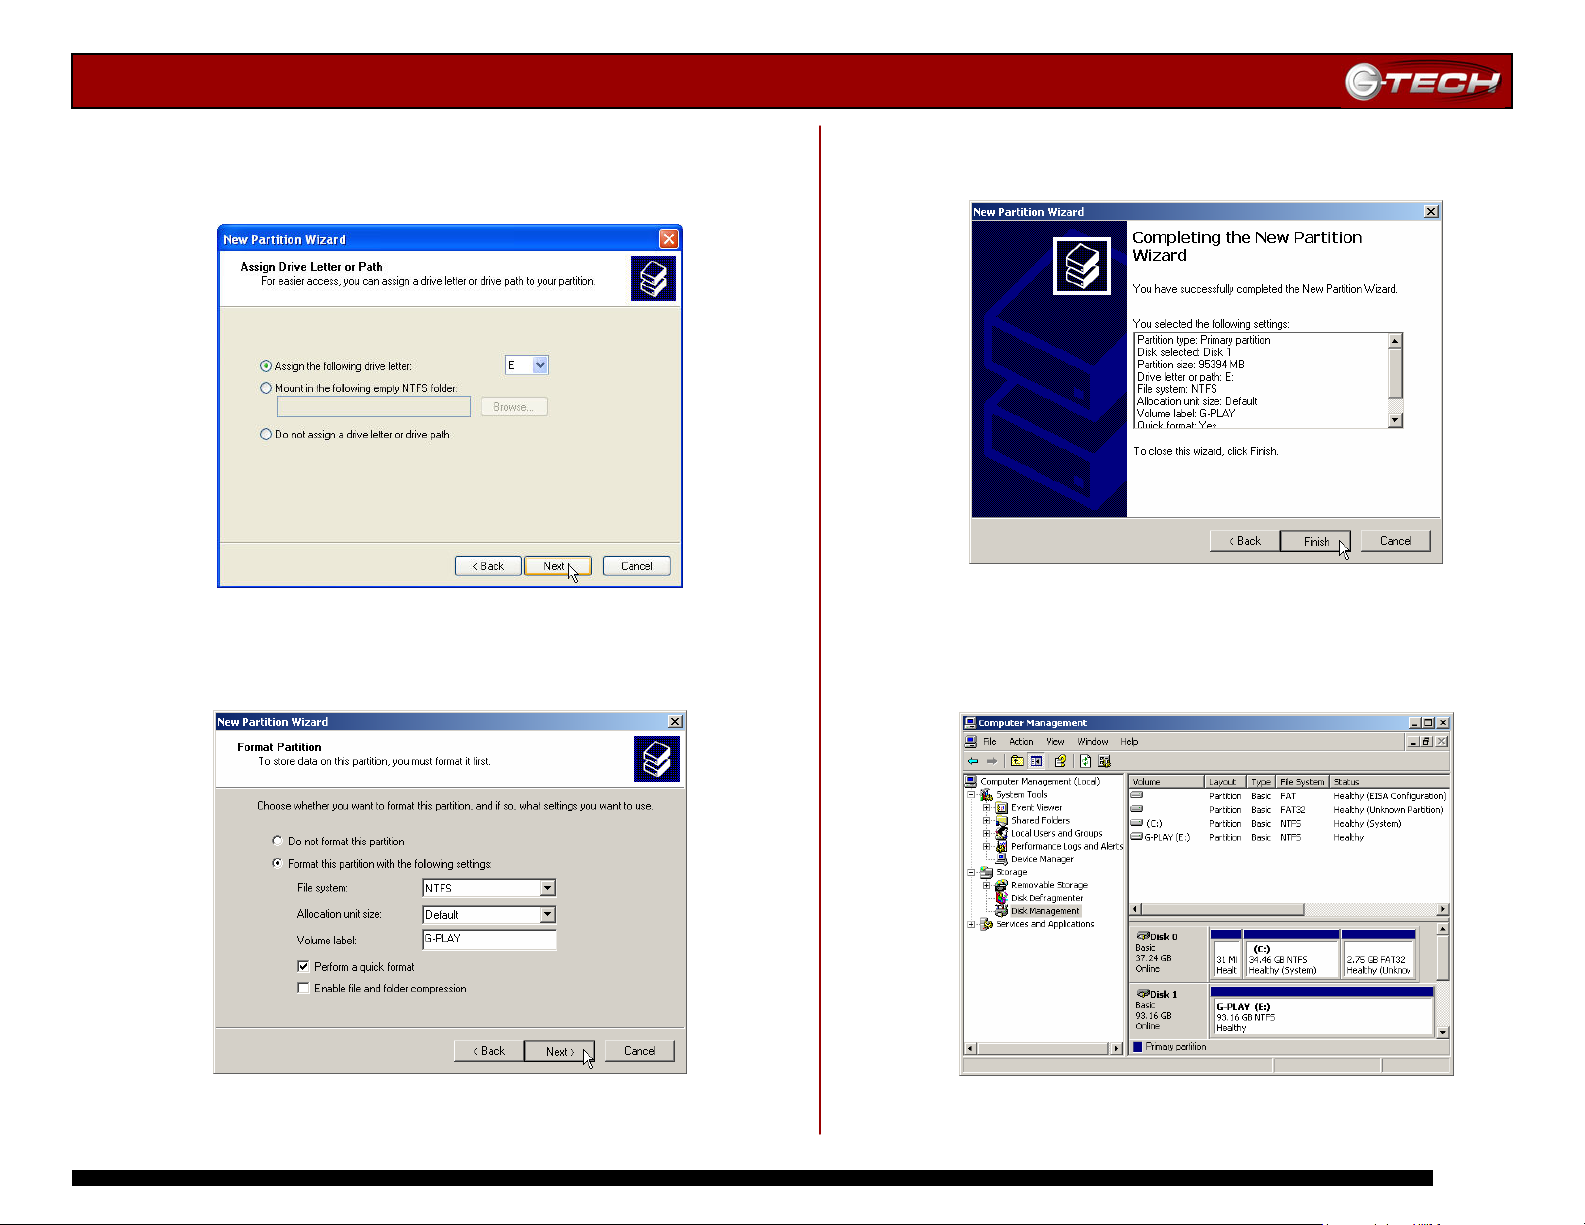
10. Windows will automatically assign a drive letter (in
this example E:). Accept this assignment and click on the
<Next> button to continue.
12. The following window will appear. Click on the <Finish>
button to continue.
11. Enter a Volume Label: (in this example, G-PLAY),
check the Perform a quick format box and click on the
<Next> button to continue.
13. Windows will format the volume and then display the
following window. Disk 1 is now identified as G-PLAY (E:).
Exit the Computer Management console.
Pa
e 12
Page 13
g
G-PLAY Installation Guide
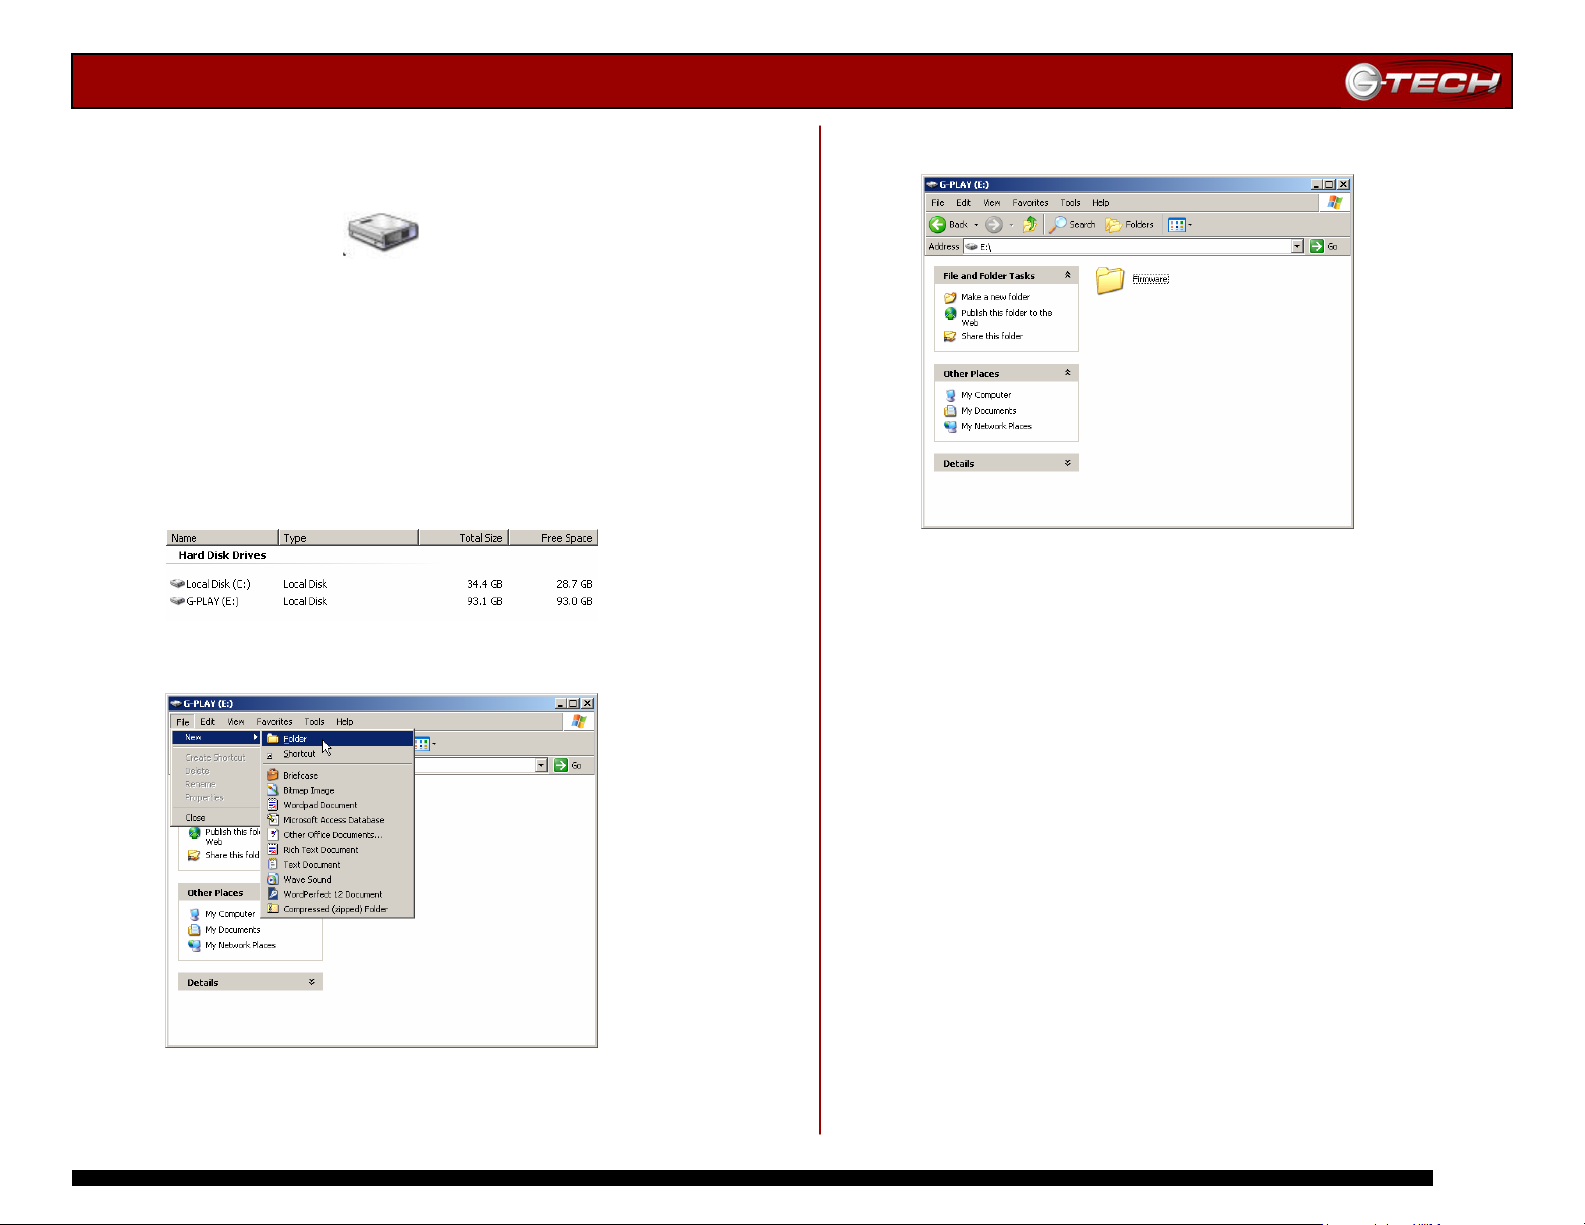
14. G-PLAY will now be displayed as an available hard disk
drive under My Computer as shown below.
G-PLAY (E:)
9.4 Creating the Required File Folders on G-PLAY
Windows 2000/XP
Now that G-PLAY is initialized, four folders must be
created to store the various types of media files.
1. Double click on the My Computer icon on your desktop.
2. Double click on the G-PLAY icon.
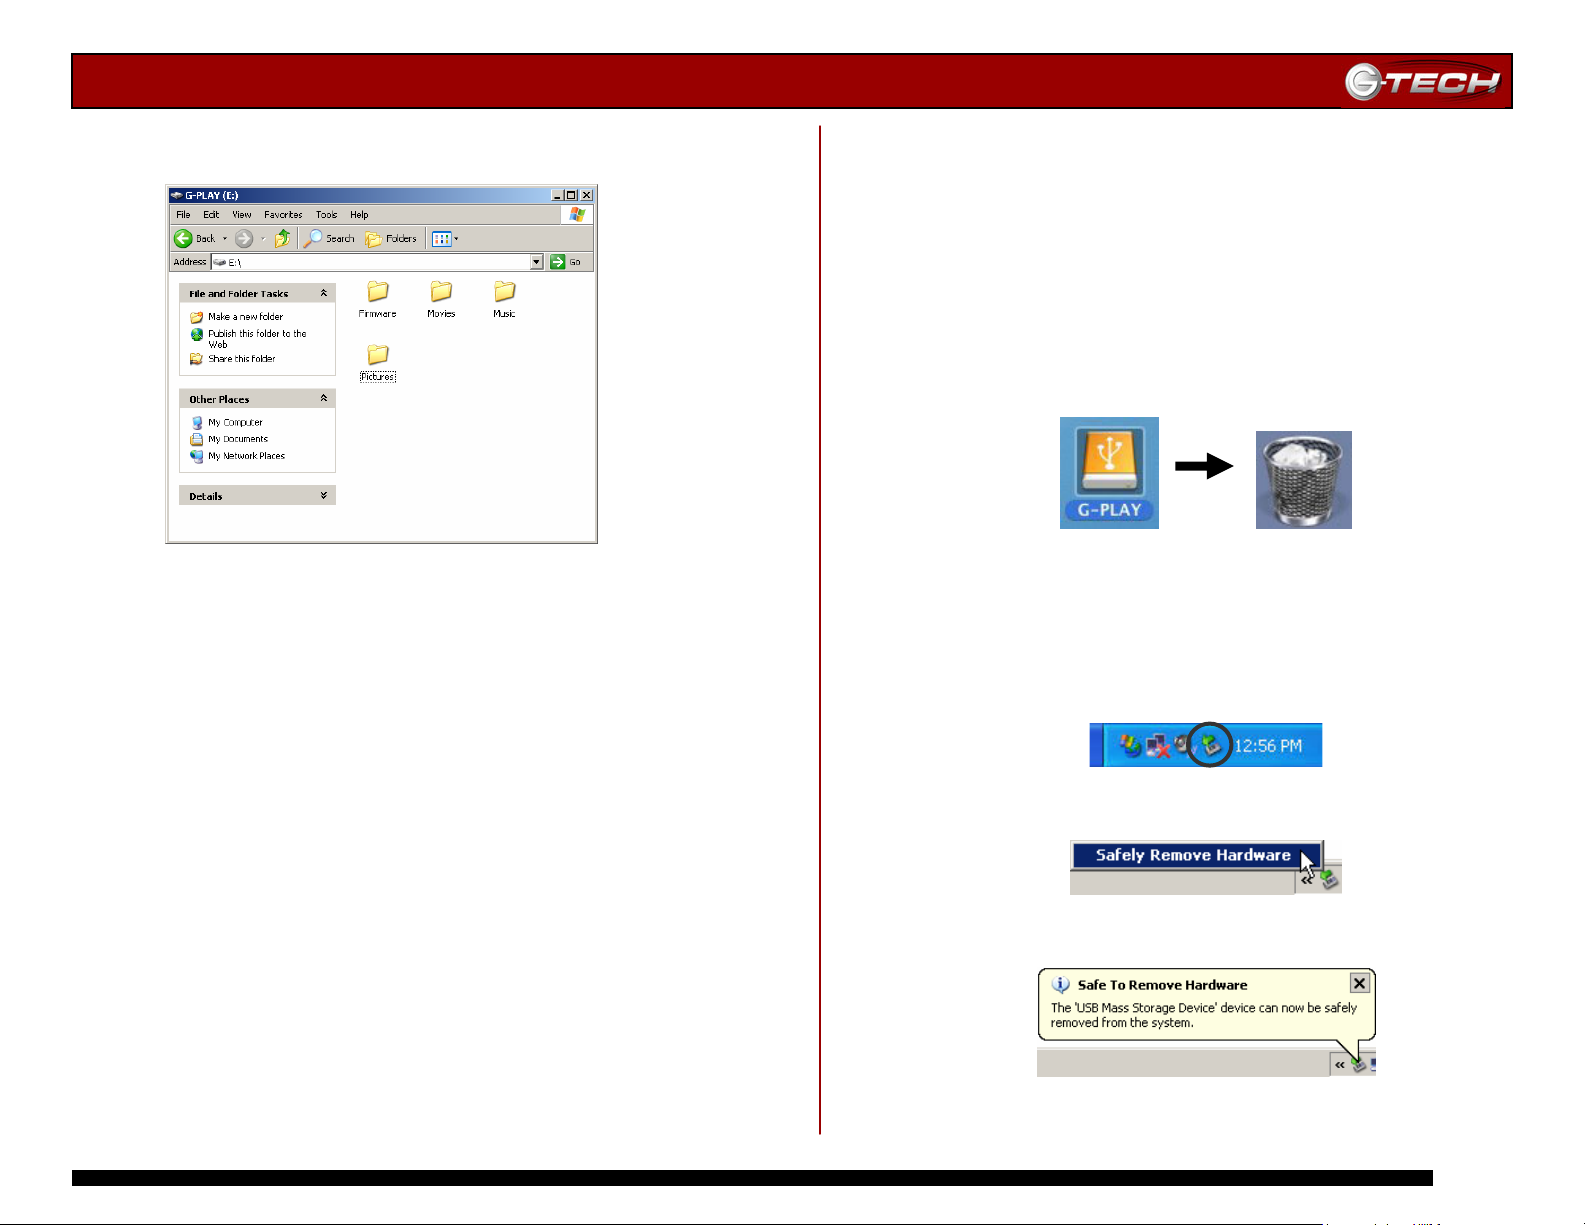
3. Click on the <File> menu and choose New > Folder.
4. Name the new folder Firmware.
5. Repeat the above steps and create three additional new
folders with the following names…
• Movies
• Music
• Pictures
Note: DO NOT change the names of these folders. G-PLAY uses
these exact names to locate files. These folders can be
customized. For example, the Movies folder could be spilt into
sub-directories with names such as “Action”, “Adventure”, etc.
The Music folder could be spilt into “Rock”, “Classical”, etc.
Note: G-PLAY can also double as a standard USB hard drive. You
can create another folder (“Data” for example) to store your
data files. This folder will only be visible and accessible when GPLAY is attached to your computer.
e 13
Pa
Page 14
g
G-PLAY Installation Guide
6. Your G-PLAY should now have the following folders:
10. Loading G-PLAY with Content
Loading G-PLAY with movies, music or pictures is easy!
Simply drag and drop files from your computer to the appropriate
file folder located on G-PLAY. The following file formats are
supported…
Movies: MPEG-1 (AVI, MPG), MPEG-2 (AVI,VOB), ISO*,
MPEG-4 (AVI, DivX, DivX VOD, XviD)
Music: WAV, MP3, MPEG-4 (AAC), WMA, AC3, Ogg Vorbis
Pictures: JPEG (up to 8 mega pixels)
*DVD image file
11. UNMOUNTING/DISCONNECTING G-PLAY
A great feature of G-PLAY is its ability to be connected and
disconnected while your computer is running. To prevent
failures and/or data loss it is important to follow the steps
below when unmounting/disconnecting G-PLAY from your
computer.
11.1 Mac OS X Computers
1. Before powering down and disconnecting G-PLAY, you
must unmount the system by simply dragging the G-PLAY
icon to the trash located in the dock.
2. It is now safe to power off and remove G-PLAY from your
system.
11.2 Windows Computers
1. Before powering down and disconnecting G-PLAY, leftclick on the Eject icon shown below.
2. The following box will appear. Click on the entry.
3. A balloon like the following will appear.
4. It is now safe to power off and remove G-PLAY from your
system.
e 14
Pa
Page 15
g
G-PLAY Installation Guide
12. Connecting G-PLAY to your TV
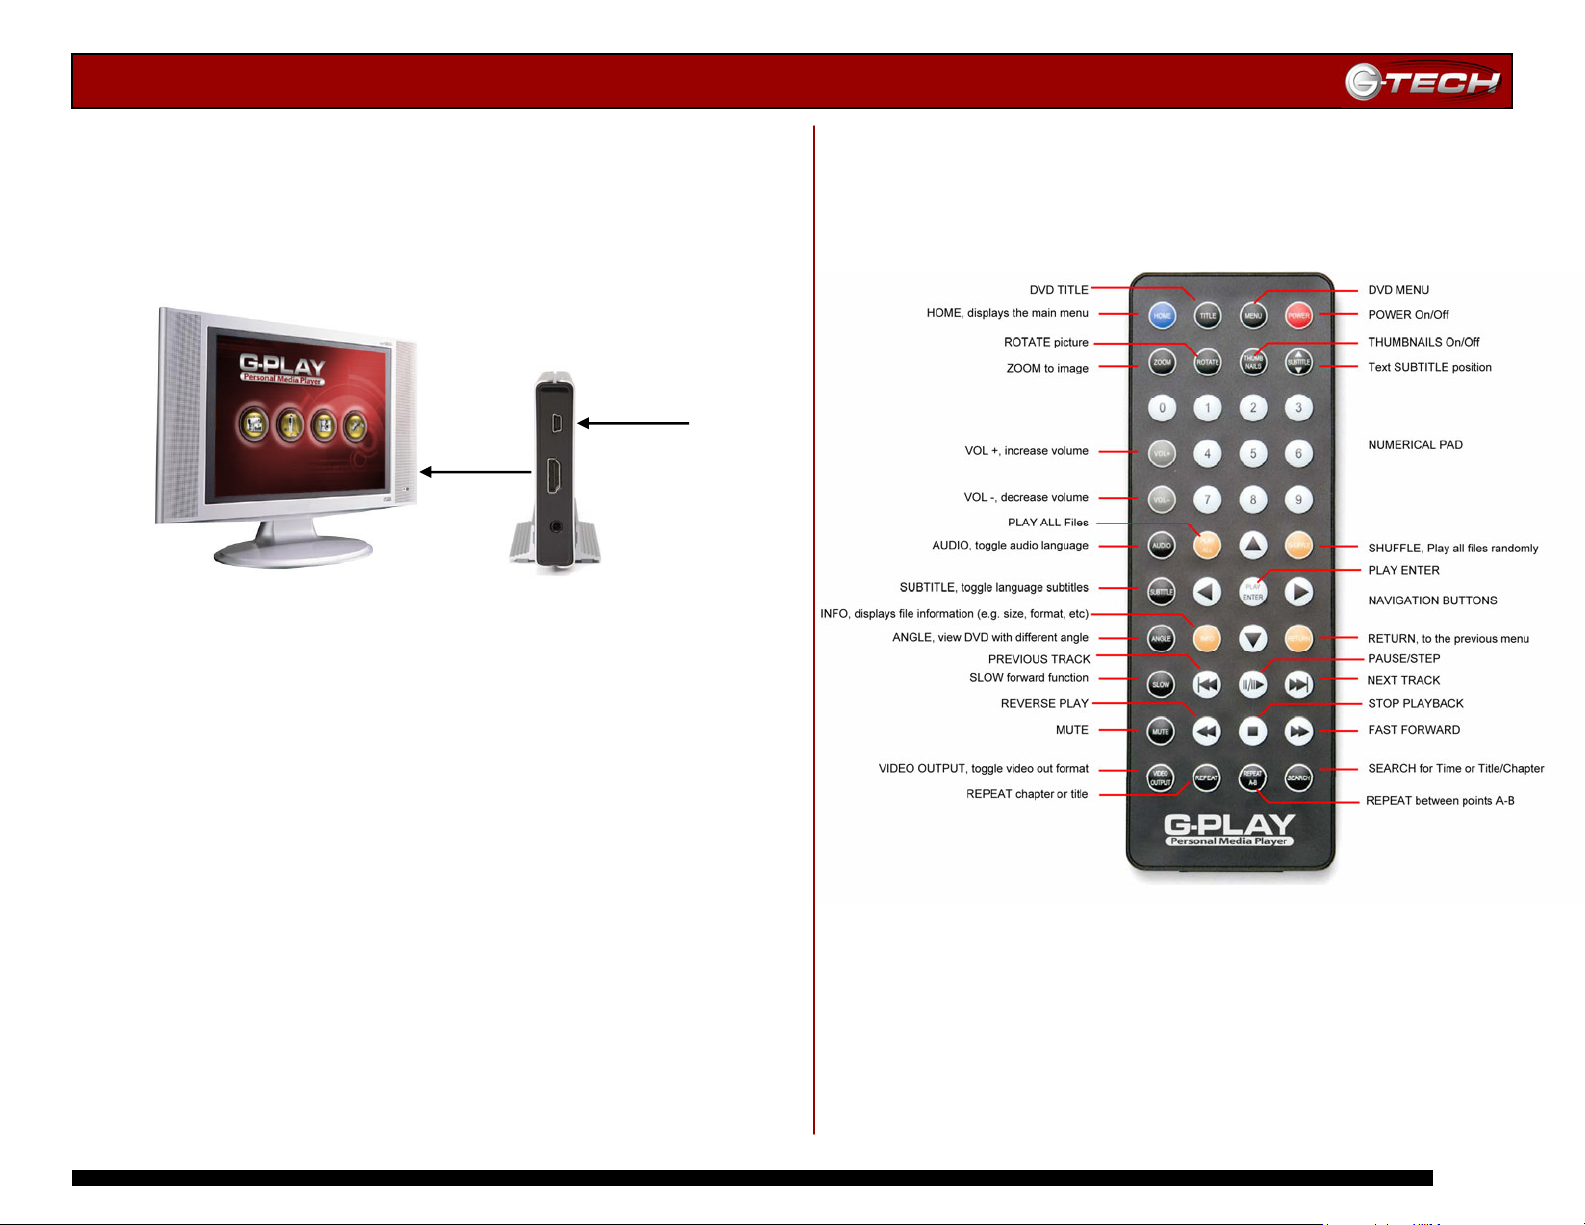
Connecting G-PLAY to any TV is very straightforward!
1. Connect G-PLAY to your TV/VCR/Cable/Satellite box using the
included AV cable. Consult your user manual for the exact location
of the AV ports.
USB Power
AV Cable
Note: Use either the yellow composite or the black S-Video connection. DO
NOT use both as you will not receive a video signal if they are both plugged
in at the same time.
2. Plug the Power Adapter to the USB port and the other end into
an electrical outlet.
The following optional AV cables are available:
• Component – YPbPr connection to high-end TV/HDTV’s
• VGA – for connection to CRT/Flat Panel monitors
• SPDIF – digital audio for Dolby Digital or DTS home theater
• SCART – for connection to European TV’s
You can purchase any of the cables described above by contacting
G-Tech Sales at (310) 449-4599 or online at
www.g-technology.com
13. The Remote Control
G-PLAY ships with an infrared remote control that enables
you to navigate the graphical user interface (GUI) built-in to
G-PLAY whenever the system is attached to your TV.
Note: For a detailed summary of all remote control functions, see
the Appendix.
e 15
Pa
Page 16

g
G-PLAY Installation Guide
14. Navigating the G-PLAY User Interface
When G-Play is connected to your TV and powered on, the
main menu shown below will be displayed.
Movies Pictures Music Settings
From the main menu, you can select the following
sub-menus:
• Movies
• Music
• Pictures
• Settings
You can navigate to the sub-menus by using the ▲▼
Navigation Buttons on the infrared remote control.
Highlight any sub-menu selection and then press the
Play/Enter button.
14.1 Movies Menu
This menu displays all of the movie files that you have
uploaded to G-PLAY.
Use the ▲▼ Navigation Buttons on the remote control to
select the movie you wish to play and then press Play/Enter
to confirm your choice.
Note: When viewing a DivX movie, you can position the subtitles by
pressing the Subtitle button. You can position the subtitle on the TV
screen by using the
set the subtitle position.
▲▼ buttons. Press the Subtitle button again to
e 16
Pa
Page 17
g
G-PLAY Installation Guide
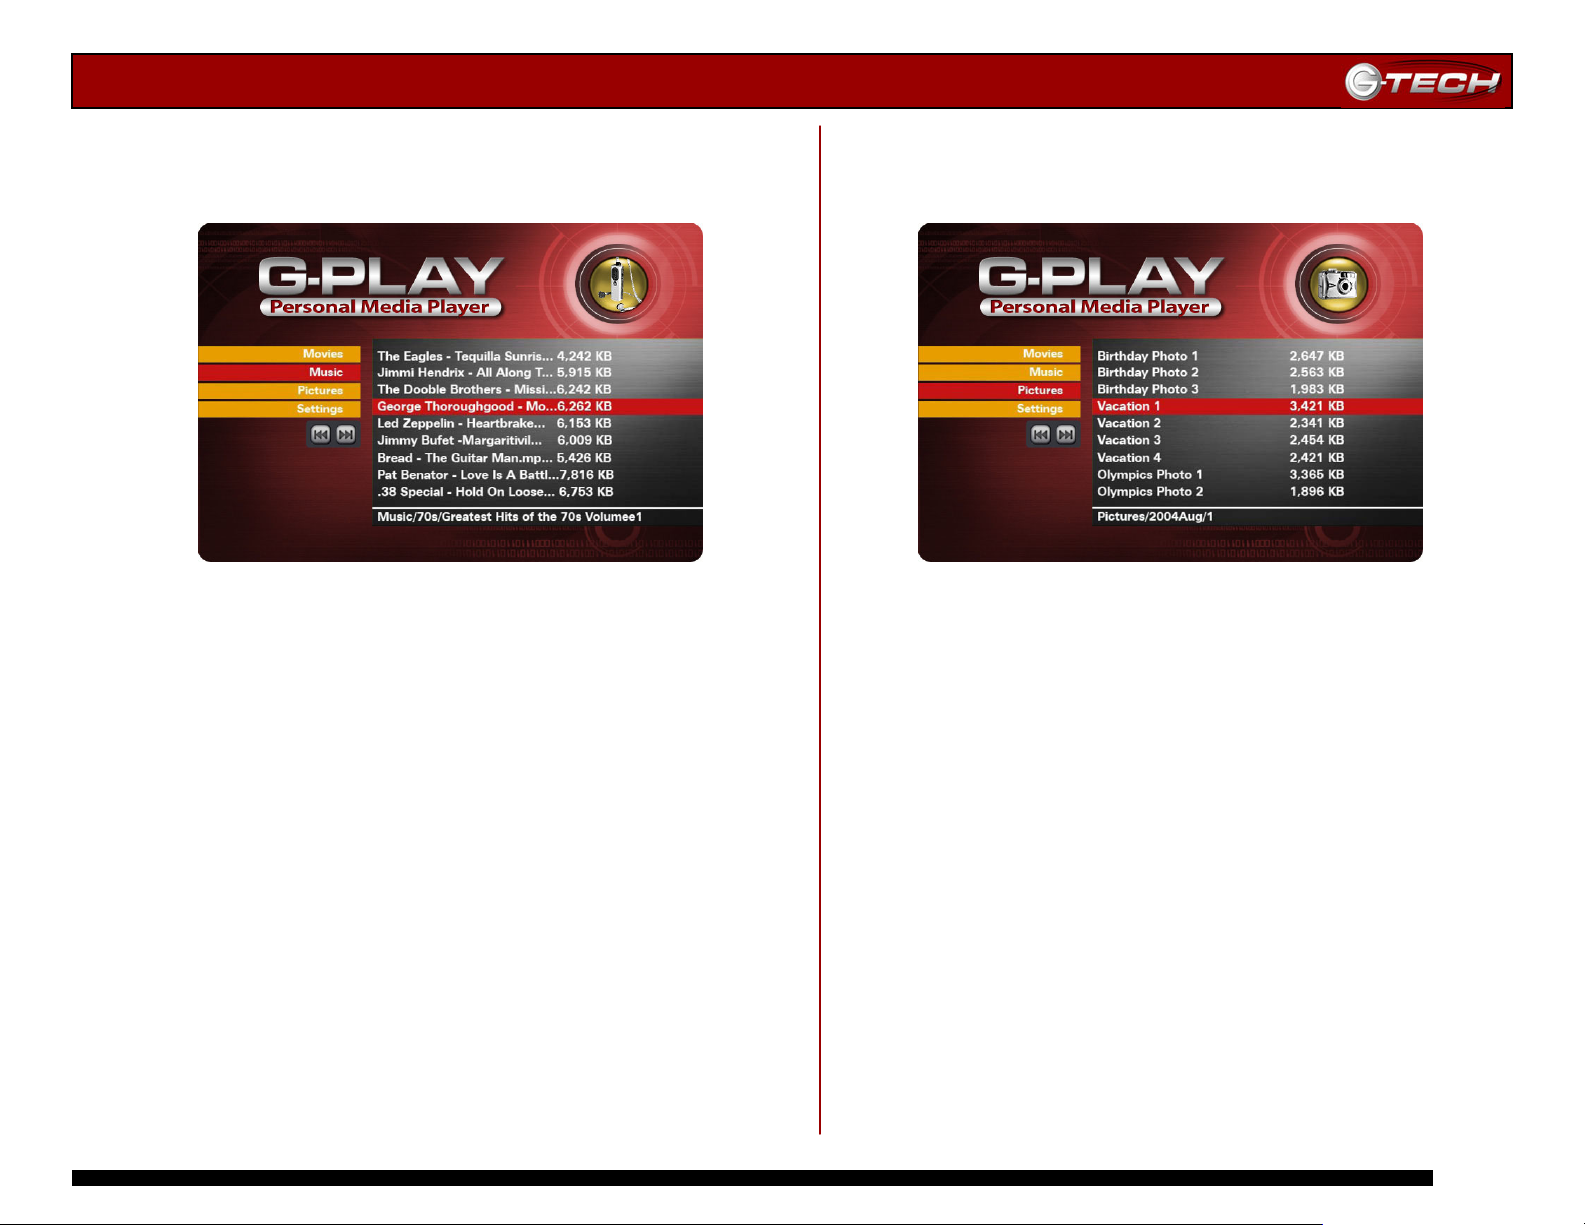
14.2 Music Menu
This menu displays all of the MP3 music files that you have
uploaded to G-PLAY.
Use the ▲▼ Navigation Buttons on the remote control to
select the music file you wish to play and then press
Play/Enter to confirm your choice.
14.3 Pictures Menu
This menu displays all of the JPEG picture files that you
have uploaded to G-PLAY.
Use the ▲▼ Navigation Buttons on the remote control to
select the image you wish to view and then press
Play/Enter to confirm your choice.
Note: You can view previews of your images by pressing the
Thumbnails button on the remote control.
Note: To view all of your files as a slide show, press the PLAY ALL
button on the remote control.
e 17
Pa
Page 18
g
G-PLAY Installation Guide
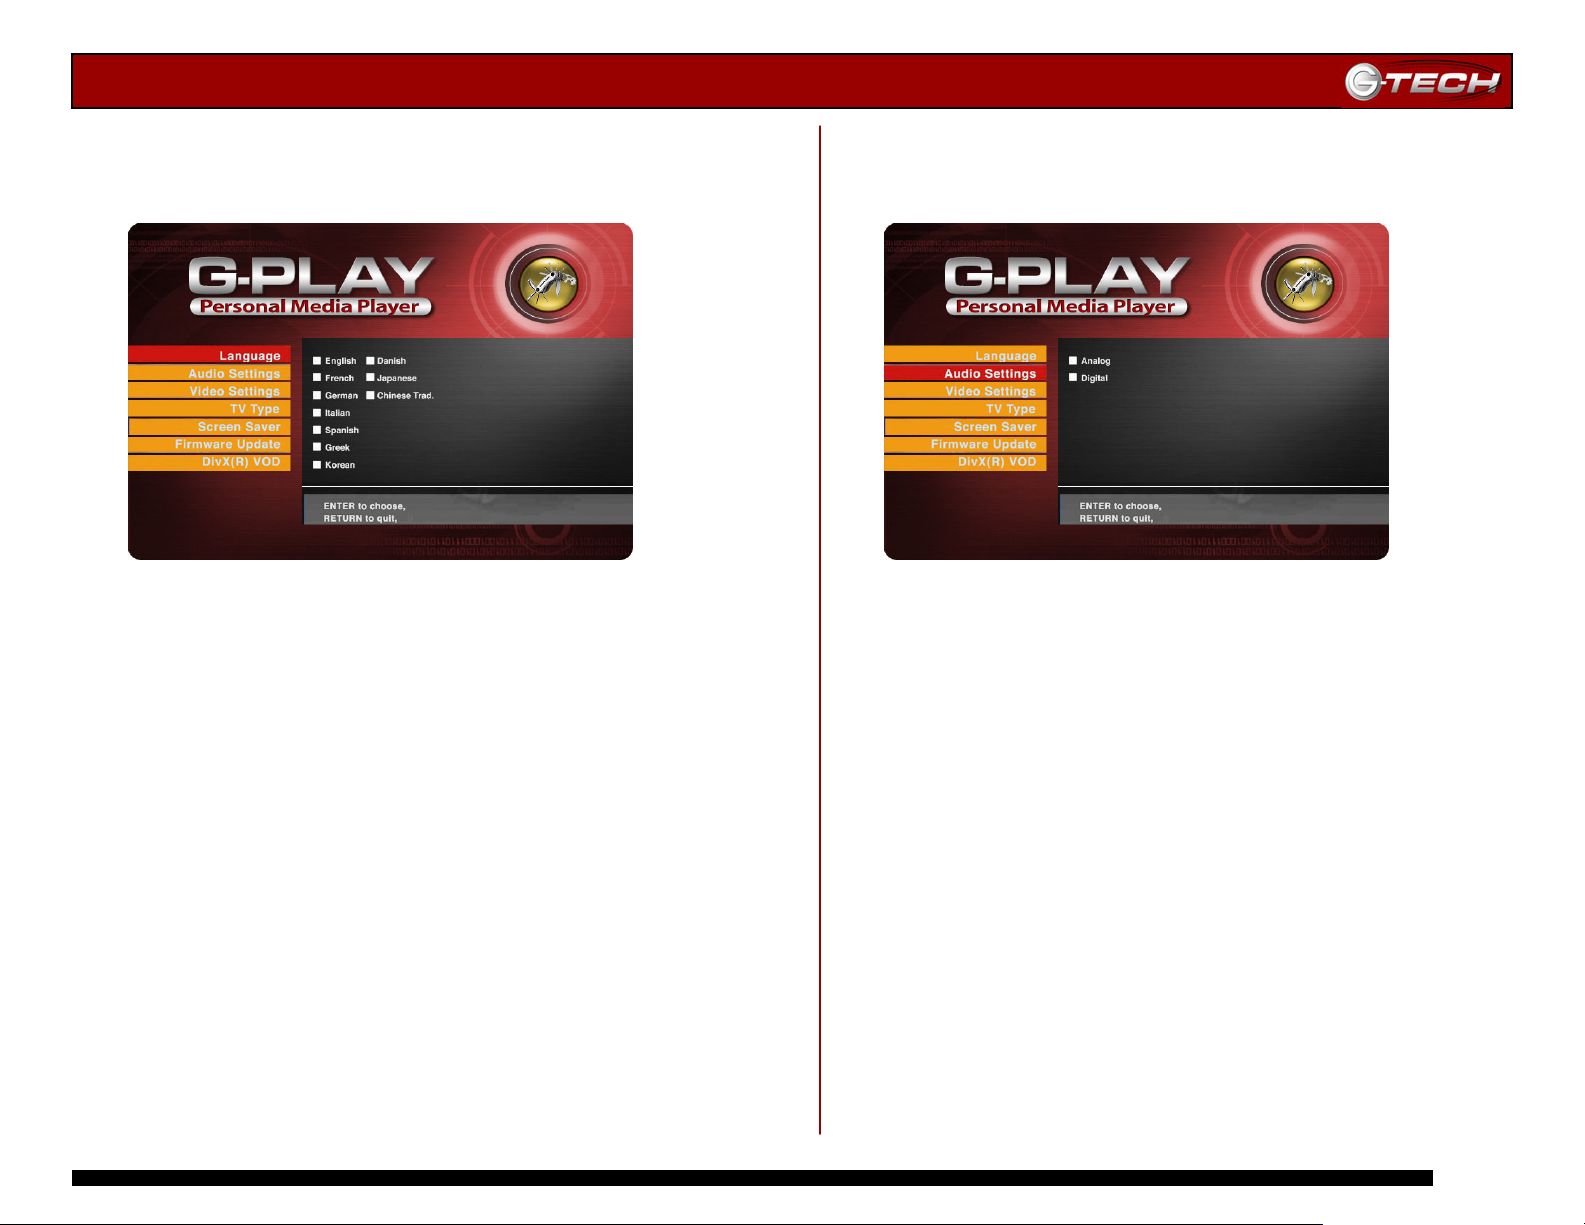
14.4 Language Settings Menu
This menu enables you to set the language for the various
G-PLAY menus.
Use the ▲▼ Navigation Buttons to select the appropriate
language and then press Play/Enter to confirm your choice.
Press the Home button to save your changes.
14.5 Audio Settings Menu
This menu enables you to set the proper audio setting for
G-PLAY.
Use the ▲▼ Navigation Buttons to select the correct
audio setting and then press Play/Enter to confirm your
choice. Press the Home button to save your changes.
Note: Select <Analog> when using RCA audio inputs. Select
<Digital> if you are using the optional SPDIF digital audio cable to
connect to a Dolby Digital or DTS Home Theater system.
e 18
Pa
Page 19
g
G-PLAY Installation Guide
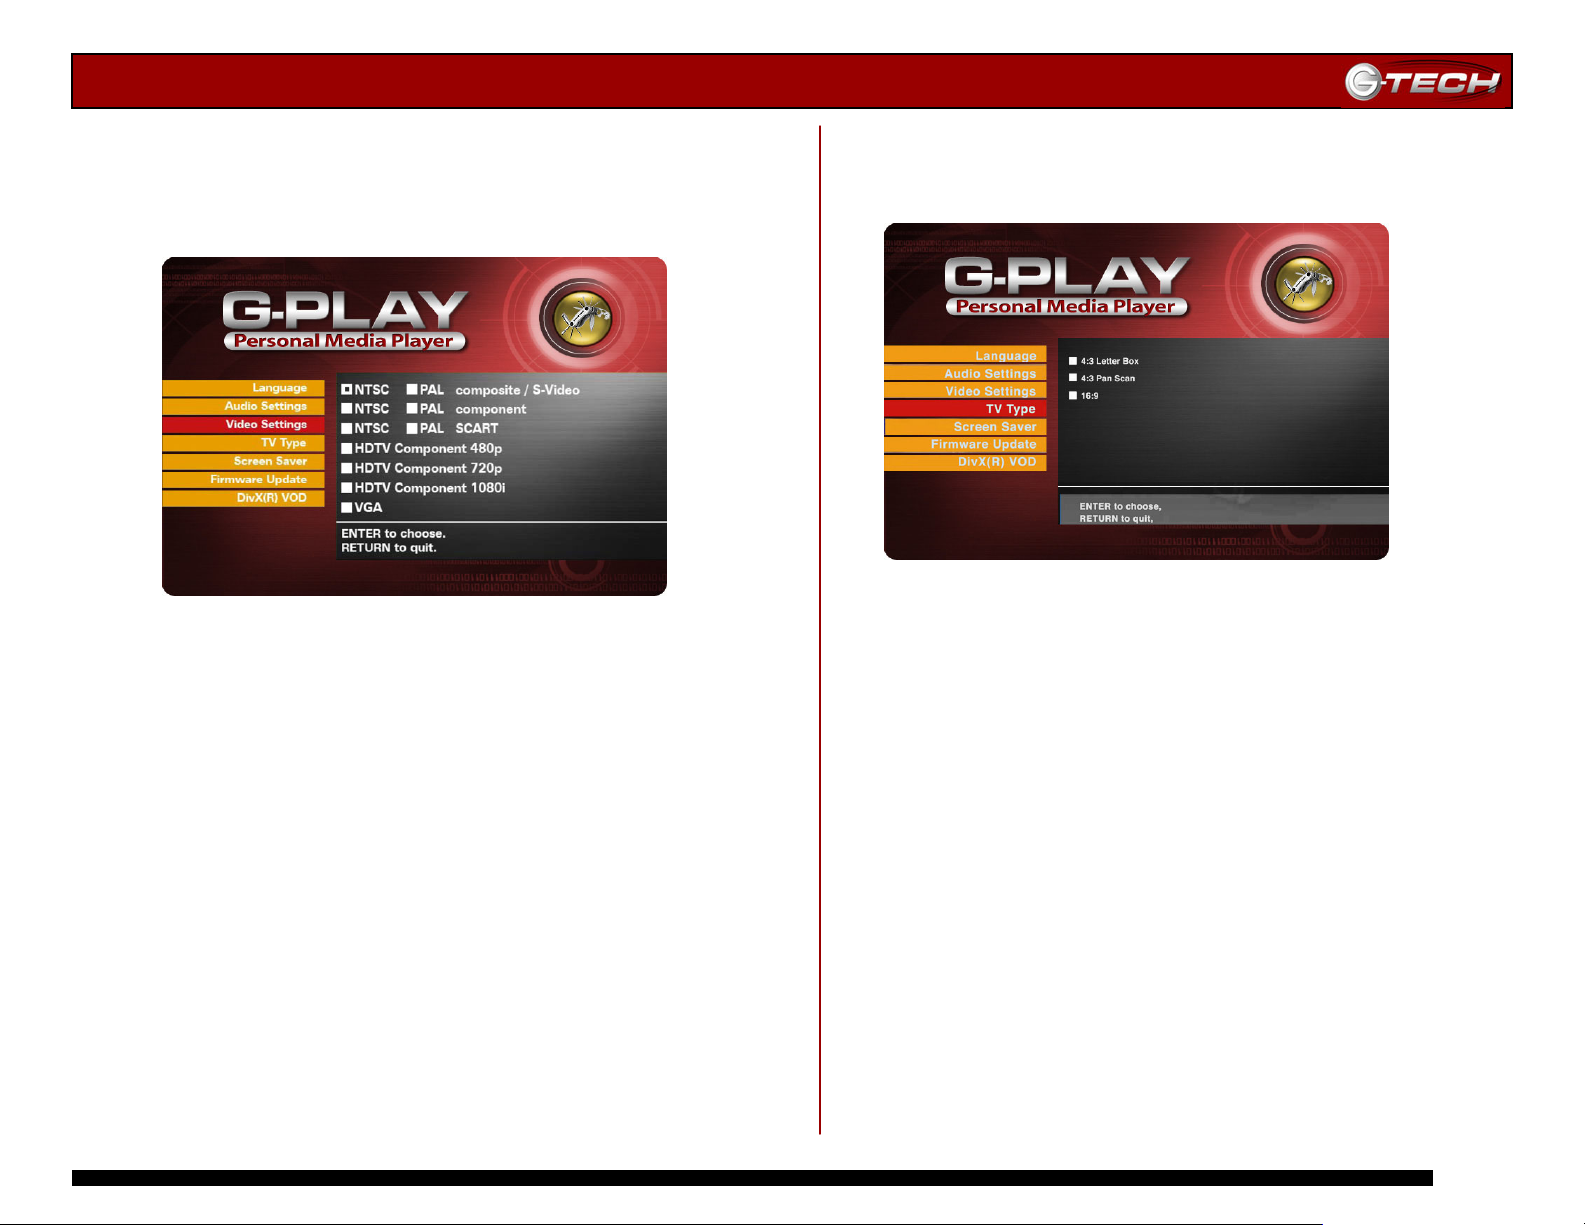
14.6 Video Settings Menu
This menu displays all of the video output settings supported
by G-PLAY. You must have the proper AV cable attached to
G-PLAY to support the various settings.
Use the ▲▼ Navigation Buttons to select the video
setting and then press Play/Enter to confirm your choice.
Press the Home button to save your changes.
Note: The NTSC settings are used primarily in the US, Canada and
Japan. The PAL settings are used primarily in European countries.
To use the HD settings, your TV/monitor must be HD Ready.
Note: You can easily toggle through the Video Output options by
pressing the Video Output button on the remote control. You must
return to the Video Settings menu to confirm the setting you want.
14.7 TV Type Menu
This menu displays the TV aspect ratios supported by
G-PLAY. Choose the appropriate setting for your TV.
Use the ▲▼ Navigation Buttons to select the TV Type and
then press Play/Enter to confirm your choice. Press the
Home button to save your changes.
e 19
Pa
Page 20
g
G-PLAY Installation Guide
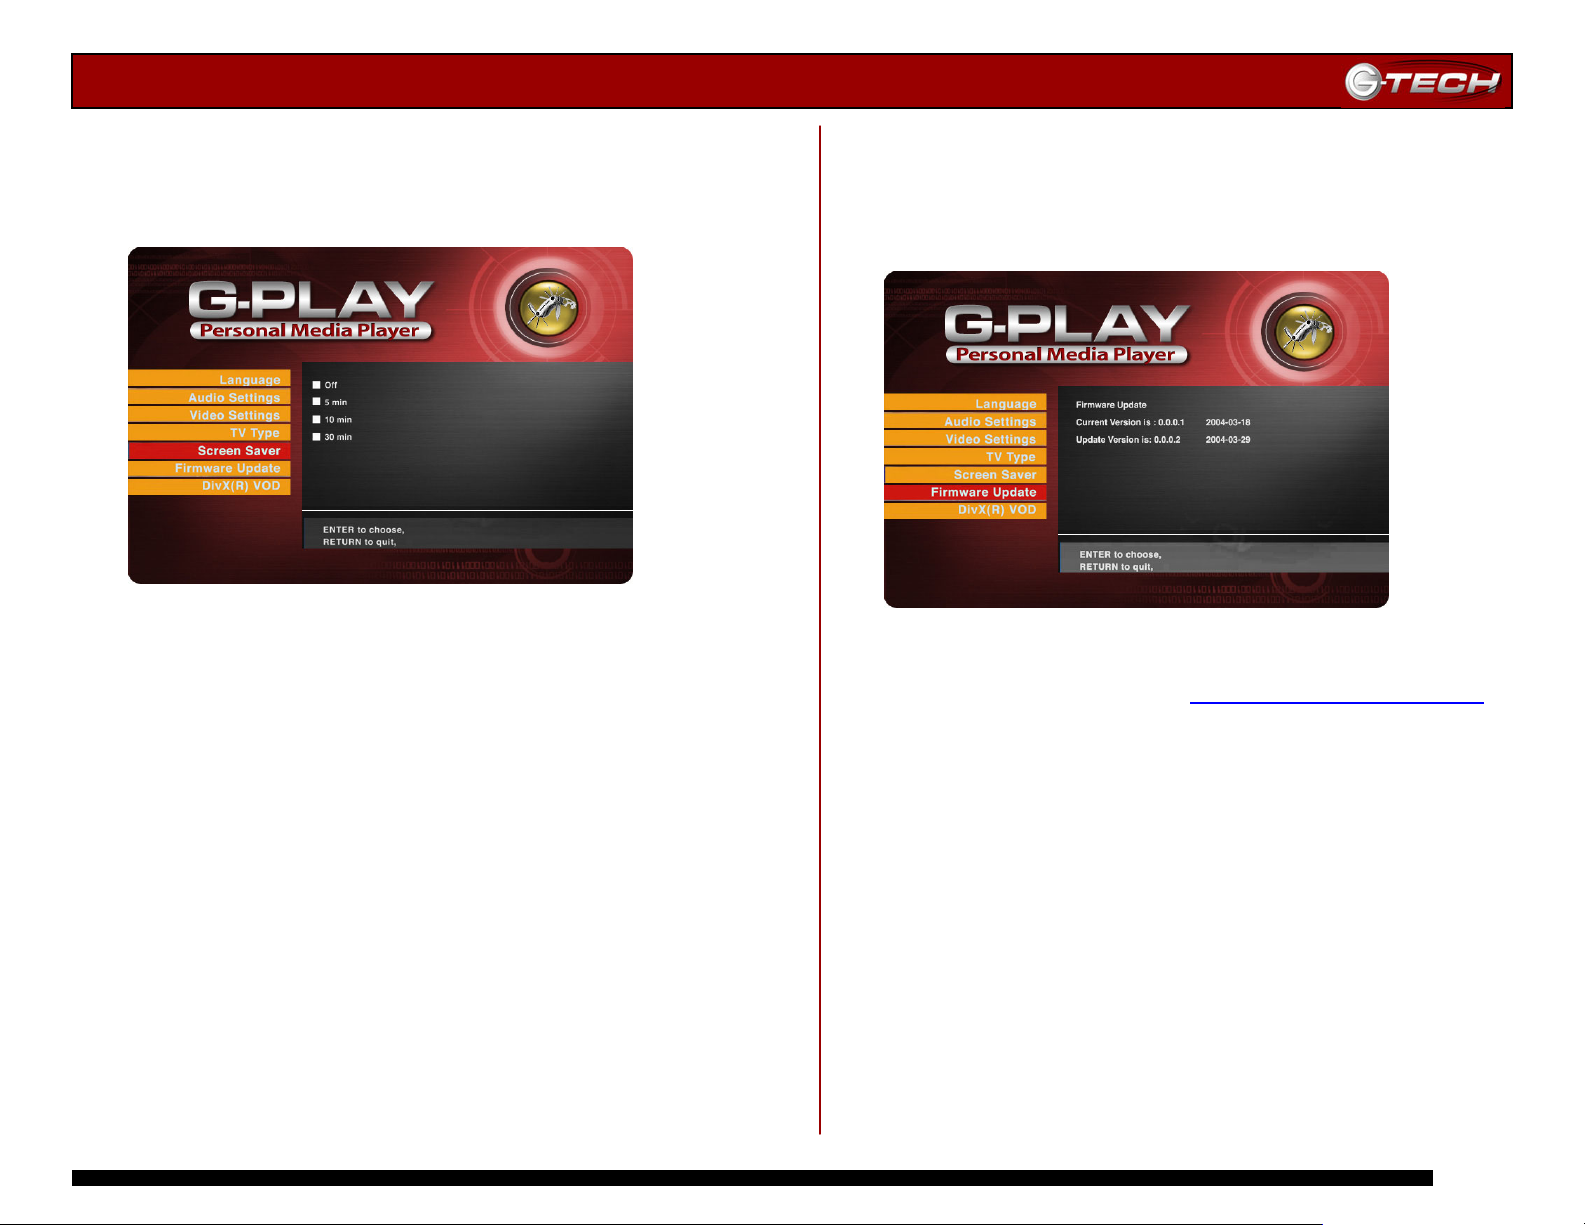
14.8 Screen Saver
This menu enables you to select the amount of time that
G-PLAY can be inactive before launching the screen saver
function.
Use the ▲▼ Navigation Buttons to select the time interval
you wish and then press Play/Enter to confirm your choice.
Press the Home button to save your changes.
14.9 Firmware Update
A nice feature of G-PLAY is the ability to easily update the
system firmware to enable new features. When new
firmware for G-PLAY becomes available, it will be posted in
the Support section on the G-Tech website.
Follow the directions below to update G-PLAY’s firmware.
1) Download new firmware at
www.g-technology.com/support
2) Connect G-PLAY to your computer.
3) Copy the firmware to the Firmware folder on G-PLAY.
4) Connect G-PLAY to your TV/monitor.
5) Use the ▲▼ Navigation Buttons to select the new
firmware you downloaded and then press Play/Enter to
confirm your choice.
The firmware update will take approximately 1 minute. Once
the update has completed, turn off G-PLAY and remove the
power adapter. Wait 30 seconds before reconnecting the
power adapter and powering G-PLAY back on. The new
firmware is now active.
Note: DO NOT power off G-PLAY during the firmware update process!
Doing so may render G-PLAY inoperable. If this should happen,
contact G-Tech Support or your reseller for assistance.
e 20
Pa
Page 21
g
G-PLAY Installation Guide
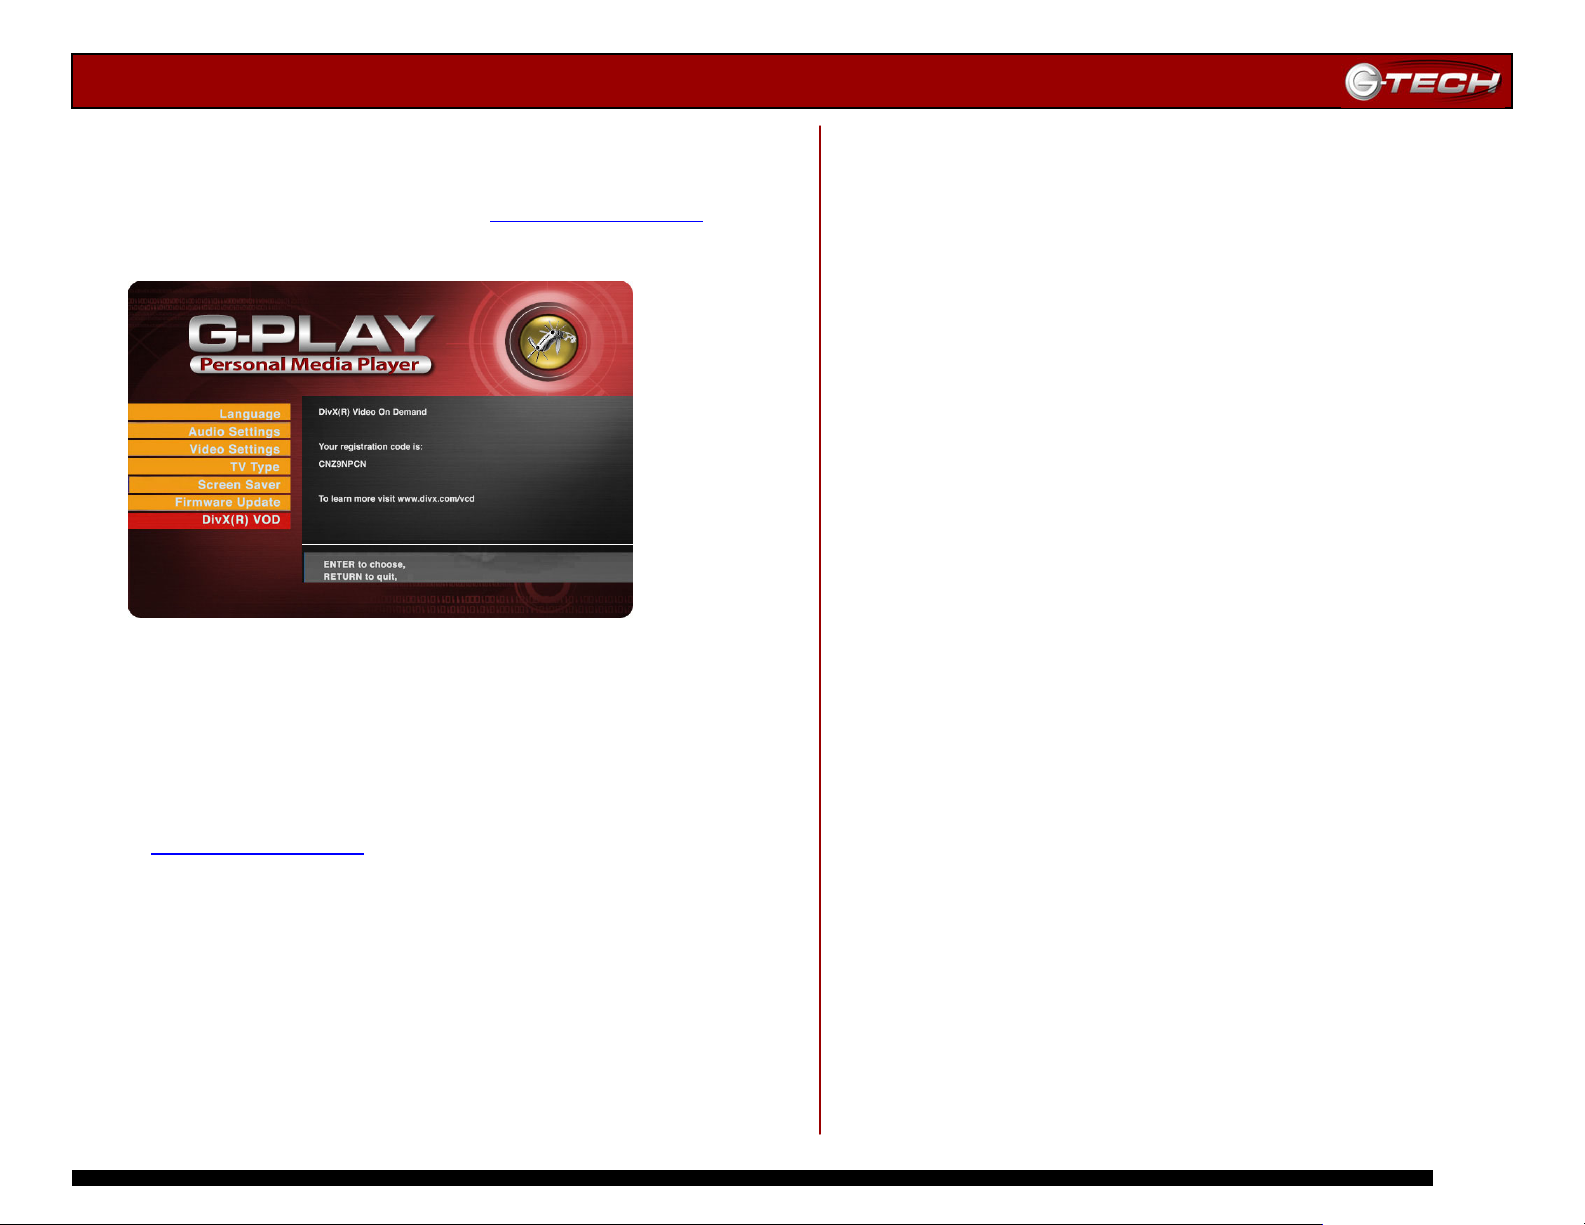
14.10 DivX VOD
G-PLAY supports DivX Video-on-Demand (VOD). DivX VOD is
a digital delivery service that let’s you buy or rent
high-quality video content from https://vod.divx.com
play it on G-PLAY.
and
To utilize the DivX VOD feature of G-PLAY, follow the directions
below.
1) Connect G-PLAY to your TV/monitor.
2) Select DivX VOD under the Settings Menu.
3) Write down the displayed 8-digit DivX VOD registration code.
4) Attach G-PLAY to your computer.
5) Visit https://vod.divx.com
6) Download DivX content to the Movies folder on G-PLAY.
7) Enjoy your DivX VOD content!
and enter your 8-digit code.
(This page intentionally blank)
e 21
Pa
Page 22
g
G-PLAY Installation Guide
15. TECHNICAL SUPPORT
If you encounter any difficulties while installing or using
G-PLAY, please contact G-Tech Technical Support via one of
the following ways:
Telephone: (310) 449-4599
Fax: (310) 449-4670
E-mail: [email protected]
Internet: http://www.g-technology.com
When contacting Technical Support, make sure to be in front
of your computer and have the following information readily
available:
• Your G-PLAY serial number (located on side of unit)
• Operating system and version
• Computer brand and model
• Type of AV cable/audio cable you are using
• Type of TV/monitor you are using
Thank you for purchasing G-PLAY. If you have any comments
or questions about this manual or the product, please call
(310) 449-4599, or send an email to
16. LIMITED WARRANTY
G-Technology Inc. (G-Tech) warrants your product against any
defect in material and workmanship, under normal use, for
the designated warranty period. If the product should
become defective within the warranty period, G-Tech, will at
its discretion, repair or replace the product. Repair or
replacement parts or products will be furnished on an
exchange basis and will be either new or reconditioned. All
replaced parts or products shall become the property of GTech. This warranty shall not apply if the product has been
damaged by accident, misuse, abuse or as a result of
unauthorized service or parts. Warranty service is available to
the purchaser by obtaining a Return Material Authorization
number (RMA) and by delivering the product during the
warranty period to an authorized G-Tech service facility or to
G-Tech. The purchaser shall bear all shipping, packing and
insurance costs and all other costs, excluding parts and labor,
necessary to effectuate repair, replacement or refund under
this warranty. All returned product must be shipped to
G-Tech in the original shipping container.
For more information on how to obtain warranty service, an
RMA number or to acquire shipping materials, contact G-Tech
at 1653 Stanford Street, Santa Monica, CA 90404, (310) 4494599 or [email protected]
IN THE EVENT A PRODUCT BECOMES DEFECTIVE DURING
THE WARRANTY PERIOD, THE PURCHASER’S EXCLUSIVE
REMEDY SHALL BE REPAIR OR REPLACEMENT AS PROVIDED
ABOVE. INCIDENTAL OR CONSEQUENTAL DAMAGES,
INCLUDING WITHOUT LIMITATION LOSS OF DATA, ARISING
FROM BREACH OF ANY EXPRESS OR IMPLIED WARRANTY ARE
NOT THE RESPONSIBILITY OF G-TECH AND, TO THE EXTENT
PERMITTED BY LAW, ARE HEREBY EXCLUDED BOTH FOR
PROPERTY DAMAGE, AND TO THE EXTENT NOT
UNCONSCIONABLE, FOR PERSONAL INJURY DAMAGE.
.
e 22
Pa
Page 23
g
G-PLAY Installation Guide
17. APPENDIX – Remote Control Functions
Button Movies Menu
HOME Displays the main menu
TITLE DVD Title (.ISO files only)
MENU DVD Menu (.ISO files only)
POWER Power On/Off
ZOOM IN (using key), ZOOM OUT (using
ZOOM
key), SCROLL UP (using key), SCROLL
DOWN (using key)
ROTATE N/A
THUMBNAILS N/A
SUBTITLE Text SUBTITLE position, for DivX files
NUMERIC KEY PAD
VOL + Increase Volume
VOL - Decrease Volume
MUTE Mute
AUDIO Toggle audio language
PLAY ALL Play all files
SHUFFLE Play all files randomly
SUBTITLE Toggle language subtitles
PLAY/ENTER SELECT/PLAY movie
ANGLE View DVD with different angle (.ISO only)
INFO Displays file information
RETURN Return to previous menu
SLOW Slow forward function (.ISO files only)
PREVIOUS TRACK
Previous track (.ISO), Previous 5 minutes
(DivX), Previous page in file list
PAUSE/STEP Pause/Step
NEXT TRACK
Next track (.ISO), Next 5 minutes (DivX),
Next page in file list
REVERSE PLAY Reverse playback
STOP PLAYBACK Stop playback
FAST FORWARD Fast forward
You can switch between all
TV/monitor.
VIDEO OUPUT
Toggle video output.
of the available video output formats by pressing this
button. The video output selected will be displayed on
the TV/monitor. If you cannot see an image, continue to
press this button until an image appears on the
REPEAT Repeat chapter or title (.ISO files only)
REPEAT A-B Repeat between points A-B, (.ISO files)
SEARCH
Search for time or Title/Chapter (.ISO
files)
Pressing these buttons consecutively
INFO-0-1-2-RETURN
returns the G-PLAY settings to the factory
default.
Button Music Menu
HOME Displays the main menu
TITLE N/A
MENU N/A
POWER Power On/Off
ZOOM
ROTATE N/A
THUMBNAILS N/A
SUBTITLE N/A
NUMERIC KEY PAD
VOL + Increase Volume
VOL - Decrease Volume
MUTE Mute
AUDIO N/A
PLAY ALL Play all files
SHUFFLE Play all files randomly
SUBTITLE N/A
PLAY/ENTER SELECT/PLAY movie
ANGLE N/A
INFO Displays file information
RETURN Return to previous menu
SLOW N/A
PREVIOUS TRACK
Select previous track, display previous
PAUSE/STEP Pause
NEXT TRACK
Select next track, display next page in file
REVERSE PLAY Jump back 10 seconds within track
STOP PLAYBACK Stop playback
FAST FORWARD Fast forward 10 seconds within track
Toggle video output.
of the available video output formats by pressing this
VIDEO OUPUT
button. The video output selected will be displayed on
the TV/monitor. If you cannot see an image, continue to
press this button until an image appears on the
REPEAT N/A
REPEAT A-B N/A
SEARCH N/A
Pressing these buttons consecutively
INFO-0-1-2-RETURN
returns the G-PLAY settings to the factory
N/A
page in list
list
You can switch between all
TV/monitor.
default.
e 23
Pa
Page 24
g
G-PLAY Installation Guide
Button Pictures Menu
HOME Displays the main menu
TITLE N/A
MENU N/A
POWER Power On/Off
ZOOM IN (using key), ZOOM OUT (using
ZOOM
key), Enlarge image (using key), Shrink image
ROTATE Rotate picture
THUMBNAILS Preview image On/Off
SUBTITLE N/A
NUMERIC KEY PAD
VOL + N/A
VOL - N/A
MUTE N/A
AUDIO N/A
PLAY ALL Play all files
SHUFFLE Play all files randomly
SUBTITLE N/A
PLAY/ENTER Select/Display image movie
ANGLE N/A
INFO Displays file information
RETURN Return to previous menu
SLOW N/A
PREVIOUS TRACK
Select previous image, display previous
PAUSE/STEP N/A
NEXT TRACK
Select next image, display next page in
REVERSE PLAY N/A
STOP PLAYBACK Stop display
FAST FORWARD N/A
Toggle video output.
of the available video output formats by pressing this
VIDEO OUPUT
button. The video output selected will be displayed on
the TV/monitor. If you cannot see an image, continue to
press this button until an image appears on the
REPEAT N/A
REPEAT A-B N/A
SEARCH N/A
Pressing these buttons consecutively
INFO-0-1-2-RETURN
returns the G-PLAY settings to the factory
(using key)
page in file list
file list
You can switch between all
TV/monitor.
default.
Button Settings Menu
HOME Displays the main menu
TITLE N/A
MENU N/A
POWER Power On/Off
ZOOM
ROTATE N/A
THUMBNAILS N/A
SUBTITLE N/A
NUMERIC KEY PAD
VOL + N/A
VOL - N/A
MUTE N/A
AUDIO N/A
PLAY ALL N/A
SHUFFLE N/A
SUBTITLE N/A
PLAY/ENTER Select
ANGLE N/A
INFO N/A
RETURN Return to previous menu
SLOW N/A
PREVIOUS TRACK N/A
PAUSE/STEP N/A
NEXT TRACK N/A
REVERSE PLAY N/A
STOP PLAYBACK N/A
FAST FORWARD N/A
Toggle video output.
of the available video output formats by pressing this
VIDEO OUPUT
button. The video output selected will be displayed on
the TV/monitor. If you cannot see an image, continue to
press this button until an image appears on the
REPEAT N/A
REPEAT A-B N/A
SEARCH N/A
Pressing these buttons consecutively
INFO-0-1-2-RETURN
returns the G-PLAY settings to the factory
N/A
You can switch between all
TV/monitor.
default.
e 24
Pa
 Loading...