

Page 1
PRODUCT MANUAL
High-Performance 4 Bay Thunderbolt 2 RAID Solutions for HD 2K/4K Production
g-technology.com
Page 2

Table of Contents
Safety & General Use
Safety Precautions .................................................................................5
Backup Your Data ...................................................................................6
About Your G-SPEED Studio R
Introduction .............................................................................................8
What’s in the Box ...................................................................................9
System Requirements ...........................................................................9
Overview of the Drive ....................................................................... 10
Using Your Drive
Drive Activity LED.................................................................................12
Warning LED and Alarms ...................................................................13
Disconnect the Drive ........................................................................ 14
Conguring G-SPEED Studio R
G-Technology Assistant .....................................................................17
Recommended Installation ..............................................................17
G-SPEED Studio R Utility ................................................................... 18
Power Modes on G-SPEED Studio R ............................................. 22
Shutting Down G-SPEED Studio R Units ..................................... 22
Daisy Chaining Multiple G-SPEED Studio R Units .................... 23
Displaying Multiple G-SPEED Studio R Units ............................ 25
Manage the Enclosure with G-SPEED Studio R Utility ........... 25
Accessing the G-SPEED Studio R Utility ...................................... 26
Unlocking the UI .................................................................................. 28
G-SPEED Studio R Utility Overview ............................................... 29
Toolbar Icons .........................................................................................30
Customizing the Toolbar .................................................................. 30
Component List ................................................................................... 31
Physical Drive Menu ........................................................................... 31
Highlight Arrays ................................................................................... 32
Managing System Information ...................................................... 33
Viewing System Information .......................................................... 34
Making System Settings ................................................................... 34
Clearing Statistics ................................................................................ 35
Restoring Factory Default Settings .............................................. 35
Saving a Service Report .................................................................... 36
Updating Firmware............................................................................. 36
Managing Enclosures......................................................................... 37
Viewing the Enclosure Information .............................................. 37
Viewing Temperature Sensor Information ................................ 38
Locating an Enclosure ....................................................................... 39
Managing the RAID Enclosure ........................................................ 39
Viewing Controller Information ..................................................... 39
Viewing Controller Statistics ........................................................... 41
Changing Controller Settings ......................................................... 41
Changing Buzzer Settings................................................................ 42
Managing Background Activities .................................................. 43
Viewing Current Background Activities ...................................... 43
Viewing Scheduled Background Activities ...............................44
Adding a Scheduled Background Activity .................................44
Changing Background Activity Schedule .................................. 45
Enabling or Disabling a Scheduled Background Activity .... 47
Deleting a Scheduled Background Activity .............................. 47
Media Patrol .......................................................................................... 48
Changing Media Patrol Settings .................................................... 48
Redundancy Check ............................................................................. 48
Changing Redundancy Check Settings ...................................... 49
Initialization ........................................................................................... 49
Changing Initialization Settings .................................................... 50
Rebuild .................................................................................................... 50
Changing Rebuild Settings .............................................................. 51
Migration ................................................................................................ 51
Changing Migration Settings ......................................................... 52
PDM .......................................................................................................... 52
Changing PDM Settings.................................................................... 53
Transition ................................................................................................ 53
Changing Transition Settings ......................................................... 54
Synchronization ................................................................................... 54
Changing Synchronization Settings ............................................ 55
Managing Physical Drives ................................................................ 55
Viewing a List of Physical Drives .................................................... 56
Viewing Physical Drive Information ............................................. 56
Viewing Physical Drive Statistics ................................................... 58
p. 2
Page 3

Table of Contents
Viewing Physical Drive SMART Log Information ..................... 59
Locating a Physical Drive .................................................................. 59
Changing Global Physical Drive Settings ................................... 60
Changing Individual Physical Drive Settings ............................ 60
Changing Physical Drive SMART Log Settings ......................... 61
Clearing a Stale or PFA Condition ................................................. 62
Running Media Patrol on Your Physical Drives ........................ 63
Managing Disk Arrays ........................................................................ 64
Viewing a List of Disk Arrays ...........................................................64
Viewing Disk Array Information ..................................................... 65
Creating a Disk Array Manually ...................................................... 65
To Create a Disk Array and Logical Drive .................................... 66
Creating a Disk Array and Logical Drive With the Wizard .... 67
Choosing Automatic Configuration ............................................. 68
Choosing Express Configuration ................................................... 69
Choosing Advanced Configuration .............................................. 71
Formatting Your Logical Drives ..................................................... 73
Changing Disk Array Settings ......................................................... 73
Locating a Disk Array ..........................................................................74
Deleting a Disk Array ......................................................................... 75
Preparing a Disk Array for Transport ............................................ 76
Rebuilding a Disk Array ..................................................................... 76
Pausing and Resuming a Rebuild .................................................. 78
Stopping a Rebuild ............................................................................. 78
Managing Logical Drives .................................................................. 78
Viewing a List of Logical Drives ..................................................... 79
Viewing Logical Drive Information ............................................... 79
Viewing Logical Drive Statistics ..................................................... 80
Changing Logical Drive Settings ................................................... 81
Viewing Logical Drive Check Tables ............................................. 82
Creating a Logical Drive Manually ................................................ 82
Formatting Your Logical Drive ....................................................... 84
Locating a Logical Drive ................................................................... 84
Deleting a Logical Drive ................................................................... 85
Initializing a Logical Drive ................................................................ 85
Pausing and Resuming an Initialization ...................................... 86
Stopping an Initialization ................................................................. 86
Redundancy Check on a Logical Drive ........................................ 87
Pausing and Resuming a Redundancy Check .............................8
Stopping a Redundancy Check ...................................................... 87
Migrating a Logical Drive ................................................................. 88
Running PDM on a Logical Drive ................................................... 89
Pausing and Resuming PDM ........................................................... 89
Stopping PDM ......................................................................................89
Managing Spare Drives ..................................................................... 90
Viewing a List of Spare Drives.........................................................90
Viewing Spare Drive Information .................................................. 90
Creating a Spare Drive Manually ................................................... 91
Changing Spare Drive Settings ...................................................... 92
Running Spare Check......................................................................... 93
Deleting a Spare Drive....................................................................... 93
Running a Transition on a Spare Drive ........................................ 93
Running a Transition .......................................................................... 94
Pausing and Resuming a Transition ............................................. 94
Stopping, Pausing or Resuming a Transition ............................ 94
Formatting Logical Drives ................................................................ 95
G-SPEED Studio R Software With Default Settings ................. 95
G-SPEED Studio R Utility With Custom Settings ...................... 96
Disk Utility .............................................................................................. 97
Spare Drives ..........................................................................................98
Running a Transition .......................................................................... 99
Maintenance for Your Drive
Replace a Failed Disk Drive ........................................................... 102
Initialize Drive for Mac .................................................................... 10 4
Restore the Drive Icon ..................................................................... 107
Reformat With Partitions ................................................................10 9
Appendix
RAID Levels Explained .................................................................... 114
Support & Warranty
Technical Support ............................................................................. 116
Limited Warranty ................................................................................117
Copyright ............................................................................................. 119
p. 3
Page 4

Safety and General Use
• Safety Precautions ........................................ p. 5
• Backup Your Data ......................................... p. 6
Page 5

Safety & General Use
Safety Precautions
Your G-SPEED Studio R’s warranty may be voided as a result of failing to respect the precautions
listed below. If you detect a problem with your drive, please contact our Technical Support
department.
If the product is returned with damage caused by improper handling, the warranty will be void and
liability will rest with the user. Please read our Limited Warranty.
• Servicing: Your drive contains no user-serviceable parts. If it appears to be malfunctioning,
have it inspected by a qualified Technical Support representative.
• Moisture: Place the device away from moisture or liquids. To reduce the risk of damage, do
not expose this drive to rain or moisture. Do not use it in damp or wet conditions. Never place
objects containing liquids on the drive as they may spill into its openings.
• Ventilation: Place the device in a vented area. The drive should never be placed near or over
a radiator or heat source.
• Temperature: Do not expose this drive to temperatures outside the range of 5°C to 35°C
(41°F to 95°F). It should also not be exposed to operational humidity beyond 5% to 80%
(non-condensing) or non-operating humidity beyond 10% to 90% (non-condensing). Avoid
placing your drive near a source of heat, exposing it to sunlight (even through a window),
or setting it in an environment that is too cold or humid.
• Physical Damage: Do not place heavy objects on the drive. Never use excessive force
on your drive.
p. 5
Page 6

Safety & General Use
Backup Your Data
The disk drive contained in your G-SPEED Studio R is a delicate electronic instrument and is
susceptible to damage from excessive physical shock. Under no circumstances will
G-Technology be held liable for the recovery or restoration of lost data. Any loss, corruption
or destruction of data while using a G-Technology drive is the sole responsibility of the user.
Make Two Backups
To help prevent the loss of your data, we highly recommend keeping TWO copies of your
data in separate storage locations. When configured in RAID 1, 5, or (protected modes),
G-SPEED Studio R will safeguard your data from individual hard drive failure. However, if any
file system corruption occurs, the data contained on G-SPEED Studio R may be affected.
For critical data, G-Technology recommends keeping one copy on your G-SPEED Studio R
and at least one additional copy on another storage device.
p. 6
Page 7

About Your G-SPEED Studio R
• Introduction .................................................... p. 8
• What’s in the Box .......................................... p. 9
• System Requirements ................................. p. 9
• Overview of the Drive ................................. p.10
Page 8
About Your G-SPEED Studio R
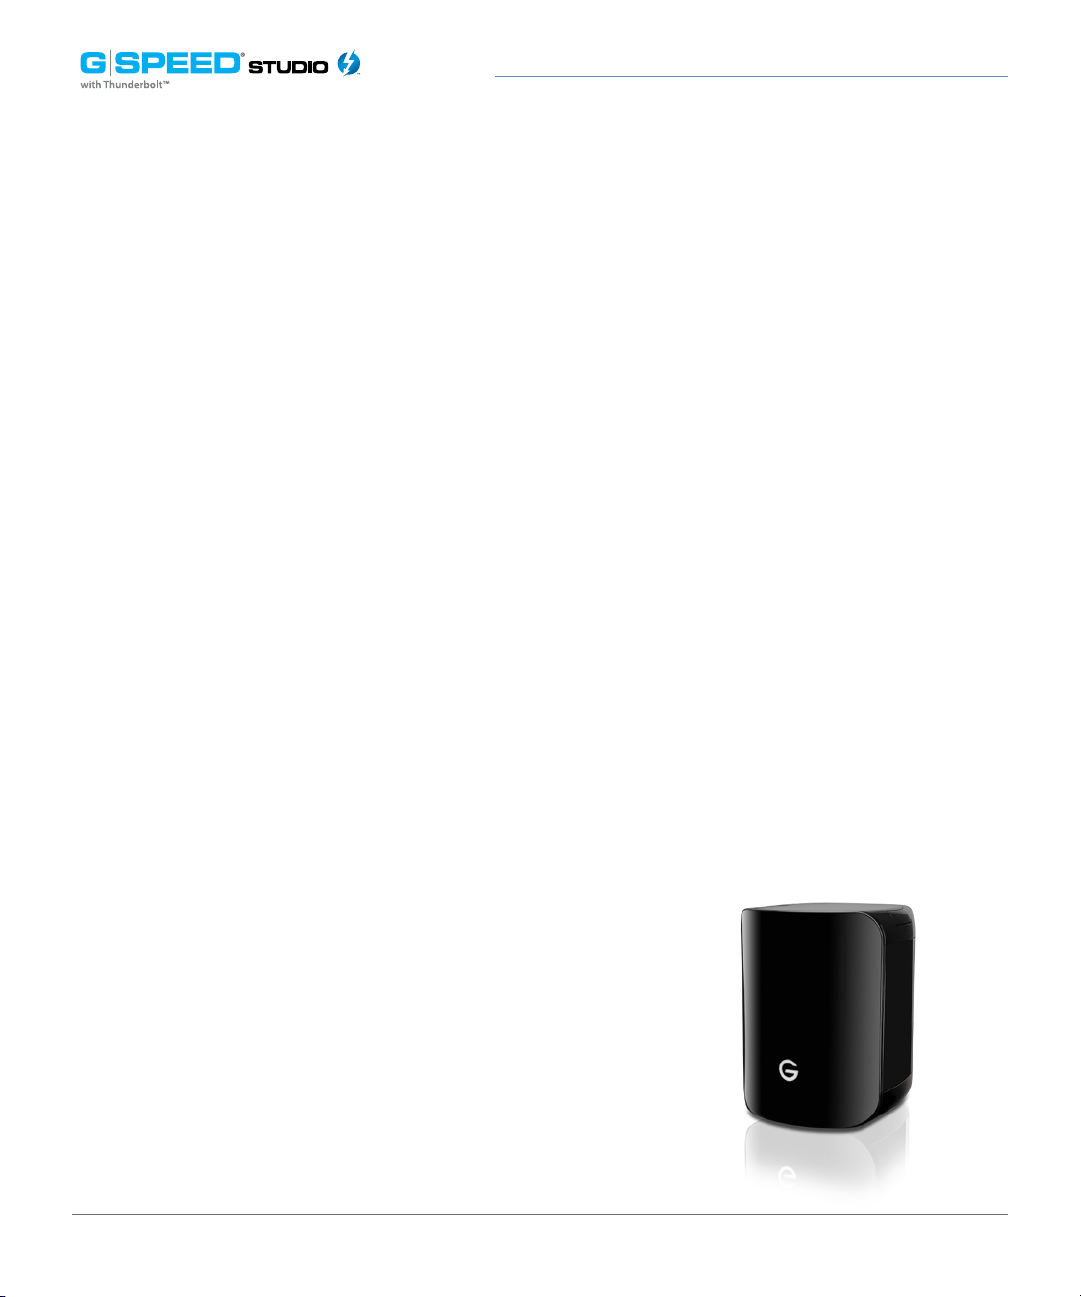
Introduction
Thank you for purchasing the G-Technology G-SPEED Studio, featuring
20 Gb/s Thunderbolt 2 interface technology.
Specifically designed for professional content creation applications,
the G-SPEED Studio R storage system provides RAID 0, 1, 5 and JBOD
functionality for both application performance and data protection.
The drive supports Thunderbolt 2™ technology which enables blazing
fast, concurrent data streams, capable of data transfer rates over 1300
MB/s. This opens up incredible time-saving and multi-stream possibilities
for content creation professionals who use bandwidth-intensive 2K
and 4K media formats.
With two bidirectional ports, a user can easily daisy chain up to six
high-speed Thunderbolt peripheral devices, including external disk
drives, video capture devices and external displays. Thunderbolt 2
is backward compatible with the previous, first-generation version
of Thunderbolt.
G-SPEED Studio supports the industry’s most demanding
professional content creation applications, including Final Cut Pro®,
Adobe Premiere® and Avid™ Media Composer.
p. 8
Page 9

About Your G-SPEED Studio R
What’s in the Box
The following items are included in the box:
• G-SPEED Studio R storage solution
• Four removable enterprise-class drive modules (installed in unit)
• (1) Thunderbolt cable
• Power Cord
• Quick Start Guide
If any items are missing, please contact G-Technology at
www.g-technology.com/contact/contact_support
Download the latest G-SPEED Studio R manual and utilities at:
www.g-technology.com/support/gspeed_studio_r
System Requirements
G-SPEED Studio R supports the following operating systems:
• Mac OS 10.9.2 or higher
The solution is set up at the factory for use with Mac OS® X systems and is formatted as
“HFS+” in a RAID 5 configuration.
p. 9
Page 10
About Your G-SPEED Studio R
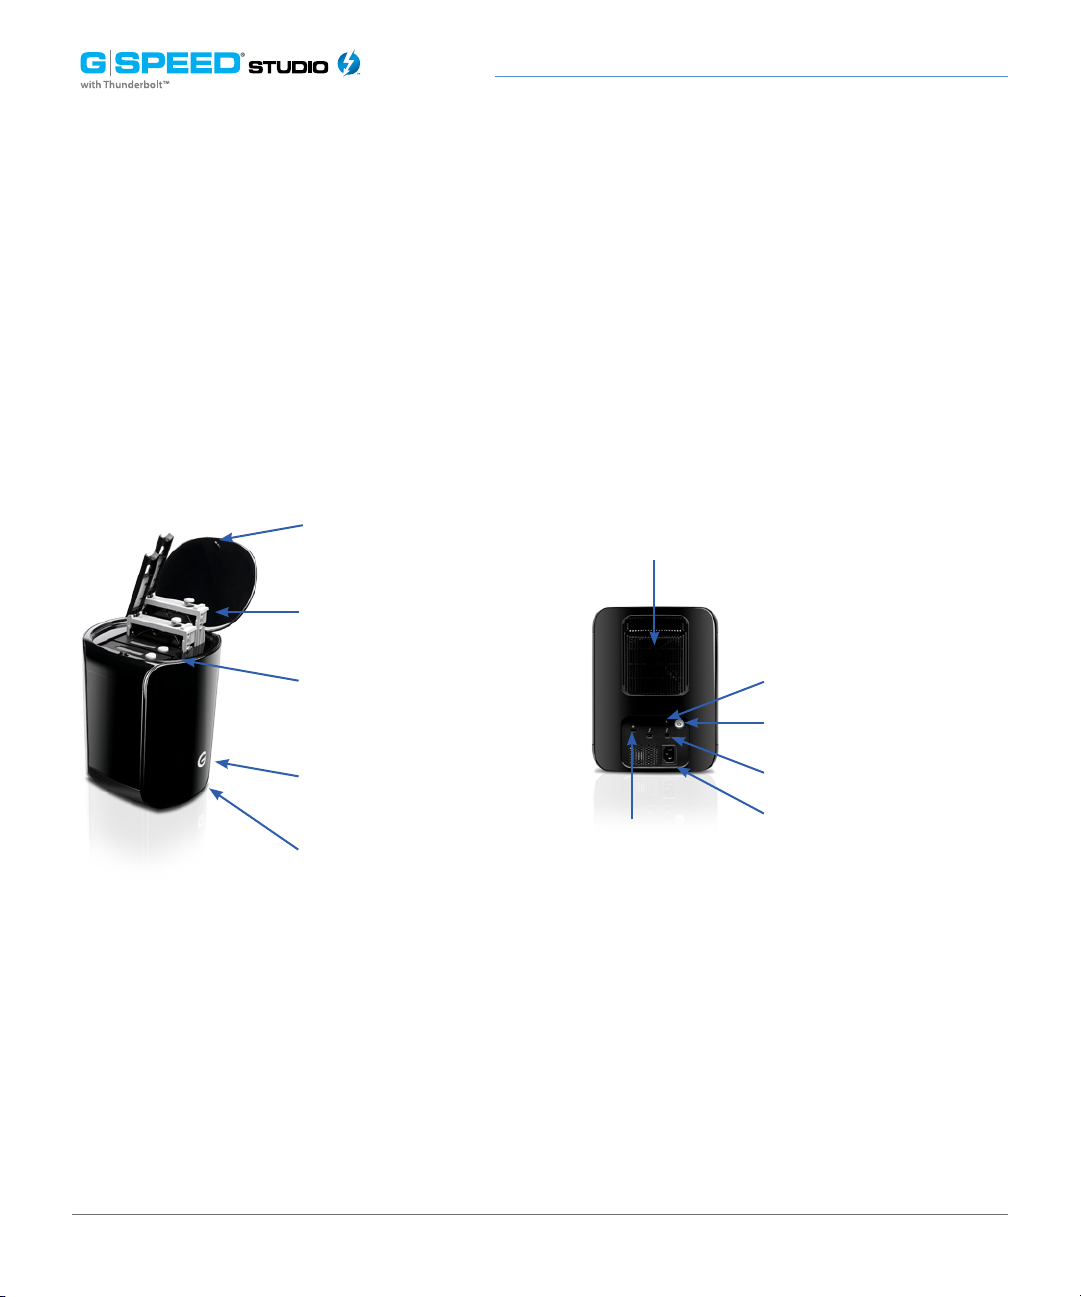
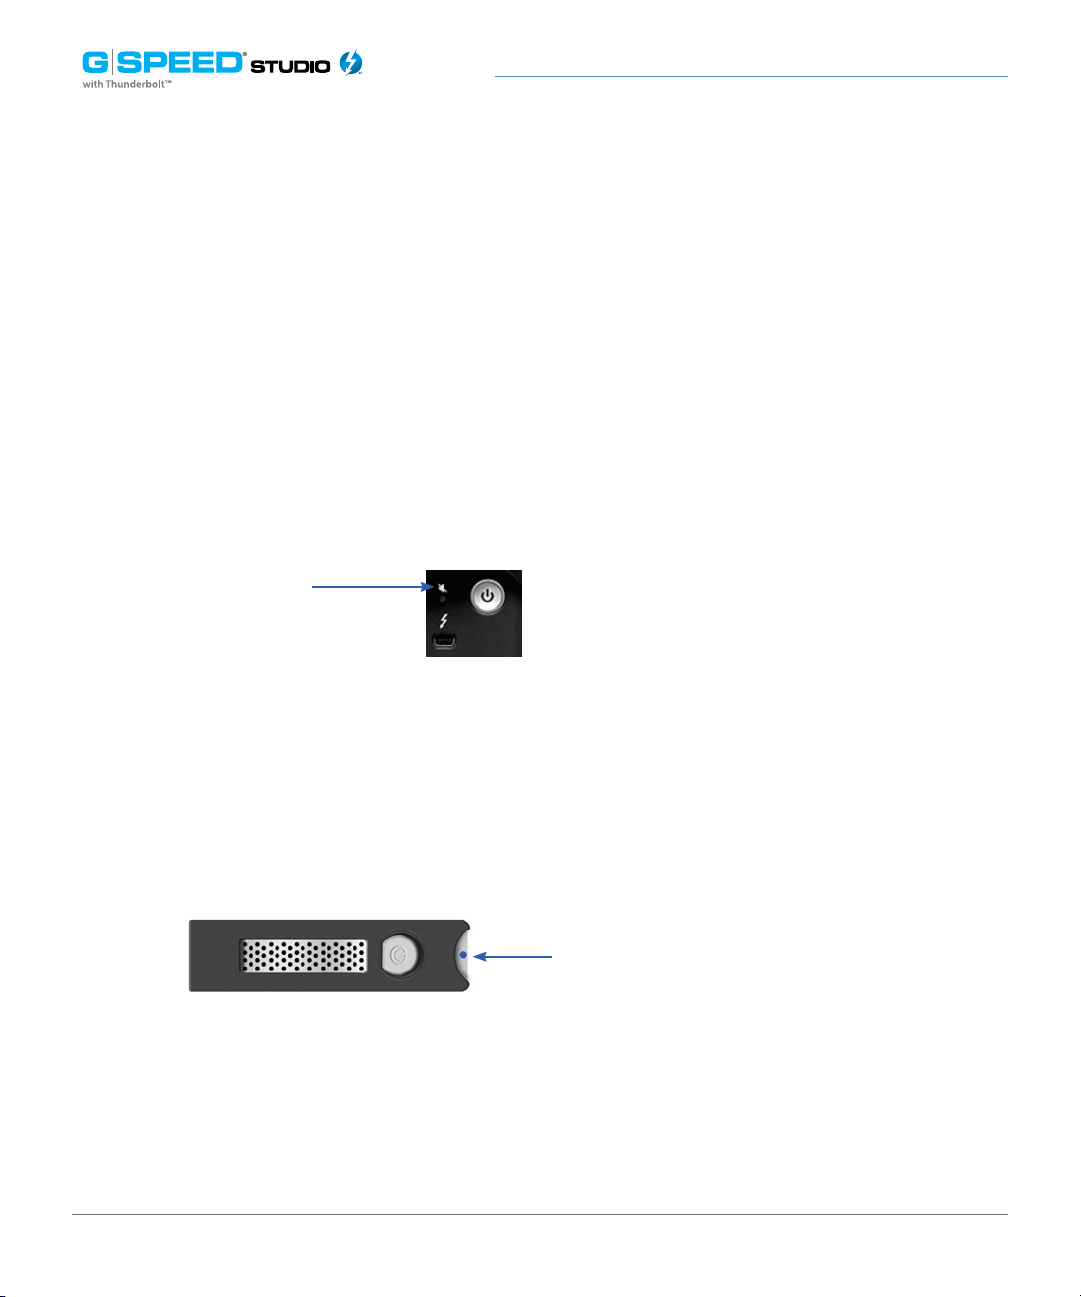
Overview of the Drive
G-SPEED Studio R ships from the factory preconfigured in RAID 5. The RAID controller
also supports RAID and JBOD configurations. For an explanation of these RAID
levels, please refer to RAID Levels Explained. If you wish to change the RAID mode,
please refer to Change the RAID Mode.
Drive Lock Hatch
“Smart” Cooling Fans
(4) Removable Disk Drives
Drive Module Power/
Activity LED
Power LED
Temperature / Fan
Warning red LED light
Alarm Mute Button
On/Off Switch
Thunderbolt Port
AC Input
Kensington Slot
p. 10
Page 11

Using Your Drive
• Drive Activity LED ....................................... p. 12
• Warning LED and Alarms ......................... p. 13
• Disconnect the Drive ................................ p. 14
Page 12
Conguring G-SPEED Studio R
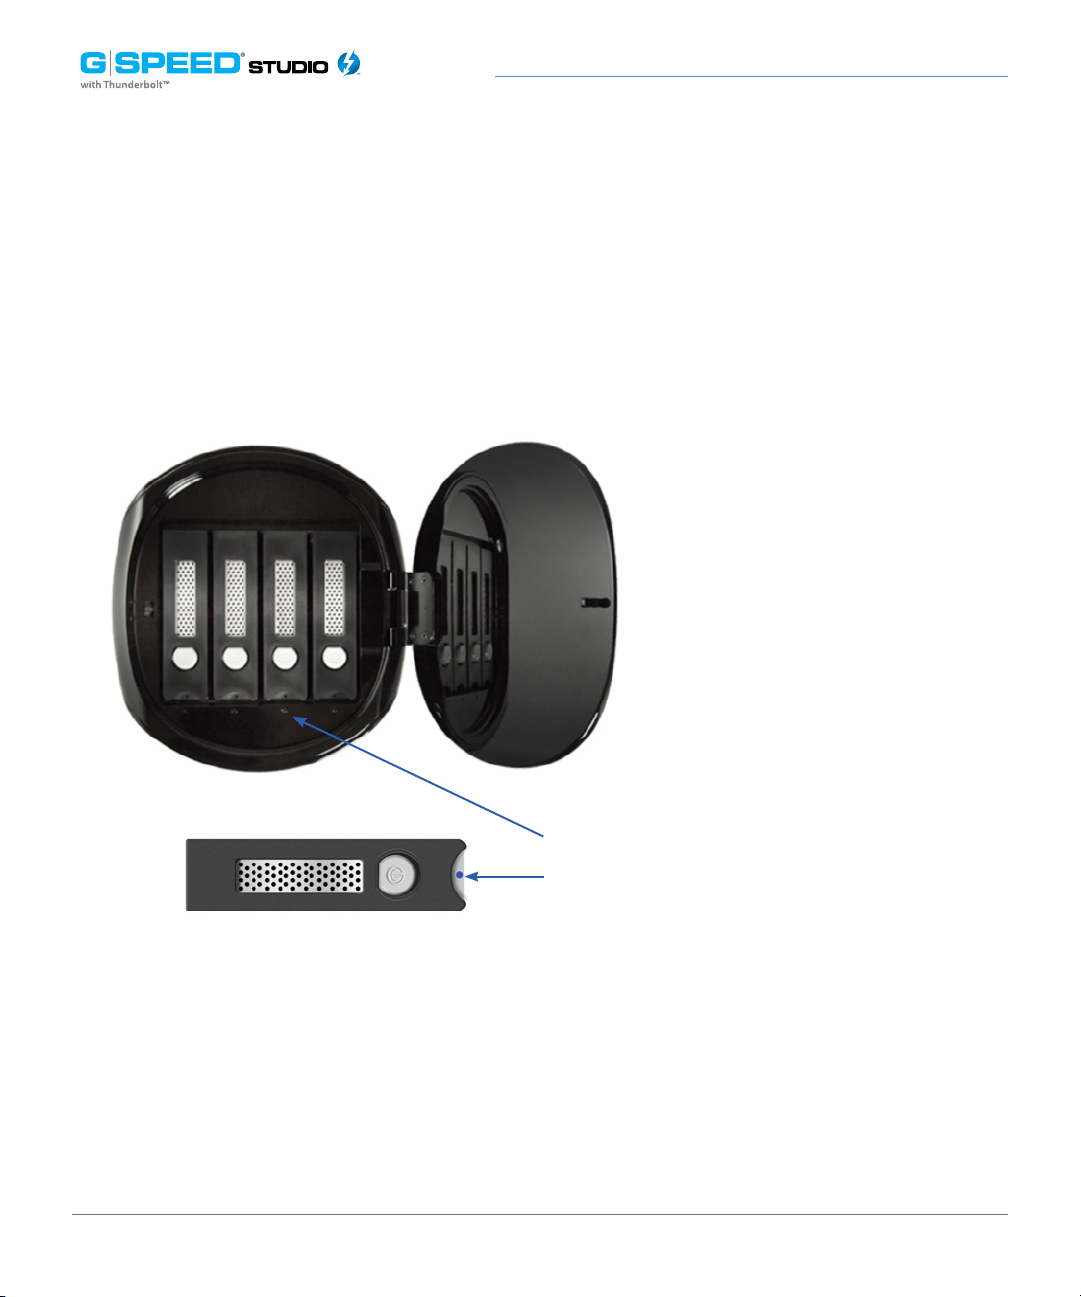
Drive Activity LED
Under normal operation, each G-SPEED Studio R drive module has an LED that glows
blue, indicating a connection to the RAID controller. The LED will flash when the drive
is being accessed.
Drive module power/
activity LED
p. 12
Page 13
Conguring G-SPEED Studio R
Warning LED and Alarms
The G-SPEED Studio R enclosure integrates an audible alarm or buzzer that will sound
when any of the following conditions exist:
Internal temperature exceeds a temperature of 60°C.
Main cooling fan fails
Fan slows to a state where the fan can no longer adequately cool the system
To silence the alarm, push the Alarm Mute button located on the back of
G-SPEED Studio R as shown below.
Alarm Mute Button
In addition to the audible alarm, the LED located on the front G-SPEED Studio R
will illuminate red.
If there is an issue with G-SPEED Studio R drive module, the LED on the
module will glow red indicating a drive or RAID issue. Please launch the
G-SPEED Studio R Utility to determine if any user action is required or contact
our support team for further troubleshooting.
Drive Module LED (red)
indicating an issue
Alarm Mute button
If you hear an audible alarm and see the red warning LED on G-SPEED Studio R front,
stop using the enclosure and contact G-Technology support.
p. 13
Page 14

Conguring G-SPEED Studio R
Disconnect the Drive
A great feature of Thunderbolt technology and G-SPEED Studio R is the ability to connect
and disconnect the system while your computer is running. To prevent drive failures
and/or data loss, it is important to follow the steps below when disconnecting or
unmounting the drive from your computer.
1. Before powering down and disconnecting the drive, unmount the system by simply
dragging the G-SPEED Studio R icon to the trash located in the system dock.
Keyboard shortcut: Select the drive icon and press Command+E.
2. It is safe to remove the drive from your system when the drive icon is no longer
present on your desktop.
3. To power off G-SPEED Studio R simply unplug the Thunderbolt cable. If no background
activities are in progress, the unit will automatically go into standby.
p. 14
Page 15

Conguring G-SPEED Studio R
• G-Technology Assistant ...................................................................17
• Recommended Installation ............................................................17
• G-SPEED Studio R Utility ................................................................. 18
• Power Modes on G-SPEED Studio R ........................................... 22
• Shutting Down G-SPEED Studio R Units................................... 22
• Daisy Chaining Multiple G-SPEED Studio R Units ................. 23
• Displaying Multiple G-SPEED Studio R Units .......................... 25
• Manage the Enclosure with G-SPEED Studio R Utility ......... 25
• Accessing the G-SPEED Studio R Utility .................................... 26
• Unlocking the UI ............................................................................... 27
• G-SPEED Studio R Utility Overview ............................................ 29
• Toolbar Icons ...................................................................................... 30
• Customizing the Toolbar ................................................................ 30
• Component List ................................................................................. 31
• Physical Drive Menu ......................................................................... 31
• Highlight Arrays ................................................................................. 32
• Managing System Information .................................................... 33
• Viewing System Information ........................................................ 34
• Making System Settings ................................................................. 34
• Clearing Statistics.............................................................................. 35
• Restoring Factory Default Settings ............................................ 35
• Saving a Service Report .................................................................. 36
• Updating Firmware .......................................................................... 36
• Managing Enclosures ...................................................................... 37
• Viewing the Enclosure Information ........................................... 37
• Viewing Temperature Sensor Information .............................. 38
• Locating an Enclosure ..................................................................... 39
• Managing the RAID Enclosure ..................................................... 39
• Viewing Controller Information .................................................. 39
• Viewing Controller Statistics ......................................................... 41
• Changing Controller Settings ...................................................... 41
• Changing Buzzer Settings ............................................................. 42
• Managing Background Activities ................................................ 43
• Viewing Current Background Activities ................................... 43
• Viewing Scheduled Background Activities ............................. 44
• Adding a Scheduled Background Activity .............................. 44
• Changing Background Activity Schedule ................................ 45
• Enabling or Disabling a Scheduled Background Activity .. 47
• Deleting a Scheduled Background Activity ............................ 47
• Media Patrol ........................................................................................ 48
• Changing Media Patrol Settings ................................................. 48
• Redundancy Check .......................................................................... 48
• Changing Redundancy Check Settings .................................... 49
• Initialization ........................................................................................ 49
• Changing Initialization Settings .................................................. 50
• Rebuild .................................................................................................. 50
• Changing Rebuild Settings ........................................................... 51
• Migration ............................................................................................. 51
• Changing Migration Settings ....................................................... 52
• PDM ........................................................................................................ 52
• Changing PDM Settings ................................................................. 53
• Transition ............................................................................................. 53
• Changing Transition Settings ....................................................... 54
• Synchronization ................................................................................ 54
• Changing Synchronization Settings .......................................... 55
• Managing Physical Drives .............................................................. 55
• Viewing a List of Physical Drives ................................................. 56
• Viewing Physical Drive Information ........................................... 56
• Viewing Physical Drive Statistics ................................................. 57
• Viewing Physical Drive SMART Log Information ................... 58
• Locating a Physical Drive ............................................................... 58
• Changing Global Physical Drive Settings ................................ 60
• Changing Individual Physical Drive Settings .......................... 60
• Changing Physical Drive SMART Log Settings ....................... 61
• Clearing a Stale or PFA Condition ............................................... 62
Page 16

Conguring G-SPEED Studio R
• Running Media Patrol on Your Physical Drives ...................... 63
• Managing Disk Arrays ..................................................................... 64
• Viewing a List of Disk Arrays ......................................................... 64
• Viewing Disk Array Information .................................................. 65
• Creating a Disk Array Manually .................................................... 65
• To Create a Disk Array and Logical Drive.................................. 66
• Creating a Disk Array and Logical Drive With the Wizard .. 67
• Choosing Automatic Conguration ........................................... 68
• Choosing Express Conguration ................................................ 69
• Choosing Advanced Conguration ........................................... 71
• Formatting Your Logical Drives ................................................... 73
• Changing Disk Array Settings ...................................................... 73
• Locating a Disk Array ........................................................................74
• Deleting a Disk Array ....................................................................... 75
• Preparing a Disk Array for Transport ......................................... 76
• Rebuilding a Disk Array .................................................................. 76
• Pausing and Resuming a Rebuild ............................................... 78
• Stopping a Rebuild ........................................................................... 78
• Managing Logical Drives ............................................................... 78
• Viewing a List of Logical Drives ................................................... 79
• Viewing Logical Drive Information ............................................ 79
• Viewing Logical Drive Statistics ................................................... 80
• Changing Logical Drive Settings ................................................ 81
• Viewing Logical Drive Check Tables .......................................... 82
• Creating a Logical Drive Manually .............................................. 82
• Formatting Your Logical Drive ..................................................... 84
• Locating a Logical Drive ................................................................. 84
• Deleting a Logical Drive ................................................................. 85
• Initializing a Logical Drive .............................................................. 85
• Pausing and Resuming an Initialization ................................... 86
• Stopping an Initialization ............................................................... 86
• Redundancy Check on a Logical Drive ..................................... 87
• Pausing and Resuming a Redundancy Check ........................ 87
• Stopping a Redundancy Check ................................................... 87
• Migrating a Logical Drive ............................................................... 88
• Running PDM on a Logical Drive ................................................ 89
• Pausing and Resuming PDM ......................................................... 89
• Stopping PDM ............................................................................... …89
• Managing Spare Drives .................................................................. 90
• Viewing a List of Spare Drives ...................................................... 90
• Viewing Spare Drive Information ............................................... 90
• Creating a Spare Drive Manually ................................................. 91
• Changing Spare Drive Settings.................................................... 92
• Running Spare Check ...................................................................... 93
• Deleting a Spare Drive .................................................................... 93
• Running a Transition on a Spare Drive ...................................... 93
• Running a Transition ........................................................................ 94
• Pausing and Resuming a Transition ........................................... 94
• Stopping, Pausing or Resuming a Transition .......................... 94
• Formatting Logical Drives ............................................................. 95
• G-SPEED Studio R Software With Default Settings .............. 95
• G-SPEED Studio R Utility With Custom Settings .................... 96
• Disk Utility............................................................................................ 97
• Spare Drives ........................................................................................ 98
• Running a Transition ........................................................................ 99
Page 17

Conguring G-SPEED Studio R
G-Technology Assistant
To enhance your experience with G-SPEED Studio R we have developed the G-Technology
Assistant (GTA) utility. The utility provides notifications and details on G-SPEED Studio R
as well as a link to the configuration and management utility known as the G-SPEED
Studio R Utility.
The G-Technology Assistant is available for download from the G-Technology website at
www.g-technology.com/support. Please visit the site to check for updates as well as
helpful tips and tricks.
Recommended Installation
When you first setup G-SPEED Studio R you will want to install the G-Technology Assistant
on your computer along with the G-SPEED Studio R Utility.
To install the G-Technology Assistant, follow the simple onscreen instructions. Once you
have successfully completed the installation, you can access the utility from the Mac OS
Menu Bar and/or from the Applications folder.
Please visit the G-Technology Assistant Overview for general functionality and to
optimize the experience with your G-SPEED Studio R.
p. 17
Page 18

Conguring G-SPEED Studio R
G-SPEED Studio R Utility
G-SPEED Studio R ships preconfigured in RAID 5 and is ready to use out of the box
without configuration. However, G-Technology recommends installing the bundled
G-Technology Assistant utility and the G-SPEED Studio R utility even if you do not plan
to make any changes to device configuration. The applications are useful for monitoring
the system and getting firmware updates. Additionally, the utility is necessary if you
plan to change the enclosure’s default RAID configuration (RAID 5) or if you will swap
out any of the pre-installed hard drives.
The G-SPEED Studio R Software utility installation package is available on the
G-Technology website and can be easily downloaded. Follow the instructions below
to easily install the G-SPEED Studio R utility.
1. Visit www.g-technology.com/support to download the G-SPEED Studio R utility.
2. Mount the virtual drive containing the installation software package.*
* The version number of the .dmg file and .pkg file will change as it is updated.
The version number used in this example is for illustration purposes.
p. 18
Page 19
Conguring G-SPEED Studio R
3. Double-click on the G-SPEED_Studio_R_Utility.pkg* file to begin the installation.
* The version number of the .dmg file and .pkg file will change as it is updated.
The version number used in this example is for illustration purposes.
The introduction window explains that software will be installed on the Mac. You can
review the software license agreement. Once ready, click the Continue button
to proceed.
p. 19
Page 20
Conguring G-SPEED Studio R
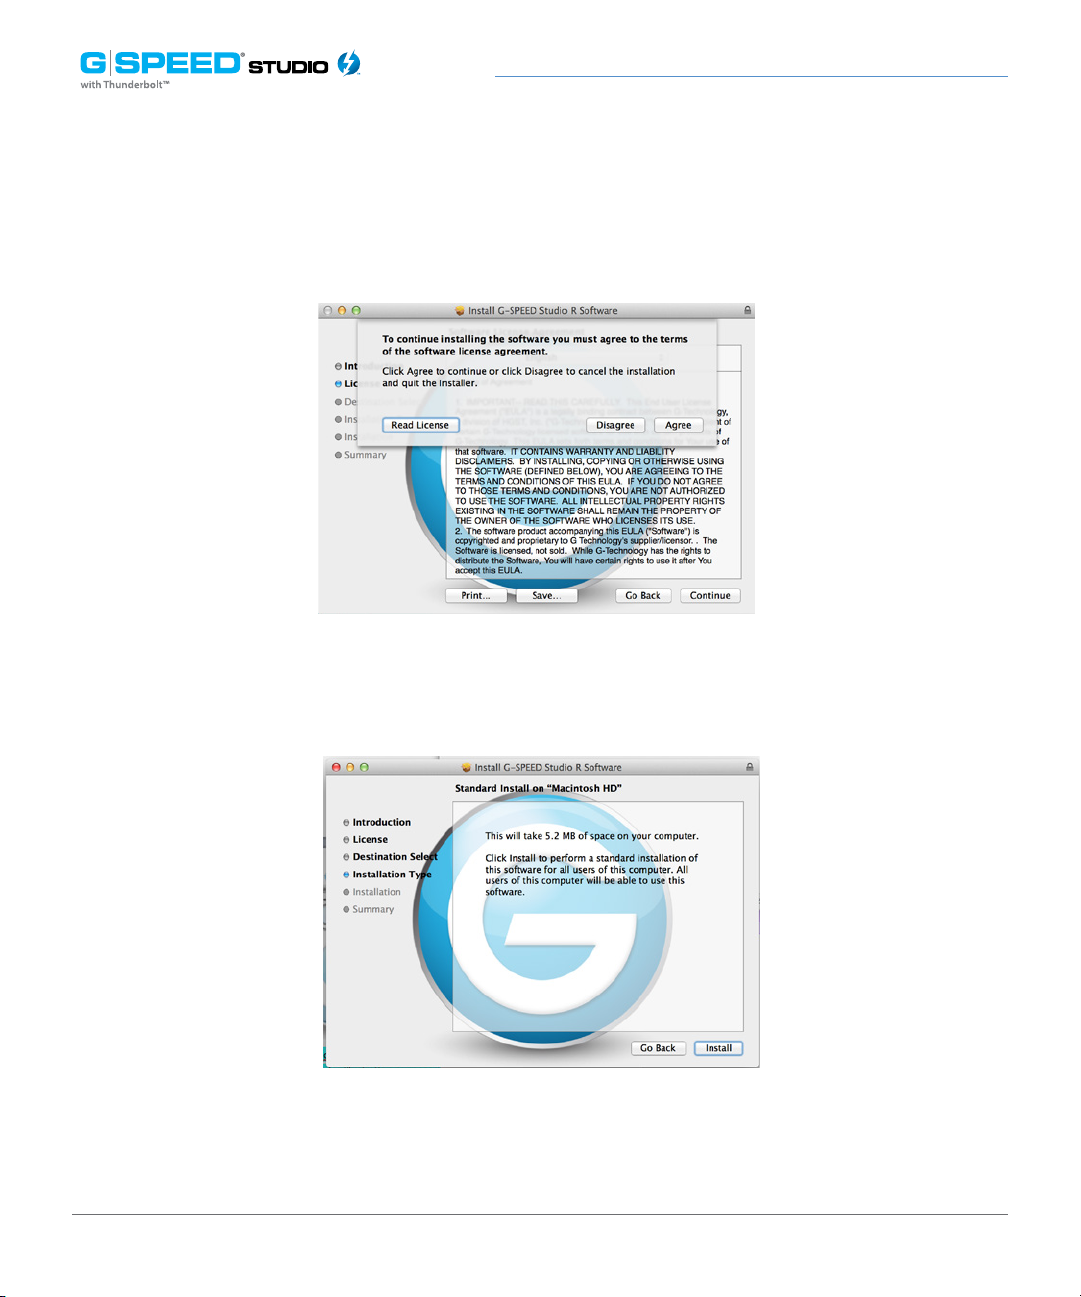
4. The software license agreement will appear. Please read the statement and click Continue
to proceed.
5. Click Agree if you agree to the terms of the license. To read the license, click Read License.
Choose Disagree if you do not agree with the terms. This will terminate the installation procedure.
p. 20
Page 21
Conguring G-SPEED Studio R
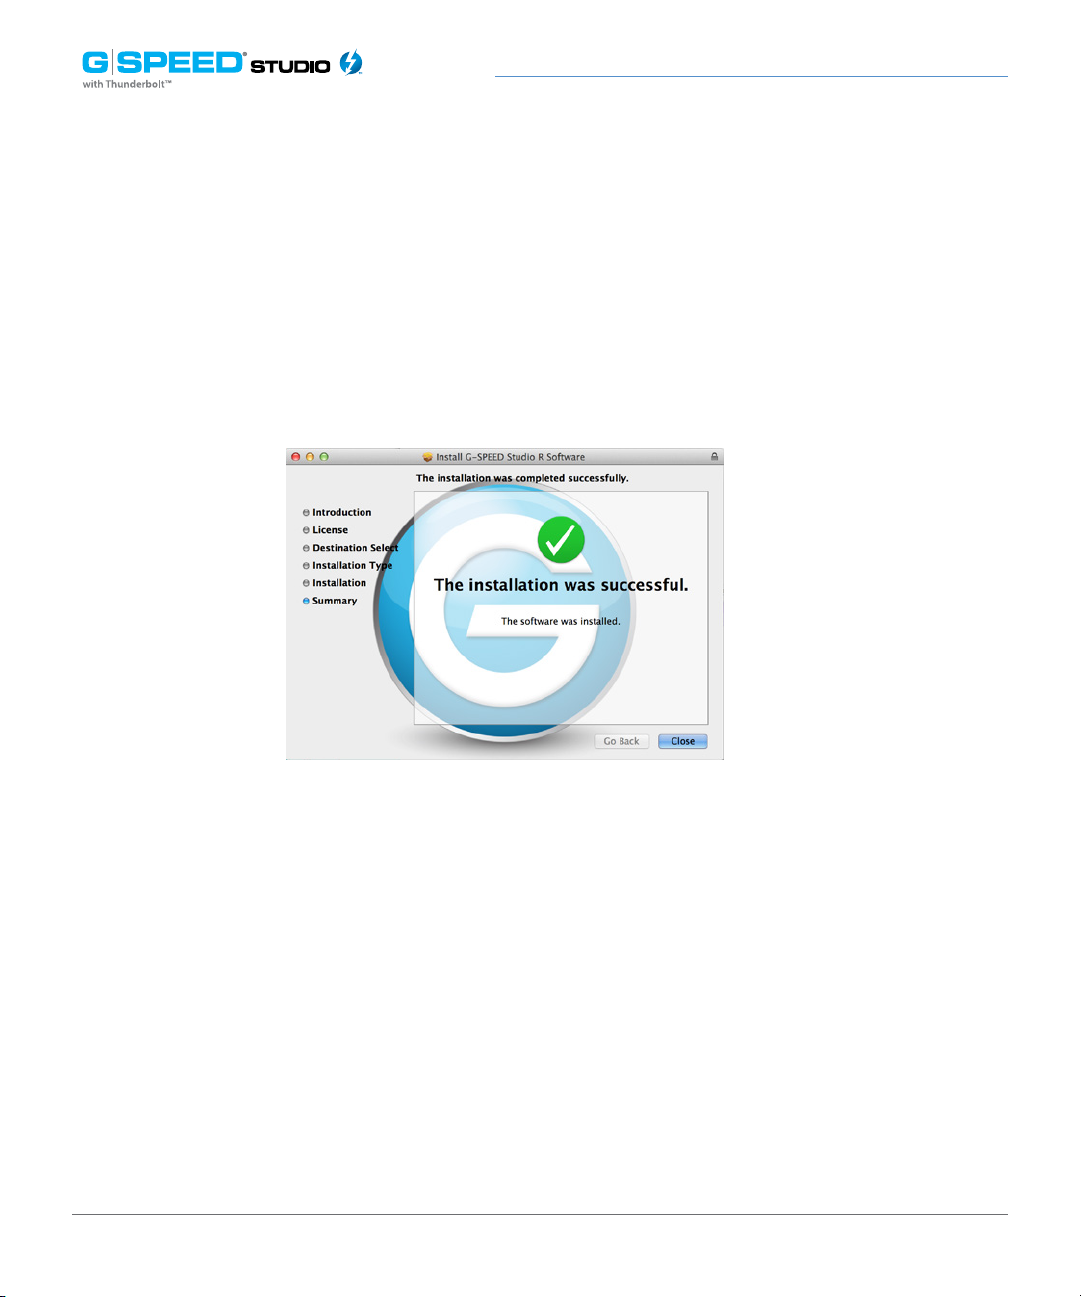
6. Click Install to begin the installation process.
7. The G-SPEED Studio R utility software will install in a few moments. Once complete, a
message will inform you that the installation was successful. Click Close to complete the
installation procedure.
The G-SPEED Studio R Utility is now available to help manage your G-SPEED Studio R.
Use this tool if you need to modify the array configuration, retrieve system information
or update the enclosure firmware. The utility tool is also useful for monitoring the storage
system status as well as troubleshooting. For more information on using the G-SPEED
Studio R, including instructions on how to use the Wizard menu or install a different
RAID array configuration, please visit Manage With G-SPEED Studio R Utility.
p. 21
Page 22

Conguring G-SPEED Studio R
Power Modes on G-SPEED Studio R
G-SPEED Studio R introduces new power-saving and condition-response features.
The automatic power features are:
• Sleep — When your Mac computer goes to sleep, G-SPEED Studio R
automatically goes into standby mode after all background activities complete.
• Wake — When your system wakes, G-SPEED Studio R automatically powers on.
• Shutdown — When your Mac computer shuts down, G-SPEED Studio R
automatically shuts down.
• Restart After Shutdown — When your Mac computer powers up, G-SPEED
Studio R automatically powers up.
• HDD Spin Down — Your G-SPEED Studio R includes a power saving feature
that spins down the hard disk drives if the enclosure is idle for 30 minutes. This
feature can be enabled or disabled, and the amount of idle time can be adjusted
in the G-SPEED Studio R Utility. Click on the Controller link in the Dashboard,
then click the Settings button to change this setting.
Shutting Down G-SPEED Studio R
The storage solution shuts down automatically if you turn off your Mac. If you want to
turn off your G-SPEED Studio R without shutting down your computer, follow these steps.
1. Eject G-SPEED Studio R by right-clicking on the drive icon and choosing
the Eject option.
p. 22
Page 23

Conguring G-SPEED Studio R
2. Launch the G-SPEED Studio R Utility and click on the System Information tab
in the navigation bar. Unlock the user interface (see Unlocking the UI), click on
the Shutdown button then click on Shutdown in the new menu that appears.
You will need to type “CONFIRM” in the pop-up menu and click the Conrm
button.
Alternatively, you can press and hold the power button, located on the back of the units,
until the LED on the front turns off. When you release the power button, the system will
be off and can only be turned on by pressing the power button or removing the power
cord and re-inserting the power cord.
Daisy Chaining Multiple G-SPEED Studio R Units
Up to six G-SPEED Studio R or Thunderbolt-enabled devices can be connected to each
other and to your Mac in a sequential Thunderbolt connection. To daisy chain multiple
Thunderbolt devices to your G-SPEED Studio R, follow these steps:
1. Use a Thunderbolt cable to connect one of the Thunderbolt ports on the back
of your computer to one of the Thunderbolt ports on your G-SPEED Studio R.
2. Use another Thunderbolt cable to connect the second Thunderbolt port on
G-SPEED Studio R with one of the Thunderbolt ports on a second device.
3. Use additional Thunderbolt cables to link subsequent storage enclosures or
Thunderbolt enabled devices into the daisy chain via available Thunderbolt
ports.
p. 23
Page 24
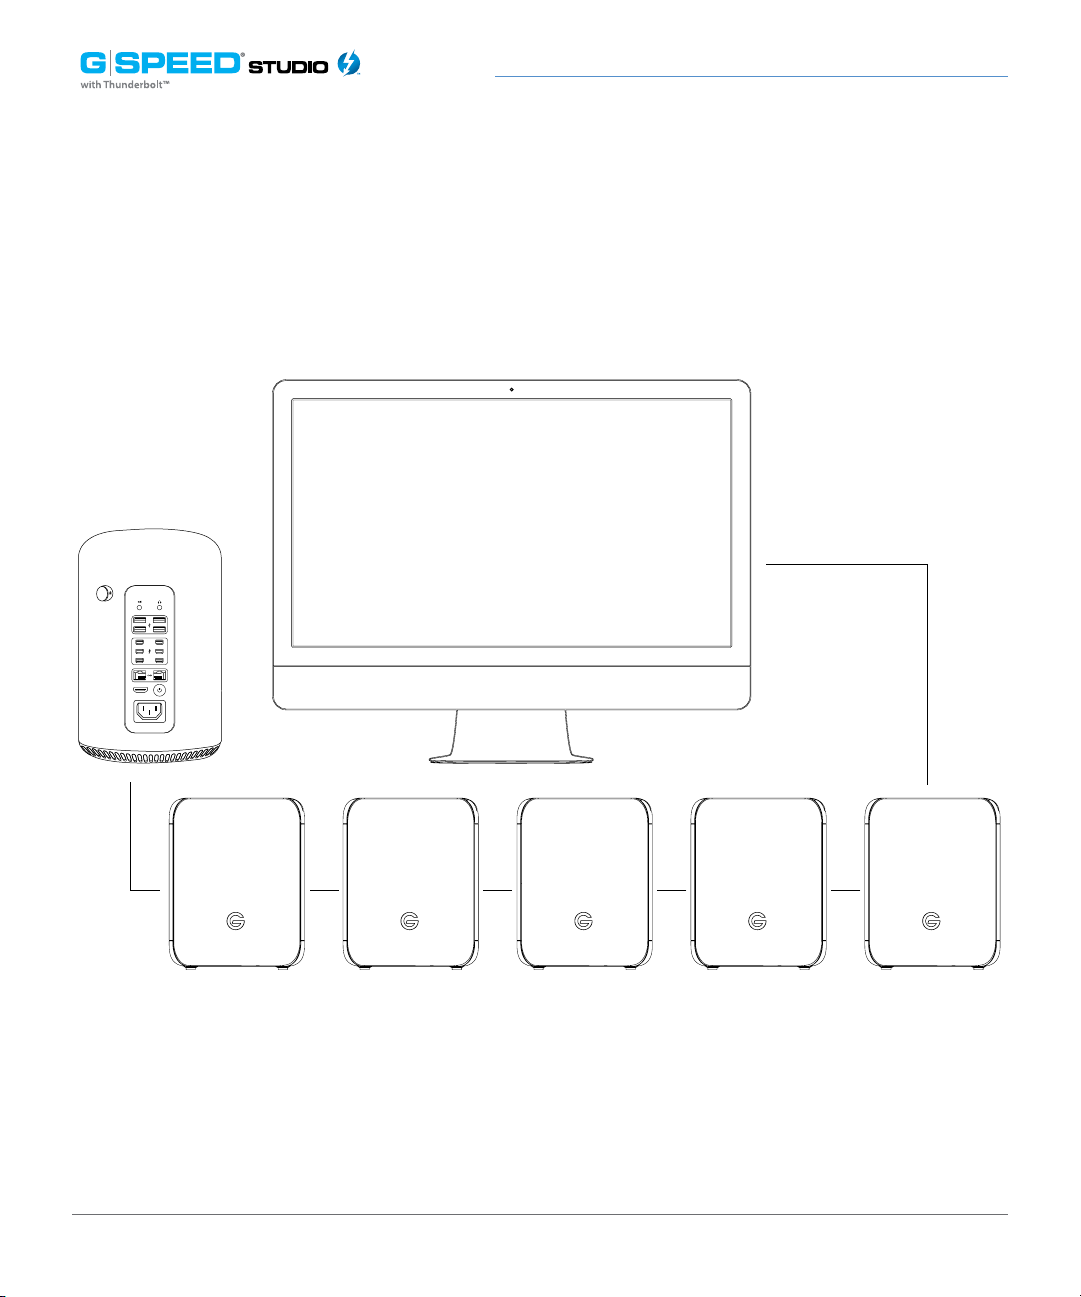
Thunderbolt daisy chain connections
Conguring G-SPEED Studio R
HDMI
p. 24
Page 25
Conguring G-SPEED Studio R
Displaying Multiple G-SPEED Studio R Units
The G-SPEED Studio R Utility displays a separate window for each powered up G-SPEED
Studio R unit connected by Thunderbolt.
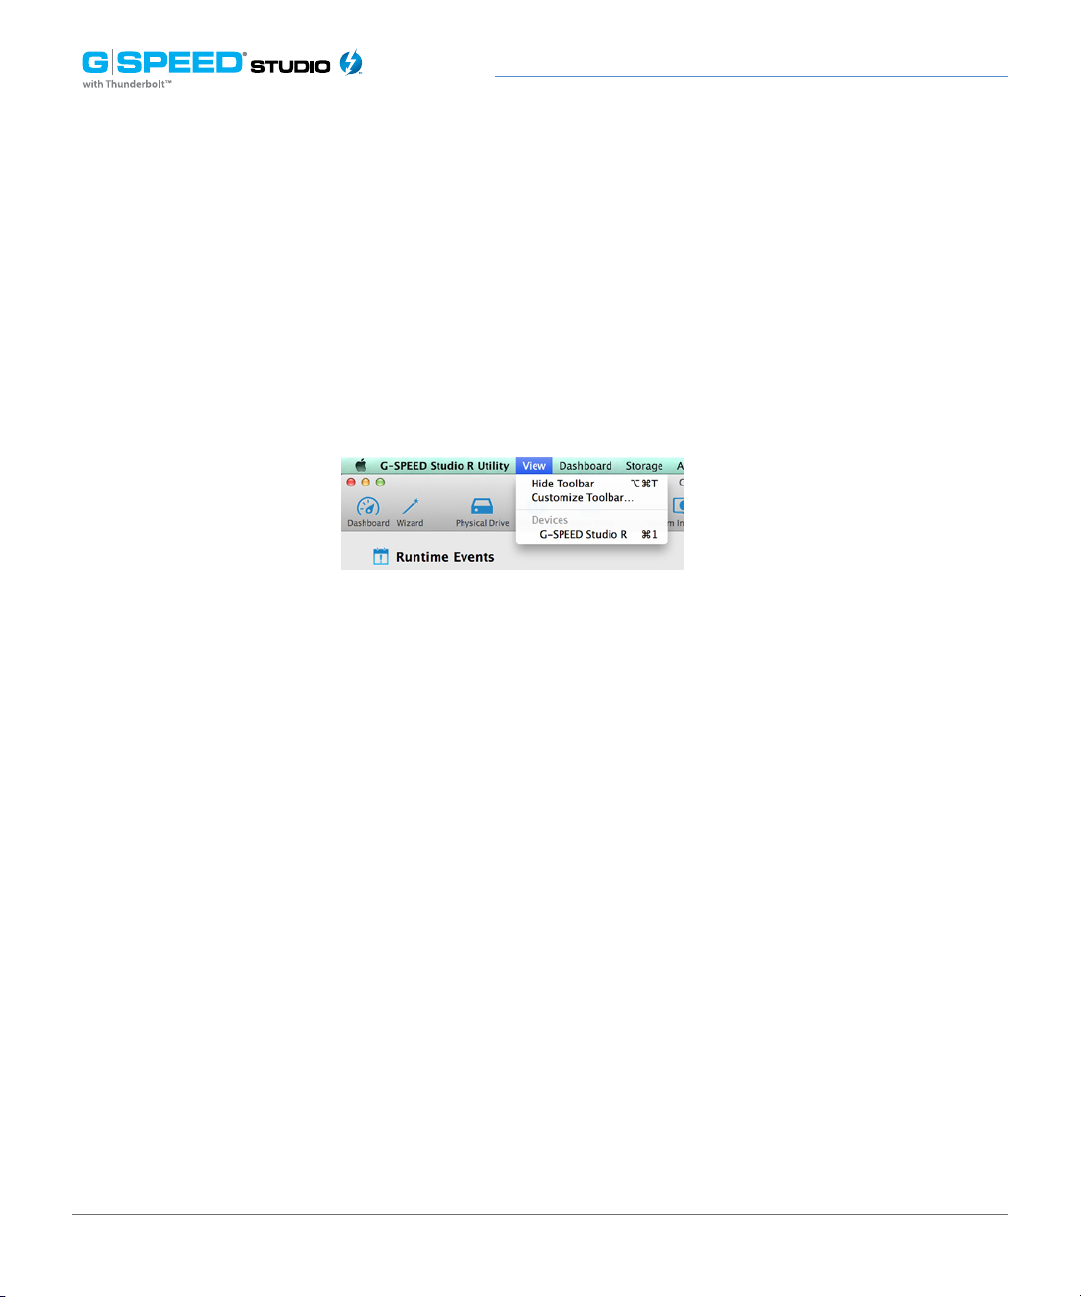
• To view a list of the G-SPEED Studio R units, click the View menu.
• To display a G-SPEED Studio R unit in the G-SPEED Studio R Utility, go to the
View menu choose the unit you want to see.
Note that G-SPEED Studio R units are listed in the order in which they are recognized.
Manage the Enclosure With G-SPEED Studio R Utility
This section contains the following topics:
1. “Accessing the G-SPEED Studio R Utility”
2. “G-SPEED Studio R Utility Overview”
3. “Managing System”
4. “Managing the RAID Controller”
5. “Managing Background Activities”
6. “Managing Physical Drives”
7. “Managing Disk Arrays”
8. “Managing Logical Drives”
9. “Managing Spare Drives”
p. 25
Page 26
Conguring G-SPEED Studio R
The G-SPEED Studio R Utility requires a Thunderbolt connection between your computer
and your G-SPEED Studio R. See Connect G-SPEED Studio R to Your Mac.
The G-SPEED Studio R Utility must be installed onto your computer before you can use
it. See Installing G-SPEED Studio R Utility.
Accessing the G-SPEED Studio R Utility
Accessing the G-SPEED Studio R Utility includes:
• Opening and closing G-SPEED Studio Utility
• Unlocking the UI
Opening
To open the G-SPEED Studio R Utility, double-click the G-SPEED Studio R Utility icon
in the Applications folder. The G-Technology Utility window will open and display the
Dashboard. See G-SPEED Studio R Utility Overview.
p. 26
Page 27
Conguring G-SPEED Studio R
You can also choose to place an alias into the dock.
Closing
There are two ways to close the G-SPEED Studio R Utility:
G-SPEED Studio Utility icon
12. Click the G-SPEED Studio R Utility drop-down menu and choose Quit G-SPEED Studio R Utility.
13. Press Command+Q
p. 27
Page 28
Conguring G-SPEED Studio R
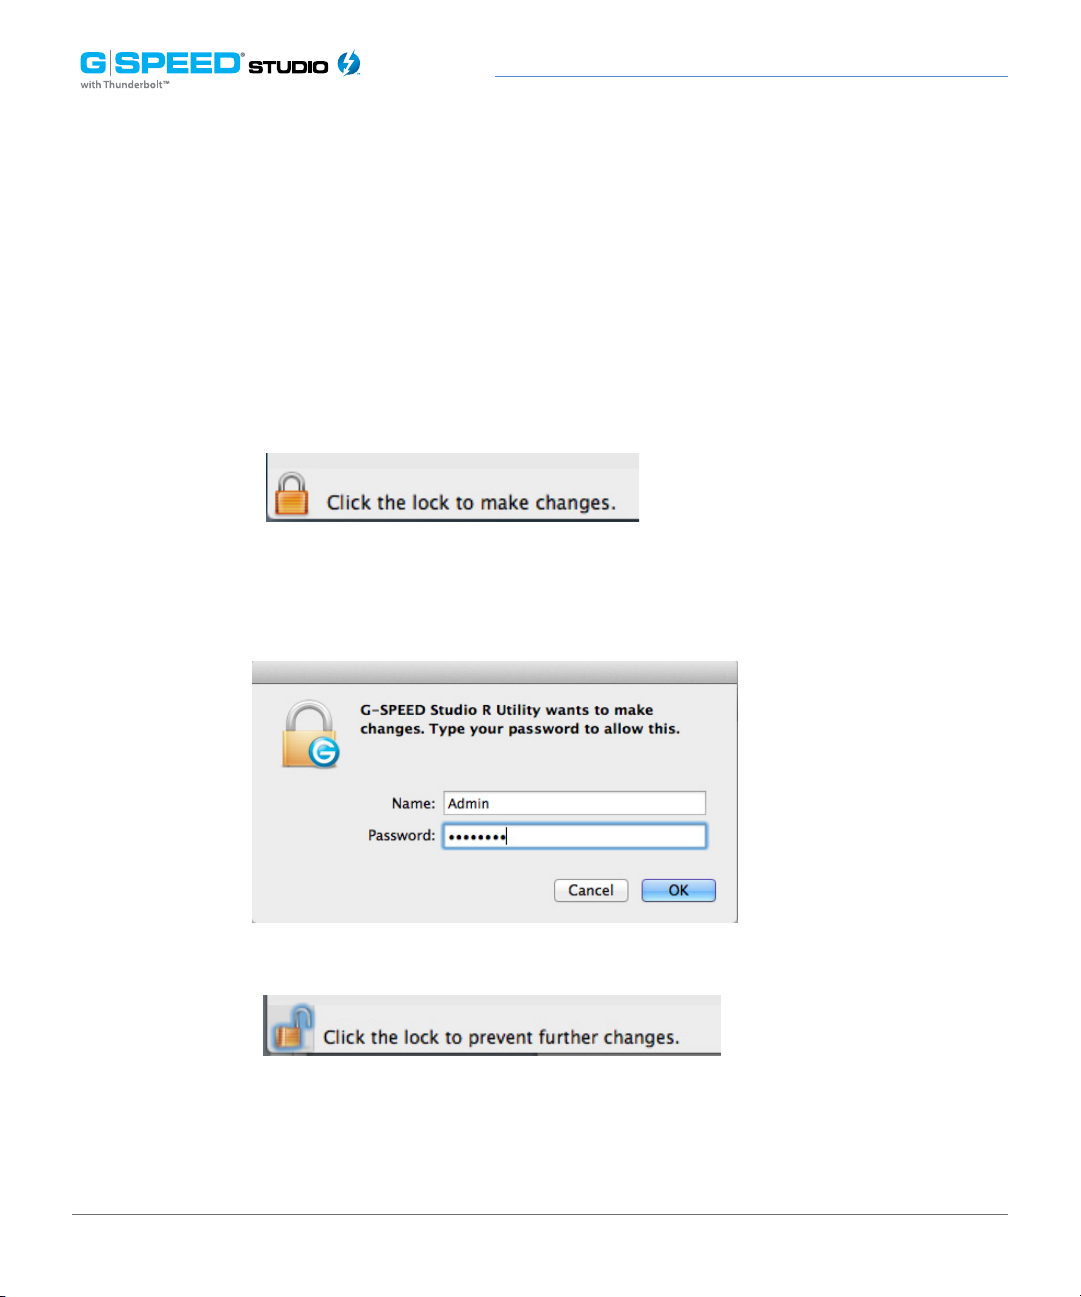
Unlocking the UI
By default, the user interface (UI) is locked to prevent unauthorized changes to your
RAID system. When the UI is locked, you cannot create logical drives or change settings
on your G-SPEED Studio R.
To unlock the UI:
1. At the lower-left of the G-SPEED Studio R Utility window, click the closed lock icon.
The G-SPEED Studio R Utility password dialog box will open.
Type your computer password into the Password field, then click the OK button.
The lock icon will change to open.
You can now add and delete logical drives, make setting changes, run background activities
and update your G-SPEED Studio R.
p. 28
Page 29
Conguring G-SPEED Studio R
G-SPEED Studio R Utility Overview
The G-SPEED Studio R Utility interface consists of menus and icons, each leading you to
a specific function.
The G-SPEED Studio R Utility interface with the Dashboard displayed:
Toolb a r icons
• G-SPEED Studio R Utility – About, Checking for Updates, Preferences, Services, Hide, Quit
• View – Show/Hide Toolbar, Customize Toolbar, Devices (G-SPEED Studio R units)
• Dashboard – Show the Dashboard
• Storage – Wizard, Disk Array List, Logical Drive List, Spare Drive List
• Admin – System Information, Events, Background Activities, System Updates,
Performance Monitor, Restore Factory Defaults
• Window – Minimize, Zoom, Close Window, Bring All to Front, G-SPEED Studio R unit
• Help – Links to Online help and the Support Site
Most of the functions accessed in the menu bar are described in this chapter.
p. 29
Page 30

Conguring G-SPEED Studio R
Toolbar Icons
• Dashboard – Displays the Dashboard and overview
• Wizard – Displays the Wizard options for quickly setting up RAID arrays
• Physical Drive – Displays the physical drive list, settings and functions
• Disk Array – Displays menu for monitoring, managing and creating disk arrays
• Logical Drive – Displays the logical drive list, settings and functions
• System Information – Displays G-SPEED Studio R information and settings
• Events – Displays the Event logs
• Background Activity – Display or run background tasks
The above Icons are the default icons. You can add additional icons such as Top View, Back
View and Component List.
Customizing the Toolbar
You can customize the toolbar by adding or removing icons. To add remove toolbar
icons:
1. From the G-SPEED Studio R Utility window, click the View menu and choose Customize
Toolbar. The toolbar options dialog box will appear.
2. Do one or both actions as needed:
• Click and drag an icon from the dialog box to the toolbar to add the icon.
• Click and drag an icon from the toolbar to delete the icon.
3. When finished, click the Done button.
p. 30
Page 31
Conguring G-SPEED Studio R
Component List
Click the Dashboard icon. From the System Status list choose controller to view the
device ID, operational status, enclosure type and status description of all enclosures.
The Enclosure, Controller, Buzzer and Fan menus are described in relevant sections of
this chapter. See Viewing Controller Information, Viewing the Enclosure Information
and Changing Buzzer Settings for more information.
Physical Drive Menu
Click on the Physical Drive icon in the toolbar to display the Physical Drive menu. This
is the same menu obtained by clicking the Physical Drive menu button at the top of
the G-SPEED Studio R Utility window or by clicking the Physical Drive menu link under
System Status in the Dashboard. See Managing Physical Drives for more information.
p. 31
Page 32

Conguring G-SPEED Studio R
Highlight Arrays
From the Disk Array menu, select the “Locate” button to identify the physical drives
assigned to a disk array. The LEDs on the enclosure will appear purple and flash in sync.
The bays/carriers containing drives that do not belong to the chosen disk array will
not be highlighted.
Back View
Add Back View to the Toolbar by going to the View pulldown menu and selcting
Customize Toolbar. Click and drag “Back View” to the toolbar and press Done. Then
press Back View to see a virtual view of the back of your G-SPEED Studio R. Move the
cursor over the power supply unit (PSU) or system fan to display component status
information.
Device: Back View display menu
Double-click on the unit to activate the blue drive lights.
p. 32
Page 33

Conguring G-SPEED Studio R
Device: Front View display menu
Click on the drive modules to view the status and identify the assigned disk array.
Managing System Information
Enclosure management includes:
• “Viewing System Information”
• “Making System Settings”
• “Clearing Statistics”
• “Restoring Factory Default Settings”
• “Saving a Service Report”
• “Updating Firmware”
p. 33
Page 34

Conguring G-SPEED Studio R
Viewing System Information
To view enclosure information, click the System Information icon.
System Information includes:
• Alias * – (same as controller alias)
• Model
• WWN (Worldwide Number)
• Vendor
• Serial number
• Revision number
• System date and time
• Firmware version
*Adjustable under “Making System Settings” below.
Making System Settings
To make enclosure settings:
1. Click the System Information icon.
2. Click the Settings button.
3. Make changes as required. Enter an alias or change the existing alias in the field provided.
4. Click the Save button.
p. 34
Page 35

Conguring G-SPEED Studio R
Clearing Statistics
To clear statistical data on the RAID controller, physical drives, and logical drives:
1. Click the System Information icon.
2. Click the Clear Statistics button.
3. Type the word “CONFIRM” in the field provided.
4. Click the Conrm button.
Restoring Factory Default Settings
To restore all settings to their factory default values:
From the Admin drop-down menu in the menu bar at the top of your desktop, choose
Restore Factory Default.
1. In the Restore Factory Default settings screen, check the boxes beside the settings you
want to reset to default value.
• Background activity settings
• Controller settings
• Physical drive settings
• System settings
2. Click the Submit button.
3. In the Confirmation box, type the word “CONFIRM” in the field provided and click the
Conrm button.
p. 35
Page 36

Conguring G-SPEED Studio R
Saving a Service Report
A service report can be useful to technical support for troubleshooting or diagnosing
device issues. To save a service report to your Mac, click on the System Information
menu link, then click on the Save Service Report button. A prompt will ask where you
want to save the HTML file containing the service report. Choose a location, then click
the Save button. A technical support representative might ask you to email this file for
system analysis.
Updating Firmware
For optimal controller and system hardware performance, it is a good idea to keep
your G-SPEED Studio R firmware up to date. Download the latest firmware from the
G-Technology website at www.g-technology.com/support/gspeed_studio_r and place
the .img file on your Mac.
Note that after the update process completes, you will need to restart your Mac for the
changes to take effect.
To update the controller firmware:
1. From the Admin drop-down menu in the menu bar at the top of your desktop, choose
System Update.
p. 36
Page 37

Conguring G-SPEED Studio R
2. Click on the padlock icon to unlock the menu, then type in the password for your Mac
when the prompt appears.
3. Click the Choose File button and locate the .img file you downloaded from G-Technology.
4. Click the Submit button.
5. In the Confirmation box, type the word “CONFIRM” in the field provided and click the
Conrm button.
6. The process will take several seconds. When complete, you will be prompted to restart
your Mac. Restart your Mac and continue using your G-SPEED Studio R.
Managing Enclosures
Enclosure management includes the following functions:
• “Viewing System Information”
• “Viewing Temperature Sensor Information”
• “Locating an Enclosure”
Viewing the Enclosure Information
Enclosure management includes the following functions:
• Click the Dashboard icon, then click the Controller link.
• Mouse-over the Enclosure, then click the View button.
• Close the Controller/View page by clicking the x icon at the top right.
p. 37
Page 38

Conguring G-SPEED Studio R
Enclosure information includes:
• Enclosure ID
• Enclosure Warning Temperature Threshold
• Controller Warning Temperature Threshold
• SEP Firmware Version
• Max Number of Controllers
• Max Number of Fans
• Max Number of Power Supply Units
• Enclosure Type
• Enclosure Critical Temperature Threshold
• Controller Critical Temperature Threshold
• Max Number of Physical Drive Slots
• Max Number of Temperature Sensors
• Max Number of Voltage Sensors
Click the X icon to close the information panel.
Viewing Temperature Sensor Information
To view the status of the temperature sensor:
1. Click the Dashboard icon, then click the Temperature link.
2. Scroll down until you see Temperature Sensors.
Temperature Sensors information includes:
• ID
• Status (Normal, Warning or Critical icon)
• Location (Controller or Backplane)
• Healthy Threshold (Enclosure Warning Temperature Threshold)
• Current Temperature
Click the X icon to close the information panel.
p. 38
Page 39

Conguring G-SPEED Studio R
Locating an Enclosure
If you have multiple G-SPEED Studio R units and you want to verify which unit you are
accessing in the G-Technology Utility, use the Locate function.
To locate an enclosure:
From the Logical Drive icon, click the Locate button.
The Drive Power /Status LEDs on all drive carriers blink blue for one minute.
Running the Locate function to identify an enclosure:
Drive Power/Status LEDs blink Blue
Managing the RAID Controller
RAID controller management includes:
• “Viewing Controller Information”
• “Viewing Controller Statistics”
• “Changing Controller Settings”
• “Changing Buzzer Settings”
Viewing Controller Information
To view controller information, you can access the Controller info page from the Dashboard
panel under System Status. You can also select the Component List from the View pulldown window and navigate to Customize Toolbar where you can add Component List.
The Information tab will be displayed.
p. 39
Page 40

Conguring G-SPEED Studio R
Controller information includes:
Controller ID
Vendor
Operational Status
Cache Usage – Percentage
Part Number
Hardware Revision
SCSI Protocol Supported
Single Image Version
Host Driver Version
To view advanced information, click the Advanced Information tab.
Alias * (same as enclosure alias)
Model
Power On Time
Dirty Cache Usage – Percentage
Serial Number
WWN (Worldwide Number)
BIOS Version
Single Image Build Date
Advanced controller information includes:
Memory Type19. Flash Type
NVRAM Type
Preferred Cache Line Size
Coercion *
SMART *
Write-Back Cache Flush Interval *
Enclosure Polling Interval *
Forced Read Ahead (Cache) *
*Adjustable under “Changing Controller Settings”
Click the X icon to close the information panel.
Memory Size
Flash Size
NVRAM Size
Cache Line Size
Coercion Method *
SMART Polling Interval *
Through Mode *
Adaptive Write-Back Cache
p. 40
Page 41

Conguring G-SPEED Studio R
Viewing Controller Statistics
To view controller statistics:
1. Click the Dashboard icon, then click the Controller link.
2. Click the Statistics tab.
Controller statistics include:
Data Transferred
Write Data Transferred
Non-Read/Write Errors
Write Errors
Non-Read/Write Requests
Write I/O Requests
Statistics Collection Date and Time
3. Click the X icon to close the information panel.
Read Data Transferred
Errors
Read Errors
I/O Requests
Read I/O Requests
Statistics Start Date and Time
Changing Controller Settings
To change controller settings:
1. From the Dashboard, select Controller.
2. Mouse-over the controller, then click the Settings button.
You may make any of the following settings changes:
• Enter, change or delete the alias in the Alias field.
SMART Log – Check the box to enable or uncheck to disable.
SMART Polling Interval – Enter a value into the field from 1 to 1440 minutes.
(1440 minutes = 24 hours) (SMART Log must be enabled to access this function).
Enable Coercion – Check the box to enable or uncheck to disable.
Coercion Method – Choose a method from the drop-down menu:
• GBTruncate
p. 41
Page 42

Conguring G-SPEED Studio R
• 10GBTruncate
• GrpRounding
• TableRounding
Write Back Cache Flush Interval – Enter a value into the field from 1 to 12 seconds.
Enclosure Polling Interval – 15 to 255 seconds.
• Adaptive Writeback Cache – Check the box to enable or uncheck to disable.
• Forced Read Ahead – Check the box to enable or uncheck to disable.
• Pilot LED Brightness – High, Medium, Low, O
• Enable HDD Park Ahead(Level 1)
• HDD Park Ahead Interval (10-1440)
• Enable HDD Low Rotation Speed (Level 2)
• HDD Low Rotation Speed Interaval (10-1440)
• Enable HDD Idle Spin Down(Level 3)
• HDD Idle Spin Down Interval (10-1440)
3. Click the Save button.
4. Click the X icon to close the settings panel.
Changing Buzzer Settings
To change buzzer settings:
1. From the Dashboard icon, select Controller.
2. Mouse-over the buzzer, then click the Settings button.
3. Check the Enable Buzzer box to enable the buzzer or uncheck the box to disable.
4. Click the Save button.
p. 42
Page 43

Conguring G-SPEED Studio R
Managing Background Activities
Background activity management includes:
• “Viewing Current Background Activities”
• “Adding a Scheduled Background Activity”
• “Changing a Background Activity Schedule”
• “Enabling or Disabling a Scheduled Background Activity”
• “Deleting a Scheduled Background Activity”
• “Media Patrol”
• “Redundancy Check”
• “Initialization”
• “Rebuild”
• “Migration”
• “PDM”
Background activities perform a variety of preventive functions on your physical drives,
disk arrays, logical drives and other components.
You can run a background activity immediately or schedule it to run at a later time.
Scheduling options are described below.
Setting options for each activity are listed after the scheduling options. These settings
determine how the background activity affects I/O performance.
Viewing Current Background Activities
To view a list of background activities, click on the Background Activities icon in the Toolbar.
The following list of background activities will appear:
• Media Patrol
• Redundancy Check
• Rebuild
Currently running activities show a progress bar.
• Initialization
• Migration
• PDM
• Transition
• Synchronization
p. 43
Page 44

Conguring G-SPEED Studio R
Viewing Scheduled Background Activities
To view a list of scheduled background activities:
1. Click on the Background Activities icon.
2. Click the Scheduler button. The list of scheduled background activities will appear.
Adding a Scheduled Background Activity
To add a new scheduled background activity:
1. Click on the Background Activities icon.
2. Click the Scheduler button. The list of scheduled background activities will appear.
3. Click the Add Schedule button.
4. Make schedule settings as desired.
Choose the option for the activity you want:
• Media Patrol
• Redundancy Check
• Spare Check
Choose a Start Time from the drop-down menus.
The menus have a 24-hour clock.
Choose a Recurrence Pattern option: daily, weekly or monthly.
• For the Daily option, enter an interval in the Every field.
• For the Weekly option, enter an interval in the Every eld and choose one or more
days of the week.
• For the Monthly option, choose the Day of the Month option or a sequential and
specific day from the drop-down menu. Also choose which months should apply.
Choose a Start From date from the drop-down menus.
p. 44
Page 45

Conguring G-SPEED Studio R
Choose an End On option:
• No end date or perpetual
• End after a specic number of activity actions
• Run until date from the drop-down menus
For Redundancy Check, choose:
• Auto Fix option – Attempts to repair the problem when it finds an error. Check
to enable.
• Pause on Error option – The process stops when it finds a non-repairable error.
Check to enable.
•Select LD – Check the boxes for which logical drives should run the redundancy
check. Check at least one logical drive.
Click the Save button.
To return to currently running background activities, click the Background Activities button.
Changing Background Activity Schedule
To change an existing scheduled background activity:
1. Click on the Background Activities icon.
2. Click the Scheduler button. The list of scheduled background activities will appear.
3. Mouse-over the background activity, then click the Settings button.
4. Make settings as needed.
Choose the option for the activity you want:
• Media Patrol
• Redundancy Check
• Spare Check
p. 45
Page 46

Conguring G-SPEED Studio R
Choose a Start Time from the drop-down menus.
The menus have a 24-hour clock.
Choose a Recurrence Pattern option: daily, weekly or monthly.
• For the Daily option, enter an interval in the Every eld.
• For the Weekly option, enter an interval in the Every eld and choose one or more
days of the week.
• For the Monthly option, choose a Day of the Month option or a sequential and
specific day from the drop-down menu. Also choose which months should apply.
Choose a Start From date from the drop-down menus.
Choose an End On option:
• No end date or perpetual
• End after a specic number of activity actions
• Run until a specied date from the drop-down menus
For Redundancy Check, choose:
• Auto Fix option – Attempts to repair the problem when it finds an error. Check
to enable.
• Pause on Error option – The process stops when it finds a non-repairable error.
Check to enable.
•Select LD – Check the boxes for which logical drives should run the redundancy
check. Check at least one logical drive.
Click the Save button.
To return to currently running background activities, click the Background Activities button.
p. 46
Page 47

Conguring G-SPEED Studio R
Enabling or Disabling a Scheduled Background Activity
Background activity schedules are enabled by default when you create a schedule. If you
want to stop a background activity now but plan to use it again in the future, disable the
scheduled activity rather than deleting it.
To enable or disable changes in an existing scheduled background activity:
1. Click on the Background Activities icon.
2. Click the Scheduler button.
The list of scheduled background activities will appear.
3. Mouse-over the background activity, then click the Settings button.
4. Uncheck the Enable This Schedule box to disable this particular schedule.
Check the box to enable it.
5. Click the Save button.
To return to currently running background activities, click the Background Activities button.
Deleting a Scheduled Background Activity
To delete a scheduled background activity:
1. Click on the Background Activities icon
2. Click the Scheduler button. The list of scheduled background activities will appear.
4. Type the word “CONFIRM” in the field provided.
5. Click the Conrm button.
To return to currently running background activities, click the Background Activities button.
p. 47
Page 48

Conguring G-SPEED Studio R
Media Patrol
Media Patrol is a routine maintenance procedure that checks the magnetic media on
each disk drive. Media Patrol checks are enabled by default on all disk arrays and spare
drives. Media Patrol is concerned with the media itself, not the data recorded on the
media. If Media Patrol encounters a critical error, it triggers Predictive Data Migration
(PDM) if PDM is enabled on the disk array. See Making Disk Array Settings.
Changing Media Patrol Settings
To change Media Patrol settings:
1. Click on the Background Activities icon.
2. Click the Settings button.
3. Check the Enable Media Patrol box to enable the feature; uncheck the box to disable
it. This setting enables or disables Media Patrol for all physical drives.
4. Click the Conrm button.
5. Click the X icon to close the background activities panel.
Redundancy Check
Redundancy Check is a routine maintenance procedure for fault-tolerant disk arrays
(those with redundancy) that ensures the redundant copies of data still match the
original source data. Redundancy Check can also correct inconsistencies.
See Redundancy Check on a Logical Drive
p. 48
Page 49

Conguring G-SPEED Studio R
Changing Redundancy Check Settings
To change Redundancy Check settings:
1. Click on the Background Activities icon.
2. Click the Settings button.
3. Click the Redundancy Check Rate drop-down menu and choose a rate:
• Low: Fewer system resources are required for redundancy checking, leaving
more resources for data read/write operations.
• Medium: Balances system resources between redundancy checking and data
read/write operations.
• High: Allocates more system resources to Redundancy Check and fewer to
data read/write operations.
4. Click the Conrm button.
5. Click the X icon to close the background activities panel.
Initialization
Initialization is normally done to logical drives after they are created from a disk array.
Initialization sets all data bits in the logical drive to zero. This action is useful because
there may be residual (possibly sensitive) data on logical drives left from earlier
configurations. For this reason, initialization is recommended whenever you create
a logical drive.
Note: You cannot access a logical drive while it is initializing.
See Initializing a Logical Drive.
p. 49
Page 50

Conguring G-SPEED Studio R
Changing Initialization Settings
To change initialization settings:
1. Click on the Background Activities icon.
2. Click the Settings button.
3. Click the Logical Drive Initialization Rate drop-down menu and choose a rate:
• Low: Fewer system resources are allocated to initialization, leaving more
resources for data read/write operations.
• Medium: Balances system resources between initialization and data read/
write operations.
• High: More system resources are allocated to initialization, fewer to data read/
write operations.
4. Click the Conrm button.
5. Click the X icon to close the background activities panel.
Rebuild
When you rebuild a disk array, you are actually using redundant data to rebuild the lost
or inaccessible data on one physical drive.
• When a physical drive in a disk array fails and a spare drive of adequate capacity
is available, the disk array begins to rebuild automatically using the spare drive.
• If there is no spare drive of adequate capacity, but the Auto Rebuild function
is ENABLED, the disk array will begin to rebuild automatically as soon as you
remove the failed physical drive and install an unconfigured physical drive in
the same slot. See Making Rebuild Settings.
• If there is no spare drive of adequate capacity and the Auto Rebuild function is
DISABLED, you must replace the failed drive with an unconfigured physical
drive, then perform a Manual Rebuild.
See Rebuilding a Disk Array and Managing Spare Drives. Also see Disk Array Degraded /
Logical Drive Critical and Disk Array Oine / Logical Drive Oine.
p. 50
Page 51

Conguring G-SPEED Studio R
Changing Rebuild Settings
1. Click on the Background Activities icon.
2. Click the Settings button.
3. Click the Rebuild Rate drop-down menu and choose a rate:
• Low: Fewer system resources are allocated to the rebuild, leaving more
resources for data read/write operations.
• Medium: Balances system resources between the rebuild and data read/
write operations.
• High: More system resources are allocated to the rebuild and fewer for data
read/write operations.
4. Check the Enable Auto Rebuild box to enable Auto Rebuild. This will initiate a rebuild
when you swap out the failed drive with a new one.
5. Click the Conrm button.
6. Click the X icon to close the background activities panel.
Migration
The term “Migration” means that you are doing one or both of the following:
• Changing the RAID level of a logical drive
• Expanding the storage capacity of a logical drive (See Migrating a Logical Drive)
p. 51
Page 52

Conguring G-SPEED Studio R
Changing Migration Settings
To change migration settings:
1. Click on the Background Activities icon.
2. Click the Settings button.
3. Click the Migration Rate drop-down menu and choose a rate:
• Low: Fewer system resources are available for migration, leaving more
resources for data read/write operations.
• Medium: Balances system resources between migration and data read/
write operations.
• High: More system resources are available for migration, fewer for data
read/write operations.
4. Click the Conrm button.
5. Click the X icon to close the background activities panel.
PDM
Predictive Data Migration (PDM) is the migration of data from the suspect disk drive to
a spare drive. PDM is similar to rebuilding a disk array, but unlike in rebuilding, PDM
automatically copies your data to a spare drive before the drive fails and your logical
drive goes “critical.”
PDM can be triggered automatically by Media Patrol.
Also see Running PDM on a Logical Drive.
p. 52
Page 53

Conguring G-SPEED Studio R
Changing PDM Settings
To change PDM settings:
1. Click on the Background Activities icon.
2. Click the Settings button.
3. Click the PDM Rate drop-down menu and choose a rate:
• Low: Fewer system resources are allocated to PDM, leaving more resources
for data read/write operations.
• Medium: Balances system resources between PDM and data read/write
operations.
• High: More system resources are available to PDM, fewer for data read/write
operations.
• Highlight the current values in the block threshold elds and input new values.
The reassigned block threshold range is 1 to 512 blocks. Error block threshold
range is 1 to 2048 blocks.
4. Click the Conrm button.
5. Click the X icon to close the background activities panel.
Transition
Transition is the process of replacing a revertible spare drive that is currently part of a
disk array with an unconfigured physical drive or a non-revertible spare drive.
See Running a Transition on a Spare Drive.
p. 53
Page 54

Conguring G-SPEED Studio R
Changing Transition Settings
To change Transition settings:
1. Click on the Background Activities icon.
2. Click the Settings button.
3. Click the Transition Rate drop-down menu and choose a rate:
• Low: Fewer system resources are available to Transition, leaving more resources
for data read/write operations.
• Medium: Balances system resources between Transition and data read/write
operations.
• High: More system resources are available for Transition and fewer for data
read/write operations.
4. Click the Conrm button.
5. Click the X icon to close the background activities panel.
Synchronization
Synchronization is automatically applied to logical drives when they are created.
Synchronization recalculates redundancy data to ensure that the working data on
the physical drives is properly in sync.
Mouse-over on the logical drive, click the View button, and look under Logical Drive
Information beside the line that says Synchronized. A Yes means that the logical drive
was synchronized.
See Viewing Logical Drive Information.
p. 54
Page 55

Conguring G-SPEED Studio R
Changing Synchronization Settings
To change Synchronization settings:
1. Click on the Background Activities icon.
2. Click the Settings button.
3. Click the Background Synchronization Rate drop-down menu and choose a rate:
• Low: Fewer system resources are available to Synchronization, leaving more
resources for data read/write operations.
• Medium: Balances system resources between Synchronization and data read/
write operations.
• High: More system resources are available to Synchronization and fewer for
data read/write operations.
4. Click the Conrm button.
5. Click the X icon to close the background activities panel.
Managing Physical Drives
Physical drive management includes:
• “Viewing a List of Physical Drives”
• “Viewing Physical Drive Information”
• “Viewing Physical Drive Statistics”
• “Viewing Physical Drive SMART Log Information”
• “Locating a Physical Drive”
• “Making Global Physical Drive Settings”
• “Making Individual Physical Drive Settings”
• “Making Physical Drive SMART Log Settings”
• “Clearing a Stale or a PFA Condition”
• “Forcing a Physical Drive Oine”
p. 55
Page 56

Conguring G-SPEED Studio R
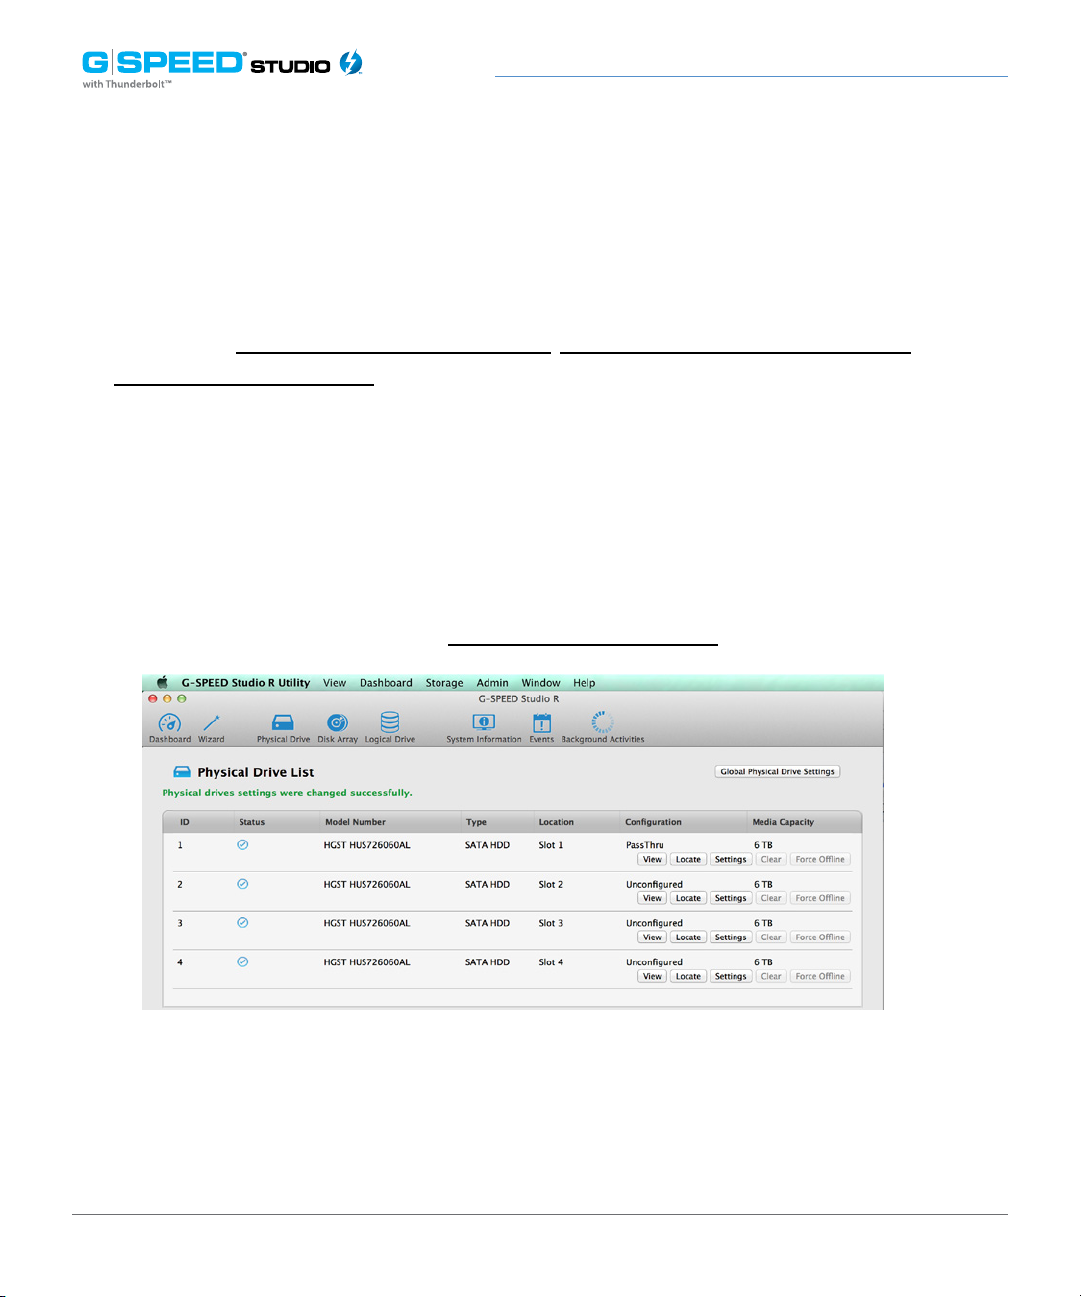
Viewing a List of Physical Drives
To view a list of physical drives in your G-SPEED Studio R, click the Physical Drive icon.
Physical drive information includes:
• ID – ID number of the physical drive
• Status - Normal, Stale, or PFA or Dead icon
• Model Number
• Type – SATA HDD or SSD
• Location – Enclosure number and slot number
• Conguration – Array number and sequence number, spare number,
unconfigured or stale configuration
• Media Capacity – In terabytes
Viewing Physical Drive Information
To view physical drive information:
1. Click the Physical Drive icon.
2. Mouse-over the physical drive you want, then click the View button.
Physical drive information includes:
• Physical Drive ID – ID number of the physical drive
•Location– Enclosure number and slot number
•Alias – If assigned
•PhysicalCapacity – Total capacity in TB
•CongurableCapacity – Usable capacity in TB
•UsedCapacity – Capacity actually used in TB
•BlockSize – Typically 512 Bytes
•OperationalStatus – OK (normal), Stale, PFA, Dead
•CongurationStatus – Array number and sequence number, spare number
•ModelNumber – Make and model of the drive
p. 56
Page 57

Conguring G-SPEED Studio R
•DriveInterface – SATA 1.5, 3 Gb/s or 6 Gb/s
•SerialNumber – Serial number of the drive
•FirmwareVersion – Firmware version on the drive
•ProtocolVersion – ATA/ATAPI protocol version
3. Click the Advanced Information tab.
Advanced information for physical drives includes:
• Write Cache – Enabled or disabled *
• Read Look Ahead Cache – Enabled or disabled *
• SMART Feature Set – Yes or No
• SMART Self Test – Yes or No
• SMART Error Logging – Yes or No
• Command Queuing Support – TCQ or NCQ
• Command Queuing – Enabled or disabled *
• Queue Depth – Number of commands
• Power Saving Level – Supported by this drive
• Medium Error Threshold **
• Drive Temperature
• Drive Reference Temperature
*Adjustable under Viewing Physical Drive Statistics.
**Adjustable under Changing PDM Settings.
4. Click the X icon to close the information panel.
p. 57
Page 58

Conguring G-SPEED Studio R
Viewing Physical Drive Statistics
To view physical drive statistics:
1. Click the Physical Drive icon.
2. Mouse-over the physical drive you want, then click the View button.
3. Click the Statistics tab.
Physical drive information includes:
• Data Transferred
• Read Data Transferred
• Write Data Transferred
• Errors – Number of errors
• Non Read/Write Errors
• Read Errors
• Write Errors
• I/O Request – Number of requests
• Non-Read/Write Request – Number of requests
• Read I/O Request – Number of requests
• Write I/O Request – Number of requests
• Statistics Start Time – Time and date
• Statistics Collection Time – Time and date
To clear physical drive statistics, see Clearing Statistics.
4. Click the X icon to close the settings panel.
p. 58
Page 59

Conguring G-SPEED Studio R
Viewing Physical Drive SMART Log Information
To view physical drive SMART Log information:
1. Click the Physical Drive icon.
2. Mouse-over the physical drive you want, then click the View button.
3. Click the SMART Log tab.
SMART Log information includes:
• Physical Drive ID
• SMART Support – Yes or No, depending on the drive
• SMART Status – Enabled or disabled *
• SMART Health Status – OK is normal
*Adjustable under Changing Controller Settings.
4. Click the X icon to close the settings panel.
Locating a Physical Drive
This feature causes the drive carrier LEDs to blink for one minute to help you locate the
physical drive.
To locate a physical drive:
1. Click the Physical Drive icon.
2. Mouse-over the physical drive you want, then click the Locate button. The drive
power/status LED for the drive carrier holding that drive will blink blue for one minute.
p. 59
Page 60

Conguring G-SPEED Studio R
Running the Locate function to identify a physical drive:
Drive power/status LEDs blink Blue
Changing Global Physical Drive Settings
To change global physical drive settings:
1. Click the Physical Drive icon
2. Click the Global Physical Drive Settings button
3. Check the following boxes to enable functionality; uncheck them to disable.
• Enable Write Cache
• Enable Read Look Ahead Cache
• Enable Command Queuing
4. Click the Save button.
5. Click the X icon to close the settings panel.
Changing Individual Physical Drive Settings
p. 60
Page 61

Conguring G-SPEED Studio R
To change individual physical drive settings:
1. Click the Physical Drive icon.
2. Mouse-over the physical drive you want, then click the Settings button.
3. Make changes as needed:
• Enter, change or delete the alias in the Alias eld.
• Choose Uncongured or PassThru Conguration.
• Uncongured drives are not visible to your computer. You will use these to
make disk arrays. PassThru drives are visible to your computer and are configured
as individual drives. They cannot be used to make a disk array.
4. Click the Save button.
5. Click the X icon to close the settings panel.
Changing Physical Drive SMART Log Settings
To change physical drive SMART log settings:
1. Click the Physical Drive icon.
2. Mouse-over the physical drive you want, then click the Settings button.
3. Click the SMART Log Settings tab.
4. Check the box to enable the SMART log.
5. Click the Save button.
6. Click the X icon to close the settings panel.
p. 61
Page 62
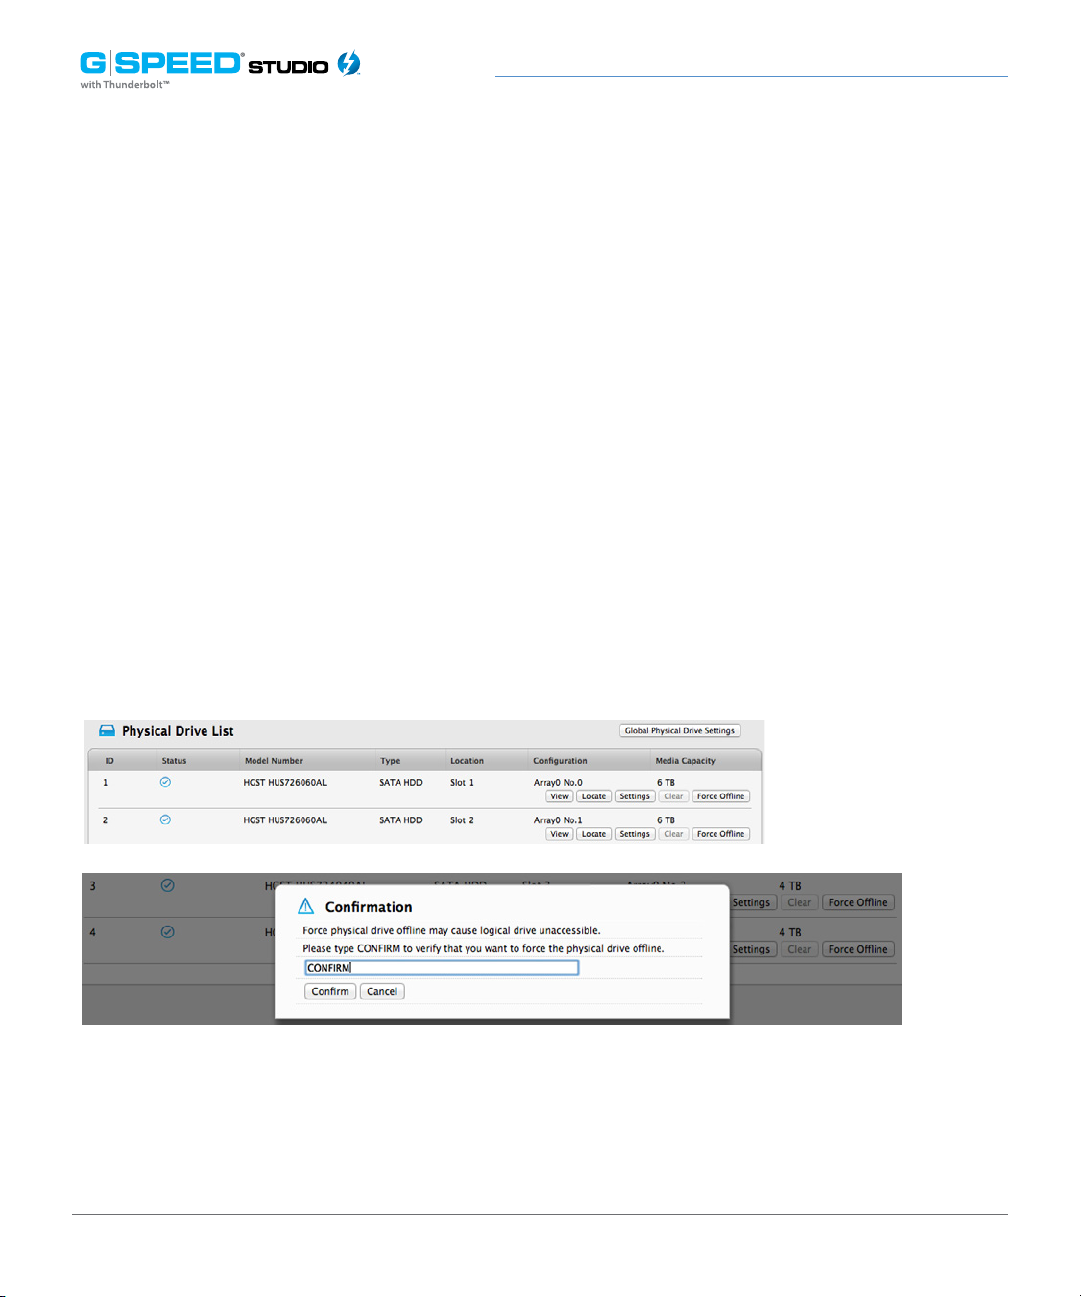
Conguring G-SPEED Studio R
Clearing a Stale or PFA Condition
Stale – The physical drive contains obsolete disk array information.
PFA – The physical drive has errors resulting in a prediction of failure.
Be sure you have first corrected the condition by replacing the physical drive and
conducting a rebuild operation, etc. Then clear the PFA condition.
To clear a Stale or a PFA condition:
1. Click the Physical Drive icon.
2. Mouse-over the physical drive you want, then click the Clear button.
Click the the Conrm button.
If the physical drive has both a Stale condition and a PFA condition, your first click will
remove the Stale condition. Click the Clear button a second time to remove the PFA
condition.
p. 62
Page 63

Conguring G-SPEED Studio R
Running Media Patrol on Your Physical Drives
Media Patrol is a routine maintenance procedure that checks the magnetic media on
each disk drive. Media Patrol checks are enabled by default on all disk arrays and spare
drives. Media Patrol is concerned with the media itself, not the data recorded on the
media. If Media Patrol encounters a critical error, it triggers Predictive Data Migration
(PDM) if PDM is enabled on the disk array. See Making Disk Array Settings.
To run Media Patrol on your physical drives:
1. Click the Background Activities icon. The list of background activities will appear.
2. Mouse-over Media Patrol, then click the Start button.
To pause or resume a Media Patrol:
1. Click on the Background Activities icon. The list of background activities will appear.
2. Mouse-over Media Patrol, then click the Pause or Resume button.
To stop/cancel the Media Patrol:
1. Click on the Background Activities icon. The list of background activities will appear.
2. Mouse-over Media Patrol, then click the Stop button.
3. In the Confirmation box, type the word “confirm” in the field provided, then click the
Conrm button.
p. 63
Page 64

Conguring G-SPEED Studio R
Managing Disk Arrays
Disk array management includes:
• “Viewing a List of Disk Arrays”
• “Viewing Disk Array Information”
• “Creating a Disk Array Manually”
• “Creating a Disk Array and Logical Drive With the Wizard”
• “Making Disk Array Settings”
• “Locating a Disk Array”
• “Deleting a Disk Array”
• “Preparing a Disk Array for Transport”
• “Rebuilding a Disk Array”
Also see Disk Array and Logical Drive Problems.
Viewing a List of Disk Arrays
To view a list of disk arrays, do one of the following actions:
1. From the Dashboard window, click the Disk Array link.
2. The list of disk arrays will appear.
Each disk array lists:
1. ID – DA0, DA1, etc.
2. Alias – If assigned
3. Status - Normal, Degraded or Incomplete/Physical Drive missing icon)
4. Capacity – Data capacity of the array
5. Free Capacity – Unconfigured or unused capacity on the physical drives
6. Media Patrol – Enabled or disabled on this array
7. Number of Logical Drives – The number of logical drives on this array
p. 64
Page 65

Conguring G-SPEED Studio R
Viewing Disk Array Information
To view disk array information:
1. Do one of the following actions:
• From the Dashboard window, click the Disk Array link.
• From the Storage menu, choose Disk Array.
2. Mouse-over the disk array you want, then click the View button.
Disk array information includes:
• Disk Array ID – DA0, DA1, etc.
• Alias – If assigned
• Operational Status – OK, Degraded or Oine
• Media Patrol – Enabled or disabled in this array
• PDM – Enabled or disabled in this array
• Total Physical Capacity – Maximum capacity, including used and unused
capacity, of the physical drives
• Congurable Capacity – Data capacity of the array
• Free Capacity – Unconfigured or unused capacity on the physical drives
• Max. Contiguous Free Capacity – The largest single chunk of unused capacity
on the physical drives
• Number of Physical Drives – The number of physical drives in this array
• Number of Logical Drives – The number of logical drives in this array
• Number of Dedicated Spares – The number of spare drives dedicated to this array
• Available RAID Levels – RAID levels that this disk array can support
Creating a Disk Array Manually
This feature only creates a disk array. You can also use the Wizard to create a disk array
with logical and spare drives concurrently.
p. 65
Page 66

Conguring G-SPEED Studio R
To create a disk array:
1. From the Dashboard menu, click the Disk Array link.
2. Click the Create Disk Array button.
3. Accept the defaults or make changes:
• Enter an alias in the Alias field with a maximum of 32 characters (letters,
numbers and spaces between characters).
• Enable Media Patrol – Uncheck to disable on this array. For more information,
see Media Patrol.
• Enable PDM – Uncheck to disable on this array. For more information, see PDM.
4. In the Select Physical Drives diagram, click drives to add them to your array.
The drive carriers turn blue when you click them. The physical drives’ ID numbers will
appear in the field below the diagram.
5. When you have finished your settings and choices, click the Submit button.
The new array will appear in the list.
• If you are done creating disk arrays, click the Finish button.
• To create additional disk arrays, click the Create More button.
After you create a disk array, create a logical drive on it. See Creating a Logical Drive
Manually.
To Create a Disk Array and Logical Drive
G-SPEED Studio R ships preconfigured in a RAID 5 array. If you want to change out the
hard drives or configure a different RAID mode, you will need to create a new array and
logical drive. If you are installing new disk drives, you can use the Wizard to create a new
logical drive. Procedures for using the Wizard are described below.
p. 66
Page 67

Conguring G-SPEED Studio R
Creating a Disk Array and Logical Drive With the Wizard
A disk array is a method of organizing data across hard disks or solid state drives. One
or more logical drives can be created on a disk array. Your computer saves files within
logical drives on G-SPEED Studio R.
The G-SPEED Studio R Utility includes a Wizard to help you set up a disk array, logical
drives and spare drives. To open the Wizard, click the Storage menu and choose Wizard.
The Wizard dialog box will open and offer three configuration methods.
Wizard dialog box:
Choose the best method for your needs as per the following table:
Method User options Suggested for users who are
Automatic None New to data storage
Express General parameters Familiar with data storage
Advanced Individual parameters Data storage professionals
p. 67
Page 68

Conguring G-SPEED Studio R
Choosing Automatic Conguration
To use the Automatic Configuration Wizard:
1. From the Storage menu, choose Wizard.
2. Click the Automatic button.
The Automatic Configuration dialog box will appear.
Automatic Conguration dialog box:
1. Do one of the following actions:
• If you agree with the proposed conguration, click the Submit button.
The Wizard will create your disk array and logical drive. The Wizard can also
create a spare drive.
• If you do NOT agree with the proposed conguration, click the Cancel button
to return to the original Automatic Configuration menu.
p. 68
Page 69
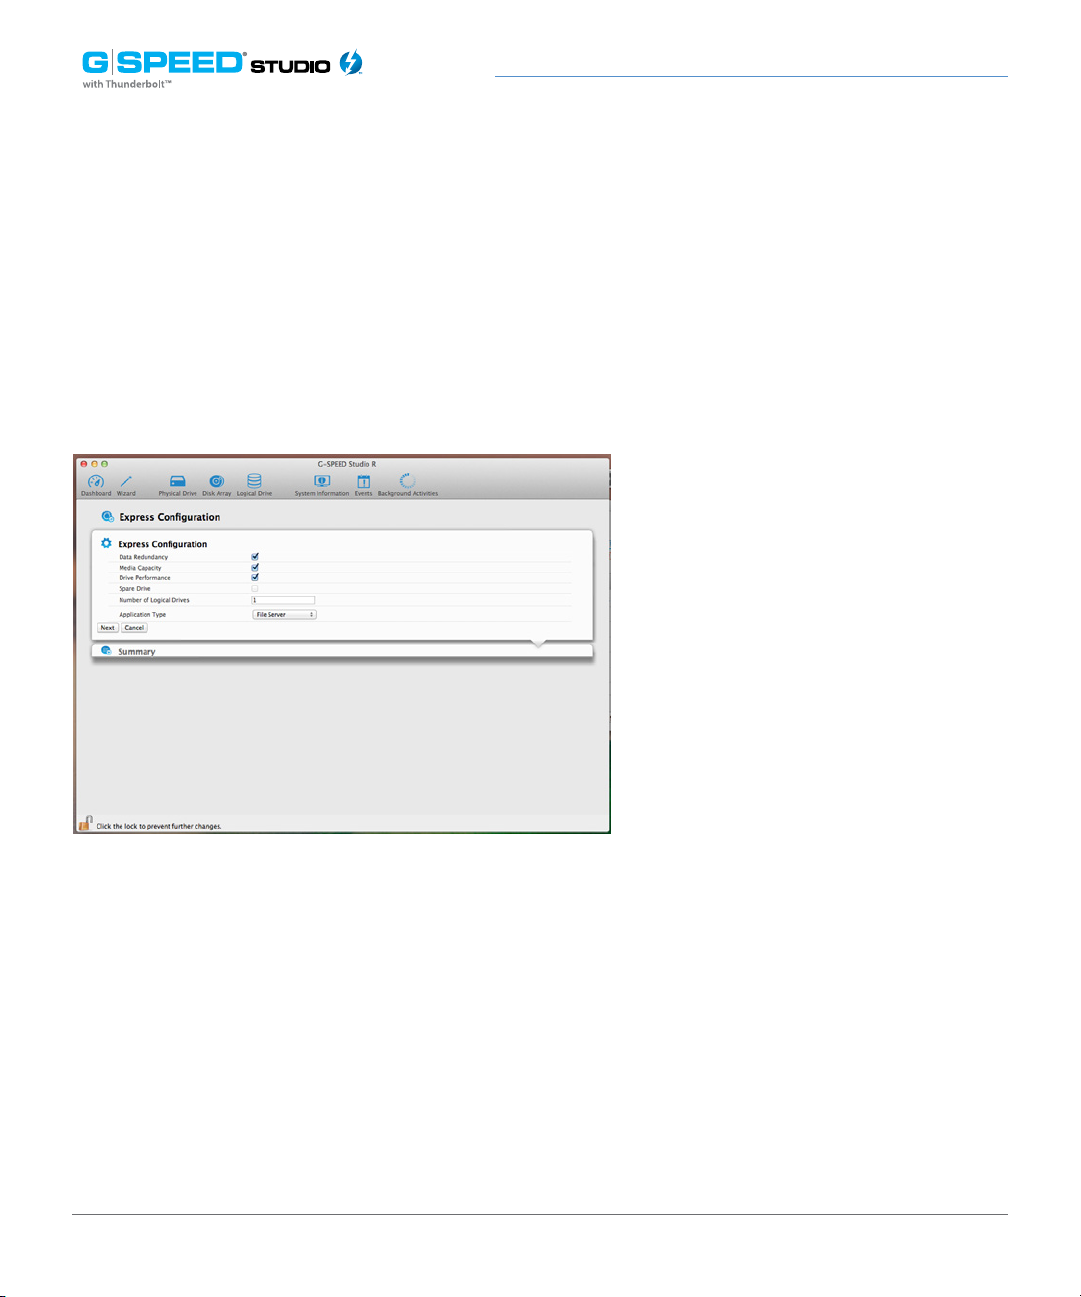
Conguring G-SPEED Studio R
Choosing Express Conguration
To use the Express Configuration Wizard:
1. From the Storage menu, choose Wizard.
2. Click the Express button.
The Express Configuration dialog box will appear.
Express Conguration dialog box:
3. Check the boxes to choose any one or a combination of:
• Data Redundancy – The array remains available if a physical drive fails
• Media Capacity – The greatest possible amount of data capacity
• Drive Performance – The highest possible read/write speed
• Spare Drive – Check box to create a hot spare drive (R6 and R8 only)
• Number of Logical Drives – Enter a number of logical drives to create
• Application Type – Choose how the storage will be used
4. In the Number of Logical Drives field, type the number of logical drives you want to0
make from this disk array.
p. 69
Page 70

Conguring G-SPEED Studio R
5. From the Application Type drop-down menu, choose an application that best
describes your intended use for the logical drives.
• File Server (default)
• Video Stream
• Transaction Data
• Transaction Log
• Other
6. Click the Next button to continue.
The Summary dialog box will appear with information about the disk arrays, logical
drives and spare drives you are about to create. See example below.
The Summary dialog box:
7. Perform one of the following actions:
• If you accept these parameters, click the Submit button.
The Wizard will create your disk array and logical drives. If you have an R6 or R8,
the Wizard will also create a spare drive.
• If you do NOT accept these parameters, click the Back button, then review and
modify your choices.
• Press Cancel to dismiss the configuration all together.
p. 70
Page 71

Conguring G-SPEED Studio R
Choosing Advanced Conguration
This option enables you to specify additional parameters for a new disk array, logical
drives and spare drives.
To use the Advanced Configuration Wizard:
1. From the Storage menu, choose Wizard.
2. Click the Advanced button.
The Create Disk Array screen will display.
Task 1 – Disk Array Creation
To create your disk array:
1. Accept the defaults or make changes to any of the following:
• Enter an alias in the Alias field, up to a maximum of 32 characters (letters,
numbers and spaces between characters).
• Media Patrol – Uncheck to disable on this array. For more information, see
Media Patrol.
• PDM – Uncheck to disable on this array. For more information, see PDM.
2. In the Select Physical Drives diagram, click the desired drives to add them to your
array. Drive carriers turn blue when you click them. The physical drives’ ID numbers
appear in the field below the diagram.
3. Click the Next button to continue.
The Create Logical Drive screen will display.
Task 2 – Logical Drive Creation
To create your logical drive:
1. Enter your information and choose your options.
• Enter a logical drive alias in the eld provided.
• Choose a RAID level from the drop-down menu.
Note the max capacity value, then enter a capacity value in the field provided
and choose a unit of measure from the drop-down menu.
p. 71
Page 72

Conguring G-SPEED Studio R
• Enter a value for capacity and choose the appropriate size unit of measurement
(MB, GB or TB)
• Choose a Stripe size: 64 KB, 128 KB, 256 KB, 512 KB and 1 MB are available.
• Choose a Sector size: 512 B, 1 KB, 2 KB, and 4 KB are available.
• Choose a Read Cache Policy: The choices are Read Cache, Read Ahead (cache),
and None.
• Choose a Write (cache) Policy: The choices are WriteThru and WriteBack.
WriteBack requires a ReadCache or Read Ahead/Read Cache Policy.
• If you want the Utility to format your logical drives, leave the Format box checked.
For additional format options, see Formatting Your Logical Drives.
2. Click the Add button. The new logical drive will appear on the list at the right. If any
capacity remains, you will have the option to create an additional logical drive.
3. Click the Next button to continue. The Create Spare Drive screen will display.
Task 3 – Spare Drive Creation
To create your spare drive:
1. For each of the following items, accept the default or change the following settings
as required:
• Check the Revertible box if you want a revertible spare drive.
A revertible spare drive returns to its spare drive assignment after you replace
the failed physical drive in the disk array and run the Transition function.
• Global – Allows the spare to be used by any disk array
• Dedicated – Restricts the drive to only working with the disk array you are
now creating
2. In the Select Physical Drives diagram, click a drive to choose it for your spare.
The drive carrier will turn blue when you click it. The physical drive’s ID number will
appear in the field below the diagram.
p. 72
Page 73

Conguring G-SPEED Studio R
3. Click the Next button to continue. The Summary screen will display.
Task 4 – Summary
1. Review your choices of disk array, logical drives and spare drive.
• To make any changes, click the Back button to reach the appropriate screen.
• To accept, click the Submit button. Creating the disk array, logical drive and
spare drive will take a few moments.
2. Click the Finish button to close the Wizard.
Formatting Your Logical Drives
If you left the Format box checked under Task 2 – Logical Drive Creation, your logical
drives will be formatted automatically.
If you unchecked the Format box, you must format your logical drives manually.
When the G-Technology Utility finishes the partition and format operation, new removable
drive icons, each representing one logical drive, will appear on your desktop. When you
see these icons, your new logical drive(s) will be ready to use.
Changing Disk Array Settings
To make disk array settings:
1. Do one of the following actions:
• From the Dashboard window, click the Disk Array link.
• From the Storage menu, choose Disk Array.
2. Mouse-over the disk array you want, then click the Settings button.
p. 73
Page 74
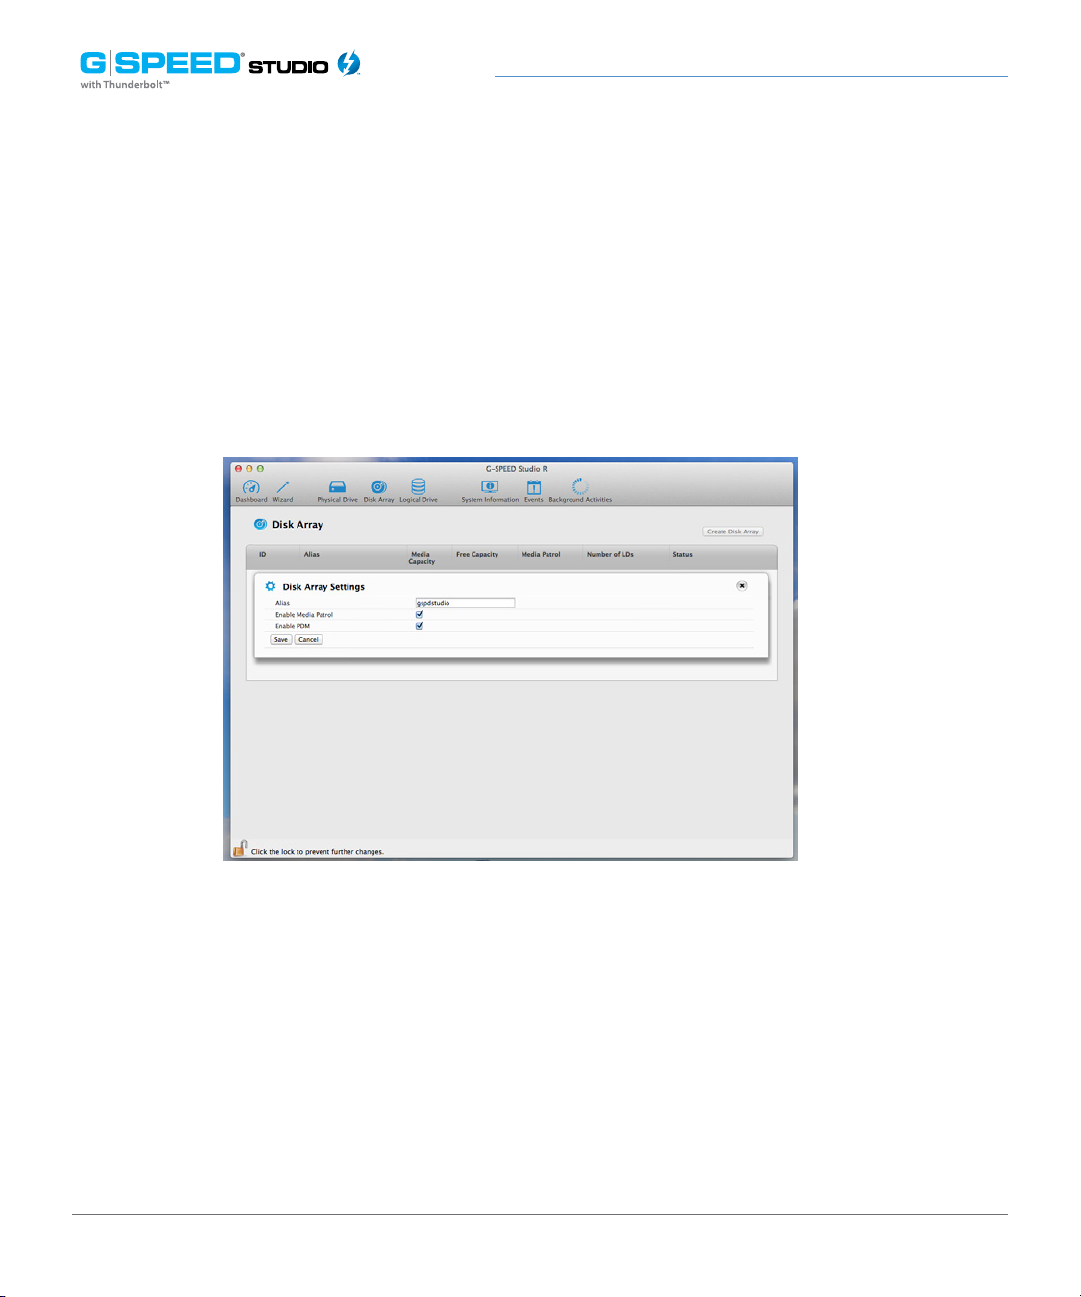
Conguring G-SPEED Studio R
3. Make the following setting changes as required:
• Enter change, or delete the alias in the Alias eld. An alias must be a maximum
of 32 characters (letters, numbers and spaces between characters).
• Enable Media Patrol – Check to enable or uncheck to disable on this array.
• Enable PDM – Check to enable or uncheck to disable on this array.
4. Click the Save button.
Locating a Disk Array
This feature causes the drive carrier LEDs to flash for one minute to assist you in locating
the physical drives that make up a given disk array. To locate a disk array:
1. Perform one of the following actions:
• From the Dashboard window, click the Disk Array link.
• From the Storage menu, choose Disk Array.
p. 74
Page 75

Conguring G-SPEED Studio R
2. Mouse-over the disk array you want to identify, then click the Locate button. The
drive power/status LEDs for the physical drives that comprise the array will blink blue
for one minute.
Running the Locate function to identify a disk array:
Drive power/status
LEDs blink
Deleting a Disk Array
To delete a disk array:
1. Perform one of the following actions:
• From the Dashboard window, click the Disk Array link.
• From the Storage menu, choose Disk Array.
2. Mouse-over the disk array you want, then click the Delete button.
3. In the Confirmation box, type the word “CONFIRM” in the field provided, then click the
Conrm button.
p. 75
Page 76

Conguring G-SPEED Studio R
Preparing a Disk Array for Transport
This feature prepares the physical drives that make up the disk array to be removed from
the enclosure and installed in a different G-SPEED Studio R enclosure. To prepare a disk
array for transport:
1. Perform one of the following actions:
• From the Dashboard window, click the Disk Array link.
• From the Storage menu, choose Disk Array.
2. Mouse-over the disk array you want, then click the Transport button.
3. In the Confirmation box, type the word “CONFIRM” in the field provided, then click the
Conrm button. The disk array status will change to Transport Ready.
4. Remove the physical drives and install them in their new location.
See Replacing a Physical Drive for more information.
Rebuilding a Disk Array
When you rebuild a disk array, you actually rebuild data on one physical drive from
redundant data maintained on other drives. If there is no spare drive of adequate capacity,
you must replace the failed drive with an unconfigured physical drive, then perform a
Manual Rebuild.
On the carrier with the failed drive, the drive power/ status LED will be red.
Drive carrier LEDs for a dead or failed drive:
Red LED
p. 76
Page 77
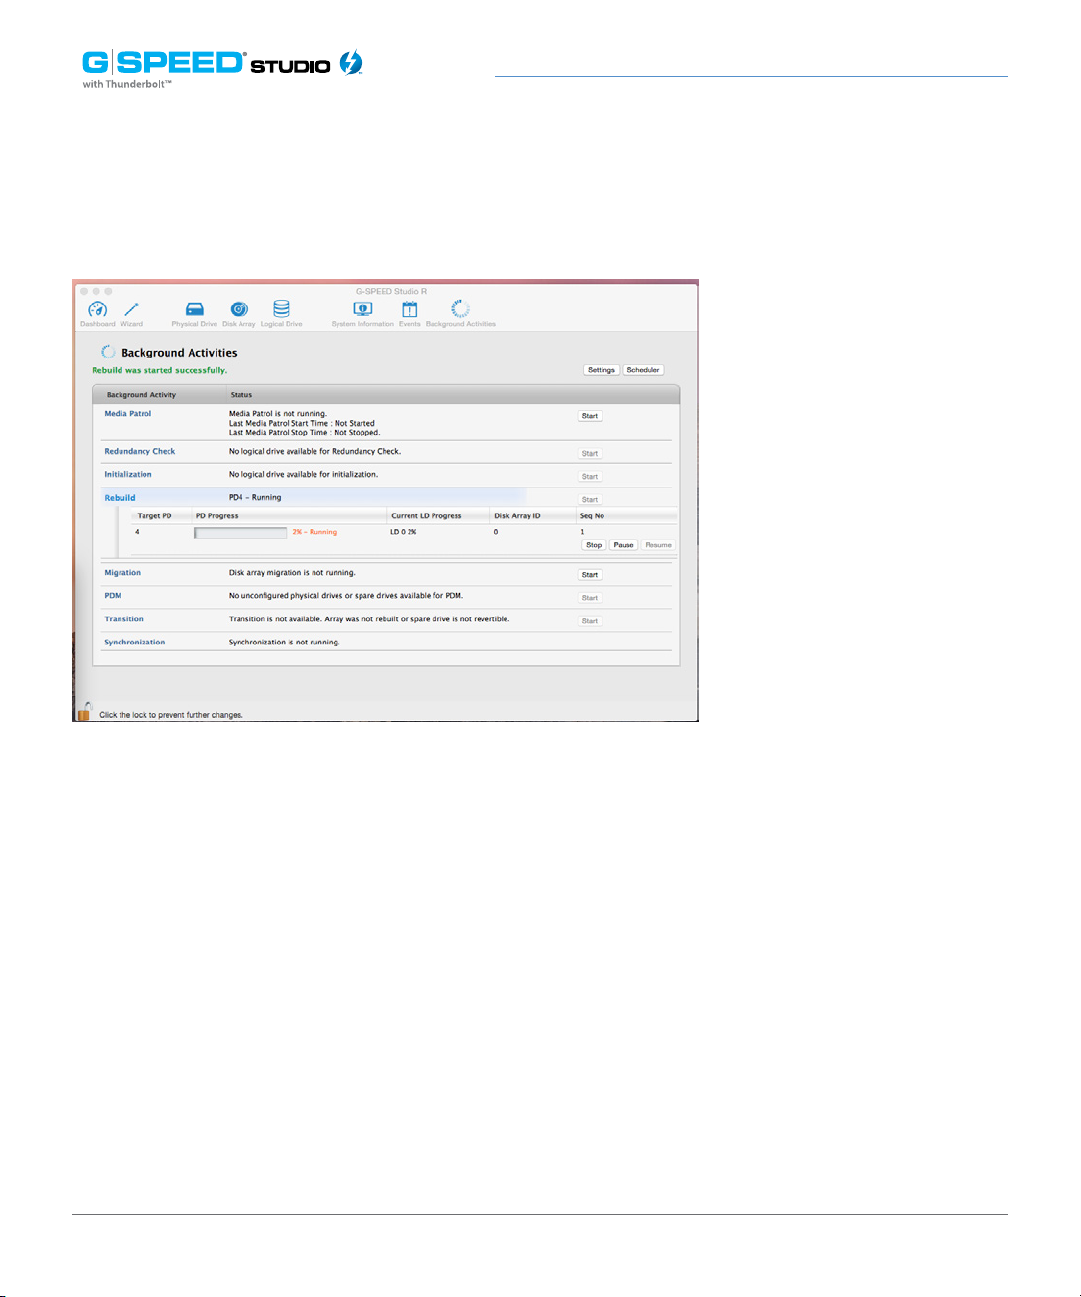
Performing a Manual Rebuild
Conguring G-SPEED Studio R
To perform a manual rebuild:
1. Click on the Background Activities icon.
2. Mouse-over Rebuild, then click the Start button.
3. From the Source Physical Drive drop-down menu, choose a Source disk array and
physical drive. Arrays have an ID number. Physical drives have a sequence number.
4. From the Target Physical Drive drop-down menu, choose a Target physical drive.
5. In the Confirmation box, type the word “CONFIRM” in the field provided, then click the
Conrm button. While the disk array is rebuilding:
• The disk array will show a green check icon and a Rebuilding status.
• Logical drives under the disk array will continue to show a yellow “!” icon and a
Critical, Rebuilding status.
• If the buzzer is enabled, your G-SPEED Studio R unit will emit two quick beeps
every five seconds. When the beeps stop, the rebuild will be done.
p. 77
Page 78

Conguring G-SPEED Studio R
Pausing and Resuming a Rebuild
To pause or resume a Rebuild:
1. Click on the Background Activities icon.
2. Mouse-over Rebuild, then click the Pause or Resume button.
Stopping a Rebuild
To stop or cancel a Rebuild:
1. Click on the Background Activities icon.
2. Mouse-over Rebuild, then click the Stop button.
3. Click the Conrm button. Also see Making Rebuild Settings.
Managing Logical Drives
Logical drive management includes:
• “Viewing a List of Logical Drives”
• “Viewing Logical Drive Information”
• “Viewing Logical Drive Statistics”
• “Making Logical Drive Settings”
• “Viewing Logical Drive Check Tables”
• “Creating a Logical Drive Manually”
• “Formatting Your Logical Drives”
• “Locating a Logical Drive”
• “Deleting a Logical Drive”
• “Initializing a Logical Drive”
• “Redundancy Check on a Logical Drive”
• “Migrating a Logical Drive”
• “Running PDM on a Logical Drive”
p. 78
Page 79

Conguring G-SPEED Studio R
Viewing a List of Logical Drives
To view a list of logical drives, perform one of the following actions:
• Click the Logical Drive icon.
• From the Storage menu, choose Logical Drive.
The list of logical drives will appear. Logical drive information includes:
• ID – LD0, LD1, etc.
• Alias – If assigned
• Status - Normal, Critical or Oine icon
• Capacity – Data capacity of the logical drive
• RAID Level – Set when the logical drive was created
• Stripe – Set when the logical drive was created
• Cache Policy – Read and write cache settings
• Array ID – ID number of the disk array where this logical drive was created
Viewing Logical Drive Information
To view logical drive information:
1. Do one of the following actions:
• Click the Logical Drive icon.
• From the Storage menu, choose Logical Drive. The list of logical drives will
appear.
2. Mouse-over the logical drive you want, then click the View button.
Logical Drive information will display, including:
• Logical Drive ID – LD0, LD1, etc.
• Alias – If assigned
• Array ID – ID number of the disk array where this logical drive was created
• RAID Level – Set when the logical drive was created
• Operational Status – OK, Critical or Oine
p. 79
Page 80

Conguring G-SPEED Studio R
• Capacity – Data capacity of the logical drive
• Number of Axles – For RAID 10, two axles
• Physical Capacity – Data capacity of the physical drives
• Number of Physical Drives – The number of physical drives in the disk array
• Stripe size – Set at logical drive creation
• Read Policy – ReadCache, ReadAhead or None *
• Sector size – Set at logical drive creation
• Write Policy – WriteThru or WriteBack *
• Current Write Policy – May change from WriteBack to WriteThru under certain
conditions
• Preferred Controller ID – Not applicable
• Tolerable Number of Dead Drives Per Axle – Number of physical drives that can
fail without the logical drive going oine
• Synchronized – A new logical drive shows “No” until synchronizing is completed.
See Synchronization
• Parity Pace – Pertains to some RAID levels
• WWN – Worldwide Number, a unique identifier assigned to this logical drive
• RAID 5 and 6 Algorithm – Pertains to RAID 5 and 6
• Codec Scheme – Pertains to some RAID levels
• Serial No. – Serial number assigned to this logical drive
Viewing Logical Drive Statistics
To view logical drive statistics:
1. Do one of the following actions:
• Click the Logical Drive icon.
• From the Storage menu, choose Logical Drive. The list of logical drives will appear.
p. 80
Page 81

Conguring G-SPEED Studio R
2. Mouse-over the logical drive you want, then click the View button.
3. Click the Statistics tab. Logical Drive statistics will display, including:
• Data Transferred – In megabytes
• Read Data Transferred – In megabytes
• Write Data Transferred – In megabytes
• Errors
• Non-Read/Write Errors
• Read Errors
• Write Errors
4. Click the X icon to close the statistics panel.
To clear the check tables, see Clearing Statistics.
• I/O Requests
• Non-Read/Write I/O Requests
• Read I/O Requests
• Write I/O Requests
• Statistics Start Time
• Statistics Collection Time
Changing Logical Drive Settings
To change logical drive settings:
1. Do one of the following actions:
• Click the Logical Drive icon.
• From the Storage menu, choose Logical Drive. The list of logical drives will
appear.
2. Mouse-over the logical drive you want, then click the Settings button.
3. Make setting changes as required:
• Enter, change or delete the alias in the Alias eld. Aliases must have a maximum
of 32 characters (letters, numbers and spaces between characters).
• Choose a Read (cache) Policy. Read Cache, Read Ahead and No Cache are available.
• Choose a Write (cache) Policy. Write Back and Write Through (Thru) are available.
4. Click the Save button.
For more information, see Read Cache Policy and Write Cache Policy.
p. 81
Page 82

Conguring G-SPEED Studio R
Viewing Logical Drive Check Tables
This feature allows you to view error tables. Use this information to evaluate the integrity
of a logical drive and determine whether corrective action is needed.
To view logical drive check tables:
1. Do one of the following actions:
• Click the Logical Drive icon.
• From the Storage menu, choose Logical Drive. The list of logical drives will
appear.
2. Mouse-over the logical drive you want, then click the Check Table button.
3. Choose an option:
• All – All errors (default)
• Read Check – Read errors for this logical drive
• Write Check – Write errors for this logical drive
• Inconsistent Block – Inconsistent blocks for this logical drive, meaning that mirror
data for RAID levels 1, 1E and 10 and/or parity data for RAID levels 5 and 6 may
contain errors. Inconsistencies are identified by the Redundancy Check.
The Check Table lists:
• Table Type – Read Check, Write Check or Inconsistent Block
• Start Logical Block Address – The LBA of the first block for this entry
• Count – The number of errors or continuous blocks starting from this LBA
4. Click the X icon to close the information panel.
To clear the check tables, see Clearing Statistics.
Creating a Logical Drive Manually
This feature creates a logical drive only. You can also use the Wizard to create a disk array
with logical drives and spare drives concurrently. See Creating a Disk Array and Logical
Drive With the Wizard. To create a logical drive manually:
p. 82
Page 83

Conguring G-SPEED Studio R
1. One of the following actions:
• Click the Logical Drive icon.
• From the Storage menu, choose Logical Drive.
2. Click the Create Logical Drive button.
3. Click the radio button of the disk array you want to use, then click the Next button.
4. Accept the defaults or make changes from the following:
• Optional. Enter an alias in the Alias field with a maximum of 32 characters (letters,
numbers and spaces).
• Choose a RAID level. The choice of RAID levels will depend in part on the number
of physical drives in the disk array.
• In the Capacity eld, accept the default maximum capacity or enter a lesser
capacity in MB, GB or TB. Any remaining capacity will be available for an additional
logical drive.
• Choose a Stripe size: 64KB, 128KB, 256KB, 512KB and 1MB are available.
• Choose a Sector size: 512KB, 1KB, 2KB and 4KB are available.
• Choose a Read (cache) Policy: Read Cache, Read Ahead and No Cache are available.
• Choose a Write (cache) Policy: Write Back and Write Through (Thru) are available.
The Write Cache is always set to WriteThru when the Read Cache is set to NoCache.
• If you want the G-SPEED Studio R Utility to format your logical drives,
leave the Format box checked. See Formatting Logical Drives.
5. Click the Add button. The new logical drive will appear on the list at the right. If any
capacity remains, you can create an additional logical drive. G-SPEED Studio R supports
up to 32 logical drives.
6. When finished, click the Submit button.
The new logical drive(s) will appear in the logical drive list. The new Volume will appear
on the desktop.
p. 83
Page 84

Conguring G-SPEED Studio R
Formatting Your Logical Drives
If you left the Format box checked when you created your logical drives, they will be
formatted automatically.
If you Unchecked the Format box, you must format your logical drives manually.
See Formatting Logical Drives.
When the G-SPEED Studio R Utility finishes formatting, new drive icons, each
representing one logical drive, will appear on your desktop (right).
When you see the icon, your logical drive will be ready to use.
Locating a Logical Drive
This feature causes the drive carrier LEDs to flash for one minute to assist you in locating
the physical drives that make up a logical drive.
To locate a logical drive:
1. Click the Logical Drive icon. The list of logical drives will appear.
2. Mouse-over the logical drive you want, then click the Locate button. The drive power /
status LEDs for the physical drives that make up the logical drive will blink blue for one
minute.
Running the Locate function to identify a disk array:
Drive power/status
LEDs blink blue
p. 84
Page 85

Conguring G-SPEED Studio R
Deleting a Logical Drive
This action requires administrator or superuser privileges. To delete a logical drive:
1. Perform one of the following actions:
• Click the Logical Drive icon.
• From the Storage menu, choose Logical Drive. The list of logical drives will appear.
2. Mouse-over the disk array you want, then click the Delete button.
3. In the Confirmation box, type the word “CONFIRM” in the field provided, then click the
Conrm button.
Initializing a Logical Drive
Initialization is normally done to logical drives after they are created from a disk array.
p. 85
Page 86

Conguring G-SPEED Studio R
To initialize a logical drive:
1. Click on the Background Activities icon. The list of background activities will appear.
2. Mouse-over Initialization, then click the Start button.
3. Check the box to the left of the logical drive you want to initialize.
4. Choose the initialization option you want:
• Quick Initialization – Check this box and then enter a value in the Quick
Initialization Size field.
• Full Initialization – Enter a hexadecimal value in the Initialization Pattern in the
Hex field or use the default 00000000 value.
5. Click the Conrm button.
6. In the Confirmation box, type the word “CONFIRM” in the field provided, then click the
Conrm button.
Pausing and Resuming an Initialization
To pause or resume Initialization:
1. Click on the Background Activities icon. The list of background activities will appear.
2. Mouse-over Initialization, then click the Pause or Resume button.
Stopping an Initialization
To stop/cancel the Initialization:
1. Click on the Background Activities icon. The list of background activities will appear.
2. Mouse-over Initialization, then click the Stop button.
3. In the Confirmation box, type the word “CONFIRM” in the field provided, then click the
Conrm button.
p. 86
Page 87

Conguring G-SPEED Studio R
Redundancy Check on a Logical Drive
Redundancy Check is a routine maintenance procedure for fault-tolerant disk arrays
(those with redundancy) that ensures the redundant copies of data still match the original
source data. Redundancy Check can also correct inconsistencies.
To run Redundancy Check on a logical drive:
1. Click on the Background Activities icon. The list of background activities will appear.
2. Mouse-over Redundancy Check, then click the Start button.
3. Check the boxes to the left of the logical drives on which to run Redundancy Check.
4. Check the option you want:
• Auto Fix – Attempts to repair the problem when it finds an error
• Pause on Error – The process stops when it finds a non-repairable error
5. Click the Conrm button.
Pausing and Resuming a Redundancy Check
To pause or resume a Redundancy Check:
1. Click on the Background Activities icon. The list of background activities will appear.
2. Mouse-over Redundancy Check, then click the Pause or Resume button.
Stopping a Redundancy Check
To stop or cancel the Redundancy Check:
1. Click on the Background Activities icon. The list of background activities will appear.
2. Mouse-over Redundancy Check, then click the Stop button.
Click the Conrm button.
p. 87
Page 88

Conguring G-SPEED Studio R
Migrating a Logical Drive
Migration means one or both of the following:
• Changing the RAID level of a logical drive
• Expanding the storage capacity of a logical drive
Before you begin a migration, examine your current disk array to determine whether:
• The physical drives in your array can support the target RAID level
• There is sucient capacity to accommodate the target logical drive size
If you need to add physical drives to your array, be sure there are unassigned physical
drives installed in your RAID system before you begin migration. See RAID Levels and
RAID Level Migration.
To migrate a logical drive:
1. Click on the Background Activities icon. The list of background activities will appear.
2. Mouse-over Migrate, then click the Start button.
3. In the Select Disk Array drop-down menu, choose the source disk array.
4. In the Select Physical Drives diagram, click the drives you wish to add to your array.
The ID numbers of the chosen drives will appear in the field below the diagram.
5. Click the Next button.
6. Check the box next to the logical drive you want to modify.
7. From the drop-down menu, choose a target RAID level. The choice of RAID levels will
depend in part on the number of physical drives in the disk array. See the note below.
8. In the Capacity field, either accept the current capacity or check the Expand Capacity
box and enter a greater capacity in MB, GB or TB. If any capacity remains, you can create
an additional logical drive.
9. Click the Next button. The logical drive ID numbers, with their original and target RAID
levels and capacities, are shown.
10. To accept the proposed target values, click the Conrm button.
p. 88
Page 89

Conguring G-SPEED Studio R
Running PDM on a Logical Drive
Predictive Data Migration (PDM) is the migration of data from the suspect disk drive to
a spare drive, similar to rebuilding a disk array. But unlike rebuilding, PDM automatically
copies your data to a spare drive before the drive fails and your logical drive goes critical.
PDM can be triggered automatically by Media Patrol. See PDM. To run PDM on a logical drive:
1. Click on the Background Activities icon. The list of background activities will appear.
2. Mouse-over PDM, then click the Start button.
3. Choose a Source Physical Drive. The Source Physical Drive is the drive suspected of
possible failure. Source Physical Drives are identified by their disk array and sequence
numbers in the disk array.
4. Choose a Target Physical Drive. The Target Physical Drive is the replacement drive.
Target Physical Drives are identified by their physical drive ID number.
5. Click the Conrm button.
Pausing and Resuming PDM
To pause or resume PDM:
1. Click on the Background Activities icon. The list of background activities will appear.
2. Mouse-over PDM, then click the Pause or Resume button.
Stopping PDM
To stop or cancel PDM:
1. Click on the Background Activities icon. The list of background activities will appear.
2. Mouse-over PDM, then click the Stop button.
3. Click the Conrm button.
p. 89
Page 90

Conguring G-SPEED Studio R
Managing Spare Drives
Spare drive management includes:
• Viewing a List of Spare Drives (see below)
• “Creating a Spare Drive Manually”
• “Making Spare Drive Settings”
• “Running Spare Check”
• “Deleting a Spare Drive”
• “Running a Transition”
Viewing a List of Spare Drives
To view a list of spare drives, perform the following action:
• From the Dashboard window, click Spare Drive.
Spare Drive information will display, including:
• ID – Spare0, Spare1, etc.
• Status - Normal, Rebuilding, or Failed/Missing icon
• Congurable Capacity – Usable capacity of the spare drive
• Physical Drive ID – ID number of the physical drive chosen for this spare
• Revertible – Yes or No
• Spare Type – Global or Dedicated
• Dedicated to Array – ID number of the disk array to which the spare is dedicated
Viewing Spare Drive Information
To view spare drive information:
1. Perform the following action:
• From the Dashboard window, click Spare Drive.
2. Mouse-over the spare drive you want, then click the View button.
p. 90
Page 91

Conguring G-SPEED Studio R
Spare Drive information will display, including:
• Spare Drive ID – Spare0, Spare1, etc.
• Physical Drive ID – ID number of the physical drive chosen for this spare
• Location – Enclosure number and slot number
• Model Number – Make and model of the physical drive
• Operational Status – OK, Rebuilding, Failed or Missing
• Spare Type – Global or Dedicated *
• Physical Capacity – Total data capacity of the spare drive
• Revertible – Yes or No*
• Congurable Capacity – Usable capacity of the spare drive
• Spare Check Status – Not Checked or Healthy
• Media Patrol – Enabled or Not Enabled*
• Dedicated to Array – ID number of the disk array to which the spare is dedicated*
*Adjustable under Making Spare Drive Settings. For Spare Check, see Running Spare Check.
3. Click the X icon to close the information panel.
Creating a Spare Drive Manually
This feature creates a spare drive only. You can also use the Wizard to create a disk array
with logical drives and spare drives concurrently. See Spare Drives for more information.
To create a spare drive:
1. Perform the following action:
• From the Dashboard window, click the Spare Drive link.
2. Click the Create Spare Drive button.
p. 91
Page 92

Conguring G-SPEED Studio R
3. For each of the following items, accept the default or change the settings as required:
• Check the Revertible box if you want a revertible spare drive. A revertible spare
drive returns to its spare drive assignment after you replace the failed physical
drive in the disk array and run the Transition function.
• Type (choose spare type)
• Global – Can be used by any disk array
• Dedicated to the specific disk array noted by the checked radio button.
• Media Type: If you have more than one type of physical drive installed (SSD and
HDD, for example), choose the type of drive for the spare.
4. In the Create Spare Drive diagram, click a drive to choose as your spare. The drive
carrier will turn blue when you click this. The physical drive’s ID number will appear in
the field below the diagram.
5. Click the Submit button to continue. If you are done creating spare drives, click the
Finish button. To create another spare drive, click the Create More button.
Changing Spare Drive Settings
For more information on settings options, see Spare Drives. To change spare drive settings:
1. From the Dashboard window, click the Spare Drive link. The list of spare drives will appear.
2. Mouse-over the spare drive you want, then click the Settings button.
3. Accept the default or change the settings as required:
• In the Revertible drop-down menu, choose Yes or No.
• In the Spare Type drop-down menu, choose Global or Dedicated.
• If you use chose a Dedicated spare, check the box beside the disk array to which
this spare drive is assigned.
4. Click the Save button.
p. 92
Page 93

Conguring G-SPEED Studio R
Running Spare Check
Spare Check verifies the status of your spare drives. To run Spare Check:
1. From the Dashboard window, click the Spare Drive link. The list of spare drives will appear.
2. Mouse-over the spare drive you want, then click the Spare Check button.
3. Click the Conrm button.
Spare Check has no pause, resume or stop functions. When Spare Check completes, it
adds “Healthy” next to Spare Check Status on the Spare Drive information box.
After the “Spare Check completed” message appears, click the View button to see Spare
Check Status.
Deleting a Spare Drive
This action requires administrator or superuser privileges. To delete a spare drive:
1. From the Dashboard window, click the Spare Drive link. The list of spare drives will appear.
2. Mouse-over the spare drive you want, then click the Delete button.
3. In the Confirmation box, type the word “confirm” in the field provided, then click the
Conrm button.
Running a Transition on a Spare Drive
Transition is the process of replacing a revertible spare drive that is currently part of a disk
array with an unconfigured physical drive or a non-revertible spare. You must specify an
unconfigured physical drive of the same or larger capacity and same media type as the
revertible spare drive. Also see Transition.
p. 93
Page 94

Conguring G-SPEED Studio R
Running a Transition
To run a Transition on a revertible spare drive:
1. Click on the Background Activities icon. The list of background activities will appear.
2. Mouse-over Transition, then click the Start button.
3. Choose a Source Physical Drive. The Source Physical Drive is the revertible spare drive
that is now part of the disk array. Source Physical Drives are identified by their disk array
and sequence numbers within the disk array.
4. Choose a Target Physical Drive. The Target Physical Drive is the drive that replaces the
revertible spare. Target Physical Drives are identified by their physical drive ID number.
5. Click the Conrm button.
Pausing and Resuming a Transition
To pause or resume a Transition:
1. Click on the Background Activities icon. The list of background activities will appear.
2. Mouse-over Transition, then click the Pause or Resume button.
Stopping, Pausing or Resuming a Transition
To stop/cancel a Transition:
1. Click on the Background Activities icon. The list of background activities will appear.
2. Mouse-over Transition, then click the Stop button.
3. Click the Conrm button.
p. 94
Page 95

Conguring G-SPEED Studio R
Formatting Logical Drives
A RAID logical drive must also be formatted to be compatible with your computer. In this
User Manual, the term “format” includes both partition and format operations.
You can format your logical drives using the:
• G-SPEED Studio R Utility with Default settings
• G-SPEED Studio R Utility with Custom Settings
• Mac OS Disk Utility
Both the G- SPEED Studio R Utility and your Mac’s Disk Utility offer a choice of formatting
options. However, if there is no specific reason to customize the settings, G-Technology’s
default format settings are recommended.
G-SPEED Studio R Software With Default Settings
Wizard, Automatic or Express
When you create your logical drives using the Wizard’s Automatic or Express options, your
logical drives are always formatted automatically.
When the G- SPEED Studio R Utility finishes its format operation, new removable drive
icons, each representing one logical drive, will appear on your desktop. When you
see the icon, your logical drive will be ready to use.
Wizard, Advanced or Manual Creation
When you create your logical drives using the Wizard’s Advanced option, the Format option
is enabled by default.
p. 95
Page 96

Conguring G-SPEED Studio R
When the G- SPEED Studio R Utility finishes the format operation, new removable drive
icons, each representing one logical drive, will appear on your desktop. When you see the
icon, your logical drive is ready to use.
For more information, see Creating a Disk Array and Logical Drive With the Wizard and
Creating a Logical Drive Manually.
G-SPEED Studio R Utility With Custom Settings
To use your own format settings, you must create your logical drives using the Wizard’s
Advanced option or create your logical drives manually, and you must un-check the
Format box.
See Creating a Disk Array and Logical Drive With the Wizard and Creating a Logical Drive
Manually
To format your logical drives using the G-SPEED Studio R Utility with your own settings:
1. In the Logical Drive list, mouse-over the logical drive you want to format, then click the
Format button.
2. Supply information as required:
• Optional: Type a different name into the Volume Name field.
• Choose a partition from the Partition Type drop-down menu.
• Choose a format type from the Format Type drop-down menu.
p. 96
Page 97

Conguring G-SPEED Studio R
• For Macintosh computers, the default GPT Format partition and the default.
• Journaled HFS+ format are recommended.
3. Click the Format button.
When the G-SPEED Studio R Utility has finished the partition and format operation, new
removable drive icons, each representing one logical drive, will appear on your desktop.
When you see the icon, your logical drives will be ready to use.
Disk Utility
For information on using your computer’s Disk Utility application, see the online help or
the computer’s user manual.
To format your logical drives using the computer’s Disk Utility, you must create your
logical drives using the Wizard’s Advanced option or create your logical drives manually,
and you must un-check the Format box.
See Creating a Disk Array and Logical Drive With the Wizard and Creating a Logical
Drive Manually
To format your logical drives using the computer’s Disk Utility:
1. Click the Go menu and choose Utilities from the drop-down list.
2. Double-click the Disk Utility icon to open the utility.
3. In the drive list, highlight the logical drive you want to format, then click the Partition
button.
p. 97
Page 98

Conguring G-SPEED Studio R
4. Change your Volume Scheme, Volume Information and Options settings, then click
the Apply button.
For Macintosh computers, the default GPT Format partition and the default Journaled
HFS+ format are recommended.
5. In the Confirmation dialog box, click the Partition button.
When Disk Utility has finished the partition and format operation, new removable drive
icons, each representing one logical drive, will appear on your desktop and your logical
drives will be ready to use.
Spare Drives
A spare drive is a physical drive that you designate to automatically replace the failed
physical drive in a disk array. See Creating a Spare Drive Manually.
G-Technology’s general recommendation is to acquire at least one spare drive and
configure the spare(s) as a global revertible spare drive(s).
Options
There are several options you can specify for a spare drive:
System Options
• Revertible – A revertible spare returns to its spare drive assignment after you
replace the failed physical drive in the disk array and run the Transition function.
• Media Patrol – By default, Media Patrol runs on spare drives unless you disable it.
Spare Type
• Global – Can be used by any disk array
• Dedicated – Can be used only by the assigned disk array
p. 98
Page 99

Conguring G-SPEED Studio R
Media Type (type of physical drive)
• Hard disk drive (HDD)
Requirements
The spare drive must have adequate capacity to replace the largest physical drive in
your disk arrays. Additionally, it must be the same media type as the physical drives in
your disk arrays. A revertible spare drive requires you to replace the failed physical drive
in the disk array and run the Transition function.
Transition
Transition is the process of replacing a revertible spare drive that is currently part of a
disk array with an unconfigured physical drive or a non-revertible spare, whereupon
the revertible spare drive will return to its original status. To run the Transition function,
the spare drive must be revertible.
In addition, you must specify an unconfigured physical drive of the same or larger
capacity and the same media type as the revertible spare drive.
Running a Transition
The Transition feature enables you to specify “permanent” spare drives for your
G-SPEED Studio R unit. Transition is the process of replacing a revertible spare
drive that is currently part of a disk array with an unconfigured physical drive or a
non-revertible spare. The revertible spare drive will return to its original status.
Transition happens automatically when the following sequence of events takes place:
• You create a revertible spare drive. See Creating a Spare Drive Manually.
• A physical drive assigned to your disk array fails and the array goes Critical or
Degraded.
p. 99
Page 100

Conguring G-SPEED Studio R
• G-SPEED Studio R automatically rebuilds your array to the revertible spare
drive and the array becomes functional again.
• You replace the failed physical drive with a new physical drive of equal or
greater capacity.
• G-SPEED Studio R automatically transitions (moves) the data from the revertible
spare to the new physical drive.
• The new physical drive becomes part of the array and the revertible spare
drive returns to its original spare status.
Transition happens manually when you specify an unconfigured physical drive as a
transition target for data from the revertible spare drive.
p. 100
 Loading...