

Page 1
G SPEED
eS
PRO
PRODUCT MANUAL
™
High-Performance RAID Solutions for HD/2K Production
g-technology.com
Page 2

G SPEED
eS
PRO
Table of Contents
Table of Contents
Table
™
Table of Contents
Safety & General Use
Safety Precautions .........................................4
Backup Your Data ..........................................5
About Your G-SPEED eS Pro
Introduction ....................................................7
What’s in the Box ..........................................8
System Requirements ..................................8
Overview of the Drive ................................. 9
Overview of the Controller .......................9
Using Your Drive
Drive LED Operation .....................................11
Warning LED and Alarms ............................11
Disconnect the Drive ...................................12
Windows Use ...................................................12
Using ATTO R680 RAID Controller
Download ATTO RAID Software ...............14
Conguring G-SPEED eS Pro
RAID Conguration Scripts for Mac ........18
Use the ATTO CongTool ............................19
Change the RAID Mode ...............................21
Congure Two RAID Units ..........................26
Set Up Alert Notications ........................... 31
Maintenance for your Drive
Replace a Failed Disk Drive ........................33
Initialize Drive for Mac ................................36
Restore the Drive Icon .................................39
Reformat with Partitions .............................41
Appendix
RAID Levels Explained .................................46
Support & Warranty
Technical Support .........................................48
Limited Warranty ...........................................49
Install ATTO Driver & CongTool ............. 14
Install ATTO Controller .................................15
Attach eS Pro to ATTO Controller .............15
Add Second G-SPEED eS Pro Unit ............16
Uninstall ATTO Driver & CongTool ........16
Copyright ..........................................................51
p.2
Page 3

G SPEED
eS
PRO
™
Safety & General Use
• Safety Precautions ................................................................ p.4
• Backup Your Data ................................................................. p.5
Page 4

G SPEED
eS
PRO
health
™
Safety & General Use
Safety Precautions
G-SPEED eS Pro’s warranty may be void as a result of the failure to respect the precautions listed here. If
you detect a problem with your drive, please contact our Technical Support department.
If the product is returned with damage caused by improper handling, the warranty will
be void and liability will rest with the user. Please read our Limited Warranty.
• Servicing: Your drive contains no user-serviceable parts. If it appears to be malfunctioning,
have it inspected by a qualied Technical Support representative.
Moisture: Place the device away from moisture or liquids. To reduce the risk of damage, do
•
not expose this drive to rain or moisture. Do not use it in damp or wet conditions. Never place
objects containing liquids on the drive as they may spill into its openings.
Ventilation: Place the device in a vented area. The drive should never be placed near
•
or over a radiator or heat source.
• Temperature: Do not expose this drive to temperatures outside the range of 5°C to 35°C (41°F to 95°F);
or to operational humidity beyond 5-80%, non-condensing, or non-operating humidity beyond 10-90%,
non-condensing. Avoid placing your drive near a source of heat, or exposing it to sunlight (even through
a window), or in an environment that is too cold or humid.
• Physical Damage: Do not place heavy objects on the drive. Never use excessive force
on your drive.
p.4
Page 5

G SPEED
eS
PRO
backup
™
Safety & General Use
Backup Your Data
The disk drive contained in your G-SPEED eS Pro device is a delicate electronic instrument
and is susceptible to damage due to excessive physical shock. Under no circumstances
will G-Technology be held liable for the recovery or restoration of lost data. Any loss, corruption
or destruction of data while using a G-Technology drive is the sole responsibility of the user.
Make Two Backups
To help prevent the loss of your data, we highly recommend that you keep TWO copies
of your data in separate storage locations. When in RAID 1, 5 or 6 (Protected mode),
G-SPEED eS Pro will safeguard your data from hard drive failure. However, if any le
system corruption occurs, the data contained on G-SPEED eS Pro may be aected.
For critical data, it is recommended to keep one copy on G-SPEED eS Pro and a second copy on
another storage device.
p.5
Page 6

G SPEED
eS
PRO
™
About Your G-SPEED eS Pro
• Introduction ............................................................................ p.7
• What’s in the Box .................................................................. p.8
• System Requirements ........................................................... p.8
• Overview of the Drive ......................................................... p.9
• Overview of the Controller ................................................ p.9
Page 7
G SPEED
eS
PRO
intro
™
About Your G-SPEED eS Pro
Introduction
Thank you for purchasing G-SPEED eS Pro from G-Technology.
Specically designed for professional content creation applications, G-SPEED eS Pro
features a high-speed mini-SAS interface. The storage system provides RAID 0, 1, 5, 6 and
JBOD functionality when used in conjunction with the ATTO ExpressSAS R680 PCIe miniSAS RAID controller.
Two G-SPEED eS Pro units can be attached to the ATTO R680 RAID controller for incredible
performance.
p.7
Page 8
G SPEED
eS
PRO
inbox
™
About Your G-SPEED eS Pro
What’s in the Box
The following items are included in the box:
• G-SPEED eS Pro storage system
• 4 removable SATA drive modules (installed in unit)
• (2) disk module keys
• 2-meter mini-SAS cable
• AC Power cable
• Quickstart Guide
Optional purchase: ATTO R680 PCIe x8 RAID controller
If any items are missing, please contact G-Technology at
support@g-technology.com or call (888) 426-5214.
Download the latest G-SPEED eS Pro manual and ATTO software at:
www.g-technology.com/support/gspeed_es_pro/
System Requirements
G-SPEED eS Pro and the ATTO R680 RAID controller support the folllowing Operating
Systems. The drive is set up at the factory for use with Mac OS® X systems, and formatted as ‘HFS+’.
• Mac OS 10.5 or higher
• Windows XP, Vista or Windows 7
NOTE: The ATTO CongTool makes it possible to create RAID groups up to 16TB that
are compatible with Windows XP. For more information, please refer to the chapter
Using ATTO R680 RAID Controller.
p.8
Page 9
G SPEED
eS
PRO
overview
™
About Your G-SPEED eS Pro
Overview of the Drive
G-SPEED eS Pro ships from the factory congured in RAID 0 for use with the ATTO R680
RAID controller. The RAID controller also supports RAID 1, 5, 6 and JBOD congurations. If you wish to change the RAID mode, please refer to Change the RAID Mode.
For an explanation of supported RAID levels, please refer to RAID Levels Explained.
‘Smart’ cooling fans
(4) Removable disk
drive modules
Alarm Mute button
Drive Lock key hole
mini-SAS port
Drive module
Power/Activity LED
Kensington lock
Power LED
Temperature/Fan
Warning LED
Overview of the Controller
The ATTO R680 RAID controller connects your G-SPEED eS Pro to a Mac or
Windows workstation, and also provides RAID 0, 1, 5, 6 and JBOD functionality.
Download the latest ATTO software at:
www.g-technology.com/support/gspeed_es_pro/
(2) High-speed
mini-SAS ports
AC inputON/OFF Switch
PCIe x8 interface
p.9
Page 10

G SPEED
eS
PRO
™
Using Your Drive
• Drive LED Operation ......................................................... p.11
• Warning LED and Alarms ................................................ p.11
• Disconnect the Drive ......................................................... p.12
• Windows Use ........................................................................ p.12
Page 11
G SPEED
eS
PRO
led
™
Using Your Drive
Drive LED Operation
Under normal operation, each G-SPEED eS Pro drive module has an LED that glows blue
indicating a connection to the RAID controller. The LED will ash brighter when the drive
is being accessed.
Drive module
Power/Activity LED
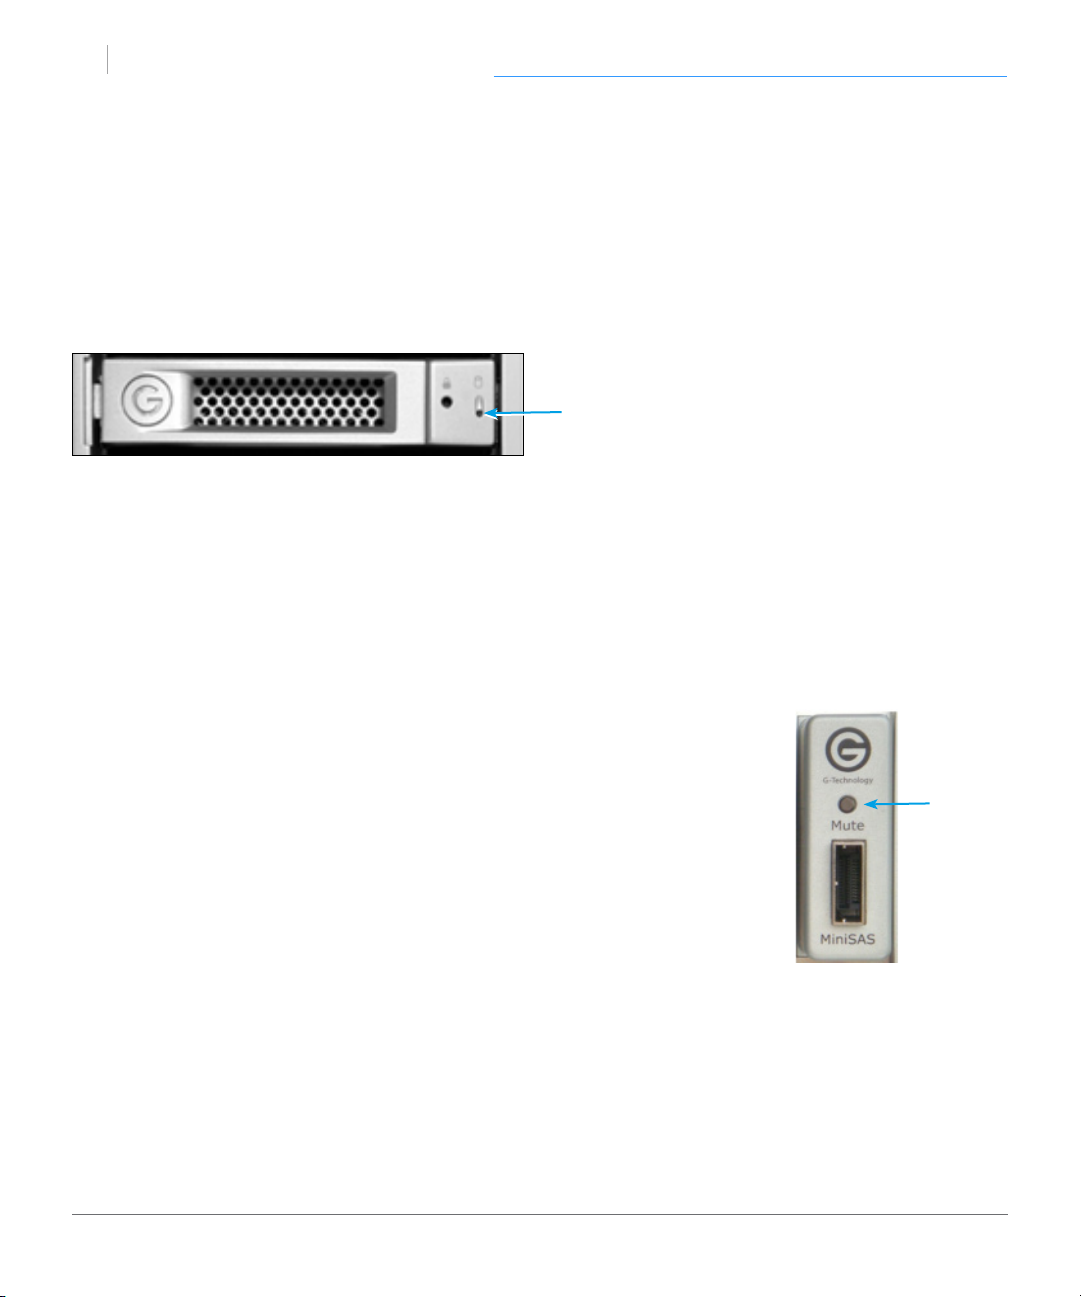
Warning LED and Alarms
The G-SPEED eS Pro enclosure is equipped with an audible alarm that sounds when:
• The internal temperature of the G-SPEED eS Pro enclosure
exceeds a temperature of 60° centigrade, and/or
• The main cooling fan fails, or the RPM of the fan slows to a
state where the fan can no longer adequately cool the system.
Alarm
To silence the alarm, push the Mute button located on the back
of the G-SPEED eS Pro, as shown at right.
Mute
button
In addition to the audible alarm, the Temperature/Fan Warning
LED located on the front bezel of G-SPEED eS Pro will illuminate.
If you hear an audible alarm and see the RED warning LED on the front of G-SPEED eS Pro,
stop using G-SPEED eS Pro and contact G-Technology support.
p.11
Page 12

G SPEED
eS
PRO
disconnect
™
Using Your Drive
Disconnect the Drive
It is not recommended to disconnect G-SPEED eS Pro while your system is running. First
power o your system, and when it is completely powered down, turn o the G-SPEED
eS Pro. It is then safe to unplug the drive from your system.
Windows Use
G-SPEED eS Pro is set up at the factory for use with the ATTO R680 RAID controller and
formatted for Mac OS X systems. The ATTO controller is also compatible with Windows
systems, and G-SPEED eS Pro can be reformatted to work with Windows as well.
Please refer to the ATTO R680 RAID controller documentation for instructions on installing for Windows OS. You can nd a link to download the documentation here:
www.g-technology.com/support/gspeed_es_pro/
NOTE: The ATTO CongTool makes it possible to create RAID groups up to 16TB that are
compatible with Windows XP. For more information, please refer to the chapter Using
ATTO R680 RAID Controller.
p.12
Page 13

G SPEED
eS
PRO
usingatto
™
Using ATTO R680 RAID Controller
• Download ATTO RAID Software .................................. p.14
• Install ATTO Driver & CongTool ................................ p.14
• Install ATTO Controller ..................................................... p.15
• Attach eS Pro to ATTO Controller ................................. p.15
• Add Second G-SPEED eS Pro Unit ................................. p.16
• Uninstall ATTO Driver & CongTool ............................... p.16
Page 14
G SPEED
eS
PRO
download
™
Using the ATTO RAID Controller
Download ATTO RAID Software
To use the ATTO R680 RAID controller, you rst need to install drivers and software on
your system. Visit www.g-technology.com/support/gspeed_es_pro/
Here you will nd a special link to the ATTO website where you can download GTechnology approved drivers and software. You will also nd the latest verison of this
manual and easy conguration scripts for quickly setting up your G-SPEED eS Pro with
the ATTO controller.
From the G-Technology page* on the ATTO website,
please download the following items:
• Driver for your system
• CongTool utility
• ATTO R680 User Guide (optional)
* The software listed on the ATTO/G-Technology page has been tested
and approved for use with G-SPEED eS Pro. Software listed on the
standard download page on the ATTO website may not be compatible with G-SPEED eS Pro.
Install ATTO Driver & CongTool
G-SPEED eS Pro comes pre-congured for use with the ATTO R680 RAID controller.
The drive is set up in RAID 0 and formatted for Mac OS X. Connecting G-SPEED eS Pro
to your Mac Pro and conguring your system takes just a few steps as outlined below.
(Windows users, please refer to the ATTO R680 User Guide.)
1. Locate the driver and CongTool downloaded from
the ATTO/G-Technology page and install the driver,
then CongTool.
2. The ATTO CongTool can notify you if problems oc-
cur with the G-SPEED eS Pro. If you would like to use
this feature, select ‘Full Installation’.
3. Shut down your system.
p.14
Page 15
G SPEED
eS
PRO
attach
™
Using the ATTO RAID Controller
Install ATTO Controller
It is simple to install the ATTO controller, as explained below. Keep in mind that ATTO ExpressSAS Host Adapters contain components that are sensitive to electrostatic discharge
(ESD). Please follow standard methods to avoid ESD.
1. For maximum performance, install the ATTO R680 RAID controller in your MacPro in
SLOT 2 (x16 slot closest to video card).
2. Secure the ATTO controller in place.
NOTE: If you are using a video capture card such as AJA Kona
TM
or Blackmagic DecklinkTM,
follow their recommendations for slot usage.
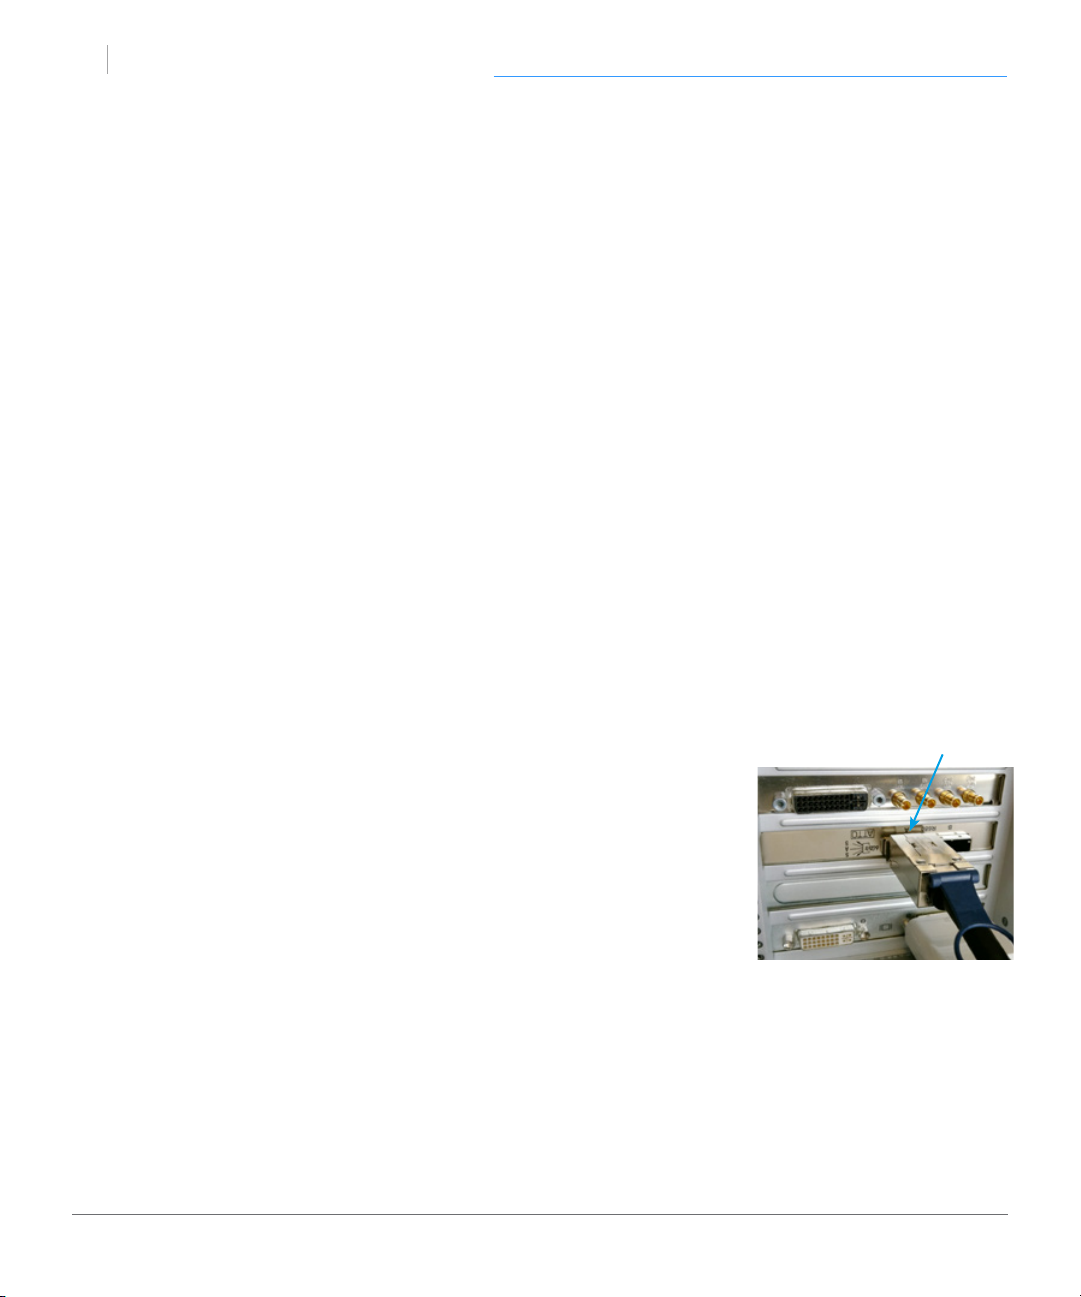
Attach eS Pro to ATTO Controller
Attaching G-SPEED eS Pro to the ATTO R680 RAID controller takes a few easy steps.
1. Shut down your system.
2. Attach one end of the supplied mini-SAS cable to the mini-SAS
Port A
port located on the back of G-SPEED eS Pro.
3. Attach the other end of the mini-SAS cable to Port A (leftmost
port) on the ATTO controller, as shown at right.
4. Attach the power cord to the back of G-SPEED eS Pro and con-
nect the other end to AC power.
5. Power on the G-SPEED eS Pro and power on the system.
G-SPEED eS Pro will mount on the desktop.
NOTE: G-SPEED eS Pro is shipped from the factory in RAID 0 mode for best performance.
The ATTO controller also supports RAID 1, 5, 6, 10 and JBOD modes. Refer to Change the
RAID Mode if you want to change the RAID mode. See RAID Levels Explained for infor-
mation on the features of supported RAID modes.
p.15
Page 16
G SPEED
eS
PRO
uninstall
™
Using the ATTO RAID Controller
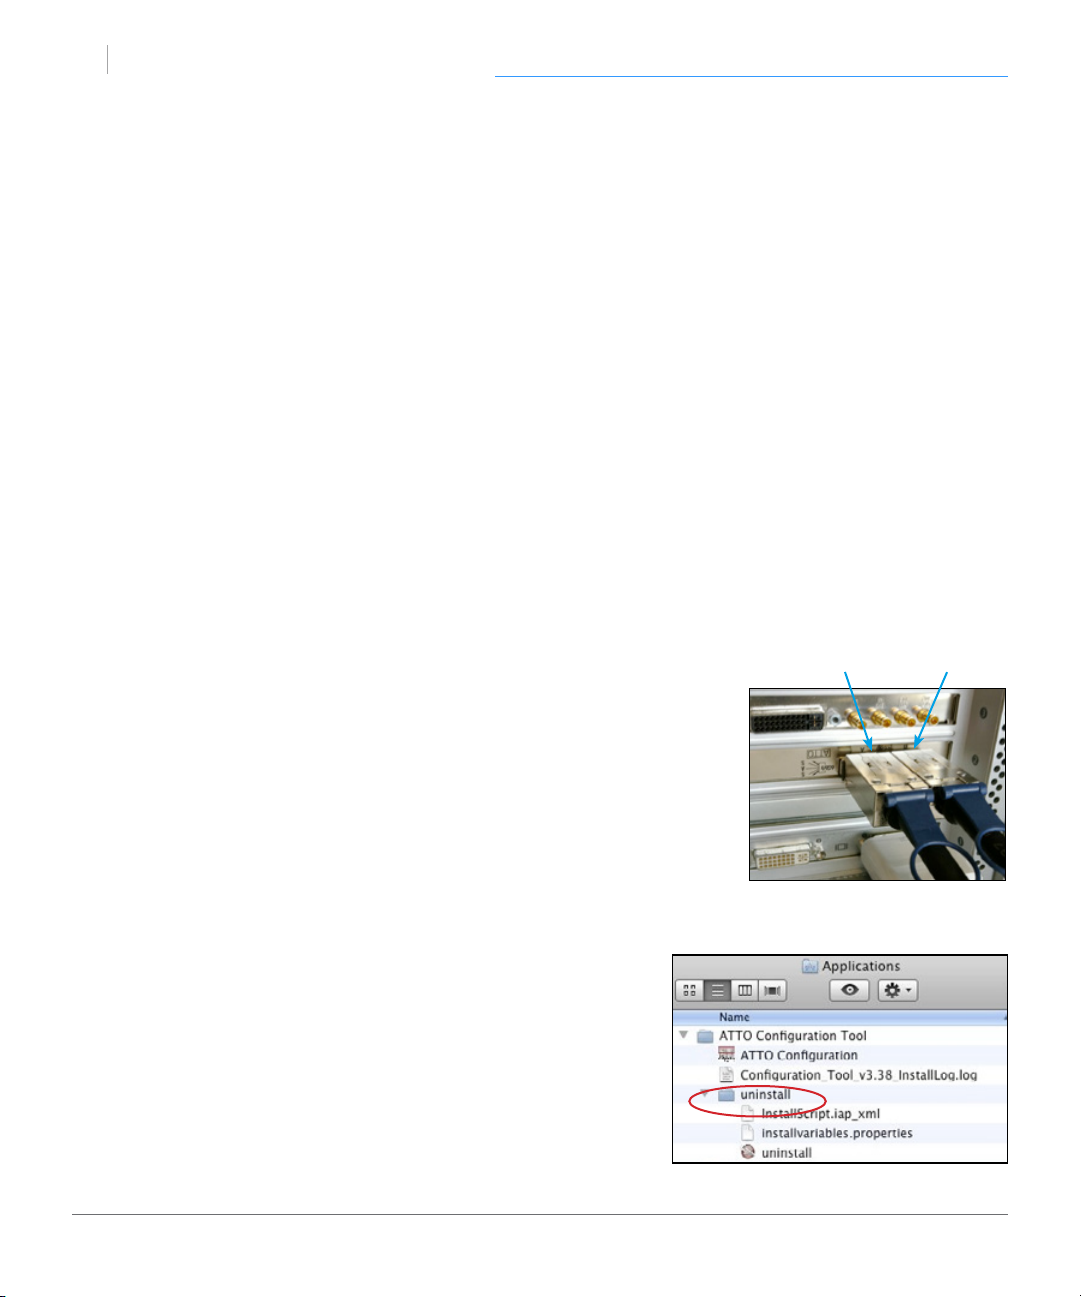
Add Second G-SPEED eS Pro Unit
You can add an additonal G-SPEED eS Pro as either a stand-alone volume,
or combine it with another unit to create a very fast 8-drive RAID array.
Add as a stand alone volume:
To add as a stand-alone volume, simply repeat the steps in the previous section,
attaching the new unit to Port B. Both G-SPEED eS Pro units will mount on the
desktop.
Combine with another G-SPEED eS Pro:
In order to combine two G-SPEED eS Pros, both units will need to be recongured,
deleting all data on the drives. If you currently have a G-SPEED eS Pro and you wish
to add a second unit to increase capacity and performance, be sure to BACK UP
YOUR DATA BEFORE CONTINUING.
Port A Port B
1. Plug the second unit into Port B on the ATTO controller.
2. Power on G-SPEED eS Pro.
3. Now you need to congure the two units. Continue to the
section Congure Two RAID Units for instructions.
Uninstall ATTO Driver & CongTool
The Uninstall application is located in the Applications/
ATTO CongTool/Uninstall folder.
Double-click the application le to launch, and follow the
prompts.
p.16
Page 17

G SPEED
eS
PRO
™
Conguring G-SPEED eS Pro
• RAID Conguration Scripts for Mac ........................... p.18
• Use the ATTO CongTool ............................................... p.19
• Change the RAID Mode ................................................... p.21
• Congure Two RAID Units .............................................. p.26
• Set Up Alert Notications ................................................ p.31
Page 18

G SPEED
eS
PRO
scripts
™
Conguring G-SPEED eS Pro
RAID Conguration Scripts for Mac
G-Technology provides RAID Conguration Scripts so you can quickly congure/recongure the RAID mode of G-SPEED eS Pro. Download the scripts from www.g-technolo-
gy.com/support/gspeed_es_pro/.
These scripts will congure ALL G-SPEED eS Pro enclosures
attached to the RAID controller, using ALL drives
in the new RAID group. Disconnect any G-SPEED eS
Pro enclosure that you do not want to recongure.
WARNING: THESE SCRIPTS WILL COMPLETELY ERASE THE DATA ON YOUR DRIVES
WHILE RECONFIGURING THE RAID MODE AND WILL REQUIRE THE DRIVE TO BE
FORMATTED USING DISK UTILITY.
To change the RAID mode, do the following steps. There is no Undo function, so use the
scripts very carefully!
1. Make sure you have backed up the data on all G-SPEED eS Pro enclosures connected
before continuing. This process will erase ALL DATA on ALL DRIVES.
2. Unmount G-SPEED eS Pro by dragging the icon to the trash. (Keyboard shortcut:
Command+E.)
3. Double-click the command le that matches the RAID mode to which you would like
to recongure the G-SPEED eS Pro(s). You will need to be logged into an
account with Administrator privileges.
4. A terminal window will automatically open and execute the command le.
G-SPEED eS Pro will begin to initialize if RAID 5 or RAID 6 was selected. This
process takes approxomately 45 min per TB. RAID 0 does not require intialization and
the new volume will be immediately available for system format.
5. When the conguration process is complete, you will need to format the G-SPEED eS
Pro using Disk Utility. See Initialize Drive for Mac for instructions.
p.18
Page 19

G SPEED
eS
PRO
congtool
™
Conguring G-SPEED eS Pro
Use the ATTO CongTool
The ATTO CongTool application is used to congure the
many parameters of the ATTO R680 RAID controller. You will
nd CongTool in the Applications/ATTO CongTool folder.
1. Double-click to launch the application.
2. The screen shown below will appear. Double-click ‘localhost’.
3. Enter the System Administrator username and password when prompted.
4. Click on ‘ExpressSAS R680’.
p.19
Page 20

G SPEED
eS
PRO
™
5. Select the RAID tab to display the currently attached drives and RAID groups.
Conguring G-SPEED eS Pro
The following sections will explain how to Change the RAID Mode of G-SPEED eS Pro,
and how to Congure Two RAID Units for maximum performance. You can also see
RAID Conguration Scripts for Mac for easy reconguring of G-SPEED eS Pro.
Please refer to the separate ATTO documentation for more information on the many
additional features of the CongTool.
p.20
Page 21

G SPEED
eS
PRO
changeraid
™
Conguring G-SPEED eS Pro
Change the RAID Mode
The G-SPEED eS Pro/ATTO R680 RAID controller combination is congured at the
factory in RAID 0 mode. RAID 1, 5, 6, 10 and JBOD modes are available and the ATTO
CongTool is used to change the mode of operation.
NOTE: There are Mac OS X RAID conguration scripts available that will quickly recongure your G-SPEED eS Pro units in RAID 0, RAID 5 or RAID 6. See RAID Conguration
Scripts for Mac for more information.
Steps to Change from RAID 0 to RAID 5
1. Unmount G-SPEED eS Pro by dragging
the icon to the trash. (Keyboard shortcut:
Command+E.)
2. Launch the ATTO CongTool as explained in
the previous section, Use the ATTO Cong-
Tool.
3. Select the RAID tab, and in the lower pane,
right-click on the G-SPEED eS Pro RAID
group. From the dropdown menu, select
‘Delete Group’.
p.21
Page 22
G SPEED
eS
PRO
™
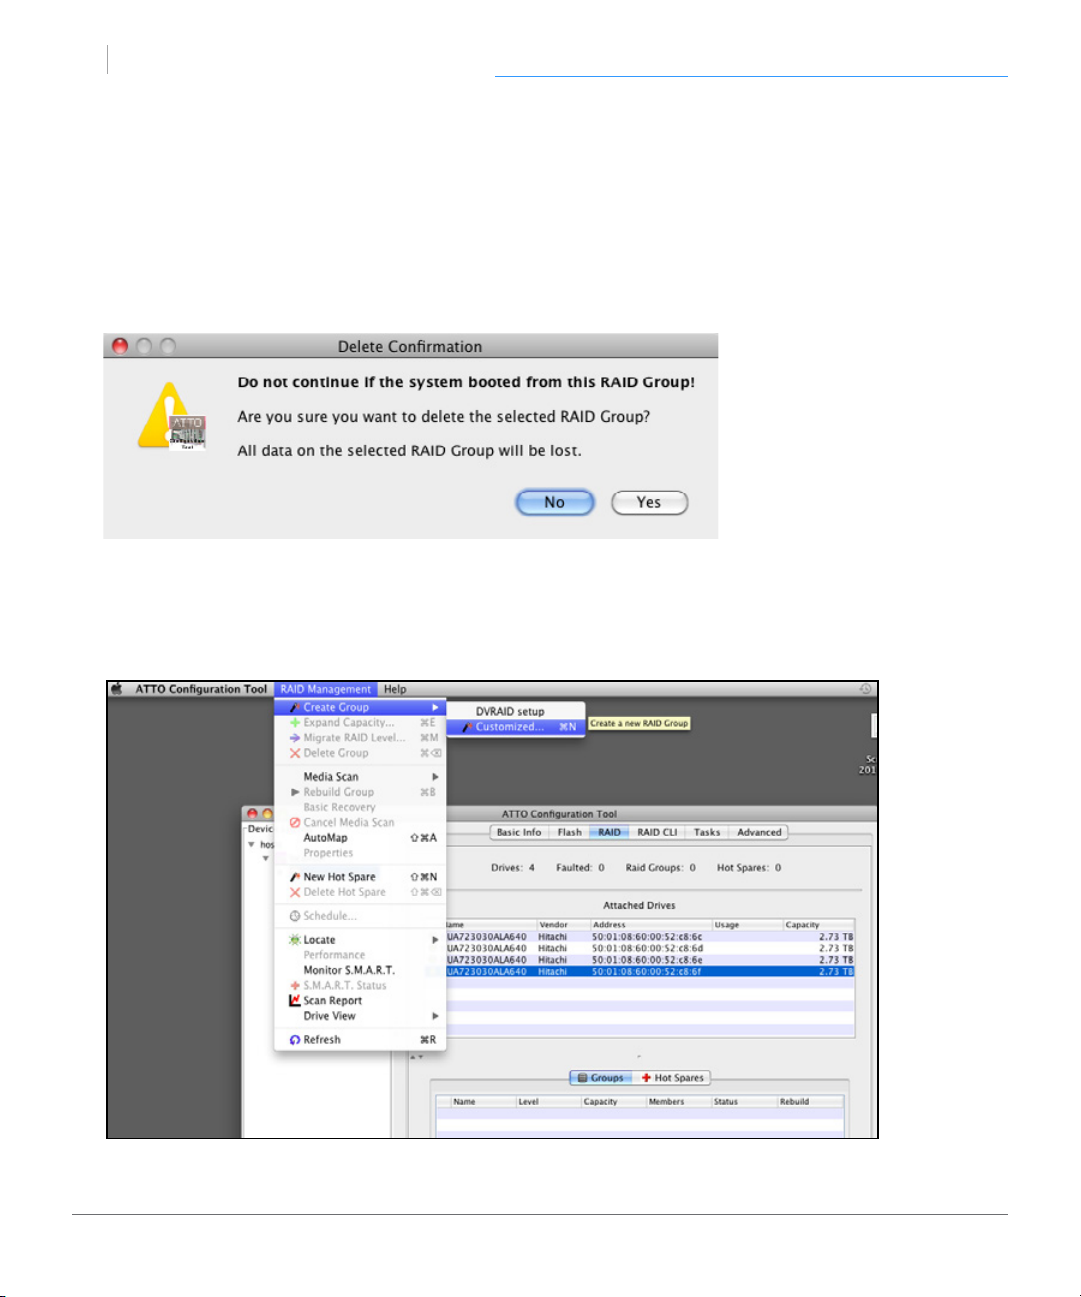
4. The following dialog box will appear, alerting that you about to delete the
RAID group. Click ‘Yes’ to continue.
WARNING: THIS WILL DELETE ALL DATA STORED ON GSPEED eS Pro!
5. Click on the RAID Management menu item and select ‘Create Group>
Customized’. (Keyboard shortcut: Command + N.)
Conguring G-SPEED eS Pro
p.22
Page 23

G SPEED
eS
PRO
™
6. The ‘Create New RAID Group’
panel will open in CongTool.
Make the following choices,
then click the ‘Next’ button.
A. Name: Enter a name for the
RAID group (like GTECHR5)
B. Level: Select RAID 5
C. Interleave: Select 512KB
D. Initialize: Select Advanced
Conguring G-SPEED eS Pro
7. Select all the drives listed in the
top pane of the window, and
drag them to the bottom pane.
Then click ‘Next’.
A
B
C
D
p.23
Page 24

G SPEED
eS
PRO
™
Conguring G-SPEED eS Pro
8. The ‘Create New RAID Group’ pane will display the conguration options.
Make the following choices, then click the ‘Next’ button.
E. Sector Size: Select 512 bytes
F. SpeedRead: Select Adaptive
G. Rebuild Priority: Same
H. Auto Rebuild: Selected
E
F
9. Conrm the RAID Group
conguration and click ‘Yes’.
G
H
10. The RAID Group will begin to initial-
ize. This process takes
approxomately 45 min per TB.
p.24
Page 25

G SPEED
eS
PRO
™
11. Right-click on the RAID group in the lower panel. From the dropdown menu, select
‘Properties’.
12. In the popup window that opens, select a Prefetch value of 2 and check
Auto-Rebuild.
Conguring G-SPEED eS Pro
13. Click ‘Accept’ to close the window.
14. The RAID initialization process will continue and when complete, the RAID Group
(Volume) will need to be formatted using Disk Utility. See Initialize Drive for Mac
for instructions.
p.25
Page 26

G SPEED
eS
PRO
twounits
™
Conguring G-SPEED eS Pro
Congure Two RAID Units
Combining two G-SPEED eS Pros on the ATTO RAID Controller can produce incredible
performance. In order to combine two units, both units will need to be recongured,
which deletes all data on the drives. If you currently have one G-SPEED eS Pro and you
wish to add a second unit, be sure to BACK UP YOUR DATA BEFORE CONTINUING.
NOTE: There are Mac OS X RAID conguration scripts available that will quickly recongure your G-SPEED eS Pro units in RAID 0, RAID 5 or RAID 6. See RAID Conguration
Scripts for Mac for more information.
Steps to Congure the Units
1. Unmount G-SPEED eS Pro by dragging
the icon to the trash. (Keyboard shortcut:
Command+E.)
2. Launch the ATTO CongTool as ex-
plained in the previous section, Use the
ATTO CongTool.
3. Select the RAID tab, and in the lower
pane, select both RAID groups. Rightclick and from the dropdown menu,
select ‘Delete Groups’.
p.26
Page 27

G SPEED
eS
PRO
™
4. The following dialog box will appear, alerting that you about to delete the RAID
group. Click YES to continue.
WARNING: THIS WILL DELETE ALL DATA STORED ON GSPEED eS Pro DRIVES!
5. Click on the RAID Management menu item and select ‘Create Group>
Customized’. (Keyboard shortcut: Command + N.)
Conguring G-SPEED eS Pro
p.27
Page 28

G SPEED
eS
PRO
™
6. The ‘Create New RAID Group’
panel will open in CongTool.
Make the following choices,
then click the ‘Next’ button.
A. Name: Enter a name for the
RAID group (like GTECHR5)
B. Level: Select RAID 5 (or RAID 0,
or RAID 6 if desired)
C. Interleave: Select 512KB
D. Initialize: Select Advanced
Conguring G-SPEED eS Pro
A
B
C
D
7. Select all the drives listed in the
top pane of the window, and
drag them to the bottom pane.
Then click ‘Next’.
p.28
Page 29

G SPEED
eS
PRO
™
Conguring G-SPEED eS Pro
8. The ‘Create New RAID Group’ pane will display the conguration options.
Make the following choices, then click the ‘Next’ button.
E. Sector Size: Select 512 bytes
F. SpeedRead: Select Adaptive
G. Rebuild Priority: Same
H. Auto Rebuild: Selected
E
F
9. Conrm the RAID Group
conguration and click ‘Yes’.
G
H
10. The RAID Group will begin to
initialize. This process takes approxomately 45 min per TB.
p.29
Page 30

G SPEED
eS
PRO
™
11. Right-click on the RAID group in the lower panel. From the dropdown menu, select
‘Properties’.
12. In the popup window that opens, select a Prefetch value of 2 and check
Auto-Rebuild.
Conguring G-SPEED eS Pro
13. Click ‘Accept’ to close the window.
14. The RAID initialization process will continue and when complete, the RAID Group
(Volume) will need to be formatted using Disk Utility. See Initialize Drive for Mac
for instructions.
p.30
Page 31

G SPEED
eS
PRO
alert
™
Conguring G-SPEED eS Pro
Set Up Alert Notications
The ATTO CongTool can notify you when events occur on the RAID system. Open the
CongTool and select ‘localhost’ in the left bar. The screen below will appear.
The CongTool has four types of Alerts: Audbile Alert, Visual Alert,
System Log and By Email. You can set the Event threshold for each
Alert type and for dierent email addresses. To enable email notication,
enter your server information and up to three recipient addresses.
Events are categorized in two ways. ‘Critical’ indicates a serious
problem has occurred and the System Administrator should perform corrective action. ‘Warning’ indicates events that are less serious but still warrant notication.
p.31
Page 32

G SPEED
eS
PRO
™
Maintenance for your Drive
• Replace a Failed Disk Drive ........................................... p.33
• Initialize Drive for Mac .................................................... p.36
• Restore the Drive Icon ...................................................... p.39
• Reformat with Partitions .................................................. p.41
Page 33

G SPEED
eS
PRO
replace
™
Maintenance for Your Drive
Replace a Failed Disk Drive
The ATTO R680 RAID controller continually monitors the health of each of the disk drives
in G-SPEED eS Pro. In the event of a disk failure, you will be notied based on the notications settings you entered in Set Up Alert Notications. The ATTO CongTool service
will report the failed drive and help you locate its physical position in the G-SPEED eS Pro
enclosure.
Mute the Alarm
If you have set up ‘audible alarms’, the ATTO RAID controller will beep when a drive has failed, or other critical event
has occurred. To mute the audible alarm, click on the Alert
icon
Select ‘Mute Audible Alert’.
Note About Drive Failure
If the G-SPEED eS Pro was congured in RAID 1 or RAID 5 mode, a drive failure does not
necessarily result in data loss. However, the array is now in a degraded and unprotected
state; the failed drive should be replaced as soon as possible to avoid data loss.
If G-SPEED eS Pro was congured in RAID 6 mode, up to two drives can fail with no loss
of data. Replace any failed drive as soon as possible.
Follow the steps on the next page to identify and replace a failed drive.
in the System Notication area of your desktop.
p.33
Page 34

G SPEED
eS
PRO
replacefail
™
1. Launch the ATTO CongTool. You will nd the CongTool in the Applications/ATTO
CongTool folder on your computer.
2. Double click on ‘localhost’, click on ‘ExpressSAS R680’, and login to the
application.
3. Select the ‘RAID’ tab and the top pane should show a screen similar to the one show
below. In our example, the failed drive is the entry with the orange indicator next to
its name.
Maintenance for Your Drive
4. Right-click on the failed drive and select ‘locate’.
p.34
Page 35

G SPEED
eS
PRO
™
Maintenance for Your Drive
WARNING: Make absolutely sure that you remove the correct drive as indicated in the
steps below.
REMOVING THE WRONG DRIVE CAN RESULT IN THE LOSS OF THE ARRAY AND ALL
OF THE CONTENT STORED ON GSPEED ES PRO.
5. The failed drive’s LED will begin to blink in the
G-SPEED eS Pro enclosure, making it easy to
identify which drive needs to be replaced. Be
certain to remove the correct drive, as removing
the wrong drive could cause data loss.
NOTE: It is possible the failed drive will be completely
Drive Activity LED
oine. In this case, the drive’s Activity LED will be completely turned o, indicating the failed drive.
6. Remove the failed drive by inserting the provided key into the Lock hole and
sliding the drive out of the enclosure.
7. Replace the failed drive with a new disk module and secure in place. Once the drive
has spun up to speed, the CongTool will indicate that the array is rebuilding. The
rebuild time is approximately 1 hour per TB.
Once the rebuild is complete, G-SPEED eS Pro is back to normal, protecting your valuable data once again.
NOTE: Replacement and/or extra G-SPEED eS Pro disk modules are available for purchase online at: www.g-technology.com/Products/g-speed-es-pro.cfm
p.35
Page 36

G SPEED
eS
PRO
initialize
™
Maintenance for Your Drive
Initialize Drive for Mac
G-SPEED eS Pro was factory-formatted for use or ‘initialized’ for Mac OS X. You can reinitialize if you¹d like to quickly erase the contents of the drive, or if you recongure the
RAID mode. Here are the steps.
1. First, open the Disk Utility Program. This application is located on your hard drive un-
der Applications/Utilities/Disk Utility. The window below will appear. Your G-SPEED
eS Pro will be displayed in the left-hand column.
2. Select the G-SPEED eS Pro by clicking its drive icon in the left-side column.
Information about the drive willl be displayed at the bottom of the window.
3. Select the Erase tab to view the formatting options. Select ‘Mac OS Extended’ on the
Format menu and enter ‘G-SPEED eS Pro’ for the name.
p.36
Page 37

G SPEED
eS
PRO
™
4. Click the Erase button in the lower right corner of the window. A dialog box will ap-
pear asking if you want to erase the G-SPEED eS Pro partition.
Maintenance for Your Drive
WARNING: THIS NEXT STEP WILL ERASE ALL DATA ON YOUR DRIVE.
5. Click on the Erase button to continue. A Progress bar in the lower right corner of the
window will show the progress of the disk’s reformatting.
p.37
Page 38

G SPEED
eS
PRO
™
6. After the drive is reinitialized, you should automatically see the Time Machine dialog
box. Click the ‘Don’t Use’ button if you do not want to use G-SPEED eS Pro as a Time
Machine backup target.
7. Quit the Disk Utility Program. After reinitializing the drive, the custom icon for G-
SPEED eS Pro has been erased. You can optionally restore this icon with the steps on
the following page.
Maintenance for Your Drive
p.38
Page 39

G SPEED
eS
PRO
restore
™
Maintenance for Your Drive
Restore the Drive Icon
If the G-SPEED eS Pro drive icon was erased during the reinitializing process (see
previous section), you can restore the icon with the following easy steps.
NOTE: This Process is not required for the operation of G-SPEED eS Pro. However,
it will make your drive’s appearance on the computer desktop look nicer and more
accurate.
1. To get the G-Technology icon package, go to www.g-technology.com/support and
navigate to your Product. There will be a link to download the icons.
2. Once downloaded, double-click the Zip le to open. Next, double-click the DMG
le to open the G-Technology Icons package.
3. Click to select the drive icon for G-SPEED eS Pro in the package window. Press
Command+C to copy the icon. (below)
p.39
Page 40

G SPEED
eS
PRO
™
4. Select the G-SPEED eS Pro icon on your desktop and press Command+I. This opens
its Get Info window. (below left)
5. Select the default icon in the Get Info window. (below left)
6. Press Command+V to paste the G-SPEED eS Pro custom icon into the Get Info
window. (below right)
Maintenance for Your Drive
The icon for your G-SPEED eS Pro has been restored and you can close the Get
Info window. Your drive is now fully ready for use!
p.40
Page 41

G SPEED
eS
PRO
format
™
Maintenance for Your Drive
Reformat with Partitions
‘Partitioning’ a hard drive is the Process of dividing a hard drive into separate,
discrete sections called ‘volumes’. Each volume works like a separate disk. You can
create up to 16 dierent partitions on a hard drive in OS X and each partition can
be a dierent size and format.
With hard drives getting bigger, it is useful to partition your hard drive so sections
of its space can be used for dierent purposes. For instance, segment user data from
backup data, set up a multi-boot environment with dierent Operating Systems or create a dedicated capture scratch disk for programs like Final Cut Pro
The following steps will guide you through this simple process of partitioning your
drive. In this example, we will partition a 500 GB G-DRIVE mini connected via FireWire.The
steps will be identical for your drive, only the name may be dierent.
TM
.
1. First, open the Disk Utility Program. This application is located on your hard drive un-
der Applications/Utilities/Disk Utility. The window below will appear. Your
G-Technology drive will be displayed in the left-hand column.
p.41
Page 42

G SPEED
eS
PRO
™
2. Select the FireWire or USB icon – not the G-Technology drive
icon – by clicking it in the left-side column.
3. Click on the Partition button in the main window.
4. Select the number of partitions you would like from the Volume Scheme menu.
Below, we have selected ‘2 Partitions’ to create two partitions.
Maintenance for Your Drive
p.42
Page 43

G SPEED
eS
PRO
™
Maintenance for Your Drive
5. Click on the rst partition in the Volume Scheme area. Your partition will be highlight-
ed by a blue bounding box.
• In the Name eld, type a name for the partition.
• From the Format menu, choose your desired disk format. If you will use your drive
primarily on Mac OSX, it is recommended to use Mac OS Extended or Mac OS Extended (Journaled).
• In the Size eld, type in a size for the partition. Alternately, you can drag the bar in
between each partition to quickly change the size.
6. Repeat this Process for each partition you have created.
7. Click the Apply button in the lower right corner of the window. A dialog box will ap-
pear asking if you want to erase the G-Technology drive partition.
WARNING: THIS NEXT STEP WILL ERASE ALL DATA ON YOUR DRIVE.
p.43
Page 44

G SPEED
eS
PRO
™
8. Click on the Partition button to continue. A Progress bar in the lower right
corner of the window will show you the Progress of the disk’s reformatting.
9. When partitioning is complete, the multiple partitions
will be displayed in the left-hand panel of Disk Utility.
10. Quit the Disk Utility Program. After reinitializing the drive,
the custom icon for the G-Technology drive has been
erased. You can optionally restore this icon to each partition with the steps on this page.
Maintenance for Your Drive
11. The multiple partitions of the G-Technology drive will be
displayed on the desktop. Your drive is now setup
with two or more partitions and ready for use.
p.44
Page 45

G SPEED
eS
PRO
™
Appendix
• RAID Levels Explained ....................................................... p.46
Page 46

G SPEED
eS
PRO
raidlevels
™
RAID Levels Explained
Appendix
p.46
Page 47

G SPEED
eS
PRO
™
Support & Warranty
• Technical Support ............................................................ p.48
• Limited Warranty ............................................................ p.49
• Copyright ............................................................................. p.51
Page 48

G SPEED
eS
PRO
techsupp
™
Support & Warranty
Technical Support
Thank you for purchasing G-SPEED eS Pro. If you have any comments or questions
about this manual or the Product, please let us know!
G-Technology appreciates and values its customers, striving to give you the nest service
and support. If you encounter any diculties while installing or using G-SPEED eS Pro,
please contact G-Technology Technical Support at g-technology.com/support
Helpful information for support
When contacting Technical Support, it’s best to be in front of your computer and have
the following information available:
• Your G-SPEED eS Pro serial number (on bottom of unit)
• Operating System and version
• Computer brand and model
• List of other devices attached to your computer
p.48
Page 49

G SPEED
eS
PRO
warranty
™
Support & Warranty
Limited Warranty
HGST, a Western Digital Company (“HGST”)
Including G-Technology for External Hard Disk Drives
What does this limited warranty cover?
This Limited Warranty applies to new HGST products purchased from an authorized HGST dealer by the
original purchaser for normal use and not for resale. HGST warrants that a covered product is free from
defects in materials and workmanship, with the exceptions stated below.
How long does limited warranty coverage last?
This limited warranty lasts for 1 year, 2 years, 3 years or 5 years, or a xed period from date of purchase,
depending on when and where it was originally purchased. To determine the warranty specically for
your product, visit www.g-technology.com. A valid proof of purchase may be required to prove eligi-
bility. If you do not have a valid proof of purchase, the limited warranty period will be measured from the
date of sale from HGST to the authorized distributor.
What does this limited warranty not cover?
The limited warranty does not cover damage resulting from commercial use, misuse, accident, modication or alteration to hardware or software, tampering, unsuitable physical or operating environment
beyond product specications, improper maintenance, or failure caused by a product for which HGST is
not responsible.
There is no warranty of uninterrupted or error-free operation. There is no warranty for loss of data—you
must regularly back up the data stored on your product to a separate storage product. There is no warranty for product with removed or altered identication labels.
HGST DOES NOT PROVIDE ANY OTHER WARRANTIES OF ANY KIND, INCLUDING, BUT NOT LIMITED TO,
THE IMPLIED WARRANTIES OR CONDITIONS OF MERCHANTABILITY AND FITNESS FOR A PARTICULAR
PURPOSE. SOME JURISDICTIONS DO NOT ALLOW THE LIMITATION OF IMPLIED WARRANTIES, SO THIS
LIMITATION MAY NOT APPLY TO YOU. HGST is not responsible for returning to you product which is not
covered by this limited warranty.
p.49
Page 50

G SPEED
eS
PRO
™
Support & Warranty
What must you do?
If you are having trouble with a product, before seeking limited warranty service, rst follow the troubleshooting
procedures that HGST or your reseller provides.
To obtain limited warranty service, you must rst obtain a Return Materials Authorization (RMA) and ship-to address by contacting G-Technology at http://www.g-technology.com/support. Please follow the instructions
found on the website. You must return the covered hard disk drive using approved packaging to our logistics
center. You must pay any associated transportation charges, duties and insurance in shipping the drive to our
logistics center. You should remove all personal information from the product prior to its return.
What will HGST do?
HGST will replace the drive with a functionally equivalent replacement product, transportation prepaid. HGST
may replace your product with a product that was previously used, repaired and tested to meet HGST specications. You receive tile to the replaced product at delivery to carrier at HGST shipping point. You are responsible
for importation of the replaced product, if applicable. HGST will not return the original drive to consumers;
therefore, the consumer is responsible for moving data to another media before returning. Data Recovery is not
covered under this warranty and is not part of the warranty returns process. HGST warrants that the replaced
products are covered for the remainder of the original product warranty or 90 days, whichever is greater.
How is our liability limited?
HGST AND ITS AFFILIATES, SUPPLIERS, DISTRIBUTORS, AND RESELLERS ARE NOT LIABLE FOR ANY OF THE FOLLOWING: 1) THIRD-PARTY CLAIMS AGAINST YOU FOR DAMAGES (OTHER THAN BODILY INJURY INCLUDING DEATH
AND TANGIBLE PERSONAL PROPERTY; 2) LOSS OF, OR DAMAGE TO, YOUR DATA; OR 3) SPECIAL, INCIDENTAL, OR
INDIRECT DAMAGES OR FOR ANY ECONOMIC CONSEQUENTIAL DAMAGES (INCLUDING LOST PROFITS OR SAVINGS), EVEN IF INFORMED OF THE POSSIBILITY. SOME JURISDICTIONS DO NOT ALLOW LIMITATION OF LIABILITY,
INCIDENTAL DAMAGES, OR CONSEQUENTIAL DAMAGES, SO THE ABOVE LIMITATIONS MAY NOT APPLY TO YOU.
How do local laws apply?
THIS LIMITED WARRANTY GIVES YOU SPECIFIC LEGAL RIGHTS, AND YOU MAY ALSO HAVE OTHER RIGHTS WHICH
VARY FROM JURISDICTION TO JURISDICTION.
p.50
Page 51

G SPEED
eS
PRO
copyright
™
Support & Warranty
CAPACITY DEFINITION AND DISCLAIMER
For G-Technology products 1TB or greater: “One gigabyte (GB) is equal to one billion bytes and
one terabyte (TB) equals 1,000 GB (one trillion bytes). Accessible capacity will vary from the stated capacity due to formatting and partitioning of the hard drive, the computer’s operating system, and other
factors”
For G-Technology products less than 1TB: “One gigabyte (GB) is equal to one billion bytes when
referring to hard drive capacity. Accessible capacity will vary depending on the operating environment
and formatting.”
Copyright
One gigabyte (GB) is equal to one billion bytes when referring to hard drive capacity.
Accessible capacity will vary depending on the operating environment and formatting.
Design by G-Technology in California. G-SPEED and G-Technology are trademarks of HGST, a Western
Digital company. Apple, Mac, MacBook Pro, FireWire, Time Machine and the Mac logo are trademarks of
Apple, Inc. Microsoft, Windows, Windows Vista and Windows XP are trademarks or registered trademarks
of Microsoft Corporation in the US and/or other countries. Other trademarks are the property of their
respective owners.
©2012 G-Technology. All rights reserved. R0 09/12
p.51
 Loading...