

Page 1

1
Operating conditions .....................................................................................................................2
Technical characteristics ...............................................................................................................3
Completing parts ............................................................................................................................3
Description of connectors and buttons ..................................................................................4
Meaning of buttons ........................................................................................................................5
Operation guide ..............................................................................................................................7
System menu ....................................................................................................................................8
Operation modes .........................................................................................................................11
Video recording mode............................................................................................................................ 11
Photo mode ............................................................................................................................................... 11
Playback mode .......................................................................................................................................... 11
Other functions ............................................................................................................................. 12
Mounting and operating a rear-view camera ................................................................... 13
Possible problems and their causes ......................................................................................14
[ Table of Contents]
Dear user!
Thank you for purchasing this 3 in 1 Rear view panoramic mirror with a 4.3 inch
mirror dual-channel car DVR. Study this manual thoroughly in order to use the
device correctly and to make its service life longer. Do not throw the user‘s
manual away because you may need to consult it in future
Page 2

2
1. Before start of using the device, study the user’s manual thoroughly.
2. Get acquainted with warranty terms
3. Before launching the device, charge its in-built battery fully using a car power supply adapter included in the kit.
4. Operate the device using accessories only from the supplied kit. Neoline Company
is not liable for any possible damage done to the product if accessories made by other
manufacturers are used.
5. Make sure that you install a memory card correctly; incorrect installation of the
memory card may damage the device.
6. Use Micro SD cards class 10 (or higher) to avoid operation failure.
7. Use memory cards from 8 Gb to 64 Gb.
8. Format your memory card once in 2 months to avoid any damage to its le system.
9. Do not remove the memory card before recording is completed; otherwise the le
may be damaged.
10. If in your car the power supply does not stop automatically upon the engine switch
o, remove the power charger from the dashboard outlet to avoid full discharge of the
car battery.
11. Do not expose the device directly to sun.
12. Do not connect the car adapter to battery directly (this is not covered by warranty).
13. Disassembling or modifying of the device is forbidden.
14. Do not drop the device or expose it to shocks. Do not press LCD display, this may
damage the mirror or DVR screen.
15. Do not expose the device to re, humidity or chemically active substances (gasoline, solvents, reagents, etc.).
16. Do not operate the device if your hands are wet.
17. Do not clean the device with detergents containing aggressive acids or alkali.
18. Neoline Company is not liable for the loss of data and/or any damage – direct
or indirect – sustained by the user or a third party due to the improper usage of the
device or software, inadequate installation, or application of accessories that are not
included in the accessory kit.
[ Operating conditions]
Page 3

3
• Processor: Allwinner V3
• Matrix: SIMG F02, 2Mp, 6 glass lenses.
• View angle: basic camera 170 degrees (diagonal), additional camera
120 degrees (diagonal)
• Video resolution: Front camera Full HD 1920x1080 (30fps). Additional
camera VGA 640x480 (50fps)
• Video recording format: MP4 (H.264)
• Video recording format: MP4 (H.264
• Display: 4.3in
• Screen resolution: 480x272
• Built-in microphone / dynamic
• G-sensor
• Motion sensor
• Loop recording
• Continuous recording
• Night shot mode: no
• Auto switch on/o
• Date/Time stamp
• Car plate number stamp
• Micro SD 8GB-64GB (Class 10)
• Storing temperature: from -20 degrees to +70 degrees
• Operating temperature: from -10 degrees to +60 degrees
• Incoming voltage: DC 5V, 1.5A
• Car charger input: DC 12-24V
• Dimensions: 285x110x13 mm
• Weight: 315 g
[ Technical characteristics]
[ Completing parts]
• Mirror Neoline G-tech X23
• Additional camera
• Mirror cleaning wipe
• Car power charger
• USB cable
• User‘s manual
• Warranty card
• Car mounting kit
Page 4
4
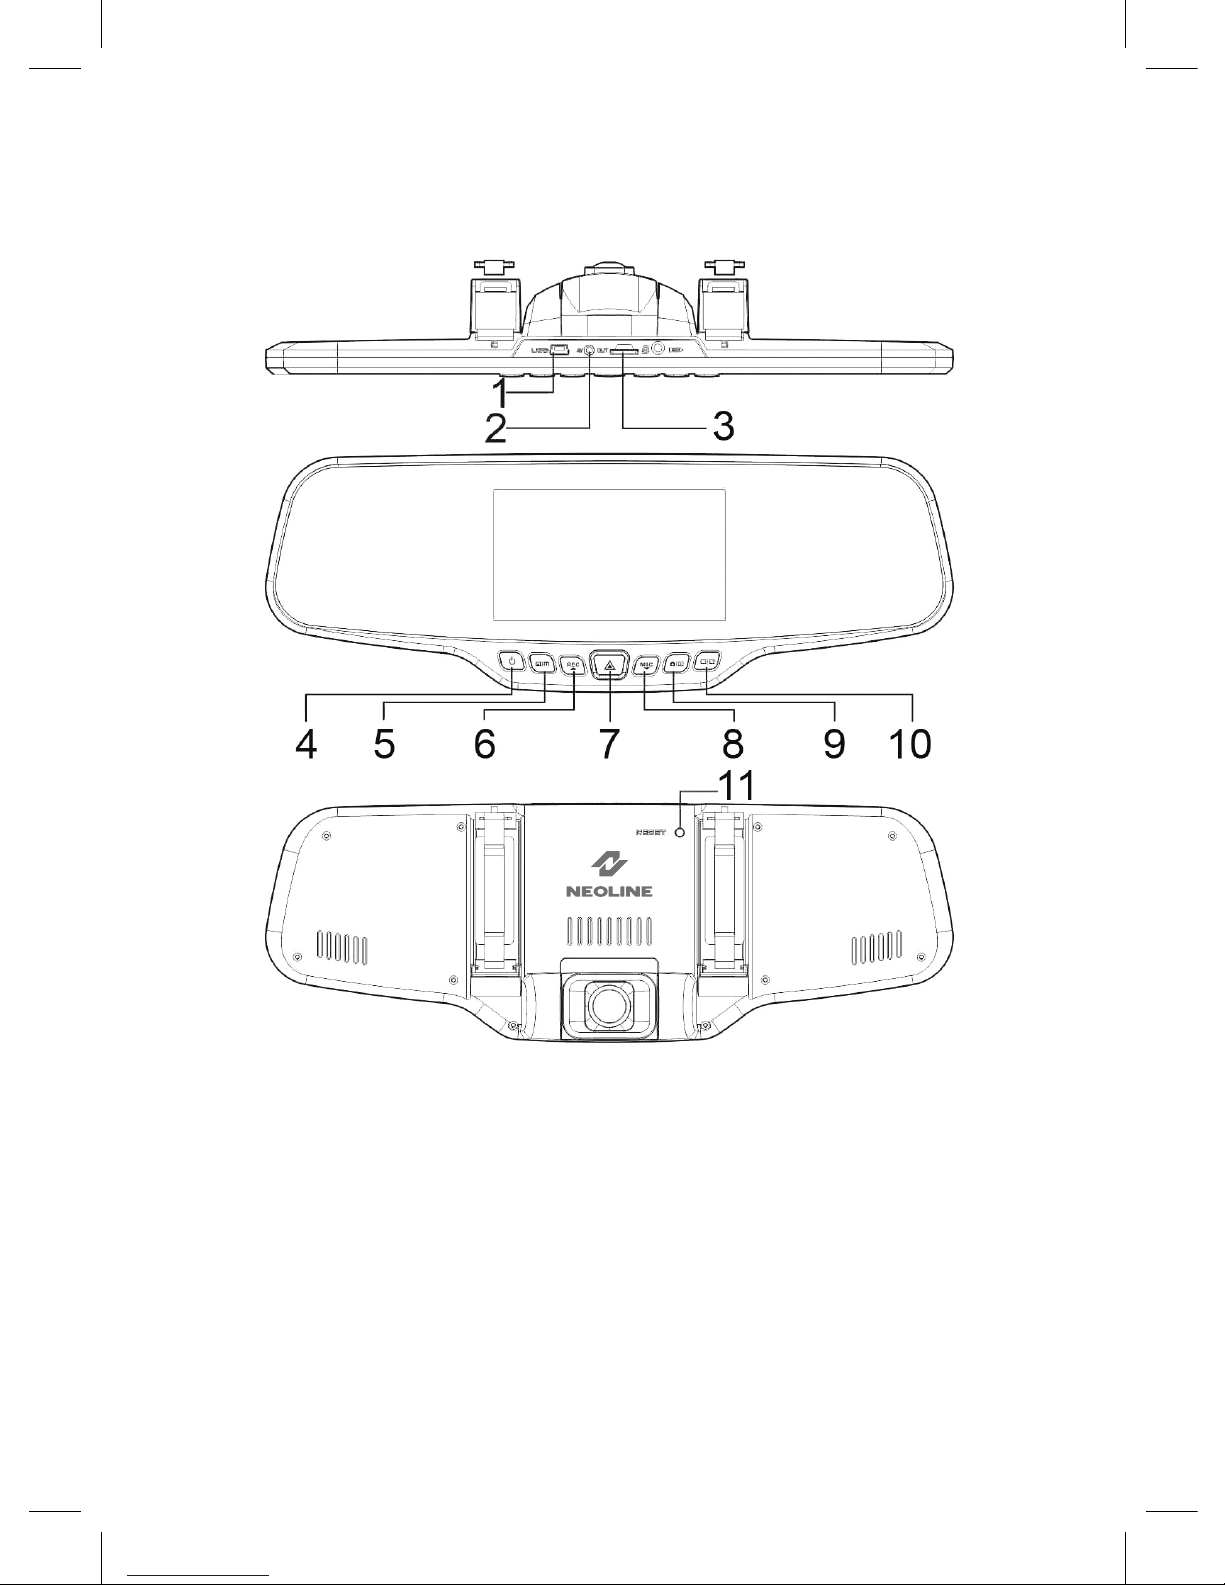
[ Description of connectors and buttons ]
1. Mini USB connector
2. AV outlet (rear-view camera)
3. TF card slot
4. On/o power switch button
(POWER)
5. Menu button (MENU)
6. Up/Record button (UP/REC)
7. OK button
8. Down/Microphone
button (DOWN/MIC)
9. Modes button (MODE)
10. Switch button (SWITCH)
11. Reset button (RESET)
Page 5

5
[ Meaning of buttons]
1. Power feeding button (POWER)
Press and hold – switching the device on/o.
Short press in Operation mode – switching the screen lighting on/o.
2. MENU button
Stop video recording. Short press in standby mode opens/closes Settings
menu.
3. UP/REC button
Short press in Video mode – starting/pausing the video recording.
Press and hold – switching the motion sensor on/o.
In Settings menu, the button is used for moving along menu items (upwards).
In Playback mode, press on the button allows to select a video or photo for
back playing /viewing. During the video playback, press on the button starts
the fast reverse winding.
4. OK button
In Setting menu – acknowledging the selection of a denite item or setting.
In Record mode – protection against the re-recording of current video le.
5. DOWN/MIC button
Short press in Video mode – switching the microphone on/o.
Prolonged press – switching the Parking mode on/o.
In Settings menu, this button is used for moving along menu items (downwards).
In Playback mode, press on the button allows to select a video or photo for
back playing /viewing. During the video playback, press on the button starts
the fast forward winding.
Page 6

6
6. MODE button
Stop video recording. Short press in standby mode allows switching the
operation modes: Video / Photo / Playback.
7. SWITCH button
Short press – switching between front and rear cameras.
8. RESET button
If your video recorder fails to react to the pressing of buttons, press RESET button for forced resetting of the device.
9. Slot for memory card
Slot is meant for installing MicroSD memory card into the video recorder.
Before installing the memory card switch the device o.
ATTENTION: Make sure that the memory card‘s position is right. Your attempt
to insert the memory card facing the wrong direction may bring about
damage to the device and also to the memory card.
Warning: Do not apply too much force when installing the memory card to
avoid damage to the device.
In order to install the memory card insert the micro SD card into the slot
pushing it down all the way (till it clicks). In order to remove the memory card,
press it until it clicks and pull it out of the slot.
Page 7

7
10. USB connector
USB connector is meant for charging and connecting to computer. In order
to transfer data from your device to computer, use cable from the supplied
kit, switch o the device by pressing POWER button, and make sure that the
device is switched o. Insert into your device mini-USB –B connector, and into
the computer – USB type A connector.
For the purpose of securing feeding (car battery charging) connect your video
recorder to the car power supply network through the charger included
in the kit.
11. AV outlet
AV outlet is meant for connecting rear-view camera from the device kit.
[ Operation guide]
1. Battery charging
Connect the car charging adapter to video recorder’s USB connector; install
and x the video recorder on the rear-view mirror.
Charging may be also secured either from computer’s USB connector (DC 5V)
or from a common 220V socket, in this case a special power adapter must be
used (not included in the kit).
2. Switching the device on
Press POWER button to switch on the video recorder; upon the appearance
of a screensaver with Neoline logo the device will switch on. Press and hold
POWER button to switch o the video recorder; this will stop current video
recording and save the last le.
Note: Before launching the device, charge its in-built battery fully using a car
power supply adapter included in the kit. If the battery charge level is too low,
the video recorder may not switch on.
Page 8

8
Automated switching on/o: As soon as power is supplied to the video
recorder (ignition switch on), the device will switch on automatically, starting
video recording. As soon as power supply is cut o, the video recorder will
automatically stop the recording and switch o.
Note: If voltage in your car is supplied to the dashboard outlet even after the
ignition switch o, remove the plug from the dashboard socket.
3. Entering the system menu
In order to enter Settings menu, stop video recording by pressing REC button
and MENU button. Move along menu items by pressing UP and DOWN but-
tons. Press OK button to select an item or acknowledge setting.
Video
Stop video recording, press Menu button, and then select any menu item for
setting.
Video settings Description Submenu
Resolution Selection of video
resolution
1080P: FullHD resolution, 30 frames /
second
720P: HD resolution, 30 frames /second
Quality Setting of video
quality
Usual / Medium / Best
Cyclic recording Video le duration 1 min. / 3 min. /5 min. / O
White balance Setting of white
balance
Auto balance / Sunny / Cloudy / Fila-
ment lamp / Fluorescent
Contrast Setting contrast of a
video
0/1/2/3/4/5
Exposure Setting of exposure
value
-3/-2/-1/0/1/2/3
Page 9

9
Photo
Press Menu button in Photo mode, then select any menu item for setting.
Video settings Description Submenu
Recording upon
switching on
Automated start
of recording upon
switching on
• Recording on
• Recording o
Stamp date/time Switching on the date
and time stamp
• Stamp on
• Stamp o
Motion sensor Switching on
motion sensor
• Motion sensor is switched on
• Motion sensor is switched o
Stamp state registra-
tion No
Setting of the state
registration No
XXXXXXXX
Photo Description Submenu
Resolution Selection of photo resolution 12M/ 8M/ 5M/ 2M
Quality Selection of shooting quality Best / Medium / Usual
White balance Setting of white balance Auto / Sunny / Cloudy /
Filament lamp / Fluorescent
Exposure Setting of exposure value -3/-2/-1/0/1/2/3
Stamp date/time Switching on the date and time
stamp
•Stamp on
•Stamp o
Playback
In Playback mode press and hold Menu button, then select any menu item for
setting.
Playback Description Submenu
Remove le? Removal of video or image OK / Cancel
Page 10

10
Settings
In order to enter the menu of general settings, press Menu button twice in
Video mode or Photo mode, then select any menu item for setting setting.
Settings Description Submenu
Parking mode Selection of G sensor’s sensitivity
level in Parking mode
O/Low/Medium/High
G sensor Selection of G sensor’s sensitivity
level in Video mode
O/Low/Medium/High
Recording of sound Switching on microphone •Microphone on
•Microphone o
Volume of sound Selection of the dynamic sound
volume
High/Medium/Low
Button sound Switching on the button sound •Button sound on
•Button sound o
Network frequency Selection of network frequency 50Hz/60Hz
Memory card Memory card data Occupied/Overall
Urgent recording
SD card test
Automated switch o Setting the interval of auto
switch o
15 sec./30 sec./60 sec./O
Formatting Memory clearing OK/Cancel
Language Selection of the menu language Russian/ English
Date/Time Setting of date and time YY/MM/DD XX:XX:XX
Screen auto switch o Selection of the interval after
which the display lighting will be
switched o
10 sec./20 sec./30 sec./O
Manufacturer‘s settings Reset of all settings OK/Cancel
Software version
Software version XXXXXXX-XXXXXXXX
Page 11

11
[ Operation mode ]
1. Video recording mode
Upon switching on the video recorder it gets into Video recording mode
automatically. Cyclic recording is set as default; recorded in this mode, video
les of equal duration are saved on the memory card consecutively; as soon
as the memory card is full, automated removal of old les and saving of new
ones starts. In this way perpetual substitution of the oldest video le with the
newest currently shot one takes place on the memory card. In cyclic recording
mode video le duration can be changed through Settings menu. To start/
nish recording press REC button in Video recording mode. Following the start
of recording countdown begins in the upper left corner of display. This means
that the recording is actually performed.
2. Photo mode
To enter Photo mode, stop recording by clicking on REC button and then
pressing MODE button. An icon in the left upper corner will change from the
video camera image to photo. For shooting a photo, it is necessary to press OK
button. To get back into Recording mode, press MODE button twice.
3. Playback mode
To enter Playback mode for playing back video les and viewing photos, stop
recording by clicking REC button, then press MODE button to get into Photo
mode, then press MODE button again. An icon in the left upper corned will
change from the video camera image to the blue-coloured symbol “Play”. In
Playback mode you can view on the video recorder’s screen video les and
photos saved on the memory card; you can remove them by pressing MENU
button. File selection is made by UP and DOWN buttons. To playback / pause a
video press OK button. To fast-wind the video back press on UP button during
the playback of a video le; press on DOWN button for fast-winding the video
forward
Page 12

12
[ Other functions ]
1. Motion sensor
This function is meant for monitoring the environment. As soon as camera spots any
motion within its lens range, recording stops automatically for a while. To switch the
motion sensor on, press and hold REC button in Standby mode or activate this function through Settings menu. Upon activation of this function an icon of human gure
will appear on the screen top.
We do not recommend switching on the motion sensor while the car is moving. This
may lead to video quality distortions, hang / damage of the equipment, and fast CD
card lling.
2. G sensor
This G sensor (impact sensor) function allows protecting current video le
from re-recording and removing in case the device records a shock/impact. In
the right upper corner of the screen a “blockage” icon meaning that the current le is protected will appear.
This video le will be protected from deletion / re-recording; prex “SOS”
will be attached at the end of the le name; the le will not get lost unless
removed manually.
We recommend setting the “medium” (default) G sensor sensitivity value. The
level of sensitivity can be set in Settings menu.
3. Manual le blocking
Press OK button during the recording; in the right upper corner of the screen a
“blockage” icon meaning that the current le is protected will appear.
This video le will be protected from deletion / re-recording; prex “SOS”
will be attached at the end of the le name; the le will not get lost unless
removed manually.
3. Parking mode
Upon activation of this mode, even if the device is switched o, recording will
switch on automatically every time the device records a shock/impact.
This function may be switched on/o through Settings menu or by prolonged
press on MIC button.
Page 13

13
Mounting the parking camera:
1) Inside the car with 3M scotch
2) On the rear car bumper
mirror
red
black
car body
camera
rear light
[Mounting and operating a rear-view camera]
1. Mount your rear-view camera as shown in Fig.1.
2. Fix the camera on the rear car bumper using self-tapping screws or inside
the car using 3M scotch tape (included ion the kit) as shown in Fig.2.
3. Connect video cable to your video recorder’s AV input.
4. Connect power cable to the rear light wires in order to display rear-view
camera videos in full screen mode when you switch your car’s gear box to the
reverse gear box mode. If power is not supplied to the rear light wires, the
rear-view camera will record videos but will not get into full-screen mode
automatically
Page 14

14
[Possible problems and their causes ]
If any problems with the device emerge although the equipment maintenance
and operation terms have been observed, read this section to solve them.
- It is impossible to shoot photos and record videos.
Check if there is enough free space on Micro SD card, and if it is not blocked.
- Spontaneous stop occurs during the recording.
Since HD quality video les occupy much space, use only high quality Micro
SD cards no lower than 6 class (class 10 is recommended).
- When you try to view / back play a photo-video le, “video back play
mistake” inscription appears on the display.
This is caused by incomplete le recording due to the le system failure on the
Micro DS card. Format the Micro SD card.
- Blurred image.
Check for dirt or ngerprints on the lens. If you nd any, wipe the lens with a
piece of soft cloth before usage. (To avoid damage to the lens surface special
substances for the maintenance of optical equipment are recommended).
- Image is darkened when you shoot the sky or water.
If a sharp contrast is present on the shooting scene, it will aect the exposure.
Change the exposure value settings in menu.
- Unnatural colour on the recording and photo occurs when you shoot on
a cloudy day or indoors.
Check White balance settings in menu, set White balance in Auto mode or
select the value which suits the shooting conditions.
- Hang (no image on the display, no reaction to pressing on buttons).
For starting a forced reset of the device press RESET button.
 Loading...