

Page 1
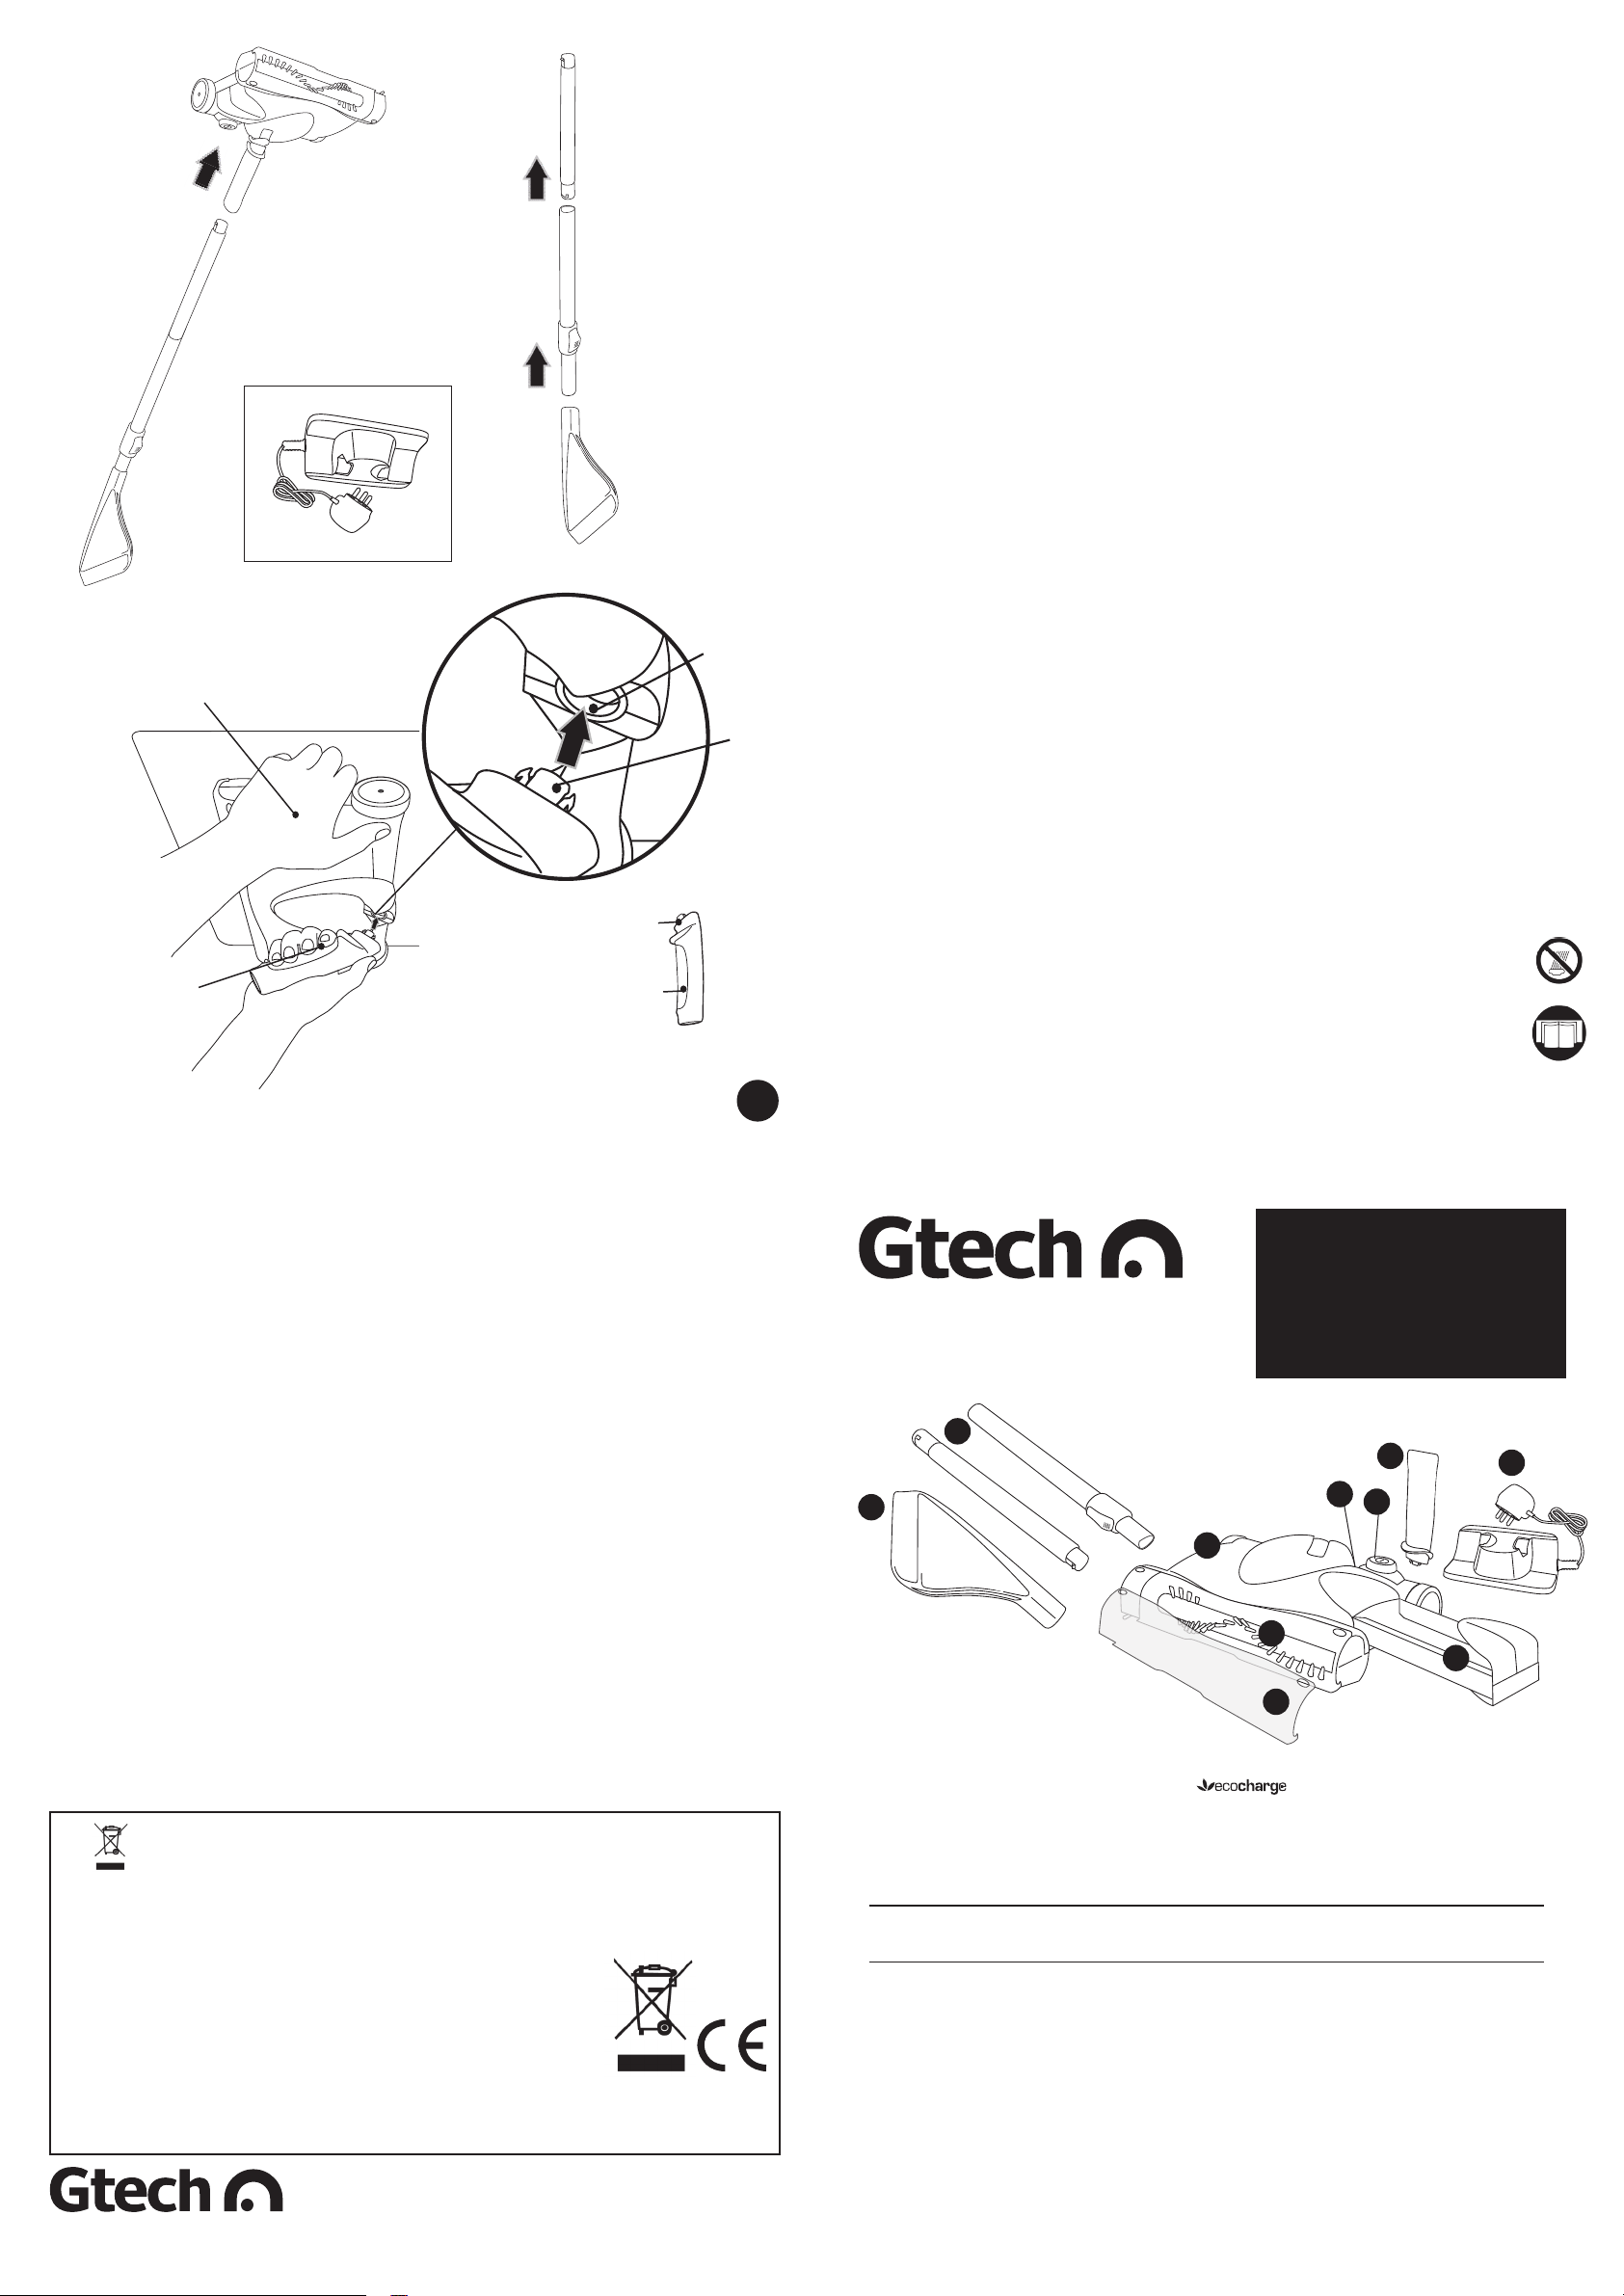
with one hand
hold unit firmly
D
CHARGER STAND
‘Click”
C
at the top
Telescopic Tube
hole
bracket
joint
lugs
Plastic
burning or smoking.
body clear of moving parts.
that may interfere with the brushes.
openings free of dust, lint, hair and anything
contact professional help immediately!
irritation or burns. In an emergency situation
Liquid ejected from the battery may cause
of 10 minutesand seek medical attention.
immediately with clean water for a minimum
If the liquid gets into the eyes, flush them
skin wash immediately with soap and water.
extreme conditions. If the liquid gets on the
high temperatures, as they may explode.
not incinerate batteries or expose to
cord can increase the risk of fire and
storage. A damaged or entangled charger
to wrap the cord around the charger for
To avoid damage it is not recommended
charger cord for signs of damage or ageing.
FOR HOUSEHOLD USE ONLY
21 Use extra care when cleaning on stairs.
20 Do not pick up anything that is flammable,
19 Keep hair, clothing, fingers, and all parts of
18 Do not use with any opening blocked; keep
17 Leaks from battery cells can occur under
16 This product includes NiMH batteries; do
the mains supply when removing the battery.
15 The appliance must be disconnected from
electric shock.
14 Before use check the power supply and
before it is discarded.
13 The battery must be removed from the appliance
12 Do not handle the charger with wet hands.
surfaces and sharp edges.
11 Keep the charger cord away from hot
plug and pull to disconnect.
cord to disconnect from a socket; grasp the
carry the charger by the cord. Do not pull the
increase the risk of fire or electric shock. Never
10 Do not abuse the charger cord as this can
battery pack.
may create a risk of fire when used with another
that is suitable for one type of battery pack
this product with another charger. A charger
other product nor attempt to charge
9 Do not attempt to use the charger with any
8 Only use the charger supplied with the product.
Never modify the charger in any way.
7 Use only as described in this manual.
they don’t play with the appliance.
6 Children should be supervised to ensure that
responsible for their safety.
concerning use of the appliance by a person
they have been given supervision or instruction
lack of experience and knowledge, unless
physical, sensory or mental capabilities, or
persons (including children) with reduced
5 This appliance is not intended for use by
when used by or near children.
4 Not to be used as a toy; pay close attention
with wet hands.
3 Do not handle the charger or appliance
2 Do not use outdoors or on wet surfaces.
1 Do not store or charge the unit outdoors.
face down
handle is
front grip on
Warranty Information
Grey Technology has provided the
SW20/21/22 Cordless Power Sweeper with a
12 month guarantee.
In Guarantee:
Please retain your receipt as proof of purchase.
In the rare and unfortunate event of your
Gtech product being faulty, please accept
our apologies and we will aim to remedy the
problem as fast as possible once brought to our
attention. However please be aware that due
to Company Policy, Grey Technology can only
repair or replace all or part of the product if proof
of purchase is provided and the claim is made
within 12 months of the purchase date.
If your product is within the 12 months warranty
period you should either return this product with
its receipt to the retailers where the product was
purchased or if a simple part or advice is required
ring the Gtech Helpline where we will be more than
happy to assist.
Note: Gtech cannot refund any monies if the
product was brought from a third party.
Note: The battery is a consumable item and is
not covered by this guarantee.
The symbol indicates that this product is
covered by legislation for waste electrical and
electronic products (EN2002/96/EC)
When the sweeper has reached the end of its
life, it and the NiMH battery it contains should
not be disposed of with general household
waste. The battery should be removed from
the sweeper and both should then be disposed
of properly at a recognised recycling facility.
WARNING: Only use the charger supplied with
the product.
plastic lugs
base, with
B
grip area
front, with
A
lower handle
Assembly
We would like to remind our customers that
the Gtech guarantee does not cover any
unauthorised repairs and will be annulled:
1 if the product has been damaged due to
incorrect use or maintenance.
2 if any part is modified or replaced or if it is
used in any way that is not
recommended by Gtech.
3 if it is used with any parts not produced or
not recommended by Gtech.
4 if it is used for purposes other than those
specified by Gtech.
If after reading the manual and following the
instructions you are sure that the product is
defective please call the Gtech Helpline on
01905 345891.
A Customer Service Advisor will be available
to deal with any problems you have with our
product. To assist them please be ready with
the product, a detailed description of the
problem, and your proof of purchase.
Out of Guarantee:
If your Gtech product is over 12 months old
and you need any parts or advice then please
contact our Helpline. Parts will be sent out
usually within 3 weeks of request.
Call your local council, civic amenity site, or
recycling centre for information on the disposal
and recycling of electrical products.
Alternatively visit www.recycle-more.co.uk
for advice on recycling and to find your nearest
recycling facilities.
21/03
Using another charger may damage the
product and the battery and will invalidate
your guarantee.
1
customer helpline
01905 345891
clever cordless creations
Cordless Power Sweeper
support@greytechnology.co.uk
www.gtechonline.co.uk
SW20/21/22 Instruction Manual
6
7
9
5
1 Main Unit
2 Brush Bar
3 Front Visor
4 Dust Tray
5 Upper Handle
6 Telescopic Handle Tubes
1
2
3
7 Lower Handle
8 Charging Station
(inside Dust Tray)
9 LED Indicator
10 ON/OFF button
10
4
Technical specification
Unit operating cycle with full battery up to 60 minutes (dependent on floor surface)
Battery type 7.2V DC 1.3Ah
Charging period for fully discharged battery 4 hours
Battery charger output 9.0V DC, 400mA
Battery charger model GTECHCS02
Sound Level 75db (A)
Weight 1.6Kg
be observed, including the following to reduce the risk of fire; electrical shock, or injury:
WARNING: When using an electrical appliance basic safety precautions should always
Do not use in rain or leave outdoors whilst raining.
RETAIN INSTRUCTIONS FOR FUTURE REFERENCE.
READ ALL INSTRUCTIONS BEFORE USE.
IMPORTANT:
Important Safeguards
8
clever cordless creations
customer helpline 01905 345891 support@greytechnology.co.uk
www.gtechonline.co.uk
WARNING: Only use a replacement battery as supplied by the manufacturer and only use
the charger provided with the product. Using another charger may damage the product and battery.
Page 2
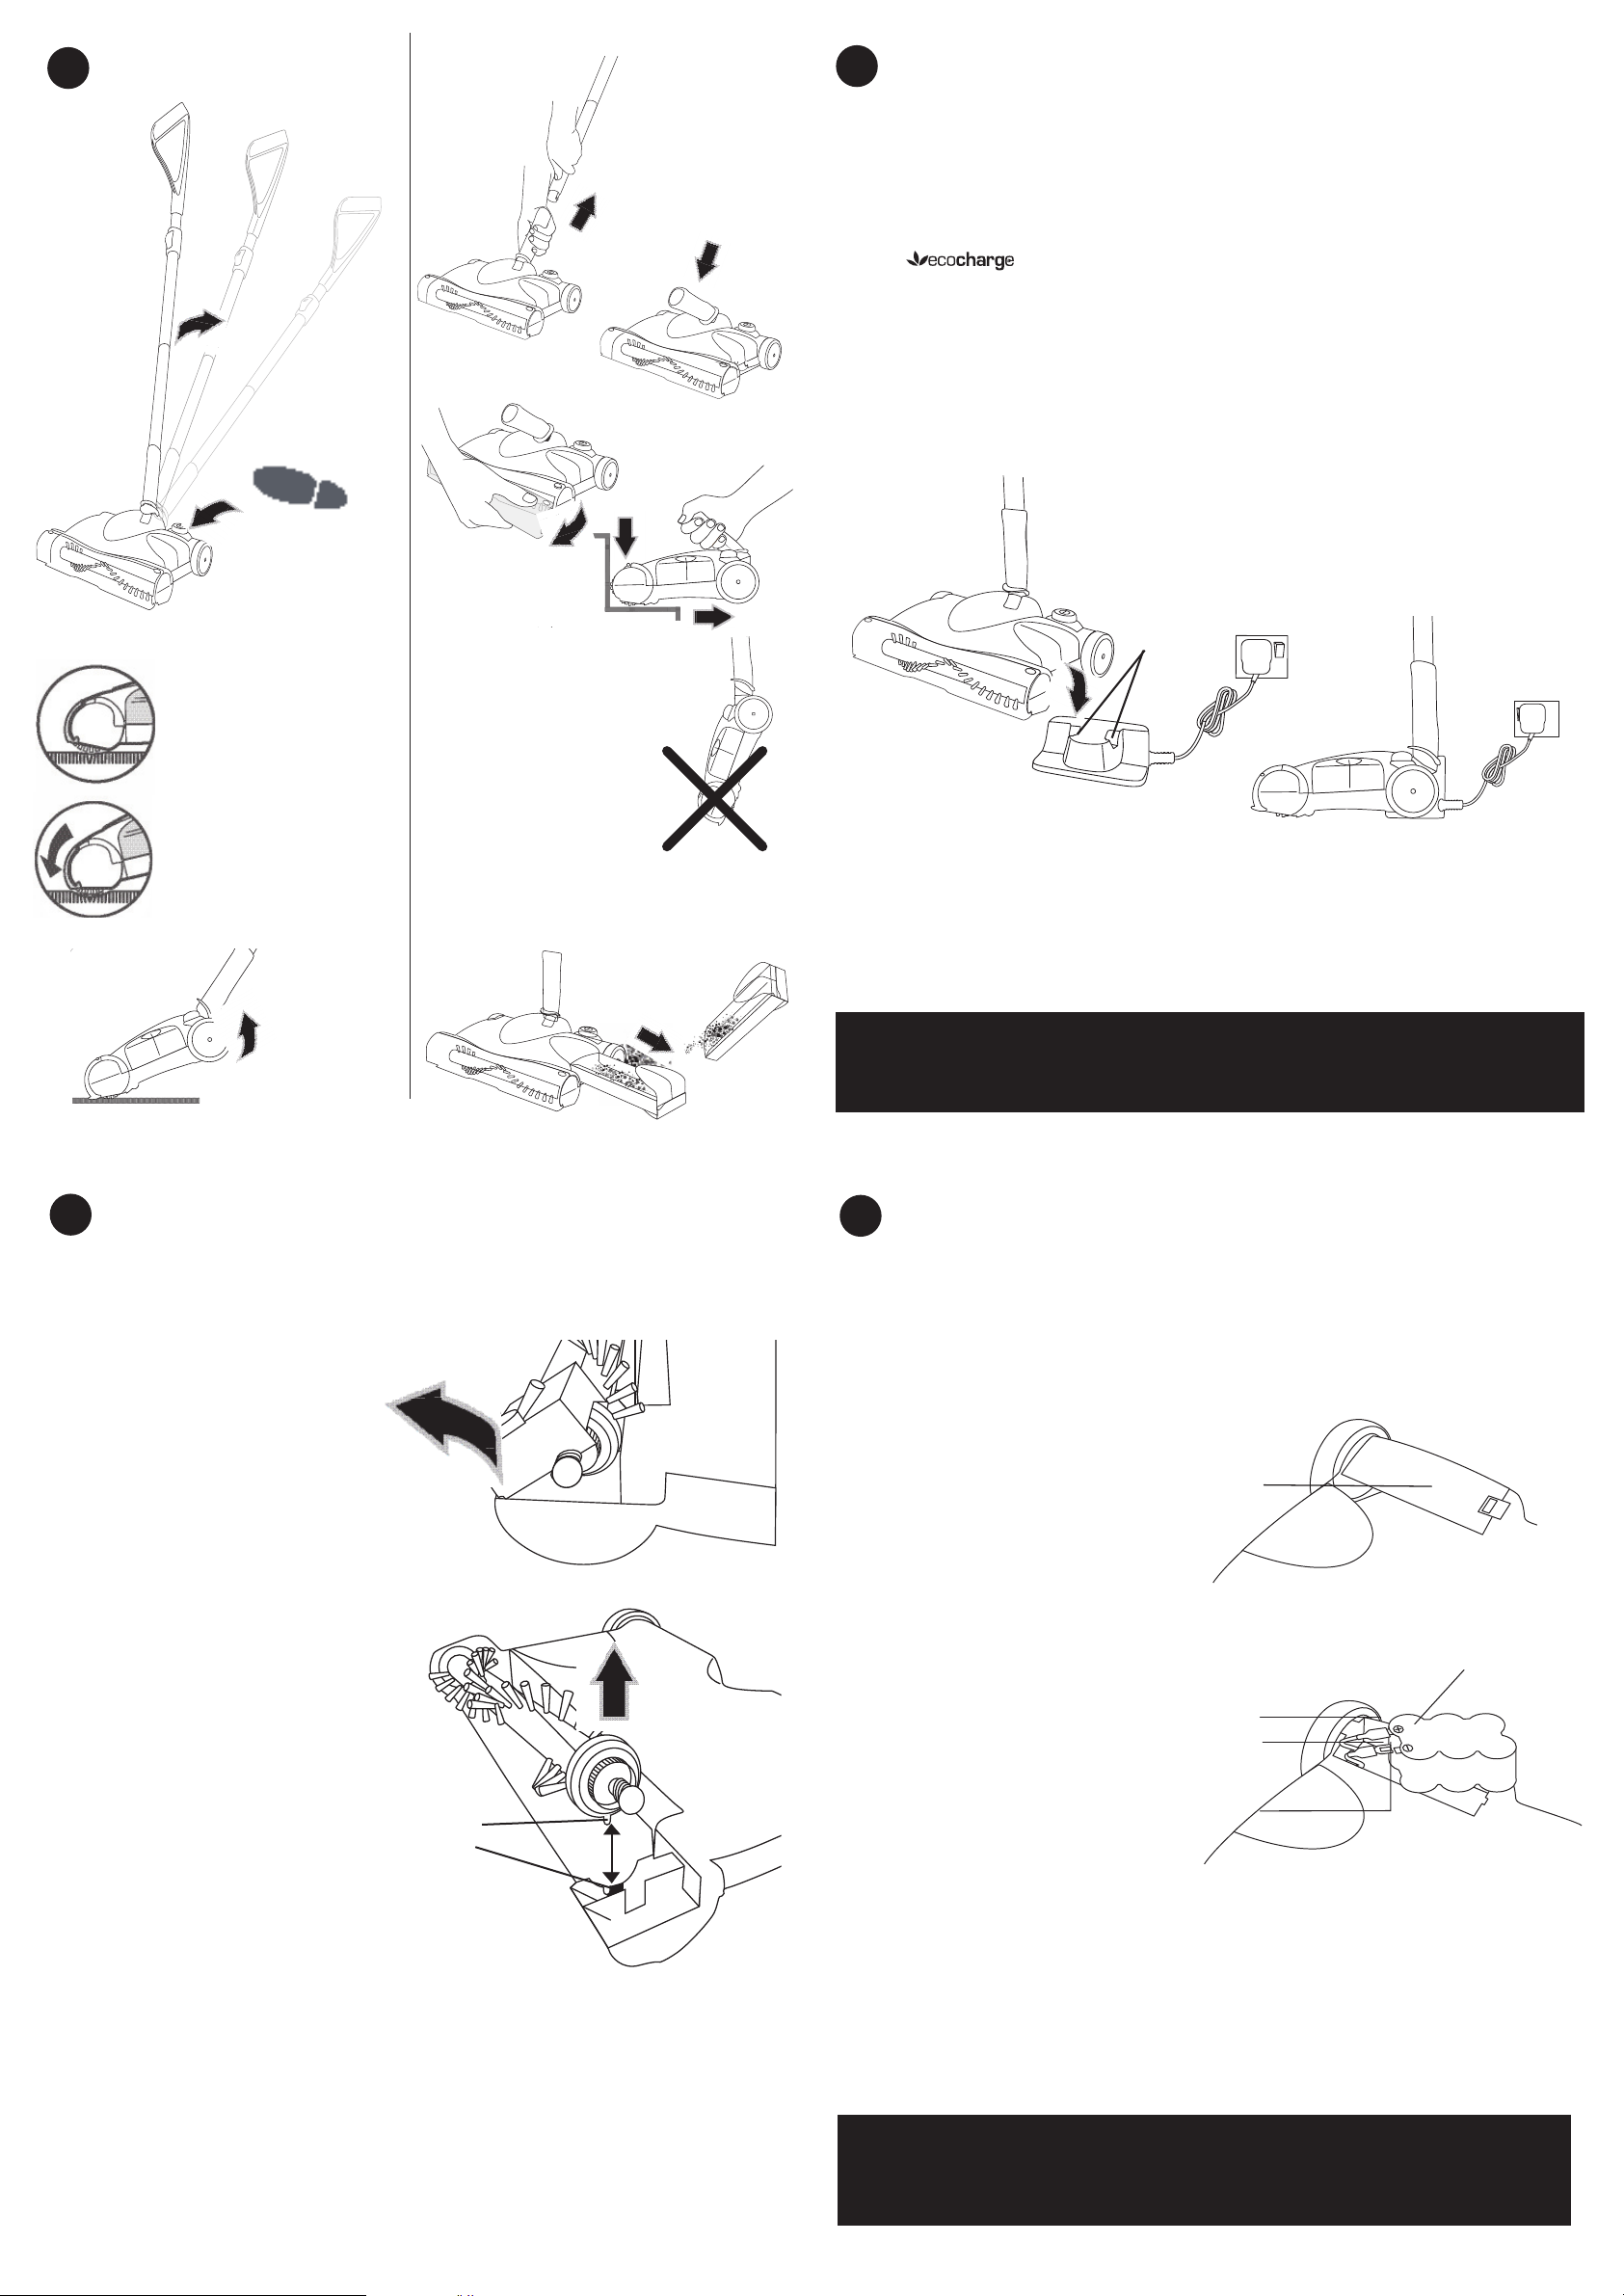
Operation
2
Battery Charging & Recharging
3
Floor Cleaning
1 For normal cleaning
push the sweeper flat
over the floor.
Handheld Operation
and Stair Cleaning
Carrying
To avoid spilling dirt
from the Dust Tray do
not carry the product
‘nose down’.
1 Plug the charging stand into an
electrical outlet. Place the sweeper
onto the charging stand with the rear
of the unit sitting over the contacts.
2 The stand has a trickle
charge to maintain full capacity and
a totally discharged battery will only
take approx 4 hours to fully recharge.
3 The unit can be left on the charging
station until it is needed for use.
contacts
1 WARNING: Only use the charger
provided with the product. Using
another charger may damage the
product and battery.
2 Before use check the power
supply and charger cables for signs
of damage or ageing. A damaged
charger can increase risk of fire or
electric shock.
3 if the battery is damaged in any way
do not attempt to charge it and
replace it immediately.
4 Never run the battery empty and
then put the product away without
switching it off - deep discharge can
damage the battery.
2 For deeper cleaning
and carpet grooming,
lift the Handle to
lower the brush bar
into the carpet.
Care &
4
Maintenance
WARNING: Do not accidentally turn the
unit on while cleaning it.
Each week clean the product with a dry
cloth, plus the chamber in which the Dust
Tray fits. Remove hair and fibre from the
Brush Bar and Edge Wheel.
1 Don’t use abrasive materials to clean
the product or immerse it in water.
2 Don’t pick up liquids or use on wet floors.
3 Don’t use on concrete, Tarmacadam
or other rough surfaces.
4 Don’t pick up pieces of string or fabrics
with the unit.
5 Don’t clean rug tassels or frayed
carpets with the unit.
Brush Bar & Edge
Wheel Removal
The Brush Bar and Edge Wheel can be
removed for cleaning or replacement.
1 Push the latch and un-hook the
Edge Wheel Cover from the front of
the unit.
2 Slide the belt off the end of the Brush
Bar drive gear.
3 Lift the end of the Brush Bar, then
slide out of the unit.
4 The Edge Wheel Brush can be pushed
out of the cover.
5 Remove any hair, fibre and dust from the
Edge Wheel and Brush Bar.
6 Replace the Brush Bar by fitting the shaft
into the bearing in the housing, then
engage the end with the drive gear into the
unit. Note: peg to relocate
into unit.
Bin Empty
To achieve the best performance,
empty the Dust Tray after
each use.
.
7 Refit the belt onto the drive gear.
8 Hook the Edge Wheel Cover back onto
the unit and push into place until the
latch is securely engaged.
Note: peg
to relocate
into unit.
Product Is Not Working Properly?
1 Empty the Dust Tray.
2 Remove any build-up of hair or fibre from
the Brush Bar and Edge Wheel.
3 Fully discharge the product (run until
battery is flat) and then recharge for
16 hours.
The LED will illuminate RED
whilst the product is charging.
The RED LED will turn off when the unit is fully charged. The unit will only re-charge
when the unit is switched off. If the unit is placed on the charging stand and there is
no red light then push the on/off button once to start the charging.
To maintain peak performance of your cordless sweeper, it is recommended
that the unit be fully discharged, then completely recharged at least once a
month.
Battery Pack Removal & Replacement
5
At the end of the product’s or battery’s life
the battery should be removed for disposal
and recycling. Only a technically competent
person should undertake battery removal
and replacement.
Follow these steps for battery removal
or replacement:
1 Switch off the product and ensure
the Charger is disconnected.
2 Remove the Telescopic Tubes and
Dust Tray.
3 Turn the unit over, being careful not
to switch the product on.
4 Press the clip to release the
Battery Cover.
5 Carefully lift the battery out.
6 Slide the plastic cover off the black (-)
cable connector.
7 Push the latch on the connector and
pull the connector off the battery
contact.
8 Repeat for the red (+) cable connector.
9 Push the cable connectors onto the
new battery contacts, ensuring they
are securely fitted.
10 Slide the plastic covers back over the
connectors.
11 Replace the battery into the
compartment and refit the battery cover.
ONLY USE A REPLACEMENT BATTERY AS SUPPLIED BY MANUFACTURER
Replacement batteries, Brush Bars and Edge Wheels can be purchased
through the helpline Tel: 01905 345891 or by visting www.gtechonline.co.uk
If uncertain as to how to replace your battery
pack, we suggest you take your unit to a reputable
small appliance servicetechnician to have this
service performed.
Battery Cover
Underside of Sweeper
Battery Connector
Cover
Cable
Connector
Latch
WARNING: NEVER touch both the metal
battery contacts at the same time with any
metal objects as this may create sparks
that can cause small burns.
NEVER use the unit in a partially assembled
state.
 Loading...