

Page 1

Electronic Cordless
Sweeper
Model SW 01
© Copyright Grey Technology Limited 2002
Revolution
Operating Instructions
Page 2

IMPORTANT:
READ ALL INSTRUCTIONS BEFORE USE.
RETAIN INSTRUCTIONS FOR FUTURE REFERENCE.
WARNING:
When using an electrical appliance, basic safety precautions should always
be observed, including the following, to reduce the risk of fire, electrical
shock, or injury:
Page 3

IMPORTANT:
READ ALL INSTRUCTIONS BEFORE USE.
RETAIN INSTRUCTIONS FOR FUTURE REFERENCE.
WARNING:
When using an electrical appliance, basic safety precautions should always
be observed, including the following, to reduce the risk of fire, electrical
shock, or injury:
1. Do not store or charge the unit outdoors.
2. Do not use outdoors or on wet surfaces.
3. Do not handle charger or appliance with wet hands.
4. Not to be used as a toy; pay close attention when used by or near children.
5. Use only as described in this manual.
6. Do not attempt to use the charger with any other product nor attempt to charge
this product with another charger.
7. Do not abuse the charger cord; never carry the charger or base by the cord or
pull cord to disconnect from an outlet; grasp the charger and pull to disconnect.
8. Keep charger cord away from hot surfaces.
9. This product includes Nickel Cadmium batteries; do not incinerate batteries
or expose to high temperatures, as they may explode.
10. Leaks from battery cells can occur under extreme conditions. If the liquid gets
on the skin wash immediately with soap and water. If the liquid gets into the
eyes, flush them immediately with clean water for a minimum of 10 minutes
and seek medical attention.
11. Do not use with any opening blocked; keep openings free of dust, lint, hair and
anything that may interfere with the brushes.
12. Keep hair, clothing, fingers, and all parts of body clear of moving parts.
13. Do not pick up anything that is flammable, burning or smoking.
14. Use extra care when cleaning on stairs.
FOR HOUSEHOLD USE ONLY
Page 4
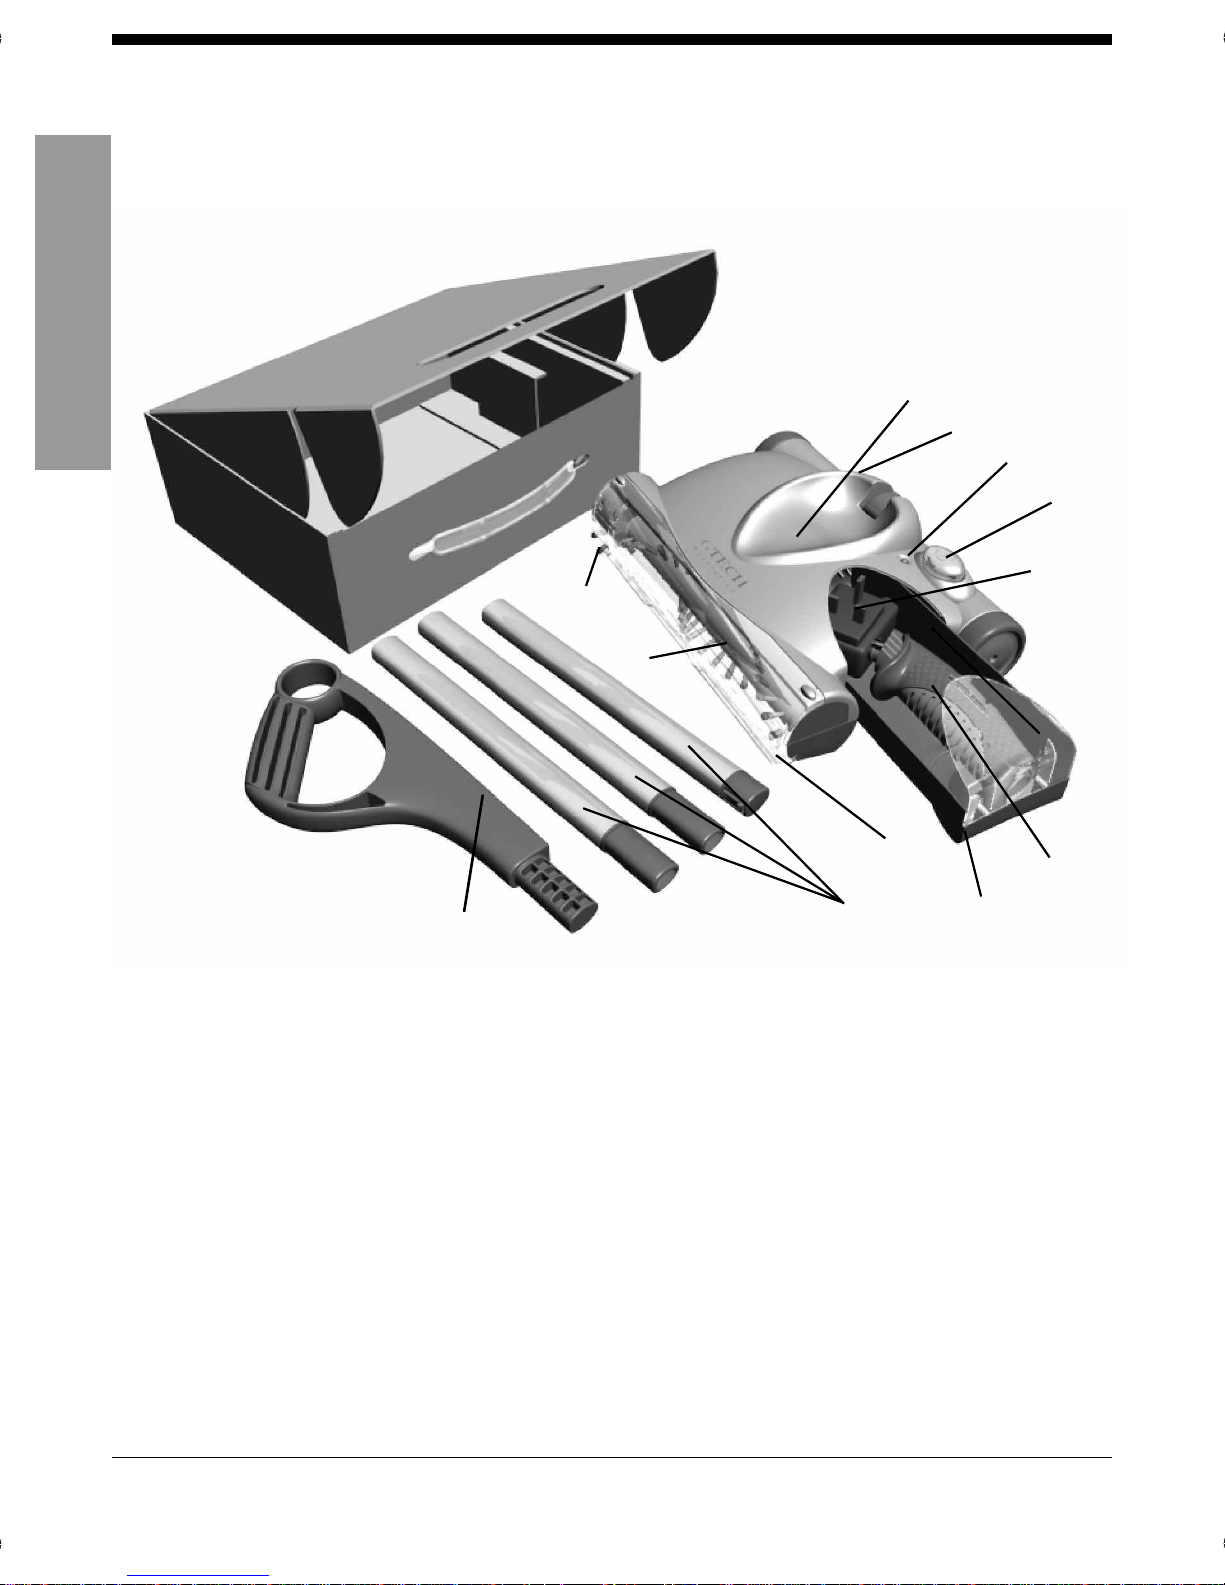
Unpacking
1. Main Unit 7. Edge Wheel
2. On / Off Switch 8. Charging Jack
3. Dual Colour LED Indicator 9. Lower Handle*
4. Dust Container 10. Handle Tubes x3
5. Brush Roll 11. Upper Handle
6. Front Visor 12. Charging Adaptor*
* will be packed inside (4) Dust Container
Assembly
1. Unpack and remove the whole unit from packaging.
2. Fit the Lower Handle onto the Main Unit, ensuring the handle faces
3. Push the Handle Tubes and the Upper Handle together.
Getting Started
1
2
3
4
5
6
7
8
9
10
11
12
Page 5

Assembly
1. Unpack and remove the whole unit from packaging.
2. Fit the Lower Handle onto the Main Unit, ensuring the handle faces
forward.
3. Push the Handle Tubes and the Upper Handle together.
Before first use charge the battery for 20 hours
Getting Started
Ensure the correct
tube is at the bottom
Page 6

Handheld Operation
1. Remove the main handle.
2. Fold the lower handle forward.
Stair Cleaning
l When cleaning stairs the visor can be
Floor Cleaning
1. Parking and release of the
main Handle.
2. Push the On / Off Switch to operate the
unit and push again to stop. The LED
illuminates GREEN during use.
3. Lift the handle for deep cleaning and carpet grooming.
Lift handle for Extra
Deep Cleaning and
Carpet grooming
Standard Cleaning
Operation
Page 7

Handheld Operation
1. Remove the main handle.
2. Fold the lower handle forward.
Stair Cleaning
l When cleaning stairs the visor can be
removed to allow the front surfaces
of stairs to be cleaned. With the
visor removed use only in
backwards strokes.
Do not use or carry
the product 'nose down'
Operation
Page 8

Emptying The Dust Container
To achieve the best performance, empty the Dust Container after each use.
1. Removal and replacement
2. Empty dust from the Dust Container.
Recharging
l Connect the charger to the Charging Jack on the back of the product. Plug
the Charging Adaptor into an electrical outlet. The LED illuminates RED
when the charger is connected.
l The unit will only recharge when the switch is in the Off position.
l WARNING : Never run the battery empty and then put the product
away without switching it off - deep discharge can damage the
battery.
l The LED does not flash when the unit is fully charged.
l To maintain peak performance of your cordless sweeper, it is
recommended that the unit be fully discharged, then completely recharged at least once a month.
Operation
Page 9

Emptying The Dust Container
To achieve the best performance, empty the Dust Container after each use.
1. Removal and replacement
of the Dust Container.
2. Empty dust from the Dust Container.
Operation
Page 10

Battery Pack Removal
The battery pack of your unit is replaceable, however only a technically competent
person should undertake replacement. If uncertain as to how to replace your
battery pack, we suggest you take your unit to a reputable small appliance service
technician to have this service performed.
Follow these steps when replacement is required.
1. Remove the extension handle and dust tray.
2. Turn the unit over so that the base is facing upwards.
3. With a #1 Phillips screwdriver, remove the screw which secures the battery
4. Remove the battery pack being careful not to bend the terminals.
CAUTION : NEVER use the unit in a partially assembled state
Battery Disposal
This cordless sweeper contains Nickel Cadmium (Ni-Cd) batteries, which must be
disposed of properly. Call your nearest recycling centre for information on the
recycling and disposal of Ni-Cd batteries
Care And Maintenance
1. Each week clean the product with a dry cloth, including the chamber in
which the Dust Container fits and remove hair and fiber build up from the
Brush Roll and Edge Wheel.
CAUTION : Do not accidentally turn the unit on while cleaning it.
2. Don't use abrasive materials to clean the product or immerse it in water.
3. Don't pick up liquids or use on wet floors.
4. Don't use on concrete, tar macadam or other rough surfaces.
5. Don't pick up pieces of string or fabrics with the unit.
6. Don't clean rug tassels or frayed carpets with the unit.
If The Product Is Not Working Properly
A. Empty the dirt tray
B. Remove any build-up of hair or fibre from the brushroll and edge wheel
C. Fully discharge the product (Run until battery is empty) and then recharge
for 12 hours.
Care
Page 11

Battery Pack Removal
The battery pack of your unit is replaceable, however only a technically competent
person should undertake replacement. If uncertain as to how to replace your
battery pack, we suggest you take your unit to a reputable small appliance service
technician to have this service performed.
Follow these steps when replacement is required.
1. Remove the extension handle and dust tray.
2. Turn the unit over so that the base is facing upwards.
3. With a #1 Phillips screwdriver, remove the screw which secures the battery
to the unit.
Some models have terminals which will need to be disconnected before the next
step, be careful not to disturb any of the wiring.
4. Remove the battery pack being careful not to bend the terminals.
CAUTION : NEVER use the unit in a partially assembled state
Battery Disposal
This cordless sweeper contains Nickel Cadmium (Ni-Cd) batteries, which must be
disposed of properly. Call your nearest recycling centre for information on the
recycling and disposal of Ni-Cd batteries
Battery
Screw
Care
Page 12

Technical specifications
*Dependant on floor surface
www.greytechnology.co.uk
email: support@greytechnology.co.uk
- 25 to 60 minutes*
- 7.2 v
- 12 hours
- 9v, 200mA
- 60dB(A)
- 1.6Kg
Unit operating cycle with full battery
Battery operating voltage
Charging period for fully discharged battery
Battery charger output
Sound level
Weight
© Copyright Grey Technology Limited 2002
 Loading...