

Page 1
Cylinder Vacuum Cleaner
Operating Instructions
Page 2

Table of contents
Table of contents..............................................................................
Important safeguards ......................................................................
Unpacking: Part location.................................................................
Assembly..........................................................................................
Cleaning: using the vacuum cleaner...............................................
- How to plug in and use...........................................................
- Using the brush on the head..................................................
- Using the scorpion hard floor head..........................................
- Using the pet hair tool..............................................................
- Using the crevice tool.............................................................
- Using the dusting brush..........................................................
- Changing the dust bag...........................................................
p1.
p2.
p3.
p4.
p5.
p6.
p7.
p8.
Care and maintenance.....................................................................
- Cleaning the inlet filter............................................................
- Cleaning the exhaust filter......................................................
Troubleshooting guide....................................................................
Spares...............................................................................................
Technical specifications..................................................................
p9.
p10.
Manual Version: 2005-01
Designed and edited in the UK
Printed in PRC
1
Page 3

Important Safeguards
ê IMPORTANT:
READ ALL INSTRUCTIONS BEFORE USE.
RETAIN INSTRUCTIONS FOR FUTURE REFERENCE.
ê WARNING:
When using an electrical appliance, basic safety precautions should
always be observed, including the following, to reduce the risk of fire,
electrical shock, or injury:
a Do not use or store the unit outdoors or on wet surfaces.
a Do not leave the cleaner when plugged in. Turn off the appliance and
unplug the cord when not in use and before servicing.
a Do not use with a damaged cord or plug.
a If the appliance is not working as it should, has been dropped, damaged,
left outdoors, or dropped in water, return it to a service centre before using.
a Do not pull or carry by cord, use cord as a handle, close door on cord, or
pull cord around sharp edges or corners. Do not run vacuum cleaner over
cord. Keep cord away from heated surfaces.
Important Safeguards
a Do not pull cord to disconnect from socket; grasp the plug and pull to
disconnect.
a Turn off the appliance before unplugging.
a Do not handle appliance with wet hands.
a Not to be used as a toy; pay close attention when used by or near children.
a Use only as described in this manual.
a Do not use without dust bag or filters in place.
a Do not use with any opening blocked; keep openings free of dust, lint, hair
and anything that may hinder the airflow.
a Keep hair, clothing, fingers, and all parts of body clear of moving parts.
a Do not pick up anything that is flammable, burning or smoking.
a Unplug electrical appliances before vacuuming them.
a Use extra care when cleaning on stairs.
a Use only with the manufacturers recommended attachments.
a The plug must be fitted with a 13A fuse.
a Repairs should be carried out by a service agent or a suitably qualified
person in accordance with relevant safety regulations. Repairs by
unqualified persons could be dangerous.
FOR HOUSEHOLD USE ONLY
2
Page 4
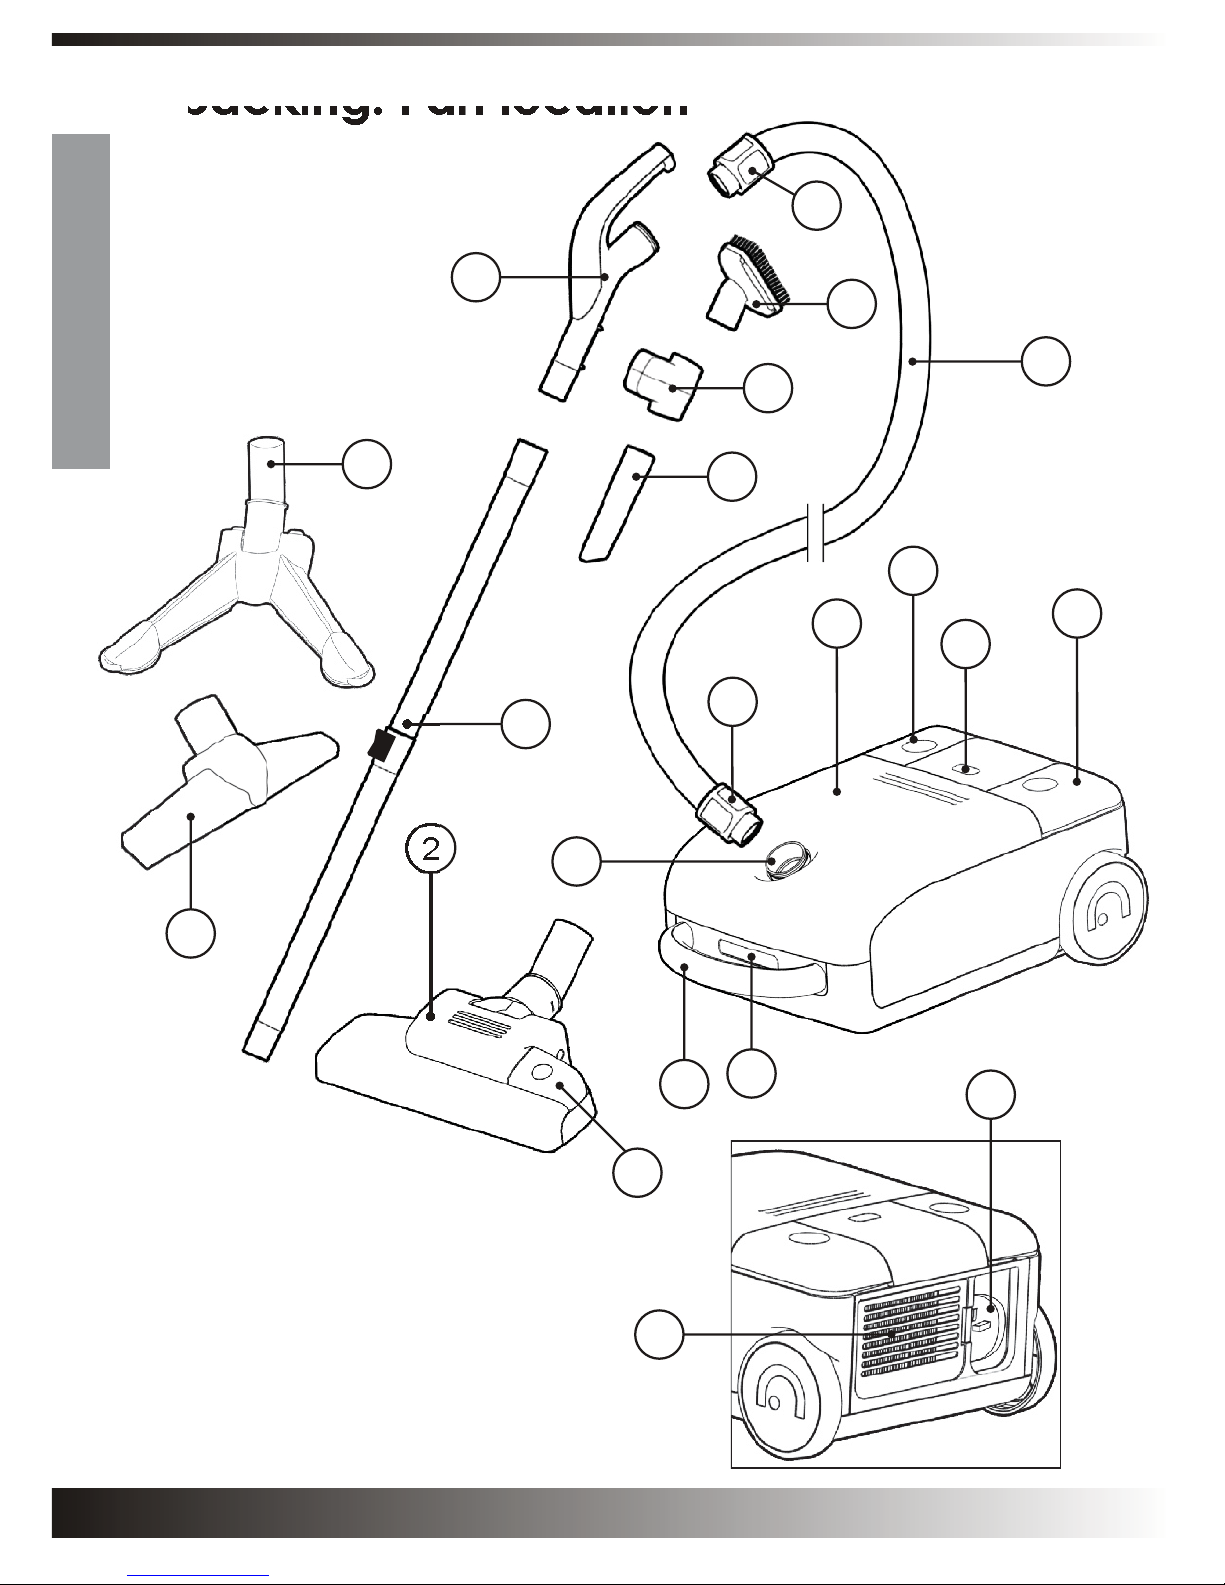
Unpacking: Part location
Getting Started
1. Vacuum cleaner, main unit
2. Combi-head
3. Scorpion hard floor head
4. Pet hair tool
5. On/off button
6. Cord rewind button
7. “Bag full” indicator light
8. Carry handle
9. Cover latch
15
14
17
13
18
4
3
2
19
10
16
14
1
6
5
7
10. Attachment for flexible hose
11. Exhaust filter
12. Power cord
13. Flexible hose
14. Hose End Connector
15. Upper handle
16. Crevice tool
17. Dusting brush
18. Tool clip
19. Telescopic tubes
20. Brush pedal
3
20
11
8
9
12
Page 5

Assembly
Connecting the flexible hose:
a Push the hose end connector of the flexible hose onto the attachment part on
the vacuum cleaner and twist to lock.
a Follow the same procedure to attach the flexible tube to the upper handle.
a To remove the flexible hose from the vacuum cleaner, twist the hose end
connector and pull to release. Do not pull the hose itself!
Getting Started
Assembling the tubes:
a Push the tubes firmly together (by twisting slightly).
a Push the head and upper handle onto the ends of the tube.
a Fit the Crevice tool and the dusting brush onto the tool clip, and snap the tool
clip onto the handle.
4
Page 6

Using the vacuum cleaner
How to plug in and use:
a Pull out the power cord to the desired length and plug into a socket.
a To start press the on/off button of the vacuum cleaner. To stop press button again.
a Remove the plug from the socket. Pull the plug only, not the cord.
a Press the cord rewind button to rewind the power cord.
Cord rewind
Operation
Operation
Combi-head: The combi-head has a pedal which allows you to alter its function
according to the type of floor to be cleaned.
a Hard floor position (tiles, parquet floors...) Press on the pedal to lower the
brush. (Pedal tilted back)
a Carpet or rug position. Press on the pedal to lift the brush up.
On/Off
Carpets or rugs
5
Hard floors
Page 7

Scorpion hard floor head: The scorpion head is ideal for use on hard floors, for
example hard wood floors, tiles, linoleum, polished concrete, etc.
Fit the scorpion head onto
the end of the tubes.
Dust and large objects are
Dust and large objects are
collected in the ‘v’ shape,
collected in the ‘v’ shape,
with finer dust being able to
with finer dust being able to
be collected down the
be collected down the
channels of the head.
channels of the head.
Operation
Pet hair tool: The pet hair tool is ideal for cleaning hair from chairs, upholstery and
carpets. The pet hair tool can be fitted onto the
extra reach.
handle or the extension tubes for
6
Page 8

Crevice tool: The crevice tool can be used for vacuuming in those normally
inaccessible places like a window frame, a crevice in a wall or creases in the car
seats.
The crevice tool
can be fitted
onto the handle
or extension
tubes for extra
reach.
Operation
Dusting brush: The dusting brush can be used for vacuuming picture frames,
furniture outlines, books and other uneven objects. The
the extension tubes for extra reach.
dusting brush can fitted to
7
Page 9

Changing the dust bag:
ê TURN OFF THE APPLIANCE AND UNPLUG THE POWER CORD
FROM THE SOCKET! Pull the plug only, not the cord.
The dust bag needs changing when the ‘bag full’ indicator light illuminates. Even if
the dust bag does not appear to be full at this stage, it should be changed. It
could be that a great deal of fine dust has blocked up the pores of the dust bag.
a Turn off the appliance and unplug the power cord.
a Open the bag cover by pushing the cover latch and lifting the cover.
a To remove the dust bag, slide it out of the bag holder, by pulling the
cardboard of the dust bag upwards. Discard the bag.
a To refit a new bag, push the cardboard support of a new bag fully into the
bag holder.
Operation
ê The cover will not close without a bag being fitted, or if bag is not
fitted correctly.
ê The dust bags are disposable. Once full, dispose of the bag and
replace with a new, clean bag. Do not re-use as blocked bags will
reduce the efficiency of the vacuum cleaner.
i SPARE DUST BAGS (part number:CY-B1) CAN BE PURCHASED FROM
GTECH CUSTOMER SERVICES:
Tel; 0870 794 4001 Email; sales@greytechnology.co.uk
i USE ONLY SPARE PARTS AS SUPPLIED BY THE MANUFACTURER
www.greytechnology.co.uk
8
Page 10

Care and maintenance
Cleaning the inlet filter: The filter needs to be cleaned regularly to ensure
optimal operation of the appliance.
ê TURN OFF THE APPLIANCE AND UNPLUG THE POWER CORD!
a This filter is situated inside the cleaner between the dust bag and the motor
a To remove the filter, slide it upwards out of its mounts.
a This filter is washable. After washing, make sure that the filter is
completely dry before replacing it in the appliance!
Cleaning the exhaust filter: The filter needs to be cleaned regularly to ensure
optimal operation of the appliance.
a To remove the exhaust filter, remove the filter holder by pushing the latch on
the right of the filter holder sideways (left) towards the filter.
a Remove the exhaust filter from the filter holder.
Care
a This filter is washable. After washing, make sure that the filter is
completely dry before replacing it in the appliance!
Latch
i SPARE FILTERS CAN BE PURCHASED FROM GTECH CUSTOMER
SERVICES:
Tel: 0870 794 4001 Email; sales@greytechnology.co.uk
i USE ONLY SPARE PARTS AS SUPPLIED BY THE MANUFACTURER
9
www.greytechnology.co.uk
Page 11

Troubleshooting guide
IMPORTANT:
ê PLEASE, DO NOT RETURN THE APPLIANCE TO THE STORE! If you
have any problems or questions, or if you would like to order spare parts or
accessories, please call the Gtech help line on 0870 794 4001 or email
sales@greytechnology.co.uk
PROBLEM
Vacuum cleaner will
not operate
Vacuum cleaner
suction performance
reduces
IMPORTANT: THERMAL CUT-OFF
POSSIBLE REASON
1. Fuse needs replacing
2. Unit needs servicing
1. Dust bag is full
2. Tubes, hose or cleaning tool
is blocked
3. Filters are dirty
POSSIBLE SOLUTION
1. Replace Fuse
2. Call customer service
1. Replace dust bag
2. Find the blockage and
remove the obstruction
3. Clean filters or replace if
necessary
ê To prevent the vacuum cleaner from damage caused, it is equipped
with a thermal cut-off which switches off the motor in the unlikely event
of overheating. If this happens:
a Press the on/off button once, and unplug the vacuum cleaner cord from the
socket.
a Allow the motor to cool down for 60 minutes.
a Check if the dust bag is full and replace if necessary.
a Check if the filters need cleaning and clean or replace if necessary.
a Check for any blockages in the head, handle and hose and remove if
necessary.
a If the vacuum cleaner still doesn’t start, please, call the Gtech help line on
0870 794 4001 or email sales@greytechnology.co.uk
10
Page 12
Spares
i Spare parts can be purchased from Grey Technology Limited. See below for
all contact details. USE ONLY SPARE PARTS AS SUPPLIED BY THE
MANUFACTURER.
PART
Dust bag and filter pack
Cordless vacuum
sweeper head
PART NUMBER
CY-B1
CYA 01
Technical specifications
Power source
Power Output
220 - 240V AC 50Hz
1600W max
Net weight
Sound level
Email: sales@greytechnology .co.uk
4.5Kg
80dB(A)
Grey T echnology Ltd
Unit 1 & 2
Cupola Court
Spetchley
Worcester
WR5 1RL
Tel. (+44) 0870 794 4001
Fax. (+44) 0870 794 4002
Web: www.greytechnology .co.uk
©
Copyright Grey Technology Limited 2006
 Loading...