

Page 1

Safety and Instruction Manual for
CM01 Cordless Cylinder Mower
Page 2

Page 3

IMPORTANT:
READ ALL INSTRUCTIONS
BEFORE USE.
RETAIN INSTRUCTIONS FOR FUTURE
REFERENCE.
WARNING:
THIS PRODUCT CAN CAUSE SERIOUS
INJURIES.
Read all instructions. Failure to follow
all instructions listed below may result in
electric shock, re and/or serious injury.
The term “power tool” in all of the warnings
listed below refers to your mains-operated
(corded) power tool or battery-operated
(cordless) power tool.
WARNING:
When using any electrical appliance,
basic safety precautions should always be
observed, including the following, to reduce
the risk of re, electrical shock, or injury.
Work area:
•Keep work area clean and well lit.
Cluttered and dark areas invite accidents.
•Mow only in daylight or good articial light
•Thoroughly inspect the area where
the mower is to be used and move any
object which may jam or be thrown by the
machine.
•Do not operate power tools in explosive
atmospheres, such as in the presence of
ammable liquids, gases or dust. Power
tools create sparks which may ignite the
dust and fumes.
•Keep children, bystanders, and pets
away while operating the power tool,
distractions can cause you to lose control.
•Not to be used as a toy. Not to be used
near children.
•Never allow children or people unfamiliar
with these instructions to use the power
tool. Local regulations may restrict the age
of the operator.
•When not in use store the power tool out
of the reach of children.
•Always be sure of your footing on slopes,
do not over-reach or use on excessively
steep slopes.
•Mow across the face of slopes, never up
and down.
•Take extreme caution when changing
direction on slopes.
•Avoid operating the mower in wet grass
where possible.
Electrical safety:
•Power tool plugs must match the outlet.
Never modify the plug in any way.
•Do not use any adaptor plugs with
earthed (grounded) power tools.
Unmodied plugs and matching outlets
will reduce the risk of electric shock.
•Avoid body contact with earthed or
grounded surfaces such as pipes,
radiators, ranges and refrigerators. There
is an increased risk of electric shock if
your body is earthed or grounded.
•Do not expose power tools to rain or wet
conditions. Water entering a power tool
will increase the risk of electric shock.
•Do not abuse the charger cord. Never
use the charger cord for carrying the
charger, or pulling and unplugging the
power tool. To disconnect the charger
from an outlet grasp the plug and pull to
disconnect. Damaged or entangled cords
increase the risk of electric shock.
•Keep charger cord away from heat, oil,
sharp edges or moving parts.
•When operating a power tool outdoors,
use an extension cord suitable for outdoor
use. Use of a cord suitable for outdoor use
reduces the risk of electric shock.
•If the cord becomes damaged during use
disconnect the cord from the power supply
immediately- do not touch the cable
before disconnecting.
•Before use check the power supply and
charger cables for signs of damage or
ageing.
•When charging or operating the power
tool it is recommended that the appliance
Important Safeguards
Page 4

should be supplied via a residual current
device (RCD) with a tripping current of not
more than 30mA.
•Do not attempt to use the charger with
any other product nor attempt to charge
this product with another charger.
•Do not handle the charger or the power
tool with wet hands.
Personal Safety:
•Stay alert, watch what you are doing
and use common sense when operating
a power tool. Do not use any power tool
while you are tired or under the inuence
of drugs, alcohol or medication. A moment
of inattention while operating power tools
may result in serious personal injury.
•Always be aware of your surroundings
and stay alert for possible hazards
that you may not be aware of due to
concentration on the power tool.
•Use safety equipment. Always wear eye
protection. Safety equipment such as non
-slip footwear, safety glasses and sturdy
gloves are recommended.
•Do not operate when barefoot or wearing
open sandals.
•Always wear substantial footwear and
long trousers.
•Dress appropriately. Do not wear loose
clothing or jewellery which can be caught
by moving parts.
•Keep your hair, clothing, ngers, and all
parts of the body away from moving parts.
•Keep hands and feet away from the
cutting element at all times, and especially
when switching on.
•Do not put hands or feet near rotating
parts. Keep clear of the discharge opening
at all times.
•Avoid accidental starting. Ensure the
switch is in the off position before plugging
in. Carrying power tools with your ngers
on the switches or plugging in power tools
that have the switch on invites accidents.
•Never pick up or carry the appliance
while the motor is running.
•Remove any adjusting key or wrench
before starting the power tool. A key or
wrench left in a rotating part of the power
tool may result in personal injury.
•Do not overreach. Keep proper footing
and balance at all times. This enables
better control of the power tool in
unexpected situations
•Take care in slippery conditions, and on
slopes and uneven ground.
•Walk, do not run with the power tool.
•When operating the power tool ensure
that both hands are correctly positioned
on both handles. Do not operate this
product if incomplete or with unauthorized
modications.
•Warning cutting element will continue to
move after the motor is switched off.
•Ensure that the motor has fully stopped
and the isolator key is removed before
cleaning, clearing a blockage, checking,
or carrying out maitenance on the power
tool.
•Be careful when adjusting the height.
Ensure the isolator key and battery is
removed and keep ngers away from
moving parts.
•Never operate the power tool with
damaged guards or without guards or
saftey devices in place, and/or grass
catchers in place.
•The operator or user is responsible for
accidents or hazards occuring to other
people at their property.
Power tool use and care:
•Do not force the power tool. Use the
correct power tool for your application.
The correct power tool will do the job
better and safer at the rate for which it
was designed.
•Do not use the power tool if the switch
does not turn it on and off. Any power tool
that cannot be controlled with the switch is
dangerous and must be repaired.
•Disconnect the isolator key and the
battery pack from the power tool before
making any adjustments, changing
accessories, or storing power tools. Such
preventive safety measure reduce the risk
of starting the power tool accidentally.
Page 5

•Store idle power tools out of the reach
of children and do not allow persons
unfamiliar with the power tool or these
instructions to operate the power tool.
Power tools are dangerous in the hands of
untrained users.
•Maintain power tools. Check for
misalignment or binding of moving parts,
breakage of parts and any other condition
that may affect the power tools operation.
If damaged, have the power tool repaired
before use. Many accidents are caused
by poorly maintained power tools.
•Check that the cutting blades are clean
without damage. If the blade becomes
worn a replacement should be tted
before use.
•Do not tilt power tool when switching on.
• Remove the isolator key before carrying
or moving the power tool.
•Stop the blade if the appliance has to
be tilted for transportation when crossing
surfaces other than grass, and when
transporting the appliance to and from the
area to be mowed.
• Use caution when reversing or pulling or
moving the power tool towards you.
•Use the power tool, accessories etc. In
accordance with these instructions and
in the manner intended for the particular
type of power tool, taking into account
the working conditions and the work to
be performed. Use of the power tool for
operations different from those intended
could result in a hazardous situation.
•Before using the machine and after any
impact, check for signs of wear or damage
and repair as necessary.
•Keep all nuts, bolts, screws tight to
ensure the power tool is in good working
condition.
•Always ensure that ventilation openings
are kept clear of debris.
•Keep the product and all accessories
away from hot surfaces.
•Remove the isolator key from the power
tool when storing.
•Store the tool in a secure, dry place out of
reach of children and animals.
Battery use and care:
•Do not attempt to use the charger with
any other product nor attempt to charge
this product with another charger.
•Using a charger from a different product
may cause a risk of re.
•Leaks from battery cells can occur under
extreme conditions. If the liquid gets on
the skin wash immediately with soap and
water. If the liquid gets into the eyes, ush
them immediately with clean water for a
minimum of 10 minutes and seek medical
attention.
•This product contains lead acid (Pb)
batteries. Do not incinerate batteries or
expose to high temperatures, as they may
explode.
•When the battery pack is not in use,
keep away from other metal objects such
as: paper clips, coins, keys, nails, screws,
or other small metal objects that can make
a connection from one terminal to another.
•Shorting the battery terminals may cause
burns or re.
•In an emergency situation contact
professional help immediately!
Service:
•Have your power tool serviced by a
qualied repair person using only identical
replacement parts. This will ensure that
the safety of the power tool is maintained.
•Do not attempt to repair any damaged
parts on this product unless you are
qualied to do so.
•Never use replacement parts or
accessories not provided or recommended
by the manufacturer.
Page 6
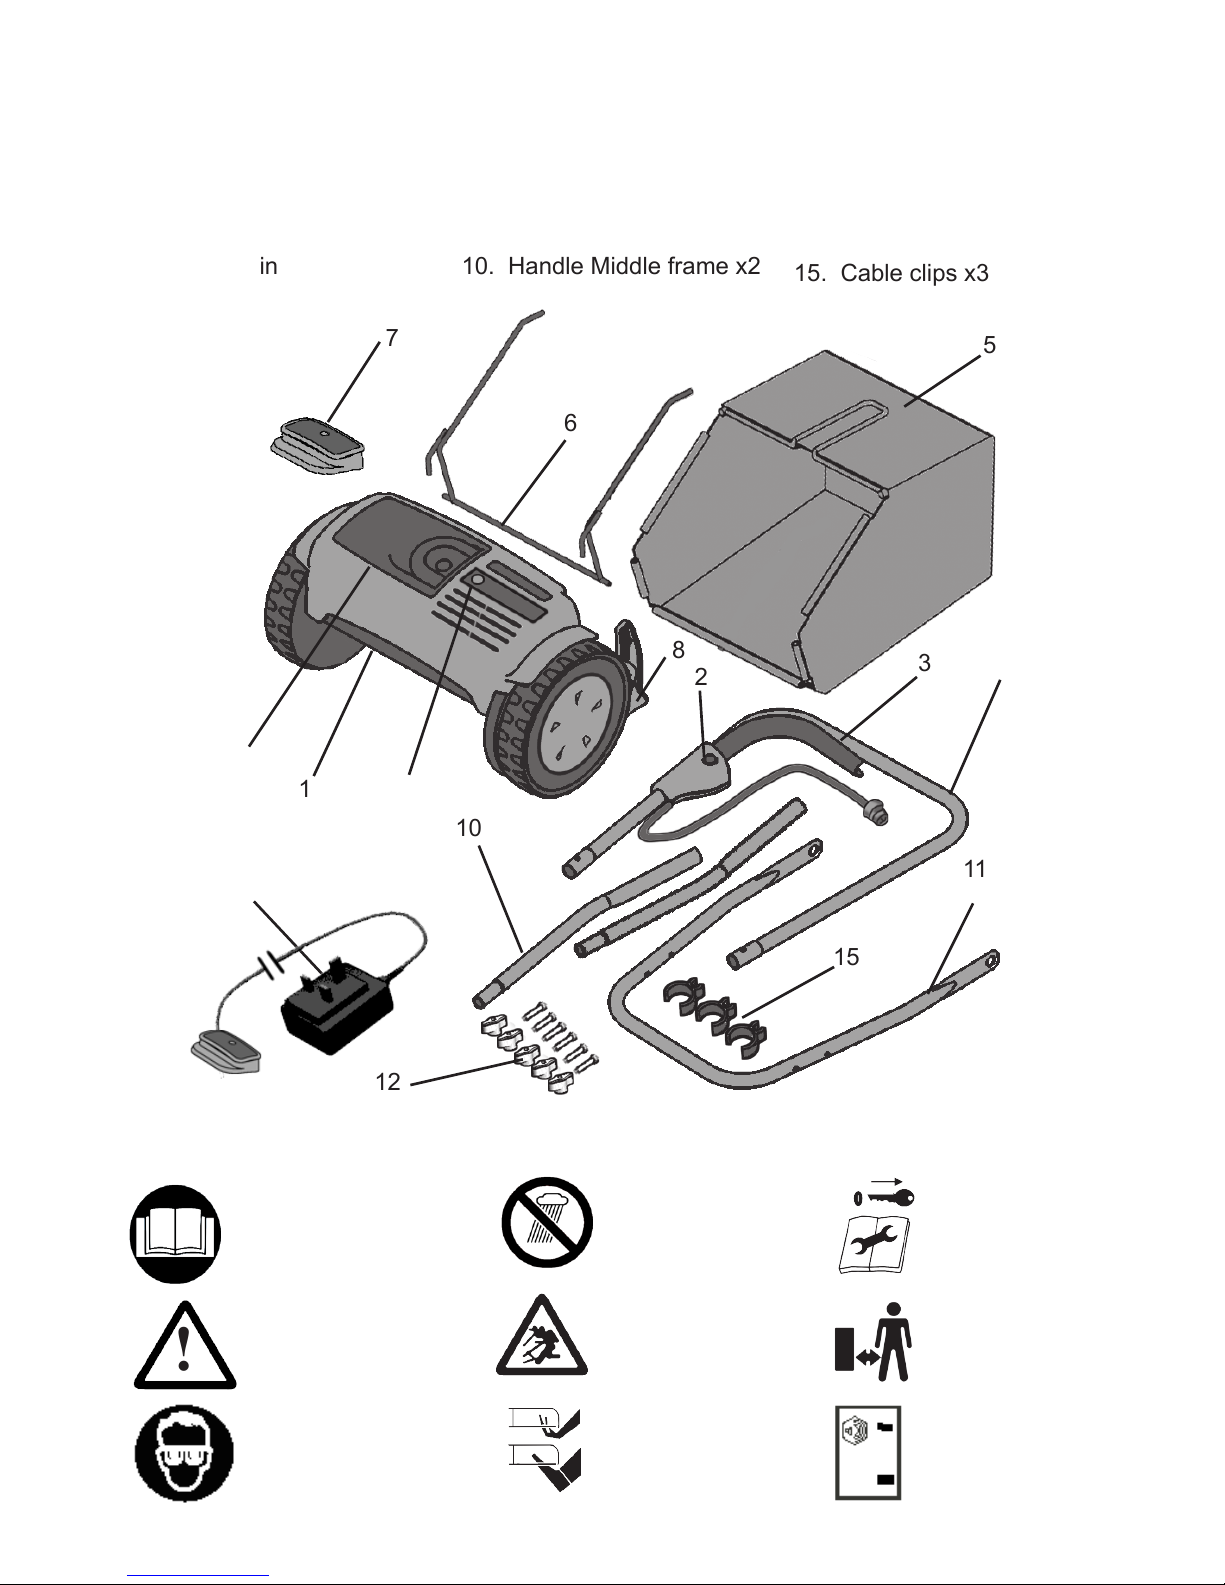
Unpacking: Part location
1. Main unit
2. Safety button
3. Operation lever
4. Battery pack
5. Grass bin
6. Grass bin frame
7. Isolator key
8. Height Adjust Knob
9. Handle Upper frame
10. Handle Middle frame x2
11. Lower frame
12. Nuts and Bolts x6
13. Charger adaptor
14. Reset button
15. Cable clips x3
1
4
12
11
10
8
7
5
3
2
9
13
15
Gtech helpline : 0870 7944001 email: support@greytechnology.co.uk
Read instruction
manual before
use.
General hazard
safety alert.
Wear eye protection
when using this
product.
Sound Power
Level 95 dB(A)
Beware of ying
objects and
debris
95
Keep bystanders
away
Beware of
Sharp blades
Remove disabling
device before
maintenance
Do not use in rain or
leave outdoors whilst
raining.
Warning label descriptions:
6
14
!
Page 7

Charge the battery for 16 hours before rst use.
Warning : if the battery is damaged in any way do not attempt to charge it, and
replace it immiediatly
The battery can be charged in or out of the product.
To charge the battery in the product, remove the
isolator key and plug the charger connector onto
the battery socket.
To charge the battery out of the product, rst remove the isolator key, raise the handle and
lift the battery out of the product. Place the battery on a dry, at surface. Plug the charger
connector onto the battery socket.
Plug the charger adaptor into a suitable electrical socket and switch on.
Once the battery is fully charged remove the charger connector from the battery and
unplug the charger adaptor from the mains socket.
Do not pull the charger by the cord.
From at the battery requires 16 hours to fully charge.
Note : there is no indicator on the charger to show when the battery is charging or
fully charged. Charge the battery for 16 hours after use to ensure a full charge.
The battery will not be damaged if charged for longer than 16 hours, but do not
charge for longer than 48 hours.
IMPORTANT - to keep the battery in good condition charge the battery after each
use. Never store the battery at.
If storing the battery for long periods then charge the battery every 3 months.
Warning : only use the charger provided with the product. Using any other
charger may damage the product and the battery.
Only use a replacement battery as supplied by manufacturer.
Replacement batteries can be purchased from Grey Technology.
Tel : 0870 7944001 www.greytechnology.co.uk
Battery Charging & Recharging
Gtech helpline : 0870 7944001 email: support@greytechnology.co.uk
Page 8

Assembly
Fit the lower handle frame to the main
unit.
Fit the lower frame between the two
smaller lugs on the main unit.
Fit one side and then ex the other side
into position over the opposite lug.
The lower handle should rest on the 2
larger lugs.
Assemble the upper handle frame to the
middle handle frame parts.
Ensure the upper frame is facing upwards
(safety button up)
The middle frame parts should bend down.
The bottom section of the middle frame
should have the hollow side facing inwards
to locate onto the lower handle frame tube.
Use two nuts and bolts to secure together.
If incorrectly assembled, disconnect and
re-assemble in the correct orientation.
Locate and assemble the upper handle
frame and middle handle frame assembly
to the lower handle frame.
Use four nuts and bolts to secure in place .
CAUTION : remove the isolator key and battery before assembling the
mower.
Gtech helpline : 0870 7944001 email: support@greytechnology.co.uk
Page 9

Secure the cable to the handle using the
3 cable clips
Connect the plug from the handle cable
to the socket on the main unit.
Tighten the screw ring to secure the
cable.
Locate the front frame of the grass bag
into the 2 holes in the top of the main
grass bag frame.
Gtech helpline : 0870 7944001 email: support@greytechnology.co.uk
Attach the plastic strips on the grass bag
to the front frame by exing the open the
slot in the plastic strip and pushing over
the frame
Page 10

Fitting the grass bin
To t the grass bin locate the hooks into the holes in the bin support and lower the grass
bin onto the mower.
To replace the grass bin locate the hooks into the holes in the bin support and lower the
grass bin onto the mower as described above
Removing the grass bin
Before removing the grass box for emptying, release the operation lever and wait for
the blades to stop turning.
Hold the handle on top of the grass bin.
Lift the grass bin up until the hooks are clear of the bin supports
Gtech helpline : 0870 7944001 email: support@greytechnology.co.uk
Page 11

Isolator Key
IMPORTANT : the mower is tted with an isolator key.
This is a safety device and the product will not work without it.
Ensure the battery is tted corectly before tting the isolator key
Place the isolator key over the contact points on the main unit and battery press down
rmly.
NOTE - The isolator key will only t in one orientation.
The isolator key needs to be tted for the product to operate.
To remove, grip the isolator key and pull upwards.
The isolator key will automatically detach if the battery handle is lifted
IMPORTANT : to prevent accidental starting always remove the isolator
key and battery before carrying out any adjustment or maintenance on the
product.
Gtech helpline : 0870 7944001 email: support@greytechnology.co.uk
Page 12

Cutting height adjustment
CAUTION : remove the isolator key and battery before adjusting the height.
It is recommended that the height is adjusted on a at surface
Removing the grass bin will allow easier adjusment.
The mower has 5 height positions. To prevent overloading the mower when cutting long,
thick grass it is recommended to make one cut at the highest height setting, then another
cut at a lower setiing.
To adjust the height setting:
Loosen the large knob on each side of the mower
Unscrew the knob for 5 turns. It is not necessary to remove the knob.
Pull the lock piece towards the knob. The bin support is now free to move to the required
height setting.
Slide the bin support to the required height setting. Release the lock piece and ensure that
it engages into a recess in the side of the mower.
Tighten the knob to secure the lock piece and bin support in position.
Check that the roller is level and at the same height position on each side.
Low cut height
for short, dry grass
High cut height
for long, thick, or
wet grass
Gtech helpline : 0870 7944001 email: support@greytechnology.co.uk
Page 13

Blade cutting adjustment and lubrication
CAUTION : remove the isolator key and
battery before adjusting the blade.
The blade can be adjusted to ensure a clean cut
when mowing.
To adust the blade tighten the two nuts on the
blade shield.
The cutting cylinder should just touch the blade.
CAUTION : do not over tighten the blade.
To check for correct adjustment insert a piece
of paper between the cutting cylinder and the
straight blade.
Check with a piece of paper at each end of the
blade to ensure correct adjustment along the
length of the blade.
When the cutting cylinder is turned by hand the
paper should be cut cleanly.
If the paper is not cut then gradually tighten the
nuts until the paper can be cut cleanly.
To maintain maximum run time and smooth, efcient cutting performance, an oil or spray
lubricant can be applied to the edge of the straight blade and the shaft bearings.
Gtech helpline : 0870 7944001 email: support@greytechnology.co.uk
Paper
Straight blade
Cutting
cylinder
Page 14

Using your mower
The handle is designed with a safety button to prevent accidental starting.
To start the mower:
Ensure the battery and isolator key are tted.
Press and hold the safety button located on
top of the handle, then pull the operating lever
towards the upper handle.
Continue holding the operating lever and release
the safety button.
The mower will be on for as long as the operating
lever is being pulled.
To stop the mower:
Release the operating lever to stop the mower
WARNING : the blades continue to rotate for a few seconds after the mower
is switched off.
Wait for the blades to stop turning before clearing any grass or putting your
hands near the blades!
Mowing
Caution : remove any stones, loose debris and other objects from cutting
area.
Check to see if the grass is very long, thick, or wet. In these conditions make a rst cut with
a high cutting height, then a second cut with a lower height setting.
When cutting move slowly and steadily along the line of cut. Do not overload the mower.
Attempting to force the mower to cut may damage the motor.
Push the mower more slowly when cutting thick, long, or wet grass.
The area of cut (battery duration) depends on the lawn conditions, grass thickness, grass
length, moisture content, and height of cut.
For the maximum area of cut (battery duration) it is recommended to cut the lawn more
frequently, mow in dry conditions, select a high cutting height, and walk at normal speed.
Start mowing around the edges of the area to be mowed, then cut the centre area in
stripes.
Before removing the grass bin for emptying release the operation lever and wait for the
blades to stop turning.
Safety
button
Operating
lever
Gtech helpline : 0870 7944001 email: support@greytechnology.co.uk
Page 15

Reset Button
The mower is tted with a protective cut-out.
This will stop the mower if the motor becomes overloaded or if the blades
become jammed.
Cutting long, thick, or wet grass could overload the mower and cause the
blade to stall.
Should the blade become jammed, the reset button will raise up above the surface of the
housing and the cut-out function will operate.
To re-start the mower wait for a few seconds then press the reset button so that it is level
with the surface of the housing.
If the cut-out continues to operate then the following actions are recommended:
1) Do not force the mower to cut in thick or wet grass as this can overload the
motor.
2) Adjust the cutting height to a higher setting. Take a rst cut then make a second
cut with a lower height setting.
3) Push the mower more slowly.
4) Check the blade is correctly adjusted so the grass is being cut cleanly.
5) Clean the blades and remove any grass or objects that may be causing the
mower to stall
Normal use
Cut-out operated.
Reset button raised.
Press to reset and
re-start mower.
Gtech helpline : 0870 7944001 email: support@greytechnology.co.uk
Page 16

Care and maintenance
CAUTION : Remove the Isolator key and Battery before carrying out any
maintenance.
Do not accidentally turn the unit on while cleaning it.
To ensure long and reliable service, carry out the following maintenance
regularly:
Clean inside the mower after use. Remove any grass, dirt or debris from around the blade
and guards using a suitable wooden or plastic tool.
Wipe clean with a dry cloth or soft brush. Do not use water, solvents, polishes, or abrasive
materials to clean the mower. Do not immerse in water
Before use, check for obvious defects such as loose, dislodged, worn or damaged parts. If
necessary carry out any repairs before using the mower again.
Check that covers and guards are correctly tted and undamaged.
Before use, visually check the condition of the cutting blade.
Don’t use on concrete, tar macadam or other rough surfaces.
Don’t pick up pieces of string, stones or fabrics with the unit.
Beware of raised areas such as paving stones or manhole covers that can damage the
blades.
Always charge the battery after use, and every 3 months if stored for a long period of time.
Store in a dry place. Do not expose to moisture.
Apply oil or spray lubricant to the straight blade and bearings.
Do not place any objects on top of the unit when stored.
For storage in conned spaces the handles can be removed from the mower
Dis-connect the power cord and ex the lower handles to remove from the frame locating
lugs
If the product needs to be repaired or replaced only use parts which
are approved by the manufacturer.
Replacement batteries can be purchased from Grey Technology.
Tel : 0870 7944001 www.greytechnology.co.uk
Gtech helpline : 0870 7944001 email: support@greytechnology.co.uk
Page 17

Troubleshooting
PROBLEM POSSIBLE REASON POSSIBLE SOLUTION
Mower fails to start
1. Battery at
2. Isolator key not tted
3. Displaced battery contacts
4. Protective cut-out operated
5. Faulty switch
1. Recharge battery
2. Check isolator key is correctly
tted and fully pushed down
3.
4. Press reset button down
5. Listen for ‘click’ when switch lever is pulled ‘ON’ If no ‘click’ then
call customer service helpline
Does not cut grass
1. Poor blade adjustment
1. Tighten blade - see blade cut-
ting adjustment
Stalls frequently
1. Poor blade adjustment
2. Grass caught around blades
1. Tighten blade - see blade cut-
ting adjustment
2. Remove any grass or debris
that may be jamming the blade.
Cutting time low
1. Battery at
2. Blade too tight or dirty
3. Guard has build up of debris
4. Grass thick, long, or wet.
5. Cutting height too low.
1. Recharge battery for 16 hours
2a. Adjust blade
2b. Clean blade
2c. Oil blade and bearings
3. Clean guard
4. Adjust to higher cut height, wait
for dry conditions.
5. Set to higher cut height
Reset button operates
frequently
1. Motor overloaded
2. Blade jammed
1. Adjust cutting height to a higher
setting and take a lighter cut
2. Push the mower more slowly
3. Check blade is correctly ad-
justed so grass is cut cleanly
4. Remove any grass or debris
that may be jamming the blade.
Reset button does not
push back down
1. Faulty reset switch 1. Call customer service helpline
Battery at and will not
recharge
1. Faulty charger
2. Battery stored for long time without being charged
1a. If the charger does not get
warm then charger has fault. Call
customer service helpline
1b. If charger gets warm then fault
with battery. Call customer service
helpline
2. Replacement battery
Excessive noise
1. Blade and bearing require lubrica-
tion
2. Gears require lubrication
1. Apply oil or lubricating spray to
blade and bearings
2. Call customer service helpline
Motor works but blades
do not turn
1. Broken drive belt 1. Call customer service helpline
For further help or assistance please contact the Gtech helpline.
Tel : 0870 7944001 email: support@greytechnology.co.uk
Gtech helpline : 0870 7944001 email: support@greytechnology.co.uk
Page 18

Unit operating time with full battery 45 minutes*
Cutting Width 30cm
Battery type 12.0V DC, 7.0Ah, Lead acid (Pb)
Rated input power 180W
Charging period for fully discharged battery 16 hours
Charger output 12Vdc 500mA
Charger input 230-240V ~ 50Hz
Sound pressure level 80dB
Measured sound power level, LpA,d 95dB(A)
Guaranteed sound power level, LwA,d 95dB(A)
Vibration level 3.0m/s
2
Weight 12Kg
*depending on grass length & thickness.
The symbol indicates that this product is covered by legislation for waste electrical and
electronic products (EN2002/96/EC)
When the product has reached the end of its life please do not dispose of it with general
household waste. Consider the environment and take it to a recognised recycling facility.
Call your local council, civic amenity site, or recycling centre for information on the disposal
and recycling of electrical products.
Alternatively visit www.recycle-more.co.uk for advice on
recycling and to nd your nearest recycling facilities.
Battery Disposal
The product contains a Lead acid (Pb) battery which should not be disposed of with
general household waste. At the end of the product’s or battery’s life the battery pack
should be removed from the product and be disposed of properly at a recycling facility.
For safety we do not recommend to dis-assemble and remove the battery from the battery
pack, and this should only be carried out by a professional or technically competent
person. It is recommended to dispose of the complete battery pack at a recognised
recycling facility.
Environmental and Product Recycling
WARNING : ONLY USE THE CHARGER PROVIDED WITH THE PRODUCT.
USING ANY OTHER CHARGER MAY DAMAGE THE PRODUCT AND THE
BATTERY.
Technical specication CM01
Gtech helpline : 0870 7944001 email: support@greytechnology.co.uk
Page 19

Warranty information
Grey Technology has provided the CM01 Cordless Cylinder Mower with a 12
month guarantee.
IN GUARANTEE: Please retain your receipt as proof of purchase. In the rare and
unfortunate event of your Gtech product being faulty, please accept our apologies
and we will aim to remedy the problem as fast as possible once brought to our
attention. However please be aware that due to company policy Grey Technology
can only repair or replace all or part of the product if proof of purchase is provided
and the claim is made within 12 months of the purchase date.
If your product is within the 12 months warranty period you should either return
this product with its receipt to the retailers where the product was purchased or
if a simple part or advice is required ring the Gtech customer services line where
will be more than happy to assist.
Please note: Gtech can not refund any monies if the product was brought from a
third party.
We would like to remind our customers that the Gtech guarantee does not cover
any unauthorised repairs and will be annulled:
1. If it has been damaged due to incorrect use or maintenance.
2. If any part is modied or replaced or if it is used in any way that is not recommended by Gtech.
3. If it is used with any parts not produced or not recommended by Gtech.
4. If it is used for purposes other than those specied by Gtech.
Please note: the battery is a consumable item and is not covered by the 12
month guarantee.
If after reading the manual and following the instructions you are sure that the
product is defective please call the Gtech customer service helpline on 0870
7944001. A customer service advisor will be on hand to deal with any problems
you have with our product. To assist them please be ready with the product, a
detailed description of the problem, and your proof of purchase.
OUT OF GUARANTEE: If your Gtech product is over 12 month old and you need
any parts or advice then please contact our customer services department. Parts
will be sent out usually within 3 weeks of request.
WARNING: only use the charger supplied with the product. Using another charger
may damage the product and the battery and will invalidate your guarantee.
Gtech helpline : 0870 7944001 email: support@greytechnology.co.uk
Page 20

Grey Technology Ltd
Units 1&2 Cupola Court
Spetchley
Worcester
WR5 1RL
Tel: 0870 7944001
www.greytechnology.co.uk
© Copyright Grey Technology Ltd 2008
EC Declaration of Conformity
We, manufacturer/importer
Grey Technology Ltd
Units 1&2 Cupola Court
Worcester
WR5 1RL
declare that the product
CM01 Cordless Cylinder Lawn Mower
complies with the essential health and safety requirements of the following directives:
2004/108/EC - EMC Directive.
98/37 EEC - Machinery Directive
73/23 EEC - Low Voltage Directive
93/68 EEC - CE Marking Directive
2000/14/EC - Noise emission in the environment by equipment for use outdoors Directive.
- Conformity assessment procedure as per ANNEX VI.
- Measured Sound Power Level = 95 dB(A)
- Declared Guaranteed Sound Power Level = 95 dB(A)
- Notied Body: Intertek Testing & Cercation Ltd, Davy Avenue, Knowlhill,
Milton Keynes, MK5 8NL
Technical documentation holder: Grey Technology Ltd, WR5 1RL
Standards and technical specications referred to:
EN60335-1
EN50338
EN50366
EN ISO 3744
ISO 11094
EN55014-1
EN55014-2
EN61000-3-2
EN61000-3-3
 Loading...