


User Manual
GTECH104 - 3G, Voice, Video, WIFI Phone

2 | P a g e
Preface
Copyright GAP Technology Pty Ltd. All rights reserved.
No part of this document may be reproduced or transmitted in any form or by any means without prior written consent of
GAP Technology Pty Ltd.
The product described in this manual may include copyrighted software of GAP Technology Pty Ltd and possible licensors.
Customers shall not in any manner reproduce, distribute, modify, decompile, disassemble, decrypt, extract, reverse
engineer, lease, assign, or sublicense the said software, unless such restrictions are prohibited by applicable laws or such
actions are approved by respective copyright holders under licenses.
Notice
Some features of the product and its accessories described herein rely on the software installed, capacities and settings of
local network, and may not be activated or may be limited by local network operators or network service providers, thus
the descriptions herein may not exactly match the
Product or its accessories you purchase. GAP Technology Pty Ltd reserves the right to change or modify any information or
specifications contained in this manual without prior notice or obligation.
NO WARRANTY
THE CONTENTS OF THIS MANUAL ARE PROVIDED “AS IS”. EXCEPT AS REQUIRED BY
APPLICABLE LAWS, NO WARRANTIES OF ANY KIND, EITHER EXPRESS OR IMPLIED,
INCLUDING BUT NOT LIMITED TO, THE IMPLIED WARRANTIES OF MERCHANTABILITY AND FITNESS FOR A PARTICULAR
PURPOSE, ARE MADE IN RELATION TO THE ACCURACY, RELIABILITY OR CONTENTS OF THIS MANUAL.
TO THE MAXIMUM EXTENT PERMITTED BY APPLICABLE LAW, IN NO CASE SHALL GAP TECHNOLOGY PTY LTD BE LIABLE FOR
ANY SPECIAL, INCIDENTAL, INDIRECT, OR CONSEQUENTIAL DAMAGES, OR LOST PROFITS, BUSINESS, REVENUE, DATA,
GOODWILL OR ANTICIPATED SAVINGS.
Import and Export Regulations
Customers shall comply with all applicable export or import laws and regulations and will obtain all necessary
governmental permits and licenses in order to export, re-export or import the product mentioned in this manual including
the software and technical data therein.
IMPORTANT NOTICE
The GTECH Wireless Broadband Business System is not a mobile phone. As such please note the following in relation to
the operation of the equipment.
1. In accordance with Australian and International regulatory standards, the user should operate the device whilst
remaining a distance of 25 cm from the main phone unit.
2. This product has been designed to receive incoming and make outgoing calls on a GSM network, and whilst it
operates in a similar manner to a mobile phone certain functions such as SMS Alphanumeric address is not
available.

3 | P a g e
Table of Contents
Introduction 4 - 8
Setup 9 - 10
Making Calls 11
Messaging 12
Settings 13
Data Service 14 - 21
FAQ’s 22
Legal & Regulatory Information 23 - 24
4 | P a g e
1. Introduction
Introduction to your GTECH104
Welcome
Congratulations on your new purchase. Before you start using your GTECH104, make sure the On/Off switch is in the Off
position. Do not turn on the phone until the following has been completed.
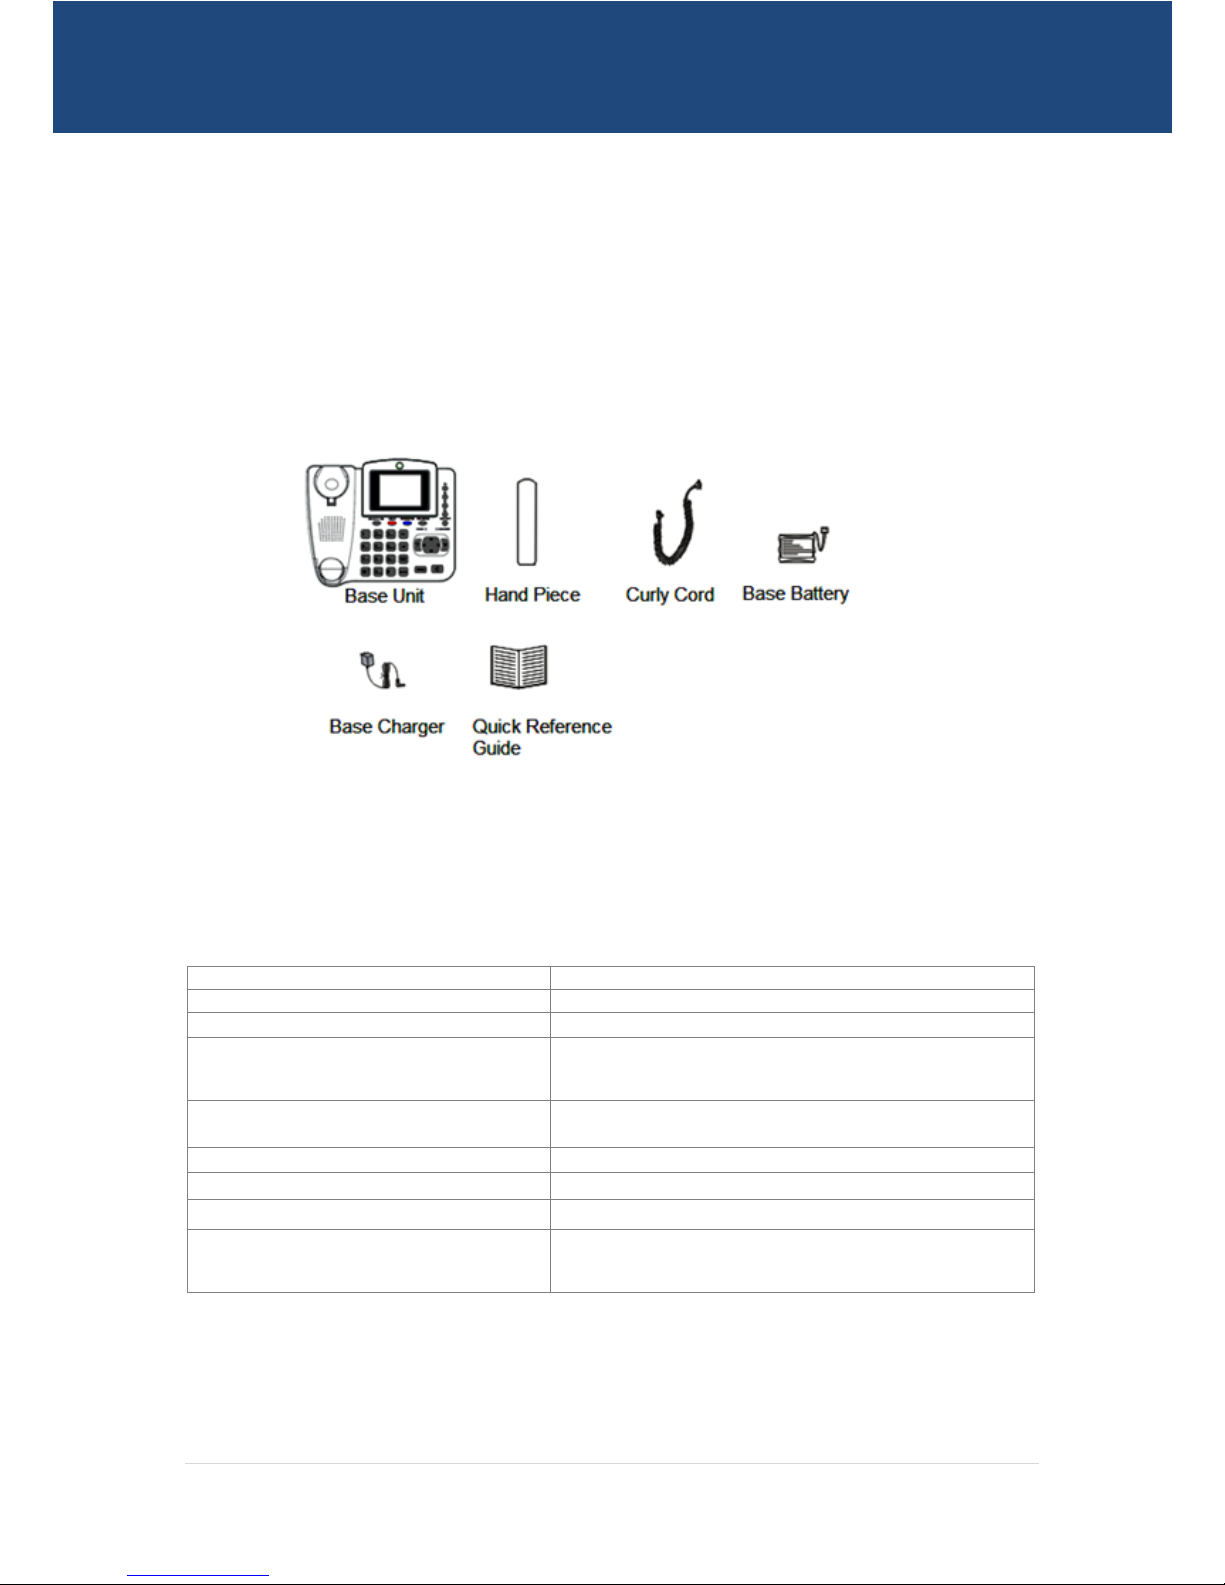
Getting Started
Check the contents of the box, you should have the following.
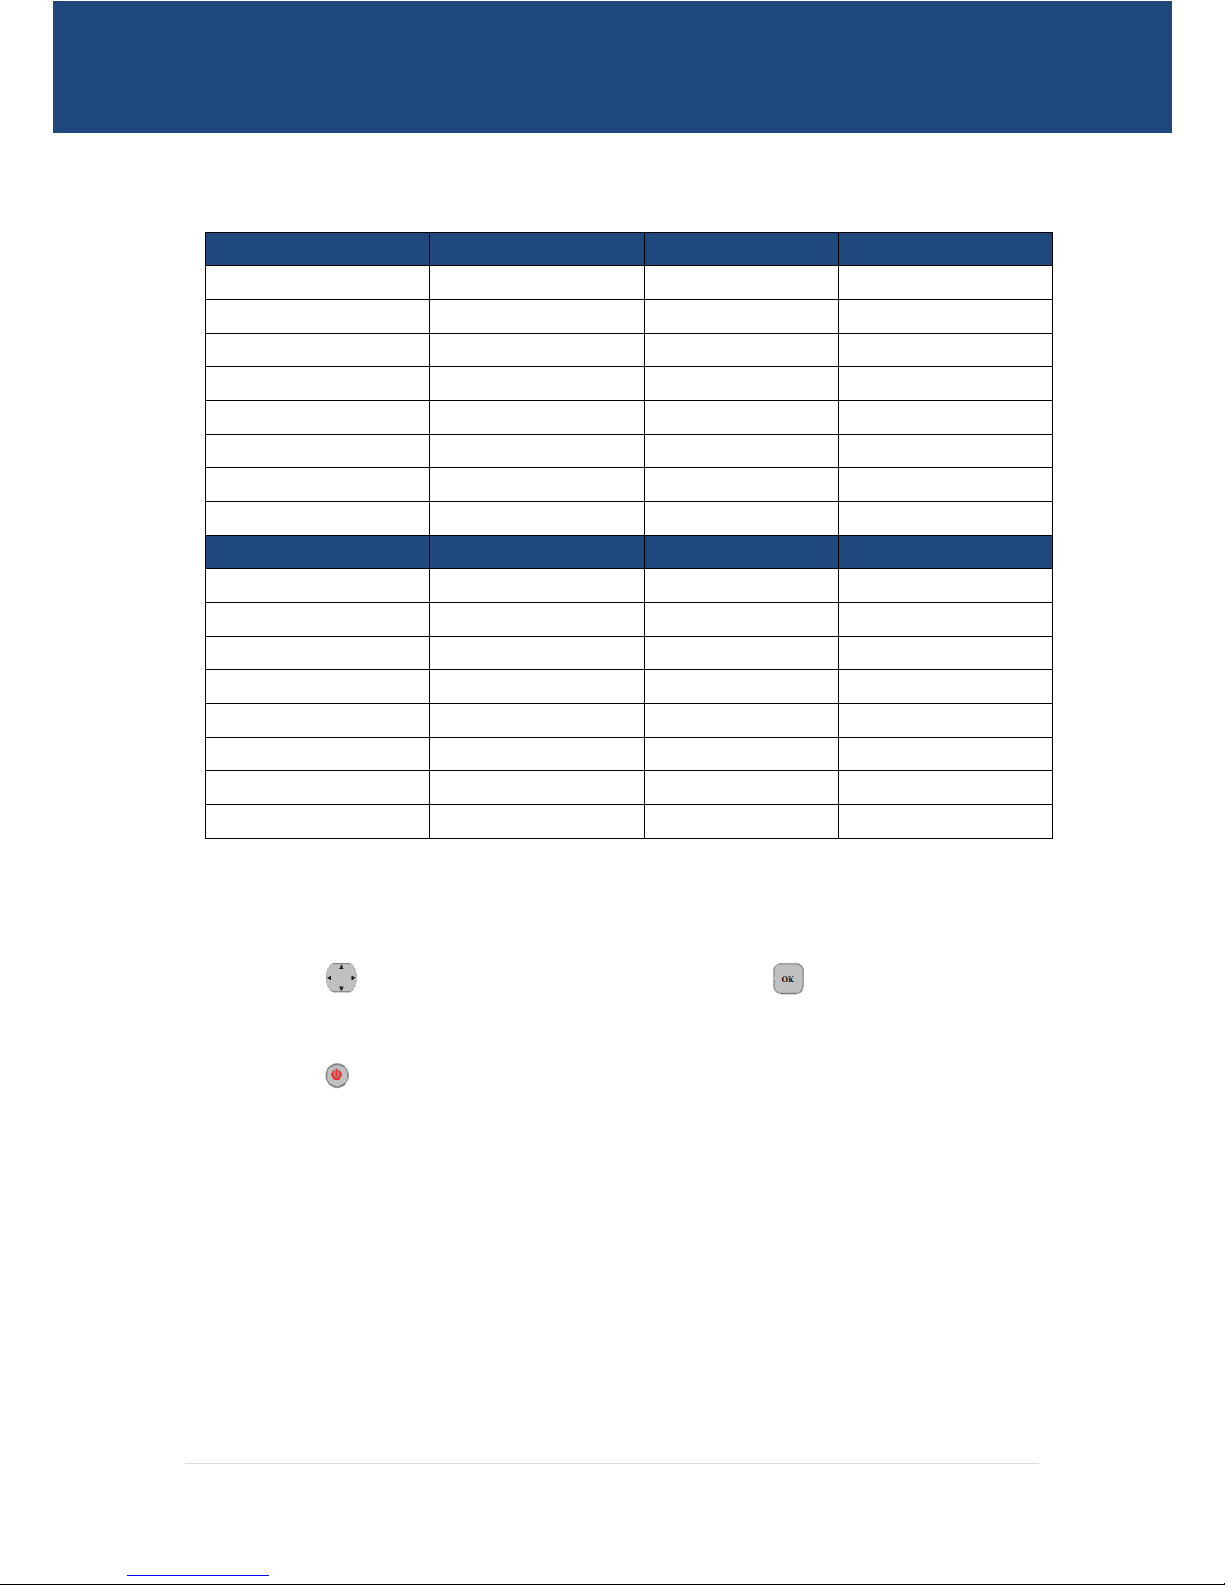
Technical Information
Dimensions (W x D x H)
230mm x 190mm x 75mm
Weight
1.2Kg
Mounting Mode
Desktop or Wall Mounted
Input Voltage
AC: 100 – 240V 50-60Hz 0.25A
Output: 5V AC, 1000mA
Standby Time: 48Hrs Talk Time: 3Hrs
Battery
Type: Li-ion
Voltage:5V Capacity :1000mAh
Ambient Temperature
- l0°C - 60°C
Storage Temperature
-20°C - 80°C
Relative Humidity
5% - 95%
Working Frequency
UTMS (850 or 900)/1900/2100 Mhz
GSM 850/900/1800/1900
5 | P a g e
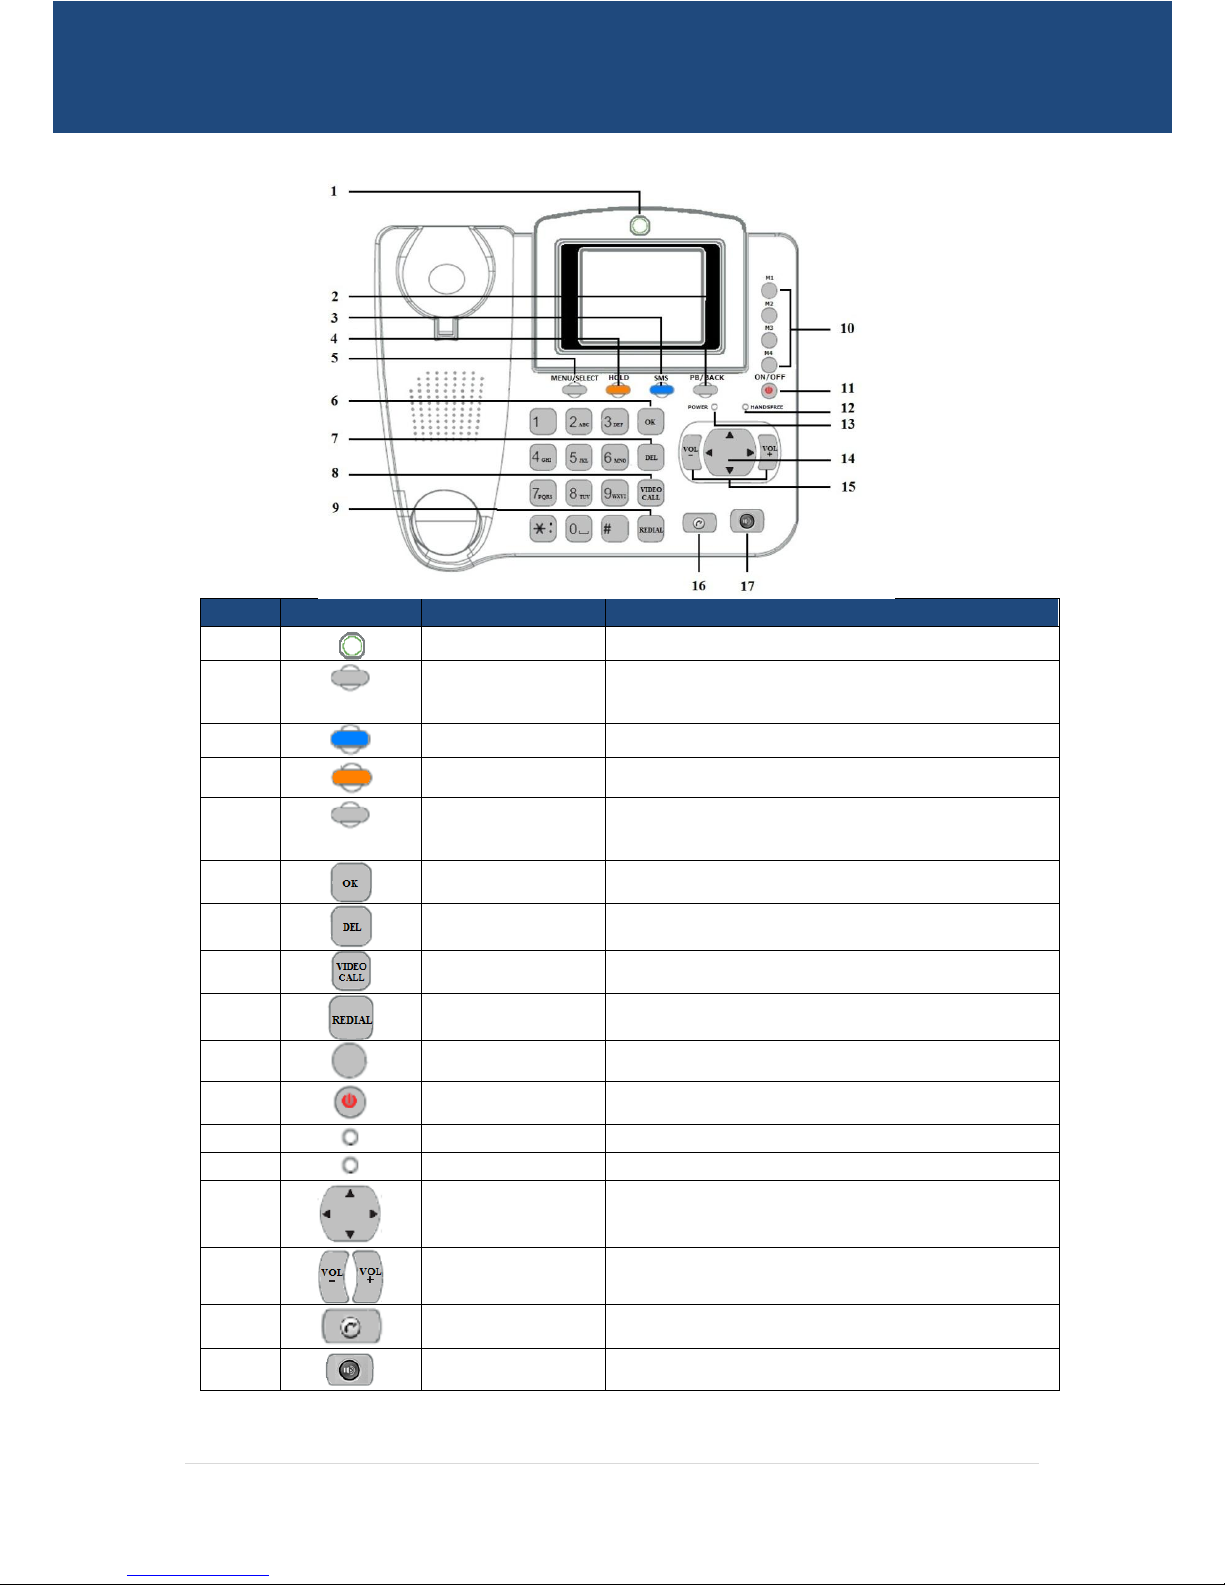
Front View
No Item
Description
1
Camera
2
P.B/Back
Access Contacts/Phonebook in standby mode
Select option displayed in the lower right hand corner of the
screen.
3
SMS
Access the Messages menu
4
Hold
Place a call on Hold.
5
Menu/Select
Access the Main Menu in standby mode.
Select option displayed in the lower left hand corner of the
screen.
6
Ok
Select option displayed in the lower right hand corner of the
screen.
7
Del
In SMS edit mode, deletes the character before the cursor.
8
Video Call
Make a Video Call.
9
Redial
Redial the last number called.
10
Shortcut Keys
Speed dial a phone number.
11
On/Off
Turn the phone On or Off.
12
Hands free Indicator
Indicates if a call is being made or received hands free.
13
Power Indicator
Indicates if the power adapter is plugged in.
14
Scroll Key
Scroll to access Menu and Sub Menus
15
Volume Keys
Adjust the volume during a call.
16
Send
Initiate a dial.
17
Speaker
Make or receive a call without lifting the hand piece.
6 | P a g e
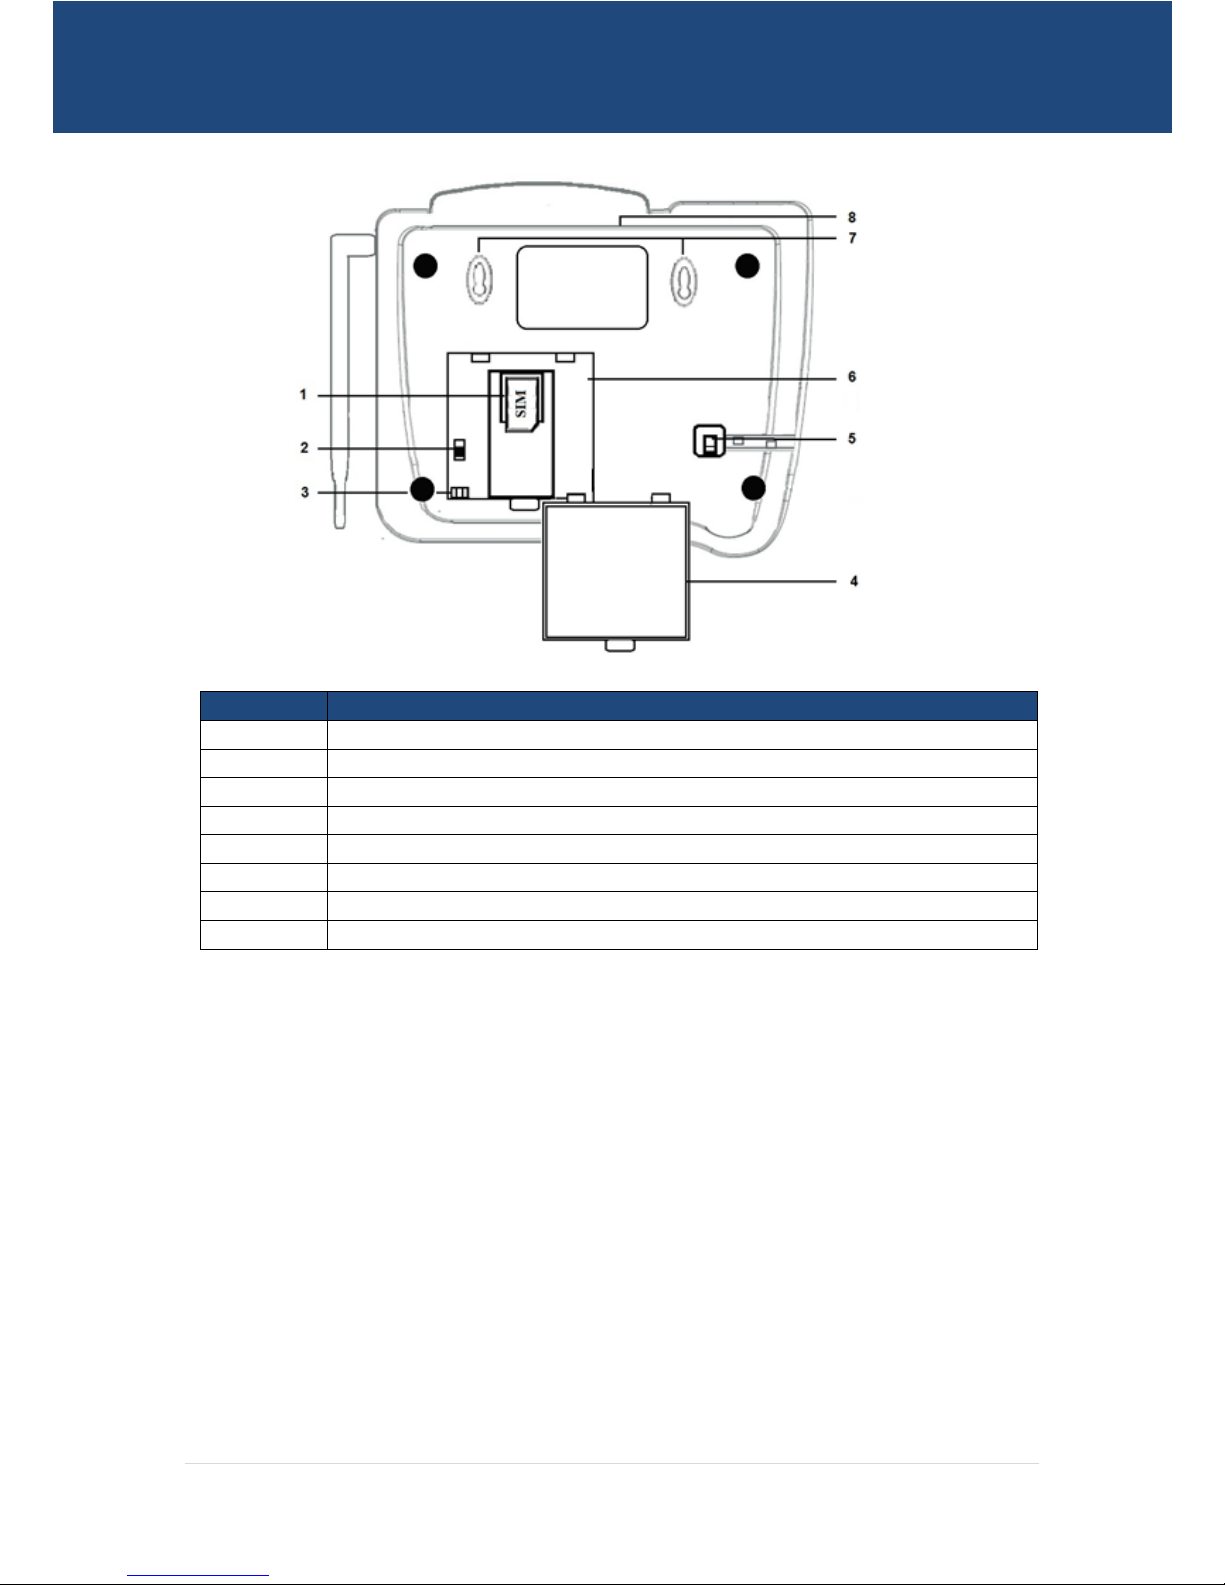
Base View
No
Item
1
SIM Card Slot
2
On/Off
3
Battery Connector
4
Battery/SIM Card Cover
5
Hand Piece Jack (Connection)
6
Battery Container
7
Wall Mount Brackets
8
Power Jack (Connection)
7 | P a g e
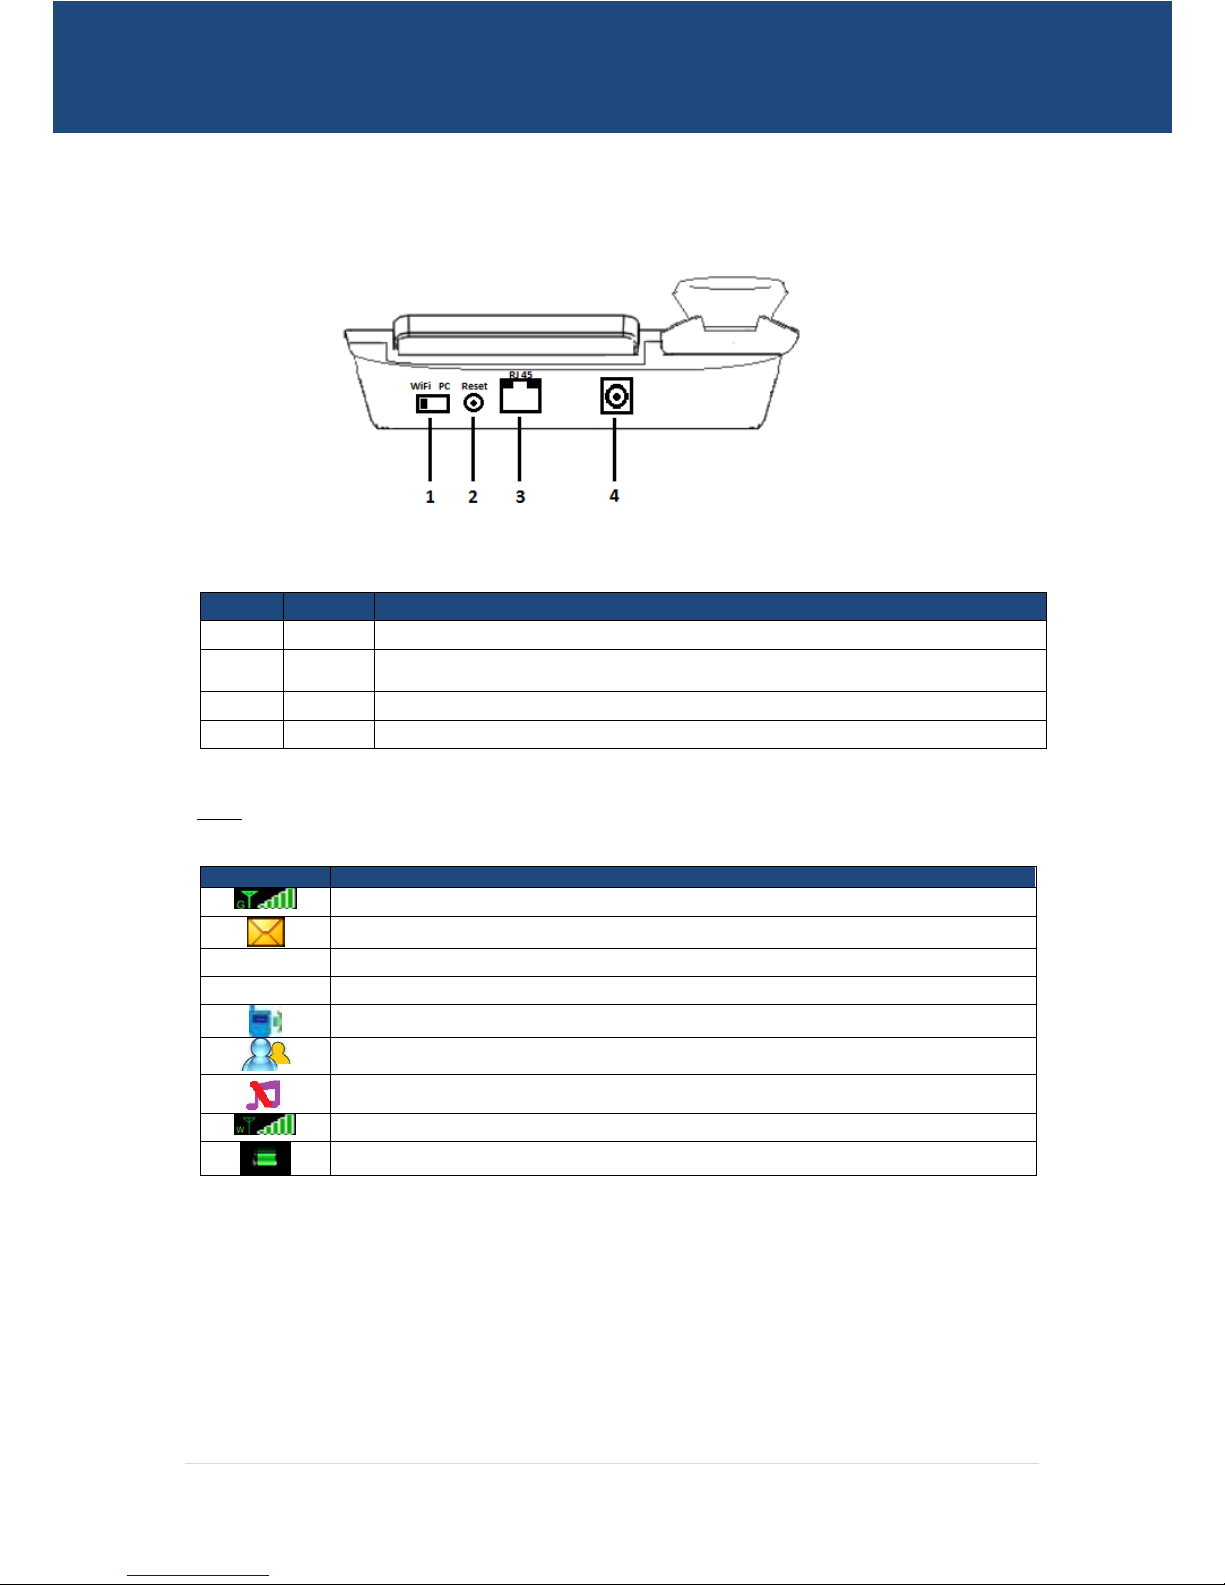
Back View
No
Item
Description
1
3G/LAN
Switchable between 3G and LAN Access via Ethernet Port
2
Reset
Hold this button down for over 10 seconds to reset to factory defaults.
Hold and release this button for less than 10 seconds to soft reset.
3
LAN/WAN
Switchable LAN/ WAN Ethernet port for Fixed Line (ADSL/Cable/Satellite) connection
4
Power
Power Jack, connects to a DC 5V 2A Power Adapter.
Icons
Icons
Description
Network Signal Strength
Message Received
Voice Mail Received
Missed Call
Standard Profile
Meeting Profile
Silent Profile
3G Network
Battery Power Level
8 | P a g e
Menu Tree
Using the Menu
1. In Standby mode, press the Menu/Select key to display the main menu.
2. Press the scroll key to move around the menu options, and press the key to select items.
3. If the menu contains submenus, repeat Step 2.
4. Follow the prompts on the screen to select desired function.
5. Press the P.B./BACK key to return the previous menu.
6. Press the key to return to standby mode.
Profile
Tools
Call Log
Messages
Standard
Alarm
Missed Calls
New
Meeting
Calculator
Outgoing Calls
Inbox
Silent
World Time
Incoming Calls
Outbox
New Profile
Browser
All Calls
Sent Calendar
Data Transmission
Drafts
Call Duration
Cell Broadcast
Templates
Settings
Contacts
Settings
All
Display Settings
Group
Phone Settings
Call Settings
Network Settings
Security Settings
Connection Settings
Memory Status
Reset Settings

9 | P a g e
2. Basic Setup
WARNING!!!!! IMPORTANT INFORMATION ON SAFE AND EFFICIENT OPERATION OF THE GTECH104, PLEASE READ AND
COMPLY WITH THE FOLLOWING INFORMATION BEFORE USING YOUR PHONE.
Please note, failure to follow the following steps can result in damage to the phone and therefore void any warranty on the
product.
Handset Connection
Connect the hand piece to the handset connection located on the base of the phone as shown in the following
figure.
Installing SIM
WARNING!!!!! The SIM card and its golden contact can be easily damaged by a scratch or bend. Be careful when installing
or removing the SIM card.
Power off the device and remove the power supply cable. Install the SIM card according to the following figure. Make sure
that the golden contact on the SIM card is facing downwards.

10 | P a g e
Installing the Battery
Warning: New batteries for the units are shipped partially charged. Before you start using the GTECH104, you will need
to charge the batteries for at least 12 – 16 hrs.
Power off the device and remove the power supply cable. Install the battery according to the following figure. Make sure
you clip the pins into the connecter correctly
External Power Adapter
Insert the power adapter into the power jack labeled DC 5V, and plug it into a power source.
Turning the phone On
Press and hold the key for 5 seconds to turn the phone on, the display lights up, and the phone is now on.
Turning the phone Off
Press and hold the key for 5 seconds to turn the phone off, the display goes off, and the phone is now off.

11 | P a g e
3. Making Calls
Making a Voice Call
Pick up the hand piece and dial the number. Press , or wait 3 seconds for the call to connect.
Making a Video Call
Pick up the hand piece and dial the number. Press to initiate a video call. Note: Video Calls can only be made between
two GTECH104 devices, and provided a 3G service is available.
Answering a Call / Ending a Call
Pick up the hand piece to receive the call. Hang up the hand piece to end the call.
Redial
Pick up the hand piece and press the key to dial the last number.
Handset Receiver Volume
During a call, you can adjust the volume by pressing the key adjust accordingly.
Speakerphone Calls
Making a call using the Speakerphone
Press the key and dial the number, press , or wait 3 seconds for the call to connect.
Receiving a call using Speakerphone
Press the key for the call to be transferred to the loudspeaker. To switch the Speakerphone off, and return to the
hand piece at any time, pick up the hand piece.
Putting a Call on Hold
To place an active call on hold, press the button. Press the button again, to return to the call.

12 | P a g e
4. Messaging
Input Modes
Note:
Press the * key to display a list of Symbols.
Press the # key to switch between input modes and or language (ABC, abc, 123, preABC, preabc)
Press the key to Delete, the character in front of the cursor.
Press the “0” key to insert a space.
Predictive Text
Press each key with the desired letter once, and the predictive text will present you with available words.
Traditional Input Method
Press the # Key to select either Upper Case or Lower Case mode, and then press the key with the desired letter repeatedly
till the letter appears on the screen.
“123” Numeric Input Method
In Edit mode, press and hold the key with the desired number till it appears on the screen.
Symbol Input Method
In Edit mode, press the * key to display a list of symbols. Use the scroll key to scroll through the list of symbols, and
press the key to select the one you want.
Inputting Different Languages
Press the # Key to select the language. Press each key with the desired letter once, and the predictive text will present you
with available words.
Creating a Message
1. Select Messages > New and press the key to start writing a message.
2. Use the keypad to enter the message.
3. In the message editing screen, select Options to perform the operations in the operation list.
4. After editing the message, press the key to add a recipient’s number.
5. Press the key to send the message.
Viewing a Message
1. Select Menu > Messages > Inbox.
2. Press the scroll key to scroll through the messages.
3. Press the key to view the selected message.
4. Select Options (Menu/Select) to Reply, Delete, Call, Extract, or Move to Mobile.

13 | P a g e
5. Settings
Display Settings
Allows you to adjust what’s displayed on the screen when the phone is in idle mode, the backlight time, and the brightness
of the screen.
Phone Settings
Allows you to adjust the Date and Time.
Call Settings
The GTECH104 supports a number of call features for supplementary services such as Call Waiting, Call Forwarding and Call
Barring. Note: This applies to both Voice and Video calls.
Call Waiting
Call waiting allows for indication and answering of an incoming telephone whilst an existing call is underway.
Note: The Call Waiting feature will automatically turn off if you enable Call forwarding. Call Waiting will need to be enabled again after Call Forwarding is
disabled.
Call Divert/Forwarding (All Calls)
Call forwarding all calls, will divert all incoming calls to either voicemail or a phone number that you desire.
Call Divert/Forwarding (No Answer)
Call forwarding No Answer will divert all incoming calls to either voicemail or a phone number that you desire only if the
incoming call is not answered.
Call Divert/Forwarding (If Busy)
Call forwarding busy will divert all incoming calls to either voicemail or a phone number that you desire only if your
telephone is busy on another call.
Call Divert/Forwarding (If Not Available)
Call forwarding busy will divert all incoming calls to either voicemail or a phone number that you desire only if your
telephone is unreachable by the network.
Cancel All
Cancels all forwarding/diversion.
Network Settings
Allows you to choose a network mode (i.e. 3G or GSM), set a preferred network, and set the search mode to either Auto or
Manual.
Security Settings
Allows you to lock the phone, using a PIN or Password.
Connection Settings
Allows you set the Access Point Name (APN) for the particular network you are connected to.
Reset Settings
Resets the GTECH104 to its default settings.

14 | P a g e
6. Data Service (Accessing the Internet)
Connect via USB
Setting Up a Mobile Broadband Connection via USB
Your GTECH104 allows you to connect your computer to the internet over the 3G mobile network.
System Requirements
To use the GTECH104 and the Mobile Connect Software, you need :
A computer running Microsoft Windows XP or 2000.
At least 100 MB free disk space and 256 MB RAM
A USB socket
Administration rights on your computer
Start by connecting the supplied USB cable to your Phone and PC.
The first time you connect the GTECH104 to your PC, the phone will display “Dial up”, press the key, and the software
setup should start automatically.
On your PC, Select English from the dropdown box, and click the OK button to proceed.
Click the Next button to procced.

15 | P a g e
Leave the destination folder as default, and click the Next button to proceed.
Click the Next button to proceed.
Click the Install button to start the installation.

16 | P a g e
Click the Finish button to complete the installation. You are now ready to Browse the Internet.
Note: You may need to unplug and re-plug the USB from the phone for the device to be recognized by the Mobile
Connect Software.
Click Connect in the Mobile Connect Panel, this will enable access across the mobile phone network.

17 | P a g e
Connect via WiFi
Setting Up a Mobile Broadband WiFi Connection
Your GTECH104 allows you to connect your computer via a WiFi hotspot to get internet access over the 3G mobile
network.
System Requirements
To use the GTECH104 and the WiFi Connectivity, you need :
A computer running Microsoft Windows XP or 2000.
A computer with built-in wireless networking support or a wireless network adapter
Make sure that the supplied power adapter (5V) is plugged into the back of the unit, as it needs minimum current
for the WIFI to work.
Default Settings
LAN Management
Static IP Address:
192.168.1.1
Subnet Mask :
255.255.255.0
Default Gateway :
192.168.1.1
WAN Internet
WAN Mode:
DHCP
Wireless
SSID:
192.168.1.1
Security :
WPA-PSK
Security Key :
12345678
Interface Access
Username:
admin
Password :
admin

18 | P a g e
First Time Simple Configuration Wizard
1. Ensure the WiFi is enabled on your device (PC/Smartphone/gaming console)
2. Scan for wireless networks in your area and connect to the network labelled “3GRouter” or “TFnet-Wifi Router”
3. After establishing a wireless connection, open your Web browser and type in http://192.168.1.1 into the address bar
at the top of the web browser window and press “Enter”
You will be prompted with a popup window, requesting a Username and Password.
4. Enter admin as the username, and the password as 12345678, and click OK to continue.
The following web page will be displayed when you log in successfully.

19 | P a g e
5. Click the “Wizard” option on the top left hand corner of the screen and click Next to continue.
6. Select your Time Zone, and click Next to continue.
7. Select 3G Mode as your WAN Mode.

20 | P a g e
8. Click “Operator Info”, to select the 3G service details, or manually enter details supplied by your 3G service provider.
Make sure it is correct before clicking Next to continue.
9. Keep the default LAN settings and click Next to continue.
10. Enter a new SSID under Network Name, and click Next to continue.

21 | P a g e
11. Enter a wireless Security Password to protect your wireless connection from any unauthorized access. Click Finish
when done, the 3G Router will now reboot to register settings. Wait for a few minutes before attempting to connect
to it again.

22 | P a g e
7. FAQ’s
1. I cannot seem to access the web page interface.
The default IP address of the unit is 192.168.1.1, so first try to open a web browser to this address. Make sure an
established WIFI connection exists, and your laptop/PC is on the same subnet as the router.
2. The GTECH104 was connected to the Internet, but cannot get back on.
Press and hold the Reset button for less than 5 seconds for a soft reset, if the problem persists, unplug the power
adapter, and turn the phone Off/On (Refer to Base View instructions)
3. I cannot seem to get a 3G WAN connection.
Click on the 3G Internet Settings link on the webpage interface and check that the correct APN settings are entered.
• Also check that the username and password credentials are correct if the APN in use requires these.
4. I have replaced the SIM in the unit, but can’t get access to the Internet.
Click on the 3G Internet Settings link on the webpage interface and check that the correct APN settings are entered.
• Also check that the username and password credentials are correct if the APN in use requires these.
• If the problem still persists, Press and hold the Reset button for 10 seconds for a hard reset, this will set the
GTECH104 back to its default settings. Follow the instructions labeled “First Time Simple Configuration Wizard” , to
setup the GTECH104 again.
5. I can’t seem to setup data access via the USB connection.
Make sure that your PC has the appropriate operating system installed (Microsoft Windows XP or 2000). If the auto
install dosen’t run, you might might have to locate the software manually on the device and run the install. If the
problem persists, contact your local support centre.

23 | P a g e
8. Legal & Regulatory Information
IMPORTANT INFORMATION ON SAFE AND EFFICIENT OPERATION, READ THIS INFORMATION BEFORE USING
YOUR PHONE.
Safety
Exposure to Radio Frequency (RF) Energy
Your phone contains a transmitter and a receiver. When it is ON, it receives and transmits RF energy. When you
communicate with your phone, the system handling your call controls the power level at which your phone transmits.
RF Energy Interference/Compatibility
Nearly every electronic device is susceptible to RF energy interference from external sources if inadequately shielded,
designed, or otherwise configured for RF energy compatibility. In some instances your phone may cause interference.
Medical Devices
Radio signals transmitted from the unit may cause interference to hearing aids.
It is recommended that if you have a pacemaker fitted you check with a medical expert before using this product.
Other
Radio signals transmitted from the unit may cause interference to electrical equipment, such as TV’s, Microwave,
Computer’s etc. It is recommended that the unit be placed at least one meter away from such appliances.
Cleaning
Make sure the unit is off and the charger is not plugged in before cleaning the unit.
Use a damp cloth or anti-static wipe to clean. Never use household polish as this may damage the product and could
void warranty.
Environmental
Only use the power supply suitable for the GTECH range. Using an unauthorized power supply will invalidate your
warranty and may damage the telephone.
Do not expose unit to direct sunlight.
Do not expose the unit to fire, explosive or other hazardous conditions.
The earpiece/mouthpiece region on the handset can attract and retain small metallic objects.
Battery and Charger
Unplug the charger from the electrical plug and the device when not in use.
Do not disassemble the battery or solder the battery poles, it may lead to electrolyte leakage, overheating, fire,
or explosion.
If battery electrolyte leaks out, ensure that the electrolyte does not touch your skin and eyes. If the electrolyte
touches your skin or splashes into your eyes, wash your eyes with water immediately and consult a doctor.
If there is a case of battery deformation, colour change, or abnormal heating while you charge or store the
battery, remove the battery immediately and stop using it. Otherwise, it may lead to battery leakage,
overheating, explosion, or fire.
If the power cable is damaged (for example, the cord is exposed or broken), or the plug loosens, stop using the
cable at once. Otherwise, it may lead to an electric shock, a short circuit of the charger, or a fire.
Emergency Call
Whilst emergency calls can be made using this device, you should not rely solely on it for emergency calls, as a connection
is not always guaranteed.

24 | P a g e
Disposal and Recycling Information
This device (and any included batteries) should not be disposed of as normal household garbage. The device (and any
batteries) should be handed over to a certified collection point for recycling or proper disposal at the end of their life. For
more detailed information about the recycling of the device or batteries, contact your local city office, the household waste
disposal service or the retail store where you purchased this device. The disposal of this device is subject to the Waste from
Electrical and Electronic Equipment (WEEE) directive of the European Union. The reason for separating WEEE and batteries
from other waste is to minimize the potential environmental impacts on human health of any hazardous substances that
may be present.
Reduction of Hazardous Substances
This device is compliant with the EU Registration, Evaluation, Authorisation and Restriction of Chemicals (REACH)
Regulation (Regulation No 1907/2006/EC of the European Parliament and of the Council) and the EU Restriction of
Hazardous Substances (RoHS) Directive (Directive 2002/95/EC of the European Parliament and of the Council).
Declaration of Conformity
We declare under our sole responsibility that the product detailed in this manual, and in combination with our accessories,
conform to the essential requirements of the European Union Directive 1999/5/EC Radio and Telecommunications
Terminal Equipment Directive 3.1(a). 3.1(b) and 3.2, the Radio Communications Standard (Electro-magnetic Radiation
Human Exposure) 2003, and the Australian Communications and Media Authority Section 376 of the Telecommunications
Act 1997.
 Loading...