

GTC Sound Innovations REVPAD User Manual

Copyright © 2016 GTC Sound Designs
All rights reserved.
No part of this publication may be reproduced in any form without the written permission of GTC Sound Designs.
The product can be used to record or duplicate audio without being limited by certain technological copy-protection measures. This
is due to the fact that this product is intended to be used for the purpose of producing original music, and is therefore designed so
that material that does not infringe copyrights belonging to others (for example, your own original works) can be recorded or
duplicated freely.
Do not use this unit for purposes that could infringe on a copyright held by a third party. We assume no responsibility whatsoever
with regard to any infringements of third-party copyrights arising through your use of this unit.

Table of Contents
Welcome to the Creative World of the GTC Sound Innovations REVPAD i
Important Safety Instructions ii
Protecting From the Elements iii
Protecting the Power System iii
General Battery Safety Instructions iv
Battery Replacement Instructions vi
EMC and Certificate of Conformity viii
Quick Start 1
The REVPAD Touchpad 1
Attaching the Touchpad 2
The REVPAD Base Unit 4
Setting up the REVPAD Base Unit 5
Take the REVPAD for a Spin 6
Exploring Your GTC Sound Innovations REVPAD 7
Getting to Know the REVPAD Base Unit 8
The Front Panel of the REVPAD Base Unit 8
REVPAD Base Unit Controls 8
Status and Mode LEDs 11
Footswitch Control and Patch Navigation 14

The Back Panel of the REVPAD Base Unit 15
Connecting Your REVPAD to the Outside World 17
Getting to Know the REVPAD Touchpad 20
Charging the REVPAD Touchpad 23
Customizing your REVPAD 25
Creating and Editing Patches 26
Modifying a Patch 27
Setting Patch Effect Parameters 28
Mix/Touch Mix 29
Tempo and Global Tempo 29
Setting X-Y Values in Effects 30
Saving a New Patch 32
Organizing Your Patch List 33
Modes 33
True Bypass Mode 34
Normal Mode 34
Freeze Mode 34
Patch Favorite Mode 35
Setting Patch Favorites 36
Single Mode 37
Tap Tempo Mode 38

Patch Setup 38
Routing 41
Pad Setup 43
MIDI Setup 44
Auto Setup 45
External Control of Internal Effects 47
System Configuration 49
Device Utilities 49
Pad Settings 51
Touchpad Control Button Assignment 52
MIDI Settings 54
MIDI IN CC Map 55
MIDI Control 57
MIDI-IN 58
MIDI-IN Program Change 58
MIDI-IN Control Change 59
MIDI-OUT 60
MIDI-OUT Program Change 60
MIDI-OUT Control Change 61

Clock 62
Specifications 65
MIDI Implementation Map 69


Welcome to the Creative World of the GTC Sound Innovations
REVPAD
The GTC Sound Innovations REVPAD is a sound effect controller for use with amplified instruments. It includes a sound processing
base unit, which can connect to other equipment or systems. It has a Touchpad, which attaches to the guitar and communicates
wirelessly with the base unit. The Touchpad attaches to the guitar by an adhesive that does not damage or otherwise affect the
surface of the instrument. The base unit contains algorithms that provide a great number of effects, in addition to analog distortion
and overdrive, and includes the possibility to change effects while playing.
The REVPAD includes multiple patches (presets) of effect parameters, including analog distortion and overdrive, as well as
additional effects, such as chorus, delays, and virtual faders. It enables the user to manipulate sound effects by swiping or tapping
the Touchpad surface and allows for improvisation and creating new effects on the fly. The REVPAD enables smooth cross-fading
between effects, a dynamic kill switch, a virtual whammy bar, volume control, ambient sounds, and control of external gear, such as
a favorite pedal. With the REVPAD the user can manipulate the wah and virtual whammy bar, change volume, apply cross-fading,
and create varying levels of feedback more easily than by using the knobs on the guitar.
The REVPAD supports your creativity to explore the limitless world of sound effects.
i

REVPAD User Manual
Important Safety Instructions
• Read and follow these instructions before operating your REVPAD system.
• Keep these instructions for future reference.
• Refer all servicing to qualified service personnel. Servicing is required when the apparatus has been damaged in any way, such
as power supply cord or plug is damaged, liquid has been spilled or the apparatus has been exposed to rain or moisture, does not
operate normally, or has been dropped.
• The REVPAD does not require preventive maintenance.
• Clean the REVPAD only with a dry cloth. Do not use any chemicals.
• This equipment has been tested and found to comply with the limits for a Class B digital device, pursuant to Part 15 of the FCC
rules. See EMC and Certificate of Conformity on pageviii for more information.
Warning! DO NOT INGEST BATTERY. CHEMICAL BURN HAZARD.
This product contains a coin/button cell battery. If the coin/button cell battery is swallowed, it can cause
severe internal burns in just two hours and can lead to death. Keep new and used batteries away from
children. If the battery compartment does not close securely, stop using the product and keep it away from
children. If you think batteries might have been swallowed or placed inside any part of the body, seek
immediate medical attention.
ii

Welcome to the Creative World of the GTC Sound Innovations REVPAD
Protecting From the Elements
• The REVPAD is designed for indoor use. Do not operate the system outdoors without proper protection against mist or rain.
• Do not expose the REVPAD to dripping or splashing and ensure that no objects filled with liquids, such as vases, are placed on
the apparatus.
• Unplug the unit during lightning storms and when not intended for use for long periods of time.
Protecting the Power System
• Use only the power adaptor supplied with the system.
• Protect the power cord from being walked on or pinched.
• The DC power jack is used to disconnect the REVPAD. Please keep this plug accessible.
• Charge the REVPAD Touchpad frequently; this will increase the lifetime of the battery.
• In long storage periods it is recommended to remove the battery from the REVPAD Touchpad.
• Limit exposure to extremely high noise levels.
• Charge the REVPAD Touchpad with the USB cable supplied with the system. Do not charge the battery using an external charger
at any time.
Note: After connecting the USB wait for a message to appear in the base unit display area before continuing. If this is the first time you are using
the Touchpad the message will say PAD WAS SUCCESFLLY ASSIGNED. Otherwise the message will say PAD CONNECTED.
iii

REVPAD User Manual
General Battery Safety Instructions
Warning! DO NOT INGEST BATTERY. CHEMICAL BURN HAZARD.
This product contains a coin/button cell battery. If the coin/button cell battery is swallowed, it can cause
severe internal burns in just two hours and can lead to death. Keep new and used batteries away from
children. If the battery compartment does not close securely, stop using the product and keep it away from
children. If you think batteries might have been swallowed or placed inside any part of the body, seek
immediate medical attention.
• Before using the battery, be sure to read the instructions and observe the precautions printed on its packaging.
• Improper handling a Li-Ion rechargeable battery might cause leakage, heat, smoke, explosion, or fire. This could cause
deterioration of performance or failure.
• See Battery Replacement Instructions on pagevi before installing or removing the battery from the REVPAD Touchpad.
• All of the following are dangerous.
• Do not leave, charge, or use the battery in a car or similar place where inside temperature might be over 140 ºF.
• Do not leave the battery near a fire or a heat source. Do not throw the battery into a fire. Do not immerse, throw into, or wet the
battery in water or seawater.
• Do not short circuit positive (+) and negative (-) terminals with a metallic object intentionally.
• Do not pierce the battery with a sharp object such as a needle or screwdriver.
• Do not heat a partial area of the battery with heated objects or solder directly to the battery.
• Do not hit with heavy objects such as a hammer and do not throw or drop the battery on a hard floor.
iv

Welcome to the Creative World of the GTC Sound Innovations REVPAD
• Do not disassemble the battery or modify the battery design, including the electric circuit.
• Do not put the battery into a microwave oven, dryer, or high-pressure container.
• If at any time you witness a battery starting to balloon, swell up, smoke, heat, discolor, deform, or if an abnormal condition is
detected during use, charge, or storage:
• If charging, immediately discontinue charging process.
• Immediately, disconnect the battery and observe it in a safe place for approximately 15 minutes.
• If at any time leakage or foul odors are detected make sure that there is sufficient distance from fire.
• If liquid leaking from the battery gets onto your skin or clothes, immediately wash well with fresh water.
• If liquid leaking from the battery gets into your eyes, do not rub them. Immediately flush them with clean water and seek medical
attention.
v

REVPAD User Manual
Battery Replacement Instructions
The REVPAD is supplied with a Li-Ion rechargeable battery.
The battery does not need to be replaced unless its operating time becomes much shorter than usual.
Warning! DO NOT INGEST BATTERY. CHEMICAL BURN HAZARD.
This product contains a coin/button cell battery. If the coin/button cell battery is swallowed, it can cause
severe internal burns in just two hours and can lead to death. Keep new and used batteries away from
children. If the battery compartment does not close securely, stop using the product and keep it away from
children. If you think batteries might have been swallowed or placed inside any part of the body, seek
immediate medical attention.
vi
Welcome to the Creative World of the GTC Sound Innovations REVPAD
To replace the battery:
1. Remove the REVPAD Touchpad from the guitar.
2. Turn off the Touchpad by clicking the microswitch toward the
rounded end.
3. Turn the Touchpad over and use a philips screwdriver to
release the two mounting screws. Set them aside.
4. Slide the cover off.
5. Remove the old battery from the holder by pulling it out using
your fingers. Do not use any metal apparatus to pull out the
battery, as it might short the battery leads.
Note: Do not throw the spent battery in your household trash. It should
be handed over to an authorized collection site for recycling
waste electrical and electronic equipment. If recycling is not
available in your community the battery shouldbe disposed of
responsibly, according to local codes.
6. Clean the leads of the new battery.
7. Replace the battery into the holder in the correct orientation.
Note: Make sure that you place the battery as is pictured in the illustration. A battery placed the wrong orientation will short-circuit the battery
and may cause it to heat up and possibly explode.
8. Close the cover and secure it in place with the two mounting screws.
9. Connect the USB connection of the Touchpad to the base unit to charge the battery. Wait for PAD CONNECTED to appear in the
base unit display area before using the Touchpad. See Charging the REVPAD Touchpad on page23 for more information.
vii

REVPAD User Manual
EMC and Certificate of Conformity
Class B Warnings
The FCC Wants You to Know
This equipment has been tested and found to comply with the limits for a Class B digital device, pursuant to Part 15 of the FCC rules.
These limits are designed to provide reasonable protection against harmful interference in a residential installation. This equipment
generates, uses and can radiate radio frequency energy and, if not installed and used in accordance with the instructions, may cause
harmful interference to radio communications. However, there is no guarantee that interference will not occur in a particular
installation. If this equipment does cause harmful interference to radio or television reception, which can be determined by turning
the equipment off and on, the user is encouraged to try to correct the interference by one or more of the following measures:
• Reorient or relocate the receiving antenna.
• Increase the separation between the equipment and receiver.
• Connect the equipment to an outlet on a circuit different from that to which the receiver is connected.
• Consult the dealer or an experienced radio/TV technician.
viii

Welcome to the Creative World of the GTC Sound Innovations REVPAD
RF Exposure Warnings
Mobile Device RF Exposure Statement
Mobile Device definition:
a Mobile: (§2.1091) (b) — A mobile device is defined as a transmitting device designed to be used in other than fixed locations and to
generally be used in such a way that a separation distance of at least eight inches is normally maintained between the transmitter’s
radiating structure(s) and the body of the user or nearby persons. Per §2.1091d(d)(4) In some cases (for example, modular or desktop
transmitters), the potential conditions of use of a device may not allow easy classification of that device as either Mobile or Portable.
In these cases, applicants are responsible for determining minimum distances for compliance for the intended use and installation of
the device based on evaluation of either specific absorption rate (SAR), field strength, or power density, whichever is most
appropriate
RF Exposure
This device is only authorized for use in a mobile application. At least 8" of separation distance between the REVPAD and the user's
body must be maintained at all times.
ix


Quick Start
The REVPAD Touchpad provides a wireless connection to the REVPAD Base Unit so you can switch and control effects with a
swipe, touch or tap of your finger.
Driven by the TouchFx Patented Technology engine, the REVPAD provides guitarists full, simultaneous control of multiple effects
parameters, including their own existing pedal board effects. This enables the player, for the first time, to actually play effects on the
fly, instead of in a standard manner, and combine this naturally with playing the guitar.
Up to eight effects and their parameters can be simultaneously assigned to any axis on the pad and by that to actually perform as
“virtual” faders and switches for any aspect of the signal and its processing. It gives the player full, accurate and super-dynamic
control of the effects with just a simple finger tap, touch or swipe. It also eliminates the need to go to the pedal board to change
effects and the hassle of bending down and tweaking knobs while playing.
Three buttons located on the REVPAD Touchpad can be assigned to operate many great features offered by the REVPAD. They can
be used to switch between patches, go through different modes, bypass, freeze, MIDI applications and much more.
Before exploring how to customize the REVPAD to fit your personal way of playing, let’s see what it can do by itself.
The REVPAD Touchpad
The REVPAD Touchpad provides a wireless connction to the REVPAD Base Unit so you can switch and control effects with a swipe
or a touch of your finger.
1

REVPAD User Manual
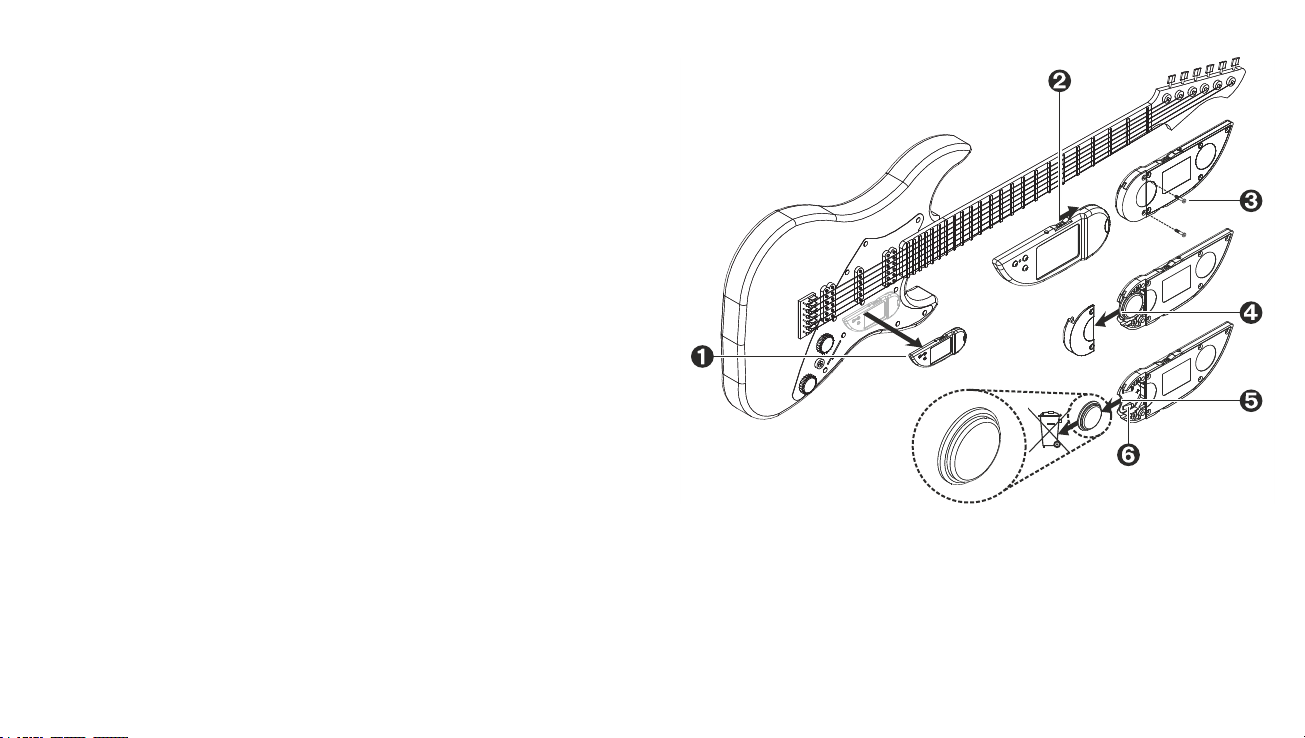
Attaching the Touchpad
The REVPAD Touchpad comes with three slim (0.6 mm) hook/loop fastener dots, which stick onto the guitar body in any location,
according to your personal preference. It is easily removed if it needs to be replaced. The guitar unit attaches to the dots firmly
enough to endure even the most vigorous live performance, while remaining easy to remove. The guitar remains clean and
undamaged.
Note: The hook/loop fastener dots may leave marks on vintage guitars with nitrocellulose finishes. Check on an inconspicuous spot before attaching
the hook/loop fastener dots.
2
3
12
4
5
6
To attach the Touchpad:
1. Turn the Touchpad on by pushing the switch toward the
pointed end.
2. The power LED should glow green.
Note: If the power LED glows yellow or red, or does not light up at all,
the battery must be recharged. See Charging the REVPAD
Touchpad on page23 for more information.
3. Remove one side of the adhesive backing of a hook/loop fastener
dot.
4. Press the adhesive firmly in the recessed circle on the inside
5. Remove the adhesive backing of both hook/loop fastener dots.
6. Attach the Touchpad to your guitar where you can conveniently
face of the Touchpad. Repeat with the second hook/loop
fastener dot.
touch the Control Buttons and touchpad.
Quick Start
3

REVPAD User Manual
The REVPAD Base Unit
It's all about preserving the natural sounds and soul of the guitar. The REVPAD is not generating sounds but processing them, so
even though you can get synth-like sounds it is not a synthesizer, rather a signal-processing unit that preserves the natural sound of
the instrument as well as the natural response to and feel of the guitar player's fingers.
The REVPAD System offers 200 factory and user presets to build and explore your own sounds.
Building a patch is easy and intuitive:
Step 1: Choose any effect you want.
Step 2: Explore the effect to set parameters.
Step 3: Push a button to select which one of those parameters you’d like to be controlled by the Touchpad and in which direction:
X+, X-, Y+, Y-.
Repeat those three action steps to all of the other effects you’d like to add to the effect chain and press the save button. That’s all you
need to do to build a fully customized patch.
4

SAVE
SYS
X-Y
X
Y
X
Y
X
Y
X
Y
A
B
C
D
BYPASS
SET
1
2
3
CLIP
COMM
BATT
FREEZE
PEDAL
PATCH
NORMAL
1
4
2 3
Quick Start
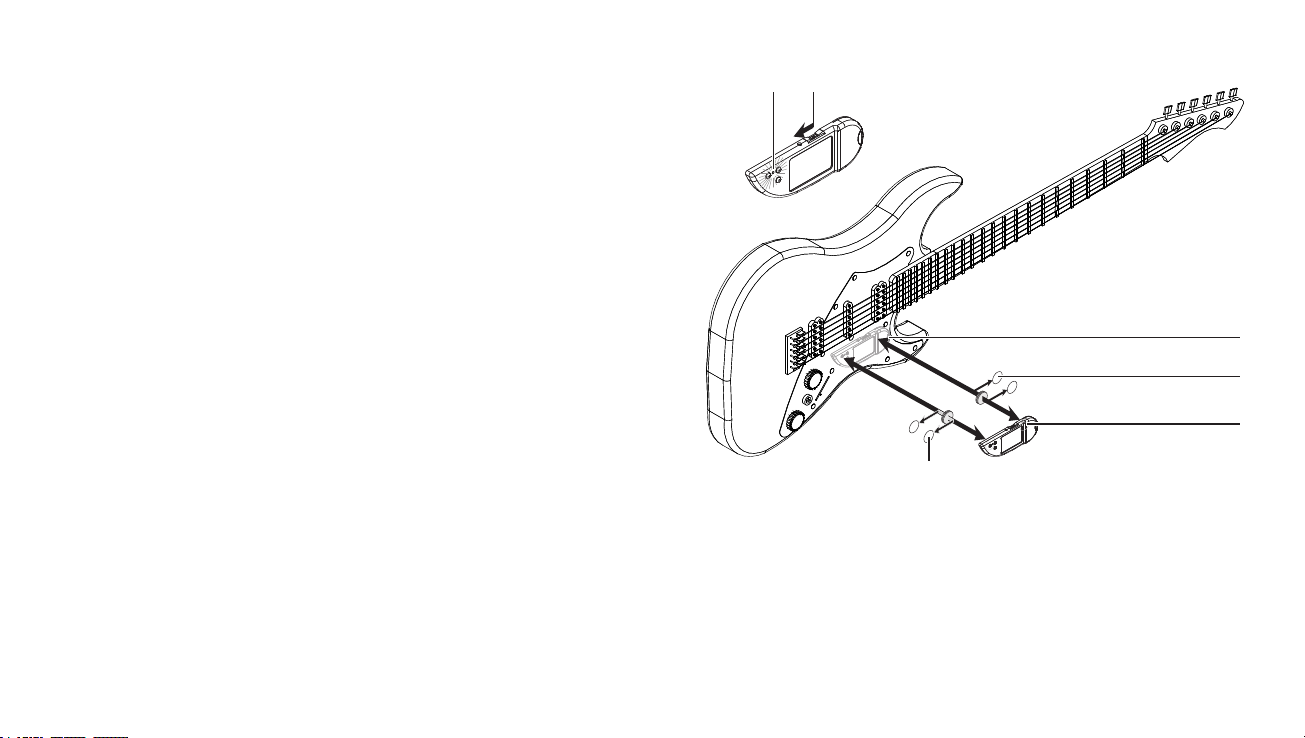
Setting up the REVPAD Base Unit
The REVPAD Base Unit provides high-end effects, analog distortion and an overdrive circuit. While designed with foot switches, the
REVPAD system displays its greatest power and flexibility through wireless communication with the Touchpad.
To set up the base unit:
1. Connect the included 9 VDC transformer to the POWER inlet on the base
unit back panel.
2. Run a 1/4" guitar cable from your electric guitar to the INPUT connector.
3. Run a 1/4" guitar cable from the OUTPUT LEFT connector on the
REVPAD Base Unit to your amplifier.
Note: The REVPAD system accomodates a wide range of output options. See
Connecting Your REVPAD to the Outside World on page17 for more
information.
4. Connect the antenna to the ANT. connector of the base unit.
5
REVPAD User Manual
C
B
H I G EF
D
A
SAVE
SYS
X-Y
XYXYXYX
Y
A
B
C D
BYPASS
SET
1
2 3
CLIP
COMM
BATT FREEZE PEDAL PATCH NORMAL
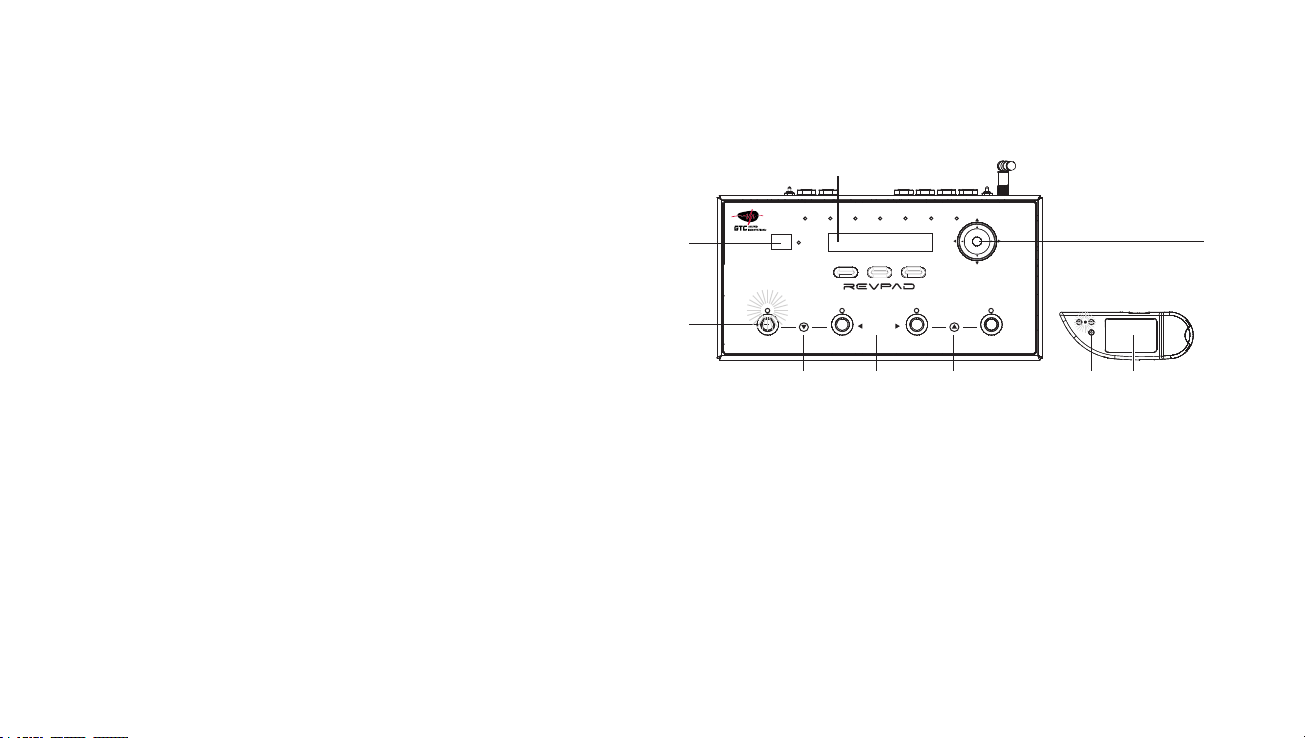
Take the REVPAD for a Spin
When you power up your REVPAD Base Unit the editing screen (A) indicates that you are in true bypass mode.
To begin using your new REVPAD system:
• Press any footswitch to exit true bypass mode. For example, if
you press Footswitch A (B) the green LED will illuminate and
the number of the default Effect Bank will appear in the Active
Patch Screen (C).
or
• Press any part of the Navigation Roller (D). The default Bank
and Patch will appear in the Active Patch Screen (C).
or
• Press any of the three Touchpad Control Buttons (E). The
default Bank and Patch will appear in the Active Patch Screen (C).
Now experiment and explore. Tap the Touchpad (F) or slide your finger along the X- or Y-axis as you play. Scroll through all of the
patches by rotating the Navigation Roller (D), or bank by bank by pressing Next Bank (G: footswitch C and D together) or Previous
Bank (H: footswitch A and B together), and then one of the footswitches to change the bank's patch.
When you want to return to True Bypass mode press BYPASS (I: footswitch B and C together).
See Setting Patch Favorites on page36 for more information about how to get started.
6

Exploring Your GTC Sound Innovations REVPAD
The GTC Sound Innovations REVPAD is a sound effect controller for use with amplified instruments. It includes a sound processing
base unit, which can connect to other equipment or systems. It has a Touchpad, which attaches to the guitar and communicates
wirelessly with the base unit. The Touchpad attaches to the guitar by an adhesive that does not damage or otherwise affect the
surface of the instrument. The base unit contains algorithms that provide a great number of effects, in addition to analog distortion
and overdrive, and includes the possibility to change effects while playing.
The REVPAD includes multiple patches (presets) of effect parameters, including analog distortion and overdrive, as well as
additional effects, such as chorus, delays, and virtual faders. It enables the user to manipulate sound effects by swiping or tapping
the Touchpad surface and allows for improvisation and creating new effects on the fly. The REVPAD enables smooth cross-fading
between effects, a dynamic kill switch, a virtual whammy bar, volume control, ambient sounds, and control of external gear, such as
a favorite pedal. With the REVPAD the user can manipulate the wah and virtual whammy bar, change volume, apply cross-fading,
and create varying levels of feedback more easily than by using the knobs on the guitar.
The REVPAD supports your creativity to explore the limitless world of sound effects.
7
REVPAD User Manual
Getting to Know the REVPAD Base Unit
The REVPAD Base Unit is used to for electronic connections, status of the system, editing patches and modifying effects.
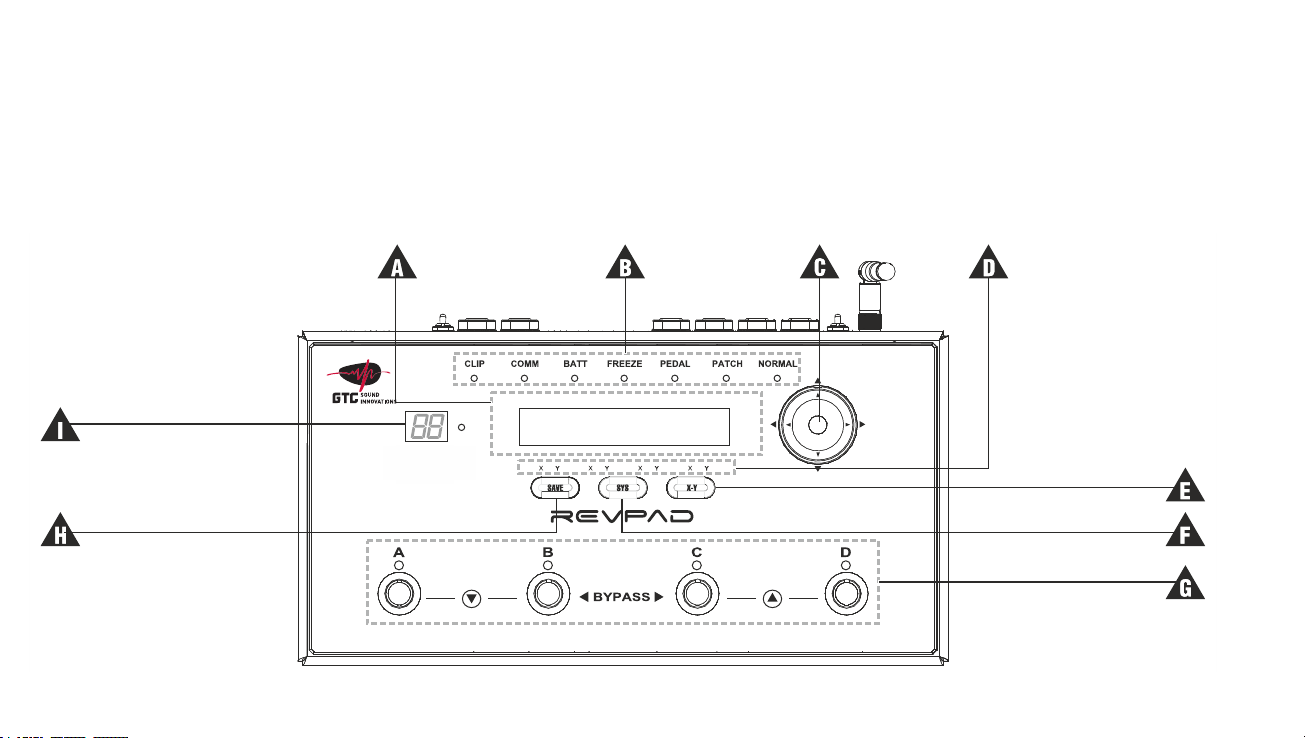
The Front Panel of the REVPAD Base Unit
REVPAD Base Unit Controls
8

Item Name Function
A
B
C
D
E
Editing Screen The editing screen facilitates navigation and operation of the REVPAD andmodification of REVPAD patches.
Mode and Status LEDS
Navigation Roller
X-Y LEDs Indicates the X/Y assignment for a parameter
X-Y Button
• Clip: Indicates that the input level or one of the effects levels is too high.
• Comm: Green, orange, or red Indicates the quality of communication with the Touchpad.
• Batt: Green or red indicates battery strength.
• Freeze: Lights when a patch is in Freeze Mode.
• Pedal: Lights when the REVPAD is in Single Mode.
• Patch: Lights when the REVPAD is in Patch Favorite Mode.
• Normal: Lights when the REVPAD is in Normal Mode.
• Arrows above, below, to the left, and to the right of the Naviation Roller knob are used for navigating
between screens. Above each arrow a LED lights up to indicate the directions available for navigation.
• Roller (rolls clockwise and counter-clockwise) for changing values and effects.
• The Home button returns the REVPAD to the beginning of the current patch edit screen. This is useful if you
lose track of your location within the patch.
For assigning X or Y control for specific parameters The user increases or decreases a parameter value on the Xaxis by moving a finger on the Touchpad to the right or left. To increase or decrease a parameter value on the
Y-axis the user moves a finger up or down on the Touchpad.
Note: The rules for changing parameter values are not rigid. The user can decide if a given effect, such as
volume, is controlled by the X or Y axis on the Touchpad. See Setting X-Y Values in Effects on page30 for
more information.
Exploring Your GTC Sound Innovations REVPAD
9

REVPAD User Manual
Item Name Function
F
G
H
I
SYS Button Accesses the system preferences screen. See System Configuration on page49 for more information.
Foot Switches The foot switches (A, B, C, and D) are used to scroll through banks of patches, change patches within banks and
toggling between Normal Mode and True Bypass mode. See Footswitch Control and Patch Navigation on
page14 for more information.
SAVE Button Saves an edited patch. See Saving a New Patch on page32 for more information.
Current Bank Screen The REVPAD makes 200 patches available, stored in 50 banks, each of which with four patches. The Current
Bank Screen shows which bank is active (01 through 50). The LEDs above the foot switches (G) show which of
the four patches in the bank, A, B, C or D, is active. The full patch ID also appears in the Editing Screen (A).
10
 Loading...