

Page 1
QuikRuler III 1
Page 2

Table of Contents
QuikRuler III Overview
Set Up
Components
Connecting the Components
Digitizer Connections
QuikRuler III Display Module Connections
Optional PC Connections
Starting QuikRuler III
Making Selections
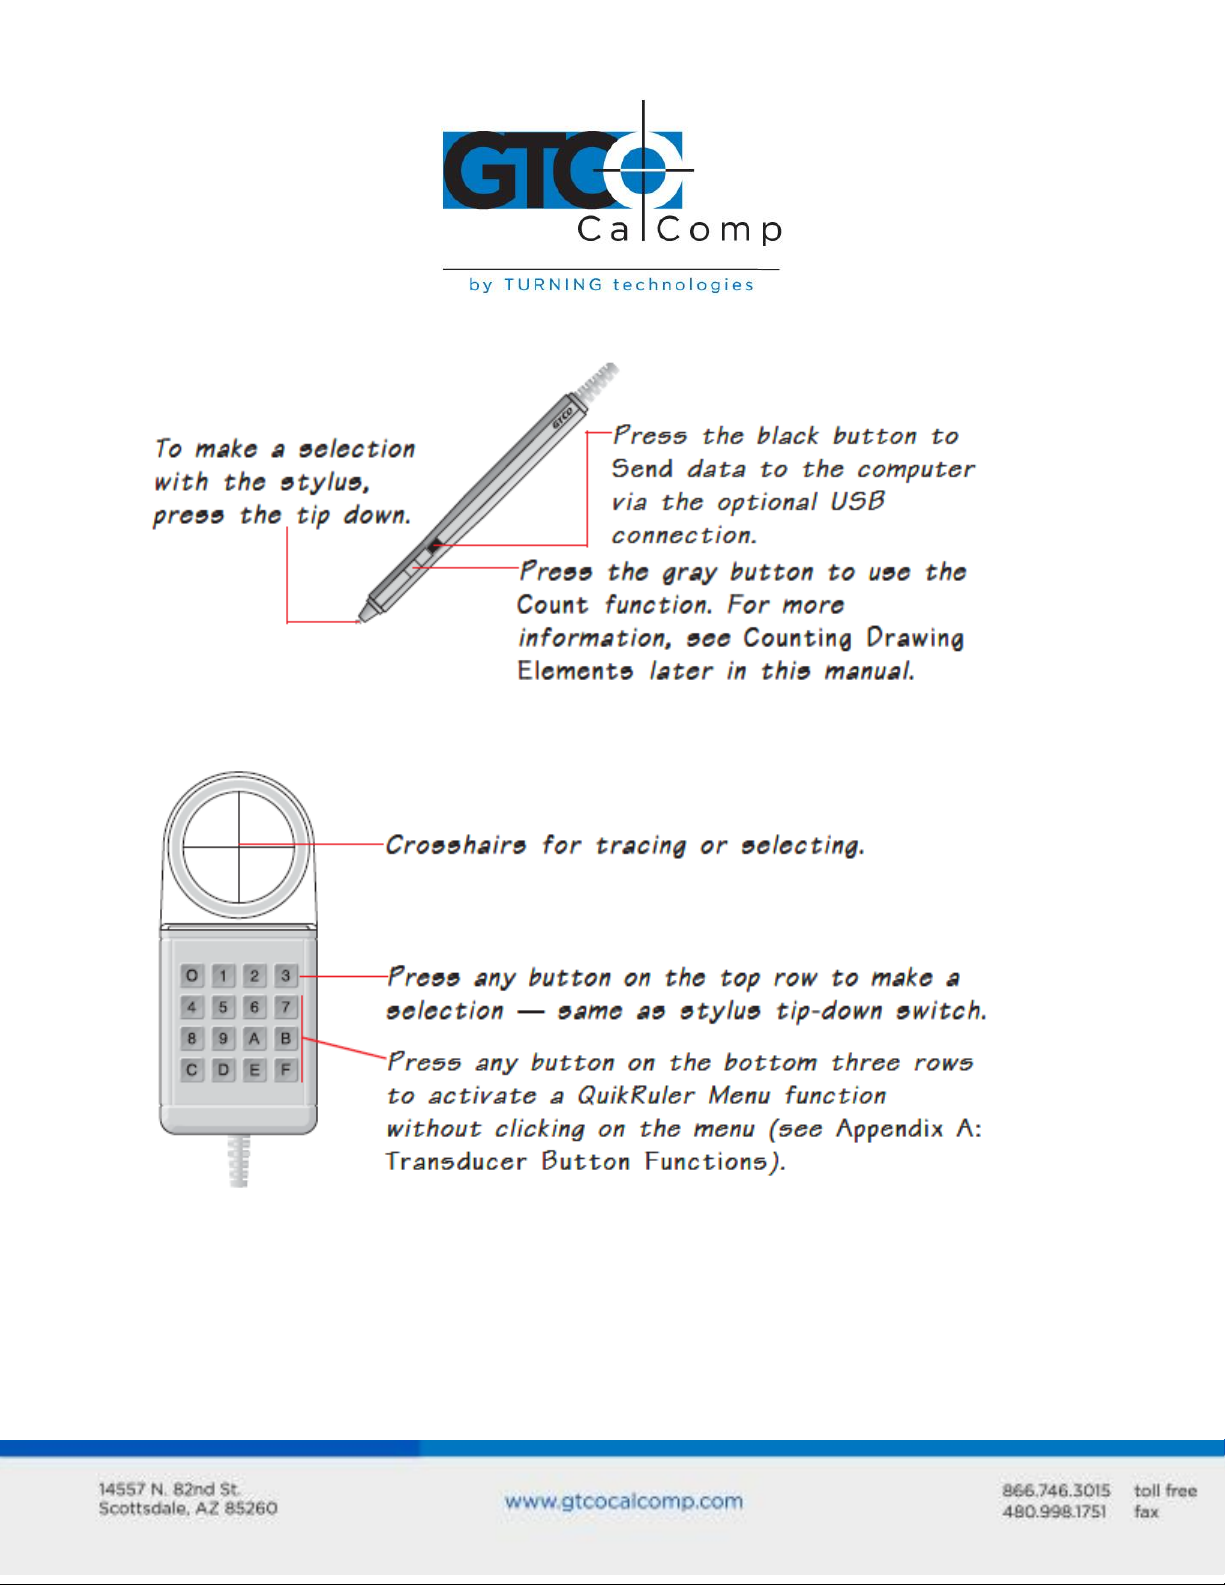
Stylus
16-Button Cursor
4-Button Cursor
Configuring QuikRuler III
The QuikRuler Menu
QuikRuler Menu Location
Relocating the Menu at Start-Up
Relocating the Menu While Working with QuikRuler III
If You Lose the Menu Location
Using the Configure Function
Setting Fractional Digits
Setting Tone Options
Selecting Your Language
Setting the Decimal Point Character
Setting the Last Output Character
Setting the Units and the Scale
First, Identify the Unit of Measure
Set the Units
Manually Setting the Scale
Automatically Setting the Scale
Set the Scale Automatically
Setting the Counting Scale
Change the Counting Scale
Measurements
Measuring the Size of an Area
Area Shortcut
Adding or Subtracting Areas
4
5
5
6
6
6
7
7
7
8
8
9
9
9
10
10
11
12
12
13
13
14
14
15
16
16
16
17
18
19
20
20
21
21
22
22
QuikRuler III 2
Page 3
QuikRuler III 3
Measuring the Length of a Perimeter
Counting Drawing Elements
Measuring a Straight Segment
Measuring a Continuous Length
Adding or Subtracting Lengths
Using QuikRuler III as a Calculator
Editing Data on the Display
Correcting Mistakes When Accumulating Measurements
Clearing the Total
Correcting Numeric Entries
Sending Data to Your PC
Send Data from QuikRuler III to PC
Messages
Appendix A
Transducer Button Functions
Appendix B
Conversion Table
Appendix C
Regulatory Statements
Radio Frequency Energy Notice
Canada
Declaration of Conformity
Japan
Bescheinigung des Herstellers/Importeurs
European Union WEEE Directive
Appendix D
Limited Warranty for the QuikRuler III
23
23
24
25
26
26
27
27
28
28
28
29
30
31
31
32
32
33
33
33
34
35
37
37
38
39
39
Page 4

QuikRuler III 4
QuikRuler III Overview
QuikRuler III is a portable measuring system that is perfect for estimators, builders,
contractors, surveyors, scientists, planners, designers and appraisers who need to take
measurements from blueprints, maps, diagrams and other drawings. QuikRuler III quickly
and accurately automates blueprint takeoff and drawing measurement processes.
With QuikRuler III, you can easily measure areas, perimeters and lengths using any scale
and unit of measure. Perform more complex measurements by adding or subtracting
areas and lengths. The built-in measurement functions, combined with QuikRuler’s
calculator, make QuikRuler III an indispensable tool. And with the optional PC interface,
you can send results directly from the QuikRuler III display to your PC, for use in a
spreadsheet or estimating package.
Best of all, you do not need any special experience or training. QuikRuler III is compatible
with all leading estimating software. Simply select a function from the QuikRuler Menu,
click the stylus or cursor on the drawing and view the results on the LCD display.
Page 5
QuikRuler III 5
Set Up
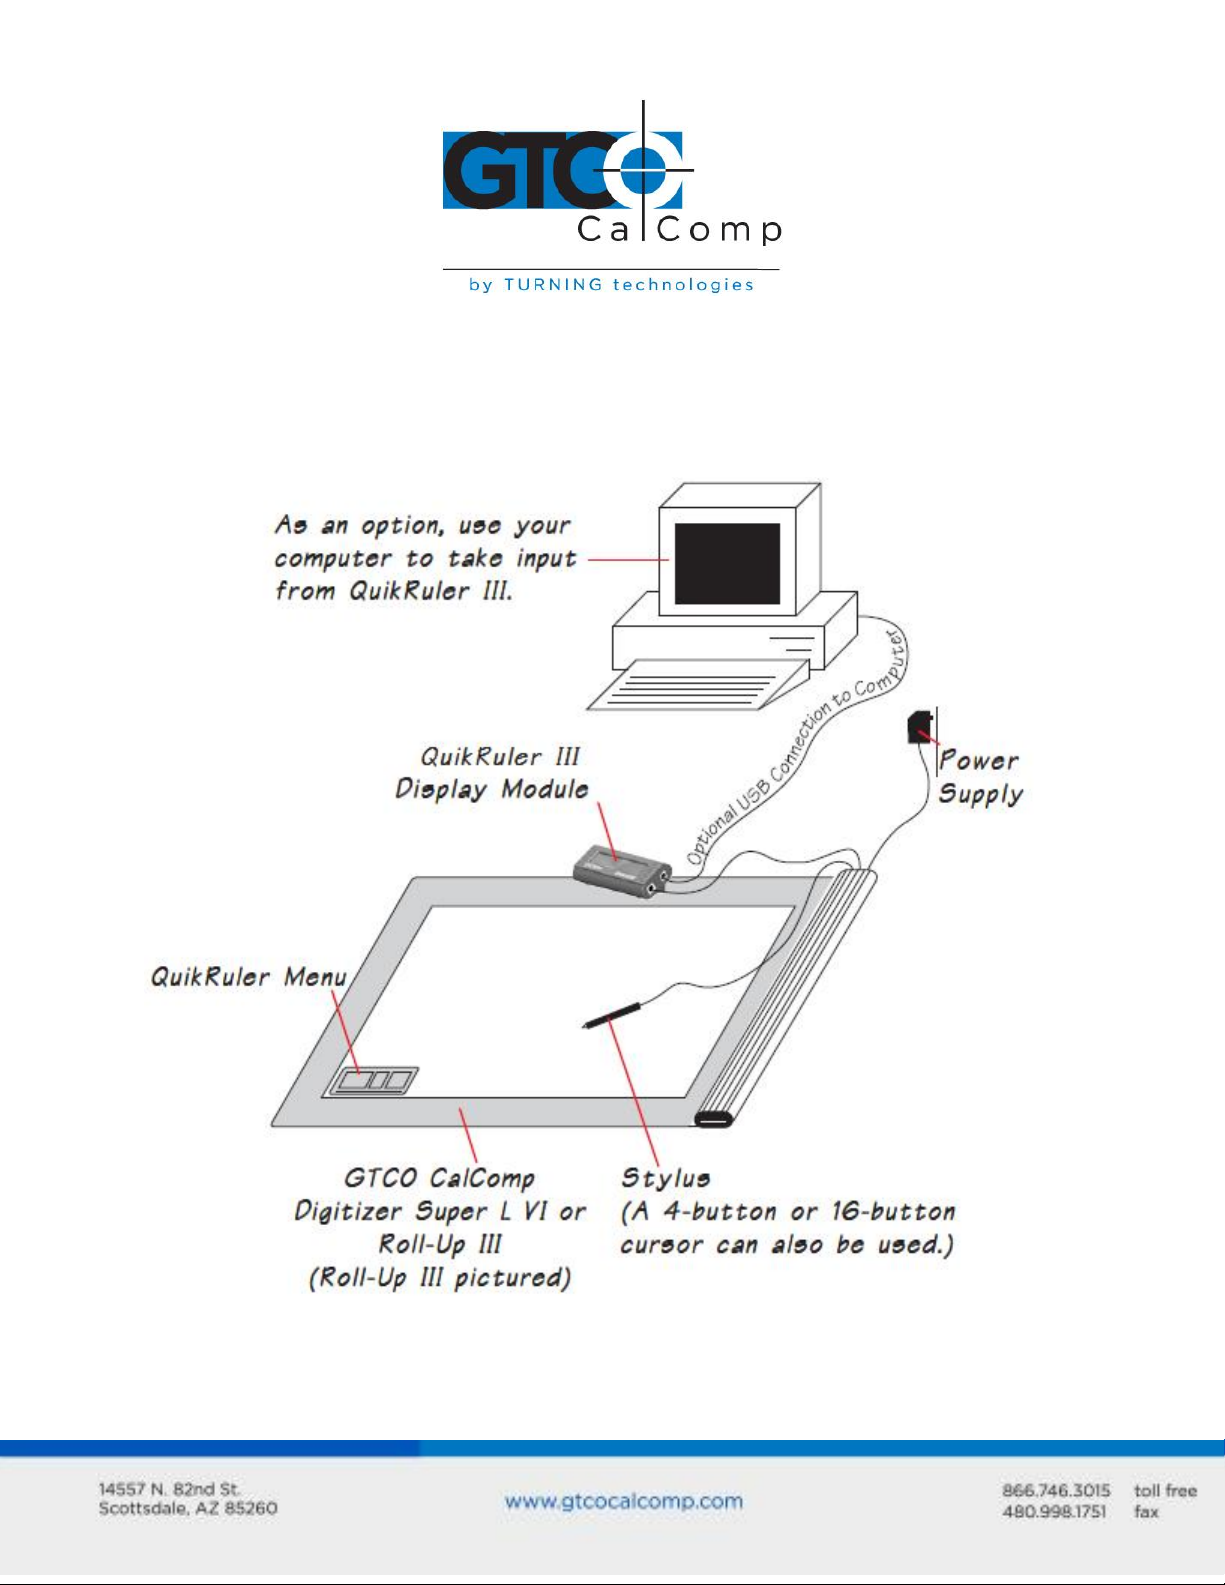
Components
QuikRuler III combines a digitizer, stylus or cursor, and portable display into a single system
that is easy to move and set up as needed.
NOTE: Contact GTCO CalComp by Turning Technologies Technical Support Team for
instructions on the use of the QuikRuler III with older products – Roll-Up II, Super L III,
Super L II Plus, etc.
Page 6
QuikRuler III 6
Connecting the Components
1. Connect the 8-pin mini-DIN end of the digitizer interface cable to the QuikRuler III
Display Module.
2. Attach the RJ12 end of the digitizer interface cable to the digitizer.
3. Join the stylus or optional cursor to the digitizer when using a corded pointing
device.
4. Connect the power supply to the digitizer.
Optional: If you are inputting data to the computer, link QuikRuler III to the
computer, using the USB cable.
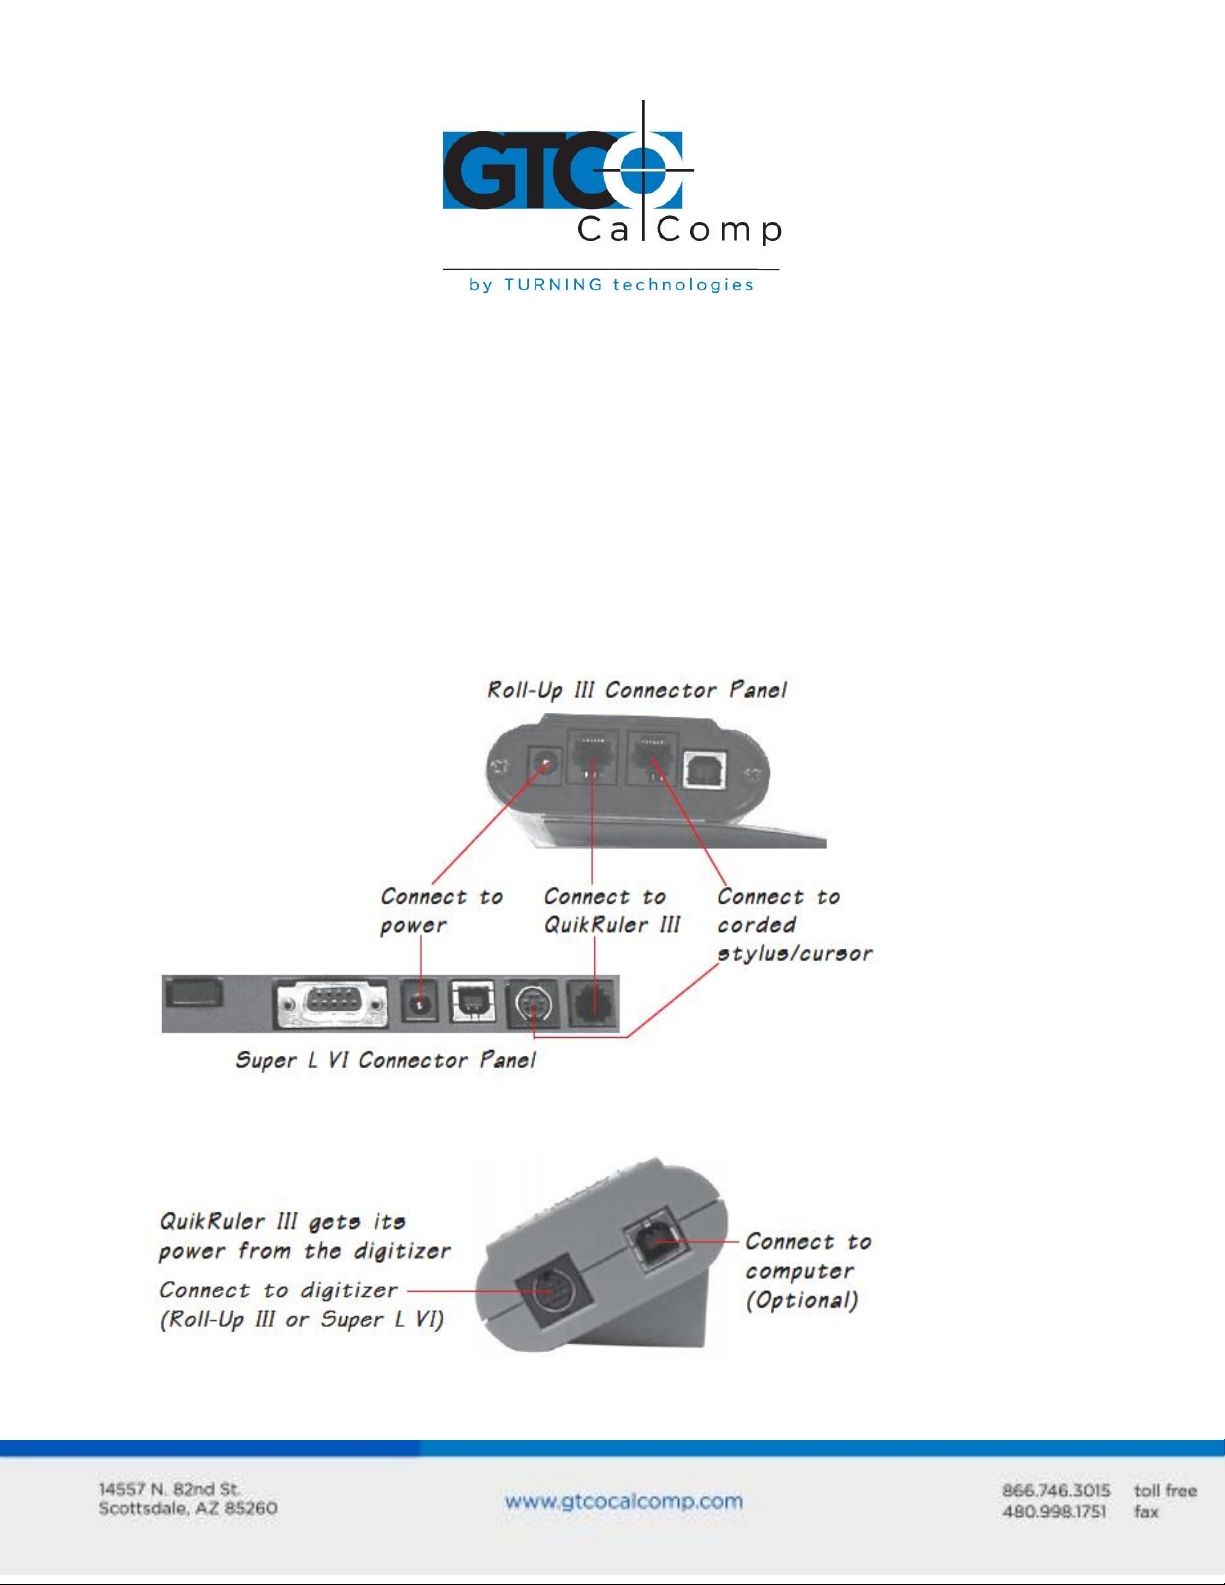
Digitizer Connections
QuikRuler III Display Module Connections
Page 7

QuikRuler III 7
NOTE: When QuikRuler III is used with GTCO CalComp by Turning Technologies’ digitizers
other than the Roll-Up III or Super L VI, additional hardware is required. Contact GTCO
CalComp by Turning Technologies at 1.866.746.3015 for further information.
Optional PC Connection
To send data directly from QuikRuler III to a PC, connect the keyed end of the supplied USB
cable to the QuikRuler Display Module and the USB connector end to an available USB port
on the computer. Contact Technical Support regarding computers that do not
support USB communications.
Starting QuikRuler III
QuikRuler III starts when you apply power to the digitizer. If the startup is successful, you
will hear four short beeps from the digitizer and after the sign-on messages, line 1 of the
Display Module will read Select from Menu. Line 2 of the display will show the current X-
axis and Y-axis position of the stylus and a number indicating the status of the stylus
switches. If the stylus is positioned over the menu, the numbers will be replaced by
If the stylus is not in prox of (close to) the digitizer’s measuring area, the
numbers will be replaced by asterisks
Position your plans or blueprints on the digitizer’s active area. You can use tape to hold
them in place. Use the tip of the stylus to click on a QuikRuler Menu function button. (See
QuikRuler Menu Location in this manual before you begin using the device.)
Making Selections
Use either a stylus or cursor to trace and measure drawings. You can also use either
device to make selections from the QuikRuler Menu. This manual assumes you are using a
stylus.
Page 8
Stylus
QuikRuler III 8
16-Button Cursor
Page 9
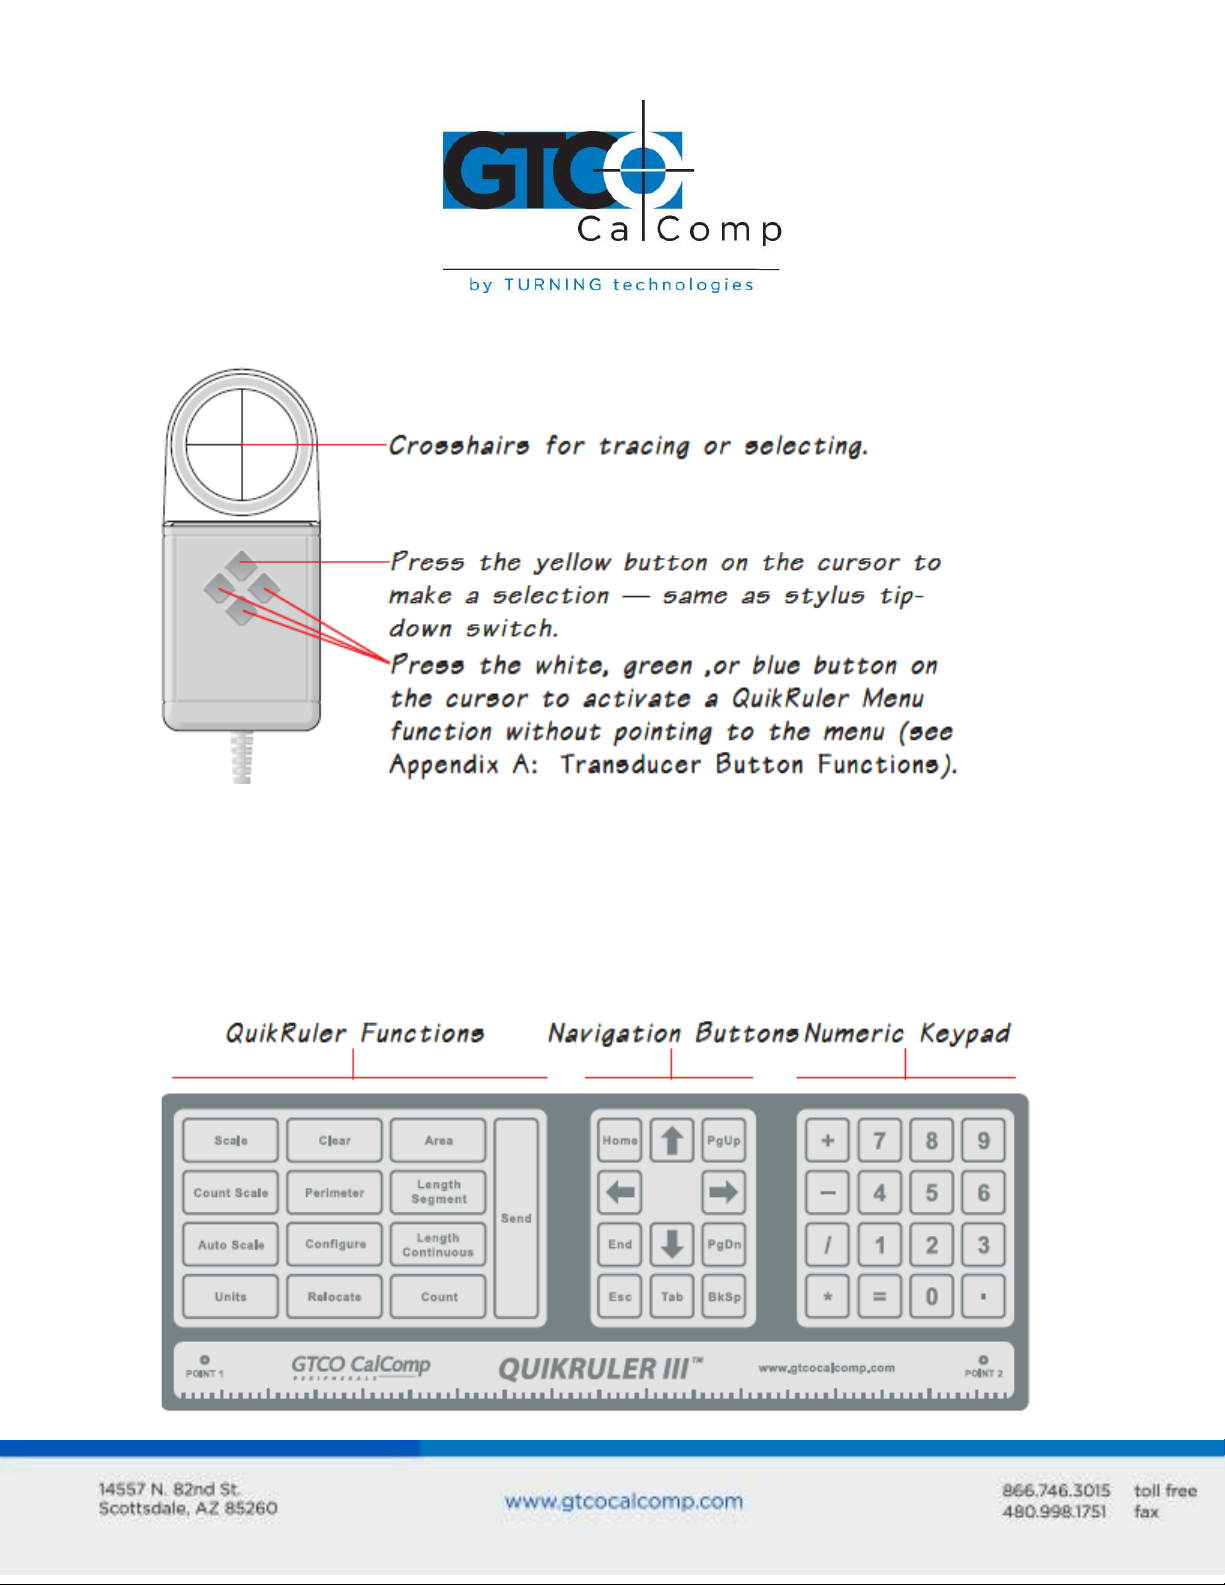
4-Button Cursor
QuikRuler III 9
Configuring QuikRuler III
The QuikRuler Menu
The QuikRuler Menu is used to select QuikRuler III functions and to determine settings.
Page 10
QuikRuler III 10
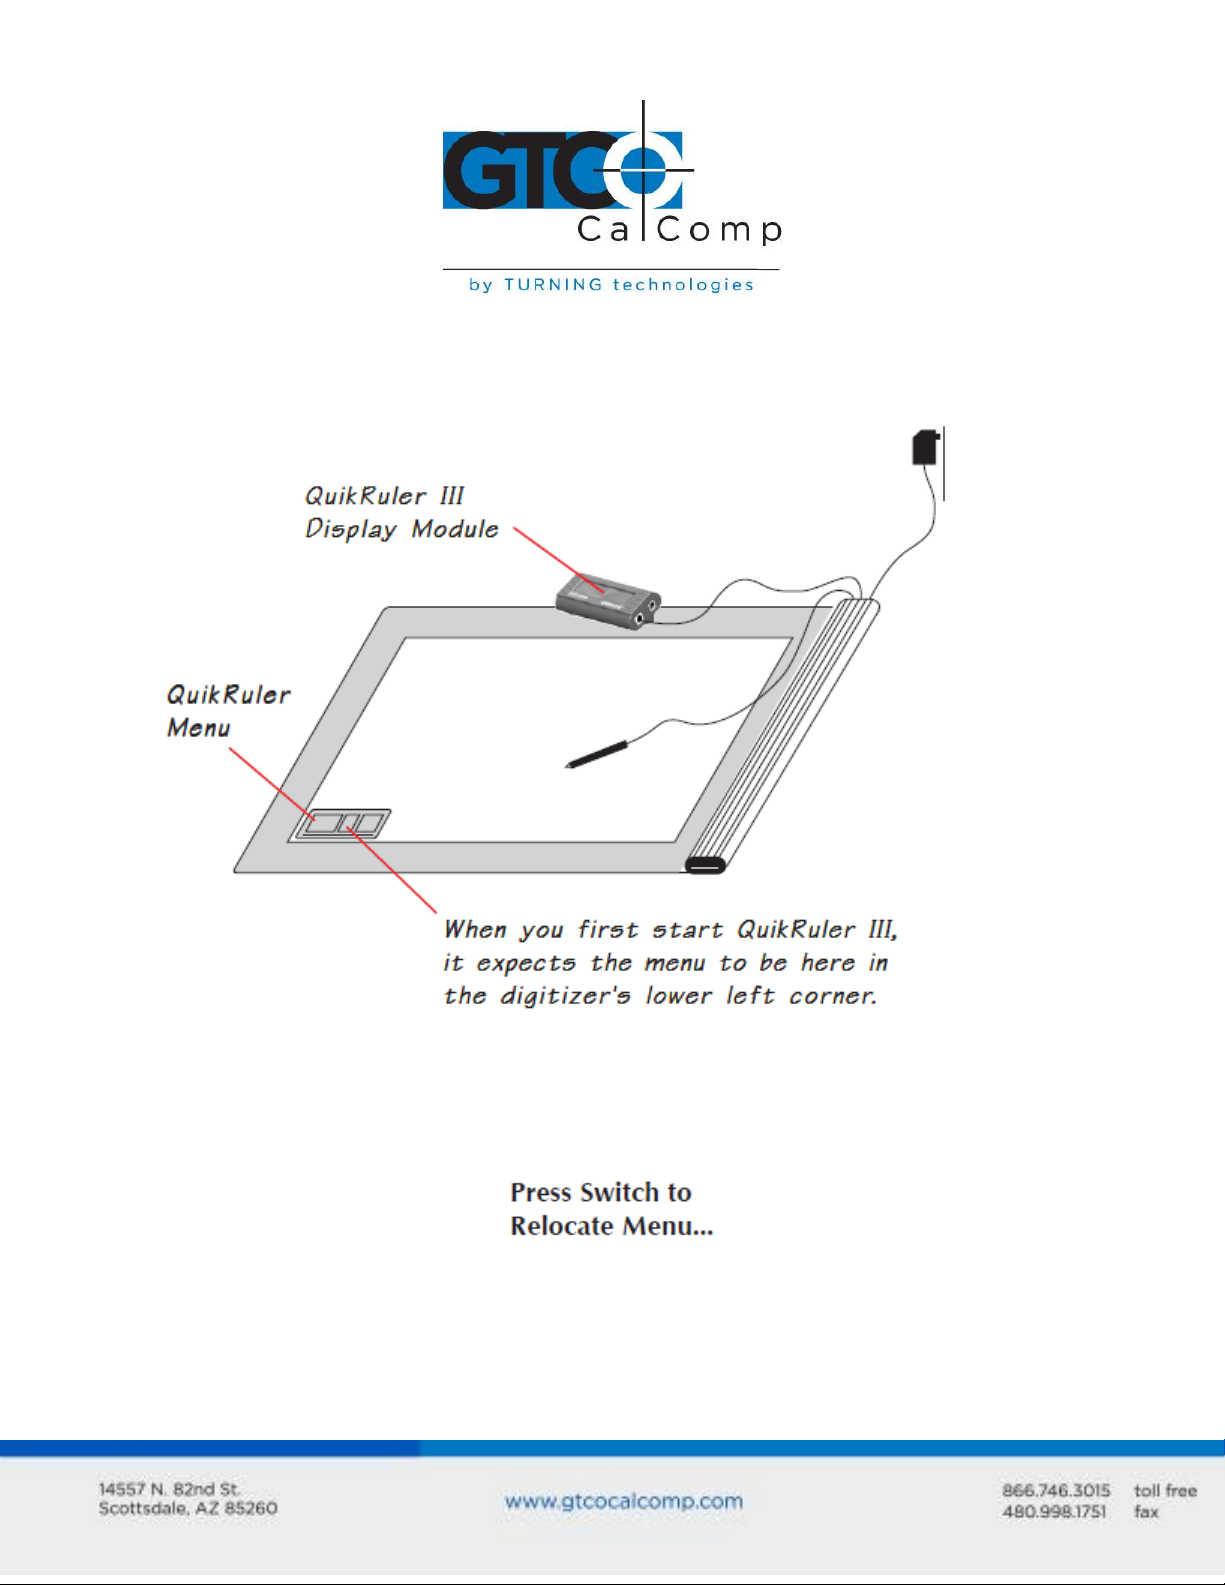
QuikRuler Menu Location
When QuikRuler III is shipped to you, it is programmed to expect the QuikRuler Menu to be
located in the lower left corner of the digitizer’s active area.
Relocating the Menu at Start-Up
When you start QuikRuler III, the below message appears for five seconds.
If you do not want the QuikRuler Menu to be positioned in the lower left corner of the
digitizer, this is the time to relocate it.
1. Position the menu where you prefer to have it located and tape it down. The entire
menu must be within the digitizer’s active measuring area.
Page 11
QuikRuler III 11
2. Power-up the digitizer.
3. Using the stylus tip, click anywhere on the digitizer when the Relocate Menu
message is displayed.
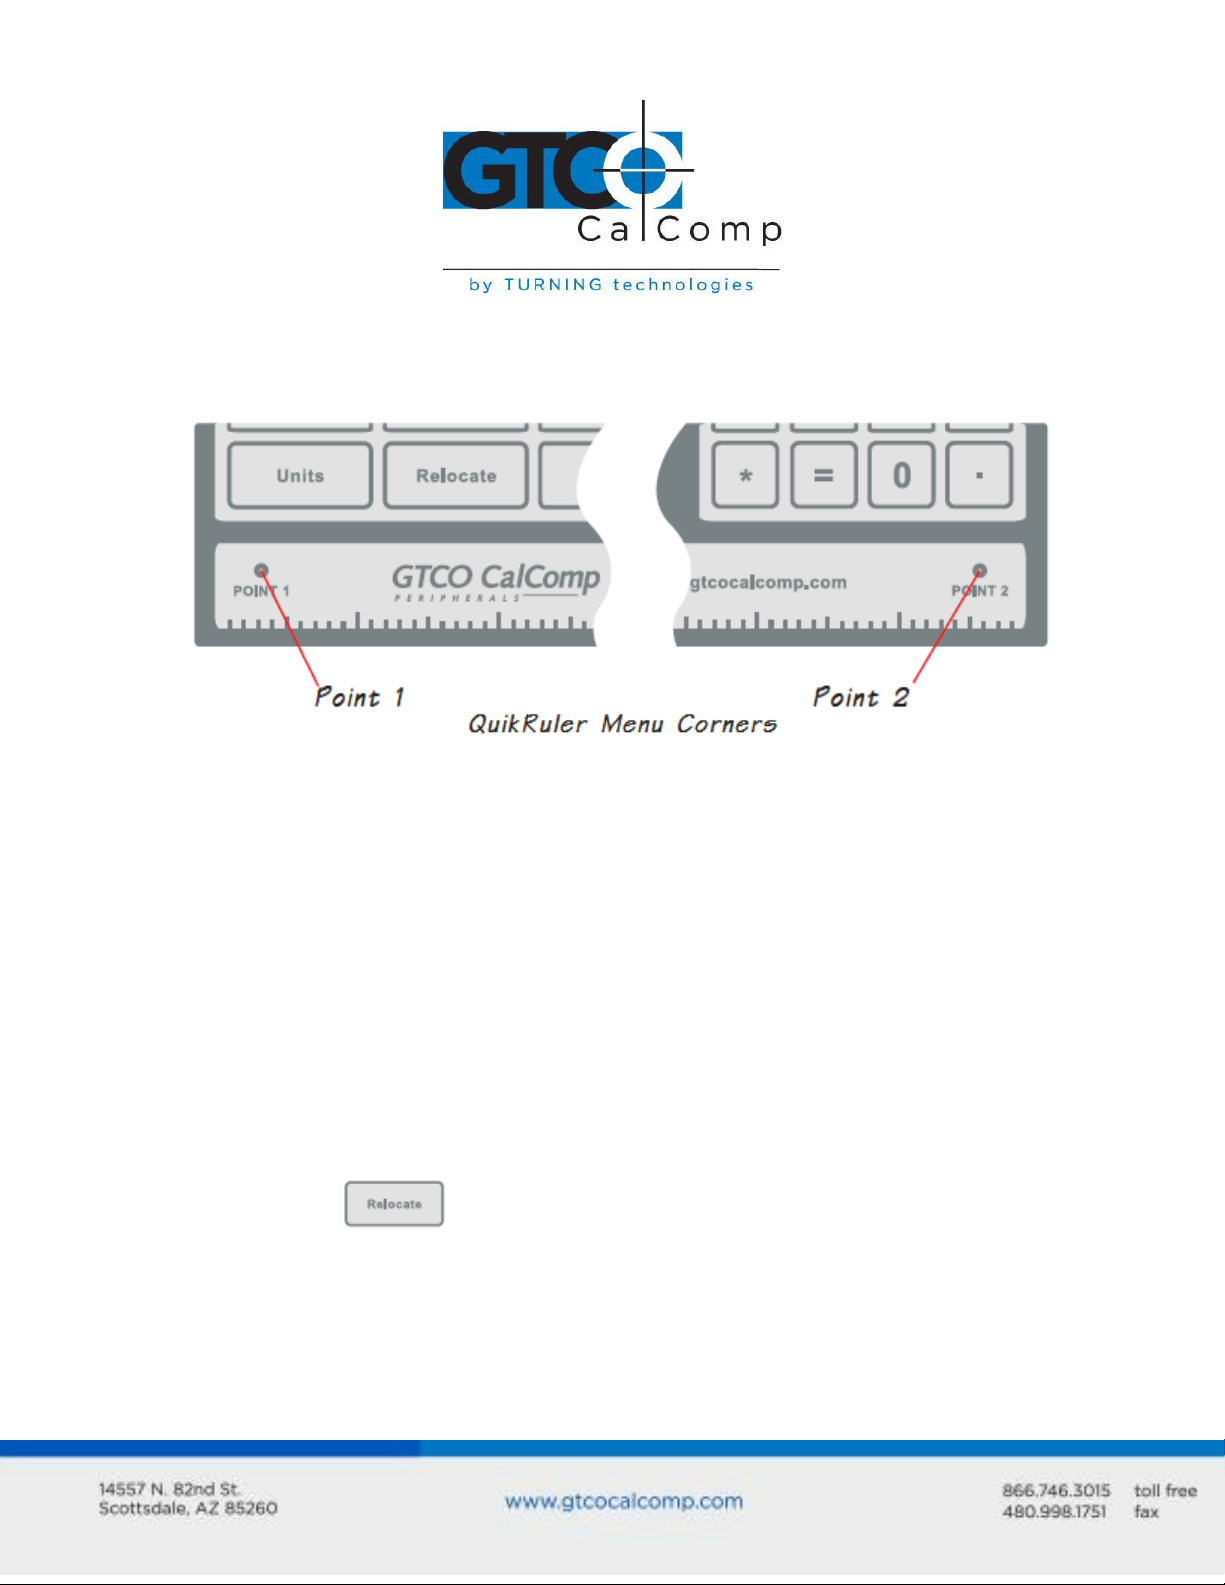
QuikRuler III prompts you to Select Point 1.
4. Click the stylus on the left point of the menu.
QuikRuler III then prompts you to Select Point 2.
5. Click the stylus on the right point of the menu.
The Select from Menu prompt displays to indicate the QuikRuler Menu relocation has
been successful.
Relocating the Menu while Working with QuikRuler III
You can change the location of the QuikRuler Menu at any time while working with
QuikRuler III.
1. Click on the button.
2. Put the menu where you want it to be relocated and tape it down. QuikRuler III
prompts you to Select Point 1.
3. Click the stylus on the left point of the menu. QuikRuler III then prompts you to
Select Point 2.
Page 12
QuikRuler III 12
4. Click the stylus on the left point of the menu. The Select from Menu prompt
displays to indicate the QuikRuler Menu relocation has been successful.
If You Lose the Menu Location
If you inadvertently move the QuikRuler Menu, please follow the below instructions:
1. Tape the menu down where you want it to be located.
2. Disconnect the digitizer power supply.
3. Reconnect the digitizer power supply and listen for the digitizer’s four beeps.
4. When QuikRuler III displays the below message, click the stylus anywhere on the
digitizer’s active area to enter Relocate Mode.
5. Follow the prompts to select Point 1 and Point 2. (See the previous page for an
illustration of the left and right menu points, Point 1 and Point 2.)
The Select from Menu prompt displays to indicate the QuikRuler Menu relocation
has been successful.
Using the Configure Function
QuikRuler III provides a number of user preference settings. Use the Configure button to
set:
Number of digits to the right of the decimal point
Tones you want to hear when you perform specific functions
Language preference
Character selections
The steps below describe how to select a specific configuration preference. The sections
that follow describe how to select a setting for each configuration preference.
1. Select the button to activate the Configure function.
QuikRuler III displays a preference option and its current setting.
Page 13
QuikRuler III 13
2. Click on the button repeatedly or click on the or button to
display the option you want to change. The Configure options include:
Digits Rt of ‘.’
Select Tones
Select Language
Decimal Pnt Char
Last Character
3. Click on the or button to change the current setting of the displayed
option. See the following sections for details on each option.
Setting Fractional Digits (Digits to the right of the period [.]]
QuikRuler III can display from 0 to 8 digits to the right of the decimal point. Use this
Configure option to set the number of digits to the right of the decimal point.
1. Display the Digits Rt of ‘.’ Option on line 1.
The current setting for the number of digits is displayed on line 2 beneath the
flashing cursor.
2. Change the current setting by clicking on a number from to on the
QuikRuler Menu.
3. Click on the button to save your setting, or choose another configuration
option or QuikRuler function to save your setting or activate the selected function.
Setting Tone Options
QuikRuler III can sound a tone when you make a selection from the QuikRuler Menu, or
when you press the stylus tip on the digitizer surface, or both. You can opt to turn off the
tones entirely.
1. Display the Select Tones option on line 1.
The currently selected tone option is displayed on line 2.
Page 14

QuikRuler III 14
2. Click on the or button repeatedly until you see the tone setting that you
want to use. Choose from the following options:
Menu + Tablet
Menu Only
Tablet Only
Disabled
3. Select the button to save your setting, or choose another configuration option
or QuikRuler function to save your setting or activate the selected function.
Selecting Your Language
The QuikRuler III display supports a variety of languages. You can select your language
preference by:
1. Displaying the Select Language option on line 1.
The currently selected language is displayed on line 2.
2. Click on the or button repeatedly until you see the language setting you
want to use.
3. Select the button to save your setting, or choose another configuration option
or QuikRuler function to save your setting or activate the selected function.
Choosing the Decimal Point Character
QuikRuler III can display either a period (.) or a comma (,) as the decimal point character
when numeric values are shown.
1. Display the Decimal Pnt Char option on line 1.
The currently selected character, followed by a flashing cursor, is displayed on line 2.
Page 15

QuikRuler III 15
2. Click on the or button to move the cursor to the character you want to
use.
3. Select the button to save your setting, or choose another configuration option
or QuikRuler function to save your setting or activate the selected function.
Setting the Last Output Character
When a numeric value is present on line 2 of the display and the button is clicked,
the value is sent to the computer. You can use this option to specify which character you
want to use to indicate the end of the numeric value being sent. Your selection may be
predicated on the destination of the data. For example, you may want to choose the Tab
character as the Last Character if you are sending data to an Excel spreadsheet. The tab
character will move the cursor to the next cell, where it will be ready to receive the next
numeric value.
1. Display the Last Character option is shown on line 1.
The currently selected last character is displayed on line 2.
2. Click on the or button until you see the last character you want to use.
You can choose from the following terminator characters:
Enter
Tab
Down Arrow <↓>
Right Arrow <→>
3. Select the button to save your setting, or choose another configuration option
or QuikRuler function to save your setting or activate the selected function.
Page 16

QuikRuler III 16
Setting the Units and the Scale
Use the and functions to tell QuikRuler III the units in which you
want measurements to be displayed and the scale of the drawing being measured.
First, Identify the Unit of Measure
Use the function to indicate the units in which you want measurements to be
displayed. You will then set the scale of the measurements.
Example: Suppose you’re working with a map where 1 centimeter represents 3 kilometers.
You would use the function to tell QuikRuler III that you want to measure your
drawing in centimeters and to display the results in kilometers. You would then use the
function to set a 1:3 scale.
NOTE: Use the function at any time to convert the current measurement,
shown on the second line of the display, to a different unit of measure.
Set the Units
1. Click on the button.
QuikRuler III displays:
Using the previous example, centimeters are the units of measurements from your
drawing, and kilometers are the units you want to display. The flashing cursor follows
the unit that can be changed.
Page 17

QuikRuler III 17
2. Click on the or button to move the flashing cursor to the unit you want
to set. Select the or button until you see the unit of measurement you
want to use displayed. Select from:
mm in
cm ft
m yd
km mi
3. Click on the button to save your setting, or choose another option or function
to save your setting and activate the selected function.
Manually Setting the Scale
If you know the scale of the drawing you are working with, you can enter the measurement
scale manually.
1. Use the button to select the unit of measure for the first part of the
scale. For example, if 1 centimeter equals 3 kilometers, select cm as the unit of
measure and km as the displayed unit.
2. Click on the button to activate the Scale function.
QuikRuler III displays the current scale setting on line 2. For example, if the current
scale is 1 cm = 3 km, QuikRuler III displays 1:3 on line 2 with the flashing cursor
positioned over the 3.
3. Change the scale by clicking on a number on the QuikRuler Menu. For example,
click on if the desired scale is 1 cm = 5 km.
4. When the drawing scale is larger than 1:1, use a decimal value. If the scale were 5:1,
you would divide both sides of the ratio by 5 and click on the buttons so
the scale reads 1:2.
Page 18

QuikRuler III 18
In another example, if the drawing scale is given as 1/8 in = 1 ft, you would multiply
both sides of the equation by 8 and click on the button so that the QuikRuler
scale reads 1:8.
5. Click on the button to save your setting, or choose another option or function
to save your setting and activate the selected function.
NOTE: See Appendix B for a list of commonly used scales and their decimal equivalents.
Automatically Setting the Scale
On maps and many other types of drawings, a scale diagram can be found in the drawing’s
legend. You can use this type of diagram to set the measurement scale automatically.
Simply mark the starting and ending points of the legend and tell QuikRuler the distance
between the two points.
On other drawings, you can set the scale automatically using a straight surface in the
drawing that is of a known length. Simply mark the starting and ending points of the
surface and tell QuikRuler III the distance between the two points.
Page 19

QuikRuler III 19
Set the Scale Automatically
1. Click on the button to activate the Auto Scale function.
2. Follow the prompts that QuikRuler III displays to select the starting and ending scale
points.
For example, using the illustration of the map legend shown below, you would
select the point just below 0 as the starting point and the point just below the 4 as
the ending point.
QuikRuler III prompts you for Distance (units).
3. Use the number buttons on the QuikRuler Menu to indicate the distance between
the two points you selected.
Referring to the map legend above, you would click on to tell QuikRuler III that
the distance between the two points is 4 kilometers-kilometers having been
previously established as the unit of measure.
NOTE: You must first use the function to specify that your measured
values are in centimeters and displayed values are in kilometers.
Page 20

QuikRuler III 20
4. Click on the button to save your setting, or choose another option or function
to save your setting and activate the selected function.
5. To view the current Auto Scale setting, click on the button.
Setting the Counting Scale
You can use QuikRuler’s function to count areas or other components on your
drawing. For example, if you are using QuikRuler III to estimate how much electrical wiring
will be required for a building, you could use the function to count how many
electrical outlets will be needed. Normally, QuikRuler III counts by ones. However, you can
change the scale to something else using the function. For example, you can
use the function to tell QuikRuler III to count by fives, tens or some other value –
even fractions.
Change the Counting Scale
1. Click on the button to activate the Count Scale function.
QuikRuler displays the current counting scale under the flashing cursor.
2. Select the appropriate number on the QuikRuler Menu. For example, click on the
and buttons if you want to count by tens.
3. Click on the button to save your setting, or choose another option or function
to save your setting and activate the selected function.
Page 21

QuikRuler III 21
Measurements
The following sections can describe how to use QuikRuler III to measure the components of
your drawing.
Measuring the Size of an Area
QuikRuler III can instantly calculate the size of an area on your drawing. Follow these steps:
1. Click on the button on the QuikRuler Menu to activate the Area
calculation function.
2. Press and hold down the stylus tip on the outer edge of the area you want to
measure.
3. While still holding the stylus tip down, trace around the perimeter of the area with
the stylus.
4. Lift the stylus tip when you have finished tracing the area.
QuikRuler III displays the size of the area in the units you specified.
Page 22

QuikRuler III 22
Area Shortcut
If the area you are measuring has some straight edges, you can use a shortcut when
calculating the size of the area:
1. Trace the curved portion of the area, as previously described, by pressing the stylus
tip down and following the area’s perimeter.
2. When you reach a straight edge, lift the stylus tip at one end of the edge and press it
back down at the other end.
Adding or Subtracting Areas
After calculating the size of an area, you can add an additional area to it, or subtract
another area from it. For example, suppose you are estimating the amount of paving
material that will be needed for a parking lot. You would first measure the size of the
entire lot, and then subtract the sizes of the areas within the lot that will not be paved.
Page 23

QuikRuler III 23
1. Measure the entire area, as described in the previous sections.
2. Click on the or button to indicate an area is going to be added or
subtracted, respectively.
3. Measure the area to be added to, or subtracted from, the first area.
4. If necessary, repeat the previous two steps to add or subtract additional areas.
5. Click on the button to calculate the total.
Measuring the Length of a Perimeter
QuikRuler can instantly calculate the length of an area’s perimeter.
1. After measuring an area, click on the button to display the length of the
area’s perimeter.
NOTE: Only the perimeter of the most recently measured area is displayed. Perimeters of
multiple areas are not summed unless the areas are measured in Perimeter Mode.
Counting Drawing Elements
Use the function to count the elements of your drawing, such as rooms, or
walls, or electrical outlets. You can count at any time, even while you are using another
function. Use the function to set the counting scale.
1. Click on the gray button on your stylus if you want to increment the current count in
the background while you are using another function.
OR
Page 24

QuikRuler III 24
1. Click on the button on the QuikRuler Menu to activate the Count
function. QuikRuler III displays the current count.
2. Continue the current count either by touching the pen tip to the elements you are
counting in the drawing, or by clicking on the gray buttons on your stylus.
3. To initiate a new count, click on the button to zero out the count, and
then click on the first element on the drawing to be included in your new count.
Continue counting by clicking the stylus gray button, or by clicking directly on the
elements in the drawing with the pen tip to add them to the count.
Measuring a Straight Segment
Use the function to measure the length of a straight segment.
1. Click on the button.
2. Follow the prompts that QuikRuler III displays to select the starting and ending
points of the segment.
QuikRuler III displays the length of the segment.
Page 25

QuikRuler III 25
3. To measure another segment, click on its starting and ending points. You do not
have to click on the button first.
NOTE: Each measured segment is automatically summed with previously measured
segments when in Length Segment Mode.
4. To start a new sum, click on the button.
Measuring a Continuous Length
Use the function to measure a curved length.
1. Click on the button.
2. Press the stylus tip down on the starting point of the length and hold.
3. Trace along the length of the segment until you reach the ending point.
4. Lift the stylus tip.
QuikRuler III displays the length of the line.
5. If the segment you are measuring is a straight line, click on the starting point of the
line, lift up the stylus and click on the ending point.
Page 26

QuikRuler III 26
Adding or Subtracting Lengths
To add or subtract lengths, follow these steps:
1. Measure the first length.
2. Click on the or button.
3. Measure the next length.
4. If necessary, repeat the previous two steps to add or subtract additional lengths.
5. Click on the button to display the length total.
Using QuikRuler III as a Calculator
You can use the arithmetic operations and the numeric keypad buttons on the
QuikRuler Menu to perform calculator functions.
Page 27

QuikRuler III 27
You can use the calculator to transform your measurements in various ways. For example,
suppose you are using a drawing to estimate the amount of carpeting that will be required
for an entire floor of an office building. You want to add 5 percent to the measurement, to
account for waste, mistakes and so on. You would follow these steps:
1. Measure the area where carpeting is required.
2. Click on the buttons.
3. Select the button to display the total.
You can also use the QuikRuler Menu numeric keypad as a traditional calculator to add,
subtract, multiply and divide numbers independently of your measurements. You can do
this at any time, even while you are using QuikRuler III functions.
Editing Data on the Display
QuikRuler III provides several ways of editing and correcting the data on the display.
Correcting Mistakes When Accumulating Measurements
When you are accumulating measurements for areas and lengths, use the
function to clear the current measurement. In addition, you can use this function to
correct mistakes made while accumulating measurements.
Follow the steps below when you need to fix a mistake that occurred while you were
adding the measurements of several areas. You can use the same procedure to fix
mistakes made while accumulating measurements for lengths.
1. Click on the button to clear the area you are currently measuring from
the QuikRuler III display.
2. Select the button.
QuikRuler III displays the size of the area you have already calculated.
Page 28

QuikRuler III 28
3. Measure the rest of the area or areas. Click on the button to display the total
when you are done.
Clearing the Total
You can clear the total that is on the second line of the display at any time. Click on the
button to clear the total.
Correcting Numeric Entries
When you are entering numbers, you can delete the last number you entered by clicking on
the button. It will delete the last digit you entered.
Sending Data to Your PC
You can send data directly from the QuikRuler III display to your computer via a USB
connection. The data can be input to any program running under Windows 98 SE, ME,
2000, XP, Vista, 7 and 8. Contact GTCO CalComp by Turning Technologies Technical
Support for information about connecting the QuikRuler III to other operating systems.
Page 29

QuikRuler III 29
You can navigate around in your
spreadsheet application by selecting the
cursor-movement buttons. For example,
click on the button to move up one line
or cell in your spreadsheet application.
Send Data from QuikRuler III to PC
1. Make sure the cursor is positioned in the application where you want to insert the
measurement from QuikRuler III.
2. Click on the button on the QuikRuler Menu, or on the black button on your
stylus, (or on the green button on the 4-Button Cursor, or the 7 button on the 16Button Cursor) to send the number shown on line 2 of the QuikRuler III display to
the computer. The value will be entered into your application as it would if you had
actually typed the value on your keyboard.
To simplify data entry to your spreadsheet, use the Last Character option from the
function. The option is used to set the last character sent, terminating the
numeric value on line 2 of the QuikRuler III display. For example, select the Down Arrow
<↓> or Enter option as the last character when you want to enter a column of values to
your spreadsheet. This will enter the value in a cell and move the cursor to the cell
immediately below the entry, where it will be ready for the next value.
Page 30

QuikRuler III 30
Message Meaning
**No Digitizer**
QuikRuler III is not attached to the digitizer. You must
attach it before you can proceed. See instructions for
Connecting the Components.
**Memory Failure**
The power on test detected a memory failure. QuikRuler
III will attempt to continue normally with all operations, if
you click the stylus tip or cursor anywhere on the digitizer
surface.
**Bad Ref Point**
This message will appear during a Relocate Menu
operation when an incorrect lower left or lower right
reference point is entered. Make sure that the entire
QuikRuler Menu is within the digitizer’s measuring area.
Repeat the Relocate Menu operation when this message
appears.
**Menu Off Tablet**
This message will appear during a Relocate Menu
operation when the QuikRuler Menu is not positioned
entirely within the digitizer’s measuring area. Move the
menu and repeat the Relocate Menu operation when this
message appears.
**Number Too Big**
The number on line 2 of the display is too large for
QuikRuler III. Try changing units to reduce the number
size when this message appears.
Messages
QuikRuler III displays a variety of messages as you use its functions. Most of the messages
are indicative of normal operation, such as prompts that instruct you how to perform the
next step in a process. Other messages can signal a problem.
If you receive any of these messages and the above suggestions do not correct the
problem, contact the GTCO CalComp by Turning Technologies Technical Support Team.
Page 31

Appendix A:
Transducer Element
Function
Stylus
Tip switch
Gray button
Black button
QuikRuler Menu selections
Increment Count accumulator
Send
4-Button Cursor
Yellow button
White button
Blue button
Green button
QuikRuler Menu selections
Increment Count accumulator
Clear
Send
16-Button Cursor
0 button
1 button
2 button
3 button
4 button
5 button
6 button
7 button
8 button
9 button
A button
B button
C button
D button
E button
F button
QuikRuler Menu selections
QuikRuler Menu selections
QuikRuler Menu selections
QuikRuler Menu selections
Increment Count accumulator
Clear
Relocate Menu
Send
Area
Length Segment
Length Continuous
Perimeter
Count Mode
Left Arrow
Right Arrow
Total (=)
Transducer Button Functions
QuikRuler III 31
Page 32

Appendix B:
Conversion Table
QuikRuler III 32
Page 33

QuikRuler III 33
Scale to convert: 3/16”=1’
Make both sides the same unit of measure (inches): 3/16” = 12”
Multiply both sides by the denominator (16) to eliminate the fraction:
3/16*16 = 12*16 Result: 3 = 192
Divide both sides by the numerator (3) to get the ratio: 3/3 = 192/3 = 64”
Divide the value by the number of inches in a foot (12) to convert the value to feet: 64/12 =
5.33
So, in 3/16” scale, 1 inch is equal to 5.33 feet.
Appendix C: Regulatory Statements and Warranty
Radio Frequency Energy Notice
This equipment has been tested and found to comply with the limits of a Class B digital
device, pursuant to Part 15 of the FCC rules. These limits are designed to provide
reasonable protection against harmful interference in a residential installation. This
equipment generates, uses and can radiate radio frequency energy and, if not installed and
used in accordance with the instructions, may cause harmful interference to radio
communications. However, there is no guarantee the interference will not occur in a
particular installation. If this equipment does cause harmful interference to radio or
television reception, which can be determined by turning the equipment off and on, the
user is encouraged to try to correct the interference by one or more of the following
measures:
Reorient or relocate the receiving antenna.
Increase the separation between the equipment and the receiver.
Connect the equipment into an outlet on a circuit different from that to which the
receiver is connected.
Reorient or coil cables.
Consult the dealer or an experienced Radio/TV technician for help.
NOTE: Any cables the user adds to the device must be shielded to be in compliance with
the FCC standards. Any unauthorized modification to this device could result in the
revocation of the end user’s authority to operate this device.
Page 34

QuikRuler III 34
Canada
This digital apparatus does not exceed the Class B limits for radio noise emissions from
digital apparatus as set out in the radio interference regulations of the Canadian
Department of Communications.
Le present appareil numérique n’emet pas bruits radioelectriques depassant
les limites applicables aux appareils numériques de Classe B prescrites dans
le réglement sur le brouillage radioelectrique edicte par le Ministere des
Communications du Canada.
Page 35

QuikRuler III 35
Page 36

QuikRuler III 36
Page 37

Japan
QuikRuler III 37
Bescheinigung des Herstellers/Importeurs
Heirmit wird bescheinigt, dass der/die/das
3036R
(Geraet, Typ, Bezeichnung)
im Uebereinstimmung mit den Bestimmungen der
Vfg 1046/1984
(Amtsblattverfuegung)
Funk-Entstort ist.
Der Deutschen Bundespost wurde das Inverkehrbringen dieses Geraetes angezeigt und die
Berechtigung zur Ueberpruefung der Serie auf Einhaltung der Bestimmungen eingeraumt.
GTCO CalComp, Inc.
(Name des Herstellers/Importeurs)
Dieses Geraet wurde einzeln sowohl als auch in einer Anlage, die einen normalen
Anwendungsfall nachbildet, auf die Einhaltung der Funkentstoerbestimmungen geprueft.
Es ist jodoch moeglich, dass die Funkentstoerbestimmungen unter unguenstigen
Umstaenden bei anderen Geraetekombinationen nicht eingehalten werden. Fuer die
Page 38

QuikRuler III 38
Einhaltung der Funk-entstoerbestimmungen seiner gesamten Anlage, in der dieses Geraet
betrieben wird, ist der Betrieber verantwortlich.
Einhaltung mit betreffenden Bestimmungen kommt darauf an, dass geschirmte
Ausfuhrungen gebraucht werden. Fuer die beschaffung richtiger Ausfuhrungen ist der
Betrieber verantwirtlich.
European Union WEEE Directive
The manufacture of this equipment required the extraction and use of natural resources.
It may contain hazardous substances that could impact health and the environment.
In order to avoid the dissemination of the hazardous substances into the
environment and to diminish the pressure on our natural resources, GTCO CalComp
by Turning Technologies encourages you to return this product to the appropriate
take-back system facility. These facilities reuse or recycle most of the materials in
this equipment in a responsible way.
The crossed-out wheeled bin symbol below invites you to use these take-back
systems.
If you need more information about the collection, reuse and recycling systems in
your area, please contact your local or regional waste authority.
Further information about the responsible end-of-life management of this and other
GTCO CalComp by Turning Technologies products is available on our website at
www.gtcocalcomp.com.
Page 39

QuikRuler III 39
Appendix D
Limited Warranty for QuikRuler III
GTCO CalComp by Turning Technologies, Inc. warrants these products to be free from defects in
material and workmanship under the following terms. Complete and return the enclosed warranty
registration card to ensure that your products are covered with this warranty.
Coverage
Parts and labor are warranted for two (2) years from the date of the first consumer purchase for the
digitizer tablet, controller, transducers and tablet accessories. Power supply and cables are also
warranted for one (1) year. This warranty applies to the original consumer purchaser only.
Within the European Union, the warranty period is two (2) years, as mandated by the EU. Contact
your local dealer or distributor for additional warranty information.
Warranty is only valid if original consumer’s purchase or lease date is less than or equal to six
months from the original GTCO CalComp by Turning Technologies sale date. This information will
be captured by the system serial number and confirmed by the reseller’s purchase order.
A nominal Warranty Handling Fee will be charged after the first 90 days of use and calculated from
the date of original consumer purchase. This payment may be made by Visa, MasterCard or
American Express. A copy of the sales receipt or invoice will be required for warranty verification.
Conditions
Except as specified below, this warranty covers all defects in material or workmanship in the
products. The following are not covered by the warranty:
1. Any product on which the serial number has been defaced, modified or removed (if
applicable).
2. Damage, deterioration or malfunction resulting from:
a. Accident, misuse, abuse, neglect, fire, water, lightning or other acts of nature,
unauthorized modification for any purpose, unauthorized product modification, or
failure to follow instructions supplied with the product.
b. Repair or attempted repair by anyone not authorized by GTCO CalComp by Turning
Technologies.
c. Any damage in shipment of the product (claims must be presented to the carrier).
d. Any other cause which does not relate to a manufacturing defect.
3. Any product not sold or leased to a consumer within six months of GTCO CALCOMP BY
TURNING TECHNOLOGIES original sale date.
Page 40

QuikRuler III 40
GTCO CalComp by Turning Technologies will pay all labor and material expenses for covered items,
but will not pay for the following:
1. Removal or installation charges.
2. Costs for initial technical adjustments (set up), including adjustment of user controls.
3. Certain shipping charges. (Payment of shipping charges is discussed in the next section of
this warranty.)
4. Packaging costs. (Customers should keep their boxes.)
Warranty Service Procedures
1. To obtain service on your GTCO CalComp by Turning Technologies product, contact the
Technical Support Department to receive a Return Material Authorization Number (RMA#)
and shipping instructions by calling: 1-866-746-3015.
2. Ship the product to GTCO CalComp by Turning Technologies with the RMA# marked clearly
on the outside of the box. Without a clearly marked RMA# on the shipping box, GTCO
CalComp by Turning Technologies reserves the right to refuse the shipment.
3. Although you must pay any shipping charges to ship the product to GTCO CalComp by
Turning Technologies for warranty service, GTCO CalComp by Turning Technologies will pay
the return shipping charges for ground shipment. Other shipping options are available at an
additional fee.
4. Whenever warranty service is required, the original dated sales invoice (or a copy) must be
presented as proof of warranty coverage and should be included in shipment of the product.
Please also include your name, address, telephone number, fax number, email address and
a description of the problem.
5. If GTCO CalComp by Turning Technologies determines that the unit is not defective within
the terms of the warranty, the consumer shall pay the cost of all freight charges, as well as
any repair charges.
Technical Support
Web-based Technical Support is available free of charge at: www.gtcocalcomp.com, where current
driver releases, as well as comprehensive technical support, troubleshooting, Technical Bulletins and
FAQs can be found.
Telephone Technical Support is available free of charge to the original consumer for a period of 90
days from the date of purchase of the product. Please contact our Technical Support Department
at: 1-866-746-3015 or fax your request to: 480.998.1751.
Disclaimer of Unstated Warranties
The warranty printed above is the only warranty applicable to this purchase. ALL OTHER
WARRANTIES, EXPRESS OR IMPLIED, INCLUDING, BUT NOT LIMITED TO, THE IMPLIED WARRANTIES
OF MERCHANTABILITY AND FITNESS FOR A PARTICULAR PURPOSE ARE DISCLAIMED. Assuming the
warranty above stated is otherwise applicable, it is expressly understood and agreed that GTCO
CalComp by Turning Technologies sole liability whether in contract, tort, under any warranty, in
Page 41

QuikRuler III 41
negligence or other shall be for the repair or replacement of the defective parts and under no
circumstances shall GTCO CalComp by Turning Technologies be liable for special, indirect or
consequential damages. The price stated and paid for the equipment is a consideration in limiting
GTCO CalComp by Turning Technologies liability.
Notice
Some states and provinces do not allow the exclusion or limitation of incidental or consequential
damages, so the above exclusion may not apply to you. This warranty gives you specific legal rights,
and you may have other rights, which vary from state to state, or province to province.
To obtain service on your GTCO CalComp by Turning Technologies product, call our Technical
Support Department at: 1-866-746-3015 or fax us at (480) 998-1751. We can also be contacted
through our website at www.gtcocalcomp.com (in US); at EUOffice@gtcocalcomp.com (in Germany);
at infos@calcomp.fr (in France).
Important!
All products returned to GTCO CalComp by Turning Technologies for service must have prior
approval in the form of a Return Merchandise Authorization Number (RMA#), which can be obtained
by calling the Technical Support Department.
Page 42

QuikRuler III 42
Corporate Headquarters
14557 N. 82nd Street
Scottsdale, Arizona 85260
Tel: 1-866-746-3015
Support: 1-866-746-3015
Fax: 480-998-1751
Copyright© 2014 GTCO CalComp by Turning Technologies, Inc.
QuikRuler III is a trademark of GTCO CalComp by Turning Technologies, Inc.
All other products and company names are the trademarks or registered trademarks of
their respective owners.
The information contained in this document is subject to change without notice. GTCO CalComp by
Turning Technologies assumes no responsibility for technical, or editorial errors, or omissions that may
appear in this document, or for the use of this material. Nor does GTCO CalComp by Turning
Technologies make any commitment to update the information contained in this document. This
document contains proprietary information which is protected by copyright. All rights reserved. No part of
this document can be photocopied or reproduced in any form without the prior, written consent of GTCO
CalComp by Turning Technologies, Inc.
 Loading...