

1. GENERAL SAFETY RULES
IR
MEASURE
WARNING
!
• CAUTION—use of controls or adjustments or performance
of procedures other than those specied herein may result
in hazardous radiation exposure.
• DO NOT operate this instrument in areas where there is risk
of re or explosion, like in the presence of ammable liquids,
gases, dust, etc.
• DO NOT disassemble the instrument. There are no user
serviceable parts inside. Disassembling the instrument will
void all warranties on the product.
• DO NOT modify the instrument in any way. Modifying the
instrument may result in hazardous laser radiation exposure.
• To ensure that the instrument is used safely, follow all safety
and operating instructions in this manual. If the instrument
is not used as described in this operation manual, the safety
features of this device may be impaired.
• To avoid personal injuries and damage to the instrument, use
extreme caution when working around hot machine or engine parts,
such as radiators, exhaust manifolds, catalytic converters, etc.
• Repair and servicing must always be performed by qualied
repair personnel. Repairs performed by unqualied personnel
could result in serious injury.
• This instrument is designed for indoor use at temperatures
between 32°F and 122°F (0°C to 50°C), altitudes up to 6500
ft. (2,000 m), and 10% to 90% relative humidity.
Read all instructions. Failure to follow all
instructions listed below may result in
hazardous radiation exposure, electric
shock, re, and/or serious injury.
2. LASER SAFETY RULES
This label is on your
laser instrument
for your safety.
ALWAYS BE AWARE
of its location when
using the tool.
DO NOT direct the laser beam at persons or
animals and do not stare into the laser beam
yourself. This tool produces class 2 laser
radiation and complies with 21 CFR 1040.10 and
1040.11 except for deviations pursuant to Laser
Notice No. 50, dated June 24, 2007. This can lead
to persons being blinded.
Working safely with this instrument is possible only when the
operating and safety information are read completely and the
instructions contained therein are strictly followed.
• Never make the warning labels on the instrument unrecognizable.
• Never aim the beam at a workpiece with a reective surface.
• Mirrors or similar reective surfaces are not recommended for laser
use, as these could reect the beam back towards the operator.
• Do not point the laser beam at persons or animals and do not look
into the laser beam yourself, not even from a long distance.
• Do not use laser viewing glasses as safety goggles, because they
do not protect against laser radiation.
• Do not allow children to use the measuring tool without supervision.
They could unintentionally blind other people.
• ALWAYS: Make sure that any bystanders in the vicinity of use are
made aware of the dangers of looking directly into the instrument.
into beam. Laser class 2 product complies
with 21 CFR 1040.10 and 1040.11 except
for deviations pursuant to Laser Notice No.
50, dated June 24, 2007.
IEC60825-1:2007-03
<1 mw @ 635 nm
Laser radiation. Do not stare
TA110
3. TECHNICAL SPECIFICATIONS
3.1 General Specications
Display: 5-digit LCD, with measuring unit, low
battery and laser on target indicators.
Resolution: ±(0.05%+1 Digit)
Operating temperature: 32°F to 122°F (0°C to 50°C)
Response time: 0.5 seconds (over 120 RPM)
Range selection: Auto ranging
Memory: Maximum, minimum, and display
hold.
Distance to target: 2” to 20” (50 mm to 500 mm)
Laser class: 2
Laser type: < 1 mW @ 635 nm
Power source: 9 V battery type NEDA 1604,
IEC6F22 IEC 6LR61
Battery life: Approx. 20 hours (w/alkaline batteries)
Power saving: Automatic shut off after 7 seconds
Dimensions: 3.13”x 1.88”x 7.0” (80 x 48 x 178 mm)
Weight: 7.6 oz. (215 g) including battery
Accessories: User’s manual, 3 x 20 cm self-adhesive
reective tape, soft pouch, and 9 V
alkaline battery
3.2 Measurement Specications
•Accuracies are ±(% of reading + number of least signicant digits)
at 23°C ±3°C (73°F ± 6°F) ambient temperature, with less than 75%
relative humidity.
Function Range Acuracy Resolution
RPM
COUNT
(total revolutions)
1 to 99,999 RPM
1 to 99,999
4. OPERATION
!
Use of controls or adjustments or performance of procedures other
than those specied herein may result in hazardous radiation exposure.
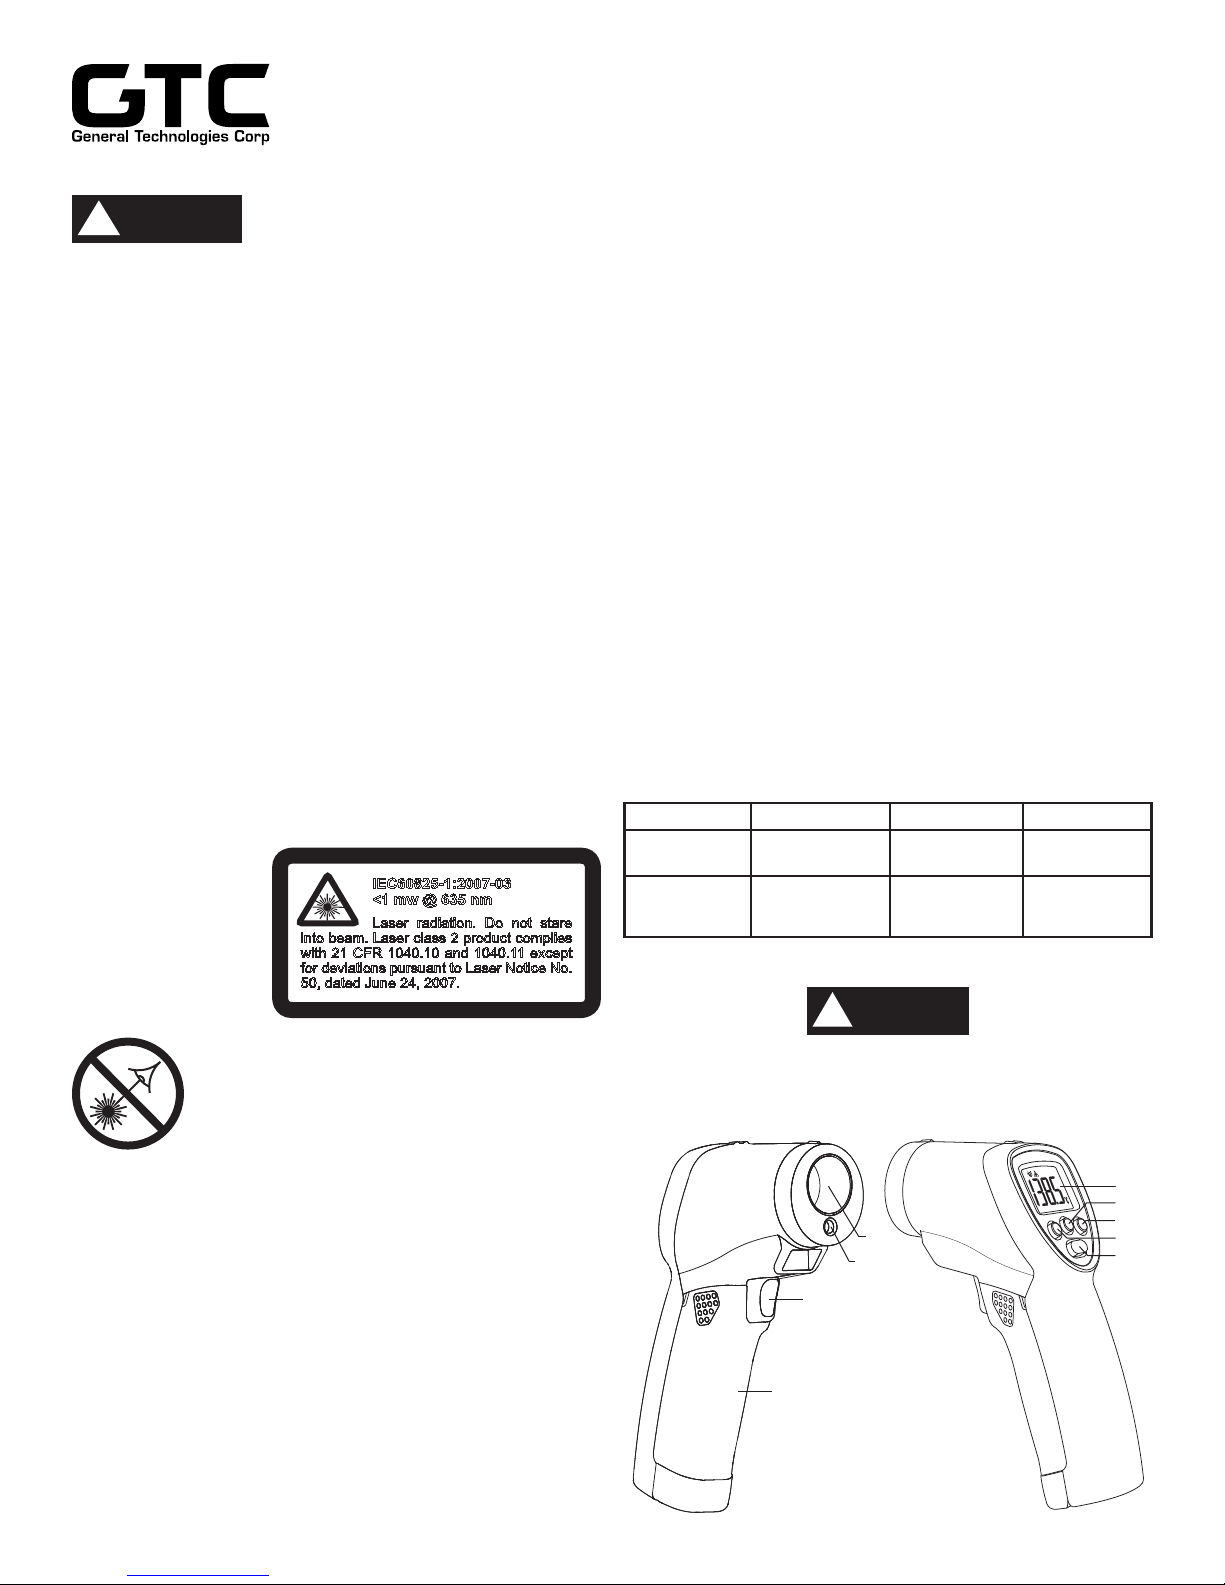
4.1 Instrument Description
8
1) LCD display
2) Backlight on/off button
3) Minimum select button
9
4) Maximum select button
5) RPM/Count button
6) IR sensor aperture
7) Laser aperture
8) Measurement trigger
9) Battery cover
±(0.05%+1 Digit)
±(0.05%+1 Digit)
CAUTION
6
7
1 RPM
1 COUNT
1
2
3
4
5
4.2 Display Description
5
HOLD indicator
On target indicator
Low battery
MAX indicator
MIN indicator
Backlight indicator
Laser output warning
Numeric reading
RPM indicator
COUNT indicator
4.3 Measurement Procedures
CAUTION
!
4.3.1 RPM/COUNT Measurement
Reective
tape
• Apply a reective mark or a piece of reective tape to the rotating
object under measurement.
• Press the Measurement trigger and verify if the RPM or COUNT
Indicator is shown in the display. The selected function can be
changed by pressing the RPM/COUNT button.
• Press the Measurement trigger and aim the laser beam at the
reective mark or tape on the rotating object.
• Verify that the on target indicator appears on the display to
conrm the instrument is detecting the rotation of the object and
the reective mark on it.
• Proceed to read the RPM or Count on the digital display.
4.3.2 Reective marks
• Cut a 1/2” (1.25 cm) length of the reective tape provided, peel off
the backing to expose the adhesive, and attach it to the rotating
part or shaft to be measured, following these recommendations:
- The non-reective area must be larger than the reective piece of tape.
- If the object or shaft to be measured is reective, rst cover it with
a matte tape or paint it black before attaching the reective tape.
- Ensure the surface is clean and smooth before applying the tape.
4.3.3 Very low RPM measurements
To measure slowly rotating parts, it may be advantageous to
follow the procedure below to increase the update rate of the
measurement:
• Depending on the size of the rotating object or shaft, attach
multiple reective marks, evenly spaced along its circumference.
• Proceed to measure RPM as described in 4.3.1, and divide the
reading by the number of reective marks, in order to obtain the
correct RPM.
Use of controls or adjustments or performance
of procedures other than those specied herein
may result in hazardous radiation exposure.
Laser beam
2 to 20”
5 to 50 cm
4.4 Other Functions
4.4.1 Display Hold
• The instrument will automatically hold the last measurement
reading for approximately 7 seconds after the Measurement
trigger has been released.
4.4.2 Display Backlight
• Make sure the instrument is turned on, if not, press the
Measurement trigger to turn it on.
• Pressing the Backlight on/off button, will turn the display backlight
on and off.
• When the backlight is not needed, turn it off to prolong battery life.
4.4.3 MAX and MIN functions
• The instrument automatically stores in its internal memory the
maximum and minimum values measured during a measuring
cycle. A measuring cycle starts when the Measuring trigger is
pressed, and nishes when the Measuring trigger is released.
• While the instrument is on, press once the MAX or MIN button,
the corresponding indicator will appear on the display, and the
maximum or minimum value stored in memory will be shown.
• Once the MAX or MIN function is selected, if the Measurement
trigger is pressed again, the maximum and minimum values
stored in memory will be cleared and then updated with the new
measurement. To turn the MAX or MIN function off, press the
corresponding function button once.
Note: The values stored in memory (maximum and minimum) will
be deleted when the unit turns itself off (automatic shut off),
or when a new measuring cycle is started.
5. MAINTENANCE
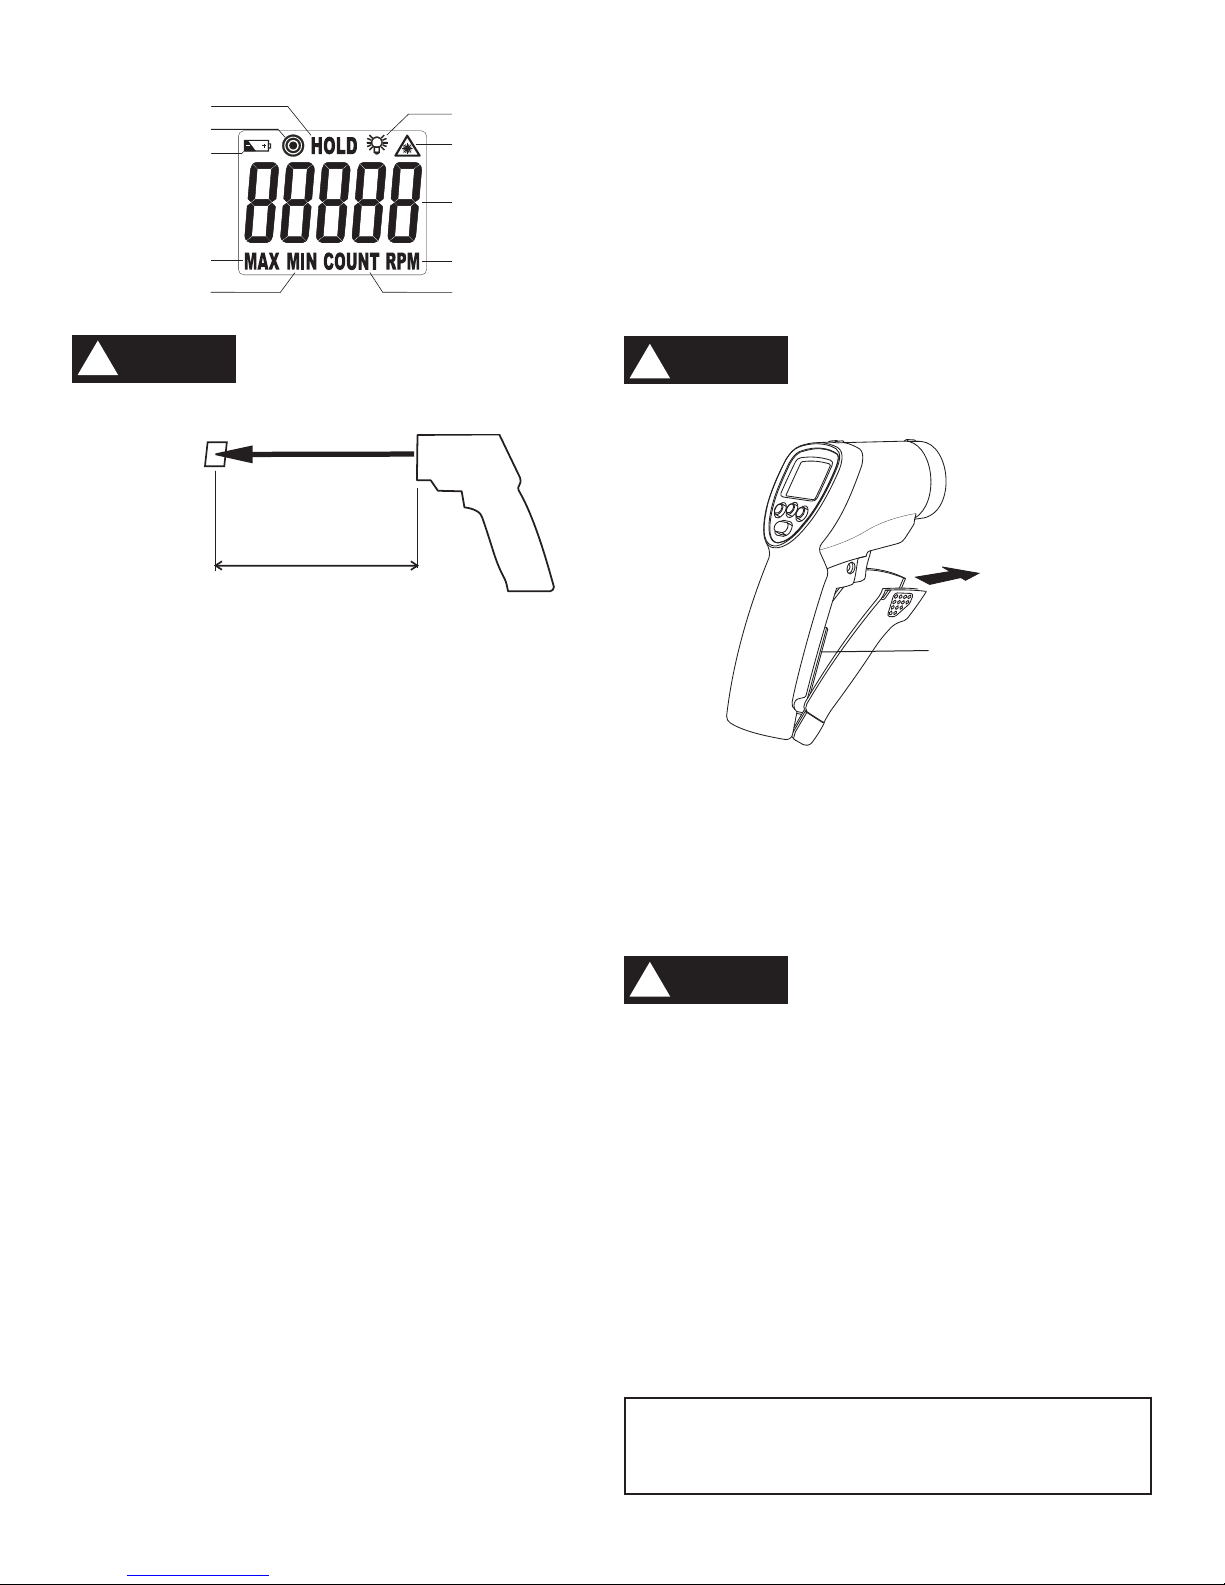
5.1 Battery Replacement
In order to avoid laser radiation exposure
CAUTION
!
opposite to the display) is pointing away from any person, animal,
or reective surface.
• When the battery is low and needs to be replaced, the “Low battery
indicator” symbol will appear on the lower left hand side of the display.
• To replace the battery, open the battery compartment cover
(located at the front of the handle) by pulling on the nger indents
near the trigger, and remove the battery.
• Replace with a new 9 V alkaline battery type NEDA 1604 or
IEC6F22 observing the proper polarity when connecting the battery
terminals, and close the battery cover.
when removing or replacing the battery
always make sure the laser aperture (located
Pull to open
battery cover
Battery
5.2 Cleaning
In order to avoid laser radiation exposure,
CAUTION
!
remove the battery before performing any
cleaning of the lens or exterior of the instrument.
5.2.1 Lens Cleaning
Debris or dirt on the lens may cause obstruction and reduce the
accuracy of the tachometer. If this occurs, either wipe the lens
with a cotton swab (moistened with water only) or blow the loose
particles off with clean compressed air. Do not use solvents on the
lenses, as they may damage the instrument.
5.2.2 Exterior Cleaning
Periodically wipe the enclosure with a soft damp cloth and mild
household cleanser. Do not use abrasives or solvents. Ensure that
no water gets inside the instrument to prevent possible short circuits
and damage.
6. WARRANTY
One year limited warranty, excluding batteries and fuses. For
details see Standard Warranty Information on our web page or
request a printed copy.
General Technologies Corp.
#121 - 7350 72nd Street Tel.: (604) 952-6699
Delta, BC Fax: (604) 952-6690
Canada V4G 1H9 www.gtc.ca
© Copyright 2016 General Technologies Corp.
 Loading...