

TR-206
User Manual
Version 1.1

TR-206 page 2
CONTENT
1 Safety ............................................................................... 4
2 TR-206 Introduction ......................................................... 6
Brief Introduction ............................................................ 6
Features ......................................................................... 6
3 Specifications ................................................................... 8
Hardware Specifications.................................................... 8
4 Getting Started ............................................................... 10
Included accessories .......................................................10
Preparing your SIM Card for GPRS-activation .....................11
Installing The SIM Card ...................................................11
Charging the Battery .......................................................13
Powering the TR-206 On/ Off ............................................13
5 TR-206 Device Configuration .......................................... 14
Standby Mode ................................................................20
Keypad Lock ..................................................................23
6 Phone Call Function ........................................................ 25
Making Phone Calls .........................................................25
Answer or reject the incoming calls ...................................26
Adjusting the earpiece volume during a phone call ..............26
7 Phone Book ..................................................................... 28
Searching Your Contacts ..................................................28
8 Call List .......................................................................... 29
9 Settings of Tracker ......................................................... 30
Vibrating and ring ...........................................................31
Ringing volume ..............................................................31
Alarm Clock ...................................................................32
Data Logger ...................................................................33
Auto Key Lock ................................................................34
Date and Time................................................................34
10 Frequent Operation ...................................................... 36
Answer/ hang up the phone call........................................36
Adjust the volume level ...................................................36

TR-206 page 3
Speed dial and phone book dial ........................................37
Sending out an emergency message to the assigned phone
number(s) and/ or GPRS service server. ............................38
11 Installing The USB Driver and Device Utility For The
TR-206 .............................................................................. 40
Install USB Driver ...........................................................40
Install Device Utility ........................................................46
12 Device Utility Operation ................................................ 47
Logging into the Device Utility ..........................................48
TR-206 Device Information ..............................................51
Adding phone numbers to your phone book and assigning phone
numbers to speed dial buttons .........................................53
Setting up phone number(s) to receive emergency messages
....................................................................................54
Setting up GPRS parameters ............................................55
Setting up the ring tone and alarm clock ...........................56
Setting Up The TR-206 Logger ..........................................58
Setting up the language of the “Device Utility” ...................59
13 Simple Command .......................................................... 60
14 Troubleshooting and Safety .......................................... 62

TR-206 page 4
1 Safety
● In order to reduce the risk of an electromagnetic wave,
please use this tracker accordingly.
● Battery Usage:
1. The battery might explode if it is placed in the
device incorrectly, or it is in an extremely high
temperature environment.
2. Charge the battery in a cool dry place.
3. The included battery is manufacturer-approved
to use with the TR-206. Do not use any other
non-manufacturer approved battery. It might
damage the tracker. If you need to change the
battery, please contact your local GlobalSat
dealer.
4. Please dispose of any unused batteries according
to your local regulations.
● Persons with a pacemaker should keep the TR-206
more than 20 cm (6 inches) from their pacemakers
when the TR-206 is powered on. Do not put the
TR-206 in a breast pocket; doing so could create
interference with your pacemaker.
● Turn off the TR-206 near medical equipment.
● Turn off the TR-206 when you are aboard an airplane.
Not doing so can cause interference with aircraft.
● Do not use the TR-206 at a gas station or in a highly
flammable area.
● The TR-206 must be used without interfering and

TR-206 page 5
being interfered by local legal broadcasting stations.

TR-206 page 6
2 TR-206 Introduction
Brief Introduction
The TR-206 is targeted towards children and the elderly. It not only
works as a tracker but also as a basic cell phone with two-way voice
communication to keep in touch with those whom are important to
you, with pre-programmed phone numbers via a single button
dialing. It also has an extra long battery life, and has an easy to use
interface. The TR-206 come with a SOS emergency panic button that
when pressed sends a text message to the assigned phone number(s)
to alert them to your emergency. The device can record, track, and
geo-tag its position via an “Over the Air” (OTA) command to the
tracking unit. The device can also be setup with a “Geo- fencing”
function, when the device is taken out of the “geo-fence” area it will
alert the assigned phone number(s).
Features
1. Four-band GSM 850/900/1800/1900MHz personal
tracker
2. Voice/SMS/GPRS communication.
3. Omni-directional GPS/GSM antenna
4. Built-in highly sensitive GPS chipset
5. Two-way voice communication
6. The TR-206 has the capability of being found
instantly via the internet based location/tracking

TR-206 page 7
service.
7. Up to 20 contacts in the phone book.
8. The TR-206 is equipped with an emergency panic
button.
9. Remotely set the tracker configuration by SMS or
GPRS or directly set via USB connection.
10. Supports Geo-fencing
11. The TR-206 sends SMS and tracker status to the
assigned phone number or service platform when
the battery power is low.
12. The TR-206 supports vibration and ringing
functions.
13. The TR-206 uses a rechargeable and replaceable
1100 mAh Li-ion battery for a long standby time.
14. The TR-206 comes with an alarm clock function.

TR-206 page 8
3 Specifications
Hardware Specifications
GSM Module:
GSM 850/900/1800/1900 MHz,GPRS class 10
GPS Chipset:
High sensitivity GPS chipset
Frequency:
L1, 1575.42 MHz
C/A code:
1.023 MHz chip rate
Channels:
66 channels
Antenna Type:
Omni-directional GPS antenna
Default Datum:
WGS-84
Operation
Temperature:
-20 ° to 60 ° C
Charging
Temperature:
0 ° to 45 ° C
Storage
Temperature:
-20 ° to 75 ° C
Humidity:
5% to 95% Non-condensing
Dimension:
84.5 mm(L) x 42.2 mm(W) x 17.2 mm(H)
Weight:
70g
Battery:
Rechargeable and replaceable 1100 mAh Li-ion
battery
Charging conne
ctor:
DC 5V
Standby time
(GPS off, GSM
on):
Up to 1 week
Periodic Report
Operation time
(60-second report
interval):
10~13 hour (depends on environment)
Talking time:
2 ~ 3 hour
USB Port:
Mini USB, used to connect to PC and

TR-206 page 9
power-charging。
Sensor
Motion sensor。
Certification
CE, FCC, NCC, RoHs
TR-206 page 10
4 Getting Started
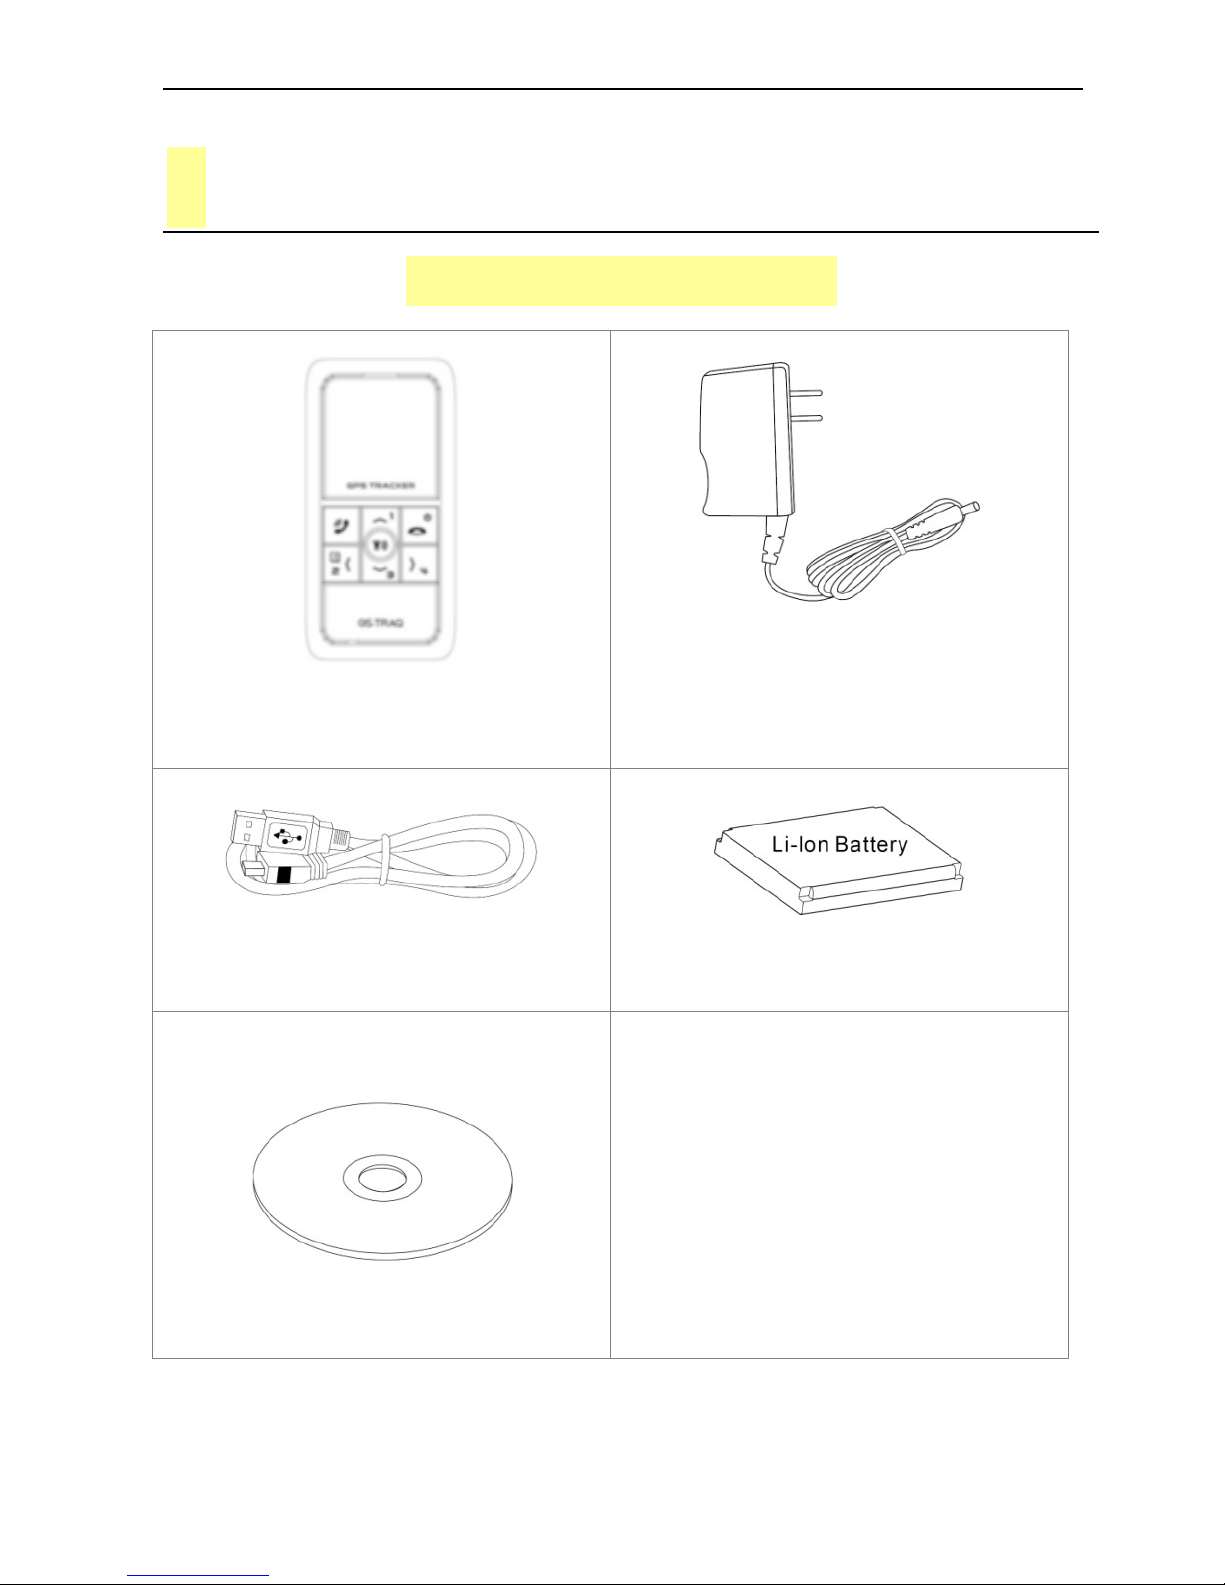
Included accessories
TR-206
AC Charger
Mini USB Cable
1100 mAh Li-ion Battery
CD-ROM

TR-206 page 11
Preparing your SIM Card for GPRS-activation
1.Inform your GSM service provider to activate the
GPRS function, get the APN information, the user
name, and user password.
Installing The SIM Card
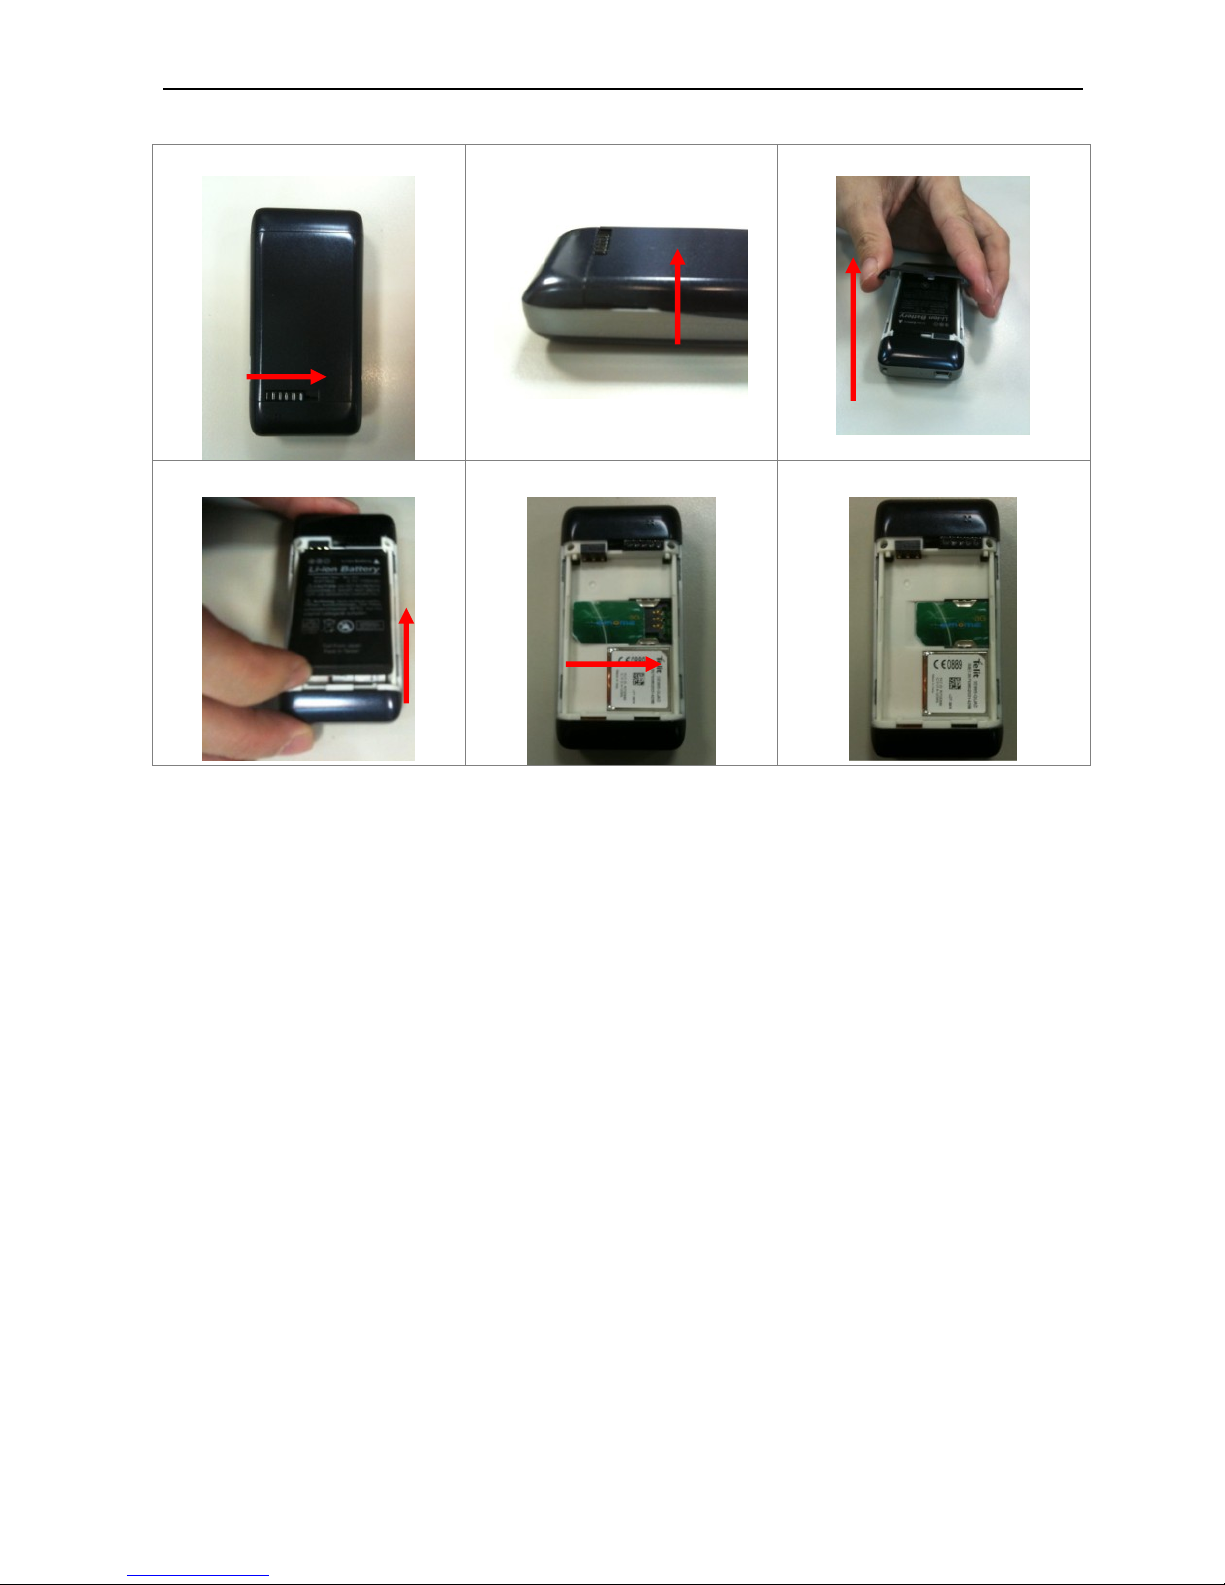
Steps for installing the SIM card are as follows:
1. Turn the TR-206 on its face with the battery
compartment facing up.
2. Open the battery cover.
3. Take out the battery after opening the cover.
4. Insert the SIM card into the SIM card slot, as shown
on the device.
5. Place the battery back into the battery compartment,
and put back the battery cover.
TR-206 page 12
1 2
3
4 5 6

TR-206 page 13
Charging the Battery
If you are using the TR-206 for the first time, charge
the TR-206 for at least 5 hours. (The included battery is
manufacturer-approved for use with the TR-206 tracker.
The use of any other battery might damage the tracker.
If you need to change/return the battery, contact your
local dealer.)
Powering the TR-206 On/ Off
Power On:Press and hold the Power key for 3 seconds.
The LCD and backlighting will turn on. If you are powering
on the TR-206 for the first time the TR-206 will
automatically adjust the time after the tracker gets a GPS
fix.
Power Off:Press and hold the Power key for 3 seconds.
To be sure the TR-206 is powered off, the words
“Shutting down” will be shown on the screen just before
powering down.
TR-206 page 14
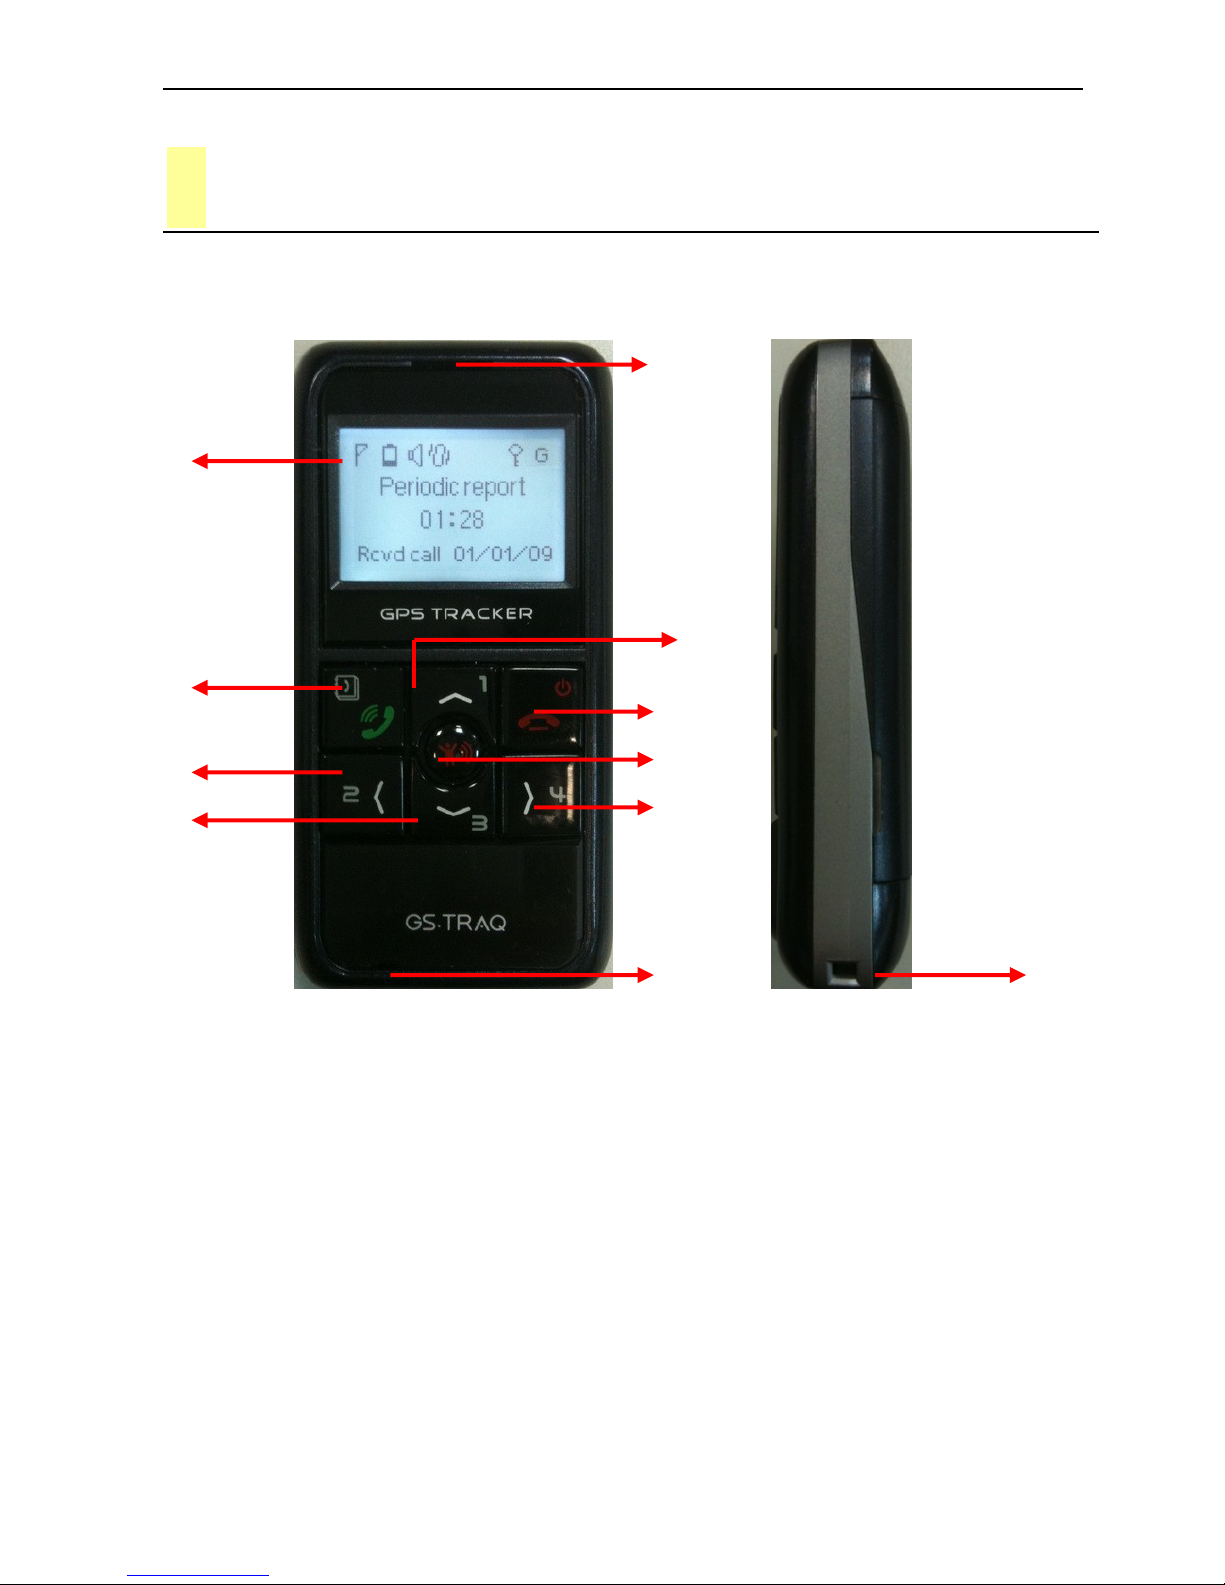
5 TR-206 Device Configuration
Front and Side
(2)
(1)
(3)
(4)
(7)
(8)
(5)
(6)
(9)
(11)
(10)
TR-206 page 15
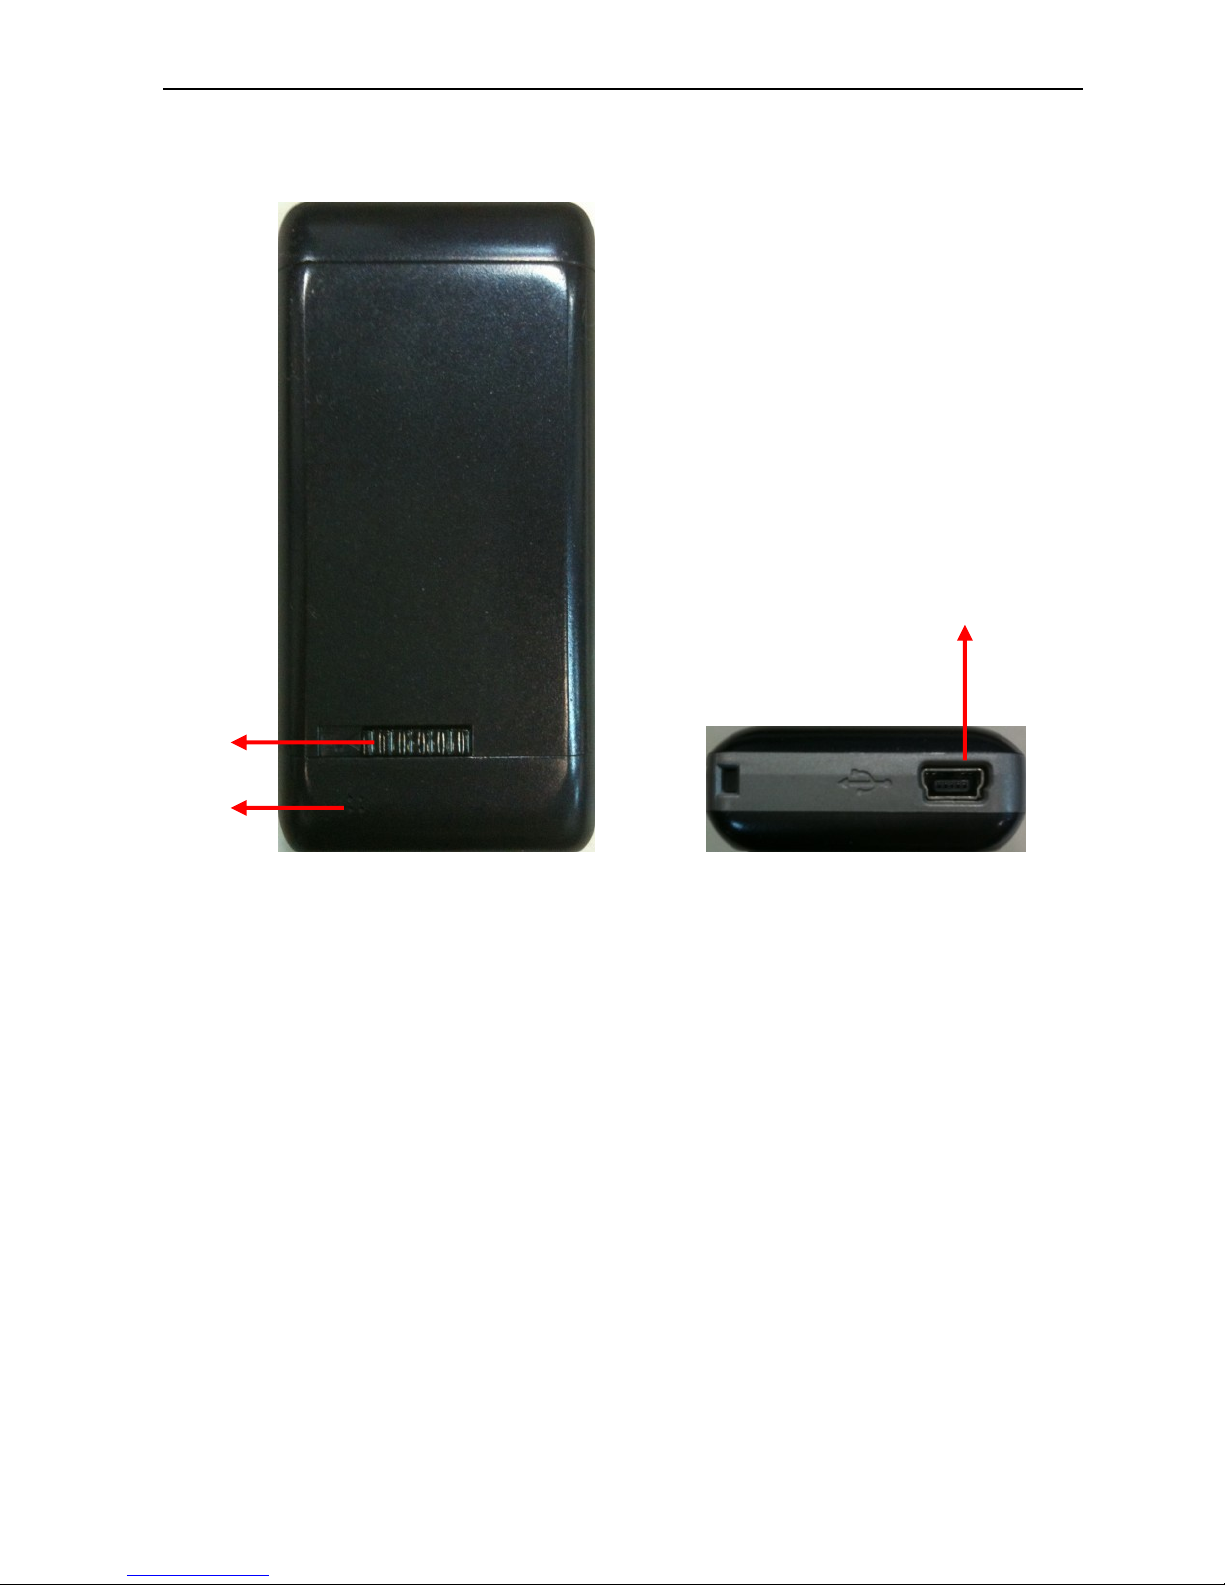
Back and bottom
(12)
(14)
(13)

TR-206 page 16
(1)
Receiver
Receiver. Used for listening
to the other party during
the phone call.
(2)
LCD
In standby mode, it shows
the time and tracker status.
During the phone call, it
shows the talk time.
When there is an incoming
call, it shows the phone
number of the incoming
call.
(3)
Answer key/Call
List/Selection key/
Unlock keypad
When there is an incoming
call, press the GREEN phone
key to answer the phone
call.
In standby mode, press the
GREEN phone key to access
the Call List.
In “Settings Menu”, press
the GREEN phone key to
confirm that setting.
When the keypad is locked,
click Speed dial #3 and then
press the GREEN phone key
to unlock the keypad.

TR-206 page 17
(4)
Speed dial 1 (Long
click)/ Increase
Volume/ Scroll Up/
Access to Setting
Menu
In standby mode, hold the
button down to dial the
speed dial that the #1
speed dial number is
assigned to, or press the
button to access the
“Settings Menu.”
During a phone call, press
the speed dial #1 to
increase the volume level.
In “Settings Menu”,
pressing this button will
scroll up.
(5)
Power key (Long
click)/ Reject key/
Exit key
Hold down to power the
device on/off.
When there is an incoming
call or during a phone call,
press to reject or hang up
the call.
In the “Settings Menu”,
press to cancel the setting
and return to the last page.
(6)
SOS button(Long
click)/GPRS
connection
Hold to send an emergency
message to the assigned
phone number or service
platform.
Press to connect to your
GPRS server service.

TR-206 page 18
(7)
Speed dial 2 (Long
click) /Phone book
In standby mode, hold
down to speed dial the #2
assigned phone number.
In standby mode, press to
enter the phone book.
(8)
Speed dial 3 (Long
click) /Decrease the
volume / Unlock
keypad
In standby mode, hold
down to speed dial the #3
assigned phone number.
During the phone call, press
to decrease the volume
level.
When the keypad is locked,
press the #3 and then press
the “Call” key to unlock the
keypad.
(9)
Speed dial 4 (Long
click)
In standby mode, hold
down to speed dial the #4
assigned phone number.
(10)
Microphone
Microphone for phone calls
(11)
Lanyard Hole
Used for hanging a lanyard
to prevent the tracker from
accidentally being dropped.
(12)
Battery cover
switch
To open the battery cover
slide the switch to the left,
to lock the battery cover
slide the switch to the right.
(13)
Speaker
Used to emit the ringing

TR-206 page 19
tone and alarm clock tone.
(14)
Mini USB Port
Used for charging the
TR-206, or setting
parameters by connecting it
to your PC

TR-206 page 20
Standby Mode
Status Icons
GSM signal strength
The more bars that are visible, the
stronger is the signal.
Power status
Battery power status.
Ringing setting
This icon will be displayed when the
ringing function is activated.
Vibration setting
This icon will be displayed when
vibration function is activated.
Alarm clock
This icon will be displayed after an
alarm is set.
logger
This icon will be displayed after the

TR-206 page 21
GPS data logger function is activated.
Keypad Lock
This icon will be displayed when the
keypad is locked.
GPS status
Has a GPS fix,
No GPS fix
Text Info
Status Message
Shows the present tracker status.
For example, Period report, Missed
Call, Low Battery, Clock Alarm, etc.
Local Time
Shows the local time after your time
zone is selected. The default time
Status
Message
Call List
Local
Time
Date

TR-206 page 22
zone is GMT+00:00. If this is not
your time zone, access the “Date
and time” settings in the menu
selection to set the correct time
zone.
Call List
Shows the most recently dialed,
received, and missed calls.
Date
Shows the present date. When the
tracker is used for the first time, the
date is set to factory settings. The
date will be adjusted to the present
date after getting a GPS fix
Note 1:In order to conserve battery power and lengthen the
operating time, backlighting will be turned off after 10
seconds of non-use. The LCD will be turned off after 30
seconds of non-use.
Note 2:After getting a GPS fix, The TR-206 will display the
correct local time and date.

TR-206 page 23
Keypad Lock
In order to prevent the keypad from accidentally being
pressed, the keypad will automatically lock after 10
seconds of non-use.
When the keypad is locked, the locked icon will be shown
in the example below.
Keypad is not locked
Keypad is locked

TR-206 page 24
You can unlock the keypad by pressing the “Down” key first and
then the “Call” key second.

TR-206 page 25
6 Phone Call Function
Making Phone Calls
● You can have up to 20 contacts in your phone book.
(Please refer to Chapter 11 for adding contacts to
your phone book.)
● The first four phone numbers are auto assigned to the
4 speed dial keys. You can make a phone call to the
assigned phone numbers by holding the speed dial
keys in standby mode.
● Making phone calls to the contacts from your
phone book: Press the “Left” button to access your
phone book and use the “Up” and “Down” buttons to
reach the desired contact, and then press the
“Answer” button. If you want to cancel the phone call,
press the “Reject” button.

TR-206 page 26
Answer or reject the incoming calls
● When there is an incoming call, press the “Answer”
button to answer the call. As shown in the picture
below.
● To reject an incoming call or to hang up the phone call
press the “Reject” button. As shown in the picture
below.
Adjusting the earpiece volume during a
phone call
● To adjust the earpiece volume during a phone call.
Press the “Up” button to increase the volume level or
“Down” button to decrease the volume level.

TR-206 page 27

TR-206 page 28
7 Phone Book
Searching Your Contacts
To access your phone book press the #2 button. You can
have up to 20 contacts in your Phone Book.
After accessing to the Phone book, please refer to the
picture below for an operation example.
Contacts
1.Father
0988773268
Call
Exit
Call the
displayed
phone
number
Press to return
to the main
menu
Scroll to next
contact
Scroll to last

TR-206 page 29
8 Call List
In standby mode, you could short click “Call” key to
access to the “Call List.” System could separately record
10 sets of dialed calls, received calls and missed calls. If
there are over 10 sets of call records, the latest record
will replace the oldest record.
After accessing to the Call List, please refer to the
diagram below for operation.
Dialed Numbers
1.0282263799
2009.4.16 AM 11:11
Call
Back
Call the shown
numbers on
the screen
Return to Main
screen
Switch between
dialed calls/
received calls/
Switch between
dialed calls/ received
calls/ missed calls
Scroll to last call record
Scroll to next call record

TR-206 page 30
9 Settings of Tracker
In standby mode, you could short click “Up” or “Down”
key to access to the “Setting Menu.”
Menu
Date and Time
Ringing Volume
Select
Exit
There are 6 settings in the Setting Menu as shown below.
1) Vibrating and ring
2) Ring volume
3) Alarm setup
4) Logger
5) Auto key lock
6) Date and time
The selected item
is highlighted
Short click “Up”
or “Down” key to
access the
“Setting Menu.”
Access to the
highlighted item
Exit from
“Setting Menu.”

TR-206 page 31
Vibrating and ring
There are 3 selections for the “Vibrate and ring” setting: “Ring
only”, “Vibrating only”, and “Vibrate and ring”.
Ringing volume
There are 4 selections for the “Ring Volume”: Low, Medium,
High, and Progressive.

TR-206 page 32
Alarm Clock
There are 3 settings for the alarm clock. After accessing the
alarm clock menu, press the “Up” and “Down” keys to select the
alarm clocks and then press the “Call” key for editing the alarm
clock.
There are 4 frequencies for the alarm clock: Daily, Recurrent,
Once, and Disable. After selecting the frequency, click “Call” key
to set the alarm time.

TR-206 page 33
Logger
After accessing the “Data Logger” settings, click the “Call” key to
start the GPS data logger. The tracker will start to record the
GPS location and save the data in the memory. Press the “Call”
key again to stop the GPS data logger.(If there is not enough
memory to record the data; the most recent GPS location will
replace the oldest one.
Start Data Logger Stop Data Logger

TR-206 page 34
Auto Key Lock
After accessing the “Auto Key Lock” setting, choose either to
turn on the feature or turn off this feature. The default is set to
“On.” After turning on the function, the keypad will automatically
lock after idling for 10 seconds.
Date and Time
To set the appropriate “Time Zone”, “Daylight Saving” features,
and “Time Format” in the “Date and time” settings menu, follow
the below steps:
Time Zone: Use the “Up” and “Down” buttons to reach
your time zone and press the “Call” button to select it.
Daylight Saving: Use the “Up” and “Down” buttons to
select Standard time or Daylight saving time and then press the
“Call” button to save the setting.

TR-206 page 35
Time Format: Use the “Up” or “Down” buttons to select the
“24 hours” setting or the “AM/PM” setting as the time
format, and then press the “Call” button to save the setting.

TR-206 page 36
10 Frequent Operation
Answer/ hang up the phone call
● When there is an incoming call; you can press the
“Call” button to answer the phone call.
● To reject an incoming call or to hang up the phone call,
press the “Reject” button.
Adjust the volume level
● During the phone call, you can use the “Up” button to
increase the volume level or the “Down” button to
decrease the volume level.

TR-206 page 37
Speed dial and phone book dial
● To add contacts to your phone book you must use the
“Device Utility.” The TR-206 has the capacity to store
up to 20 phone numbers in its “Phone book”.
● Your first four contacts in your phone book are auto
assigned to the TR-206’s speed dial buttons. To dial a
speed dial contact press and hold the assigned button
to call the contact. Please refer to the diagram below
for the corresponding position of the speed dial
buttons.

TR-206 page 38
● To call the contacts in your phone book, press the#2
button with the phone book icon on it to access your
phone book and use the #1 or #3 button to search
your phone book, when you have found the desired
contact press the “Answer” button to call the contact.
To cancel the phone call, press the “Reject” button.
Sending out an emergency message to the
assigned phone number(s) and/ or GPRS
service server.
● To setup the assigned phone number(s) with the
emergency messaging service you must use the
device utility. The TR-206 has the capability of having
up to 6 phone numbers to setup with the emergency
message service. In standby mode, after pressing the
emergency button, the TR-206 will send the
emergency message to the assigned phone number(s)
and/ or to your GPRS service server. In order to
prevent the emergency button from being accidentally
pressed, the emergency button on the TR-206 needs
to be held for 3 seconds until the device vibrates, after
that the message will be sent out.

TR-206 page 39
IMPORTANT:The TR-206 will send out an emergency message
regardless if the device has a GPS fix or not. What this means
that the receiver of the emergency message will receive the
message without accurate GPS coordinates.

TR-206 page 40
11 Installing The USB Driver
and Device Utility For The
TR-206
Install USB Driver
Insert product CD to the CD ROM of PC. Your PC will
automatically open the program for the installation and
prompt you to select an installation option.
Click on the “Install USB driver” option. A folder named
“stmcdcXP_VISTA-x86-x64” will open.
Right click on this folder and click on copy. Go to your
desktop and click paste. This folder will then be copied to

TR-206 page 41
your desktop.
Connect your TR-206 to your PC using the included USB
cable.
Turn on the power to your TR-206.
Press the Reject/Power button. A window as shown below
will be brought up. Click on the “Install USB Driver” option.
Select “Install from a list or specific location [Advanced]” and
click the Next button.

TR-206 page 42
Click the Browse button and locate the folder you copied
(stmcdcXP_VISTA-x86-x64) to your desktop earlier and
then click the Next button.

TR-206 page 43
Windows will search the folder for the required drivers.
When it is done, click the Next button.
Select “STM Virtual COM Port”, click the Next button.

TR-206 page 44
The window shown below will pop up.
Click “Continue Anyway”.
After you click on the “Finish” button ( shown on the window
below) the USB driver has been successfully installed!

TR-206 page 45
Note:
The USB driver is installed on the COM port the TR-206 device is
connected to. If you connect the TR-206 into a different COM port
on your PC next time, you will have to install the USB driver on to
that COM port.

TR-206 page 46
Install Device Utility
1. Insert the CD into the CD-ROM drive of your PC. Your
PC will automatically open the program for the
installation and prompt you to select an installation
option.
2. Click on the “Install Device Utility” option. Follow
the on-screen instructions to finish the installation.

TR-206 page 47
12 Device Utility Operation
Connect your TR-206 device to your PC via the supplied USB
cable, and then launch the “Device Utility” program.
Click on the “Hang up/ Power” button to enter the settings
mode, from there the “Device Utility” will be able to detect your
TR-206.
The image shown below is what you will see for the first time
when you connect your TR-206 to your computer and open
“Device Utility”.

TR-206 page 48
The default name of your TR-206 is shown as the device IMEI
number. To change the name click on “Device Information”.
Logging into the Device Utility
Click the “Login” button on the right corner of the home screen,
once clicked you will be directed to the login screen. (see the
screenshot below.)
Enter the default password and then click Login. (The default
password is “0000”.) In order to protect your privacy, please
change the default password in the “Device Information”
settings.

TR-206 page 49
Icon
Function
Device
Information
Set the device name, phone number, time zone,
change the login password
Contacts &
Message
Add contact phone numbers in the phone book,
assign the phone numbers for speed dial keys
and receiving the emergency message.
GPRS
Parameters
Set the GPRS parameter and read the GPRS
server address

TR-206 page 50
Ringing &
Alarm
Set the ringing tone, alarm clock frequency, etc.
Logger
Turn on/ off GPS data logger, export/ delete
logger files.
Setting
Set the language of Device Utility

TR-206 page 51
TR-206 Device Information
Click icon to access the device information settings. Here
you can change the device name, the device phone number, the
time zone, and your login password.
Item
Description
Device IMEI
Your IMEI can be found on the
packaging of the device or in the
battery compartment.
Device Name
Enter the identification name of your
TR-206
Device Phone Number
The phone number of the SIM card in
your TR-206
Time Zone
Choose the local time zone

TR-206 page 52
Time Format
Choose the time format shown on
TR-206 LCD
Daylight Saving
Turn on/off Daylight savings
Date Format
Choose the date format shown on
TR-206 LCD
Auto Key Locks
Turn on the Auto key lock function.
Note: After turning on this function,
the keypad will be locked after 10
seconds of idle.
Command and
Software Password
Change the login password of Device
Utility and the password of simple
command. Default is 0000.
SIM card PIN code
Enter the correct SIM PIN for proper
operation of TR-206.
Wrong SIM PIN would result in
power-on failure. And if still try to
power on TR-206 over 3 times; the
SIM card will be locked.

TR-206 page 53
Adding phone numbers to your phone book
and assigning phone numbers to speed dial
buttons
Click icon to access to the phone book and speed dial
menu.
The TR-206 has the capability of having up to 20 phone
numbers total. The first four phone numbers are automatically
assigned to their corresponding speed dial buttons.
You could use the buttons to adjust the order of the phone
numbers. Click on the Apply button to confirm the changes.

TR-206 page 54
Setting up phone number(s) to receive
emergency messages
Click icon and then click the “SMS Message” tab to access
the SOS emergency message options.
Item
Description
Emergency Message
Enter the phone numbers for
receiving emergency message. You
could set up to 6 sets of phone
numbers. (Please set the phone
number that could receive SMS.)
SMS Report Phone
Enter the phone number for receiving

TR-206 page 55
Number
location reports
Report Interval
GPRS report interval
SMS Format
Choose the SMS format to be
engineer format or text format
After you are done, click the Apply button to confirm the
changes.
Setting up GPRS parameters
Click icon to access the GPRS parameter settings.
Item
Description
GPRS APN
Please contact your
telecommunication service provider
GPRS User Name

TR-206 page 56
GPRS Password
for the parameters and then enter the
value.
DNS 1
DNS 2
Host/ Port Settings
Only for displaying the server address
of GPRS service
After you are done, click the Apply button to confirm the changes
Setting up the ring tone and alarm clock
Click icon to access the ring tone and alarm clock
settings.

TR-206 page 57
Item
Description
Ring tone
Choose the ringing tone of incoming
call. You could click Play button to
play the ring tone and click Stop
button to stop it.
Vibrate and ring
Choose the method of reminding user
of the incoming call: Vibrate and ring,
or Ring only, or Vibrating only, or Mute
Ringing Volume
Choose the ringing volume of
incoming call :Low , Medium, High,
Progressive
Alarm
You could set 3 sets of alarm clock.
There are 4 frequencies of the alarm
clock: Daily, Recurrent, Once, and
Disable. After selecting the frequency,
please set the alarm time.
If you choose “Recurrent” as the
frequency, please choose what days
to activate the alarm clock
After you are done, click the Apply button to confirm the changes.

TR-206 page 58
Setting Up The TR-206 Logger
Click icon to access the TR-206 GPS data Logger
settings.
Item
Description
GPS Data Log Interval
Set the interval for recording GPS
data. Check “ON” to start recording
GPS data
Data log Export to
Choose the data to be exported into
CSV or KML format. You could check
“Drop no-fix data” to delete the no-fix
data

TR-206 page 59
Delete Data Log
After exporting the data, you could
click “Delete Data Log” button to
delete the data log in the TR-206
After you are done, click the Apply button to confirm the
changes.
Setting up the language of the “Device
Utility”
Click the icon to access the Device Utility Language
settings.
Select your preferred language from the pull-down menu of the
available language options. After selecting your preferred
language, click Confirm to change the displayed language of the
Device Utility.

TR-206 page 60
13 Simple Command
You could send simple commands to TR-206 by mobile phone’s
SMS. In order to protect the privacy, the simple command should
be followed after the password of the “Device Utility.” (Please
refer to page 48 and page 52.)
The simple commands must be capital case.
The simple commands could be optionally added with the equal
mark and the concerning parameters. If you do not add
parameters with the simple command, TR-206 will take the
present setting as the setting.
The simple commands are “ping TR-206”, “TR-206 periodic
report”, “TR-206 motion report”, and “Link to server.” For ping
command, you could set the tolerance time of GPS fix. For
periodic report, you could set the report interval. For motion
report, you could set the static report interval and the moving
report interval. So there are two simple commands for TR-206 to
switch to motion report, one is “MM” for setting moving report
interval, and the other is “MS” for setting static report interval.
The unit of the simple command’s concerning parameters is
second.
Below please find the table of simple command.
You could send several simple commands in one SMS. The
simple command is separated by the “comma.”
Command
Code Word
Concerning Parameter
Ping
PI
=tolerance time of GPS fix

TR-206 page 61
Periodic report
PR
=report interval
Motion moving
MM
=moving report interval
Motion static
MS
=moving static interval.
Link Server
LI
Command format:
“password,simple command,simple command,simple command”
Note:
Do not keep any blanks between the commas. Otherwise,
TR-206 could not distinguish what is the command.
Example 1, ping TR-206 and set the tolerance time of GPS fix
as 3 minutes. The password is 520JX
The command is “520JX,PI=180”
Example 2, switch TR-206 to motion mode and set the moving
report interval as 30 seconds and static report interval as 30
minutes. The password is 7777.
The command is “7777,MM=30,MS=1800”
Example 3, make TR-206 to periodically report with the interval
of factory value. The password is VICTORY.
The command is “VICTORY,PR”

TR-206 page 62
14 Troubleshooting and
Safety
It takes about 3~4 hours to fully charge the battery
when TR-206 is powered-off. If you charge battery in
powered-on status, it will take more time to fully
charge the battery.
Please avoid storing your TR-206 in extreme temperatures
(heat/cold) or a humid area. Do not leave the device in your
car under the direct sunlight with the windows closed. A
high temperature environment may damage the device or
even cause battery explosion.

TR-206 page 63
FCC Regulations:
• This mobile phone complies with part 15 of the FCC Rules. Operation is subject
to the following two conditions: (1) This device may not cause harmful
interference, and (2) this device must accept any interference received, including
interference that may cause undesired operation.
• This mobile phone has been tested and found to comply with the limits for a
Class B digital device, pursuant to Part 15 of the FCC Rules. These limits are
designed to provide reasonable protection against harmful interference in a
residential installation. This equipment generates, uses and can radiated radio
frequency energy and, if not installed and used in accordance with the instructions,
may cause harmful interference to radio communications. However, there is no
guarantee that interference will not occur in a particular installation If this
equipment does cause harmful interference to radio or television reception, which
can be determined by turning the equipment off and on, the user is encouraged to
try to correct the interference by one or more of the following measures:
- Reorient or relocate the receiving antenna.
- Increase the separation between the equipment and receiver.
- Connect the equipment into an outlet on a circuit different from that to which the
receiver is connected.
- Consult the dealer or an experienced radio/TV technician for help.
Changes or modifications not expressly approved by the party responsible for
compliance could void the user„s authority to operate the equipment.
 Loading...