

Page 1

QUICK INSTALLATION MANUAL
1. Start to Install and set the IP address
When there are not too man y PCs to support, or the PC/Laptop c annot automatically get the IP from
the router, or when the IPs you got are 169.254.x.x., it’s recommended to set the IP addresses
manually. The setting steps are as follows: Click “My network” on your PC and select “ Propriety”,
then go to “ Local Network” to select “ Propriety”, select “ Internet Protocol” (TCP/IP)”, click
“ Propriety”, the followi ng picture will display:
Set the IP address here as 192.168.16.2, subnet mask as 255.255.255.0, default gateway as
192.168.16.1. As for DNS IP settings, please consult with your Service Provider to get the DNS server
address and then input it here.
Note 1:Since the Default gateway of the router is 192.168.16. 1, so the last digit of the above image
should vary between 2 to 254. In case there are many PC/Laptops to share for internet access, the IP
assigned to the PC/Laptop should be different with each other so as to avoid the IP conflicting;
Furthermore, while y ou are assigning the IP address by manual, at t he same time, you must set the
DNS too, or you cannot open the website even you have got it connected.
Note 2: You can also select and tick the boxes of “Obtain an IP address automatically” and “Obtain
DNS server address automatically”, so that it can automatically obtain the IP from the router.
Page 2
2. Test of the network connection
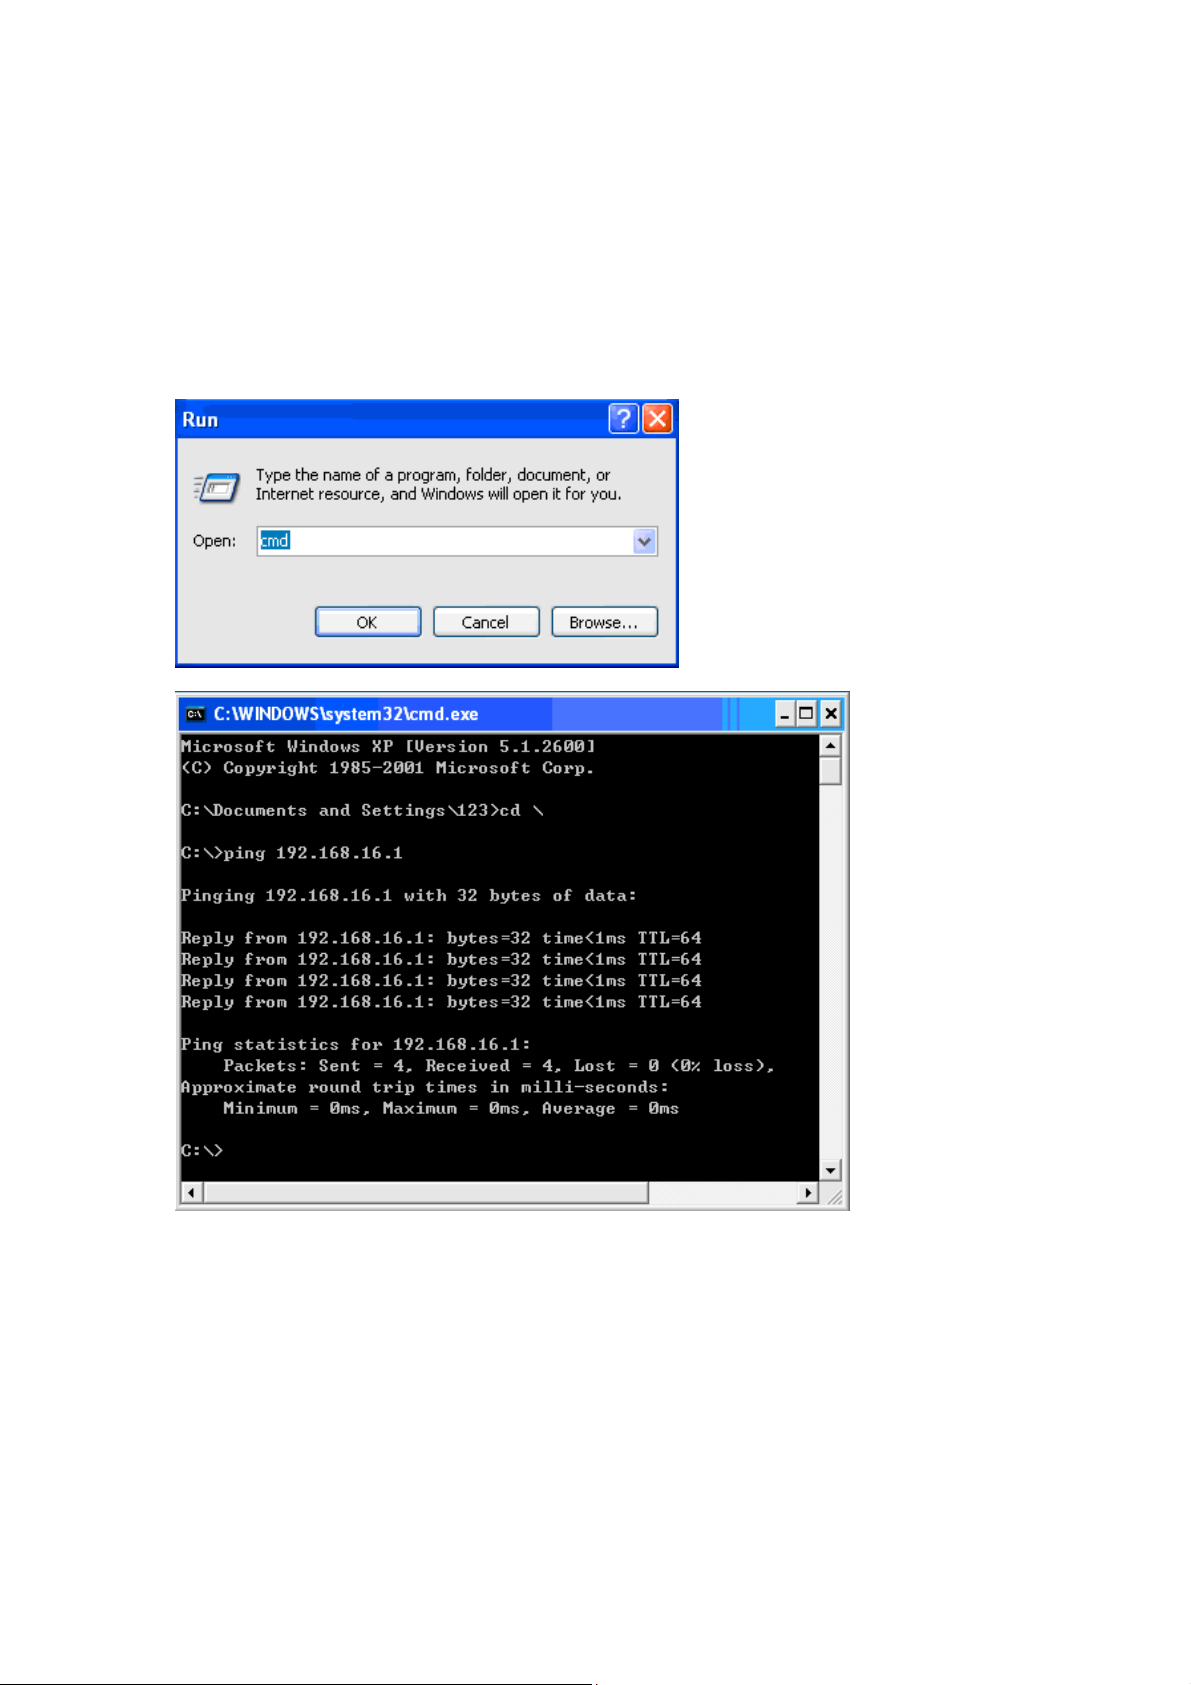
Open the “start” on the system of the PC/Lap top and then select “run”, input “cmd” to enter into th e
DOS window, then input: “ping 192.168.16.1” and press ENTER key, if it displays as follows:
Reply from 192.168.16.1: byte=32 time=2ms TTL=64
It proves the connection between the PC and Router has been successfully established.
3. Open the WEB page of the router
Open the IE browser and input 192.168.16.1 in the address box, the Web management page will
display as follows:
Page 3
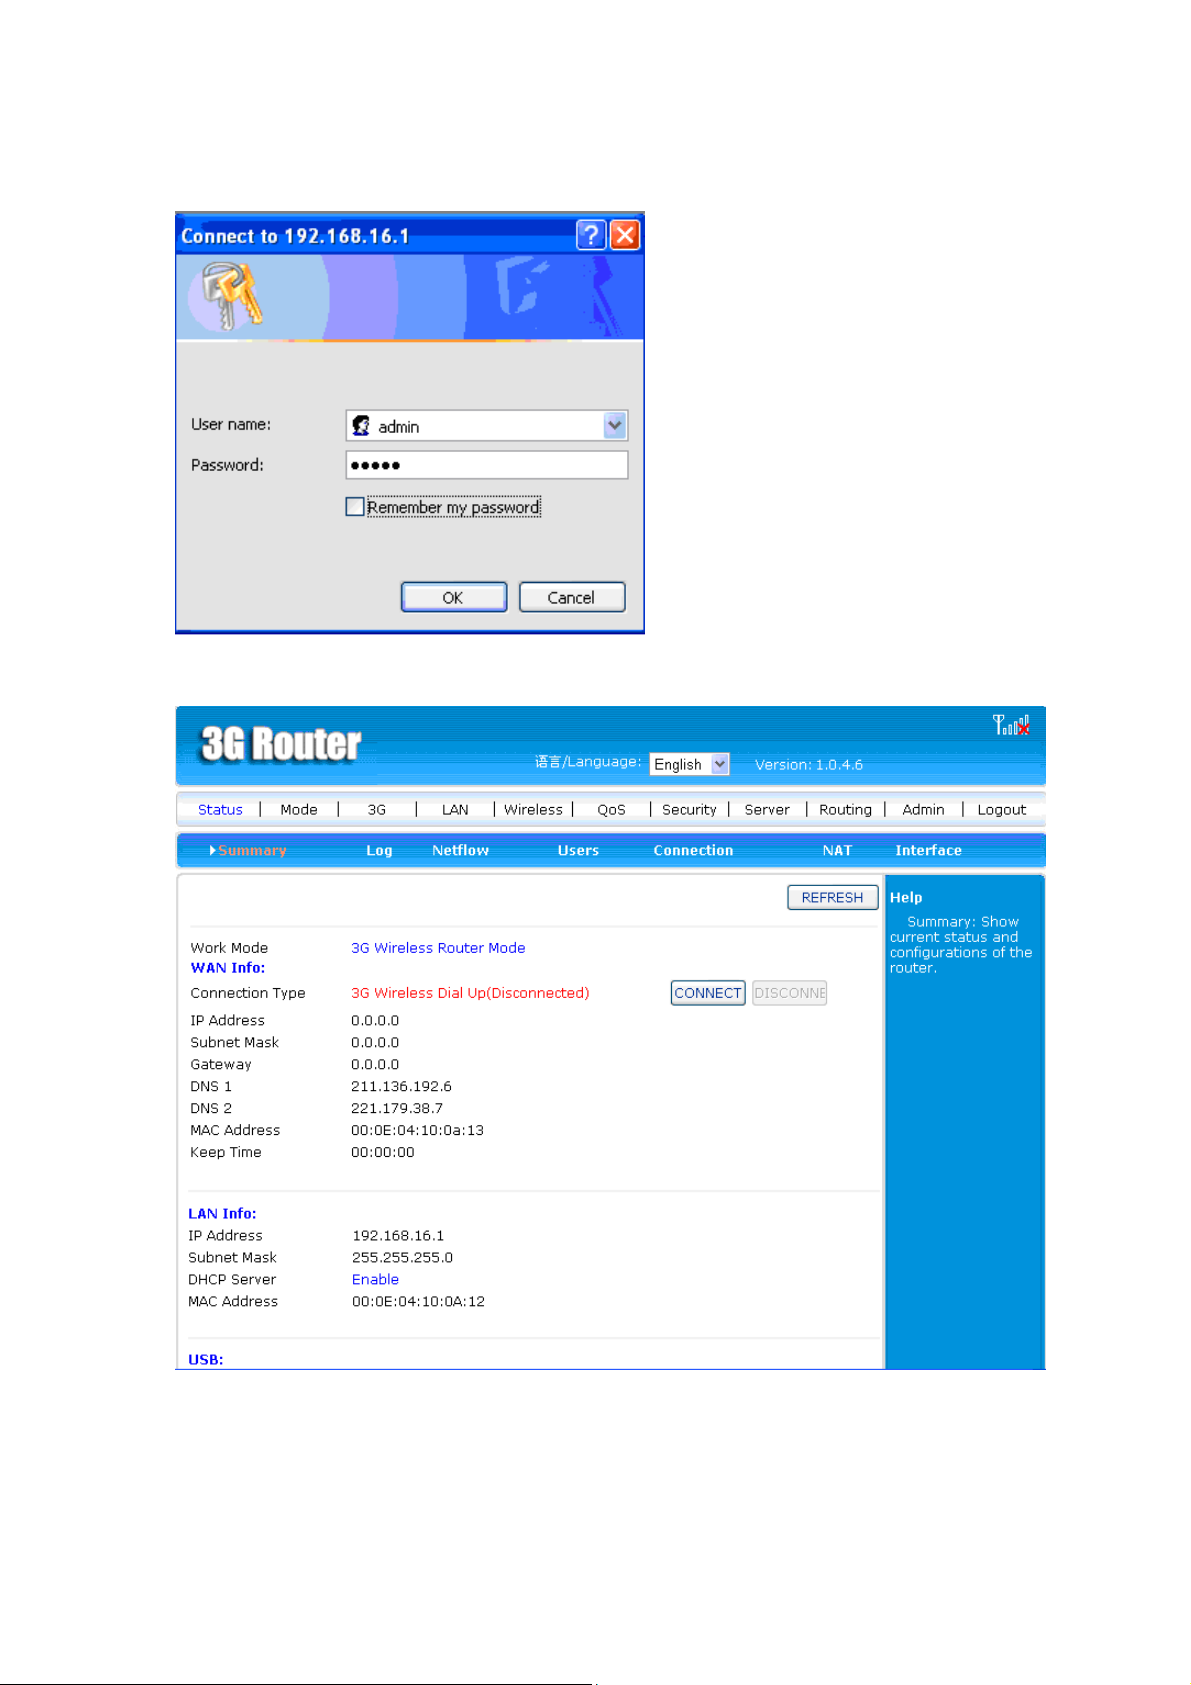
Input the ID of “admin” and password of “admin” into the boxes, then the 3G Router page will display
as follows:
Open the WEB page, select “status ”- “WAN” – “Int ernet access mode”, th en you can se t accordi ng to
your different internet access mode. It supports 4 modes as 3G, Static, Dynamic and PPPoE, we will
illustrate respectively as follows:
Page 4
A. 3G Dial-up Ac ce ss
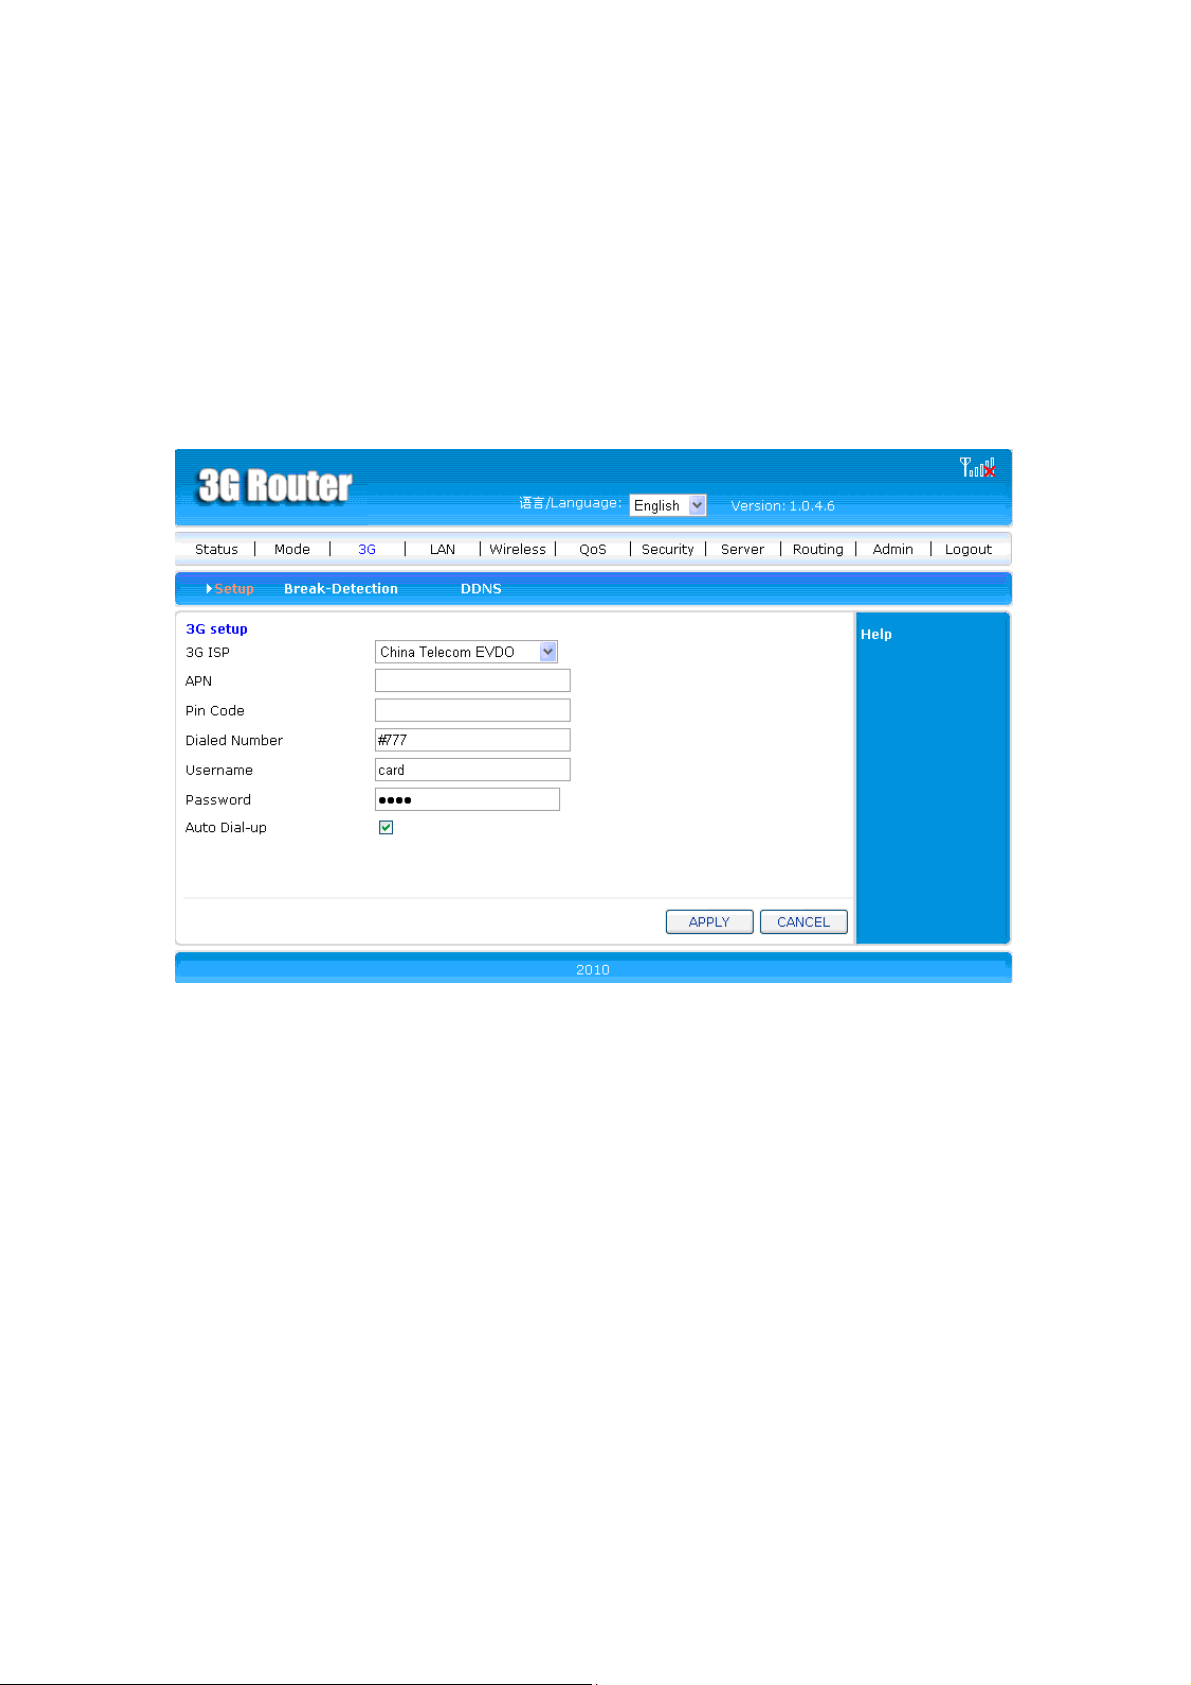
First you connect the hardware of 3G wireless modem with the Router, and then select the access
mode as 3G, the Auto-setting will be Open as default. Auto-setting means that the router can
automatically recognize the 3G wireless modem connected to it and dial-up automatically, without
manual settings at all. But if the Auto-setting is forbidden, you must manually input the “Dailed
Number”, “Username” and “Passwor d”, for the detailed infor mation, please consult with y our service
provide. The following image is an exa m ple of the settings for China Telecom:
Then go back to “Status” for the sy stem status, if it shows “connected”, it means the con nection is
successfully established; while “disconnected” for unsuccessful connection.
B. Static IP
If the ISP provided you with internet access IP address, then you can select the Static IP in the router,
and input the data of IP Address, Subnet Mask, Default Gateway, and etc provided by your ISP.
C. Dy namic IP
If the internet access mode provided by your ISP is by Dynamic IP, so you may go “WAN” – “Internet
access mode” to select Dynamic IP mode (Obtain IP Address from DHCP server automatically), then
“apply” and go “Status” – “ current status of WAN”, then click “Refresh” key. Normally the router can
obtain the IP address, Subnet Mask, Network Gateway, and etc.
D. PPPoE Mode
If the telephone line is linked to your house, first please conne ct the Router and Modem by Router ’s
WAN port and Modem’s LAN port, and then connect the PC/Laptop with the Router by any of their
Page 5
available LAN ports; if the LAN cable is linked directly to your house, just connect the cable to the
Router, and then go to “WAN setting” – “Internet Access Mode” of the Router to select PPPoE (for
normal broadband network and xDSL), input the ID & Password provided by the ISP, “apply” and
escape. If you want to disconnect, click “ disconnect”.
 Loading...