


GSSIM
Mini Scaffold (Interior or Exterior)
Assembly & Operating Instructions
READ ALL INSTRUCTIONS AND WARNINGS BEFORE USING THIS PRODUCT.
This manual provides important information on proper operation and maintenance. Every effort has been
made to ensure the accuracy of this manual. We reserve the right to change this product at any time
without prior notice.
STOP! DO NOT RETURN THIS PRODUCT TO THE RETAILER.
Questions? Problems? CONTACT CUSTOMER SERVICE.
If you experience a problem or need parts for this product, visit our website http://www.buffalotools.com or
call our customer help line at 1-636-532-9888, Monday-Friday, 8 AM - 4 PM Central Time. A copy of the
sales receipt is required.

GSSIM Mini Scaffolding Assembly & Operating Instructions
2
GSSIM Mini Scaffold Interior or Exterior Assembly and Operating Instructions
Improper erection, dismantling or use of Multi-Use Scaffold may result in serious injury or death!
Erectors, dismantlers, and users of Multi-Use Scaffold must read and fully understand these Safety
Rules and Instructions.
MAXIMUM LOAD CAPACITY: - 500 Lbs (Workers & Materials)
.
DO NOT OVERLOAD SCAFFOLD! IT MAY RESULT IN SERIOUS INJURY!
DO NOT STACK MORE THAN TWO UNITS HIGH
OUTRIGGERS REQUIRED WHEN STACKING
SPECIFICATIONS
Assembled Product Dimension: 46.45" H x 43" L x 21" D
Platform Dimension: 40 " x 21.25"
Adjustable Height: 1' 8.9" H - 3' 8.9" H
GSSIM Mini Scaffolding Assembly & Operating Instructions
3
Figure B
Figu
Figure C
Figure C
ASSEMBLY INSTRUCTION
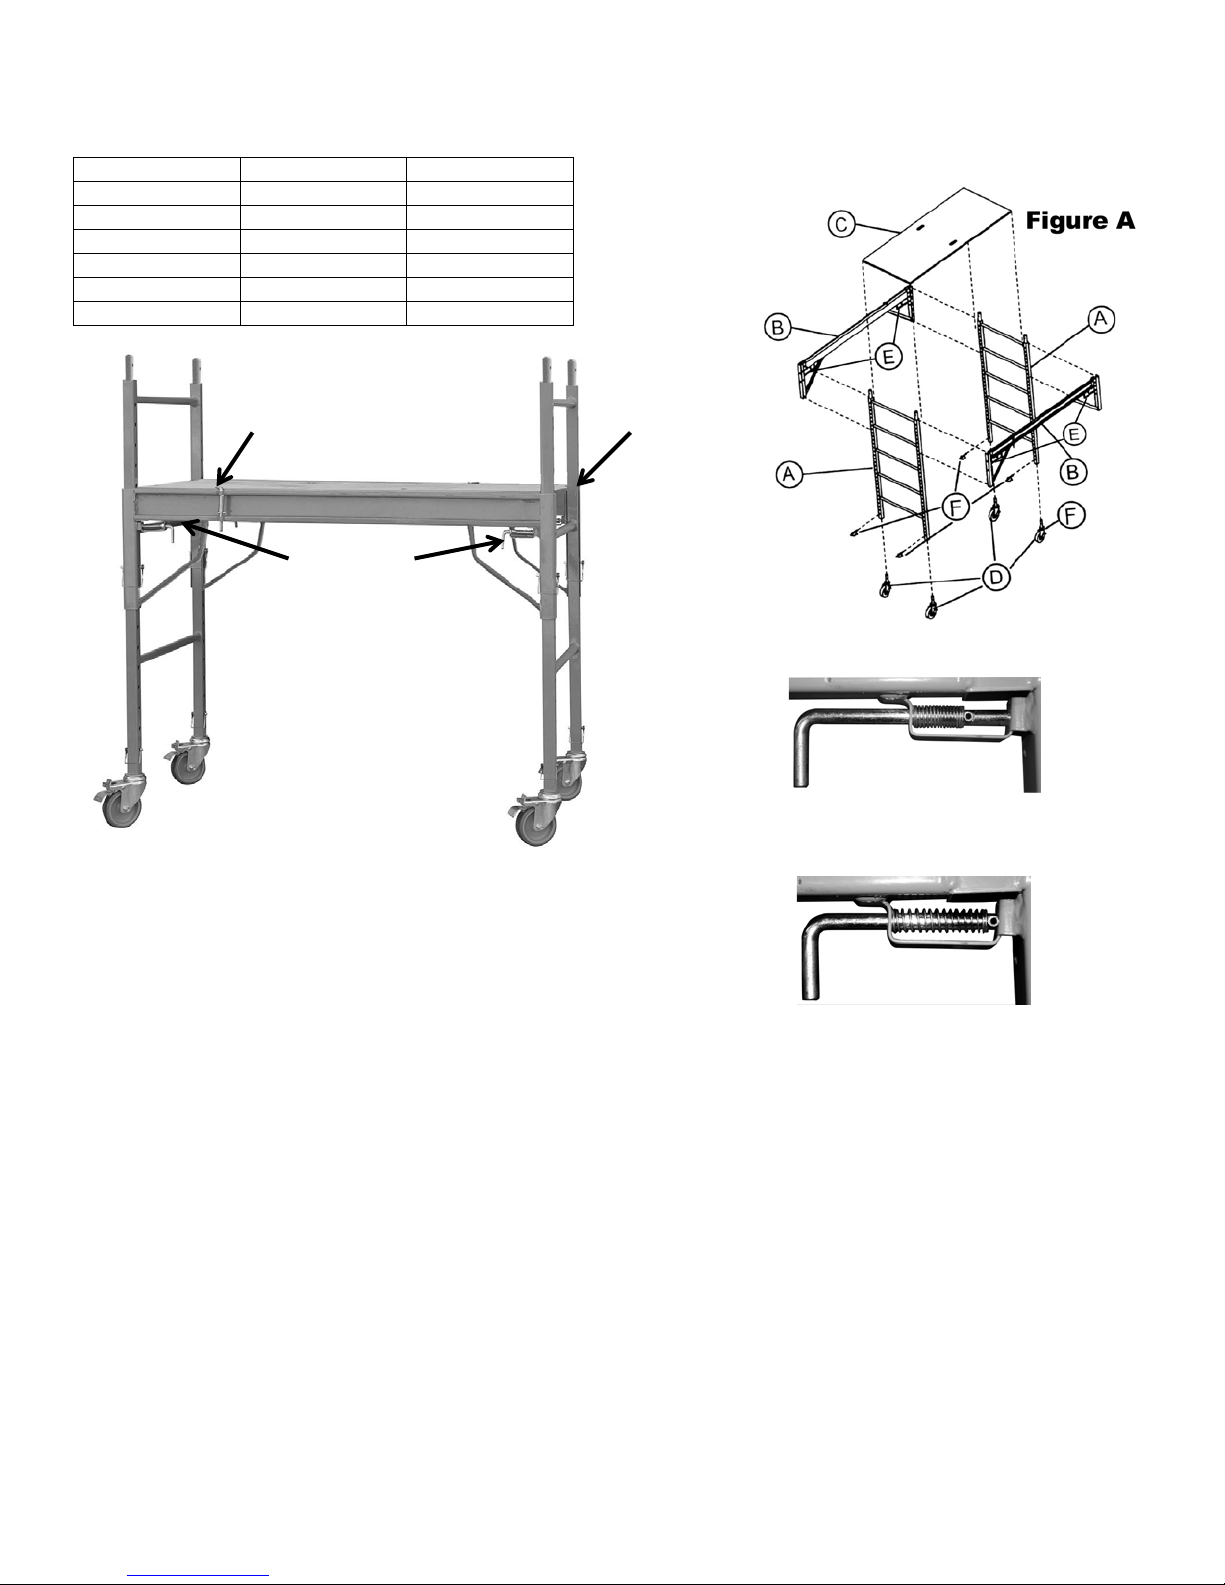
For proper assembly, the Mini Scaffold must be comprised of these individual parts. (See Figure A)
Item
Part Name
Qty
A
Frame
2
B
Side Brace
2
C
Platform
1 D Caster
4
E
Lock Pin
4
F
Connector Pin
8
STEP 1
Attach side brace B to two frames A:
• Pull L-shape lock pin at each end of side brace to the
disengaged position. (Figure B)
• While holding L-shape pin in disengaged position,
place U-channel on each end of side brace B around
leg of frame A at desired platform height.
• Release lock pin and be sure that pin fully engages
into hole in frame A leg.
Pin Is Disengaged (Unlocked Position)
Pin Is Fully Engaged (Locked Position)
STEP 2
Attach second side brace B to both frames A (REPEAT INSTRUCTIONS IN STEP 1).
All four L-shaped lock pins must be inserted fully in holes on frame. (FIGURE C)
WARNING: Be certain Pin is fully inserted into hole (Figure B). Do not leave the Pin half-inserted.
WARNING:
• BOTH SIDE BRACES MUST BE POSITIONED AT THE SAME HEIGHT ON THE FRAMES SO THAT THE
PLATFORM WILL BE LEVEL.
• BE SURE ALL 4 L-SHAPE LOCK PINS ARE FULLY ENGAGED IN HOLES OF FRAMES.
• REMOVE THE PLATFORM BEFORE ADJUSTING THE DECK LEVEL.
Figure C

GSSIM Mini Scaffolding Assembly & Operating Instructions
4
STEP 3
Install “Platform C” on side braces B so that platform is fully seated within inner channel on top of side braces.
STEP 4
Rotate the platform clips into the engaged position. (See Figure D)
STEP 5
Install 4 casters (D) into legs of frames with 4 Connector Pins (F) (See Figure E)
STEP 6
Remaining 4 Connector Pins must be inserted fully in holes on frame.
(FIGURE G)
WARNING: Be certain all eight Pins are fully inserted and locked intos holes.
(See Figure H)
WARNING:
• RECHECK ALL SIDE BRACE LOCK PINS
AND ALL CONNECTOR PINS FOR FULL
ENGAGEMENT BEFORE ACCESSING
PLATFORM.
• RECHECK PLATFORM TO BE SURE IT IS
PROPERLY SEATED WITHIN SIDE BRACE
CHANNEL AND THE PLATFORM CLIPS ARE
FULLY ENGAGED.
• WHEN ACCESSING PLATFORM, CLIMB
OVER TOP OF FRAME LADDER.
• DO NOT SWING AROUND SIDE OF FRAME.
• REMOVE THE PLATFORM BEFORE
ADJUSTING THE DECK LEVEL.
TYPICAL APPLICATIONS INCLUDE:
• Painting
• Overhead Door Installation
• Acoustical/Ceilings
• Lighting and wire Maintenance & Electrical
• Drywall installation & taping
• General Building Maintenance
• Window Cleaning & Treatment Installation
• HVAC Installation
• Sign Installation and Maintenance
• Shelving
Figure D
8 Connector Pins (F)
Figure G
Figure E
Figure H

GSSIM Mini Scaffolding Assembly & Operating Instructions
5
DISMANTLING NOTES
The work of dismantling scaffolding should be under the supervision of an individual with proper
experience and aptitude. The following should be observed while dismantling:
1. It shall be the responsibility of the user to read and comply with the following common sense
guidelines that are designed to promote safety in the dismantling of scaffolding.
2. Check to see if scaffold has been structurally altered in any way that would make it unsafe; and, if
so, reconstruct where necessary before commencing with the dismantling procedures.
3. Dismantle scaffold from the top down. Begin by removing all accessories from that section being
dismantled at the time.
4. Always work within the inside of the scaffolding.
5. When moving up or down the scaffold do NOT climb on ties, braces or un-braced components.
Climb over the top of the frame. Do not swing around outside of the frame.
6. Be sure that area below is clear of individuals not involved in the dismantling and is secured
against unauthorized access.
7. Lower scaffold components in a safe manner as they are dismantled. Avoid dropping or throwing
the components as this could result in injury or damage to the equipment.
SCAFFOLDING SAFETY RULES
SERIOUS INJURY OR DEATH MAY RESULT FROM IMPROPER ERECTION OR USE of
scaffolding equipment. Erectors and users must be familiar with and follow safe practice and the
Safety Rules contained herein. These Safety Rules cover generalized situations only and should not
be used to replace any other additional safety and precautionary measures that may be necessary to
cover the many usual or unusual conditions encountered during installation or dismantling. The
Rules are not intended to conflict with, or supersede the requirements of OSHA or any other
governmental regulations, codes and ordinances; the user must refer to and comply with all such
specific provisions of law.
A. FOLLOW SAFE PRACTICE OF THE SAFETY RULES AND COMPLY WITH OSHA and all other
federal, state and local regulations, codes and ordinances pertaining to scaffolding during any use of
the equipment.
B. THE POTENTIALLY HAZARDOUS NATURE OF SCAFFOLDING ERECTION WORK makes it
important that all personnel assigned to this work be instructed in these Safety Rules, safe practices
and procedures and be under the supervision of an experienced and knowledgeable person. Assure
that these Safety Rules are posted and that all persons erecting and using the scaffold are aware of
and follow them.
C. REPORT ANY UNSAFE CONDITIONS TO SUPERVISORS. Do not work or allow persons to work
on scaffolds when sick or suffering from dizziness, unsteadiness or other physical symptoms which
could affect their ability to work safely.

GSSIM Mini Scaffolding Assembly & Operating Instructions
6
D. INSPECT ALL EQUIPMENT BEFORE USING. Never use any equipment which is damaged,
defective or deteriorated in any way.
E. INSPECT ERECTED SCAFFOLD FREQUENTLY and be sure that they are maintained in safe
condition, that scaffold connections have not become loose and that components have not been
improperly released or removed.
F. MAINTAIN ALL EQUIPMENT IN GOOD REPAIR. Never use corroded or excessively rusted
equipment; the strength of such equipment is not known.
G. CONSULT YOUR SCAFFOLDING SUPPLIER WHEN IN DOUBT. NEVER TAKE CHANCES.
H. ALWAYS READ THESE SAFETY RULES in conjunction with the safety packet.
I. ALWAYS SUPPORT SCAFFOLDS FROM A SOUND, STABLE SURFACE and assure that it is
adequate to support the intended scaffold loads. Never support scaffolds on unstable, loose objects
which could tip, break or become dislodged.
J. LIFT AND LOWER COMPONENTS CAREFULLY AND SAFELY; use tag lines when appropriate
to the handling method. Never allow excessive quantities of components to be stockpiled on partially
complete scaffolds. Stock only sufficient components consistent with the progress of the work. Lower
dismantled components as soon as possible. Never drop components deliberately.
K. TIEING THE SCAFFOLD TO THE STRUCTURE IS OF GREAT IMPORTANCE to the stability
and safety of the scaffold. Assure that the structure to which the scaffold is tied or anchored is
capable of safely supporting all loads imposed by the scaffold.
L. FREE STANDING SCAFFOLDS other than wall scaffolds must be restrained from tipping by
guying or other means, recognizing that stability is essential to the safety of the scaffold.
M. NEVER USE LADDERS OR MAKESHIFT DEVICES on top of scaffold to increase the height.
Never place plank on or stand on guardrails and mid-rails.
N. POWER LINES NEAR SCAFFOLDS ARE DANGEROUS. Use extreme caution and consult the
power service company to have the lines de-energized, insulated or otherwise rendered safe.
Never allow any installation or use of scaffolds until this is done.
O. FOR ROLLING SCAFFOLDS, FOLLOW THESE ADDITIONAL SAFETY RULES:
a. Never ride rolling scaffolds.
b. Remove all material and equipment from the scaffold before moving.
c. Lock caster brakes at all times the scaffold is not being moved.
d. Do not attempt to move rolling scaffolds without sufficient help and roll on level surfaces only.
Watch out for holes or floor obstructions and for overhead obstructions, including power lines,
energized craneways, and other hazards.
e. If the base dimensions cannot be increased, extreme care must be taken to secure the scaffold
from tipping; it must be guyed, or tied to a solid structure and maintained in a stabilized condition at
all times so that it cannot tip over while supporting persons, while being moved or while being erected
or dismantled.

GSSIM Mini Scaffolding Assembly & Operating Instructions
7
f. Apply pulling or pushing forces at the bottom frames and as close to the scaffold base as possible.
Never attempt to move scaffold from on top.
g. If rolling scaffolds are used outdoors, care must be taken to assure that they cannot become
unstable due to wind or other conditions.
P. DO NOT OVERLOAD SCAFFOLD. Refer to and do not exceed the scaffold load capacities.
Post these scaffolding safety guidelines in a place where it will be seen and understood by all persons
who erect, dismantle or use scaffolding.
Be certain all persons are aware of the correct installation of scaffold, the potential dangers, and discuss
this in safety meetings.
Since field conditions vary and are beyond the control of the SSFI and the SIA, safe and proper use of
scaffolding is the sole responsibility of the user
CODE OF SAFE PRACTICES FOR FRAME SCAFFOLDS, SYSTEM SCAFFOLDS,
TUBE & CLAMP SCAFFOLDS & ROLLING SCAFFOLDS
Developed by the Scaffold Industry Association, Inc. (SIA) and the Scaffold, Shoring & Forming Institute (SSFI)
It shall be the responsibility of all users to read and comply with the following common sense guidelines which are designed to promote safety in the
erecting, dismantling and use of Scaffolds. These guidelines do not purport to be all-inclusive nor to supplant or replace other additional safety and
precautionary measures to cover usual or unusual conditions. If these guidelines in any way conflict with any state, local, provincial, federal or other
government statue or regulation, said statute or regulation shall supersede these guidelines and it shall be the responsibility of each user to comply
therewith.
I. General Guidelines
A. Post these scaffolding safety guidelines in a conspicuous place and be sure that all persons who erect, dismantle or use scaffolding are aware
of them, and also use them in tool box safety meetings.
B. Follow all state, local and federal codes, ordinances and regulations pertaining to scaffolding.
C. Survey the job site. A survey shall be made of the job site by a competent person for hazards, such as untamped earth fills, ditches, debris,
high tension wires, unguarded openings, and other hazardous conditions created by other trades. These conditions should be corrected or
avoided as noted in the following sections.
D. Inspect all equipment before using. Never use any equipment that is damaged or defective in any way. Mark it or tag it as defective. Remove it
from the job site.
E. Scaffolds must be erected in accordance with design and/or manufacturer’s recommendations.
F. Do not erect, dismantle or alter a scaffold unless under the supervision of a competent person.
G. Do not abuse or misuse the scaffold equipment.
H. Erected scaffolds should be continually inspected by users to be sure that they are maintained in safe condition. Report any unsafe condition
to your supervisor.
I. Never take chances! If in doubt regarding the safety or use of the scaffolds, consult your scaffold supplier.
J. Never use equipment for purposes or in ways for which it was not intended.
K. Do not work on scaffolds if your physical condition is such that you feel dizzy or unsteady in any way.
L. Do not work under the influence of alcohol or illegal drugs.
II. Guidelines For Erection And Use Of Scaffolds:
A. Scaffold base must be set on base plates and an adequate sill or pad to prevent slipping or sinking and fixed thereto where required. Any part
of a building or structure used to support the scaffold shall be capable of supporting the maximum intended load to be applied
B. Use adjusting screws or other approved methods to adjust to uneven grade conditions.
C. Bracing, leveling and plumbing of frame scaffolds.
1. Plumb and level all scaffolds as erection proceeds. Do not force frames or braces to fit. Level the scaffold until proper fit can be easily
made.
2. Each frame per panel shall be braced by horizontal bracing, cross bracing, diagonal bracing, or any combination thereof for securing
vertical members together laterally. All brace connections shall be made secure, in accordance with the manufactures recommendations.
D. Bracing, leveling and plumbing of tube and clamp system scaffolds.
1. Posts shall be erected plumb in all directions, with the first level of runners and bearers positioned as close to the base as feasible. The
distance between bearers and runners shall not exceed manufacturer’s recommendations.
2. Plumb and level all scaffolds as erection proceeds.
3. Fasten all couplers and/or connections securely before assembly of next level.
4. Vertical and/or horizontal diagonal bracing must be installed according to manufacturer’s recommendations.
E. When free standing scaffold towers exceed a height of four (4) times their minimum base dimension, they must be restrained from tipping.
(CAL/OSHA and some government agencies require stricter ration of 3 to 1.)

GSSIM Mini Scaffolding Assembly & Operating Instructions
8
F. Tie continuous (running) scaffolds to the wall or structure at each end and at least every 30 feet of length in between when scaffold height
exceeds the maximum allowable free standing dimension. Install additional ties on taller scaffolds as follows:
On scaffolds 3 feet or narrower in width, subsequent vertical ties shall be repeated at intervals no greater than every 20 feet. On scaffolds
wider than 3 feet, subsequent vertical ties shall be repeated at intervals no greater than 26 feet. The top tie shall be installed as close to the
top of the platform as possible; however, no lower from the top than 4 times the scaffold’s minimum base dimension. Ties must prevent the
scaffold from tipping either into or away from the structure. Stabilize circular or irregular scaffolds in such a manner that the completed
scaffold is secure from tipping. Place ties near horizontal members.
When scaffolds are fully or partially enclosed, or when scaffolds are subjected to overturning loads, additional ties may be required. Consult a
qualified person.
G. Do not erect scaffolds near electrical power lines. Consult a qualified person for advice.
H. Access shall be provided to all platforms. Do not climb cross braces or diagonal braces.
I. Provide a guardrail system, fall protection and toeboards where required by the prevailing code.
J. Brackets and cantilevered platforms.
1. Brackets for system scaffold shall be installed and used in accordance with manufacturer’s recommendations.
2. Brackets for frame scaffolds shall be seated correctly with side bracket parallel to the frames and end brackets at 90 degrees to the
frames. Brackets shall not be bent or twisted from normal position. Brackets (except mobile brackets designed to carry materials) are to
be used as work platforms only and shall not be used for storage of material or equipment.
3. Cantilevered platforms shall be designed, installed and used in accordance with the manufacturer’s recommendations.
K. All scaffolding components shall be installed and used in accordance with the manufacturers’ recommended procedure. Components shall not
be altered. Scaffold frames and their components manufactured by different companies shall not be intermixed, unless the component parts
readily fit together and the resulting scaffold’s structural integrity is maintained by the user.
L. Planking –
1. Working platforms shall cover scaffold bearer as completely as possible. Only scaffold grade wood planking, or fabricated planking and
decking meeting scaffold use requirements shall be used. Planks and platforms should rest on bearers only.
2. Check each plank prior to use to be sure plank is not warped, damaged, or otherwise unsafe.
3. Planking shall have at least 12” overlap and extend 6” beyond center of support, or be cleated or restrained at both ends to prevent
sliding off supports.
4. Solid sawn lumber, LVL (laminated veneer lumber) or fabricated scaffold planks and platforms (unless cleated or restrained) shall extend
over their end supports not less thank 6” nor more than 18”. This overhang should be guardrailed to prevent access.
M. For “Putlogs” and “Trusses” the following additional guidelines apply:
1. Do not cantilever or extend putlogs/trusses as side brackets without thorough consideration of loads to be applied.
2. Install and brace putlogs and trusses in accordance with manufacturer’s instructions.
N. For rolling scaffolds the following additional guidelines apply:
1. Riding a scaffold is very hazardous! The SSFI and the SIA do not recommend nor encourage this practice.
2. Casters with plain stems shall be attached to the frames or adjustment screws by pins or opther suitable means.
3. No more than 12 inches of the screw jack shall extend between the bottom of the adjusting nut and the top of the caster.
4. Wheels or casters shall be locked to prevent caster rotation and scaffold movement when scaffold is in use.
5. Joints shall be restrained from separation.
6. Use horizontal diagonal bracing near the bottom and at 20 foot intervals measured from the rolling surface.
7. Do not use brackets or other platform extensions without compensating for the overturning effect.
8. The top platform height as measured from the rolling surface of a rolling scaffold must not exceed four (4) times the smallest base
dimension (CAL/OSHA and some government agencies require a stricter ratio or 3:1)
9. Cleat or secure all planks.
10. Secure or remove all materials and equipment from platform before moving.
11. Do not attempt to move a rolling scaffold without sufficient help – watch out for holes in floor and overhead obstructions – stabilize
against tipping.
O. Safe use of Scaffold –
1. Prior to use, inspect scaffold to insure it has not been altered and is in safe working condition.
2. Erected scaffold and platforms should be inspected continuously by those using them.
3. Exercise caution when entering or leaving a work platform.
4. Do not overload scaffold. Follow manufacturer’s safe working load recommendations.
5. Do not jump onto planks or platforms.
6. DO NOT USE ladders or makeshift devices to increase the working height of a scaffold. Do not plank guardrails to increase the height of
a scaffold.
7. Climb in access areas only and use both hands.
III. When Dismantling Scaffolding, The Following Additional Guidelines Apply:
A. Check to assure scaffolding has not been structurally altered in a way which would make it unsafe and, if it has, reconstruct and/or stabilize
where necessary before commencing with dismantling procedures. This includes all scaffold ties.
B. Visually inspect planks prior to dismantling to be sure they are safe.
C. Do not remove a scaffold component without considering the effect of that removal.
D. Do not accumulate excess components or equipment on the level being dismantled.
E. Do not remove ties until scaffold above has been dismantled to that level.
F. Lower dismantled components in an orderly manner. Do not throw off of scaffold.
G. Dismantled equipment should be stockpiled in an orderly manner.
201707
 Loading...