

Page 1
Operating Instruc
tions
Grundig SAT SystEm
s
tions
Digital Satellite Receiver
DRS 550 HDMI
GSS
English
Grundig SAT Systems GmbH
Beuthener Strasse 43
Operating Instruc
D-90471 Nuremberg
Phone: +49 (0) 911 / 703 8877
Fax: +49 (0) 911 / 703 9210
e-mail: info@gss.tv
Internet: http://www.gss.tv
Page 2

Contents
1 Introduction...................................................................................................................... 5
1.1 Meaning of the icons used .................................................................................5
2 General information .........................................................................................................5
2.1 Packing contents ...............................................................................................5
2.2 Accessories for satellite receivers ........................................................................5
2.3 Receiving digital satellite channels ......................................................................5
2.4 Special facilities of your satellite receiver .............................................................6
2.5 Features of your satellite receiver ........................................................................6
2.6 Environmental note ............................................................................................7
3 Important note on safety and set up .................................................................................. 7
4 Your satellite receiver in overview ..................................................................................... 8
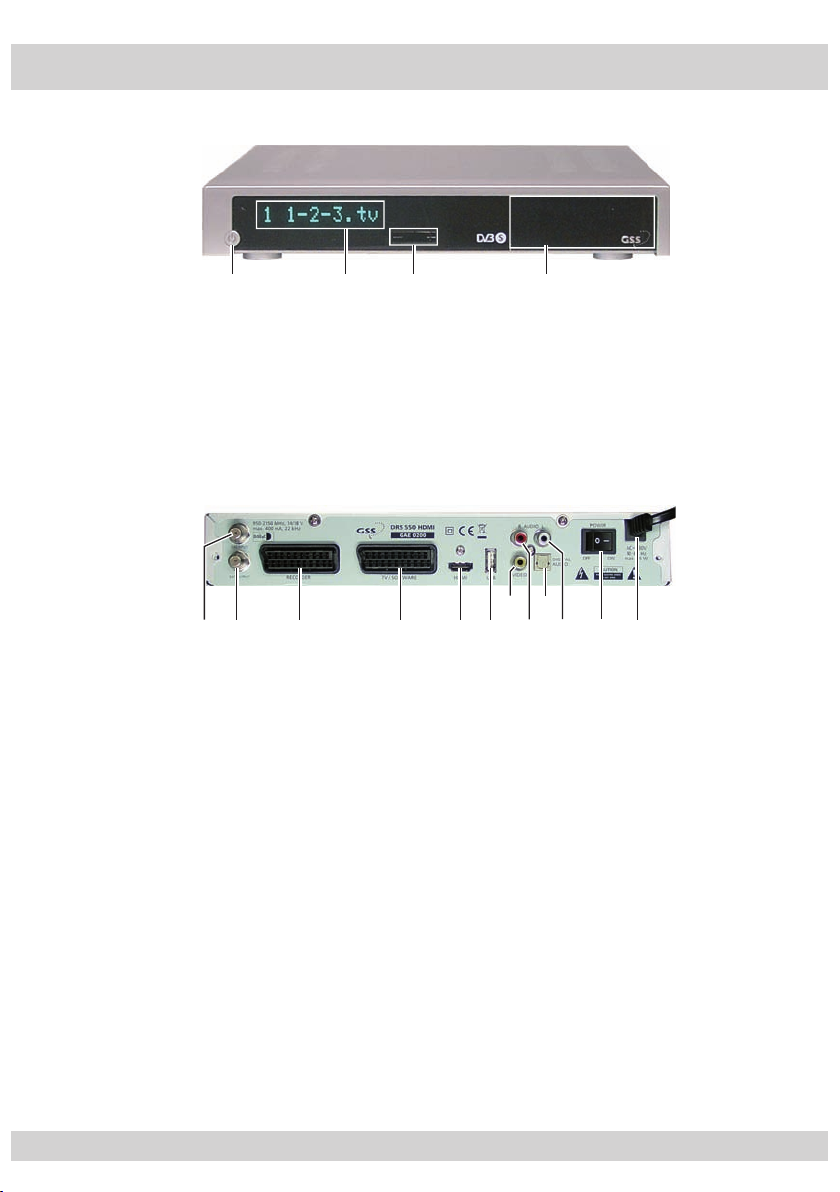
4.1 Front view ........................................................................................................8
4.2 View from behind .............................................................................................8
4.3 The remote control ............................................................................................9
4.3.1 Inserting batteries in the remote control ...................................................9
4.3.2 Control elements on the remote control ..................................................10
5 Connecting a satellite receiver .........................................................................................11
5.1 Connecting the satellite antenna ....................................................................... 11
5.2 Connecting the television .................................................................................11
5.3 Connecting a hard disc/storage device .............................................................12
5.4 Connecting the AV recorder/player ..................................................................12
5.5 Connecting a HiFi system .................................................................................12
5.6 Connecting a digital multi-channel amplifier (SPDIF) ............................................12
6 Starting up the satellite receiver ...................................................................................... 13
6.1 Switching on ..................................................................................................13
6.2 Switching off ..................................................................................................13
6.3 General menu information ..............................................................................14
6.4 Basic settings at first connection ........................................................................14
6.5 Screen display ................................................................................................14
7 Basic functions ............................................................................................................... 15
7.1 Setting the volume ...........................................................................................15
7. 2 M u t i n g ...........................................................................................................15
7.3 Selecting channels ..........................................................................................15
7.4 Channel related information .............................................................................15
7.5 Selecting channels from the radio and TV channel lists ........................................16
7.5.1 Inserting/deleting channels in the favourite list ........................................16
7.6 Selecting channels from the channel list .............................................................17
7.7 Selecting locked channels ................................................................................ 17
7.8 Selecting soundtrack language and subtitles ......................................................17
7.9 Teletext .......................................................................................................... 17
7.10 Zapping function ............................................................................................ 18
7.11 Electronic program guide .................................................................................18
8 The “Settings“ menu ....................................................................................................... 19
8.1 User Preferences ............................................................................................. 19
8.1.1 Setting the menu language ..................................................................19
8.1.2 Setting the Pop-up timeout ....................................................................20
8.1.3 Setting the primary audio language ......................................................20
- 2 -
Page 3

8.1.4 Displaying subtitles ..............................................................................20
8.1.5 Selecting history depth ........................................................................21
8.1.6 Setting the power up mode ..................................................................21
8.1.7 Reading messages ..............................................................................21
8.1.8 Exiting the menu function, switching back to the previous menu,
saving settings ....................................................................................22
8.2 PVR settings ....................................................................................................22
8.3 Sound/picture settings .....................................................................................23
8.3.1 Adapting the satellite receiver to the television set ...................................23
8.3.2 Output signal on the SCART slot ”RECORDER“ .......................................26
8.3.3 Setting the signal for the audio digital out ..............................................26
8.3.4 Fading the menu briefly .......................................................................26
8.4 Setting the time and date .................................................................................27
8.4.1 Setting the system time ........................................................................27
8.4.2 Setting the date ..................................................................................28
8.4.3 Setting the local time ...........................................................................28
8.4.4 Setting the time zone ...........................................................................28
8.4.5 Setting daylight saving time..................................................................29
8.5 Adjusting the satellite receiver to the reception system .........................................29
8.5.1 Selecting the LNB type ........................................................................30
8.5.2 Selecting satellites ...............................................................................30
8.5.3 Selecting the oscillator frequencies ........................................................ 31
8.5.4 Setting the band switching ...................................................................31
8.5.5 Setting DiSEqC ...................................................................................32
8.5.6 Settings for Unicable-LNB/Unicable multi-switch .....................................33
8.5.7 Signal quality and signal strength .........................................................34
8.6 Channel search...............................................................................................34
8.6.1 Automatic channel search ....................................................................34
8.6.2 Manual Channel Search ......................................................................36
8.7 Factory defaults ..............................................................................................38
8.7.1 Restoring to factory defaults .................................................................38
8.7.2 Resetting user preferences ....................................................................40
8.8 System information ..........................................................................................40
8.8.1 Product information .............................................................................40
8.8.2 Updating software ..............................................................................40
9 Editing the channel lists .................................................................................................. 42
9.1 Editing the channel lists ....................................................................................42
9.1.1 Moving channels .................................................................................42
9.1.2 Deleting channels ................................................................................43
9.1.3 Locking/unlocking channels .................................................................43
9.1.4 Sorting channels .................................................................................43
9.2 Editing favourite lists ........................................................................................44
9.2.1 Adding, renaming and removing favourite lists .......................................44
9.2.2 Adding channels to the favourite list ......................................................45
9.2.3 Editing channels in the favourite list .......................................................46
10 Program Guide .............................................................................................................. 47
11 Personal Planner ............................................................................................................ 49
11.1 Planning an event............................................................................................49
11.2 Changing a planner event ................................................................................52
11.3 Deleting a planner event ..................................................................................52
ENGLISH
- 3 -
Page 4

12 Parental control .............................................................................................................. 53
12.1 Setting the access rights ...................................................................................53
12.2 Locking channels.............................................................................................54
12.2.1 Unlocking channels .............................................................................54
12.3 Changing the PIN code ...................................................................................55
13 Receiving encrypted satellite channels ............................................................................. 56
13.1 Reception of channels with subprograms ...........................................................57
14 Sleep timer .....................................................................................................................57
15 Reading messages .......................................................................................................... 58
16 USB port ........................................................................................................................ 58
17 Recording programs ....................................................................................................... 59
17.1 Preparations ...................................................................................................59
17.1.1 Connecting a storage device ................................................................59
17.1.2 Formatting storage devices ...................................................................59
17.2 General to the recording functions ....................................................................59
17.2.1 Recording a live program .....................................................................59
17.2.2 Time-shift recording .............................................................................60
17.3 Timer recording ..............................................................................................61
17.3.1 Automatic setting ................................................................................61
17.3.2 Manual setting .................................................................................... 61
18 Playback functions ......................................................................................................... 62
19 Editing the video library ................................................................................................. 63
19.1 Renaming recordings .......................................................................................63
19.2 Deleting a recording .......................................................................................63
20 Information .................................................................................................................... 64
20.1 Technical data ................................................................................................64
20.2 Warranty .......................................................................................................64
20.3 Troubleshooting ..............................................................................................65
Index ................................................................................................................................... 66
- 4 -
Page 5

- 5 -
1 Introduction
• Thank you for deciding to purchase our product. In order to take advantage of all
its possible uses, we recommend that you carefully read these operating instructions
and that you keep them close at hand for quick access.
• Do not touch any parts inside the device and do not change any settings which are
not described in these operating instructions.
• We assume that you familiar with the operation of electronic devices. However,
please take the time to carefully read these operating instructions in order to become familiar with the wide range of options provided.
• Electronic devices should never be disposed of in the household rubbish. In accordance with EU directive 2002/96/EC which addresses
old electronic and electrical devices, such devices must be disposed
of at a designated collection facility. At the end of its service life,
please take your satellite receiver to one of these public collection
facilities for proper disposal.
1.1 Meaning of the icons used
Important note
—> General note
• Carrying out operating steps
2 General information
2.1 Packing contents
– DRS 550 HDMI
– Remote control and 2 batteries (2 x 1.5 V, e.g. UM-3 or AA type batteries)
– HDMI cable
– Operating Instructions
Updates for the operating instructions can be found on the website of
GSS Grundig SAT Systems GmbH: ”http://www.gss.tv”.
2.2 Accessories for satellite receivers
You can find out more about the extensive GSS range of accessories for satellite receivers at your specialist dealer or at the website of
GSS Grundig SAT Systems GmbH: ”http://www.gss.tv.”
2.3 Receiving digital satellite channels
To use this satellite receiver you require a satellite system that must be prepared for
receiving digital signals. Unlike analogue satellite broadcasting, digital TV or radio
stations are not all assigned their own frequencies; instead, several TV and/or radio
stations are transmitted by a single transponder using the same frequency.
- 5 -
ENGLISH
Page 6

- 6 -
To help you with the choice and settings for satellite channels, a selection of TV and
radio stations have been preprogrammed for this device. New channels, which are
not yet featured in the channel list on your satellite receiver, can be found using the
channel search.
2.4 Special facilities of your satellite receiver
This satellite receiver allows you to receive both free-to-air as well as encrypted digital
satellite channels from various encryption systems using the Common Interface slots
(see page 56), and to record them using a storage device (e.g. hard disc, USB stick)
connected to the USB port.
To ensure that your satellite receiver always uses the latest software, we recommend
that you update the operating software from time to time (see page 40).
This satellite receiver has a comprehensive, user-friendly menu system. It is displayed
on the television screen and the functions of the remote control buttons are explained.
The technology used allows the simultaneous recording of a SAT program and playback of a recorded program when an external storage device is connected. This procedure is used for the so-called “time shift” (time-delayed television).
2.5 Features of your satellite receiver
• 10-character, alphanumeric display
• Common Interface slot
Your satellite receiver is equipped with a Common Interface slot. It allows you to
connect two CA modules for various encryption systems and service providers.
Encrypted channels can only be decoded with a CA module suitable for the encryption system and the corresponding Smart card. The Smart card contains all the
information for authorisation, decoding and subscription.
The CA module and the corresponding Smart card can be obtained from the de-
sired service provider.
• 4,000 radio and television stations can be stored.
• Blind and fast scan
• You can save your preferred channels in individual lists of favourites.
• DiSEqC 1.0/1.1 and Unicable mode
DiSEqC means “Digital Satellite Equipment Control”. This is a circuit system which
controls the polarisation and the frequency bands. The Unicable mode is used to
control the satellite receiver in reception systems with Unicable-LNBs or Unicable
multi-switches.
• The electronic program guide EPG informs you about the complete range of channels from the various broadcasters. Detailed information on individual television
programs is available at the touch of a button.
• Using the HDMI connection (High Definition Multimedia Interface), high definition
picture signals and sound signals are provided digitally.
• Using the USB port an external storage device (e.g. hard disc, USB stick) can be
connected.
• SCART sockets for connecting TV and recorder
• SAT input with loop-through output
• Analogue audio outlet via Cinch sockets
- 6 -
Page 7

- 7 -
• Analogue video outlet via Cinch sockets
• Optical digital audio output
2.6 Environmental note
If you do not intend to use the satellite receiver for some time (e.g. at night), we recommend that you use the
To disconnect the satellite receiver from the mains supply, we recommend switching
this off using the mains switch at the back of the device.
button to switch to stand-by.
3 Important note on safety and set up
• Only operate the device at the voltage indicated on the back of the device.
• Never open the device under any circumstances. Only specialist qualified specialist
staff may work on the inside of the device.
• Thunderstorms are a danger to all electrical devices. Even if the device is switched
off, it can be damaged by lightning striking into the mains or the antenna cable.
Therefore, always disconnect the satellite receiver from the mains and from the antenna unit during a thunderstorm.
• This satellite receiver set is designed to receive and display video and audio signals. Any other use is expressly prohibited.
• When setting up the device, make sure the mains plug is easily accessible.
• If the digital receiver is subject to sudden changes in temperature, e.g. when brought
in from the cold to a warm room, let it stand for at least two hours before you connect it to the mains supply.
• Never expose the satellite receiver to moisture, as operation is only intended in dry
rooms. Should you however operate it outdoors, protect it from any moisture (rain,
splashing water etc.).
• Make sure that the satellite receiver is ventilated adequately.
• Do not operate the device close to heating units or in direct sunlight.
• Place the satellite receiver on a hard, level surface.
• When operating on a shelf, observe the minimum interval of approx. 10 cm on both
the sides and the top!
• Do not place any vessels containing liquids on the satellite receiver.
• Damages caused by tampering or improper handling are excluded from the warranty.
- 7 -
ENGLISH
Page 8
- 8 -
4 Your satellite receiver in overview
4.1 Front view
!
A Stand-by button with operating indicator
B Display
C Channel selection buttons “ – ”/“ + ”
D Cover for the Common Interface slot
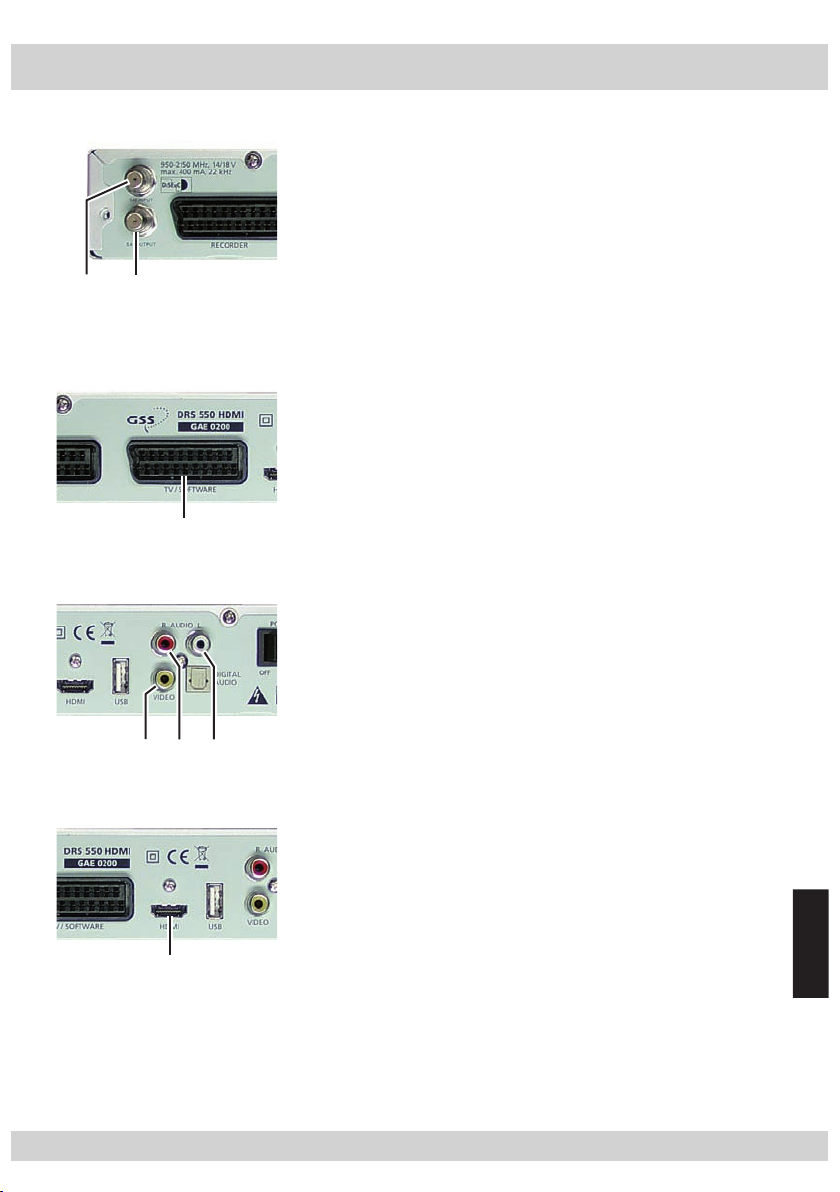
4.2 View from behind
1 SAT-IF input: Antenna socket for the satellite antenna
2 SAT-IF loop-through output: Antenna socket for connecting an
additional SAT receiver
3 SCART socket (RECORDER):
Input and output for video or DVD recorder
4 SCART socket (TV): Output for the television set
5 HDMI connection: Output to a television set with HDMI
connection
6 USB port: For connecting an external hard disc,
a USB stick or a PC
7 Video output: Cinch socket
8 Audio output (right): Cinch socket: Sound output (right)
9 Audio output (left): Cinch socket: Sound output (left)
0 Digital audio output: Optical connection for connecting a
digital multi-channel amplifier (SPDIF)
! Mains power switch
@ Power cord
- 8 -
Page 9
- 9 -
4.3 The remote control
Î
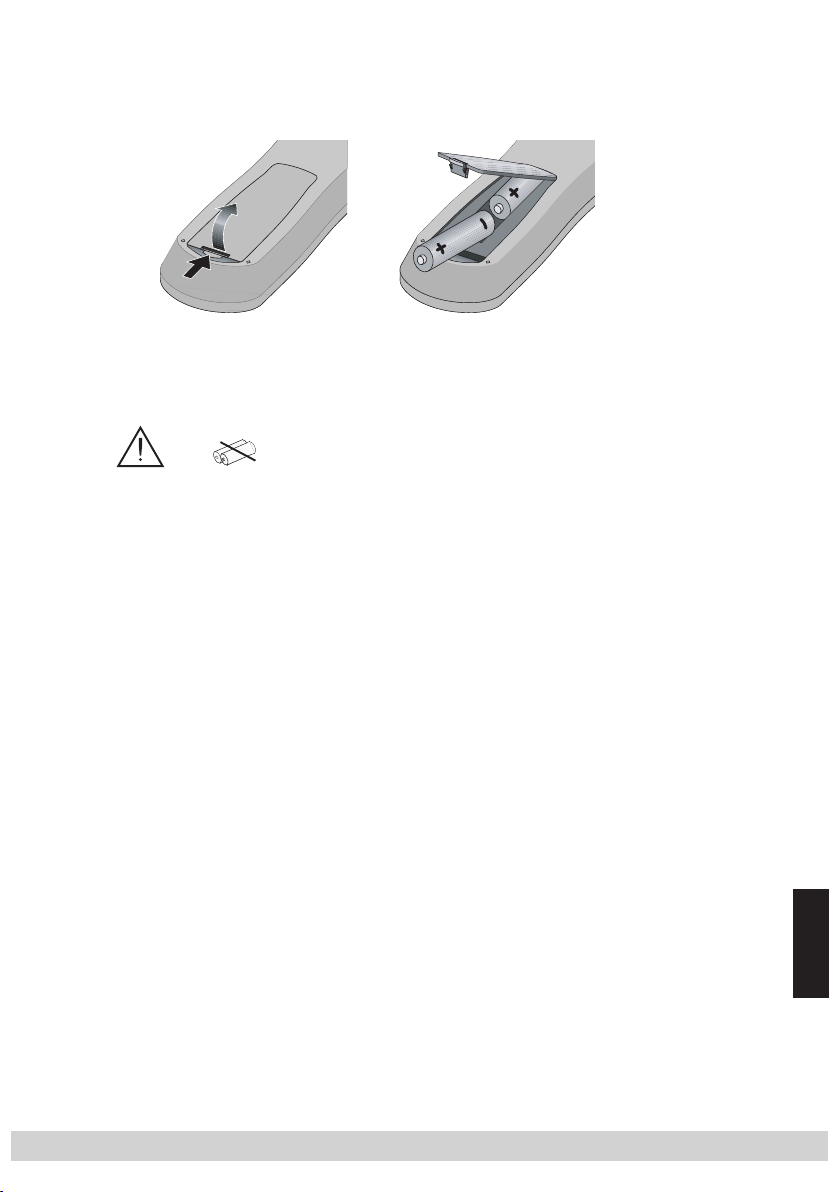
4.3.1 Inserting batteries in the remote control
• Open the battery compartment (1) and remove the cover (2).
2
1
• Insert batteries (2 x 1.5 V e.g. UM-3 or AA type). Observe the polarity marked in
the battery compartment base.
• Close the battery compartment.
If the satellite receiver does not react to the remote control properly or the sym-
bol
Always remove used batteries.
The manufacturer accepts no liability for damage resulting from leaking bat-
teries.
Environmental note
Never dispose of batteries with household rubbish. They should be disposed of at used
battery collection points in retail outlets or at public disposal facilities.
appears on the screen, we recommend changing the batteries.
ENGLISH
- 9 -
Page 10
- 10 -
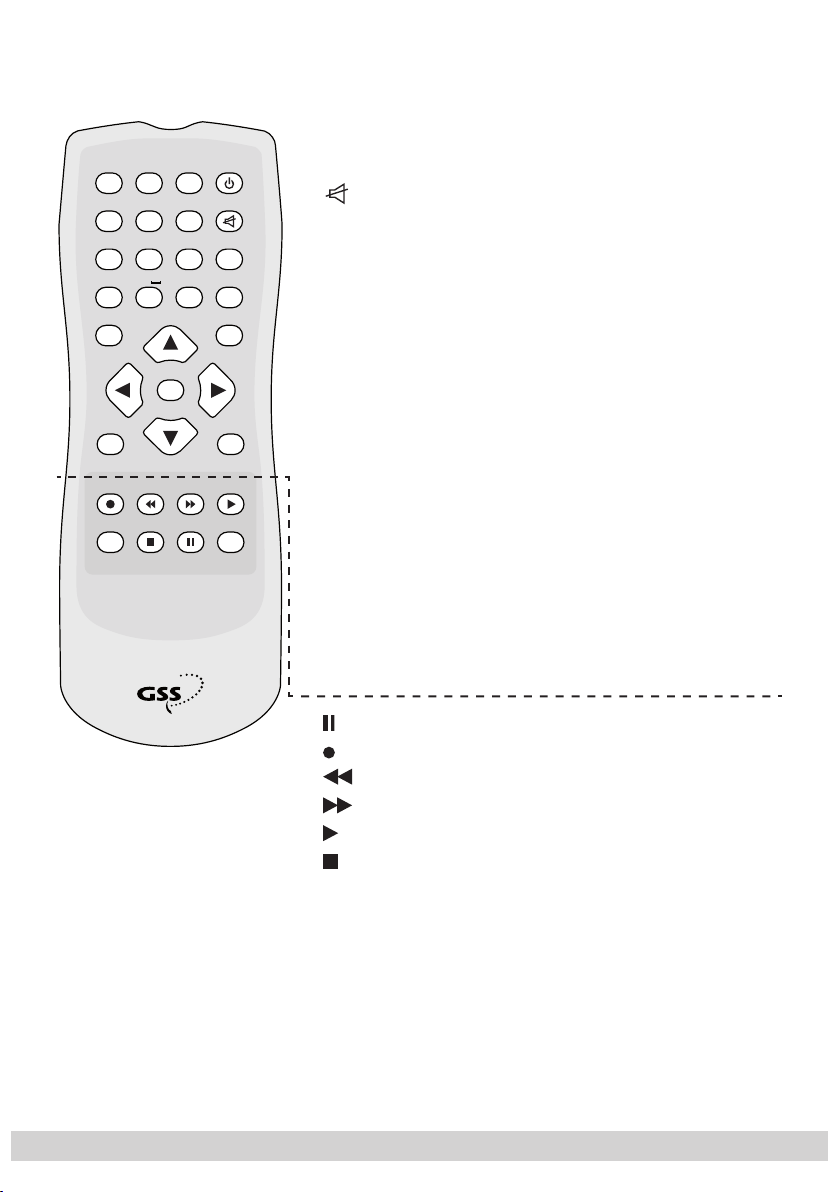
4.3.2 Control elements on the remote control
Switches to stand-by, and from stand-by to the
ABC DEF
1 2 3
JKL MNOGHI
4 5 6
TUV WXYZPQRS
7 8 9
AV
0
Ton e
i
Channel
OK
TXT
F
Fav
MENU
TV/RA/B
Exit
z
Timer
EPG
0 … 9 Select channels.
Switches the sound to mute and on again.
TV/R Switches between the lists of favourites and
MENU Opens the main menu, ends settings.
i Displays channel information.
Z Zapping function, hides menus.
In menu mode: Switches back to the previous
A/B Opens the menu “ Menu Language”.
Locks/unlocks channels in menu mode.
F Opens sub-programs (when available).
◀▶ Change the volume, control the cursor in the
SAT LIST
▲▼ Change channel places in increments up and
OK Opens the channel list, confirms entries.
TXT Opens teletext.
EPG Opens the electronic program guide (EPG).
channel last selected.
the TV and radio channel lists.
menu and cancels wrong entries.
menus.
down, select lines in the menus, open pages
in teletext.
RCR 100
Time-shift recording, pause, freeze
Recording, various functions in the menus
Fast rewind, various functions in the menus
Fast forward, various functions in the menus
Playback
Stop
LIST Opens “video library”
SAT Is not used on this device
- 10 -
Page 11
- 11 -
5 Connecting a satellite receiver
5.1 Connecting the satellite antenna
• Connect antenna cable of the satellite antenna to the connector
1 of the satellite receiver (screw connection, F-
connector).
—> On the connector
connect an additional satellite receiver. Conditions
of reception do however depend on the settings
5.2 Connecting the television
Connecting the television using the SCART cable
(page 29) of the first satellite receiver.
• Connect the socket 4 of the satellite receiver using a
standard SCART cable to the corresponding SCART socket on the television.
Connecting the television using the Cinch cable
• Connect the video output
ets
8 and 9 of the satellite receiver to the correspond-
ing sockets of your television set using standard Cinch
cables.
Yellow – Video signal (CVBS)
Red – Audio signal (right) 8
White – Audio signal (left) 9
2 ( loop-through output), you can
7 and the audio output sock-
7
Connecting the television using HDMI
• Connect the HDMI socket
the HDMI socket of your television set using the cable
enclosed.
- 11 -
5 of the satellite receiver to
ENGLISH
Page 12
- 12 -
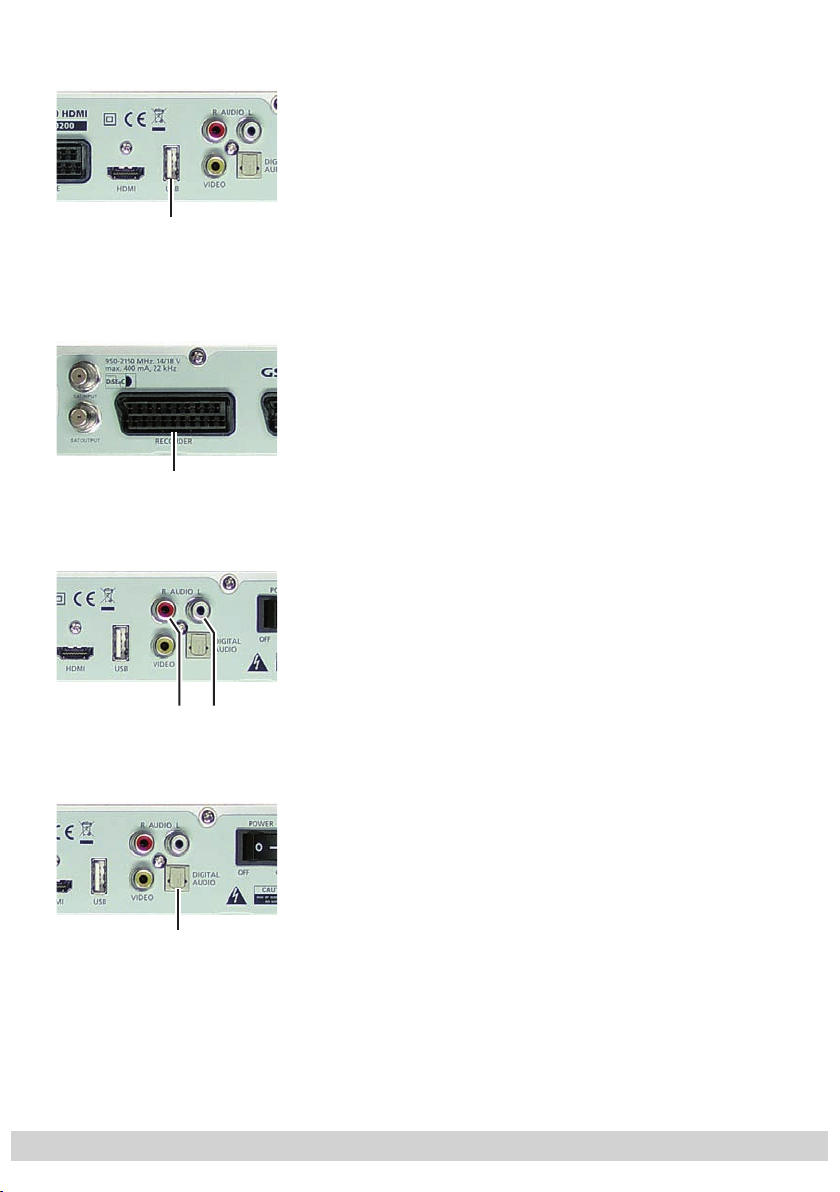
5.3 Connecting a hard disc/ storage device
• Connect the USB port
USB port of the hard disc using a standard USB cable.
—> You can also connect a PC or a USB stick to this
socket.
—> Storage devices can be supplied with operating
voltage of max. 500 mA via the USB interface. Stor-
5.4 Connecting the AV recorder/player
age devices requiring a higher power input need
their own mains adapter.
•
Connect the
the SCART socket of the AV recorder/player (e.g. video
or DVD recorder/player) using a standard SCART cable.
—> When replaying recorded programs switch the
satellite receiver to stand-by
5.5 Connecting a HiFi system
• Connect the audio output sockets
satellite receiver to the corresponding input sockets on
your HiFi system using standard Cinch cables.
6 of the satellite receiver to the
SCART socket 3 of the satellite receiver to
.
8 and 9 of your
Red – Audio signal (right) 8
White – Audio signal (left) 9
5.6 Connecting a digital multi-channel amplifier ( SPDIF)
• Connect the digital optical audio output
lite receiver to the corresponding input socket of your
digital multi-channel amplifier using a standard optical
connection.
- 12 -
0 of your satel-
Page 13

- 13 -
6 Starting up the satellite receiver
Your satellite receiver has been set at the factory for operation on universal LNBs in
Germany, immediately after it is switched on. After switching on the satellite receiver
we recommend adapting it to your personal requirements.
satellite receiver on a Unicable receiver system, you must set this as described in
chapter 8.5, page 29, before adapting it to your personal requirements.
For operation in other countries the satellite receiver must be reset to the factory settings. This is necessary to
(s. chapter 6.4, page 14). We recommend
to your personal requirements.
—> Operation using a storage device (recording mode) is described from page
58 on.
The following descriptions refer to the operation of your satellite receiver with the
remote control unless otherwise specified. The icons used correspond to the icons on
the remote control (s. page 10).
• Connect the power plug of the satellite receiver to the mains supply.
6.1 Switching on
• Switching the television to AV mode.
• Switch on the satellite receiver using the mains switch “POWER” on the rear side of
the device (position — “ON”).
prepare your satellite receiver for operation in your country
subsequently adapting the
If you wish to operate the
satellite receiver
• Use the
(s. page 8) to switch on from stand-by.
—> Control indicator in the stand-by button lights up in white.
6.2 Switching off
• Use the button on the remote control or on the device to switch it to stand-by.
—> Control indicator in the stand-by button lights up in red.
By using the mains switch on the rear side of the device, you can disconnect
button on the remote control (s. page 10) or on the device A
the satellite receiver completely from the mains supply (position O “OFF”).
- 13 -
ENGLISH
Page 14
- 14 -
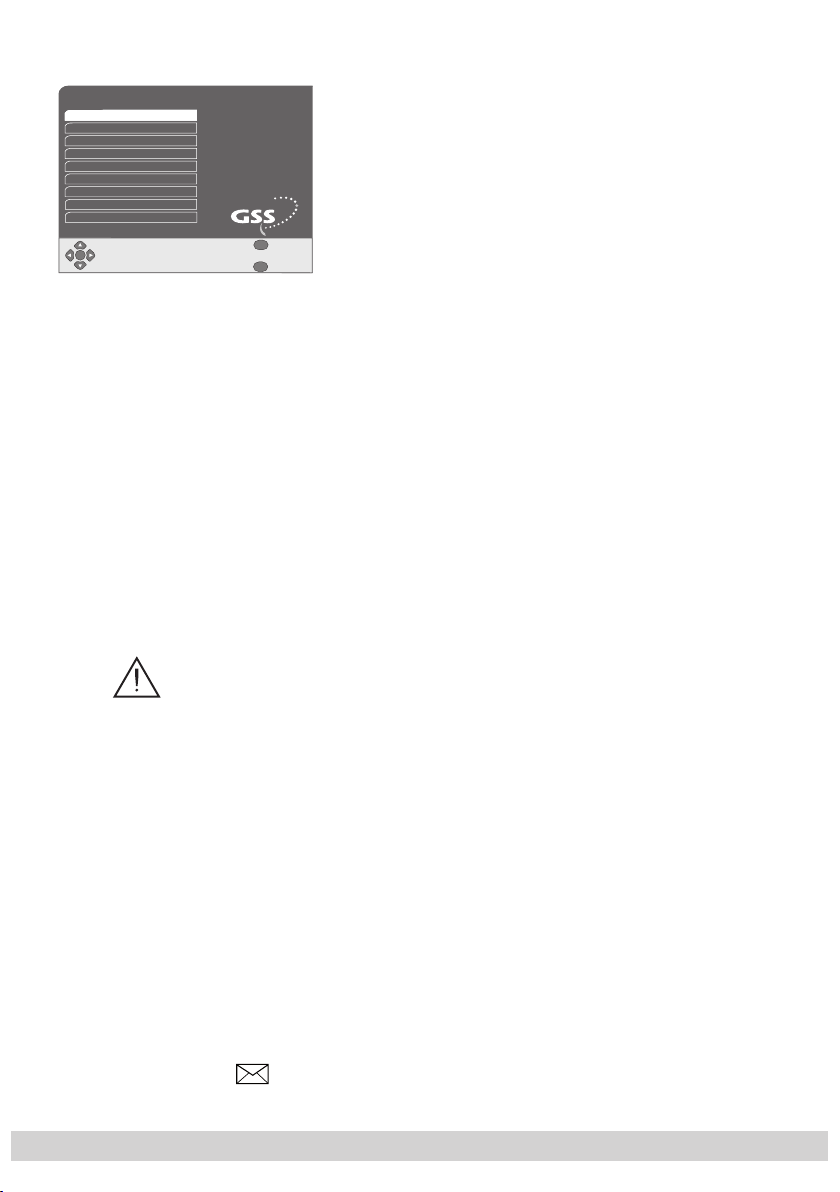
6.3 General menu information
Main Menu
1 Settings
2 List Manager
3 Program Guide
4 Personal Planner
5 Parental Lock
6 Common Interface
7 Sleep Timer
8 Read Messages
9 Exit
OK
MENU
Z
– This satellite receiver features a comprehensive, user-
friendly menu system. The menus are displayed on the
television screen.
–
The satellite receiver responds to many functions that you
can select on the remote control with informative menus
and icons on the screen. It enables you to select many
different settings and contains information on using your
Exit
Back
satellite receiver.
– The buttons on the remote control which are necessary
for using the menu are explained in the menus.
–
The main menu is the control centre for your satellite receiver.
–
Open the main menu using the remote control button MENU
and use ▼/▲ to
select the required line. It is displayed on a light background.
– Press OK to confirm your selection. In the related submenu which appears, use
▼/▲ to select the required line. It is displayed on a light background.
– Press OK to confirm your selection. If applicable, a further menu appears, in
which you can use
respective function/setting.
– The buttons
–
The return to the previous menu or cancellation of entries can be made using Z.
◀/▶ are control buttons.
– To save settings please refer to chapter 8.1.8, page 22.
– To end the menu function press MENU or use ▼/▲ to activate the line “Exit” and
press OK.
6.4 Basic settings at first connection
This setting is not required for operating the satellite receiver in Germany.
▼/▲ to select the required line and use OK to confirm the
When you switch on your satellite receiver for the first time, it must be set for operation
in your country. Using this setting you can open preprogrammed channel lists and can
select the desired menu language as well as the time zone in which you are operating
the device.
• Press the MENU button.
—> The “Main Menu” (”Hauptmenü”) appears with the active line “Settings”
(”Einstellungen”).
• Press the OK button.
—> The menu “Settings” (”Einstellungen”) appears with the active line
“User Preferences” (”Benutzereinstellungen”).
• Use
▼/▲ to select the line “Factory Defaults” (“Werkseinstellungen“).
—> The procedure is described in chapter 8.7, page 38.
6.5 Screen display
When the icon
is shown on the screen, there is a message. You can view this as
per chapter 15, page 58.
- 14 -
Page 15

- 15 -
7 Basic functions
7.1 Setting the volume
You cannot adjust the volume in menu mode.
Any changes to volume refer to the output level of the sound signals from the satellite
receiver.
• Use the ◀/▶ buttons to set the individual volume.
—> The change in volume appears on the screen as a bar.
7.2 M ut i ng
• Press the
—> The icon
• To end muting: Press the button again or press ◀/▶.
7.3 Selecting channels
•
Changing channels is done using the 0 … 9/OK or ▼/▲ button on th
trol or +/–
•
Enter single and multi-digit channel presets with the 0 ... 9 and OK buttons.
• To switch presets up and down one by one: press the ▼/▲ buttons on the remote
control or +/– on the satellite receiver as often as needed.
• To “scroll” quickly through presets: press ▼/▲ and hold as long as necessary.
—> After changing a channel, information on the channel selected is displayed
button.
appears on the screen.
C (s. page 8) on the satellite receiver.
temporarily on the monitor (s. also chapter 7.4).
e remote con-
7.4 Channel related information
In this menu channel related information is shown, EPG data can be called up and
programs can be transferred to the
• Press the i button.
The display shows the following information.
– Channel preset
– Name of the channel
– Date/time
– Title and starting time/duration of the current and next program
– The display may also contain the following icons:
The channel is broadcast with multi-channel sound.
The sound type “Dolby Digital” is being broadcast.
Subtitles are available.
The broadcast picture format is 16 : 9.
This channel is broadcast with teletext.
This program features subprograms.
personal planner as a recording.
- 15 -
ENGLISH
Page 16

- 16 -
$$
This channel is encrypted.
Reminder
Recording
R
• By pressing the
data of the station.
• Use the
a recording.
—> The transferred show (event) is indicated in the display by the recording icon
• By pressing and holding the
personal planner list.
7.5 Selecting channels from the radio and TV channel lists
You can choose between the channel lists
– TV (TV channels),
– Radio (radio stations) and
– favourite lists (see chapter 9.2, page 44).
• Select the desired channel list by repeatedly pressing the TV/R button.
• Use ▼/▲ and ◀/▶ to select a channel and press OK to open.
—>
7.5.1 Inserting/deleting channels in the favourite list
In the menu which is open you can sort channels in the TV list and the radio list, insert
channels into the favourite lists compiled in the “favourite list manager” (page 44)
menu and delete selected channels from all favourite lists.
(red) button to transfer the selected show to the personal planner list as
R
.
The selected channel list is used for channel selection using the
0 … 9/OK or
lite receiver.
(yellow) or the (green) button you scroll through the EPG
(red) button the event will be removed from the
▼/▲ on th
e remote control or +/– C (s. page 8) on the satel-
buttons
Inserting channels
• Select the TV list or radio list by repeatedly pressing the TV/R button.
• Use ▼/▲ and ◀/▶ to select a channel.
• Use the
• Use
• Confirm channel insertion using
Deleting channels
• Select the TV list or radio list by repeatedly pressing the TV/R button.
• Use ▼/▲ and ◀/▶ to select a channel.
• Use the
• Use
• Confirm channel deletion using
• Exit menu by pressing the Z button.
button (yellow) to open the selection of favourite lists.
▼/▲ to select favourite lists.
OK
.
button (yellow) to open the selection of favourite lists.
▼/▲ to select “
Delete from all favourite lists
OK
.
- 16 -
”.
Page 17

- 17 -
7.6 Selecting channels from the channel list
• Select the desired channel list by pressing the OK button.
• Use ▼/▲ and ◀/▶ to select a channel and press OK to open.
—> To switch over the channel list use the
—>
The selected channel list is used for channel selection using the
0 ... 9/OK or
lite receiver.
—> To insert channels in the favourite list see chapter 7.5.1.
7.7 Selecting locked channels
When you select a blocked channel via the menu point “Parental Lock” only the channel display and the menu “Enter PIN Code” appear. By entering the PIN code into the
menu “Enter Pin Code” you can release the locked channel until
next switched off.
Select channels using ▼/▲ or 0 … 9 / OK.
•
—> The following menu appears “Enter Pin Code”.
• Enter four-digit PIN code using 0 … 9.
—> All locked channels are released until you switch off the satellite receiver
again.
7.8 Selecting soundtrack language and subtitles
For channels broadcasting in several languages you can select a different language, audio type and digital sound (AC 3), if available. Digital sound is only available via the optical SPDIF output. If subtitles are transmitted, you can also activate these in this menu.
▼/▲ on th
e remote control or +/– C (s. page 8) on the satel-
TV/R
button.
the satellite receiver
buttons
is
• Press the
—> The menu “Current Language” with the activated line “Soundtrack Language”
• Press
• Use ▼/▲ to select the desired language or audio type (e.g. “2CH” - two channel,
“AC3”).
•
Confirm the setting using OK.
• When subtitles are broadcast, select line “Subtitles” using
activate.
• Use
• Confirm the setting using OK.
• Exit menu by pressing the A/B or Z button.
7.9 Teletext
Teletext is a service offered by some broadcasting stations, which is provided along
with the video and audio signals. These signals are converted by the satellite receiver
and can be displayed on the TV screen.
A/B button.
appears.
OK button.
▼/▲ to display subtitles e.g. “English” or to hide “None”.
- 17 -
▼/▲ and use OK to
ENGLISH
Page 18

- 18 -
• Select the channel using 0 … 9/OK or ▼/▲ whose teletext pages you wish to
view.
• To display teletext: press TXT.
—> After a few seconds, teletext page 100 appears on the screen.
• Enter the three-digit number of the text page using 0 … 9 or using ▼/▲ to scroll
text pages up/down.
• To exit teletext: press TXT.
7.10 Zapping function
This function allows you to switch back and forth (zap) between the previously viewed
channels. Further details can be found in the chapter “Selecting History Depth”,
page 21.
• Press the Z button repeatedly to switch back and forth between the previously
viewed channels.
7.11 Electronic program guide
The EPG – (Electronic Program Guide) provides information on the current show, the
channel preset, the title, beginning and end of the show as well as a brief description. It additionally contains the current time, the current date and the date of the list
selected. You can display information on the upcoming programs and change channels incrementally. Further information can be found in the chapter “Program Guide”,
page 47.
• Press the EPG button.
—> A list of the current programs and the upcoming programs is displayed.
• Use the
• Use the OK button to transfer the selected show to the personal planner list.
—> The transferred program (event) is identified in the EPG display by the
•
By pressing the OK button again, the event is planned as a reminder.
—> The transferred event is displayed in the EPG display as a reminder .
• By pressing and holding the OK button the event will be removed from the personal
planner list.
•
Use the i button to display detailed information on the selected program.
—> This display can be switched off again using the OK button.
• Use the (blue) button “+ 24
days.
• To scroll back use the (red) “– 24 Hours”.
• Use the
channels in descending and ascending order.
• To exit the EPG menu, press the Z button.
▼/▲, ◀/▶ buttons to select programs.
recording symbol
(green) “Channel –” and (yellow) “Channel +” buttons to select
R
.
Hours
” to display the EPG lists for the following
- 18 -
Page 19
- 19 -
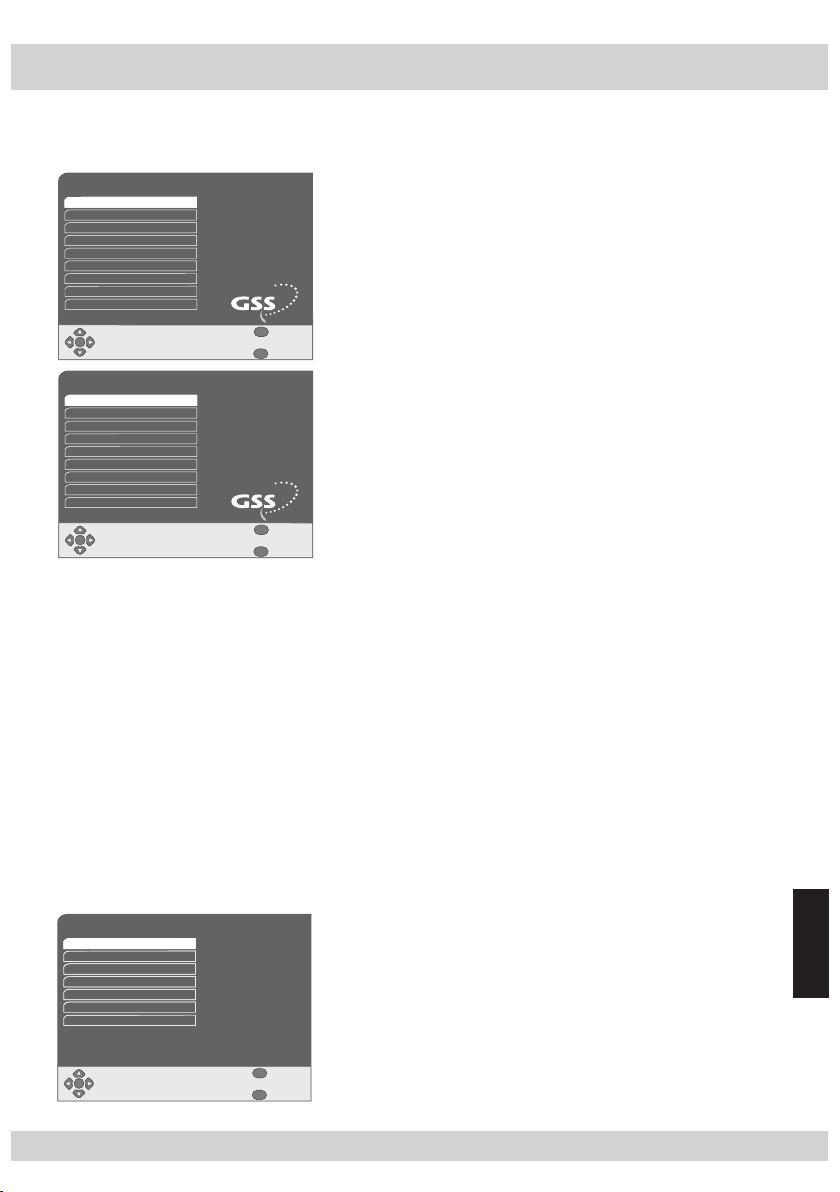
8 The “Settings“ menu
2 PVR Settings
1 User Preferences
Settings
OK
Exit
Back
MENU
Z
3 Audio/Video Settings
6 Channel Search
5 Antenna Settings
8 System Information
9 Exit
4 Time / Date
7 Factory Defaults
This menu allows you to set your satellite receiver to local conditions and personal
requirements.
Main Menu
1 Settings
2 List Manager
3 Program Guide
4 Personal Planner
5 Parental Lock
6 Common Interface
7 Sleep Timer
8 Read Messages
9 Exit
OK
MENU
Z
• Press the MENU button.
—> The “Main Menu” appears with the active line
“Settings”.
Exit
Back
• Press OK to confirm.
—> The menu “Settings” appears with the active line
“User Preferences”.
8.1 User Preferences
This menu allows you to set your specific requirements of the device:
- Menu language
- Timeout for the POP-UP menus
- Primary audio language ( Soundtrack for multi-lingual shows)
- Subtitles
- History Depth (Zapping function)
- Power Up Mode
- Messages
8.1.1 Setting the menu language
This menu allows you to set the desired menu language.
User Preferences
Menu Language English
Pop-up Timeout
Soundtrack Language
Subtitles
History depth
Power Up Mode
Auto Upgrades
OK
3
English
Subtitling Off
1
Stand-by Mode
Notify
• In the menu “Settings” confirm line “User Preferences”
using OK.
—> The menu “User Preferences” appears with the ac-
tive line “Menu Language”.
ENGLISH
Next to the menu line all the relevant, current set-
tings can be viewed.
MENU
Z
• Confirm line “Menu Language” using OK.
Exit
• In the selection menu use the
Back
desired language and confirm using OK.
- 19 -
▼/▲ buttons to select the
Page 20
- 20 -
8.1.2 Setting the Pop-up timeout
When you select a channel, channel information is displayed. This menu allows you to
set the duration of the screen display.
User Preferences
Menu Language English
Pop-up Timeout
Soundtrack Language
Subtitles
History depth
Power Up Mode
Auto Upgrades
OK
3
English
Subtitling Off
1
Stand-by Mode
Notify
3
6
9
press OK to confirm.
• In the selection menu which appears use the
to set the time “3”, “6” or “9” (seconds) after which the
screen display should fade out.
• Confirm the setting using OK.
MENU
Exit
Back
Z
• Use the
▼/▲ buttons to activate “Pop-up Timeout” and
8.1.3 Setting the primary audio language
Some shows are broadcast in several different languages. This menu allows you to
select your preferred language.
User Preferences
Menu Language English
Pop-up Timeout
Soundtrack Language
Subtitles
History depth
Power Up Mode
Auto Upgrades
OK
3
English
Subtitling Off
1
Stand-by Mode
Notify
• Use the
Language” line and press OK to confirm.
• In the selection menu which appears use the
to select the desired language.
• Confirm the setting using OK.
MENU
Exit
Back
Z
▼/▲ buttons to activate the “Soundtrack
▼/▲ buttons
▼/▲ buttons
8.1.4 Displaying subtitles
Some programs are broadcast with subtitles. This menu allows you to set whether and
in which language subtitles should be displayed on the screen.
User Preferences
Menu Language
Pop-up Timeout
Soundtrack Language
Subtitles
History depth
Power Up Mode
Auto Upgrades
OK
English
3
English
Subtitling Off
1
Stand-by Mode
Notify
• Use the
press OK to confirm.
• If no subtitles should be displayed, in the selection menu
which appears use the
“Subtitling Off” line.
If subtitles should be displayed, in the selection menu
MENU
Exit
Back
Z
which appears use the
preferred language.
• Confirm the setting using OK.
▼/▲ buttons to activate the “ Subtitles” line and
▼/▲ buttons to activate the
▼/▲ buttons to activate the
- 20 -
Page 21
- 21 -
8.1.5 Selecting history depth
This menu allows you to decide between how many of the previously viewed channels
you wish to switch back and forth (zapping function).
User Preferences
Menu Language
Pop-up Timeout
Soundtrack Language
Subtitles
History depth
Power Up Mode
Auto Upgrades
OK
English
3
1
English
2
Subtitling Off
1
3
Stand-by Mode
4
5
• Use the
and press OK to confirm.
• In the selection menu which appears, use the
buttons to select the desired number of channels
(“1” … “5”).
• Confirm the setting using OK.
MENU
Exit
Back
Z
▼/▲ buttons to activate the “History depth” line
8.1.6 Setting the power up mode
This menu allows you to set which operating mode the satellite receiver e.g. after a
power failure should be switched on in.
User Preferences
Menu Language English
Pop-up Timeout
Soundtrack Language
Subtitles
History depth
Power Up Mode
Auto Upgrades
OK
3
English
Subtitling Off
1
Stand-by Mode
Last Mode
Stand-by Mode
• Use the
press OK to confirm.
• In the selection menu which appears, use the
buttons to select the desired power up mode (“Last Mode”
or “Stand-by Mode”).
• Confirm the setting using OK.
MENU
Exit
Back
Z
▼/▲ buttons to activate “Power Up Mode” and
▼/▲
▼/▲
8.1.7 Reading messages
This menu allows you to set whether messages (e.g. about changes to software) should
be displayed (“Notify”) or not (“Off”).
User Preferences
Menu Language English
Pop-up Timeout
Soundtrack Language
Subtitles
History depth
Power Up Mode
Auto Upgrades
OK
3
English
Subtitling Off
1
Stand-by Mode
Off
Notify
• Use the
line and press OK to confirm.
• In the selection menu which appears use the
to select the desired language.
• Confirm the setting using OK.
MENU
Exit
Back
Z
▼/▲ buttons to activate the “Auto Upgrades”
- 21 -
▼/▲ buttons
ENGLISH
Page 22

- 22 -
8.1.8 Exiting the menu function, switching back to the previous menu, saving settings
• To exit the menu function, press the “MENU” button.
• To return to the previous menu, press the Z button or using
the
▼/▲ buttons activate the “Exit” line and confirm
using OK.
—> By pressing the Z button repeatedly you can exit the
menu function.
—> If you have changed settings, you can either confirm
i
Save changes?
Yes
No
or cancel them in the menu which, if applicable,
appears.
• Using the
◀/▶ buttons activate “Yes” to confirm (save)
or “No” to cancel and press OK.
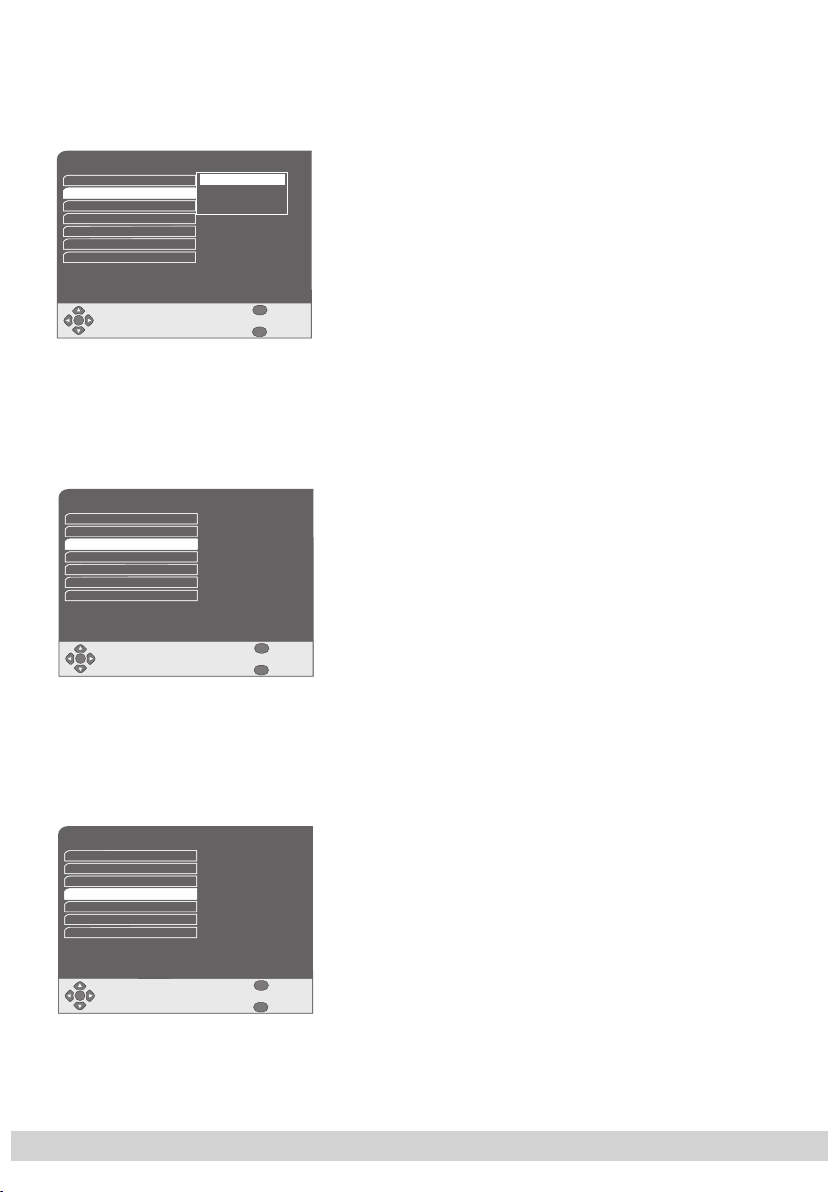
8.2 PVR settings
When in recording mode, this menu generally allows you - despite programmed switch
on and switch off times - to bring forward the real switch-on and switch-off times
(advance) and also put them back (trail). Additionally the control of the time shift function can be programmed.
PVR Settings
Start Guard Time
End Guard Time
End of Timeshift behavior
Number of Timeshift files
OK
PVR Settings
Start Guard Time
End Guard Time
End of Timeshift behavior
Number of Timeshift files
OK
None
1 Minute
Keine
2 Minutes
Keine
3 Minutes
5 Minutes
10 Minutes
15 Minutes
30 Minutes
60 Minutes
None
None
Pause
Play
Cancel Timeshift
• In the menu “Settings” use the
▼/▲ buttons to activate
the line “PVR Settings” and confirm using OK.
—> The menu “PVR Settings” appears with the active
line “Start Guard Time”.
Next to the menu line all the relevant, current settings
can be viewed.
MENU
Z
• Use the
Exit
Back
and/or “ End Guard Time” and confirm using OK.
• In the selection menu which appears, set the desired
▼/▲ buttons to select the line “ Start Guard Time”
advance and/or trail time (“None” … “60 Minutes”).
• Confirm the setting using OK.
• Use the
▼/▲ buttons to select the line “End of Timeshift
behavior“ and confirm using OK.
• In the selection menu which appears, set the desired function, which after the end of a time shift record shall be
performed.
—> “Pause“: After the end of a played back time shift
record an another time shift record is started (the
MENU
Exit
Zurück
Z
screen of the TV set shows a freeze frame).
—> “Play“: After the end of a played back time shift
record the time shift record is continued.
—> “Cancel Timeshift“: After the end of a played back
time shift record the satellite receiver switches to television reception.
• Confirm the setting using OK.
- 22 -
Page 23

- 23 -
• Use the ▼/▲ buttons to select the line “Number of
Timeshift files“ and confirm using OK.
• In the selection menu which appears, set the desired
number of time shift files (” 1 ” or ”No limit”) and confirm
using OK.
•
To exit the menu, see chapter 8.1.8, page 22
8.3 Sound/picture settings
This menu allows you to set the parameters for sound and picture:
- TV resolution (when connecting a television via HDMI)
- Type of picture signal in TV SCART output
- Type of picture signal in RECORDER SCART output
- Screen format
- Screen format (when connecting a television via HDMI)
- Aspect ratio
- Aspect ratio (when connecting a television via HDMI)
- Digital audio output
- Menu display
8.3.1 Adapting the satellite receiver to the television set
8.3.1.1 Connecting a television set via the HDMI slot
Your television set must be prepared accordingly for this connection.
Setting the TV resolution
This menu allows you to adapt your satellite receiver to the resolution of the LCD or
plasma television you have connected.
.
Audio/Video Settings
TV Resolution 1920 x 1080i
TV SCART
VCR SCART
Aspect Ratio
AR HD
Aspect Ratio Conversion
AR Conversion HD
Digital Audio Out
OSD over SCART
OK
RGB
CVBS
4 : 3
16 : 9
Letter/Pillar Box
Auto
Stereo
On
• In the menu “Settings” use the
the line “Audio/Video Settings” and confirm using OK.
—> The menu “Audio/Video Settings” appears with the
active line “TV SCART”. Next to the menu line all the
current settings can be viewed.
• Select the line “TV Resolution” using the
and confirm using OK.
MENU
Exit
• In the selection menu which appears use the
Back
Z
to select the desired resolution. This information can be
▼/▲ buttons to activate
found in the instructions for your television set.
• Confirm the setting using OK.
Adapting the picture format to the screen format on the television set
This menu allows you to adapt the picture provided by your satellite receiver to the
screen format of your television set. If you have a 4:3 format television, select the “4:3”
setting. If you have a 16:9 format screen, select the “16:9” setting.
- 23 -
▼/▲ buttons
▼/▲ buttons
ENGLISH
Page 24

- 24 -
Audio/Video Settings
TV Resolution 1920 x 1080i
TV SCART
VCR SCART
Aspect Ratio
AR HD
Aspect Ratio Conversion
AR Conversion HD
Digital Audio Out
OSD over SCART
OK
RGB
CVBS
4 : 3
16 : 9
Letter/Pillar Box
Auto
Stereo
On
In the menu “
•
using the
• In the selection menu which appears select screen format
4:3
16:9
MENU
Exit
Back
Z
using
• Confirm the setting using OK.
Audio/Video Settings
” select the line “AR HD”
▼/▲ buttons and confirm using OK.
▼/▲.
Setting the aspect ratio
This menu allows you to convert the aspect ratio of the picture shown on the screen to
your personal requirements, or to have the aspect ratio converted automatically to the
one provided by the station.
•
Audio/Video Settings
TV Resolution 1920 x 1080i
TV SCART
VCR SCART
Aspect Ratio
AR HD
Aspect Ratio Conversion
AR Conversion HD
Digital Audio Out
OSD over SCART
OK
RGB
CVBS
4 : 3
16 : 9
Letter/Pillar Box
Letter/Pillar Box
Auto
Stereo
On
Center
Auto
MENU
Exit
Back
Z
In the menu “Audio/Video Settings” use the ▼/▲ buttons
to select the line “AR Conversion HD” and confirm using
OK.
•
In the selection menu which appears use ▼/▲ to select
the desired aspect ratio “Center”, “ Letter/Pillar Box” or
“Auto” and confirm using OK.
—> The names have the following meanings:
Center: The picture is proportionally
adjusted to the screen height.
Letter/Pillar Box: The picture is proportionally
adjusted to the screen width.
At the upper and lower picture
edges black stripes
could appear.
Auto: The broadcaster’s aspect ratio is
used.
8.3.1.2 Connecting a television set via the SCART slot
Setting the output signal
This setting depends on the display device which is connected to the SCART slot. You can
choose between the settings “CVBS” (normal picture quality), “ RGB” (high picture quality)
and “ YUV” (e.g. connecting a beamer).
Ton/Bild Einstellungen
Audio/Video Settings
TV Resolution 1920 x 1080i
TV Resolution 1920 x 1080i
TV SCART
TV SCART
VCR SCART
VCR SCART
Bildschirmformat
Aspect Ratio
Bildformat HD
AR HD
Bildschirmformat Anpassung
Aspect Ratio Conversion
Bildschirmformat Anpassung HD
AR Conversion HD
Digitaler Audio Ausgang
Digital Audio Out
OSD auf SCART
OSD over SCART
OK
OK
RGB
RGB
RGB
CVBS
4 : 3
4 : 3
16 : 9
16 : 9
Letter/Pillar Box
Letter/Pillar Box
Auto
Auto
Stereo
Stereo
An
On
CVBS
FBAS
RGB
RGB
YUV
YUV
MENU
MENU
Z
Z
• In the menu “Settings” use the ▼/▲ buttons to activate
the line “Audio/Video Settings” and confirm using OK.
—> The menu “Audio/Video Settings” appears with the
active line “TV SCART”. Next to the menu line all the
relevant, current settings can be viewed.
• Confirm line “TV SCART” using OK.
• In the selection menu which appears, use the
Exit
Beenden
Zurück
Back
buttons to select the desired type of signal “ CVBS”, “RGB”
or “YUV”.
- 24 -
▼/▲
Page 25

- 25 -
—> For the settings “RGB” and “YUV” the television set
must be prepared accordingly and if necessary a
corresponding standard adapter be used.
• Confirm the setting using OK.
Adapting the picture format to the screen format on the television set
This menu allows you to convert the picture provided by your satellite receiver to the
screen format of your television set. If you have a 4:3 format television, select the “4:3”
setting. If you have a 16:9 format screen, select the “16:9” setting.
•
Audio/Video Settings
TV Resolution 1920 x 1080i
TV SCART
VCR SCART
Aspect Ratio
AR HD
Aspect Ratio Conversion
AR Conversion HD
Digital Audio Out
OSD over SCART
OK
RGB
CVBS
4 : 3
16 : 9
Letter/Pillar Box
Auto
Stereo
On
4:3
16:9
MENU
Exit
Back
Z
In the menu “Audio/Video Settings” select the line “Aspect
Ratio” using the
▼/▲ buttons and confirm using OK.
• In the selection menu which appears use ▼/▲ to select
screen format “4:3” or “16:9”.
• Confirm the setting using OK.
Setting the aspect ratio
This menu allows you to convert the aspect ratio of the picture shown on the screen to
your personal requirements, or to have the aspect ratio converted automatically to the
one provided by the station.
Audio/Video Settings
TV Resolution 1920 x 1080i
TV SCART
VCR SCART
Aspect Ratio
AR HD
Aspect Ratio Conversion
AR Conversion HD
Digital Audio Out
OSD over SCART
OK
RGB
CVBS
4 : 3
16 : 9
Letter/Pillar Box
Letter/Pillar Box
Auto
Stereo
On
Center
Auto
•
In the menu “Audio/Video Settings” select the line “Aspect
Ratio Conversion” using the
▼/▲ buttons and confirm
using OK.
•
In the selection menu which appears use ▼/▲ to select
the desired picture ratio “Center”, “ Letter/Pillar Box” or
“Auto” and confirm using OK.
—> The names have the following meanings:
MENU
Exit
Back
Z
Center: The picture is proportionally
adjusted to the screen height.
Letter/Pillar Box: The picture is proportionally
adjusted to the screen width.
At the upper and lower picture
edges black stripes could appear.
Auto: The broadcaster’s aspect ratio is
- 25 -
used.
ENGLISH
Page 26

- 26 -
8.3.2 Output signal on the SCART slot ”RECORDER“
This menu allows you to set the type of output signal on the SCART slot “RECORDER”.
•
Audio/Video Settings
TV Resolution 1920 x 1080i
TV SCART
VCR SCART
Aspect Ratio
AR HD
Aspect Ratio Conversion
AR Conversion HD
Digital Audio Out
OSD over SCART
OK
RGB
CVBS
4 : 3
16 : 9
Letter/Pillar Box
Auto
Stereo
On
MENU
Exit
Back
Z
In the menu “Audio/Video Settings” select the line “VCR
SCART” using the
▼/▲ buttons and confirm using OK.
• In the selection menu which appears select the desired
type of signal using
▼/▲.
• Confirm the setting using OK.
8.3.3 Setting the signal for the audio digital out
This menu allows you to set for the digital optical audio output (SPDIF) whether a stereo
signal or a Dolby digital signal
Audio/Video Settings
TV Resolution 1920 x 1080i
TV SCART
VCR SCART
Aspect Ratio
AR HD
Aspect Ratio Conversion
AR Conversion HD
Digital Audio Out
OSD over SCART
OK
RGB
CVBS
4 : 3
16 : 9
Letter/Pillar Box
Auto
Stereo
Stereo
Dolby Digital
On
MENU
Exit
Back
Z
* should be emitted.
•
In the menu “Audio/Video Settings” select the line “Digital
Audio Out” using the
▼/▲ buttons and confirm using
OK.
• In the selection menu which appears use ▼/▲ to select
the desired output signal “Stereo” or “Dolby Digital”.
• Confirm the setting using OK.
8.3.4 Fading the menu briefly
This menu allows you to fade out the current menu for approx. 15 seconds. The activated menu line is displayed in the satellite receiver display as a ticker text.
•
Audio/Video Settings
TV Resolution 1920 x 1080i
TV SCART
VCR SCART
Aspect Ratio
AR HD
Aspect Ratio Conversion
AR Conversion HD
Digital Audio Out
OSD over SCART
OK
RGB
CVBS
4 : 3
16 : 9
Letter/Pillar Box
Auto
Stereo
On
On
Off
MENU
Exit
Back
Z
* Manufactured under licence from Dolby Laboratories Licensing Corporation. “Dolby”, “Dolby Pro Logic”, “Dolby
Digital” and the double-D symbol
reserved
In the menu “Audio/Video Settings” select the line “OSD
over SCART” using the
▼/▲ buttons and confirm using
OK.
• In the selection menu which appears use ▼/▲ to fade in
the menu signal “On” or fade it out “Off”.
• Confirm the setting using OK.
•
To exit the menu, see chapter 8.1.8, page 22
.
p are trademarks of the Dolby Laboratories Licensing Corporation. All rights
- 26 -
Page 27

- 27 -
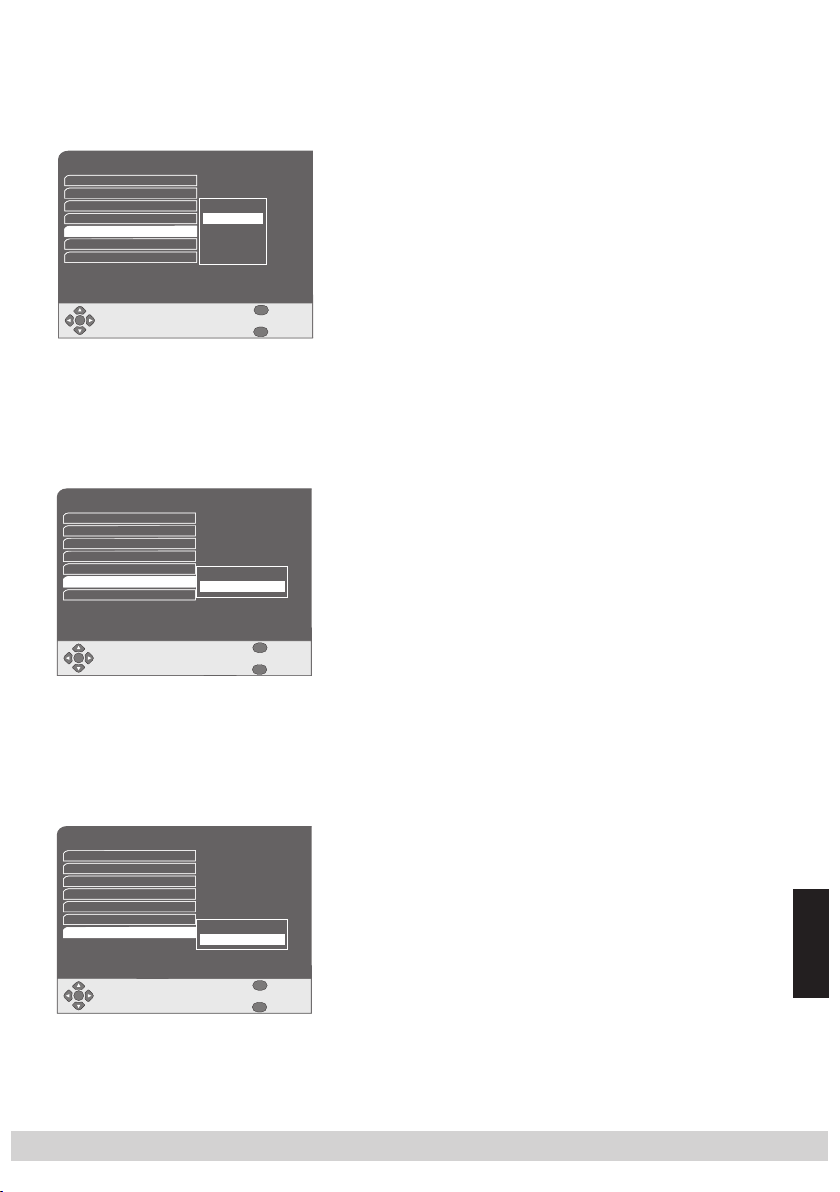
8.4 Setting the time and date
This menu allows you to set the following parameters for the time and date:
- System time
- Date
- Local time
- Time zone
- Daylight saving changeover
Next to the menu line all the relevant, current settings can be viewed. The lettering in
non-active lines is displayed in grey.
8.4.1 Setting the system time
System time refers to the local time and the date stored in the operating software.
These can be set manually and automatically. The automatic setting transfers the time
and date from data stream of the channel currently active.
To ensure the Electronic Program Guide ( EPG) displays the current programs at the
right time, you must enter the local time, the date and the time zone.
The default settings for the date and time setting are automatically set to “On”.
also set these manually.
You can
Time / Date
Automatic Time Update On
Date
Local Time
Time zone
Automatic daylight saving time
OK
Time / Date
Automatic Time Update On
Date
Local Time
Time zone
Automatic daylight saving time
OK
15. Aug. 2008
09 : 18
Amsterdam GMT + 1
On
MENU
Z
On
Off
24 : 01 : 2008
13 : 18
Amsterdam GMT + 1
On
MENU
Z
• In the menu “Settings” use the
▼/▲ buttons to activate
the line “Time/Date” and confirm using OK.
—> The menu “Time/Date” appears with the active line
“Automatic Time Update”.
Exit
Back
• Confirm line “Automatic Time Update” using OK.
• In the selection menu which appears, use the
buttons to select the desired setting “On” or “Off”.
—> Setting “On”.
Time and date are automatically transferred from
the data stream of the channel currently selected.
The lines “Date” and “Local Time” are displayed in
Exit
Back
grey lettering and are therefore inactive.
—> Setting “Off”.
Date and time must be set manually (s. chapter
8.4.2 and 8.4.3).
• Confirm the setting using OK.
▼/▲
ENGLISH
- 27 -
Page 28

- 28 -
8.4.2 Setting the date
Time / Date
Automatic Time Update
Date
Local Time
Time zone
Automatic daylight saving time
OK
Off
15|. Aug. 2008
09 : 25
Amsterdam GMT + 1
On
MENU
Z
8.4.3 Setting the local time
Time / Date
Automatic Time Update
Date
Local Time
Time zone
Automatic daylight saving time
OK
Off
15. Aug. 2008
09| : 30
Amsterdam GMT + 1
On
MENU
Z
• In the menu “Time/Date” use the
▼/▲ buttons to acti-
vate the line “Date” and confirm using OK.
—> In the related setting display, a cursor appears next
to the day.
• Use the
• Use the
▼/▲ buttons to display the current day.
◀/▶ buttons to place the cursor next to the
month display.
Exit
• Use the
Back
• Use the ◀/▶ buttons to place the cursor next to the year.
•
Use the ▼/▲ buttons to display the current year.
—> Alternatively, you can use the
▼/▲ buttons to display the current month.
(red) button to delete the digits left of the cursor and use the 0 … 9
buttons to enter the digits of the date. The cursor can
be controlled using the
◀/▶.
• Confirm the setting using OK.
•
In the menu “Time/Date” use ▼/▲ to select the line
“Local Time” and confirm using OK.
—> In the related setting display, a cursor appears next
to the hour.
•
Use the ▼/▲ buttons to display the current time (hours)
• Use the
◀/▶ buttons to place the cursor next to the
minutes.
Exit
•
Back
Use the ▼/▲ buttons to display the current time (minutes).
—> Alternatively, you can use the (red) button to de-
lete the digits left of the cursor and use the 0 ... 9
buttons to enter the time. The cursor can be controlled using the
◀/▶ buttons.
• Confirm the setting using OK.
.
8.4.4 Setting the time zone
The time zone indicates the difference between the time which applies at your location
and GMT time (Greenwich Mean Time, longitude “0”).
Time / Date
Automatic Time Update On
Date
Local Time
Time zone
Automatic daylight saving time
15. Aug. 2008
London GMT
13 : 18
Amsterdam GMT +1
Amsterdam GMT + 1
Helsinki GMT +2
On
• In the menu “Time/Date” use the
the line “Time Zone” and confirm using OK.
• In the selection menu which appears select the desired
time zone using
▼/▲.
▼/▲ buttons to activate
—> Valid for Germany: “Amsterdam GMT + 1”.
• Confirm the setting using OK.
MENU
OK
Exit
Back
Z
- 28 -
Page 29

- 29 -
8.4.5 Setting daylight saving time
This menu allows you to set whether the changeover to daylight savings is done manually or automatically.
Time / Date
Automatic Time Update On
Date
Local Time
Time zone
Automatic daylight saving time
15. Aug. 2008
09 : 35
Amsterdam GMT + 1
On
On
Off
• In the menu “Time/Date” use the
the line “Automatic daylight saving time” and confirm
using OK.
• In the selection menu which appears, use the
buttons to select the desired setting “On” or “Off”.
▼/▲ buttons to activate
—> Setting “On”.
Daylight saving changeover takes place automati-
MENU
OK
Exit
Back
Z
cally.
—> Setting “Off”.
When daylight saving time commences the local
time must be set manually (s. chapter 8.4.3).
• Confirm the setting using OK.
•
To exit the menu, see chapter 8.1.8, page 22
8.5 Adjusting the satellite receiver to the reception system
This satellite receiver was factory pre-programmed to be ready for operation with most
satellite antennas and Universal-LNB configurations. For operation on satellite receiving systems with a Unicable-LNB or a Unicable multi-switch the satellite receiver must
be set accordingly.
Unicable refers to a type of installation allowing several satellite receivers can be connected to a Unicable-LNB or to a Unicable multi-switch using one cable. For each of
the satellite receivers connected, the independently-selectable satellite channels are
transmitted on a frequency assigned to the respective satellite receiver.
Changes in this menu have a direct effect on the reception characteristics of the satellite receiver and should therefore only be made by an expert.
This menu allows you to set the following parameters for adjusting the satellite receiver
to the reception system:
- Selection of the LNB-type (Universal/Unicable)
- Satellite selection
- Lower oscillator frequency of the LNB
- Upper oscillator frequency of the LNB
- Band changeover
- DiSEqC settings
- IF frequency (Unicable only)
- IF channel (Unicable only)
Signal quality and signal strength are also displayed.
Next to the menu line all the relevant, current settings can be viewed. The lettering in
non-active lines is displayed in grey.
▼/▲
.
ENGLISH
- 29 -
Page 30

- 30 -
8.5.1 Selecting the LNB type
This menu allows you to select the LNB type of your satellite reception system. Use the
setting “Universal” for conventional LNBs (factory default).
The setting “ Unicable LNB” is necessary when the satellite receiver is to be connected
directly to a Unicable-LNB. Use the setting “ Unicable Switch” when the satellite receiver
is to be connected to a satellite reception system with a Unicable multi-switch.
Antenna Settings
LNB Type
Satellite
LOF Low Band
LOF High Band
Band Switching
Primary DiSEqC
Primary DiSEqC Input
Signal quality
Signal strength
Delete Satellite
OK
Insert Satellite
Antenna Settings
LNB Type
Satellite
LOF Low Band
LOF High Band
Band Switching
Primary DiSEqC
Primary DiSEqC Input
Signal quality
Signal strength
Delete Satellite
OK
Insert Satellite
Universal
19,2°E ASTRA 1F,G,H,KR,L
9750
10600
Auto
None
A
MENU
Z
Universal
Universal
Unicable LNB
ASTRA 1B, 1C, 1E, 1F, 1
Unicable Switch
9750
10600
Auto
None
A
MENU
Z
• In the menu “Settings” use the
the line “Antenna Settings” and confirm using OK.
—> The menu “Antenna Settings” appears with the ac-
tive line “LNB Type”.
Exit
Back
• Confirm line “LNB Type” using OK.
• In the selection menu which appears use the
to select the desired mode of operation “Universal”,
“Unicable LNB” or “Unicable Switch”.
—> Use a Universal-LNB “Universal” and continue with
chapter 8.5.2.
—> Use one of the Unicable settings and continue with
Exit
Back
chapter 8.5.6.
• Confirm the setting using OK.
▼/▲ buttons to activate
8.5.2 Selecting satellites
This menu allows you to select from which satellite the input signal in your satellite
receiver should originate. Prerequisite for the reception from the selected satellite is
that your antenna system is prepared accordingly.
• In the menu “Antenna Settings” use the
▼/▲ buttons to
activate the line “Satellite” and confirm using OK.
Antenna Settings
LNB Type
Satellite
LOF Low Band
LOF High Band
Band Switching
Primary DiSEqC
Primary DiSEqC Input
Signal quality
Signal strength
Delete Satellite
OK
Insert Satellite
Universal
19,2°E Astra 1F,G,H,KR,L
ASTRA 1B, 1C, 1E, 1F, 1
13,0°E HOTBIRD 6,7A,8
9750
10600
Auto
None
A
MENU
Z
• In the selection menu which appears use the
to select the desired satellite.
• Confirm the setting using OK.
To add a satellite to the selection list:
• Press the
(green) button.
• In the selection menu which appears use the
Exit
Back
to select the desired satellite.
• Confirm the setting using OK.
▼/▲ buttons
▼/▲ buttons
▼/▲ buttons
- 30 -
Page 31

- 31 -
To delete satellites from the selection list:
• In the selection menu, use the
▼/▲ buttons to select the
satellite to be deleted and delete by pressing the
button.
8.5.3 Selecting the oscillator frequencies
These menus allow you to select the oscillator frequencies (LOF) of the LNB used. These
are usually printed on the LNB or can be found in the respective documentation.
(red)
Antenna Settings
LNB Type
Satellite
LOF Low Band
LOF High Band
Band Switching
Primary DiSEqC
Primary DiSEqC Input
Signal quality
Signal strength
Delete Satellite
OK
Insert Satellite
5150
9750
10000
Universal
10200
ASTRA 1B, 1C, 1E, 1F, 1
10415
9750
10600
10600
Auto
10700
None
10750
A
11300
11450
MENU
Z
•
In the menu “Antenna Settings” use ▼/▲ to select the
line “LOF Low Band” and confirm using OK.
• In the selection menu use the
oscillator frequency and confirm using OK.
• Use
▼/▲ to select the line “LOF High Band” and confirm
using OK.
• In the selection menu use the
Exit
Back
desired upper oscillator frequency and confirm using
OK.
▼/▲ buttons to select the
▼/▲ buttons to select the
8.5.4 Setting the band switching
The satellite receiver uses a 22 kHz signal for the LNB lower band/upper band switching. This menu allows you to turn the switching off, on or to automatic. In case you
are not aware whether your LNB can process the 22 kHz signal, turn it to automatic
switching.
•
Antenna Settings
LNB Type
Satellite
LOF Low Band
LOF High Band
Band Switching
Primary DiSEqC
Primary DiSEqC Input
Signal quality
Signal strength
Delete Satellite
OK
Insert Satellite
Universal
19,2°E ASTRA 1F,G,H,KR,L
9750
Auto
10600
On
Auto
Off
None
A
MENU
Z
Exit
Back
In the menu “Antenna Settings” use ▼/▲ to select the
line “Band Switching” and confirm using OK.
• In the selection menu which appears, use the
buttons to select the desired mode of operation “Auto”
(automatic), “On” or “Off”.
• Confirm the setting using OK.
▼/▲
- 31 -
ENGLISH
Page 32

- 32 -
8.5.5 Setting DiSEqC
The satellite receiver can be operated on cascadable DiSEqC switches. In the menus
“Primary DiSEqC” and “Primary DiSEqC Input” you can set the DiSEqC type and the
input allocation for each DiSEqC switch.
Antenna Settings
LNB Type
Satellite
LOF Low Band
LOF High Band
Band Switching
Primary DiSEqC
Primary DiSEqC Input
Signal quality
Signal strength
Delete Satellite
OK
Insert Satellite
Universal
19,2°E ASTRA 1F,G,H,KR,L
9750
10600
None
Auto
Mini DiSEqC
None
DiSEqC 1.0
A
DiSEqC 1.1
MENU
Z
• In the menu “Antenna Settings” use
▼/▲ to select the
line “Primary DiSEqC” and confirm using OK.
• In the selection menu use the
▼/▲ buttons to select the
desired operating mode and confirm using OK.
—> If “None” is activated, then the menu “Primary
DiSEqC Input” is inactive.
Exit
Setting DiSEqC input
Back
• In the menu “Antenna Settings” use
▼/▲ to select the
line “Primary DiSEqC Input” and confirm using OK.
• In the selection menu which appears use the
▼/▲ buttons
to activate the desired input for the satellite selected in
the menu point “Satellite” and confirm using OK.
Examples:
Receiving signals from a single satellite
•
In the menu “
using
• In the selection menu, u
satellite
• Use
▼/▲ to select
• In the selection menu, u
lator frequency of the LNB
• Use
▼/▲ to select
• In the selection menu, u
lator frequency of the LNB
• Use
▼/▲ to select
• In the selection menu, u
Antenna Settings” activate line “Satellite”
▼/▲ and confirm using OK.
se ▼/▲
and confirm using OK.
“
LOF Low Band” and confirm using OK.
se ▼/▲
“
LOF High Band” and confirm using OK.
se ▼/▲
“
Band Switching” and confirm using OK.
se ▼/▲
and confirm using OK.
and confirm using OK.
to select the desired
to select the lower oscil-
to select the higher oscil-
to select “
Auto” and con-
firm using OK.
• Use
▼/▲
to select “
Primary DiSEqC” and confirm using OK.
• In the selection menu use ▼/▲ to select “None” and
confirm using OK.
•
To exit the menu, see chapter 8.1.8, page 22
.
Receiving signals from 2 or more satellites
•
In the menu “
using
• In the selection menu u
lite
and confirm using OK.
• Use ▼/▲ to select “
Antenna Settings” activate the line “Satellite”
▼/▲ and confirm using OK.
se ▼/▲
LOF Low Band
to select the desired satel-
” and confirm using
OK.
- 32 -
Page 33

- 33 -
• In the selection menu, u
lator frequency of the LNB
• Use ▼/▲ to select “LOF High Band” and confirm using
OK.
• In the selection menu, u
lator frequency of the LNB
• Use ▼/▲ to select “Band Switching” and confirm using
OK.
• In the selection menu use
firm using OK.
• Use
▼/▲ to select “Primary DiSEqC” and confirm using
OK.
• In the selection menu which appears use the
buttons to select the desired DiSEqC operating mode and
confirm using OK.
•
Use ▼/▲ to select the line “Primary DiSEqC Input” and
confirm using OK.
• In the selection menu which appears use the
to activate the desired input for the satellite selected in
the menu point “Satellite” and confirm using OK.
• Repeat setting for each satellite.
• To exit the menu, see chapter 8.1.8, page 22.
8.5.6 Settings for Unicable-LNB/ Unicable multi-switch
•
Antenna Settings
LNB Type
Satellite
LOF Low Band
LOF High Band
Band Switching
Primary DiSEqC
Primary DiSEqC Input
Signal quality
Signal strength
Tuner IF
Delete Satellite
OK
Insert Satellite
Universal
Universal
Unicable LNB
ASTRA 1B, 1C, 1E, 1F, 1
Unicable Switch
9750
10600
Auto
None
A
Not assigned
MENU
Exit
Back
Z
In the selection menu “LNB Type”, depending on connection type, use
▼ to activate the line “Unicable LNB” or
“ Unicable Switch” and confirm using OK.
—> The
menu “
Antenna Settings
“Tuner IF” and “Channel ID”.
—> The settings ...
select satellites,
select the oscillator frequency,
set the band switching,
set DiSEqC,
are made as described in chapter 8.5.2 to 8.5.5.
se ▼/▲
to select the lower oscil-
and confirm using OK.
se ▼/▲
to select the higher oscil-
and confirm using OK.
▼/▲ to select “Auto” and con-
▼/▲ buttons
” is enhanced by the
▼/▲
lines
Antenna Settings
Satellite
LOF Low Band
LOF High Band
Band Switching
Primary DiSEqC
Primary DiSEqC Input
Signal quality
Signal strength
Tuner IF
Channel ID
Delete Satellite
OK
Insert Satellite
19,2°E ASTRA 1F,G,H,KR,L
9750
10600
Auto
None
A
Not assigned
Not assigned
MENU
Z
•
In the menu “
using
Antenna Settings” activate the line “Tuner IF”
▼/▲ and confirm using OK.
• In the selection menu which appears u
the
desired or allocated input frequency for the satellite
receiver and confirm using OK.
—> Should these not be included, close the selection
menu using Z and use the 0 ... 9 buttons to enter the
Exit
Back
desired or allocated IF frequency and confirm using
OK.
- 33 -
se ▼/▲ to select
ENGLISH
Page 34

- 34 -
• In the menu “
ID” using
Antenna Settings
” activate the line “Channel
▼/▲ and confirm using OK.
• In the selection menu which appears use ▼/▲ to select
the desired or allocated IF channel and confirm using
OK.
—> The IF channel which must be selected for the set
frequency can be found in the documentation for
the Unicable-LNB or Unicable multi-switch used.
8.5.7 Signal quality and signal strength
The menu points “Signal quality” and “Signal strength” cannot be set. They merely
indicate the quality and the strength of the antenna signal provided.
• To exit the menu, see chapter 8.1.8, page 22.
8.6 Channel search
This satellite receiver was programmed with most digital TV and radio stations, e.g.
on the satellite Astra 19.2° East, as default settings. These can be displayed in the
menus “Main TV List” and “Main Radio List” by pressing OK , TV/R and
As satellite channels are constantly being added and satellite data altered, we recommend starting the search “Automatic Channel Search” on the satellite receiver from
time to time and updating the channel list
.
8.6.1 Automatic channel search
In the automatic channel search, the selected satellite is scanned for new channels
and a current channel list is generated. This menu allows you to set the following parameters for the channel search:
- Channel scan mode
- Search for all or unencrypted channels
- Satellite selection
▼/▲ , ◀/▶.
Channel Search
Satellite Search
Advanced Channel Search
Exit
OK
• In the menu “Settings” use the
▼/▲ buttons to activate
the line “Channel Search” and confirm using OK.
—> The menu “Channel Search” appears with the active
line “Satellite Search”.
MENU
Exit
Back
Z
• Confirm line “Satellite Search” using OK.
- 34 -
Page 35

- 35 -
Satellite Search
Scan mode
Channels
Satellite
Complete
All
19,2°E ASTRA 1F,G,H,KR,L
—> The menu “Satellite Search” appears with the active
line “Scan mode”.
Next to the menu line all the relevant, current set-
tings can be viewed.
• Confirm line “Scan mode” using OK.
OK
Start Search
Back
Z
• In the submenu which appears, use
“Complete” or “Quick Scan”:
▼/▲ to activate
“Complete”: Channels on all transpon ders of all sat-
ellites and the usual symbol rates are
scanned.
This scan mode can take some time.
“Quick Scan”: Channels on all known transponders of
the satellite set are scanned.
—> Please also observe the segment “Confirm the line
Satellite …” in this chapter.
• Confirm setting using OK and use the
▼/▲ to activate
the “Channels” line.
• Confirm line “Channels” using OK.
• In the submenu which appears, use the
▼/▲ buttons to
activate “All” or “FTA”:
“All”: Both encrypted and unencrypted channels
are scanned.
“ FTA”: Only unencrypted channels are scanned.
• Confirm setting using OK and use the
▼/▲ to activate
the line “Satellite”.
• Confirm the line “Satellite” using OK.
• In the submenu which appears use the
▼/▲ buttons to
activate the desired satellite or “All Satellites” and con-
firm using OK.
• To start the channel search, press the
(green) button.
—> By pressing the Z button you can pause the channel
search.
—> The channels found are displayed in a list.
• By pressing the
the
(red) button to cancel the channel search.
(green) button, save channels or use
• To return to the menu “Channel Search”, press the Z
button.
- 35 -
ENGLISH
Page 36

- 36 -
8.6.2 Manual Channel Search
If a channel is not located by the automatic channel search, you can look for it directly
using the manual channel search. To do so, enter all the parameters of the channel you are
looking for. The current transponder data can be found in the broadcasters’ teletext service,
in an up-to-date satellite trade magazine or in the internet.
Channel Search
Satellite Search
Advanced Channel Search
Exit
OK
MENU
Z
8.6.2.1 Selecting a satellite
Advanced Channel Search
Satellite
Frequency
Polarity
Symbol Rate
FEC
PID
Video PID
Audio PID
PCR
Channels
OK
19.2°E Astra 1F,G,H,KR,L
ASTRA 1B, 1C, 1E, 1F, 1
13.0°E HOTBIRD 6,7A,8
12071
Horizontal
27500
Automatic
Automatic
100
100
100
All
Signal strength
Signal Quality
Z
Start Search
Back
8.6.2.2 Setting the frequency
• In the menu “Channel Search” use the ▼/▲ buttons to
activate the line “Advanced Channel Search” and confirm
using OK.
—> The menu “Advanced Channel Search” appears with
the active line “Satellite”.
Next to the menu line all the relevant, current set-
tings can be viewed. Signal quality and signal
Exit
Back
strength are also displayed.
• Confirm the line “Satellite” using OK.
• In the selection menu which appears use the
▼/▲ buttons
to select the desired satellites and confirm using OK.
• Select the line “Frequency” using the
▼/▲ buttons and
confirm using OK.
—> In the related settings display, a cursor appears next
to the entry.
• Use the
(red) button to delete an existing entry by
pressing repeatedly and use the 0 … 9 buttons to set the
frequency of the channel you wish to locate.
• Confirm the setting using OK.
8.6.2.3 Setting the polarity
• Select the line “Polarity” using the
▼/▲ buttons and
confirm using OK.
• In the selection menu which appears use the
buttons to set the polarity of the transponder (“Vertical”,
“Horizontal”, “ Right Circular” or “Left Circular”).
• Confirm the setting using OK.
- 36 -
▼/▲
Page 37

- 37 -
8.6.2.4 Setting the symbol rate
8.6.2.5 Setting the error correction
8.6.2.6 Setting PID and PCR
• Select the line “Symbol Rate” using the
confirm using OK.
—> In the related settings display, a cursor appears next
to the symbol rate which has been set.
• Use the
pressing repeatedly and use the 0 … 9 buttons to set the
symbol rate of the channel you wish to locate.
• Confirm the setting using OK.
• Select the line “ FEC” (error correction) using the
buttons and confirm using OK.
• In the selection menu which appears use the
buttons to select the channel-related FEC (“Automatic”,
“1/2”, “2/3”, “3/4”, “5/6” or “7/8 ”) and confirm using
OK.
—> In case you do not know the FEC of the channel you
• Select the line “ PID” using the
using OK.
• In the selection menu which appears use the
to select the automatic or manual PID setting (“Automatic”
or “Manual”) and confirm using OK.
—> In case you do not know the PIDs and PCR of the
—> If “Automatic” is activated, the lines “Video PID”,
(red) button to delete an existing entry by
are looking for, activate “Automatic”.
▼/▲ buttons and confirm
channel you are looking for, activate “Automatic”.
“Audio PID” and “PCR” become inactive, are displayed in grey and are skipped. Continue with
chapter “8.6.2.7 Channel Selection”.
▼/▲ buttons and
▼/▲ buttons
▼/▲
▼/▲
• If “Manual” is activated, select the line “Video PID” using
the
▼/▲ buttons and confirm using OK.
—> In the related settings display, a cursor appears next
to the Video-PID which has been set.
• Use the
pressing repeatedly and use the 0 … 9 buttons to set the
Video-PID of the channel you wish to locate.
• Confirm the setting using OK.
—> The settings in “Audio PID” and “PCR” are
(red) button to delete an existing entry by
analogue.
- 37 -
ENGLISH
Page 38

- 38 -
8.6.2.7 Channel selection
• Use the
using OK.
• In the submenu which appears, use the
activate “All” or “FTA”:
“All”: Both encrypted and unencrypted
channels are scanned.
“FTA”: Only unencrypted channels
are scanned.
• Confirm the setting using OK.
8.6.2.8 Starting the search
• To start the channel search, press the
—> By pressing the Z button you can pause the channel
—> The channels found are displayed in a list.
• By pressing the
the
•
To exit the menu, see chapter 8.1.8, page 22
8.7 Factory defaults
8.7.1 Restoring to factory defaults
This menu allows you to reset the satellite receiver, including the channels lists and user
settings, back to the factory defaults.
This setting is necessary, when …
… the satellite receiver is to be set for conditions in other countries.
… the functionality of the satellite receiver, e.g. due to wrong settings, is
compromised.
▼/▲ to activate the line “Channels” and confirm
▼/▲ buttons to
(green) button.
search.
(green) button, save channels or use
(red) button to cancel the channel search.
.
Using this function you delete all your own settings including the lists of fa-
vourites and reset the satellite receiver to the primary factory defaults.
- 38 -
Page 39

- 39 -
Factory Defaults
Factory Defaults
Settings only
Exit
OK
Quick Start Guide
Country
Menu Language
Time zone
OK
MENU
Z
Others
English
Amsterdam GMT + 1
MENU
Z
• In the menu “Settings” (“Einstellungen“) use the ▼/▲ but-
tons to activate the line “Factory Defaults” (“Werksein-
stellungen“) and confirm using OK.
—> The menu “Factory Defaults” (“Werkseinstellungen“)
appears with the active line “Factory Defaults”
(“Werkseinstellungen“).
Exit
•
Back
Confirm line
ing OK.
“Factory Defaults” (“Werkseinstellungen“) us-
—> All settings are reset to the factory defaults.
—> The menu “Quick Start Guide” (”Installationshilfe”)
appears.
This menu serves to prepare your satellite receiver
for operation in your country (channel lists, menu
language, time zone).
Setting the country
• Confirm active line “Country” (”Land”) using OK.
• In the selection menu which appears use
▼/▲ to set the
country in which the satellite receiver is to be used.
—> The menu is displayed in the language set.
• Confirm the setting using OK.
—> If necessary, carry out the following settings.
Exit
Setting the menu language
Back
• Use the
▼/▲ buttons to select the line “Menu language”
and confirm using OK.
• In the selection menu which appears use
▼/▲ to set the
language in which the menus should be displayed.
• Confirm the setting using OK.
Setting the time zone
• Use the
▼/▲ buttons to select the line “Time Zone” and
confirm using OK.
• In the selection menu which appears, use
▼/▲ to set the
time zone in which the satellite receiver is to be used.
—> Valid for Germany: “Amsterdam GMT + 1”.
• Confirm the setting using OK.
•
To exit the menu, see chapter 8.1.8, page 22
- 39 -
.
ENGLISH
Page 40

- 40 -
8.7.2 Resetting user preferences
This menu point allows you to reset settings implemented by the user back to the
factory defaults. The channel lists are not affected.
• In the menu “Factory Defaults” use the
▼/▲ buttons to
activate the line “Settings only” and confirm using OK.
—> Only those settings implemented by the user
(e.g. time, date etc.) are reset to the factory
defaults.
•
To exit the menu, see chapter 8.1.8, page 22
8.8 System information
This menu allows you to display information about your satellite receiver and to update
the software.
8.8.1 Product information
System Information
Product Information
Software Update
Exit
• In the menu “Settings” use the
the line “System Information” and confirm using OK.
—> The menu “System Information” appears with the
▼/▲ buttons to activate
active line “Product Information”.
• Confirm line “Product Information” using OK.
—> The menu “Product Information” appears with in-
formation about your satellite receiver, e.g. model
MENU
OK
Exit
Back
Z
number/type designation, software version etc.
•
To exit the menu, see chapter 8.1.8, page 22
.
.
8.8.2 Updating software
8.8.2.1 Updating software via satellite
The software for the satellite receiver is provided by the Astra 19.2° East satellite. The
satellite receiver is designed so that you can update its operating software and certain
channel information directly via this satellite. If new software is available, this will be
indicated by a display on the screen.
Do not disconnect the satellite receiver from the mains network during soft-
ware downloads and the software update. An interruption like that can
damage the satellite receiver’s operating software!
- 40 -
Page 41

- 41 -
System Information
Product Information
Software Update
Exit
OK
• In the menu “System Information” use the ▼/▲ buttons
to activate the line “Software Update” and confirm using
OK.
—> The satellite receiver starts searching for updated
operating software. This process may take a few
minutes. Please wait until the search is finished.
—> This process can be cancelled using the Z button.
MENU
Exit
Back
Z
—> If suitable software is detected, a corresponding
message appears in the menu.
• Start the software update by pressing the
button.
—> The progress of the software download is indicated
by a bar and a corresponding time display appears
in the menu.
—> This process can be cancelled using the Z button.
• After completion of the software download, press the
(green) button.
—> The satellite receiver restarts.
—> The user settings and channel lists are not affected
by the software update.
8.8.2.2 Updating software via a USB stick
For this type of software update, it is necessary to load the current software for the
satellite receiver from the internet using a PC. This can be found in the internet on the
website “http://www.gss.tv”.
• Copy software from the PC to the USB stick.
—> Only one ”.bin” data must be stored on the USB
stick.
• Switch off the satellite receiver using the mains switch
(s. page 8).
• Connect the USB stick to the USB port
6 (s. page 8).
• Switch on the satellite receiver using the mains switch
!.
—> The satellite receiver switches to stand-by mode
(indicator display
• Press the stand-by button
selection button “ – ”
shows ”on the USB".
—> The progress of the software update is indicated via
the screen of the television set.
—> The satellite receiver restarts.
—> The user settings and channel lists are not altered by
the software update.
A, page 8 lights up in red).
A and afterwards the channel
C (s. page 8) until the display
(green)
!
ENGLISH
- 41 -
Page 42

- 42 -
9 Editing the channel lists
This menu allows you to edit the TV list and the radio list. You can also add TV and
radio channels you like both to the favourite lists as well as to newly compiled channels
lists, and edit the lists.
—> The channel lists can also be edited using a PC via the USB interface. The soft-
ware required to do this and the appropriate instructions can be found in the
internet on the website “http://www.gss.tv”.
Main Menu
1 Settings
2 List Manager
3 Program Guide
4 Personal Planner
5 Parental Lock
6 Common Interface
7 Sleep Timer
8 Read Messages
9 Exit
OK
List Manager
Main TV List
Main Radio List
Favourite lists manager
Exit
OK
MENU
Z
MENU
Z
• Press the MENU button.
—> The “Main Menu” appears with the active line
“Settings”.
• Select the line “List Manager” using
using OK.
—> The menu “List Manager” appears with the active
line “Main TV List”.
Exit
Back
• Confirm line “Main TV List” using OK.
—> The menu “Main TV List” appears.
Exit
Back
▼/▲ and confirm
9.1 Editing the channel lists
This menu allows you to shift, delete, lock/unlock and sort channels. The following
description also applies for the “Main Radio List”. Changing over is done using the
TV/R button.
9.1.1 Moving channels
Main TV List
1 1-2-3.tv
2 2M Maroc
3 3sat
4 9Live
5 ANDALUCIA TV
6 ARIRANG TV
7 ARTE
9 Al Jazeera
8 AL JAZEERA ENG
10 Al Masriya
Mark Block
TV/R
TV / Radio
SortingRemove
Lock / Unlock
AB
• In the menu “Main TV List” use the
buttons to select the channel to be moved and mark it
using the
(blue) “Mark Block” button.
—> The lettering appears in green.
• If necessary, use the
▼/▲ buttons to activate further
channels.
• By pressing the
Back
Z
again mark the end of the channels selected for moving.
(blue) “Mark Block End” button once
▼/▲ and ◀/▶
- 42 -
Page 43

- 43 -
9.1.2 Deleting channels
9.1.3 Locking/unlocking channels
9.1.4 Sorting channels
Main TV List
1 1-2-3.tv
2 2M Maroc
3 3sat
4 9Live
5 ANDALUCIA TV
6 ARIRANG TV
7 ARTE
9 Al Jazeera
8 AL JAZEERA ENG
10 Al Masriya
Sort SatelliteSort A-Z Sort CAS
Back
Z
• Use the ▼/▲ and ◀/▶ buttons to activate the channel
in front of which the selected channel or channels should
be inserted.
• By pressing the
(blue) button “Move Here” insert the
marked channels.
• In the menu “Main TV List” or “Main Radio List” use the
▼/▲ and ◀/▶ buttons to select the channel to be deleted
and confirm using the
—> The channel is deleted from the TV list or the radio
list.
• In the menu “Main TV List” use the
tons to select the channel to be locked/unlocked and use
the A/B button to lock or unlock channels.
—> Locked channels are marked with “ x ” (s. chap-
ter 12, page 53).
• In the menu “Main TV List” press the
—> In the menu the following buttons appear …
(red) “Sort A-Z”:
The channels are sorted in alphabetical order.
(green) “Sort Satellite”:
The channels are listed by satellite.
(yellow) “Sort CAS”:
The channels are listed by encryption system.
• According to the desired method of sorting, press the
(red), (green) or (yellow) button.
—> After the sorting process return to the previous
menu.
(red) button “Remove”.
▼/▲ and ◀/▶ but-
(green) button.
• To exit the menu, see chapter 8.1.8, page 22.
- 43 -
ENGLISH
Page 44

- 44 -
9.2 Editing favourite lists
9.2.1 Adding, renaming and removing favourite lists
This menu allows you to add up to 5 new favourite lists, to rename and, if required,
delete them.
Do not delete the preprogrammed list “My Favourite”!
To guarantee the full functionality of the satellite receiver, we recommend
storing channels in the favourite list “My Favourite” and in newly compiled
lists.
Favourite lists manager
My Favourite
List 1
OK
Favourite lists manager
My Favourite
Liste 1|
OK
Delete List
Rename List
Delete
☞
• In the menu “List Manager” use the
▼/▲ buttons to
activate the line “Favourite lists manager” and confirm
using OK.
—> The menu “Favourite lists manager” appears.
Adding new favourite lists
• Press the
New List
Back
Z
Z
Z
—> A new list is added.
(green) button.
Renaming favourite lists
To rename a favourite list, the 2 … 0 buttons are additionally marked with letters (e.g. 2 button with ABC, 0 button
with space, underline, full stop etc.).
• Use the
▼/▲ buttons to select the favourite list to be
renamed.
• Press the
• If necessary, use the
(yellow) button.
◀/▶ buttons to position the cursor
to the right of the last letter of the letters to be deleted.
• By pressing the
(red) button once or several times,
delete the letters.
• Use the 0 … 9 buttons to enter the new name.
—> In the line marked by
☞ the letters, symbols and
digits appear which are allocated to the respective
button. The selected letter will be highlighted by a
grey background.
—> Press the respective button as often as needed to
correspond to the position at which the letter to be
entered in the line
☞ is situated (e.g. for the letter
“R” press the 7 three times).
• Confirm entries using OK.
• By pressing the Z button you can return to the previous
menu.
- 44 -
Page 45

- 45 -
Deleting favourite lists
• Use the
press the
• In the menu which appears use the
▼/▲ buttons to select the line to be deleted and
(red) button.
◀/▶ buttons to acti-
vate “Yes” to confirm and “No” to cancel and press OK.
—> The selected list will be deleted along with the
channels stored in it.
—> The Main channel list is not affected by the dele-
tion.
• By pressing the Z button you can return to the previous
menu.
9.2.2 Adding channels to the favourite list
This menu allows you to select channels from the main channel list (TV and radio) and
add them to the selected favourite list.
Main TV List My Favorite
1 1-2-3.tv
2 2M Maroc
3 3sat
4 9Live
5 ANDALUCIA TV
6 ARIRANG TV
7 ARTE
9 Al Jazeera
8 AL JAZEERA ENG
10 Al Masriya
Mark Block
TV/R
TV / Radio
AB
OK
Sorting
Lock / Unlock
Add to favorite
1
1-2-3.tv
2 3sat
3 9Live
4 ARTE
Toggle Right/Left
Back
Z
• In the menu “Favourite lists manager” use the
▼/▲
buttons to select the list to be changed and confirm using
OK.
• In the TV list or radio list use the
▼/▲ buttons to select
the desired channel and add it to the favourite list using
OK. Use the TV/R button to change between the TV list
and the radio list.
Adding several channels
• To add several channels to the favourite list at the same
time, use the
▼/▲ and ◀/▶ buttons to select a channel
to be added in the TV list or radio list and use the
(blue) button to mark it.
—> The lettering appears in green.
• Use the
• By pressing the
▼/▲ buttons to activate further channels.
(blue) button again, mark the last
of the selected channels and use OK to add it to the
favourite list.
• By pressing the Z button you can return to the previous
menu.
ENGLISH
- 45 -
Page 46

- 46 -
9.2.3 Editing channels in the favourite list
This menu allows you to shift, delete, lock/unlock and sort channels in the selected
favourite list.
Main TV List My Favorite
1 1-2-3.tv
2 2M Maroc
3 3sat
4 9Live
5 ANDALUCIA TV
6 ARIRANG TV
7 ARTE
9 Al Jazeera
8 AL JAZEERA ENG
10 Al Masriya
Mark Block
TV/R
TV / Radio
AB
OK
Sorting
Lock / Unlock
Remove
1 1-2-3.tv
2 3sat
3 9Live
4 ARTE
Toggle Right/Left
Back
Z
• Use the
(yellow) button “Toggle Right/Left” to change
from the “Main TV List” or “Main Radio List” to the
favourite list.
—> The letters in the white-highlighted line in the non-
active list is displayed in grey.
• To add channels to the favourite list, to lock/unlock or to
sort them, please proceed as described in chapter 9.1.1,
9.1.3 and 9.1.4.
• To remove a channel from the favourite list use the
and
◀/▶ buttons to activate the channel and delete the
▼/▲
entry by pressing the OK button.
Removing several channels
• To delete several channels in the favourite list at the same
time, use the
nel to be deleted and mark it using the
▼/▲ and ◀/▶ buttons to select the chan-
(blue) button.
—> The lettering appears in green.
• Use the
• By pressing the
▼/▲ buttons to activate further channels.
(blue) button again, mark the end of
the selected channels and use OK to delete them.
—> By removing an entry in the favourite lists no chan-
nels in the Main TV list or Main radio list are removed.
• To exit the menu, see chapter 8.1.8, page 22.
- 46 -
Page 47

- 47 -
10 Program Guide
The Program Guide menu, also called Electronic Program Guide (EPG), offers information on channels currently set, such as channel position, title, start and end of the
show, and a brief description as well as details on the encryption system. It additionally contains the current time, the current date and the date of the list selected. You
can display information on the following programs and change channels incrementally. You can also transfer programs into the personal planner (e.g. as a reminder or
recording).
The menu can additionally contain the following icons:
To ensure that the program guide functions properly, the date and time must be set
correctly (s. chapter 8.4, page 27).
The program is being broadcast with multi-channel sound.
Type of sound “Dolby Digital”
Subtitles are also available.
The broadcast picture format is 16 : 9.
This program is being broadcast with teletext.
Reminder
R
Recording
Main Menu
1 Settings
2 List Manager
3 Program Guide
4 Personal Planner
5 Parental Lock
6 Common Interface
7 Sleep Timer
8 Read Messages
9 Exit
OK
• Press the MENU button.
—> The “Main Menu” appears with the active line
“Settings”.
• Select the line “Program Guide” using the
▼/▲ buttons
and confirm using OK.
—> The list which appears contains data on current and
MENU
Exit
Back
Z
upcoming programs.
• Use the
•
By pressing OK the selected program (event) is earmarked
▼/▲, ◀/▶ buttons to select programs.
for recording.
—> The respective event is marked with the recording
R
icon
•
By pressing the OK button again, the event is planned as
.
a reminder.
—> The event which was transferred is displayed in the
EPG display as a reminder
•
By pressing the OK button again, the event earmarked for
.
recording is also planned as a reminder.
—> The event which was transferred is displayed in the
EPG display as a reminder/recording
R.
ENGLISH
- 47 -
Page 48

- 48 -
• By pressing and holding the OK button the event will be
removed from the personal planner list.
• Use the i button to display detailed information about
the program. If a text banner appears in the window
displayed, scroll the text using the
—> This display can be switched off again using the OK
button.
• Use the
lists for the following days.
• To scroll back use the
• Using the
tons “Channel +” you can select channels incrementally
in descending or ascending order.
• By pressing the Z button you can return to the previous
menu.
(blue) button “+ 24 Hours” to display the EPG
(red) “– 24 Hours” button.
(green) “Channel –” and (yellow) but-
▼/▲ buttons.
- 48 -
Page 49

- 49 -
11 Personal Planner
This menu allows you to preset switch-on and switch-off data, which your satellite
receiver should allow for when automatically switching on for a program. You can
also save program data in the personal planner, which you wish to be reminded of
or which you wish to record using a storage device (e.g. hard disc) connected to the
USB port.
Main Menu
1 Settings
2 List Manager
3 Program Guide
4 Personal Planner
5 Parental Lock
6 Common Interface
7 Sleep Timer
8 Read Messages
9 Exit
OK
MENU
Z
• Press the MENU button.
—> The “Main Menu” appears with the active line
“Settings”.
• Select the line “Personal Planner” using the
and confirm using OK.
—> Preprogrammed planner events are filed in the list
which appears.
Exit
Back
11.1 Planning an event
This menu allows you to enter the data on a planner event. This menu also contains
data on planned and ongoing recordings.
The following icons are used in the list of planner events:
Green arrow: The planner event is currently active.
Red arrow: The planner event is currently being recorded.
A problem has occurred during this planner event.
Reminder
A notification window appears.
The event takes place once.
1
The event takes place daily.
5
The event takes place from Monday to Friday.
7
The event takes place once a week.
R
The event is being recorded.
▼/▲ buttons
New Planner Event
Type
Favourite List
Channel
Name
Start Date
Start Time
End Date
End Time
Mode
Cycle
OK
Tune
Main TV List
3sat
3sat
15 . Aug. 2008
15 : 30
15 . Aug. 2008
16 : 50
Automatic
Single
• In the list of planner events use the
Entry” to activate the entry menu.
—> The entry menu “New Planner Event” appears with
the active line “Type”.
• Confirm line “Type” using OK.
• In the selection menu which appears use the
buttons to select the desired function “Tune”, “Reminder”
Save & Exit
Cancel
or “Record” and confirm using OK.
—> “Tune”:
The satellite receiver switches on at the preset time
with the preprogrammed data.
- 49 -
(blue) button “New
▼/▲
ENGLISH
Page 50

- 50 -
—> “Reminder”:
Before the start of the program a display appears
on the screen in which you can confirm or cancel
switching over to the event.
—>
“Record”:
The planner event is being recorded (page 59).
• Select the line “Favourite List” using the
and confirm using OK.
• In the selection menu which appears use the
to select the desired channel list and confirm using OK.
• Select the line “Channel” using the
confirm using OK.
• In the selection menu which appears use the
to select the desired channel and confirm using OK.
• Select the line “Start Date” using the
confirm using OK.
—> In the related settings display, a cursor appears next
to the start day.
• Use the
and confirm using OK.
—> Alternatively, you can use the
The cursor can be controlled using the
• Select the line “Start Time” using the
confirm using OK.
—> In the related settings display, a cursor appears next
• Use the
and confirm using OK.
—> Alternatively, you can use the
The cursor can be controlled using the
▼/▲ and ◀/▶ buttons to preset the start date
lete the digits left of the cursor and use the 0 … 9
buttons to enter the digits of the date.
buttons.
to the hour display.
▼/▲ and ◀/▶ buttons to preset the start time
lete the digits left of the cursor and use the 0 … 9
buttons to enter the time.
buttons.
▼/▲ buttons
▼/▲ buttons
▼/▲ buttons and
▼/▲ buttons
▼/▲ buttons and
(red) button to de-
▼/▲ buttons and
(red) button to de-
◀/▶
◀/▶
• Select the line “End Date” using the
confirm using OK.
—> In the related settings display, a cursor appears next
to the day display.
• Use the
and confirm using OK.
▼/▲ and ◀/▶ buttons to preset the end date
- 50 -
▼/▲ buttons and
Page 51

- 51 -
—> Alternatively, you can use the (red) button to
delete the digits left of the cursor and use the 0 … 9
buttons to enter the digits of the date.
The cursor can be controlled using the
buttons.
◀/▶
• Select the line “End Time” using the
confirm using OK.
—> In the related settings display, a cursor appears next
to the hour display.
• Use the
time and confirm using OK.
—> Alternatively, you can use the
The cursor can be controlled using the
• Select the line “Mode” using the
firm using OK.
• In the selection menu which appears use the
to select the way you wish to perform this (“Automatic” or
“Notification”) and confirm using OK.
—> “Automatic”:
The planner event is carried out automatically.
—> “Notification”:
• Select the line “Cycle” using the ▼/▲ buttons and con-
firm using OK.
• In the selection menu which appears use the
to select the desired switch-on cycle “Single”, “Daily”,
“Weekly” or “Mon–Fri” and confirm using OK.
—> “Single”:
The planner event is carried out once and then
—> “Daily”:
The planner event is carried out daily.
—> “Weekly”:
The planner event is carried out once a week.
—> “Mon–Fri”:
The planner event is carried out from Monday to
▼/▲ and ◀/▶ buttons to preset the switch-off
delete the digits left of the cursor and use the 0 ... 9
buttons to enter the time.
buttons.
Around 2 minutes prior to carrying out the planner
event an notification appears on the screen, in which
you can confirm or cancel the event.
deleted from the list of planner events.
Friday.
▼/▲ buttons and
(red) button to
◀/▶
▼/▲ buttons and con-
▼/▲ buttons
▼/▲ buttons
ENGLISH
- 51 -
Page 52

- 52 -
11.2 Changing a planner event
11.3 Deleting a planner event
• To save the entries in the menu “New Planner Event”
press the
• To cancel the menu “New Planner Event” press the
(red)
• In the list of planner events
buttons to select the entry to be changed.
• By pressing the OK button activate the menu
Planner Event”
• In the menu which appears change entries as per
chapter 11.1.
—> Non-changeable entries are displayed in grey
—> Entries which were prompted via the EPG or the
• Confirm line “Unbind EPG” using
•
• For changes, use the
• In the list of planner events use the
buttons to select the planner event to be deleted.
• Remove the selected entry by pressing the
“Delete” button.
• In the menu which appears “Delete…” use the
buttons to confirm the procedure with “Yes” or to cancel
it with “No”.
• Press the OK button.
(green)
“Cancel”
lettering.
menu ”Channel related information” must be unbound from EPG before changing:
Use the ▼ button to activate “Yes” and confirm
using OK.
button.
.
“Save & Exit”
use the ▼/▲ and ◀/▶
(green)
button.
the OK button.
“Save & Exit”
“New
button.
▼/▲ and ◀/▶
(red)
◀/▶
• By pressing the Z button you can return to the previous
menu.
- 52 -
Page 53

- 53 -
12 Parental control
This menu allows you to block access to the menus “Settings” and “List Manager” using
a PIN code, as well as lock channels.
(Default setting for the PIN code: ”1 1 1 1”, see chapter “Changing the PIN code”,
page 55).
• Press the MENU button.
—> The “Main Menu” appears with the active line
“Settings”.
12.1 Setting the access rights
Main Menu
1 Settings
2 List Manager
3 Program Guide
4 Personal Planner
5 Parental Lock
6 Common Interface
7 Sleep Timer
8 Read Messages
9 Exit
OK
Parental Lock
Set Access Rights Level
Change Pin Code
MENU
Z
Access All
Lock System Settings
Lock System Settings + Channels
• Select the line “ Parental Lock” using the
and confirm using OK.
—> The menu “Parental Lock” appears with the active
line “Set Access Rights Level”.
Exit
Back
• Confirm line “Set Access Rights Level” using OK.
• In the selection menu which appears use the
to select the desired setting:
—> “Access All”: All functions can be operated.
—> “Lock System Settings”:
The menus “Settings” and “List Manager” are
MENU
OK
Exit
Back
Z
locked.
—> “Lock System Settings + Channels”:
The menus “Settings” and “List Manager” are
locked. The channels marked in the channel lists
and favourite lists with “ x ” are also locked.
• Confirm the setting using OK.
• In the menu which appears, enter the PIN code.
• By pressing the Z button you can return to the previous
menu.
• In the menu which appears “Save changes?” use the
◀/▶ buttons to confirm the procedure with “Yes” or
cancel it with “No”.
• Press the OK button.
•
To exit the menu, see chapter 8.1.8, page 22.
▼/▲ buttons
▼/▲ buttons
ENGLISH
- 53 -
Page 54

- 54 -
12.2 Locking channels
• Use the MENU button to display the menu “Main Menu”.
• Use the
and confirm using OK.
• Activate line “Main TV List” or “Main Radio List” and confirm using OK.
• Use the
and use the A/B button to mark for locking.
—> The channels marked for locking are identified by
• Press the Z button.
• In the menu which appears “Save changes?” use the
▼/▲ buttons to activate the line “List Manager”
▼/▲ buttons to select the channels to be locked
“ x ”.
◀/▶ buttons to confirm the procedure with “Yes” or
cancel it with “No”.
• Press the OK button and then press the Z button.
• In the “Main Menu” use the
“Parental Lock” and confirm using OK.
—> The menu “Parental Lock” appears with the active
line “Set Access Rights Level”.
• Confirm line “Set Access Rights Level” using OK.
• In the selection menu which appears use the
select the menu “Lock System Settings + Channels”.
• Press the OK button.
• Enter four-digit PIN code using 0 … 9.
• Press the Z button.
• In the menu which appears “Save Changes?” use the
▼ button to activate the line
▼ button to
◀/▶ buttons to confirm the procedure “Yes” or to cancel
it “No”.
• Press the OK button and then press the Z button.
12.2.1 Unlocking channels
• Use the MENU button to display the menu “Main Menu”.
• Use the
and confirm using OK.
• Enter four-digit PIN code using 0 … 9.
• Activate line “Main TV List” or “Main Radio List” and confirm using OK.
• Use the
locked and use the A/B button to unlock them.
• Press the Z button.
• In the menu which appears “Save Changes?” use the
▼/▲ buttons to activate the line “List Manager”
▼/▲ buttons to select the channels to be un-
◀/▶ buttons to confirm the procedure “Yes” or cancel
using “No”.
• Press the OK button and then press the Z button.
• In the “Main Menu” use the
activate the line “Parental Lock” and confirm using OK.
- 54 -
▼ button, if necessary, to
Page 55

- 55 -
• Confirm line “Set Access Rights Level” using OK.
• In the selection menu which appears use the
select the line “Access All”.
• Press the OK button.
• Enter four-digit PIN code using 0 … 9.
• Press the Z button.
• In the menu which appears “Save Changes?” use the
◀/▶ buttons to confirm the procedure with “Yes” or to
cancel it with “No”.
• Press the OK button and then press the Z button.
12.3 Changing the PIN code
In the factory defaults the PIN code is set to “1 1 1 1”. We recommend that you replace
it with your own personal PIN code.
Keep your personal PIN code in a safe place.
In case you cannot remember it, you can restore it to the default setting in the
menu “Factory Defaults” —> “Settings Only”.
▲ button to
• Activate the line “Change Pin Code” using the
buttons and confirm using OK.
• In the display which appears “Enter Pin Code” enter the
current four-digit PIN code using 0 … 9.
• In the following display “Enter New Pin Code” enter the
desired four-digit PIN code using 0 … 9.
• In the following display “Re-Enter New Pin Code” repeat
the new four-digit PIN code and confirm using OK.
▼/▲
ENGLISH
- 55 -
Page 56

- 56 -
13 Receiving encrypted satellite channels
This satellite receiver is equipped with two CI slots ( Common Interface). It allows you
to connect a CA module for various encryption systems and broadcasting networks.
Encrypted channels can only be decoded with a CA module suitable for the encryption
system and the corresponding Smart card. The Smart card contains all the information
for authorisation, decoding and subscription.
!
• Unclip the cover
• Insert the Smart card
a way that the chip
thicker side (top) of the CA module.
• Insert the CA module with the Smart card carefully, with-
out twisting it, into the guide rails in the CI slot and push
it into the CI slot.
D by pressing it once and open it.
1 into the CA-Modul 2 in such
3 on the Smart card is facing the
• To remove the CA module press the appropriate ejector
4 and pull the CA module out of the CI slot.
When working with the CA module, please read the appropriate operating
instructions by the respective manufacturer.
• Press the MENU button.
—> The following menu appears “Main Menu”.
Main Menu
1 Settings
2 List Manager
3 Program Guide
4 Personal Planner
5 Parental Lock
6 Common Interface
7 Sleep Timer
8 Read Messages
9 Exit
OK
• In the “Main Menu” use the
line “Common Interface” and confirm using OK.
—> The following menu appears “Common Interface”.
• Use the
▼/▲ buttons in the menu “Common Interface”
to select the slot loaded with a CA module and confirm
MENU
Exit
Back
Z
using OK.
—> A menu generated by the CA module appears on
the screen. Its operation is described in the CA
module’s operating instructions.
▼/▲ buttons to select the
• In the CA module’s menus for setting the functions/select
lines use the
▼/▲ buttons and confirm using OK.
• Press Z to return to the previous menu.
• To end the menu “Common Interface”, press the MENU
button.
- 56 -
Page 57

- 57 -
13.1 Reception of channels with subprograms
If the symbol at the left appears in the channel information, displayed when
changing channels or pressing the i button, this indicates that subprograms
are available.
• Press the i button to display channel information.
—>
It can take several seconds to display the symbol.
• Display the list of subprograms using the F button.
• Select desired channel using
▼/▲ and display it using
OK.
—> If the
$$
symbol appears in the channel information
on display, this indicates that a CA module with an
appropriate Smart card is required to receive this
program.
14 Sleep timer
Your satellite receiver is equipped with a sleep timer, which allows it to switch to
stand-by mode after the preset time is over.
• Press the MENU button.
—> The “Main Menu” appears with the active line
“Settings”.
Main Menu
1 Settings
2 List Manager
3 Program Guide
4 Personal Planner
5 Parental Lock
6 Common Interface
7 Sleep Timer
8 Read Messages
9 Exit
OK
Sleep Timer
Time
Exit
OK
• Select the line “Sleep Timer” using the
▼/▲ buttons and
confirm using OK.
—> The menu “Sleep Timer” appears with the active line
“Time”.
MENU
Exit
Back
Z
Off
15
30
45
60
90
120
• Confirm line “Time” using OK.
• In the selection menu which appears use the
▼/▲ buttons
to select the desired switch-off time in 15 and 30 minutes
intervals (15 … 12 0 minutes) or if the sleep timer should
be deactivated, select “Off” and confirm using OK.
—> The satellite receiver switches to stand-by mode
ENGLISH
after the time is set.
•
Back
Z
To exit the menu, press the Z button.
- 57 -
Page 58

- 58 -
15 Reading messages
This menu allows you to display messages collected via the reception satellite. Such
messages could e.g. inform you of software updates.
• Press the MENU button.
—> The “Main Menu” appears with the active line
“Settings”.
•
Main Menu
1 Settings
2 List Manager
3 Program Guide
4 Personal Planner
5 Parental Lock
6 Common Interface
7 Sleep Timer
8 Read Messages
9 Exit
OK
MENU
Exit
MENU
Back
Z
Select line “Read Messages” using the ▼/▲ buttons and
press OK to confirm.
—> An information window appears.
• To fade out the information window press the OK
button.
• To exit the menu, see chapter 8.1.8, page 22.
16 USB port
The satellite receiver is equipped with a USB port. This can be used to connect a PC,
a USB stick or a hard disc.
The USB port conforms to the USB 2.0 standard.
Storage devices can be supplied with operating voltage of max. 500 mA via
the USB port. Storage devices requiring a higher power input need their own
mains adapter.
When connecting a device to the USB port the following messages can appear on
the screen:
– USB - Mounting —> Message appears after connecting a storage de-
vice to the USB port.
– USB - Check Disk —> Storage device is checked for possible mistakes.
– USB - Init: Fail —> An error has occurred during initialization.
The USB storage device must be formatted to
FAT32.
– USB - Init: OK —> The USB storage device has been initialised.
– USB - Removed —> The USB storage device has been removed.
- 58 -
Page 59

- 59 -
17 Recording programs
17.1 Preparations
17.1.1 Conn ecting a storage device
A hard disc as well as a USB stick can be connected to the USB port. The storage
devices must be formatted to FAT32.
• Connect the storage device as per chapter 5.3, page 12.
17.1.2 Formatting storage devices
In case the storage device to be used does not comply with the required data format,
you can format this accordingly.
17.2 General to the recording functions
The technology used for this satellite receiver allows the simultaneous recording of a
SAT program and playback of a recorded program when an external storage device
is connected. This procedure is used for the so-called “ Time shift”. Time shift means that
you can record a program and start to play it from the beginning e.g. delayed in time
by 30 minutes while it is still being recorded. Another option for using the time shift is
e.g. the following situation:
You are watching a film and the telephone rings. Now simply switch “Time shift” on
and continue to watch the film, from the time of the interruption on, after returning. The
saved programs are stored in the “ Video/Video library” memory.
17.2.1 Recording a live program
You wish to record a program that is now showing on TV.
The function “Format Device” deletes all data on the storage device
• Press the LIST button.
The following menu appears “Video/Video Library”.
—>
• Press the 0 button.
• Press the
• Enter the PIN code.
Before commencing a recording it may be necessary to implement the PVR
setting, chap. 8.2, page 22.
• Press the
—> The
(red) button “Format Device”.
(red) record button.
symbol and the name of the program will
briefly appear on the screen.
.
ENGLISH
- 59 -
Page 60

- 60 -
Ending the recording
• To end the recording press the Stop
• In the menu which appears “Stop Recording” using the
button.
◀/▶ buttons activate “Yes” to confirm and “No” to
cancel and confirm using OK.
Ending the recording automatically
The recording data is filed in the menu “Personal Planner”.
• To set the switch-off time, activate chapter 11.2, Changing
a planner event, page 52. This menu allows you to enter
the switch-off data (date and time).
—> Please observe the preset run-on time.
17.2.2 Time-shift recording
You are watching a show, are interrupted and wish to continue watching the show from
the start of the interruption on.
—> Time-shift for radio programs is not possible.
• Press the pause
—>
The picture on the screen is “frozen” (freeze frame).
—> The paus
time displacement of the current show.
•
To start playing the time shift recording at this point:
Press the pause or play
—> To fast forward, press the (yellow) button. Once
the end of the time shift recording is reached, the
program is played.
• To end the time shift recording press the stop
button.
e symbol appears on the screen and the
(blue)
button.
button.
- 60 -
Page 61

- 61 -
17.3 Timer recording
17.3.1 Automatic setting
Data is transferred from the EPG for the automatic timer setting (chapter Electronic
program guide, page 18).
—> This description also applies to radio programs.
• Press the EPG button.
—> A list of the current program and the upcoming
programs is displayed.
• Use the
• Use the
lists for the following days.
• To scroll back use the
• Using the
“Channel +” you can select channels incrementally in
descending or ascending order.
•
By pressing OK the selected program (event) is earmarked
for recording.
—> The event which was transferred is displayed in the
•
By pressing the OK button again, the event is planned as
a reminder.
—> The event which was transferred is displayed in the
•
By pressing the OK button again, the event earmarked for
recording is also planned as a reminder.
—> The event which was transferred is displayed in the
• By pressing and holding the OK button the event will be
removed from the personal planner list.
▼/▲, ◀/▶ buttons to select programs.
(blue) button “+ 24 Hours” to display the EPG
(red) “– 24 Hours” button.
(green) “Channel –” and (yellow) buttons
EPG display with the recording icon
EPG display as a reminder
EPG display as a reminder/recording
.
R
.
R.
• To exit the menu, press the Z button.
17.3.2 Manual setting
The manual setting of recordings can be done as described in the chapter Personal
Planner, page 49.
- 61 -
ENGLISH
Page 62

- 62 -
18 Playback functions
You have the following playback options:
– “Time shift” (see chapter Time shift recording, page 60)
– Playback of saved programs while another program is being recorded (Video/
Video library)
– Interference-free freeze frame
– Fast forward and rewind at 5 speeds with picture
Playback of recordings from the “Video/Video library”
menu
•
Display the menu “
LIST button.
• Use ◀/▶ and ▼/▲ to select the desired recording.
• Press OK to confirm.
—> The recording appears as a small picture in the
preview window.
• To switch to large picture
—> The menu “Video/Video library” disappears.
—> In the satellite receiver display the title of the record-
ing being played is displayed as a ticker text.
Pausing/ending playback
• To stop playing: press the pause
—> To continue playback of this recording, press the
playback
again.
• To end playback: press the stop
—>
The following menu appears “Video/Video library”.
• To exit the menu, press the Z button.
Video/Video library
press the
(blue) button or the pause button
” by pressing the
(blue) button.
button.
button.
Repeating playback
• During playing back a recording press and hold down
the
playback
—> The recording is played back from the beginning.
• To continue the playback at the position of returning,
press the
Fast forward/rewind
Recordings from the “Video/Video library
back at different speed by pressing the
(yellow)
buttons.
- 62 -
(blue) button for some seconds.
(blue) button for some seconds again.
”
can be played
(green)
or
Page 63

- 63 -
19 Editing the video library
You can only edit the video library if recording and playback are not active.
19.1 Renaming recordings
You can rename recordings e.g. if the name has been used twice or to change their
titles. For this purpose the numbers 1 … 0 on the remote control are assigned to groups
of letters.
• Open the video library ”Video” using LIST.
/USB0
Tagesschau
Mittagsmagazin
News
News
Planet Wissen
WISO
Monitor
OK
/USB0
Tagesschau
Mittagsmagazin
News
News|
Planet Wissen
WISO
Monitor
OK
Delete
Rename
Delete
Video
Video
Video file
Size: 97.500 MB
00:03:07 (@ 00:00:00)
0
Z
☞
Video file
Size: 97.500 MB
00:03:07 (@ 00:00:00)
• Select the recording to be renamed using
50% used
Play
Up Folder
Back
◀/▶ and press the
• If necessary, use the
(yellow)
button.
◀/▶ buttons to position the cursor
to the right of the last letter of the letters to be deleted.
• By pressing the
(red) button once or several times,
delete the letters.
• Use the 0 … 9 button to enter the new name.
—> In the line marked by
☞ the letters, symbols and
digits appear which are allocated to the respective
button. The selected letter will be highlighted by a
grey background.
—> Press the respective button as often as necessary to
correspond to the position at which the letter to be
entered in the line
☞ is situated (e.g. for the letter
“R” press the 7 three times).
• Confirm entries using OK.
• To exit the video library ”Video” menu, press the Z button.
▼/▲ and
19.2 Deleting a recording
• Open the video library ”Video” using LIST.
• Use ▼/▲ to select the recording to be deleted.
• Press the (red) button.
• In the selection menu which appears use the ◀/▶
buttons to select “Yes” to confirm and “No” to cancel and
confirm using OK.
• To exit the menu video library ”Video” press the Z
button.
- 63 -
ENGLISH
Page 64

- 64 -
20 Information
20.1 Technical data
It conforms with the standards required for CE labelling.
Resolution via HDMI: 1080i, 720p, 576p, 480p, 480i
TV/radio channels: 4000
Number of satellite levels: max. 16
Reception range: 950 … 2,150 MHz
Input symbol rate: 1 … 45 Msymb/sec
SAT-IF input: 1 F-socket
SAT-IF loop-through output: 1 F-socket
LNB power supply: 14 V/18 V, max. 400 mA
LNB switching signal: 0/22 kHz, 0.5 V
DiSEqC: Unicable, DiSEqC 1.0/1.1
Search: automatic/manual
Last channel memory: for the last selected channel
Teletext: Video text decoder installed, supports teletext
on the television set
Software download: via satellite Astra 19.2° East
Mains supply: 230 V, 50/60 Hz
Power consumption: approx. 9 W without LNB, Common Interface and
device at the USB port
Ambient temperature: +5°C … +40°C
Dimensions: 280 x 195 x 45 mm
Ton Burst
pp
20.2 Warranty
Our products are developed, produced and tested in compliance with the latest
technical knowledge.
If a malfunction should nevertheless occur, please consult your specialist dealer or
contact the point of sale where you purchased the device. Therefore always keep your
sales receipt.
Warranty claims cannot be made directly to GSS Grundig SAT Systems GmbH!
- 64 -
Page 65

- 65 -
20.3 Troubleshooting
Please consult the following information first in the event of an fault. If you are unable
to rectify the fault using the information given here, please contact your local dealer
or service specialist. Never under any circumstances attempt to repair the satellite
receiver yourself. That would invalidate any warranty claims.
Problem Possible cause Remedy
No function,
no operating indicator
No picture Connection to the television set
No sound The sound is off (muted) End muting
Blocks forming Satellite antenna is not installed
Remote control
does not work
Mains switch is switched off Switch on the device’s mains
is faulty
Incorrect settings in the menu
“Settings”
Connection to the television set
is faulty
Recorder volume on the satellite
receiver is set too low
correctly
Satellite cable is damaged Replace satellite cable
Incorrect settings in the menu
“
Settings/Antenna Settings”
The batteries are inserted
incorrectly
The batteries are flat Insert new batteries
switch
Connect the connector cable
correctly
Set the menu
Connect the connector cable
correctly
Set higher volume
Install the satellite antenna
correctly and align it
Set the menu correctly
Insert batteries with the correct
polarity
The time is not
displayed correctly
Interference of picture
from channels with a
frequency of approx.
12480 MHz
The remote control is not
directed at the infrared sensor
of the satellite receiver
Time zone is not correctly set
The interference may be caused
by DECT cordless telephones
near the satellite receiver
- 65 -
Point the remote control at the
infrared sensor
Set the menu “Time/Date”
Remove DECT cordless telephones from the vicinity of the
satellite receiver
ENGLISH
Page 66

Index
A
Accessories ....................... 5
Aspect ratio ................ 24,25
Automatic setting .............. 61
B
Basic functions .................. 15
C
CA module ..................... 56
Changes in temperature ..... 7
Changing the PIN code .... 55
Channel list ...................... 17
Channel search ............... 34
Cinch cable...................... 11
Common Interface ........... 56
Connecting the television ... 11
Control elements ............... 10
CVBS ............................. 24
D
Daylight saving time ......... 29
Deleting channels ............ 43
DiSEqC ............................ 32
DiSEqC switch .................. 32
DVD recorder ................... 12
E
Editing favourite lists ........ 44
Editing the channel lists .... 42
Editing the video library ... 63
Electronic program guide ... 18
Encryption system ............ 56
End Guard Time .............. 22
Ending the recording ........ 60
Environmental note ............. 7
EPG ........................... 18,27
Error correction ................ 37
Exiting the menu function .. 22
F
Factory defaults ............... 38
FEC ................................. 37
First connection ................. 14
Formatting storage devices 59
FTA ................................ 35
H
HDMI .............................. 11
HiFi system ....................... 12
I
Icons ................................ 5
L
Large picture .................... 62
List of subprograms .......... 57
LNB ................................. 31
Local time ........................ 28
Locking channels ............. 54
Loop-through output .......... 11
M
Mains supply ................... 64
Manual setting ................. 61
Menu information ............. 14
Menu Language ............... 10
Minimum interval ............... 7
Moving channels ............. 42
O
OK .................................. 10
Optical audio output ......... 12
P
Parental control ............... 53
Parental Lock ................... 53
PCR ................................. 37
PID .................................. 37
Planning an event ............ 49
Playback functions ............ 62
primary audio language ... 20
Product information .......... 40
PVR settings ..................... 22
R
Reading messages ....... 21,58
Reception system ............. 29
Recording functions ........... 59
Remote control ................. 5,9
Resetting user preferences 40
RGB ............................... 24
S
Sales receipt ................... 64
Satellite antenna ............... 11
Saving settings ................ 22
SCART socket .................... 8
Screen display .................. 14
Selecting channels ............ 15
Setting the access rights ... 53
Setting the date ................ 28
Signal quality .................. 34
Signal strength ................ 34
Sleep timer ...................... 57
Small picture .................... 62
Sorting channels .............. 43
Sound/picture settings ...... 23
Soundtrack................... 17,19
SPDIF .............................. 12
Start Guard Time ............. 22
Storage device ............ 12,59
Subprograms ............... 15,57
Subtitles .......................... 20
Switch-off time ................. 22
Switch-on time ................. 22
System time ..................... 27
T
Teletext ............................ 17
Timer recording ................ 61
Timer setting ..................... 61
Time shift ......................... 59
Time-shift recording .......... 60
Time zone ........................ 28
Troubleshooting ............... 65
T V/R ................................ 10
TXT.................................. 10
U
Unicable ......................... 30
Unicable-LNB .................. 33
Unicable multi-switch ........ 33
Unicable Switch ........... 30,33
Unlocking channels .......... 54
Updating software ........... 40
USB port ......................... 58
Used batteries ................... 9
User Preferences ............... 19
V
Video recorder ................. 12
Video/Video library .......... 59
Volume ............................ 15
W
Warranty ................. 7,64,65
Wrong settings ................ 38
Y
YUV ............................... 24
Z
Zapping function .............. 18
- 66 -
Page 67

- 67 -
ENGLISH
Page 68

Alterations reserved. Technical data subject to change. © by GSS GmbH 19092008
 Loading...