

Page 1
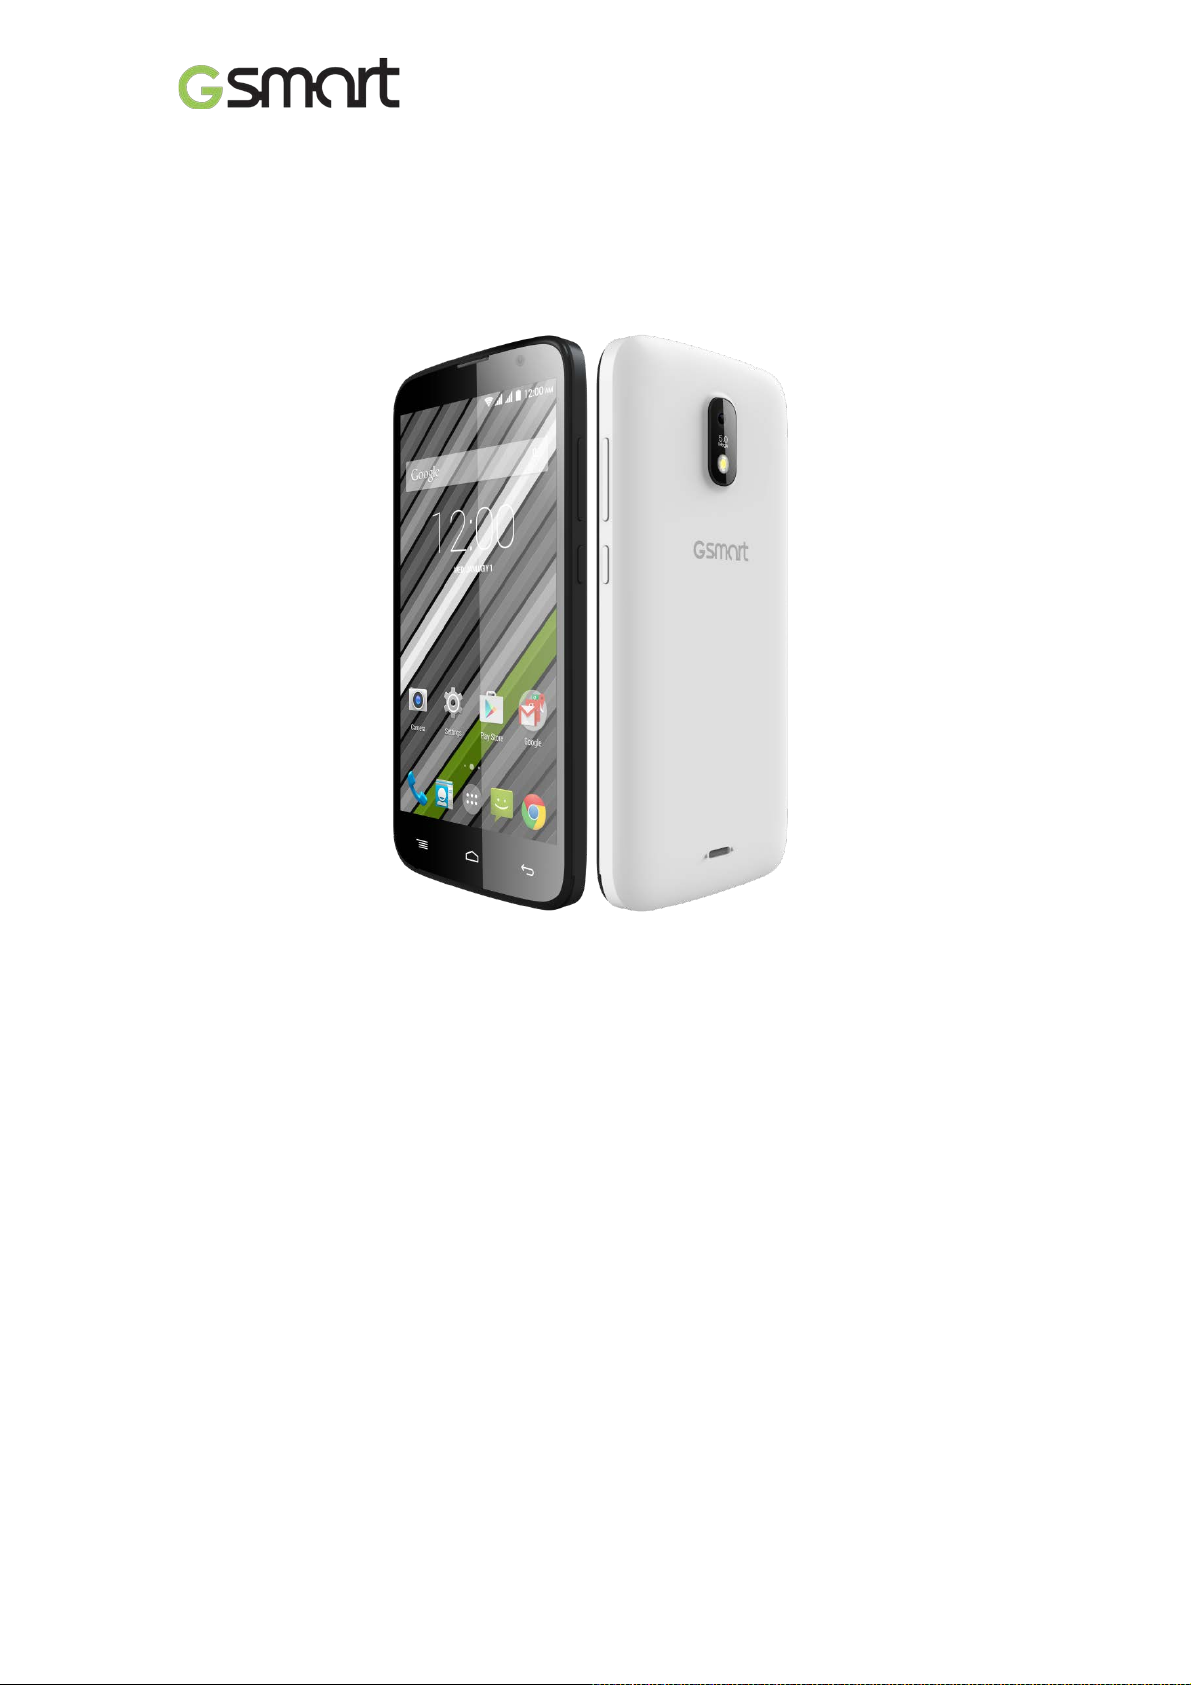
GSmart Roma RX
User Manual
Roma RX|0
Page 2

Copyright
All mobile pr oducts by GIGA-BYTE COMMUNICATIONS INC. mentioned in this document,
including the device, accessories, software, text, music, and pictures, are owned by, or
authorized by origi nal manufactur ers to GIGA-BYTE COMMUNICATIONS INC. Reproducti on,
transfer, distribution, or storage of part or all of the contents in this document in any form
without the prior wri tt en permission of GIGA-BYTE COMMUNICATIONS INC. is prohibited.
GIGA-BYTE COMMUNICATIONS INC.
Roma RX|1
Page 3

General Information
This section contai ns important information on safe and efficient oper ation. Please read this
informati on before using the devic e. Ignorance of the foll owing notices m ay lead to violations
of the law.
Before using the devic e, please make sure you have fully charged the batt er y.
Do NOT remove the battery fr om the dev ic e duri ng c hargi ng.
Before inserting S IM c ar d into the device, make sure that the device is switched off .
Keep the battery in low battery status for long time might cause batter y over-discharged or
even reduce battery lif e. To maintain batt ery in good lifecycle please recharges it o nc e in
low battery.
Please fully charge the battery if you are going to leave the phone without use for long time
to prevent battery goes over-discharged.
Do NOT attempt to dissemble the device on your own. This should be done by an
authorized person.
Use the device in accordanc e to instructions when in public facil ities.
In some countries, it is a violation agai nst the law to record phone conversati ons. Always
ask permission of the ot her par ty when you are going to record a conversation.
To protect your ears, turn down the volum e before you use stereo headsets or other audio
devices.
To avoid damaging the touch screen and the device, do NOT apply excessive pressure on
them, and remove the device from your pants’ pocket before you sit down. It is also
recommended t hat you only use the stylus or your finger to interact with the t ouc h screen.
It is not covered by the warranty that you crack the t ouch screen because of t he improper
usage.
When you use the device for a long time, such as talking on the phone, browsing online, or
charging the battery, the device may become warm. In most cases, this condition is
normal.
Refer servi ci ng to the provider, or an authorized technici an under the following condi tions:
1. The device has been damaged. 2. When you follow the instructions to use your device,
it does not operate normally. 3. The device has been exposed to water. 4. Liquid has been
spilled or an object has fallen onto the device.
Do NOT push unauthorized object s i nto slots and openings in your device.
The device should be placed away from heat sources such as stoves, radiators, heat
registers, or other pr oduc ts that produce heat.
Condensation m ay form on or within your device, when you m ove your device between
environments with v ery different temper ature and/or humidity ranges. To av oid damaging
your device, make the moistur e to evaporate before you use the device.
To av oid damaging your device, do NOT put your device on an unstable tabl e, stand,
bracket, or other plac es.
Before you cl ean your device, unplug it, please. Use a damp cl oth for cleaning, but do
NOT use water, liquid cleaners, or aerosol c leaners to clean the touch screen.
Roma RX|2
Page 4

Table of Contents
Copyright
1
General Information
2
2.1 Voice Calls
11
2.2Creating and sending a text message
11
3.1Wi-Fi
13
3.2 Bluetooth
13
4.1 Camera
15
4.2 Music
16
6.1 Protecting Your Phone
19
6.2 Backup or Reset Your Phone
19
1. Getting Started 4
1.1 Your Phone 4
1.2 Installing or uninstalling the SIM Card, Battery, and Memory Card 4
1.3Charging the B att er y 6
1.4 Turning the P hone On or Off 7
1.5Lock/Unlock 7
1.6 Contacts 7
1.7 The Home Screen 7
2. Phone Functions &Messages 11
2.3Multim edia M essage 12
3.Wi-Fi & Bluetooth 13
4.Multimedia Applications 15
5. Pre-Installed Programs Introduction 17
6.Managing Your Phone 19
7.Specifications 20
Roma RX|3
Page 5
Micro-USB Port
Menu
Earphone Jack
Home
Receiver
Return
Front Camera
Microphone
Sensor
Volume Key
Flash LED
Power Key
Battery Cover
Display &Touch Screen
Speaker
1
2
9
12
3
4
5
6
13
14
15
16
7
8
10
11
1. Getting Stared
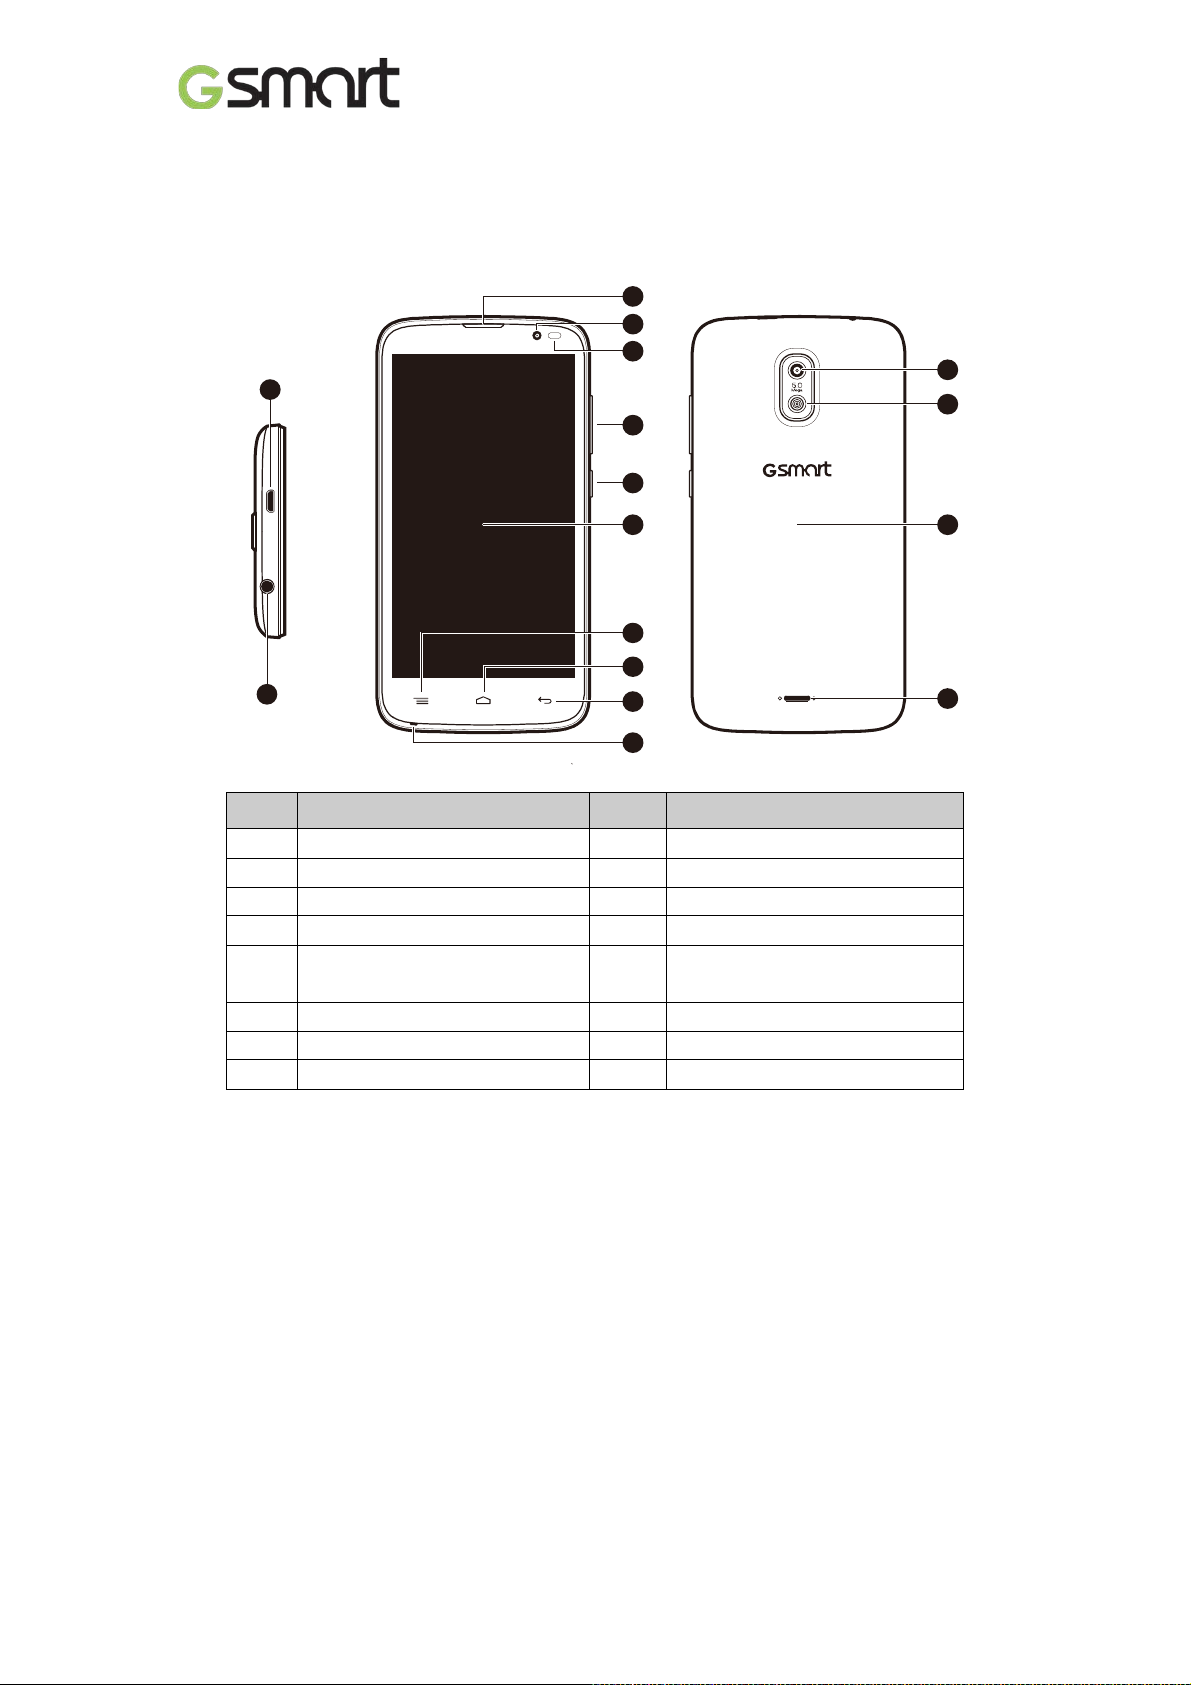
1.1 Your Phone
This section int r oduc es you t o the hardware of the device.
No items No Items
1
2
3
4
5
Proximity Sensor/ Light
6
7
8
9
10
11
12
13
14
15
16
Camera
1.2 Installing or uninstalling the SIM Card, Battery, and Memory Card
To install the SIM card
There are two SIM card slots.The right slot is SIM1(to use with MiniSIM card) andleft slot is
SIM2(to use with MicroSIM card).
To install the SIM1 card:The gold contact is facing downand the cut-off corner is facing
toward the outside. Slide the SIM car d into the slot andpush it to the end.
To install the SIM2 card:The gold contact is facing downand the cut-off corner is facing
toward the inside.Slide the SIM card into the slot and push it to the end.
Roma RX|4
Page 6
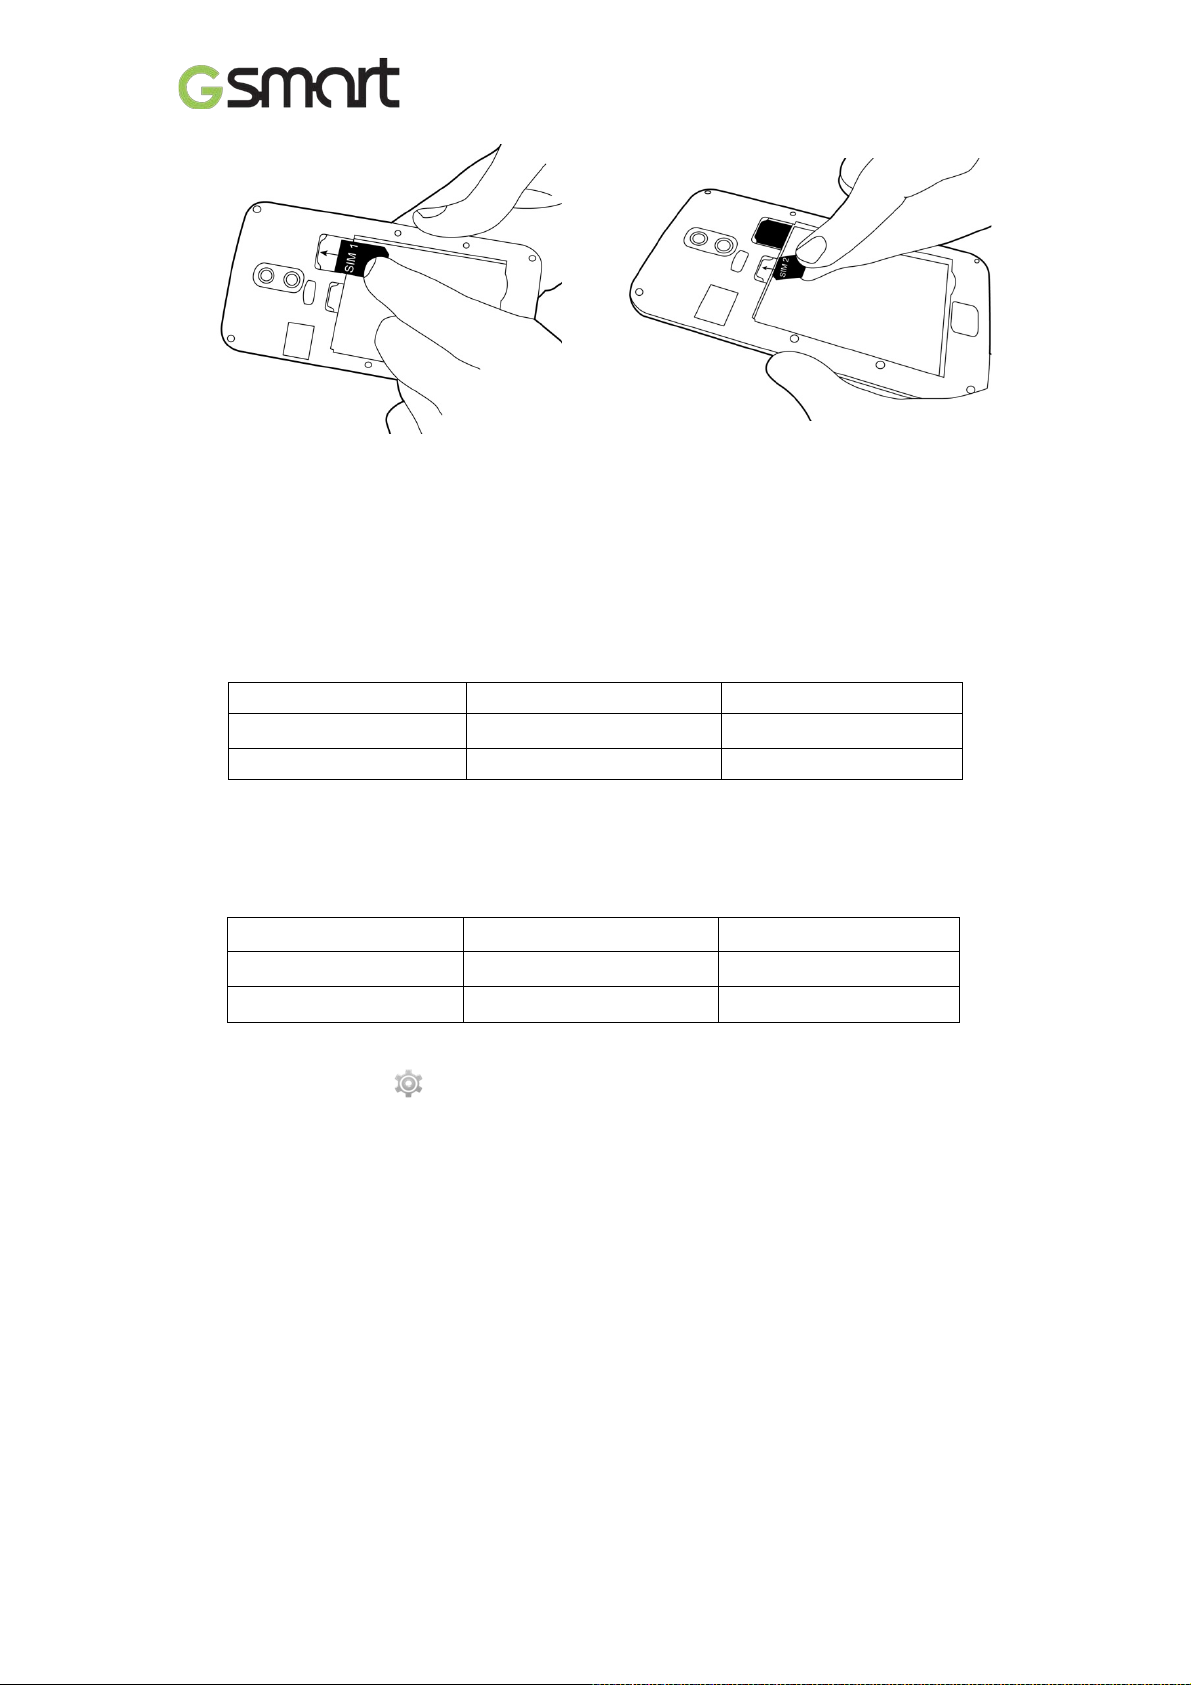
To install the SIM1 card To install the SIM2 card
To remove the SIM card
Please turn off your phone first, and use your finger to slide the SIM card out of c ar d slot.
NOTE:
SIM Card Data Switch
3G (GSM+WCDMA) is set in SIM1 by default however switchable to SIM2 by manual
setup.
SIM1 SIM2
Default Setting GSM+WCDMA GSM
User Switchabl e GSM GSM+WCDMA
Tap App lic a t i ons tab > More… > Mobile networks > 3G service > Ena ble 3 G. Cho os e one
SIM card for WCDMA+GSM, then the other one will be for GSM automatically.
If you insert singal SIM card, the default setting will be set up as GSM+WCDMA.
SIM1 SIM2
SIM1 inserted GSM+WCDMA X
SIM2 inserted X GSM+WCDMA
Data ON/OFF Switch
Tap Applications tab > >SIM management > Data con nection. Choose the same SIM
card as3G (GSM+WCDMA) SIM card.
Battery
Your phone comes with a rec har geable battery. Battery lif e varies depending on the network,
used applications, and the type of connections attached to your phone.
To install the battery
Make sure the contact of the bat tery is close to connectors in the battery sl ot.
Roma RX|5
Page 7
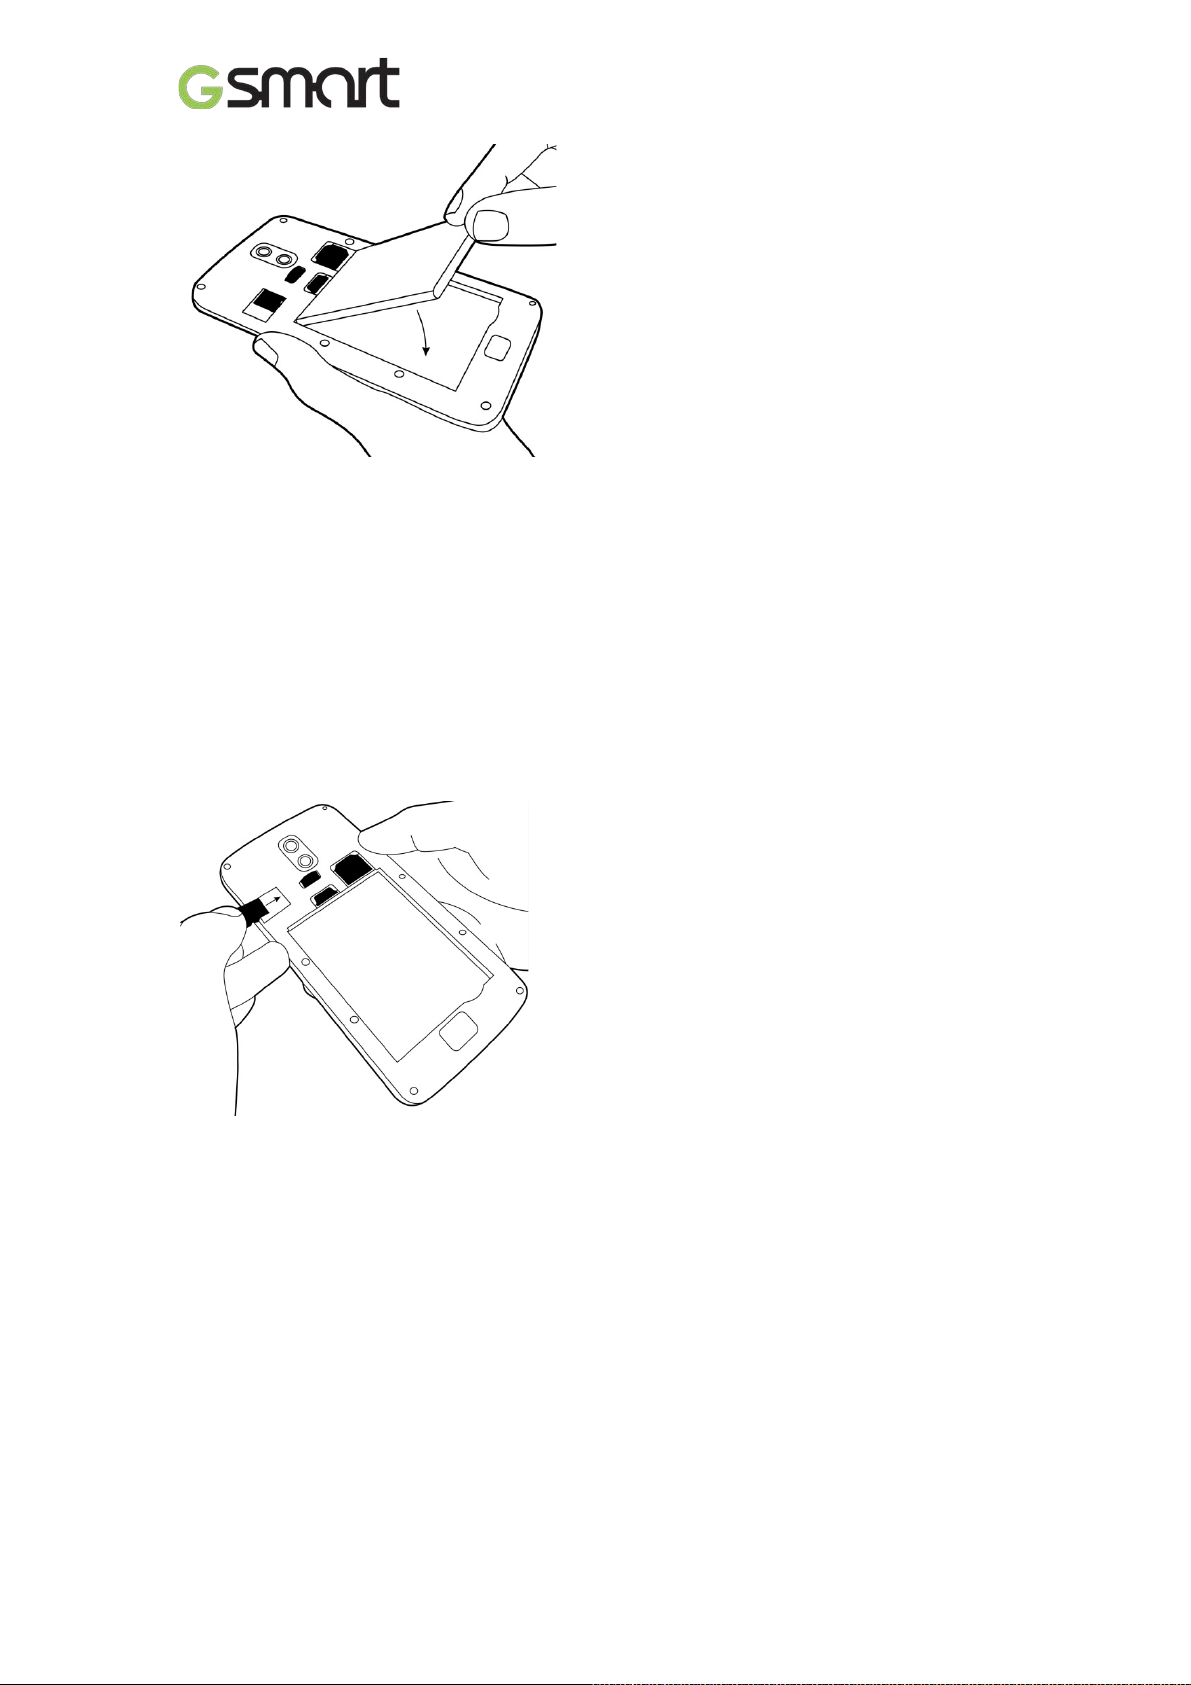
To remove the battery
Use your fingertip to lift the battery, and then remove it.
To replace the back cover
(1) Insert the cover into the slot from the bott om .
(2) Then, press all around back c ov er fully until hearing clicks.
Memory card
You may need a microSD card to store photos, m usi c , videos and other data.
To install the memory card
(1) Insert the memory card with the gold contact f aci ng down.
(2) Push the memory card until it clicks into slot .
To remove the memory card
(1) For safe removal, tap Applicati ons tab > Settings >Storage >UnmountSD card>OK.
(2) Push the memory card to eject it from the slot.
1.3 Charging the Battery
When you take your phone out of box f or the first time, the battery isn’t at full power. Pl ease
charge the batter y fully before using.
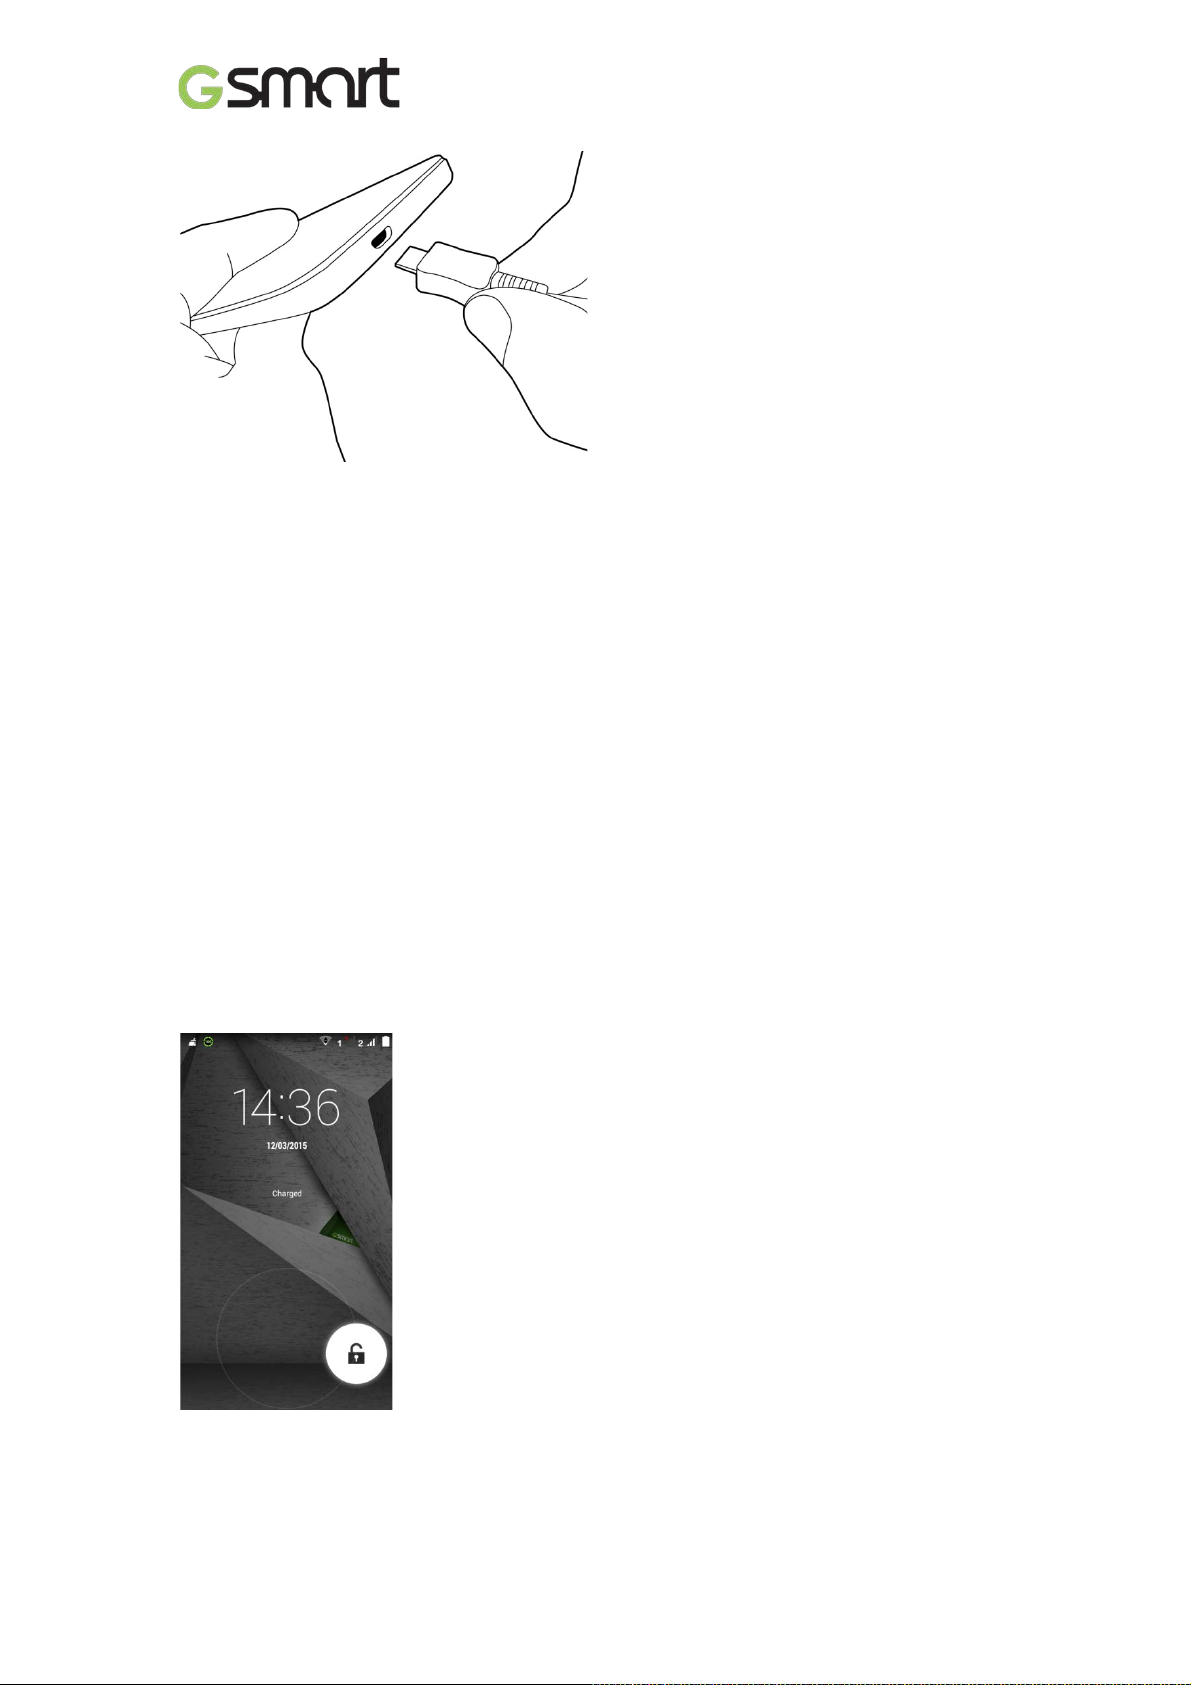
(1) Connect the USB cable to the AC adapter, and then, connect to the device via the USB
cable.
(2) Plug the AC adapter to a socket to start the charge.
(3) For phone’s safety, please only use the or iginal charger that comes with your dev ic e. Any
possible damage caused by using non-original charger or any other equipment will not be
under GIGABYTE Comm unic ation Inc.’s responsibility .
Roma RX|6
Page 8
NOTE:
To ensure safety, do not remove the batt ery f rom the phone while the AC adapter is
connected or while it is be in g cha rged.
1.4 Turni ng t he Phone on or off
To turn on your phone
Press and hold the power button until the displayappears “GSmart” logo.
To turn off y our phone
(1) Press and hold the power button for sev eral seconds.
(2) A pop-up window appears, then tap “P ower off”.
(3) Select “OK” to confirm.
To set your phone to the sleep mode
To set your phone to the sleep mode, pr ess the power but ton briefly. It will turn t he displ ay off .
To turn the display on, pr ess the power button br iefly again.
1.5 Lock/Unlock
Unlock the device
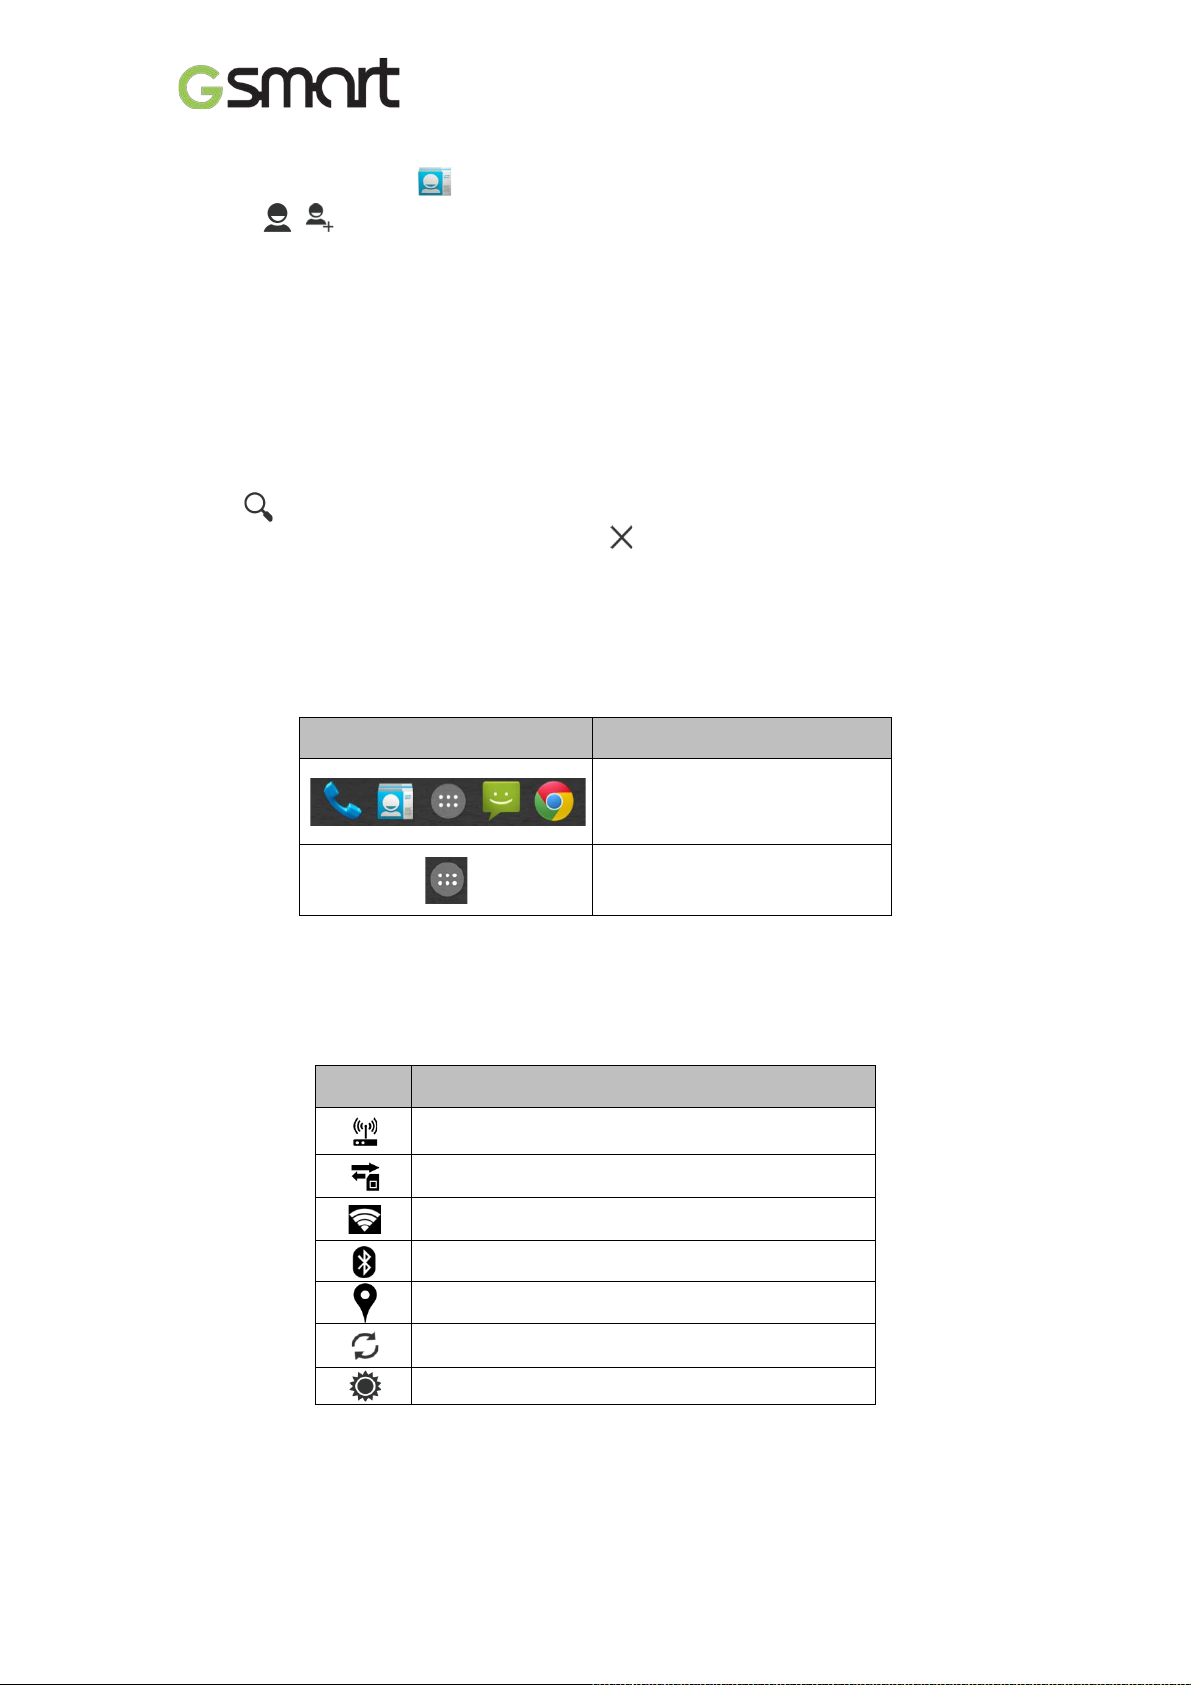
Drag G icon on screen and sli de to unlock icon for unlocking the devic e.
1.6Contacts
“Contacts”is your phonebook that you can store fri ends’ names, phone numbers, e-mail
addresses and other inf ormation.”Contacts” can connect to your Googleaccount, corporate
accounts, and int egr ate your contact information.
Roma RX|7
Page 9
Adding a Contact
(1) Tap Applications tab > .
(2) Tap > to add a new contact.
(3) Choose where y ou want t o synchr onize the new contact wit h Google account, Phone,
SIM1 or SIM2.
(4) A new contact screen appears.
(5) Tap each field to fill out t he contac t information.
(6) Tap ”DONE”t o save it.
NOTE:
The SIM card contact can’t add picture to contact information.
Searching for Contact s
On Contact Screen, do any of the following to easily search for contacts:
• Tap to type the first few letters of the contact name to search. The list is filt er ed when
typing. When finishingsearchi ng, you could tap to go back to the contacts screen.
1.7 The Home Screen
On Home Screen, you can quickl y access common features and view notifications of missed
calls, received messages, battery, and the stat us of the connec tion.
Default Home Screen: Main functions.
Icons Descriptions
Favorites Tray c an keep your
most important shortc uts and
folders.
Tap to launch
ApplicationDrawer.
You can slide the Home Screen fr om the left si de to the right side or from the right side to the
left side to switch it. The icons located at the bottom of the home page have different functions:
Self-defined Ho me Screen: You can add t he short c uts and widgets.
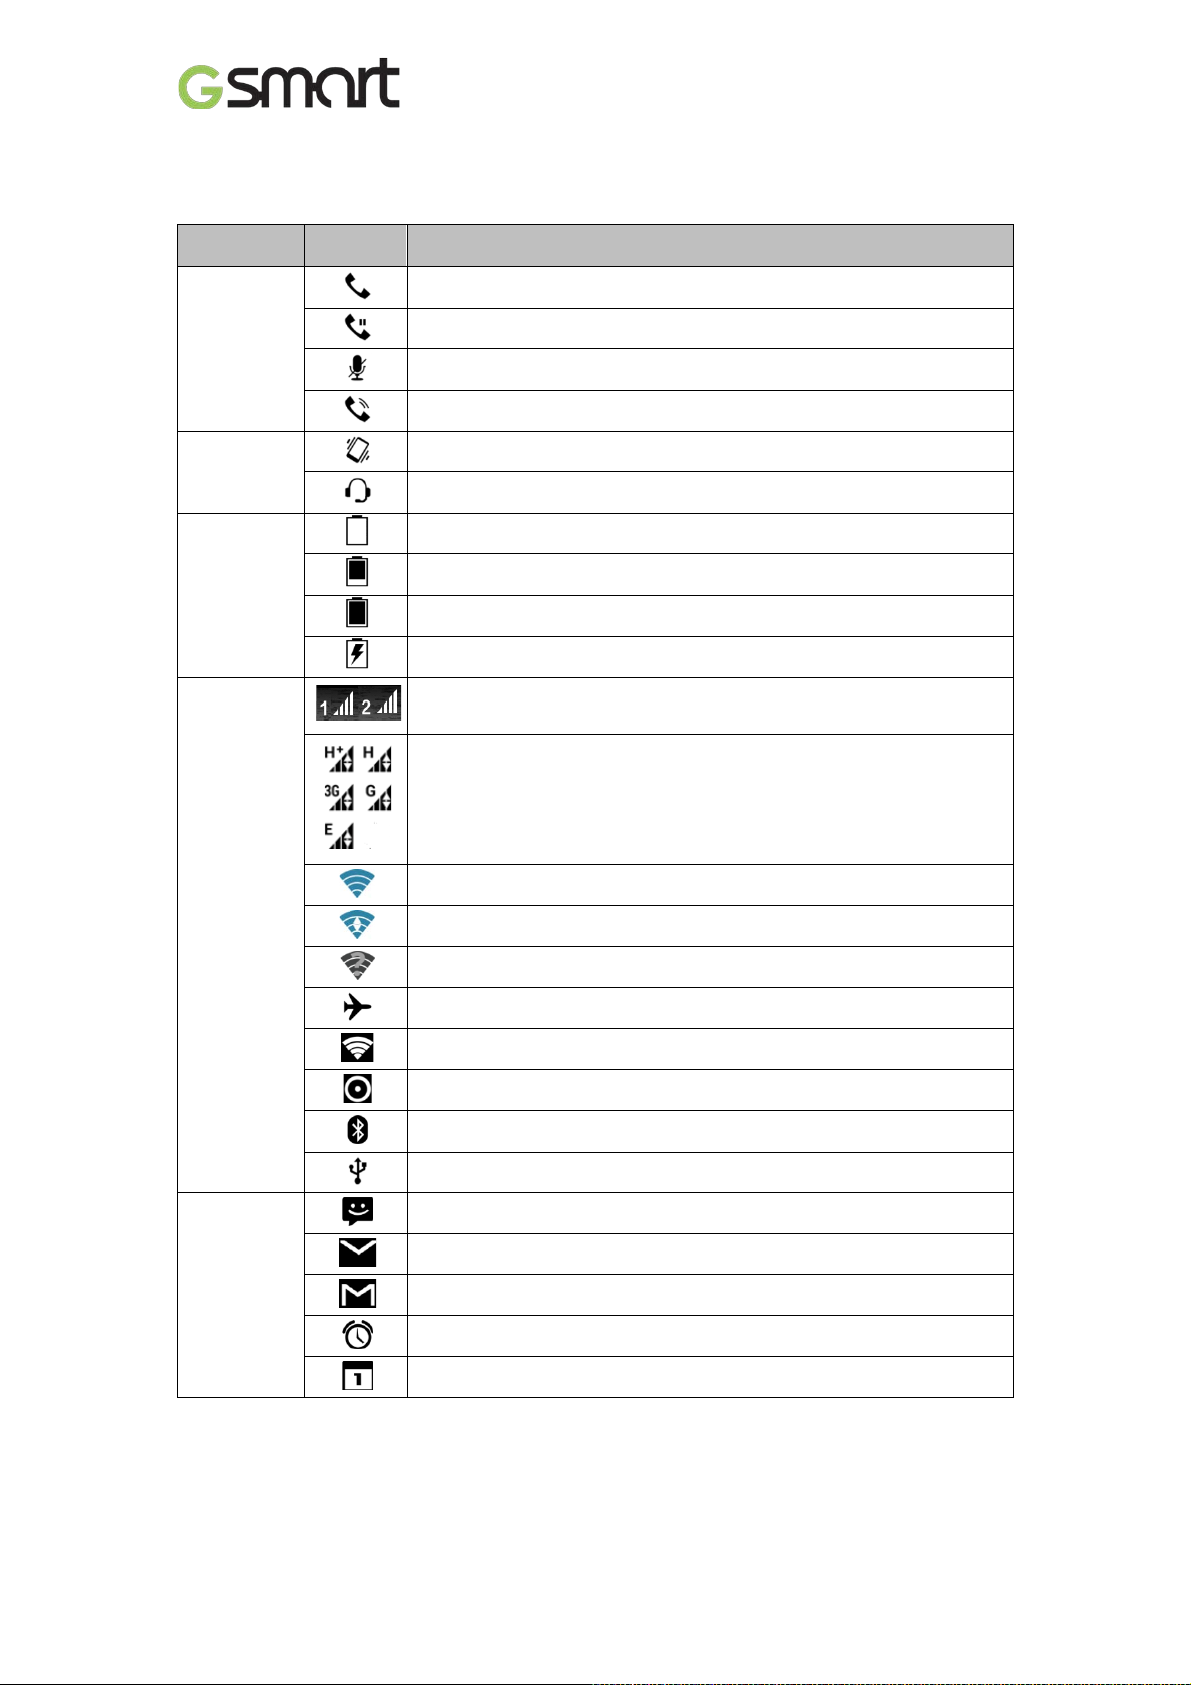
Icons Functions
Tethering or hotspot ac tive
Tap to turn on/ off network.
Enable/disable Wi-Fi.
Enable/disable Bluetooth.
Enable/disableGoogle Location Servic e™.
Enable/di sabl e Data Synchronization.
Tap to adjust the bright ness.
Roma RX|8
Page 10
Maximum signal strength. F ewer bars indic ate lower signal strength.
Status Ic ons
The icons of the status bar indicat e different types of information. T ap the stat us bar and scroll
down to view notifications or view system informati on.
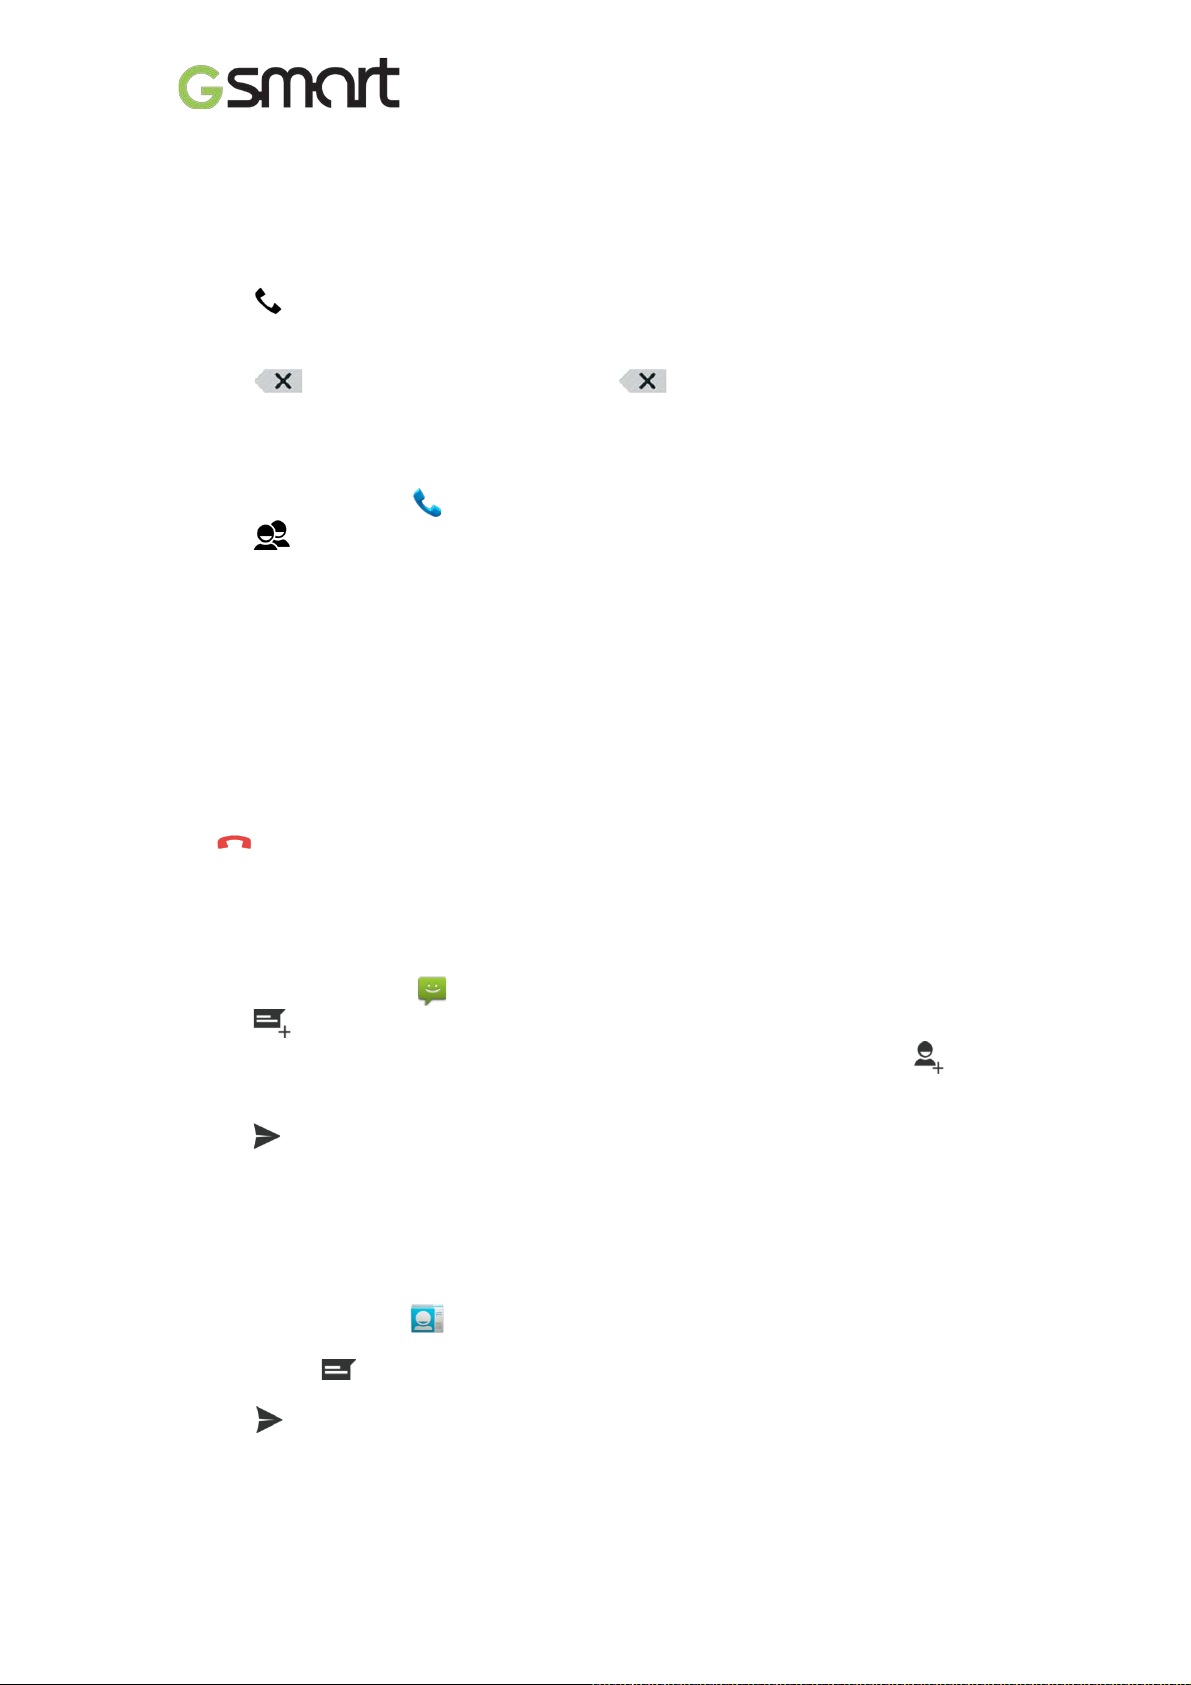
Types
Phone call
Volume
Battery
Icons
Descriptions
Call is in progress.
Your call is on hold.
Mute the call.
Speaker is on.
Vibration is on.
Wired microphone headset connected.
Battery is full.
Battery is low.
Battery is very low.
Battery is charging.
Left icon is SIM1 signal. Right icon is SIM2 signal.
GPRS\EDGE\ 3G\ HSPA is i n progress.
Network
and
Connection
Notification
Wi-F i is connected.
Wi-Fi is in progress.
Wi-Fi Network is activ ated.
Airplane mode.
Portable Wi-Fi hotspot is activated.
Both USB tethering and Por table Wi-Fi hotspot are activated.
Bluetooth is on.
The device is connect ed to PC vi a the USB cable.
New text message.
New e-mail.
New Gmail™.
Alarm.
Event notific ation.
Roma RX|9
Page 11

Types
Notification
Icons
Missed call.
General notification.
FM radio is on.
Playing a song.
Downloading an appli c ation.
Descriptions
Roma RX|10
Page 12
2. Phone Functions &Messages
2.1 Voice Calls
To make a call from the Phone screen
(1) Go to the Phone screen.
(2) Use the keypad to input phone numbers.
(3) Tap to make the phone call.
NOTE:
1. Tap to delete a number. Tap and hold to erase entire numbers.
2. If you insert SIM1 and SIM2 at the sametime, the Voice service wil l be set as default.
You can setthedefault from the status bar on Phone screen.
To make a call from Contacts
(1) Tap Applications tab> .
(2) Tap .
(3) Tap a c ontact you want to call.
To make emergency call s
You have to unlock your device bef or e making an emergency c all. Enter the international
emergency number 112to make the emergency call.
Answering a call
When there is an incomi ng c all:
The phone wil l ring with the ring volume is turned on.
A notification m essage will appear on thescreen.
Ending a call
Tap . It’s the end icon to end a call.
2.2 Creating and sending a t ext message
Your phone offers several ways to create and send a new text message.
From Message screen
(1) Tap A pplications tab > .
(2) Tap to creat e anew message.
(3) In the “Type name or number” field, enter t he recipient’s phone numbers or tap to add
from your contacts.
(4) Ty pe y our m essage in t he “Type text message”field.
(5) Tap to send your message.
NOTE:
If you insert SIM1 and SIM2 at the sametime, the Message service will be set as default.
You can setthe default fromthe status bar .
From Contact screen
(1) Tap Applicati ons tab > .
(2) Tap a contact to display the contact information.
(3) Tap the icon to send the m essage.
(4) Compose your message.
(5) Tap t o send your m essage.
NOTE:
If you exit Messages befo re sending , unsent message will be saved as a
draftautomatically.
Roma RX|11
Page 13
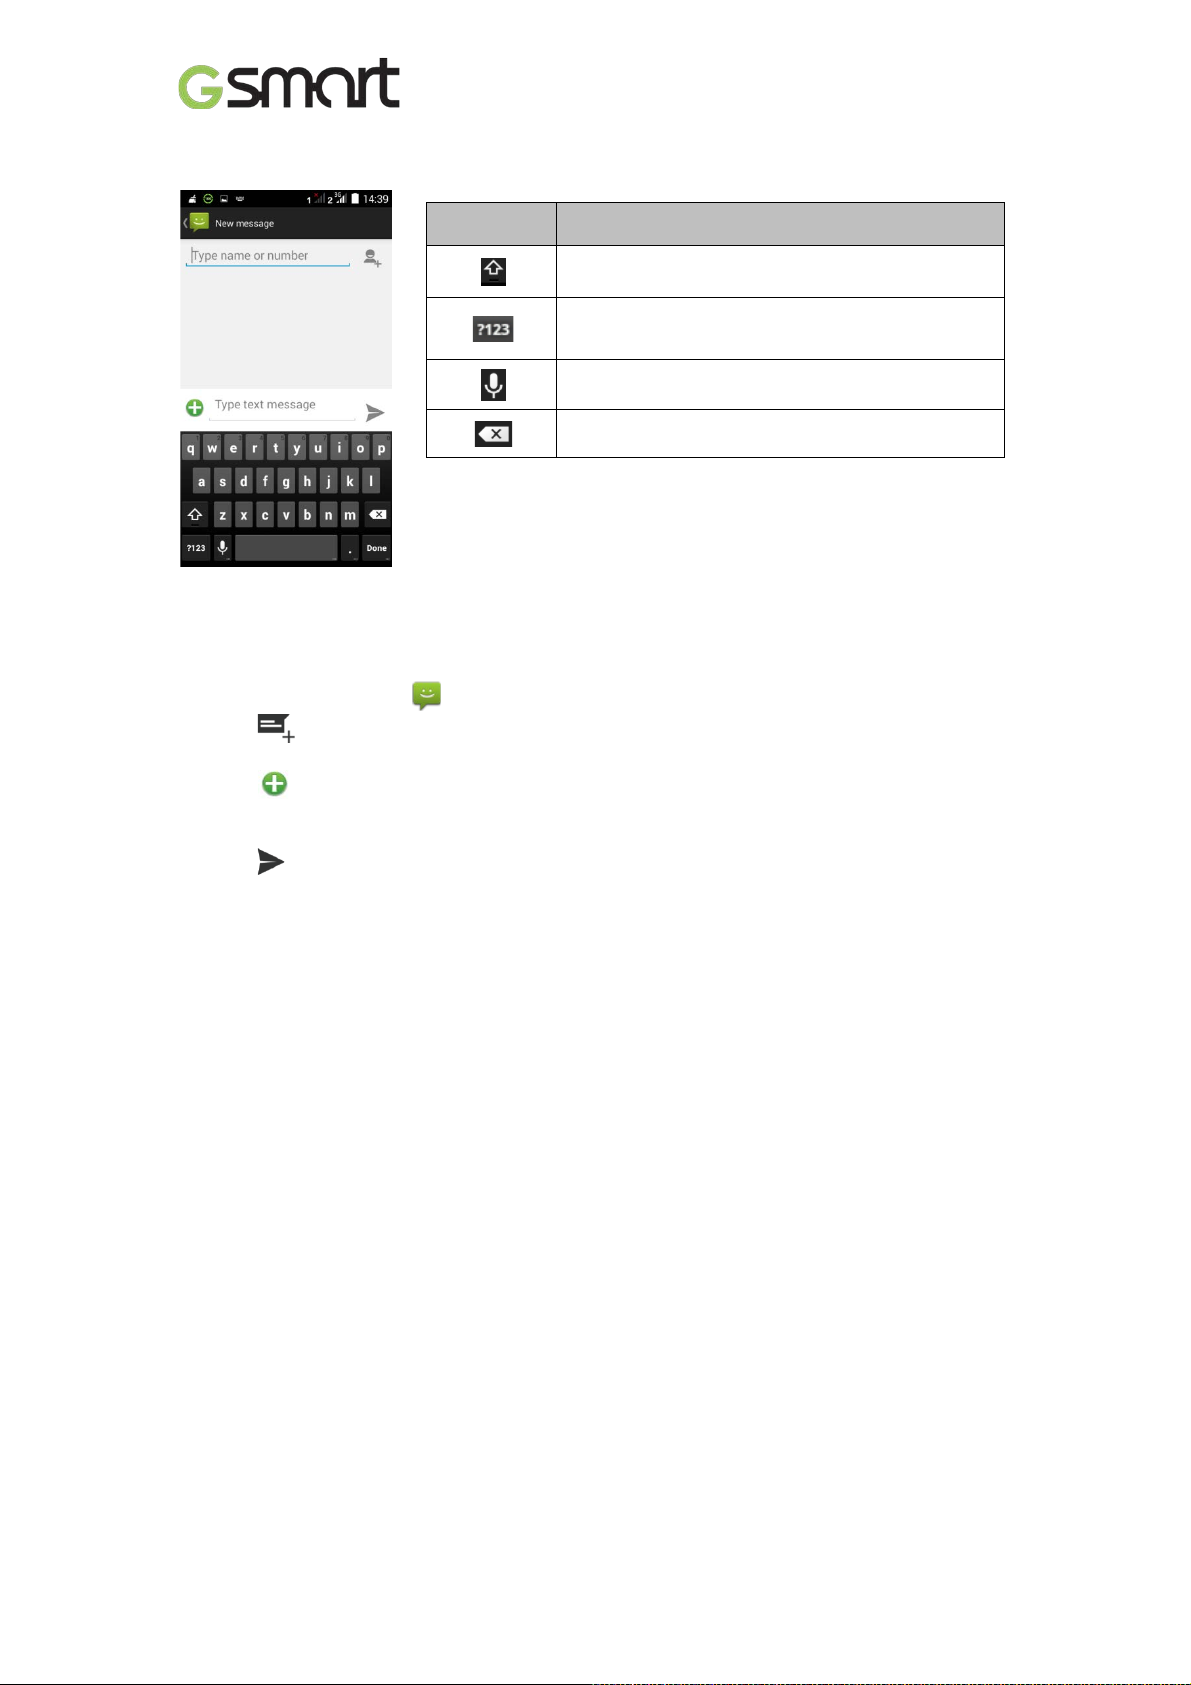
Google™ keyboard
Icons Function
2.3 Multimedia Message
A Multimedia message or MMS can contain letters, an image, an audio, or a v ideofile.
To send MMS from Message screen
(1) Tap Applications tab> .
(2) Tap to create a new message.
(3) Enter the recipient’s phone numbers in the “Type name or number” field
(4) Tap to attach picture, video, record audio, contact, pictures, videos, audio or c alendar .
The message converts to a MMS message automatically.
(5) Enter your message with the on-screen key boar d in “Type text message” filed.
(6) Tap to send your m essage.
Tap to activ e Capital letter mode.
Tap to activate the sym bols and numerical
keyboard.
Tap to input something by v oic e.
Tap to delete words.
Roma RX|12
Page 14
3. Wi-Fi & Bluetooth
3.1 Wi-Fi
Your device can connect to t he detected network through Wi-Fi.
(1) Tap Appli c ations tab > > Wi-Fi.
(2) Switchto turn “Wi-Fi” on or off.
To connect to a Wi-F i ne t w or k
(1) Tap “WI-FI”, check Wi-Fi function and turn it on. Begin to search t he available Wi-Fi
networks.
(2) Detected networks are displ ay ed below. Tap one network then tap “Connect” .
(3) If you select an open network, t he connection is establishedautomatically.
(4) To connect a secured connection, you will be prompted for the password. E nter the
password then tap “Connect ” .
(5) When Wi-Fi is connected, the connection icon will be displayed on the status bar.
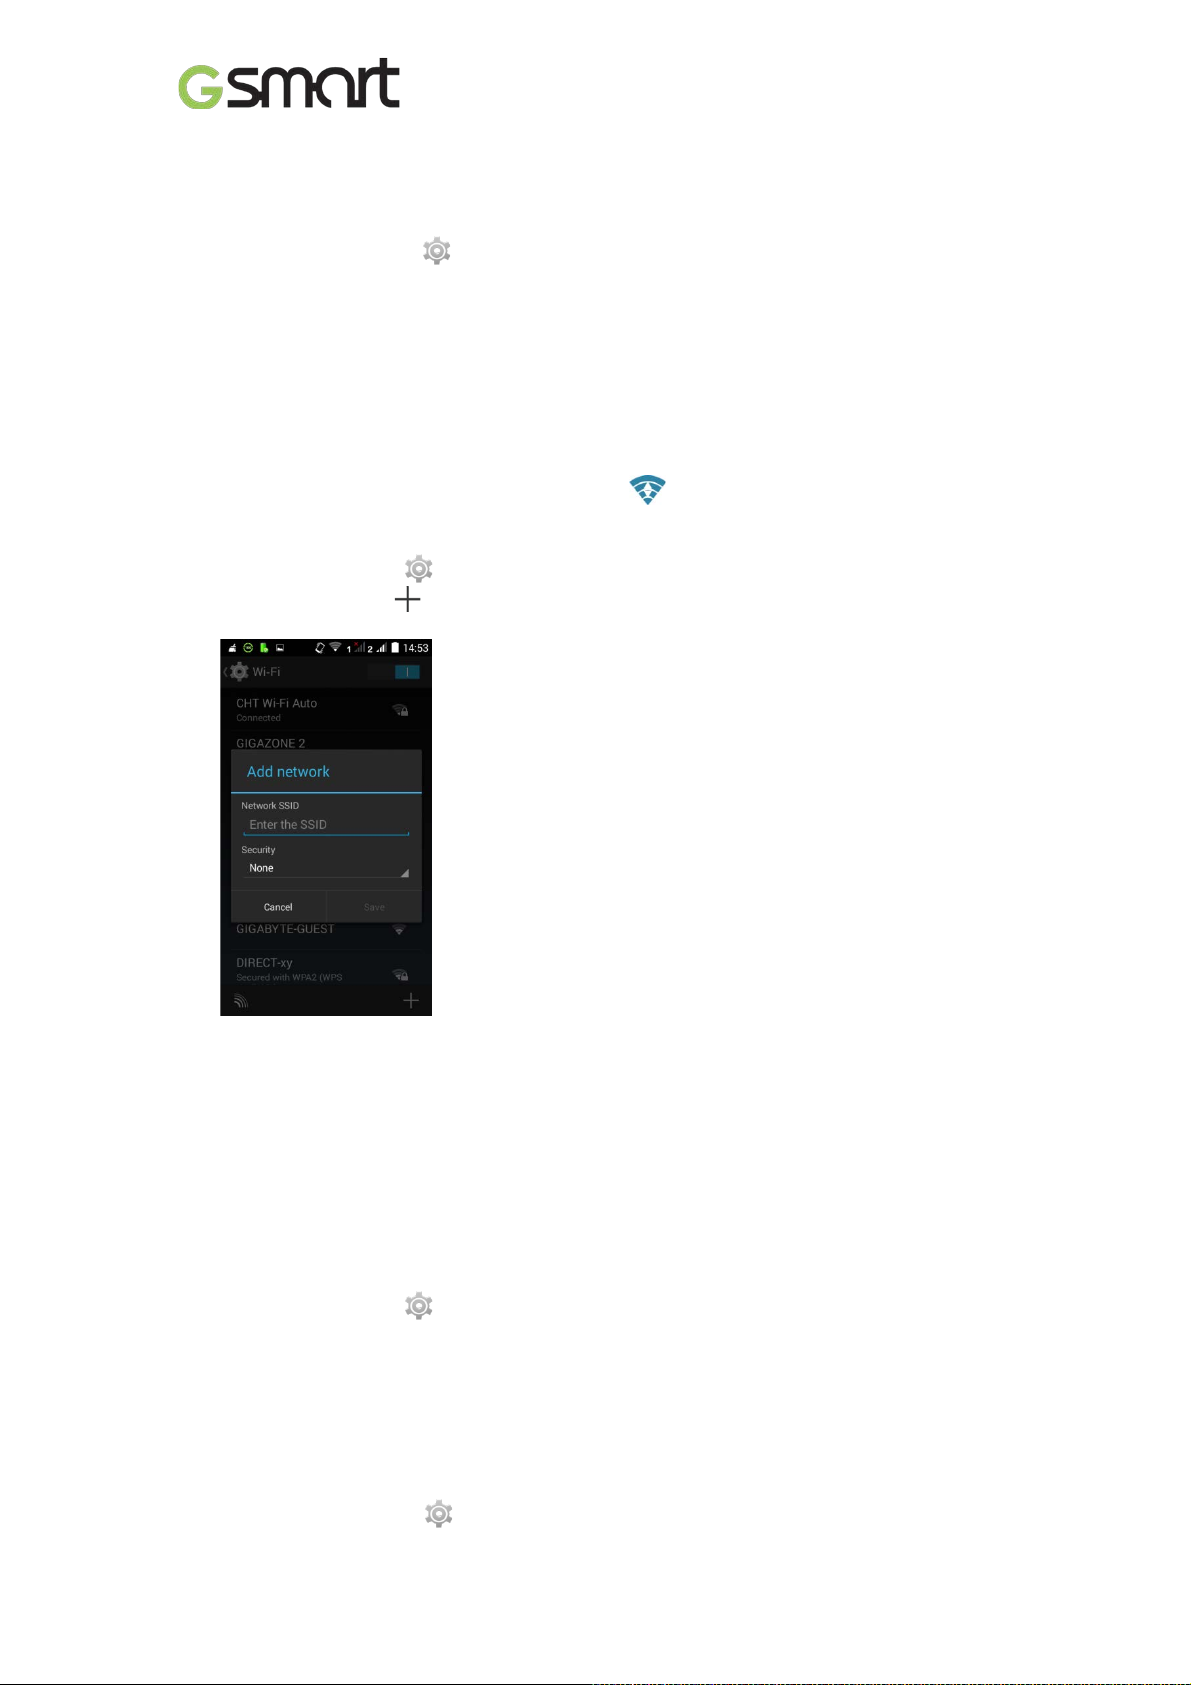
To add Wi-Fi network
(1) Tap Applicati ons tab> > Wi-Fi.
(2) In Wi-Fi screen, tap . An on-screen window will pop-up.
(3) Follow the on-screen instruc tions and enter the necessary information, thentap “S av e” to
save the settings.
3.2 Bluetooth
Bluetooth on your phone operates in three different m odes:
On: Bluetooth is turned on. Y our phone detec ts other Bluetooth devices, but your phone is
not visible to others.
Discoverable: Bluetoot h is tur ned onand y our phone is visible to other Bluetooth devi c es.
Off: Bluetooth is turned off.
To turn Bluetooth on or off
(1) Tap Applicati ons tab> >Bluetooth.
(2) Switch or tap totur niton.
(3) Tap “Bluetooth” to view the menu options.
(4) Tapthe devic e’s name t o make your dev ic e v isible to others.
To connect to Blue tooth devices
A connection to a Bluetoot h dev ic e is called a partnership. You need to pair and c r eate a
partnership with a Bluetooth device to exchange information.
(1) Tap Appli c ations tab > >Bluetooth.
Roma RX|13
Page 15

(2) Tap “SEA RCHFO RDEVI CE S ” to search for a new device.
(3) Detected Bl uetooth devices are displayed on the screen. Tap one device to connect.
(4) Start to pair, ent er the password, and thentap “OK” to finish pairing.
Roma RX|14
Page 16
4. Multimedia A pplications
Icon
Function
Icon
Function
settings.
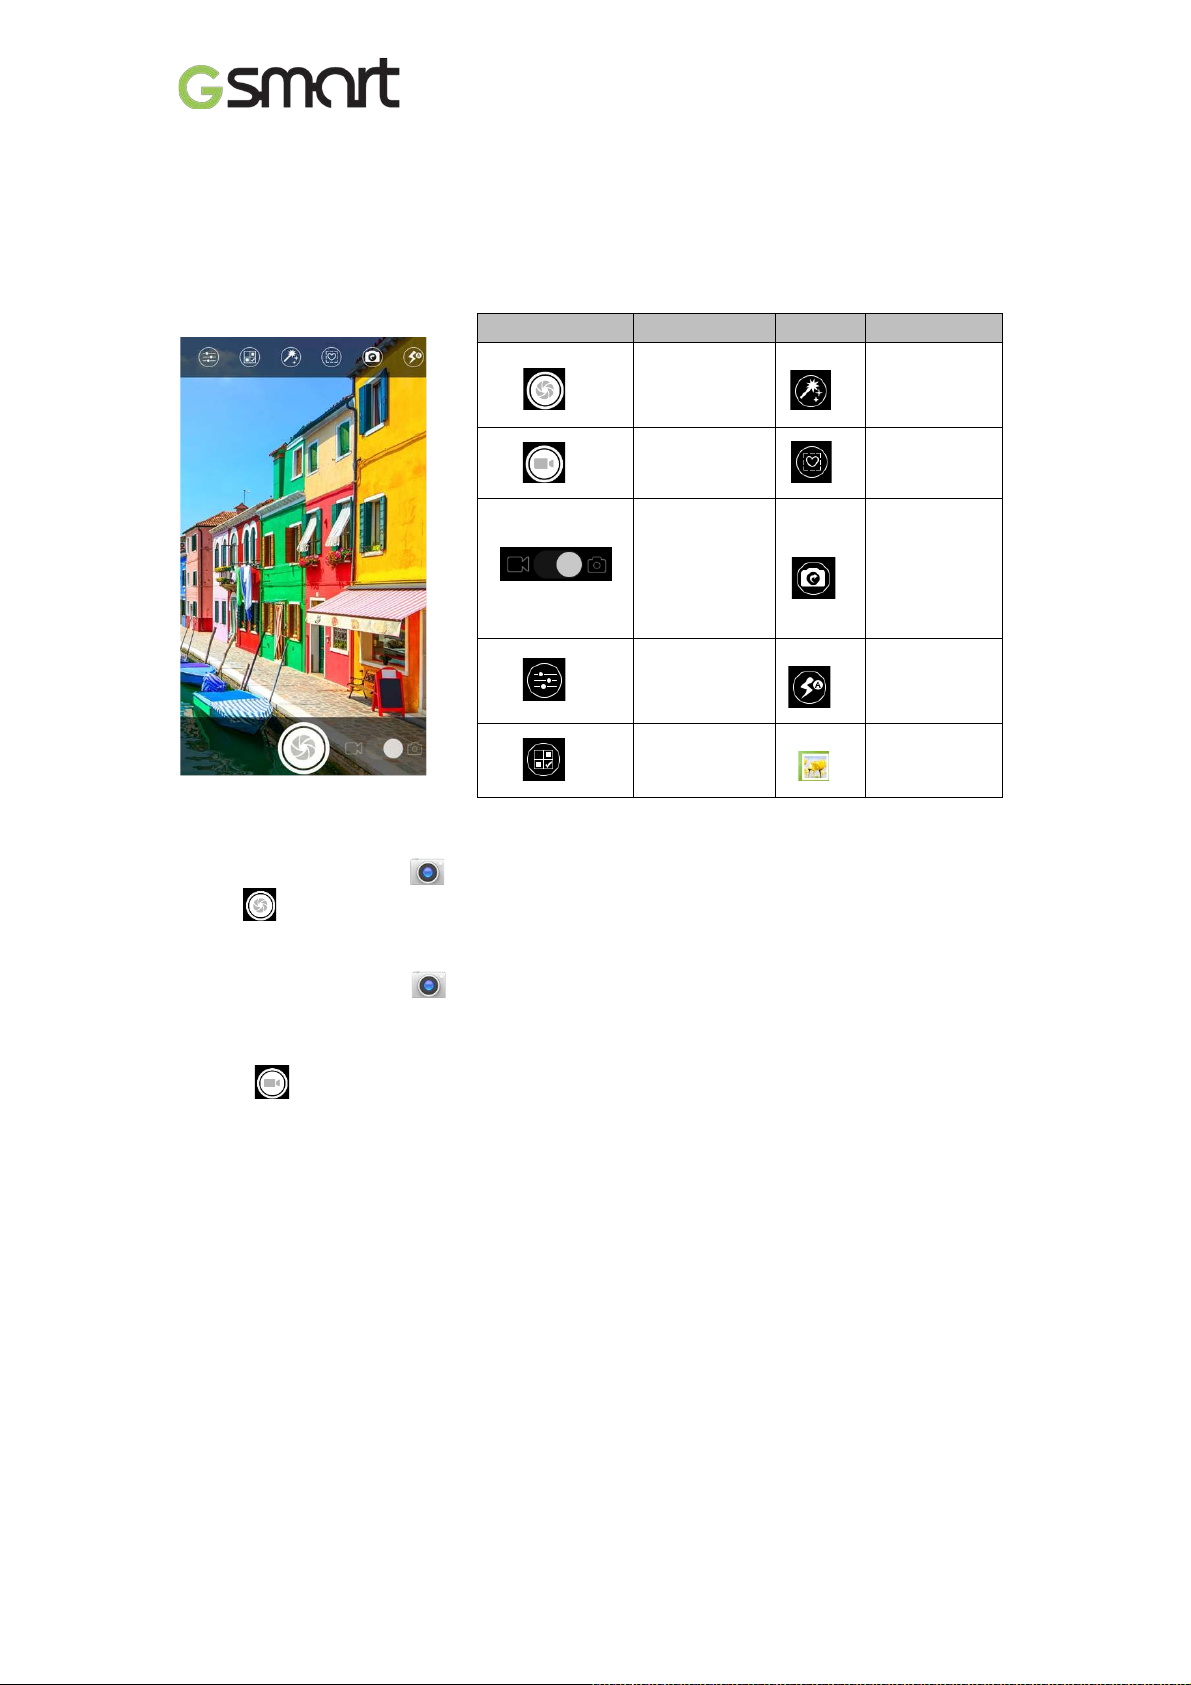
4.1 Camera
Your phone is equipped with an 5MP camera to take photos and videos.
Camera Function
Ta
king a p hoto
Tap to take a
photo.
Tap to record
a video.
Switch
between
camera
mode and
record mode.
Configure
camera
Capture
mode.
Color effect
Modeling
stickers
Switch
between
rear and
front
camera.
Display the
flash mode.
Displays the
last image.
(1) Tap Applicati ons tab > . T he screen switc hes to landscape view automatically.
(2) Tap to tak e apictur e.
Re
cording a video
(1) Tap Applications t
ab > .
(2) Switch to recorder mode.
(3) Aim the phone at the subject.
(4) Tap to start to record, tap again to stop recording.
Roma RX|15
Page 17
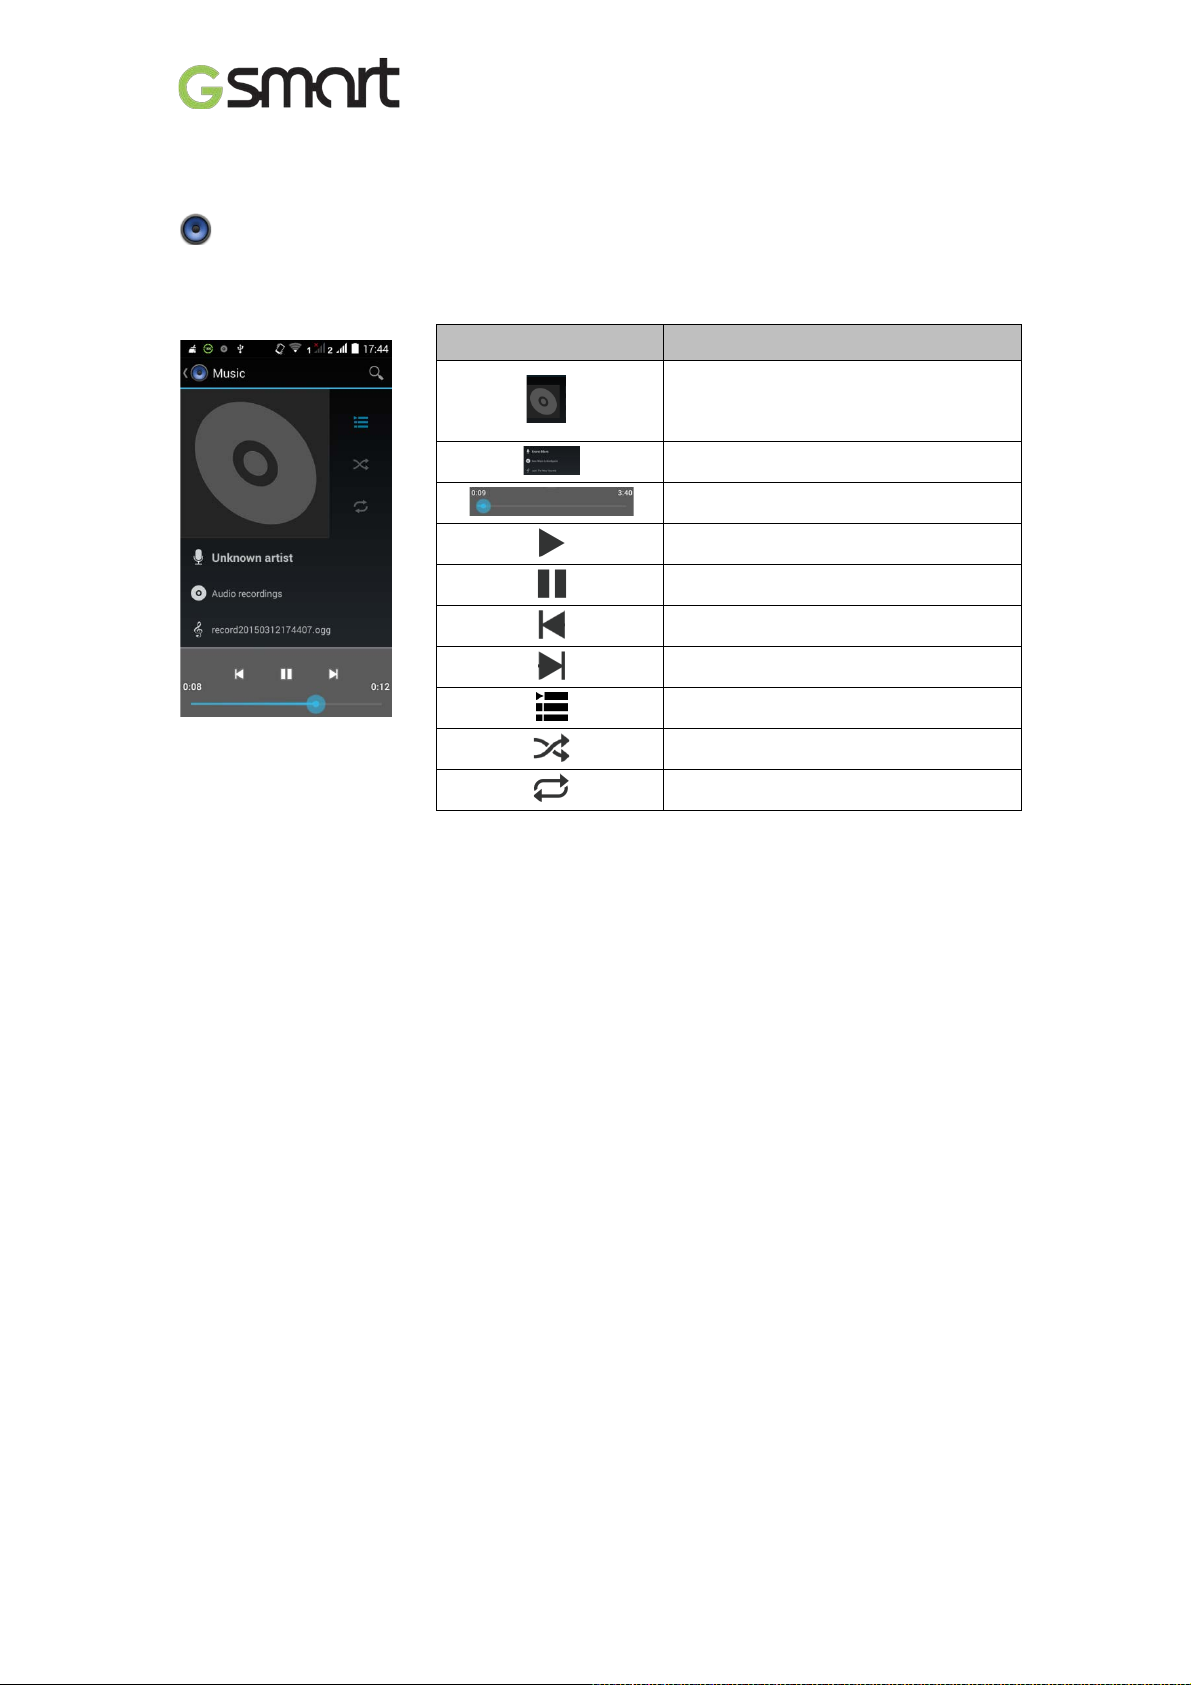
4.2Music
You have to copy your audio files to the storage card before playing music, because the music
player only plays audio files saved in the storage card of your phone. Tap Applications tab >
.
Playback screen: Displ ay s the playback area with the playback controls.
Icon Function
Album art pictur e or animation
T
he area of audio informati on
S
lide to go forward or backward
To play the song
T
o pause the song
Previous song
Nex
t song
Tap to go to playlists
To start or close shuffle function
T
o repeat the current song/ all songs
Roma RX|16
Page 18
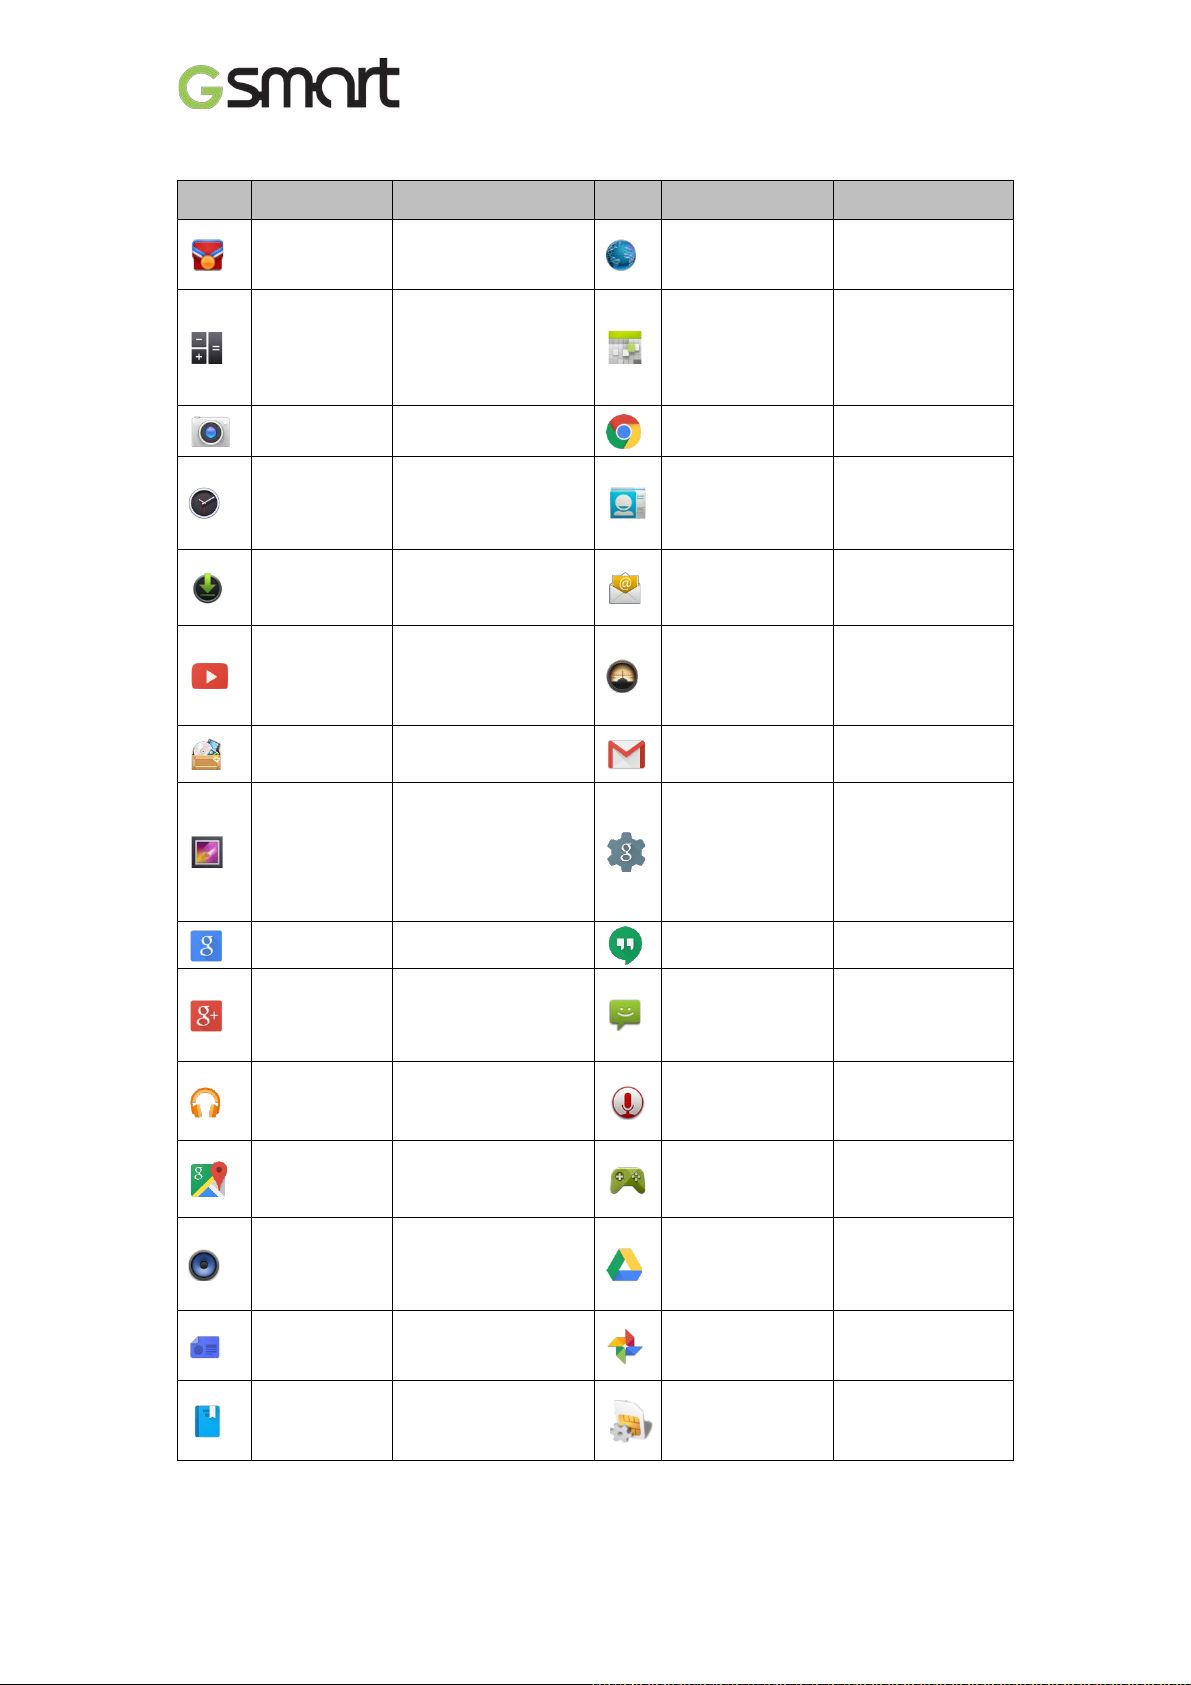
5. Pre-Installed Programs Introduction
Icons
Recommended the
functionality.
Browses the web
files
from Internet.
Performsarithmetic
division, et c.
Creates and tracks
Storesnames,
information.
music/news on the
Shortcuts to your
Ads.
Google
Now™service.
Instant messaging
program.
Checks friends’
own.
Google Drive™
Docs.
Google™ service
to edit and back up
pictures.
Icons Programs Description
Best
Choice
Cal
culator
ra
Came
Cl
ock
D
ownloads
ouTube™
Y
Manager
File
best software and
functions, such as
addition, subtrac tion,
multiplicati on, and
Captures still images.
Sets up alarmclock .
To view
filesanditem s you've
downloaded.
It is online video
streaming servic e
that to view, search,
and upload videos.
Manages all files.
Programs Description
wser
Bro
Cal
endar
rome™
Ch
P
eople
E
mail
Radio
FM
mail™
G
and download
schedule or
appointments.
Browser service.
numbers, e-mail,
and other
Sends and
receives e-mail
messages.
Listen to
FM Radio.
Web-based e-mail
service.
allery
G
ogle
Go
ogle+™
Go
Play Music
aps™
M
M
usic
lay
P
Newsstand
Views and edits
photos and videos.
updates and post
updates of your
Listening to your
music collection
anywhere.
Searching plac es
you want.
Plays and manages
the music and audio
files.
Newsservices.
ogle Settings
Go
Hangouts™
M
essaging
S
ound
Recorder
lay Games
P
Dri
ve™
P
hotos
Google+™
settings, Maps™&
Location™,
Search™, and
Sends and
receives all types
of messages.
Records a voice
note.
Google™ game
center.
to store files
withGoogle™
lay Books
P
Google™ e-book
Store .
Roma RX|17
IM Toolk it
S
It enables the
SIM to initiate
actions.
Page 19
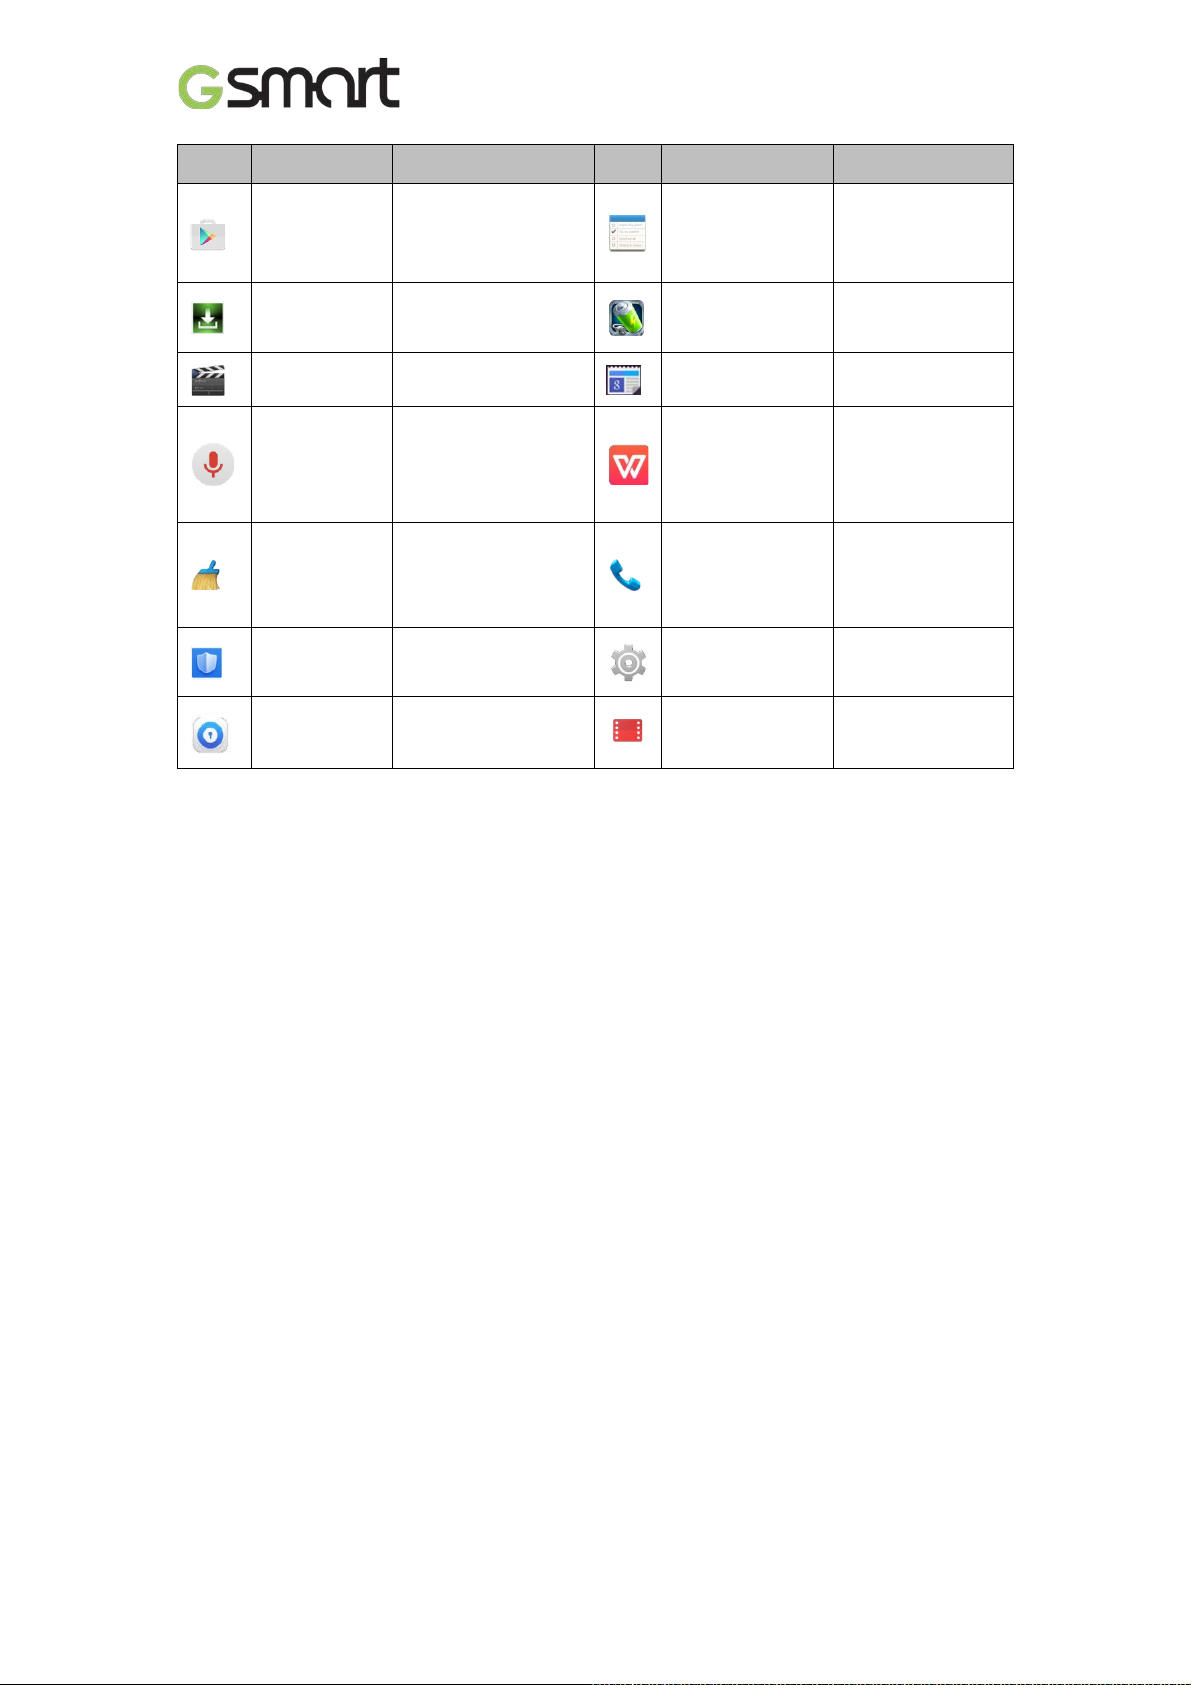
Icons Programs Description
Icons
Checking the
information.
To save juice and
significantly.
Quickly to
speaking.
Programs Description
lay™ store
P
ystem
S
update
ideos
V
V
oice
Search
Cl
ean Master
CM Security
ock Screen
L
To find applications
which you can
download and install
on your phone.
system update
Playing videos.
search your phone,
the web, and nearby
locations by
Clearing cache,
residual files,
privacy data and
uninstalli ng apps.
Scan your device to
protect from virus
Control how and
when the screen
locks
o
ToD
tery Doctor
Bat
s&Weather
New
PS Office
W
hone
P
Settings
Play Movies &
TV
To save all the
tasks and daily
planning.
extend battery life
Understand news
and weather today
Document
processing app
Makes and
receives phone
calls.
Set up your phone
Playing movies
and TV program.
Roma RX|18
Page 20

6. Managing Your Phone
6.1
Protecting Your Phone
You can protect your phone f r om unauthor ized users in a few different ways.
Set up PIN Protection
(1) Tap Applications tab > > Security > Screen lock >PIN.
(2) Enter your PIN, and then, tap “Continue” . Confirm your password, then, tap “OK ” .
(3) If you want to disable screen lock security, please tap Application Drawer > > APPS tab
> Security > Screen loc k. Confirm your PIN, and then, tap “Continue”. Tap “None” to
disable it.
Set up Password Protection
(1) Tap A pplicationstab > > Security > Screen lock > Password.
(2) Enter your password, and then, tap “ Continue”. Confirm your password, then, tap “OK”.
(3) If you want to disable screen lock security, please tap Application Drawer > >APPS tab
> Security > Screen lock. Confirm your password, and then, tap “Conti nue” . Tap “None” to
disable it.
Set up Unlock Pattern
You can further secure your dat a by loc ki ng the screen and requiring a screen unloc k pattern
every time after your phone is turned on or it wakes up from the sleep mode every time (screen
is off ).
(1) Tap A pplicationstab > >Security >Screen lock > Pattern .
(2) Draw the unl oc k pattern by connecting at least f our dots. Then t ap “ Continue”.
(3) Draw the unl oc k pattern again, and then, tap “Confirm”.
(4) If you want to disable the function, please tap A pplications tab > > Security > Screen
lock. Confirm the sav ed patt er n, and then, tap “None” to disable it.
Set up Voice Unlock
You can use voice command to unlock y our phone.
(1) Tap A pplicationstab > >Security >Screen lock > Voice U nlock.
(2) Tap unlock command.
(3) Speak a c ommand with 2-8 syllables, then repeat 3-6times.
(4) Tap Rec or d button and speak out your voice command.
(5) Set up P att er n as the bac k up loc k .
(6) If you want to disable the function, please tap A pplications tab > > Security > voice
unlock. Confi rm t he saved pattern, and then, tap “None” to disable it .
Enable the PIN of the SIM card
When the PIN is enabled, y ou ar e requi r ed to enter the PIN before using the phone.
(1) Tap A pplications tab > > Security > Set up SIM card lock.
(2) Tap “SIM1” or “SIM2”. (If SIM2 inserted).
(3) Check “ Loc k SIM c ar d”. Input the PIN, and then, tap “OK”.
6.2Backup or ResetYour Phone
With Clean Boot, you can reset your phone to its factory default s. When you reset your phone,
the data stored in your phone may be er ased.
(1) Tap A pplications tab > >Backup & reset.
(2) Tap Factory data reset>Reset phone > Er ase everything to reset the phone.
NOTE:
Before resetting your device, please remember to back up all your data and information.
Roma RX|19
Page 21
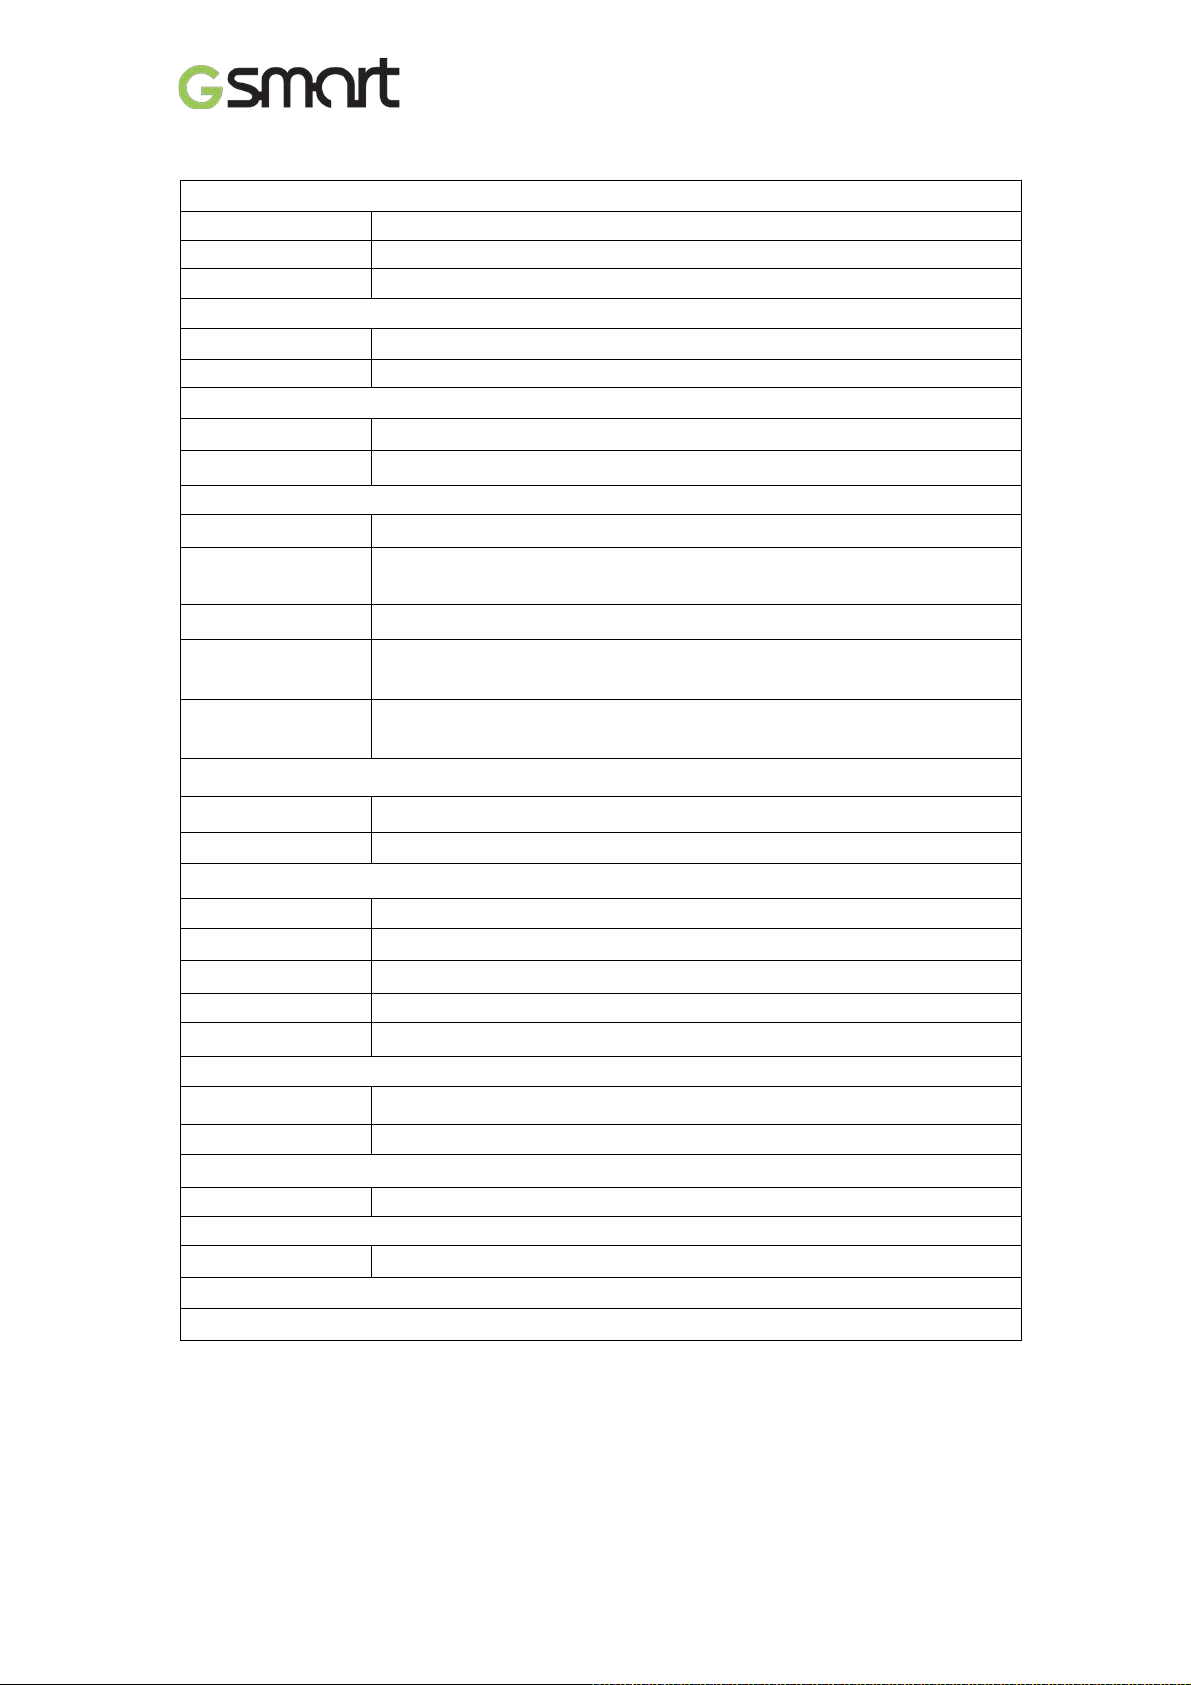
7. Specifications
System Information
Platform Android™ 4.4
Processor 1.3GHz Quad Core
Memory ROM 4GB/ RAM 512MB
Display
Size 5”
Resolutions 854 x 480 pixels
Size
Dimensions 142 x 73 x 9.5 mm (L x W x H)
Weight 155 grams with batt ery
Power
Battery Li-ion pack 2000mAh
Power Adapter AC
input
DC output 5V, 1A
100-240V, 50/60Hz,
0.2A ma x.
Standby time
Talk time
Radio Band & Standard
GSM/GPRS/EDGE 850/ 900/ 1800/1900 MHz
WCDMA/HSDPA 2100 MHz
Connectivity
GPS GPS, AGPS
Wi-Fi WLAN 802.11 b/g/n
Bluetooth Bluetooth 4.0
USB Micro USB
Audio Jack 3.5 mmstereo audio jack
Digital Camera
Rear Camera 5MP Color CameraandVideo Recording
Front Camera 0.3MP
External Memory
Memory Card MicroSD supports up to 32GB
Temperature
Operating 0°C to 40°C
SIM Card Slot
Dual SIM card slot.
Up to 400 hours (It may vary depending on network and t he individual
usage.)
Up to 20 hours (I t may vary depending on net work and the individual
usage.)
NOTE:
1. Specifications and accessories may differ subject to different SKUs or/and regions.
The specif ic a tion is su bje c t t o c ha nge without prior notice.
2. Mobile data interruption, unexpected error in CPU and high power consumption
could be caus ed by in-app AD in Android™ ph one . We sugges t you try to remove
those apps with AD which had been installed in your device for preventing any
abnormal situatio n h app ens and savin g mo re power as well.
Roma RX|20
Page 22

3. Memory comprises of approximately 2 GB firmware, pl us 2 GB of “Phone storage”
for do wnl oa ded a pp lic a t i ons and their dat a, mus ic , picture s , v ideos and doc um e nt s.
If this document is modified, please download the latest version on G Smart official
website.
Android, Googl e, G oogle Pl ay and other marks are trademarks of Google Inc.
www.gigabytecm.com
Roma RX|21
Page 23

Android4.4,KitKat
Introduction
Android 4.4 | 0
Page 24

Table of Contents
Chapter 1 Phone Functions& Input 2
1.1 Phone Calls 2
1.2Video Calls 3
1.3Using On-Screen Keyboard 3
Chapter 2 Email & Messages 5
2.1Creating and sending a text message 5
2.2E-mail Accounts 7
Chapter 3 Using the Internet 9
3.1 Connecting to the Internet 9
3.2 Bluetooth modes 10
Chapter 4 Multimedia Applications 11
4.1 Viewing Photos and Videos 11
4.2 Music 14
Chapter 5 Programs 14
5.1 Browser 14
5.2 Calculator 14
5.3 Calendar 14
5.4 SoundRecorder 15
5.5Gmail 15
5.6Maps 15
5.7Clock 16
5.8Play store 16
5.9YouTube 16
5.10Googlesearch 17
5.11 Downloads 17
5.12File Manager 17
5.13 FM Radio 17
5.14Google+ 18
5.15Connecting your phone to a computer 18
5.16Screenshots 18
Chapter 6 Managing Your Phone 20
6.1Managing Basic Settings 20
6.2 ManagingYour SIM Cards 20
6.3 ManagingYour Accounts 20
6.4 Protecting Your Phone 21
6.5 Resetting Your Phone 22
Android 4.4 | 1
Page 25
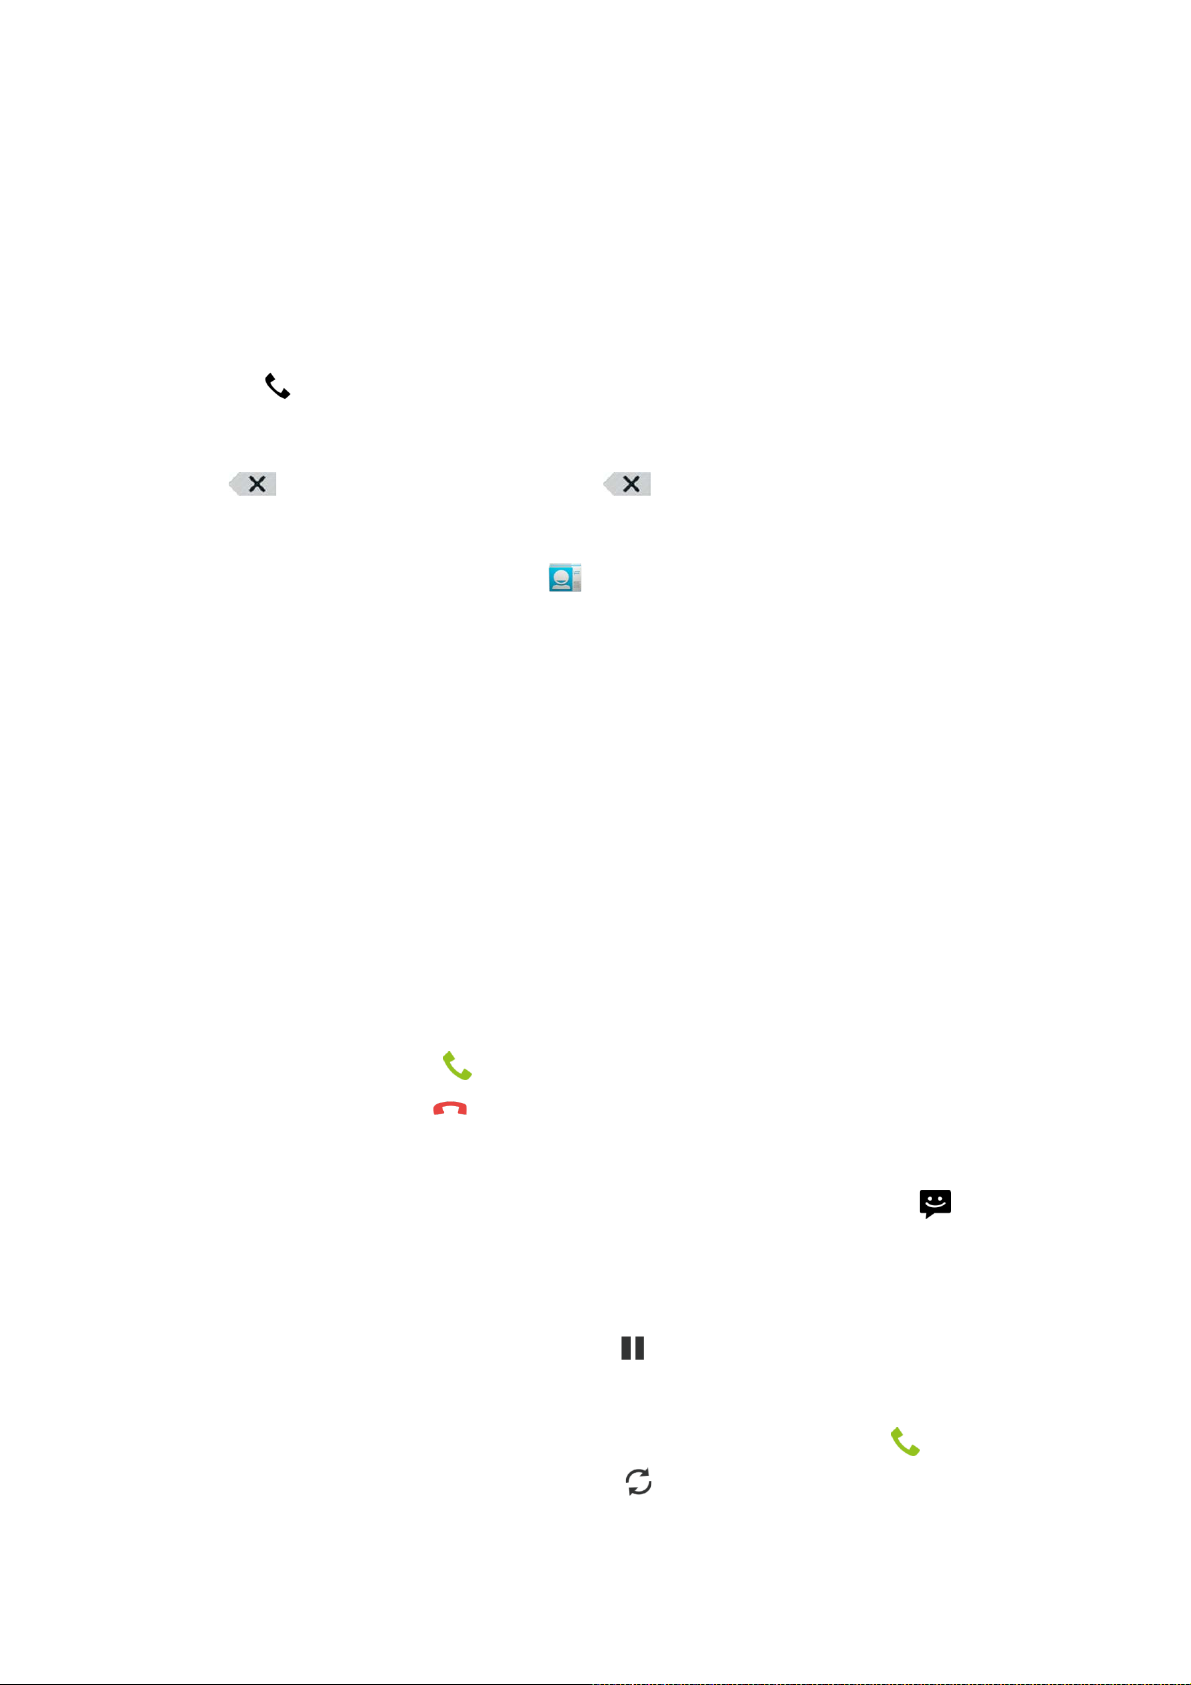
1. Phone Functions & Input
Phone Fu nc tions
Tap Application Drawer > APPS tab > Phone.
1.1 Voice Calls
To make a call from the Phone screen
1. Go to the Phone screen.
2. Use the keypad to input phone number.
3. Tap
NOTE:
Tap to delete a number. Ta p an d ho ld to erase entire numbers.
To make a call from People
1. Tap Application Drawer > APPS tab> .
2. Tap a contact into the information screen.
3. Tap a phone number you want to call.
4. If SIM2 inserted, ther e is a menu will pop up. You mayselect “SIM1” or “SIM2” to make a
phone call.
To make emergency call s
You have to unlock your device before making an em ergency c all. On the Phone screen, input
the international emergency number 112, and tap SIM1 or SIM2to make the emergency call.
To make international call s
1. Go to the Phone screen.
2. Tap and hold 0 until the “+” is displayed which is international prefixcode.
3. Ent er the country code, area code, and phone number.
4. Then tap SIM1 or SIM2 to make the international c all.
To accept or reject an incoming c a ll
To accept a call, slide t o on the screen.
To reject a call, slide t o on the screen.
Quick response an incoming call
When there is an incoming call, you can quick response with message by sliding to onthe
screen.
To put a call on hold
If you are having a call conversation, you cantap to put the call on hold.
To switch between calls
If you are having a call conversation, and there isanother incoming call, slide to to put the
first call on hold and answer t he second call. Tap to switch between calls.
Android 4.4 | 2
Page 26
To set up conference calls
1. When you are already having a call conversation, tap t o enter another phone number.
2. When someone answer your phone call, tap . Merge callsto set up the conferenc e call .
3. If you are having a call conversation, and there isanother incoming call, you can t ap to
set up the conference calls also.
NOTE:
Conference call is a network service. Pleasecheck with your network carrier forthis
function.
To manage other voice call features
When you are havi ng a call conv er sation
Tap to activate speakerphone, or tap again to cancelit.
Tap to mute microphone, or tap again to un-mute it.
Ending a call
Tap End icon to end a call.
1.2 Video Calls
To make a video call from Phone screen
1. Go to the Phone screen.
2. Use the keypad to input phone number.
3. Then tap > Video Call to make the video call.
To make a video call from People
1. Tap Application Drawer > APPS tab> .
2. On tab, tap a c ontact into information screen.
3. Tap to make the video call.
Ending a video call
Tap End icon to end a video call.
To manage other video call features
When you are havi ng a video call c onv er sation
Tap to activate speakerphone, or tap again to cancelit.
Tap to mute microphone, or tap again to un-mute it.
Tap to switch the video windows.
1.3 Using On-Screen Keyboard
On-screen keyboard appears in port r ait mode when an application requires text input, such as
messagingand writ ing e-mails. The keyboard input method i s act ivated by the default settings.
Using on-screen keyboard
Use the keys on the on-screen keyboard.
Android 4.4 | 3
Page 27

Tap the keys to enter the characters.
Setting the Input Method from Settings Screen
1. Tap Application Drawer > APPS tab> > Language & i nput.
2. Tap ”Default” .There is a pop-up window will show.
3. Select an input method you want to use.
Personal Dictionary
1. Tap Application Drawer > APPS tab> > Language & i nput > Per sonal dic tionary.
2. Tap to add the self -defined words in the personal dictionary for English or all
languages. When y ou compose, you c an use them . Tap the self-defined word in the
personal dictionar y to edit it or tap t o delete it.
Using Google Keyboard
To toggle betweenupper and lower c ase l etterdisplay, tap .
To display the numeric al and symbols keyboard, tap .
GoogleKeyboard Settings
1. Tap Application Drawer > APPS tab> > Language & i nput
2. On K ey boar d & Input Methods Screen, Tap to do the preference settings。
Android 4.4 | 4
Page 28
2. Email & Messages
2.1 Creating and sending a message
Create and send messages
1. Tex t messages could be included text and em otional icons.
2. Multimedia messages/ MMS contain letters, an image, an audio, or a video file.
3. Support to send voice messages and attach files with ringtone and audio.
NOTE:
1. If you insert both of SIM1 and SIM2, the messages service will be set as default.
2. Tap Application Drawer > APPS tab > > SIM management > M essagi ng to change
the default setting.
From Message screen
1. Tap A pplication Drawer > APPS tab > .
2. Tap to creat e anew message.
3. Type the recipient’s phone number or tap to add from your contact s.
4. Type your message and t ap to send your message.
NOTE:
If you exit Messaging befo re send ing, unsent message will be saved as a
draftautomatically.
From People screen
1. Tap Application Drawer> APPS tab > .
2. Tap a contact to display the contact inform ation.
3. Tap to send the message.
4. Compose your message and t ap to send your message.
From Phone screen
1. Tap A pplication Drawer > APPS tab> .
2. Tap tab to view all call history.
3. Tap a c all contact from the call log.
4. Tapicon to send the message.
5. Compose your message and t ap to send your message.
Receive and Manage messages
When you send and receive messages from acontact, these messages are grouped as a
message thread. A message thread looks like an exchanged conversation.
To reply to a text message
1. Tap Application Drawer > APPS tab> .
2. Tap a message you want to reply.
Android 4.4 | 5
Page 29
3. Ty pe y our m essage and tap to send your message.
To forward a text message
1. Tap Application Drawer > APPS tab> .
2. Tap a message to view the whole thread.
3. Tap and hold a message to showMessage option li st.
4. Tap “ Forward”.
5. Tap to selec t recipient.
6. Tap to send your message.
To delete all messages
1. Tap Application Drawer > APPS tab> .
2. Tap M enu > Delete all threads.
3. Tap “Delete” to delete all messages in t his message bo x .
To delete a message thread
1. Tap Application Drawer > APPS tab> .
2. Long press a message thread you want to delet e.
3. Tap to delete the messagethread.
To delete a message within a thread
1. Tap Application Drawer > APPS tab> .
2. Choose a message you want to delete.
3. Tap and hold it until a Message options list shows.
4. Tap “ Delete” to delete the message.
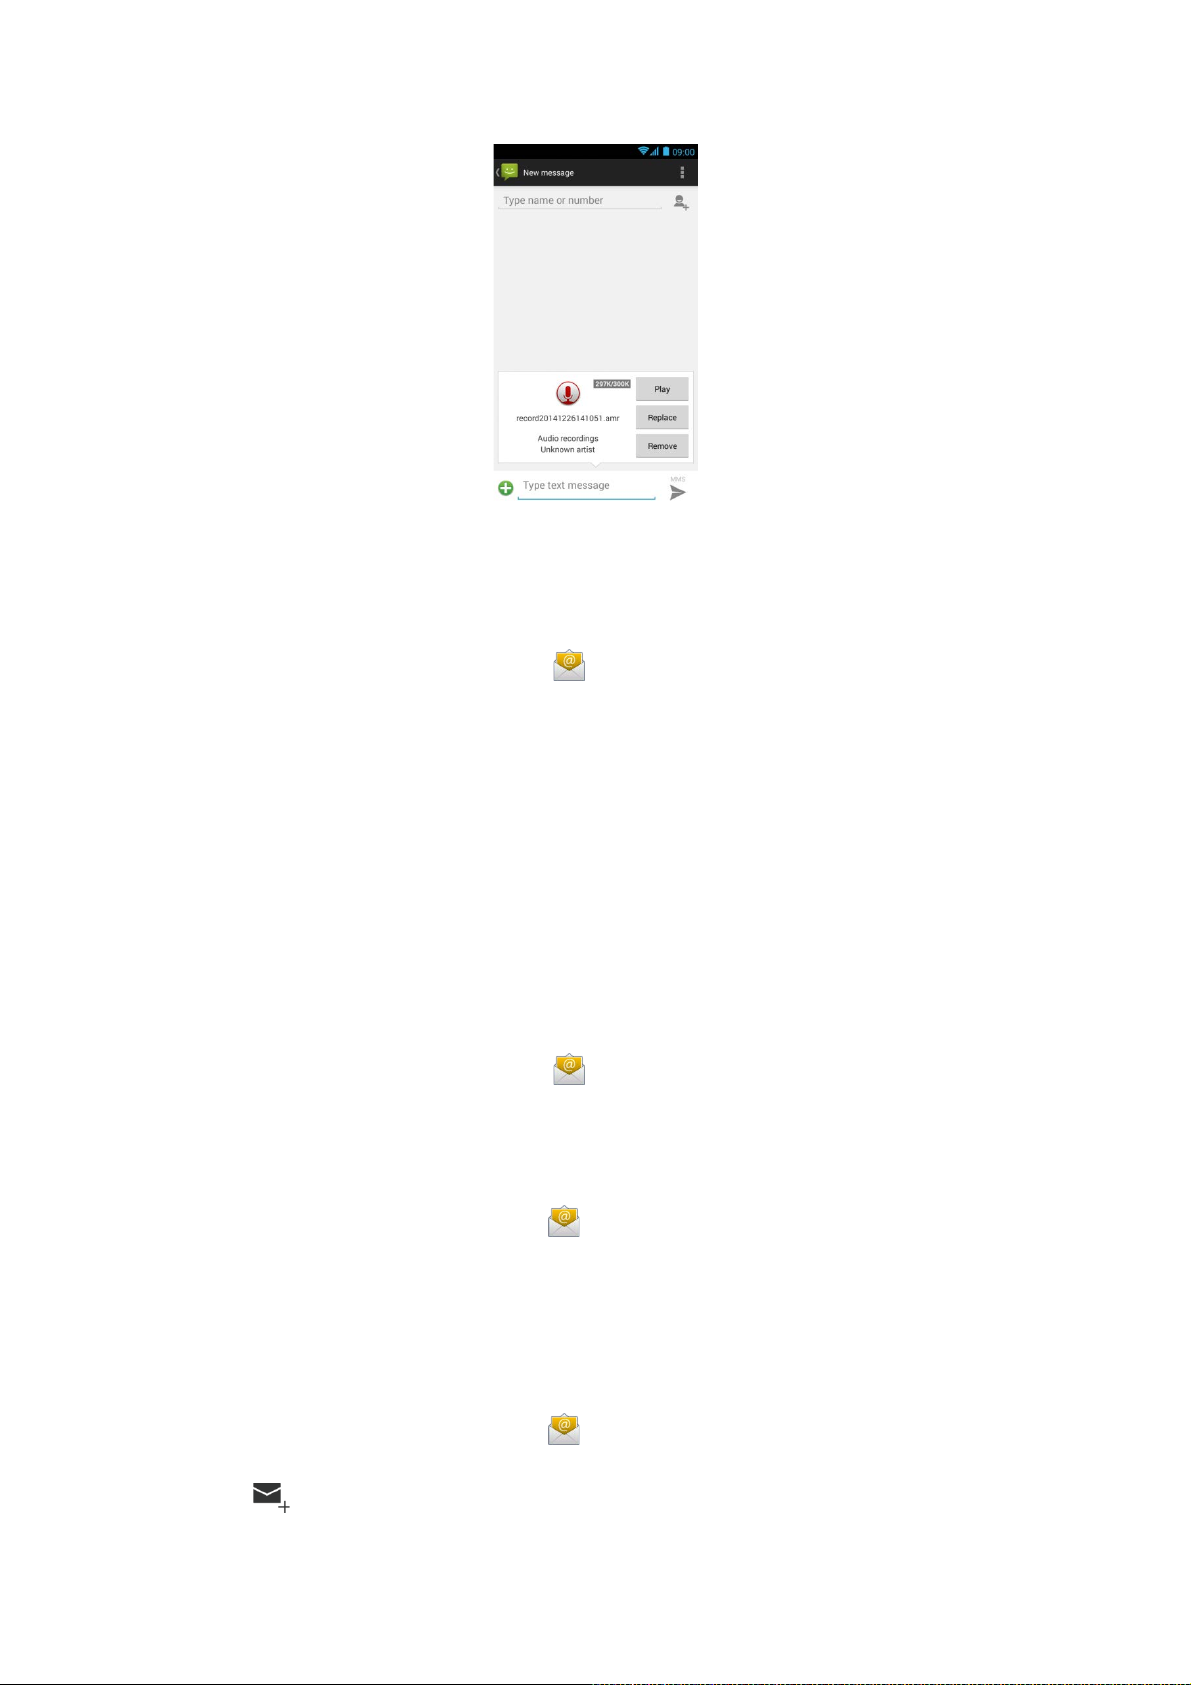
To create a voice message
1. Tap Application Drawer > APPS tab > .
2. Tap to create a new message.
3. Tap > .
4. Add “Ringtone” or “Audio” on the Message screen
5. Tap “ Play” to li sten to your r ec or ding again, Tap“Replace” to be replaced another
attachment, or tap “Rem ov e” to delete.
6. Type your message and t ap to send your message.
Android 4.4 | 6
Page 30
2.2Email Accounts
All your receiv ed em ail m essages are del ivered to your phone.
Set up an Internet Email account
1. Tap Application Drawer > APPS tab > .
2. Ent er y our e-mail addr ess and Password. Tap “Next”.
3. Sel ec t t he e-m ail ac c ount of types.
4. The phone will retrieve the e-mail sett ings automatically.
If the e-mail settings are pre-c onfigured, the e-mail setup wizard display s asuccessf ul
message.
If the e-mail settings are not found, manualsetup is in process automatically . You can
follow the instruc tions to complete thesettings.
5. Enter Account name and then, tap “Next” to finish the settings.
NOTE:
The Account name is the nameshown on the Email screen.
To add the second Email account
1. Tap Application Drawer > APPS tab > .
2. Tap Menu >Settings> ADD ACCOUNT.
3. Please follow the “Account setup” steps to fi nish the settings
To delete an Email account
1. Tap Application Drawer > APPS tab> .
2. Tap Menu >Settings.
3. Tap one of your accounts (If you have two more email accounts).
4. Tap “Remove account” which is on the bottom of the page.
5. Tap “ OK” to confi rm.
Composing and sending an Email
1. Tap A pplication Drawer > APPS tab>
2. Tap A c c ount nameto select an account.
3. Tap to com pose a new email.
Android 4.4 | 7
Page 31
4. Enter the recipient’s emailaddress.
5. Ent er the Subject and compose your email.
6. Tap t o send your em ail.
Sendi ng an E-mail from People screen
1. Tap Application Drawer > APPS tab> .
2. Tap a contact you want to email to.
3. Tap the contact’s Email address. Tap “Email”in the subm enu.
4. Ent er the Subject and compose your email.
5. Tap t o send your em ail.
Adding attachments to an Email message
Before sending your message, tap Menu >Attach file, and then, choose an attachment you
want to attach.
To reply or forward an Email
1. Open an e-mail.
2. Refer the following instructions:
Reply: Tap to reply the email.
Reply all: Tap > to reply all recipients and sender.
Forward: Tap > to forward the e-mail to other people.
3. Enter the recipient and compose your e-mail.
4. Tap t o send your em ail.
To delete an Email
1. Tap A pplication Drawer > APPS tab>
2. In y our m ail Inbox, select the email you would like to delete.
3. Tap to delete the email.
Android 4.4 | 8
Page 32

3. Using the Internet
3.1 Connecting to the Internet
Your phone connects to the Internet via:
Wi-Fi
GPRS/ EDGE/ 3G/ 3.5G/ HSPA+
NOTE:
If you connect to the Internet, you may be charg ed. If you want to stop the connection,
you need to tap Application Drawer > APPS tab> > SIM management > Data
connectionto unmark data enabled.
Wi-Fi
1. Tap A pplication Drawer > APPS tab > > Wi-Fi.
2. Switchto turn “Wi -Fi” on or off.
To connect to a Wi-F i ne t w or k
1. Tap “Wi-Fi”, check Wi-Fi function and turn it on. B egin to search the available Wi-Fi
networks.
2. Detec ted networks are displayed below. T ap one network then tap “Connect”.
3. If you select an open network, the connection is establishedautomatically.
4. To c onnec t a secured connection, you will be prom pted for the password. Enter the
password and then tap “Connect ” .
5. When Wi-Fi is connected, the c onnec tion icon will be displayed on the status bar.
To add Wi-Fi network
1. Tap A pplication Drawer > APPS tab> > Wi-Fi.
2. On Wi-Fi screen, tap . And an on-screen window will pop-up.
3. Follow the on-screen instructions and enter the necessary information, thentap “Save” to
finish the settings.
To configure Wi-Fi settings
1. Tap A pplication Drawer >APPS tab > >Wi-Fi.
2. Tap M enu > Adv anc ed to check the Wi-Fi settings.
Tetheri ng & portab le hotspot
1. Share y our phone’s mobile data connecti on v ia USB, Bluetooth, or as a portable Wi-Fi
hotspot.
2. Tap A pplication Drawer > APPS tab > > More >Tethering & port able hotspot.
3. You can turn on/off USB tethering, Por table Wi-Fi hotspot, Bluetooth tetheri ng and
configure the Wi-Fi hotspot settings.
VPN settings
1. Tap A pplication Drawer >APPS tab> > More >VPN.
2. You must set lock screen pattern, PIN or password before usi ng c r edential storage.
Please tap “OK” go to Unlock selection, then choose whi c h way you want to lock the
screen.
3. Af ter you set it up. It will go back to VPN screen.
Android 4.4 | 9
Page 33

4. Tap ”Add VPN network” to edit VPN network.
5. Af ter filling in all necessary information, tap “Save” to finish the settings.
To start a data connection
If you set up multiple data connections, select the connection you want to use.
1. Tap A pplication Drawer >APPS tab> >SIM management>Data connection.
2. Choose a SIM card you want to enable data access over Mobile network.
Enabling data roaming
Please set up your data connection first, and then foll ow the steps as belo w:
1. Tap A pplication Drawer >APPS tab> >SIM management> Roaming>Data roaming.
2. Check the SIM card you want to connect to data when roami ng.
3.2 Bluetooth modes
Bluetooth on your phone operates in three different m odes:
On: Bluetooth is turned on. Your phone detects other Bluetooth devices, but your phone is
not visible to others.
Discoverable: Bluetooth is turned on,but your phone is not visible to other Bluetooth
devices.
Off: Bluetooth is turned off.
To turn on/off Bluetooth
1. Tap A pplication Drawer >APPS tab> > Bluetooth.
2. Swit c h or tap t oturniton.
3. Tap “Bluetooth” to view the menu options.
4. Tapthe device’s name to make yourdevice visible to others.
Connecting to Bluetooth Devices
A connection to a Bluetoot h dev ic e is called a partnership. You need to pair and c r eate a
partnership with a Bluetooth device to exchange information.
1. Tap Application Drawer >APPS tab> > Bluetoot h.
2. Tap “S EARCHFORDEVICES” to search for a new device.
3. Detec ted Bluetooth devices are di spl ay ed on the screen.Tap one device to connect.
4. Start to pair, enter t he password, and t hentap “OK” to finish pairing.
NOTE:
1. The password enter on your phone must be the same one be entered on the device
which you want to pa ir with. The password is required at the first time, once a
partnership has b een created, the password will no longer require again .
2. If you wan t to view the recei ved files, you can tap Menu > Show received files.
Android 4.4 | 10
Page 34

4. Multimedia Applications
4.1 Viewing Photos and Videos
To view photos in the album
1. Tap A pplication Drawer > APPS tab > .
2. Tap one of picture folders to vi ew the images i n thumbnails.
3. Tap an im age to view.
4. Sli de the screen from left side to right side or from ri ght side to left side to view all the
photos in this album.
To play slideshow
1. While viewing an image, tap Menu >Slideshow.
2. Tap screen to stop the slide show.
To set the image as Wallpaper
1. While viewing the image, tap Menu > Set picture as > Wallpaper.
2. Drag your finger to select the crop area.
3. Tap “CROP” to set the image as the wallpaper.
To savean image as Contact photo
1. While viewing the image, tap Menu > Set picture as > Contact photo.
2. Choose a contact to add image.
3. Drag your finger to select the crop area.
4. Tap “CROP” to save the image as the contact photo.
To edit an image
While viewing the image, to edit an image:
To crop, tap Menu > Crop.Drag your finger to select the area you want to keep. Tap
“CROP” to save the image.
To add effects, tap Menu >E dit. Usi ng effects on the bottom to apply to the image.
Tap“Save” to save the image.
To view file properties
1. While viewing the image, tap Menu > Details.
2. The file information is displayed. Tap “Close” to ret ur n to the image.
Play video from the video file
1. Tap A pplication Drawer > APPS tab >Gallery> > select a video file you want.
2. Tap to play it.
4.2Music
To play music
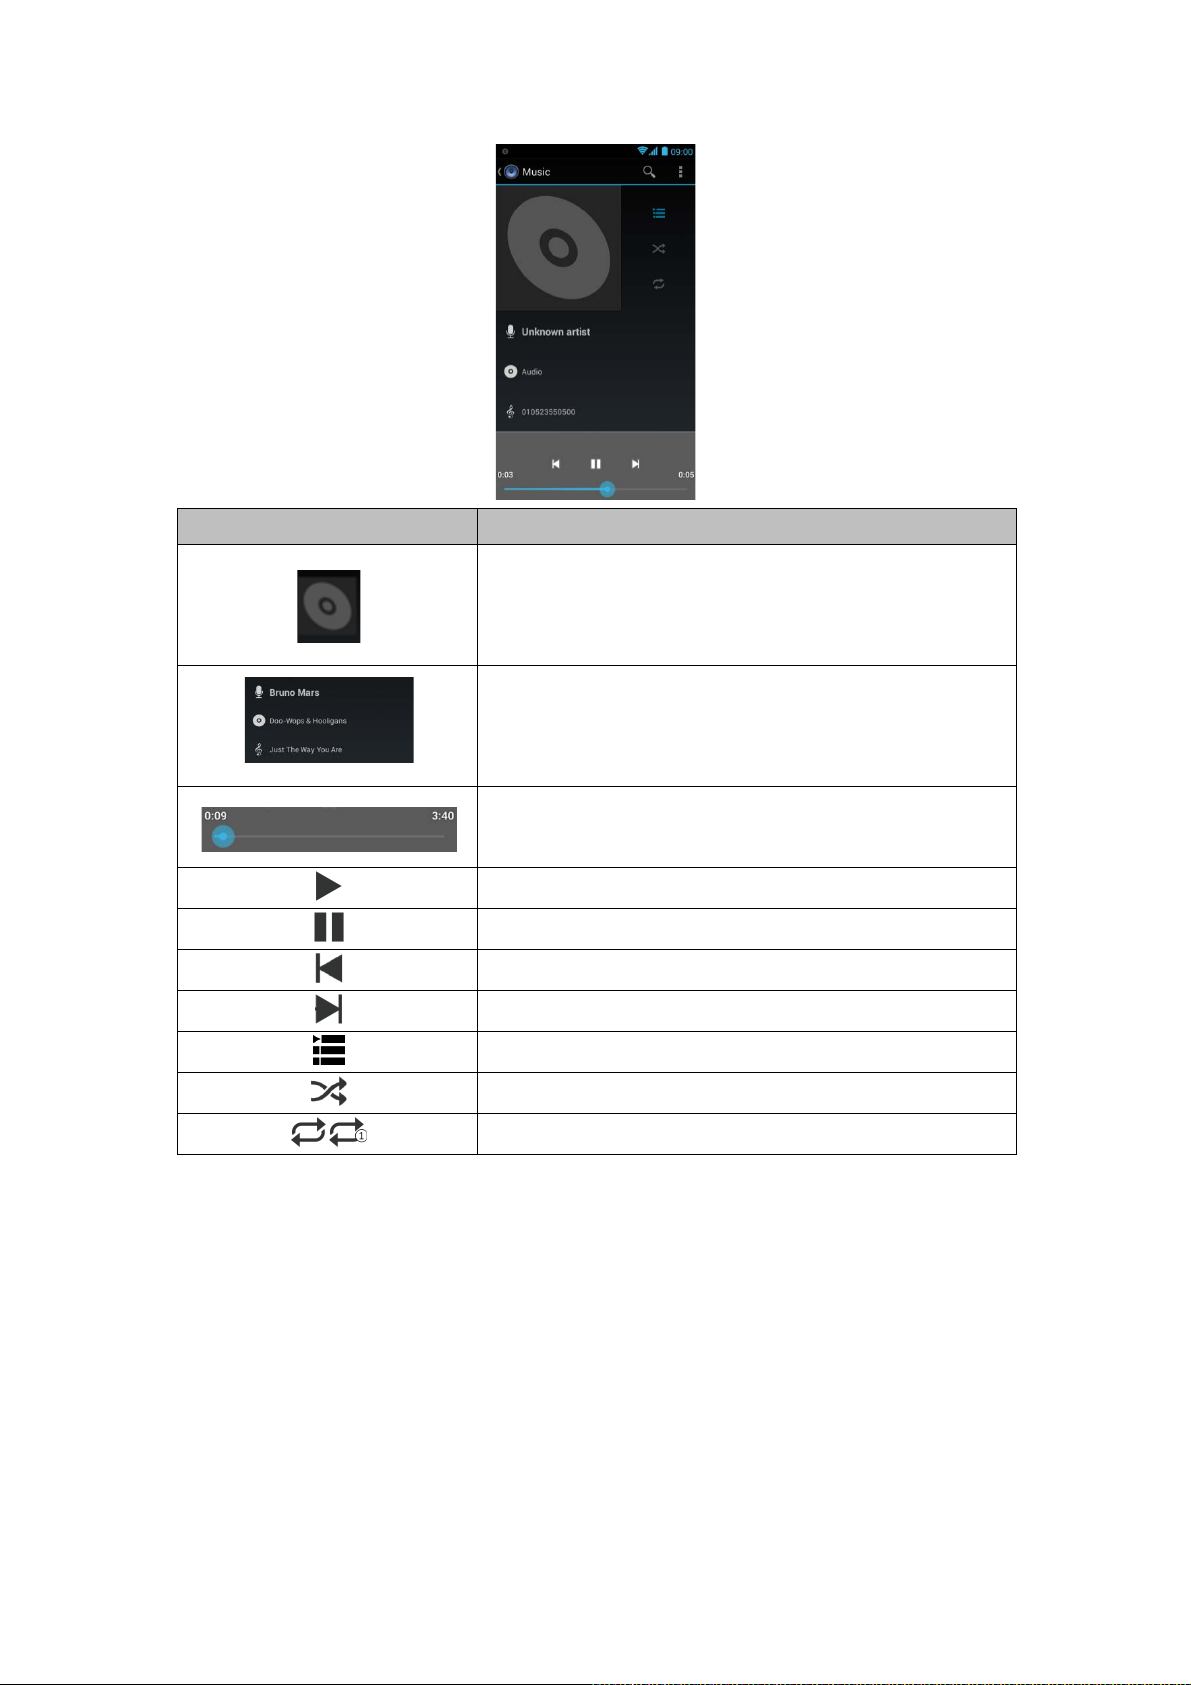
1. Tap A pplication Drawer > APPS tab > .
2. Tap Songs, and all songs on the phone will be displayed.
3. Tap to select a song, and then it will play autom atically.
Android 4.4 | 11
Page 35
Icon Function
Album art pictur e or animation
The area of audio information
Slide to go forward or backward
Changin g P la y ba c k options
While playing music, tap Menu but ton on the bottom of screen.
Tap “Party shuffle” to play all songs in shuffle order.
Tap “Add to playlist” to add the song.
Tap “Use asringtone”to set up y our per sonal r ingtone.
Tap “Delete” to delete the song which is playing.
Tap“Library” to see all playlists.
To edit music
You could set up effect s, tap Menu > Sound effects.
1. Drag or tap Equalizer to turn it on.
2. Tap ar r ow to show different effect list
To play the song
To pause the song
Previous song
Next song
Tap to go to playlists
To start or close shuffle function
To repeat the current song/ all songs
Android 4.4 | 12
Page 36

3. Tap to select an effect you want.Item s will be adjusted automatically.
4. Tap ar r ow to show different preset rever b list.
5. Tap to select an effect you want.
Creating a new playlis t
Add songs to a specific playlist or create a playlist.
1. Tap A pplication Drawer > APPS tab > .
2. In S ongs tab, long pressa song you want to add, then tap “Add to playlist” in the pop-up
submenu.
3. Tap “New” to c r eate a new playlist. The song will be added to the new playlist
automatically.
4. You may c hec k this new playlist in Playlists tab.
To remove a music file from the playlist
1. Tap A pplication Drawer > APPS tab > .
2. In S ongs tab, tap and hold the song you want to delete. Then, tap “Delete” in the pop-up
submenu.
3. Tap“OK”, and then, the song will be deleted from the list.
Android 4.4 | 13
Page 37

5. Programs
5.1 Browser
Open the Browser to view web pages.
1. Tap A pplication Drawer > APPS tab> .
2. An address bar appears at the upper side of screen, and you can type the URL there.
3. You can open several web pages at the same time.
Tap to view all of web pages that are opening.
Tap to open a new web page.
Tap to cl ose a web page.
Tap to view BOOKMARKS.
To set the Home page
1. While viewing a web page, tap Menu >Setting>General >Set homepage.
2. Tap ”Other” to enter the URL of the page that you want to set as your home page.
3. Tap “OK” to save your settings.
To add the Bookmarks
1. While viewing a web page, tap Menu > Save to bookmarks.
2. Edit the bookmark label and other informati on if needed.
3. Tap “Add to” to save the bookmark to Home screen, Bookmarks, or Other Folder.
4. Tap “OK” to save y our settings.
Managing Bookmarks
On a web page, tap Menu > Bookmarks/History. You can view BOOKMARKS, HISTORY and
SAVED PAGES.
5.2 Calculator
With Calculator, you can perform basic arithmeti c functions on your phone.
1. Tap A pplication Drawer > APPS tab> .
2. In Calculator screen, tap “Menu” to select the adv anc ed panel.
5.3Calendar
1. Calendar helps you schedule and sound alarms for appointments, meetings, and event s.
2. Tap A pplication Drawer > APPS tab > .
3. If you do not log in your Google Account, tap Menu > Settings > ADD ACCOUNT to create
an account, or tap “Existing” to sign in the Google account. Please follow the on-screen
instruction to log in.
4. Tap Calendar arrow > Day, Week, Month, or Agenda to change the displays of your
events.
5. Tap to go back to today.
6. Tap Menu > Settings to see more settings.
Android 4.4 | 14
Page 38

To view an event
1. Tap A pplication Drawer > APPS tab> .
2. Tap Calendar arrow> Agenda to display the events.
To add a nd schedule an event
1. Tap A pplication Drawer> APPS tab> .
2. Tap Menu > New event.
3. Enter the details of th e event.
4. Select the dates in the fields of “From” and “To”. For an all-day event, c hec k “ALL DAY”.
5. To set up the “REPETITION”, select one of the options from the list.
6. To set up a reminder, select the time from the list.
7. When finished, tap “DONE” to return to thecalendar.
NOTE:
The added and scheduled events will be showed in the status bar.
5.4Sound Recorder
1. Tap A pplication Drawer > APPS tab>
2. On the recorder screen, tap to record. Tap to end recording. Then Tap to
play.
3. Tap “Discard” to delete an audio file. Tap “Save” to stor e an audio file.
To play an audio file
1. Tap A pplication Drawer > APPS tab> > Playlists >My recordings.
2. Tap an audio file to play .
5.5 Gmail
Gmail is Google's web-based email service. Gmailcan be configured when you set up your
phone for the first time. Depending on your settings of the synchronization, Gmail on y our
phone may be synchronized with your Gmail account on the web automatically .
1. Tap A pplication Drawer > APPS tab > .
2. If you do not log in your Google Account,tap “NEW” to create an account, or ta p “Existing”
to sign in the Google account. Please follow the on-screen instruction to log in.
3. Once logged in, you can begin reading and sending emails from your Gmail account.
To remove Gmail account
1. Tap A pplication Drawer > APPS tab > > ACCOUNT S> the preferredGmail account >
Sync.
2. Tap Menu> Remove account.
5.6 Maps
Mapping service help you search for the places you want.
To open Maps
Android 4.4 | 15
Page 39
1. Tap A pplication Drawer > APPS tab> .
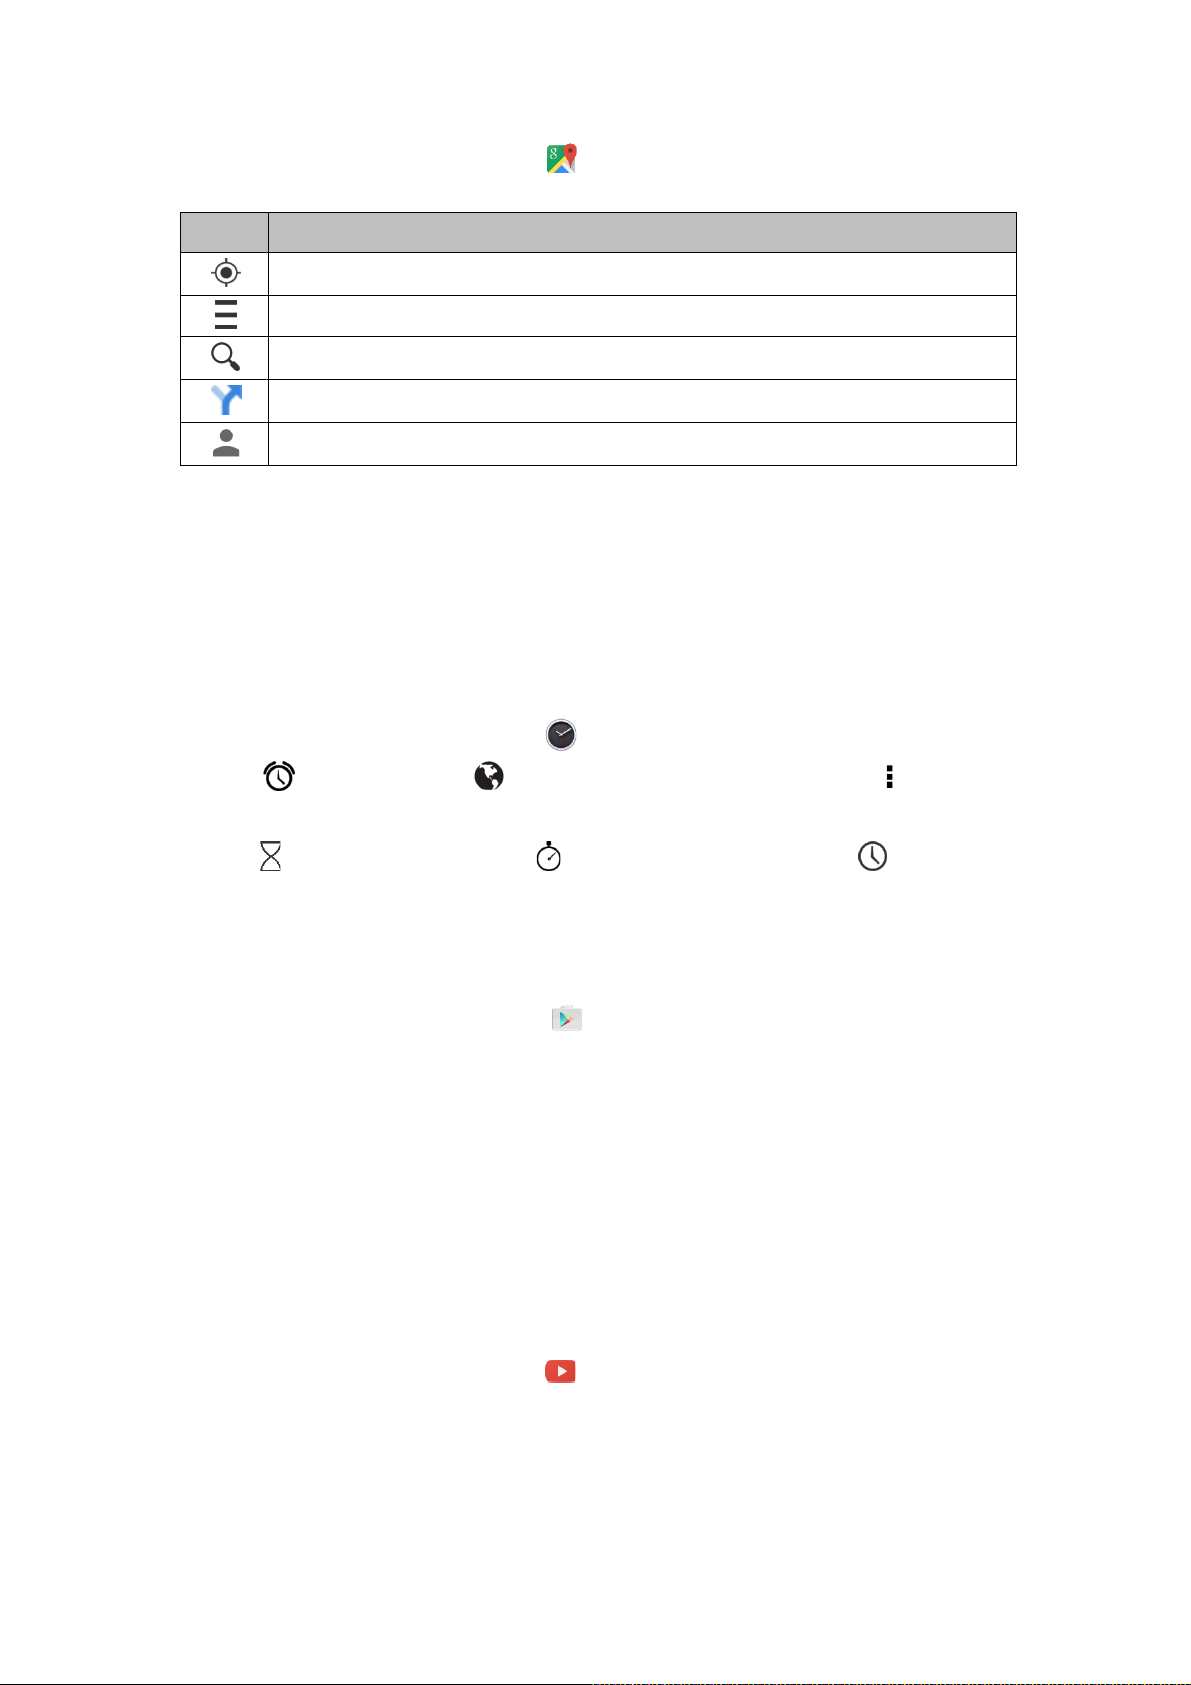
Icons Function
Display your cur r ent location
Select differ ent layers, such as Traffic, Satelli te, Transit Lines, etc.
Type in a keyword and search for a place you want
Input the start point and end point to get the direction
Find places, such as restaurants, cafes, bars, attr ac tions, etc.
2. Tap Menuto set more options as below:
To view about, terms, and privacy: Tap Menu >Settings>About, terms& privacy.
To show extra functions on map: Tap Menu > Settings.
NOTE:
If you connect to the Internet and turn on the GPS, you may be charged.
5.7 Clock
1. Tap A pplication Drawer > APPS tab> 。
2. Tao to set alarms. T ap to select the time in different cities. Tap > Settings >
adjust CLOCK/A LA RMS setti ngs.
3. Tap to use Timer function. Tap to use Stopwatch function. Tap to back to
Clock function.
5.8Play store
Google Play store allows you to find and download applications and fun games to your phone.
1. Tap A pplication Drawer > APPS tab > .
2. If you do not log in your Google Account, tap “ NEW” to create an account, or tap “Existing”
to sign in the Google account. Please follow the on-screen instruction to log in.
3. Once logged in, you can search and download programs from the market. Slide the screen
to switch the pages of Google Play store.
4. You can also tap Menu >My apps to view the programs you hav e downloaded.
5.9YouTube
YouTube is an online v ideo str eam ing service that allows you to view, search, and upload
videos.
To PlayYouTube
1. Tap Application Drawer > APPS tab> .
2. Videos are grouped into categories. Tap a categor y to watch the available videos.
3. Tap a video to play.
To upload your video
Android 4.4 | 16
Page 40
1. Tap A pplication Drawer >APPS tab > .
2. Tap Menu > Sing in. Then select one of your account s to sign in.
3. Tap the YouTube icon on the top left of the screen.
4. Tap your account name into account informati on screen.
5. Tap then Tap a video to upload.
5.10Search
Search for the information in the Inter net and on t he phone. Tap A pplic ation Drawer > APPS
tab > . Y ou can al so see the Google search bar on the Home screen.
5.11 Downloads
Files and other items you downloaded i n Email or Browser are stored.You canvi ew,reopen or
delete what you've downloaded.
1. Tap A pplication Drawer > APPS tab > .
2. Choose “Sort by size” or “Sort by date”.
5.12 File Manager
File manager helps you manage t he files in your phone and in your SD card.
1. Tap A pplication Drawer > APPS tab > .
2. Tap the folder you want to browse it.
5.13 FM Radio
Tap Applicati on Dr awer > APPS tab> .
Please plug i n your earphone before listening.
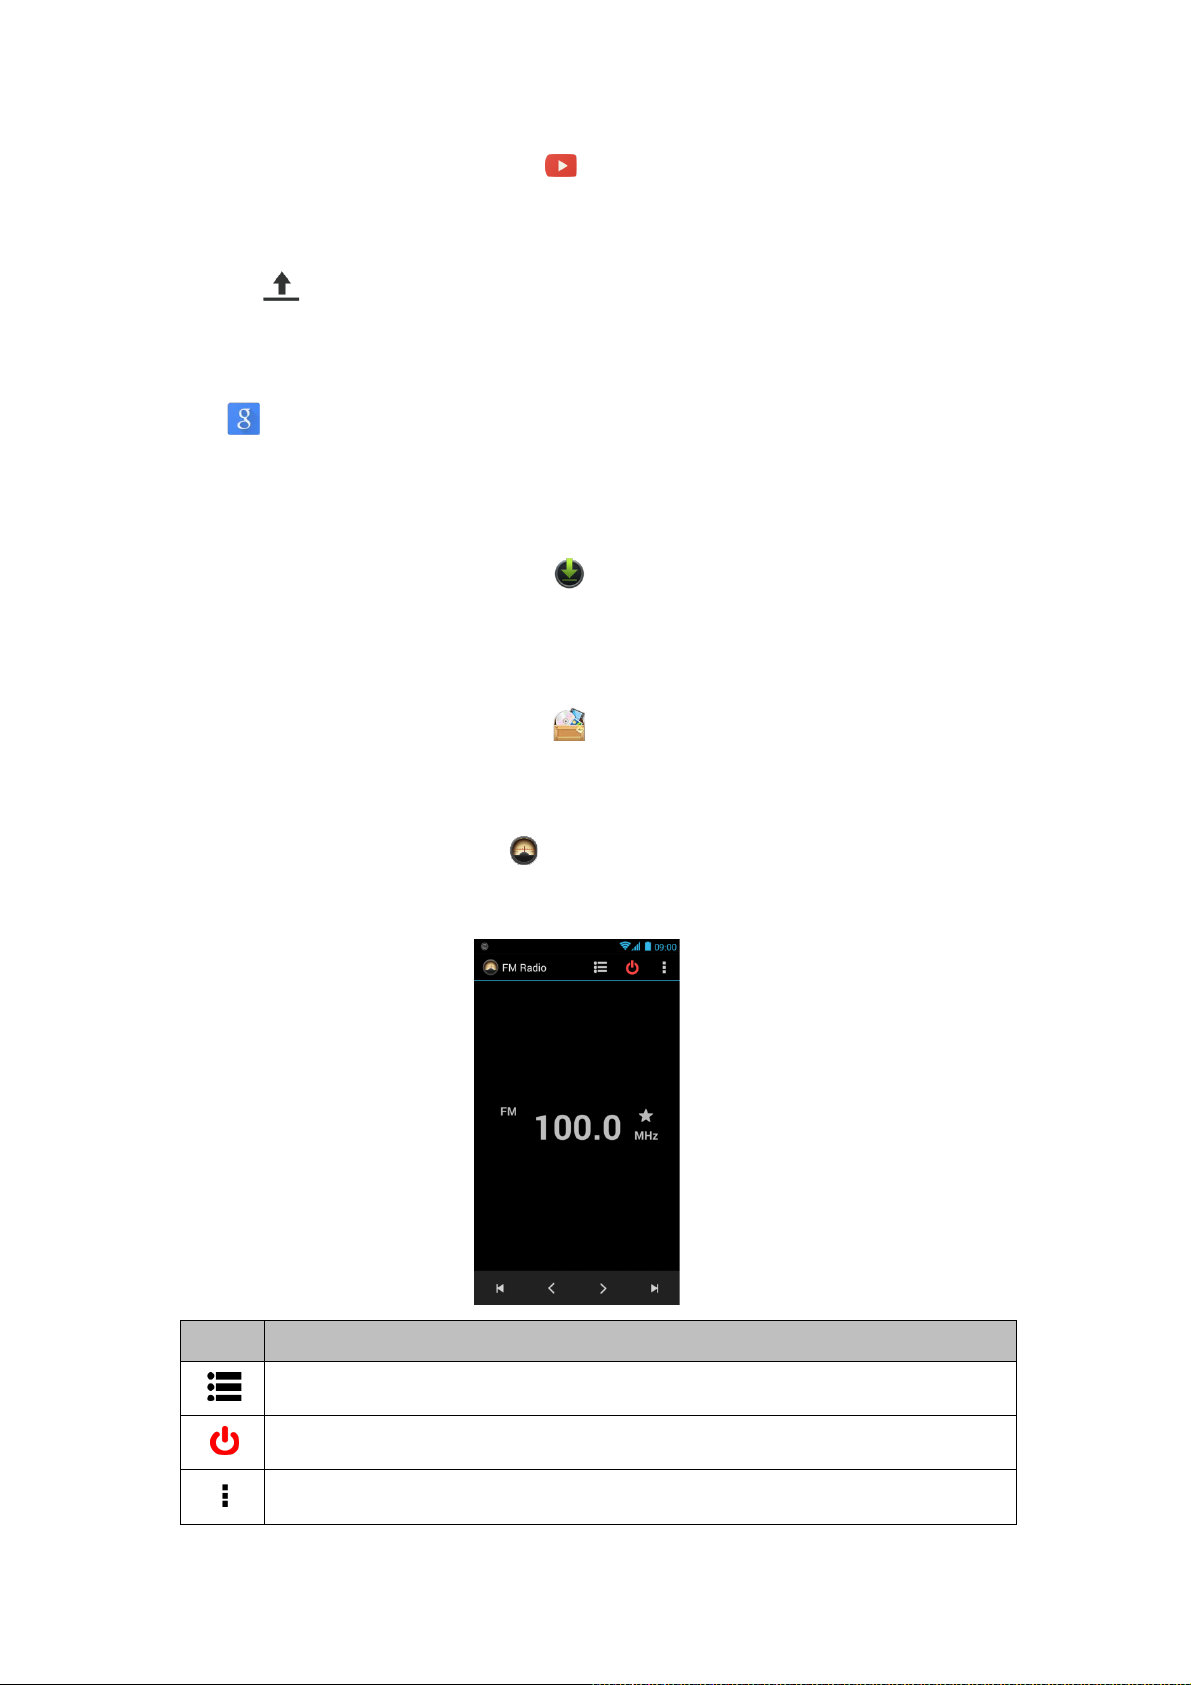
Icons Function
Open the channel list
Close FM Radio
More functions
Android 4.4 | 17
Page 41
Add to favorites
Previous radio frequency/ Next radio frequency
Previous channel/ Next channel
5.14Google+
You can check your friends’ updates, post updates of your own and chat with your f ri ends i n
Google+.
1. Tap A pplication Drawer > APPS tab >.
2. If you do not log in your Google Account, tap “ NEW” to create an account, or tap “Existing”
to sign in the Google account. Please follow the on-screen instruction to log in.
5.15Connecting your phone to a computer
Tap and drag down Status Bar and tap “Connected as USB Storage” on your device.Please
choose one of modes to connect with your computer.
5.16Screenshots
Please press the and hol d “Volume DownKey”and“Power Key” at the same time to capture
any screen from the devic e.Tap > view screenshots. Please refer the screenshots
link :/Pictures/Screenshots
Android 4.4 | 18
Page 42

6. Managing Your Phone
6.1 Managing Basic Settings
Date and Time
You can set up the date and the time on your phone.
To set up the date and time
1. Tap A pplication Drawer > APPStab > > Date & time.
2. If you turn on “Automatic data & time”, the system will get the information of the current
date and time automatically from network or GPS. You can set up the date and the time
manually also.
3. If you check “Automatic time zone”, the system will get the informati on of time zone
automatic ally . You c an tap “S elec t time zone” to select a time zone from the list also.
4. Tap “ S et dat e” . Please adjust the month, the day, and the year. Tap “Set” to save the
settings.
5. Tap “Set Time”. Please adjust thehour and the minute. You can switch AM/PM. Tap “Set”
to save the settings.
6. Check “Use 24-hour format” if you want.
7. Tap “Select date format” to selec t t he date format you want.
Setting Alarms
You can set up many alarms on your phone.
To set the alarm
1. Tap A pplication Drawer > APPS tab > .
2. Tap to set up a new alarm.
3. Tap to adjust thehour and the minute. You can switch AM/PM. Tap “OK” to save the
settings.
4. Tap “ Repeat” to select a day to sound the alarm.
5. Tap “ CESIUM”to set up the preferred ringtone asthe alarm sounds. Tap “OK” to save the
settings.
6. Check “Vibrate” to enable/ disabl e the vibration as the alarm sounds.
7. Tap “ Label” to enter the description for the alarm.
8. Tap “ OK” to save the settings of the alarm.
To turn off the backlight when the phone is idle
1. Tap A pplication Drawer > APPS tab > >Display>Sleep.
2. Select from the list of screen timeout. Your setting is saved automatically.
To adjust the brightness
1. Tap A pplication Drawer >APPS tab > >Display>Brightness.
2. Dragthe sl ider of brightnessto adjust the brightness.
3. Or select “Automatic brightness” to l et device adjust brightness by itself.
Android 4.4 | 19
Page 43

To change the screen ori entation
1. Tap A pplication Drawer >APPS tab > >Display.
2. Check “Auto-rotate screen” to adjust the screen autom atically.
To display the screen n ever sleep while charging
1. Tap A pplication Drawer >APPStab > >About phone.
2. Tap five times on “Build number”.
3. “Develop options” will be show up.
4. Select “Stay awake” to display the screen never sleep while charging.
To create a new ringtone mode
You can create sever al audio pr ofiles to use.In the meanwhile, you m ay al so set up the voice
call ringtone, v ideo c all ri ngtone, volumes, and ringtone of ev ents together.
1. Tap A pplication Drawer > APPS tab > >Audio profil es.
2. Tap to add a new audio pr ofile.
3. Input the new profile name.
4. Tap the new audio profile on the settings screen.
6.2 Managing your SIM cards
Setting SIM card’ background color
You can change the SIM1 and SIM2 background colors.It helps you identify S IM1 and SIM 2
quickly.
1. Tap Application Drawer > APPS tab > > SIM management.
2. Tap a SIM card from “SIM INFORMATION” list.
3. Tap “Set background color” to select one of colors.
Setting the default SIM for Voice cal l/ M essagi ng
If you insert SIM1 and SIM2 at t he same time,please follow the step as below:
1. Tap Application Drawer > APPS tab > > SIM management.
2. Tap “Voice call”/ “Messaging”to showoption list.
3. Select one of SIM cards, or “Alwa ys ask”.
6.3 Managing your accounts
Adding one or more Google Accounts
1. Tap A pplication Drawer >APPS tab > >ACCOUNTS.
2. Tap “ADD ACCOUNT”.
3. Tap “Google”.
4. Tap “NEW” to create an account, or tap “Existing” t o si gn in the Googleaccount. Please
follow the on-screen instruction to sign in.
Syncing all your accounts automatically
1. Tap A pplication Drawer >APPS tab > >ACCOUNTS.
2. Tap the account you want to sync.
3. Tap M enu > Sy nc now.
Android 4.4 | 20
Page 44

Removing your account
1. Tap A pplication Drawer >APPS tab > >ACCOUNTS.
2. Tap the account you want to remove.
3. Tap Menu > Remove account.
NOTE:
1. Let Google apps access your location, please tap Application Drawer >APPS tab >
>Google ACCOUNTS > Location setting s > ON.
2. To allow location access by non-Google apps, please go to Application Drawer
>APPS tab > > Location access.
6.4 Protecting Your Phone
You can protect your phone f r om unauthor ized users by requiring the PIN or entering a
password.
Enable the PINof the SIM card
When the PIN is enabled, y ou ar e requi r ed to enter the PIN before making a call.
1. Tap A pplication Drawer > APPS tab > >Security> Set up SIM card lock.
2. Tap “SIM1” or “SIM2”. (If SIM2 inserted).
3. Select “Lock SIM card”. Input the PIN, and then, tap “OK”.
Changethe PINof the SIM card
1. Tap A pplication Drawer > APPS tab > > Security > Set up SIM card lock.
2. Tap “SIM1” or “SIM2”. (If SIM2 inserted).
3. Tap “ Change S IM PIN”. Type the old PIN. Then tap “OK”.
4. Type the new PIN. Then tap “OK”.
5. Re-ty pe the new PIN. Then tap “OK” to change the PIN.
Set up Password Protection
1. Tap A pplication Drawer >APPS tab > > Security > Screen lock > Password.
2. Ent er y our password, and t hen, tap “Continue”. Confirm your password, t hen, tap “OK”.
3. If you want to disable screen lock security, please tap Application Drawer > > APPS tab
> Security> Screen loc k . Confi rm your password, and then tap “Continue”. Tap “None” to
disable it.
Set up unlock pattern
You can further secure your dat a by loc ki ng the screen and requiring a screen unloc k pattern
every time after your phone is turned on or it wakes up from the sleep mode every time (screen
is off ).
1. Tap A pplication Drawer > APPS tab > >Security >Screen lock > Pattern.
2. Draw the unl oc k pattern by connecting at least f our dots. Then t ap “Continue”.
3. Draw the unloc k pattern again, and then, tap “Confirm”.
4. If you want to disable the function, please tap A pplication Drawer > APPS tab >
Android 4.4 | 21
Page 45

>Security > Scr een loc k . Confi rm the saved pattern, and then, tap “None” to disable it.
6.5 Resetting Your Phone
With Clean Boot, you can reset your phone to its factory default s. When you reset your phone,
the data stored in your phone may be er ased.
1. Tap Application Drawer > APPS tab > >Backup & reset.
2. Tap F actor y data reset>Reset phone > Erase everything to r eset the phone.
NOTE:
Before reset your devi ce, please remember to back up all your data and information.
Check IMEI on the phone
You may check IMEI on the phone, please choose t he below instructions:
Input *#06#,IMEI will aut om atically appear on the screen.
Or tap Applicati on Dr awer > APP S tab > >About phone > Status > IMEI information.
Functions and appli c ations may vary by model.
Please visit
www.gigabytecm.com and download the latest ver si on if any.
Android 4.4 | 22
 Loading...