

Page 1
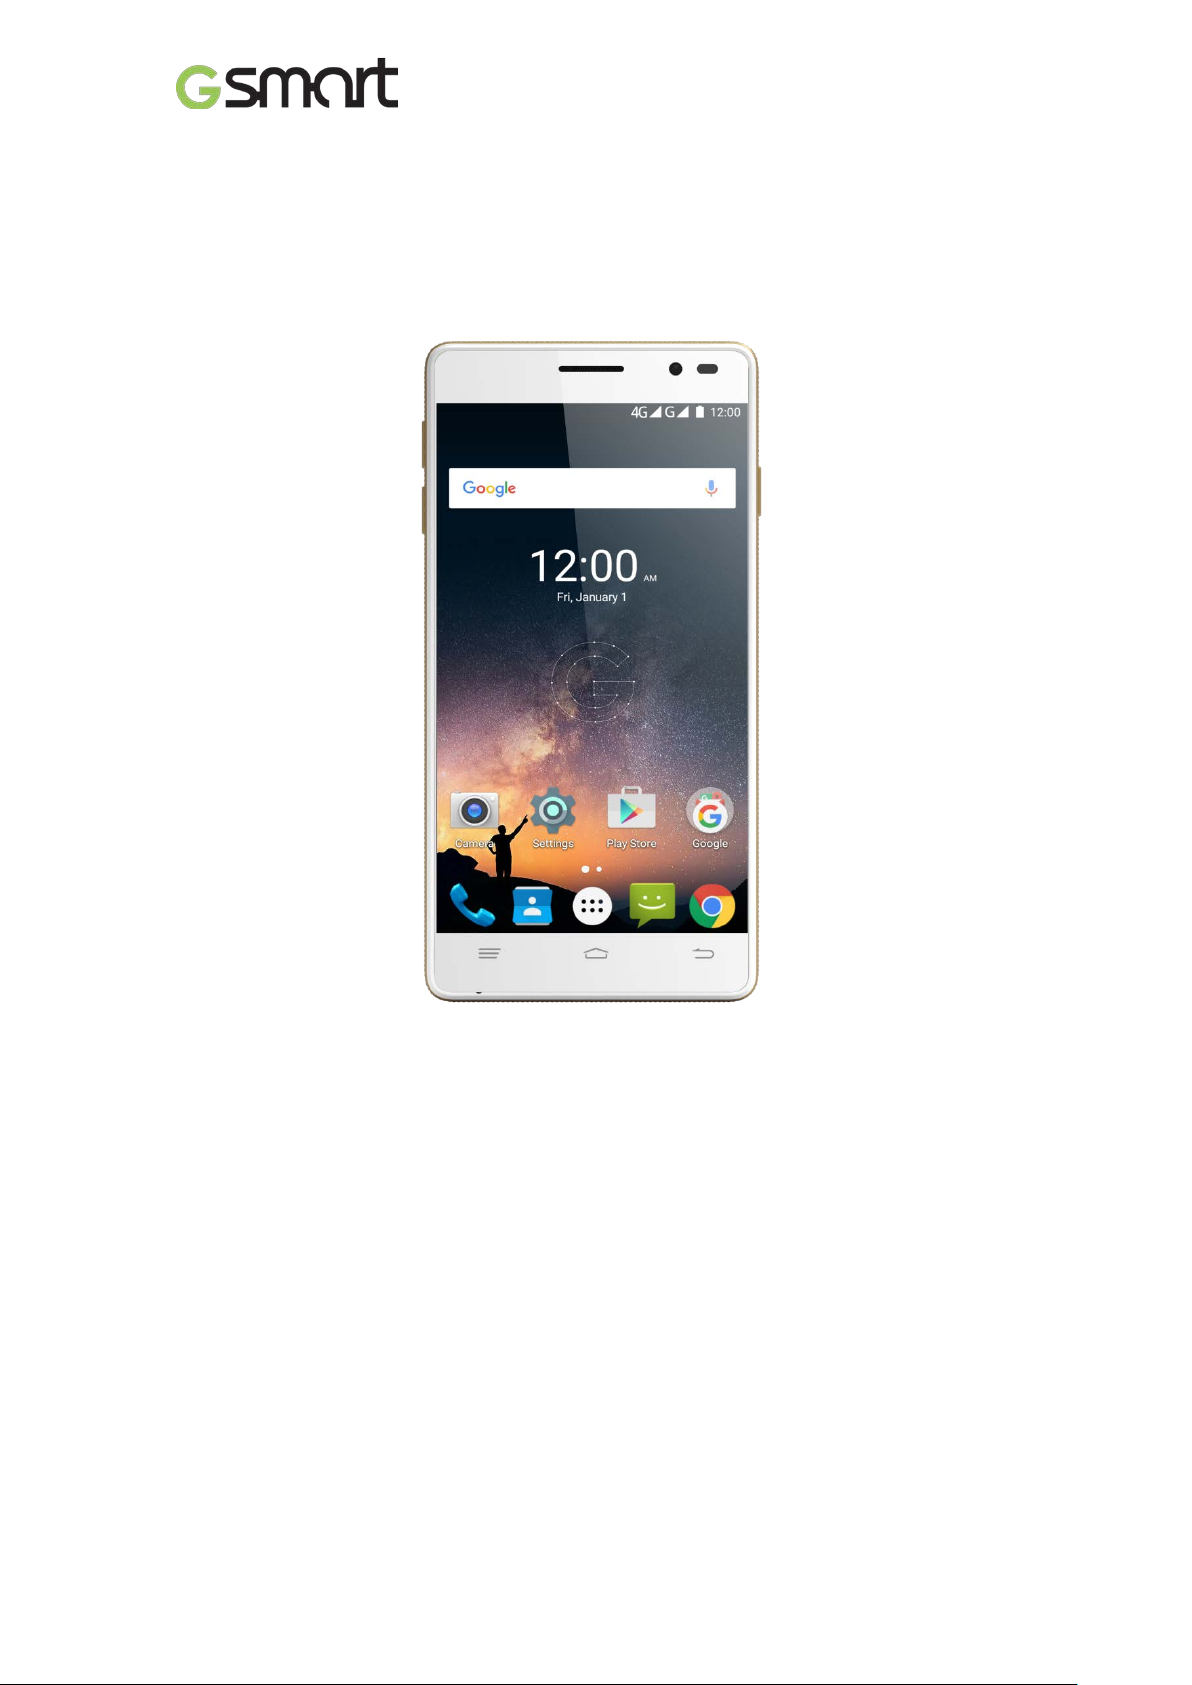
GSmart Elite
User Manual
Elite|0
Page 2

Copyright
All mobile products by GIGA-BYTE COMMUNICATIONS IN C. mentioned in this document,
including the device, accessories, software, text, music, and pictures, are owned by, or
authorized by orig ina l manufacturers to GIG A-BYTE COMMUNICATIONS INC. Reproduction,
transfer, distribution, or storage of part or all of the contents in this document in any form
without the prior written permission of GIGA-BYTE COMMUNICATIONS INC. is prohibited.
GIGA-BYTE COMMUNICATIONS INC.
Elite|1
Page 3
General Information
This section contains im portant information on safe and ef ficient operation. Please r ead this
information before using the d evice. Ignorance of the following notices m ay lead to violations
of the law.
Before using the device, please make sure you have fully charged the battery.
Do NOT remove the battery from the device during charging.
Before inserting SIM card into the device, make sure that the device is switched off.
Keep the battery in low battery status for long time might cause battery over-discharged or
even reduce battery lif e. To maintain batter y in good lifec ycle please rechar ges it once in
low battery.
Please fully charge the battery if you are going to leave the phone without use for long time
to prevent battery goes over-discharged.
Do NOT attempt to dissemble the device on your own. This should be done by an
authorized person.
Use the device in accordance to instructions when in public facilities.
In some countries, it is a vi olation against th e law to recor d phone conversat ions. Always
ask permission of the other party when you are going to record a conversation.
To protect your ears, turn down the volume before you use stereo headsets or other audio
devices.
To avoid damaging the touch screen and the device, do NOT apply excessive pressure on
them, and remove the device from your pants’ pocket before you sit down. It is also
recommended that you on l y use the stylus or your finger to interact w ith t he touch screen.
It is not covered by the w arrant y that you crack the touc h scr een because of the im proper
usage.
When you use the device for a long time, such as talking on the phone, browsing online, or
charging the battery, the device may become warm. In most cases, this condition is
normal.
Do NOT push unauthorized objects into slots and openings in your device.
The device should be placed away from heat sources such as stoves, radiators, heat
registers, or other pr oduc ts that produc e he at.
Condensation ma y form on or within your device, when you move your de vice between
environments with ver y different tem perature and/or humidity ran ges. To avoid dam aging
your device, make the moisture to evaporate before you use the device.
To avoid damaging your device, do NOT put your device on an unstable table, stand,
bracket, or other places.
Before you clean your device, unplug it, pleas e. Use a damp cloth for c leaning, but do
NOT use water, liquid cleaners, or aerosol cleaners to clean the touch screen.
Elite|2
Page 4
Table of Contents
Copyright
1
General Information
2
1. Getting Started
4
1.1 Your Phone
4
1.2 Install or uninstall the SIM Card, Battery, and Memory Card
4
1.3 Charging Battery
5
1.4 Turn Phone On or Off
6
2. Basic
7
2.1 The Home Screen
7
2.2 Contacts
9
2.3 Phone Lock/Unlock
9
2.4 Personalization
10
2.5 Date and Time
10
2.6 On-The-Go (OTG)
11
4.1 Voice & Video Calls
12
4.2 Create / send text message
13
4.3 Multimedia Message
14
5. Wi-Fi & Bluetooth
14
5.1 Wi-Fi
14
5.2 Bluetooth
14
6. Camera
15
7. Manage Phone
16
7.1 Protect Phone
16
7.2 Backup or Reset Phone
16
8. Specifications
17
3. Pre-Installed Programs Introduction 11
4. Phone Calls & Messages 12
Elite|3
Page 5

1
Earphone Jack
9
Home
2
Micro USB Port
10
Back
3
Volume Key
11
Microphone
4
Receiver
12
Power Key
5
Front Camera
13
Camera
6
Proximity Sensor/ Light Sensor
14
Flash
7
Display & Touch Screen
15
Battery Cover
8
Recents
16
Speaker
1. Getting Stared
1.1 Your Phone
No items No Items
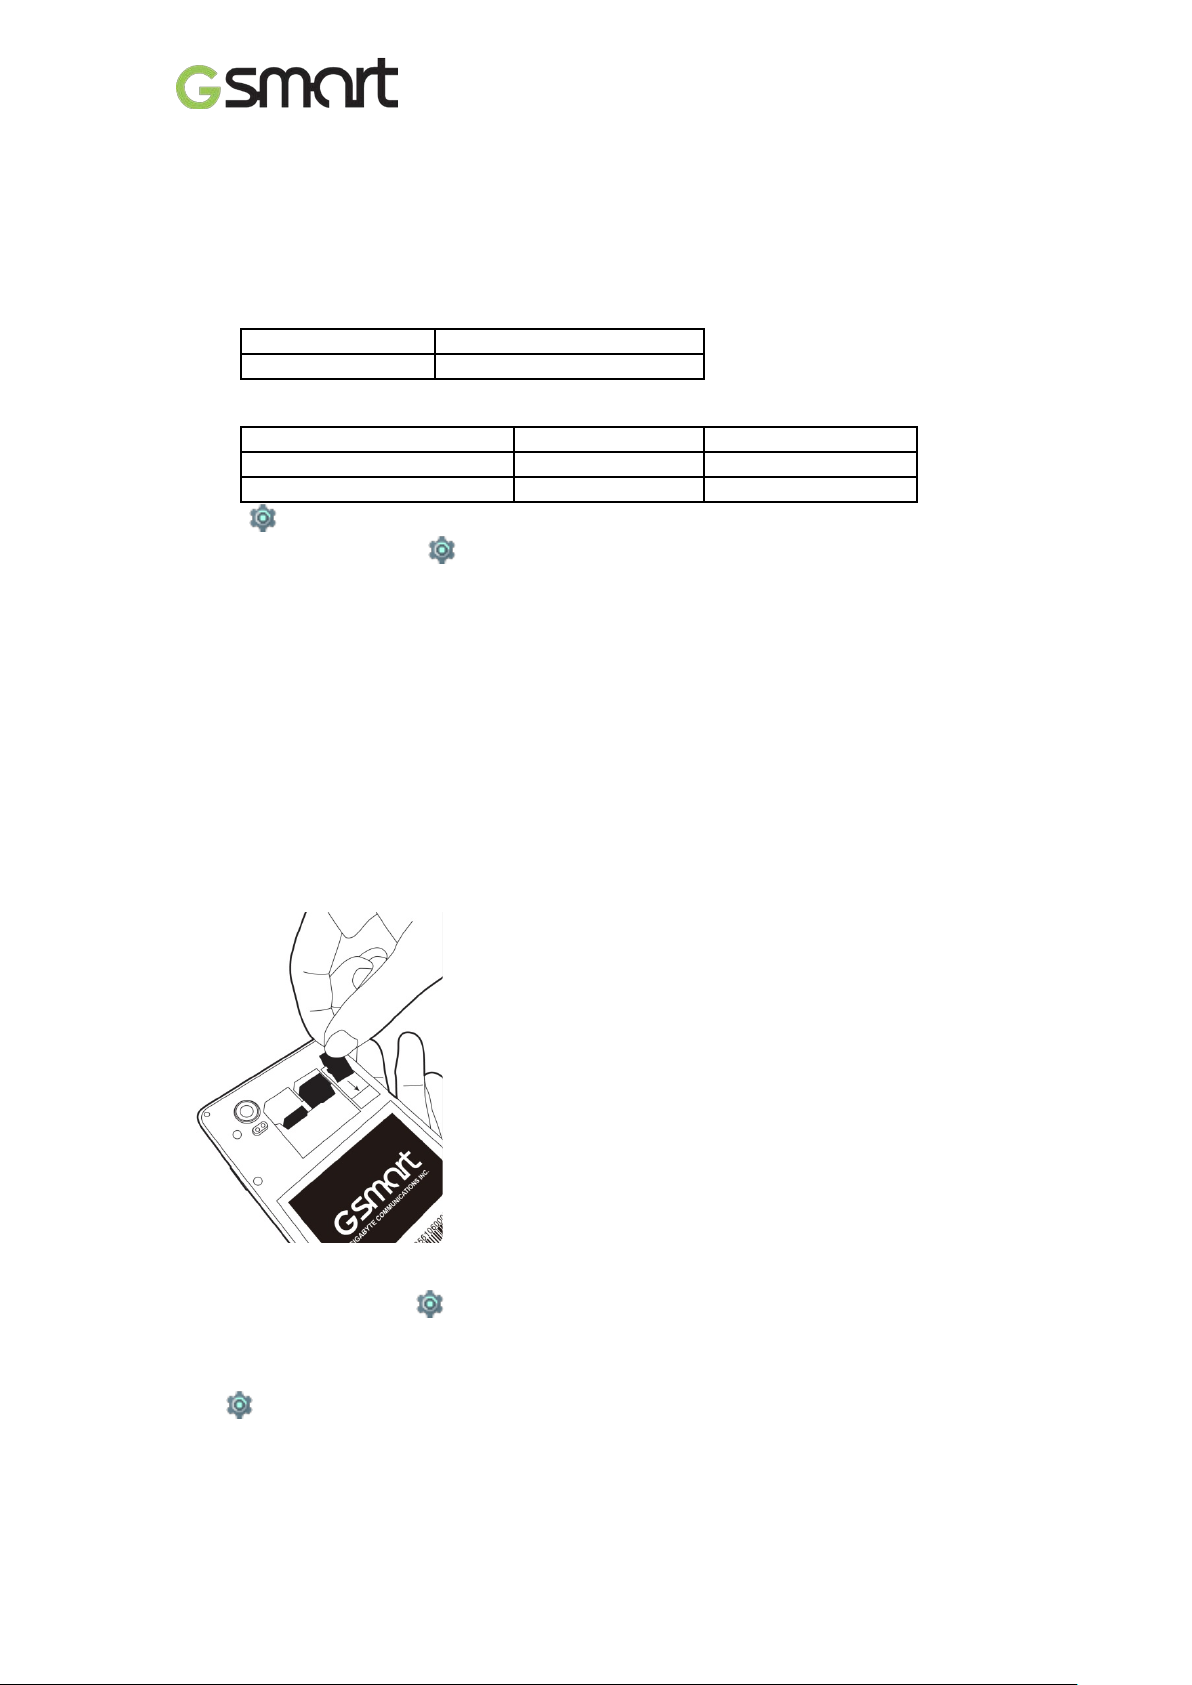
1.2 Install / uninstall SIM Card, Battery, and Memory Card
Install SIM card
Install the SIM1 card Install the SIM2 card
Elite|4
Page 6
In SIM1
4G in SIM1
In SIM2
4G in SIM2
SIM1
SIM2
Factory default
4G & 3G
2G
User switchable
2G
4G & 3G
Remove SIM card
Turn off phone slide SIM card out.
NOTE:
4G Data Service (if the SIM card supports)
• 4G data service is switchable between SIM1 and SIM2.
• One SIM card:
The inserted SIM slot will be assigned to 4G by default.
• Two SIM cards:
4G in SIM1 by default and switchable to SIM2.
Tap SIM cards Cellular data to select a SIM for data
• Data on/off switch: tap Data usage cellular data
Battery
Phone comes with a battery. Battery life may vary depending on availability of local networks
and individual usage.
Replace back cover
(1) Insert cover into slot from the bottom.
(2) Press all around back cover fully until hearing clicks.
Memory card
Micro SD card might be required to store photos, music, videos and other data if internal
memory is full.
Install memory card
To remove the memory card
(1) For safe removal, tap Storage Unmount SD card OK.
(2) Push memory card to eject it from slot.
To set default storage
Tap
1.3 Charging Battery
Battery has been partially charged at factory, you may need to recharge it before you can
switch on phone for the first time.
(1) Connect USB cable to AC adapter connect to device via USB cable.
Storage Default write disk to set default storage.
Elite|5
Page 7
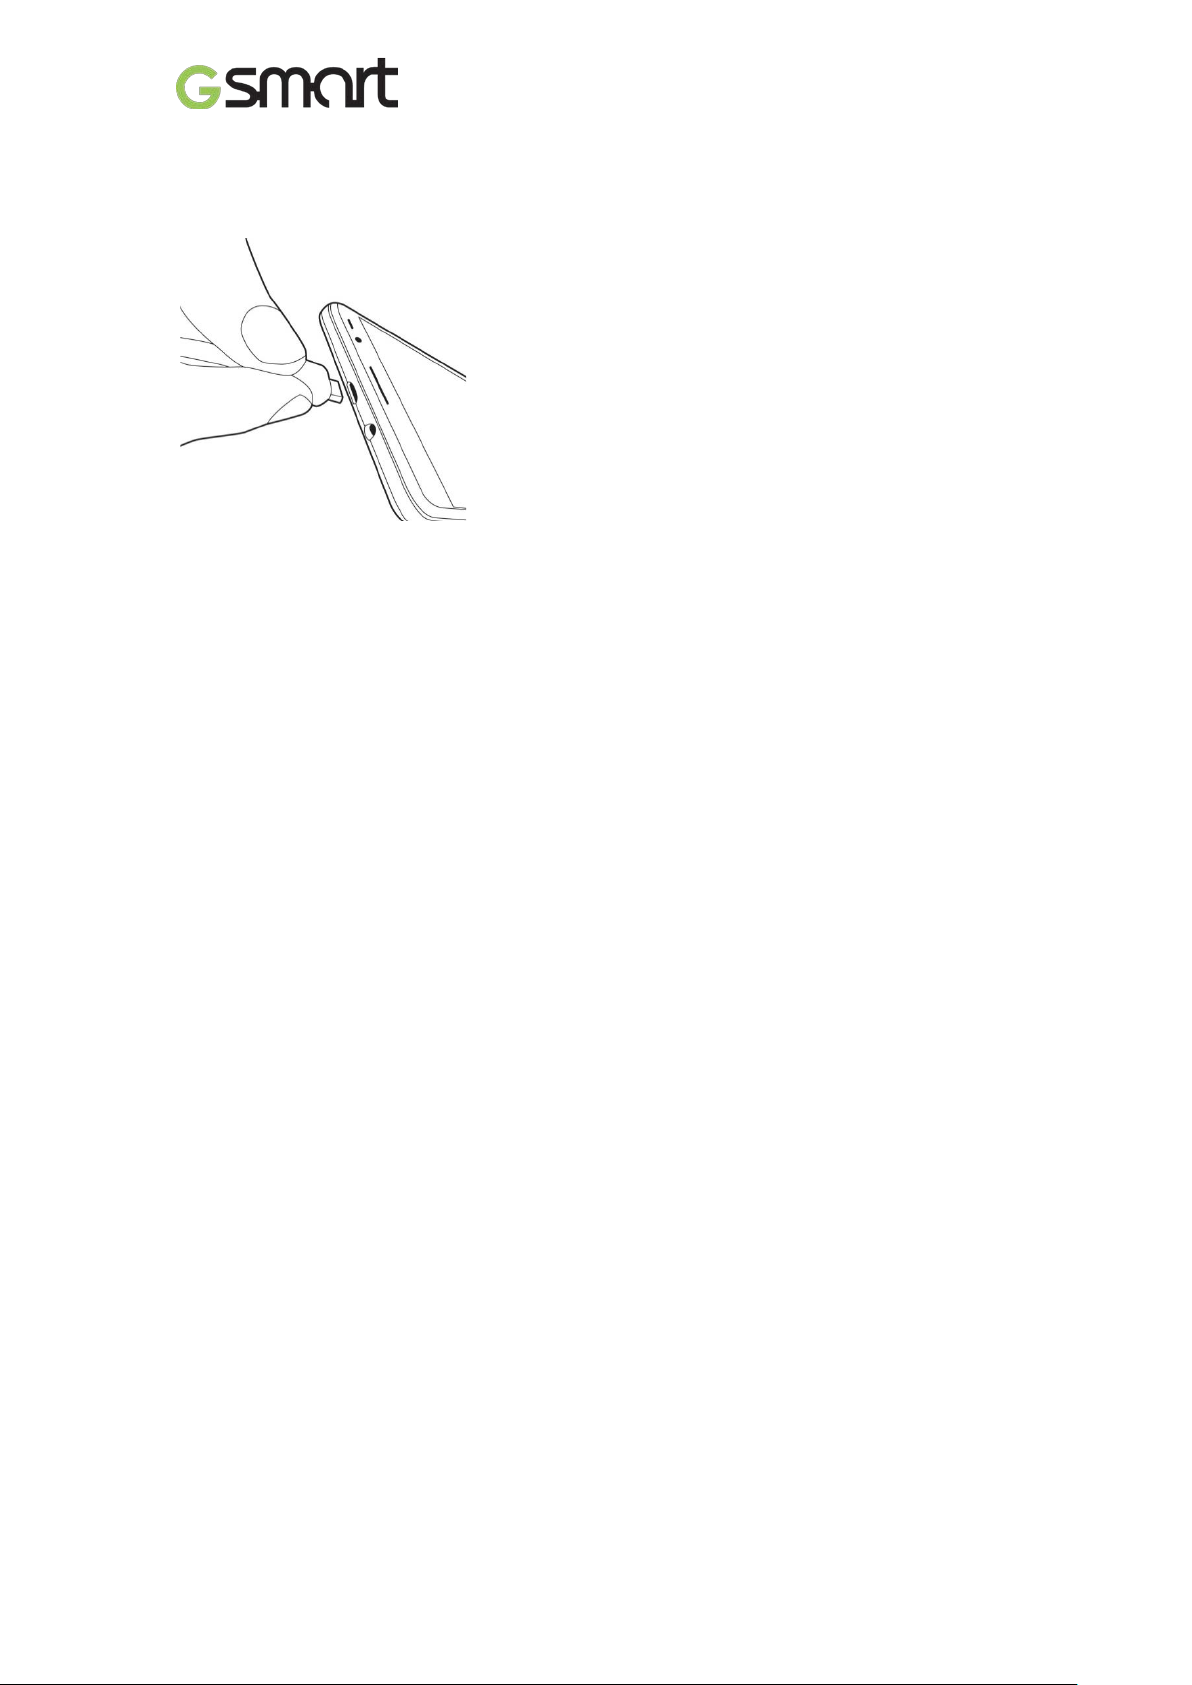
(2) Plug AC adapter to socket start charging.
(3) For safety, only use original charger that comes with your device. Any possible damage
caused by using non-original charger or any other equipment will not be under GIGABYTE
Communication Inc.’s liability.
NOTE:
CHARGE PHONE IMMEDIATELY IF BATTERY IS LOW. CHARGE FOR AT LEAST 10
MINUMTES TO REACTIVATE BATTERY IF IT IS OVERDISCHARGED.
For safety, don’t remove battery from phone while A C adapter is connected or while it is
being charged.
1.4 Turn Phone on / off
Turn phone on
Press and hold power button until phone shown GSmart logo.
Turn phone off
(1) Press and hold power button for few seconds.
(2) A pop-up win do w appear s tap “Power off” “OK” to confirm.
Elite|6
Page 8
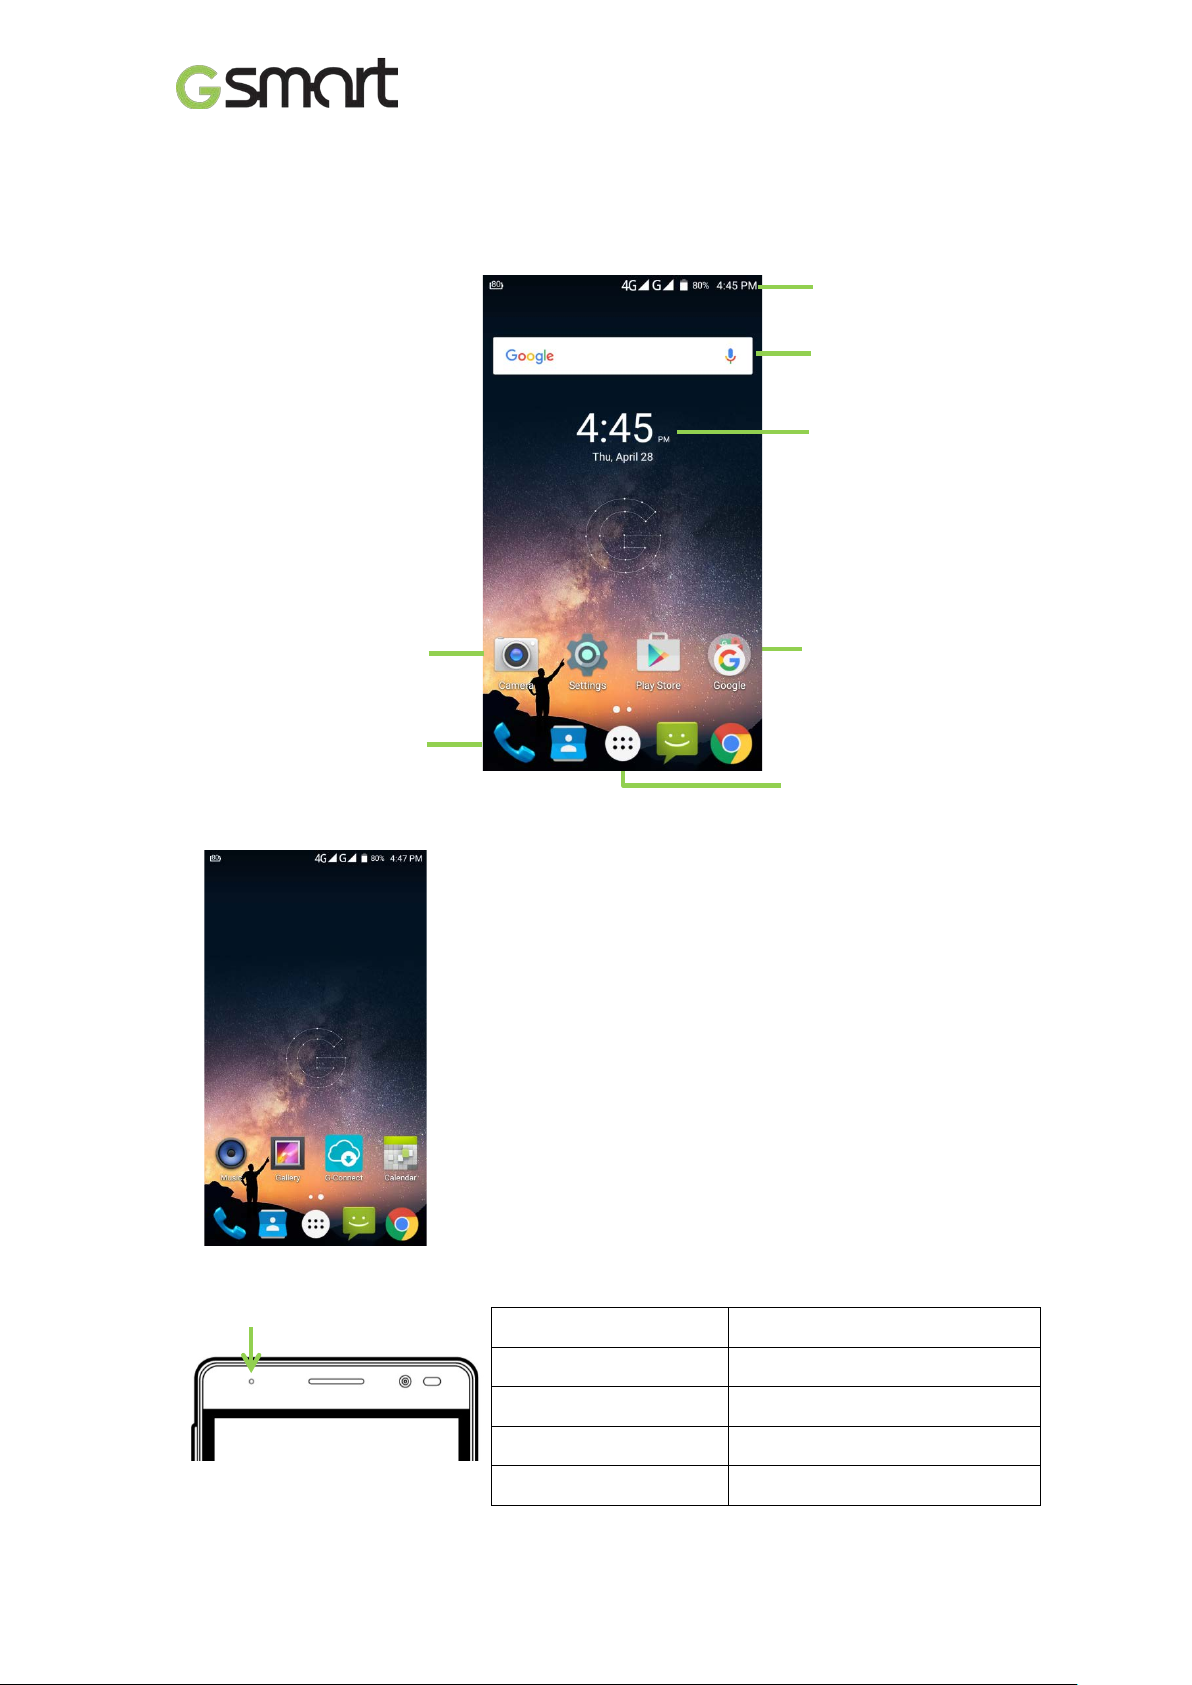
Status Bar & Icons
Time Widget
2. Basic
2.1 Home Screen
Default Home Screen:
Self-defined Home Screen: Add your favorite APP shortcuts and widgets.
Main Apps
App
Widget
App Folder
Tap to launch Apps screen.
LED Notification
Red LED remains on
Green LED remains on
Blue LED flashes
Green LED flashes
Red LED flashes
Elite|7
Charging
Fully charged
Unread messages/ Missed calls
Unread mail/ notifications
Low battery (0%~15%)
Page 9

Status Icons
Types
Phone call
Volume
Battery
Icons
Descriptions
Call in progress.
Call on hold.
Call muted.
Speaker on.
Vibration mode.
Wired headset connected.
Battery full.
Battery low.
Battery in charging.
Signal strength indicator.
Left: SIM1
Right: SIM2
4G\ HSPA \3G \ EDGE \ GPRS is in progress.
4G:LTE
H+: HSPA+
H: HSPA
3G: WCDMA
E: EDGE
G: GPRS
Network
and
Connection
Notification
Wi-Fi connected.
Wi-Fi data in progress.
Wi-Fi network detected.
Airplane mode.
Portable Wi-Fi hotspot activated.
USB Tethering activated.
Both USB tethering and Wi-Fi hotspot activated.
Bluetooth on.
Connected to PC via USB cable.
Unread text message.
Unread e-mail.
Unread Gmail™.
Alarm.
Event notification.
Missed call.
Elite|8
Page 10
General notification.
Notification
2.2 Contacts
Add a Contact
(1) Tap add a new contact.
(2) Choose either of Google /Phone/SIM1/SIM2 to store a new contact.
(3) New contact screen appears.
(4) Fill in contact information save.
NOTE:
Contact portrait is not editable to contacts stored in SIM cards.
Search for Contacts
Tap to search.
2.3 Phone Lock/Unlock
Sleep mode
Press power key to turn display on or off.
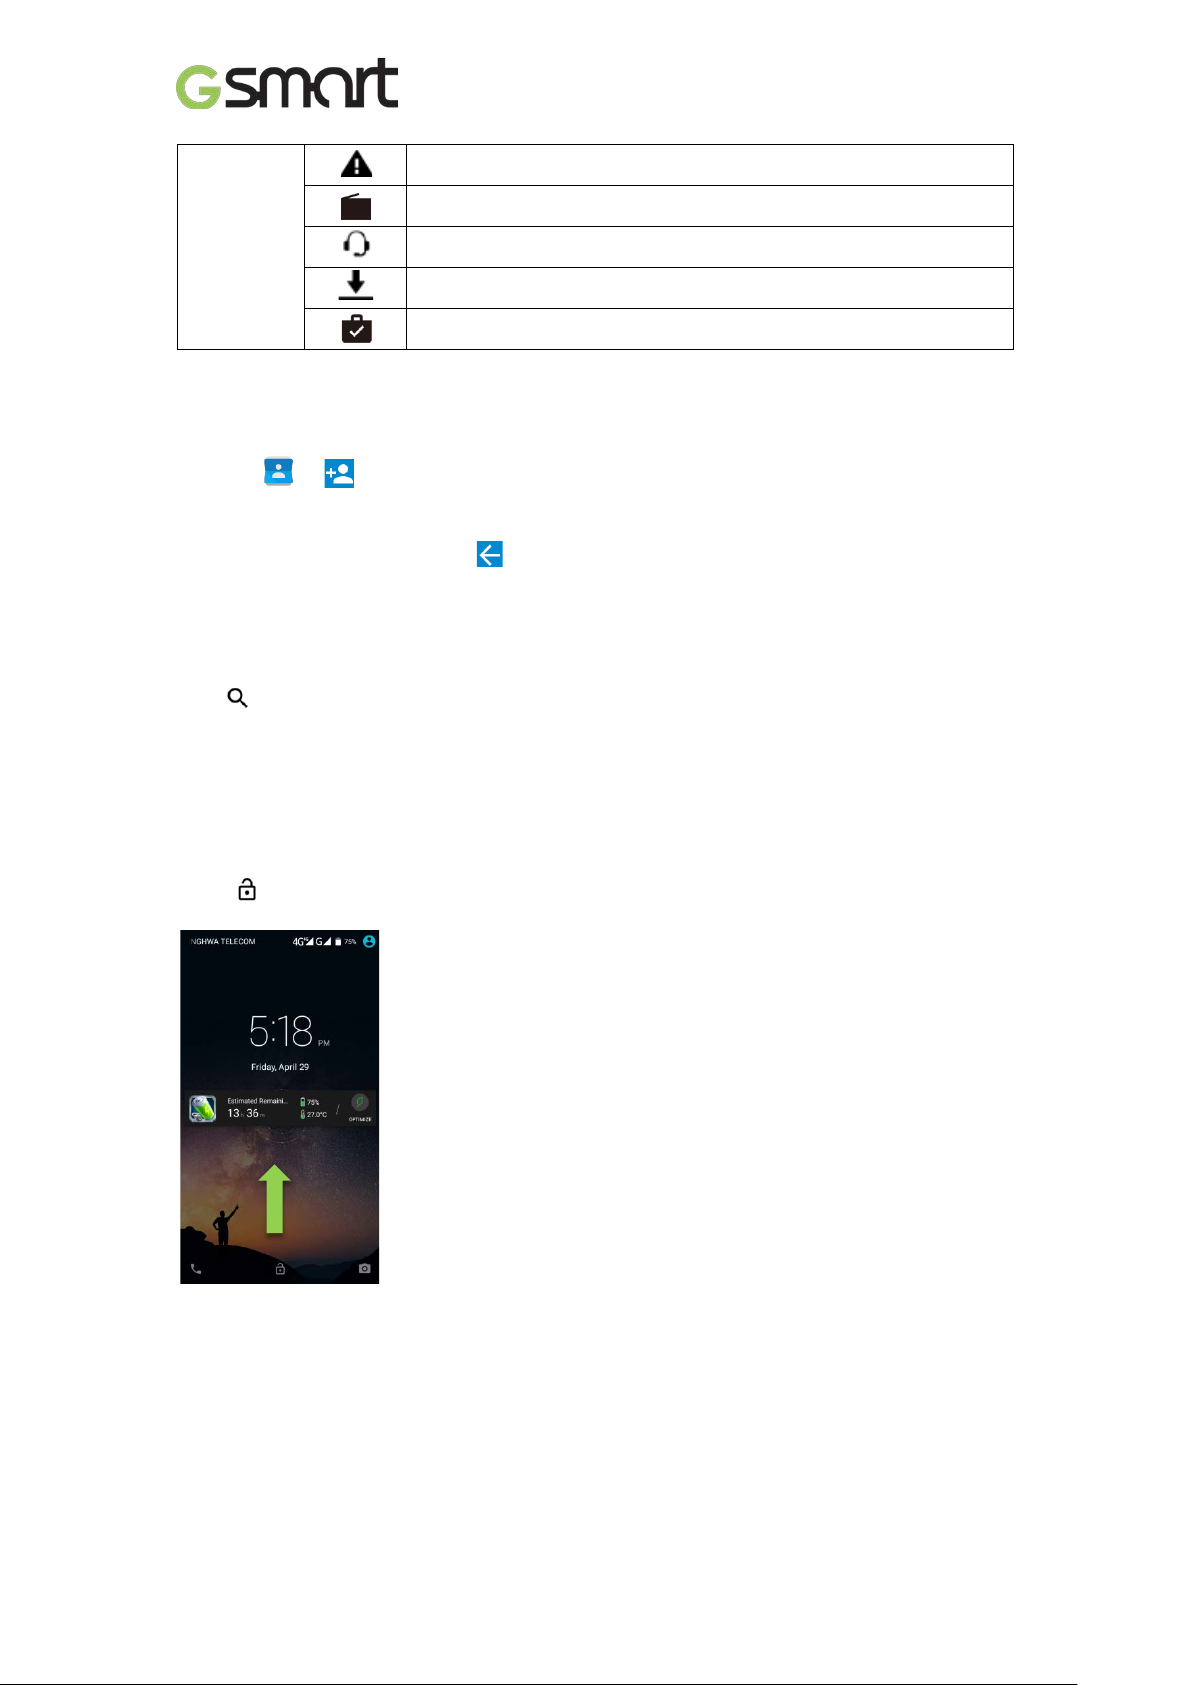
Unlock phone
Drag icon on screen slide up to unlock.
FM radio activated.
Playing music.
App downloading.
App download/updated completed.
Elite|9
Page 11
2.4 Personalization
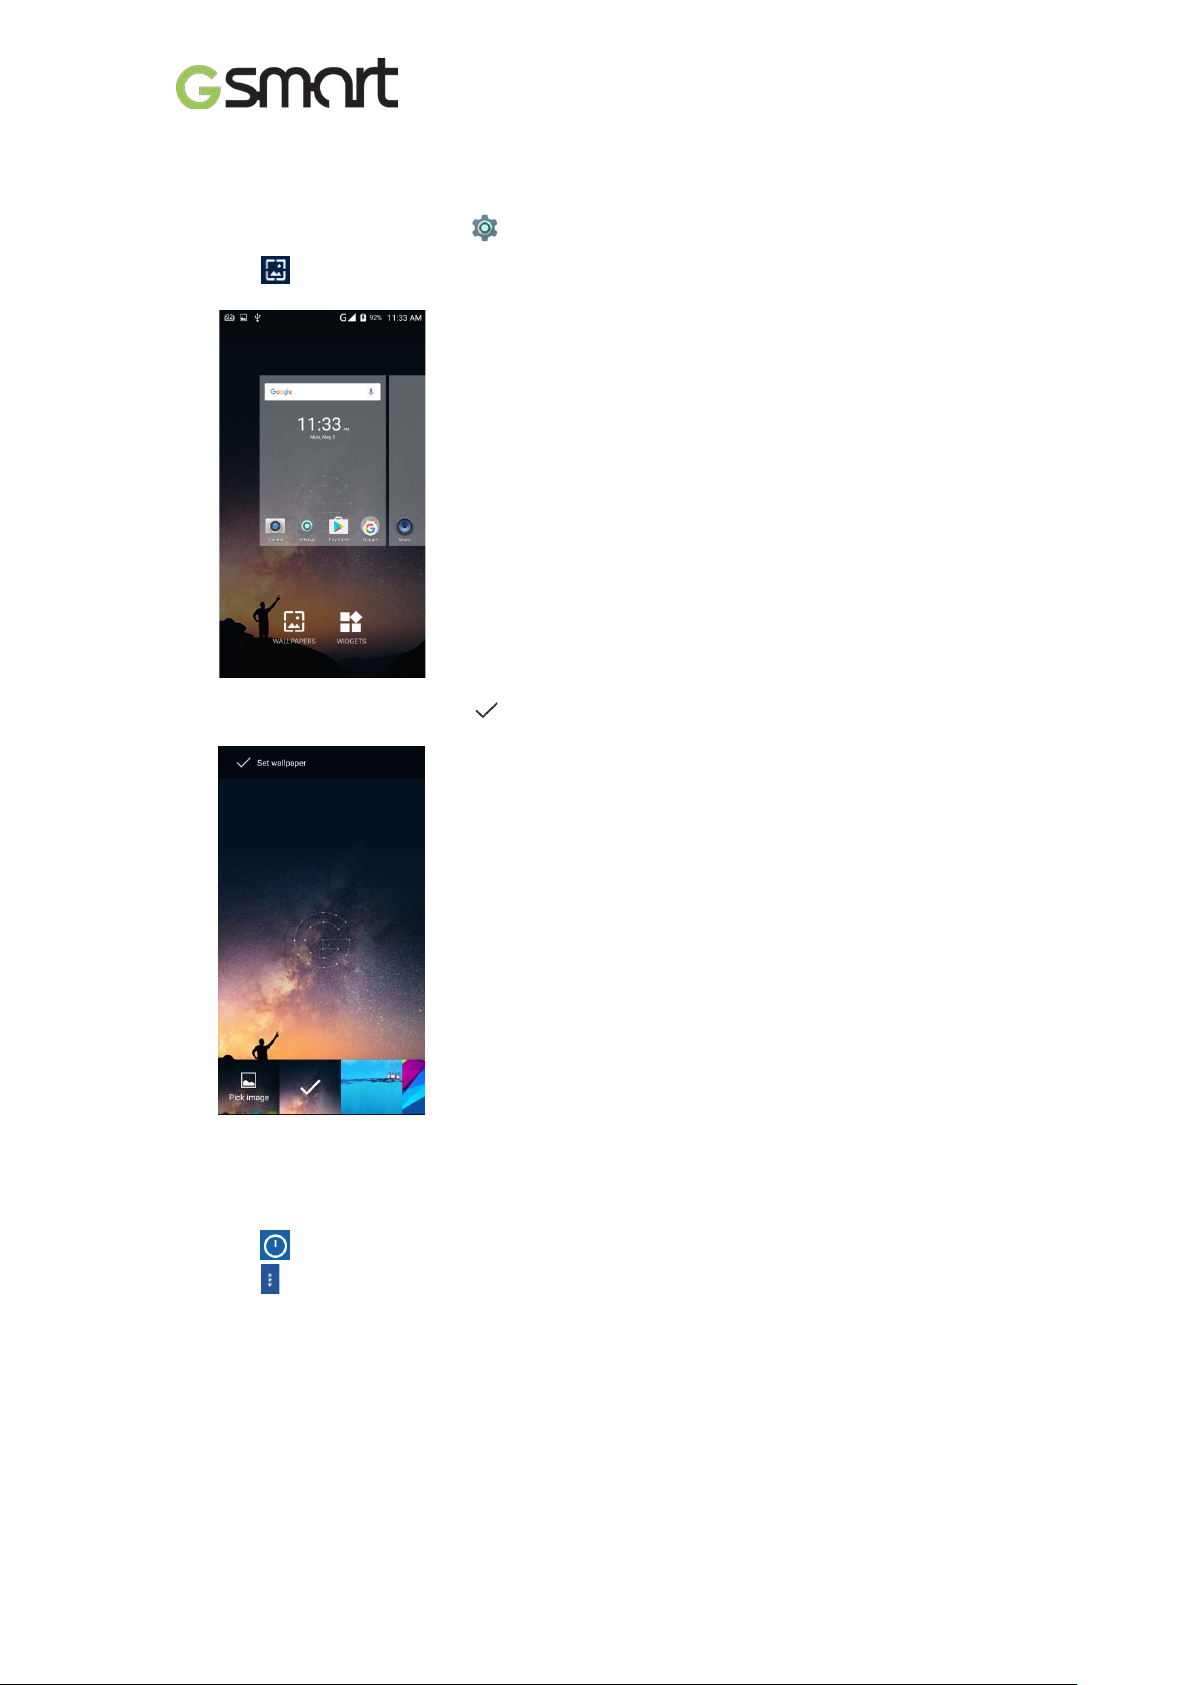
Wallpaper
Long press Home screen or tap Display Wallpaper get into settings.
(1) Tap select pictures.
(2) Tap pictures preview, tap confirm.
2.5 Date and Time
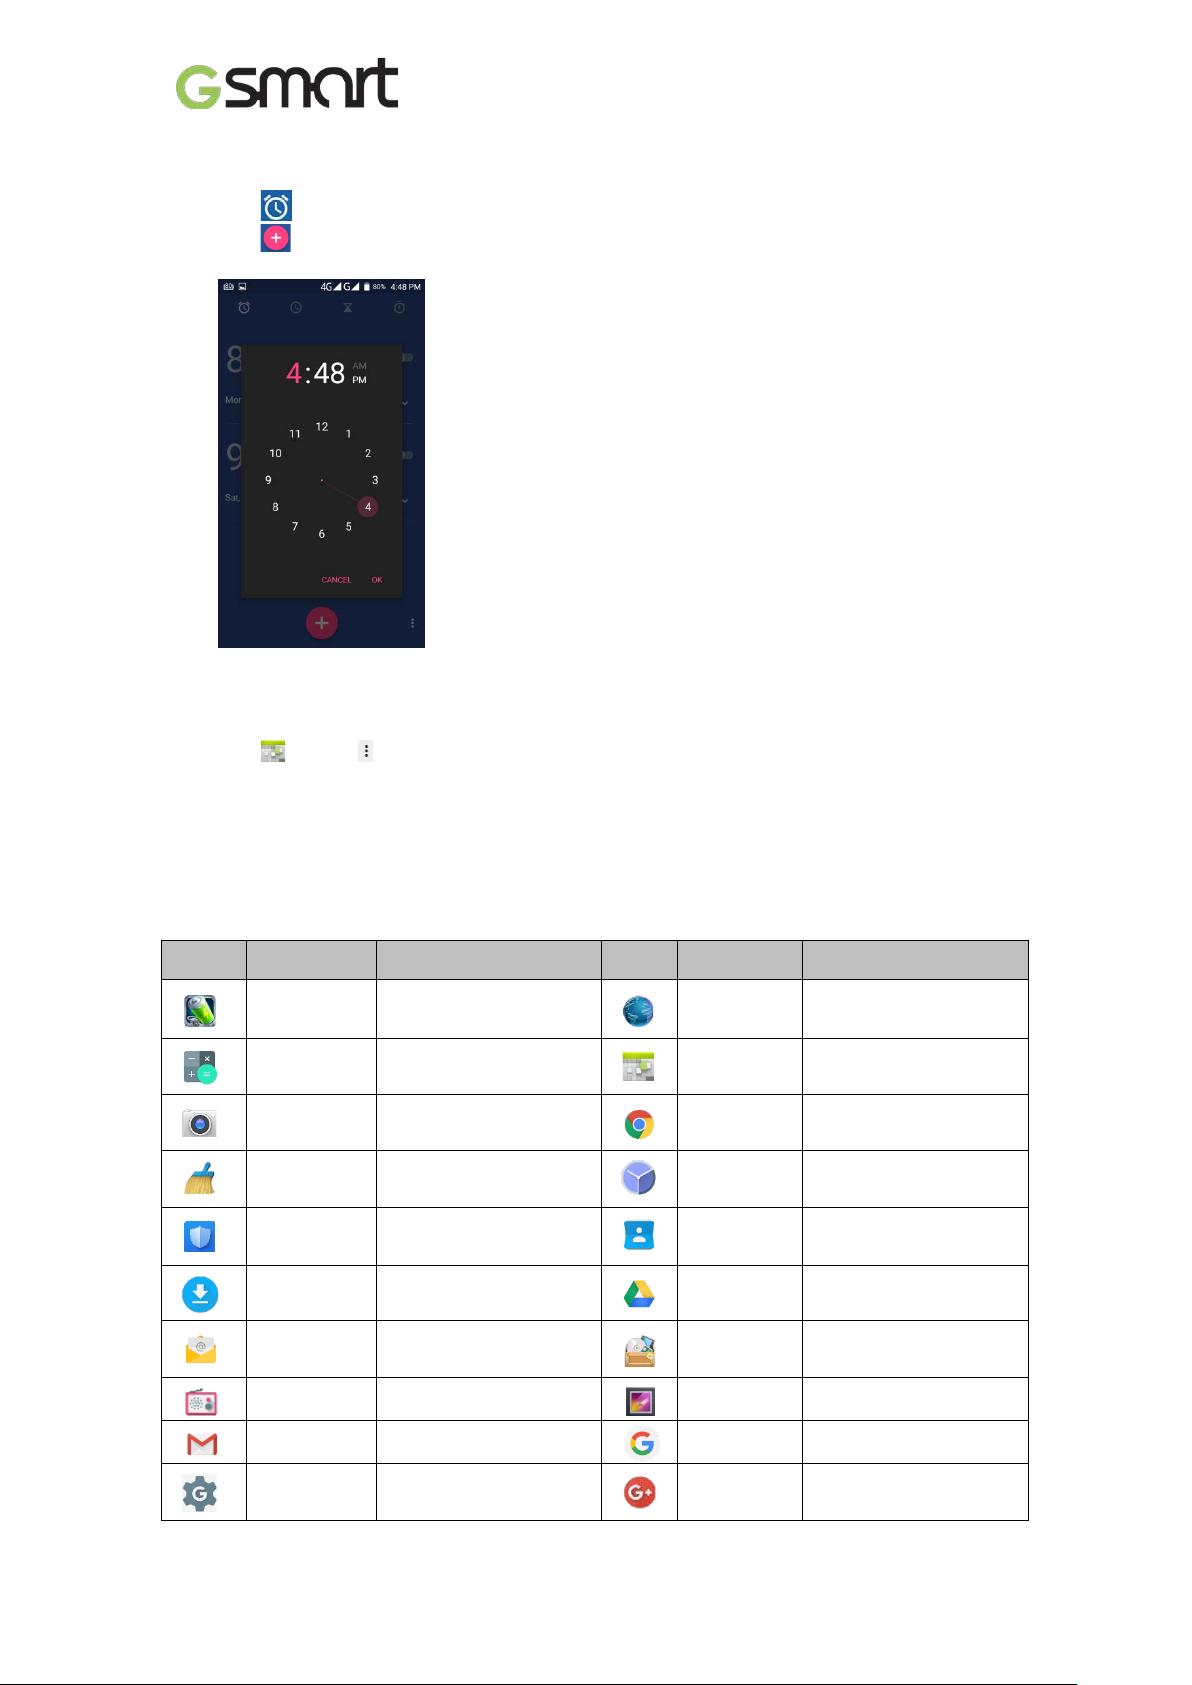
Set up date and time
(1) Tap Time Widget on Home screen.
(2) Tap
(3) Tap (lower-right) to start settings.
Elite|10
Page 12
Google
Alarms
(1) Tap Time Widget on Home screen.
(2) Tap
(3) Tap
Calendar
Add new event
(1) Tap tap (upper-right) New event.
(2) Fill in event information.
2.6 On-The-Go (OTG)
OTG or On-The-Go is a feature that turns your smartphone into a host and lets you plug USB
storage.
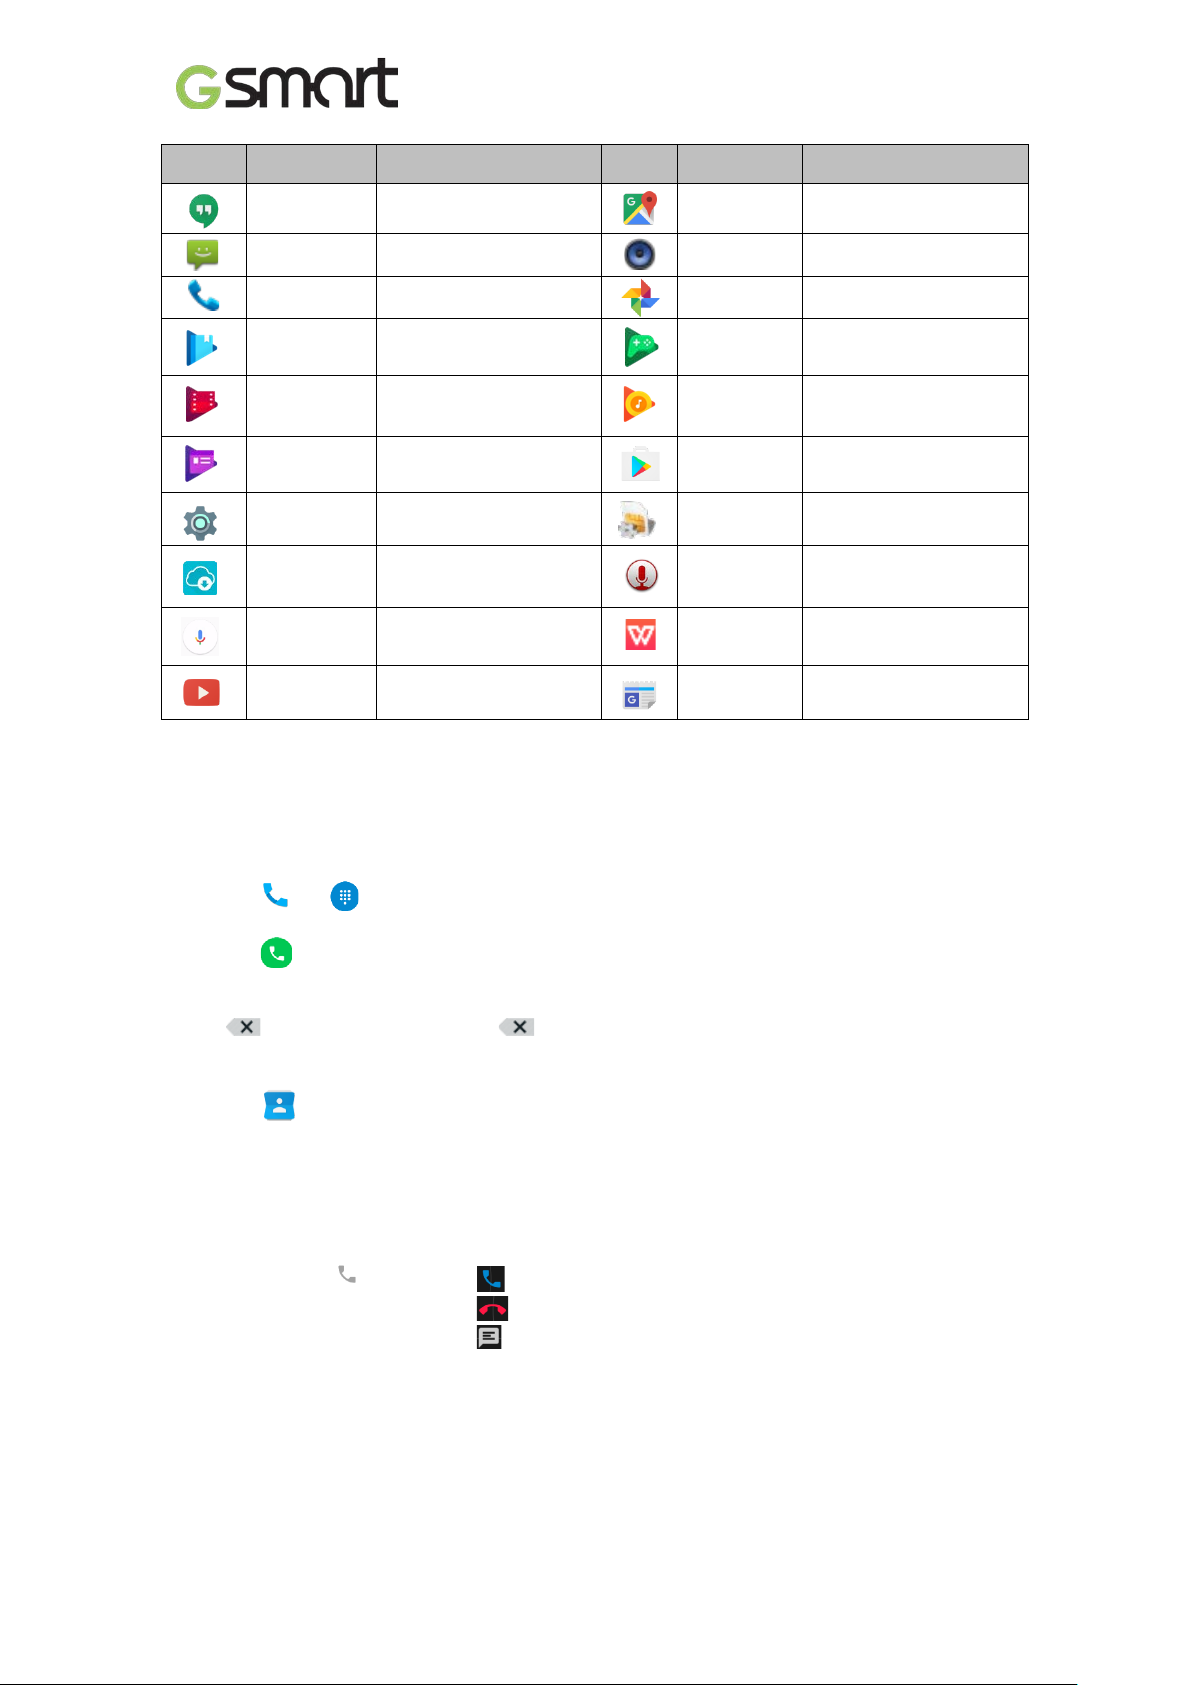
3. Pre-Insta lled Programs Introduction
Icons Programs Description Icons Programs Description
Battery
Doctor
Calculator
Camera
Clean
Master
Power management.
Calculation
Capture images/videos.
System optimizer.
Browser
Calendar
Chrome
Clock
Web/Internet browser.
Schedule management.
Google browser service.
Arrange alarm clocks.
CM Security
Downloads
Email
FM Radio
Gmail
Google
Settings
Antivirus app.
View downloaded files.
E-mail app.
FM radio app.
Google e-mail service.
Google settings.
Elite|11
Contacts
Drive™
File
Manager
Gallery
Google
Google+
Contacts folder.
Google drive.
Manage all files.
Photos / videos folder.
Google app.
Google social app.
Page 13
Google
Maps™
New &
Weather
New and weather
Icons Programs Description Icons Programs Description
Hangouts
Messaging
Phone
Play Books
Play Movies
& TV
Play
Newsstand
Settings
G-Connect
Voice
Search
YouTube
Messenger.
SMS/MMS messenger.
Phone dialer.
e-Bookstore.
Video player.
News services.
Phone settings..
System update
information.
Searching by voice.
Video service.
4. Phone Calls & Messages
4.1 Voice and Video Calls
Make a call from Phone screen
Music
Photos
Play
Games
Play Music
Play Store
SIM Toolkit
Sound
Recorder
WPS Office
Map service.
Music player.
Google gallery.
Game center.
Music player.
App store.
SIM related apps.
Record voice notes.
Office Software.
service.
(1) Tap Go into Phone screen.
(2) Input phone numbers.
(3) Tap to call.
NOTE:
Tap delete. Tap and hold erase entire numbers.
Make a call from Contacts
(1) Tap .
(2) Tap a contact to call.
Make emergency calls
Dial 112 for emergency call
Answer a call
• Tap and hold
slide to to answer call.
slide to to dismiss call.
slide to to dismiss call and send message.
Elite|12
Page 14
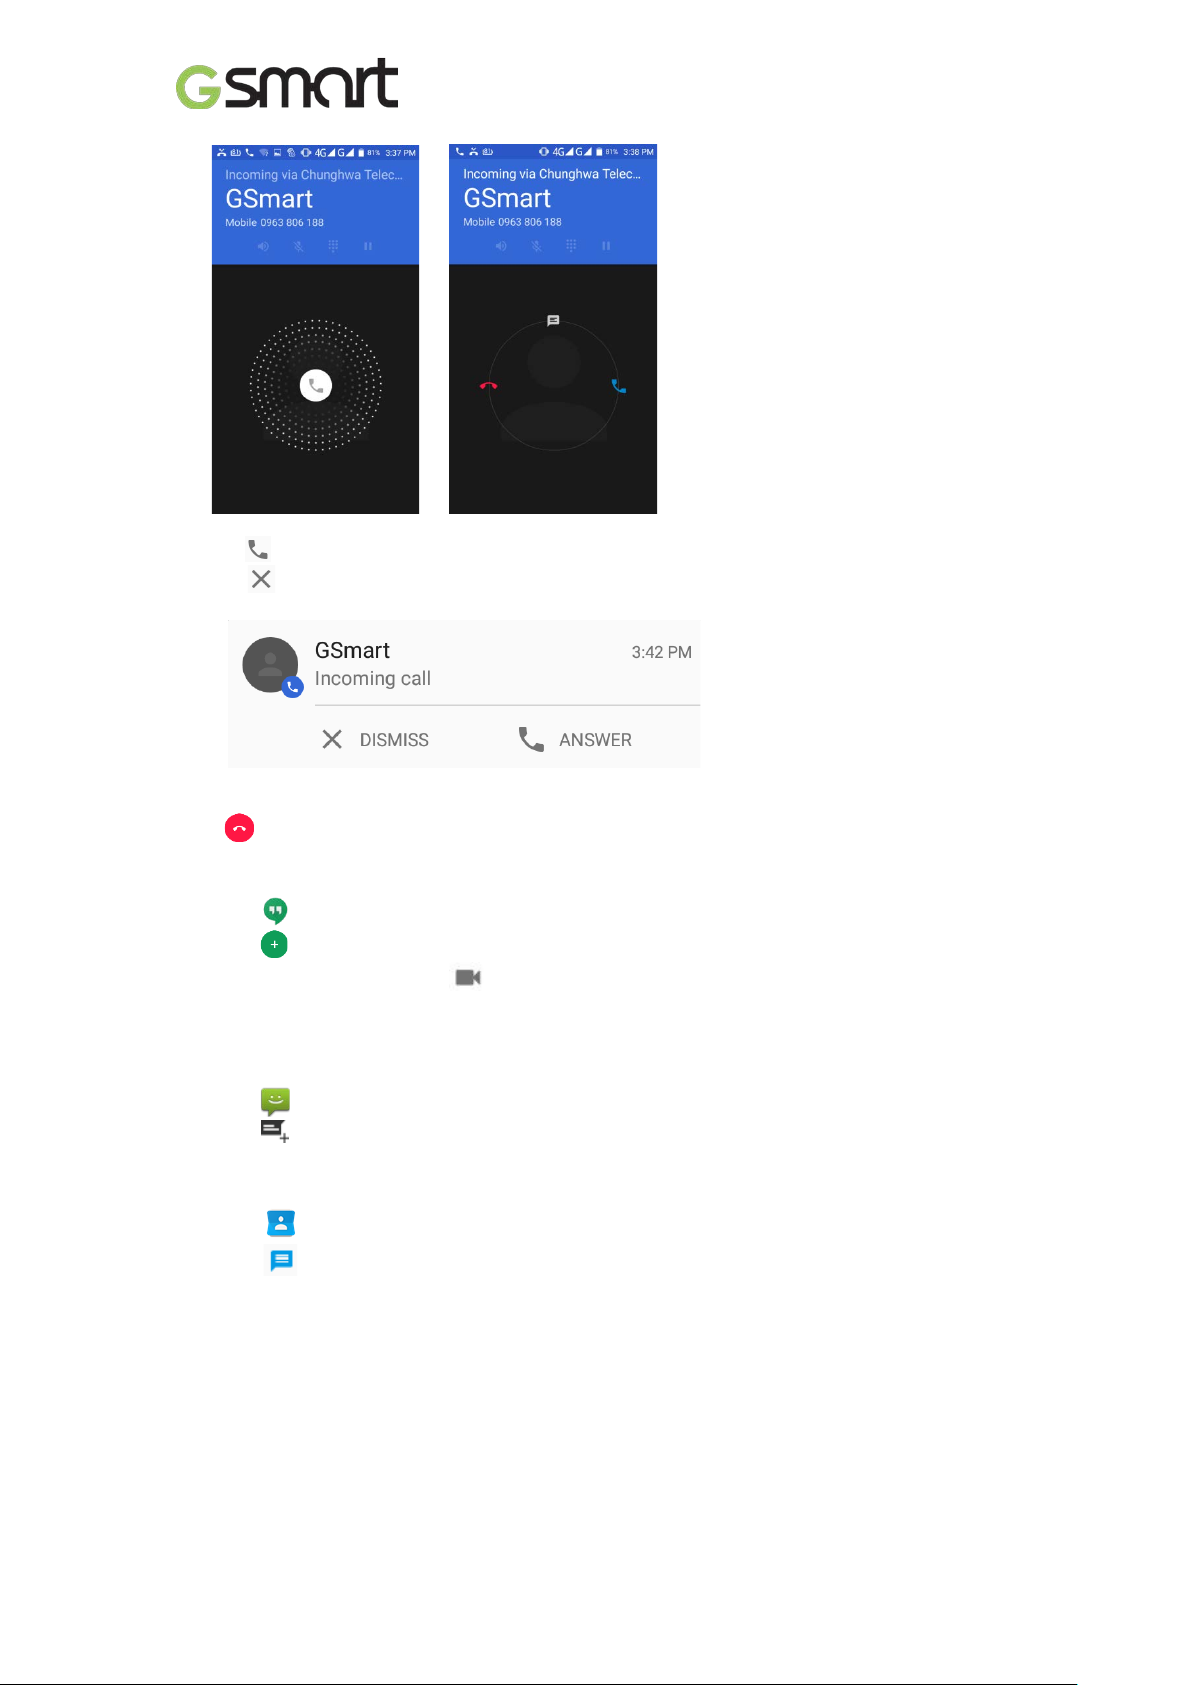
• Tap answer call.
• Tap
dismiss call.
End a call
Tap end call.
Make a video call
(1) Tap .
(2) Tap .
(3) Tap “NEW VIDEO CALL” .
4.2 Create / send text message
From Message screen
(1) Tap .
(2) Tap to create new message.
From Contact screen
(1) Tap
(2) Tap
Elite|13
Page 15
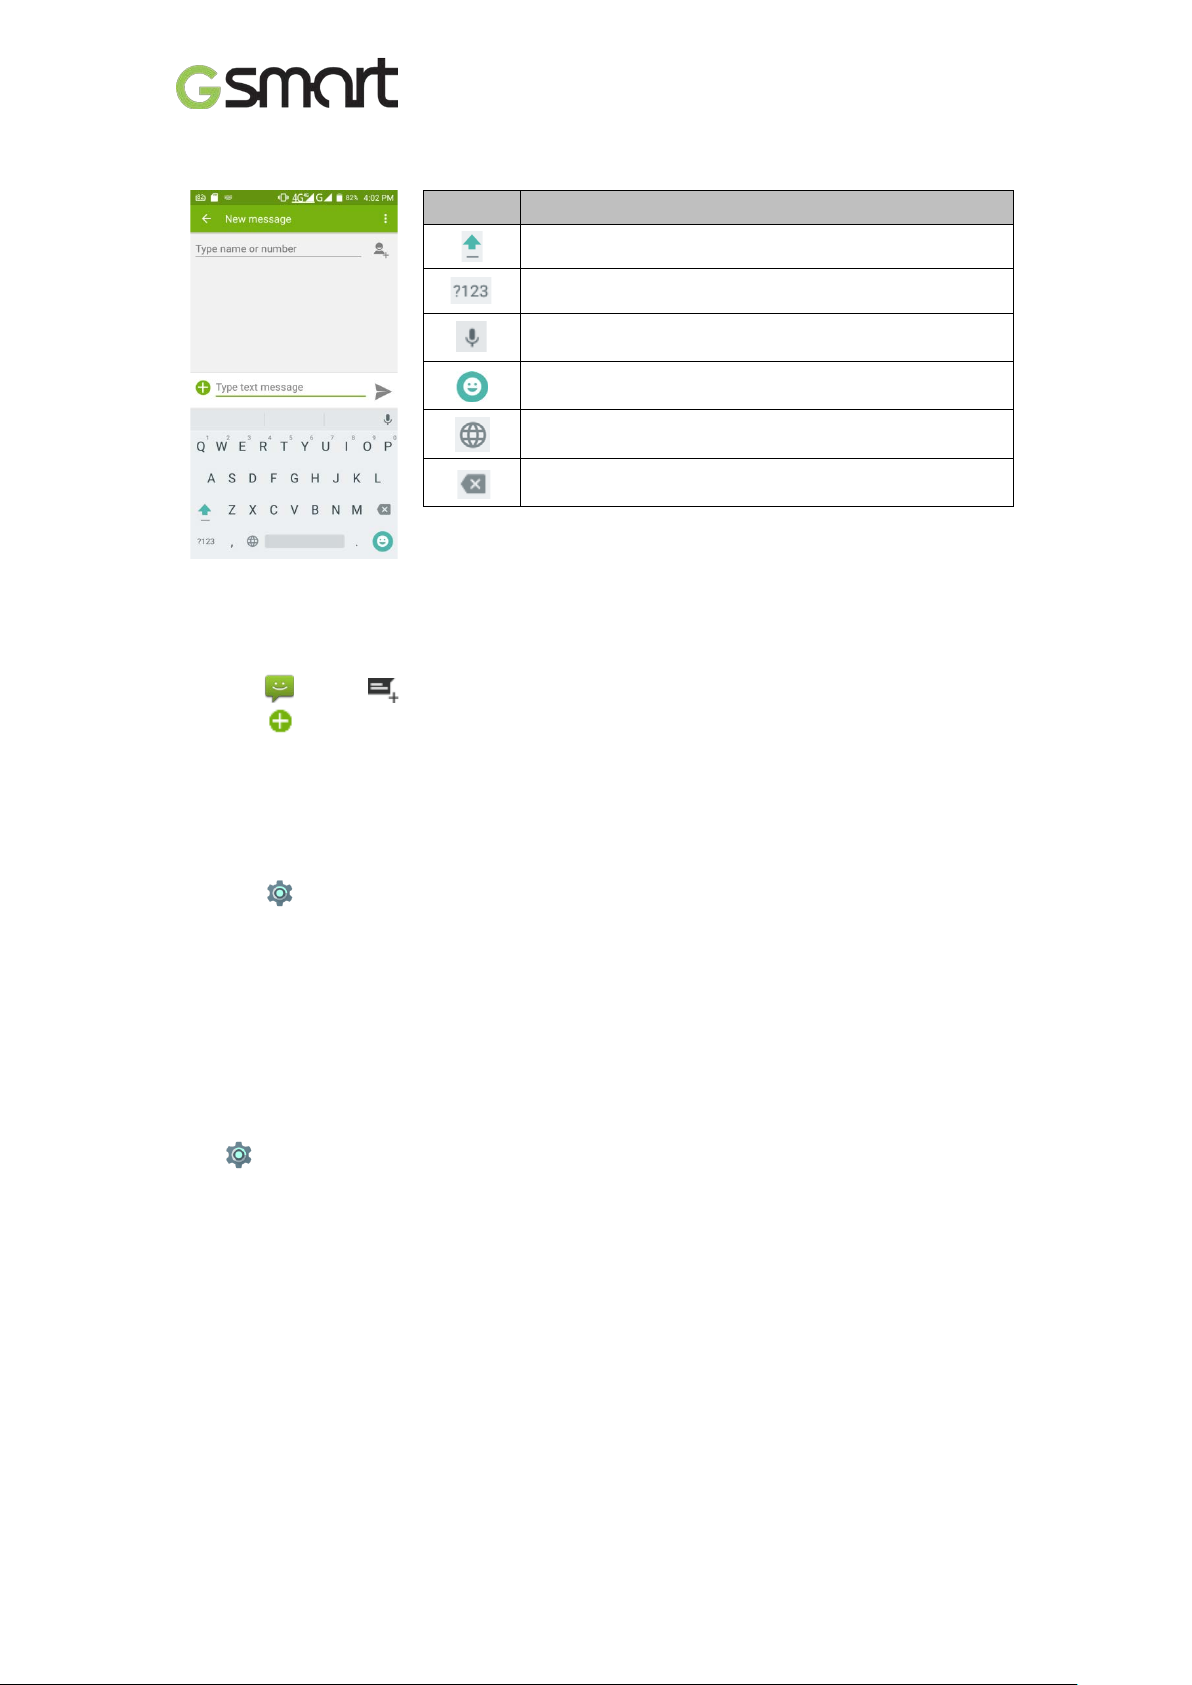
Google keyboard
Icons Function
Capital letter mode.
4.3 Multimedia Message
To send MMS from Message screen
(1) Tap tap create new message.
(2) Tap attach pictures, videos, record audio, contact, calendar, or slide show.
Message converts to MMS message automatically.
Symbols and numerical keyboard.
Voice typing.
Emoji.
Input method switch.
Delete.
5. Wi-Fi & Bluetooth
5.1 Wi-Fi
(1) Tap to Wi-Fi main screen.
(2) Switch to turn “Wi-Fi” on or off.
Connect to Wi-Fi network
(1) Choose a Wi-Fi network to connect.
(2) Enter pass word if it is encrypted.
5.2 Bluetooth
Turn Bluetooth on / off
Tap to Bluetooth main screen.
Elite|14
Page 16
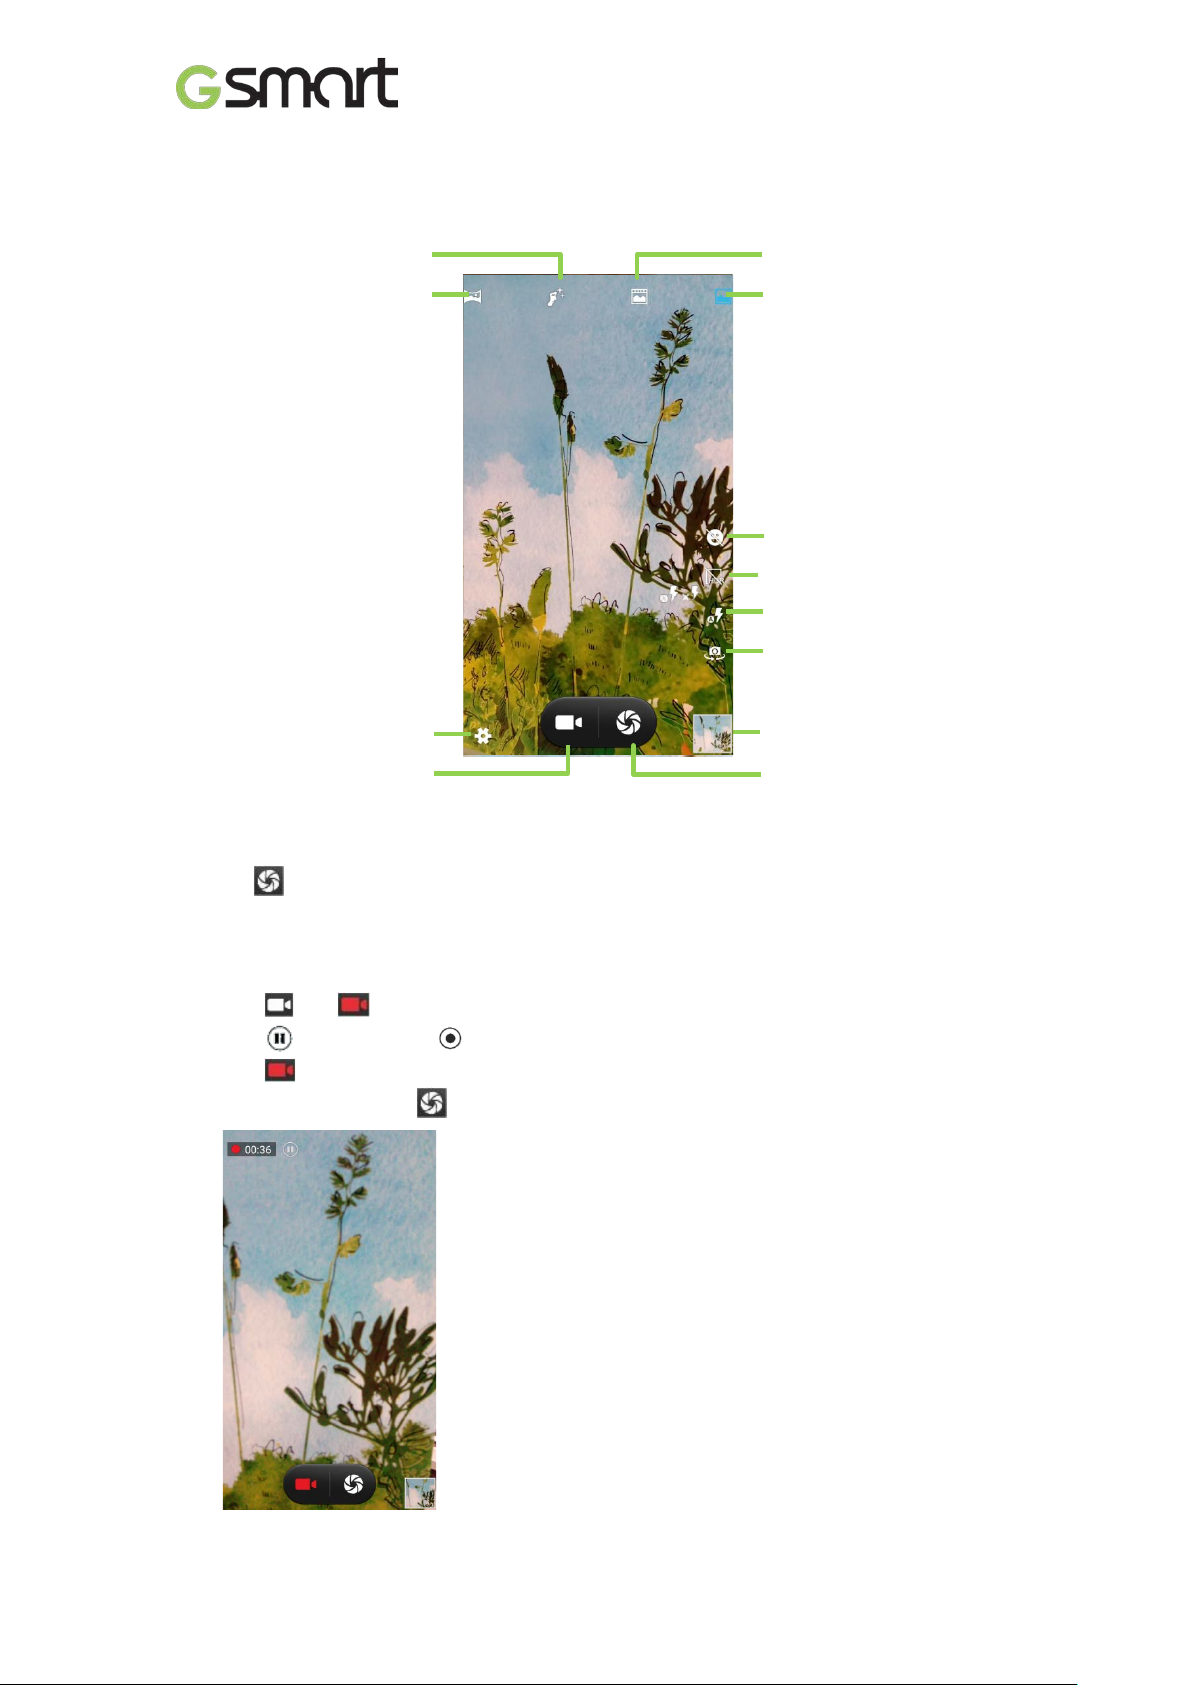
6. Camera
Camera Function
Taking photo
On the camera main screen:
Face beauty mode
Panorama mode
Settings
Video shutter
Live Photo mode
Normal mode
Smile capture
HDR
Flash
Rear / front camera switch
Previous photo/video
Shutter
Tap take pictures.
Tap Volume Up Key to take a picture.
Press and hold Volume Up Key to take continuous photos.
Recording video
(1) Tap
(2) Tap
(3) Tap again
(4) During recording, tap
start recording.
pause; tap continue recording.
stop recording and saved file.
take pictures.
Elite|15
Page 17
7. Manage Phone
7.1 Protect Phone
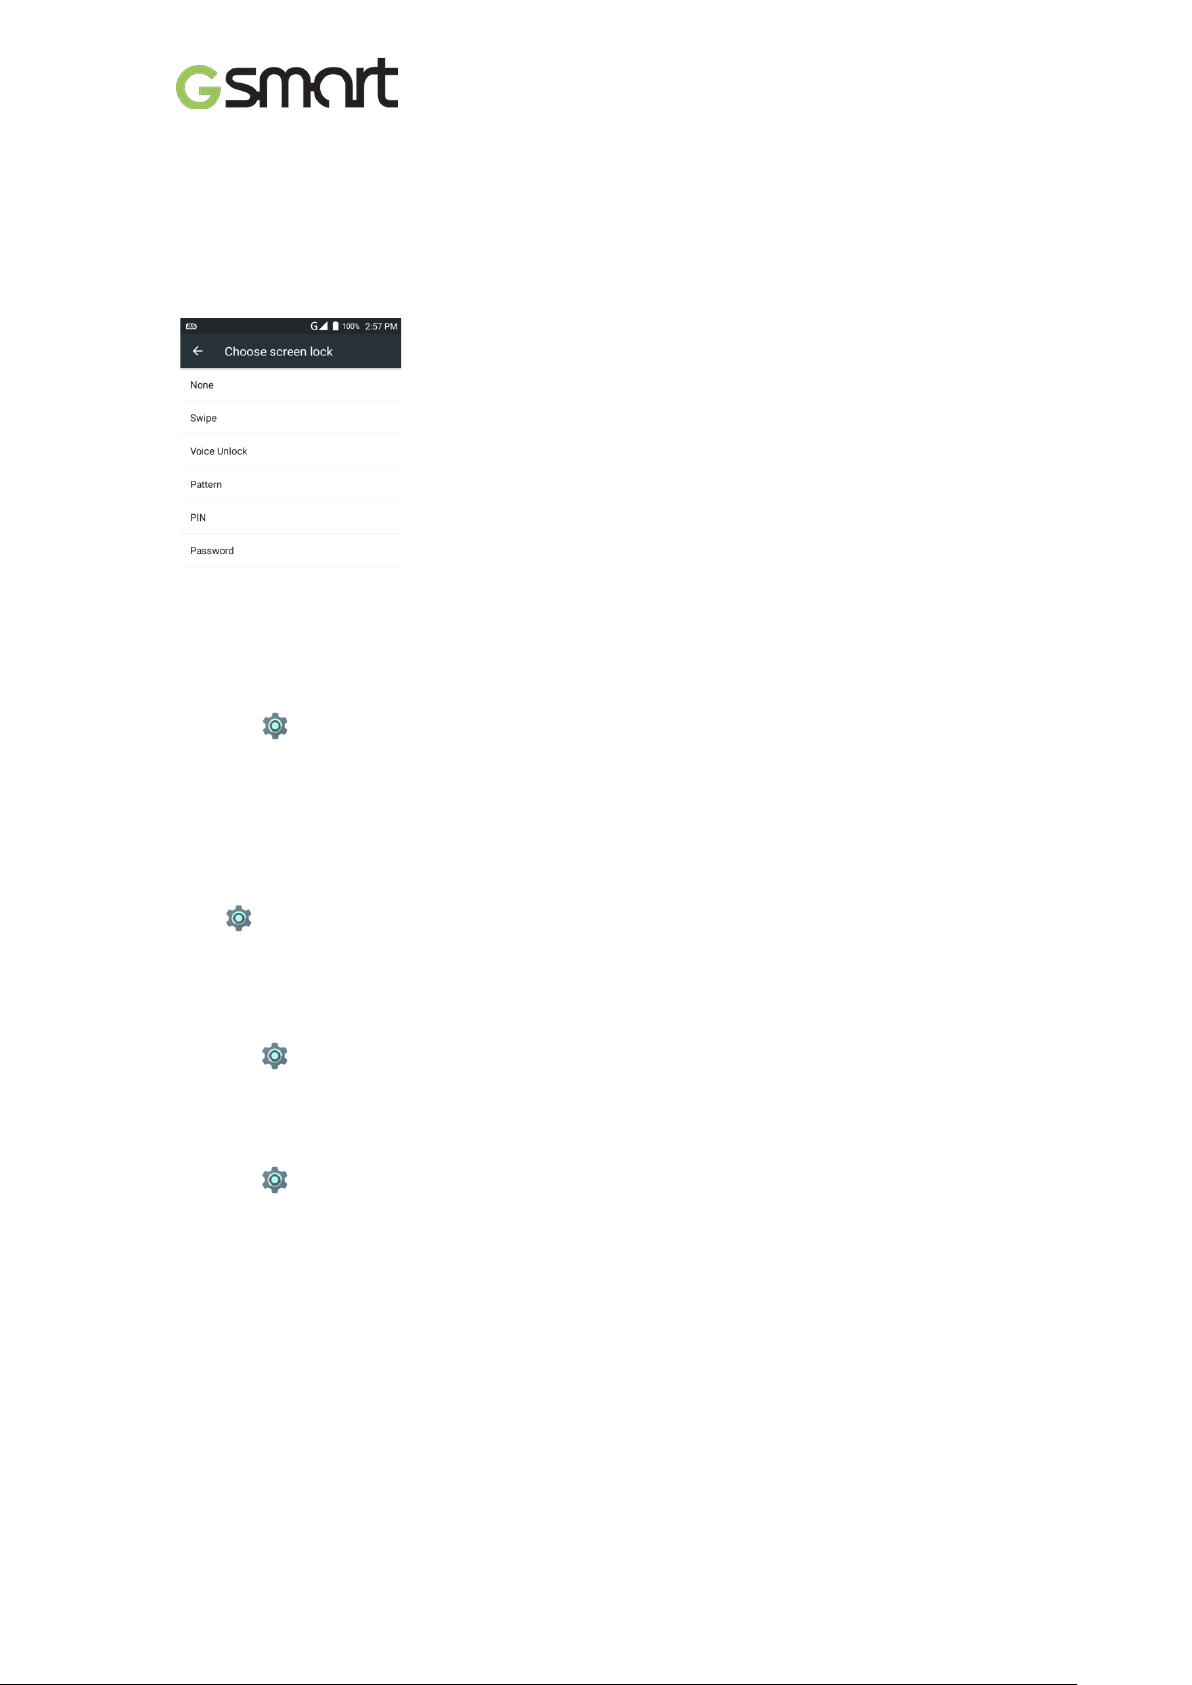
Screen lock
There are six screen lock types can protect your phone.
(1) Tap Security Screen lock Choose one screen lock type.
(2) Get into main setting screen and follow the instructions to set up.
Note:
Secure data by screen lock, required different screen unlock types every time after
phone is turned on or waked up from sleep mode every time (scre en is off ).
Disable screen lock securit y
Tap
disable it.
Enable the PIN of the SIM card
When PIN is enabled, required to enter PIN before using phone.
(1) Tap Security Set up SIM card lock.
(2) Tap “SIM1” or “SIM2”. (If SIM2 inserted).
(3) Check “Lock SIM card”. Input PIN tap “OK”.
7.2 Backup or Reset Phone
(1) Tap Backup & reset.
(2) Tap Factory data reset Reset phone Erase everyth ing reset phone.
NOTE:
Before resetting device, please remember to back up all data and information.
Security Screen lock Choose one screen lock type to unlock tap “None”
Elite|16
Page 18
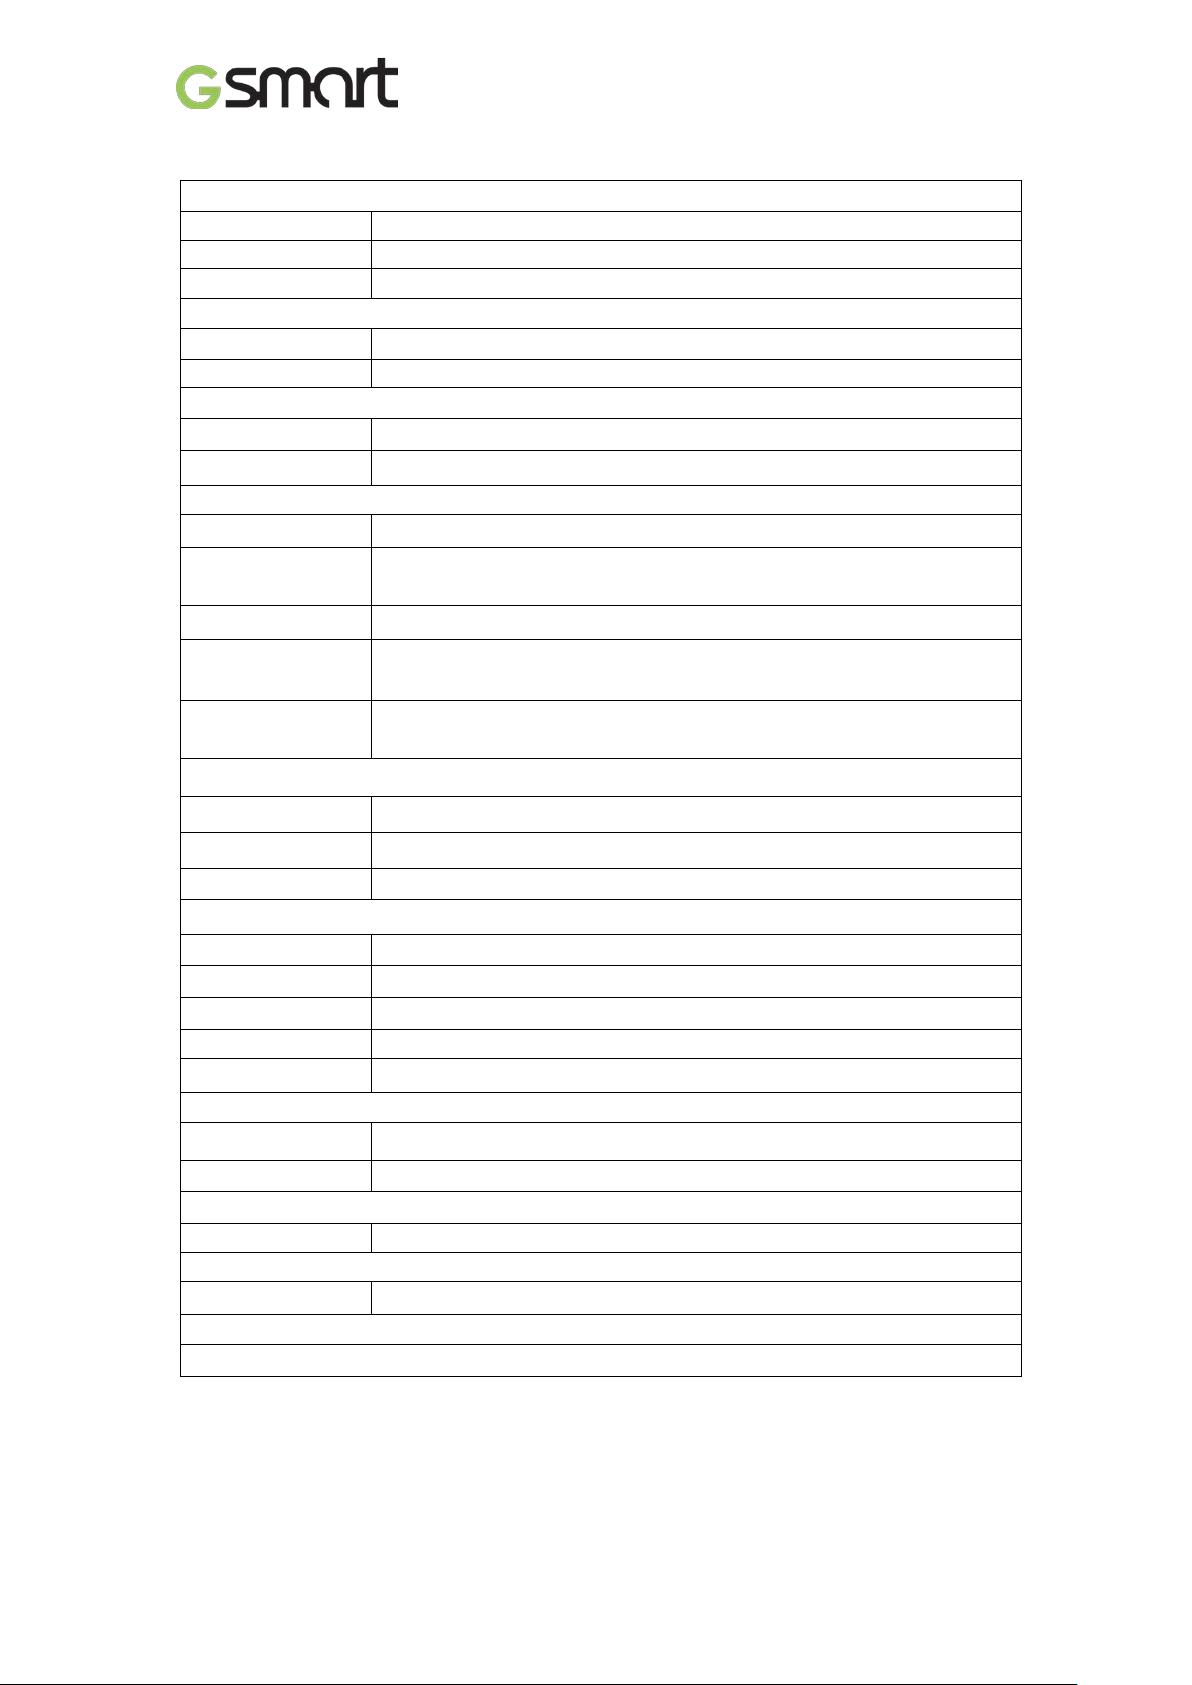
System Information
Processor
1.4GHz Octa Core
Memory
ROM 16GB/ RAM 2GB
Display
Resolutions
1280 x 720pixels
Size
Power
USB
Micro USB
Digital Camera
Temperature
SIM Card Slot
8.Specifications
Platform Android™ 5.1
Size 5”
Dimensions 143 x 72 x 9.3 mm (L x W x H)
Weight 150 grams with battery
Battery Li-polymer pack 4000mAh
Power Adapter AC
input
DC output 5V, 1.5A
100-240V, 50/60Hz,
0.5A max.
Standby time
Talk time
Radio Band & Standard
LTE 800/ 1800/ 2600MHz (B3/ 7/ 20)
GSM/GPRS/EDGE 850/ 900/ 1800/ 1900 MHz
WCDMA/HSDPA 900/ 2100 MHz
Connectivity
GPS GPS, AGPS
Wi-Fi WLAN 802.11 b/g/n
Bluetooth Bluetooth 4.0
Audio Jack 3.5 mm stereo audio jack
Rear Camera 13MP Color Camera with AF and Video Recording
Front Camera 5MP
External Memory
Memory Card Micro SD supports up to 32GB
Up to 700 hours (It may vary depending o n net wor ks and the individual
usage.)
Up to 20 hours (It may vary depending on n etworks and the ind ividual
usage.)
Operating 0°C to 40°C
Dual SIM card slot.
1. Specifications and accessories may differ subject to different SKUs or/and regions.
2. Mobile data interruption, unexpe cted error in CPU and high power consumption
The specification is subject to change without prior notice.
could be caused by in-app AD in Android phone. We suggest you try to remove
Elite|17
Page 19

those apps with AD which had been installed in your device for preventing any
abnormal situation happens and saving more p ower as well.
3. Memory comprises of approximately 2 GB firmware, plus 11.68 GB of “Phone
storage” for downloaded applications and their data, music, pictures, videos and
documents.
If this document is modified, please download the latest version on GSmart official
website.www.gigabytecm.com
Android, Google, Google Play, the Google Play logo and other marks are trademarks of
Google Inc.
Elite|18
Page 20
Android 5.1, Lollipop
User Manual
Page 21
Set up your device
When you first turn on your phone, you’ll see a Welcome screen. Choose the
language you want and touch the arrow to continue.
When prompted, sign in with your Google Account or create one at that time.
Signing in lets y ou imm ediat ely access ev ery thing associ ated w ith y our G oog le
Account, like Gmail . If you prefer, you can skip thi s s tep a nd c r ea te an ac count
later.
After you finish setting up your device, the Home screen appears for the first
time. Here, you can add app icons and widgets (an “at-a-glance” view of an
app’s most important information) to your Home screens to easily find them.
• To move between Home screens, swipe left or right.
• To see notifications, swipe down from the top of the screen with one finger.
• To open Quick Settings — frequently used settings — swipe down from the
top of the screen twice with one finger or once with two fingers.
• To open Settings, swipe down from the top of any screen with two
fingers or swipe twice with one finger, then touch in the top right.
• From the Home screen, touch Google at the top of the screen, or say “Ok
Google” to search and start telling Google what to do.
Send an SMS (text message) from your phone
1. Touch Messenger on your Home screen.
2. Touch to create a new message.
3. At the top of the screen, enter a phone number or select a contact. Type
your message, then touch .
To change your default messaging app, go to Settings > Wireless &
networks > More > Default SMS app.
Make a phone call
1. Touch Phone on a Home or All A pps screen.
2. To choose someone to call, scroll or search. If the keypad is in the way,
touch the Back button to lower it.
3. To place a call, touch the contact’s name.
Lollipop|1
Page 22
•
•
•
•
To view recent calls, touch the Recents tab. To use the keypad, touch the
keypad.
Make a video call
The Hangouts™ app lets you send and receive video calls. To open it, touch
Hangouts on a Home or All Apps screen.
Send an email
Use the Gmail app to read and write email from your Gmail or other email
addresses.
1. Touch Gmail on a Ho me or All Apps screen.
2. If you already signed into a Gmail account during setup, your email will be
synced to your device. Otherwise, add an email address now.
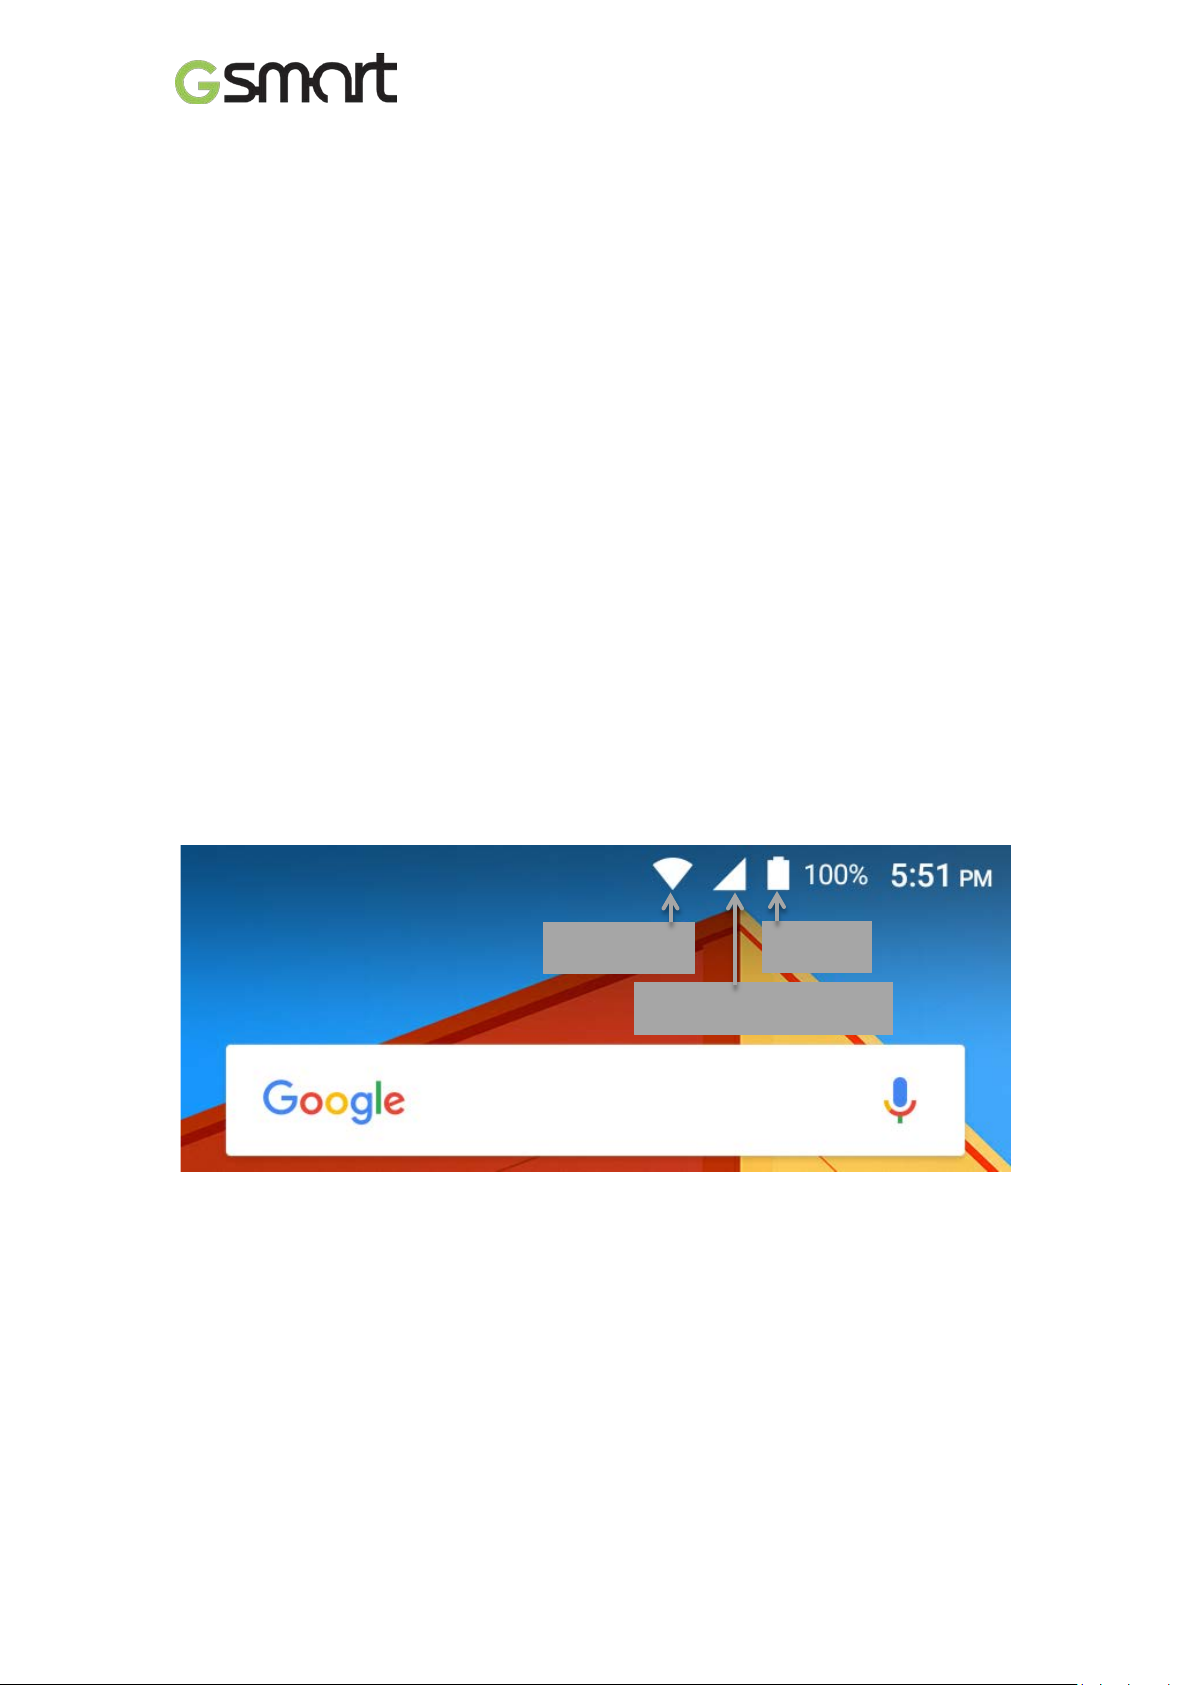
Status bar
The status bar is at the very top of the screen. On the right, you can see the
Wi-Fi an d m obi l e si g na l s tr eng th, how much battery power is left, an d t he time.
On the left, you can see which apps have sent you notifications.
Quick Settings
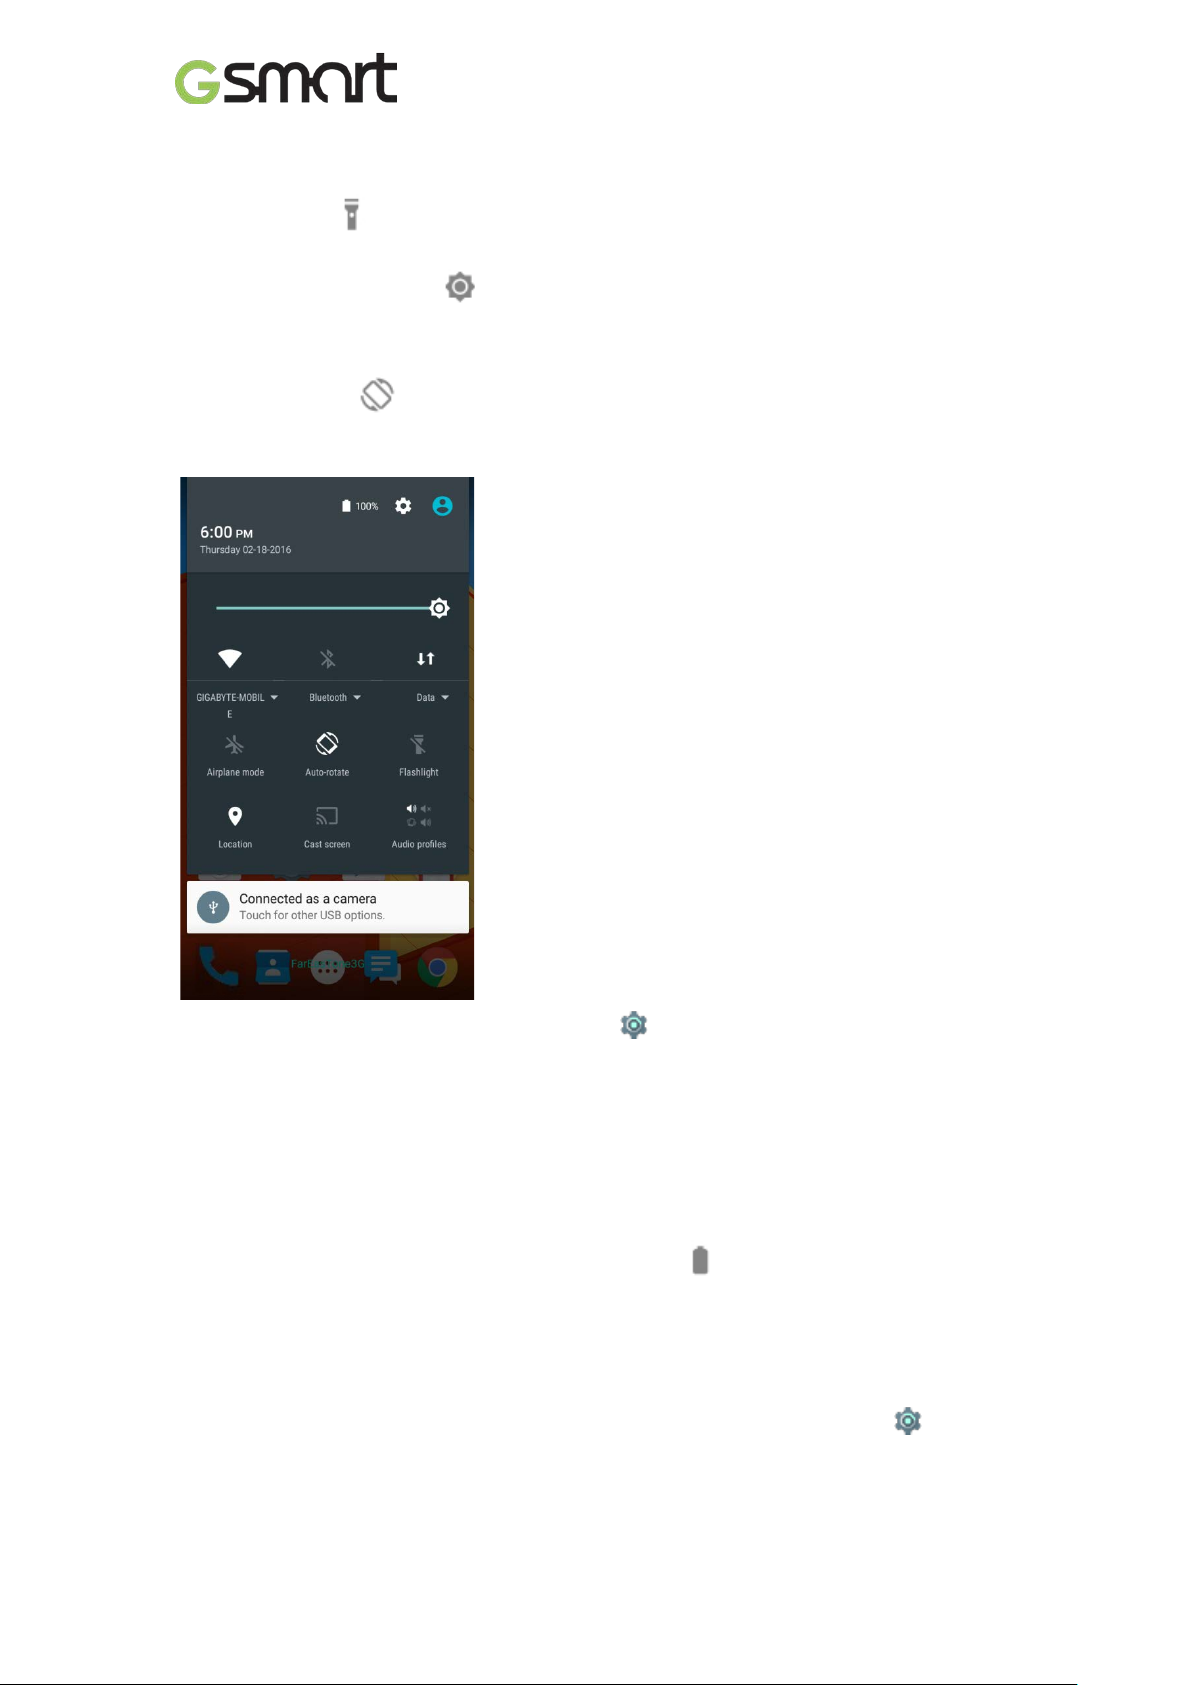
Use Quick Settings to easily get to frequently used settings, like turning on
airplane mode. To open Quick Settings, swipe down from the top of the screen
with two fingers or twice with one finger. To change a setting, just touch the
icon:
Wi-Fi network : Turn Wi-Fi on or off. To open W i-Fi settings, touch the
Wi-Fi network name.
Bluetooth settings : Turn Bluetooth on or off. To open Bluetooth
settings, touch the word “Bluetooth”.
Cellular data : See cellular usage data and turn it on or off.
Airplane mode : Turn airplane mode on or off. Airplane mode means
Lollipop|2
Page 23
•
•
•
•
your phone won’t connect to Wi-Fi or a cell signal, even if one is available.
Flashlight : Turn the flashlight on or off.
Display brightness : Slide to lower or increase the brightness of your
screen.
Auto-rotate : Lock your device’s orientation in portrait or landscape
mode.
Open the main Settings app by touching Settings in the top right.
You can also turn Auto Rotate on or off from Quick Settings, to lock or unlock
automatic screen rotation.
Manage battery life
The status bar show s how much b attery y ou hav e left, b ut y ou can also see
the exact percentage and approximate t ime of battery life remai ni ng . Swipe
down from the top of the screen, then touch Battery.
Your Android device’s battery is built to get you through your day. When you’re
running low, Androi d battery saver conserves your battery power so you can
still make calls and send SMS (text) messages. To turn it on, go to
Settings > Battery > Battery saver.
Lollipop|3
Page 24
•
•
•
Get around
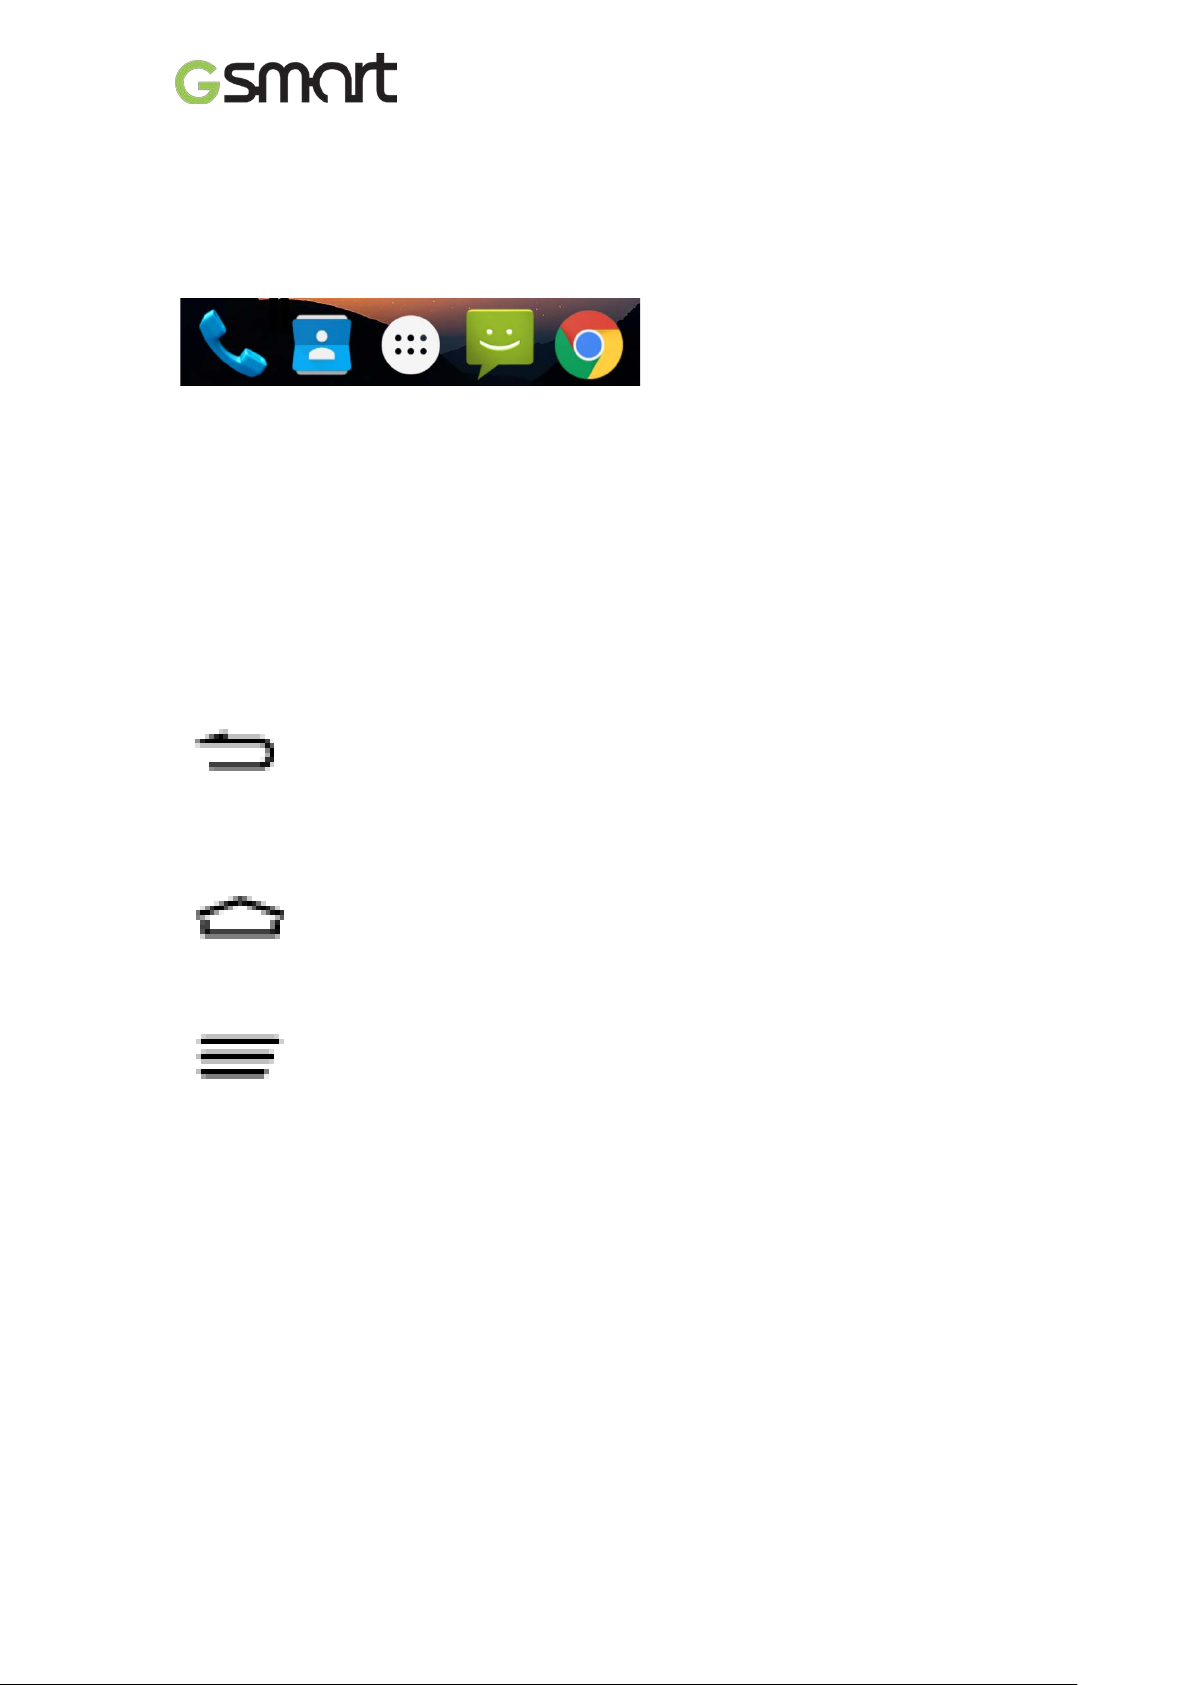
At the bottom of every Home screen you’ll find the Favorites tray: another
quick way to get to your apps.
To open an app, touch it. To drag an app in or out of the Favorites tray or
anywhere else on a Ho me scr een, to uch & h ol d it, the n mov e it w ith your fing er
where you want it.
Navigation buttons
At the bottom of most phone or tablet screens, no matter what you’re doing,
you’ll always find the navigation bar with three buttons.
Back
Opens the previous screen you were working in, even if it was in a different
app. Once you back up to the Home screen, you can’t go back any further.
Home
Opens the central Home screen. To open Google Now™, swipe up.
Recents
Opens a list of thumbnail images of screens you’ve worked with recently. To
open one, touch it. To remove a screen from the list, swipe it left or right or
touch on the X.
Organize your Home screens
To change your wallpaper, add a widget, adjust Search settings, or change
screen order, touch & hold the background of any Home screen.
You can have any number of Home screens to the right. To add a new
screen, swipe to the ri ghtmost screen and dr ag an app or w idget to the r ight
edge.
The screen to the left o f the main H ome scree n is res erved for Goog le Now,
Lollipop|4
Page 25

•
•
•
•
•
and is available only when Google Now is turned on.
To create a folder, slide one icon quickly on top of another.
To name or rename a folder, open it and touch its name.
To add an app icon to a Home screen:
1. Go to the Home screen where you want to place the app.
2. Touch All Apps.
3. Swipe from right to left, if necessary, to find the app you want.
4. To uch & hol d the app u ntil the Ho me screen appear s, slide i t into pla ce, and
lift your finger.
To add a widget:
1. Touch & hold the background, then touch Widgets.
2. Swipe right to choose a widget, which provides a quick view or way to
access information on your home screen, like a larger size clock or a view
of information in your Google Play™ library.
To move an app or widget to another position:
1. Touch & hold the icon.
2. Slide your finger to the new position. To move between Home screens,
slide toward the edge of the screen. To bump another icon out of the way,
slide slowly into it.
3. Lift your finger.
Touch & type
To select or activate something, touch it.
To type something, such as a name, password, or search terms, just touch
where you want to type. A keyboard pops up that lets you type into the field.
Other common gestures include:
Touch & hold. To select an item, touch & hold it by not lifting your finger
until something happens. This is how you access accent and other special
characters on the keyboard. Slide your finger to the accented letter you
need.
Touch, hold, & drag. Touch & hold an item for a moment and then, w ithout
lifting your finger, move your finger on the screen until you reach the target
position. You can move apps around on the Home screen.
Swipe or slide. Quickly move your finger across the surface of the screen,
without pausing w hen y ou first touc h (so you don’t dr ag somet hing inst ead).
Lollipop|5
Page 26

•
•
•
•
•
•
•
•
•
Slide a Home screen left or right to view the other Home screens.
Double-tap. Tap quickly twice on a map or image to zoom in and out.
Scale. In some apps (such as Maps, Chrome™, and Photos), you can
scale by placing two or more fingers on the screen at once and pinching
them together (to enlarge scale) or spreading them apart (to reduce it).
Rotate the screen. The orientation of most screens rotates with your
device as you turn it. To keep your screen locked in Portrait mode, swipe
down with two fingers from the top of any screen and touch
Portrait/Auto-Rotate in Quick Settings.
Android version & updates
To check your version number or get the latest system update, first go to
Settings > System > About phone. Then look for these labels:
System updates. Touch to check whether you have any pending system
updates.
Android version. Look partway down the list for this heading and the
number just below it.
Display
Change the display settings on your device by following these steps:
Go to Settings > Device > Display.
Brightness level: Move the slider to set the brightness level on your
device.
Adaptive brightness: Turn on adaptive brightness to automatically
optimize the brightness level on your device based on the available light
around you. Adaptive brightness is on by default. You can still adjust your
brightness when needed.
Sleep: Change how long it takes for your device’s screen to go black when
you’re not using it.
Daydream: Set up screens av ers that displ ay phot os, c olor ful bac kgr ounds ,
and more when your device is charging or docked.
Prompt & notification
You can change the sound and notification settings on your device by going to
Settings > Device > Prompt & notification.
Lollipop|6
Page 27
•
•
•
•
Wi-Fi signal
Mobile signal strength
Notifications alert you to the arrival of new messages, calendar events, and
alarms, as well as ongoing events, such as downloads:
Interruptions. Touch the settings to turn pho ne call and m ess ag e
interruptions on or off. If you turn Messages notifications on, touch
Calls/messages from to specify from whom you accept notifications
(Anyone, Starred contacts or Contacts Only). In Downtime, select which
days and times you allow for sound notifications.
When device is locked. Manage whether notifications can be seen when
your phone is locked, and whether sensitive c onte nt in a notification can be
seen. Sensitive content includes things like the title of a song you
downloaded, who sent you an email, or the details of a calendar event.
App Notifications. Modify the notification settings individually for apps
such as Gmail. The setting under When device is locked will always take
precedence over the setting for an individual app.
Notification access. See which apps can access your notifications.
When a notification arrives, its icon appears at the top of the screen. Icons for
pending notifications appear on the left, and system icons showing things like
the Wi-Fi signal, mobile carrier signal, or battery strength are on the right:
Battery
Certain notificati ons ca n be expande d to show more in formati on, suc h as email
previews or calendar events. The one at the top is always expanded when
possible. To expand a notification, position one finger inside it an d swipe down
slowly.
To open the related app, touch the notification icon on the left. Some
notifications also al l ow you to take specific act i ons by t ouchi ng i cons within the
notification. For example, Calendar notifications allow you to Snooze (remind
you later) or send email to other guests.
Lollipop|7
Page 28

•
•
•
When you’re finished with a notification, swipe it away. To dismiss all
notifications, touc h Dismiss at the very bottom of the notifications list.
Manage accounts on your device
Add an account
1. Go to Settings > Personal > Accounts. Touch “Add account.”
2. Touch the type of account you want to add. You may be able to choose
from choices like “Google,” “Personal (IMAP),” or “Personal (POP3).” If
you’re not sure whether to choose IMAP or POP3, try IMAP first. Many
email services use IMAP.
i. Choose “Googl e” if you want to a dd your Google Accoun t . When you sign
in with a Google Account, all the email, contacts, calendar events, and
other data associated with that account are automatically synced with your
device.
ii. Follow the on-screen instructions to add the account.
To change the settings of any of the accounts you added, follow these steps:
1. Go to Settings > Personal > Accounts.
2. Select your account. If you’re using a Google Account, touch Google and
then your account.
Remove an account
To remove an account from your device, follow these steps:
1. Check to see if the account you want to remove is the account you used to
set up your device.
If it’s not, go to step 2 and follow the instructions.
If it is, reset your device to its factory settings instead of following the steps
below. This erases all of the data from your device and you’ll need a
Google Account to set up your device again.
2. Open the Settings menu on your device.
3. Under “Accounts,” touch the name of the account you want to remove. If
you’re using a Google Account, touch Google and then the account.
When you sign out of your Google Account, all the email, contacts,
Calendar events, an d other data associ at ed with that account will no longer
automatically sync with your device.
4. Touch Menu in the top right corner of the screen.
Lollipop|8
Page 29
•
•
•
•
5. Touch Remove account.
Security
1. Go to Settings > Personal > Security > Screen lock.
2. Touch the type of lock you’d like to use.
Even when your screen is locked, you can perform certain activities.
Quick Settings: Slide down from the top of the screen to open Quick
Settings without entering your password.
Camera: Slide from right to left to open the Camera.
Access Dialer: Slide from left to r i g ht to m ake a phone call. (F i r st you have
to enter your password.)
Emergency Call s: Slide from le ft to r ig ht to make an emerg ency p hone c all
without having to enter your password.
Printing
With Android 5.1, Lollipop, you can preview and print the content of certain
screens to a printer on the same Wi-Fi network as your Android device.
Before you can print, you need a printing service installed on your device. To
check what services are currently available, go to Settings > System >
Printing.
From here, you can open each available service to turn it on or off, check
which printers it makes available, add new printers, and adjust the service’s
settings.
1. Touch Menu > Print.
2. In the dialog that appears, adjust settings such as printer, copies,
orientation, and so on.
3. Touch Print.
File storage
To attach an image to an email you’re composing, touch the Paper Clip in the
Lollipop|9
Page 30

•
•
•
•
•
•
•
top right and choose to either Attach file or Insert from Drive to select stored
images in your Drive folder.
From here, you can view any of these sources:
Recent shows you the photos or videos you’ve taken or opened most
recently.
Drive lets you attach any files stored in Google Drive™.
Images displays any photos, videos, or other images on your device.
Downloads includes most files (excluding Play content) you’ve
downloaded from emails or the Web
Photos lets you browse all the images and videos that are on your device
or have been uploaded to your Google account.
Use the Downloads app to view, reopen, or delete files you download from
Gmail or other sour ces (excluding Goog l e Pl ay books, videos, magazines, and
other media.)
In the Downloads app:
Touch an item to open it.
In your list of downloads, touch & hold an item to select it. Touch
Share and choose a sharing method from the list. Touch to delete.
Google Play streams purchases and rentals via the Internet. So the purchases
and rentals don’t always occupy storage space when you play them. Although
you can download content in Google Play apps to access offline, Google Play
content never appears i n Dow nl oads.
Screenshots
1. Make sure the image you want to capture is displayed on the screen.
2. Press the Power and Volume down buttons simultaneously.
The screenshot is automatically saved in your Photos.
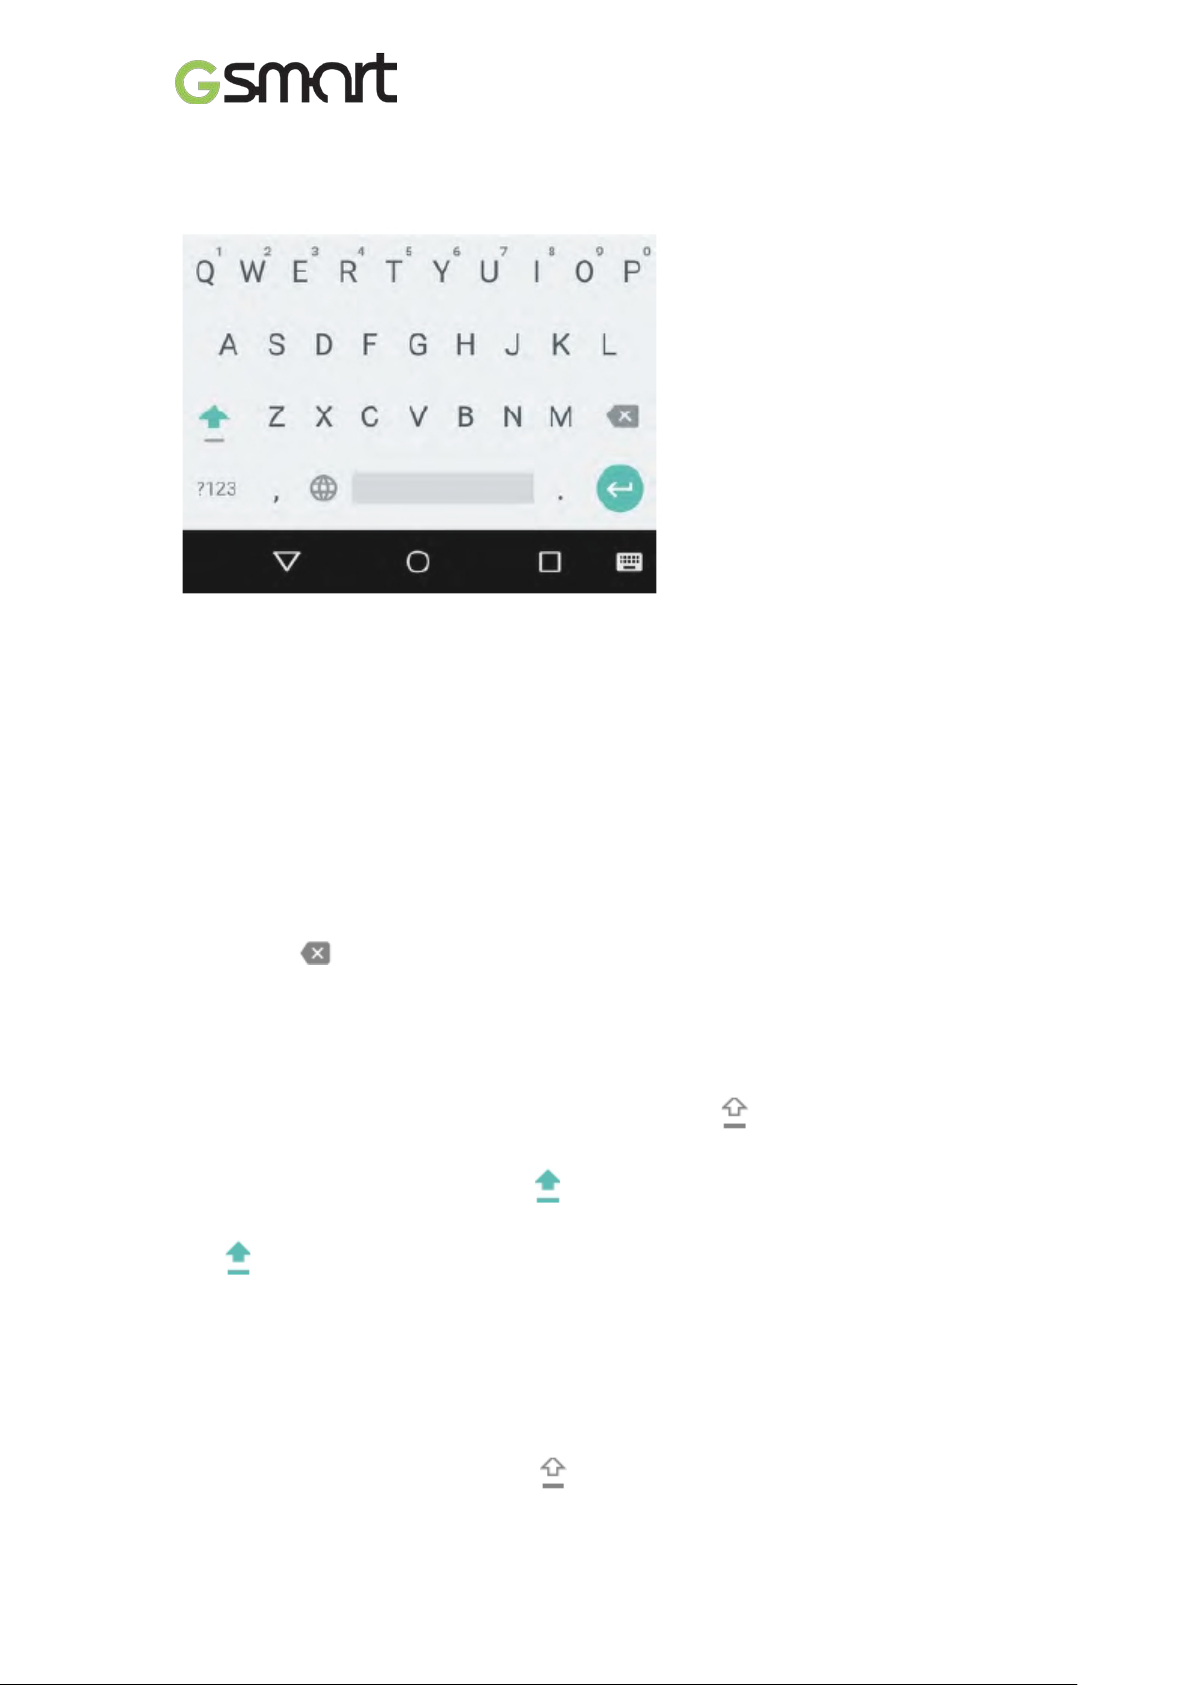
Use the keyboard
To select a keyboard language other than English, go to Settings, Personal >
Language & input.
Lollipop|10
Page 31
Enter & edit text
Use the onscreen keyboard to enter text.
Basic editing
Select text
Touch and hold or double-tap within the text.
The nearest word highlights, with a tab at each end of the selection. Drag the
tabs to change the selection.
Delete text
Touch the Delete key to delete the characters before the cursor or
selected text.
Type capital letters
To switch to capital letters for one letter, touch the Shift key once.
You can also touch and hold the Shift key while you type or you can touch
the Shift key and slide to another key.
When you release the key, the lowercase letters reappear.
Turn caps lock on
Double-tap or to uch and hold the Shift key so that it cha nges to. Touch the
Lollipop|11
Page 32
Shift key again to return to lowercase.
Change word capitalization
If you want to quickl y change the capitaliz ati on o f a w or d you’ve already typed,
you can select it and touch the Shift key.
You’ll have the option to select the capitalized word or the word in all capital
letters.
Type a symbol or character
To switch to symbol keys for one word, touch the symbol key once.
You can also touch and hold the symbol key
while you type or you can touch the symbol key and slide to another
key. When you release the key, the letter keys reappear.
View more symbols and characters
Touch and hold sy mb ols or characters to get accented c haracters or additi onal
symbols.
Cut, copy, paste
Select the text you want to cut or copy. Then touch th e C ut button or Copy
button . To paste, touch the space where you want to paste your text and
then touch Paste. If you want to replace other text with the text you copied,
highlight the text, then touch the Paste button .
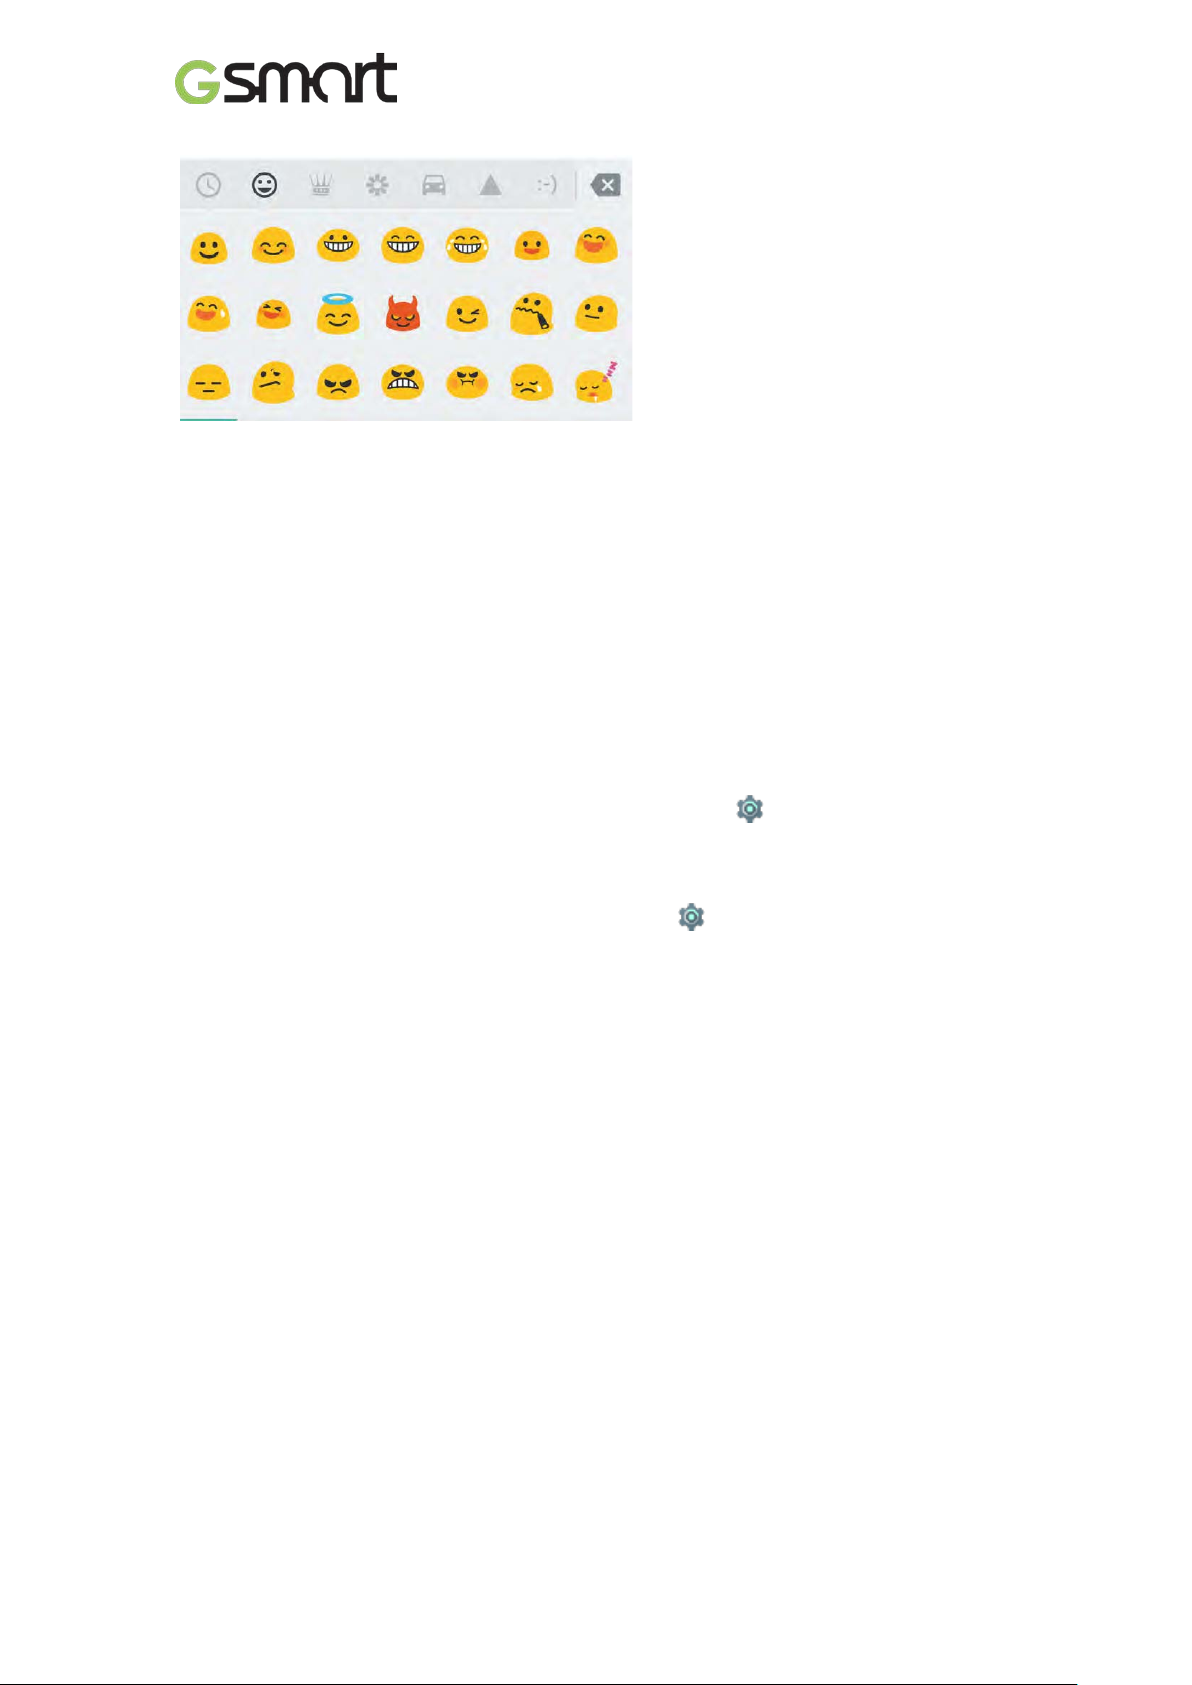
Emoji
Use Google Keyboard to choose from a variety of small, colorful images used
to express emotion (known as emoji) to add some fun to your messages.
Lollipop|12
Page 33
Use next-word suggestions
1. Touch the location where you want to input text
2. Start typing out a word. When th e w ord y ou w ant i s dis play ed i n a lis t abov e
the keyboard, touch it.
3. Continue to touch words unless the one you want doesn’t appear. If so,
type it.
Android continues to suggest words as you type.
To change your keyboard and input methods, go to Settings > Personal
> Language & input.
To turn next-word suggestions on or off, go to Settings > Personal >
Language & input > Keyboard & input methods > Google Keyboard >
Text correction > Next-word suggestions.
Gesture typing
To input a word using Gesture Typing:
1. Touch the location where you want to type to open the keyboard.
2. Slide your finger slowly across the letters of the word you want to input.
3. Release your finger when the word you want is displayed in the floating
preview or the middle of the suggestion strip. To select one of the other
words in the suggestion strip, touch it.
If the word you want isn’t shown while using Gesture Typing, you can type it
out manually. If you gesture a word and want to change it, touch the word to
see other choices in the suggestion strip.
If there are l ett er s y ou want to emphasi z e, li k e repeated letters, s uc h as the “e”
Lollipop|13
Page 34

in sleep, pause over the “e” slightly longer before moving on to the next letter.
Use Gesture Typing without the space bar
When you use Gesture Typing, there’s no need to use the space bar — just
continue to slide your finger across the letters you want to input, then lift your
finger to start the next word.
To change Gesture Ty ping set tings, g o to Settings > Language & input >
Keyboard & input methods > Google Keyboard> Gesture Typing.
Keyboard dictionaries
To manage keyboard dictionaries, go to Settings > Personal >
Language & input.
Personal dictionary
You can add your own words to your personal dictionary so that your device
remembers them. To add a word or phrase, including an optional shortcut, go
to Settings > Personal > Language & input > Google Keyboard > Text
Correction > Personal dictionary and the language of the dictionary you
want to modify, then choose Add and type in the word. When you use the
optional shortcut when typing, y our w or d or phrase appears as an option in the
suggested words above the keyboard.
Add-on dictionaries
1. Go to Settings > Personal > Language & input > Google Keyboard
> Text Correction > Add-on dictionaries.
2. You’ll see dictionaries for other languages that you can download to your
device.
3. Touch the dictionary you want, then Install.
Type by speaking
You can speak to enter text in most places where you can enter text with the
onscreen keyboard.
1. Touch a text field, or a location in the text you’ve already entered in a text
field.
2. Touch the Microphone key on the onscreen keyboard.
3. When you see the microphone image, speak what you want to type.
Lollipop|14
Page 35
•
•
•
•
•
In some languages, you can also enter punctuation by speaking it, like
“comma,” “period,” “question mark,” “exclamation mark,” or “exclamation point.”
Supported languages include English, French, Italian, German, Spanish, and
Russian.
To change your speech settings, go to Settings > Personal > Language
& input.
Try Some apps
All apps
This is where you can see all your apps, including those that come with your
phone and those y ou downloaded on Goog l e Pl ay. You can move app ic o ns to
any of your Home screens.
From All Apps, you can:
Move between screens. Swipe left or right.
Open an app. Touch its icon.
Place an app icon on a Home screen. Touch & hold the app icon, slide
your finger, and lift your finger to drop the icon into your desired Home
screen.
Browse widgets. Touch the Widgets tab at the top of any All Apps screen.
Get more apps. Touch Google Play in the list of app icons.
To remove an app icon fro m the Ho me scre en w ithout r emov ing it per manently
from your device, touc h & hol d it, sl ide y our fing er tow ar d the top of t he sc reen ,
and drop the app over Remove.
To view info about an app from an All Apps screen, touch & hold it, slide your
finger toward the top of the screen, and drop the app over App Inf o.
Gmail
Use the Gmail app to read and write email from any mobile device. To open it,
touch Gmail on a Home or All Apps screen.
Lollipop|15
Page 36
•
•
•
•
•
•
You can use your Gmail account to sign in to all Google Apps™ and services ,
including these and many more:
Google Now, for getting the information you need at just the right time
Calendar
People, for keeping track of your contacts
Google Drive, for working with documents
While you’re reading a message:
Touch the icons along the top of the screen to archive, throw away, and
mark as read. Touch to mark a message as unread. Look under the
Menu to move, change labels, mute, print and do other actions to the
email.
Swipe left or right to read the previous or next conversation.
Organize your conversations: From the Inbox, touch & hold a conversation
to select it. Then use the icons and menu along the top of the screen to
manage the selected messages.
To change your settings, add an account, or get help, touc h the m enu icon or
button.
No matter where you are in Gmail, you can always get back to the Inbox by
touching the Back button at the top of the screen.
From the Inbox, touch Menu to open the drawer that reveals available
accounts, labels, and so on.
To add a non-Gmail email account to Gmail:
1. Go to Settings > Personal > Accounts > Add account.
2. Touch the type of account you want to add. You may be able to choose
from choices like “Google,” “Personal,” or “Work.”
3. Choose “Google” if you want to add your Google Account. When you sign
in with a Google Account, all the email, contacts, Calendar events, and
other data associated with that account are automatically synced with your
device.
4. Follow the on-screen instructions to add the account.
To change the settings of any of the accounts you added, follow these steps:
Lollipop|16
Page 37
•
•
1. Open the Settings menu on your device.
2. Under “Personal,” touch “Accou nts” an d selec t y our accoun t. If y ou’r e usi ng
a Google account, touch Google and then your account.
Google Play
1. Open the Google Play app.
2. Touch Menu at the top left.
From here, you can view the current account or switch to another, view your
purchased apps, check your wish list, and so on.
To set preferences, clear your search history, and turn on user controls, go to
Menu > Settings. For example, to filter apps based on maturity level or
require a PIN for purchases, touch Content filtering or Require
authentication for purchases.
To find your content, open any of the Google Play apps fro m the All Apps
screen and touch Menu.
Photos
To open Photos from the:
Camera app. Swipe from right to left.
All Apps screen. Touch Photos.
When you’re signed into your device with your Google Account, the Photos
app makes it easy to auto-back up al l t h e p hotos and videos you t ak e , or g ani ze
them, and share with friends.
You can also browse, search, cro p, edit , and tag photos, and create albums
and movies.
Lollipop|17
Page 38
•
•
•
•
•
•
•
•
•
•
•
Touch Menu to:
Switch to or from Google+™.
Organize and edit your photos and videos.
Create and browse albums.
Explore Auto Awesome animations, panoramas, or merged group shots
created for you automatically.
Browse photos of yourself.
Contacts
When you first turn on your device and sign into a Google Account, existing
contacts from that account are synced with your Contacts app. After that, your
contacts stay in sync automatically on your different devices or a Web
browser.
If you use Exchange, you can also sync that contact information with
Contacts.
All your Contacts information is available from Gmail, G oog l e Talk, and oth er
apps. As you add co ntac ts fro m di fferent s our ces , they ’r e sy nced automatically
across all the places you need them.
When you open the Contacts app, you can:
View all contacts or fav or it es. C hoose fr om the top of the scr een .
Add a contact. Touch Add Contact.
Read details. Touch a name to see details for a contact or group.
Share the contact or place a frequently used contact on the Home s cr een.
Touch Menu.
Edit details. While viewing a contact, touch Edit at the top of the
screen to edit the contact’s information.
Change your settings. While viewing the main list screen, touch Menu
to import or export contacts, choose display options and add or edit
Lollipop|18
Page 39
•
•
•
accounts.
Messenger
To read and respond to messages, follow these steps:
1. When you receive a new message, you’ll get a notification on your device
and a new message icon will appear in your notification panel.
2. To open and read the message, touch the new message notification in the
notifications panel.
3. To respond to a message, touch the Send message box and type your
message.
4. To send, touch Send.
To create and send a text message, follow these steps:
1. Go to All Apps and touch Messenger.
2. In the main Messenger screen, touch .
3. Enter a name from your contacts or a mobile phone number in the To field.
To send a group text message, touch the group icon in the To field
and touch additional contacts or enter additional mobile phone numbers. .
Below the To field, y ou can c hoos e fro m your freq uent c ont acts by to uching
Frequents or your list of contacts by touching All contacts.
If you’re sending a group message, make sure you turn on group
messaging in Messenger setting.
If you choose to enter a name or mobile number in the To fiel d, ma tching
contacts appear as you type, if any exist among your contacts. You can
touch a suggested recipient or cont inue entering the phone number.
4. To write your message, touch the Send message box and type your
message. Learn more about using Google Keyboard and emoji.
5. If you touch the Back button while composing a message, it’s saved as
a draft in Messenger. Touch the conversation to resume composing it.
6. To send, touch Send.
You can manage your messages, conversations, notifications, and contacts
right from Messenger home screen. You can also change your sound,
notification, and other set ti ng s.
Lollipop|19
Page 40
•
•
•
•
Delete messages
1. Open a conversation in Messenger.
2. Touch and hold the message you wish to delete.
3. When the “Message options” box appears, touch Delete.
Delete conversations
While viewing your list of conversations in Messenger, touch and hold a
conversation to select it.
To delete the conversation, touch Trash in the top right corner of the
screen.
Archive. Touch Archive to store the conversation.
Delete. Touch to delete the conversation from the Messenger app.
Turn notifications on or off. Touch Notification to turn notific ations on
or off for the conversation.
Add contact. Touch Add contact to add the conversation’s contact to
your list of contacts.
Hangouts
With Hangouts, you can make video calls to anyone with a Google Account.
You can share photos and your location with others.
Calendar
As you edit events, they’re synced automatically across all the places you
need them.
To change the Calend ar v iew , touch th e Menu and choose Schedule, Day,
or Week from the top of the screen.
From any of these views, you can:
Lollipop|20
Page 41

•
•
•
•
Read or edit event details. Touch an event to view its details.
Manage events and calendars. Touch icons across the top of the screen
or the menu to search or create events, return to today, or adjust settings.
To email everyone who is invited to an event, you have two options:
Open the event fro m th e Calen dar ap p at any time and touc h Em ail guest s.
You have a list of quick responses or you can write your own.
When a notification of the event arrives just before the meeting starts,
swipe down the notification shade. Then swipe using one finger to expand
the notification if necessary, and touch Email guests.
Accessibility
To use the accessibility options, open Settings > System >
Accessibility.
Captions: You can turn on captions for your device and specify the language,
text size, and sty le. F or som e apps, you h av e to turn on t he capti ons in t he ap p
itself.
TalkBack is a scr een reader from Google tha t com es with your Android phone .
It uses spoken feedback to describe events, such as notifications, and the
results of your actions, such as opening an app. When TalkBack is on, you
have to double-tap in order to select something. TalkBack settings let you
control the nature of TalkBack speech, feedback, and touch exploration
(Explore by touch).
Lollipop|21
 Loading...