

GSM Gecapp crono Wi-Fi User Manual
Rep.1
Download the
App
Wi-Fi timer
GECA HAS DEVELOPED A SMARTPHONE/TABLET APP ABLE TO
INTERFACE IN A SIMPLE AND INTUITIVE MANNER TO THE CONNECTED
DEVICES. THE USER CAN CHECK AT ANY TIME THE STATUS OF THE
RELAYS AND CHANGE IT AS NEEDED.


CONTENTS
P.31 APP mode for op. system iOS
PAGE 5 - The programmable thermostat
PAGE 32 - Set up new device.
PAGE 6 - General description
- Power supply 230Vac-50/60 Hz
PAGE 34
-Interface Home page App.
PAGE 7
- Wiring REL1
PAGE 35 - Possible errors.
- Add Smartphone/Tablet.
-EXT PROBE connection
-Add/Delete device.
PAGE 8 - Remote input
- AUX output
- Installation.
PAGE 36 - Enter settings via
App.
- Power On/Off
Programmable Thermostat
PAGE 9
- Mounting on box 503.
PAGE 37 - Automatic Program heating operating mode.
- Wall mounting.
PAGE 38 - Weekly Program.
PAGE 10 - The first start-up
- Description of programmable thermostat
PAGE 40 - Automatic Program heating operating mode.
PAGE 11
- Temperature chart programmable thermostat
PAGE 41 - Programmed manual.
- System activation contact.
PAGE 42 - Advanced parameters
Auxiliary relay
PAGE 12
- Settings MENU
Remote contact.
Maximum/minimum temperature exceeded.
Antifreeze temperature.
PAGE 13 - Signal quality.
PAGE 14
-
Wi-Fi
submenu.
PAGE 45 - Problems/solutions
WiFi module ON.
WiFi module OFF.
Wi-Fi setup.
PAGE 47 APP mode for op. system Android
PAGE 48 - Set up new device.
PAGE 16 -
Wi-Fi
module reset.
PAGE 50 -
App.Home page
interface
PAGE 17
- AUX (Auxiliary relay).
PAGE 51 - Possible errors.
- Add Smartphone/Tablet.
-Add/Delete device.
PAGE 18 - Correction of temperature measured (Cort.)
PAGE 52 - Send settings via
App.
PAGE 19
-Internal/external temperature probe (Probe)
- Power On/Off programmable thermostat
- Reset programmable thermostat (RST).
PAGE 53 - Automatic Program heating operating mode.
PAGE 20 - Exit
PAGE 54 - Weekly Program.
PAGE 21 - Weekly programming.
PAGE 56 - Automatic Program heating operating mode.
PAGE 22 - COPY function.
- Setting DAY and TIME.
PAGE 57 - Programmed manual.
PAGE 23
- Manual Program.
PAGE 58 - Advanced parameters
Auxiliary relay
PAGE 24
- Manual Program Timer.
Remote contact.
Maximum/minimum temperature exceeded.
PAGE 25
- Summer/Winter mode
Antifreeze temperature.
PAGE 26
- valve
- Lock with password.
PAGE 60 - Problems/solutions
PAGE 27 - TEMPERATURE DIFFERENTIAL.
PAGE 28 - Correct use and maintenance
- Technical specifications.
3

4

5
THE CHRONO
Wi-Fi timer
6
BAT
BAT
GENERAL DESCRIPTION
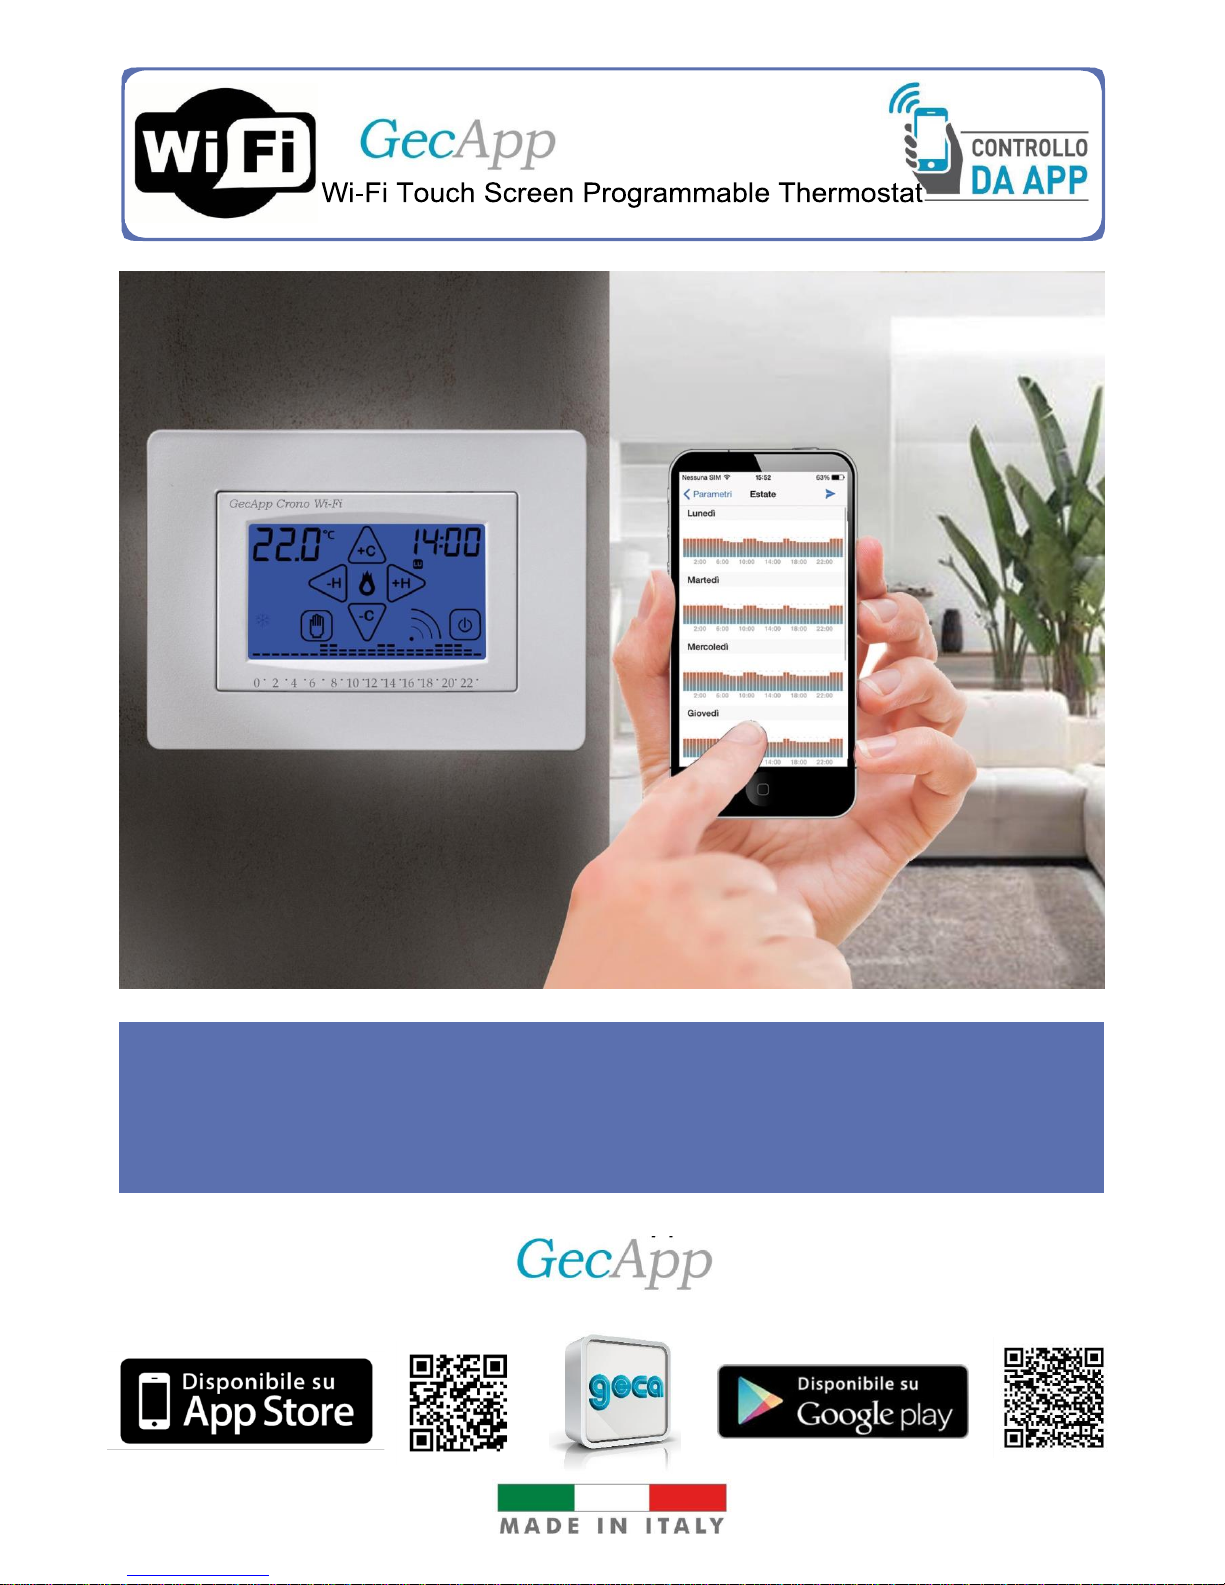
GecApp crono Wi-Fi is a Wi-Fi touch screen programmable thermostat that allows you to control
the temperature in your home via an App in a simple and intuitive manner, using your
Smartphone or Tablet.
GecApp crono Wi-Fi is equipped with a back-lit display with graphical display of temperatures,
editable through simple and functional controls that facilitate programming. GecApp crono Wi-Fi
allows you to control both heating and cooling systems.
It helps you save energy by activating the heating or air conditioning systems only when needed.
GecApp crono Wi-Fi features:
-
an input (EXT PROBE) to which you can connect a 4-metre long external temperature probe
(code 20301037);
-
a remote input to which you can connect an external device to find a specific event, such as
opening/closing of a valve, an alarm etc.
Contact opening/ closing involves sending a push-notification to your Smartphone/Tablet.
-
a second relay (AUX) can be controlled automatically (Auto) via the Programmable Thermostat
allowing you to replicate the status of the Programmable Thermostat on other thermostats or
programmable thermostats installed in your home or, in Manual mode (On-Off), it allows you to
enable/disable external devices and/or systems.
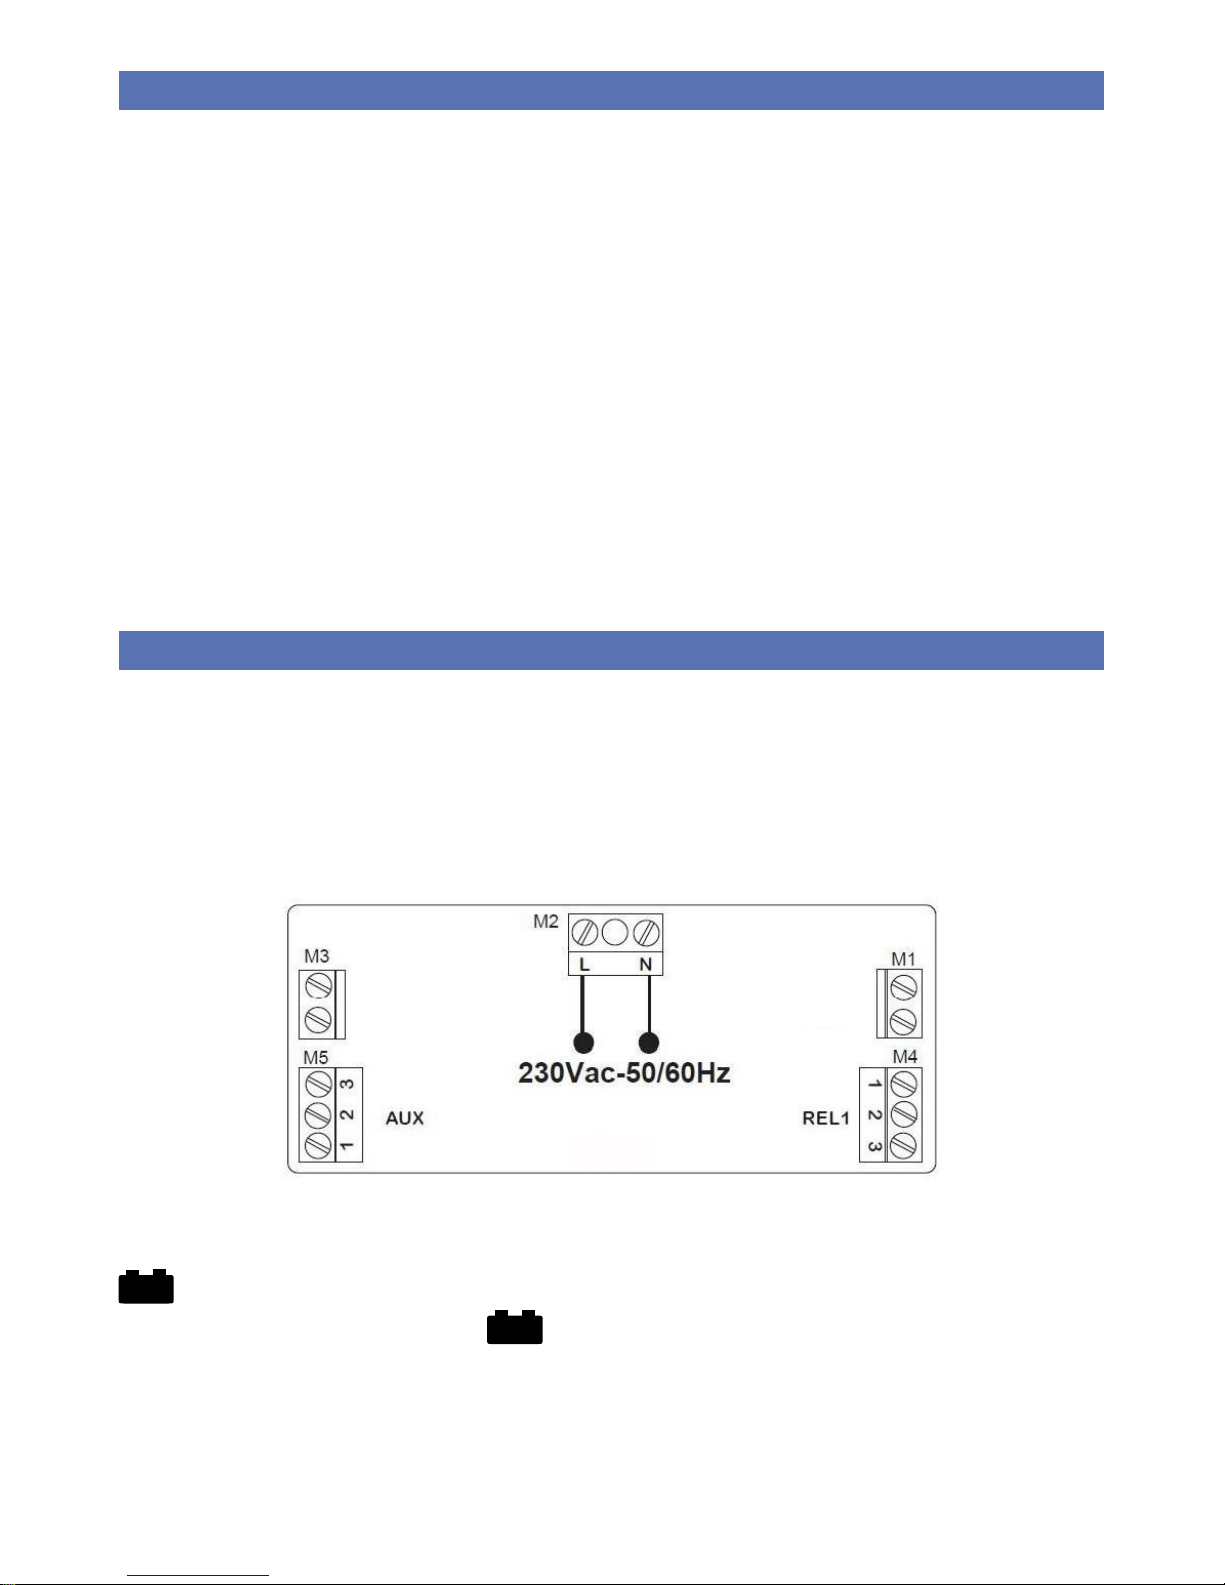
POWER SUPPLY 230Vac-50/60Hz
N.B. BEFORE CONNECTING THE PROGRAMMABLE THERMOSTAT GecApp crono Wi-Fi,
CUT OFF THE MAINS VOLTAGE.
Remove the two screws from the "Base" of the GecApp crono Wi-Fi and remove the RED
COVER (if installed) to access the power supply terminals.
N.B. The GecApp crono Wi-Fi programmable thermostat is powered at 230Vac-50/60Hz via
terminals "L" and "N" (terminal block M2), (Fig. 1).
Once you have completed wiring, fit the RED COVER.
Fig.1
Gecapp crono Wi-Fi also features TWO AAA ALKALINE BATTERIES RECHARGEABLE at 1.2V acting as back-up battery in case of power failure (if the symbol is lit). Actually,
they keep day and hour of the programmable thermostat updated.
Without mains voltage (the symbol lit) GecApp crono Wi-Fi disables the operation
of the relays. The batteries are essential deactivate the relay in the absence of power from the
mains. The mini batteries rechargeable at 1.2V can be easily inserted in the dedicated battery
compartment located under the flap, following the polarity indicated on the plastic casing (Fig. 2).
When the batteries must be replaced, dispose of the used ones in the appropriate bins for separate
waste collection.
REMOTE
PROBE
EXT
7
You should always use new batteries and replace them every 2 years.
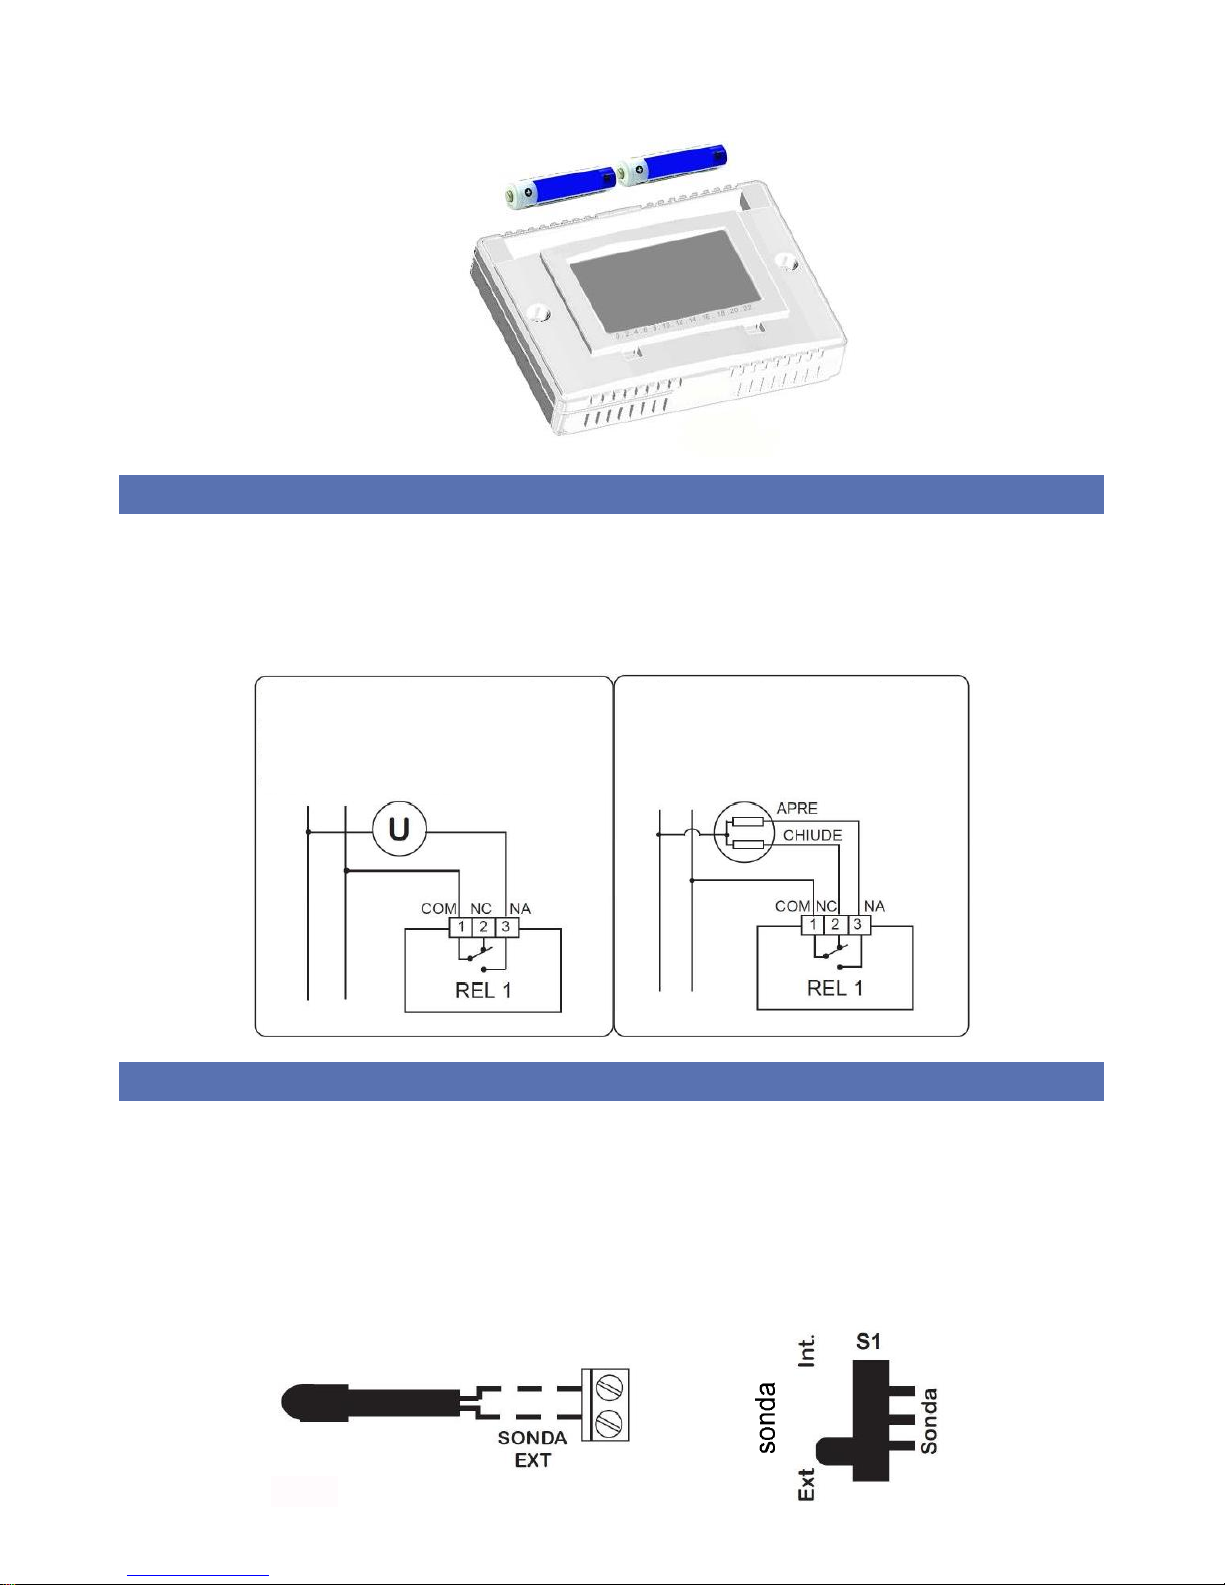
REL 1 WIRING
Via the terminal block REL1 (M4), able to withstand a charge of 5A-250Vac, it is possible to
connect the following devices (heating/cooling) using the diagrams below:
Fig.3
EXT PROBE CONNECTION
Gecapp crono Wi-Fi allows you to connect an external temperature probe 4-metre long (code
2.030.1037) to EXT PROBE terminals (M1) (Fig. 4).
After connecting the external temperature probe, set the switch (S1 in Fig. 4) at the rear of the
programmable thermostat to position Ext and set the type of PROBE in the Settings MENU ' of
the programmable thermostat.
The programmable thermostat GecApp crono Wi-Fi will use the EXT PROBE as room
temperature sensor.
Fig.4
Fig.2
M1
Connection with burner, wallmounted boiler, air conditioning
system, zone valve with spring
return:
Connection to zone valve:

8
REMOTE INPUT
GecApp crono Wi-Fi has a REMOTE input (M3) (Fig. 5) to which you can connect a device or
system to know a specific event such as opening or closing of a valve, blockage of the boiler, an
alarm ... etc.
The REMOTE input is a dry NO contact (Normally Open).
Fig.5
AUX OUTPUT
GecApp crono Wi-Fi has an AUX relay (M5) that allows to activate/deactivate thermostats,
programmable thermostats (T-Touch, Green) and many other devices.
The AUX relay (M5) (Fig. 6), has 3 voltage-free contacts: COM, NO, NC, able to withstand a
maximum charge of 5A-250Vac.
Fig.6
The AUX output can be set:
- to AUTOMATIC operation (Auto):
The auxiliary relay follows the state of the programmable thermostat
GecApp crono Wi-Fi. If the GecApp crono Wi-Fi is set to ON, the
auxiliary relay is ON (Closed).
If the GecApp crono Wi-Fi is set to OFF, the auxiliary relay is OFF (Open).
- to MANUAL mode (ON-OFF):
If you set the auxiliary Relay to ON, the AUX output will be ON (Closed). If you
set the auxiliary Relay to OFF, the AUX output will be OFF (Open).
The AUX output can be set via the App or via the programmable thermostat GecApp crono Wi-Fi
in the Settings MENU- AUX.
ATTENTION: The AUX output goes to OFF mode If there is no mains voltage and cannot be set.
INSTALLATION
GecApp crono Wi-Fi can be installed directly on 3 modules or in built-in
box on the wall using the screws supplied (Fig. 7).
In both cases the recommended height is 1.5 m above the floor, in a dry
place, protected from direct airflow and away from heat sources.
N.B. When mounting the section between the BASE and the FRONT
SIDE pay attention to carry out the CONNECTIONS on the back of the
programmable thermostat.
Fig.7
9
MOUNTING ON BOX 503
After making the electrical connection, proceed as shown in Figure 8: 1 - Fix the
"Base" to "Box 503" using the screws “C” supplied.
2
- Fix the "Front Side" to the "Base" using the screws "A".
3
- Install the Flap on the "Front side” by inserting the 4 hooks into the slots.
Fig.8
WALL MOUNTING
After making the electrical connection, proceed as shown in Figure 9: 1- Fix the Base
to the wall using dowels and screws "B".
2
- Fix the "Front Side" of the programmable thermostat to the "Base" using the screws "A".
3
- Install the Flap on the "Front side” by inserting the 4 hooks into the slots.
Fig.9
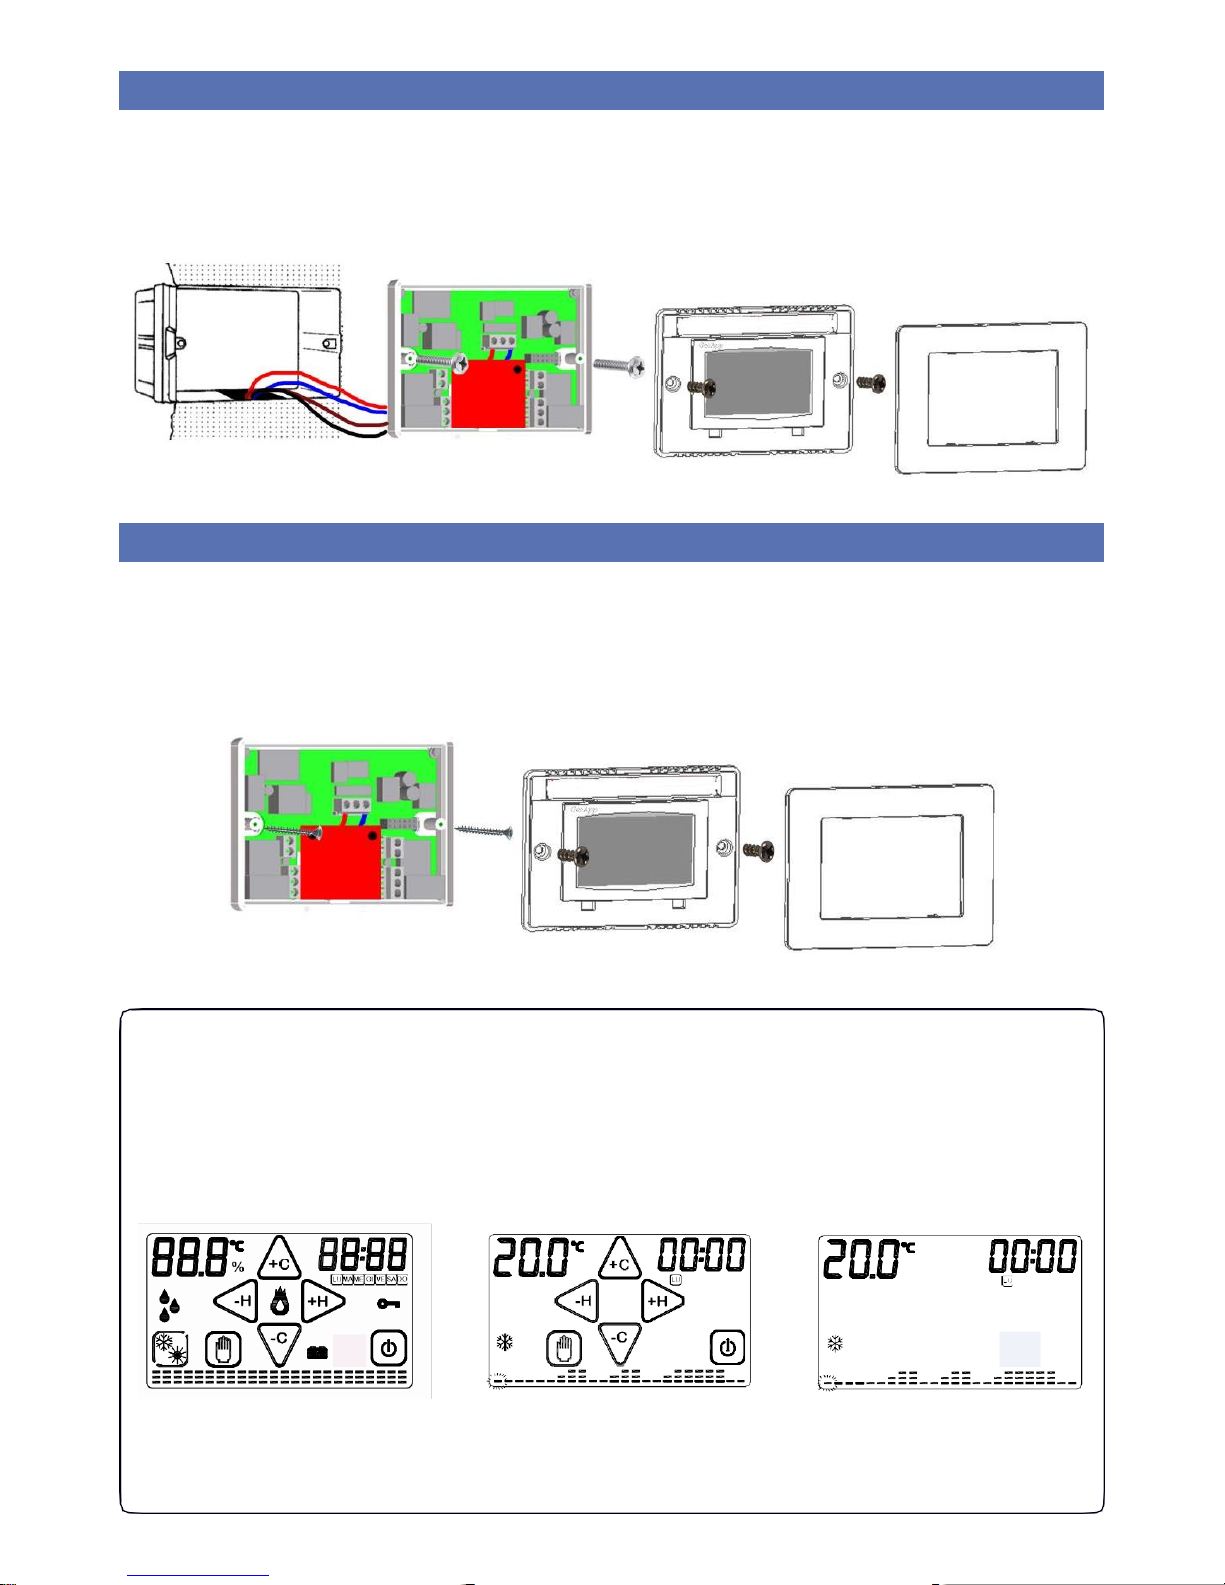
FIRST START-UP
Once the programmable thermostat GecApp crono Wi-Fi is powered, it runs a checkup
cycle, switching on all display sections by enabling the charge for a few seconds (Fig. 10).
Thereupon, the programmable thermostat GecApp crono Wi-Fi displays the Home page
(Fig.11). After about ten seconds, the display goes in STAND-BY mode (Fig. 12). Upon first
start-up, the Wi-Fi module is off.
Fig.10 Fig.11 Fig.12
Gecapp crono Wi-Fi has already stored a weekly schedule of temperatures which can be
changed as needed (Fig.12).
-EXIT FUNCTION / PROGRAM (TOUCH)
- SETTING OF DIFF. SWITCH (PRESSED)
- Settings MENU(PRESSED)
- ACCESS WEEKLY PROGRAMMING (TOUCH)
- INCREASE TEMPERATURE SLOWLY
(TOUCH)
- INCREASE TEMPERATURE FAST
(PRESSED)
- ENABLE COPY DAILY PROGRAM (PRESSED)
- COPY DAILY PROGRAM (TOUCH)
-
: VIEW PROGRAM SAVING (PRESSED)
- Settings MENU(PRESSED)
(Single TOUCH or PRESSED)
- ACCESS WEEKLY PROGRAMMING (TOUCH)
(PRESSED)
- ACCESS WEEKLY PROGRAMMING (TOUCH)
(Single TOUCH or PRESSED)
- ACCESS WEEKLY PROGRAMMING (TOUCH)
- ENABLE EDIT SEASON (PRESSED)
- EDIT SEASON (TOUCH)
- INPUT/OUTPUT PROGR. MANUAL (PRESSED)
-PASSWORD (PRESSED)
- ACCESS WEEKLY PROGRAMMING (TOUCH)
- DECREASE TEMPERATURE SLOWLY (TOUCH)
- DECREASE TEMPERATURE FAST (PRESSED)
10
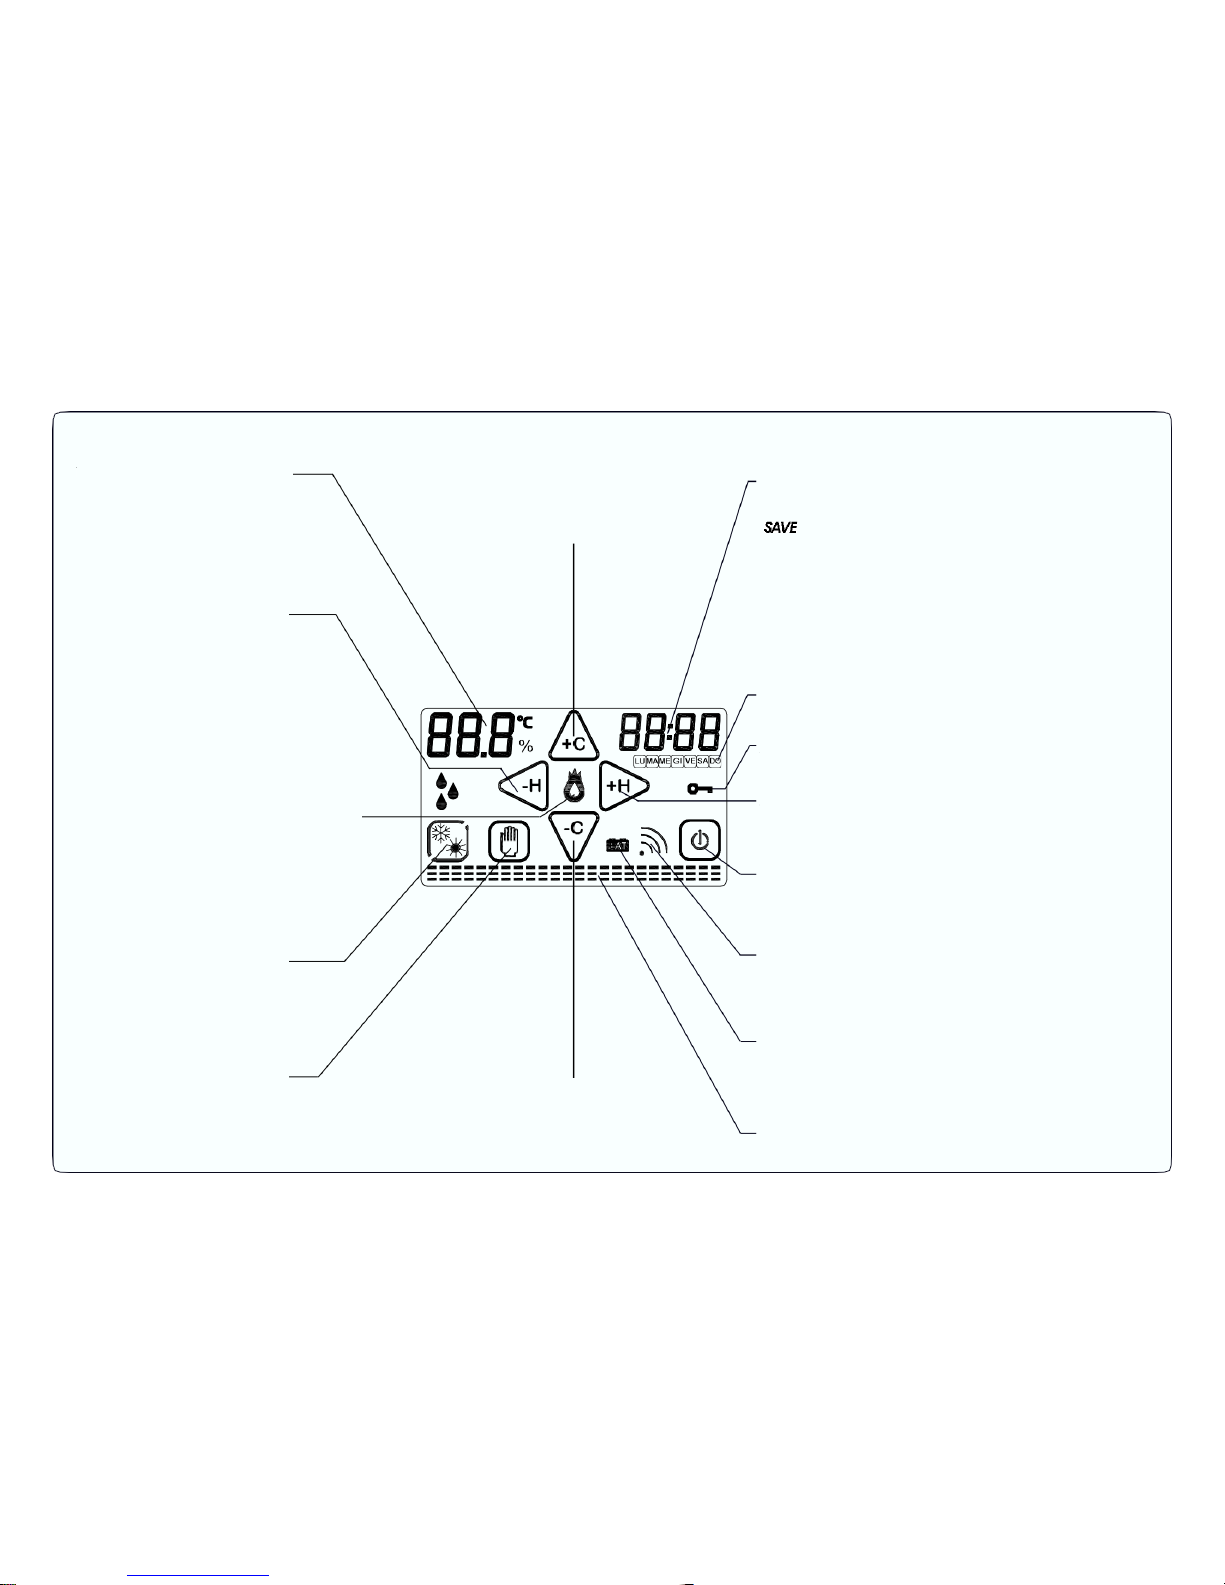
TEMPERATURE MEASURED
DECREMENT HOUR/MINUTE
HEATING/
AIR CONDITIONING SYSTEM WORKING
SUMMER/WINTER MODE
MANUAL PROGRAM
DECREMENT OF SET TEMPERATURE
AND TEMPERATURE DIFFERENTIAL
INCREMENT OF SET TEMPERATURE
AND TEMPERATURE DIFFERENTIAL
HOUR of the DAY.
DAYS of the WEEK.
UNLOCK FUNCTION
INCREMENT HOUR/MINUTE
ON/OFF.
-ON/OFF (PRESSED)
-PASSWORD (PRESSED)
WI-FI NETWORK SIGNAL SYMBOL.
WARNING EMPTY BATTERY NO VOLTAGE
FROM MAINS 50/60 Hz.
DAILY/WEEKLY CHART OF PROGRAMMED
TEMPERATURES.
11
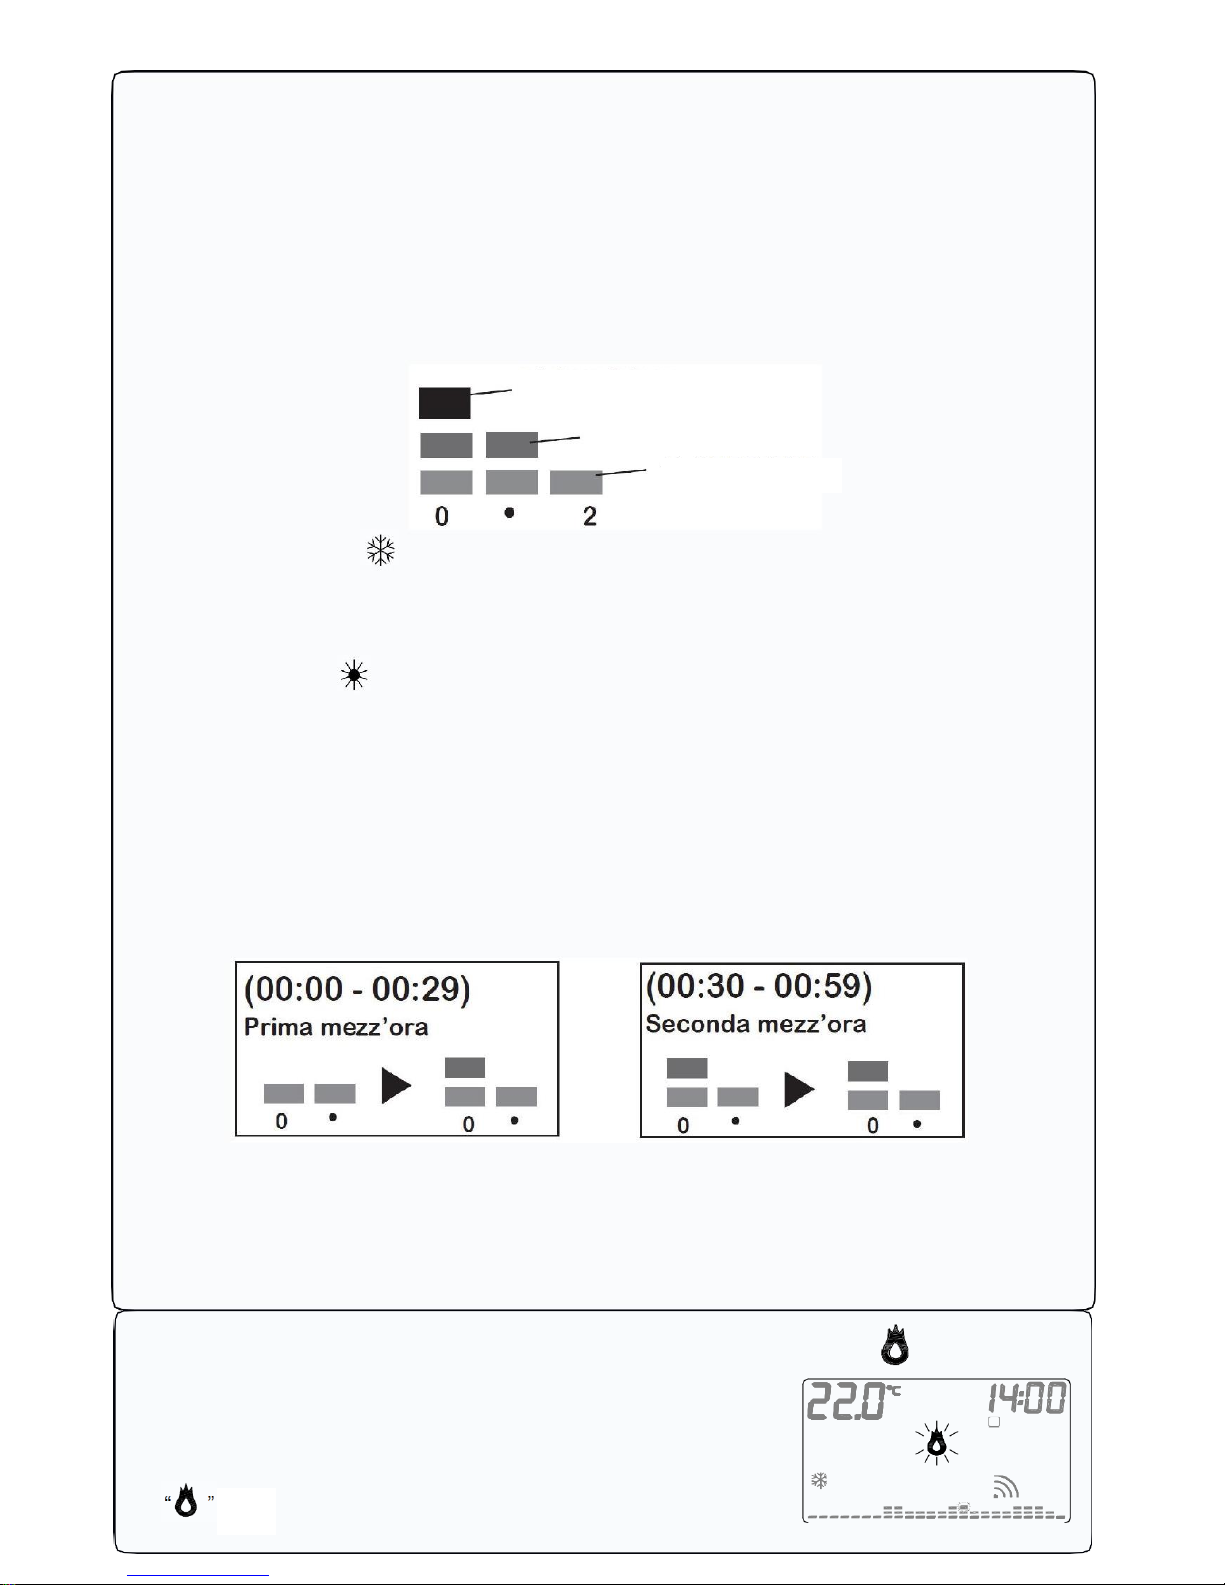
TEMPERATURE CHART PROGRAMMABLE THERMOSTAT
DISPLAY.
The programmable thermostat GecApp crono Wi-Fi features a temperature chart that shows a
diagram composed of 24 columns representing the HOURS of the day.
For every hour you can program two temperatures:
-the temperature of the FIRST HALF HOUR (i.e. from 00:00 to 00:29)
-the temperature of the SECOND HALF HOUR (i.e. from 00:30 to 00:59)
The height of the columns will change only when you will program the temperatures in the FIRST
HALF AN HOUR.
- Each COLUMN is made up of three temperature SLIDERS (Fig. 13):
Fig. 13
In WINTER mode” ” :
3
rd
SLIDER which includes temperatures from 20.0°C to 30.0°C.
2
nd
SLIDER which includes temperatures from 16.1°C to 19.9°C.
13
st
SLIDER which includes temperatures from 5.0°C to 16.0°C.
In SUMMER mode “ ” :
3
rd
SLIDER which includes temperatures from 29.0°C to 35.0°C.
2
nd
SLIDER which includes temperatures from 27.0°C to 28.9°C.
1
st
SLIDER which includes temperatures from 15.0°C to 26.9°C.
Let’s suppose you set the temperature of time "0":
Programming the temperature at 18°C in the FIRST HALF HOUR as the TIME "0" column will
change its height from the pre-set program (Fig. 14.
Programming the temperature to 25°C in the SECOND HALF-HOUR, the HOURS column "0"
will remain unchanged (Fig. 15).
Fig.14 Fig.15
Therefore: Programming of temperature in the SECOND HALF HOUR of every HOUR, does
NOT change the corresponding HOUR column, even if you set a different temperature than the
temperature of the FIRST HALF HOUR. The display will show a graphical representation of
programmed temperatures throughout the day. Depending on the currently active HOUR, the
slider of the corresponding temperature flashes.
SYSTEM ACTIVATION CONTACT
Enabling or disabling of the heating/cooling system occurs when
the temperature reaches the thresholds programmed by switching
the dedicated contact of the relay.
The symbol to activate the heating/cooling system
is (Fig.16). Fig.16
3rd SLIDER
First half hour
Second half hour
12
-H
+C
LU
+H
-C
Fig.17
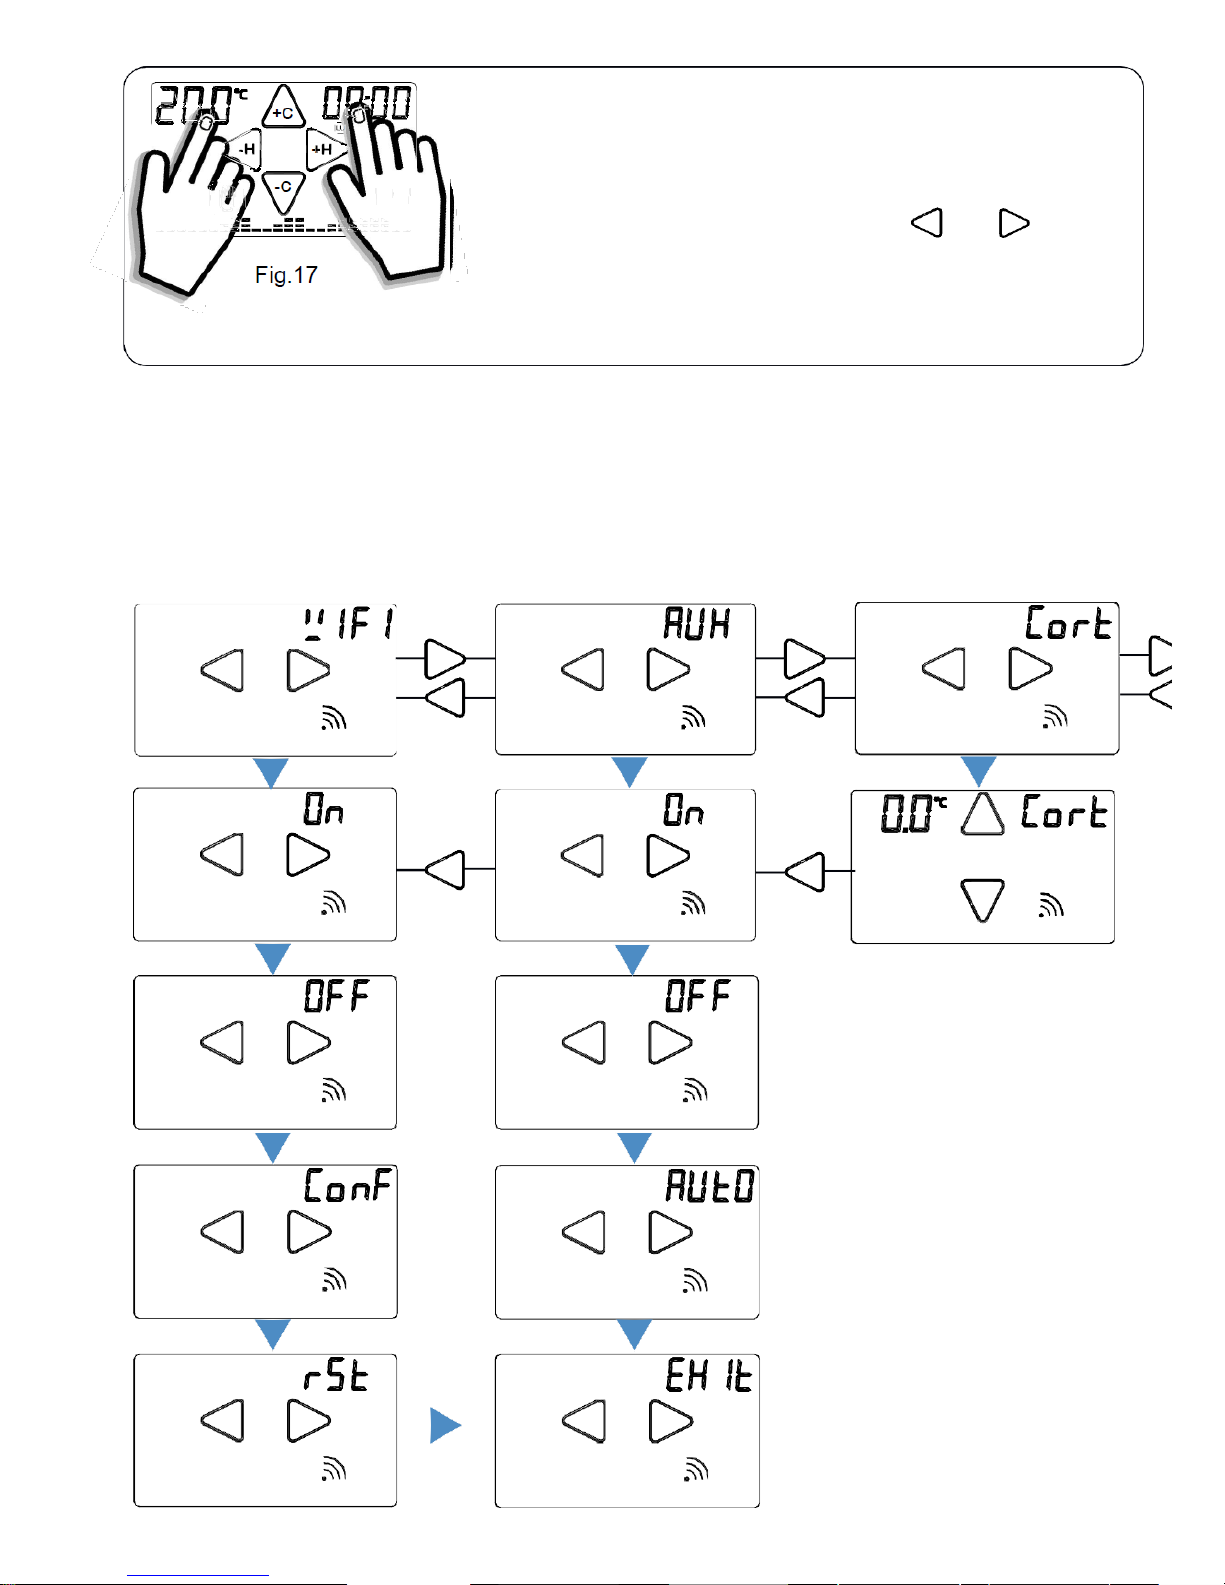
Settings MENU
To enter the Settings MENU from the programmable thermostat,
press simultaneously the touch zone of the TEMPERATURE
measured and the touch zone of the HOUR (Fig. 17).
To scroll through the Submenus press the keys “
-H
” or “
+H
”.
The Settings MENU consists of the following Submenus:
WIFI, AUX, Cort, Sond, rSt, Exit.
To enter the Submenu press and hold for about 2 seconds the name of the desired Submenu.
In the submenu, the WI-FI
module can be:
-
Enabled (On),
-
Disabled (OFF),
-
Set up (Set)
-
Reset (rSt)
In the AUX submenu you
can set the Auxiliary relay:
-
switched on (On),
-
switched off (OFF),
-
in automatic mode (Auto)
In the submenu Cort you
can compensate the
temperature measured by
the programmable
thermostat from -5°C to
+5°C.
+H
-H +H
+H
-H +H
+H
-H +H
-H -H -
+C
-H +H
-H +H
-H -H
-C
-H +H -H +H
-H +H -H +H
-H +H -H +H
13
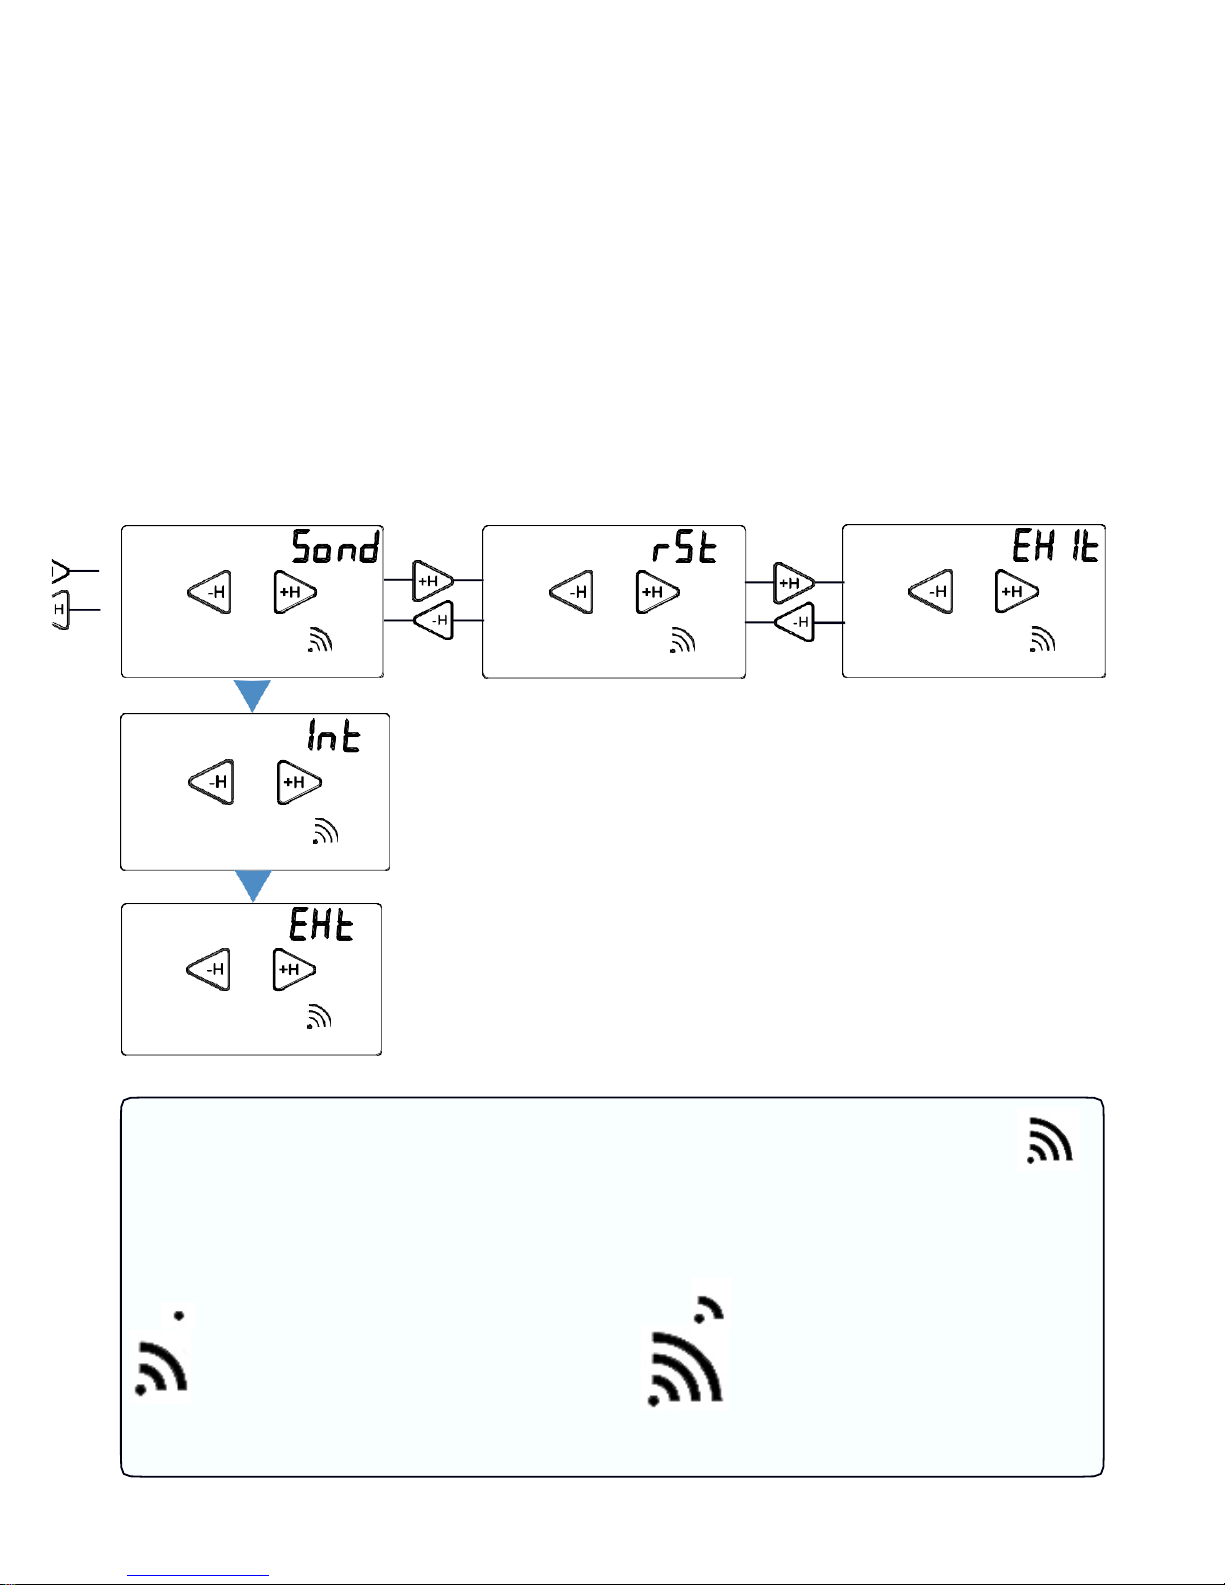
In the submenu Sond you
can set the temperature
probe type to use:
-
Internal Probe (Int)
-
External Probe (Ext)
Holding the symbol rSt for
about two seconds you
will reset all the settings
of the programmable
thermostat GecApp
crono Wi-Fi except for
those of the Wi-Fi
network.
Pre ss hold the word Exit
for about two seconds
you will go back to the
HOME PAGE.
SIGNAL QUALITY
The display of
GecApp crono Wi-Fi shows the Signal quality symbol.
It represents the "Quality of the signal" between the
GecApp crono Wi-Fi programmable
thermostat and the
WI-FI network of your home.
= POOR signal quality
= SUFFICIENT signal quality
= GOOD signal quality
= EXCELLENT signal
ATTENTION: During the search of Wi-fi network, the Signal quality symbol will flash.
14
+H
+H
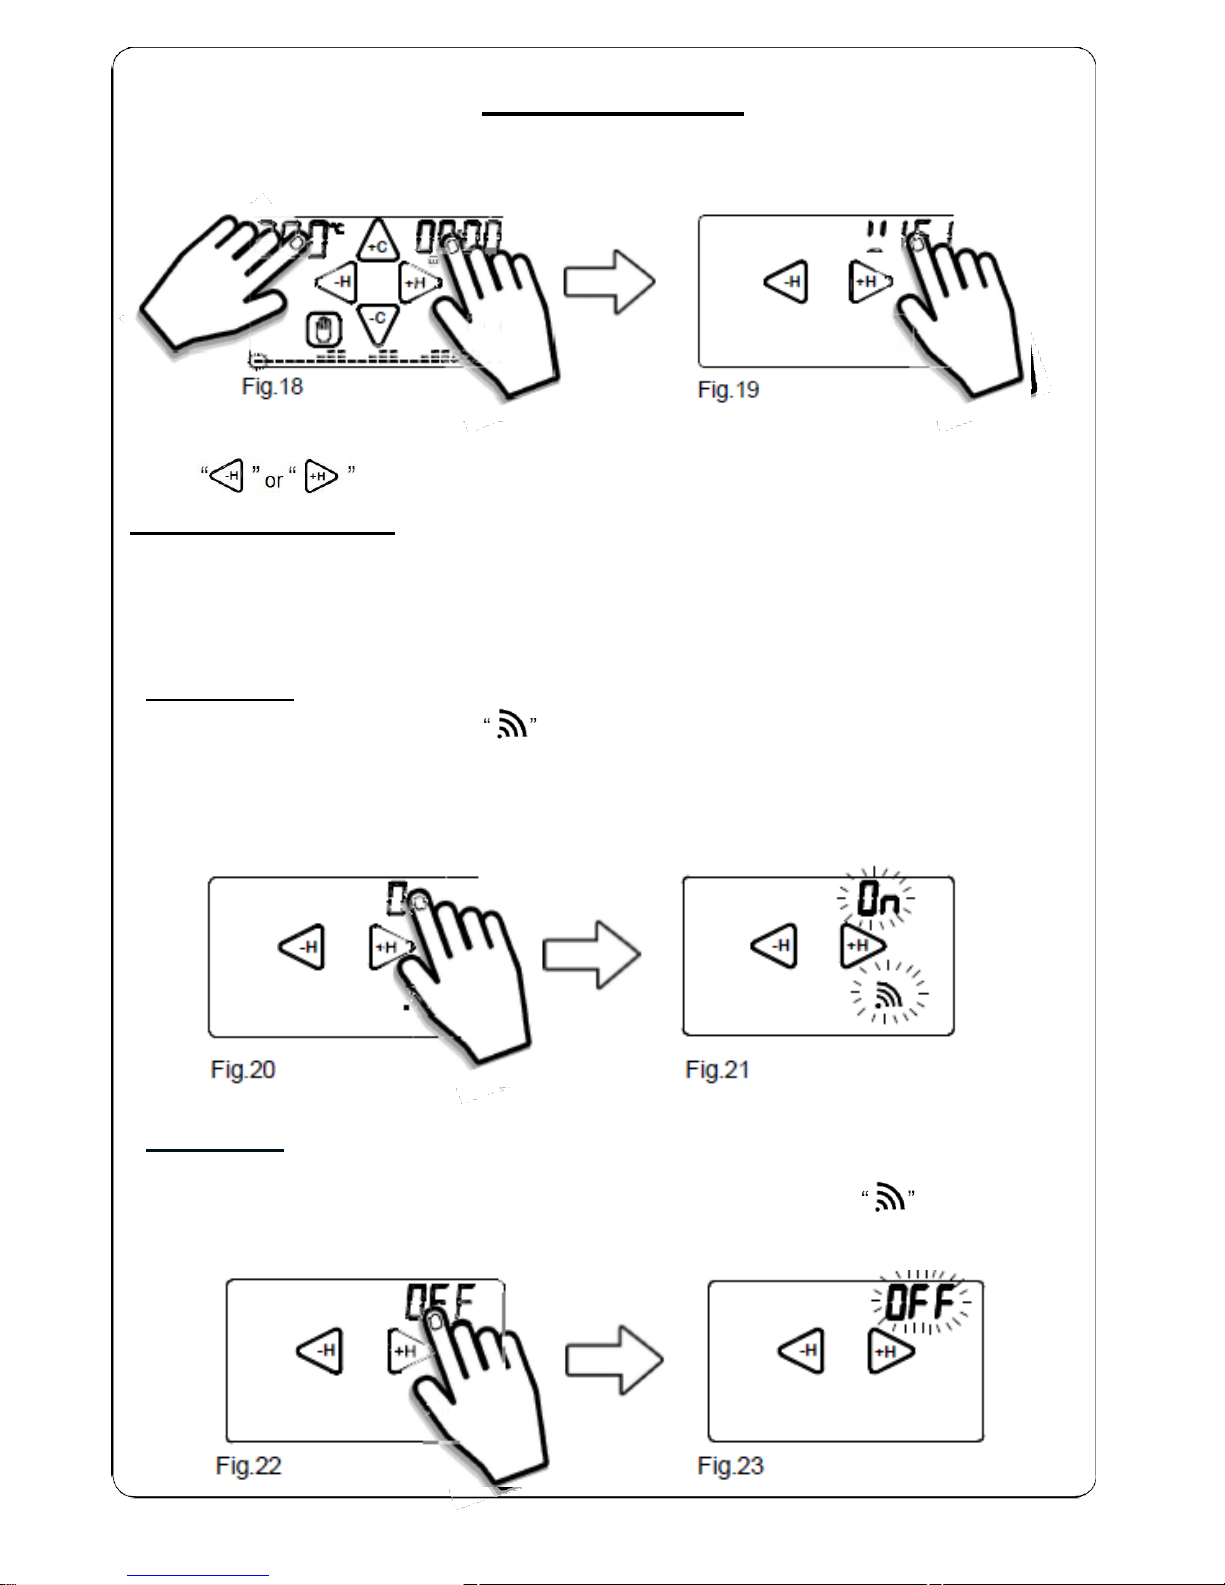
WI-FI SUBMENU
From the HOME PAGE (Fig. 18) enter the Settings MENU by pressing simultaneously for 2
seconds the the touch area of TEMPERATURE measured and the touch area of the HOUR.
+C
LU
-H +H
-H +H
-C
Fig.18 Fig.19
To enter the WIFI submenu press for about 2 seconds the word WIFI (Fig.19). Use the
keys “
-H
” or “
+H
” to scroll through the modes “ On ”, “ OFF ” , “ ConF ” or “ rSt ”.
In WIFI submenuyou can: -ENABLE THE WIFI MODULE (ON),
-
-DISABLE THE WIFI MODULE (OFF),
-
SET UP WI-FI connection (SET),
-
RESET WI-FI connection (rSt)
- WI-FI MODULE ON
- To ACTIVATE the Wi-Fi module press for about 2 seconds the word On (Fig.20).
The word "On" and Signal quality will begin to flash (Fig. 21).
If you have previously set up the GecApp crono Wi-Fi, it will connect to your Wi-Fi network set.
After 5 seconds, GecApp crono Wi-Fi will return to the Home Page.
If the message "ER1" is displayed, it means that there is no mains voltage.
WARNING If there is no mains voltage the Wi-Fi module is disabled.
-H -H +H
Fig.20 Fig.21
- WIFI MODULE OFF
- To DISABLE the GecApp crono Wi-Fi from the Wi-Fi connection, press for about 2 seconds
the word OFF (Fig.22).
The word "OFF" will flash for 2 seconds while the Signal quality symbol disappears
(Fig.23). After 5 seconds, GecApp crono Wi-Fi will return to the Home Page.
-H -H +H
Fig.22 Fig.23
15
-H +H
-WI-FI SETUP (First start-up)
Activate the display by tapping it (backlight on).
From the HOME PAGE (Fig. 18) enter the Settings MENU by pressing simultaneously for 2
seconds the the touch area of TEMPERATURE measured and the touch area of the HOUR.
To enter the WIFI submenu press for about 2 seconds the word WIFI (Fig.19).
Use the keys “
-H
” or “
+H
” to scroll until you reach the “ Set ” mode.
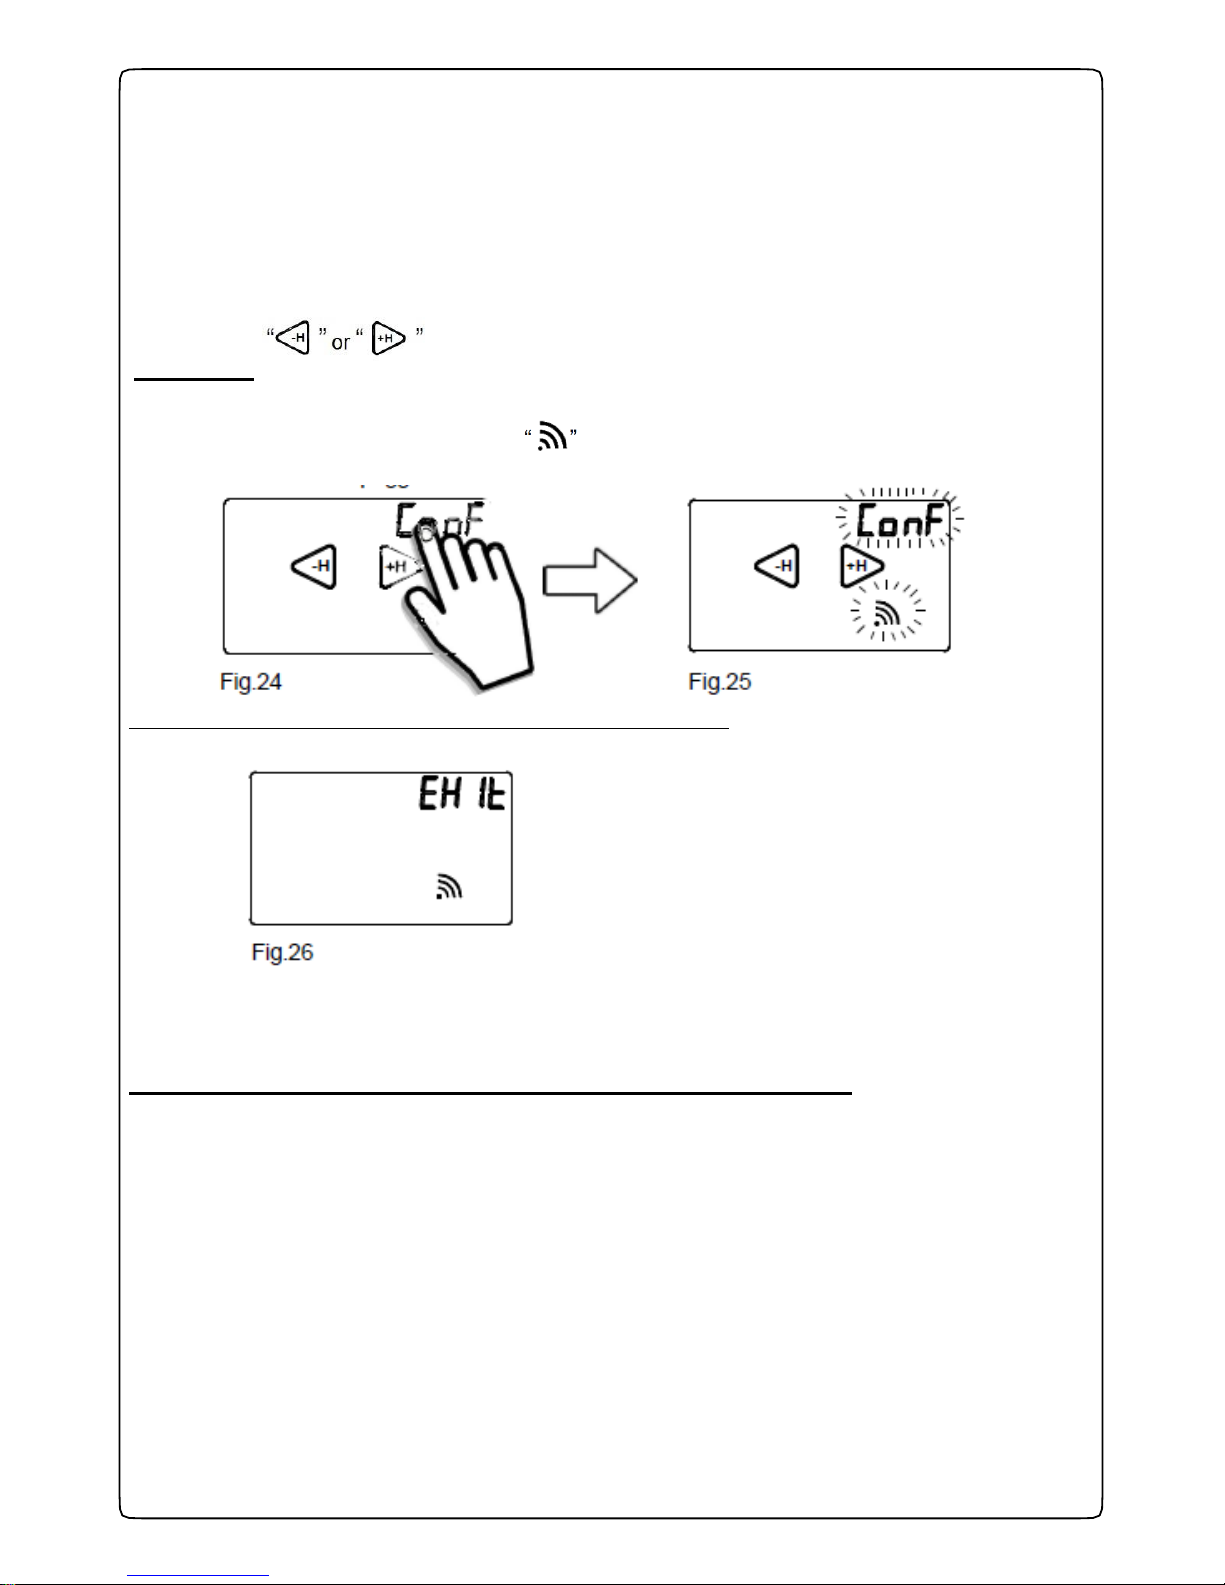
To SET UP the GecApp crono Wi-Fi to the Wi-Fi network connection, press “
Conf ” (Fig.24) for 2 seconds.
The word "Conf" and "Signal quality” will begin to flash (Fig. 25). Wait until they stop
flashing.
Fig.25
At the end of the flashes, on display appears EXIT (Fig.26):
Fig.26
At this point, the programmable thermostat GecApp crono Wi-Fi is in “Setup” mode.
Note: It is possible to exit the "Setup" mode by pressing "Exit" ("Att", m eaning hold, will appear on the screen). When the "Att"
message appears, wait a few seconds after which the thermostat will return to normal operation.
Now the “Setup procedure” is running on your Smartphone/Tablet.
1 - Connect the Smartphone/Tablet to the Wi-Fi network “GecApp crono Wi-fi”.
N.B. If the
Smartphone/Tablet
fails to connect to the Wi-Fi network “GecApp crono Wi-Fi”, see section Errors/Problems or exit
the "Setup" mode and "RESET the Wi-Fi module" (see the complete instruction manual).
2- Read the “SET UP NEW DEVICE GecApp crono Wi-Fi” section within the instructions
“APPLICATION” on page 32 for iOS operating systems and page 48 for Android.
16
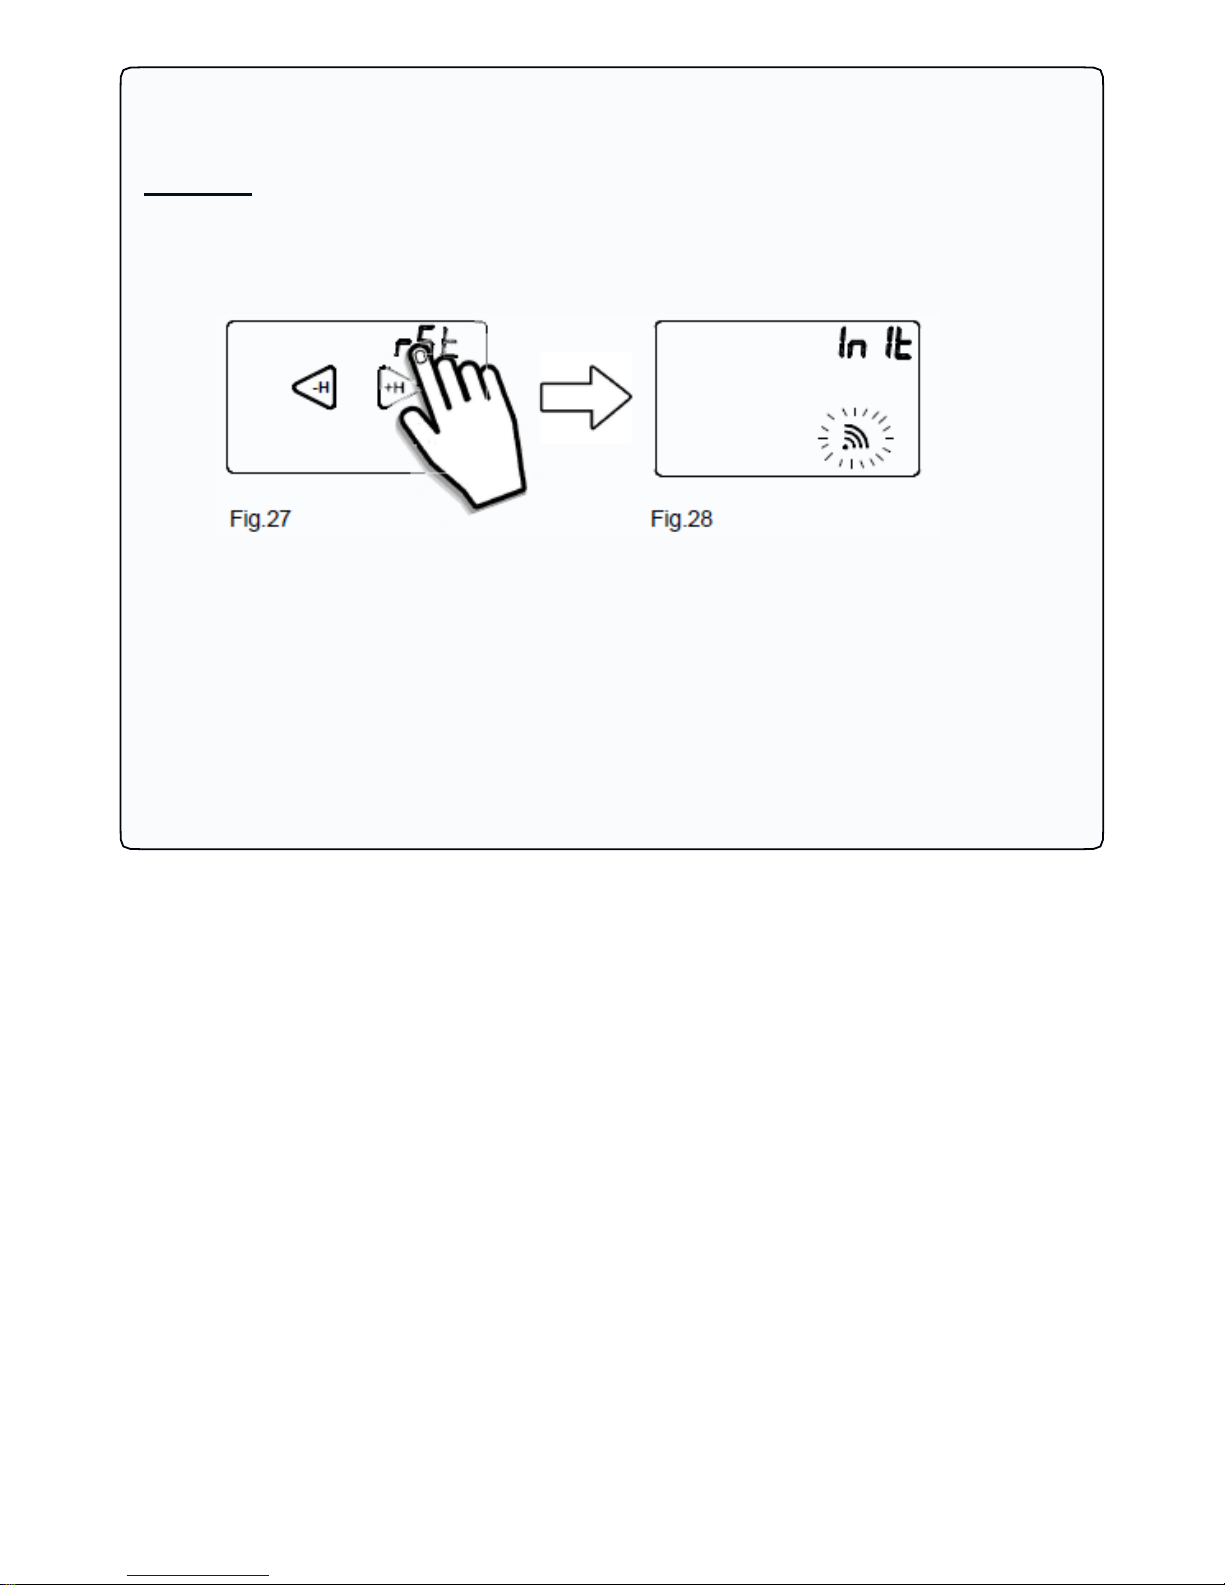
- RESET (Wi-Fi MODULE)
From the Home page go to WIFI submenu and select rSt ”.
- To RESET the Wi-Fi network connection press and hold for about 2 seconds “ rSt ”
(Fig.24).
The display will show the word "In It" (Fig. 25) indicating the start of the "RESET" procedure of
the Wi-Fi network connection.
Thereupon, the programmable thermostat GecApp crono Wi-Fi displays the Home page.
Fig.27 Fig.28
To restore the connection to the Wi-Fi network, repeat the SETUP procedure.
This function is used to restore Wi-Fi module’s factory settings.
The entire setup process of the Wi-Fi connection will be, therefore, lost.
17
+H
o
+H
+H
AUX (Auxiliary relay)
From GecApp crono Wi-Fi you can ENABLE, DISABLE or SET to AUTOMATIC mode the AUX
output (Auxiliary relay).
From the HOME PAGE enter the Settings MENU by pressing simultaneously for 2 seconds the
the touch area of TEMPERATURE measured and the touch area of the HOUR.
-Press the keys “
-H
” or “
+H
and select AUX .
-Press and hold for about 2 seconds AUX.
Use the keys “
-H
” or “
+H
” scroll through the modes “On”, “OFF” , “Auto” or press “Exit” to
return to Home page.
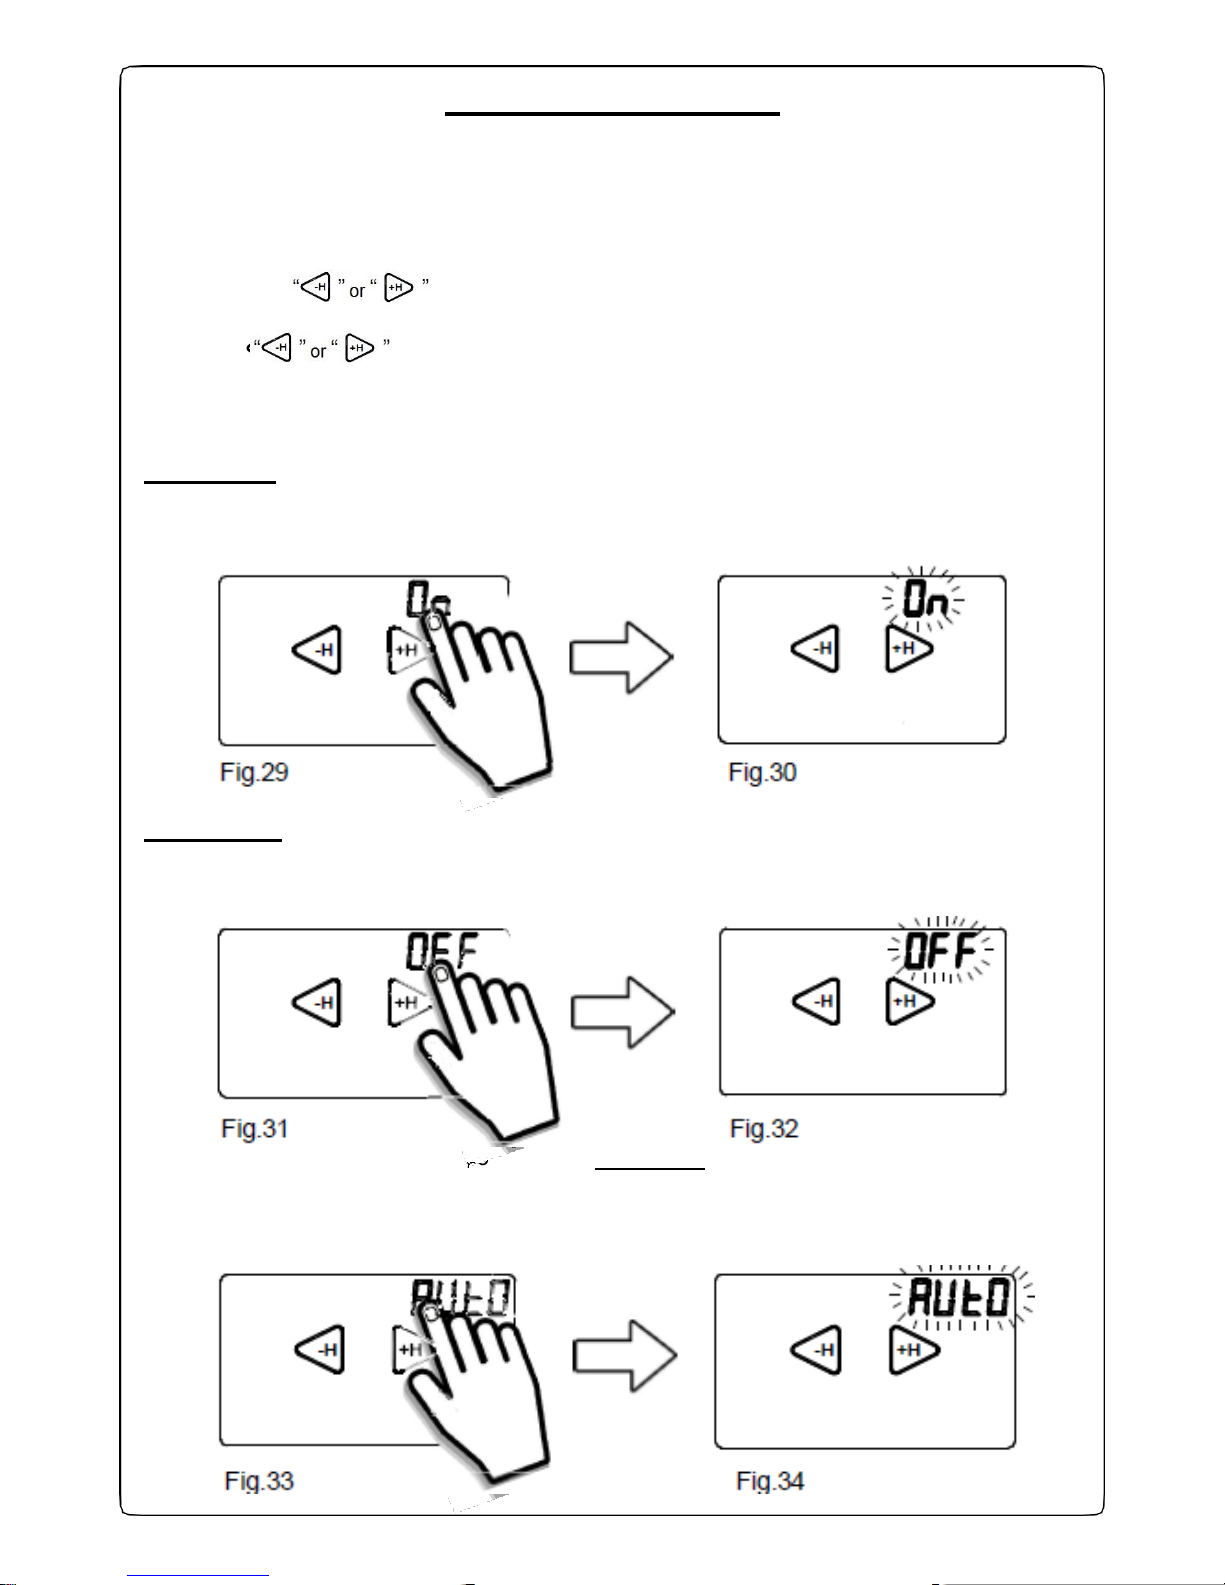
- To ENABLE the AUX output press for about 2 seconds the word “On” (Fig.29).
The word “On” will flash once (Fig.30).
After 5 seconds, GecApp crono Wi-Fi will return to the Home Page.
-H -H +H
Fig.29 Fig.30
- To DISABLE the AUX output press for about 2 seconds the word “OFF” (Fig.31). The
word “OFF” will flash once (Fig.32).
After 5 seconds, GecApp crono Wi-Fi will return to the Home Page.
-H -H +H
Fig.31 Fig.32
- To set the AUX output to AUTOMATIC mode press and hold for about 2 seconds the word
“AUTO” (Fig.33).
The word “Auto” will flash once (Fig.34).
After 5 seconds, GecApp crono Wi-Fi will return to the Home Page.
-H -H +H
Fig.33 Fig.34
18
-C
+C
+H
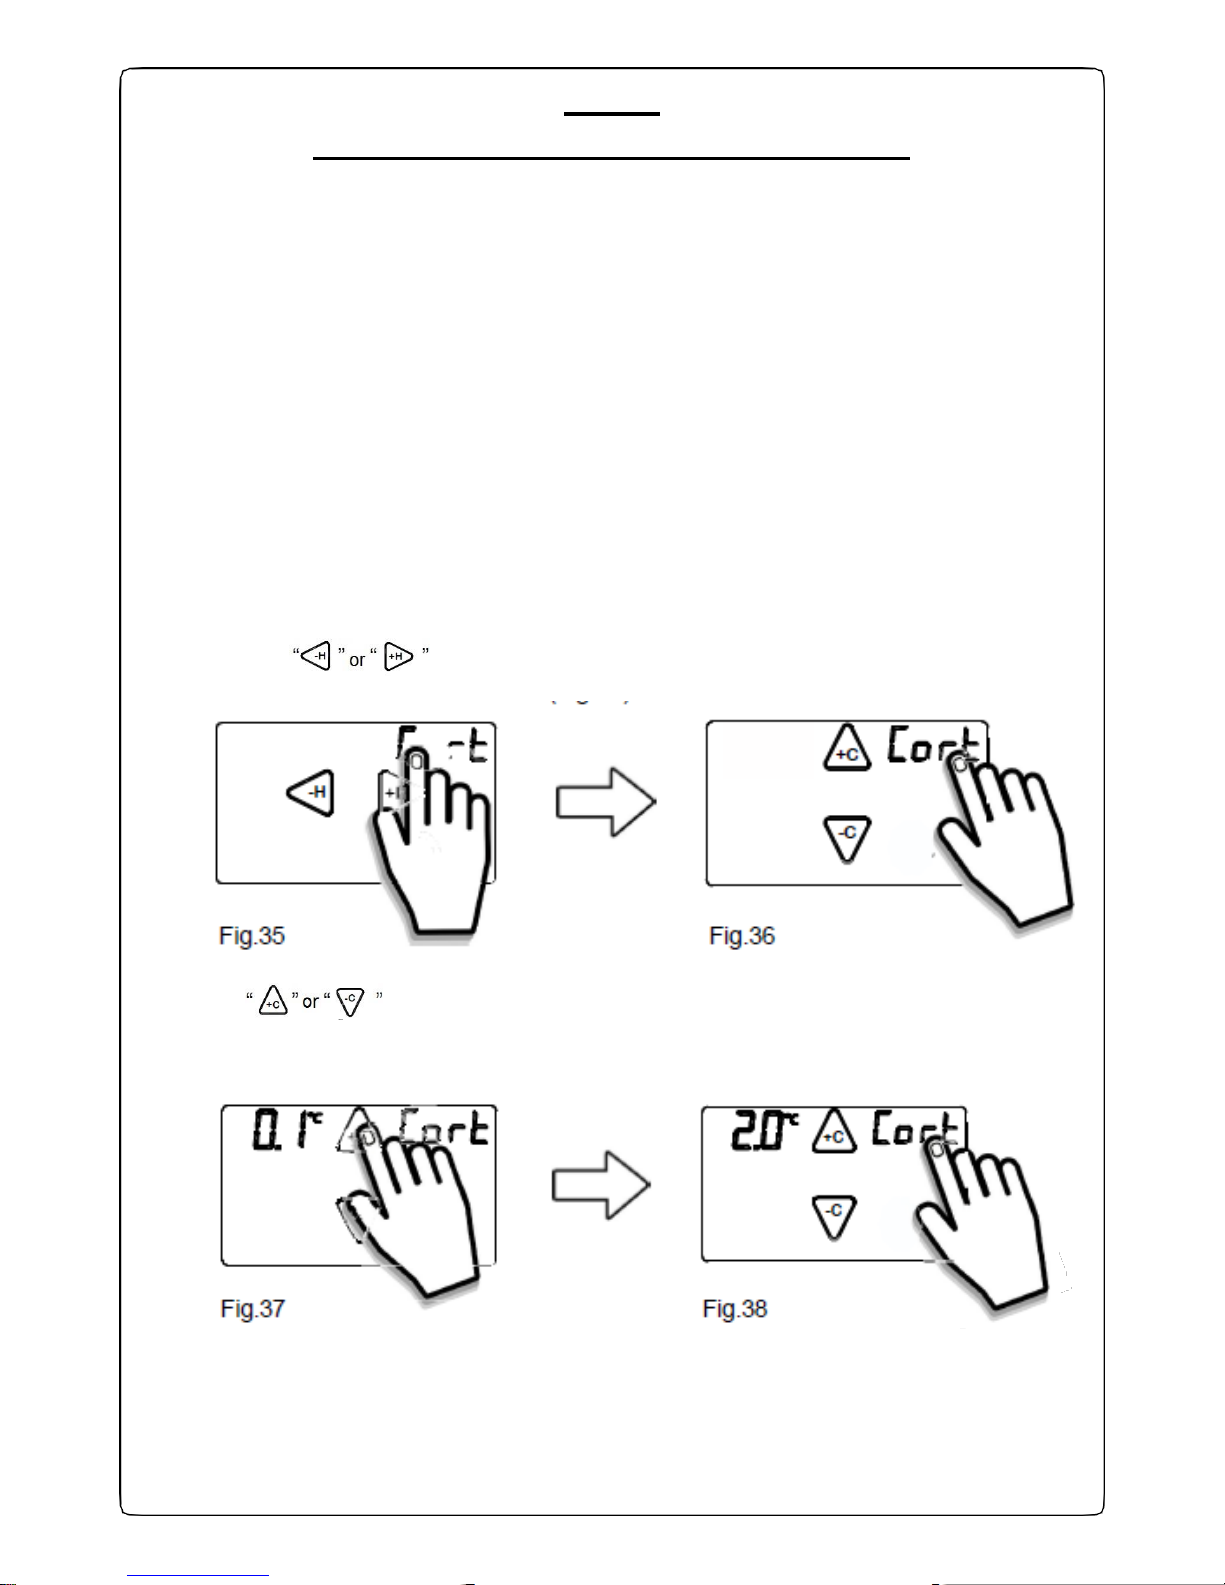
CORT
(Correction of temperature measured)
Temperature correction Cort" is a function used in case you have an incorrect measurement
of room temperature due to distracting elements such as convection heaters, refrigerators etc
etc.
GecApp crono Wi-Fi alows you to compensate the temperature measured by the
programmable thermostat within a range of -5°C to +5°C.
Example:
Suppose you set the "Temperature correction"”Cort" to:-2.0°C.
Supposing that GecApp crono Wi-Fi measures on display a temperature of 20.0°C compared to
an actual temperature of 22.5°C in the room.
In this case you can use the "Temperature Correction" function and set the value to +2.5°C
so that: 20°C+2.5°C =22.5°
C
From the HOME PAGE enter the Settings MENU by pressing simultaneously for 2 seconds the
the touch area of TEMPERATURE measured and the touch area of the HOUR.
-Press the keys “
-H
” or “
+H
and select Cort (Fig.35).
-Press and hold for about 2 seconds Cort (Fig.36).
+C
-H
-C
Fig.35 Fig.36
Use the keys “ +C ” or “
-C
” to set the Temperature Correction desired (Fig.37).
Confirm by pressing “Cort” (Fig.38).
GecApp crono Wi-Fi will return to the Home Page.
+C
-C
Fig.37 Fig.38
19
+H
+H +H
+H -H
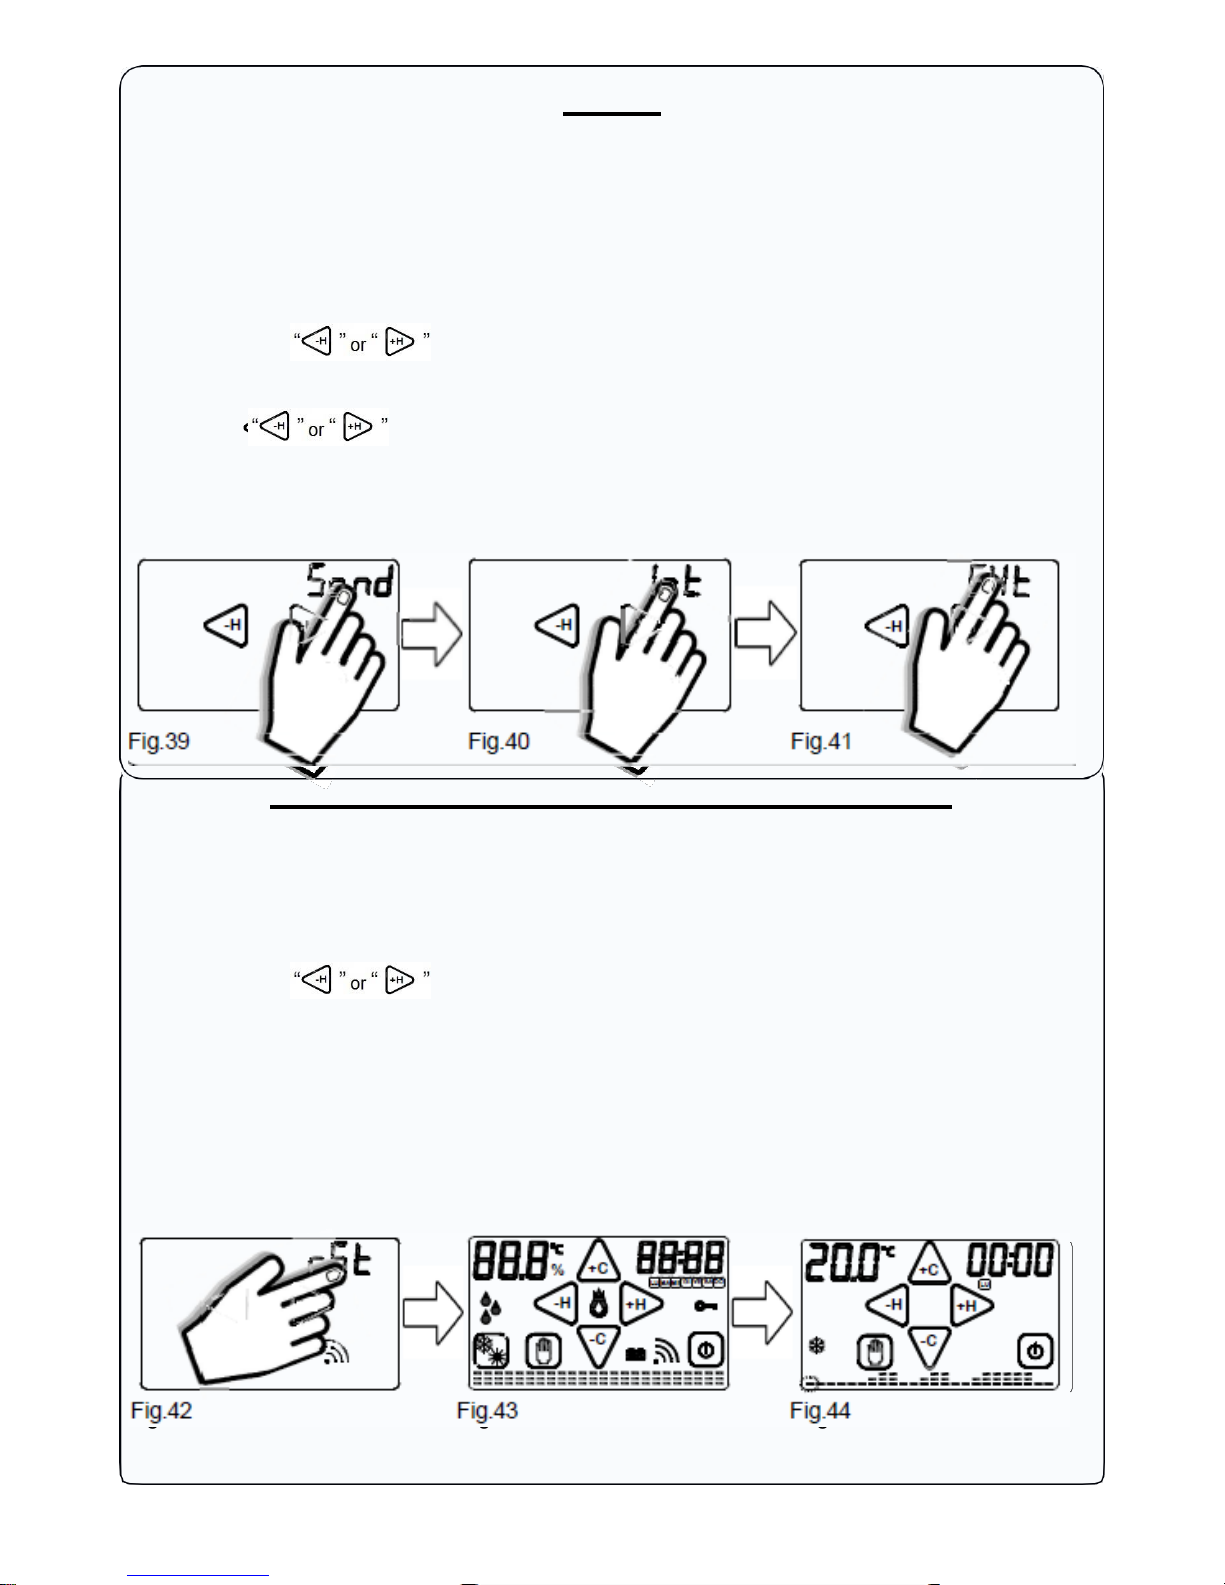
SOND
The function "Sond" allows you to set the internal or the external temperature probe (Code
2.030.1037) . This setting is required to set inside the Programmable thermostat appropriate
compensations.
From the HOME PAGE enter the Settings MENU by pressing simultaneously the touch area of
TEMPERATURE measured and the touch area of the HOUR.
-Press the keys “
-H
” or “
+H
and select “Sond” .
-Press and hold for about 2 seconds Sond (Fig.39).
With the keys “
-H
” o “
+H
” choose which type of probe to use between the internal probe "Int" (Fig.
40) and the external probe "EXt" (Fig 41).
To confirm press and hold for about 2 seconds the probe type "Int" or "EXt" to use. One flash will
confirm the choice, then GecApp crono Wi-Fi will return to the Home page.
-H -H -H
Fig.39 Fig.40 Fig.41
RST (Reset the programmable thermostat)
The "rSt" function allows you to reset the GecApp crono Wi-Fi.
The "rSt" reset all parameters of the Programmable thermostat except for those of the Wi-Fi
network. From the HOME PAGE enter the Settings MENU by pressing simultaneously for 2
seconds the the touch area of TEMPERATURE measured and the touch area of the HOUR.
-Press the keys “
-H
” or “
+H
and select rSt .
-To reset GecApp crono Wi-Fi hold for about 2 seconds "rSt"
(Fig.42).
When starting the RESET function, the programmable thermostat performs a control cycle by
turning on all segments of the display, activating the charge for a few seconds (Fig. 43),
disabling the Wi-Fi network connection and resetting the temperature program.
After a few seconds, the Programmable thermostat displays the Home page (Fig. 44).
If you want to re-enable the Wi-Fi module, enter the "Wi-Fi submenu" of the programmable
thermostat and set it to ON.
%
+C
-H
MON TU E WED THU
FRI SAT SUN
+H
+C
LU
-H +H
-C
-C
Fig.42 Fig.43 Fig.44
20
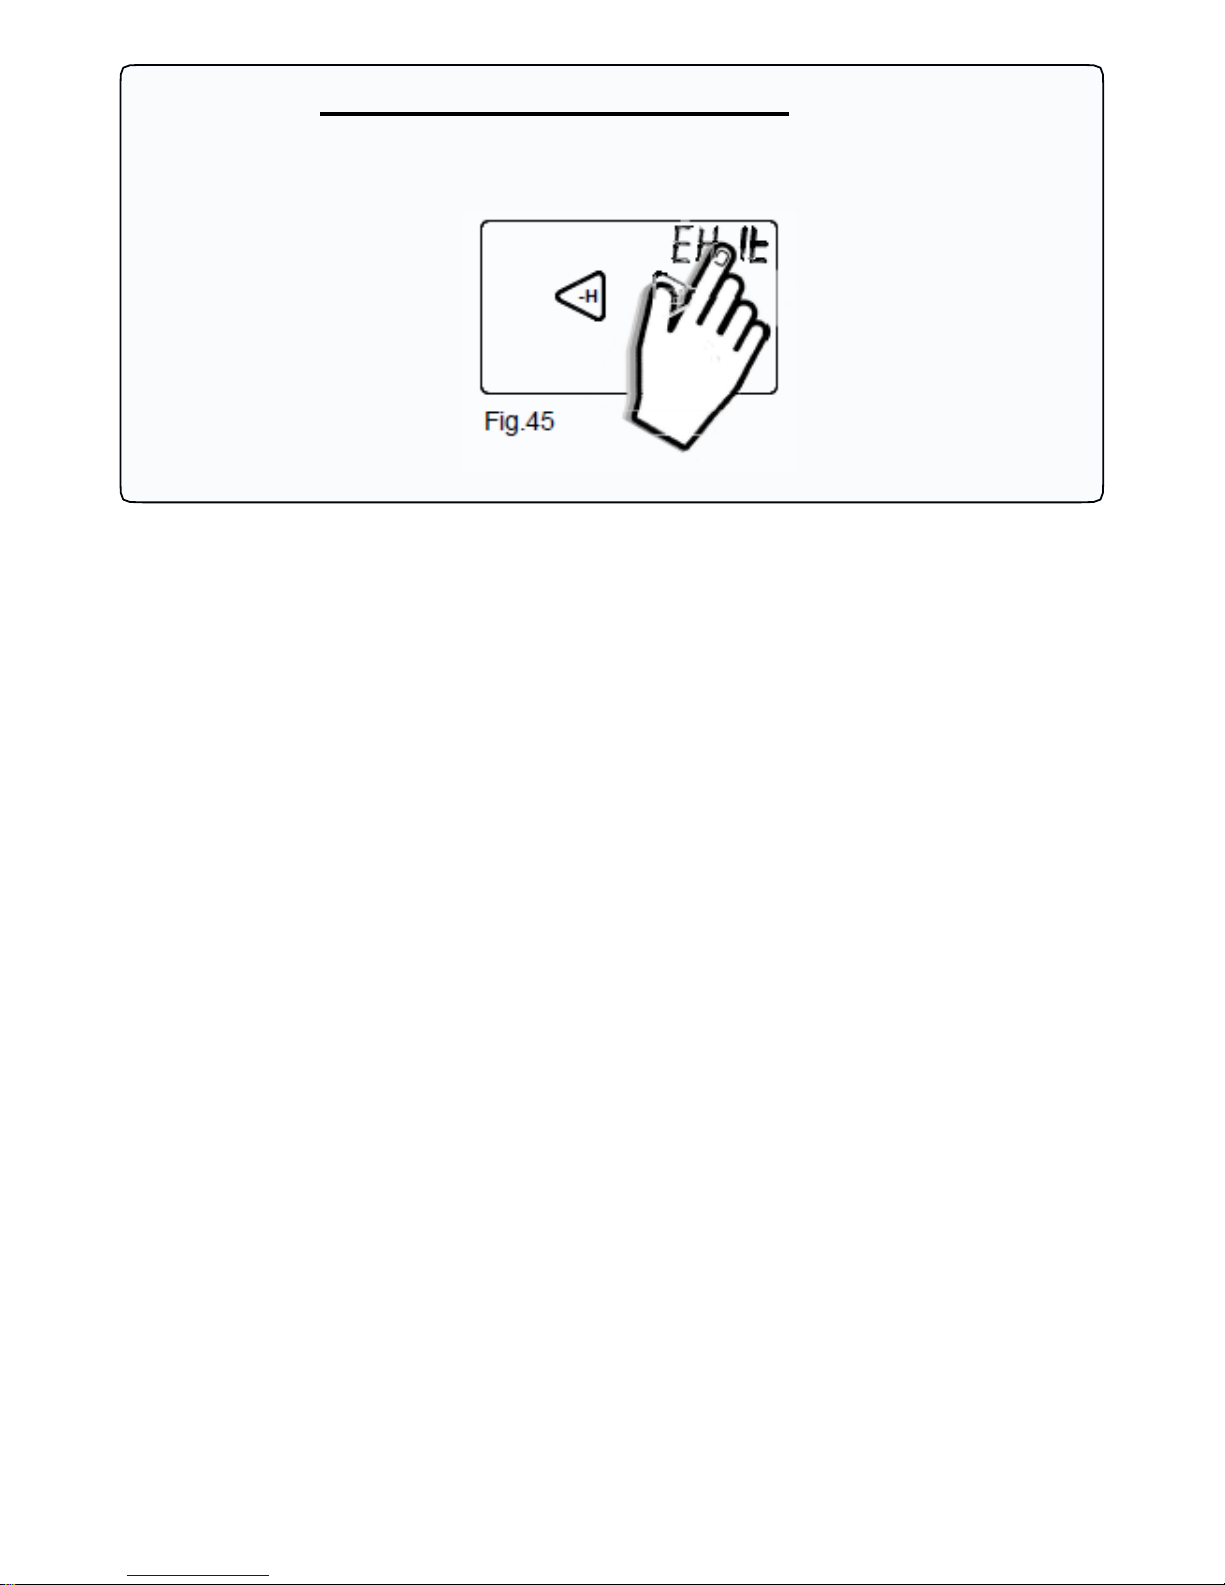
EXIT (exit the Settings menu)
By pressing the word "Exit" for about 2 seconds, you will exit the Settings menu and return to the
Home page (fig.45)
-H
+H
Fig.45
 Loading...