

GSI Outdoors Halulite Instructions Manual
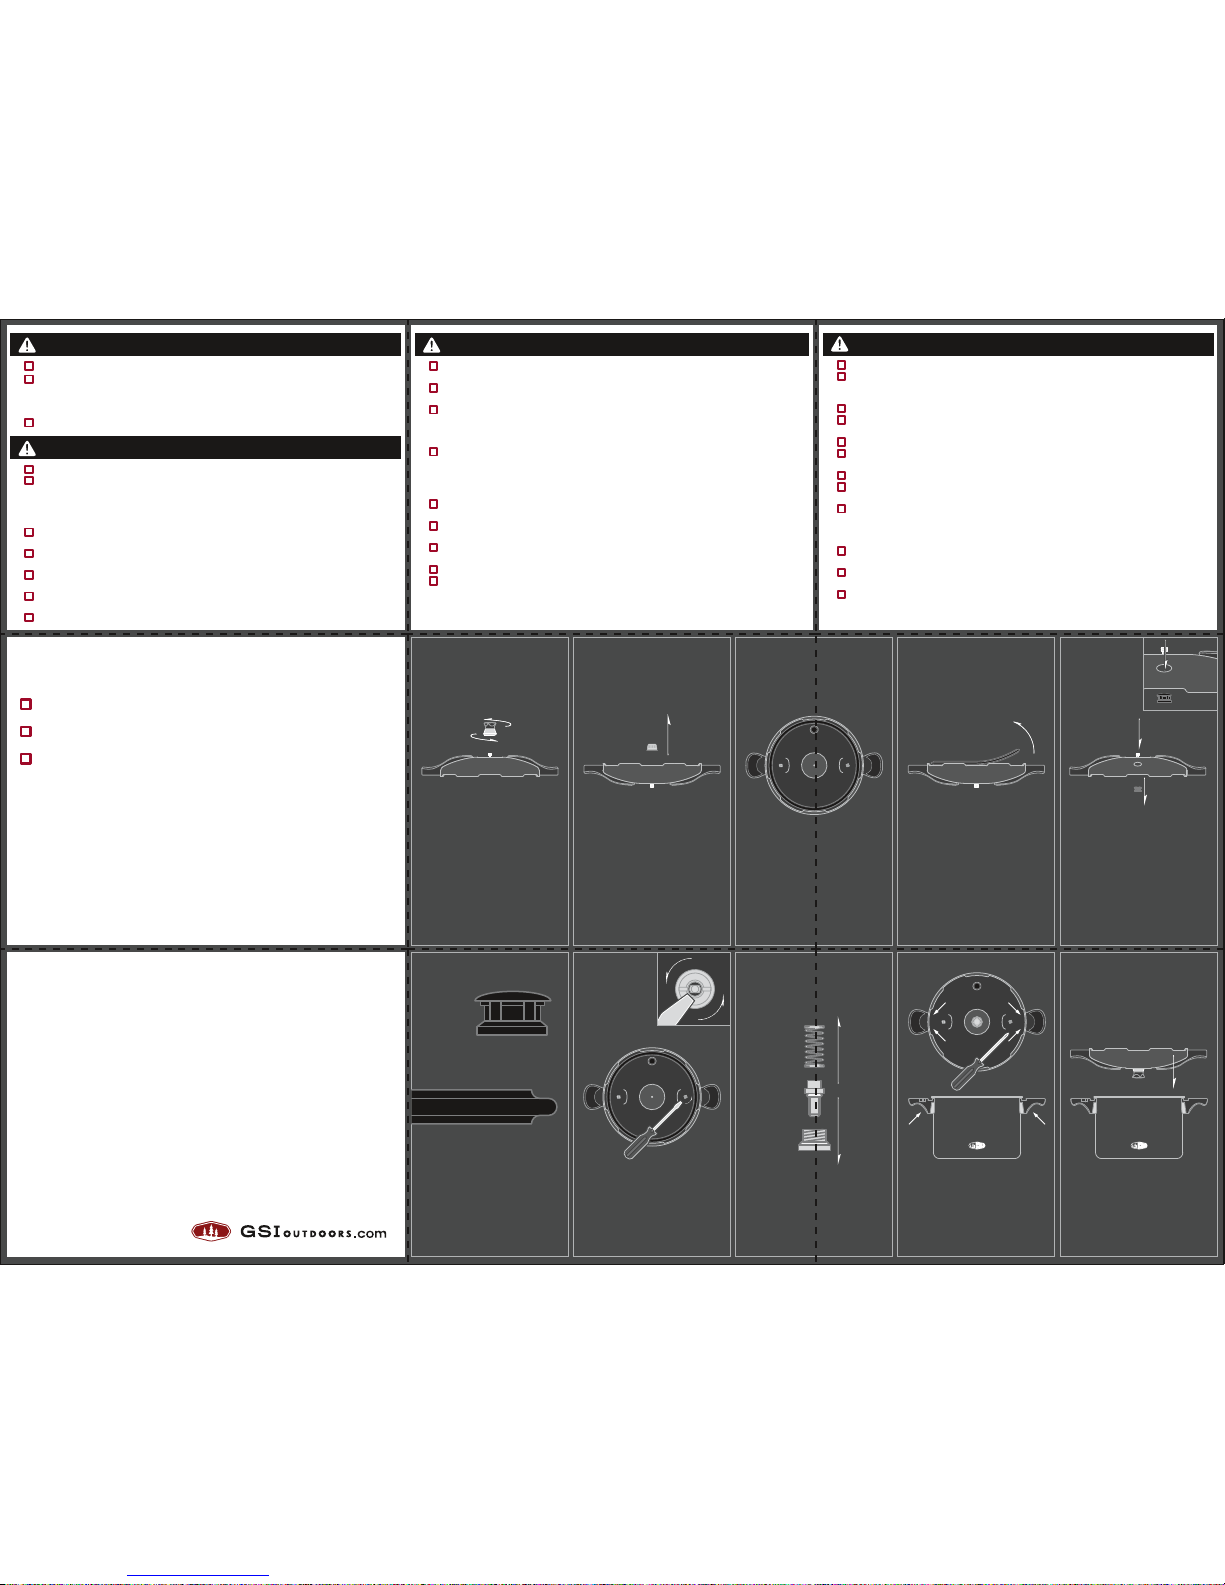
REMOVE PRESSURE
REGULATOR BY LIFTING
TO ENGAGE THREADS AND
TURNING COUNTER-CLOCKWISE
UNTIL FREE OF VENT PIPE
1. 2.
REMOVE VENT STRAINER
CAP FROM UNDERSIDE
OF LID BY GENTLY PULLING
CAP AWAY FROM LID.
INSPECT VENT STRAINER
CAP AND VENT PIPE FOR
OBSTRUCTIONS AND CLEAN
AS NECESSARY.
3.
4.
GENTLY PULL O-RING SEAL
AWAY FROM LID.
5.
GENTLY PRESS DOMED TOP
OF OVERPRESSURE PLUG TO
PUSH IT FREE OF LID.
6.
INSPECT O-RING AND
OVERPRESSURE PLUG FOR
HARDENING, DEFORMATION,
CRACKING, WEAR, PITTING, OR
SOFTENING AND STICKINESS.
CLEAN PARTS TO ASSURE THAT
THEY ARE FREE OF DEBRIS
.
7.
USING A SCREWDRIVER,
REMOVE SAFETY VALVE
FROM UNDERSIDE OF LID.
8.
CLEAN VALVE AND SPRING
ASSEMBLY WITH WARM WATER
AND CLEAN HOLE WITH
A SMALL BRUSH.
9.
INSPECT AND TIGHTEN SCREWS
HOLDING HANDLES TO LID
AND BODY OF
PRESSURE COOKER
10 .
ALWAYS STORE LID
UPSIDE-DOWN
storage
Before storing, the Halulite Pressure Cooker should always be disassembled and
thoroughly washed. Take care to note loose or damaged parts and tighten or replace
any part of the Pressure Cooker that shows cracking, wear, deformation, charring
pitting or other damage. After washing, immediately dry all components and
reassemble Pressure Cooker taking care not to over-tighten or otherwise damage
any parts. When storing, invert lid and place atop pot to prevent wear to O-Ring seal
and the possibility of vapor lock or odor formation.
cleaning
Before using the Halulite Pressure Cooker for the first time, always disassemble and
wash all components with hot water and mild detergent at home and dry immediately.
Boiling water works ideally as a soaking and cleaning agent for any GSI Outdoors
cookware when you are in the field. After boiling, strain off any food bits into your
waste bag to limit your environmental impact. Always allow your cookware to dry
thoroughly before packing it up and never attempt to rapidly cool any GSI Outdoors
cookware.
IMPORTANT! (read prior to use)
Due to the pressurized cooking environment created by the Halulite Pressure
Cooker, extreme caution is required for use.
Always inspect valves and seals before use. Never use Halulite Pressure
Cooker with worn or damaged handles, seals or safety features.
Use extreme caution while moving or opening pressure cooker. Never attempt to
force open lid. Always open lid so that steam vents away from self and others
.
When cooking, do not allow the flames from your stove to extend beyond the
base of the cookware. The pot will become very hot. Never heat Halulite
Pressure Cooker to extreme temperatures or allow it to boil dry.
about
Beloved by chefs for its speed and efficiency, the Halulite Pressure Cooker is an
indispensible tool in your backcountry culinary toolkit. With its highly conductive,
even-heating aluminum core and garnet-hard, non-reactive surface, the Halulite
Pressure Cooker provides maximum thermal efficiency allowing for 66% faster
cooking. This extreme efficiency not only frees up your time, but also your back by
cooking faster with less fuel and reduced weight. Better yet, the Halulite Pressure
Cooker’s speed preserves the rich colors and bright flavors in all of your favorite
foods for intensely delicious meals, even at altitude all while retaining the essential
vitamins and nutrients which might otherwise evaporate with other cooking methods.
It’s high performance, haute cuisine at any height.
© 2010 GSI Outdoors, Inc. 1023 S Pines Rd Spokane WA 99206 USA / PO Box 132 Wakefield, England WF1 1XJ Made In China. Fabriquè en Chine.
When cooking soups or stocks, do not fill above ½ mark.
Do not use Pressure Cooker to cook Applesauce, Cranberries, Pearl Barley, Oatmeal,
Split Pease, Noodles, Macaroni, Rhubarb or Spaghetti as these foods foam and sputter
when cooked clogging the Pressure Cooker’s safety mechanisms.
Always assure that lid is securely closed and locked before cooking.
Steam will vent through Pressure Regulator and Safety Valve during use. Always point
away from stove controls and self while cooking.
Always use extreme caution when lifting or moving Pressure Cooker.
Pressure Cooker is only for the uses described below. Never use Pressure Cooker for
any other unintended use. Never use Pressure Cooker for pressure frying.
Do not shake or move pressure cooker while cooking.
Upon reaching normal operating pressure, turn down heat. Do not allow all cooking
liquid to boil off.
Always allow Pressure Cooker to cool fully before attempting to open lid. Never attempt
to force open lid. Always remove Pressure Regulator before opening lid. Always open lid
so that any residual steam inside pressure cooker is directed away from self and others.
Do not attempt to rapidly cool Pressure Cooker by immersing in water.
Always allow unit to cool before cleaning or disassembling. Do not attempt to rapidly cool
Pressure Cooker by immersing in water.
Save these instructions. Never allow anyone who is unfamiliar with these instructions to
operate Pressure Cooker.
Always respect fire and all other hot substances.
DANGER
Improper use will result in scalding or other injury. Always assure that Halulite Pressure
Cooker is securely closed and in proper working order before use.
Before cooking, always disassemble and inspect Pressure Cooker to check for obstructions or wear.
To inspect, remove Pressure Regulator from top of lid by lifting until threads engage.
Once threads engage, turn Regulator counter-clockwise to release from Vent Pipe. On
underside of lid, gently pull Vent Strainer Cap. Inspect Vent Strainer Cap and V ent Pipe
for obstructions and clean as necessary.
Remove and inspect O-Ring from lid. Remove and inspect Overpressure Plug from lid by
gently pressing on top of plug to push it free of its hole. If either the O-Ring or Overpressure Plug has become hard, deformed, cracked, worn, pitted or soft and sticky, replace
both parts before use. Replace O-Ring and Overpressure Plug a minimum of every two
years. Do not apply cooking oil to O-Ring.
Remove and inspect Safety Valve by unscrewing from the underside of lid. Clean Valve
and Spring assembly. Inspect and clean hole in lid using a small brush.
Inspect and tighten screws holding handles to lid and body of Pressure Cooker. If handles
are cracked, broken or charred, replace before use.
After inspection, reassemble Pressure Cooker taking care not to damage or over-tighten
any parts.
Never fill Pressure Cooker above 2/3’s mark on inside of pot.
When cooking grains, beans or other foods which expand when cooked, do not fill above
½ mark. Always soak and drain dried beans and grains for at least 8 hours before
cooking. Do not add salt to grain or beans when soaking. Dried split lentils and rice
should not be soaked. Remove floating grains or shells and rinse in warm water before
adding to pressure cooker.
DANGER
Always read and follow all instructions.
Prior to initial use, disassemble and wash all components with hot water and mild
detergent at home and dry immediately. Always disassemble and wash all components
after each use and dry immediately. Always allow components to dry completely before
storing.
Dishwashers may prematurely age components.
WARNING
Never leave Halulite Pressure Cooker unattended around children or pets.
Never heat GSI Outdoors cookware to extreme temperatures or allow it to boil dry.
Always use Pressure Cooker with sufficient liquid. Recipes which call for fewer than 10
minutes of cooking time require a minimum of 4 fl. oz. of liquid. Recipes which call for
greater than 10 minutes need 8 fl. oz. of cooking liquid. Recipes over 15 minutes need at
least 16 fl. oz. of cooking liquid.
For every 1000 ft. above 2000 ft. above sea level, the cooking time and cooking liquid
must be increased by 5%.
Halulite Pressure Cooker intended for stovetop use only. Not for use with microwave
ovens, conventional ovens or open campfires.
Halulite Pressure Cooker and lid will become hot when cooking. Always use caution
when using Pressure Cooker. Never expose handles to direct flame.
Always store lid upside-down atop Pressure Cooker. Do not store with cover locked in
place.
Do not allow the flames from your stove to extend beyond the base of the cookware.
CAUTION

instructions
HALULITE
PRESSURE COOKER
1. 2. 3. 4. 5.
6. 7. 8. 9. 10 .
!
ADD INGREDIENTS TO PRESSURE
COOKER AND NECESSARY
AMOUNT OF COOKING LIQUID
FOR TENDER ITEMS, COOL BY
SLOWLY POURING COOL WATER OVER
LID UNTIL LOCK RELEASES.
FOR HARDIER FOODS, COOL
NATURALLY TO RELIEVE PRESSURE
ONCE PRESSURE HAS COMPLETELY
DISSIPATED, UNSCREW PRESSURE
REGULATOR.
TO OPEN, TURN LID COUNTER-
CLOCKWISE UNTIL ARROWS ON
POT HANDLE AND LID ALIGN.
LIFT LID TO DIRECT ANY RESIDUAL
STEAM OR HOT WATER AWAY
FROM SELF AND OTHERS.
SERVE, EAT, ENJOY…
ALIGN ARROWS ON LID AND HANDLE
AND TURN LID COUNTER-CLOCKWISE
TO LOCK. WHEN LOCKED,
HANDLES WILL ALIGN.
HEAT PRESSURE COOKER OVER HIGH
HEAT UNTIL PRESSURE REGULATOR
BEGINS TO ROCK GENTLY.
START COOKING TIMER.
REDUCE HEAT TO MAINTAIN SLOW,
GENTLE ROCKING MOTION IN
PRESSURE REGULATOR.
WHEN TIMER HAS ELAPSED,
TURN OFF STOVE AND REMOVE
PRESSURE COOKER FROM HEAT.
dried beans + legumes
NOTE: Do not cook split peas in the Pressure Cooker. Clean and rinse legumes in
warm water taking care to remove any debris. Soak beans in four times their
volume of warm water overnight (at least 8 hours). Do not add salt to the water.
NOTE: Do not soak dried split lentils. After soaking, remove any shells or floating
beans and strain off the soaking water. Rinse the beans in warm water and add to
pressure cooker. Add 3 cups of water and 1 tablespoon of vegetable oil for each
cup of beans or legumes. Do not add salt. NOTE: Do not fill Pressure Cooker
above ½ mark when cooking dried beans or legumes. 1 cup dried beans yields
approx. 2 cups after cooking.
LEGUMES COOKING TIME LIQUID ADDED
Black Beans (1 cup dry) 35 min. 3 cups (+1 tbsp. oil)
Black-eyed Peas (1 cup dry) 20 min. 3 cups (+1 tbsp. oil)
Great Northern Beans (1 cup dry) 30 min. 3 cups (+1 tbsp. oil)
Navy Beans (1 cup dry) 30 min. 3 cups (+1 tbsp. oil)
Kidney Beans (1 cup dry) 25 min. 3 cups (+1 tbsp. oil)
Lentils (1 cup dry) 20 min. 3 cups (+1 tbsp. oil)
Lima Beans (1 cup dry) 25 min. 3 cups (+1 tbsp. oil)
Pinto Beans (1 cup dry) 25 min. 3 cups (+1 tbsp. oil)
meats + poultry
Trim all visible fat and cut in such a way that the meat fits in the Pressure Cooker
without touching the sides. NOTE: Smaller pieces of meat will cook faster and will
require the water cooling method to avoid overcooking. For best results, brown
meat in the Pressure Cooker with olive oil or vegetable oil with the lid off before
adding other ingredients. After browning, drain excess fat and add remaining
ingredients and cook as indicated.
MEAT OR POULTRY COOKING TIME LIQUID ADDED
Beef Chuck Roast (3 lbs.) 35 min. 1 ½ cups
Beef Stew or Short Ribs 25 min. 2 cups
Game Fowl (pieces) 8 min. 1 cup
Game Meat 30 min. 1 ½ cups
Lamb Chops (½" thick) 5 min. ½ cup
Leg of Lamb 35-40 min. 1 ½ cups
Pork Chops (½" thick) 5 min. 1 cup
Pork Roast (3 lbs.) 55 min. 3 cups
Poultry (pieces) 8 min. 1 cup
Poultry (whole) 15 min. 1 ½ cups
Veal Roast (3 lbs.) 40 min. 2 cups
Veal Chops (½" thick) 5 min. ½ cup
vegetables
Thoroughly wash all fresh vegetables. Root vegetables like beets, carrots, potatoes
and turnips should be peeled. For frozen vegetables, extend cooking time by 1 to 2
minutes. NOTE: Vegetables require the water cooling method to avoid overcooking.
VEGETABLE COOKING TIME LIQUID ADDED
Artichokes 12 min. 1 cup
Asparagus (1" pieces) 0-2 min. ½ cup
Green Beans 1-3 min. ½ cup
Beets, Whole (2 ½” dia.) 12-14 min. 1 ½ cups
Broccoli- Medium spears 0-2 min. 1/2 cup
Brussels Sprouts 1-3 min. ½ cup
Cabbage (2" wedges) 1-3 min. 1 cup
Carrots, Whole 4-7 min. 1 cup
Carrots, Sliced 1-2 min. ½ cup
Cauliflower, Whole (6" dia.) 2-5 min. 1 cup
Corn-on-the-Cob 2-3 min. ½ cup
Greens (Chard, Spinach, Turnip) 0-3 min. ½ cup
Peas (shelled) 0-2 min. ½ cup
Potatoes, Whole (2 ½” dia.) 15 min. 1 ½ cups
Squash, Cubed or Sliced (1") 10-12 min. 1 ½ cups
Sweet Potatoes, Whole 10 min. 1 cup
seafood + fish
Clean and gut fish and remove all visible bone. Shellfish should be scrubbed and
rinsed of debris in cold water. NOTE: Seafood requires water cooling method.
SEAFOOD COOKING TIME LIQUID ADDED
Crab Legs 2 min. 1 cup
Fish (whole) 6 min. 1 cup
Fish (steaks or fillets) 2 min. 1 cup
Lobster Tail (6-8oz.) 10-12 min. 1 cup
Salmon (whole) 6 min. 1 cup
Salmon (steaks or fillet) 2 min. 1 cup
Shrimp (medium) 2 min. 1 cup
When cooking time has elapsed, turn off stove and remove Pressure Cooker from heat to
allow pressure to dissipate. For more robust recipes such as roasts and stew which call
for ‘Natural’ cooling, set Pressure Cooker aside and allow to cool until the Safety Lock
releases. For tender foods like vegetables and seafood, cool the pressure cooker by
slowly pouring cool water over the lid until the Safety Lock releases. Do not immerse
Pressure Cooker in water to attempt to rapidly cool.
After pressure has completely dissipated, remove the Pressure Regulator. To open, turn
lid counter-clockwise until the arrow on the lid and the arrow on the pot handle align. Lift
lid so as to direct any residual steam or hot water away from self and others. If lid will not
turn, the pressure has yet to drop to safe levels. Never attempt to force open lid. Allow
Pressure Cooker to cool completely before attempting to open. Your meal is now ready
to serve.
rice
NOTE: Do not cook Oatmeal, Pearl Barley or other Cereals in the Pressure Cooker.
Clean and rinse grains in warm water taking care to remove any debris. NOTE: Do
not soak rice. Bring liquid to boil in pressure cooker. Add rice to boiling water and
lock lid in place. NOTE: Do not fill Pressure Cooker above ½ mark when cooking
rice. 1 cup dried rice yields approx. 2 cups after cooking.
RICE COOKING TIME LIQUID ADDED
Polenta, Fine (1 cup dry) 5 min. 3 cups
Brown Rice (1 cup dry) 18 min. 1 3/4 cups
White Rice (1 cup dry) 6 min. 1 1/2 cups
Wild Rice (1 cup dry) 25 min. 3 cups
cooking
Thanks to the moist, pressurized heat created by the Halulite Pressure Cooker, foods
cook up to 66% faster while retaining color and flavor. Foods may be cooked in water,
broth, wine, beer, fruit juice or other liquid (except oil) to add as much or as little additional
flavor to your meals as desired. In general, it is possible to adapt standard recipes to the
pressure cooker by reducing the cooking time by 66% and using 8 fl. oz. more cooking
liquid than is desired in the final dish so a dish which would normally take 60 minutes
should only need 20 minutes in the Pressure Cooker. It is important to remember that
cooking times of 10 minutes or less require a minimum of 4 fl. oz. of cooking liquid. 10 to
15 minutes requires 8 fl. oz. and 15 minutes or more requires at least 16 fl. oz. of water.
(NOTE: High altitude requires an additional 5% increase in cooking time and cooking
liquid for every 1000 ft. above 2000 ft, so the same recipe that required 20 minutes in the
pressure cooker below 2000 ft. would need 21 minutes at 3000 ft., 22 minutes at 4000 ft.,
23 minutes at 5000 ft. and so on and so forth). Never fill the Pressure Cooker above the
2/3’s mark on the inside of the body. When cooking grains, beans, soups, stocks or foods
which expand when cooked, never fill above the ½ mark on the pot.
After prepping your ingredients, add them to the Pressure Cooker along with the desired
amount of cooking liquid. Align arrow on pot handle with arrow on lid and turn clockwise
to lock lid in place. Assure that handles are aligned and the lid is locked in place. Set
atop stove and turn stove to high. When the pressure cooker reaches temperature the
Pressure Regulator with begin to rock gently back and forth and the Safety Lock will lock
in the up position. Reduce heat to maintain a slow, gentle rocking motion in the Pressure
Regulator and start timer for your recipe. If the Pressure Regulator is rocking too
vigorously, the heat is too high and your food will burn.
 Loading...