

G-Shock GWN1000-9A User Manual

MO1405-EA
© 2014 CASIO COMPUTER CO., LTD.
Operation Guide 5371
ENGLISH
Congratulations upon your selection of this CASIO watch.
Applications
The built-in sensors of this watch measure direction, barometric pressure, temperature and altitude.
Measured values are then shown on the display. Such features make this watch useful when hiking,
mountain climbing, or when engaging in other such outdoor activities.
• The measurement functions built into this watch are not intended for taking measurements that
require professional or industrial precision. Values produced by this watch should be considered
as reasonable representations only.
•
When engaging in mountain climbing or other activities in which losing your way can create a
dangerous or life-threatening situation, always use a second compass to confi rm direction readings.
• Note that CASIO COMPUTER CO., LTD. assumes no responsibility for any damage or loss
suffered by you or any third party arising through the use of this product or its malfunction.
Warning !
E-1
Important!
• The watch’s Altimeter Mode calculates and displays relative altitude based on barometric pressure
readings produced by its pressure sensor. This means that readings taken at different times at the
same location may produce different altitude values due to changes in barometric pressure. Also note
that the value displayed by the watch may be different from the actual elevation and/or sea level
elevation indicated for the area where you are located.
• When using the altimeter of this watch for mountain climbing or other activities, it is highly
recommended that you check a map, local altitude indications, or some other source for your current
correct altitude and regularly calibrate the altimeter with the latest information. For more information,
see “To specify a reference altitude value” (page E-66).
• Whenever you use the digital compass of this watch for serious trekking, mountain climbing, or other
activities, be sure always to take along another compass to confi rm readings. If the readings produced
by the digital compass of this watch are different from those of the other compass, perform bidirectional
calibration of the digital compass to ensure more accurate readings.
• Direction readings and digital compass calibration will not be possible if the watch is in the vicinity of a
permanent magnet (magnetic accessory, etc.), metal objects, high-voltage wires, aerial wires, or
electrical household appliances (TV, computer, cellphone, etc.)
E-2
Using the Crown
This watch has a lock-type crown.
Important!
• You should keep the crown locked during normal daily use. Leaving the crown unlocked creates the
risk of unintended operations or even damage due to impact.
To lock the crown
b
b
1. Push the crown back in (see “To pull out, rotate, or push the crown in”
below).
Mark 2
Mark 2
• Note that at tempting to lo ck the crown wh en it is not pus hed in can
Mark 1
Mark 1
Mark 3
Mark 3
Mark 1
Mark 1
cause unexpected watch operation.
2. Rotate the crown so Mark 1 is aligned with Mark 2.
3. While pushing in on the crown (a), rotate it to the right (b) until it stops,
and align Mark 1 with Mark 3.
4. Gently pull on the crown to make sure it is securely locked and does
not come out.
About This Manual
Second Hand
Small hand
Small hand
To pull out, rotate, or push the crown in
Important!
• Before performing any of these operations, fi rst unlock the crown.
The illustrations below show the different crown operations.
Second Hand
Minute HandHour Hand
Minute HandHour Hand
Pull out Rotate Push in
• Depending on the model of your watch, digital display text appears
either as dark fi gures on a light background, or light fi gures on a dark
Crown
Crown
background. All examples in this manual are shown using dark fi gures
on a light background.
• Button operations are indicated using the letters shown in the
illustration.
• Note that the product illustrations in this manual are intended for
reference only, and so the actual product may appear somewhat
different than depicted by an illustration.
E-3
a
a
To unlock the crown
Rotate the crown so Mark 1 aligns with Mark 2.
E-4
High-speed Movement
You can use either of the crown operations described below to move watch hands or indicators at high
speed.
HS1: Can be used to move both hands and display indicators.
HS2: Can be used when setting the hour and minute manually to move the hands at high speed.
To start HS1 high-speed movement
To start HS2 high-speed movement
To stop high-speed movement
E-6
While the crown is pulled out, rotate it rapidly three turns away from you (for
forward movement) or towards you (for reverse movement). High-speed
movement will continue even if you release the crown.
While HS1 high-speed movement is in progress, again rotate the crown rapidly
three turns in the same direction as the current HS1 movement (away from you
for forward movement or towards you for reverse movement).
Rotate the crown in the direction that is opposite that of the current high-speed
movement or press any button.
Note
• If you do not perform any operation for more than two minutes after pulling out the crown, the indicator
shown below will appear and crown operations will become disabled. If this happens, push the crown
back in and then pull it out again to re-enable crown operations.
• Even if the indicator shown below appears immediately after you pull out the crown, crown operations
are disabled. If this happens, push the crown back in and lock it.
1 second
• You can use high-speed movement in the following cases: when changing the time and/or date setting
in the Timekeeping Mode, Countdown Timer Mode, or Alarm Mode, or when performing magnetic
declination angle calibration, altitude calibration, barometric pressure calibration, or temperature
calibration operations.
E-5
E-7

Operation Guide 5371
Things to check before using the watch
1. Check the battery power level.
In any mode, hold down B for at least two seconds. The battery power indicator will appear on the digital
display, and then the watch will enter the Timekeeping Mode.
The battery power level will be indicated as H or M on the left
side of the digital display.
NO
Does any one of the following conditions exist?
• L flashing on the digital display.
• “CHARGE” is flashing on the display.
YES
Power is low.
where it is exposed to light. For details, see “Charging the
Watch” (page E-14).
•
WhenL is fl ashing, the second hand will jump at two-second intervals.
•
When
E-8
Charge the watch by placing it in a location
CHARGE
is fl ashing, all hands will move to and stop at 12 o’clock.
Battery power
indicator
YES
The watch is charged
sufficiently.
NEXT
Go to step 2.
Contents
About This Manual …………………………………………………………………………………………… E-3
Using the Crown ……………………………………………………………………………………………… E-4
To lock the crown ……………………………………………………………………………………… E-4
To unlock the crown …………………………………………………………………………………… E-4
To pull out, rotate, or push the crown in ……………………………………………………………… E-5
Things to check before using the watch ………………………………………………………………… E-8
Charging the Watch ………………………………………………………………………………………… E-14
To recover from the sleep state …………………………………………………………………… E-19
Radio Controlled Atomic Timekeeping ………………………………………………………………… E-20
To get ready for a receive operation ……………………………………………………………… E-22
To perform manual receive ………………………………………………………………………… E-24
To check the latest signal reception results ……………………………………………………… E-26
To turn auto receive on or off ……………………………………………………………………… E-27
Mode Reference Guide …………………………………………………………………………………… E-29
Timekeeping ………………………………………………………………………………………………… E-33
Confi guring Home City Settings ………………………………………………………………………… E-34
To confi gure Home City and summer time settings ……………………………………………… E-34
Confi guring Current Time and Date Settings Manually ……………………………………………… E-36
To change the current time and date settings manually ………………………………………… E-36
To switch between 12-hour and 24-hour timekeeping …………………………………………… E-38
E-10
2. Check the Home City and the daylight saving time (DST) setting.
Use the procedure under “To confi gure Home City and summer time settings” (page E-34) to confi gure
your Home City and daylight saving time settings.
Important!
• Proper time calibration signal reception, and World Time Mode data depend on correct Home City,
time, and date settings in the Timekeeping Mode. Make sure you confi gure these settings correctly.
3. Set the current time.
• To set the time using a time calibration signal
See “To get ready for a receive operation” (page E-22).
• To set the time manually
See “Confi guring Current Time and Date Settings Manually” (page E-36).
The watch is now ready for use.
• For details about the watch’s radio controlled timekeeping feature, see “Radio Controlled Atomic
Timekeeping” (page E-20).
Hand Home Position Adjustment ……………………………………………………………………… E-39
To adjust home positions …………………………………………………………………………… E-39
Moving the Hands for Easy Viewing of the Digital Dials …………………………………………… E-40
To shift the hands and view digital info …………………………………………………………… E-40
Specifying Altitude, Barometric Pressure, and Temperature Units ……………………………… E-42
To specify altitude, barometric pressure, and temperature units ……………………………… E-42
Taking Barometric Pressure Readings ………………………………………………………………… E-43
To take barometric pressure readings …………………………………………………………… E-43
To show and hide barometric pressure differential ……………………………………………… E-45
To enable or disable the barometric pressure change indicator ……………………………… E-50
To calibrate the pressure sensor …………………………………………………………………… E-51
Taking Direction Readings ……………………………………………………………………………… E-53
To take a direction reading ………………………………………………………………………… E-53
To perform bidirectional calibration ………………………………………………………………… E-57
To perform magnetic declination correction ……………………………………………………… E-58
Using the Altimeter Mode ………………………………………………………………………………… E-62
To specify the altitude reading interval …………………………………………………………… E-63
To take altitude readings …………………………………………………………………………… E-64
To specify a reference altitude value ……………………………………………………………… E-66
To specify the altitude differential measurement range ………………………………………… E-68
To use the altitude differential value ……………………………………………………………… E-69
E-9
E-11
Taking Temperature Readings …………………………………………………………………………… E-73
To take temperature readings ……………………………………………………………………… E-73
To calibrate the temperature sensor ……………………………………………………………… E-75
Checking the Current Time in a Different Time Zone ………………………………………………… E-76
To enter the World Time Mode …………………………………………………………………… E-76
To confi gure World Time City and summer time settings ……………………………………… E-77
To swap your Home City and World Time City …………………………………………………… E-79
To access the UTC (Universal Time Coordinated) time zone ………………………………… E-79
Checking the Tide Level and Moon Ages (Tide/Moon) ……………………………………………… E-80
To view the current tide level ……………………………………………………………………… E-80
To view a Moon age ………………………………………………………………………………… E-81
To view tide level and Moon age for a specifi c date and time ………………………………… E-82
To calibrate the high tide time ……………………………………………………………………… E-85
Using the Stopwatch ……………………………………………………………………………………… E-88
To enter the Stopwatch Mode ……………………………………………………………………… E-88
To perform an elapsed time operation …………………………………………………………… E-88
To pause at a split time ……………………………………………………………………………… E-88
To measure two fi nishes …………………………………………………………………………… E-89
E-12
Charging the Watch
The face of the watch is a solar panel that generates power from light. The generated power charges a
built-in rechargeable battery, which powers watch operations. The watch charges whenever it is exposed
to light.
Charging Guide
Whenever you are not wearing the
watch, leave it in a location where it
is exposed to light.
• Best charging performance is
achieved by exposing the watch to
the strongest light available.
Warning!
Leaving the watch in bright light for charging can cause it to become quite hot.
Take care when handling the watch to avoid burn injury. The watch can become particularly hot
when exposed to the following conditions for long periods.
• On the dashboard of a car parked in direct sunlight
• Too close to an incandescent lamp
• Under direct sunlight
E-14
When wearing the watch, make sure
that its face is not blocked from light
by the sleeve of your clothing.
• The watch may enter a sleep state
(page E-19) if its face is blocked
by your sleeve even only partially.
Using the Countdown Timer ……………………………………………………………………………… E-90
To enter the Countdown Timer Mode ……………………………………………………………… E-90
To specify the countdown start time ……………………………………………………………… E-90
To perform a countdown timer operation ………………………………………………………… E-91
To stop the alarm …………………………………………………………………………………… E-91
Using the Alarm …………………………………………………………………………………………… E-92
To enter the Alarm Mode …………………………………………………………………………… E-92
To set an alarm time ………………………………………………………………………………… E-93
To turn an alarm and the Hourly Time Signal on and off………………………………………… E-94
To stop the alarm …………………………………………………………………………………… E-94
To test the alarm …………………………………………………………………………………… E-94
Illumination ………………………………………………………………………………………………… E-95
To turn on illumination manually …………………………………………………………………… E-95
To change the illumination duration ……………………………………………………………… E-96
To enable or disable the auto light switch ………………………………………………………… E-97
Other Settings ……………………………………………………………………………………………… E-99
To turn the button operation tone on or off ……………………………………………………… E-99
To turn Power Saving on or off …………………………………………………………………… E-99
Troubleshooting …………………………………………………………………………………………… E-100
Specifi cations ……………………………………………………………………………………………… E-108
E-13
Important!
• Allowing the watch to become very hot can cause its liquid crystal display to go blank (totally black or
totally white, depending on the watch model). The appearance of the LCD should become normal
again when the watch returns to a lower temperature.
• Turn on the watch’s Power Saving function (page E-19) and keep it in an area normally exposed to
bright light when storing it for long periods. This helps to ensure that power does not run down.
• Storing the watch for long periods in an area where there is no light or wearing it in such a way that it is
blocked from exposure to light can cause power to run down. Expose the watch to bright light
whenever possible.
Power Levels
In any mode, hold down B for at least two seconds. The battery power indicator will appear on the digital
display, and then the watch will enter the Timekeeping Mode.
You can get an idea of the watch’s power level by observing the battery power indicator on the display.
Level Battery Power Indicator Function Status
Battery power
Battery power
indicator
indicator
1
(H)
2
(M)
All functions enabled.
All functions enabled.
E-15
Operation Guide 5371
Level Battery Power Indicator Function Status
3
(L)
4
(
CHARGE
)
5 – – –
• The fl ashing L indicator at Level 3 (L) tells you that battery power is very low, and that exposure to
bright light for charging is required as soon as possible.
• Once the battery reaches Level 2 (M) after falling to Level 5, reconfi gure the current time, date, and
other settings.
• Display indicators reappear as soon as the battery is charged from Level 5 to Level 2 (M).
E-16
• Frequent fl ashing of the recovery indicator (
watch to bright light as soon as possible.
• Even if battery power is at Level 1 (H) or Level 2 (M), the Digital Compass Mode, Barometer Mode,
Thermometer Mode or Altimeter Mode sensor may be disabled if there is not enough power available
to power it suffi ciently. This is indicated when the recovery indicator (
• Frequent fl ashing of the recovery indicator (
is low. Leave the watch in bright light to allow it to charge.
Functions below are disabled.
• Auto and manual receive
• Sensor operation
• Moon age
• Tide Graph, barometric pressure change
indicator
When the above functions are disabled,
the small hand stays at 9 o’clock.
• Illumination
• Beeper
Second hand jumps every two seconds.
All hands stopped at 12 o’clock.
All functions disabled.
All hands stopped at 12 o’clock.
All functions disabled and settings return
to their initial factory defaults.
RECOVER
) indicates that battery power is low. Expose the
RECOVER
) probably means that remaining battery power
RECOVER
) are fl ashing.
Charging Times
Daily
Exposure Level (Brightness)
Outdoor sunlight (50,000 lux) 8 min. 3 hours 22 hours 6 hours
Sunlight through a window (10,000 lux)
Daylight through a window on a
cloudy day (5,000 lux)
Indoor fl uorescent lighting (500 lux) 8 hours 118 hours – – – – – –
*1 Approximate amount of exposure time required each day to generate enough power for normal daily
operation.
*2 Approximate amount of exposure time (in hours) required to take power from one level to the next.
• The above exposure times all are for reference only. Actual exposure times depend on lighting
conditions.
• For details about the operating time and daily operating conditions, see the “Power Supply” section of
the Specifi cations (page E-111).
E-18
Operation
30 min. 7 hours 82 hours 22 hours
48 min. 10 hours 133 hours 36 hours
Level 5 Level 4 Level 3 Level 2 Level 1
*1
Level Change *2
• Leaving the watch exposed to direct sunlight or some other very strong light source can cause the
battery power indicator to show a reading temporarily that is higher than the actual battery level. The
correct battery level should be indicated after a few minutes.
• The current time and all other settings return to their initial factory defaults whenever battery power
drops to Level 5 and when you have the battery replaced.
A dark environment while battery power is at Level 4 will cause the level to drop to Level 5. Expose the
watch to bright light whenever possible.
Jumps at two-second
Jumps at two-second
intervals
intervals
Power Recovery Mode
• Performing multiple sensor, illumination, or beeper operations during a short period may cause the
recovery indicator (
power recovery mode. Illumination, alarm, countdown timer alarm, hourly time signal, and sensor
operations will be disabled until battery power recovers.
• Battery power will recover in about 15 minutes. At this time, the recovery indicator (
fl ashing. This indicates that the functions listed above are enabled again.
Power Saving
When turned on, Power Saving enters a sleep state automatically whenever the watch is left for a certain
period in an area where it is dark. The table below shows how watch functions are affected by Power
Saving.
• For information about enabling and disabling power saving, see “To turn Power Saving on or off” (page
E-99).
• There actually are two sleep state levels: “display sleep” and “function sleep”.
Elapsed Time in Dark Hands and Display Operation
60 to 70 minutes (display sleep)
6 or 7 days (function sleep)
• The watch will not enter a sleep state between 6:00 a.m. and 9:59 p.m. If the watch is already in a sleep
state when 6:00 a.m. arrives, however, it will remain in the sleep state.
• The watch will not enter a sleep state while it is in the Stopwatch Mode or Countdown Timer Mode.
• The watch will not enter a sleep state while barometric pressure change indicator is enabled (page
E-50).
To recover from the sleep state
Move the watch to a well-lit area, press any button, or angle the watch towards your face for reading (page
E-96).
Low battery alert
When battery power reaches Level 3, the second hand of the watch will
jump at 2-second intervals in the Timekeeping Mode to let you know that
charging is required.
RECOVER
) to start fl ashing on the display. This indicates that the watch is in the
Blank display, second hand
stopped.
Blank display, all hands
stopped at 12 o’clock.
Except for display and second hand, all
functions enabled.
Except for timekeeping, all functions
disabled.
RECOVER
) will stop
E-17
E-19
Radio Controlled Atomic Timekeeping
This watch receives a time calibration signal and updates its time setting accordingly. However, when
using the watch outside of areas covered by time calibration signals, you will have to adjust the settings
manually as required. See “Confi guring Current Time and Date Settings Manually” (page E-36) for more
information.
This section explains how the watch updates its time settings when the city code selected as the Home
City is in Japan, North America, Europe, or China, and is one that supports time calibration signal
reception.
If your Home City Code setting is this:
LONDON (LON), PARIS (PAR), ATHENS (ATH) Anthorn (England), Mainfl ingen (Germany)
HONG KONG (HKG) Shangqiu City (China)
TOKYO (TYO) Fukushima, Fukuoka/Saga (Japan)
NEW YORK (NYC), CHICAGO (CHI), DENVER (DEN), LOS
ANGELES (LAX), ANCHORAGE (ANC), HONOLULU (HNL)
Important!
• The areas covered by
conditions may cause reception problems.
E-20
• Even when the watch is within range of a transmitter, signal reception may be impossible due to the
effects of geographic contours, structures, weather, the time of year, the time of day, radio interference,
etc. The signal becomes weaker at distances of approximately 500 kilometers, which means that the
infl uence of the conditions listed above becomes even greater.
• Signal reception may not be possible at the distances noted below during certain times of the year or
day. Radio interference may also cause problems with reception.
Mainfl ingen (Germany) or Anthorn (England) transmitters: 500 kilometers (310 miles)
Fort Collins (United States) transmitter: 600 miles (1,000 kilometers)
Fukushima or Fukuoka/Saga (Japan) transmitters: 500 kilometers (310 miles)
Shangqiu (China) transmitter: 500 kilometers (310 miles)
• As of December 2013, China does not use Daylight Saving Time (DST). If China does go to the Daylight
Saving Time system in the future, some functions of this watch may no longer operate correctly.
To get ready for a receive operation
1. Confi rm that the watch is in the Timekeeping Mode. If it isn’t, use B to enter the Timekeeping Mode
(page E-31).
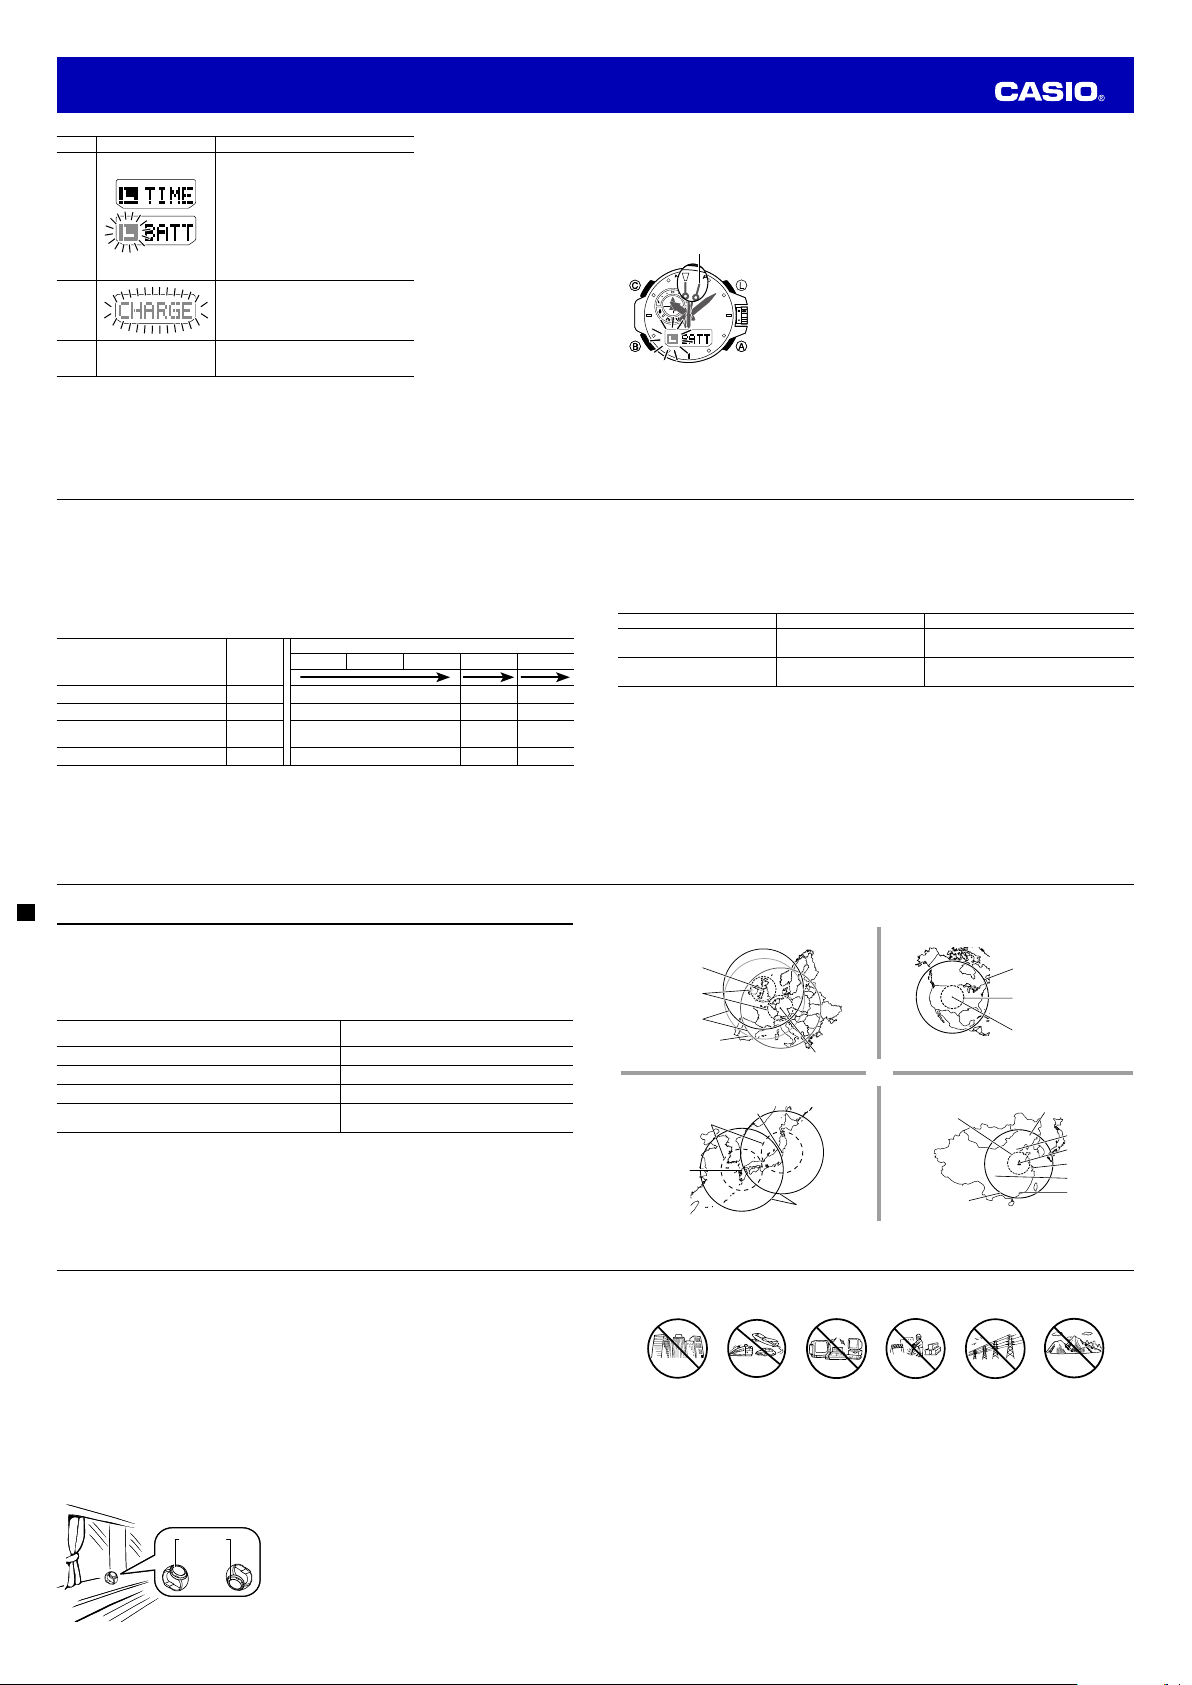
2. The antenna of this watch is located on its 12 o’clock side. Position the watch with 12 o’clock facing
towards a window as shown in the nearby illustration. Make sure there are no metal objects nearby.
E-22
ANC
and
12 o’clock
12 o’clock
or
or
HNL
are quite far from the calibration signal transmitters, so certain
• Signal reception normally is better at night.
• The receive o peration t akes from tw o to ten minutes , but
in some cas es it can take as l ong as 20 mi nutes. Take
care that you do n ot perfo rm any butto n operatio n or
move the watch duri ng this time.
The watch can receive the signal from the
transmitter located here:
Fort Collins, Colorado (United States)
Approximate Reception Ranges
UK and German Signals
Anthorn
500 kilometers
1,500 kilometers
The Anthorn signal is
receivable within this area
Japanese Signals Chinese Signal
500 kilometers
Fukuoka/Saga
Fukushima
Mainflingen
1,000 kilometers
North American Signal
2,000 miles
(3,000 kilometers)
600 miles
(1,000 kilometers)
For the Honolulu and Anchorage time zones, the
signal can be received when reception conditions
are favorable.
500 kilometers
1,500 kilometers
Fort Collins
Changchun
Beijing
Shangqiu
Shanghai
Chengdu
Hong Kong
E-21
• Signal reception may be diffi cult or even impossible under the conditions described below.
Inside or
among
buildings
3. What you should do next depends on whether you are using auto receive or manual receive.
• Auto receive: Leave t he watch over night i n the locati on you selec ted in step 2. See “Auto R eceive”
below for details.
• Manual rec eive: Perfor m the operati on under “ To perform man ual receive” o n page E-24.
Auto Receive
• With auto receive, the watch performs the receive operation each day automatically up to six times (up
to fi ve times for the Chinese calibration signal) between the hours of midnight and 5 a.m. (according to
the Timekeeping Mode time). When any receive operation is successful, none of the other receive
operations for that day are performed.
• When a calibration time is reached, the watch will perform the receive operation only if it is in the
Timekeeping Mode. The receive operation is not performed if a calibration time is reached while you
are confi guring settings.
Inside a
vehicle
Near
household
appliances,
offi ce
equipment,
or a mobile
phone
Near a
construction
site, airport
Near
high-tension
power lines
Among or
behind
mountains
E-23

Operation Guide 5371
• You can use the procedure under “To turn auto receive on or off” (page E-27) to enable or disable auto
receive.
To perform manual receive
Receiving
Receiving
Receiving indicator
Receiving indicator
Receive successful
E-24
To check the latest signal reception results
Enter the Receive Mode (page E-30).
• R/C will be displayed for abou t one secon d, and then the d ate (month and day) and t he time of the
last signal rec eption will a lternate on the d igital displ ay at two seco nd interval s.
• Even if a signal rec eive operati on is succes sful, RC will be dis played to the lef t of the date on th e
digital display.
• Dashes (-.- - and - : - -) alternat ing in place of t he date and time i ndicate there ha s been no
successf ul signal rece ption yet (since you p urchased the wa tch or had its bat tery replac ed).
1. Use B to enter the Receive Mode (
2. Hold down A for at least two seconds until RC fl ashes and then
appears on the digital display.
• A signal level ind icator (L1, L2, or L3, see pa ge E-25) will ap pear
on the display af ter receptio n starts . Do not allow t he watch to
move and do not p erform any b utton op eration unti l GET or ERR
appears on t he display.
• If the receive o peration is s uccessful , the receptio n date and time
appear on th e display, along wit h the GET indicator.
• The watch will im mediately ret urn to the Tim ekeeping M ode if you
press any but ton, or if you d o not perfo rm any but ton operatio n for
about tw o or three minu tes.
2 seconds
2 seconds
R/C
) as shown on page E-30.
Receive failed
RC!
• To return to the Time keeping Mo de, press B.
Signal Level Indicator
To turn auto receive on or off
On/Off statusOn/Off status
During calibration signal reception, the signal level indicator displays the
signal level as shown below.
Weak (Unstable) Strong (Stable)
The level indication will change in accordance with reception conditions
while reception is being performed.
As you watch the indicator, keep the watch in a location that best
maintains stable reception.
• Even under optimum reception conditions, it can take about 10
seconds for reception to stabilize.
• Note that weather, the time of day, surroundings, and other factors all
can affect reception.
E-25
1. Enter the Receive Mode (page E-30).
• R/C will be displayed for abou t one secon d, and then the d ate
(month and day) and t he time of the la st signal rece ption will
alternate on the digital display.
• Dashes (-.- - and - : - -) alternating in p lace of the date an d time
indicate the re has been no su ccessful si gnal receptio n yet (since
you purchase d the watch or had it s battery re placed).
2. Pull out the crown. This will cause the current auto receive status (
OFF
or
) to fl ash on the digital display.
• The timeke eping (hour, minu te, second) ha nds will move to 2
o’clock.
• Only AUTORC OFF is di splayed for citi es that do not su pport ti me
calibration signal reception. AUTORC ON is not dis played.
3. Rotate the crown to select either auto receive on (ON) or auto receive
OFF
off (
).
4. After the setting is the way you want, push the crown back in. This will
return to the screen that was displayed in step 1 of this procedure.
ON
E-26
Radio-controlled Atomic Timekeeping Precautions
• Strong electrostatic charge can result in the wrong time setting.
• The receive operation is disabled under any of the following conditions.
– While power is at Level 3 (L) or lower (page E-15)
– While the watch is in the power recovery mode (page E-17)
– When the watch is in the function sleep state (“Power Saving”, page E-19)
– While the crown is pulled out
– While barometric pressure change indicator is being measured
– While a countdown timer operation is in progress (page E-90)
• A receive operation is cancelled if an alarm sounds while it is being performed.
• The watch is designed to update the date and day of the week automatically for the period January 1,
2000 to December 31, 2099. Updating of the date by signal reception will no longer be performed
starting from January 1, 2100.
• Even if a receive operation is successful, certain conditions can cause the time setting to be off by up
to one second.
• If you are in an area where signal reception is not possible, the watch keeps time with the precision
noted in “Specifi cations”.
• The Home City setting reverts to the initial default of
drops to Level 5 or when you have the rechargeable battery replaced. If this happens, change the
Home City to the setting you want (page E-34).
E-28
Selecting a Mode
• The illustration below shows which buttons you need to press to navigate between modes.
• To return to the Timekeeping Mode from any other mode, hold down B for about two seconds.
Tide/Moon Data
Stopwatch Mode
Stopwatch Mode
Tide/Moon Data
Mode
Mode
TYO
(Tokyo) whenever the battery power level
World Time
World Time
Mode
Mode
Mode Reference Guide
Your watch has 11 “modes”. The mode you should select depends on what you want to do.
To do this: Enter this mode: See:
• View the current time and date in the Home City
• Confi gure Home City and daylight saving time (DST) settings
• Confi gure time and date settings manually
• Enable auto signal reception
• View the barometric pressure at your current location
• View a graph of barometric pressure readings
•
Enable alerts (display and beep) for noteworthy changes in barometric pressure
Determine your current bearing or the direction angle from your current location
to a destination
• View the altitude at your current location
• Determine the altitude differential between two locations (reference point and
current location)
View the temperature at your current location Thermometer Mode E-73
View the current time in 29 cities (29 time zones) and UTC (Universal Coordinated
Time) time
View the Tide Graph and Moon age for the currently specifi ed date and time Tide/Moon Data Mode E-80
Use the stopwatch to measure elapsed time Stopwatch Mode E-88
Use the countdown timer Countdown Timer Mode E-90
Set an alarm time Alarm Mode E-92
• Perform a manual time calibration signal receive operation
• Check whether the last receive operation was successful
• Confi gure auto receive settings
• Use the button operations below to navigate between the Timekeeping Mode and sensor (Barometer,
Digital Compass, Altimeter, Thermometer) modes.
Timekeeping Mode
Timekeeping Mode
Barometer Mode
Barometer Mode
Timekeeping Mode E-33
Barometer Mode E-43
Digital Compass Mode E-53
Altimeter Mode E-62
World Time Mode E-76
Receive Mode E-20
Sensor Modes
Sensor Modes
Digital Compass Mode
Digital Compass Mode
E-27
E-29
Countdown
Countdown
Timer Mode
Timer Mode
E-30
Alarm Mode
Alarm Mode
Receive Mode
Receive Mode
Thermometer Mode
Thermometer Mode
Altimeter Mode
Altimeter Mode
E-31

Operation Guide 5371
• When you go from the Timekeeping Mode to the sensor modes, the sensor mode that you last used
before returning to the Timekeeping Mode will be entered fi rst.
• Whenever you enter a sensor mode, the watch will beep the number of times indicated by the numbers
in the fi gure above. This will let you know what sensor mode you are entering.
• To enter a sensor mode from the Tide/Moon Data, Stopwatch, Countdown Timer, Alarm, World Time, or
Receive Mode, fi rst enter the Timekeeping Mode and then press the applicable button.
General Functions (All Modes)
The functions and operations described in this section can be used in all of the modes.
Auto Return Features
• The watch automatically returns to the Timekeeping Mode from other modes if the crown is not pulled
out and if no button operation is performed for a preset amount of time.
Mode Name Approximate Elapsed Time
Tide/Moon Data, Alarm, Receive 3 minutes
Barometer, Thermometer 1 hour
Digital Compass 1 minute
Altimeter 1 hour minimum
Initial Screens
When you enter the Alarm or World Time Mode, the data you were viewing when you last exited the mode
appears fi rst.
E-32
12 hours maximum
Confi guring Home City Settings
There are two Home City settings: actually selecting the Home City and selecting either standard time or
daylight saving time (DST).
To confi gure Home City and summer time settings
Second Hand
Second Hand
1. In the Timekeeping Mode, pull out the crown.
• CITY will fl ash on the digital display indicating that the Home City
setting ca n be changed .
2. Rotate the crown to move the second hand to the city code of the city
you want you use as your Home City.
• For detail s about cit y codes, se e the “Cit y Code Table” at the bac k
of this manual.
3. Press B to display the DST setting screen.
4. Rotate the crown away from you to cycle through the DST settings as
City code
City code
shown below.
Auto DST (AUTO) DST off (OFF)
DST on (ON)
Timekeeping
Month Day
TIME
) to set and view the current time and date.
Barometric pressure graph,
date (month/day) screen
Month Day
Barometric
pressure graph
World Time screenMoon age screen
Hour : MinutesMoon age
Time (hour, minute,
second) screen
Hour : Minutes Second
BARO
indicator.
Use the Timekeeping Mode (
• Each press of C in the Timekeeping Mode will change screen contents as shown below.
Day of the week,
month/day screen
Day of week
• Holding down C for at least two seconds while any screen is displayed will toggle the barometric
pressure change indicator between ON and OFF.
When ON, the barometric pressure graph is displayed along with the
• For information about how to check for signifi cant barometric pressure changes, refer to “Barometric
Pressure Change Indications” (page E-49).
• The Auto DS T (AUTO) setti ng will be availab le only when a c ity code t hat suppor ts time cali bration
signal recept ion (page E-2 0) is selected a s the Home C ity. While Auto D ST is select ed the DST
setting will be changed automatically in accordance with time calibration signal data.
• Note that you c annot switc h between st andard tim e and daylight sav ing time (DS T) while U TC is
selected as your Home City.
5. After the settings are the way you want, push the crown back in.
• Daylight Savi ng Time is tu rned on whe n the DST indicator is o n the display.
Note
• After you sp ecify a cit y code, the watc h will use UTC * offsets i n the World Tim e Mode to calc ulate
the current ti me for other t ime zones bas ed on the curre nt time in your H ome Cit y.
* Coordinated Universal Time, the world-wide scientifi c standard of timekeeping.
The reference point for UTC is Greenwich, England.
• Selectin g some cit y codes autom atically ma kes it possib le for the watch to rec eive the time
calibratio n signal for th e correspo nding area. S ee page E-2 0 for details .
E-33
• The displayed D ST setti ng will not cha nge if you rotate t he crown
towards you.
• After you ch ange the Ho me City an d/or DST se tting, th e hour
and minute han ds will automa tically move to t he appropriate t ime
setting. T he time sho wn on the digit al display will a lso change
E-34
accordingly.
Confi guring Current Time and Date Settings Manually
You can confi gure current time and date settings manually when the watch is unable to receive a time
calibration signal.
To change the current time and date settings manually
City codeCity code
E-36
Note
• For inform ation abo ut selectin g a Home Cit y and confi gu ring the DS T setting, s ee “Confi g uring
Home Cit y Setti ngs” (page E- 34).
• While 12-ho ur timekee ping is in use, P (p.m.) is disp layed from no on to midnight (11:59 p.m.) A (a.m .)
is displayed fro m midnight to no on (11:59 a.m.) Thes e indicators a re not displayed wh ile 24-ho ur
timekeepi ng (displays time s from 00: 00 to 23:5 9) is being us ed.
• The watch’s built- in full autom atic calenda r makes allowa nces for dif ferent mont h lengths an d leap
years. Once y ou set the date, th ere should be n o reason to cha nge it except afte r you have the
watch’s rechargeabl e battery re placed or af ter power drop s to Level 5 (page E-15).
• The day of the we ek changes au tomatica lly when the d ate changes.
• Refer to the page s shown bel ow for more info rmation o n Timekee ping Mode se ttings.
- Button operation tone on/off: “To turn the button operation tone on or off” (page E-99)
- Illumination duration setting: “To change the illumination duration” (page E-96)
- Enabling and disabling power saving: “To turn Power Saving on or off” (page E-99)
To switch between 12-hour and 24-hour timekeeping
E-38
1. In the Timekeeping Mode, pull out the crown. This will cause
fl ash on the digital display.
2. Press C.
• This will cause HOUR-MIN to fl ash o n the digita l display.
• The seco nd hand will po int to either A (a.m .) or P (p.m.)
• This is the ti me setting m ode.
• In the follow ing steps, eac h press of B cycles betwe en setti ngs
as shown below.
Home City/DST
Hour, minute
Month, day
1. Pull out the crown.
2. Press B fi ve times.
• This causes the current timekeeping set ting (12H or 24H) to fl ash
on the digital display.
3. Rotate the crown to select either 12-hour (
timekeeping.
4. After the setting is the way you want, push the crown back in.
12H
) or 24-hour (
Hour
Year
24H
CITY
)
E-35
3. Rotate the crown to change the minute setting.
• You can also use H S1 and HS2 high -speed m ovement (pag e E-6) to move th e hands for ward or
back at high spe ed.
• The hour ha nd will move in acc ordance wi th minute han d movement.
To set the hour hand separately, go to step 4 of this procedure.
to
4. Press B.
• This will cause HOUR to fl ash on th e digital disp lay.
5. Rotate the crown to change the hour setting.
• You can also use H S1 and HS2 high -speed m ovement (pag e E-6) to move th e hands for ward or
back at high spe ed.
9. Rotate the crown to adjust the month and day setting.
• You can also use H S1 high-sp eed movemen t (page E-6) to c hange this se tting.
• Pressing B will return to th e hour and min ute settin g screen.
10. After the settings are the way you want, push the crown back in.
• This will cause timekeeping to start from 0 seconds.
6. Press B.
• This cause s the currentl y set year, month, an d day to appear on
the digital di splay, with the year s etting fl ash ing.
7. Rotate the crown to adjust the year setting.
• You can also use HS1 h igh-spe ed movement ( page E-6) to ch ange
this setting.
8. Press B.
• This cause s the currentl y set date (month, day) se tting to fl ash o n
the display.
E-37
Hand Home Position Adjustment
If the watch is exposed to strong magnetism or impact, its hands can go out of alignment with the time on
the digital display. This can result in incorrect time indication even though a time calibration signal is being
received. Your watch has an auto hand position correction feature that normally adjusts the hands. Should
you notice that the hand positions are not correct, perform the operation below to correct them manually.
To adjust home positions
Wait until all of the hands
Wait until all of the hands
move to 12 o'clock.
move to 12 o'clock.
Note
After performing home position adjustment, enter the Timekeeping Mode and check to make sure that the
analog hands and the display indicate the same time. If they do not, perform home position adjustment
again.
1. In the Timekeeping Mode, pull out the crown.
2. Hold down A for at least fi ve seconds until
HAND ADJ
then
• This will sta rt home p osition adj ustment , which cause s all of the
watch hands to move to 12 o’clock .
• After the h ands stop movi ng, will appear o n the digital
display.
Important!
• Before per forming ste p 3, below, make su re that all hand s have
returned to the 12 o’clo ck positio n. Pushing th e crown back in
while any hand i s not at the 12 o’clock po sition wil l not perfo rm
home position adjustment.
3. Push the crown back in.
• This will cau se all of the han ds (small hand, h our hand, min ute
hand, seco nd hand) to retur n to their nor mal positio ns.
appears on the digital display.
HAND SET
fl ashes and
E-39
 Loading...