

Page 1
MO1202-EA
© 2012 CASIO COMPUTER CO., LTD.
Operation Guide 3295
Getting Acquainted
Congratulations upon your selection of this CASIO watch. To get the most out of your
purchase, be sure to read this manual carefully.
E E-1
About This Manual
E-2
Procedure Lookup
The following is a handy reference list of all the operational procedures contained in
this manual.
To set the time and date ......................................................................................... E-9
To toggle between 12-hour and 24-hour timekeeping .......................................E-12
To toggle the Timekeeping Mode time between DST and Standard Time ........ E-13
To configure Home Site data ............................................................................... E-15
To specify a date ................................................................................................... E-19
To view the time in another city........................................................................... E-21
To toggle a city code time between Standard Time and
Daylight Saving Time ...................................................................................... E-22
To measure times with the stopwatch ................................................................ E-24
To use Auto-Start .................................................................................................. E-25
E-4
• Button operations are indicated using the letters shown
in the illustration.
• Note that the product illustrations in this manual are
intended for reference only, and so the actual product
may appear somewhat different than depicted by an
illustration.
• Each section of this manual provides you with the
information you need to perform operations in each
mode. Further details and technical information can be
found in the “Reference” section.
• The measurement functions built into this watch are not intended for use in taking
measurements that require professional or industrial precision. Values produced
by this watch should be considered as reasonably accurate representations only.
• The longitude, lunitidal interval, Moon phase indicator and tide graph data that
appear on the display of this watch are not intended for navigation purposes.
Always use proper instruments and resources to obtain data for navigation
purposes.
• This watch is not an instrument for calculating low tide and high tide times. The
tide graph of this watch is intended to provide a reasonable approximation of tidal
movements only.
• Note that CASIO COMPUTER CO., LTD. assumes no responsibility for any
damage or loss suffered by you or any third party arising through the use of this
product or its malfunction.
Contents
General Guide ......................................................................................................... E-6
Timekeeping ............................................................................................................ E-8
Tide/Moon Data ..................................................................................................... E-17
World Time ............................................................................................................. E-21
Stopwatch .............................................................................................................. E-23
Countdown Timer .................................................................................................. E-26
Alarms ....................................................................................................................E-32
Illumination ............................................................................................................ E-39
Reference .............................................................................................................. E-43
Specifications ....................................................................................................... E-55
To configure the countdown timer ...................................................................... E-29
To use the countdown timer ................................................................................ E-31
To set an alarm time ............................................................................................. E-34
To test the alarm ................................................................................................... E-36
To turn an alarm on and off.................................................................................. E-37
To turn the Hourly Time Signal on and off .......................................................... E-38
To illuminate the display manually ...................................................................... E-39
To specify the illumination duration ................................................................... E-40
To turn the auto light switch on and off.............................................................. E-42
To turn Flash Alert on and off ..............................................................................E-48
To turn the button operation tone on and off .....................................................E-49
Warning!
E-3
E-5
General Guide
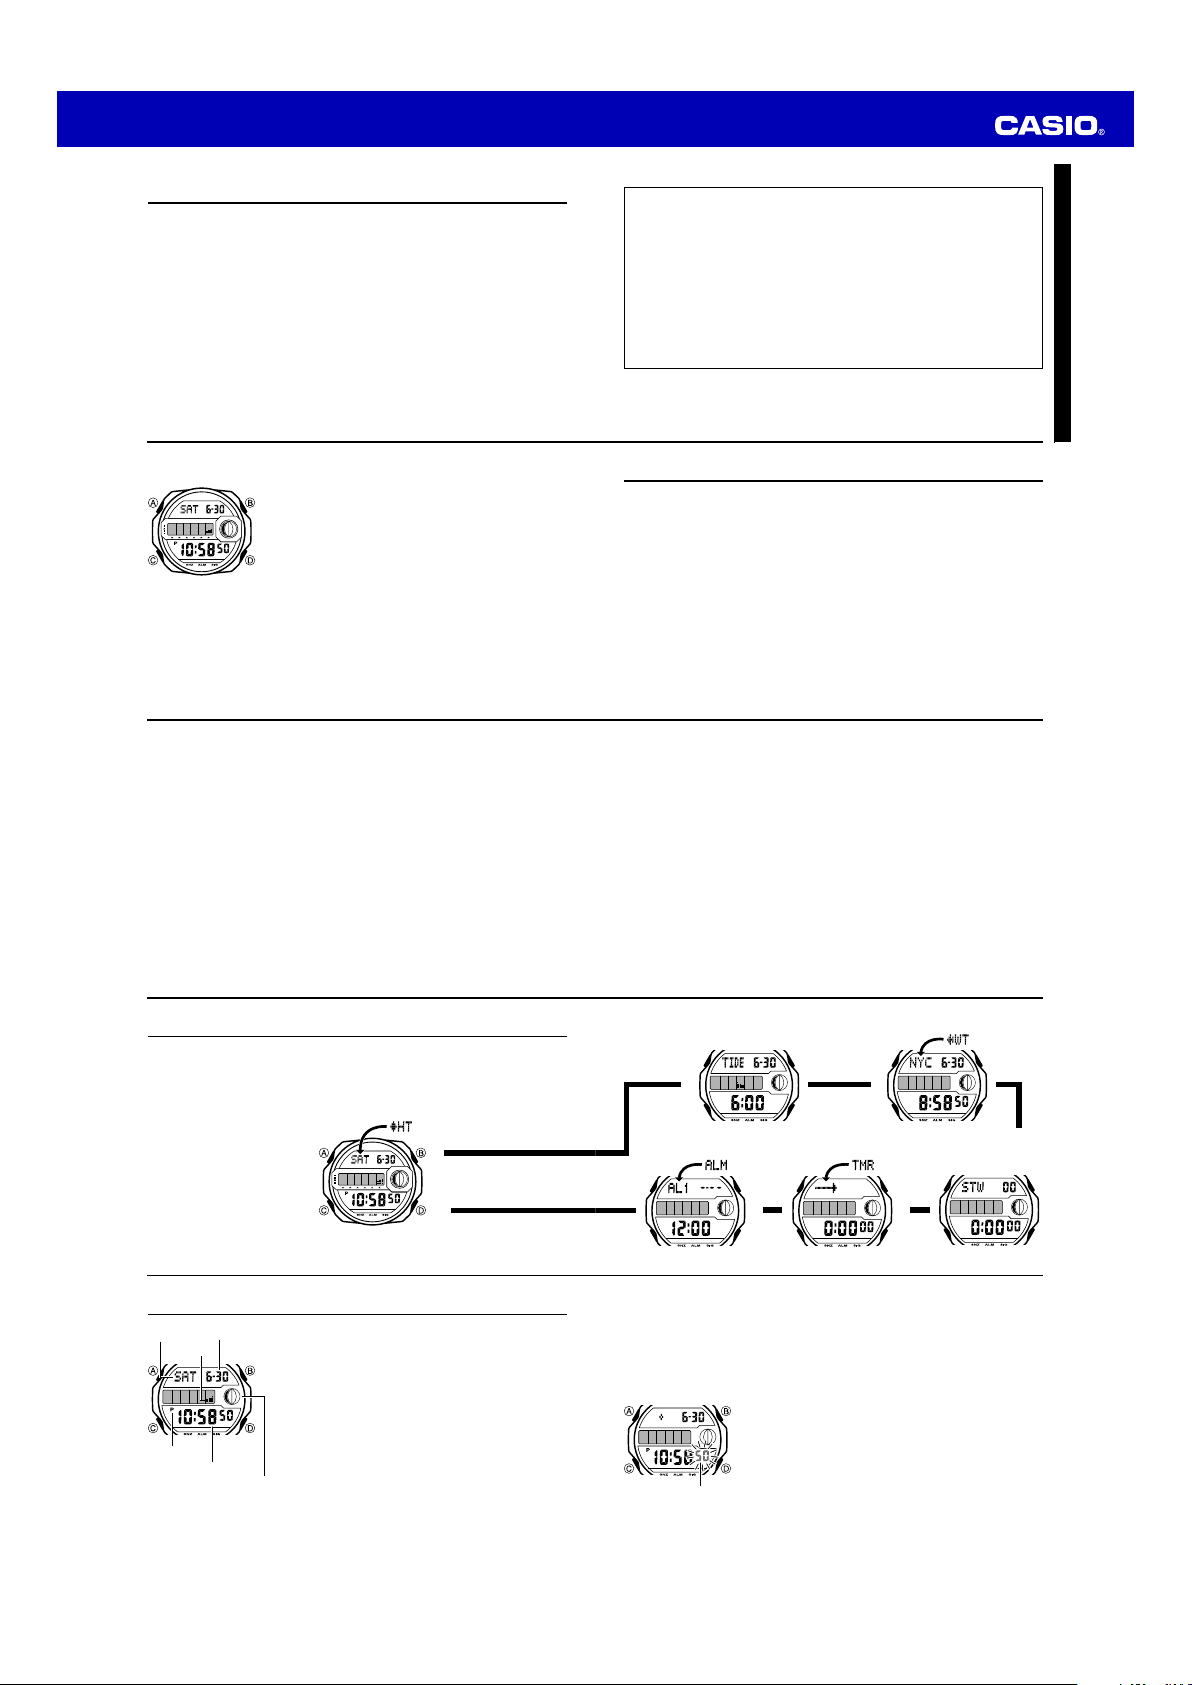
• Press C to change from mode to mode.
• In any mode (except when a setting screen is on the display), press B to illuminate
the display.
Timekeeping Mode
C
▲
E-6
C
Timekeeping
Day of week Month – Day
Tide graph
PM indicator
Hour : Minutes Seconds
Moon phase indicator
E-8
Use the Timekeeping Mode to set and view the current
time and date.
• The tide graph (page E-46) shows tidal movements for
the current date in accordance with the current time as
kept in the Timekeeping Mode.
• The Moon phase indicator (page E-43) shows the
current Moon phase in accordance with the current date
as kept in the Timekeeping Mode.
Important!
• Be sure to configure the current time and date, and your
Home Site data (data for the site where you use the
watch) correctly before using the functions of this watch.
See “Home Site Data” (page E-14) for more information.
World Time ModeTide/Moon Data Mode
▲
▲
CC
Setting the Time and Date
This watch is preset with UTC offset values that represent each time zone around the
globe. Before setting the time, be sure to set the UTC offset for your Home Site first,
which is the location where you normally will be using the watch.
• Note that World Time Mode times (page E-21) are all displayed based on the time
and date settings you configure in the Timekeeping Mode.
To set the time and date
Seconds
1. In the Timekeeping Mode, hold down A until the
C
▲
Countdown Timer ModeAlarm Mode
Stopwatch Mode
▲
seconds start to flash, which indicates the setting
screen.
• Be sure to configure the correct UTC offset for your
Home Site before configuring any other Timekeeping
Mode settings.
C
▲
E-7
E-9
Page 2

Operation Guide 3295
2. Press C to move the flashing in the sequence shown below to select other
settings.
C C
3. When the setting you want to change is flashing, use D and B to change it as
described below.
Screen To do this: Do this:
E-10
4. Press A twice to exit the setting screen.
• The day of the week is displayed automatically in accordance with the date (year,
month, and day) settings.
To toggle between 12-hour and 24-hour timekeeping
In the Timekeeping Mode, press D to toggle between 12-hour timekeeping and 24hour timekeeping.
• With the 12-hour format, the P (PM) indicator appears to the left of the hour digits for
times in the range of noon to 11:59 p.m. and no indicator appears to the left of the
hour digits for times in the range of midnight to 11:59 a.m.
• With the 24-hour format, times are displayed in the range of 0:00 to 23:59, without
any indicator.
• The 12-hour/24-hour timekeeping format you select in the Timekeeping Mode is
applied in all other modes.
Daylight Saving Time (DST) Setting
Daylight Saving Time (summer time) advances the time setting by one hour from
Standard Time. Remember that not all countries or even local areas use Daylight
Saving Time.
E-12
Home Site Data
Moon phase, tide graph data, and Tide/Moon Data Mode data will not be displayed
properly unless Home Site data (UTC offset, longitude and lunitidal interval) is
configured correctly.
• The UTC offset indicates the time differential with Greenwich, England.
• The lunitidal interval is the time elapsing between the Moon’s transit over a meridian
and the next high tide at that meridian. See “Lunitidal Interval” (page E-47) for more
information.
• This watch displays lunitidal intervals in terms of hours and minutes.
• The “Site/Lunitidal Interval Data List” at the back of this manual provides UTC offset
and longitude information around the world.
• The following is the initial factory default Home Site data (Tokyo, Japan) when you
first purchase the watch and whenever you have the battery replaced. Change these
settings to match the area where you normally use the watch.
UTC offset (+9.0); Longitude (East 140 degrees); Lunitidal interval (5 hours,
20 minutes)
E-14
CC C C
Seconds
Flash Alert Month YearDay
DST
CC C
Reset the seconds to
Toggle between Daylight Saving
Time ( ) and Standard Time
( )
HourUTC offset
Press D.
Press D.
Minutes
Screen To do this: Do this:
• See “Daylight Saving Time (DST) Setting” on page E-12 for details about the DST
setting.
• For details about the UTC offset, see the “City Code Table” at the back of this
manual.
• The UTC offset setting range is –12.0 to +14.0, in 0.5-hour units.
•
When DST is turned on, the UTC offset setting range is –11.0 to +15.0, in 0.5-hour
units.
• For information about Flash Alert, see “Flash Alert” (page E-48).
To toggle the Timekeeping Mode time between DST and Standard Time
On/Off status
To configure Home Site data
Longitude (East/West)
Longitude value
Specify the UTC offset
Change the hour or minutes
Change the year, month or day
DST indicator
1.In the Timekeeping Mode, hold down A until the
seconds start to flash, which indicates the setting
screen.
2. Press C once and the DST setting screen appears.
3. Press D to toggle between Daylight Saving Time (
displayed) and Standard Time ( displayed).
4. Press A twice to exit the setting screen.
• The DST indicator appears on the Timekeeping, and
Tide/Moon Data screens to indicate that Daylight Saving
Time is turned on. In the case of the Tide/Moon Data
Mode, the DST indicator appears on the Tide Data
screen only.
1. In the Timekeeping Mode, hold down A until the
seconds start to flash, which indicates the setting
screen.
2. Press C twice to display the UTC offset setting screen,
and confirm that the setting is correct.
• If the UTC offset setting is not correct, use D (+) and
B (–) to change it.
3. Press A to display the longitude value setting screen.
4. Press C to move the flashing in the sequence shown
below to select other settings.
Longitude Value
CC
Lunitidal Interval
Minutes
Use D (+) and B (–).
Use D (+) and B (–).
Use D (+) and B (–).
C
Longitude
(East/West)
Lunitidal Interval
Hours
C
E-11
E-13
E-15
5. While the setting you want to change is flashing, use D and B to change it as
described below.
Setting
Longitude Value
Longitude
(East/West)
Lunitidal Interval
Hours, Minutes
• For details about the Longitude Value and Lunitidal interval, see the “Site/Lunitidal
Interval Data List” at the back of this manual.
6. Press A to exit the setting screen.
E-16
Tide/Moon Data Screens
In the Tide/Moon Data Mode, press A to toggle between the Tide Data screen and
the Moon Data screen.
Tide graph
Screen
Month – Day
Use D (+) and B (–) to change the setting.
• You can specify a value from 0° to 180°, in
Use D to switch between east longitude (
and west longitude ( ).
Use D (+) and B (–) to change the setting.
▲
Time
E-18
1-degree units.
A
▲
Button Operations
Moon Data ScreenTide Data Screen
Moon phase indicator
Moon age
Tide/Moon Data
Month – Day
Tide graph
)
Time
Moon phase indicator
• While the Tide Data screen is displayed, press D to advance to the next hour.
• While the Moon Data screen is displayed, press D to advance to the next day.
• You also can specify a particular date (year, month, day) to view its tide data and
Moon data. See “To specify a date” for more information.
• When you enter the Tide/Moon Data Mode, the screen (tide data or Moon data) that
was displayed the last time you exited the mode appears first.
To specify a date
Month – Day
Year
Tide/Moon data lets you view the Moon age and the Moon
phase for a particular date, and tidal movements for a
particular date and time for your Home Site.
• When you enter the Tide/Moon Data Mode, the data for
6:00 a.m. on the current date appears first.
• If you suspect that the Tide/Moon data is not correct for
some reason, check the Timekeeping Mode data
(current time, date, and Home Site settings), and make
changes as required.
• See “Moon Phase Indicator” (page E-43) for information
about the Moon phase indicator and “Tide Graph” (page
E-46) for information about the tide graph.
• All of the operations in this section are performed in the
Tide/Moon Data Mode, which you enter by pressing C
(page E-7).
E-17
1. In the Tide/Moon Data Mode, hold down A until the
year setting starts to flash, which indicates the setting
screen.
2. Press C to move the flashing in the sequence shown
below to select the other settings.
CC
Month DayYear
C
E-19
Page 3
Operation Guide 3295
3. While a setting is flashing, use D (+) or B (–) to change it.
• You can specify a date in the range of January 1, 2000 to December 31, 2099.
4. Press A to exit the setting screen.
5. Use A to display either the Tide Data screen or the Moon Data screen.
E-20
To toggle a city code time between Standard Time and Daylight Saving Time
DST indicator
E-22
1. In the World Time Mode, use D to display the city code
whose Standard Time/Daylight Saving Time setting you
want to change.
2. Hold down A to toggle between Daylight Saving Time
(DST displayed) and Standard Time (DST not
displayed).
• The DST indicator is on the display whenever you
display a city code for which Daylight Saving Time is
turned on.
• Note that the DST/Standard Time setting affects only the
currently displayed city code. Other city codes are not
affected.
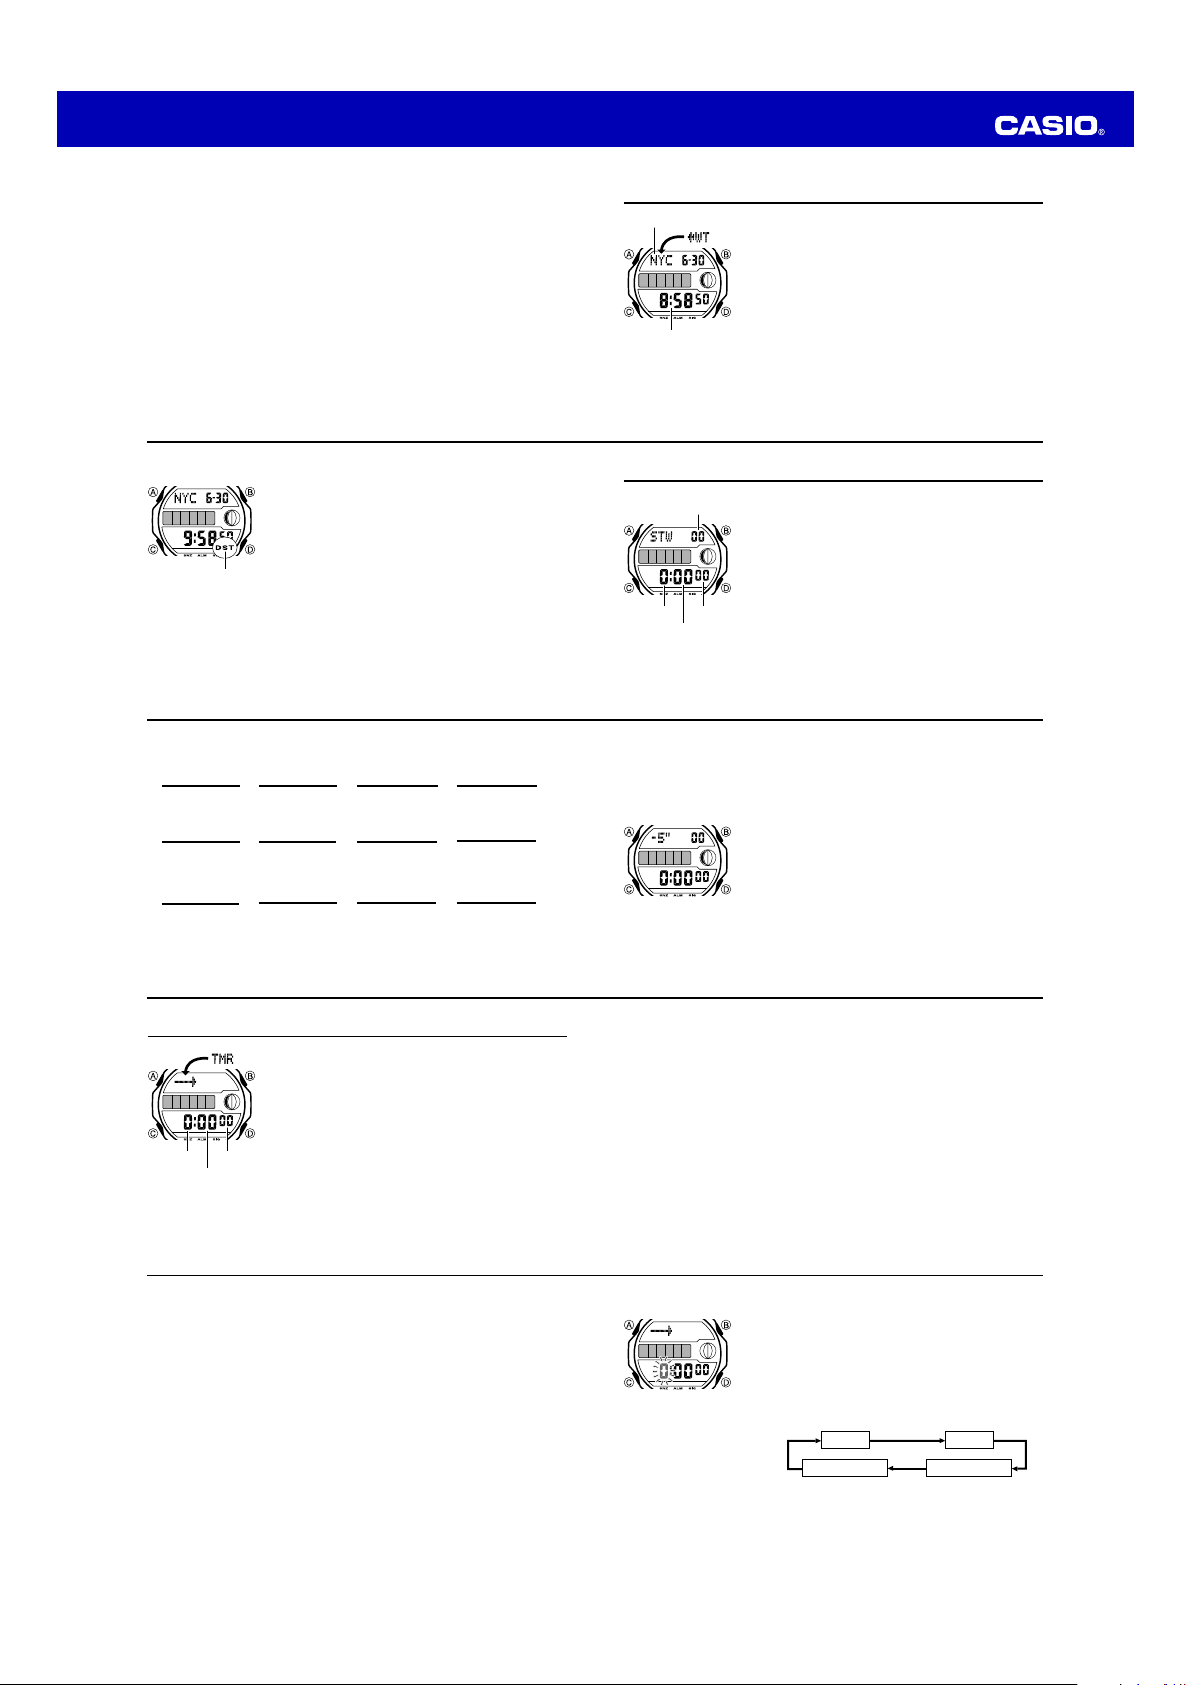
To measure times with the stopwatch
Elapsed Time
D
Start Stop
D
➤
D
➤
Re-start Clear
D
➤
Stop
Split Time
D
Start Split
A
➤
(SPL displayed)
A
➤
Split release
D
➤
Stop
Two Finishes
D
Start
E-24
A
➤
Split
First runner
finishes.
Display time of
first runner.
D
➤
Stop
Second runner
finishes.
A
➤
Split release
Display time of
second runner.
➤
➤
➤
A
A
Clear
A
Clear
World Time
City code
Current time in selected city
To view the time in another city
While in the World Time Mode, press D to scroll eastwardly through the city codes.
• For full information about city codes, see the “City Code Table” at the back of this
manual.
World Time shows the current time in 48 cities (29 time
zones) around the world.
• The times kept in the World Time Mode are
synchronized with the time being kept in the
Timekeeping Mode. If you feel that there is an error in
any World Time Mode time, check the UTC offset of your
Home Site Data and the current setting of the
Timekeeping Mode time.
• All of the operations in this section are performed in the
World Time Mode, which you enter by pressing C
(page E-7).
Stopwatch
The stopwatch lets you measure elapsed time, split times,
1/100 second
Hours
Seconds
Minutes
About Auto-Start
With Auto-Start, the watch performs a 5-second countdown, and stopwatch operation
starts automatically when the countdown reaches zero.
During the final three seconds of the countdown, a beeper sounds with each second.
To use Auto-Start
and two finishes. It also includes Auto-Start.
• The display range of the stopwatch is 23 hours, 59
minutes, 59.99 seconds.
• The stopwatch continues to run, restarting from zero
after it reaches its limit, until you stop it.
• The stopwatch measurement operation continues even
if you exit the Stopwatch Mode.
• Exiting the Stopwatch Mode while a split time is frozen
on the display clears the split time and returns to
elapsed time measurement.
• All of the operations in this section are performed in the
Stopwatch Mode, which you enter by pressing C (page
E-7).
1. While the stopwatch screen is showing all zeros in the
Stopwatch Mode, press A.
• This displays a 5-second countdown screen.
• To return to the all zeros screen, press A again.
2. Press D to start the countdown.
• When the countdown reaches zero, a tone sounds and a
stopwatch timing operation starts automatically.
• Pressing D while the Auto-Start countdown is in
progress will start the stopwatch immediately.
E-21
E-23
E-25
Countdown Timer
You can set the countdown timer within a range of one
minute to 24 hours. An alarm sounds when the countdown
reaches zero. The countdown timer also has an
auto
-
repeat feature and a progress beeper that signals
the progress of the countdown.
• All of the operations in this section are performed in the
Countdown Timer Mode, which you enter by pressing
C (page E-7).
Hours
Seconds
Minutes
E-26
Countdown End Beeper
The countdown end beeper lets you know when the countdown reaches zero.
• When the progress beeper is turned off, the countdown end beeper sounds for
about 10 seconds, or until you press any button to stop it.
• When the progress beeper is turned on, the countdown end beeper sounds for
about one second.
Progress Beeper
When the progress beeper is turned on, the watch uses beeps to signal countdown
progress as described below.
• Starting from five minutes before the end of the countdown, the watch emits four
short beeps at the top of each countdown minute.
• 30 seconds before the end of the countdown, the watch emits four short beeps.
• The watch emits a short beep for each of the last 10 seconds of the countdown.
• If the countdown start time is six minutes or greater, the watch emits a short beep for
each second of the final 10 seconds before the five-minute point is reached. Four
short beeps are emitted to signal when the five-minute point is reached.
E-28
Configuring the Countdown Timer
The following are the settings you should configure before
actually using the countdown timer.
Countdown start time; Auto-repeat on/off; Progress
beeper on/off
• See “To configure the countdown timer” (page E-29) for
information about setting up the timer.
Auto-repeat
When auto-repeat is turned on, the countdown restarts automatically from the
countdown start time when it reaches zero.
When auto-repeat is turned off, the countdown stops when it reaches zero and the
display shows the original countdown start time.
• Pressing D while an auto-repeat countdown is in progress pauses the current
countdown. You can resume the auto-repeat countdown by pressing D, or you can
press A to reset to the countdown time starting value.
Countdown Timer Beeper Operations
The watch beeps at various times during a countdown so you can keep informed
about the countdown status without looking at the display. The following describes the
types of beeper operations the watch performs during a countdown.
To configure the countdown timer
1. While the countdown start time is on the display in the
Countdown Timer Mode, hold down A until the current
countdown start time starts to flash, which indicates the
setting screen.
• If the countdown start time is not displayed, use the
procedure under “To use the countdown timer” (page
E-31) to display it.
2. Press C to move the flashing in the sequence shown
below to select other settings.
Hours Minutes
CC
Progress Beeper Auto-repeat
C
C
E-27
E-29
Page 4

Operation Guide 3295
3. When the setting you want to change is flashing, use B and D to change it as
described below.
Setting
Hours, Minutes
Auto-repeat
Progress Beeper
• To specify a countdown start time of 24 hours, set .
4. Press A to exit the setting screen.
• You also can perform steps 1 and 2 of the above procedure whenever you need to
view the current auto-repeat and progress beeper settings.
E-30
Screen
Use D (+) and B (–) to change the setting.
Press D to toggle auto-repeat on (
displayed) and off ( displayed).
Press D to toggle the progress beeper on ( )
and off (
Button Operation
).
Alarms
Alarm number
Alarm date
(Month – Day)
Alarm time
(Hour : Minutes)
E-32
To set an alarm time
• To set an alarm time, display the applicable alarm screen (AL1, AL2 or SNZ).
• The snooze alarm operation repeats every five minutes.
2. After you select an alarm, hold down A until the hour setting of the alarm time
starts to flash, which indicates the setting screen.
• This operation turns on the alarm automatically.
You can set up to three independent multi-function alarms
with hour, minutes, month, and day. When an alarm is
turned on, the alarm tone sounds when the alarm time is
reached. One of the alarms is a snooze alarm.
You also can turn on an Hourly Time Signal that causes
the watch to beep twice every hour on the hour.
• The snooze alarm screen is indicated by
the other alarm screens are numbered
The Hourly Time Signal screen is indicated by
• All of the operations in this section are performed in the
Alarm Mode, which you enter by pressing C (page
E-7).
1. In the Alarm Mode, use D to scroll through the alarm
screens until the one whose time you want to set is
displayed.
DD
D
D
SNZ, while
AL1 and AL2.
SIG.
To use the countdown timer
Alarm Types
The alarm type is determined by the settings you make, as described below.
• Daily alarm
Set the hour and minutes for the alarm time. This type of setting causes the alarm to
sound everyday at the time you set.
• Date alarm
Set the month, day, hour and minutes for the alarm time. This type of setting causes
the alarm to sound at the specific time, on the specific date you set.
• 1-Month alarm
Set the month, hour and minutes for the alarm time. This type of setting causes the
alarm to sound everyday at the time you set, only during the month you set.
• Monthly alarm
Set the day, hour and minutes for the alarm time. This type of setting causes the alarm
to sound every month at the time you set, on the day you set.
Note
The 12-hour/24-hour format of the alarm time matches the format you select in the
Timekeeping Mode.
3.
PressC to move the flashing in the sequence shown below to select other settings.
4. While a setting is flashing, use D and B to change it as described below.
Screen
To do this:
Change the hour
and minutes
Change the month
and day
5. Press A to exit the setting screen.
Press D while in the Countdown Timer Mode to start the
countdown timer.
• The countdown timer operation continues even if you
exit the Countdown Timer Mode.
• Press D while a countdown operation is in progress to
pause it. Press D again to resume the countdown.
• To stop a countdown operation completely, first pause it
(by pressing D), and then press A. This returns the
countdown time to its starting value.
CCC
Hour Minutes Month Day
C
Do this:
Use D (+) and B (–).
•With the 12-hour format, set the time correctly as
a.m. or p.m. (P indicator).
•To set an alarm that does not include a month and/
or day, set
for each setting.
E-31
E-33
E-34
Alarm Operation
The alarm tone sounds at the preset time for 10 seconds, regardless of the mode the
watch is in. In the case of the snooze alarm, the alarm operation is performed a total
of seven times, every five minutes, until you turn the alarm off (page E-37).
• Alarm and Hourly Time Signal operations are performed in accordance with the
Timekeeping Mode time.
• To stop the alarm tone after it starts to sound, press any button.
• Performing any one of the following operations during a 5-minute interval between
snooze alarms cancels the current snooze alarm operation.
Displaying the Timekeeping Mode setting screen (page E-9)
Displaying the
To test the alarm
In the Alarm Mode, hold down D to sound the alarm.
E-36
To turn the Hourly Time Signal on and off
E-38
SNZ
Hourly Time Signal
on indicator
setting screen (page E-34)
1. In the Alarm Mode, use D to select the Hourly Time
Signal (
SIG).
2. Press A to toggle it on and off.
• The Hourly Time Signal on indicator is shown on the
display in all modes while this function is turned on.
To turn an alarm on and off
Alarm on indicator
Snooze alarm indicator
Illumination
Auto light switch
indicator
E-35
1. In the Alarm Mode, use D to select an alarm.
2. Press A to toggle it on and off.
• Turning on a alarm (
on indicator on its Alarm Mode screen.
• Turning on the snooze alarm (
on indicator and snooze alarm indicator on the Alarm
Mode snooze alarm screen.
• In all modes, the alarm on indicator is shown for any
alarm that is currently turned on.
• The alarm on indicator flashes while the alarm is
sounding.
• The snooze alarm indicator flashes while the snooze
alarm is sounding and during the 5-minute intervals
between alarms.
This watch has an LED (light emitting diode) that causes
the entire display to glow for easy reading in the dark. The
watch’s auto light switch turns on illumination
automatically when you angle the watch towards your
face.
• The auto light switch must be turned on (indicated by
the auto light switch indicator) for it to operate.
• See “Illumination Precautions” (page E-52) for other
important information about using illumination.
To illuminate the display manually
In any mode, press B to turn on illumination.
• The above operation turns on illumination regardless of
the current auto light switch setting.
AL1or AL2) displays the alarm
SNZ) displays the alarm
E-37
E-39
Page 5

Operation Guide 3295
• You can use the procedure below to select either 1.5 seconds or 3 seconds as the
illumination duration. When you press B, the illumination will remain on for about
1.5 seconds or 3 seconds, depending on the current illumination duration setting.
To specify the illumination duration
E-40
Warning!
••
• Always make sure you are in a safe place whenever you are reading the
••
display of the watch using the auto light switch. Be especially careful when
running or engaged in any other activity that can result in accident or injury.
Also take care that sudden illumination by the auto light switch does not
startle or distract others around you.
••
• When you are wearing the watch, make sure that its auto light switch is turned
••
off before riding a bicycle or operating a motorcycle or any other motor
vehicle. Sudden and unintended operation of the auto light switch can create a
distraction, which can result in a traffic accident and serious personal injury.
To turn the auto light switch on and off
In the Timekeeping Mode, hold down B for about three seconds to toggle the auto
light switch on (auto light switch indicator displayed) and off (auto light switch indicator
not displayed).
• The auto light switch indicator remains in all modes while the auto light switch is
turned on.
• In order to protect against running down the battery, the auto light switch will turn off
automatically approximately six hours after you turn it on. Repeat the above
procedure to turn the auto light switch back on if you want.
E-42
Moon Phase
Indicator
Moon Age
Moon Phase
• The Moon phase indicator shows the Moon as viewed at noon from a position in the
Northern Hemisphere looking south. Note that at times the image shown by the
Moon phase indicator may differ from that of the actual Moon in your area.
• The left-right orientation of the Moon phase is reversed when viewing from the
Southern Hemisphere or from a point near the equator.
1. In the Timekeeping Mode, hold down A until the
seconds start to flash, which indicates the setting
screen.
2.
While the seconds are flashing, press B to toggle the
setting between 1.5 seconds (
3. Press A twice to exit the setting screen.
(part you cannot see)
0.0 - 1.8
1.9 - 5.5
27.7 - 29.5
New
Moon
5.6 - 9.2
First
Quarter
(Waxing)
Moon phase (part you can see)
13.0 - 16.6
9.3 - 12.9
Full
Moon
) and 3 seconds ( ).
20.3 - 23.9
16.7 - 20.2 24.0 - 27.6
Last
Quarter
(Waning)
About the Auto Light Switch
Turning on the auto light switch causes illumination to turn on, whenever you position
your wrist as described below in any mode.
Moving the watch to a position that is parallel to the ground and then tilting it towards
you more than 40 degrees causes illumination to turn on.
• Wear the watch on the outside of your wrist.
Parallel to
ground
More than
40°
E-41
Reference
This section contains more detailed and technical information about watch operation.
It also contains important precautions and notes about the various features and
functions of this watch.
Moon Phase Indicator
The Moon phase indicator of this watch indicates the current phase of the Moon as
shown below.
Moon Phases and Moon Age
The Moon goes through a regular 29.53-day cycle. During each cycle, the Moon
appears to wax and wane as the relative positioning of the Earth, Moon, and Sun
changes. The greater the angular distance between the Moon and the Sun,* the more
we see illuminated.
* The angle to the Moon in relation to the direction at which the Sun is visible from the
Earth.
This watch performs a rough calculation of the current Moon age starting from day 0
of the moon age cycle. Since this watch performs calculations using integer values
only (no fractions), the margin for error of the displayed Moon age is ± 1 day.
Moon phase indicator
E-43
E-44
Tide Graph
The Tide Graph has six graphic segments, each of which indicates a different tide
level. The current tide level is indicated by the displayed graphic segment.
High Tide
(Rising
Tide)
E-46
Flash Alert
When Flash Alert is turned on, the illumination flashes for the alarms, the Hourly Time
Signal, the countdown alarm, and stopwatch auto start.
To turn Flash Alert on and off
E-48
1. In the Timekeeping Mode, hold down A until the
seconds start to flash, which indicates the setting
screen.
2. Press C eight times to display the Flash Alert setting
screen.
3. Press D to toggle Flash Alert on (
off (
4. Press A twice to exit the setting screen.
• The Flash Alert setting you select with the above
procedure is applied in all modes.
• When Flash Alert is on,
timekeeping screen for about one second whenever you
enter the Stopwatch, Countdown Timer, or Alarm Mode.
(Falling
Tide)
displayed).
Low Tide
(Rising
Tide)
appears on the
displayed) and
E-45
Tidal Movements
Tides are the periodic rise and fall of the water of oceans, seas, bays, and other
bodies of water caused mainly by the gravitational interactions between the Earth,
Moon and Sun. Tides rise and fall about every six hours. The tide graph of this watch
indicates tidal movement based on the Moon’s transit over a meridian and the lunitidal
interval. The lunitidal interval differs according to your current location, so you must
specify a lunitidal interval in order to obtain the correct tide graph readings.
The tide graph displayed by this watch is based on the current Moon age.
Remember that the margin for error of the Moon age displayed by this watch is ± 1
day. The greater the error in a particular Moon age, the greater the error in the
resulting tide graph.
Lunitidal Interval
Theoretically, high tide is at the Moon’s transit over the meridian and low tide is about
six hours later. Actual high tide occurs somewhat later, due to factors such as
viscosity, friction, and underwater topography. Both the time differential between the
Moon’s transit over the meridian until high tide and the time differential between the
Moon’s transit over the meridian until low tide are known as the “lunitidal interval”.
When setting the lunitidal interval for this watch, use the time differential between the
Moon’s transit over the meridian until high tide.
Button Operation Tone
The button operation tone sounds any time you press one of the watch’s buttons. You
can turn the button operation tone on or off as desired.
• Even if you turn off the button operation tone, the alarms, the Hourly Time Signal,
the countdown alarm, and stopwatch auto start all operate normally.
To turn the button operation tone on and off
MUTE indicator
In any mode (except when a setting screen is on the
display), hold down C to toggle the button operation tone
on (MUTE not displayed) and off (MUTE displayed).
• Holding down C to turn the button operation tone on or
off also causes the watch’s current mode to change.
• The MUTE indicator is displayed in all modes when the
button operation tone is turned off.
E-47
E-49
Page 6
Operation Guide 3295
Auto Return Features
• If you leave the watch in the Alarm Mode or Tide/Moon Data Mode for two or three
minutes without performing any operation, it changes to the Timekeeping Mode
automatically.
• If you leave a screen with flashing digits on the display for two or three minutes
without performing any operation, the watch exits the setting screen automatically.
Scrolling
The B and D buttons are used in various modes and setting screens to scroll
through data on the display. In most cases, holding down these buttons during a scroll
operation scrolls at high speed.
Initial Screens
When you enter the World Time or Alarm Mode, the data you were viewing when you
last exited the mode appears first.
E-50
• The letters UTC is the abbreviation for Coordinated Universal Time, which is the
world-wide scientific standard of timekeeping. It is based upon carefully maintained
atomic (cesium) clocks that keep time accurately to within microseconds. Leap
seconds are added or subtracted as necessary to keep UTC in sync with the Earth’s
rotation.
Illumination Precautions
• Illumination may be hard to see when viewed under direct sunlight.
• Illumination turns off automatically whenever an alarm sounds.
• Frequent use of illumination runs down the battery.
E-52
• Under certain conditions, illumination may not turn on until about one second after
you turn the face of the watch towards you. This does not necessarily indicate
malfunction of the auto light switch.
• You may notice a very faint clicking sound coming from the watch when it is shaken
back and forth. This sound is caused by mechanical operation of the auto light
switch, and does not indicate a problem with the watch.
Timekeeping
• Resetting the seconds to 00 while the current count is in the range of 30 to 59
causes the minutes to be increased by 1. In the range of 00 to 29, the seconds are
reset to 00 without changing the minutes.
• The year can be set in the range of 2000 to 2099.
• The watch’s built-in full automatic calendar makes allowances for different month
lengths and leap years. Once you set the date, there should be no reason to change
it except after you have the watch’s battery replaced.
World Time
All World Time Mode times are calculated from the current time in the Timekeeping
Mode using UTC offset values.
• The seconds count of the World Time is synchronized with the seconds count of the
Timekeeping Mode.
• The UTC offset is a value that indicates the time difference between a reference
point in Greenwich, England and the time zone where a city is located.
E-51
Auto light switch precautions
• Avoid wearing the watch on the inside of your wrist. Doing so causes the auto light
switch to operate when it is not needed, which shortens battery life. If you want to
wear the watch on the inside of your wrist, turn off the auto light switch feature.
More than 15 degrees
too high
• Static electricity or magnetic force can interfere with proper operation of the auto
light switch. If illumination does not turn on, try moving the watch back to the starting
position (parallel with the ground) and then tilt it back toward you again. If this does
not work, drop your arm all the way down so it hangs at your side, and then bring it
back up again.
• Illumination may not turn on if the face of the watch is
more than 15 degrees above or below parallel. Make
sure that the back of your hand is parallel to the ground.
• Illumination turns off in about 1.5 seconds or 3 seconds,
even if you keep the watch pointed towards your face.
E-53
Specifications
Accuracy at normal temperature: ±15 seconds a month
Timekeeping: Hour, minutes, seconds, p.m. (P), month, day, day of the week
Time format: 12-hour and 24-hour
Calendar system: Full Auto-calendar pre-programmed from the year 2000 to 2099
Other: Daylight Saving Time (summer time)/Standard Time; Home Site data settings
(UTC Offset, longitude, lunitidal interval)
Tide/Moon Data: Moon phase indicator for specific date; Tide level for specific date and
World Time: 48 cities (29 time zones)
Other: Daylight Saving Time/Standard Time
Stopwatch:
Measuring unit: 1/100 second
Measuring capacity: 23:59' 59.99''
Measuring modes: Elapsed time, split time, two finishes
Other: Auto-Start
time
E-54
Countdown Timer:
Measuring unit: 1 second
Input range: 1 minute to 24 hours (1-minute increments and 1-hour increments)
Other: Auto-repeat timing; Progress beeper
Alarms: 3 multi-function* alarms (with one snooze alarm); Hourly Time Signal
* Alarm type: Daily alarm, date alarm, 1-month alarm, monthly alarm
Illumination: LED (light emitting diode); Auto Light Switch; Selectable illumination duration
Other: Button operation tone on/off; Flash alert
Battery: One lithium battery (Type: CR2025)
Approximately 7 years on type CR2025 (10 seconds of alarm operation per day (with
Flash Alert), one countdown timer operation (with progress beeper and Flash Alert)
per week, one stopwatch operation (with auto start and Flash Alert) per week, 1.5
seconds of illumination per day)
Frequent use of the light shortens the battery life.
E-56
City Code Table
L-2
City
Code
PPG
HNL
ANC
YVR
SFO
LAX
DEN
MEX
CHI
MIA
NYC
CCS*
YYT
RIO
RAI
LIS
LON
Pago Pago
Honolulu
Anchorage
Vancouver
San Francisco
Los Angeles
Denver
Mexico City
Chicago
Miami
New York
Caracas
St. Johns
Rio De Janeiro
Lisbon
London
City
Praia
UTC Offset/
GMT Differential
–11
–10
–9
–8
–7
–6
–5
–4
–3.5
–3
–1
0
Other major cities in same time zone
Papeete
Nome
Las Vegas, Seattle/Tacoma, Dawson City
Edmonton, El Paso
Houston, Dallas/Fort Worth, New Orleans, Winnipeg
Montreal, Detroit, Boston,
Panama City, Havana, Lima, Bogota
La Paz, Santiago, Port Of Spain
Sao Paulo, Buenos Aires, Brasilia, Montevideo
Dublin, Casablanca, Dakar, Abidjan
City
Code
BCN
PAR
MIL
ROM
BER
ATH
JNB
IST
CAI
JRS
MOW
JED
THR
DXB
KBL
KHI
MLE
DEL
City Code Table
Site/Lunitidal Interval Data List
UTC Offset/
City
Barcelona
Paris
Milan
Rome
Berlin
Athens
Johannesburg
Istanbul
Cairo
Jerusalem
Moscow
Jeddah
Teh r an
Dubai
Kabul
Karachi
Male
Delhi
GMT Differential
+1
+2
+3
+3.5
+4
+4.5
+5
+5.5
Other major cities in same time zone
Amsterdam, Algiers, Hamburg, Frankfurt, Vienna,
Madrid, Stockholm
Helsinki, Beirut, Damascus, Cape Town
Kuwait, Riyadh, Aden, Addis Ababa, Nairobi
Shiraz
Abu Dhabi, Muscat
Mumbai, Kolkata, Colombo
E-55
L-1
L-3
Page 7
Operation Guide 3295
City
Code
Dhaka
DAC
RGN
Yangon
BKK
Bangkok
Singapore
SIN
Hong Kong
HKG
Beijing
BJS
SEL
Seoul
TYO
Tokyo
Adelaide
ADL
GUM
Guam
Sydney
SYD
NOU
Noumea
WLG
• Based on data as of December 2010.
• The rules governing global times (UTC offset and GMT differential) and summer time
* In December 2007, Venezuela changed its offset from –4 to –4.5.
L-4
Wellington
are determined by each individual country.
Note, however, that this watch displays an offset of –4 (the old offset) for the CCS
(Caracas, Venezuela) city code.
Site Standard DST/ Longitude
Honolulu –10 –9 158°W 3:40
Jakarta +7 +8 107°E 0:00
Jeddah +3 +4 39°E 6:30
Karachi +5 +6 67°E 10:10
Kona, Hawaii –10 –9 156°W 4:00
Lima –5 –4 77°W 5:20
Lisbon 0 +1 9°W 2:00
London 0 +1 0°E 1:10
Los Angeles –8 –7 118°W 9:20
Maldives +5 +6 74°E 0:10
Manila +8 +9 121°E 10:30
Mauritius +4 +5 57°E 0:50
Melbourne +10 +11 145°E 2:10
Miami –5 –4 80°W 7:30
Noumea +11 +12 166°E 8:30
City
UTC Offset/
GMT Differential
+6
+6.5
+7
+8
+9
+9.5
+10
+11
+12
Time Summer Time
Other major cities in same time zone
Phnom Penh, Hanoi, Vientiane, Jakarta
Kuala Lumpur, Taipei, Manila, Perth, Ulaanbaatar
Pyongyang
Darwin
Melbourne, Rabaul
Port Vila
Christchurch, Nadi, Nauru Island
UTC offset
Lunitidal
Interval
L-6
Site/Lunitidal Interval Data List
Site Standard DST/ Longitude
Anchorage –9 –8 149°W 5:40
Bahamas –5 –4 77°W 7:30
Baja, California –7 –6 110°W 8:40
Bangkok +7 +8 101°E 4:40
Boston –5 –4 71°W 11:20
Buenos Aires –3 –2 58°W 6:00
Casablanca 0 +1 8°W 1:30
Christmas Island +14 +15 158°W 4:00
Dakar 0 +1 17°W 7:40
Gold Coast +10 +11 154°E 8:30
Great Barrier Reef, Cairns +10 +11 146°E 9:40
Guam +10 +11 145°E 7:40
Hamburg +1 +2 10°E 4:50
Hong Kong +8 +9 114°E 9:10
Site Standard DST/ Longitude
Pago Pago –11 –10 171°W 6:40
Palau +9 +10 135°E 7:30
Panama City –5 –4 80°W 3:00
Papeete –10 –9 150°W 0:10
Rio De Janeiro –3 –2 43°W 3:10
Seattle –8 –7 122°W 4:20
Shanghai +8 +9 121°E 1:20
Singapore +8 +9 104°E 10:20
Sydney +10 +11 151°E 8:40
Tokyo +9 +10 140°E 5:20
Vancouver –8 –7 123°W 5:10
Wellington +12 +13 175°E 4:50
•
Based on data as of 2003.
UTC offset
Time Summer Time
UTC offset
Time Summer Time
Lunitidal
Lunitidal
Interval
L-5
Interval
L-7
 Loading...