

Page 1
C
C
C
C
C
C
Setup Mode
Timer Mode Stopwatch Mode
Alarm Mode
World Time ModeTimekeeping Mode
B
(Approximately
0.5 seconds)
Control Mode*
Bluetooth indicator
MA1410-EC
HANDS indicator
© 2014 CASIO COMPUTER CO., LTD.
Operation Guide 5413
The information below applies to all
modes.
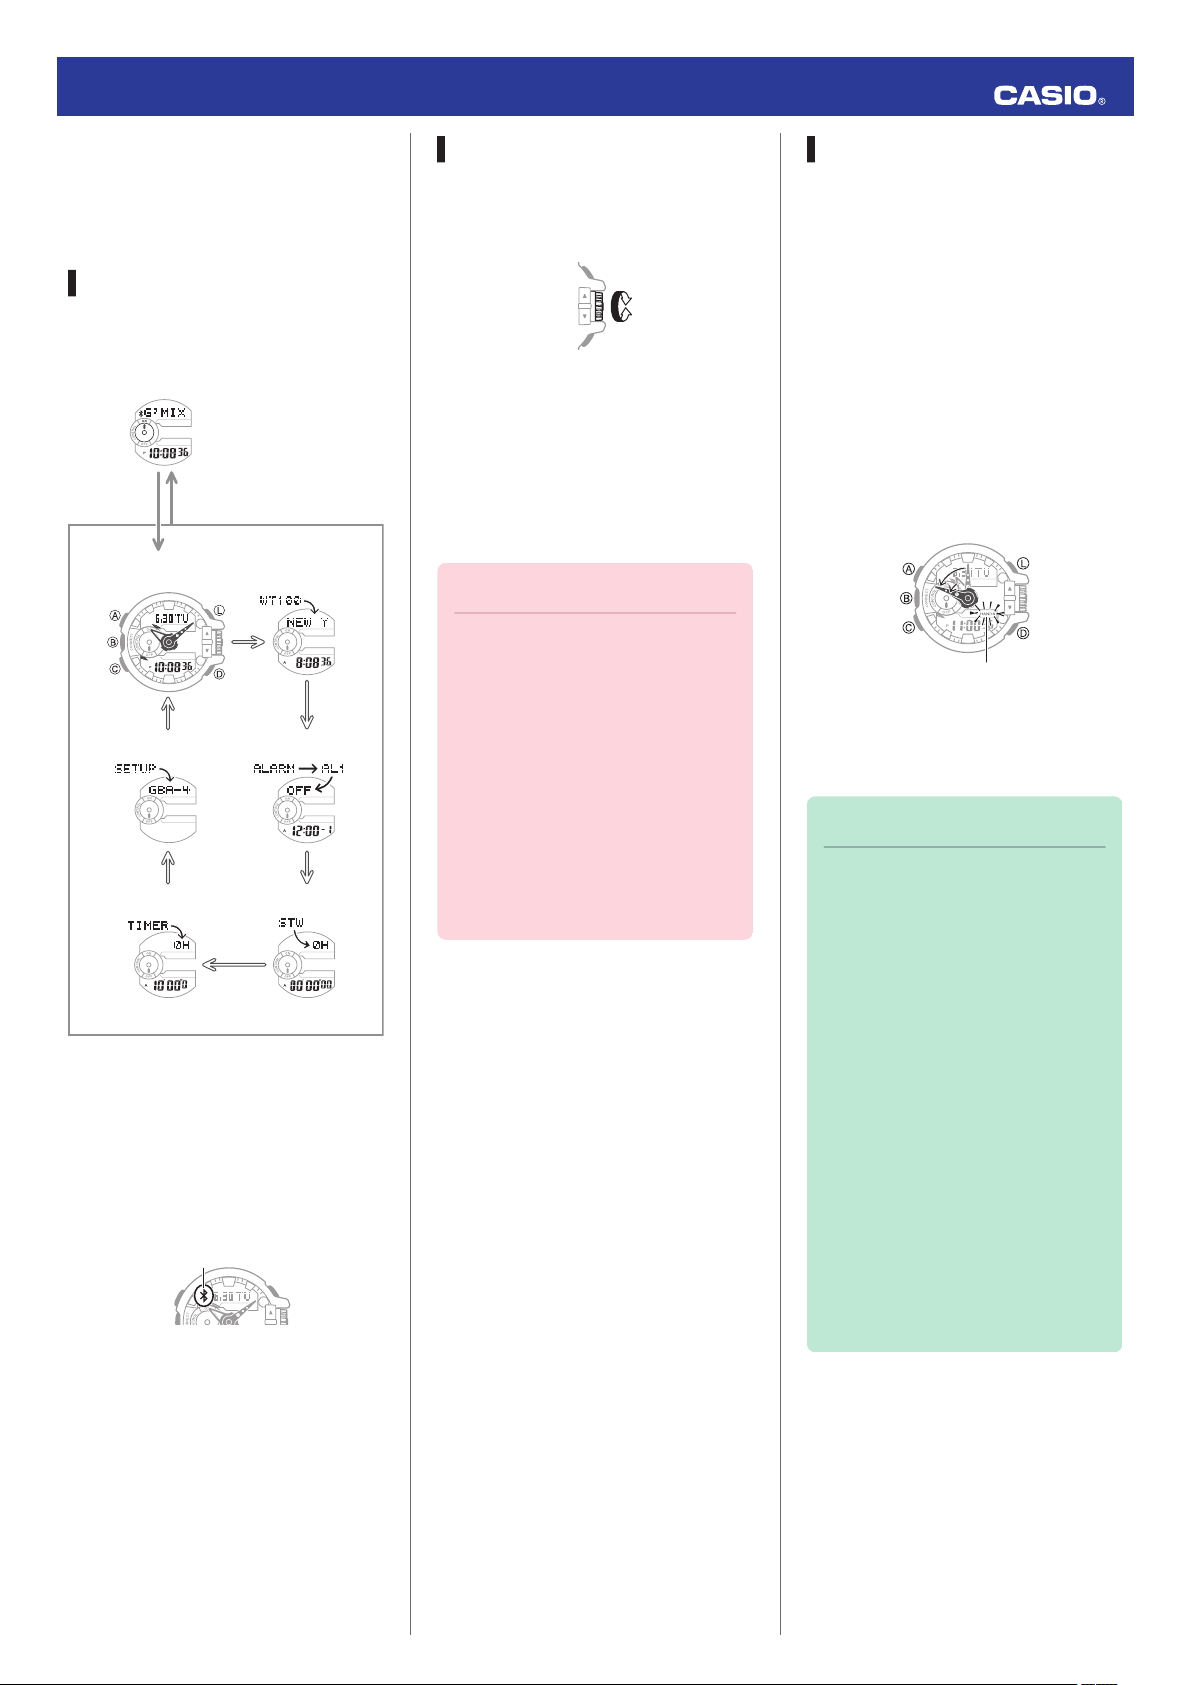
Your watch has seven modes. Navigate
between modes as shown below.
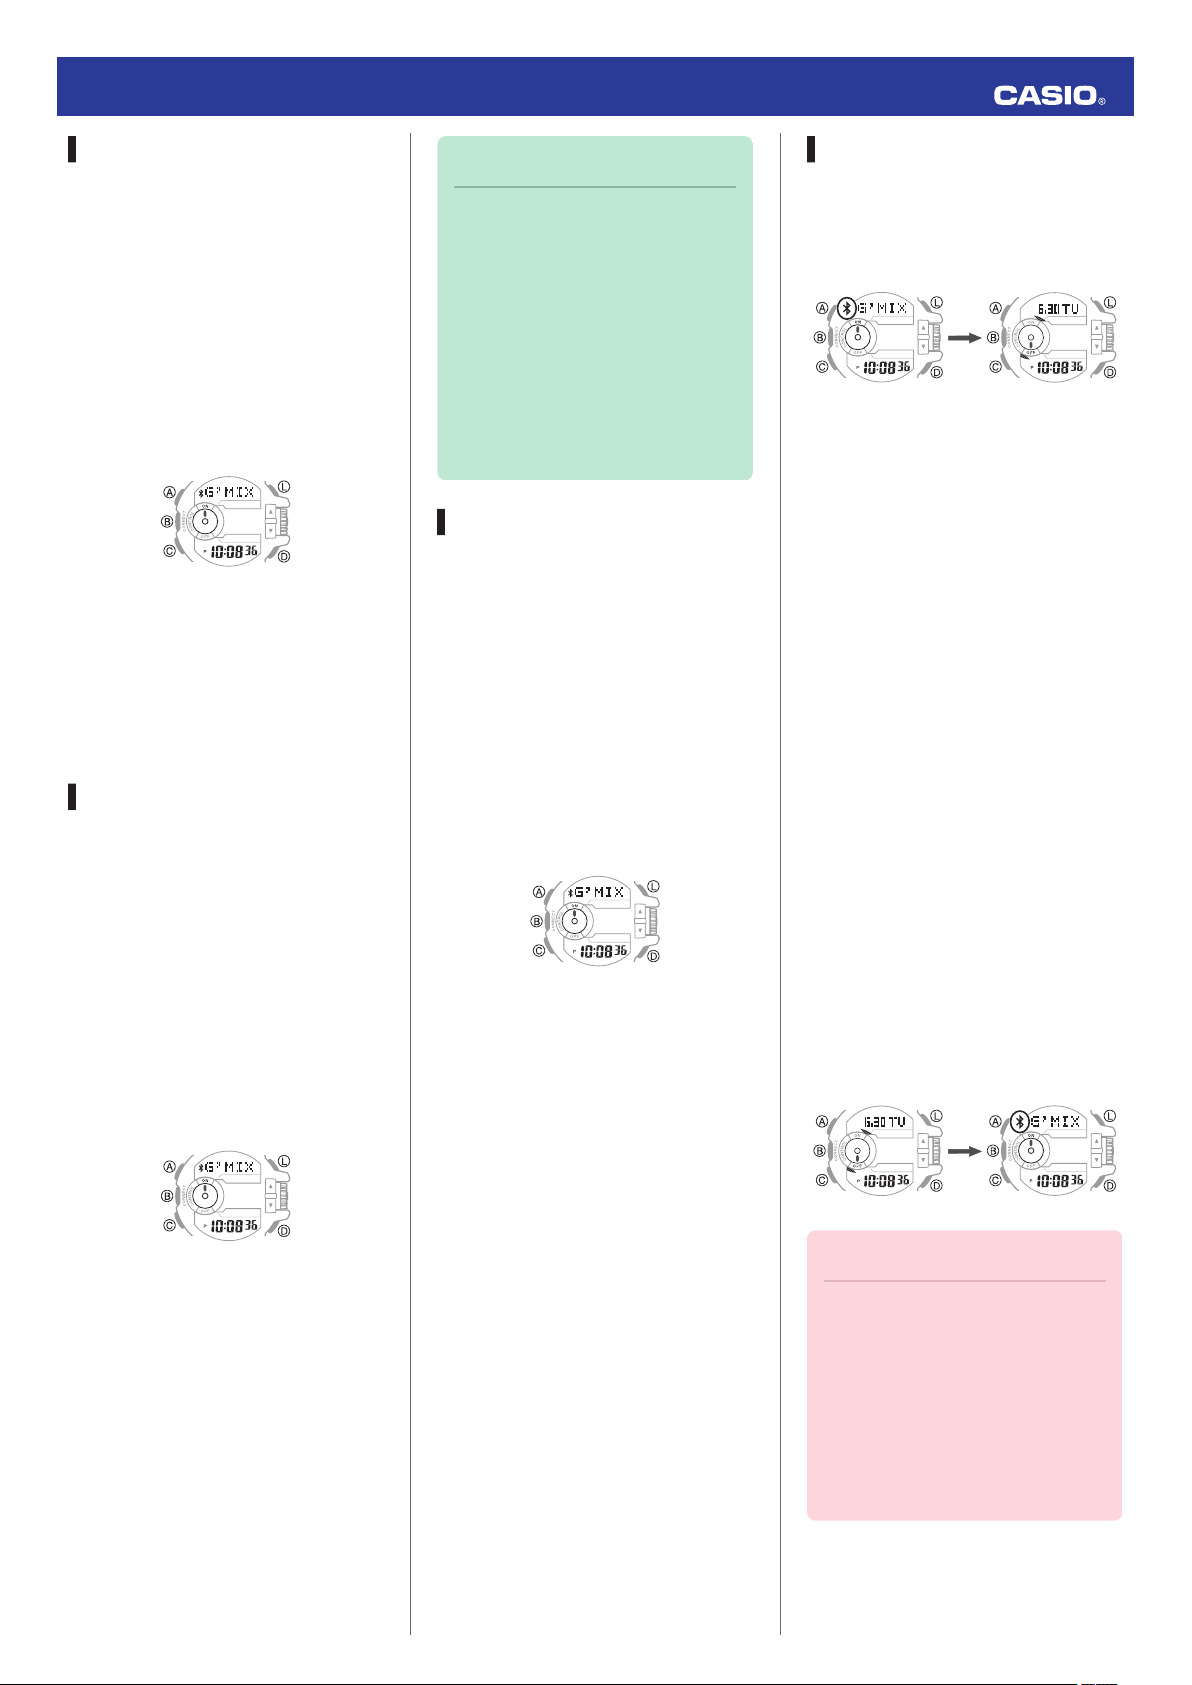
Use the (C) button to navigate between
modes. To enter the Control Mode, hold
down (B) for about 0.5 seconds.
* When the watch enters the Control
Basic Operations
Navigating Between Modes
Mode, it will establish a connection
with the phone and the Bluetooth
indicator will appear on its display.
Using the Rotary Switch
Rotate the rotary switch to change
settings.
●
Rotating the rotary switch quickly three
times starts a fast forward or fast
reverse operation. To stop a fast
forward or fast reverse operation,
rotate the rotary switch in the opposite
direction or press any button.
Important!
●
Rotate the rotary switch without
pulling it out. Pulling with strong
force can cause malfunction or
damage.
●
To prevent error, the first
rotation performs no operation.
Keep rotating to perform the
desired operation. Error
prevention re-activates about
three minutes after the last
operation.
Shifting the Hands
Hour and minute hand shift moves the
hands for easy viewing of display info.
1. To shift the hour and minute hands,
hold down (L) as you press (C).
●
This will cause the hour and minute
hands to move to a position where
they do not block the digital
display.
●
The HANDS indicator flashes
while the hands are shifted.
Example:
Shifting the hands when it is 11:00
2. To return the hands to their normal
positions, holding down (L) as you
press (C) again.
Note
●
This function can be used in any
mode.
●
Watch button operations remain
the same when the hands are
shifted.
●
Changing to another mode
returns the hands to their normal
positions.
●
Shifted hands will return to their
normal positions if no button
operation is performed for one
hour.
●
In all modes, hands shift
automatically while settings are
being configured. They move
back to their normal positions
after settings are complete.
1
Page 2
Bluetooth indicator
22:00
14:00
Operation Guide 5413
Using Mobile Link with a
Mobile Phone
While there is a Bluetooth connection
between the watch and phone, the watch
time setting is adjusted automatically and
you can perform music app operations
from the watch.
Note
●
This section describes watch
and phone operations.
X : Watch operation
Y : Phone operation
Getting Ready
A Installing required app on your
phone
To use the watch with a phone, first tap
one of the links below and install the
CASIO G-SHOCK+ app on the phone.
●
iOS (iPhone)
https://itunes.apple.com/us/app/
id550075201?ls=1&mt=8
●
Android (GALAXY, etc.)
https://play.google.com/store/apps/
details?id=com.casio.gshockplus
Android Users
Enable Bluetooth.
●
If you are presented with a choice
between “Bluetooth” and “Bluetooth
Smart”, select “Bluetooth Smart”.
Note
●
For details about setting
procedures, see your phone
documentation.
C Pairing the watch with a phone
Before you can use the watch in
combination with a phone, you first need
to pair them. Once the watch is paired
with a phone, you normally do not need
to pair them again.
1. Move the phone you want to pair with
close to (within one meter of) the
watch.
2.
Y On the Home Screen, tap the “G-
SHOCK+” icon.
●
If G’MIX App is not installed on the
phone, the G’MIX App installation
screen will appear. Follow the
instructions that appear to install
the app.
3.
Y Select “GBA-400” and then tap
“Next”.
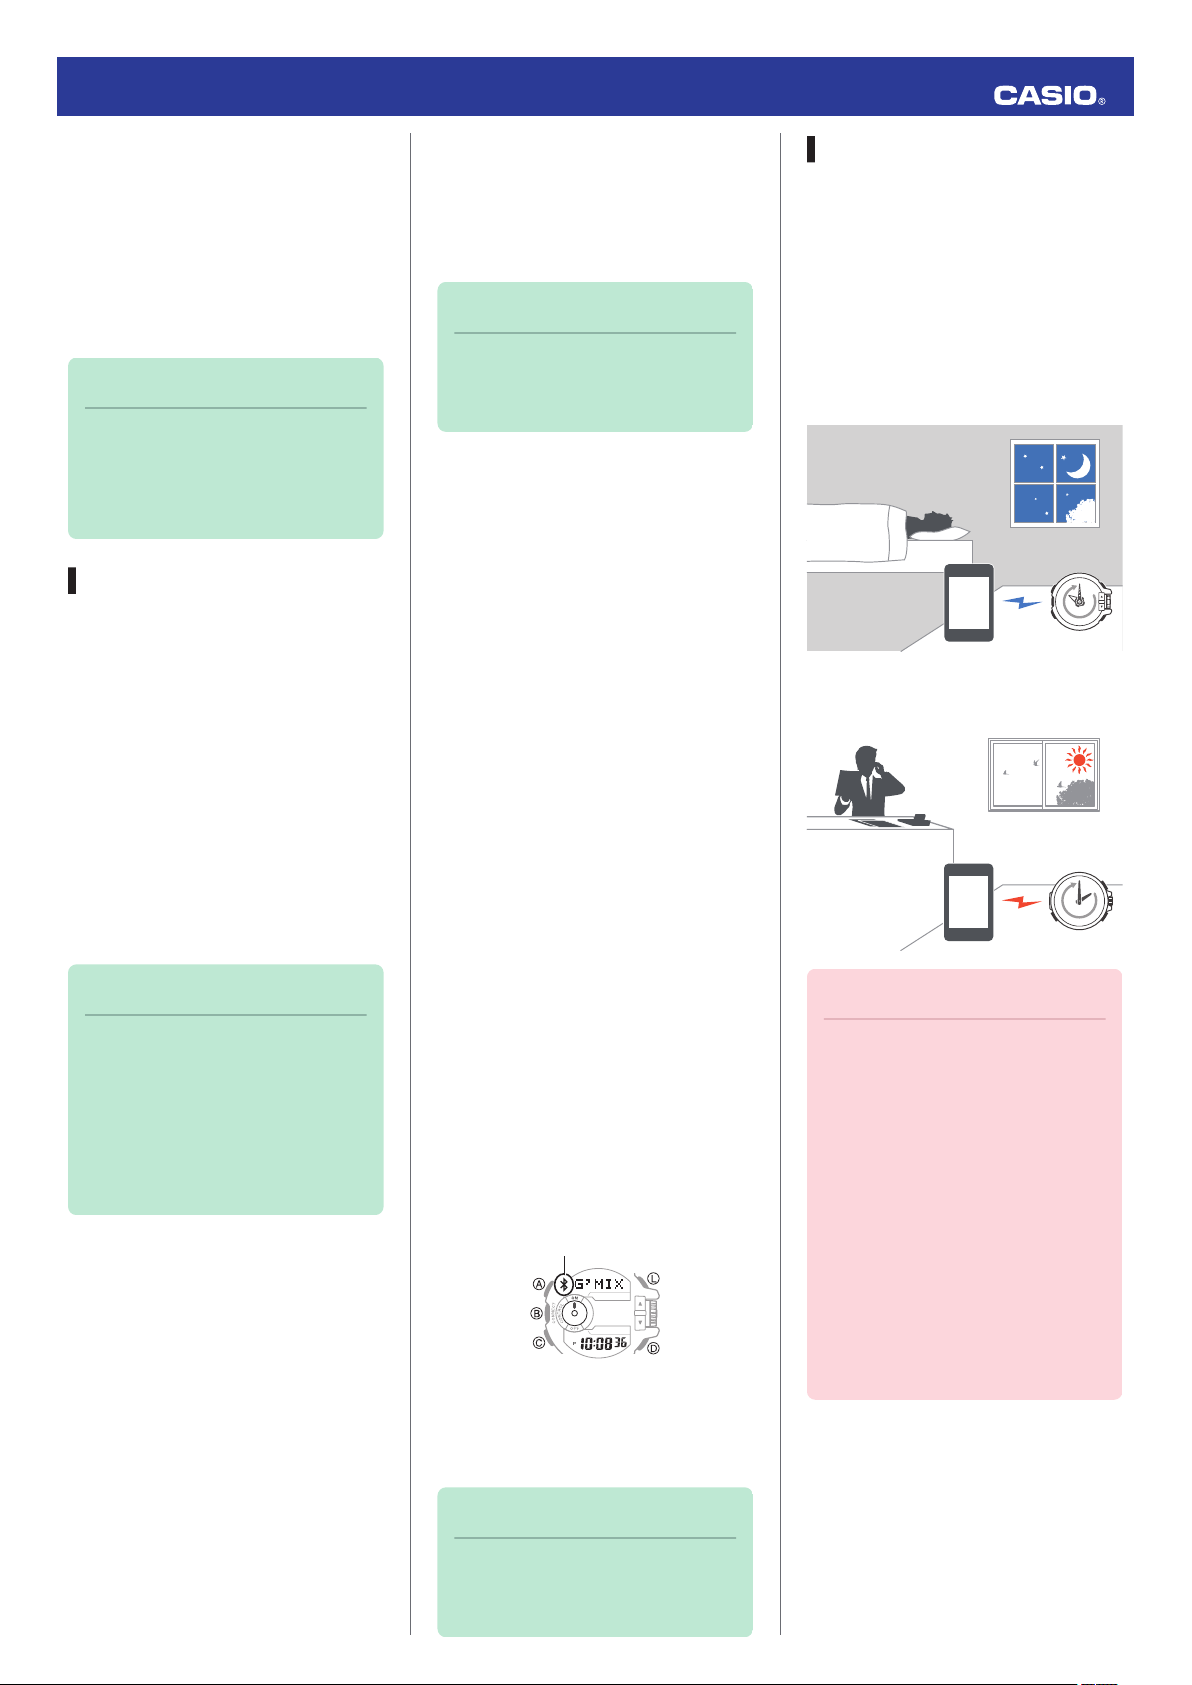
Auto Time Adjustment
The watch can be set to adjust its time
setting automatically each day in
accordance with the phone time.
●
Using Auto Adjust
Schedule auto adjust for times the watch
and phone are normally close to each
other as shown in the illustration below.
●
While you sleep at night
●
While you work at your desk in the
afternoon
Note
●
In addition to G-SHOCK+, there
is also another G-SHOCK music
app named G’MIX App. You can
install G’MIX App on your phone
by starting up G-SHOCK+ and
then following the instructions
that appear on the screen.
B Configuring Bluetooth settings
Enable the phone’s Bluetooth.
iPhone Users
1.
Y On the Home Screen, tap
“Settings” n “Bluetooth”.
2.
Y Enable “Bluetooth”.
3.
Y Tap “Settings” to return to the
“Settings” screen.
4.
Y Tap in the following sequence:
“Privacy” n “Bluetooth Sharing”.
5.
Y Enable “G-SHOCK+”.
4.
Y Perform operations as instructed
by the app.
●
If a pairing prompt message
appears, perform the operation
shown on the phone screen.
●
After pairing is complete, the
Bluetooth indicator will appear on
the watch to indicate it is
connected with the phone.
5.
Y Tap “Start”.
This displays the G-SHOCK+ top
screen.
Note
●
If pairing fails for some reason,
perform the procedure again
from step 2.
Important!
●
Even if there is no Bluetooth
connection when the auto adjust
time is reached, a connection is
established and adjustment is
performed automatically. The
connection is automatically
terminated after time
adjustment is complete.
●
The watch adjusts its time
setting automatically in
accordance with the phone time
while they are connected with
each other.
2
Page 3
Operation Guide 5413
●
Setting the Auto Adjust Time
Use G-SHOCK+ on the phone to set the
auto adjust time.
1.
Y On the Home Screen, tap the “G-
SHOCK+” icon.
This displays “Searching for
watch...”.
2.
X Hold down the (B) button for about
0.5 seconds.
This causes the watch and phone to
connect with each other, and the
watch to enter the Control Mode.
3.
Y Tap “Watch settings”.
4.
Y Tap “Basic settings”.
5.
Y Tap “Time adjustment”.
●
Perform the operation shown on
the phone screen.
Note
●
Actual adjustment of the watch
time setting will occur about 30
seconds after the auto adjust
time.
Example: When 22:00 is set as
the auto adjust time, watch time
setting adjustment will start 30
seconds after 22:00.
●
If time adjustment fails for some
reason, the watch will beep. If
this happens, move the watch
and phone close to each other.
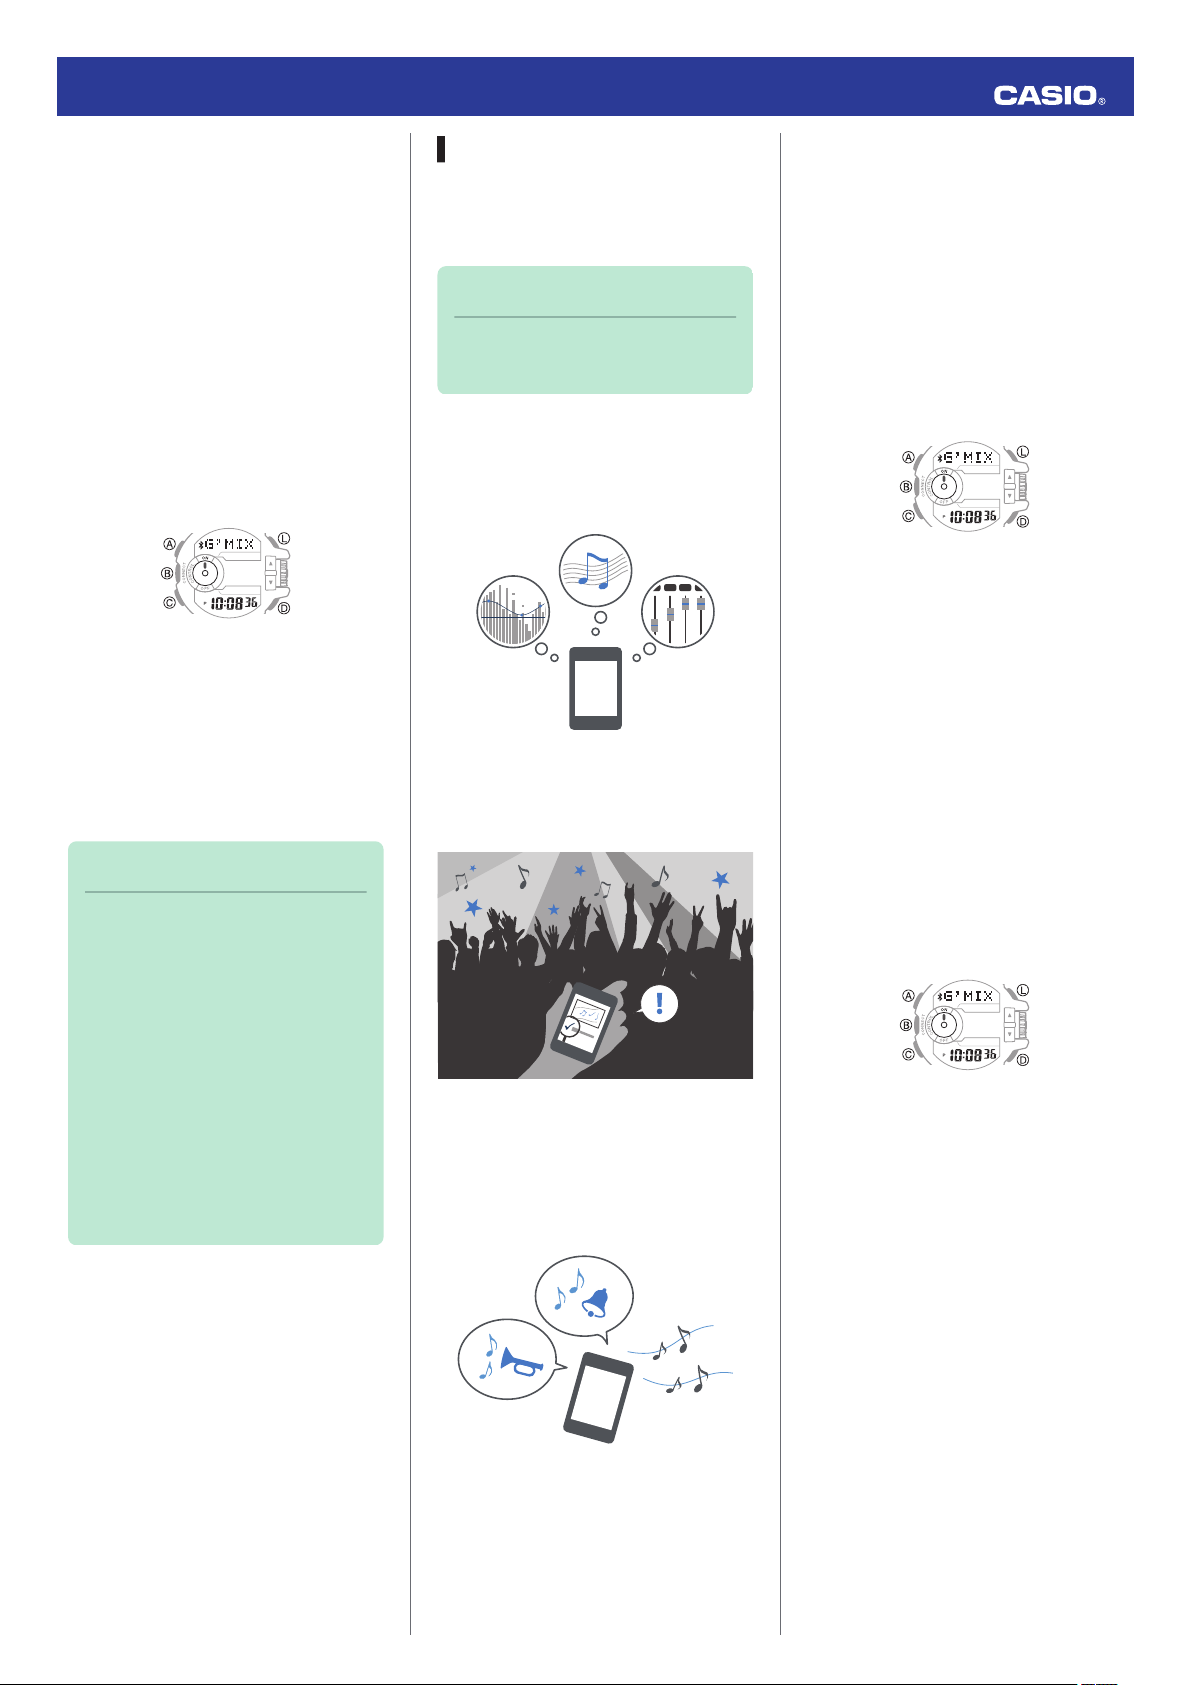
Music App Operations
The CASIO G’MIX App music app
running on your phone can be controlled
from your watch.
Note
●
G’MIX App provides three
modes for enjoying music.
●
PLAYER Mode
This mode lets you adjust sound quality
and ambiance and playback music from
your phone’s music library.
●
SEARCH Mode
When there is music playing in your area,
you can use this mode to find out its title.
●
SOUNDER Mode
Use this mode to perform watch
operations for playing G’MIX App built-in
sounds or sounds you have created
yourself.
●
Installing the G’MIX App
To use the functions described above
you need to install G’MIX App on your
phone as described below.
1.
Y Tap the “G-SHOCK+” icon.
This displays “Searching for
watch...”.
2.
Y Hold down the (B) button for about
0.5 seconds.
3.
Y Tap “Music App settings”.
Perform the operation shown on the
phone screen.
●
Using G’MIX App
There must be a connection between the
watch and phone to use G'MIX App.
Perform the operation below.
1.
Y On the Home Screen, tap the “G-
SHOCK+” icon.
2.
X Hold down the (B) button for about
0.5 seconds.
The watch enters the Control Mode.
3.
X Use buttons or the rotary switch to
perform the operation you want.
3
Page 4
Rotary switch
Song name
Operation Guide 5413
Note
●
With G’MIX App, you can assign
the following functions to the
rotary switch:
volume level, select track, select
album, select artist, select
playlist, select effect, select
SOUNDER sound.
●
In the case of an iPhone, you
can control G’MIX App or the
standard iPhone Music app
from the watch. If you want to
control the standard iPhone
Music app from the watch,
perform the procedure below.
1. Remove G’MIX App from the
phone.
2. On the G-SHOCK+ top
screen, tap: “Music App
settings” n “Music”.
●
Certain music file types may not
be supported for playback with
G’MIX App.
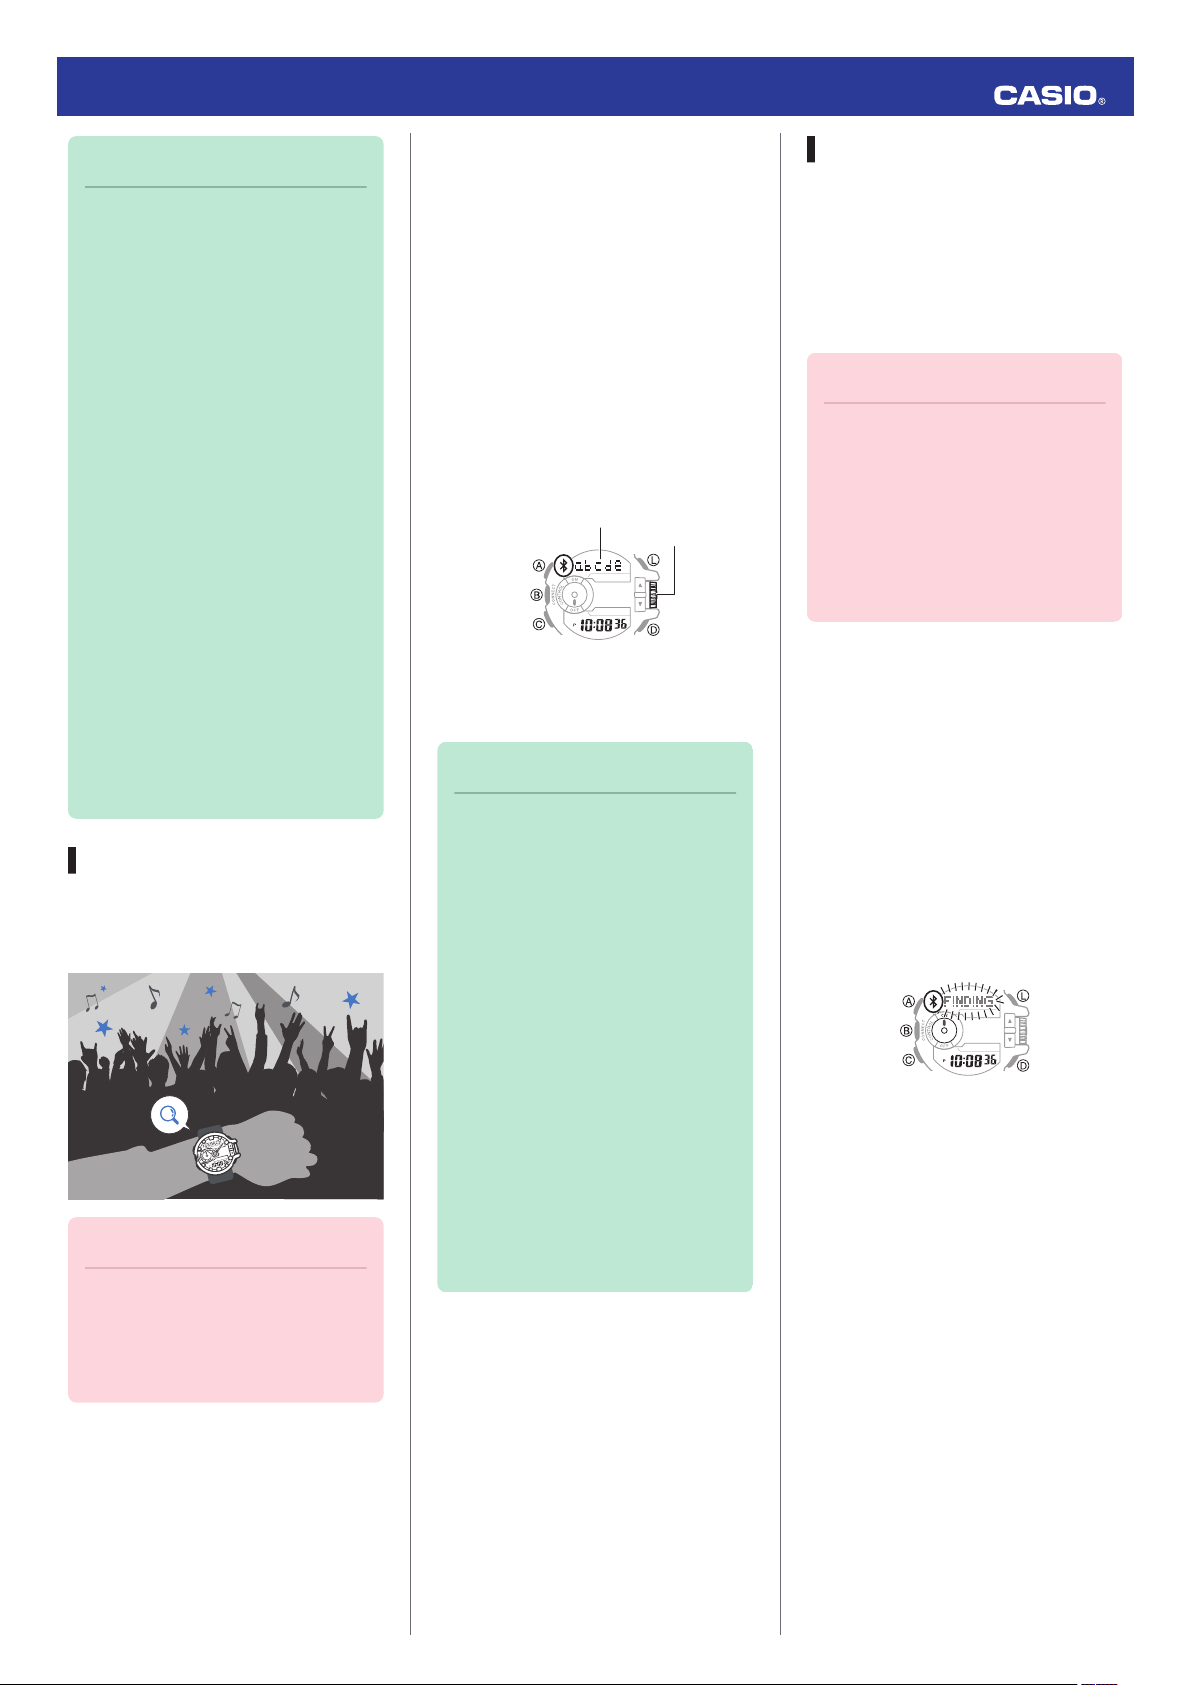
Song Title Search
When there is music playing in your area,
you can use Song Title Search to find out
its title.
Important!
●
Your phone needs to have the
CASIO G’MIX App music app
installed to use this functions.
l Music App Operations
1.
X If the watch is connected with a
phone, hold down (B) for about 0.5
seconds to terminate the connection.
2.
X On the watch, enter the
Timekeeping Mode and then quickly
rotate the rotary switch twice.
This will cause [SEARCH] to appear
on the display, indicating that search
has started.
●
If the song title search is
successful, the song title will
appear on the watch display.
3.
X Press any button other than (L) to
clear the song title from the display.
Note
●
The displayed song title can be
up to 17 alpha characters
(letters, numbers, symbols) or
five Japanese (katakana)
characters long.
●
[*CHECK App] will appear if
characters that are not
supported for display are
included or if there are multiple
titles for the song. If this
happens, use your phone to
check the song title.
●
[*FAILED] will appear if the song
title cannot be found.
●
This function is available only
while G-SHOCK+ and G’MIX
App are running on the phone.
Phone Finder
You can use phone finder to trigger a
tone on the phone to make it easy to find.
The tone is forced to sound even if the
phone is in the manner mode.
●
This function is available only while G-
SHOCK+ is running on the phone.
Important!
●
Do not use this function in areas
where phone call tones are
restricted.
●
The tone sounds at a high
volume. Do not use this function
when listening to phone output
over earphones.
1.
X If the watch is connected with a
phone, hold down (B) for about 0.5
seconds to terminate the connection.
2.
X In the Timekeeping Mode, hold
down the (D) button for about one
second.
This will display the watch screen
shown below and cause the tone to
sound on the phone.
●
It will take a few seconds before
the phone tone sounds.
3.
X Press any button to stop the tone.
●
You can press any watch button to
stop the phone tone only during
the first 30 seconds after it starts to
sound.
Perform the procedure below when there
is no connection between the watch and
a phone.
4
Page 5
After disconnectionConnected
ConnectedNot connected
Operation Guide 5413
Configuring Watch Settings
G-SHOCK+ can be used to easily
configure alarm, timer, and 12/24-hour
timekeeping settings.
1.
Y Tap the “G-SHOCK+” icon.
2.
X Hold down the (B) button for about
0.5 seconds.
This causes the watch and phone to
connect with each other, and the
watch to enter the Control Mode.
3.
Y Tap “Watch settings”.
4.
Y Select the setting you want to
change and then perform the
operation shown on the phone
screen.
World Time City Setting
With World Time, you can select the
desired World Time City from one
displayed in the G-SHOCK+ city list or
world map.
1.
Y Tap the “G-SHOCK+” icon.
2.
X Hold down the (B) button for about
0.5 seconds.
This causes the watch and phone to
connect with each other, and the
watch to enter the Control Mode.
Note
●
G-SHOCK+ World Time lets
you select from among
approximately 300 cities as the
World Time City. If the city you
select with G-SHOCK+ is not
included in the 100 cities
supported by the watch, that
city’s time zone will be
registered to [EXTRA] in the
watch’s city list.
Adjusting Hand Alignment
You can use G-SHOCK+ to correct the
watch’s hand positions when they do not
indicate the same time as the digital
display.
1.
Y Tap the “G-SHOCK+” icon.
2.
X Hold down the (B) button for about
0.5 seconds.
This causes the watch and phone to
connect with each other, and the
watch to enter the Control Mode.
3.
Y Tap “Watch settings”.
4.
Y Tap “Basic settings”.
5.
Y Tap “Adjusting home positions”.
6.
Y Perform the operation shown on
the phone screen.
Connection
Cancelling a Connection with a
Phone
To terminate the Bluetooth connection,
hold down (B) for about 0.5 seconds until
the Bluetooth indicator disappears.
Connecting with a Phone
This section explains how to establish a
Bluetooth connection between a phone
that is paired with the watch.
●
If the watch is not paired with the phone
you want to connect with, perform the
procedure under “C Pairing the watch
with a phone” to pair them.
1. Move the phone close to (within one
meter of) the watch.
2.
X If the Bluetooth indicator is not
displayed, hold down (B) for about
0.5 seconds to connect.
This will establish a Bluetooth
connection and cause the Bluetooth
indicator to appear.
●
The watch will enter the Control
Mode.
3.
Y Tap “Watch settings”.
4.
Y Tap “World time”.
5.
Y Perform the operation shown on
the phone screen.
Important!
●
If you have problems
establishing a connection, it
could mean that G-SHOCK+ is
not running on the phone. On
the phone’s home screen, tap
the “G-SHOCK+” icon. Then on
the watch, hold down the (B)
button for about 0.5 seconds.
5
Page 6
Airplane indicator
Operation Guide 5413
Note
●
The connection will be
terminated if you do not perform
any operation on the watch or
phone for a fixed amount of time
(connection limit time).
To specify the connection limit
time, perform the following
operation with G-SHOCK+:
“Watch settings”n“Basic
settings”n“Connection time”.
Next, specify a setting of 1 hour,
1.5 hours, or 2 hours.
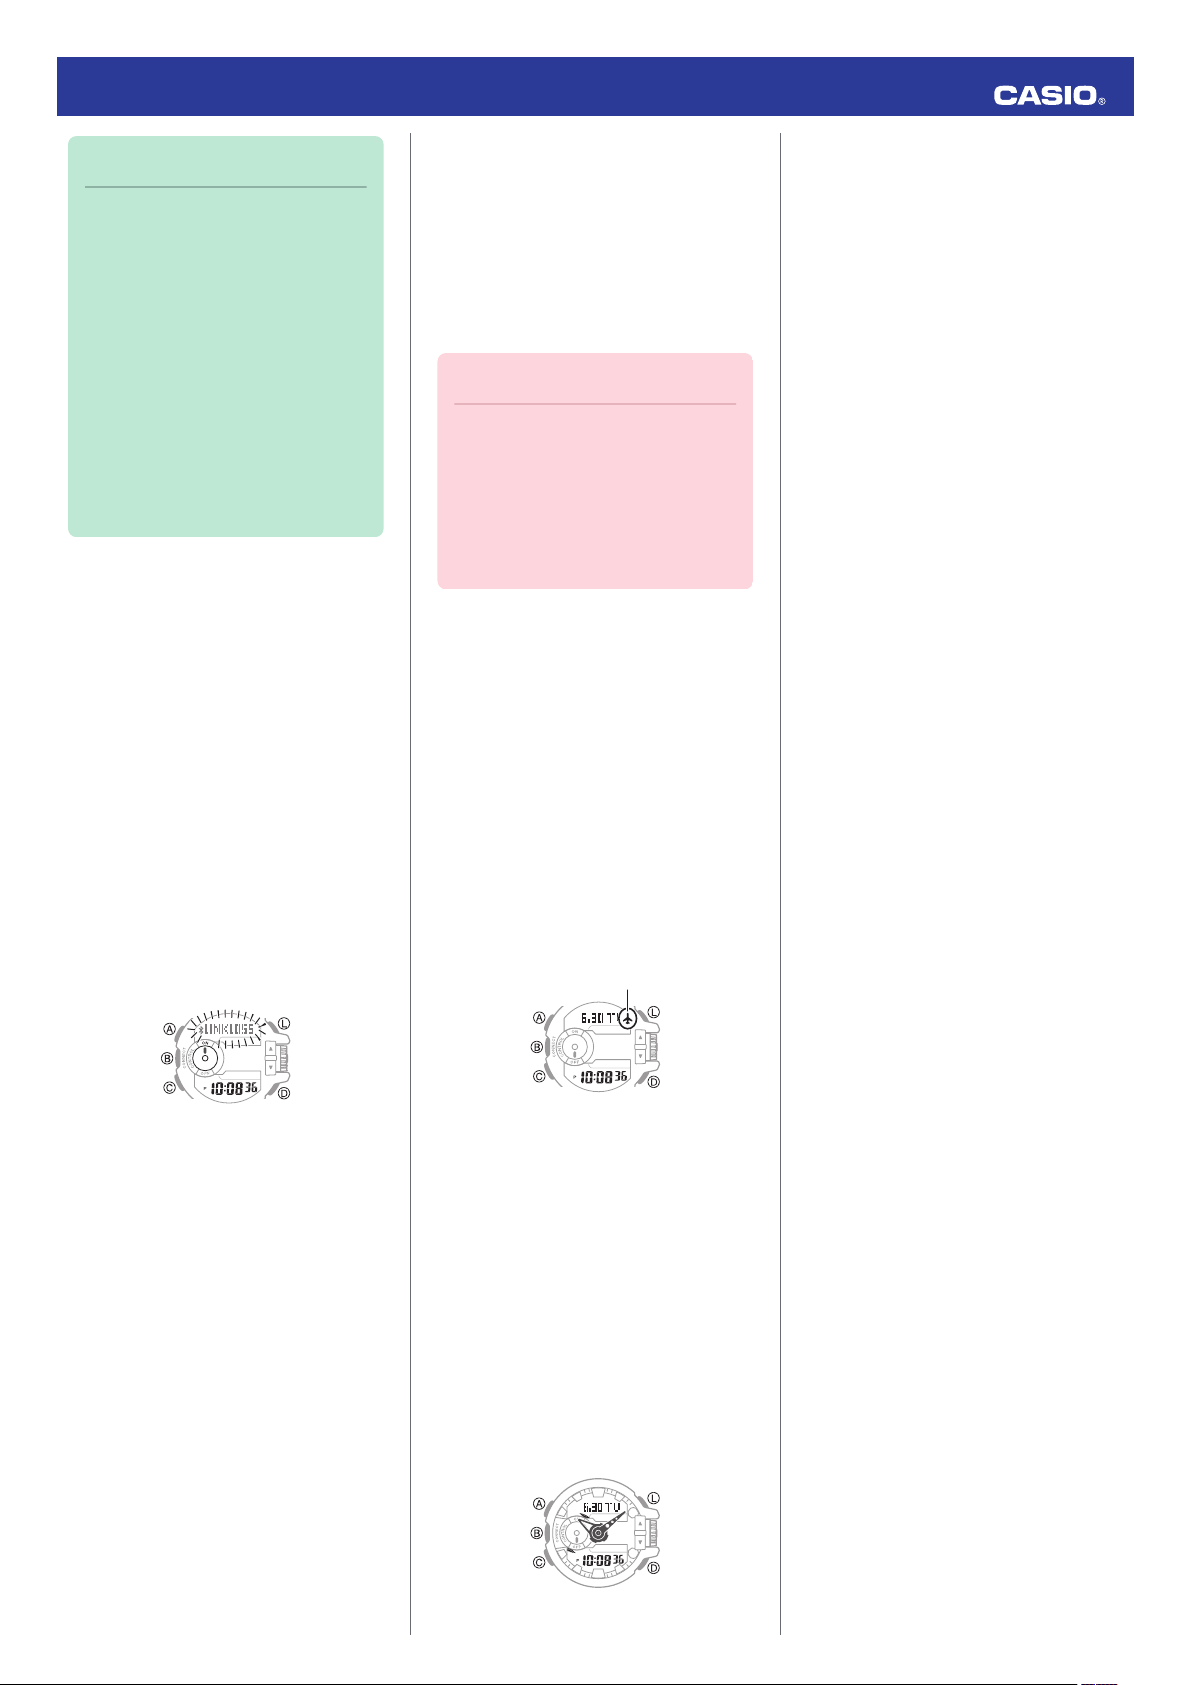
Link Loss Alert
While there is a Bluetooth link between
the watch and a phone, the [LINKLOSS]
warning will appear on the watch display
in the following cases: if you do not
perform any phone operation, if the
distance between the watch and phone
becomes too great, if the phone is turned
off, if the connection is lost due to radio
interference or some other cause. A loss
of connection will cause the watch to
return to the Timekeeping Mode.
To re-connect, move the watch and
phone close to each other and then hold
down the watch’s (B) button for about 0.5
seconds.
Entering the Watch Airplane Mode
Use the Airplane Mode to disable
Bluetooth radio wave emissions.
Enter the Airplane Mode when in a
hospital, in an aircraft, or anywhere else
where radio wave emissions are
restricted.
Important!
●
The functions below are
disabled in the Airplane Mode.
ー
Auto adjust
ー
Song title search
ー
Phone finder
ー
Bluetooth connection
1.
X If the watch is connected with a
phone, hold down (B) for about 0.5
seconds to terminate the connection.
2.
X Hold down (C) for about four
seconds.
This causes the watch to enter the
Airplane Mode and displays the
Airplane indicator.
●
Each time the (C) button is held
down for about four seconds, the
watch enters or exits the Airplane
Mode.
2.
X Press (C) five times to enter the
Setup Mode.
[SETUP] will appear on the display
followed by the watch device name.
Each press of (D) cycles the display
contents in the sequence shown
below.
Watch device name
p
Watch device address
p
Type of phone currently connected
* Displayed only when the watch is
paired with a phone.
3.
X Press (C) to return to the
Timekeeping Mode.
Clearing Pairing Info
To unpair the watch from a phone, delete
the pairing information from G-SHOCK+,
the phone, and the watch.
●
Clearing Pairing Information from
G-SHOCK+
1.
X If the watch is connected with a
phone, hold down (B) for about 0.5
seconds to terminate the connection.
2.
Y In the upper right corner of the G-
SHOCK+ top screen, tap i to
display the “Connection settings”
screen.
*
●
If “Tone” is selected for the G-SHOCK
+ “Link loss alert” setting, the watch will
beep when link loss occurs.
l Configuring Watch Settings
Viewing Mobile Link Info
Use the procedure below to view Mobile
Link Info on the watch.
1.
X Hold down the (C) button for about
two seconds.
This will cause the watch to enter the
Timekeeping Mode.
●
If the watch is connected with a
phone, hold down (B) for about 0.5
seconds to terminate the
connection.
3.
Y On the “Previously registered
watch” list, select the one whose
pairing information you want to clear.
4.
Y Tap “Delete pairing registration”.
5.
Y Tap “Yes”.
This clears the watch’s pairing
information from G-SHOCK+.
6
Page 7

Device name
Timekeeping Mode
Operation Guide 5413
●
Clearing Pairing Information from a
Phone
iPhone Users
1.
Y On the Home Screen, tap
“Settings” n “Bluetooth”.
2.
Y Next to “CASIO GBA-400”, tap g.
3.
Y Tap “Forget this Device”.
This clears the watch’s pairing
information from the phone.
Android Users
1.
Y On the App screen tap: “Settings”
n “Bluetooth”.
2.
Y Tap j next to “CASIO GBA-400”.
3.
Y Tap “Unpair”.
This clears the watch’s pairing
information from the phone.
4.
Y Scroll the status bar downwards
and open the notification panel.
5.
Y Tap e (Bluetooth) to disable
Bluetooth, and then re-enable it.
Note
●
Note that the actual operation
you need to perform depends
on the type of phone you are
using. For details, see your
phone documentation.
●
Clearing Pairing Information from
the Watch
1.
X Hold down the (C) button for about
two seconds.
3.
X Hold down the (A) button for about
two seconds.
Clearing pairing information will
cause the message [NOT YET
PAIRED!] to scroll from right to left on
the watch display.
4.
X Press (C) to return to the
Timekeeping Mode.
Connecting with Another Phone
You need to perform the operation below
whenever you buy a different phone or
when you want to establish a Bluetooth
connection with another phone.
1. Clearing Pairing Info
2. Pair the watch with the phone.
Connecting a Different Watch to a Phone
You should perform the steps below
before pairing a different watch with the
phone, such as after you buy a new
watch.
●
Pairing the Watch with a Phone
1.
Y In the upper right corner of the G-
SHOCK+ top screen, tap i to
display the “Connection settings”
screen.
2.
Y Tap “Connect new watch”.
3.
Y Select the name of the watch you
want to connect to and then tap
“Next”.
●
From this point, follow the
instructions that appear on your
phone’s screen to complete the
pairing operation.
●
Connecting with a Watch that is
Already Paired
1.
Y In the upper right corner of the G-
SHOCK+ top screen, tap i to
display the “Connection settings”
screen.
2.
Y From the “Previously registered
watch” list, tap the name of the phone
you want to connect with.
3.
Y Tap “Connect to this ***”.
●
Follow the instructions that appear
on your phone’s screen to
complete the connection
operation.
Important!
●
A phone can be connected with
only one watch at a time. To
connect to another watch, you
need to terminate the current
connection.
Watch Settings
While the watch is connected to a phone,
it will automatically adjust its date and
time settings to those of the phone. If the
watch is not connected to a phone, use
the procedure below to adjust its date
and time settings.
Getting ready
Perform this procedure in the
Timekeeping Mode. Use (C) to navigate
to the Timekeeping Mode.
l Navigating Between Modes
2.
X Press (C) five times to enter the
Setup Mode.
[SETUP] will appear on the display
followed by the watch device name.
7
Page 8

Rotary
switch
Time zone
Seconds
Rotary
switch
Hours
Time zone
PM indicator
Operation Guide 5413
Selecting a Time Zone
Use the procedure below to select the
time zone (offset from mean time) for
your Home City, where you will normally
be using the watch. If you are in an area
that uses summer time, you can also
enable or disable summer time.
Important!
●
The times shown in the World
Time Mode will not be correct if
you select the wrong time zone.
1. Hold down the (A) button for about
two seconds.
[SET Hold] will appear, and then the
time zone setting will flash.
2. Rotate the rotary switch to change
the time zone.
●
For information about time zones,
see the "City Name List".
Example:
If you plan to use the watch in Tokyo,
select [+ 09:00].
3. To change the summer time setting,
press (C).
●
If you don’t want to change the
summer time setting, press (A).
4. Rotate the rotary switch to display
[ON] (summer time) or [OFF]
(standard time).
5. Press (A) to exit the setting screen.
Note
●
The DST indicator is on the
display while summer time is
enabled.
Setting the Time and Date
1. Hold down the (A) button for about
two seconds.
[SET Hold] will appear, and then the
time zone setting will flash.
2. Press (C) three times so the seconds
digits are flashing.
3. Press (D) to reset the seconds count
to 00.
●
If the seconds count is between 30
and 59 when you press (D), 1 will
be added to the minute count.
4. Press (C) so the hour setting is
flashing.
5. Set the date.
●
Rotate the rotary switch to change
the flashing setting.
●
Each press of (C) cycles the
flashing setting in the following
sequence: hour n minute n year
n month n day.
6. Press (A) to exit the setting screen.
Switching between 12-hour and 24-hour Timekeeping
1. Hold down the (A) button for about
two seconds.
[SET Hold] will appear, and then the
time zone setting will flash.
2. Press (C) twice and the current
setting ([12H] or [24H]) will flash on
the display.
3. Rotate the rotary switch to display
[12H] (12-hour timekeeping) or [24H]
(24-hour timekeeping).
4. Press (A) to exit the setting screen.
Note
●
While 12-hour timekeeping is
selected, indicators will appear
on the display to indicate a.m.
and p.m. times.
8
Page 9

World Time Mode
Rotary switch
Time of selected city
City name
Rotary
switch
DST indicator
City name
Alarm number
Alarm Mode
Operation Guide 5413
Summer Time
Summer time, which is also known as
Daylight Saving Time (DST), advances
the time setting one hour, 30 minutes, or
some other amount of time from standard
time (STD) during the summer months.
Whether or not and how summer time is
used depends on your country or local
area. Summer time is not used in some
countries and local areas.
Selecting a Setting Item
Each press of (C) cycles the
Timekeeping Mode settings screen
content in the sequence shown below.
Time offset
p
Summer time
p
12/24-hour timekeeping
p
Seconds
p
Hour
p
Minute
p
Year
p
Month
p
Day
World Time
World Time lets you look up the current
time in any one of 100 cities around the
globe.
Getting ready
Perform this procedure in the World Time
Mode. Use (C) to navigate to the World
Time Mode.
l Navigating Between Modes
Checking the Time in Another Zone
1. Rotate the rotary switch to select a
city.
This will cause the current time in the
selected city to appear.
●
Rotating the rotary switch quickly
three times in either direction
starts high-speed operation
(forward or back).
Enabling Summer Time
When summer time is used in a World
Time city, you can enable Summer Time
for that city.
1. Hold down the (A) button for about
two seconds.
[DST Hold] will appear on the display
and then the summer time setting will
toggle between enabled and
disabled.
●
The DST indicator is displayed
while summer time is enabled.
2. Press (C) five times to return to the
Timekeeping Mode.
Alarms
The watch will perform a beep and/or
flash alert operation when an alarm time
is reached.
Getting ready
Perform this procedure in the Alarm
Mode. Use (C) to navigate to the Alarm
Mode.
l Navigating Between Modes
p
Tone ON/OFF
p
Illumination duration
p
Alarm/timer alert method
p
Returns to “Time offset” above.
2. Press (C) five times to return to the
Timekeeping Mode.
9
Page 10

Rotary
switch
Alarm number
Hours
Alarm number
Rotary
switch
Hourly time signal indicator
Snooze
indicator
Alarm indicator
Stopwatch Mode
Operation Guide 5413
Configuring Alarm Settings
1. Rotate the rotary switch to scroll
through alarm numbers ([-1] to [-5], [:
00]) until the one whose settings you
want to configure is displayed.
●
[-1] to [-4]
These are normal alarms.
●
[-5]
This is a snooze alarm.
The watch performs an alert
operation when the alarm time is
reached. After that, the alert
operation repeats up to seven
times at five-minute intervals.
●
[:00]
This is the hourly time signal.
When enabled, the watch
performs an alert operation every
hour on the hour.
3. Hold down the (A) button for about
two seconds.
[SET Hold] will appear and the hour
digits will flash.
4. Set the alarm time.
(C) button: Moves the flashing
between the hour and minute digits.
Rotary switch: Changes the flashing
hour or minute setting.
5. Press (A) to exit the setting screen.
6. Press (C) four times to return to the
Timekeeping Mode.
Turning Off an Alarm
1. Rotate the rotary switch to scroll
through alarm screens until the one
whose settings you want to configure
is displayed.
Alarm Indicators
Enabling an alarm or the hourly time
signal causes the corresponding
indicator to appear on the display.
When an alarm is enabled:
The alarm indicator is displayed.
When a snooze alarm is enabled:
The alarm indicator and snooze indicator
are displayed. (The snooze indicator
flashes while a snooze alarm operation is
in progress.)
When the hourly time signal is enabled:
The hourly time signal indicator is
displayed.
Stopwatch
2. Use (D) to specify the alarm or hourly
time signal setting you want.
●
[-1] to [-5]
[OFF]: Alarm is turned off (will not
sound).
[1TIME]: Alert is performed only
once at the alarm time.
[DAILY]: Alert is performed every
day at the alarm time.
●
[:00]
[OFF]: Hourly time signal disabled.
[ON]: Indicates the hourly time
signal is enabled, and the watch
will perform an alert operation
every hour on the hour.
2. Press (D) so [OFF] is displayed.
3. Press (C) four times to return to the
Timekeeping Mode.
Stopping an Alarm
Pressing any button while the beeper is
sounding stops it.
Note
●
In the case of the snooze alarm
pressing a button stops the
current alert operation. The
alarm will repeat up to seven
times at five-minute intervals. To
stop an ongoing snooze alarm
operation, disable the alarm.
The stopwatch can measure elapsed
time up to 999 hours, 59 minutes, 59
seconds.
It can also measure split times.
Getting ready
Perform this procedure in the Stopwatch
Mode. Use (C) to navigate to the
Stopwatch Mode.
l Navigating Between Modes
10
Page 11

1/100 seconds
Seconds
Minutes
Hours
D
D
D
D
Stop
Resume
Stop
Start
Seconds
Minutes
Hours
1/100 seconds
D
A
A
D
Stop
Split release
Split
Start
Timer Mode
1/10 seconds
Seconds
Minutes
Hours
1/10 seconds
Seconds
Minutes
Hours
Rotary
switch
Start/Stop
Reset
Operation Guide 5413
Measuring Elapsed Time
1. Use the operations below to
measure elapsed time.
2. Press (A) to reset the elapsed time to
all zeroes.
3. Press (C) three times to return to the
Timekeeping Mode.
Measuring a Split Time
Timer
Use the Timer Mode to perform a
countdown. A beeper or flash alert
operation is performed when the end of
the countdown is reached.
Getting ready
Perform this procedure in the Timer
Mode. Use (C) to navigate to the Timer
Mode.
l Navigating Between Modes
Setting the Timer Start Time
1. Hold down the (A) button for about
two seconds.
[Set Hold] will appear and the hour
digits will flash.
Using the Timer
1. Press (D) to start the countdown.
A beeper or flash alert operation is
performed when the end of the
countdown is reached.
●
To discontinue a timer operation
part way through, press (D) to stop
it and then press (A) to reset to the
timer start time.
2. Press any button to stop the alert
operation.
3. Press (C) twice to return to the
Timekeeping Mode.
Illumination Light
1. Use the operations below to
measure split times.
2. Press (A) to reset the elapsed time to
all zeroes.
3. Press (C) three times to return to the
Timekeeping Mode.
2. Set the countdown start time.
(C) button: Moves the flashing
between the hours, minutes,
seconds.
Rotary switch: Changes the flashing
hours, minutes, or seconds setting.
Note
The timer start time can be set in 1-
second units up to 100 hours.
3. Press (A) to exit the setting screen.
4. Press (C) twice to return to the
Timekeeping Mode.
Note
The face of the watch can be illuminated
for reading in the dark.
Turning On the Illumination Light
Pressing (L) in any mode turns on the
light.
Note
●
The light may flicker if it is turned
on while there is a Bluetooth
connection.
●
The light will turn off if it is on
when an alert operation starts.
●
Setting a time of [0H00’00”]
specifies a countdown start time
of 100 hours.
11
Page 12

Time zone
Rotary
switch
Timekeeping Mode
Rotary
switch
Disk pointer
Minute hand
Hour hand
Timekeeping Mode
Time zone
Rotary
switch
Mute indicator
Operation Guide 5413
Specifying the Light Duration
You can select either 1.5 seconds or
three seconds as the illumination
duration.
1. Press (C) to enter to the Timekeeping
Mode.
l Navigating Between Modes
2. Hold down the (A) button for about
two seconds.
[SET Hold] will appear, and then the
time zone setting will flash.
3. Press (C) 10 times until the current
setting ([LT1] or [LT3]) flashes on the
display.
4. Rotate the rotary switch to display
the light duration you want to use.
[LT1]: 1.5-second light
[LT3]: 3-second light
Adjusting Hand Alignment
1. Hold down the (A) button for about
five seconds.
[H.SET Hold] will appear, and then
[Sub] will flash.
2. If the disk pointer is not at 12 o’clock,
rotate the rotary switch to move it
there.
●
Rotating the rotary switch quickly
three times starts high-speed
forward operation.
3. Press (C).
This enables correction of hour and
minute hand alignment.
●
Pressing (C) again will return to
disk pointer correction.
●
Button and rotary switch operation
are disabled while the hands are
moving.
Basic Settings
Getting ready
Perform this procedure in the
Timekeeping Mode. Use (C) to navigate
to the Timekeeping Mode.
l Navigating Between Modes
Enabling the Button Operation Tone
Use the procedure below to enable or
disable the button operation tone.
1. Hold down the (A) button for about
two seconds.
[SET Hold] will appear, and then the
time zone setting will flash.
5. Press (A) to exit the setting screen.
Hand Alignment Correction
Strong magnetism or impact can cause
the time indicated by the analog hands to
become different from the time on the
digital display. If this happens, correct the
hand position.
Getting ready
Perform this procedure in the
Timekeeping Mode. Use (C) to navigate
to the Timekeeping Mode.
l Navigating Between Modes
4. If the hour and minute hands are not
at 12 o’clock, rotate the rotary switch
to move it there.
5. Press (A) to return to the
Timekeeping Mode.
2. Press the (C) button 9 times until the
current setting ([KEY♪] or [MUTE])
will flash on the display.
3. Rotate the rotary switch to display
[KEY♪] or [MUTE].
[KEY♪]: Enables the operation tone.
[MUTE]: Displays the mute indicator
and disables the operation tone.
4. Press (A) to exit the setting screen.
12
Page 13

Time zone
Rotary
switch
Low battery indicator
Operation Guide 5413
Configuring Alert Settings
Use the procedure below to specify beep
only, or beep and flash alert for alarms,
the timer, etc.
1. Hold down the (A) button for about
two seconds.
[SET Hold] will appear and the time
zone setting will flash.
2. Press the (C) button 11 times until the
current setting ([BEEP] or [FLASH])
will flash on the display.
3. Rotate the rotary switch to display
[BEEP] or [FLASH].
[BEEP]: Beep alert
[FLASH]: Beep and flash alert
4. Press (A) to exit the setting screen.
Battery Replacement
Period
When battery power goes low, the
battery indicator will start to flash and
some functions will become disabled. If
the low battery indicator continues to
flash, replace the battery.
Note
●
While [RECOV] is flashing,
some functions are temporarily
disabled to avoid running down
the battery.
Other Information
City Name List
This city list shows the 100 cities that are
built in to watch memory. For about 200
additional cities, see the G-SHOCK+
app.
City Name Time Zone
(UTC)
Reykjavik
Lisbon
Casablanca
London
Madrid
Paris
Algiers
Brussels
Amsterdam
Zurich
Frankfurt
Oslo
Rome
Copenhagen
Berlin
Stockholm
Budapest
Warsaw
Cape Town
Sofia
Athens
Helsinki
Istanbul
Kyiv
Cairo
Jerusalem
Addis Ababa
Jeddah
Tehran +3:30
Moscow
Dubai
Kabul +4:30
Karachi +5
Delhi +5:30
Kathmandu +5:45
Dhaka +6
Yangon +6:30
Novosibirsk
Bangkok
Hanoi
Jakarta
+0
+1
+2
+3
+4
+7
City Name Time Zone
Kuala Lumpur
Singapore
Hong Kong
Perth
Beijing
Manila
Shanghai
Taipei
Seoul
Tokyo
Adelaide +9:30
Guam
Sydney
Vladivostok
Noumea
Wellington
Suva
Chatham Islands +12:45
Nukualofa +13
Kiritimati +14
Pago Pago -11
Honolulu -10
Anchorage -9
Vancouver
San Francisco
Seattle
Los Angeles
Tijuana
Edmonton
Phoenix
Chihuahua
Denver
Mexico City
Winnipeg
Dallas
Houston
Guatemala City
Chicago
Atlanta
Havana
Toronto
Lima
Washington DC
Kingston
Philadelphia
Bogota
New York
Boston
Caracas -4:30
+8
+9
+10
+11
+12
-8
-7
-6
-5
13
Page 14

In Airplane ModeNormal timekeeping
Operation Guide 5413
City Name Time Zone
Santiago
La Paz
San Juan
Halifax
St. John’s -3:30
Buenos Aires
Rio de Janeiro
Fernando de Noronha -2
Praia -1
On-screen Indicators
A
Bluetooth indicator
Indicates the watch is connected with a
phone (Control Mode).
B
Snooze indicator
Indicates a snooze alarm operation is in
progress.
C
Alarm indicator
Indicates an alarm is turned on.
D
Hourly time signal indicator
Indicates the hourly time signal is
enabled.
E
Airplane indicator
Indicates the watch is in the Airplane
Mode so communication with a phone is
disabled.
F
DST indicator
Indicates summer time is enabled.
G
AM/PM indicator
Indicates a.m. and p.m. times while 12-
hour timekeeping is being used.
H
Mute indicator
Mutes output of the operation tone.
I
Hand shift indicator
Hands have been shifted.
-4
-3Montevideo
Supported Phone Models
For information about supported phone
models, visit the CASIO Website.
http://world.g-shock.com/asia-
mea/en/ble/gba/smartphone/
Mobile Link Precautions
●
Legal Precautions
●
This watch complies with or has
received approval under the radio laws
of various countries and geographical
areas. Using this watch in an area
where it does not comply with or has
not received approval under
applicable radio laws may be a criminal
offense. For details, visit the CASIO
Website.
http://world.casio.com/ce/BLE/
●
Use of this watch inside of aircraft is
restricted under the aviation laws of
each country. Be sure to follow the
instructions of airline personnel.
●
Precautions when using Mobile
Link
●
When using this watch in combination
with a phone, keep the watch and
phone close to each other. A range of
two meters is recommended as a
guideline, but the local environment
(walls, furniture, etc.), the structure of
a building, and other factors may
require a much closer range.
●
This watch can be affected by other
devices (electrical devices, audio-
visual equipment, office equipment,
etc.) In particular, it can be affected by
operation of a microwave oven. The
watch may not be able to communicate
normally with a phone if a microwave
oven is operating nearby. Conversely,
this watch may cause noise in radio
reception and the video image of a TV.
●
Bluetooth of this watch uses the same
frequency band (2.4 GHz) as wireless
LAN devices, and use of such devices
in close proximity of this watch may
result in radio interference, slower
communication speeds and noise for
the watch and the wireless LAN
device, or even communication failure.
●
Stopping Radio Wave Emission by
This Watch
The watch is emitting radio waves while
the Bluetooth indicator (e) is displayed or
flashing. Even if the Bluetooth indicator
(e) is not displayed or flashing, the watch
will attempt to connect with a phone once
a day to update its time settings.
When in a hospital, on an aircraft, or in
any other area where the use of radio
waves is not allowed, disable radio wave
emission by holding down the (B) button
for about 0.5 seconds until the Bluetooth
indicator disappears from the watch
display. Next, hold down the (C) button
for about four seconds to enter the
Airplane Mode.
For details, see “Entering the Watch
Airplane Mode”.
Copyrights and Registered Copyrights
●
Bluetooth® is a registered trademark of
Bluetooth SIG, Inc.
●
iPhone and App Store are registered
trademarks of Apple Inc. in the United
States and other countries.
●
GALAXY Note and GALAXY S are
registered trademarks of Samsung
Electronics Co., Ltd.
●
Android and Google Play are
registered trademarks of Google Inc.
●
Other company names and product
names used herein are trademarks or
registered trademarks of their
respective companies.
14
Page 15

YES
YES
YES
YES
Operation Guide 5413
Troubleshooting
I can’t pair the watch with a
phone.
Q1
I’ve never been able to
establish a (pairing)
connection between the
watch and phone.
Are you using a supported phone
model?
Check if the phone model and its
operating system are supported
by the watch.
For information about supported
phone models, visit the CASIO
Website.
http://world.g-shock.com/asia-
mea/en/ble/gba/smartphone/
Is G-SHOCK+ installed on your
phone?
The G-SHOCK+ app needs to be
installed in order to connect with
the watch.
l A Installing required app on
your phone
Are your phone’s Bluetooth settings
configured correctly?
Configure the phone’s Bluetooth
settings. For details about setting
procedures, see your phone
documentation.
iPhone Users
●
“Settings” n “Bluetooth” n On
●
“Settings” n “Privacy” n
“Bluetooth Sharing” n “GSHOCK+” n On
Android Users
●
Enable Bluetooth.
I can’t reconnect the watch
and phone.
Q1
The watch will not reconnect with the phone
after they are
disconnected.
Is G-SHOCK+ running on your
phone?
Check if G-SHOCK+ is running on
the phone. On the phone’s home
screen, tap the G-SHOCK+ icon.
Then on the watch, hold down the
CONNECT button (B) for about
0.5 seconds.
Have you tried turning your phone off
and then back on again?
Turn the phone off and then back
on again, and then tap the G-
SHOCK+ icon. Next, on the
watch, hold down the CONNECT
button (B) for about 0.5 seconds.
Q2
The phone is in the
Airplane Mode.
Connection with the watch is not possible
while the phone is in the Airplane Mode.
After exiting the phone’s Airplane Mode,
go to its Home Screen and tap the “G-
SHOCK+” icon. Then on the watch, hold
down the CONNECT button (B) for about
0.5 seconds.
Q3
The watch is in the
Airplane Mode.
Exit the watch’s Airplane Mode. Then on
the watch, hold down the CONNECT
button (B) for about 0.5 seconds.
Q4
I changed the phone’s
Bluetooth from enabled
to disabled, and now I
can’t connect anymore.
On the phone, disable and then re-
enable Bluetooth, and then go to the
Home Screen and tap the “G-SHOCK+”
icon. Next, on the watch, hold down the
CONNECT (B) button for about 0.5
seconds.
Q5
I can’t connect after
turning off the phone.
Turn on the phone and tap the G-SHOCK
+ icon. Then on the watch, hold down the
CONNECT button (B) for about 0.5
seconds.
Other than the above.
Some phones need to have BT
Smart disabled to use G-SHOCK
+. For details about setting
procedures, see your phone
documentation.
●
On the Home Screen, tap:
“Menu” n “Settings” n
“Bluetooth” n “Menu” n “BT
Smart settings” n “Disable”.
15
Page 16

YES
YES
YES
Operation Guide 5413
Phone-Watch Connection
Q1
I can’t establish a
connection between the
phone and watch.
Have you tried turning your phone off
and then back on again?
Turn the phone off and then back
on again, and then tap the G-
SHOCK+ icon. Next, on the
watch, hold down the CONNECT
button (B) for about 0.5 seconds.
Has the watch been re-paired with the
phone?
Perform the procedure below and
then re-pair the watch and phone.
A
Clear pairing information from
the watch.
B
Clear pairing information from
G-SHOCK+.
C
Clear phone pairing
information.
l Clearing Pairing Info
Connecting with another
phone
Q1
Connecting the current
watch to another phone.
Clear pairing information from the watch
you are currently using, and then pair
with another phone.
l Connecting with Another Phone
Link Loss
Q1
The link loss warning
appears even when the
watch and phone are
close to each other.
Since communication is performed using
radio waves, link loss may occur even
when the watch is within two meters of
the phone. Certain environments may
make the allowable communication
range very short.
The connection is lost.
Q1
The connection is
suddenly lost even in the
Control Mode.
If you do not perform any button
operation for about one or two hours in
the Control Mode, the connection will be
terminated to save power. You can use
G-SHOCK+ to specify the amount of time
until the connection is terminated.
Phone Finder
Q1
Phone Finder does not
work.
Are the phone and watch
disconnected?
Phone Finder does not work
during Bluetooth connection.
Is G-SHOCK+ running on your
phone?
Check if G-SHOCK+ is running on
the phone. On the phone’s Home
Screen, tap the G-SHOCK+ icon.
Other than the above.
If the phone does not respond
after a few seconds, it could mean
that the phone is located too far
from the watch. Change to a
different location and try again.
Q2
It takes some time before
the phone responds.
The phone will emit a tone when a
connection is established with the watch,
which takes a few seconds.
Q3
The phone cannot be
found even when it is
close to the watch.
Since communication is performed using
radio waves, the watch may not be able
to find the phone even if it is within two
meters. Certain environments may make
the allowable communication range very
short.
Auto Time Adjustment
Q1
When does the watch
sync its time setting with
the phone?
You can use G-SHOCK+ to specify the
start time for auto adjust. The watch will
also automatically sync its time with the
phone time when they are connected.
Q2
Time is not adjusted
when the auto adjust time
is reached.
About 30 seconds after the specified
auto adjust time is reached, the watch will
connect with the phone and adjust its
time setting accordingly.
Q3
Time is not displayed
correctly.
The phone’s time setting may not be
correct.
iPhone Users
“Settings” n “Privacy” n Turn on
“Location Services” n “System
Services” n Turn on “Setting Time
Zone”.
Android Users
Refer to your phone’s user
documentation.
Q4
The indicated time and
World Time are wrong by
a couple of hours.
Establish a connection between the
phone and watch and correct the time
setting.
Q5
The indicated time and
World Time are off by one
hour.
There may have been a change in your
area between standard time and summer
time. Establish a connection between the
phone and watch and correct the time
setting.
16
Page 17

YES
YES
YES
Operation Guide 5413
Control Mode
Q1
Why can’t I control a
music app on my phone?
Is there a Bluetooth connection
between the watch and phone?
Establish a Bluetooth connection
between the watch and phone.
Is G’MIX App running on your phone?
If G’MIX App is currently not
running on your phone (either
because you quit it or because it
was forced to shut down for some
reason), you will not be able to
perform music app operations on
the watch. Restart G’MIX App.
Q2
Rotary switch fast
forward and fast reverse
operations do not work.
Rotary switch fast forward and fast
reverse operations do not work during
Music app operations.
Q3
I want faster button
response.
You can increase button operation
response speed by selecting “High
Performance” for the G-SHOCK+ “Music
App settings” setting. Note, however,
that using the High Performance setting
will shorten battery life.
Q4
iPhone Only: You may be
trying to control a wrong
music player app with the
Control Mode.
Q5
Android Only: You may
be trying to control a
wrong music player app
with the Control Mode.
Only G’MIX App and the standard
Android Music app are supported. If you
want to control the standard Android
Music app from the watch, remove G’MIX
App from the phone.
●
Assign Music app button operations to
G-SHOCK+.
Q6
Android Only: Watch
operations do not affect
the Music app, but affect
another app instead.
When there are multiple music apps
installed on the phone, apps other than
the Music app may be affected by watch
operations.
Q7
Android Only: Watch
operations do not affect
the music app I want to
use.
When there are multiple music apps
installed on the phone, apps other than
the one you want may be affected by
watch operations. Or the wrong
operation may be performed due to a
problem with the music app. You may be
able to enable control of a particular
music player in the Control Mode by
deleting all music player apps except the
one you want.
Q8
I can’t find song titles.
Is the phone connected to the
Internet?
A song title cannot be found if you
are not connected to the Internet.
Can you input sound using the
microphone?
iPhone Users
Use the operation below to enable
microphone input.
“Settings” n “Privacy” n
“Microphone” n Turn on G’MIX
App.
Android Users
Refer to your phone’s user
documentation.
Other than the above.
You also may not be able to find a
song title under the conditions
below.
●
In an area where there is lots of
noise or where hearing is
difficult
●
When the desired song volume
is too low
●
When multiple songs are
playing
Control of G’MIX App and the standard
iPhone Music app only is supported. If
you want to control the standard iPhone
Music app from the watch, remove G’MIX
App from the phone.
●
Assign Music app button operations to
G-SHOCK+.
17
Page 18

YES
YES
Operation Guide 5413
Q9
The watch screen does
not display song titles
while in the Control
Mode.
Is the song name within the maximum
allowable characters?
The watch supports display of up
to 17 of the first alphanumeric
characters (letter, numbers,
symbols) of a song title. In the
case of Japanese characters
(hiragana or katakana), the watch
displays up to five of the first
characters as katakana. If you
want to view song titles in their
entirety, view them on the phone.
Is the song name free of unsupported
characters?
[*CHECK App] appears when a
song title includes kanji or some
other character not supported for
display by the watch. If this
happens, view the title on the
phone.
Other than the above.
The message [*FAILED] will
appear if the song title search
failed for some reason.
Q10
I can’t exit the Control
Mode to another mode.
Press the CONNECT (B) button to
terminate the connection, and then press
the mode navigation (C) button.
You can also return to the Control Mode
from any other mode by holding down the
CONNECT (B) button for about 0.5
seconds.
Q11
The rotary switch is
disabled while in the
Control Mode.
To prevent operational error, the rotary
switch will not perform operation if it is
rotated only once. Error prevention re-
activates if no rotary switch operation is
performed for about three minutes.
Q12
How do I save a
SOUNDER Mode sound
to the phone?
Use the procedure below to import a
sound source prepared by you. The
imported sound source will be displayed
on the SOUNDER Mode sound source
editor screen.
iPhone Users
The procedure below uses iTunes file
sharing.
Requirement: iTunes 9.1 or higher
A
Use a USB cable to connect your
phone to your computer.
B
On your computer, start up iTunes.
C
Under "DEVICES" on the iTunes
sidebar, select the phone name.
D
Click the App tab and then scroll to
the bottom of the page.
E
In the apps shown in the File Sharing
section, select “G’MIX” and then
drop the sound you want to import
into the Documents list on the right.
Note
●
For information about file
sharing, visit the Apple website.
Android Users
A
Use a USB cable to connect your
phone to your computer.
B
On your computer, select the
phone’s external storage.
C
Place the sound you want to input
into the “G’MIXApp” folder, which is
located in the “Music” folder.
World Time
Q1
The time for a World Time
City is not correct.
The summer time start date and time,
end date and time, or other rules were
changed by authorities.
Hand movement and digital
display
Q1
The time indicated by the
hands is different from
the digital time.
Strong magnetism or impact may cause
the hands of the watch to go out of
position. Use G-SHOCK+ to correct the
hand positions.
l Adjusting Hand Alignment
Battery
Q1
[RECOV] is flashing on
the digital display.
This indicates that the watch’s
RECOVER function has been triggered.
This function momentarily disables
watch functions to prevent rundown of
the battery.
l Battery Replacement Period
Q2
[BATT] is flashing on the
digital display.
This indicates that battery power is
getting low.
l Battery Replacement Period
Wrong input with the rotary
switch
Q1
The rotary switch
became operational
without you noticing it.
Accidental operation of the rotary switch
while the watch is being worn may result
in unintended operation.
Though the watch is designed to prevent
operation error, particular care is
required when assigning audio control
keys.
l Using the Rotary Switch
18
 Loading...