

Page 1
Eyecon
Pill Counting, Inventory, and Validation System
Instruction Manual
39-10-43582
Issue AM
Page 2

Avery Weigh-Tronix is a trademark of the Illinois Tool Works group of companies whose ultimate parent company is
Illinois Tool Works Inc (“Illinois Tool Works”). Copyright © 2016 Illinois Tool Works. All rights reserved.
No part of this publication may be reproduced by making a facsimile copy, by the making of a copy in three dimensions of a two-dimensional
work and the making of a copy in two dimensions of a three-dimensional work, stored in any medium by electronic means, or transmitted in
any form or by any means, including electronic, mechanical, broadcasting, recording or otherwise without the prior written consent of the
copyright owner, under license, or as permitted by law.
This publication was correct at the time of going to print, however Avery Weigh-Tronix reserves the right to alter without notice the
specification, design, price or conditions of supply of any product or service at any time.
GSEeyecon_u_en_43582.book
Page 3

Table of Contents
Chapter 1 General Information and Warnings ........................................................................................ 7
About this Manual ..............................................................................................................7
Text Conventions ........................................................................................................ 7
Special Messages ....................................................................................................... 7
Installation .......................................................................................................................... 8
Unpacking ................................................................................................................... 8
Intended Use ............................................................................................................... 8
General Description ..................................................................................................... 9
Product Identification ................................................................................................... 9
Setup ................................................................................................................................ 10
Sulfa and Penicillin Platter ......................................................................................... 10
External Scanner ....................................................................................................... 12
Preparing the Eyecon for Use .......................................................................................... 14
Turn on the Eyecon .......................................................................................................... 15
Routine Maintenance ...................................................................................................... 16
Cleaning the Machine ...................................................................................................... 16
Funnel and Slide Gate ............................................................................................... 16
Rapid Fill Counting Tray ............................................................................................ 17
Sharp Objects ..................................................................................................................18
Training ............................................................................................................................ 18
Scanner / Laser ................................................................................................................19
Scanner Specifications .............................................................................................. 19
Licensing Agreement ....................................................................................................... 20
Medi-Span Copyright and Disclaimer Information ..................................................... 20
Software Updates ............................................................................................................ 21
Update Warnings ....................................................................................................... 21
Install Software Updates ........................................................................................... 21
Turn off the Eyecon (Shutdown) ...................................................................................... 23
Restart ....................................................................................................................... 23
Shutdown .................................................................................................................. 23
About Eyecon Screen ...................................................................................................... 23
Warranty Policy ................................................................................................................24
Specifications ................................................................................................................... 25
FCC Statement ................................................................................................................ 25
ETL .................................................................................................................................. 25
Back up the Eyecon Data ................................................................................................ 26
Helpful Hints ..................................................................................................................... 26
Navigating the Touch Screen .................................................................................... 26
Automatic Update from the Website .......................................................................... 26
Symphony Software ......................................................................................................... 26
Chapter 2 Settings Menu ......................................................................................................................... 27
General ............................................................................................................................ 27
Launch Windows Applications ................................................................................... 30
Users ................................................................................................................................ 30
Add or Delete a User ................................................................................................. 31
User Scan-Out ........................................................................................................... 32
No User ID Lookup .................................................................................................... 33
Test .................................................................................................................................. 34
Barcode ............................................................................................................................ 35
Barcode Type ............................................................................................................ 35
Rx Barcode Examples (Validation Only) ................................................................... 36
RX Scan During Count Mode .................................................................................... 39
Barcode Setup Help .................................................................................................. 40
Eyecon Instruction Manual 3
Page 4

Test Mode ................................................................................................................. 41
Data ................................................................................................................................. 42
Report Data ............................................................................................................... 43
Physical Inventory Data ............................................................................................. 46
Files ................................................................................................................................. 48
Auto Updates ............................................................................................................. 49
TCP/IP ............................................................................................................................. 51
Listening Server Settings .......................................................................................... 52
Remote Server ................................................................................................................. 53
Inventory Interface (McKesson Enterprise Rx) .......................................................... 54
Multi ................................................................................................................................. 55
Double Check .................................................................................................................. 55
Double-Counts .......................................................................................................... 55
Back-Counts .............................................................................................................. 56
Chapter 3 Eyecon Native Modes ............................................................................................................ 57
Start-up Screen ................................................................................................................57
Count Only Mode ............................................................................................................. 58
Rx Dispensing and Pill Counting ............................................................................... 58
Unit of Use ................................................................................................................. 61
Hand-Count ............................................................................................................... 62
Accumulate Count Method ........................................................................................ 63
Rx Validation / Workflow .................................................................................................. 65
Rx Validation and Dispensing ................................................................................... 65
Partial Fill ...................................................................................................................70
Unit of Use ................................................................................................................. 71
GPI Substitution ........................................................................................................ 72
Double Count (DEA Controlled Substances) ............................................................ 74
Back Count (DEA Controlled Substances) ................................................................ 76
Hand-Count ............................................................................................................... 79
Accumulate Count Method ........................................................................................ 80
Manual Login ............................................................................................................. 82
Physical Inventory Mode .................................................................................................. 83
Count Inventory ......................................................................................................... 83
Unit of Use ................................................................................................................. 86
Hand-Count ............................................................................................................... 87
Accumulate / Counting .............................................................................................. 88
Manual Login ............................................................................................................. 89
Re-Train an Existing Pill Image ........................................................................................ 90
Train Pill Image ......................................................................................................... 91
Train Hand-Count ...................................................................................................... 91
Manual NDC Entry ........................................................................................................... 92
NDC Not Found ......................................................................................................... 93
Edit Drug Database .......................................................................................................... 94
Drug Photo ................................................................................................................ 96
Train a New Pill ................................................................................................................ 96
Chapter 4 PMSS Modes ........................................................................................................................... 98
Package Settings ............................................................................................................. 98
Pill Counting ..................................................................................................................... 99
Partial Fill ................................................................................................................. 104
Unit of Use ............................................................................................................... 105
GPI Substitution ...................................................................................................... 106
Hand-Count ............................................................................................................. 108
Accumulation ........................................................................................................... 109
Manual Login ........................................................................................................... 111
Manual NDC Entry ......................................................................................................... 111
4 Eyecon Instruction Manual
Page 5

NDC Not Found ....................................................................................................... 112
Edit Drug Database ........................................................................................................ 113
Previously Entered Drug ......................................................................................... 114
Drug Photo .............................................................................................................. 114
Re-Train an Existing Pill Image ...................................................................................... 115
Train Pill Image ....................................................................................................... 115
Hand-Count ............................................................................................................. 116
Rx PMSS Data Viewer ................................................................................................... 117
McKesson Enterprise Rx ............................................................................................... 117
Setup ....................................................................................................................... 117
Access Inventory Mode ........................................................................................... 118
Chapter 5 Workflow Mode ..................................................................................................................... 121
Pharmacy Package Settings .......................................................................................... 121
Settings .......................................................................................................................... 122
Server ...................................................................................................................... 122
Local TCP/IP Settings ............................................................................................. 123
Network Share ......................................................................................................... 124
Workflow Diagnostics and Setup ................................................................................... 125
Shutdown or Restart ................................................................................................ 126
Restart ..................................................................................................................... 126
Shutdown ................................................................................................................ 126
Basic Test ................................................................................................................ 126
About Eyecon .......................................................................................................... 127
Eyecon Setup .......................................................................................................... 128
Common .................................................................................................................. 129
Troubleshooting ....................................................................................................... 130
Network Setup ......................................................................................................... 132
Server ...................................................................................................................... 133
Local TCP/IP Settings ............................................................................................. 134
Network Share ......................................................................................................... 135
Chapter 6 Downloaded Inventory Data ................................................................................................ 136
Access Downloaded Files .............................................................................................. 136
.CSV Files ...................................................................................................................... 136
Text Files ....................................................................................................................... 138
Chapter 7 User Login Barcodes ........................................................................................................... 142
Chapter 8 Report Download Data and Photos .................................................................................... 144
Access Downloaded Files .............................................................................................. 144
Downloaded Report Data ............................................................................................ 145
Locate Tray Photo ........................................................................................................ 145
Photo (Image) Numbering ....................................................................................... 145
File Names .............................................................................................................. 145
Unit of Use Fill Types .............................................................................................. 146
Rx Information on Photo (Image) ................................................................................... 146
Example of Downloaded Pill Images ................................................................... 146
Chapter 9 File Sharing ........................................................................................................................... 151
File Sharing Setup ......................................................................................................... 151
Needed Items .......................................................................................................... 151
Eyecon Setup .......................................................................................................... 151
Computer Setup ...................................................................................................... 152
Adjust Back-Count Discrepancy Reasons ............................................................... 153
Chapter 10 Audit Reports ..................................................................................................................... 154
Access Eyecon Auditor from the Start-up Screen .......................................................... 154
Initial Use ....................................................................................................................... 154
Eyecon Instruction Manual 5
Page 6

Specify and View a Report ............................................................................................. 155
Accessing the Saved Photos and Reports .............................................................. 157
Chapter 11 Accuracy Verification Procedure ...................................................................................... 159
6 Eyecon Instruction Manual
Page 7
1 General Information and Warnings
1.1 About this Manual
This manual is divided into chapters by the chapter number and the large text at the top
of a page. Subsections are labeled as shown by the 1 and 1.1 headings shown above.
The names of the chapter and the next subsection level appear at the top of alternating
pages of the manual to remind you of where you are in the manual. The manual name
and page numbers appear at the bottom of the pages.
1.1.1 Text Conventions
The buttons used to interface with the Eyecon are via the touch screen display. The
buttons are shown as they would be seen on the display (i.e. ).
Screen headings will appear in bold (i.e. Start-up).
Displayed messages appear in bold italic type and reflect the case of the displayed
message.
1.1 About this Manual
1.1.2 Special Messages
Examples of special messages you will see in this manual are defined below. The
signal words have specific meanings to alert you to additional information or the relative
level of hazard.
DANGER!
THIS IS A DANGER SYMBOL.
DANGER MEANS THAT FAILURE TO FOLLOW SPECIFIC PRACTICES
OR PROCEDURES WILL CAUSE INJURY OR DEATH.
CAUTION!
This is a Caution symbol.
Cautions give information about procedures that, if not observed, could result
in damage to equipment or corruption to and loss of data.
NOTE: This is a Note symbol. Notes give additional and important information, hints
and tips that help you to use your product.
Eyecon Instruction Manual 7
Page 8
General Information and Warnings
1.2 Installation
DANGER: RISK OF ELECTRICAL SHOCK. NO USER SERVICEABLE
PARTS. DO NOT ATTEMPT TO SERVICE THE EYECON BY REMOVING
THE COVER OR OPENING THE UNIT. REFER TO QUALIFIED SERVICE
PERSONNEL FOR SERVICE.
DO NOT EXPOSE THE EYECON TO RAIN OR MOISTURE. DO NOT
EXPOSE THE EYECON UNIT TO DRIPPING OR SPLASHING LIQUIDS.
CAUTION!
Class 2 laser radiation when open. Refer to page 19 for more details.
1.2.1 Unpacking
Caution! The Eyecon contains components that can be damaged by rough
handling. Unpack all items carefully.
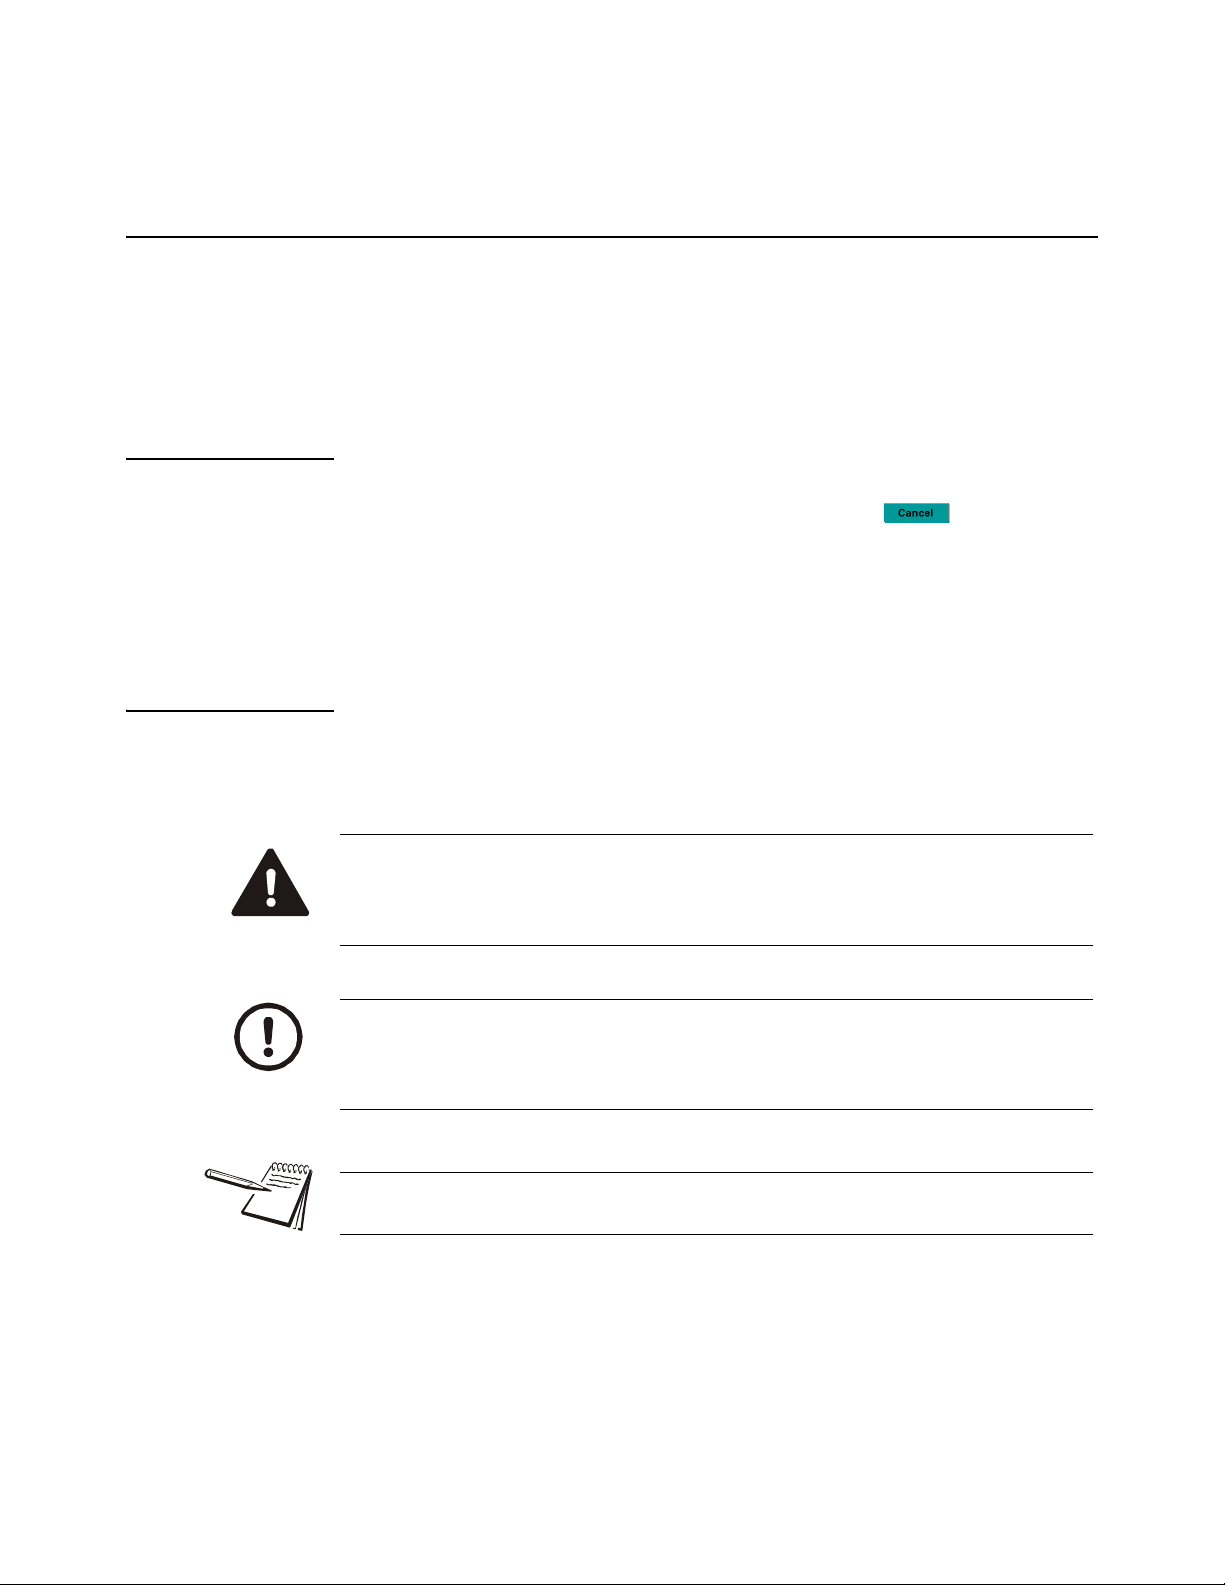
1.2.2 Intended Use
Eyecon™ utilizes machine vision technology to accurately count tablets and capsules
for prescription dispensing.
Machine vision technology allows for identification of most foreign substances and pill
variations during the counting and dispensing process.
The specialized technology of the Eyecon™ does not support the counting of gel caps.
Figure 1.1 High Voltage Warning Label
8 Eyecon Instruction Manual
Page 9
1.2.3 General Description
INTERFERENCE RECEIVED. INCLUDING INTERFERENCE
INTERFERENCE, AND (2) THIS DEVICE MUST ACCEPT ANY
CONDITIONS: (1) THIS DEVICE MAY NOT CAUSE HARMFUL
THIS DEVICE COMPLIES WITH PART 15 OF THE FCC RULES.
179400-004311
SERIAL NO. XXXXXX
std. 61010-1, 2nd Ed.
C22.2 No. 61010-1, 2nd Ed.
Conforms to ANSI/UL std.
OPERATON IS SUBJECT TO THE FOLLOWING TWO
THAT MAY CAUSE UNDESIRED OPERATION.
Certified to CSA std.
www.EyeconVPC.com
Patent Pending
AC 100-240V/47-60 Hz
Operation:
Max Power: 150W
3173012
Avery Weigh-Tronix, LLC
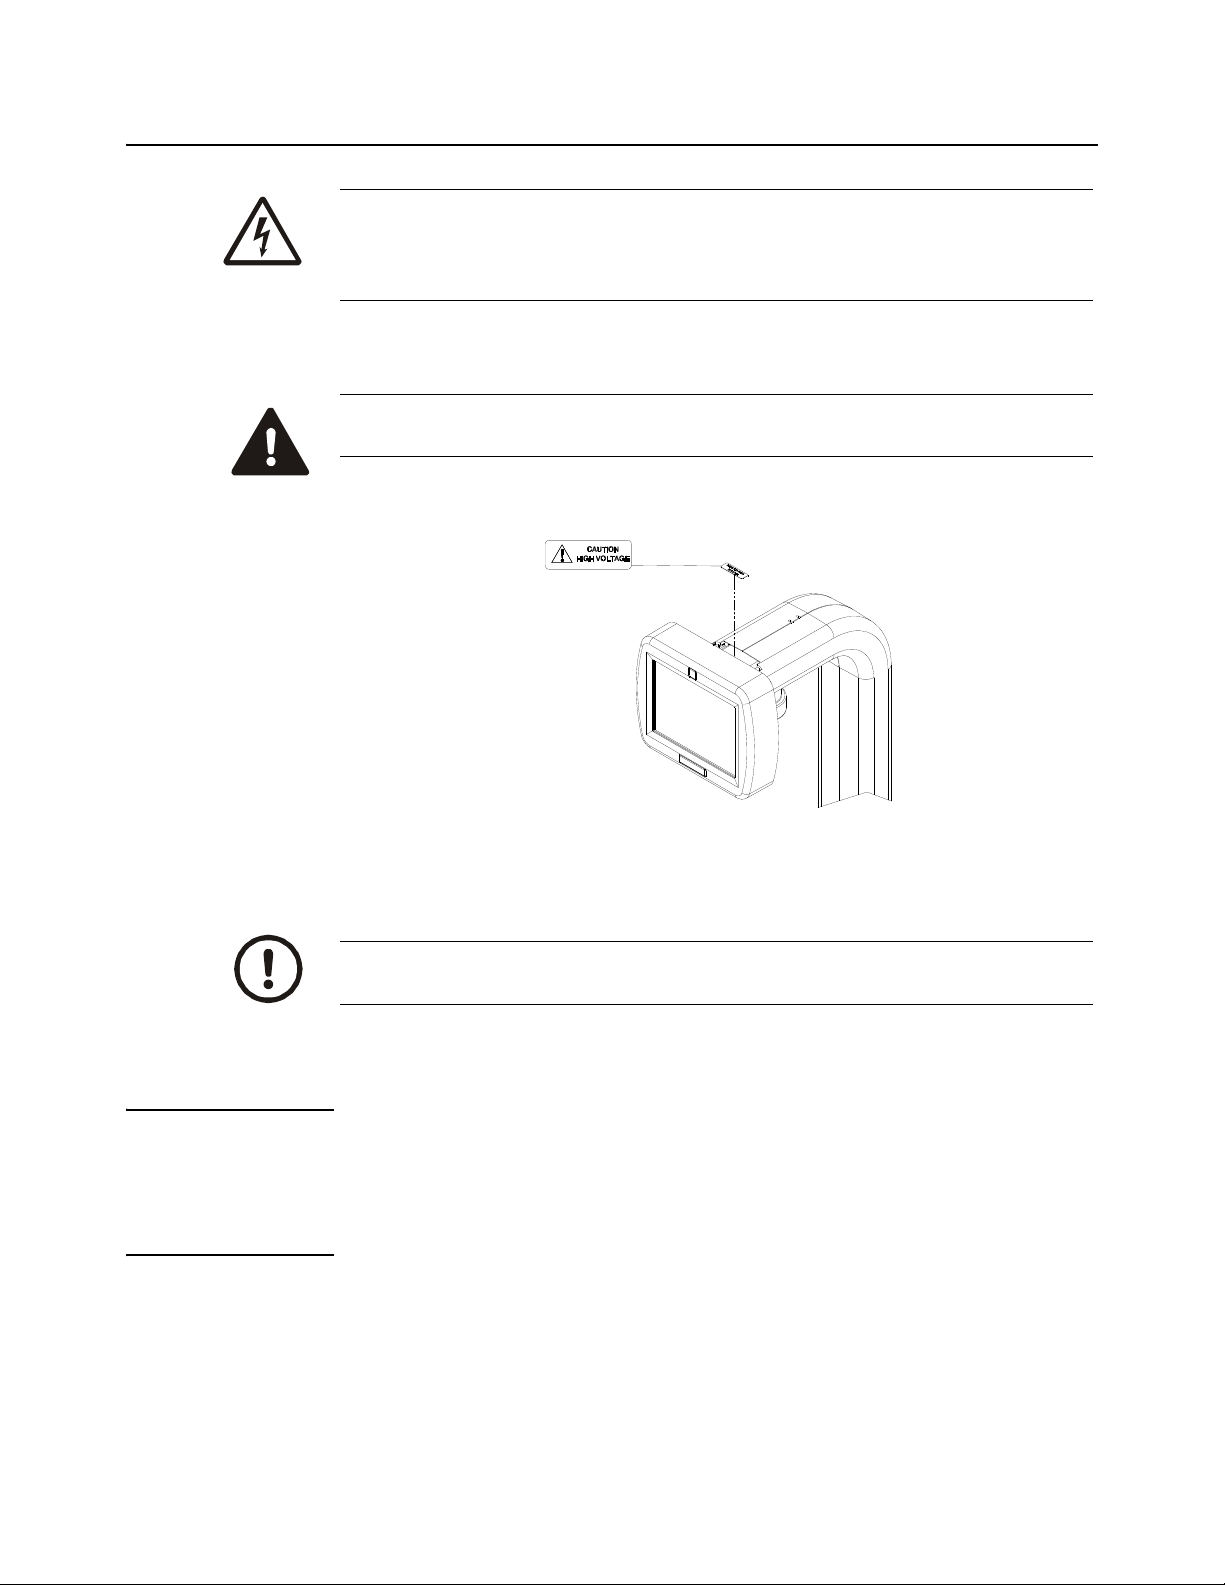
Refer to the diagram below for part descriptions for field replaceable and non-field
replaceable parts.
1.2 Installation
Description Part Number
1 Touch Screen Interface N/A
2 Infra Red Camera N/A
3 Rapid Fill Platter 249400-303A0
4 Infra Red Emitter N/A
5 (2) Spatula 44-70-43547R
6 Clear Funnel Face 44-70-43760
7 Barcode Scanner N/A
8 Funnel Slide Gate 44-70-43546
9 Penicillin Platter 249400-301A0
Sulfa Platter 249400-302A0
10 Leg Assembly 249400-304A0
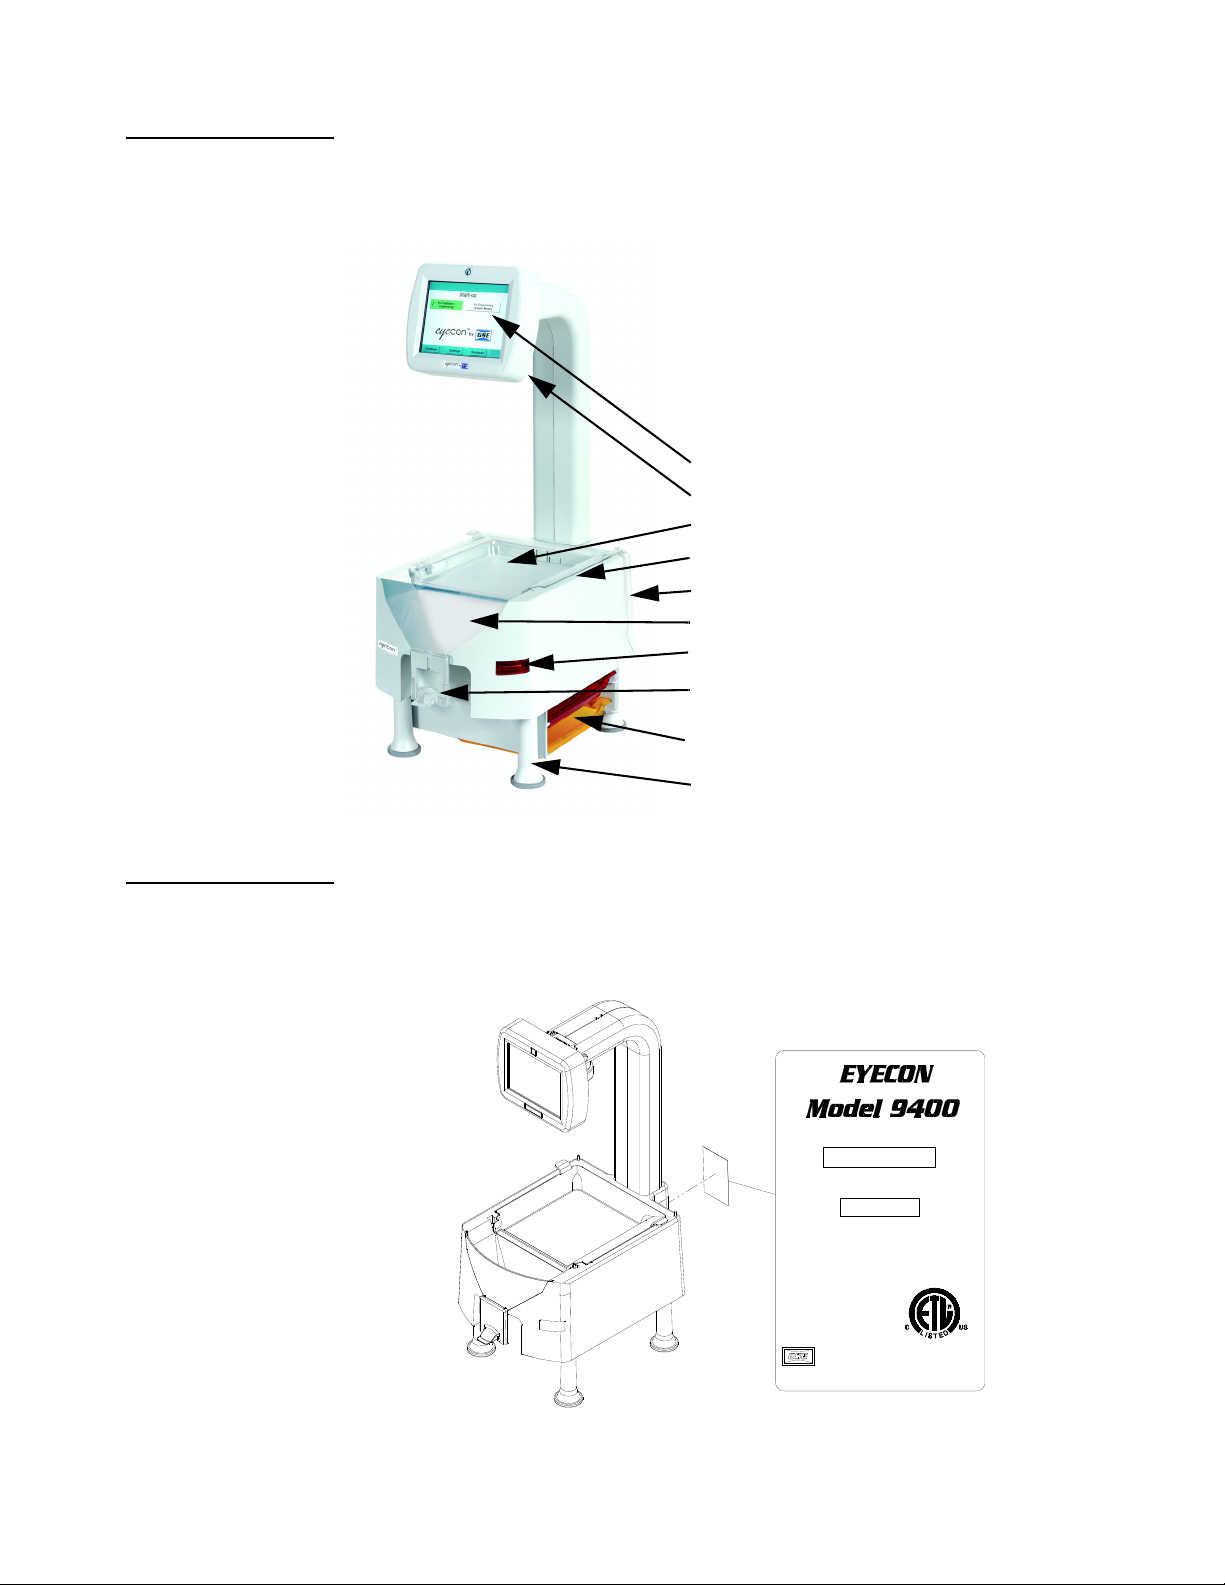
1.2.4 Product Identification
Each Eyecon has a specific part number and a unique serial number. Please refer to
Figure 1.2.
This information will be needed for periodic updates, service, and warranty claims.
Figure 1.2 Product Markings
Eyecon Instruction Manual 9
Page 10

General Information and Warnings
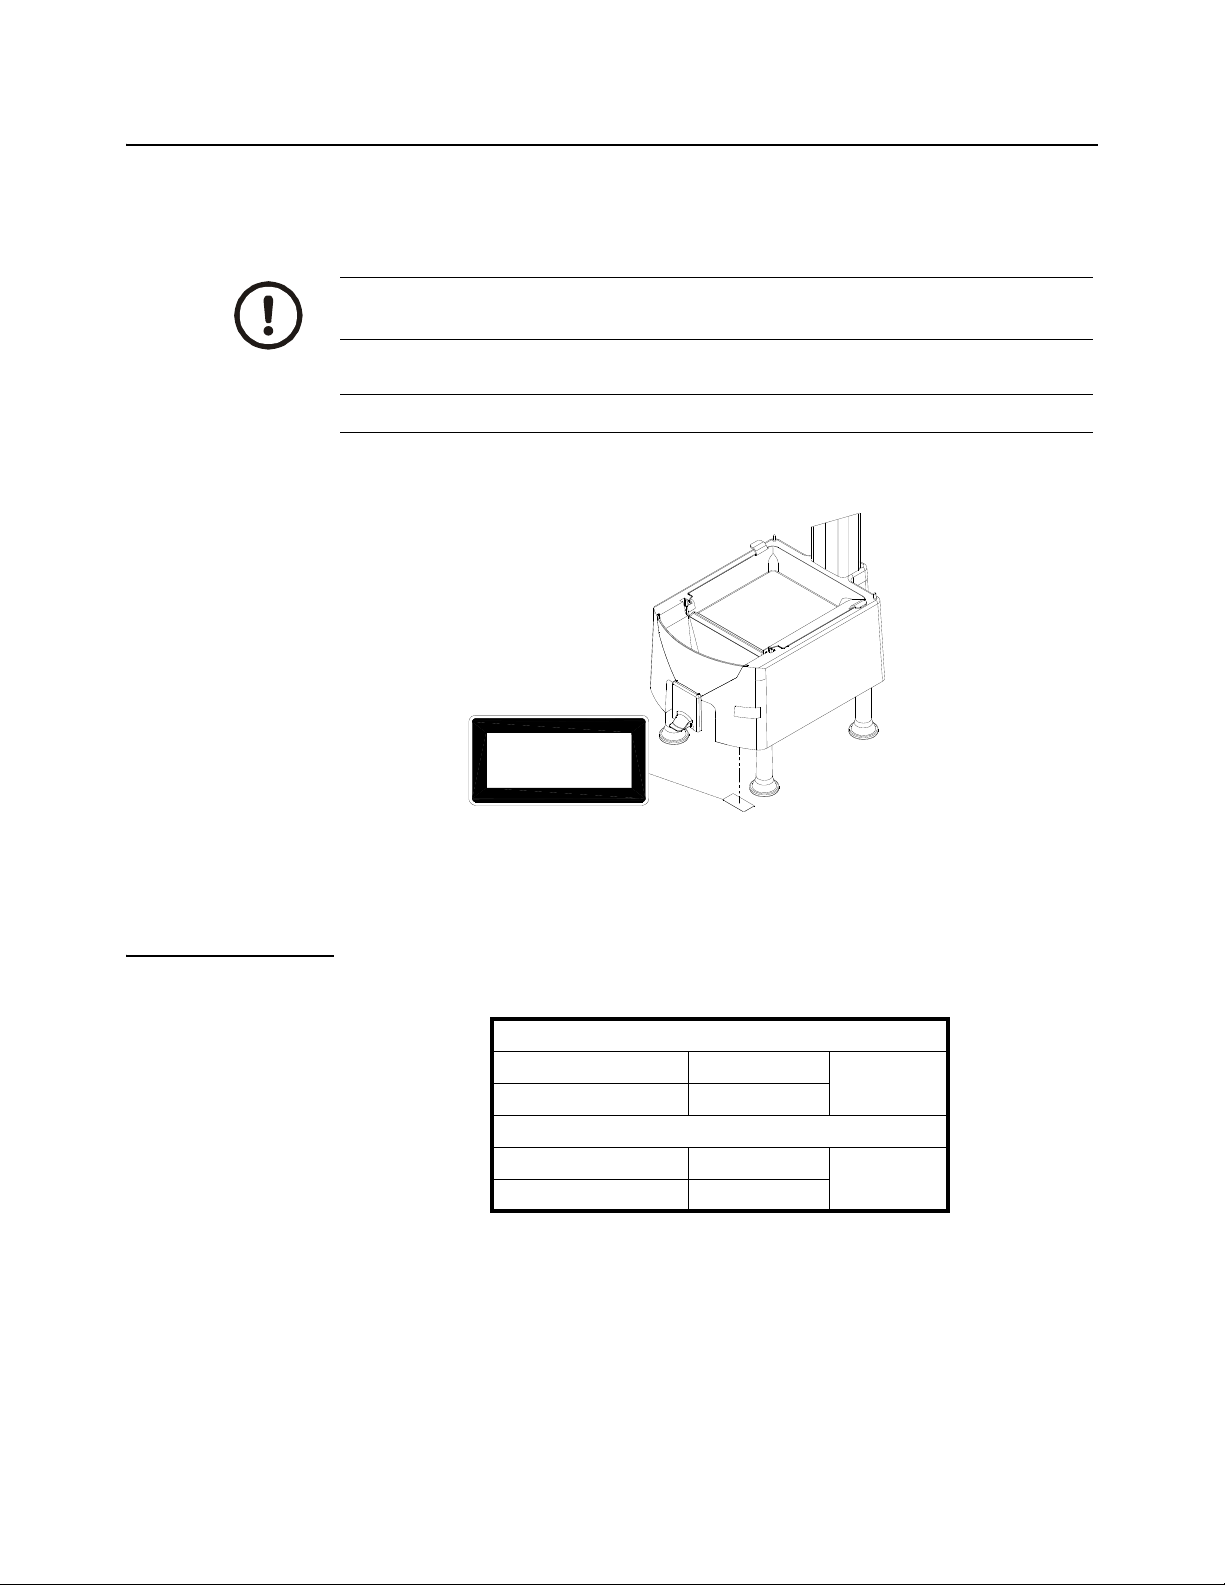
1.3 Setup
Place the Eyecon on a level surface and away from direct sunlight. Refer to Figure 1.3
for dimensions of the Eyecon.
1.3.1 Sulfa and Penicillin Platter
The sulfa (yellow) and penicillin (red) platters are used to avoid cross contamination
and are standard with Model # 179400-004311. The platters store easily under the
base of the Eyecon.
The platters are also available for purchase in a kit or separately.
l When ordering both platters and hardware, use part number 249400-300A0.
l When ordering the Penicillin platter only, use part number 249400-301A0.
l When ordering the Sulfa platter only, use part number 249400-302A0.
Sulfa and Penicillin Platter Kit Installation
No need to remove leg assembly to install optional counting platter brackets.
1. Gently turn the Eyecon unit on its side being careful to not drop the Eyecon on
the display.
2. Remove adhesive tabs from platter holder located in two places per holder
(refer to Figure 1.4).
Figure 1.3 Eyecon Dimensions
3. Position one of the platter holders on the chassis with the ridges facing the
inside (refer to Figure 1.5 for an illustration).
10 Eyecon Instruction Manual
Page 11
1.3 Setup
ADHESIVE
4. Line the four snaps of the platter bracket up with 4 holes on chassis. Push until
holders snap into place. Holders can only be installed one way, if holes don't
line up turn holders around and try again. Apply light pressure to platter holder
for approximately 15 seconds allowing adhesive to set.
5. Carefully stand the Eyecon upright.
6. Insert the sulfa and penicillin platters in between the brackets (refer to Figure
1.6).
Figure 1.4 Platter Bracket
Figure 1.5 Platter Bracket Installation
Eyecon Instruction Manual 11
Page 12

General Information and Warnings
Figure 1.6 Storing Sulfa and Penicillin Platters
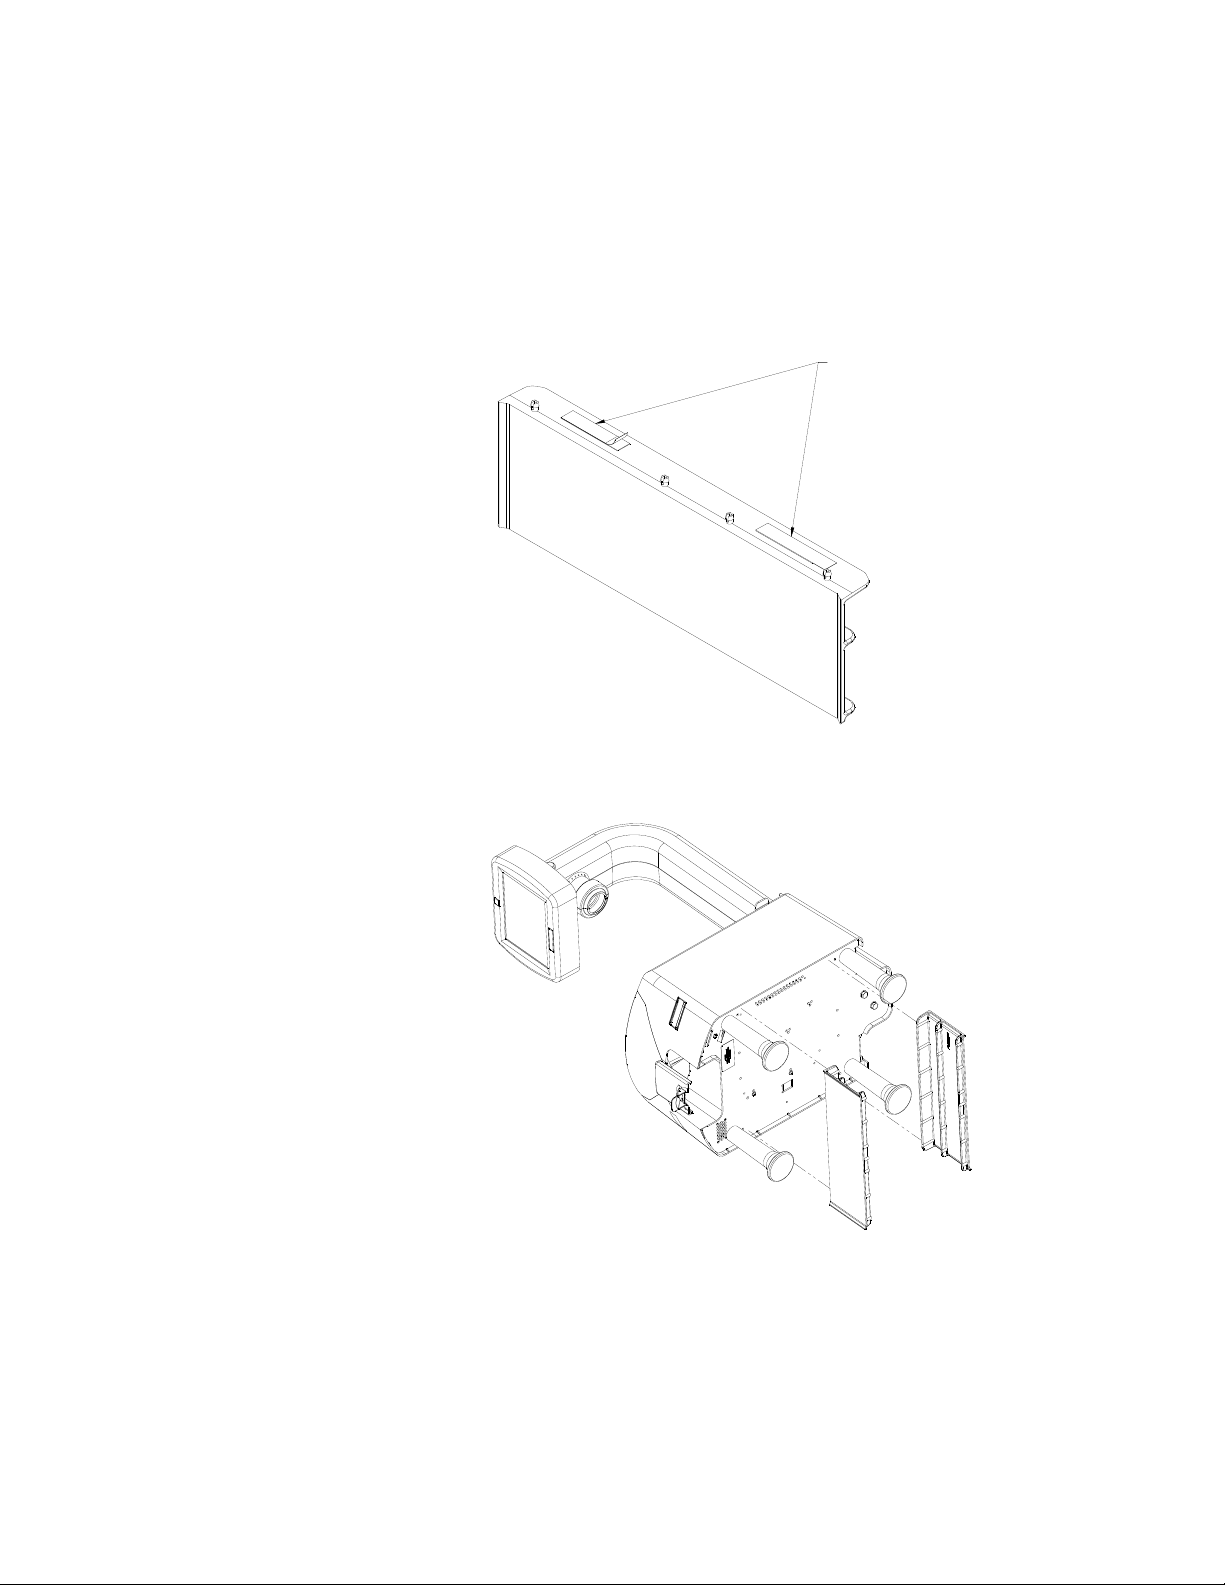
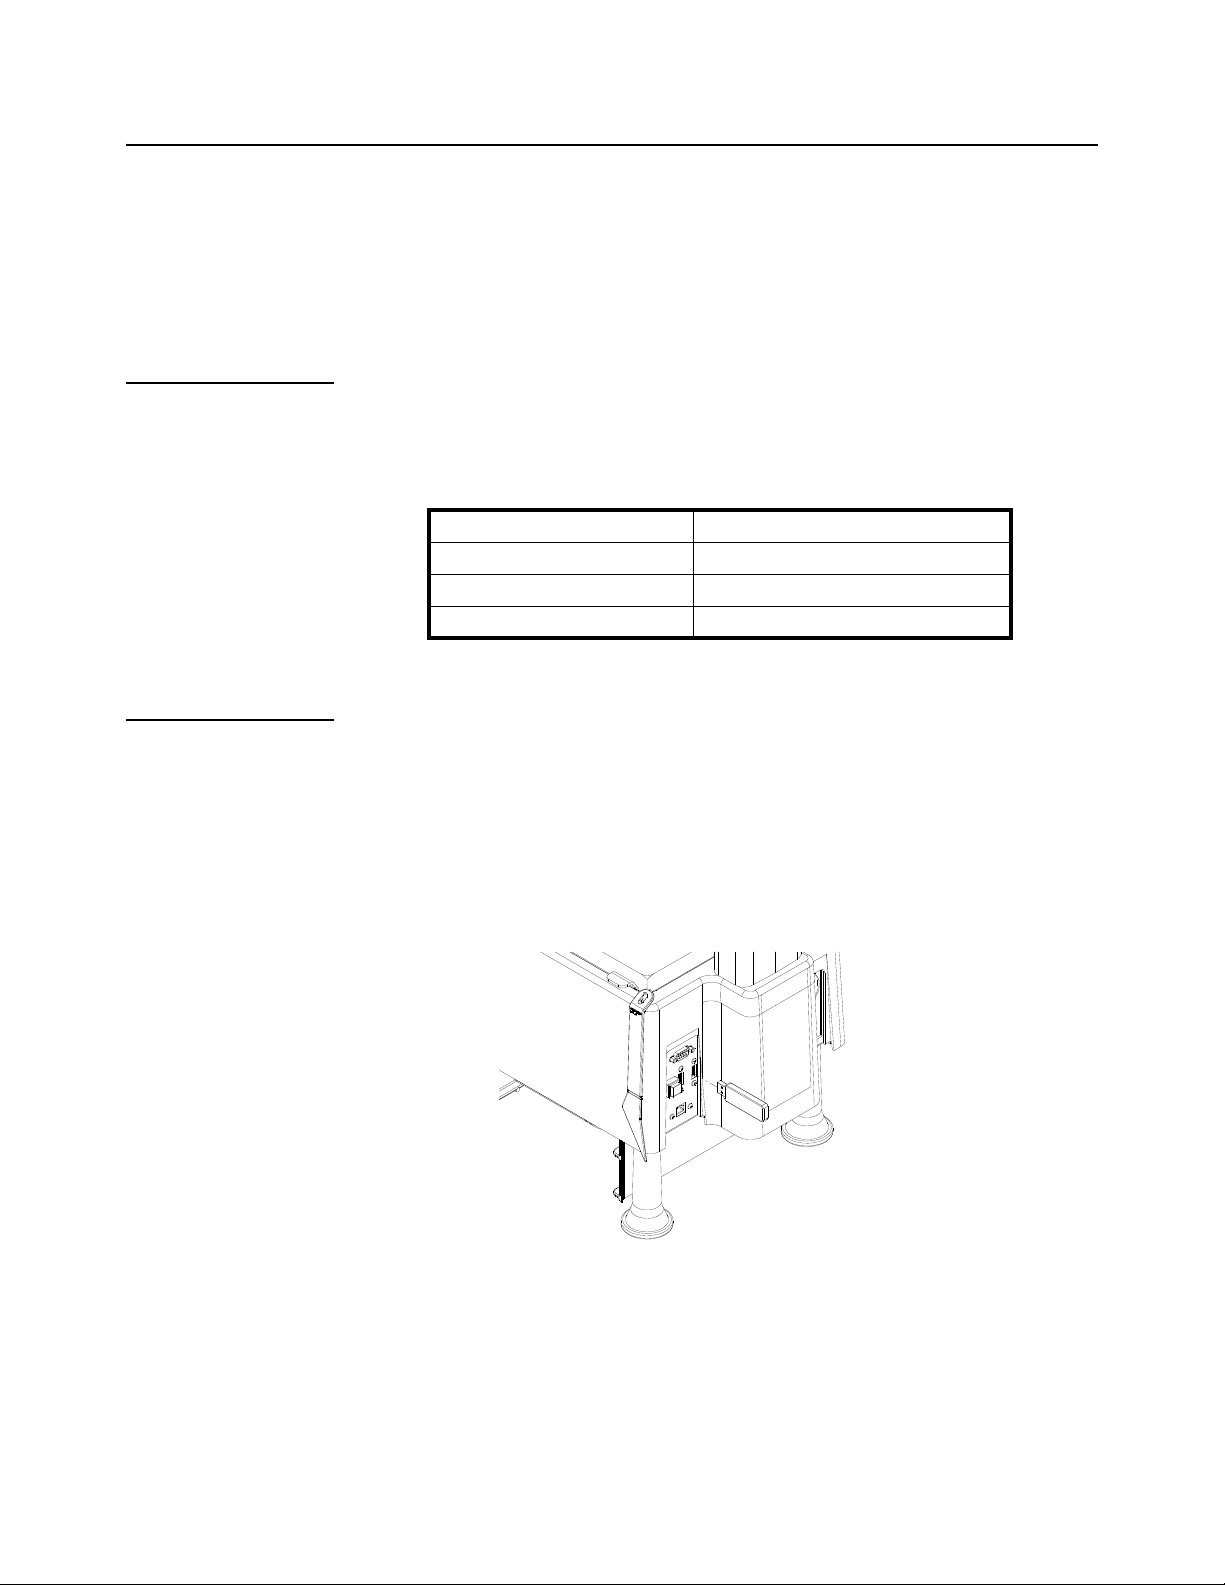
1.3.2 External Scanner
An optional omni-directional scanner is available for mounting externally to the Eyecon
enclosure. The scanner comes with an interface cable and double-sided tape for
mounting. The kit part number is 249400-430C0.
Refer to the following photos and instructions for enabling the scanner and
recommended mounting configurations.
Mounting
1. Apply double-sided tape to bottom of scanner. Stick scanner on the Eyecon
enclosure with the scan beam pointing outward.
2. Install cable tie holder by peeling off the backing and adhering to the bottom
plate of the Eyecon.
12 Eyecon Instruction Manual
Page 13
1.3 Setup
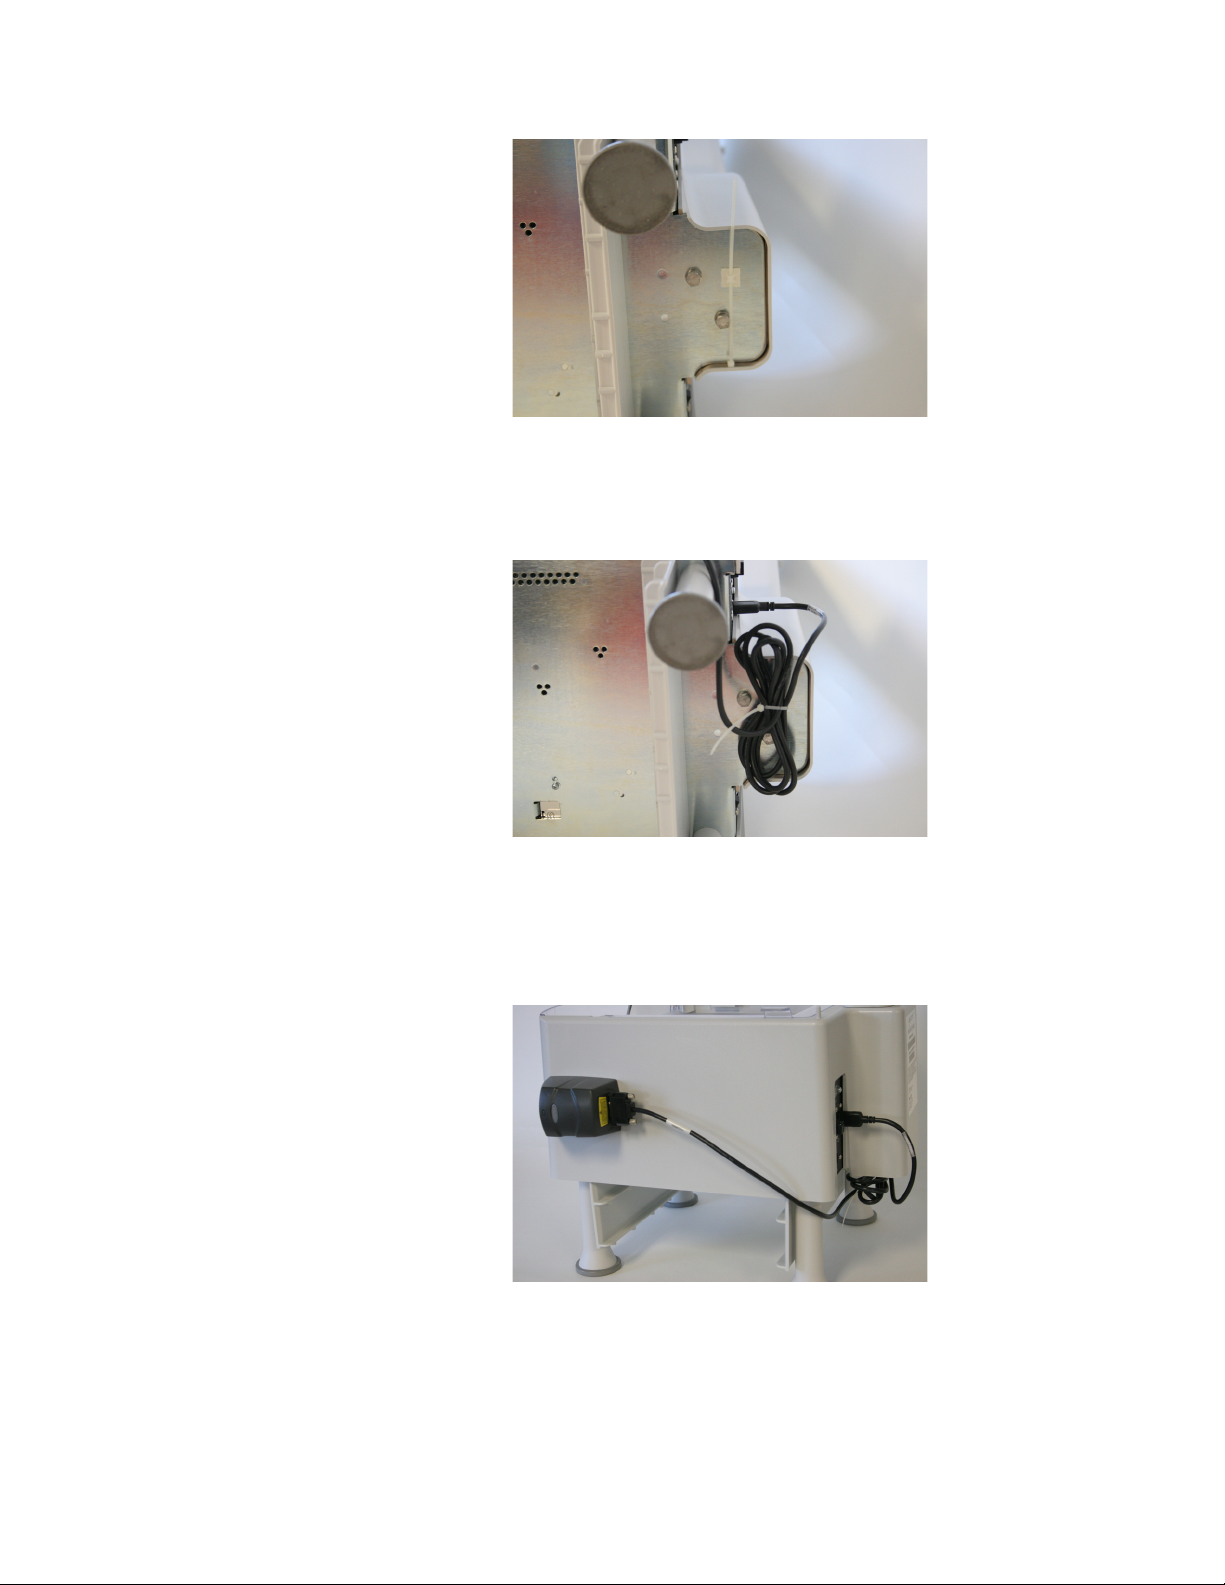
3. Insert cable tie through hole of holder.
4. Plug the USB end into an available USB port on the back of the unit.
5. Bundle excess cable and pull the cable tie tight.
6. Plug the DB9 end of the cable into the scanner. Secure the cable by tightening
the two screws.
7. Plug in the scanner cable into the USB port.
8. Plug the USB end of the scanner cable into an available USB port located on
the rear of the Eyecon unit.
Eyecon Instruction Manual 13
Page 14
General Information and Warnings
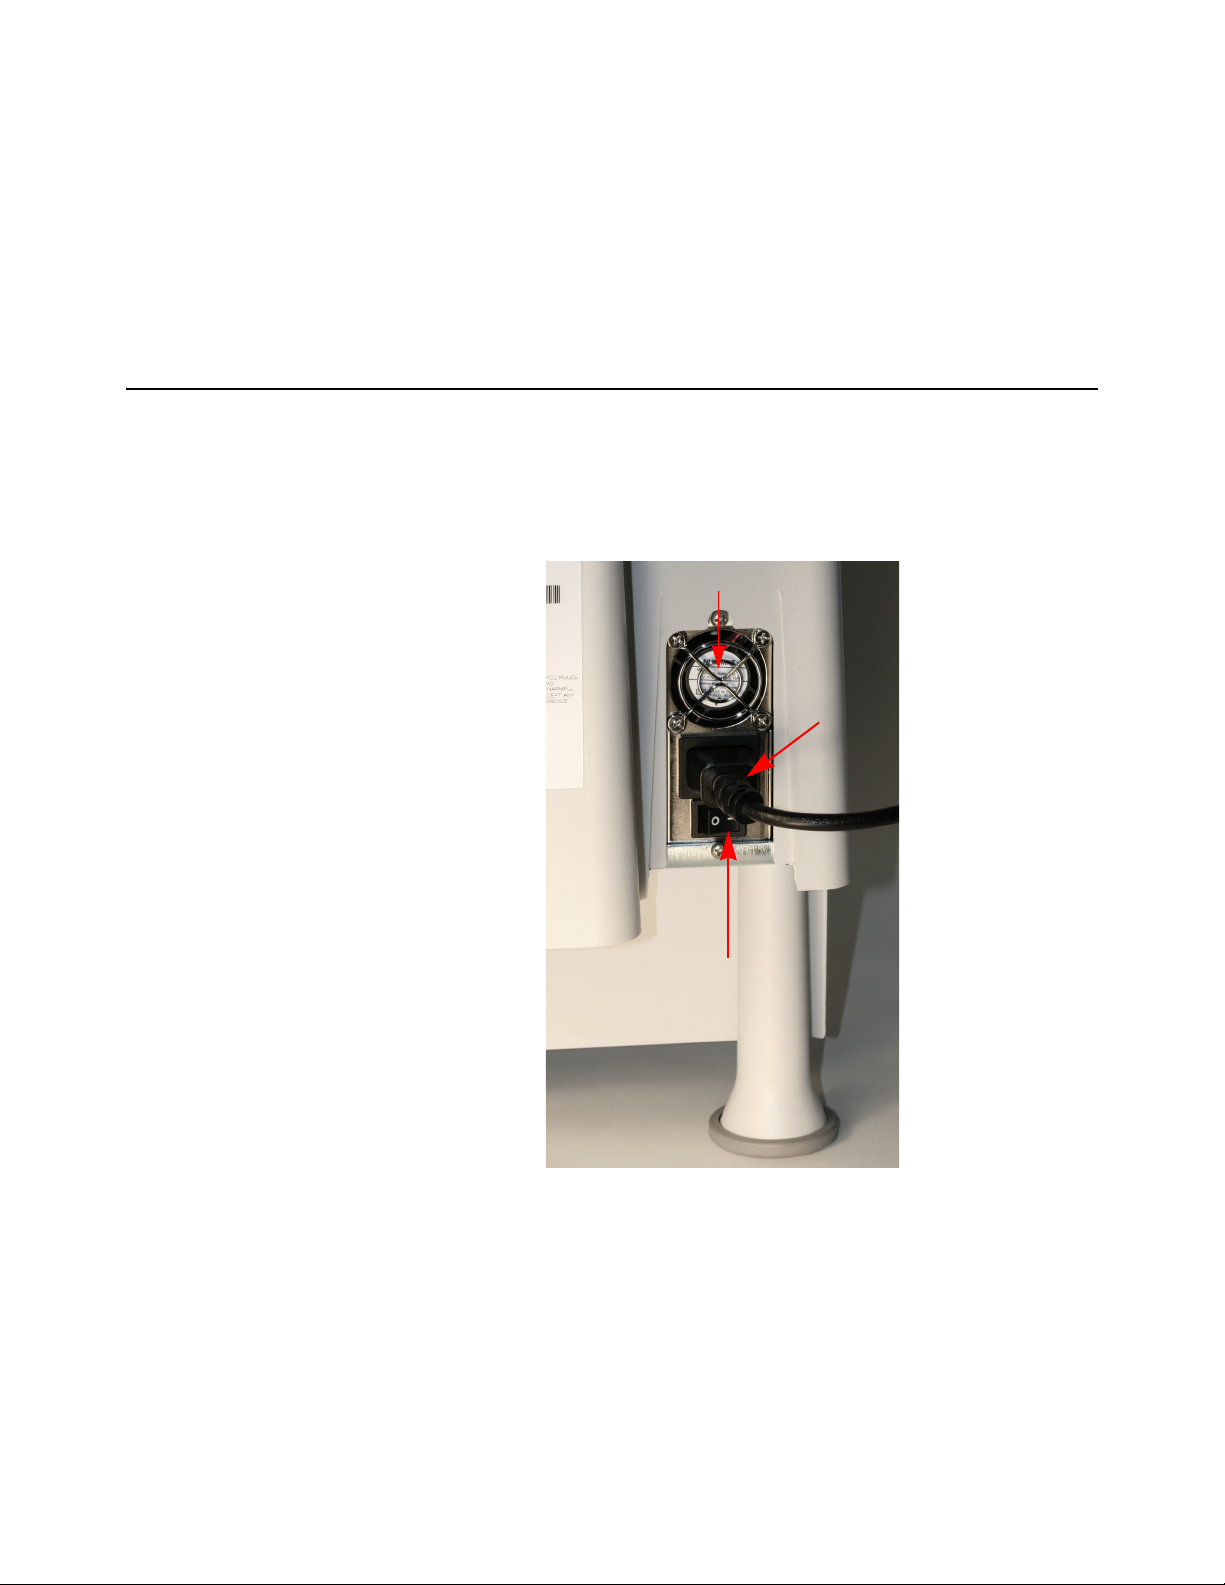
Power
Supply
Power Switch
Fan
Enable Scanner
By default the scanner internal to the Eyecon unit is set to be the primary scanner used.
In order to use the external scanner, the internal scanner must be disabled by changing
the scanner port number within the settings menu of all modes being used.
Enable the external scanner by entering a 4 as the port number under the
General>Scanner Port setting. The Eyecon must be rebooted before the changed
setting will be saved. Refer to page 29 for instructions on setting the port number.
1.4 Preparing the Eyecon for Use
1. Insert the power cable into the receptacle located in between the power switch
and fan on the back of the Eyecon. Refer to Figure 1.7.
2. The Eyecon must be installed near an easily accessible socket outlet. Plug the
Eyecon power cord into the outlet.
Figure 1.7 Power Supply
14 Eyecon Instruction Manual
Page 15
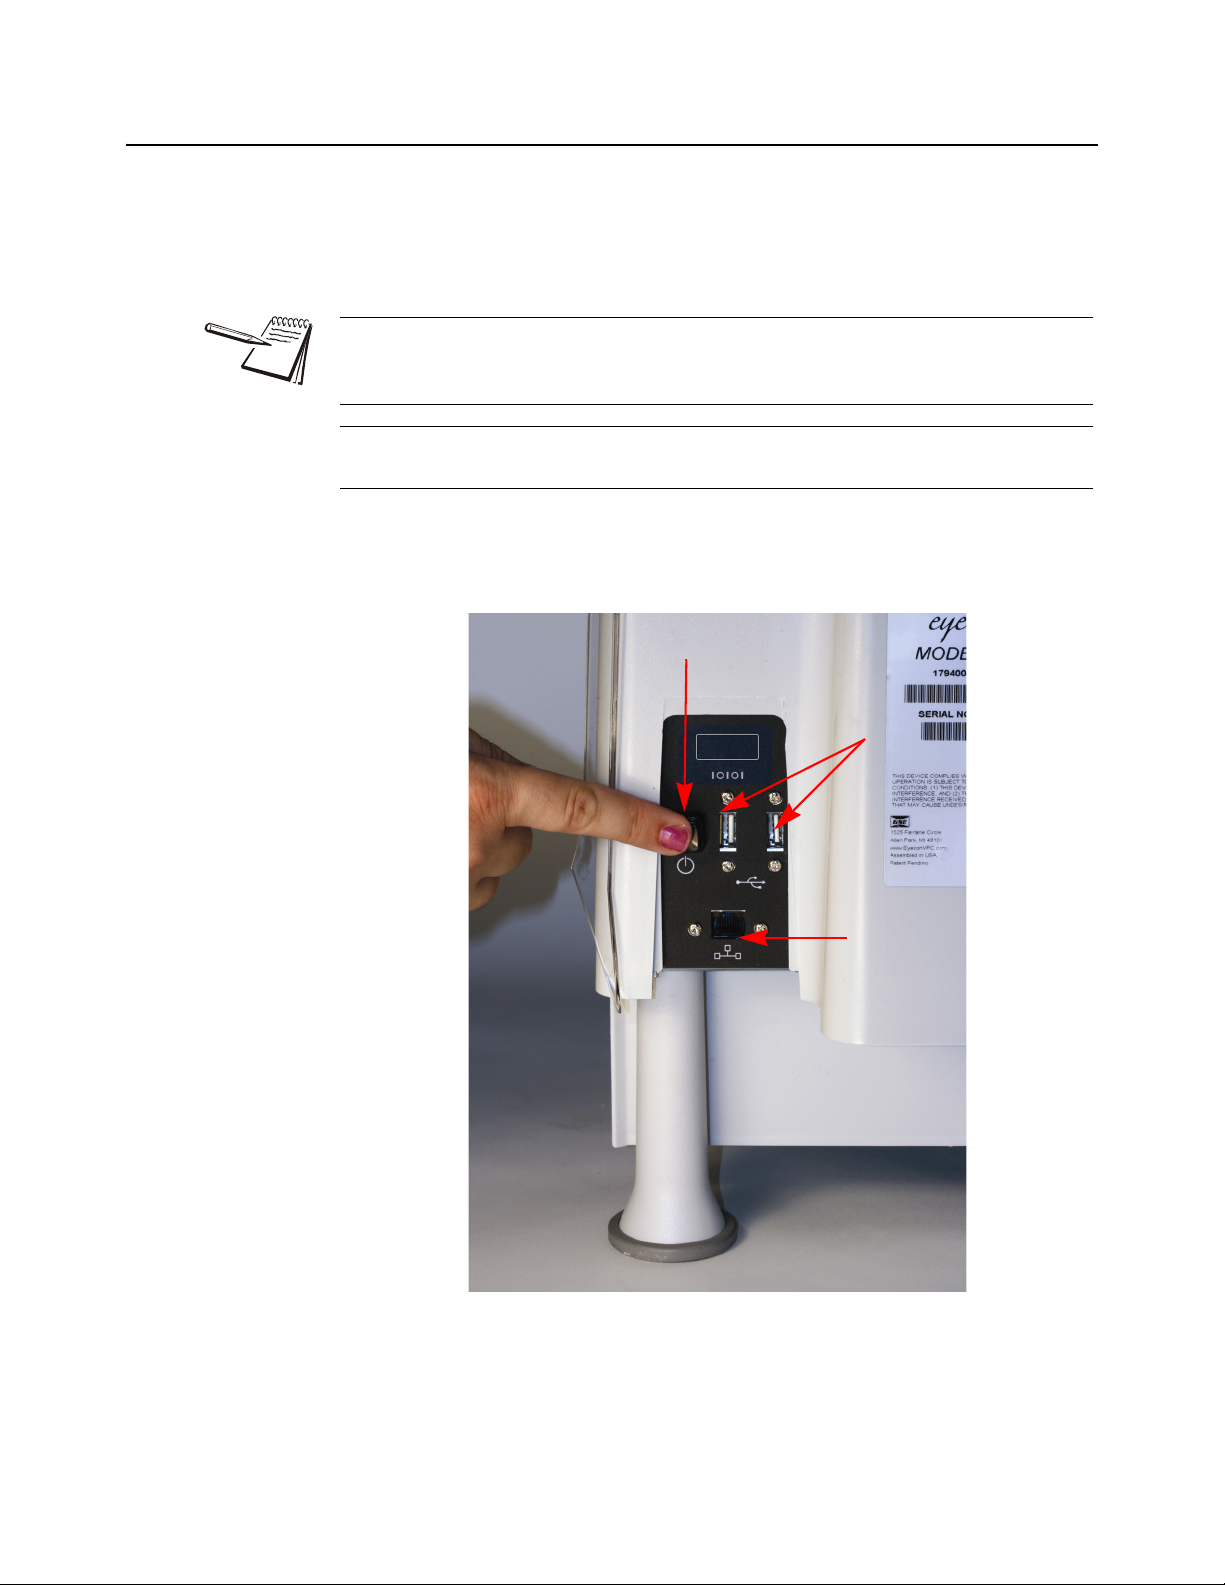
1.5 Turn on the Eyecon
Power Push Button
USB Ports
Network Port
1. Make sure the power switch is in the ON ( I ) position. Refer to Figure 1.7 for
location.
2. Fully depress and release the power push button to turn on the Eyecon (Refer
to Figure 1.8). The display area will illuminate within a few seconds.
Do not use the power switch to turn off the Eyecon. Refer to Figure 1.7 for
power switch location. The Eyecon is designed to be turned off through the
touch screen menus. Refer to page 23 for details on shutting down the Eyecon.
If power is lost, fully depress and release the power push button to turn on the
Eyecon. Refer to Figure 1.8 for power push button location
If a network cable is to be connected plug it into the receptacle on the back. Refer to
Figure 1.8.
1.5 Turn on the Eyecon
Figure 1.8 Eyecon Back Panel
Eyecon Instruction Manual 15
Page 16
General Information and Warnings
1.6 Routine Maintenance
Always turn off the machine and unplug the power cord before starting any routine
maintenance to avoid the possibility of electric shock.
Make sure that it is placed securely on a flat and level surface.
1.7 Cleaning the Machine
Be sure to keep the Eyecon unit clean and free of dust. Do not use harsh detergents or
spray water on the Eyecon unit.
It is recommended the Eyecon unit be cleaned on a daily basis. Powder and pill dust
tends to accumulate on surfaces such as the rapid fill tray and funnel gate. Follow the
steps below for effective cleaning.
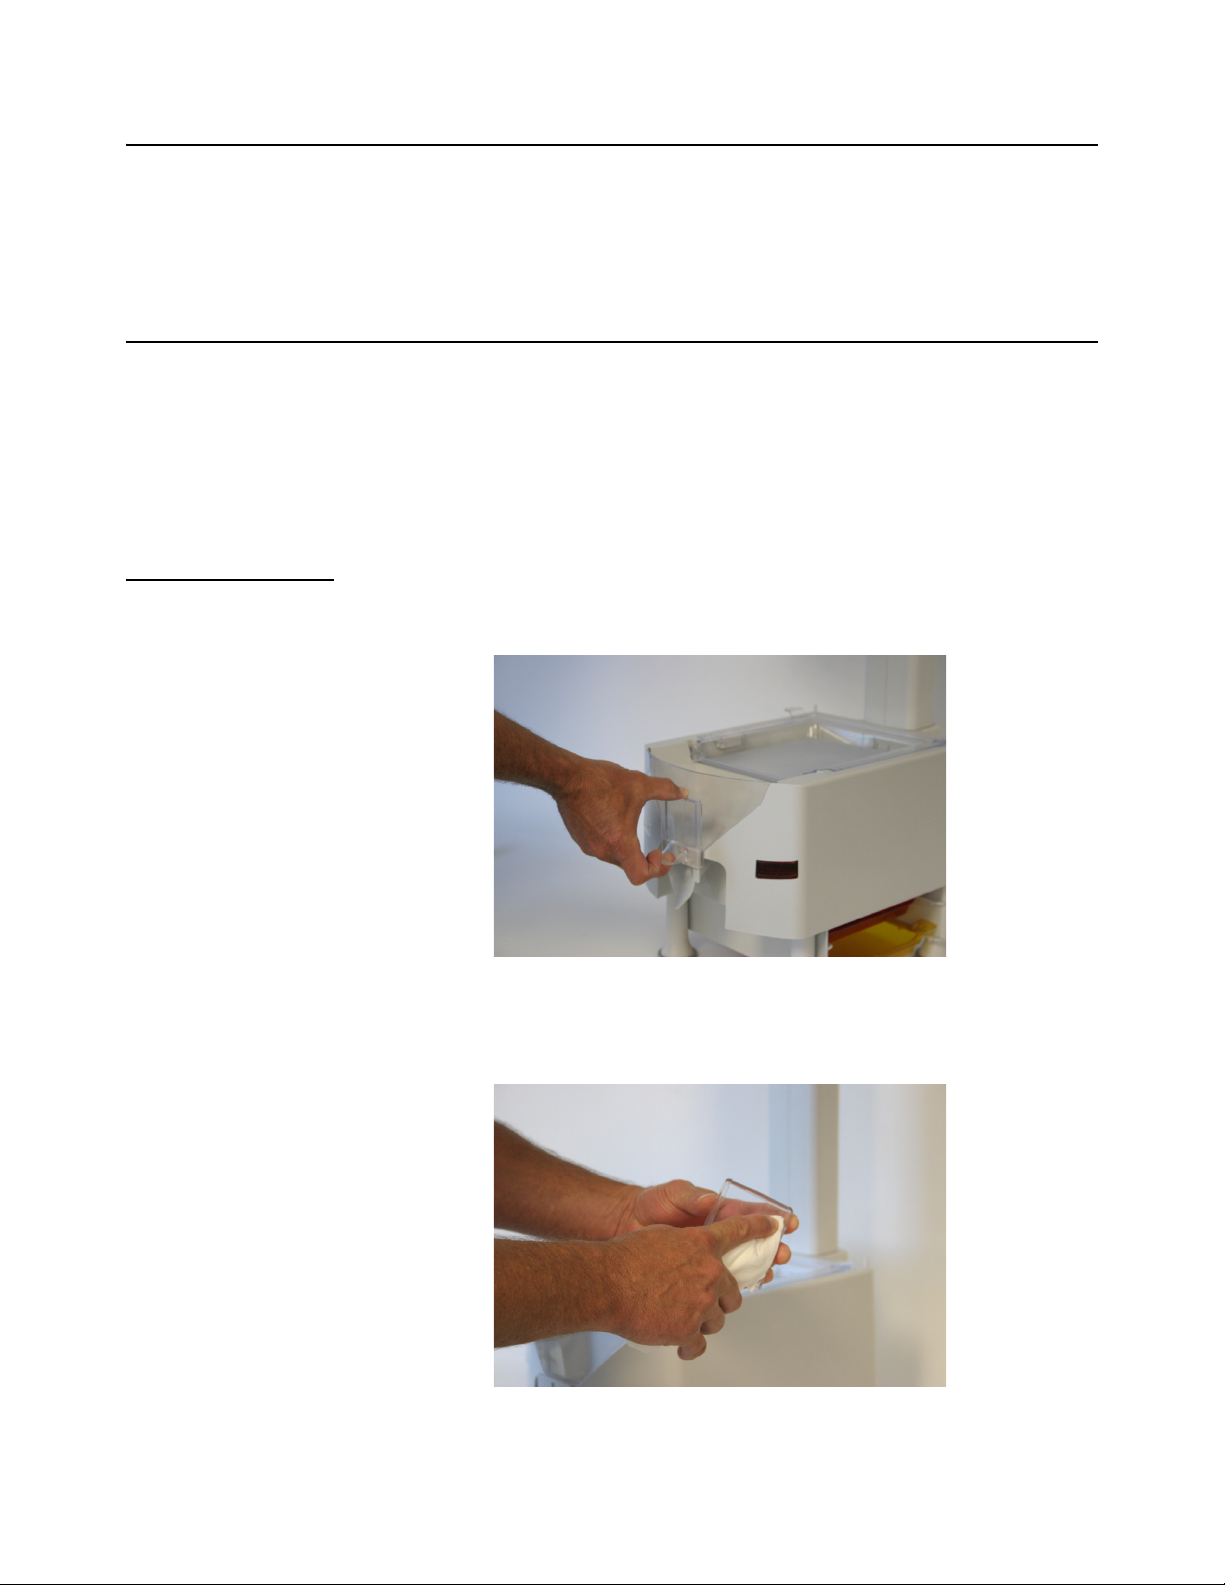
1.7.1 Funnel and Slide Gate
1. Slide the gate up while pulling out away from the housing as shown in the photo
below.
2. Clean the clear funnel gate by running it under a faucet. Make sure it is
completely dry before reattaching to housing.
16 Eyecon Instruction Manual
Page 17
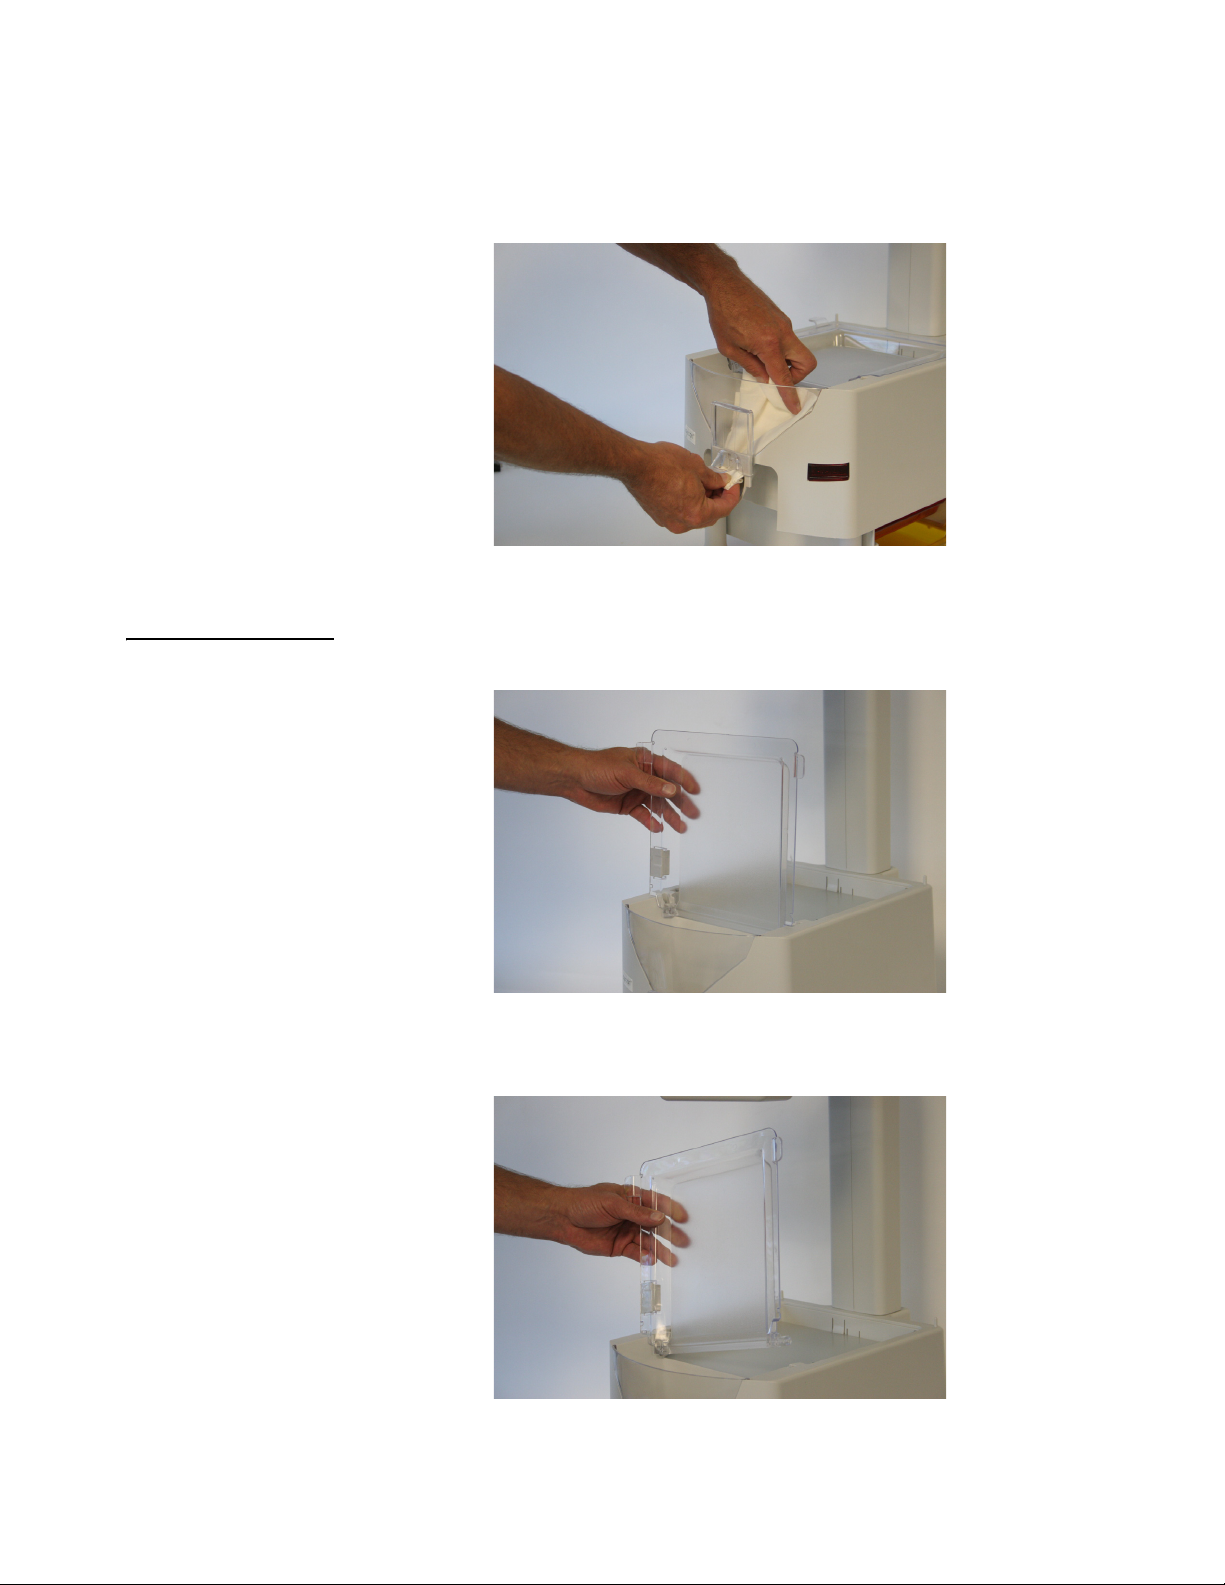
3. Clean the pill funnel by running a slightly damp rag through it a few times.
4. Clean the funnel gate bracket rails to remove all pill dust.
5. Reinstall the funnel gate by sliding down the funnel post until it snaps into
place.
1.7.2 Rapid Fill Counting Tray
1.7 Cleaning the Machine
1. Lift the counting tray up to a vertical position.
2. Tilt the tray to the left, the right side should pull out of the enclosure.
Eyecon Instruction Manual 17
Page 18

General Information and Warnings
3. Pull up on the tray to remove completely.
4. Clean the tray by running under a faucet. Make sure it is completely dry before
5. Before reinstalling the tray, clean the diffuser surface under the tray with a soft
reattaching to housing.
damp cloth.
6. Reinstall rapid fill tray onto Eyecon unit by holding the tray vertical and push it
into the slots in the housing.
1.8 Sharp Objects
Do not use sharp objects such as screwdrivers or long fingernails to operate the
buttons.
1.9 Training
Do not attempt to operate or complete any procedure on the Eyecon unless you have
received the appropriate training or read the Instruction Manual.
To avoid the risk of RSI (Repetitive Strain Injury), place the machine on a surface which
is ergonomically satisfactory to the user. Take frequent breaks during prolonged usage.
18 Eyecon Instruction Manual
Page 19
1.10 Scanner / Laser
CAUTION -
CLASS 2 LASER RADIATION
WHEN OPEN. DO NOT STARE
INTO THE BEAM
The Eyecon comes standard with a Class 1 laser product. When the unit is open Class
2 laser radiation is present. Refer to the CAUTION statement below and Figure 1.9 for
an illustration of the label and location.
CAUTION: Use of controls or adjustments or performance of procedures other
than those specified herein may result in hazardous radiation exposure.
CAUTION: Class 2 laser radiation when open. Do not stare into the beam.
1.10 Scanner / Laser
Figure 1.9 Class 2 Laser Radiation Warning Label Location
1.10.1 Scanner Specifications
External
Laser Radiation 15.47 µW Class 1
Wavelength 650 nm
Internal Laser Rating
Wavelength 650 nm Class 2
Max Output Power 460 µW
Eyecon Instruction Manual 19
Page 20
General Information and Warnings
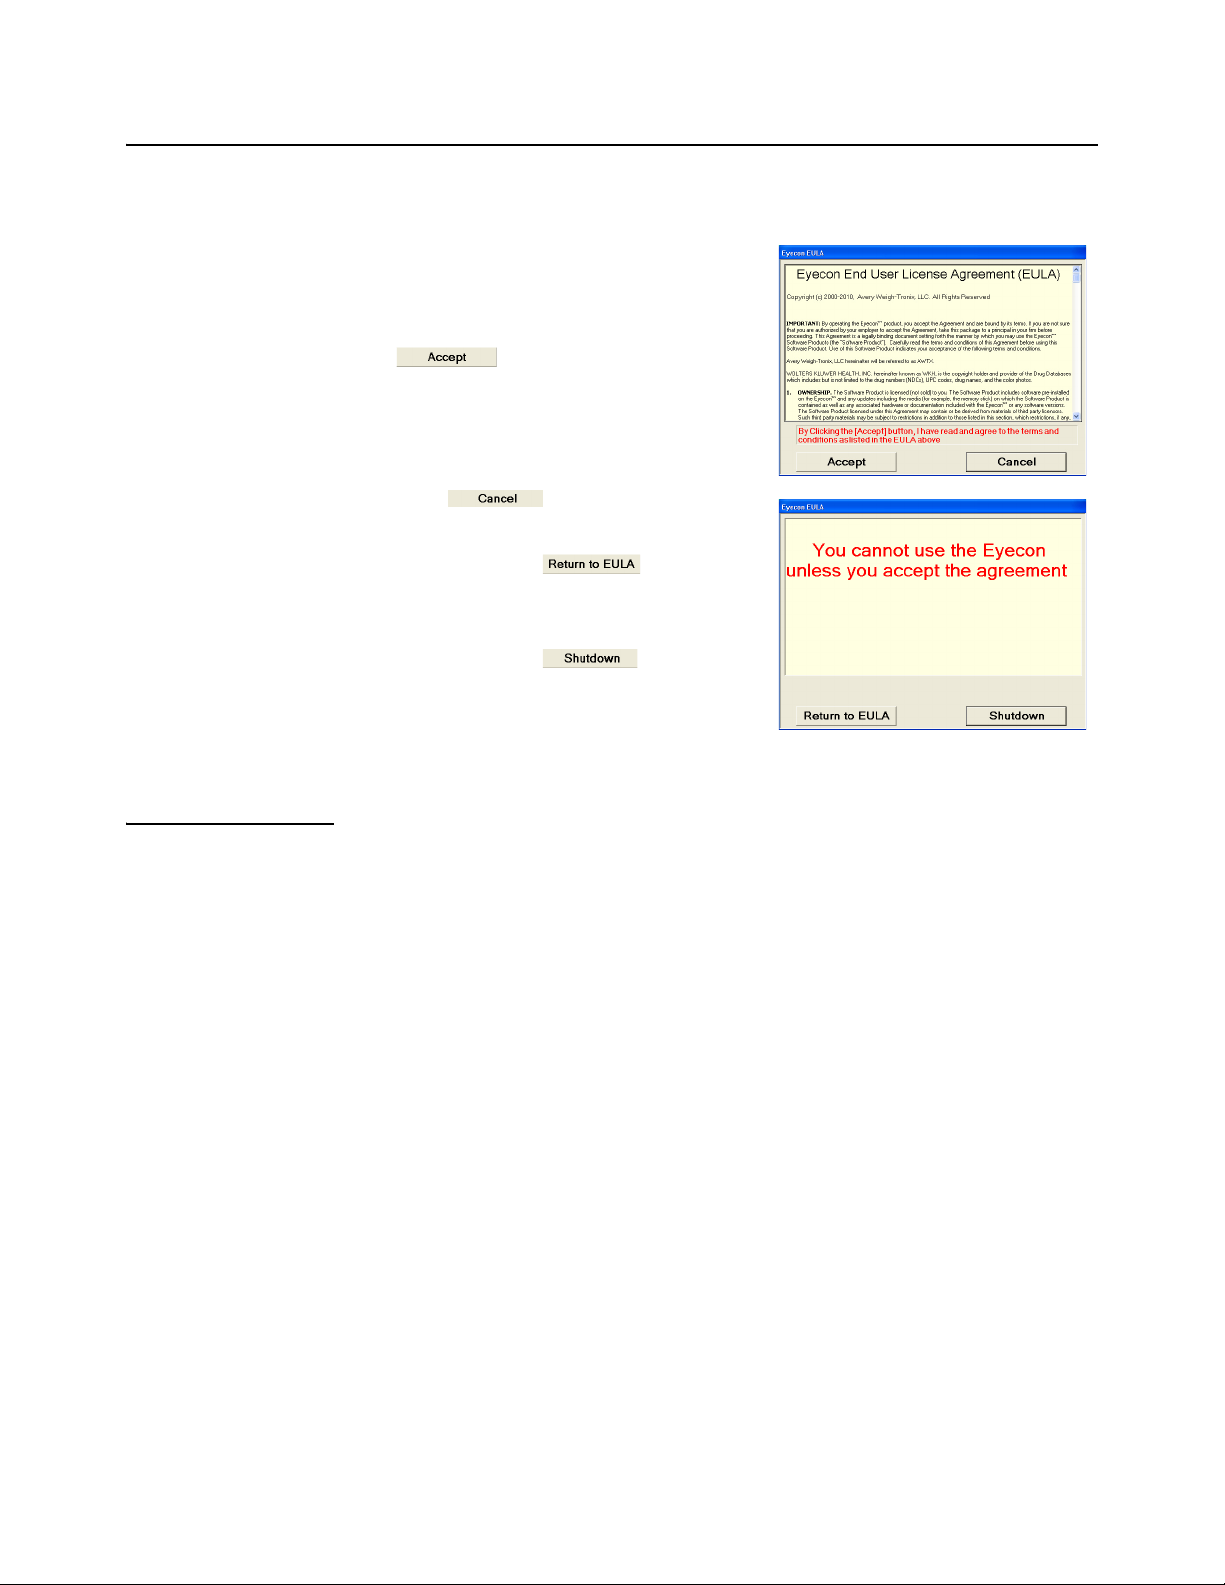
1.11 Licensing Agreement
When the Eyecon is powered up for the first time a Software Product Licensing
Agreement will be displayed after a pharmacy package is chosen.
Before the Eyecon can be used, you must
agree to the terms of the license.
1. Read the agreement thoroughly and
agree to the terms by pressing the
button.
1a. If the button was pressed, a
warning screen will be displayed.
Press the button to
return to the Licensing
Agreement.
Press the button to
turn off the Eyecon.
1.11.1 Medi-Span Copyright and Disclaimer Information
Copyright: Copyright© 2005 by Wolters Kluwer Health, Inc.
All rights reserved. The Master Drug Data Base (MDDB v2.5) Documentation Manual
and the database supplied with it may not be reproduced in any form or by any means,
in whole or in part, without written consent from the publisher. Any unauthorized use of
this copyrighted material will be subject to legal action.
Medi-Span is a division of Wolters Kluwer Health, Inc.
Master Drug Data Base (MDDB®) is a registered trademark of Wolters Kluwer Health,
Inc.
Copyright: Copyright © 2003 Wolters Kluwer Health, Inc.
All rights reserved. The Drug Image Database Documentation Manual and the
database supplied with it may not be reproduced in any form or by any means, in whole
or in part, without written consent from the publisher. Any unauthorized use of this
copyrighted material will be subject to legal action.
Disclaimer: The information contained in the Medi-Span databases is intended to
supplement the knowledge of physicians, pharmacists, and other healthcare
professionals regarding drug therapy problems and patient counseling information.
This information is advisory only and is not intended to replace sound clinical judgment
in the delivery of healthcare services. You are advised to review the definitions,
functionality, and limitations of each Medi-Span database.
Medi-Span disclaims all warranties, whether expressed or implied, including any
warranty as to the quality, accuracy, and suitability of this information for any purpose.
20 Eyecon Instruction Manual
Page 21
1.12 Software Updates
The software must be updated quarterly to uphold the Licensing Agreement. Download
the software update from www.eyeconvpc.com. These updates are comprised of drug
photo updates and application enhancements.
It is suggested to download the file(s) to a computer desktop and then transfer the
file(s) to a USB memory stick.
1.12.1 Update Warnings
Warnings will be provided when the expiration date on the data has passed. Warning
interval will be dependent on the length of time since the expiration date has passed.
1st week post expiration: One warning per day.
2nd week post expiration: One warning per 4 hours.
3rd week post expiration: One warning per hour.
Beyond 3rd week post expiration: One warning per entering count mode.
1.12 Software Updates
Table 1.1 Update Warning Frequency
1.12.2 Install Software Updates
1. Download the latest software updates from the Eyecon website
(eyeconvpc.com).
2. Copy the downloaded file to the root folder of a USB memory stick. Be sure the
memory stick does not contain an older version of an update file before
copying the current update file.
3. Plug the USB memory stick into an unoccupied USB port of the Eyecon. See
Figure 1.10 for USB port location.
Figure 1.10 USB memory stick Installation
4. Follow the prompts displayed on the Eyecon.
Eyecon Instruction Manual 21
Page 22
General Information and Warnings
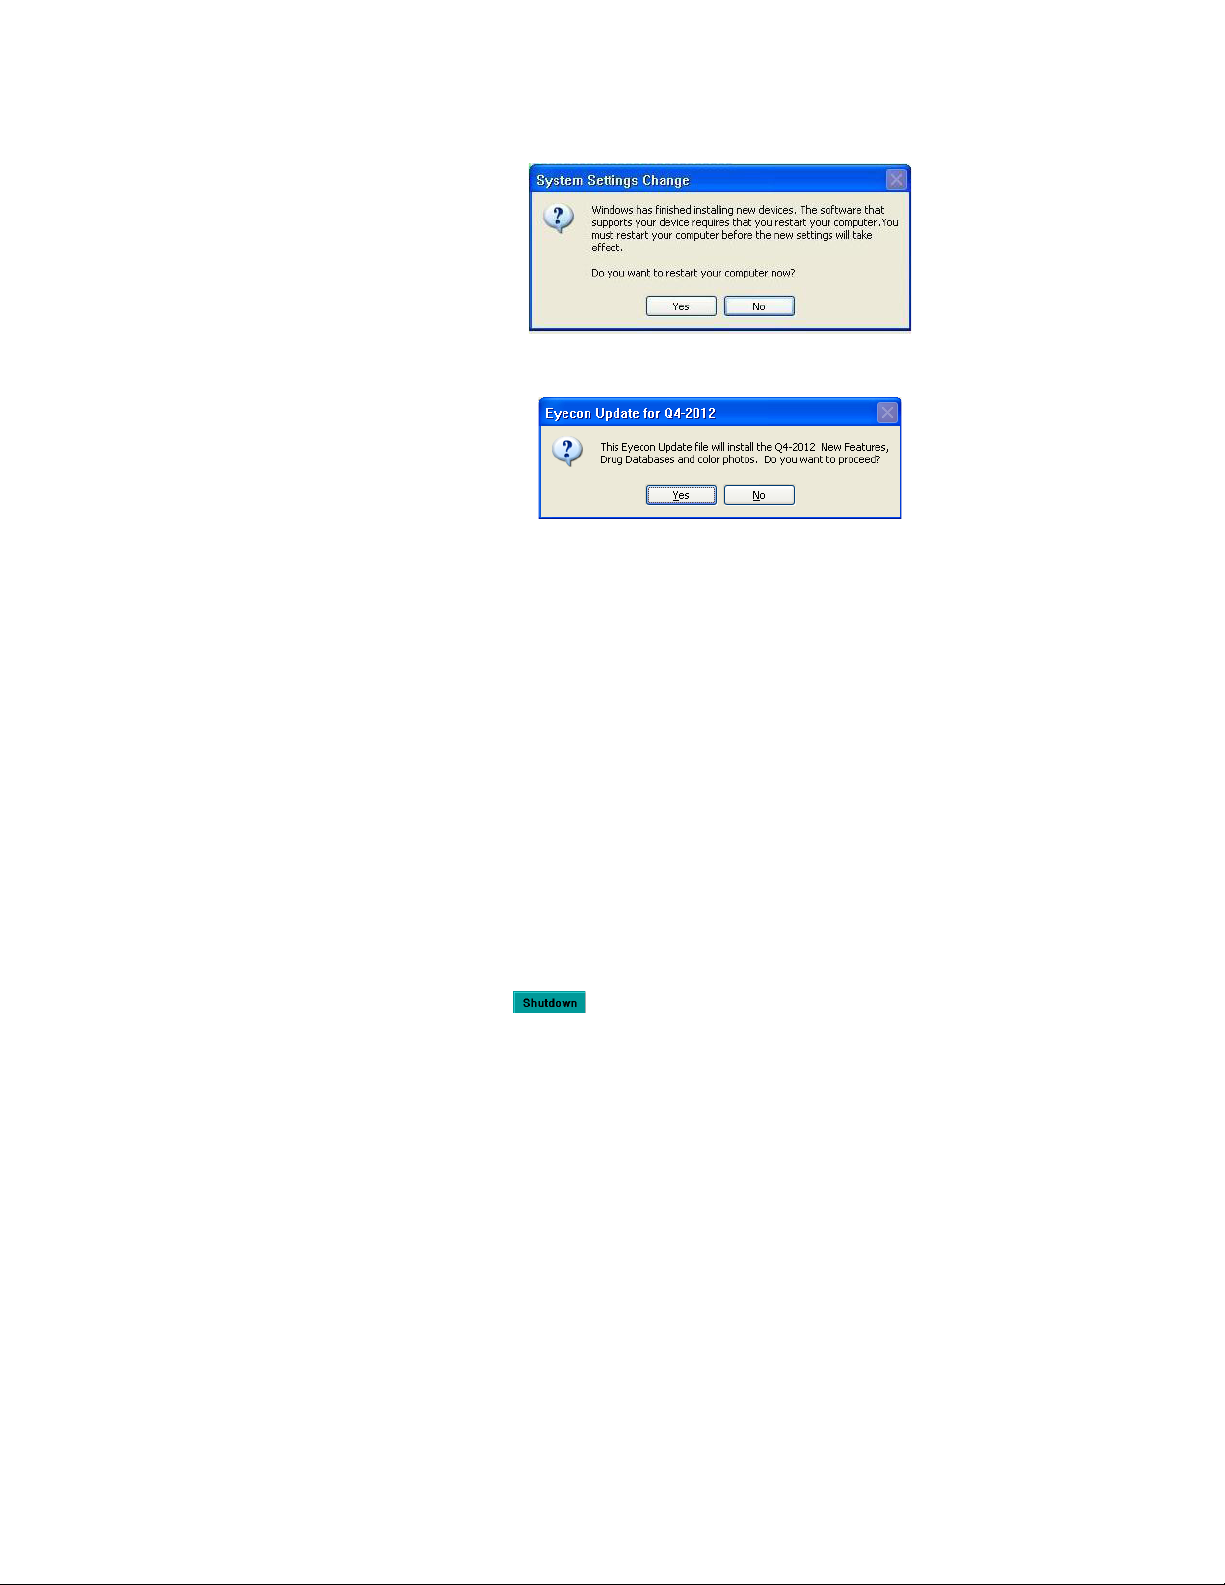
4a. If the following message is displayed, click No. This message is an indication
4b. Answer Yes if the following prompt appears.
4c. If no message appears when the USB memory stick is plugged in, then follow
that the particular USB memory stick type inserted is new to this Eyecon.
the instructions below.
Stand-Alone Mode
l Go to Settings>Files
l The update prompts should be displayed within a few seconds.
5. First you will see a message advising the outdated files are being removed.
6. Next a progress bar will advance quickly from 0 to 100% while the integrity of
the update file is verified.
7. Another progress bar will advance more slowly while the updates are installed.
8. Once the installation is complete, click the [Close] button.
9. The Eyecon should shut down and restart within a minute or so.
9a. If the Eyecon does not automatically restart, manually shut the Eyecon down
by using the button on the screen. DO NOT USE THE SWITCHES IN
THE BACK TO SHUTDOWN THE EYECON!!!
22 Eyecon Instruction Manual
Page 23

1.13 Turn off the Eyecon (Shutdown)
Do not unplug or shutdown the Eyecon with the power switch on the backside
of the unit. This could cause corruption of files which would require the Eyecon
to be returned for factory service.
The button in the Start-up screen is used
for restarting or turning off the Eyecon.
Again it is very important to use the
button to turn off the Eyecon. DO NOT USE THE
POWER SWITCHES IN THE BACK TO TURN OF
THE EYECON UNIT.
1.13.1 Restart
1.13 Turn off the Eyecon (Shutdown)
1. Press the button in order to initialize a reboot sequence and return to
the Start-up screen.
2. Press to accept.
1.13.2 Shutdown
1. Press the button to turn off the Eyecon. Press to accept.
2. Press to terminate the process.
1.14 About Eyecon Screen
The About Eyecon screen provides
information specific to the Eyecon. Including
software release date, serial number and MediSpan data.
1. While in Eyecon Native mode Start-up
screen, press in the area right or left of
the Eyecon by GSE logo.
2. Press to return to the Start-up
screen or press to view the
Software Licensing Agreement.
Eyecon Instruction Manual 23
Page 24

General Information and Warnings
1.15 Warranty Policy
GSE/Avery Weigh-Tronix warrants its products to be free from defects in material and
workmanship for a period of two (2) years from the original date of purchase. Standard
"Terms and Conditions of Sale" apply.
Factory parts and labor are provided at no charge for up to two full years from the
original date of purchase.
The obligation of GSE is limited to repairing or replacing equipment and components
that upon inspection, testing and verification by GSE are found defective. GSE extends
this warranty only upon proper installation and use of the equipment in the application
for which it was intended and does not warranty equipment that has been subject to
any of the following conditions:
l Alterations, misuse or unusual physical or electrical stress beyond the
written specifications of that equipment.
l Exposure of electronic components to Electrostatic Discharge (ESD)
resulting from improper handling or installation.
l Damage caused by freight carriers, negligence, fire, flood or other natural
disaster.
In the event, equipment is repaired or replaced under the terms of the warranty, the
warranty of the repaired or replaced equipment is limited to the remaining portion of the
original warranty period or 90 days, whichever is greater.
GSE is responsible for repair, replacement or, at the sole discretion of GSE, credit of
nonconforming equipment under the conditions and terms of this warranty. GSE is not
liable for the cost of repairs, on-site labor or any travel-related expenses performed by
another party unless otherwise agreed in writing.
Transportation charges for material shipped to GSE for warranty repair is paid by the
shipper. GSE will pay the transportation charges, via standard carrier, for the return of
items repaired or replaced under warranty. Failure to handle and ship equipment
correctly will void the warranty on that equipment.
The sole remedy under this warranty is to repair, replace or provide credit for equipment
at the sole discretion of GSE. GSE is not liable for expenses either direct or
consequential that arise from the use of or inability to use the product. GSE is not
responsible or liable for losses, injury, or property damage due to the installation or
failure of the product.
For warranty, product service, and product registration visit www.eyeconvpc.com or call
866-260-6540.
24 Eyecon Instruction Manual
Page 25

1.16 Specifications
Platter Surface Area 48 sq inch
Dimensions 28" H x 11" W x 17.5" D
Screen 6.5" Color LCD flat panel touch screen
Barcode Scanner
1.16 Specifications
Integrated Class1laser
listed symbologies
Supply Voltage 100 VAC - 240 VAC
Frequency Range 47 Hz - 63 Hz
Power 150 Watt
Temperature Range 50 - 90 ºf
Communication (2) USB, (1) Ethernet
Interface Contact GSE for details on workflow integration
Accuracy 99.97% count accuracy
Design Open flow, easy to clean
Approvals FCC, ETL
Warranty Two year limited
1.17 FCC Statement
This equipment has been tested and found to comply with the limits for a Class A digital
device, pursuant to Part 15 of the FCC Rules. These limits are designed to provide
reasonable protection against harmful interference when the equipment is operated in
a commercial environment.
UPC/EAN, Code 39, 1 2 of 5
1.18 ETL
This equipment generates, uses, and can radiate radio frequency energy and, if not
installed and used in accordance with the instruction manual, may cause harmful
interference to radio communications.
Operation of this equipment in a residential area may cause harmful interference in
which case the user will be required to correct the interference at his/her own expense.
Classified to IEC 60825-1: 2007
Eyecon Instruction Manual 25
Page 26

General Information and Warnings
1.19 Back up the Eyecon Data
CAUTION!
The Eyecon is a computer based device and it is strongly suggested to back up
all transaction data and images periodically. Otherwise saved data can be
permanently lost!!!.
Refer to page 42 for more details on backing up report data and images.
1.20 Helpful Hints
1.20.1 Navigating the Touch Screen
Use the tip of one of the provided spatulas to navigate the settings menus and counting
procedure.
1.20.2 Automatic Update from the Website
If the Eyecon is connected to a network in which automatic update is approved, the
updated software can be loaded directly onto the Eyecon without using a USB drive.
1.21 Symphony Software
If you have a legacy unit and work with Symphony Software, contact Innovation
Company for technical support.
26 Eyecon Instruction Manual
Page 27
2 Settings Menu
Press the button from the Start-Up screen to enter the setting choices menu.
The currently selected setting tab will be designated in BLUE. The following menus are
available for diagnostics and configuration.
Tab Description Page
General Miscellaneous settings 27
Users Add and delete user profiles 30
Test Test the scanner, camera and other hardware such as the touch screen and speaker 34
Barcode Setup barcode format, select barcode type 35
Data Download or delete report data. 42
Files Save all Eyecon data, restore Eyecon data or check for update 48
TCP/IP Network settings, select PMSS provider 51
Remote Server Set server protocol and McKesson Enterprises configuration 53
Multi Used for VA sites only. Future Feature 55
Double Check Setup double counts or back counts. 55
2.1 General
Table 2.1 List of Setting Tabs
2.1 General
This tab is used for calibrating the pill counting platter, user login, stock bottle
verification, scanner port and set time & date. If another menu is desired simply press
the corresponding tab on the screen.
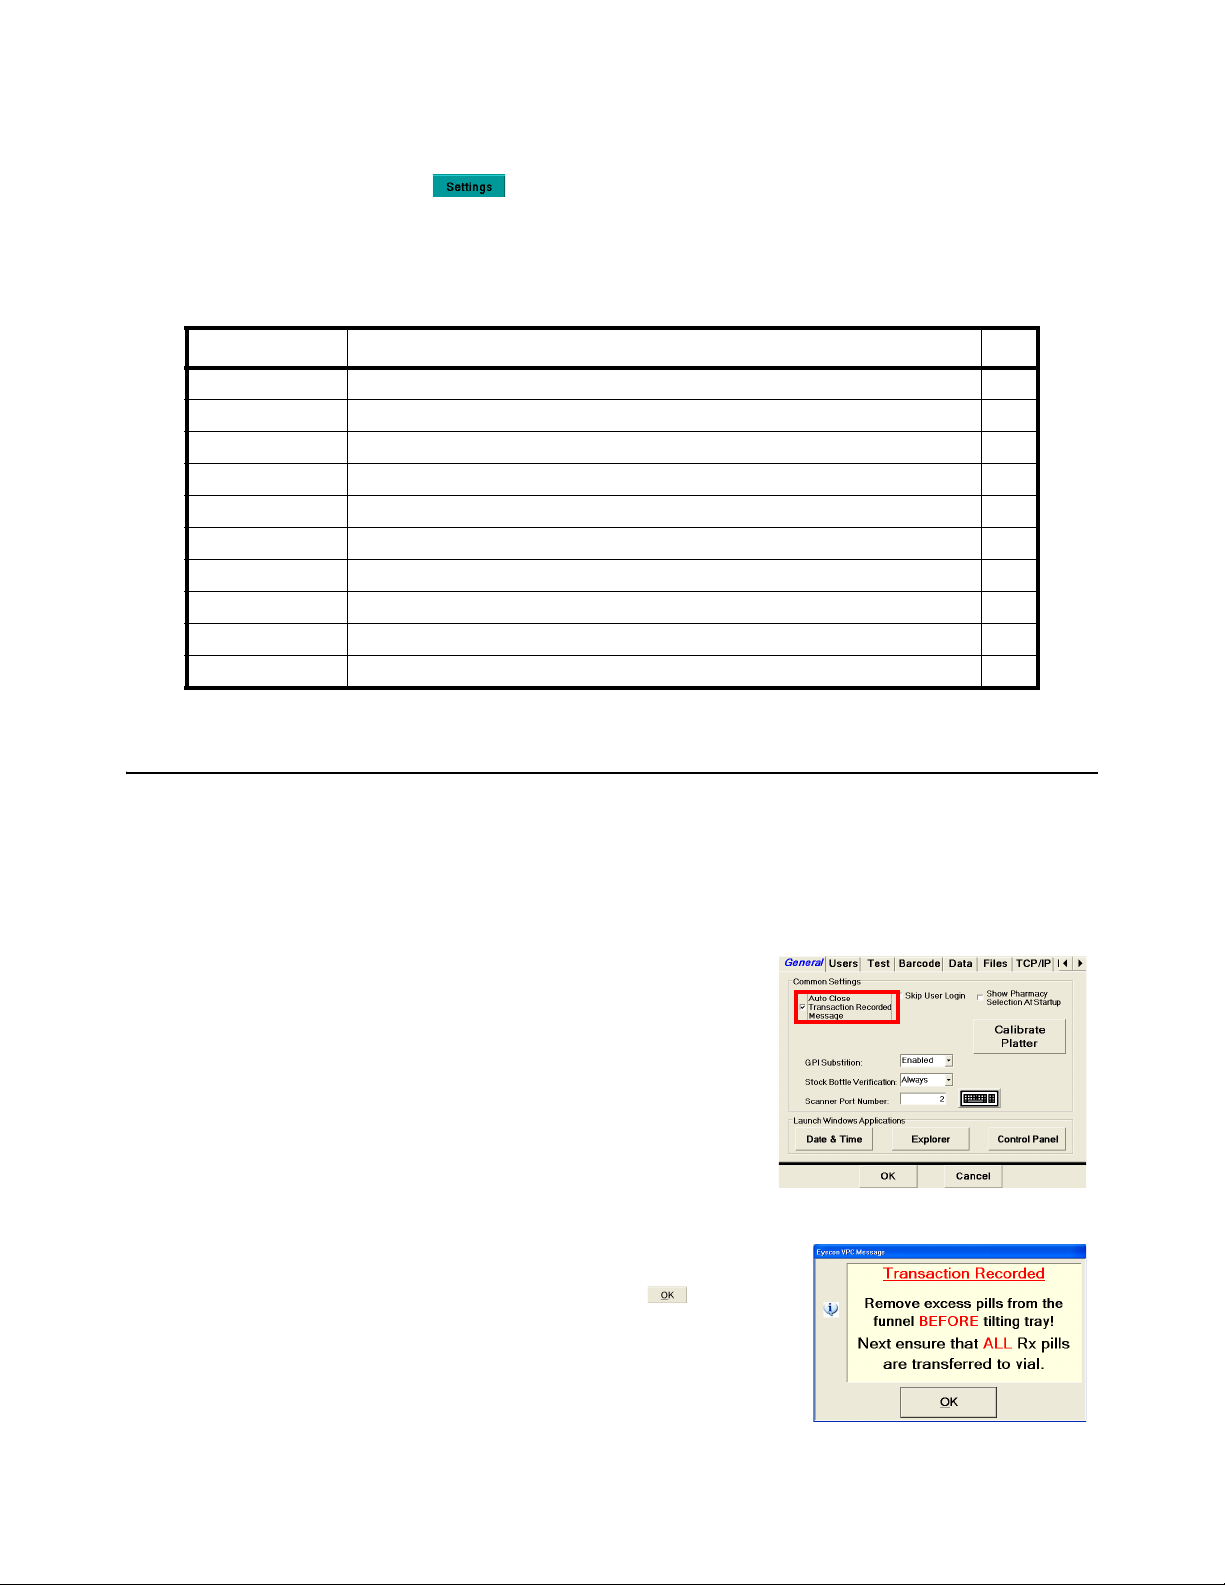
Auto Close Transaction Recorded Message
If this box is checked, the Auto Close
Transaction Recorded Message will be skipped
when a count is performed.
Uncheck the box to enable the Transaction
recorded message. This message will appear after
every counting transaction. Press after the
pills have been removed from the counting tray.
Eyecon Instruction Manual 27
Page 28
Settings Menu
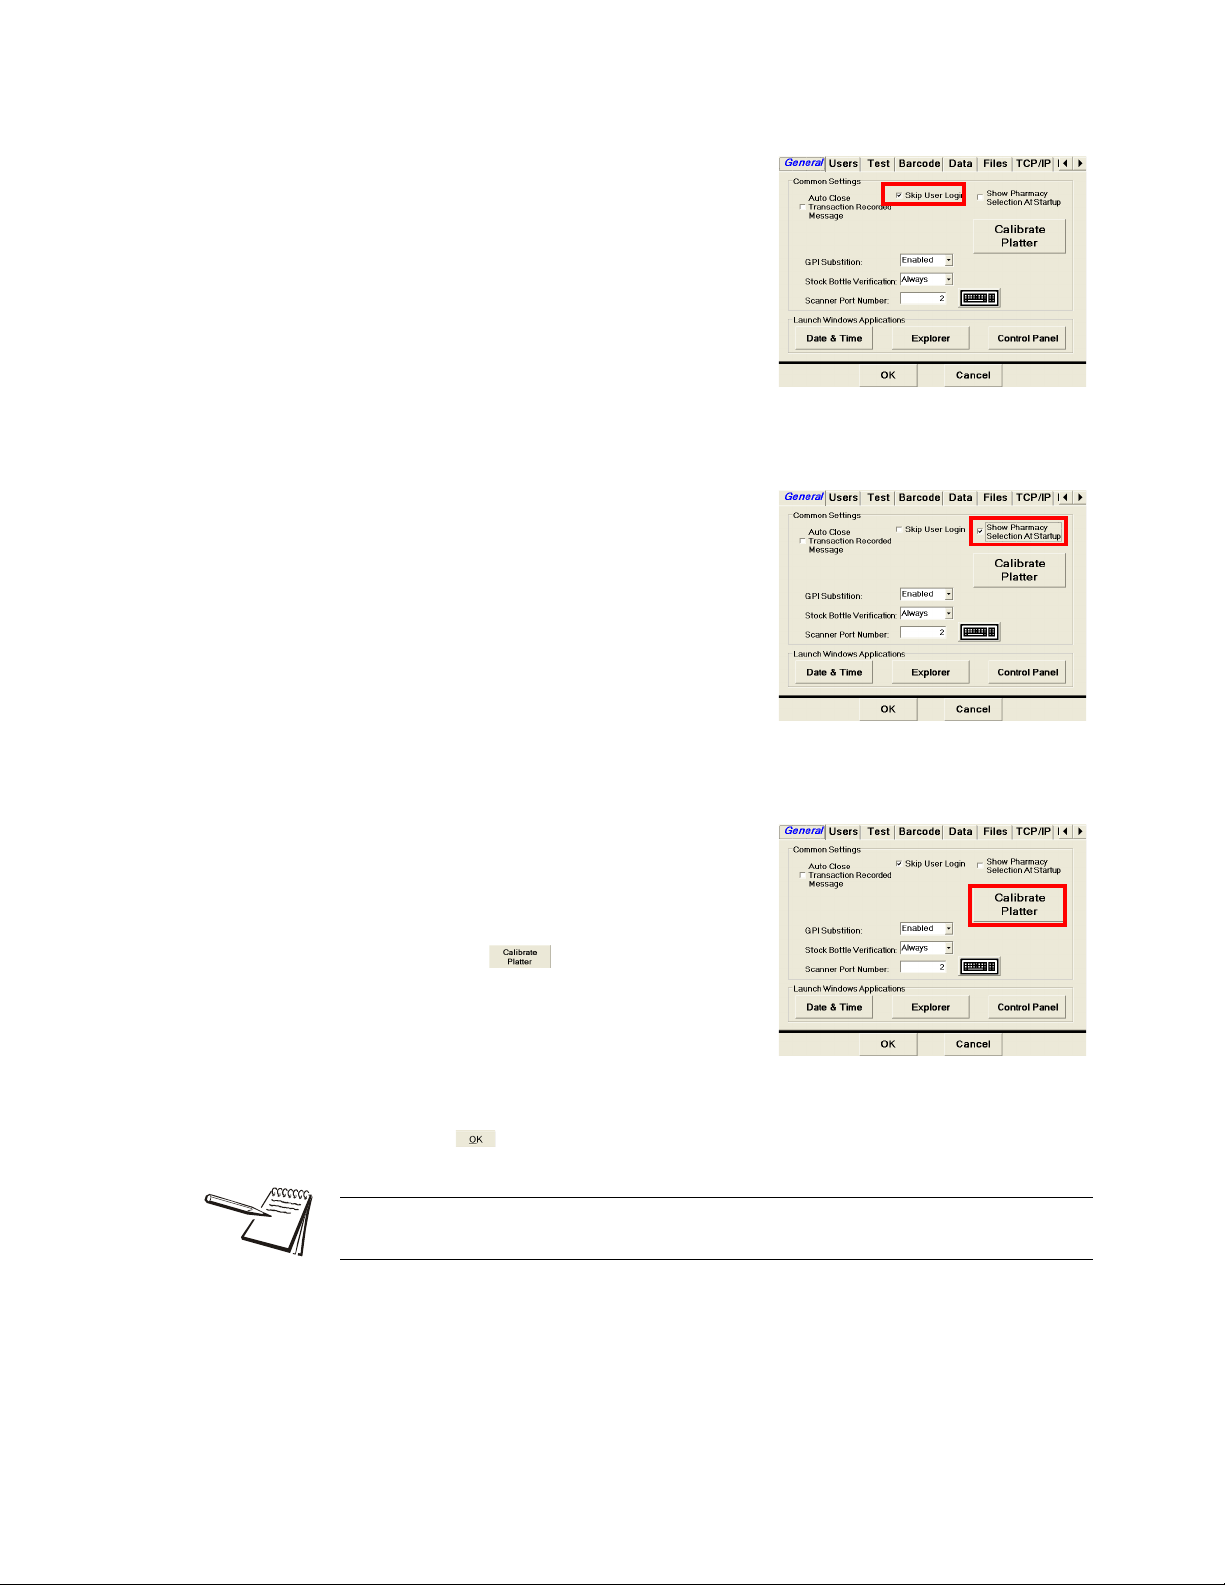
Skip User Login
Check the box to disable (skip) the Scan User
Login screen and go directly to the Scan Vial
Label screen. If disabled, no users will be able
to login.
Pharmacy Package Selection
Choose whether to display the Configure
Pharmacy Package screen on restart or boot
up.
If the box is checked the screen will be shown
on power up. Otherwise the screen will be
skipped and the currently selected package will
be accessed.
Calibrate Platter
This function is used to calibrate the counting
platter viewing area if the count is unstable.
1. Remove all foreign objects from the
counting platter.
2. Press the button and the platter
will be automatically calibrated by the
software.
3. Platter calibration successful will be
displayed when the calibration is
complete.
4. Press to complete calibration.
If Unable to calibrate message appears, clean surface of counting platter and light
diffuser. Try the Calibrate Platter process again.
28 Eyecon Instruction Manual
Page 29

GPI Substitution
Choose whether to allow a user to substitute an
NDC that does not match the prescribed NDC
if the GPI code of the scanned NDC matches
the GPI of the prescribed NDC.
If GPI Substitution is set to Disabled, the
substitution is not allowed.
If GPI Substitution is set to Enabled, the
substitution is allowed.
If GPI Substitution is set to NoWarning, the
substitution is allowed with a warning message
being displayed.
Stock Bottle Verification
Choose whether to verify a stock bottle scan
every time, never or per user.
l If Stock Bottle Verification is set to
Always, the Scan Stock Bottle
screen will appear every time the Rx
label is scanned.
l If Stock Bottle Verification is set to
Never, the Scan Stock Bottle
screen will never appear after the Rx
label is scanned and will go to the
Counting screen.
l If Stock Bottle Verification is set to User, scan the stock bottle to proceed
or press the button to proceed to the Counting screen.
2.1 General
Scanner Port
Selects the port for either the internal or
external scanner. The Eyecon must be
restarted before the port change will take
affect.
Use the keyboard icon button to the right of the
scanner port window to enter the port number.
2 = internal scanner
4 = external scanner
Eyecon Instruction Manual 29
Page 30
Settings Menu
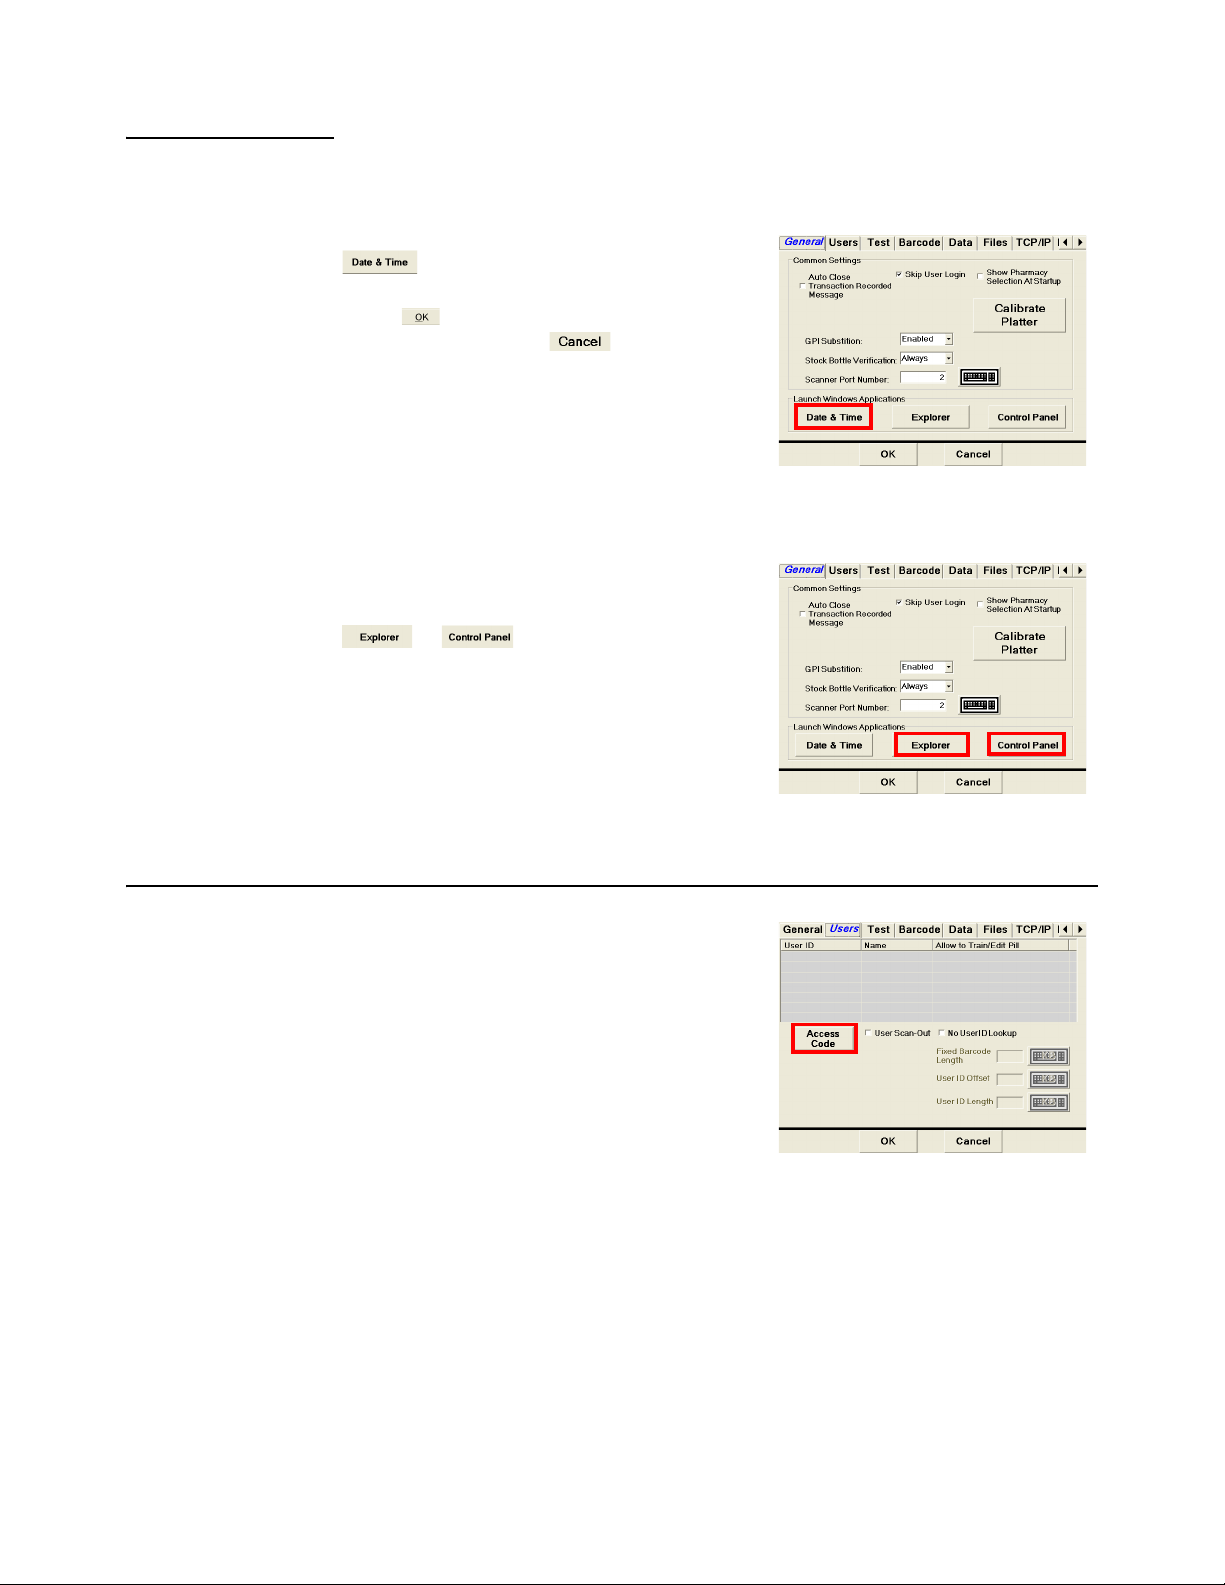
2.1.1 Launch Windows Applications
Date and Time
The time and date may be set by pressing the
button. Choose the correct time and
date from the calendar and clock displayed.
Press to accept the current settings or
changed values. Press to abort.
Windows Explorer and Control Panel
The choices available are Windows Explorer
and Control Panel. These will work the same as
standard Windows operating system. Press the
or button to launch either
application.
2.2 Users
The Administrative section used for adding and
deleting users, determine whether a scan-out
will be necessary or to allow the use of an
RDAC. Only available with the Rx Validation/
Workflow and Physical Inventory modes.
The administrator is able to add or delete users
and determine whether they are able to train pill
images. An access code is required to enter the
Administrative screens.
To enable User Logging, go to the General Tab and uncheck the Skip User Login box.
30 Eyecon Instruction Manual
Page 31

2.2.1 Add or Delete a User
Pressing the button will display the code entry screen. This button will be
disabled once the Manage Users mode is accessed.
Key in the administration access code and
press . Existing users will be displayed.
NOTE: The default access code is 'ADMIN'
Add User
1. Press the button.
2.2 Users
2. Press the keyboard icon to the right of the User ID
entry window. Key in the desired six digit number
for the user. Press the button to accept.
3. Press the keyboard icon to the right of the User
Name window. Enter the name of the user and
press the button.
4. Choose whether the user has permission to enter
a new drug or change an existing drug by pressing YES or NO under the "Train
Pill" and “Edit Drug Database” option.
5. Press to accept the user.
Eyecon Instruction Manual 31
Page 32

Settings Menu
Delete User
Choose the user to be deleted (highlighted in
blue) and press the button.
Press the button to exit
2.2.2 User Scan-Out
Used to require a user badge scan at the end of an Rx Count and/or an inventory
Count.
Check the User Scan-Out box.
If the User Scan-Out box is checked, the count
menu Finish button will be replaced with
.
32 Eyecon Instruction Manual
Page 33

2.2.3 No User ID Lookup
Allow the use of an RDAC.
1. Check the No User ID Lookup box.
2. Press the keyboard icon to the right of
the Fixed Barcode Length, User ID
Offset, and User ID Length windows to
enter the values which will define the
user barcode and the digits within that
barcode.
2.2 Users
McKesson Enterprise RDAC Barcode
Use the following values:
Fixed Barcode Length: 14
User ID Offset: 0
User ID Length: 6
Eyecon Instruction Manual 33
Page 34

Settings Menu
2.3 Test
This tab is used for testing various hardware of the Eyecon unit. The chosen test button
will be green with the check mark.
Test the scanner by scanning a stock bottle
NDC barcode. If the scanner is operating
properly, the NDC will be displayed in the blue
bar.
Verify the camera is operating properly with the
camera test. Pour pills in the pill platter or hold
hand over the platter to confirm an image is
being displayed.
Provides additional testing modes for the touch
screen display and internal speaker.
l Test the touch screen display to
verify proper operation. Press the
button to access the five
point touch screen test.
l Calibrate the touch screen display if
not operating properly. Press the
button to access the
calibration screen.
l Test audible speaker. Press the button to test for sound.
34 Eyecon Instruction Manual
Page 35

2.4 Barcode
2.4 Barcode
Calibrate Touch Screen
Calibrate the touch screen display. Touch the "+"
on the display.
Be sure to only touch where the "+" is during
touch screen calibration. Otherwise problems
could occur with the display.
The Rx Barcode is formatted to 'find' the NDC
number embedded in the pharmacy barcode.
This is the format that the barcode reader uses
to extract data from the barcode.
Consult with your network administrator for
further information on Rx label and NDC label
formats.
2.4.1 Barcode Type
Select a method of prescription filling
(Validation) or PMSS.
Validation
This selects the Rx Validation mode. The
barcode is able to be changed within the
Validation selection.
Enter the pattern for Rx number, NDC number
and quantity of the barcode label being
scanned. Press the keyboard icon to the right of
the entry window to enter a valid barcode
pattern. Refer to the Rx barcode examples
below for more details on different types of
barcodes.
Eyecon Instruction Manual 35
Page 36

Settings Menu
PMSS
This selects PMSS mode. The PMSS type
must also be selected under the TCP/IP tab.
Refer to page 51 for details. The barcode string
can’t be updated.
2.4.2 Rx Barcode Examples (Validation Only)
Press the keyboard icon to the right of the entry window to configure a barcode.
The barcode format always starts with the position of the Rx number no matter where
on the label it is located (designated with green in the following examples).
The string that will be typed into the Rx Barcode Pattern window must start with a #
for each digit or the number of the string length in the barcode label followed by a
comma and then the barcode data.
In the examples below, count the digits in the example barcode and that will determine
how many #’s are used or which number to use for the string length (either method is
correct). Compare your result with the String Length in the provided table. Next,
determine the location of the Rx number and its length. Then follow that with the NDC
number and Quantity if applicable.
The length of the quantity segment can be an asterisk (*) and any non-numeric digits
will be ignored. A variable length segment will also be accepted.
36 Eyecon Instruction Manual
Page 37

2.4 Barcode
Example 1
In this example the barcode starts with the string length (19), Rx number, NDC number,
and then the quantity
Rx Barcode Pattern
Window
Position 0 123456789101112131415161718
Data 7777750580044963050
.
Rx number NDC number Quantity
Label 77777 50580044963 050
String
Length (#)
19 0 5511163
Rx number NDC number Quantity
Start
Position
Length
of Rx
19,0,5,5,11,16,3
Start
Position
Length
of NDC
Start
Position
Length of
Quantity
Example 2
In this example the barcode starts with the string length (19 #’s), NDC number, Rx
number, and then the quantity.
NDC number Rx number Quantity
Label 50580044963 88888 200
String
Length (#)
Rx Barcode Pattern
Window
Position 01234567891011 12 13 14 15 16 17 18
Data 505800449638 8888200
19 0 11 11 516 3
Start
Position
NDC number Rx number Quantity
Length
of Rx
####################,11,5,0,11,16,3
Start
Position
Length
of NDC
Position
Start
Length of
Quantity
Eyecon Instruction Manual 37
Page 38

Settings Menu
Example 3
In this example the barcode starts with the string length (22), Rx number, NDC number,
and the quantity is last. The Rx number is seven digits and the quantity is four digits.
Rx number NDC number Quantity
Label 9999999 50580044963 0120
String
Length (#)
Rx Barcode Pattern
Window
Position 0 123456789101112131415161718192021
Data 9999999505800449630120
Rx number NDC number Quantity
22 0 771118 4
Start
Position
Length
of Rx
22,0,7,7,11,18,4
Start
Position
Length
of NDC
Start
Position
Length of
Quantity
Example 4
In this example the barcode starts with the string length (24 #’s), a hard coded RX
followed by the NDC number. The NDC number and Rx numbers are separated by an
‘A’ and the quantity is three digits.
NDC number Rx number Quantity
Label RX 50580044963 A 6666666 090
String
Length (#)
Rx Barcode Pattern
Window
Position 01234567891011121314 15 16 17 18 19 20 21 22 23
Data RX50580044963A6666666090
24 N/A N/A 2 11 N/A 14 721 3
Start
Position
Length
of RX
NDC number Rx number Quantity
Start
Position
########################,14,7,2,11,21,3
Length
of Rx #
Start
Position
Length
of NDC
Start
Position
Length of
Quantity
38 Eyecon Instruction Manual
Page 39

2.4.3 RX Scan During Count Mode
Allows an Rx label to be scanned while in the count mode.
Enabled
The Rx scan in the count mode is enabled
when the Enabled box is checked.
Trigger if Rx Barcode Contains Alpha
A barcode containing an alpha character such
as a letter can be process by checking this box.
2.4 Barcode
Auto-Finish when RX Barcode Scanned
The Enabled and Auto-Finish when Rx barcode
scanned both need to be checked.
Eyecon Instruction Manual 39
Page 40

Settings Menu
Rx # Offset
Define the Rx number offset. Press the
keyboard to the right of the entry window to
make necessary changes.
Barcode Length
Define the barcode length. Press the keyboard
to the right of the entry window to make
necessary changes.
Rx # Length
Define the Rx number length. Press the
keyboard to the right of the entry window to
make necessary changes.
2.4.4 Barcode Setup Help
If you need assistance with a barcode, call
Eyecon Technical Support and (866) 260-6540
and select option 2.
40 Eyecon Instruction Manual
Page 41

2.4.5 Test Mode
2.4 Barcode
Compare both the Rx and NDC labels to see if they match.
1. Press the button to enter the Rx /
NDC Barcode Test Mode screen.
2. Scan the Rx vial label. The output string
will be displayed in the Scan Vial Label
window.
2a. If the wrong label was scanned or the
label format was not recognized, a
message will be displayed under the
Scan Stock Bottle Label window.
Press to clear only the
scanned NDC label or press
to clear both the scanned
Rx label and NDC label.
3. Press to return to the Barcode Format screen.
Eyecon Instruction Manual 41
Page 42

Settings Menu
OK
2.5 Data
The Data tab has choices for report data and physical inventory data.
The Eyecon will store transaction history reports which can be downloaded to a
computer via a USB memory stick. This feature is enabled by default.
The report consists of transaction number, time/date, user login, user name, Rx
number, NDC, drug name, target quantity, actual number dispensed. Drug images are
also stored as separate files. The data can be viewed in text or spreadsheet format.
See Appendix C for examples of stored data and the formats. BE SURE TO BACK UP
THIS DATA PERIODICALLY AS THE EYECON IS A COMPUTERIZED DEVICE AND
DATA COULD BE LOST OR ACCIDENTLY DELETED.
Tray Photo Count Button
This button is used for troubleshooting
purposes. This will display the number of
current images stored on the Eyecon.
Enable Report Mode
The report mode is enabled when the box is
checked.
Press to save the enabled setting. The
Settings screen be exited and the Start-up
screen will be displayed.
Purge Data
Enter the number of days in which the report
data is purged from the database. Use the
keyboard icon button to the right of the entry
window to enter a value. Maximum of 180 days.
42 Eyecon Instruction Manual
Page 43

2.5.1 Report Data
Download Report Data
Insert a USB memory stick in one of the available USB ports on the rear of the Eyecon.
Refer to page 21 for an illustration the of USB port location.
1. Press the button to start
2. A message screen will be displayed. Insert
2.5 Data
download.
a USB memory stick and press to
download the report or press to cancel
and return to the Data setting screen.
Delete Report Data
Delete inventory data stored on the
Eyecon.This option will delete all report data
including pill images.
1. Press the button.
2. A message screen will be displayed. Press
to delete report data or press to
cancel and return to the Data setting
screen.
Eyecon Instruction Manual 43
Page 44

Settings Menu
3. If the button was pressed in the
previous step, the following screen will be
displayed. Press to permanently
delete report data or press to cancel
and return to the Data setting screen.
4. If the button was pressed in the
previous step, the following screen will be
displayed. Press to permanently
delete report data and images or press
to cancel and return to the Data setting
screen.
Locate Tray Photo
Find a specific pill image photo of a previously
counted prescription. Refer to Appendix C on
page 145 for a sample of tray photos.
Specify Rx Criteria
Enter a specific Rx or NDC number, then press
the button.
To narrow the search while using the NDC
number, check the box next to the left of the
date field. Choose a specific date using the
arrow to the right of the date field. A calendar
will be displayed.
To view the photos, they must be saved to a
memory stick and then put onto a computer. Be
sure to insert the memory stick into an available
USB slot in the rear of the Eyecon.
Press the button to save the data.
Press to abort.
44 Eyecon Instruction Manual
Page 45

2.5 Data
Audit Report Data
View reports on the Eyecon. Press the
button to access the Eyecon Auditor screen.
NOTE: The first time the Auditor is used, a unique store name needs to be entered.
Enter the store name and press the button.
Select the desired type of report with the drop
down menu and choose the number of days to
report.Refer to Chapter 10 for details on
filtering reports and viewing.
Disable Report Mode
When the report mode is disabled, the report options such as purge data and download
features will be grayed out and not accessible. Only the Locate Tray Photo button will
be accessible.
The report feature is disabled when the
Enabled box is not checked.
Eyecon Instruction Manual 45
Page 46

Settings Menu
2.5.2 Physical Inventory Data
This menu allows you to download or delete saved inventory count data.
Download Inventory Data
Save downloaded inventory counts data to the Eyecon or send to a USB memory stick.
1. Press the button.
2. A message screen will be displayed.
2a. If the data will only be stored on the Eyecon,
press the ‘button.
2b. If the data will be stored on a USB memory
stick, insert a USB memory stick in one of the
available USB ports on the rear of the
Eyecon. Refer to page 21 for an illustration
the of USB port location. Press the button to start download.
A message will be displayed for a few seconds acknowledging the data
was transferred successfully.
Ensure that the memory stick does not have any files in the root folder that end with a
.eyecon or.eyecon2 suffix. Otherwise you will be prompted to install a software
update.
Refer to Appendix A for assistance in using the downloaded data on your computer.
46 Eyecon Instruction Manual
Page 47

Delete Inventory Data
Delete inventory data stored on the Eyecon.
1. Press the button.
2. To delete the data press the
button.
Otherwise press the button
to abort and return to the Data
tab.
2.5 Data
3. Another message screen will be displayed to verify you want to delete the
inventory data. Press the button to delete the data.
3a. Otherwise press the button to abort and return to the Data tab.
NOTE: It is recommended that you verify the data has been successfully transferred
to your computer before deleting the data from the Eyecon!
Auto Delete Data
Check the check box to have the inventory data
deleted from the Eyecon after a download.
Eyecon Instruction Manual 47
Page 48

Settings Menu
2.6 Files
As with any computerized device it is recommended that stored data on a hard drive is
backed up periodically. The Files tab provides choices for backup of all Eyecon data to
a memory stick and to restore Eyecon data from a memory stick to the Eyecon. Backed
up data can then be transferred to a computer or copied to a CD-ROM for safe keeping.
It is recommended to backup Eyecon data on occasion.
Backup all Eyecon Data.
The data saved includes train images,
Insert a USB memory stick device into an
unoccupied USB port on the rear of the
Eyecon. Press the button.
For a detailed illustration on USB port location
refer to Figure 1.10 on page 21.
This feature is not yet released.
Application updates provide new features. To download the latest
application updates go to www.eyeconvpc.com and register your Eyecon.
The latest software can be loaded with a memory stick or downloaded directly to the
Eyecon. Refer to the following instructions on the different methods of checking for and
loading the latest version of Eyecon software.
Load Software from a USB Memory Stick.
Insert a USB memory stick device that contains
the latest software update file into an
unoccupied USB port on the rear of the
Eyecon.
For a detailed illustration on USB port location
refer to Figure 1.10 on page 21.
48 Eyecon Instruction Manual
Page 49

If software version 1.5.5 (or later) is installed, and the USB memory stick is not auto-
recognized, use the button to force the Eyecon to check for a file named
xxxxx.Update.Eyecon2.
2.6.1 Auto Updates
Update the Eyecon software and/or Medispan pill database. Set the time of download,
path, and a username and password if necessary.
Auto Download
Automatically download the Eyecon software if
checked.
2.6 Files
Auto Install
Automatically install the update by setting the
path to the downloaded file. A Local Path
Username and password can also be set.
Update Medispan Monthly
Automatically download the Medispan pill
database on a monthly basis if checked.
Eyecon Instruction Manual 49
Page 50

Settings Menu
Time
Set the time for the for the software and/or the
Medispan monthly update. The time is set in 24
hour format.
Local Path
Set the path location of the downloaded update
files. This path can be on a network. Press the
keyboard icon to the right of the path window to
enter the file location
Domain
Set the domain name of the network server.
Press the keyboard icon to the right of the path
window to enter the domain name.
Set Username and Password
Enter a unique Username and Password to set
the local path. Press the keyboard icon to the
right of the path window to enter the Username
and Password.
50 Eyecon Instruction Manual
Page 51

2.7 TCP/IP
2.7 TCP/IP
Primarily used when the Eyecon is integrated with pharmacy workflow software.
This tab is used for setting the IP address and Mask for the Eyecon when connected
to a LAN. Consult with your IT department for additional information. The Eyecon must
be restarted after changing the port number or IP address within PMSS interface.
MAC Address
The MAC address can be viewed but cannot be
changed.
Dynamic Address
The Dynamic address is automatically chosen
by the network.
Static Address
The Static address is an IP address, Subnet
Mask and Gateway that are entered by the
administrator. Enter the desired IP address,
Subnet Mask and Gateway and press the
button to save the change.
Be sure to connect a cable before pressing
the button, otherwise the IP address
may be displayed as zeros.
Use the button after network connection
has been lost and reestablished to refresh the
display with the IP address and submask value.
Enter a specific IP address or Subnet mask by pressing the keyboard icon to the right
of the entry window.
Key in the value with the numeric keys and use a decimal point between each group of
numbers. Press to accept the entry. Example: 10.123.16.9
Eyecon Instruction Manual 51
Page 52

Settings Menu
2.7.1 Listening Server Settings
Port Setting
Configure the listening server port number. If
the port number is not known, contact your
Network Administrator for further assistance.
Press the keyboard icon next to the port
number to enter a new port number. Press
to accept the entry.
Photo Retriever Listening Port
Retrieve photos from your network. If the port
number is not known, contact your Network
Administrator for further assistance.
Press the keyboard icon next to the port
number to enter a new port number. Press
to accept the entry.
PMSS Provider
Choose from one of the offered PMSS
providers.
l Computer Rx
l Computer Rx #2
l Cost Effective
l Eyecon Native
l HCC
l Liberty Software
l McKesson Enterprise Rx (see page
117 for details)
l Pioneer Rx
l QS1
l Rx30 - Prism
l Rx30 - #2
l RxSafe
l ScriptPro
l ScriptPro - USB
l Speed Script
l SRS Pharmacy Systems
After making a selection press the button to accept the mode. The screen will exit
to the Start-up screen. Press the button to return to the settings mode.
52 Eyecon Instruction Manual
Page 53

2.8 Remote Server
PMSS Data Purge Time
Set the number of days in which PMSS data will purge. The maximum number of days
is 450.
Press the keyboard icon to the right of the day
entry window to enter the number of days.
Press to accept the entry.
Clear PMSS Data
Allow clearing all of the PMSS RX transactions from the Eyecon. This can be used if
the Eyecon is being moved to a new site or the database were to be corrupted. this will
clear it out.
2.8 Remote Server
Used for bi-directional communication between the Eyecon and a remote server. Bidirectional must be checked in order to be enabled.
The IP address and port number setting for the
connected pharmacy system.
Bi-directional
Check the box to the left of Provide Count Results to Pharmacy System (Bidirectional).
The IP Address and Port No. will no longer be grayed out.
Press the keyboard icon next to the IP Address
to configure the IP address. and port number of
the server.
Press the keyboard icon next to the port
number to enter a new port number. Press
to accept the entry. If the port number is not
known, contact your Network Administrator for
further assistance.
Eyecon Instruction Manual 53
Page 54

Settings Menu
2.8.1 Inventory Interface (McKesson Enterprise Rx)
It is possible to use Mckesson Enterprise to track inventory using the Eyecon. This will
require third party software be loaded on a PC.
Enabled the McKesson mode under the TCP/IP tab, Listening Server Settings/PMSS
provider. Refer to page 52 for details.
Enable or Disable Sending Inventory Counts
Choose whether to send inventory counts to
the server. This is enabled when checked and
disabled when not checked.
Display Quantity On Hand (QOH)
This is enabled when checked and disabled
when not checked. When enabled, the quantity
left in stock will be displayed in the upper
middle of the display in the Physical Inventory
mode.
Store Number
Enter the store number of 001 by pressing the
keyboard icon to the right of the entry window.
This store number is used to communicate with
the inventory software.
54 Eyecon Instruction Manual
Page 55

2.9 Multi
Future Feature
Intended for VA sites to allow one Eyecon to send Rx Fill Data to another Eyecon for
verification counting.
2.10 Double Check
This tab allows for the configuration of back-count and/or double-counts of controlled
substances.
2.10.1 Double-Counts
Will prompt the user to re-count the dispensed
amount for specified DEA controlled items,
while capturing a 2nd set of tray photos to
document the re-count. This is enabled when
checked and disabled when not checked.
2.9 Multi
DEA Code
Choose which class of drugs will be double
counted.
Cost Threshold
Future feature
Eyecon Instruction Manual 55
Page 56

Settings Menu
2.10.2 Back-Counts
Will prompt the user to count the remainder in
the stock bottle for specified DEA controlled
items. This is enabled when checked and
disabled when not checked.
Require Adjust Reasons
Checking this box results in a pop-up menu
with various reason codes to choose from when
the Back-Count amount does not match the
expected amount.
DEA Classification
Select which class of drugs the back count will
apply to.
Cost Threshold
Future feature
Require Stock Item Re-scan
Future feature
56 Eyecon Instruction Manual
Page 57

3 Eyecon Native Modes
3.1 Start-up Screen
Three modes of operation are offered in the Stand-Alone mode.
l Count Only is a basic counting mode where the stock bottle NDC barcode
is scanned or the NDC is manually entered recalling associated drug
information. Rx is then counted by dispensing pills on the counting platter.
l Rx Validation / Workflow provides an additional level of patient safety by
assuring the stock bottle NDC barcode is associated with the Rx label
barcode.
l Physical Inventory offers a means of maintaining an inventory count / cycle
count of stock on hand.
3.1 Start-up Screen
Button Description
Advance to the Rx Validation or PMSS mode 65, 98
Advance to the Count Only mode 58
Advance to the Physical Inventory mode 83
Advance to the next screen 58, 65, 83
Change Eyecon settings 27
Restart or turn off Eyecon 23
Eyecon Instruction Manual 57
Reference
Page(s)
Page 58

Eyecon Native Modes
3.2 Count Only Mode
This mode is used to dispense a prescription which does not need to be validated and
count pills quickly.
Use the Physical Inventory mode for cycle count or count store inventory.
Press to backup one screen.
Refer to page 64 for settings menu.
3.2.1 Rx Dispensing and Pill Counting
Start
1. From the Start-Up screen activate Rx
Dispensing mode by pressing the
button. The button will be
highlighted green when this mode is
selected.
2. Press the button to proceed.
Scan Stock Bottle
3. Scan the Stock Bottle Label NDC
barcode.
If multiple stock bottles are being used to complete a transaction, be sure to
scan each one before pouring the pills on the counting platter.
58 Eyecon Instruction Manual
Page 59

3.2 Count Only Mode
Refer to page 90 to Re-Train an existing pill image.
See page 92 if the barcode does not scan. Refer to the Manual NDC Entry section.
If NDC information is not present in database, NDC not found! screen will appear.
Refer to page 93 for further information.
See page 96 for information on how to edit the drug name, chose an NDC number or
enable/disable the current drug photo.
Counting
4. Pour pills onto counting platter utilizing
the entire platter surface. Be sure not to
stack the pills on top of each other.
4a. If drug photo does not exist in the
Eyecon database "Not Found or
Disabled" will appear in place of the
photo.
4b. If Reports are enabled (Data setting
tab), the Counting screen will have a
button that needs to be pressed
after the count is displayed. The count
will be recorded into the database. A
message and an audible beep will
identify a recorded transaction has
been made.
4c. If the button was pressed with a
count of 0, a message screen will be
displayed. Press to record
the zero count or press to
cancel and return to the Counting
screen.
Eyecon Instruction Manual 59
Page 60

Eyecon Native Modes
4d. If the button was pressed with pills
on the platter, a warning message will be
displayed.
4e. If the pills are stacked on one another
the screen may change, highlighting the
position of the pills that were not able to
be counted.
Lightly shake the pill counting
platter until the pills are no longer
stacked.
4f. If the required count was exceeded, remove excess pills from the platter with
the spatula into the dispensing funnel. Place stock bottle under funnel gate
and lift.
Fill Patient Vial
5. Dispense pills by placing the tongue of
the funnel inside of the patient vial.
6. Cup hand around the outside of the
vial opening. Push the bottle up to
raise the funnel gate.
7. Lift the pill counting platter upward to
pour pills through the funnel into the
vial.
8. Validate all pills were dispensed into
vial to avoid cross contamination.
9. Ensure funnel gate is returned to the closed position.
10. Scan another stock bottle or press
to return to the Scan Stock
Bottle screen.
60 Eyecon Instruction Manual
Page 61

3.2.2 Unit of Use
Used to dispense a full bottle or manually entered quantity. The quantity will be
recorded to the Report Database. The combining of Eyecon counted pills with the full
bottle or manually entered quantity is also allowed.
1. With the pill tray empty, press the
2. A keypad will be displayed. The entry
3.2 Count Only Mode
button from the Counting
screen.
window is pre-populated with the
package quantity. To change the
quantity, press and enter the
appropriate quantity.
3. Press the button to accept the
entered quantity.
4. The screen will return to Counting
mode with Accumulate turned on.
l Add to the current quantity.
or
l Scan another bottle and pour
additional pills on the tray to achieve
the desired quantity.
or
l Press the button to include
another full bottle or manually enter a quantity.
4a. If Reporting is enabled, press the
button and the total quantity dispensed
will be recorded.
Refer to Appendix C on page 145
for information regarding
recorded data and pill photo
examples.
4b. If the package quantity is a fractional
value, it is rounded off to the nearest
whole number.
Eyecon Instruction Manual 61
Page 62

Eyecon Native Modes
3.2.3 Hand-Count
If the drug is a unit of use (such as an ointment,
cream, inhaler, syringe or blister pack) or was
trained as a hand count drug, the Hand-Count
screen will be displayed.
1. Press the button in the top right
2. The unit of use value is automatically
2a. If a change needs to be made, press the
hand corner.
filled in (for example: 15 is for 15mg). If
the value is acceptable, press the .
button.
button. The entry window will be
blank. Use the numeric keys to enter
the correct value and press the
button.
3. After the OK button has been pressed,
the Hand-Count screen will be
displayed with the entered value.
4. Press the button to save the
entry. The screen will return to Scan
Stock Bottle.
4a. If the button was pressed with a
count of 0, a message screen will be
displayed. Press to record the
zero count or press to cancel and
return to the Hand-Count screen.
62 Eyecon Instruction Manual
Page 63

3.2.4 Accumulate Count Method
1. Press the button. The button will
turn green indicating that the accumulate
function has been selected.
Notice the two blue windows Current QTY and
Tot al QT Y.
l Current QTY - The quantity currently
on the counting platter.
l Tota l Q TY - The accumulated
(added) number of pills.
2. Pour pills onto counting platter utilizing
the entire platter surface. Be sure not to
stack the pills on top of each other.
2a. If drug photo does not exist in the Eyecon
database "Not Found or Disabled" will
appear in place of the photo.
3.2 Count Only Mode
2b. If the pills are stacked on one another
the screen may change, highlighting the
position of the pills that were not able to
be counted.
Lightly shake the pill counting
platter until the pills are no longer
stacked.
2c. If the required count was exceeded, remove excess pills from the platter with
the spatula into the dispensing funnel. Place stock bottle under funnel gate
and lift.
3. Press the button to accumulate
(add) the Current QTY count to the
Total QTY.
3a. If Total QTY displayed exceeds desired
quantity, remove excess pills from the
platter with the spatula into the
dispensing funnel. Place stock bottle
under funnel gate and lift.
Eyecon Instruction Manual 63
Page 64

Eyecon Native Modes
Fill Patient Vial or Return Pills to Stock Bottle
4. After adding the Current QTY to the
Total QTY, the following message
screen will appear. The current quantity
must be dispensed before continuing.
5. Dispense pills by placing the tongue of the funnel inside of the patient vial or
stock bottle.
6. Cup hand around the outside of the
bottle opening. Push the bottle up to
raise the funnel gate.
7. Lift the pill counting platter upward to
pour pills through the funnel into the
bottle.
8. Validate all pills were dispensed into
bottle to avoid cross contamination.
9. Ensure funnel gate is returned to the
closed position.
9a. Repeat the previous steps until
accumulation is finished. Press the
button complete the
accumulation and record the count into
the database.
10. Scan another stock bottle or press
to return to the Scan Stock
Bottle screen.
The display will time out and return to the Scan Stock Bottle screen based on the
value set at the General tab screen (Refer to page 27 for details).
64 Eyecon Instruction Manual
Page 65

3.3 Rx Validation / Workflow
Ensures the proper medication is dispensed by validating an 11 digit NDC printed on
the patient vial label or Rx pamphlet matches the NDC on the stock bottle. Contact
customer support at (866) 260- 6540 for additional information on validation.
Refer to page page 23 for details to Shutdown the Eyecon.
Refer to page 27 for Settings menu.
Refer to page 98 for PMSS mode instructions.
3.3.1 Rx Validation and Dispensing
Start
1. From the Start-Up screen activate Rx
Validation / Workflow mode by pressing
the button. The button will be
highlighted green when this mode is
selected.
3.3 Rx Validation / Workflow
2. Press the button to proceed.
The User ID barcode can be scanned from the Start-Up screen when the Rx
Validation / Workflow button is highlighted. The display will go right to the Scan Vial
Label screen.
Scan User Login
3. The Scan User Login feature is
available for added system security.
The login ID can be scanned or
manually entered.
The User Login screen is
disabled by default and can be
enabled within the settings menu.
See page 28 for details.
3a. If Login was scanned or manually
entered, proceed to step 4.
3b. If manually entering the user login number, refer to page 82 for details.
3c. If disabled, this screen would be skipped and the Scan Vial Label screen will
be displayed.
Eyecon Instruction Manual 65
Page 66

Eyecon Native Modes
Scan Vial Label
4. Scan the 11 digit NDC barcode on the vial label or patient pamphlet.
4a. If Scan User Login is disabled use the
button to return to the Start-up
screen.
4b. If Scan User Login is enabled use the
button to log off of the system
and return to the Scan User Login
screen.
4c. If Stock Bottle Verification is set to Always, proceed to the Scan Stock Bottle
screen.
4d. If Stock Bottle Verification is set to Never, proceed to the Counting screen.
4e. If Stock Bottle Verification is set to User,
scan the stock bottle to proceed or
press the button to proceed to
the Counting screen.
66 Eyecon Instruction Manual
Page 67

3.3 Rx Validation / Workflow
Scan Stock Bottle
5. Scan the Stock Bottle Label NDC
barcode.
See page 90 to train an existing
pill image.
See page 92 if the barcode does
not scan. Refer to the Manual
NDC Entry section.
See page 29 to choose the stock
bottle verification method.
If multiple stock bottles are being used to complete a transaction, be sure to
scan each one before pouring the pills on the counting platter.
If NDC information is not present in database, NDC not found! screen will appear.
Refer to page 93.
See page 96 for information on how to edit the drug name, chose an NDC number or
enable/disable the current drug photo.
Government Regulations
Specific size stock bottles must be used in filling
prescriptions to control costs.
If a scanned stock bottle does not meet specific
government requirements, a message screen will
appear. It is possible to override this message by
pressing or press to go back to the Scan
Stock Bottle screen.
Counting
6. Pour pills onto counting platter utilizing
the entire platter surface. Be sure not to
stack the pills on top of each other.
6a. If drug photo does not exist in the
Eyecon database "Not Found or
Disabled" will appear in place of the
photo.
The prescription target quantity
can be included with the 11digit
NDC data and compiled into one
barcode that is scanned. If the quantity is included, it will be displayed in
the top center of the display as a quantity.
l When the Quantity matches the QTY the window will turn green.
Eyecon Instruction Manual 67
Page 68

Eyecon Native Modes
l If the number of pills poured exceeds
the QTY value, the Quantity window
will turn red.
l If the number of pills poured is less
than the QTY value, the Quantity
window will turn yellow.
6b. If the button is pressed while the
pill count is out of tolerance or a partial
fill, a Quantity Mismatch screen will be
displayed. This screen will not appear if
the pill count is the same as the QTY
displayed in the upper QTY window.
Press the button to
continue filling the prescription or
press the button to return
to the Counting Pills screen.
6c. If the button was pressed with a
count of 0, a message screen will be
displayed. Press to record the
zero count or press to cancel
and return to the Counting screen.
68 Eyecon Instruction Manual
Page 69

3.3 Rx Validation / Workflow
6d. If the pills are stacked on one another
the screen may change, highlighting the
position of the pills that were not able to
be counted.
Lightly shake the counting platter
until the pills are no longer
stacked.
6e. If the required count was exceeded, remove excess pills from the platter with
the spatula into the pill dispensing funnel. Place stock bottle under funnel gate
and lift.
Fill Patient Vial
7. Dispense pills by placing the tongue of
the funnel inside of the patient vial.
Cup hand around the outside of the
vial opening. Push the bottle up to
raise the funnel gate.
8. Lift the pill counting platter upward to
pour pills through the funnel into the
vial.
9. Validate all pills were dispensed into
vial to avoid cross contamination.
Ensure funnel gate is returned to the
closed position.
10. Scan another Rx NDC barcode or press
to return to the Scan Vial Label
screen.
Eyecon Instruction Manual 69
Page 70

Eyecon Native Modes
3.3.2 Partial Fill
If a prescription can only be partially filled, the Eyecon will store the partial fill
information and when the remainder is ready to be filled, the prescription is recalled.
Reporting must be enabled in the Data tab under the Settings menu.
1. Pour pills onto the counting platter.
2. Press the button to record the
transaction.
2a. If the prescription is a partial fill, the
Quantity Mismatch screen will be
displayed. This screen will not appear if
the pill count is the same as the QTY
displayed in the upper QTY window.
Press the button to save
the prescription for filling at a later
time or
Press the button to return
to the Counting Pills screen.
Fill the Remainder of the Prescription
3. When the prescription can be filled, scan the vial label.
4. Next, scan the stock bottle. A warning
screen will be displayed.
4a. Press the button to finish filling
the prescription.
Add the pills and press the
button. The transaction will be
recorded to the database as a
completed fill.
70 Eyecon Instruction Manual
Page 71

4b. Press the button to fill the
3.3.3 Unit of Use
Used to dispense a full bottle or manually entered quantity. The quantity will be
recorded to the Report Database. The combining of Eyecon counted pills with the full
bottle or manually entered quantity is also allowed.
1. With the pill tray empty, press the
3.3 Rx Validation / Workflow
prescribed quantity.
button from the Counting
screen.
2. A keypad will be displayed. The entry
window is pre-populated with the
package quantity. To change the
quantity, press and enter the
appropriate quantity.
3. Press the button to accept the
entered quantity.
4. The screen will return to Counting
mode with Accumulate turned on.
l Add to the current quantity
or
l Scan another bottle and pour
additional pills on the tray to achieve
the desired quantity
or
l Press the button to include
another full bottle or manually enter a quantity.
Eyecon Instruction Manual 71
Page 72

Eyecon Native Modes
4a. If Reporting is enabled, press the
button and the total quantity dispensed
will be recorded.
Refer to Appendix C on page 145
for information regarding
recorded data and pill photo
examples.
4b. If the package quantity is a fractional
value, it is rounded off to the nearest
whole number.
4c. If the total exceeds the prescribed quantity,
a warning will be displayed. Press the
button to continue filling the prescription or
press the button to revise the quantity.
3.3.4 GPI Substitution
This mode allows a generic equivalent to be counted instead of the adjudicated NDC.
A GPI equivalent can only be substituted at the initial Scan Stock Bottle screen. GPI
Substitution must be enabled in the General settings tab (refer to page 29).
1. Scan stock bottle.
2. Scan generic NDC.
3. One of the following message screens
will appear depending on the NDC
scanned. Follow the instructions on the
displayed screen.
Message Screens
When a GPI is scanned, a warning screen will appear for GPI substitution.
l At the Scan Stock Bottle screen, a stock
bottle is scanned that is not the NDC
specified. Press the button to
approve or press the button to
escape.
72 Eyecon Instruction Manual
Page 73

l If the stock bottle scanned is non-
matching this warning will be displayed.
Press the button to return to the
previous screen.
l When the last two digits of the scanned
NDC (stock bottle) are different from the
specified NDC. Press the button to
approve or press the button to
escape.
l If a non-matching stock bottle is scanned
that has the same GPI but is a different
NDC than specified. Press the
button to return to the previous screen.
3.3 Rx Validation / Workflow
l If already in the count mode and a stock
bottle with the same first 9 digits of the
NDC but the last 2 digits (package size)
are different. Press the button to
return to the previous screen.
l If a stock bottle with an equivalent GPI is
scanned but the GPI substitution feature
is disabled. Press the button to
approve or press the button to
escape.
l If while using the Unit-of-Use feature and
[OK] was pressed with an entry amount
greater than the target quantity. Press
the button to approve or press the
button to escape.
Eyecon Instruction Manual 73
Page 74

Eyecon Native Modes
l If the button was pressed with a
count of zero. Press the button to
record a zero value or press the
button to escape.
3.3.5 Double Count (DEA Controlled Substances)
If the Rx being dispensed is a controlled substance, a double count may be necessary
depending on the setting under the Double Check tab. Refer to section 2.10 on page
55.
1. Scan the 11 digit NDC barcode on the vial label or patient pamphlet.
2. Scan stock bottle.
3. Pour pills onto counting platter utilizing
the entire platter surface. Be sure not to
stack the pills on top of each other.
l When the Quantity matches the QTY the window will turn green.
l If the number of pills poured exceeds
the QTY value, the Quantity window
will turn red.
74 Eyecon Instruction Manual
Page 75

l If the number of pills poured is less
than the QTY value, the Quantity
window will turn yellow.
4. Press the button. The transaction will
be recorded. A message screen will be
displayed. A second count will need to be
performed.
4a. If the button is pressed while the
pill count is out of tolerance a Quantity
Mismatch screen will be displayed.
This screen will not appear if the pill
count is the same as the QTY displayed
in the upper QTY window.
3.3 Rx Validation / Workflow
Press the button to
continue with double-count or
press the button to return
to the Counting Pills screen.
5. Remove pills from the counting platter.
The Double Count screen will be
displayed.
6. Re-pour pills on the platter. Press the
button to finalize the double
count. The transaction will be recorded.
Eyecon Instruction Manual 75
Page 76

Eyecon Native Modes
6a. If back-count is enabled, the Back
Count screen will be displayed.
Dispense the pills and proceed to the
Back-Count section step 3.
3.3.6 Back Count (DEA Controlled Substances)
The Back-Count feature is used to count the remaining pills in the stock bottle after
every controlled substance dispense. Back Count must be checked under the Double
Check tab. Refer to section 2.10 on page 55.
The user is prompted to count the remainder and the Eyecon supplies the expected
back-count based on the prior back-count minus the dispensed amount. If the dispense
results in opening a new stock bottle, the Eyecon takes that into account by adding in
the full bottle quantity. The expected back-count amount is displayed at the top of the
count screen, in the same manner as the target quantity for Rx filling.
1. Scan the 11 digit NDC barcode on the vial label or patient pamphlet.
2. Scan stock bottle.
3. Pour pills onto counting platter utilizing
the entire platter surface. Be sure not to
stack the pills on top of each other.
76 Eyecon Instruction Manual
Page 77

3.3 Rx Validation / Workflow
l When the Quantity matches the QTY the window will turn green.
l If the number of pills poured exceeds
the QTY value, the Quantity window
will turn red.
l If the number of pills poured is less
than the QTY value, the Quantity
window will turn yellow.
4. Press the button. The
transaction will be recorded. A message
screen will be displayed. A back-count
will be needed.
5. Dispense the pills. The Back Count
screen will be displayed. The expected
amount for the Back Count is shown at
the top of the screen. If this is the first
time that the current NDC is being backcounted, the expected amount is the full
bottle amount.
Eyecon Instruction Manual 77
Page 78

Eyecon Native Modes
Back Count Quantity Mismatch
If the final Back Count achieved doesn’t match the expected Back Count amount, the
count window back-ground color will be yellow if it is lower, and red if it is over.
l If is pressed and the amount
is a mismatch the following warning
message appear.
If all of the pills in the open bottle
for the NDC have been counted,
press the button or
press the button to return
to the Counting Pills screen.
l If Require Adjust Reasons box was
checked in the Double Check
setting tab, a reason menu will be
displayed.
Select a reason and press the button. The
display will return to Scan Vial Label.
78 Eyecon Instruction Manual
Page 79

3.3.7 Hand-Count
If the drug is a unit of use (such as an ointment,
cream, inhaler, syringe or blister pack) or was
trained as a hand count drug, the Hand-Count
screen will be displayed.
1. Press the button in the top right
2. The unit of use value is automatically
2a. If a change needs to be made, press the
3.3 Rx Validation / Workflow
hand corner.
filled in (for example: 5 is for 5 ml). If the
value is acceptable, press the .
button.
button. The entry window will be
blank. Use the numeric keys to enter
the correct value and press the
button.
3. After the OK button has been pressed,
the Hand-Count screen will be
displayed with the entered value.
4. Press the button to save the
entry. The screen will return to Scan
Stock Bottle.
4a. If the button was pressed with a
count of 0, a message screen will be
displayed. Press to record the
zero count or press to cancel and
return to the Hand-Count screen.
Eyecon Instruction Manual 79
Page 80

Eyecon Native Modes
3.3.8 Accumulate Count Method
1. Press the button. The button will
turn green indicating that the
accumulate function has been chosen.
Notice the two windows Current
QTY and Total QTY. The
windows will change color
depending on the target quantity
in the right hand corner.
yellow = below
red = above
green = target quantity.
Current QTY - The quantity currently on the counting platter.
Total QTY - The accumulated (added) number of pills.
1a. If drug photo does not exist in the Eyecon database "Not Found or Disabled"
will appear in place of the photo.
2. Pour pills onto counting platter utilizing
the entire platter surface. Be sure not
to stack the pills on top of each other.
2a. If the pills are stacked on one another
the screen may change highlighting the
position of the pills that were not able to
be counted.
Lightly shake the counting platter
until the pills are no longer
stacked.
80 Eyecon Instruction Manual
Page 81

3. Press the button to accumulate
(add) the Current QTY count to the
Total QTY.
Fill Patient Vial or Return Pills to Stock Bottle
4. After adding the Current QTY to the Total
QTY, the following message screen will
appear.
3.3 Rx Validation / Workflow
5. Dispense pills by placing the tongue of
the funnel inside of the patient vial. Cup
hand around the outside of the vial
opening. Push the bottle up to raise the
funnel gate.
6. Lift the pill counting platter upward to
pour pills through the funnel into the vial.
7. Validate all pills were dispensed into vial
to avoid cross contamination. Ensure
funnel gate is returned to the closed
position.
8. Repeat the previous steps until accumulation is finished.
9. Press to return to the Scan Vial
Label screen.
Eyecon Instruction Manual 81
Page 82

Eyecon Native Modes
3.3.9 Manual Login
Enter a User ID number if it is unable to be scanned.
1. From the Scan User Login screen
2. Key in the user login ID number with the
Default code is 501812
3. Press the button to accept the
press the button.
numeric buttons.
entry.
l The button moves the entry
cursor back one space.
l The button clears the entire
entry.
4. If the login ID was accepted the Scan
Vial Label screen will be displayed.
5. Return to the Rx Validation / Workflow
section.
82 Eyecon Instruction Manual
Page 83

3.4 Physical Inventory Mode
The Physical Inventory mode provides a way to maintain accurate inventory levels.
Scan the stock bottle or manually enter the NDC number. Data is saved to the Eyecon
database and can be retrieved with a USB memory stick. See Appendix A on page 136
for details on importing data to a computer.
NOTE: Press in any of the sub-menus to backup one screen.
3.4.1 Count Inventory
Start
1. From the Start-Up screen enter the
Physical Inventory Mode by pressing
the button. The button will
be highlighted green when this mode is
selected.
3.4 Physical Inventory Mode
1a. If User Login is enabled, the User ID
barcode can be scanned from the Start-
Up screen when the Physical Inventory
button is highlighted in green. The
display will go right to the Scan Stock
Bottle screen.
2. Press the button to proceed.
Previous Inventory Data Warning
This message will be displayed only when
existing inventory data is stored in the Eyecon
database and the Physical Inventory Mode
was restarted.
If a new physical inventory is being
performed press the
button. The Eyecon will advance
to the menu shown under the Data
heading on page 46 to delete or
download the existing data.
If an existing inventory is being resumed, then press the button.
Eyecon Instruction Manual 83
Page 84

Eyecon Native Modes
Scan User Login
3. The Scan User Login feature is
available for added system security.
The login ID can be scanned or
manually entered.
l The User Login screen is disabled
by default and can be enabled within
the settings menu. See page 28 for
details.
3a. If Login was scanned or manually
entered, proceed to step 4.
3b. If manually entering the user login number, refer to page 89 for details.
3c. If disabled, this screen would be skipped and the Scan Stock Bottle screen
will be displayed.
Scan Stock Bottle
4. Scan the Stock Bottle Label NDC
barcode.
l See page 92 if the barcode does not
scan. Refer to the Manual NDC Entry
section.
4a. If NDC information is not present in
database, NDC not found! screen will
appear. Refer to page 93.
l See page 96 for information on how
to edit the drug name, choose an
NDC number or disable the current drug photo.
If multiple stock bottles are being used to complete a transaction, be sure to
scan each one before pouring the pills on the counting platter.
Count Inventory
5. Pour pills onto counting platter utilizing
the entire platter surface. Be sure not to
stack the pills on top of each other.
l NOTE: If you have more pills than
will easily fit on the pill platter, then
use the Accumulate function as
described on page 88.
5a. If drug photo does not exist in the
Eyecon database "Not Found or
Disabled" will appear in place of the
photo.
84 Eyecon Instruction Manual
Page 85

5b. If the pills are stacked on one another
the screen will highlight the position of
the pills that were not able to be
counted.
Lightly shake the counting platter
until the pills are no longer
stacked.
6. Press the button to record the
quantity to the Eyecon database.
A message will be displayed
briefly along with an audible
sound indicating the transaction
was recorded.
3.4 Physical Inventory Mode
6a. If the button was pressed with a
count of 0, a message screen will be
displayed. Press to record the
zero count or press to cancel and
return to the Counting screen.
Return Pills to Stock Bottle
7. Dispense pills by placing the tongue of
the funnel inside of the stock bottle.
Cup hand around the outside of the
bottle opening.
8. Push the bottle up to raise the funnel
gate.
9. Lift the pill counting platter upward to
pour pills through the funnel into the
bottle.
10. Validate all pills were dispensed into the stock bottle to avoid cross
contamination. Ensure funnel gate is returned to the closed position.
11. Return to step 4 to count more inventory.
Eyecon Instruction Manual 85
Page 86

Eyecon Native Modes
3.4.2 Unit of Use
Used to count a full bottle or manually entered quantity. The quantity will be recorded
to the Report Database. The combining of Eyecon counted pills with the full bottle or
manually entered quantity is also allowed.
1. With the pill tray empty, press the
2. A keypad will be displayed. The entry
button from the Counting
screen.
window is pre-populated with the
package quantity. To change the
quantity, press and enter the
appropriate quantity.
3. Press the button to accept the
entered quantity.
4. The screen will return to Counting
mode with Accumulate turned on.
l Add to the current quantity.
or
l Scan another bottle and pour
additional pills on the tray to achieve
the desired quantity.
or
l Press the button to include
another full bottle or manually enter a quantity.
4a. If Reporting is enabled, press the
button and the total quantity
dispensed will be recorded.
Refer to Appendix C on page 145
for information regarding
recorded data and pill photo
examples.
4b. If the package quantity is a fractional
value, it is rounded off to the nearest
whole number.
86 Eyecon Instruction Manual
Page 87

3.4.3 Hand-Count
If the drug is a unit of use (such as an ointment,
cream, inhaler, syringe or blister pack) or was
trained as a hand count drug, the Hand-Count
screen will be displayed.
1. Press the button in the top right
2. The unit of use value is automatically
2a. If a change needs to be made, press the
3.4 Physical Inventory Mode
hand corner.
filled in (for example: 5 is for 5 ml). If the
value is acceptable, press the .
button.
button. The entry window will be
blank. Use the numeric keys to enter
the correct value and press the
button.
3. After the OK button has been pressed,
the Hand-Count screen will be
displayed with the entered value.
4. Press the button to save the
entry. The screen will return to Scan
Stock Bottle.
4a. If the button was pressed with a
count of 0, a message screen will be
displayed. Press to record the
zero count or press to cancel and
return to the Hand-Count screen.
Eyecon Instruction Manual 87
Page 88

Eyecon Native Modes
3.4.4 Accumulate / Counting
1. Press the button from the
Counting screen. The button will turn
green indicating that the accumulate
function has been chosen.
Current QTY - The quantity currently on the
counting platter.
Tota l Q TY - The accumulated (added) number
of pills.
1a. If drug photo does not exist in the
Eyecon database "Not Found or
Disabled" will appear in place of the
photo.
1b. If the stock bottle is unopened, use the
Full Stock Bottle feature. Refer to page
86 for details.
1c. If the NDC scanned was unit item refer to the Hand-Count section on page 87
for details.
2. Pour pills onto counting platter utilizing
the entire platter surface. Be sure not
to stack the pills on top of each other.
2a. If the pills are stacked on one another
the screen may change highlighting
the position of the pills that were not
able to be counted.
Lightly shake the counting platter
until the pills are no longer
stacked.
3. Press the button to accumulate
(add) the Current QTY count to the
Total QTY.
88 Eyecon Instruction Manual
Page 89

Return Pills to Stock Bottle
After adding the Current QTY to the Total QTY,
the following message screen will appear.
4. Dispense pills by placing the tongue of
the funnel inside of the stock bottle.
Cup hand around the outside of the
bottle opening. Push the bottle up to
raise the funnel gate.
5. Lift the pill counting platter upward to
pour pills through the funnel into the
stock bottle.
6. Validate all pills were dispensed into
stock bottle to avoid cross
contamination. Ensure funnel gate is
returned to the closed position.
3.4 Physical Inventory Mode
7. Press to record the transaction.
3.4.5 Manual Login
Enter a User ID number if it is unable to be
scanned.
1. From the Scan User Login screen
A message will be displayed
briefly along with an audible
sound indicating the transaction
was recorded.
The screen will return to Scan
Stock Bottle. To continue
counting, go back to step 4 on
page 84.
press the button.
Eyecon Instruction Manual 89
Page 90

Eyecon Native Modes
2. Key in the user login number with the
numeric buttons.
l Default code is 501812
3. Press the button to accept the
entry.
The button moves the
entry cursor back one space.
The button clears the
entire entry.
3a. If the login ID was accepted the Scan Stock Bottle screen will be displayed.
4. Return to the Physical Inventory section to continue with counting inventory.
3.5 Re-Train an Existing Pill Image
The trained pill image is a shadow image used as a reference for counting.
The process below is used to update existing pill images in the event the pill size/shape
changes or the count is incorrect or unstable.
1. From the Scan Stock Bottle screen
press the button. The button
will be highlighted in green when
selected.
2. Scan the stock bottle label or manually
enter the NDC number. Refer to page
92 for details on how to manually enter
an NDC.
If the drug scanned is a pill or capsule press the
button to train the pill image. Go to
Train Pill Image section on page 96.
If the drug is a unit of use (such as an ointment,
cream or blister pack), press the
button. Go to the Hand-Count section on the
next page.
90 Eyecon Instruction Manual
Page 91

3.5.1 Train Pill Image
Two sample pills will be needed.
3. Place one pill flat and the other on its
edge on the pill counting platter.
4. Press the button.
5. If the pills were trained properly, the pill
images will be displayed. There should
be a flat image and a side image of the pill. This is a correctly trained image.
6. To accept the pill images, press the
be displayed. Refer to the Counting
section for more details.
3.5 Re-Train an Existing Pill Image
If pill will not stand on edge, lay it
flat.
button. The Counting screen will
If the pill images are not correct,
press the button. The Train
Pill Image screen will be
displayed. Go back to step 3.
3.5.2 Train Hand-Count
1. If the drug is a unit of use (such as an
ointment, cream or blister pack), press
the button.
2. Press the button in the top right
corner.
The re-trained pill images will be
stored to the internal database
automatically after the images are accepted.
Eyecon Instruction Manual 91
Page 92

Eyecon Native Modes
3. The unit of use value is automatically
filled in (for example: 15 is for 15mg). If
the value is acceptable, press the .
button.
3a. If a change needs to be made, press the
button. The entry window will be
blank. Use the numeric keys to enter
the correct value and press the
button.
4. After the OK button has been pressed,
the Hand-Count screen will be
displayed with the entered value
5. Press to save the entry. The
screen will return to the Scan Stock
Bottle screen.
3.6 Manual NDC Entry
If the stock bottle's NDC barcode is damaged or
not present, use the button to access
the keyboard screen.
In addition, if the pill image is not already stored
it will need to be trained by the Eyecon. Refer
to page 96 for details.
1. With the keyboard, enter the stock
bottle's NDC number exactly as shown
on the stock bottle including the dashes.
Enter the NDC number and press .
For Example:
Stock Bottle NDC = 1234-5678-90
2. If the NDC number was not found in the database, the NDC not found! screen
will be accessed. Refer to section 3.6.1 for more information.
92 Eyecon Instruction Manual
Page 93

3. If the NDC number was found in the
database, the Counting screen will be
accessed.
3.6.1 NDC Not Found
3a. If the drug entered previously was not
found in the database, the NDC not
found! screen will be displayed.
3b. If the NDC number is correct, press the
3.6 Manual NDC Entry
If the NDC number was not found
the NDC not found! screen will
be displayed. Follow the steps
below to add a new NDC and
drug name.
button.
3c. The Specify Drug Name screen will be
displayed. Press the keyboard icon to
the right of Drug Name entry window to
enter the drug name.
3d. Enter the drug name and press .
If is pressed without entering
a Drug Name, enter it at this time.
Press to return to the NDC
not found! screen and follow
step 2.
Eyecon Instruction Manual 93
Page 94

Eyecon Native Modes
3e. If the pill image was not found the Train
Pill Image screen will appear next.
Refer to page 96 for details on training a
new pill image.
3f. If the drug name and pill image were
found the Counting screen will appear
next.
3.7 Edit Drug Database
It is possible to edit the drug name, NDC number and enable or disable the current drug
photo stored in the database.
Press at any time to backup one screen.
1. From the Scan Stock Bottle screen
press the button.
2. Scan the stock bottle label. The NDC
number cannot be manually entered
with this option.
94 Eyecon Instruction Manual
Page 95

3.7 Edit Drug Database
The Eyecon will look up the scanned barcode to determine the NCDC and display the
NDC number.
l If the NDC number is correct, press
the button.
l If the NDC is incorrect, click the
keyboard icon adjacent to the NDC
and enter the correct value and press
to continue. Press the
button.
The NDC, Drug Name, Package Quantity and
Drug Photo will be shown. The Drug Name and
Package Quantity fields can be edited by
pressing the keyboard icon to the right of the
entry window.
Press the button once the information is
acceptable.
The DEA code may be adjusted if the displayed
DEA code is not the correct code for your
particular jurisdiction.
Select the correct DEA code and press the
button to update the Eyecon database.
The Eyecon will advance to the Count mode
and is ready to dispense the edited NDC.
Eyecon Instruction Manual 95
Page 96

Eyecon Native Modes
3.7.1 Drug Photo
Use Drug Photo
If a drug photo is shown, press the
button until highlighted in green to accept the
drug photo.
Do not Use Drug Photo
If the drug photo shown is wrong or will not be
used, press the button until it is not
highlighted. If no photo is available the button
will be disabled.
3.8 Train a New Pill
The trained pill image is a shadow image used as a reference for counting.
This method is only accessible if the pill image is not found in the drug database.
After the stock bottle is scanned and no pill
image is found, the following screen will
appear.
Press the button.
96 Eyecon Instruction Manual
Page 97

Two Sample Pills will be Needed.
1. Place one pill flat and the other on its
edge on the pill counting platter.
1a. If pill will not stand on edge, lay it flat.
2. Press the button.
3. If the pills were trained properly, the pill
images will be displayed. There should
be a flat image and a side image of the
pill. This is a correctly trained image.
3a. To accept the pill images, press the
button. The Counting screen will
be displayed.
3b. If the pill images are not correct, press
the button. The Train Pill Image
screen will be displayed. Go back to
step 1.
3.8 Train a New Pill
The trained images will be stored to the internal database automatically after the
images are accepted.
4. The Counting screen will now be
displayed.
Eyecon Instruction Manual 97
Page 98

PMSS Modes
4 PMSS Modes
The following modes are available within PMSS. Each mode has the same appearance
but perform differently in the background.
l Computer Rx
l Computer Rx - #2
l Cost Effective
l Eyecon Native
l HCC
l Liberty Software
l McKesson Enterprise Rx (refer to page 117 for details)
l Pioneer Rx
l QS1
l Rx30 - Prism
l Rx30 #2
l Rx Safe
l ScriptPro
l ScriptPro - USB
l Speed Script
l SRS Pharmacy System
4.1 Package Settings
Set PMSS mode by following the instructions below. Refer to chapter 2, Settings Menu
for more detail on system settings or to change the existing settings.
1. Press the from the Start-up
screen to access the settings menu.
TCP/IP Setting Tab
2. Go to the TCP/IP tab.
3. Select the PMSS provider from the list.
Use the scroll bar to view all selections.
98 Eyecon Instruction Manual
Page 99

Barcode Setting Tab
4. Go to the Barcode tab.
5. Select barcode type PMSS from the
drop down menu.
6. Press the to accept the changes
and return to the Start-up screen.
7. From the Start-Up screen activate Rx
Validation / Workflow mode by pressing
the button. The button will be
highlighted green when this mode is
selected.
8. Press the button to proceed.
4.2 Pill Counting
4.2 Pill Counting
Scan User Login
1. The Scan User Login feature is available
1a. If Login was scanned or manually
1b. If manually entering the user login
1c. If disabled, this screen would be skipped and the Scan Vial Label screen will
for added system security. The login ID
can be scanned or manually entered.
The User Login screen is
disabled by default and can be
enabled within the settings menu.
See page 28 for details.
entered, proceed to step 4.
number, refer to page 111 for details.
be displayed.
Eyecon Instruction Manual 99
Page 100

PMSS Modes
Scan Vial Label
2. Scan the 11 digit NDC barcode on the vial label or patient pamphlet.
2a. If Scan User Login is disabled use the
button to return to the Start-up
screen.
2b. If Scan User Login is enabled use the
button to log off of the system
and return to the Scan User Login
screen.
2c. If Stock Bottle Verification is set to Always, proceed to the Scan Stock Bottle
screen.
2d. If Stock Bottle Verification is set to Never, proceed to the Counting screen.
2e. If Stock Bottle Verification is set to User,
scan the stock bottle to proceed or
press the button to proceed to
the Counting screen.
100 Eyecon Instruction Manual
 Loading...