

GSD Compuprint 9065, Compuprint 9065 plus, Compuprint 9080, Compuprint 9080 plus User Manual
User Manual
9065
9065
plus
G00641 FAMILY


User Manual 9065/9065plus
MAN10772-00 1
Compuprint Products Information
Thanks for choosing the
Compuprint 9065
and
9065
plus
printer models.
Your printer is a reliable working equipment that will be very useful in your daily job.
Our printers have been designed to be compact and respectful of the work environment.
They offer a wide range of features and multiple functions that confirm the high technological level reached by
the Compuprint brand.
To maintain these printing performances unchanged in the long run, Compuprint has developed specific
Compuprint branded consumables for each printer type (for example: ribbon cartridges for dot matrix printers)
that assure an excellent operation with high printing quality level reliability.
Compuprint recommends to use only its original Compuprint branded consumables with original packaging
(identified by its holographic label). In this way, a proper use of the printer at quality level stated in the product
characteristics can be assured. All typical usage problems related to not certified consumables may be
avoided, such as an overall quality print level degradation and, often, the reduction of the product life
due to the fact that the proper working conditions for the print heads and other printer parts are not assured.
Moreover, Compuprint does not only certify its consumables in terms of working conditions but also
carefully controls their compliance with the international standard rules concerning:
no cancerous materials;
no flammability of the plastic materials;
other standards
Compuprint advises the customers not to use products for which the compliance to this safety rules are not
warranted.
Finally seek your dealer or contact a Compuprint office and be sure that are provided you the original
Compuprint branded consumables.
User Manual 9065/9065plus
MAN10772-00 2
Safety and environmental notices
Safety notices
There are two levels of safety notices: Danger and Cautions.
Danger hazard level
The word Danger indicates the presence of a hazard that has the potential of causing death or serious
personal injury.
Most DANGER notices are numbered <1-1>, <1-2>, and so forth where they appear in the text of this
manual.
Example of a Danger notice:
DANGER
<1-10> Hazardous voltages are present. Do not touch the pins or sockets of the power
receptacle
Caution hazard level
The word Caution indicates the presence of a hazard that has the potential of causing moderate or minor
personal injury.
Most CAUTION notices are numbered <2-1>, <2-2>, and so forth where they appear in the text of this
manual.
Example of a Caution notice:
CAUTION:
<2-22> Carefully follow all cleaning instructions, using only the materials and solutions
recommended.
Attention notices
The word Attention calls attention to the possibility of damage to a program, device, system, or data.
Attention notices are not numbered.
Examples of an Attention notice:
Attention: The above openings must always be protected with their covers. Do not touch inside and do not
insert any object into these openings or into the gears.
User Manual 9065/9065plus
MAN10772-00 3
Safety precautions
Never remove any printer cover except to install a printer accessory as
expressly described in this manual.
The following areas of the printer should be covered for safety reasons:
Rear Plug Cover
Large Rear Cove
r
Rear Plug Covers
The above opening must always be protected with their cover.
Do not touch inside and do not insert any object into these openings or into the gears.
Attention: The above openings must always be protected with their covers. Do not touch inside and do not insert
any object into these openings or into the gears.
Electrical safety
This printer is inspected and listed by recognized national testing laboratories,
such as Underwriters Laboratories, Inc. (UL) in the U.S.A. and Canadian Standards Association (CSA) in Canada.
Listing of a product by a national testing laboratory indicates that the product is designed and manufactured in
accordance with national requirements intended to minimize safety hazards. This equipment meets a very high
standard of safety in design and manufacture. Remember, however, that this product operates under conditions of
high electrical potentials and heat generation, both of which are functionally necessary.
Because the paper used in the printer can burn, you should take normal precautions to prevent fire. These
precautions include common-sense measures, such as keeping potentially combustible materials (for example,
curtains and chemicals) away from the printer, providing adequate ventilation and cooling, limiting unattended
operation, and having trained personnel available and assigned to the printer.
Approved power cord and receptacle
DANGER
<1-11> Your country may require an approved power cord and plug.
Ensure that you have the correct power cord and plug. Use this cord and plug only with
an approved, correctly-installed power receptacle.
User Manual 9065/9065plus
MAN10772-00 4
Electrical safety and portable power strip receptacles
Extension cords
DANGER
DANGER<1-1> Do not use an extension power-cord.
The customer must supply the correct electrical outlet which must meet the requirements stated under “Printer
Specifications” in the User's Guide.
Portable power strip receptacles (temporary power taps)
Portable power strip receptacles (referred to as “temporary power taps” by the National Electrical Code) may be
used if they are fully approved in the customer's geographic location. It is the customer's responsibility to supply a
fully approved “temporary power tap”, if one is to be used.
Connecting or disconnecting a communication port, a
teleport, or an attachment connector
DANGER
<1-14> Switch off printer power and unplug the printer power cord before connecting or
disconnecting a communication port, a teleport, or other attachment connector.
Servicing during an electrical storm
DANGER
<1-13> Do not connect or disconnect a communication port, a teleport, or any other
connector during an electrical storm.

User Manual 9065/9065plus
MAN10772-00 5
FFC Notes
This equipment has been tested and found to comply with the limits for a Class A digital device, pursuant to Part
15 of the FCC Rules. These limits are designed to provide reasonable protection against harmful interference
when the equipment is operated in a commercial environment. This equipment generates, uses, and can radiate
radio frequency energy and, if not installed and used in accordance with the instruction manual, may cause
harmful interference to
radio communications. Operation of this equipment in a residential area is likely to cause harmful interference in
which case the user will be required to correct the interference at his own expense. Properly shielded and
grounded cables and connectors must be used in order to meet FCC emission limits. Compuprint is not
responsible for any radio or television interference caused by using other than recommended cables and
connectors or by unauthorized changes or modifications to this equipment. Unauthorized changes or
modifications could void the user’s authority to operate the equipment. This device complies with Part 15 of
the FCC Rules. Operation is subject to the following two conditions: (1) this device may not cause harmful
interference, and (2) this device must accept any interference
received, including interference that may cause undesired operation.
European Union (EU) Conformity Statement
Compuprint declares that this product is in compliance with the essential requirements and other relevant
provisions
of
Directive 2006/95/EC, 2004/108/EC.
Per the applicable requirements of EU directive 98/37/EC (“machines”) sound pressure of the above product
(measured according to EN27779) does not exceed 70dBA.
This product has been tested and found to comply with the limits for Class A Information Technology Equipment
according
to
European standard EN 55022. The limits for Class A equipment were derived for commercial and
industrial
environments to provide reasonable protection against interference with licensed communication
devices.
Important
This is a Class A product. In a domestic environment this product may cause radio
interference in which case the user may be required to take adequate measures.
Properly shielded and grounded cables and connectors must be used in order to reduce the potential for causing
interference to radio and TV communications and to other electrical or electronic equipment.
Compuprint
cannot accept responsibility for any interference caused by using other than recommended cables and
connectors.
Industry Canada Compliance Statement
This Class A digital apparatus complies with Canadian ICES-003.
Cet appareil numérique de la classe A est conform à la norme NMB-003 du Canada.
Statement for CISPR 22 Edition 2 Compliance
Attention: This is a Class A product. In a domestic environment this product may cause radio interference in
which case the user may be required to take adequate measures.

User Manual 9065/9065plus
MAN10772-00 6
Table of Contents
Compuprint Product Information 1 Entering the Power-On Configuration 42
Safety Information 2 Resetting to Factory Default Values 65
FFC Notes 5 Program Setup 66
Canadian D.O.C. Radio Interference
Regulation iv EEC Regulations
5 Entering the Program Setup 66
5 Hexadecimal Dump 81
Table of Contents 6 ANSI Emulation 82
Getting to Know Your Printer 7 DEC Emulation 88
Printer Features (9065plus) 7 How to Select the Paper Path 92
Printer Features (9065) 7 How to Use the Tear-Off Function 92
Unpacking Your Printer 8 Selection of the Paper Size 92
Printer Parts 9 Adjusting the Tear-Off Position 93
Front View 9 Selection of the Tear-Off Mode 93
Rear View 9 How to Lock/Unlock the Printer Setups 94
Setting Up Your Printer 10 How to Handle the Paper Parking 95
Choosing a Suitable Location 10 Paper Handling 99
Printer Assembly 10 Paper Paths 99
Removal of the Shipment Locks 10 Paper Specifications 100
Ribbon Cartridge Installation 11 Fanfold Paper 100
Host Computer Connection 15 Fanfold Paper Loading 100
Driver Installation 17 Loading Paper Using the Front1 Push Tractor 100
Windows Environment 17 Printing a Configuration Sheet 103
Lan Connection 20 Printer Maintenance and Troubleshooting 104
Monitoring Printer & Remote Printer 22 Cleaning the Printer 104
Configuration in LAN Replacing the Ribbon Cartridge 105
NetViewMaster Utility 27 Printing the Self Test 106
UNIX Environment 28 Error Handling 107
Linux 7.x & Solaris 7.x Operating Systems 30 Problems List Index 109
AS/400 Environment 31 Clearing Form Jams 112
Power Connection 35 Options 113
Selecting the Display Language 35 The Controller Board (9065 only) 113
Configuring the Printer 36 Installing the Controller Board 113
Operator Panel Presentation 36 The Front2 Push Tractor 115
Display Messages 36 Installing the Front2 Push Tractor 115
Indicators 38 Removing the Front2 Push Tractor 116
Function Keys 38 Loading Paper Using the Front2 Push Tractor 117
Printer Setups 41 (option)
Entering the Printer Setups 41 Loading Paper Using the Front1 Push Tractor 119
Moving within the Printer Setups 41 when the Front2 Push Tractor (Option) is
Leaving the Printer Setups 41 Installed
Power-On Configuration 42 The Printer Pedestal 120
Ribbon Shifter Installation 121
Printing Characteristics 122
Printer Specifications 122

User Manual 9065/9065plus
MAN10772-00 7
Getting to Know Your Printer
Printer Features (9065plus)
24 Needle Print Head
136 columns @10 cpi
High speed Draft printing at 720 cps, Draft printing at 600 cps, LQ printing at 110 cps
IBM Proprinter XL24/XL24 AGM, Personal Printer 2391+, EPSON LQ Series, ANSI X3.64 and DEC PPL2
emulations
Base paper handling configuration: Front1 push path (Fanfold with 4 pins sprockets)
Multiple copies (1 original and 7 copies)
Automatic paper path selection
Easy operability via operator panel setup and S/W commands
Usage of all specific features by means of the Specific Software Driver which is applicable to the most
popular S/W Packages
Plug & Play capability for Windows 95/98/2000/XP/NT4.0/Millennium ®/Vista/Win7(32 & 64bit), Windows8,
Windows10
Single controller with four interfaces: Ethernet 10/100 Base-T interface option, Bi-directional IEEE 1284
parallel interface, serial RS-232/C interface and USB interface
Optional Front2 push path (Fanfold with 4 pins sprockets)
Optional printer pedestal
Printer Features (9065)
24 Needle Print Head
136 columns @10 cpi
High speed Draft printing at 720 cps, Draft printing at 600 cps, LQ printing at 110 cps
IBM Proprinter XL24/XL24 AGM, Personal Printer 2391+, EPSON LQ Series ANSI X3.64 and DEC PPL2
emulations.
Base paper handling configuration: Front1 push path (Fanfold with 4 pins sprockets)
Multiple copies (1 original and 7 copies)
Automatic paper path selection
Easy operability via operator panel setup and S/W commands
Usage of all specific features by means of the Specific Software Driver which is applicable to the most
popular S/W Packages
Plug & Play capability for Windows 95/98/2000/XP/NT4.0/Millennium ®/Vista/Win7(32 & 64bit), Windows8,
Windows10
Standard controller with Bi-directional IEEE 1284 parallel interface, standard serial RS-232/C interface and USB
interface
Optional controller (instead of the standard one) with Ethernet 10/100 Base-T interface option that coexists
with the Bi-directional IEEE 1284 parallel interface
Optional Front2 push path (Fanfold with 4 pins sprockets)
Optional printer pedestal
User Manual 9065/9065plus
MAN10772-00 8
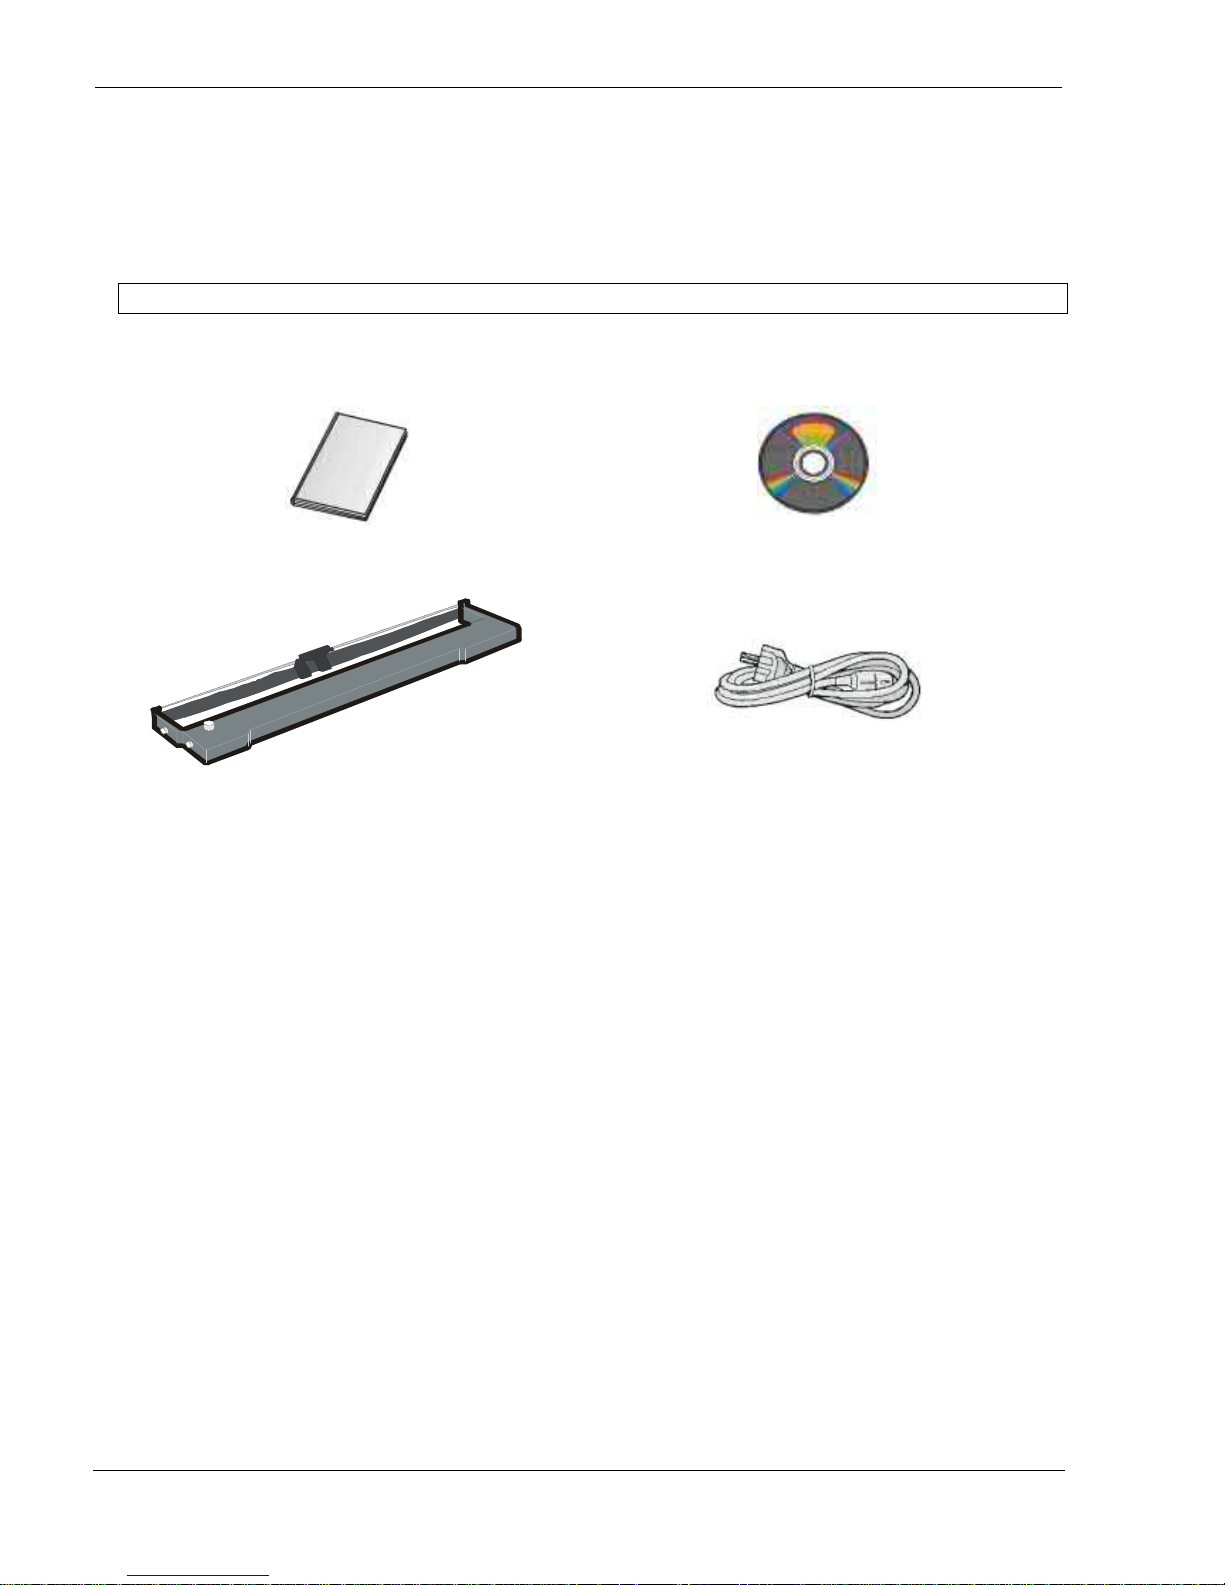
Unpacking Your Printer
The following items are included in the box:
Notify any damage to your supplier
Quick Setu
p
Guide CD Driver with User documentation
Ribbon Cartrid
g
e Power Cable
User Manual 9065/9065plus
MAN10772-00 9
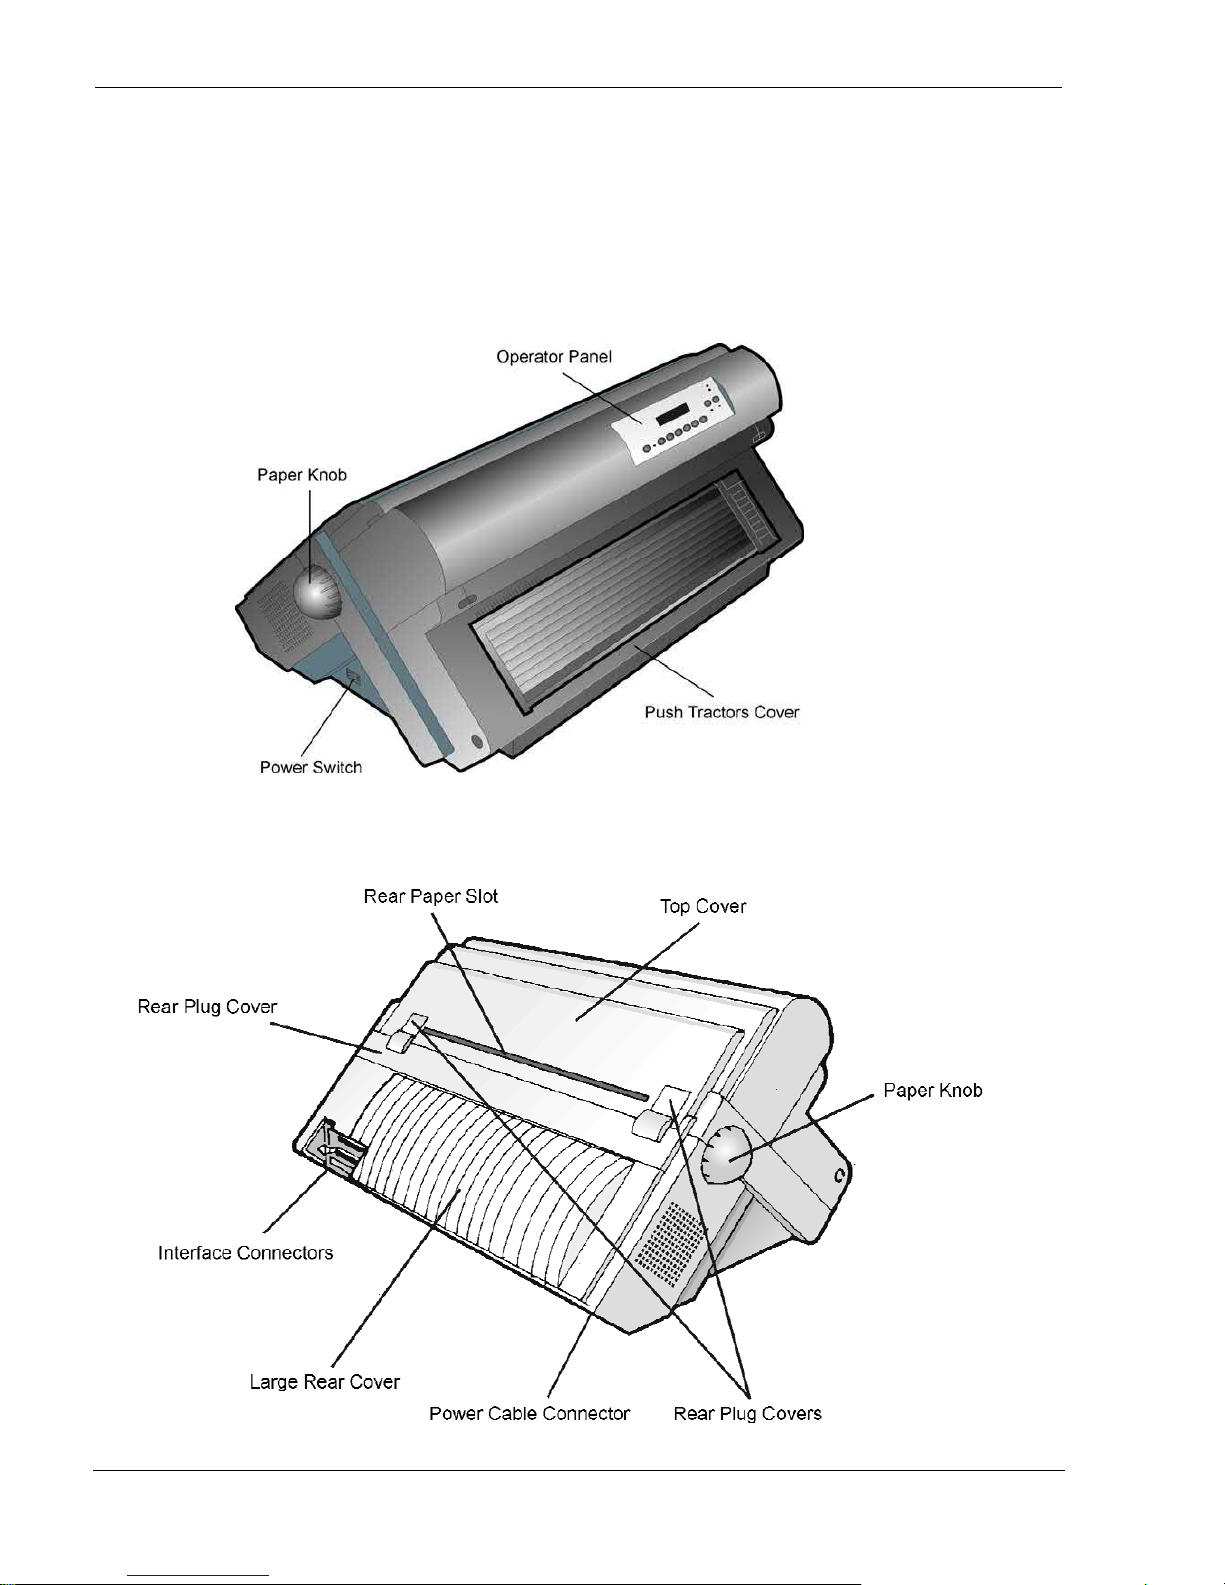
Printer Parts
Front View
RReeaarr VViieew
w
User Manual 9065/9065plus
MAN10772-00 10
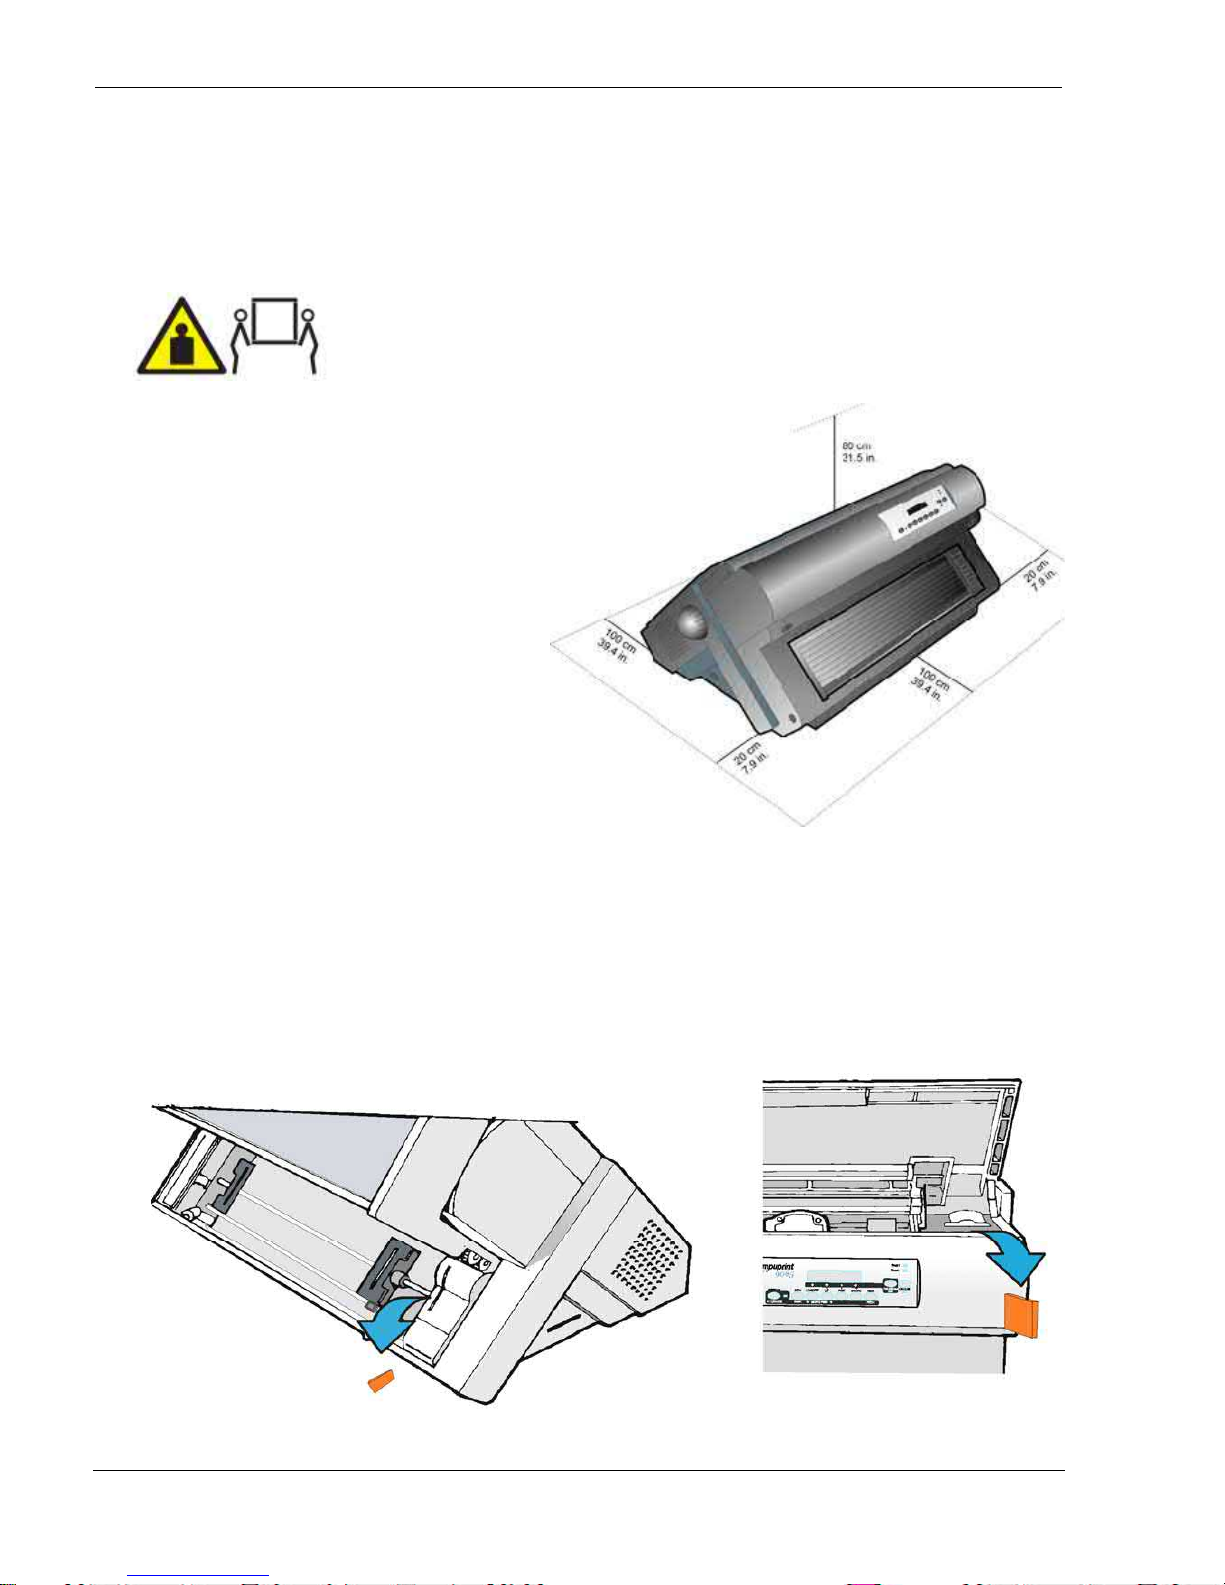
Setting Up Your Printer
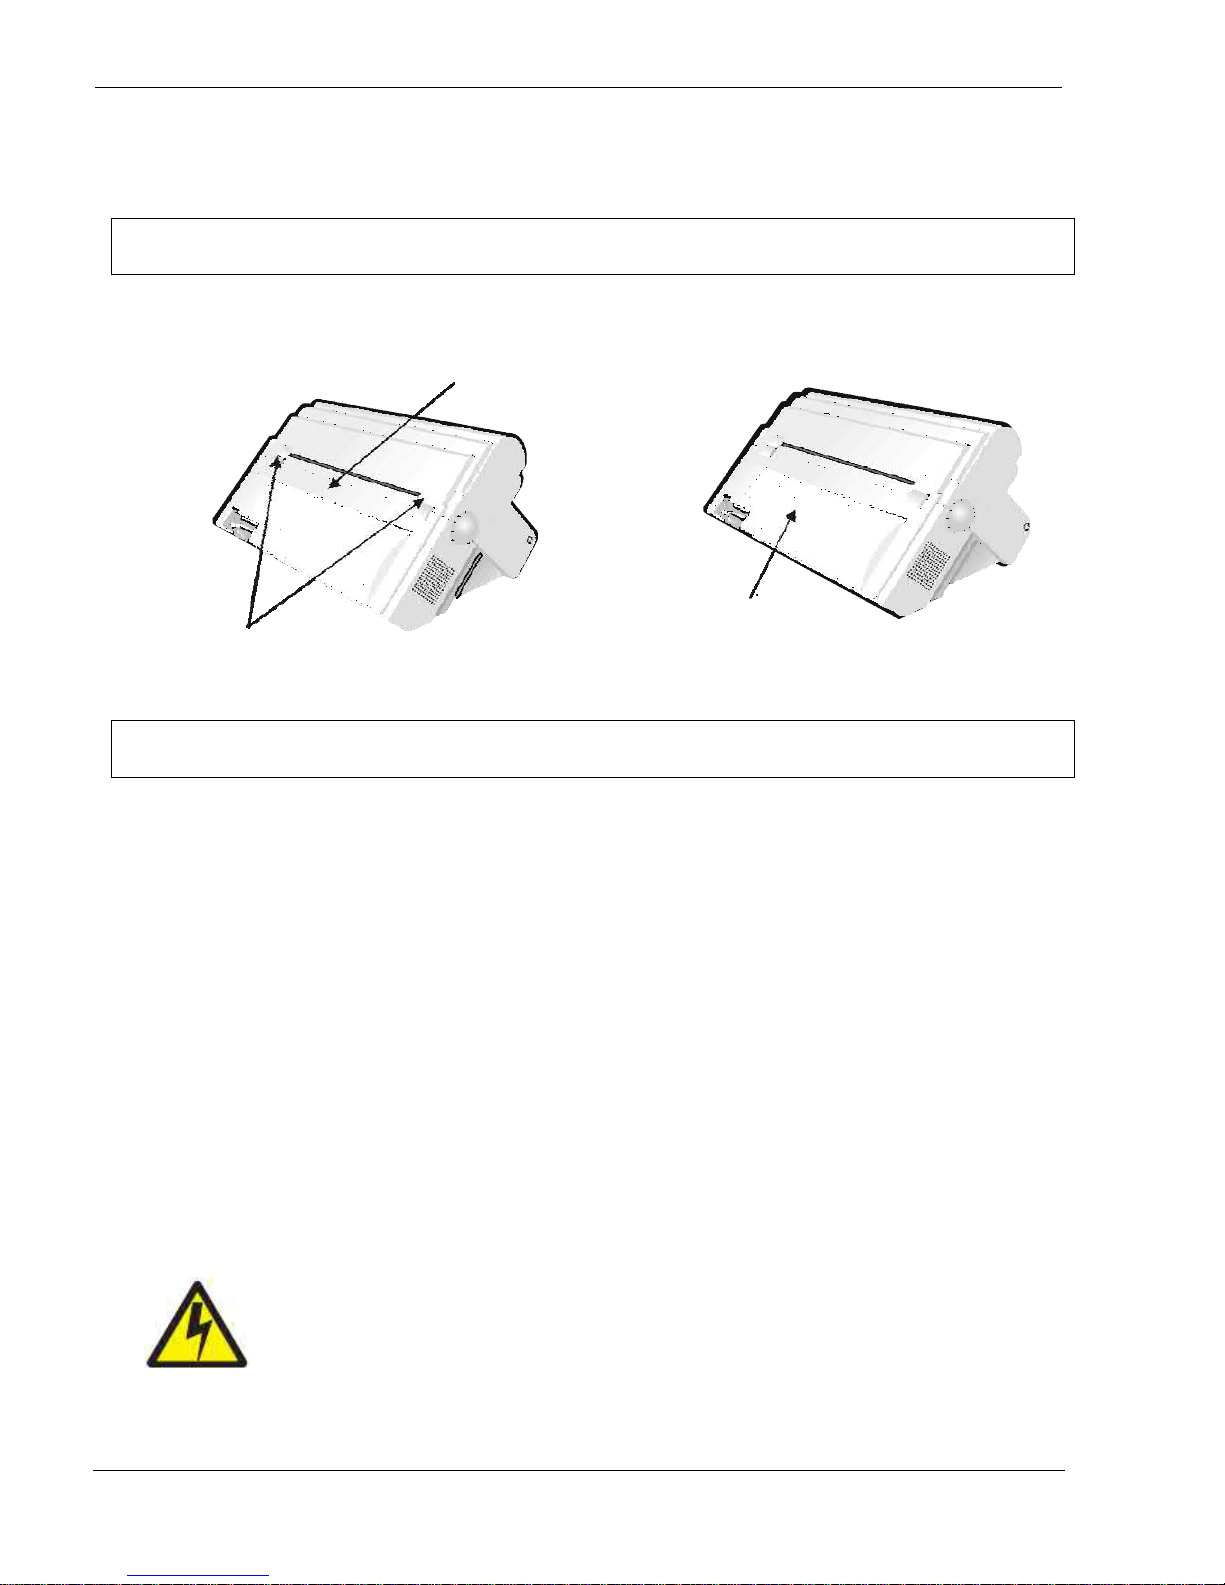
Choosing a Suitable Location
CAUTION:
The 4247 printer weighs 21 kg (46 lbs). Two persons are required to lift it..
Consider the following points when you choose
the location for your printer:
The distance between the printer and the host
computer must not exceed the length of the
interface cable;
The location must be sturdy, horizontal and
stable;
Your printer must not be exposed to direct
sunlight, extreme heat, cold, dust or
humidity (see"Printer Specifications " later);
The power outlet must be compatible with
the plug of the printer's power cord.
There must be sufficient clearances on all
sides for easy operation.
The required space is shown in the figure:
Printer Assembly
This sections describes how to assemble the printer.
Removal of the Shipment Locks
Open all the printer covers and make sure that you remove all the shipment orange locks from the printer.
User Manual 9065/9065plus
MAN10772-00 11
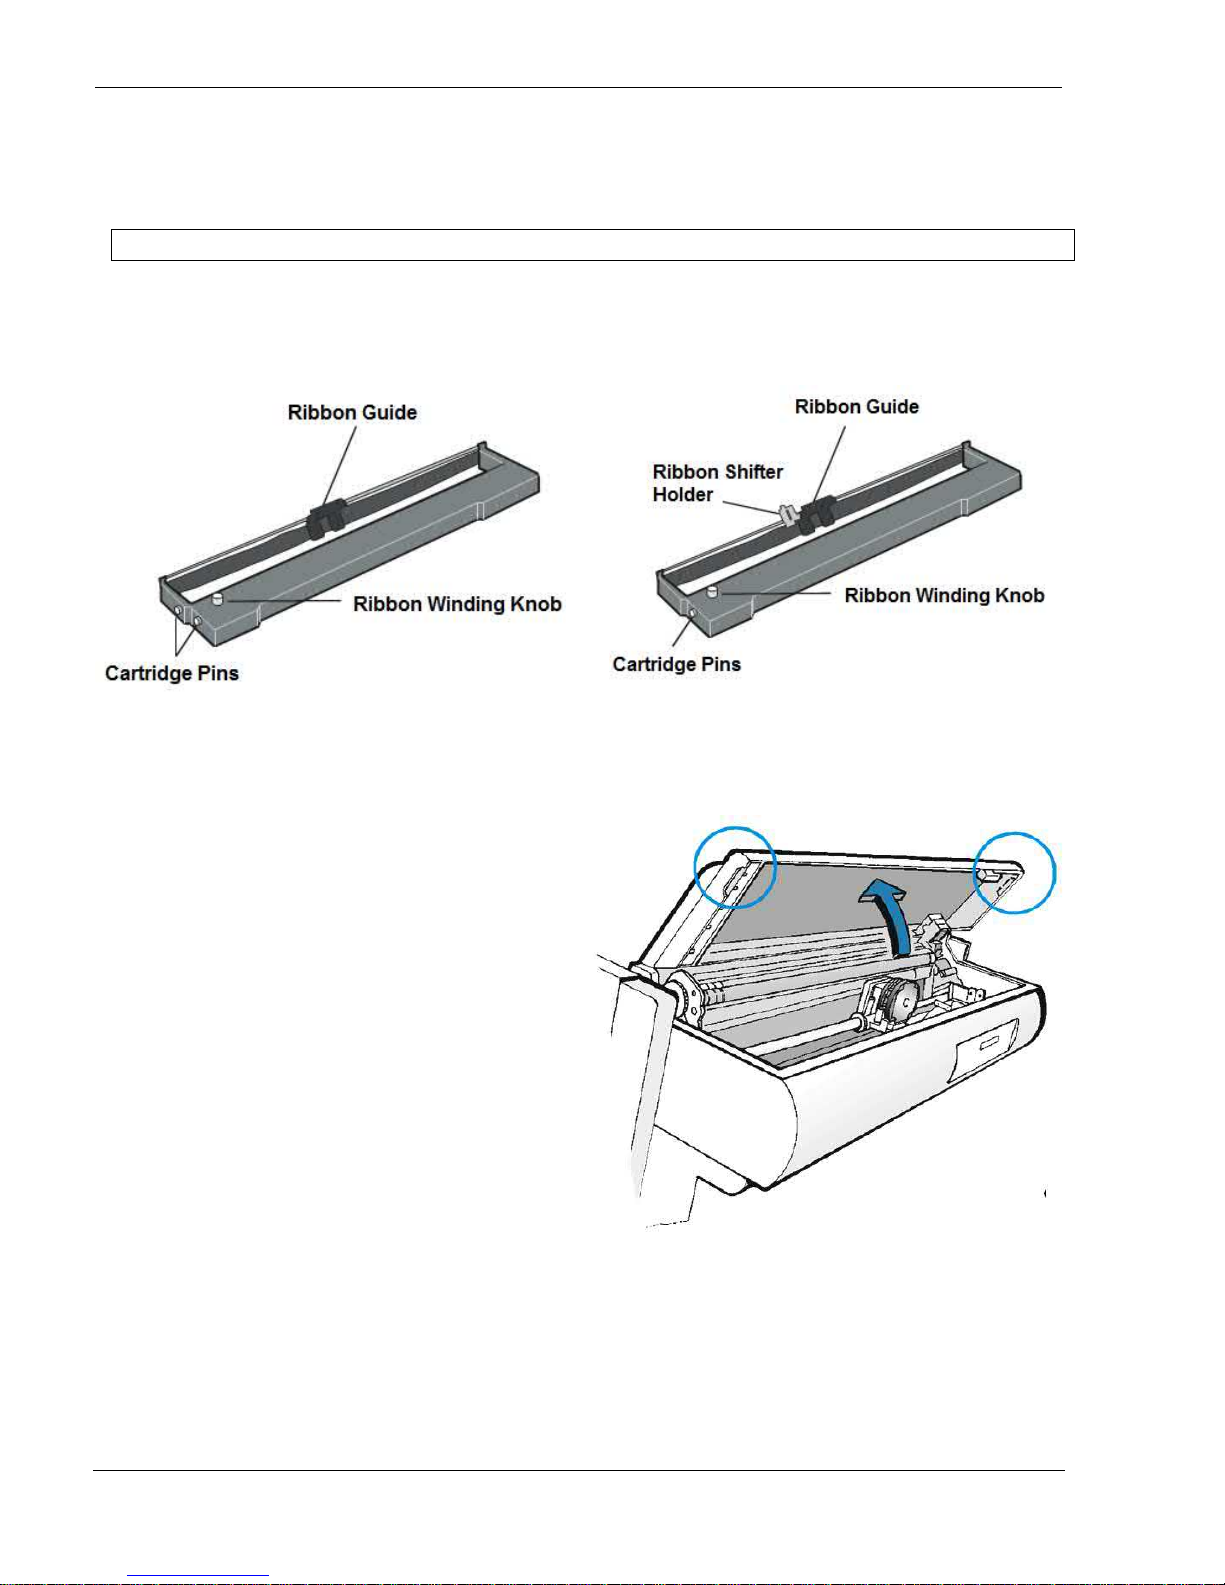
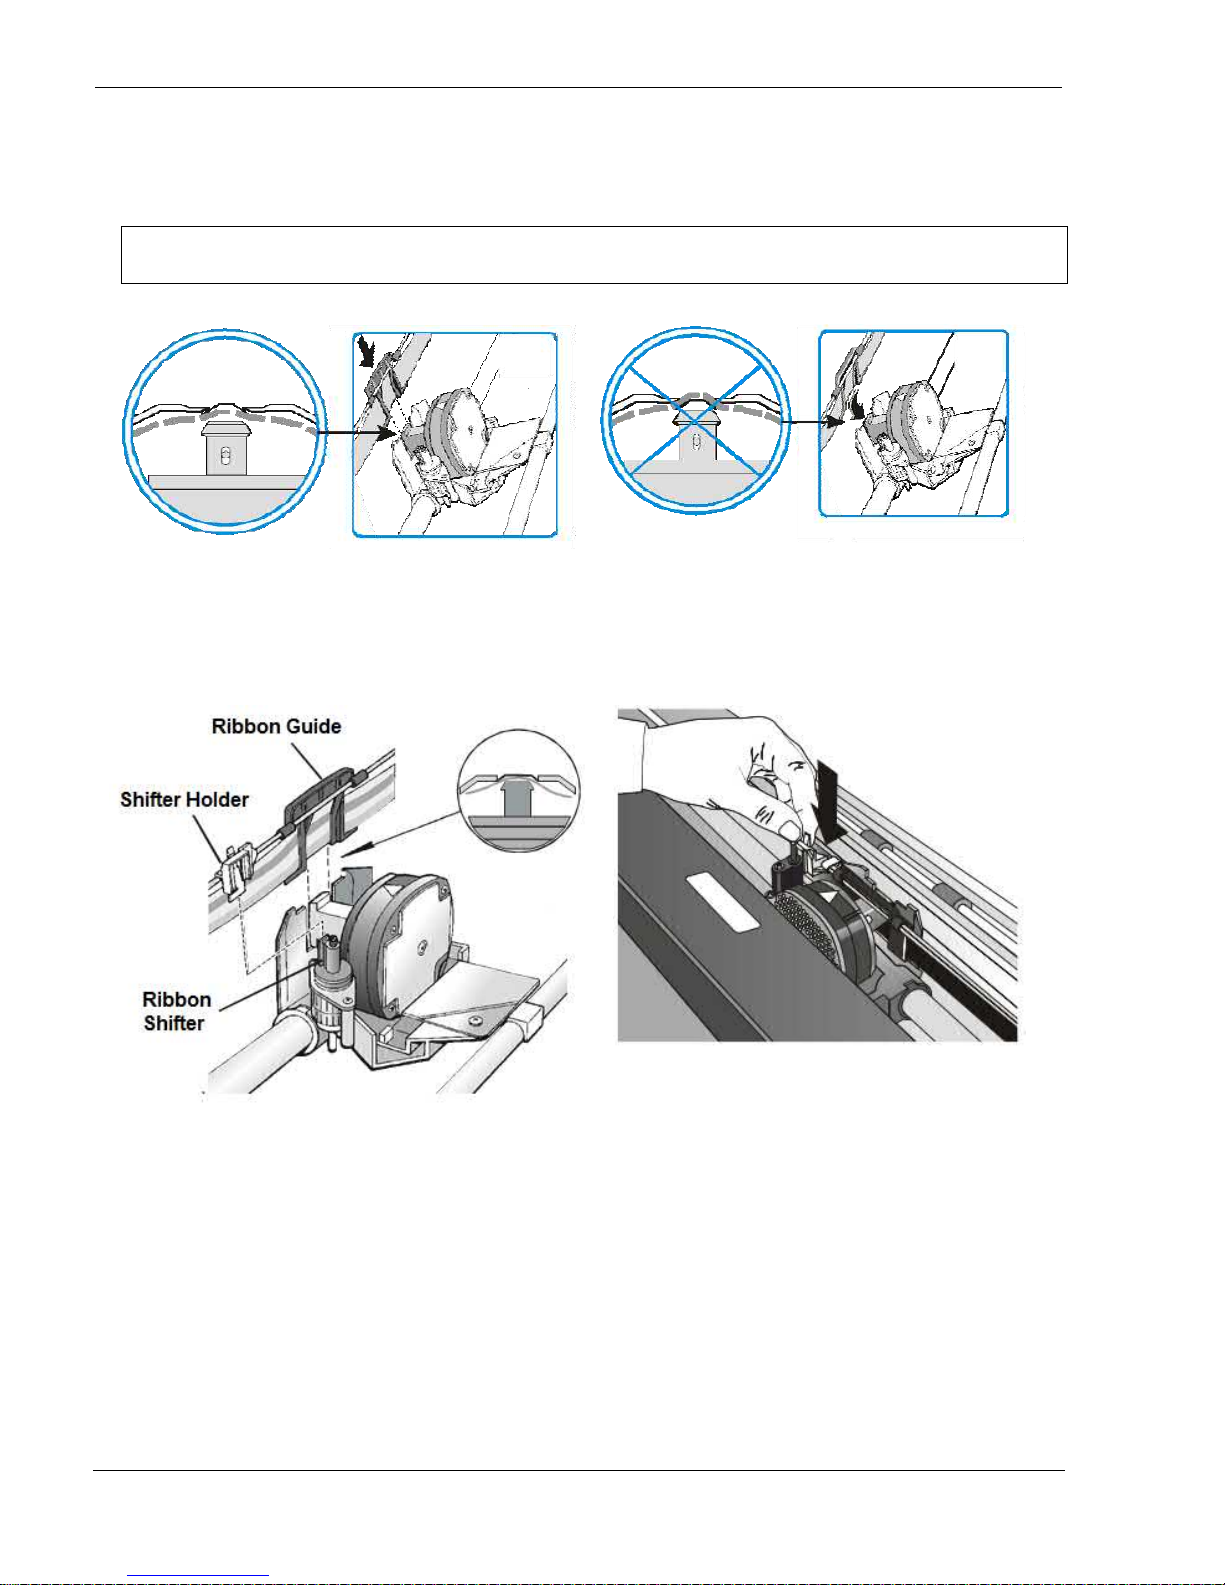
Ribbon Cartridge Installation
Make sure that you are using only Compuprint original consumables
1. Make sure that the printer is turned off.
2. Find the ribbon cartridge among the accessories
To be used when the ribbon shifter option is not installed To be used when the ribbon shifter option is installed
(see later on for installation of this option)
3. Turn the printer on and wait for printer
initialization.
4. With the printer powered on, enter the OFF
LINE status pressing the ON-LINE Key and
then checking ON-LINE indicator unlit.
5. Open the top cover using the small handles
on either side of the top cover

User Manual 9065/9065plus
MAN10772-00 12
6. Move the print carriage in the middle of
the area to prepare it for ribbon cartridge
installation
7. Before installing the ribbon cartridge turn
the ribbon-winding knob in the arrow
direction (located on the cartridge) to take up
slack in the ribbon
To avoid damage to the ribbon, do not turn the winding knob in the wrong direction
a. Align the right and left cartridge pins with the printer locking points.
Black cartridge when the ribbon shifter option is not
installed
Black “Long Life” cartridge when the ribbon shifter
option is installed
User Manual 9065/9065plus
MAN10772-00 13
Slide and insert the ribbon guide between the print head and the ribbon guide mask holding it perpendicular to the print
head.
Make sure that the ribbon is inserted correctly between the print head and the print head
mask.
OK NO
8. If the shifter kit option is installed on your printer,
insert the shifter holder onto the ribbon shifter as
shown in this figure.
9. Insert the shifter holder onto the ribbon shifter as
shown in the following figure.
10. Turn the ribbon-winding knob in the arrow direction (located on the cartridge) to take up slack in the
ribbon.

User Manual 9065/9065plus
MAN10772-00 14
10. Push the cartridge down gently until it clips into place at locking points
Black cartridge when the ribbon shifter option is not
installed
Black “Long Life” cartridge when the ribbon shifter
option is installed
11. Turn the ribbon-winding knob again in the direction of the arrow to take up slack in the ribbon.
12. To ensure that the ribbon guide runs freely along the ribbon, manually move the print carriage horizontally.
If the used ribbon cartridge needs to be replaced, see "Replacing The Ribbon Cartridge", later in this manual.
User Manual 9065/9065plus
MAN10772-00 15
Host Computer Connection
The 9065
plus printer can be connected to your host computer via different available interfaces on a single
controller.
DANGER
<1-14> Switch off printer power and unplug the printer power cord before connecting or
disconnecting a communication port, a teleport, or other attachment connector.
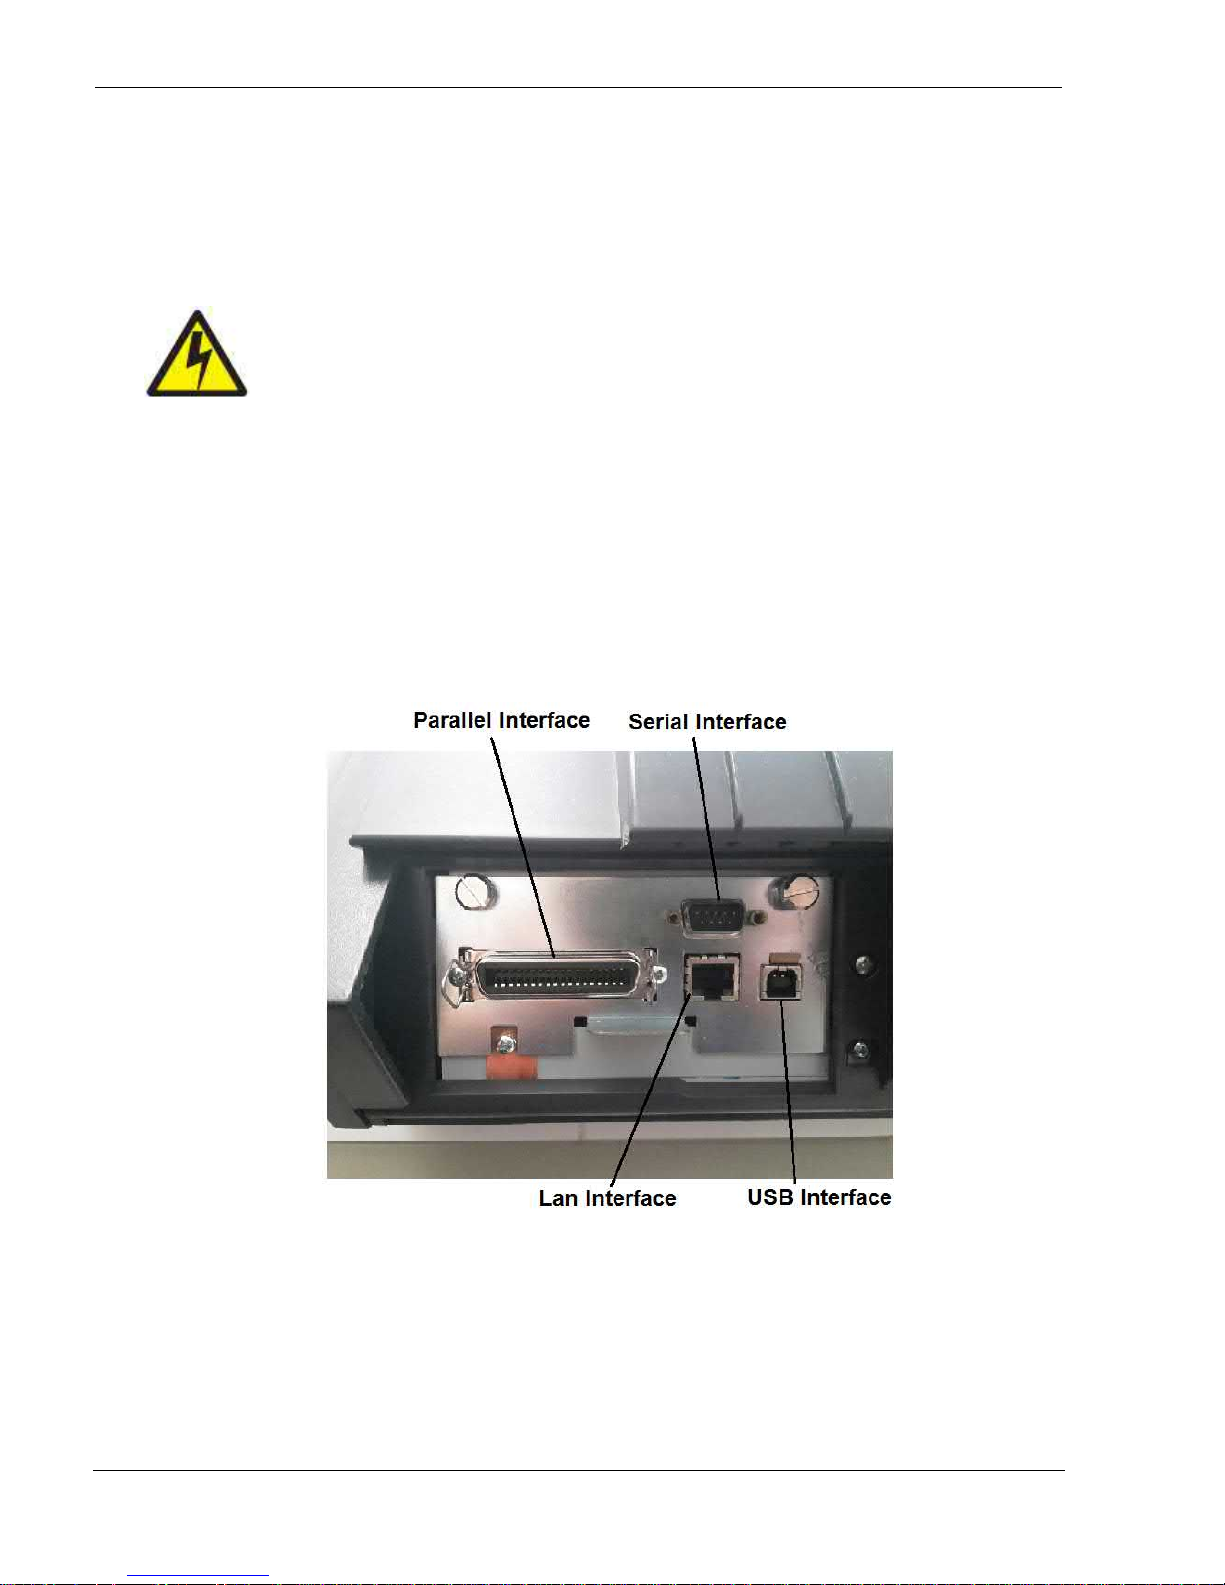
The controller provides the following four interfaces
:
:
A bidirectional IEEE1284 parallel interface
A RS-232C serial interface
An USB interface.
An Ethernet LAN interface.
The interface connectors are located on the rear of the printer.
User Manual 9065/9065plus
MAN10772-00 16
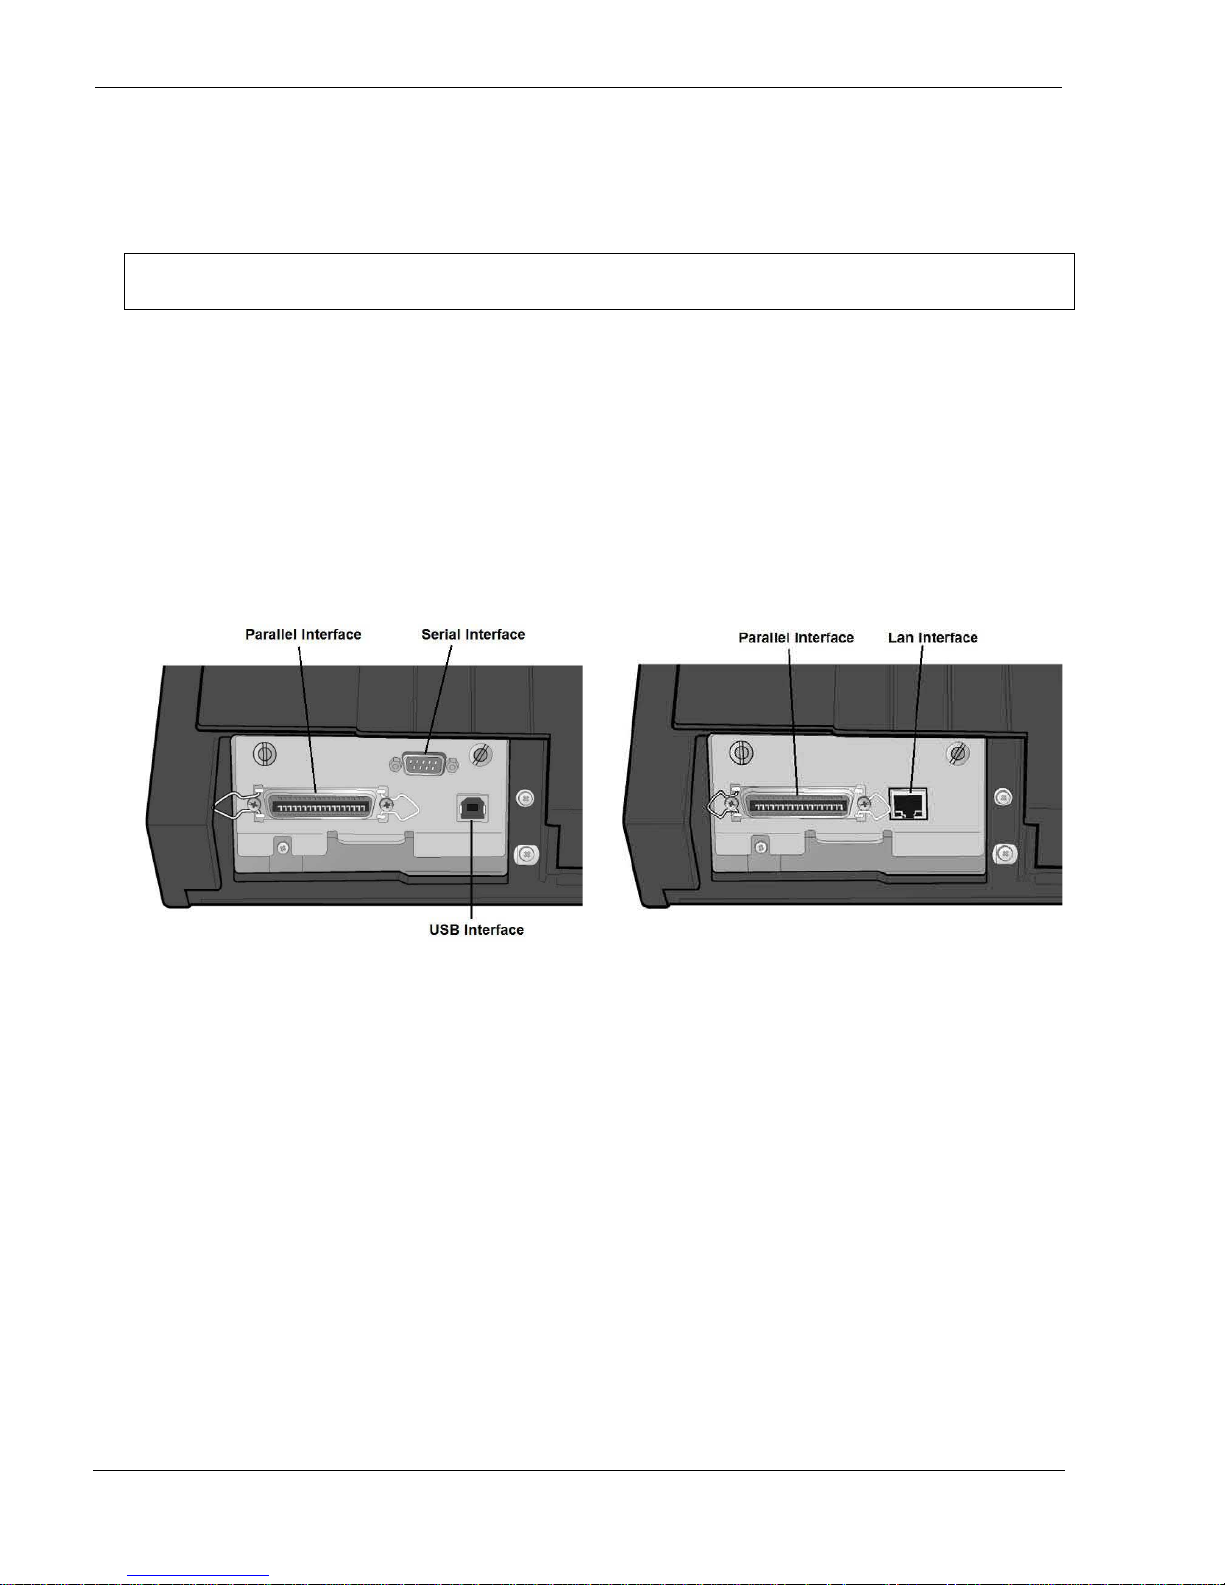
The 9065 printer can be connected to your host computer via different available interfaces on two alternative
controllers.
Before connecting the interface cable, make sure that the printer and the host computer
are turned OFF
1. First Controller: this controller provides the following three interfaces
:
:
A bidirectional IEEE1284 parallel interface
A RS-232C serial interface
An USB interface.
2. Second Controller: this controller provides the following two interfaces:
A bidirectional IEEE1284 parallel interface
An Ethernet LAN interface.
The interface connectors are located on the rear of the printer.
Insert the parallel interface cable into the parallel connector and fasten it by means of the clips.
Insert the serial interface cable into the serial connector and fasten it by means of the two screws (use the screwdriver).
Insert the USB interface cable into the USB connector
Insert the LAN interface cable into the LAN connector.

User Manual 9065/9065plus
MAN10772-00 17
Driver Installation
Windows Environment
At this point it is necessary to configure your printer for your Operating System.
The installation procedures depend upon the host environment.
The printer drivers of all curren t Compuprint printers can be found
at the Internet Address: http://www.compuprint.com
Starting from WINDOWS 95/98/2000/XP/NT4.0/Millennium®/Vista/Win7/Win8/Win10 environments the printer
supports the Plug & Play feature.
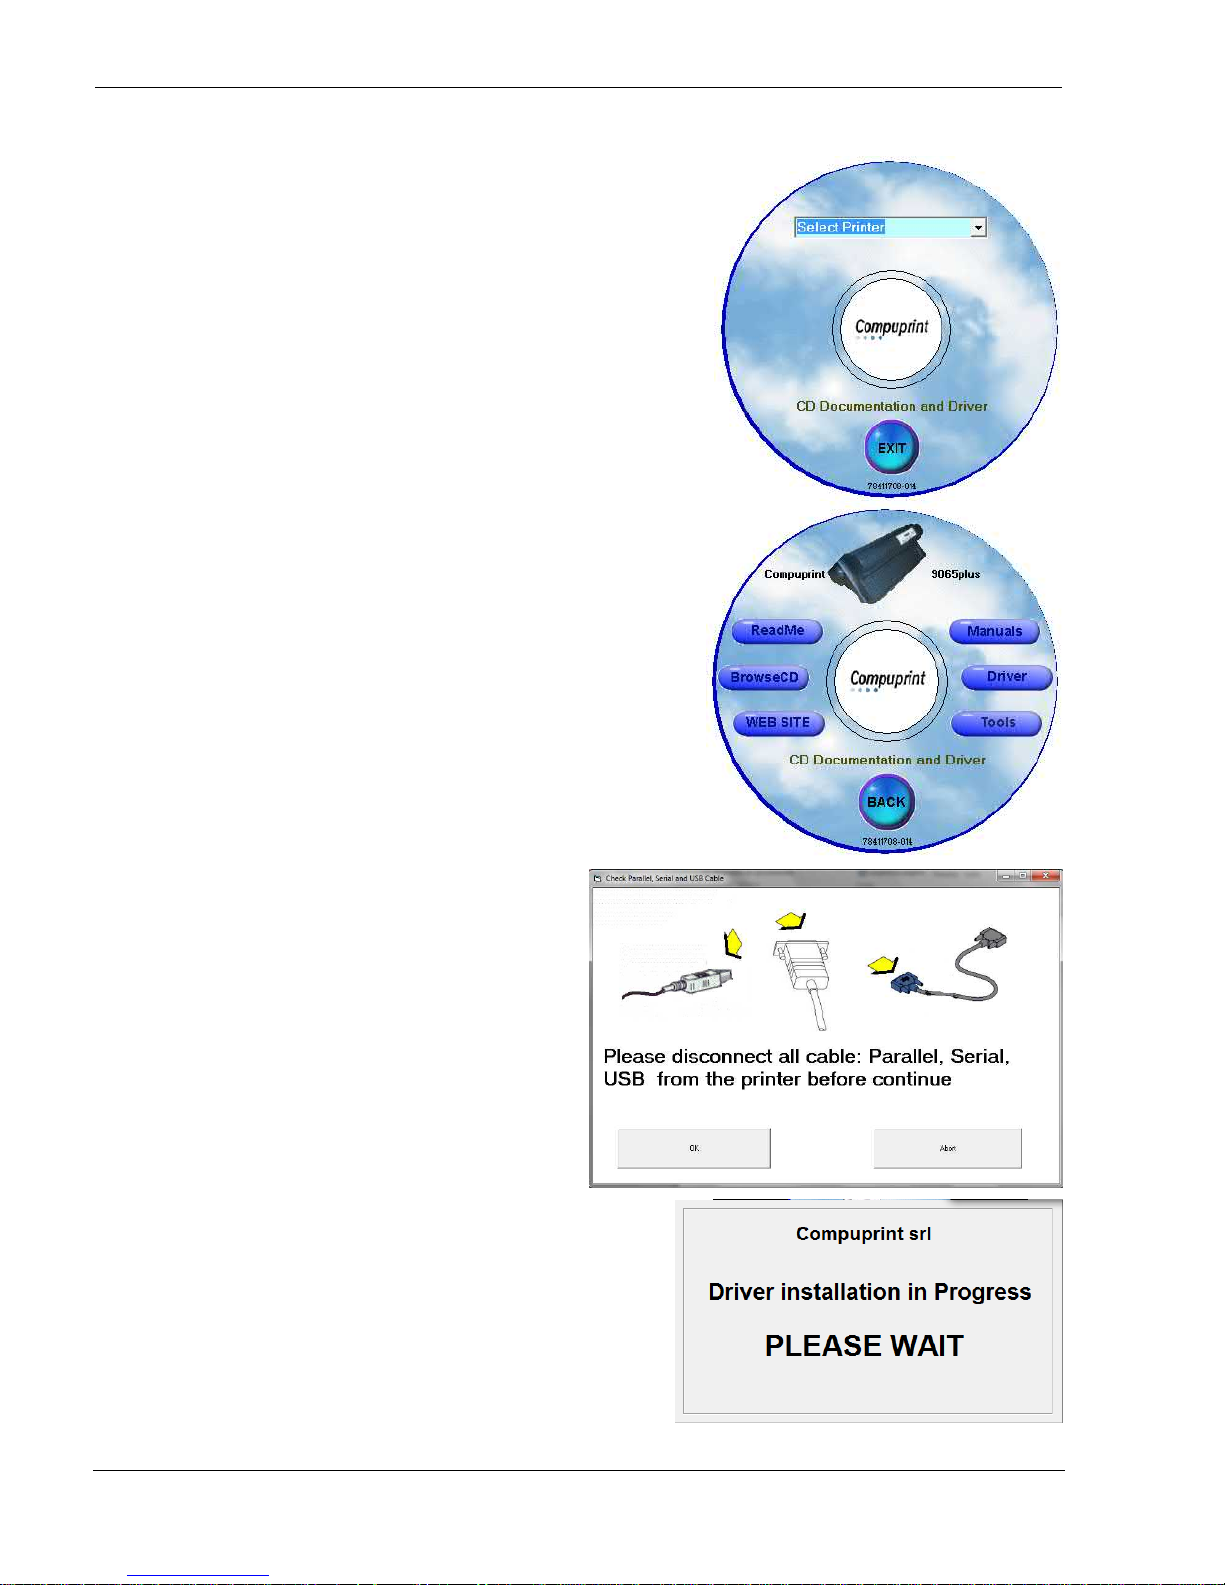
In the CD-ROM shipped with the printer there is an auto-run tool which automatically install the selected printer
driver.
If the tool does not automatically start, find
the AVVIO.exe application in the CD folder:
..\source
Windows could advise to run it as
Administrator
After the application start this mask will
displayed.
Select the language you want.
User Manual 9065/9065plus
MAN10772-00 18
At this point select the printer model.
The home of printer services will be
displayed.
ReadMe
Manuals
BrowseCD
Driver
WebSite
Tools
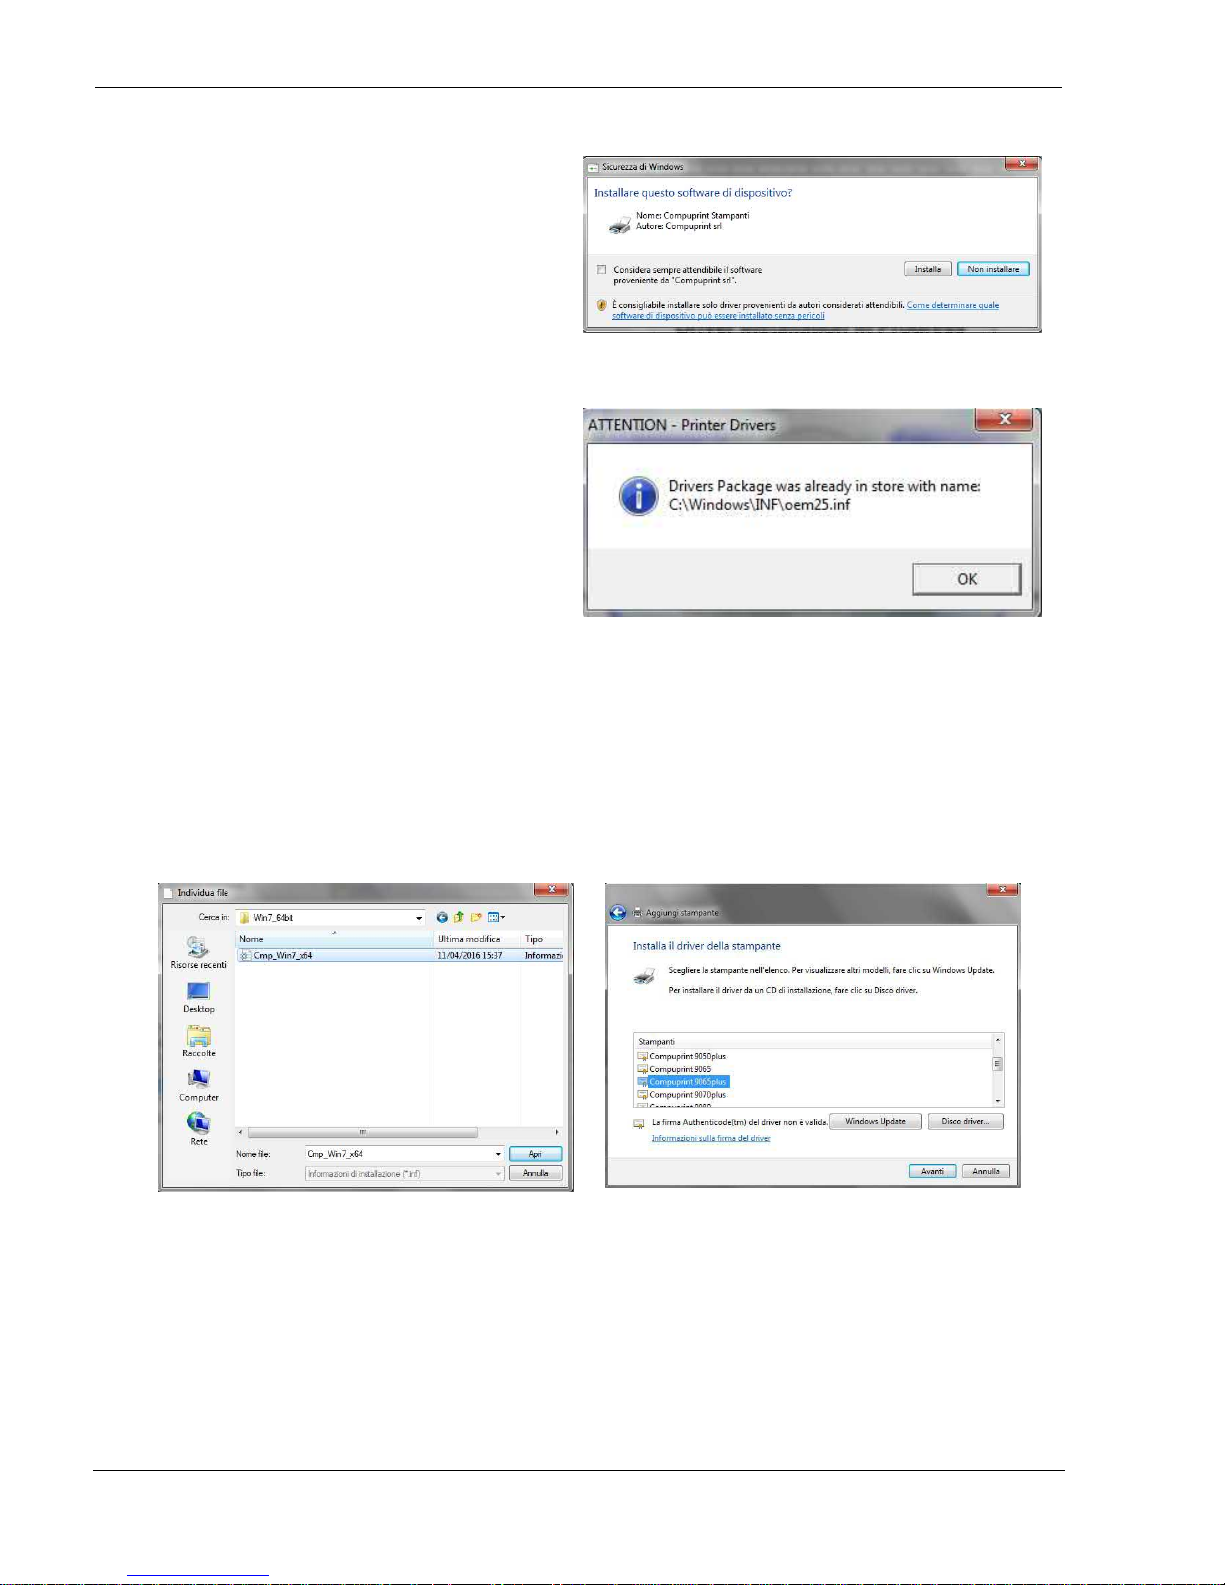
When select the Driver an attention pop-up
mask will appear to advise to disconnect all
cables and press OK
The Driver Installation starts
User Manual 9065/9065plus
MAN10772-00 19
After the Install selection, the file .INF with all the
printer information is stored in the directory:
..:\Windows\INF\
When the printer will be connected, the Windows O.S. will automatically detect it and apply the driver.
If the file .INF containing the printer information is
already installed, this message will be displayed.
Alternatively, it is possible to install the driver in the standard mode by click on Add Printer in the Device
and Printer Window function.
After the selection of the printer type (local or network) open the specific O.S. folder containing the INF
file.
The masks below shown for the Windows7/64.
..:\source\Comp9065-9065-9080-10300-9300-9300e-9070plus\Win7_64bit\Cpm_Win7_x64.INF
The printer is now connected.
User Manual 9065/9065plus
MAN10772-00 20
LAN Connection
To work under LAN (Local Area Network) it is mandatory to set the LAN Interface Through the Printer Operator
Panel to match the network setting. See later on the specific LAN configuration chapter.
Contact your system administrator for the correct values.
In the Local Area Network printing environment, the PCs can share a printer, that is, different users can use the
same printer.
Software installation must be carried out on every PC requiring access to the Compuprint printer.
For the communication between the PCs and the Compuprint printer is necessary that the same LAN protocol is
used for all connected devices: the TCP/IP or the NetBEUI protocol in a Windows environment.
For very old Windows O.S. (i.e. Windows98), in the CD you find the “Compuprint PP 20.exe” program which
install the Compuprint TCP/IP port.
This program can be found in the folder of CD: ..\source\Drivers\Microsoft\Print Port
From Windows XP the O.S. gives automatically the function to create a TCP/IP port and connect the printer in a
TCP/IP protocol.
Follow these steps.
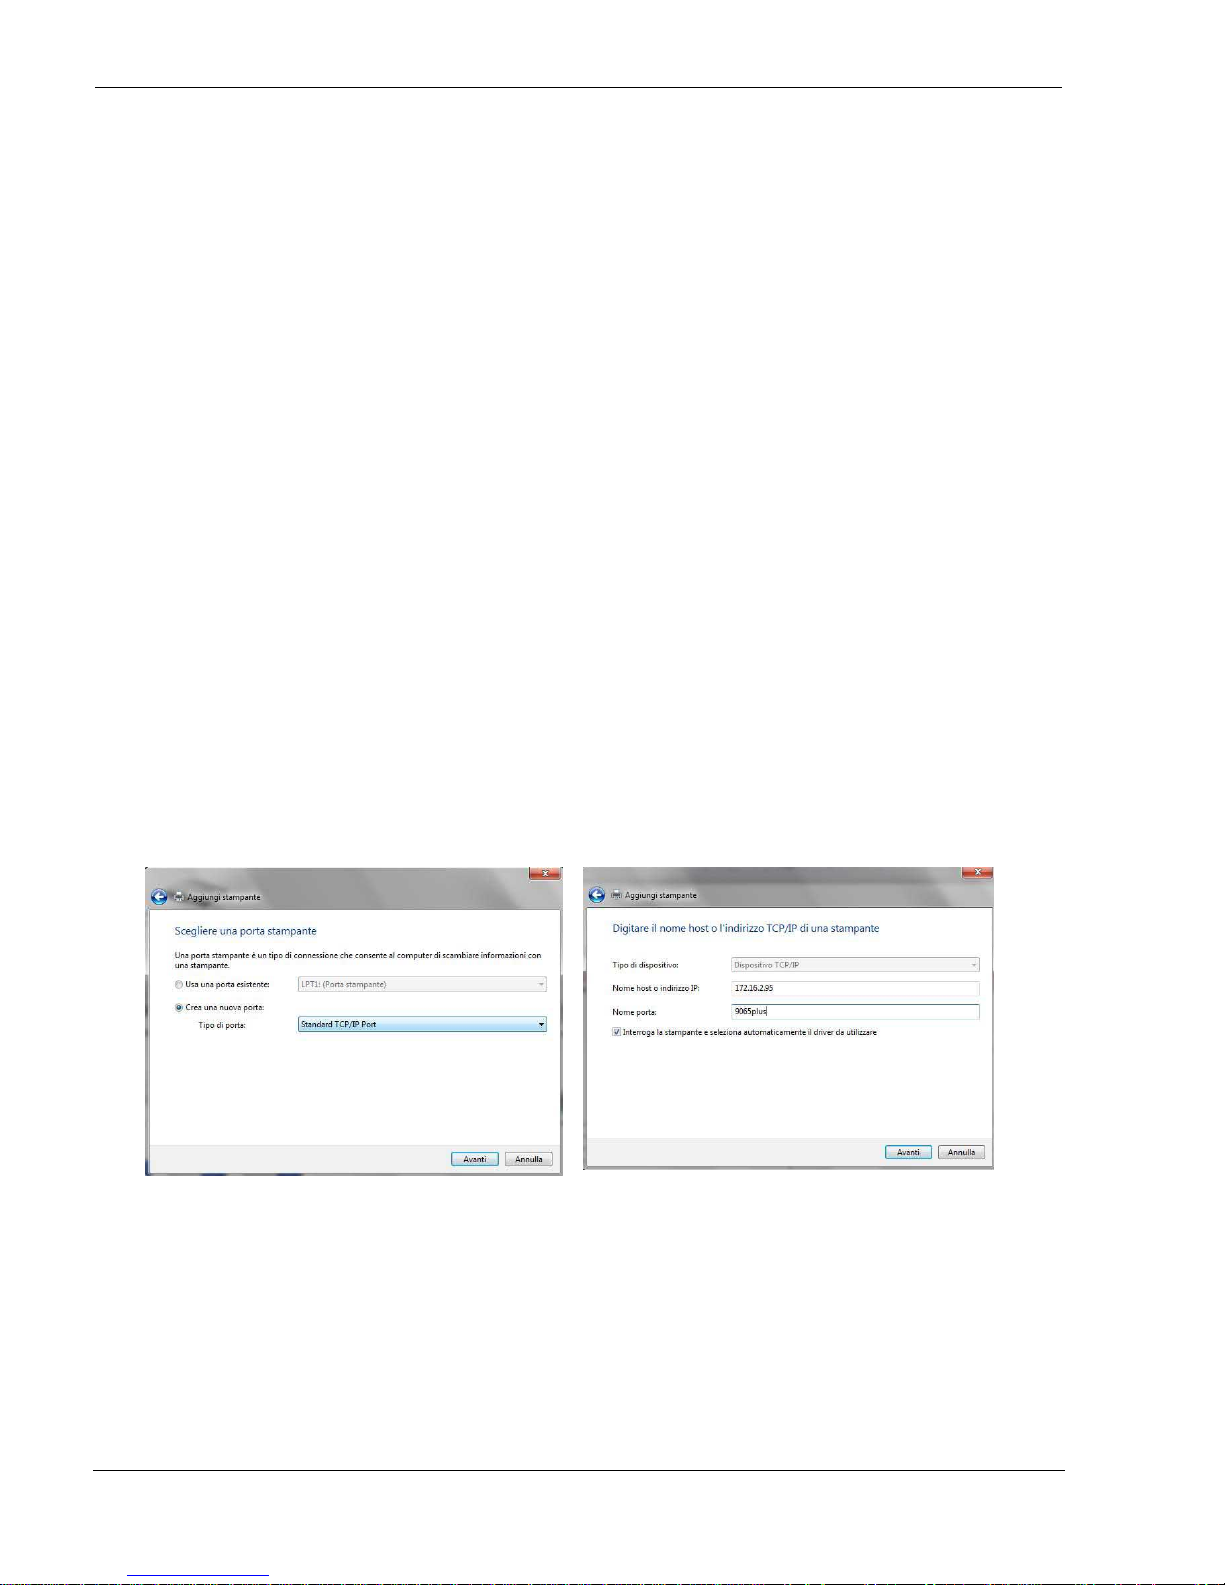
Open Control Panel>Devices and Printers>Add new Printer>Choose Local printer
Choose create a printer port>Select Standard
TCP/IP port
Define the HostName or IP Address> Define the Port
Name
User Manual 9065/9065plus
MAN10772-00 21
Define the port setting Protocol: RAW N° of Port: 9100
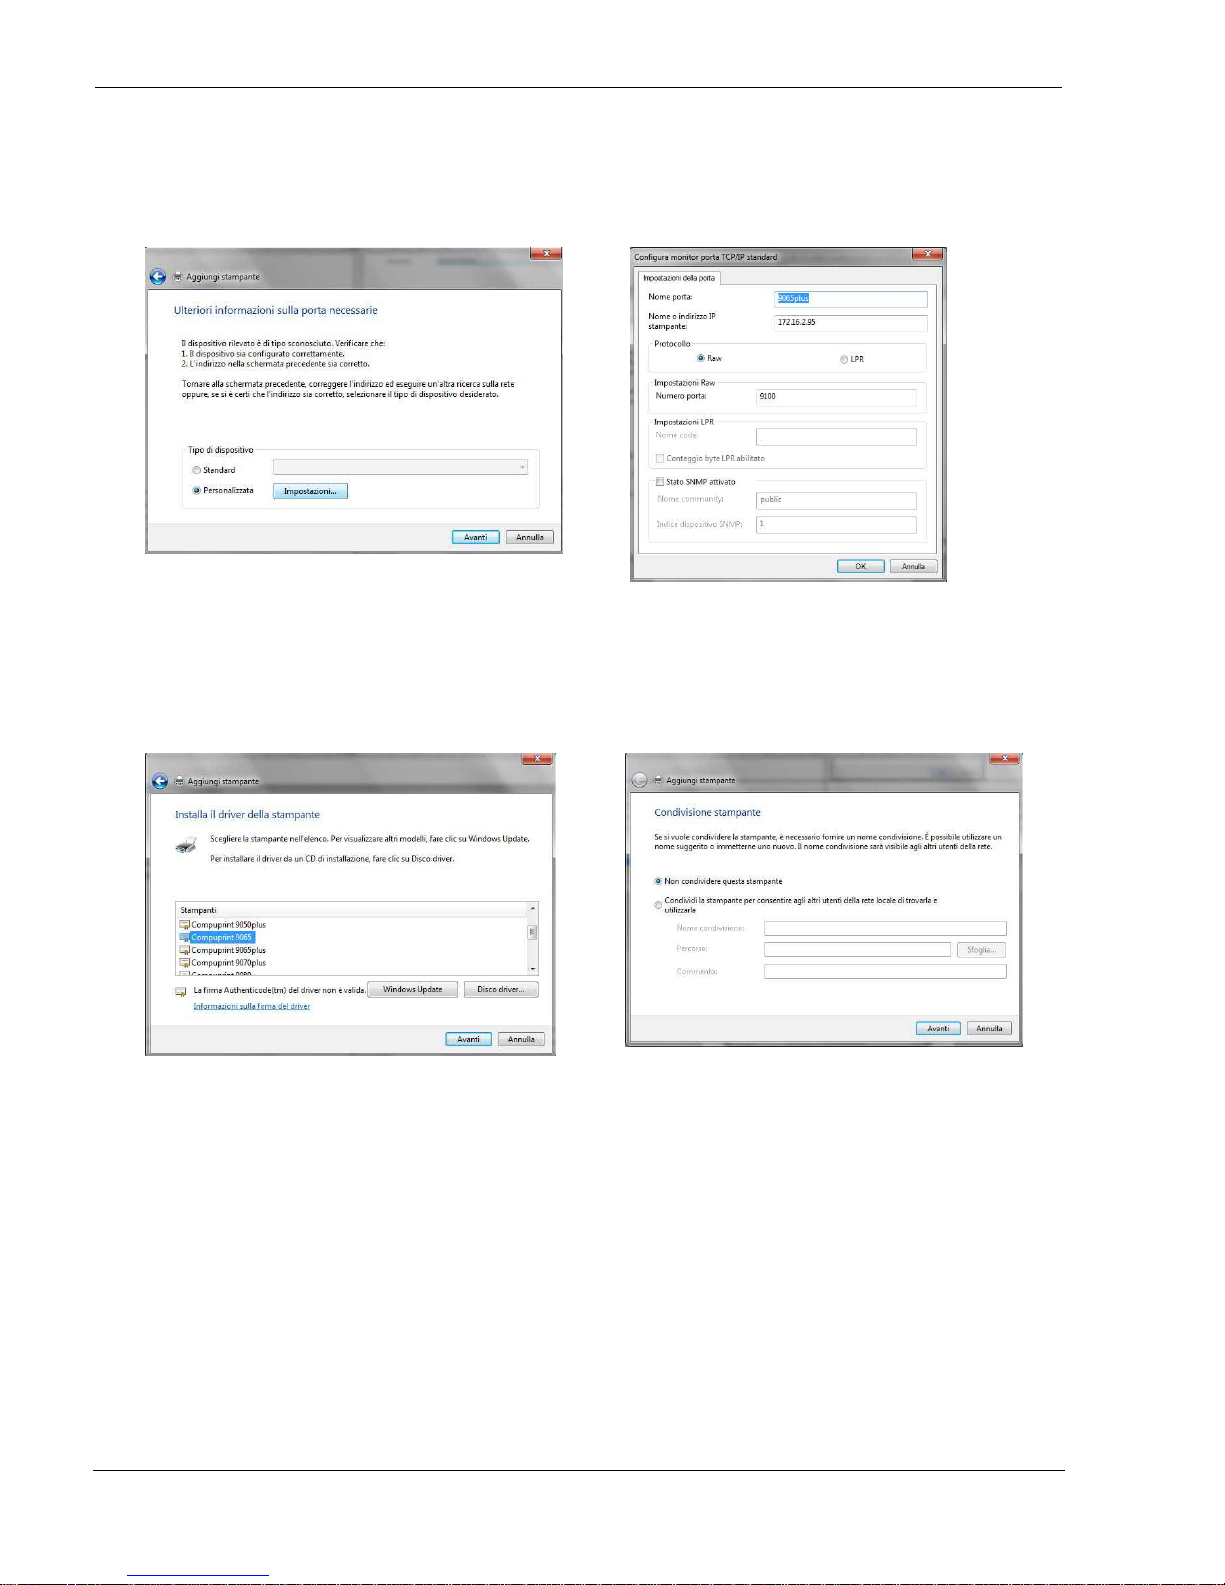
At this point the O.S. asks for the new driver.
Locate the .INF file in the CD subfolder as indicate in
the previous chapter.
Share or not the printer
The printer is now connected.
User Manual 9065/9065plus
MAN10772-00 22
Monitoring Printer & Remote Printer Configuration in LAN
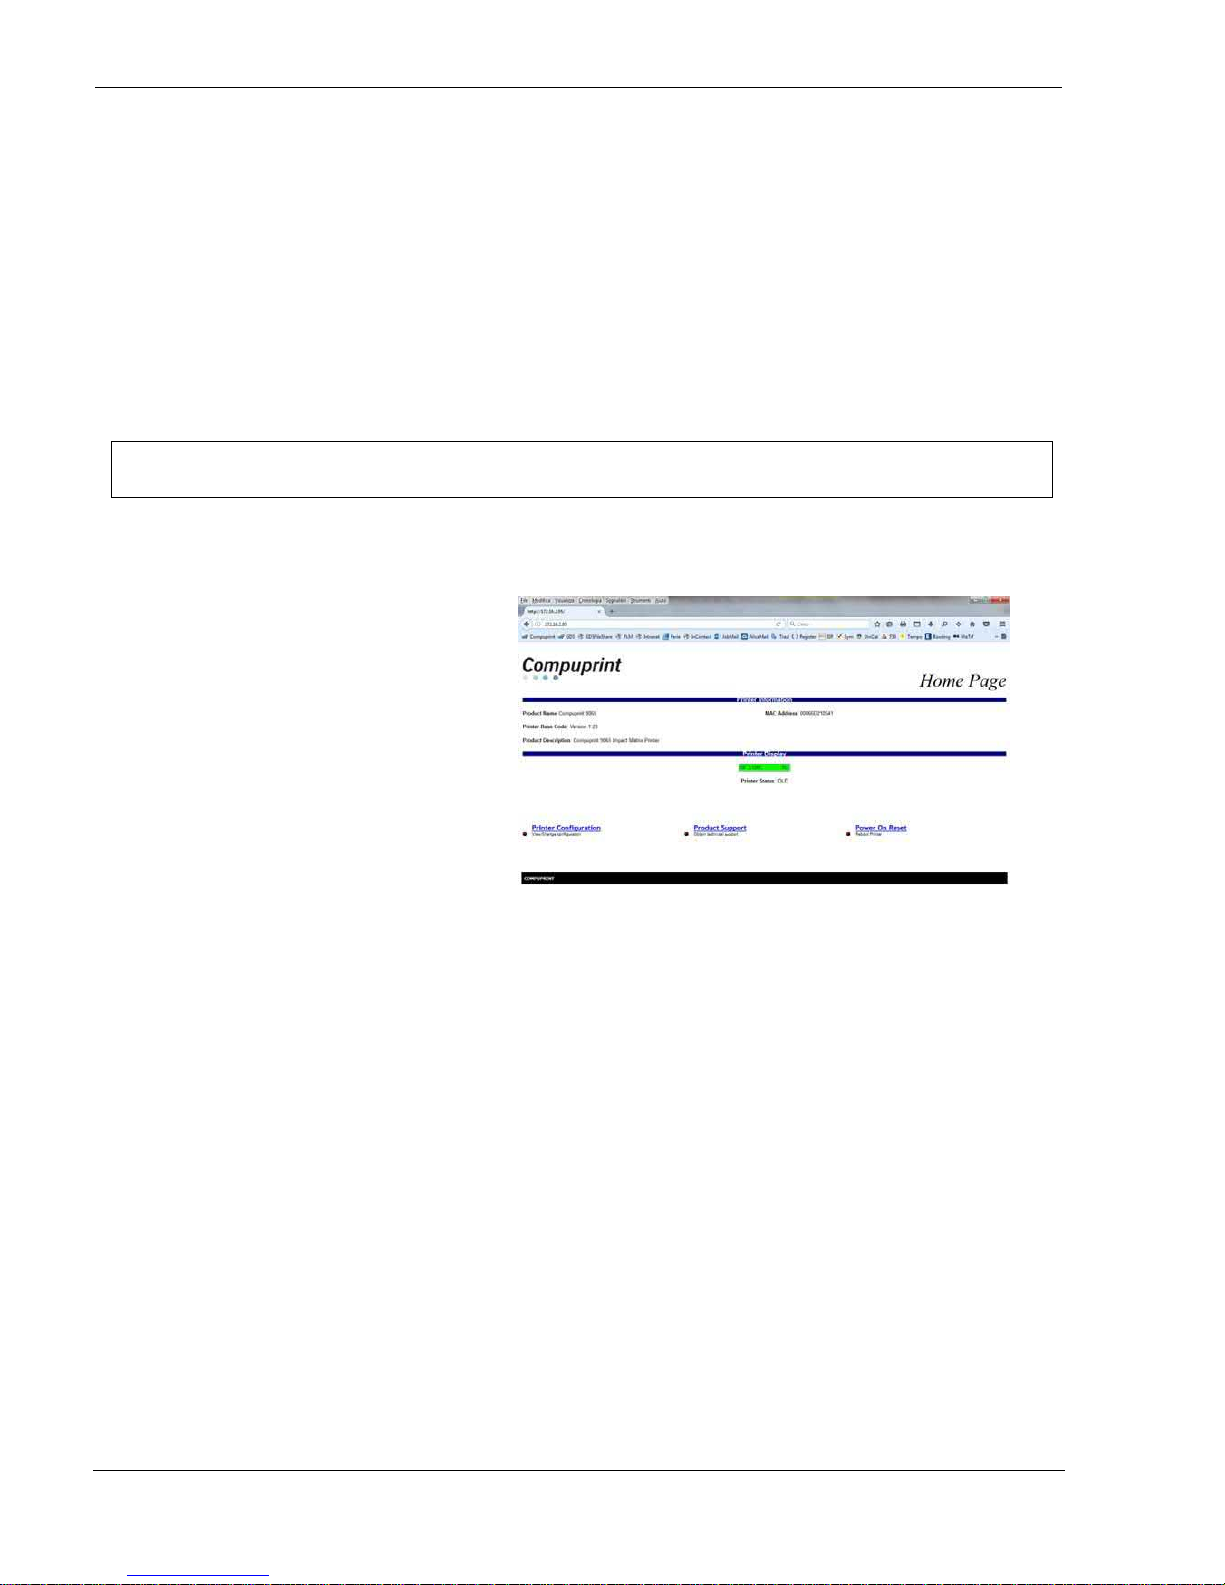
The LAN interface of the printer has a built-in web pages which can be used for monitoring the status of the
network printer and for the remote configuration.
Following procedure describes the use of an Intenet Browser (i.e.: IE, Mozilla, Chrome, etc.)
To browse the printer Home web page, enter the IP Address as web page address.
The IP Address must correspond with the IP Address set in the INIT IP ADDRESS
parameter of the LAN INTERFACE item
Home Page
The Printer Home Web Page screen
appears as the mask on the right:
This Printer Home Web Page shows the current status of the printer :
Product Name:Compuprint 9xxx
MAC Address: xxxxxxxxxxxx
Printer Base Code: Version 1.23
Product Description: Compuprint 9065 Impact Matrix Printer
And can activates following types of information about the printer:
Printer Configuration: printer setting that you can configure by remote control.
Product support: reference to contact Compuprint support
Power On Reset: feature to reboot the printer
User Manual 9065/9065plus
MAN10772-00 23
When click on Printer Configuration the System Page is opened:
It is possible to choose :
Loading the default factory setting parameters
overwriting the current ones for all setup pages
(All, Macrox, Configuration)
Setting the default Macro at power on
Setting the security password
Select one of the different webpages (Home,
System, Config, Interface, Lan, Macro#)
described hereafter.
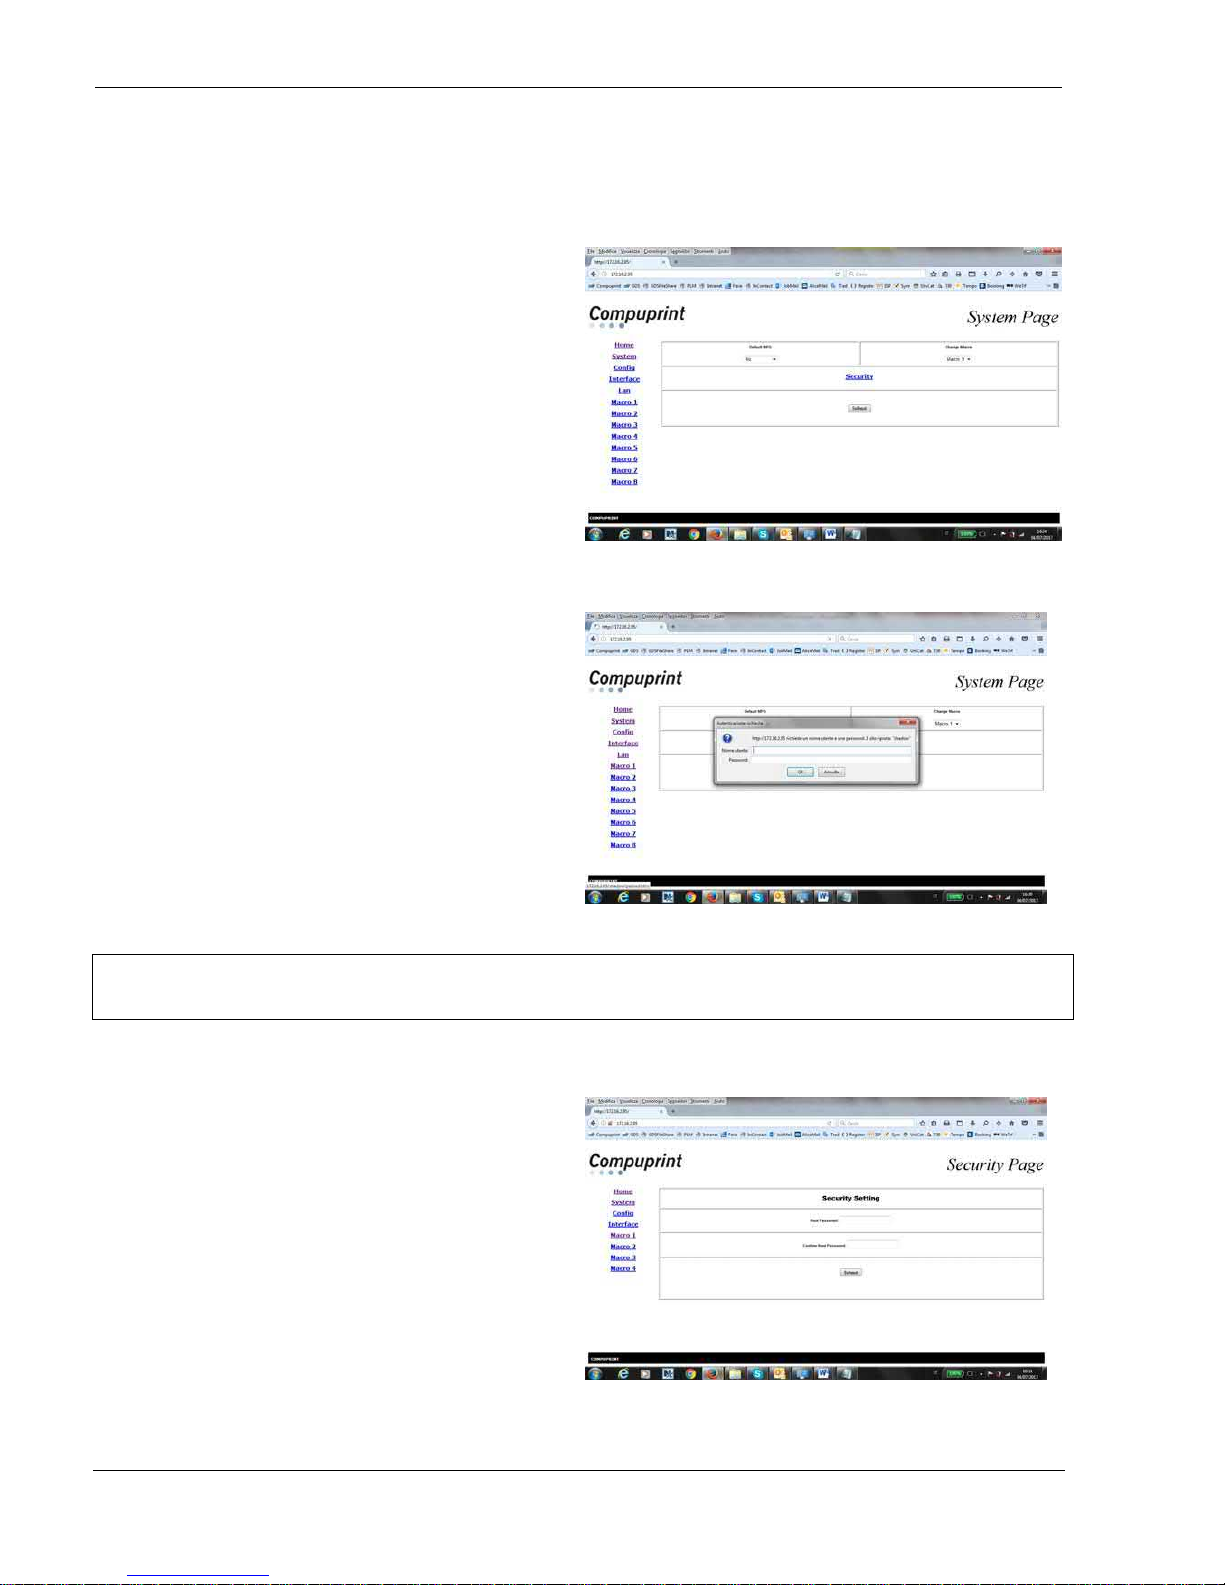
System Page
In the System Page click on Security Setting button.
The first time the following screen appears:
Type root for User Name
Type root for password
Security Page
It is now possible to indicate a new password to
protect the setting
User Manual 9065/9065plus
MAN10772-00 24
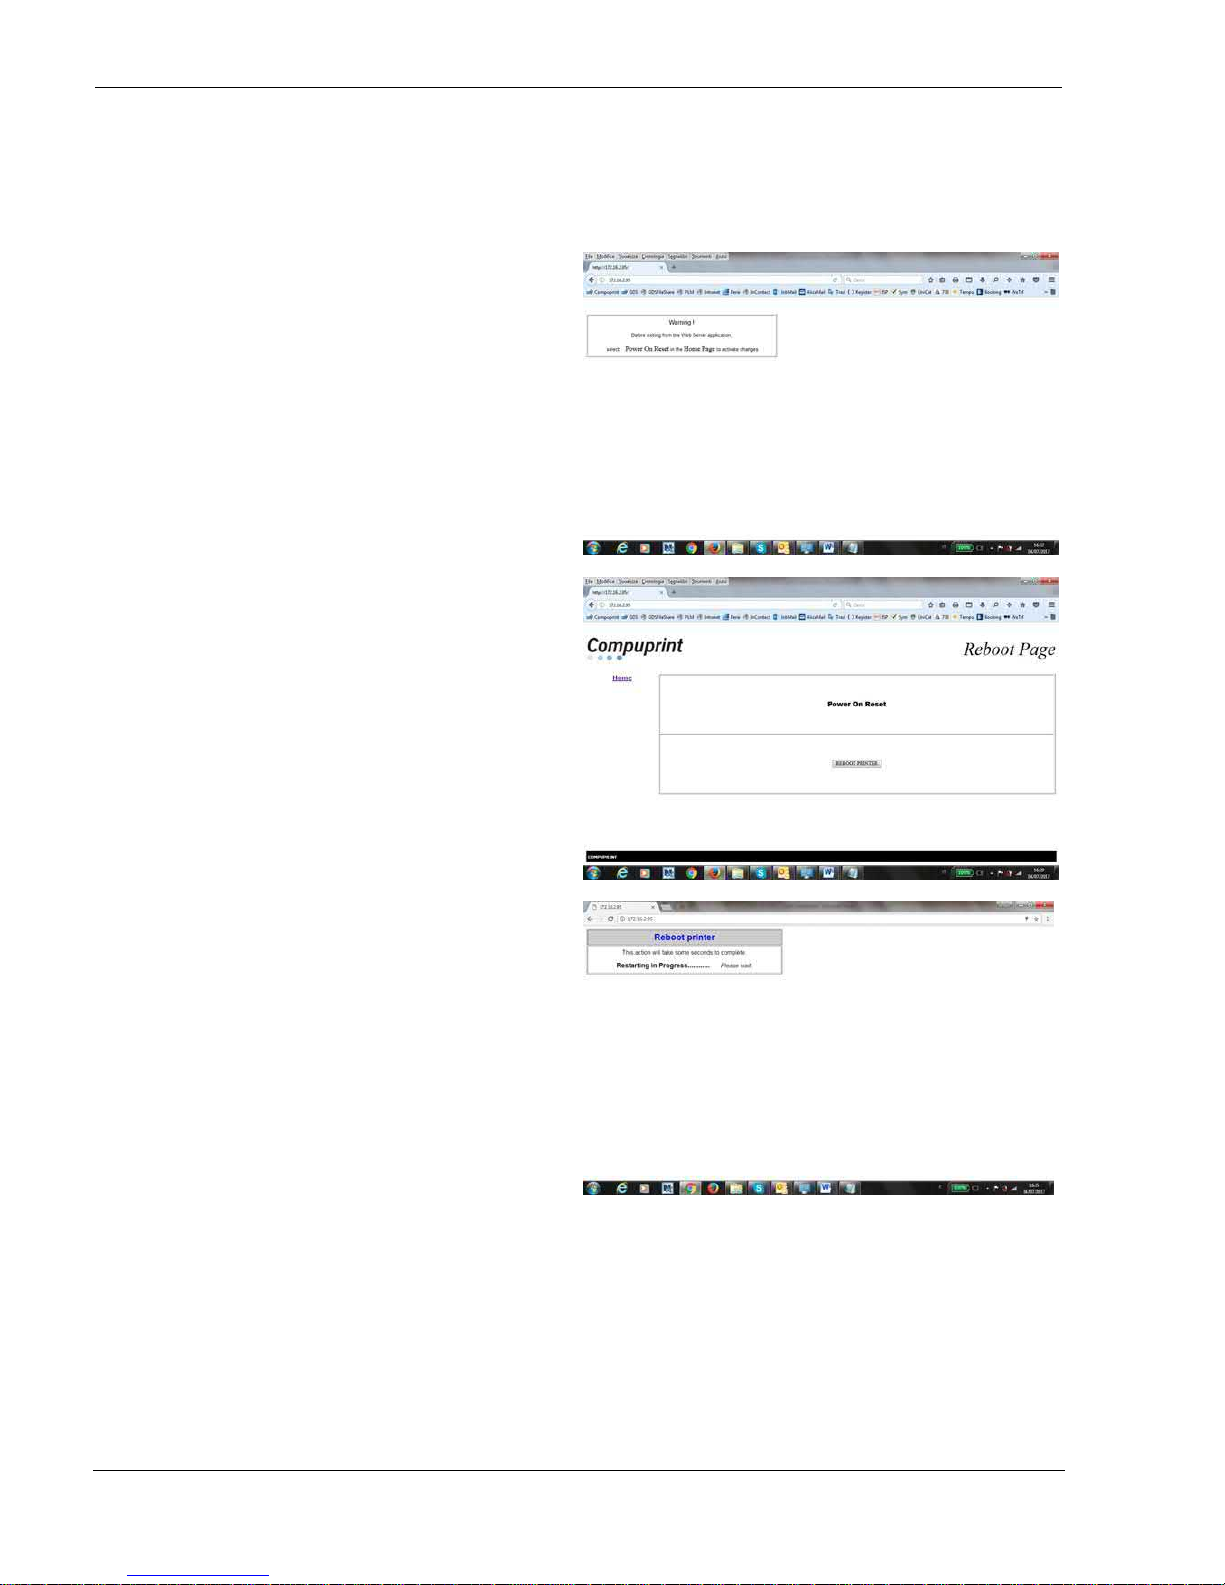
Security Page
The following screen appears
REMARK
Remind you that it is necessary to select Power on
Reset button to go to Reboot Page and save the
changes.
Screen after Reboot Printer action
User Manual 9065/9065plus
MAN10772-00 25
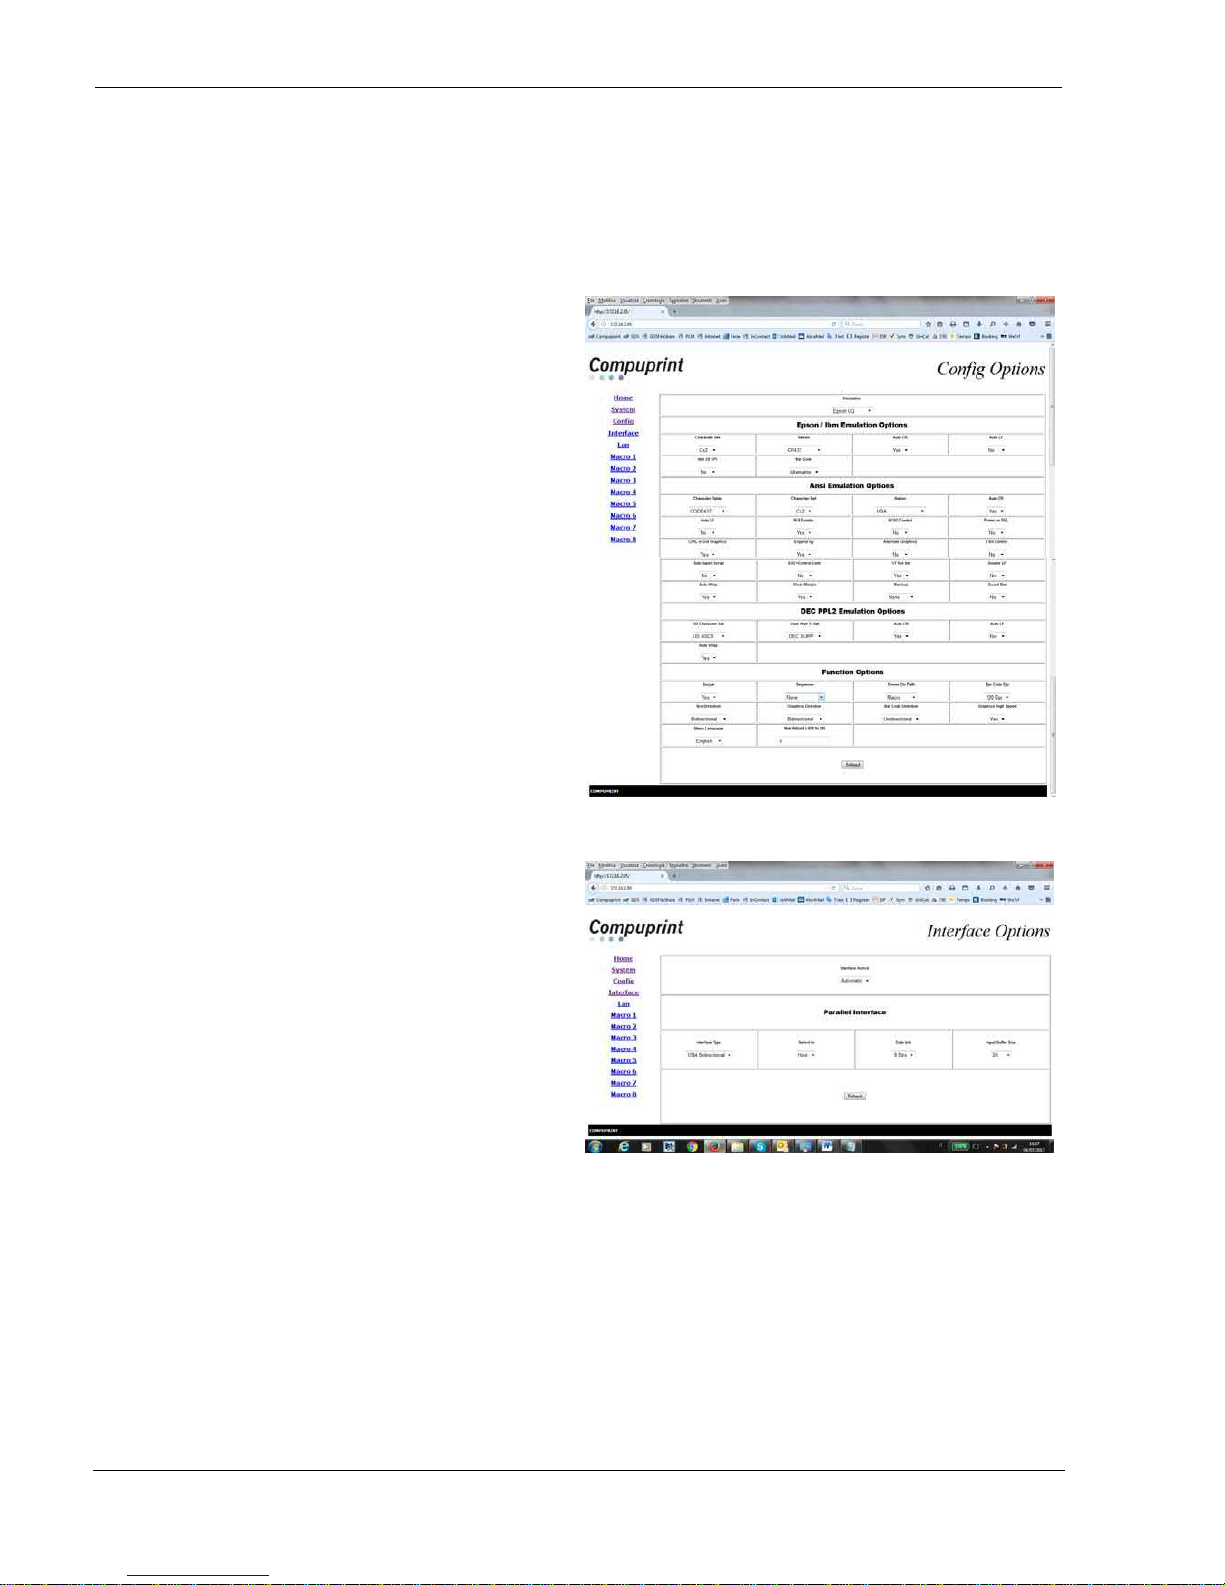
Printer Configuration
Config Options Page
To obtain the Printer Configuration information
tables, click on the respective left button.
This page contains a series of tables with the
corresponding printer set-up. For a detailed
description of each parameters and values refer to
the Configuration chapter later on in this manual.
This is the Configuration Options Page
Interface Options Page
This is the Interface Options Page
User Manual 9065/9065plus
MAN10772-00 26
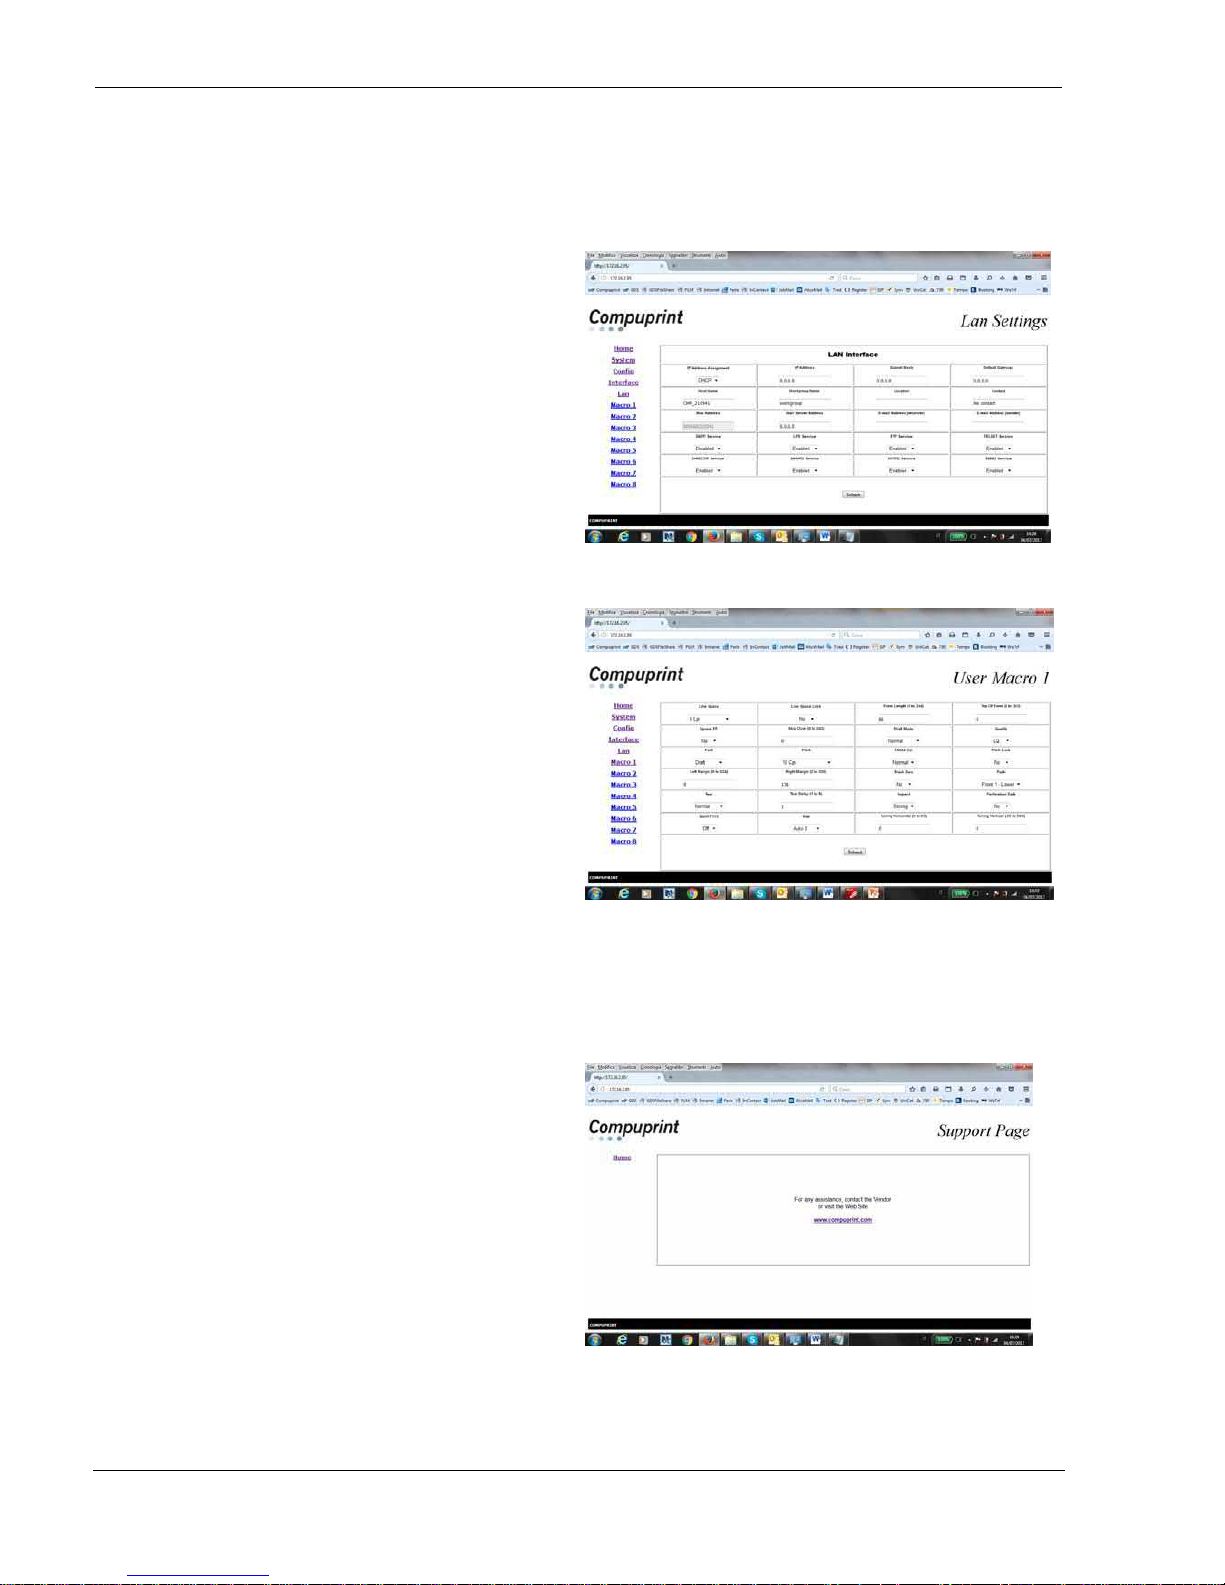
Lan Settings Page
This is the Lan Setting Page
User Macrox Page
This is the User Macro# Page
You can now choose the network printer configuration. When the parameters are set as necessary, click on the
Submit button at the end of the table. If a password has already been set in the Security item, to enter the
remote printer configuration mode you need to type the network password
Support
This is the Compuprint Support Page
User Manual 9065/9065plus
MAN10772-00 27
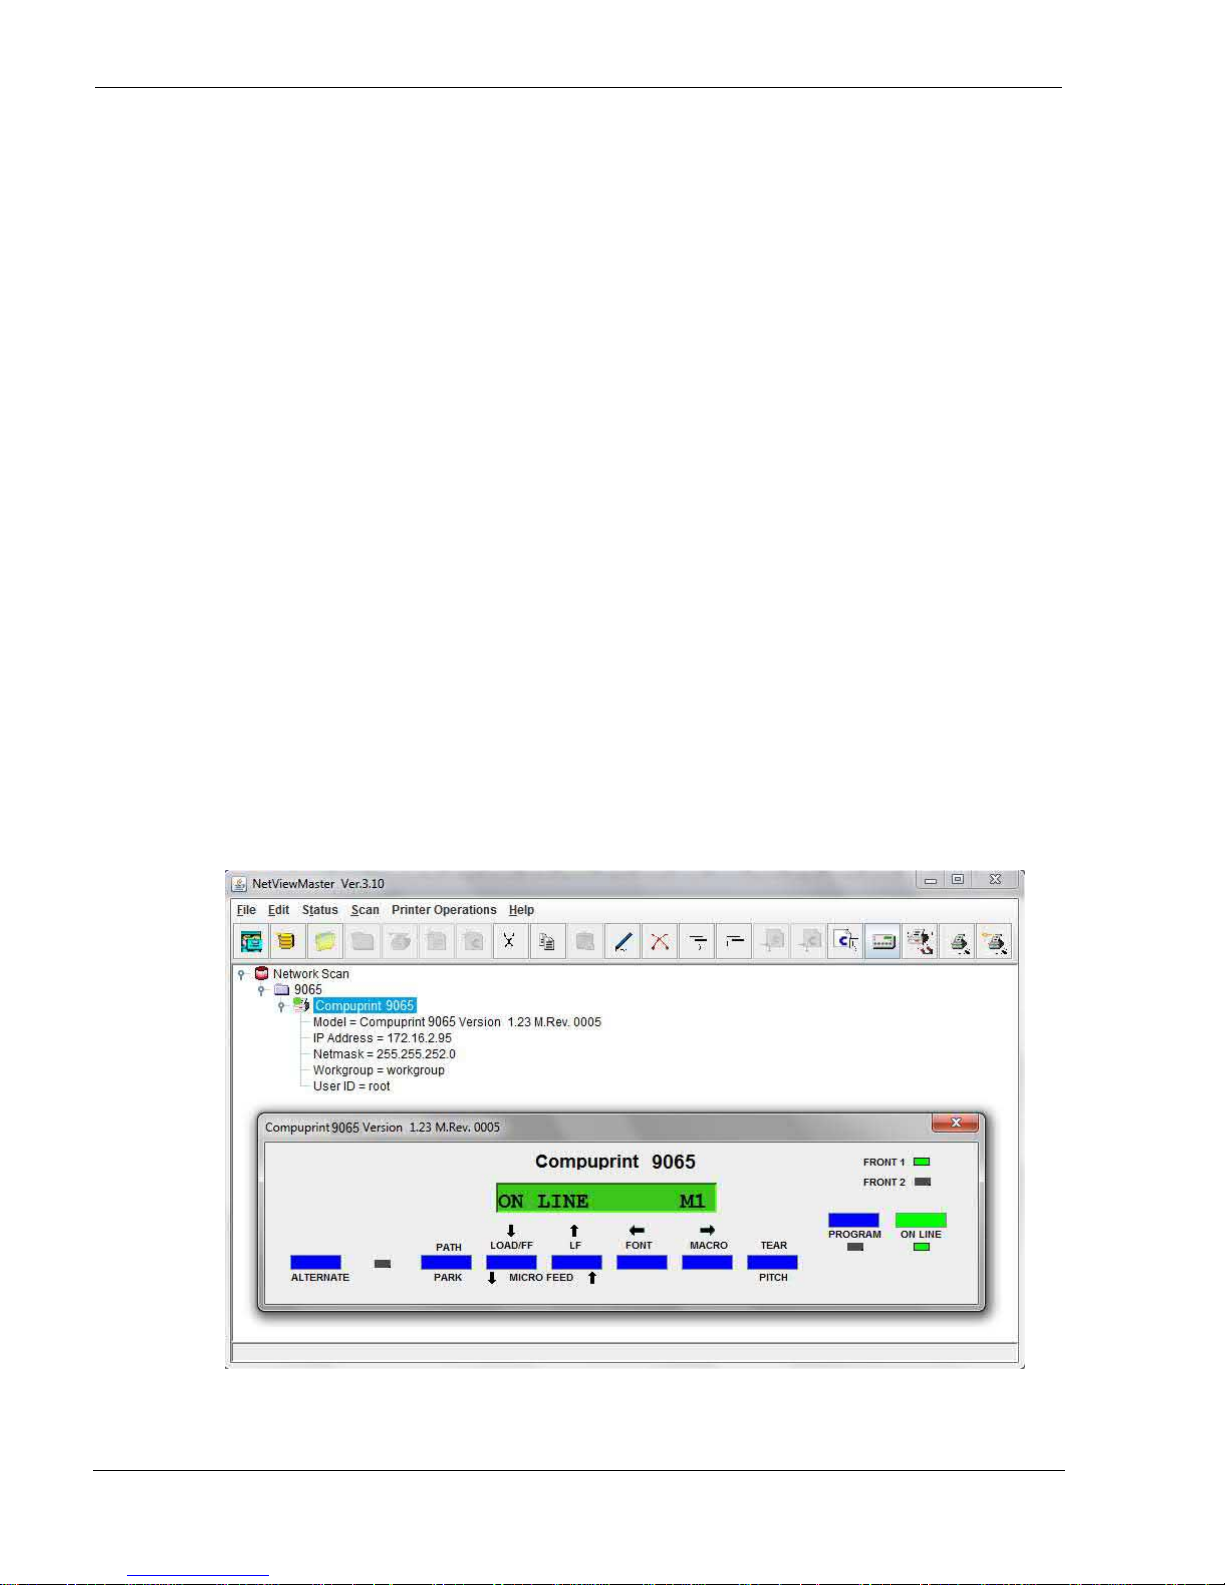
NetViewMaster Utility
The NetViewMaster Utility is a software tool for network administrators that allows the configuration and
control of Compuprint Serial Dot Matrix and Transactional Dot Matrix Printers remotely connected to the Ethernet
LAN. With this tool the installed printers may be controlled, configured and organized easily.
Detailed information can be found in the specific NetViewMaster Utility User Manual p.n. MAN10280.
This tool is available on CD driver in the folder: ..\source\tools\NetViewMaster
The main features are the following:
Device Discovery: searches for the devices within a range of IP addresses.
Printer Organization: the printers connected to the network can be organized into logical groups in a
hierarchically structured tree.
Printer Status Report: checks the printer’s status and reports alarms
Printer Configuration: the remotely connected printers may be configured as needed from the
administrator’s workstation.
Firmware Updating: provides a firmware downloading function to upgrade both the base and the LAN card
firmware.
Remote Operator Panel Management: provides a virtual operator panel for the remotely connected printer
at the administrator’s workstation that allows to perform all functions normally achieved pressing the
operator panel keys.
The NetViewMaster Utility also provides the basic status management for third-party printers compliant to the
standard MIB objects. The NetVieMasteris a Java based application and can be run on any platform supporting
the Java Run Time Environment version 6 or newer.

User Manual 9065/9065plus
MAN10772-00 28
UNIX Environment
To configure the printer in Unix environment, you have to run the “cmpwizard.sh” script from the drivers\unix
directory included in this CD-ROM , except for Linus 7.x and Solaris 7.x operating systems described later in this
section.
Port Installation & Configuration
Check that the Printer is powered on and the Green Power led of the LAN Interface Port is lit.
It is necessary to be SUPER USER
Insert the Compuprint Ethernet LAN CD-ROM.
1. From the shell bush, run the
“cmpwizard.sh” script from the
drivers\unix directory included
in the CD-ROM labeled
Compuprint Ethernet LAN. See
the following screen:
2. Select the operating system
(n.7).
3. Add the IP address. This
address must match the IP
address selected in the INIT IP
ADDRESS parameter of the
LAN INTERFACE item in the
Power-On
Configuration setup.
 Loading...