

Page 1
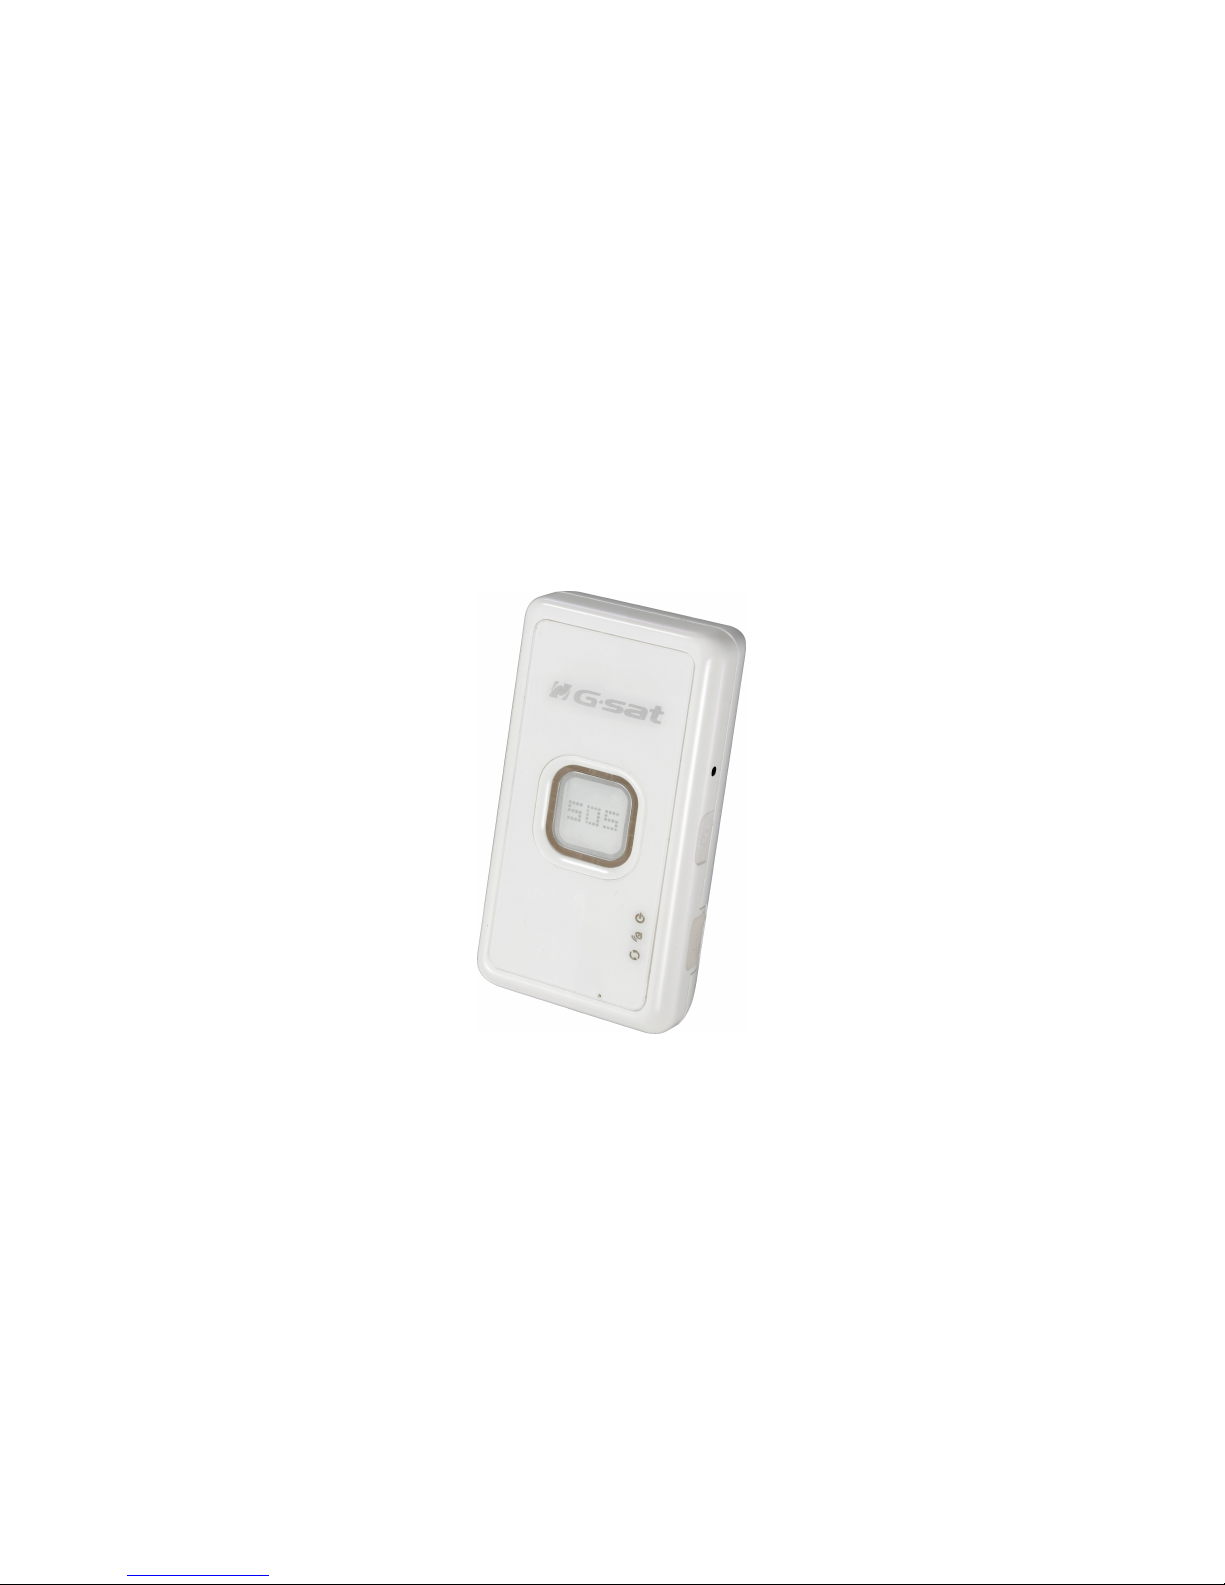
TR-203 Personal Tracker
User Manual
Version: 0.1
Page 2

1
Reminders for Users
Power Supply Usage
TR-203 is not fully charged while it is shipped from factory. Before using TR-203 for the
first time, please charge it at least 3 hours by connecting to AC power adapter under the
power-off condition.
SIM Card Notice
TR-Management Center connects TR-203 via Skype out. Please turn off the voicemail,
call waiting, and call forwarding function of the SIM card that installed in TR-203. You
could contact with your telecommunication service provider for turning off those function.
Battery Safety Precaution
TR-203 contains a Li-ion battery. Li-ion battery packs might get hot, explode, ignite and/or
cause serious injury if exploded by abusive using. There is a risk of fire and burns if the
device is handled improperly. Do not disassemble, crush, and puncture, externally short
contracts or circuits, dispose of in fire or water.
Do not use TR-203 that appears damaged, deformed, overheats, or emits a foul odor.
Do not place TR-203 where the temperature may exceed 55℃ (131℉)
Only use original manufactured power charger
Page 3

2
CONTENT
1. Introduction ............................................................................................................... 4
1.1 Delicate Appearance..................................................................................................... 4
1.2 LED Indicator.................................................................................................................. 5
1.3 Accessories...................................................................................................................... 6
2 TR-203 Operation ........................................................................................................ 7
2.1 Charge the device ......................................................................................................... 7
2.2 Install SIM card.............................................................................................................. 7
2.3 Turn on/off the device ................................................................................................. 8
2.4 Use the carry bag.......................................................................................................... 9
3 TR Management Center 203 Setting .......................................................................... 11
3.1 The computer system requirements of the TR Management Center 203
program ................................................................................................................................. 11
3.2 The network requirements of the TR Management Center 203 program. 11
3.3 Copyrights and Example Information................................................................... 14
3.4 Install TR Management Center 203....................................................................... 16
3.5 TR Management Center 203 Screen Introduction ............................................ 19
3.5.1 Tracker and Main Tool Bar............................................................................. 20
3.5.2 Query Tool.......................................................................................................... 21
3.5.3 Data Output Area............................................................................................. 22
3.6 Skype Setup.................................................................................................................. 22
4 TR Management Center 203 Operation ...................................................................... 26
4.1 TR Management Center Basic Setup..................................................................... 26
4.2 Tracker Management.................................................................................................. 26
4.2.1 Set up TR-203................................................................................................... 27
4.2.2 Tracker Management ...................................................................................... 32
4.2.3 Deleting a TR-203 tracker............................................................................. 33
4.2.4 Editing a TR-203 tracker ............................................................................... 35
4.3 Tracker Group Management..................................................................................... 37
4.3.1 Add a Group ...................................................................................................... 37
4.3.2 Edit Group .......................................................................................................... 38
4.3.3 Rename Group.................................................................................................. 39
4.3.4 Delete Group ..................................................................................................... 41
4.4 Instruction of using TR Management Center...................................................... 43
4.4.1 Ping TR-203....................................................................................................... 43
4.4.2 TR-203 Periodic Report .................................................................................. 45
4.4.3 TR-203 Motion Report .................................................................................... 48
4.4.4 TR-203 Parking Mode ..................................................................................... 50
Page 4

3
4.4.5 TR-203 Sleeping Mode................................................................................... 52
4.4.6 TR-203 Voice Monitor ..................................................................................... 54
4.4.7 TR-203 Geofence ............................................................................................. 55
4.4.8 TR-203 Data Logger........................................................................................ 56
4.4.9 Turn off TR-203 ................................................................................................ 57
4.4.8 Comparison between parking mode, motion mode, sleeping mode,
and standby mode ...................................................................................................... 59
4.5 TR Management Center Data Query ..................................................................... 60
4.5.1 Look up for history data ................................................................................ 60
4.5.2 Export the data into KML format ................................................................ 63
4.5.3 Delete the history data in the database................................................... 64
4.6 Update TR-203’s Firmware....................................................................................... 66
Appendix ...................................................................................................................... 68
Page 5
4
2
3
4
7
8
6
2
5
3
4
5
1. Introduction
TR-203 is a personal tracking device with fast acquisition time. It is compact, portable and
stylish in design with GPS / GSM / GPRS wireless network. User can easily remotely
configure TR-203, and then displays the location by specific map software. Plus voice
monitoring function, this is simply your best choice for remote tracking.
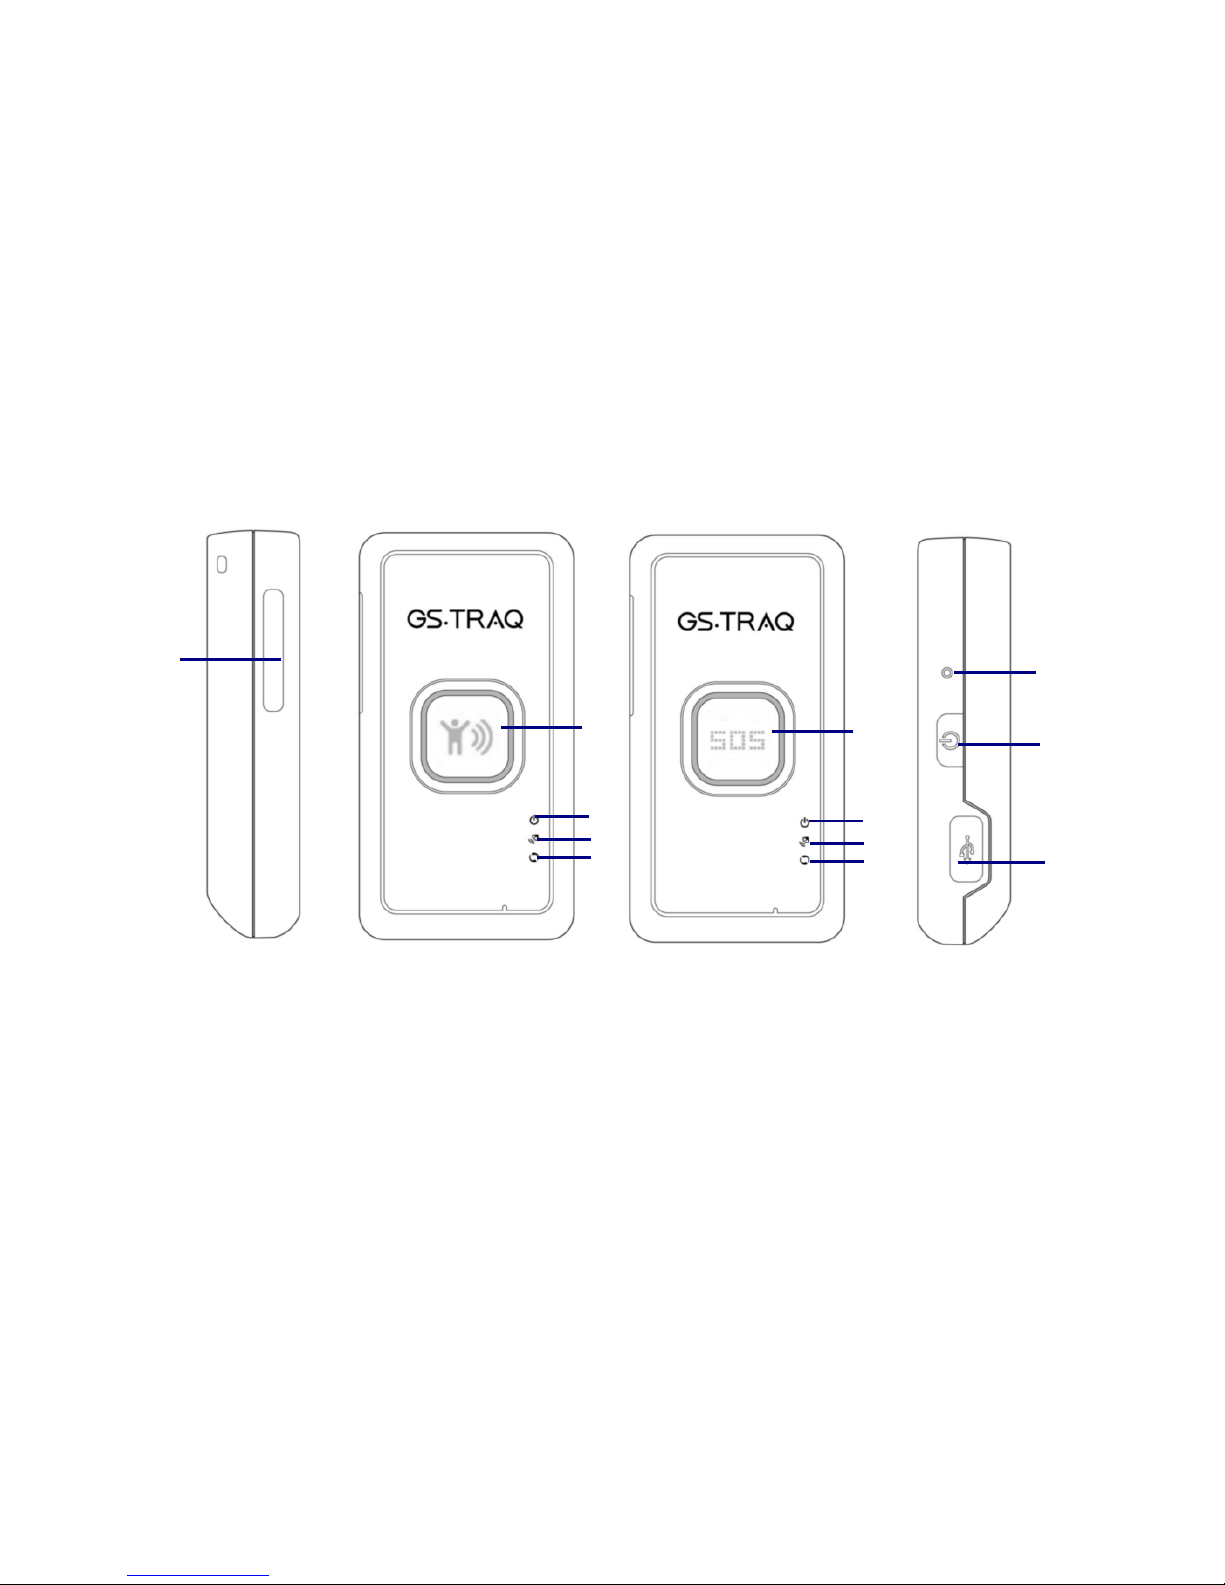
1.1 Delicate Appearance
1
1 SIM card holder
2 SOS button
3 Power status LED
4 GPS LED
5 GSM LED
6 Reset key
7 Power Key
8 Mini USB port
Page 6
5
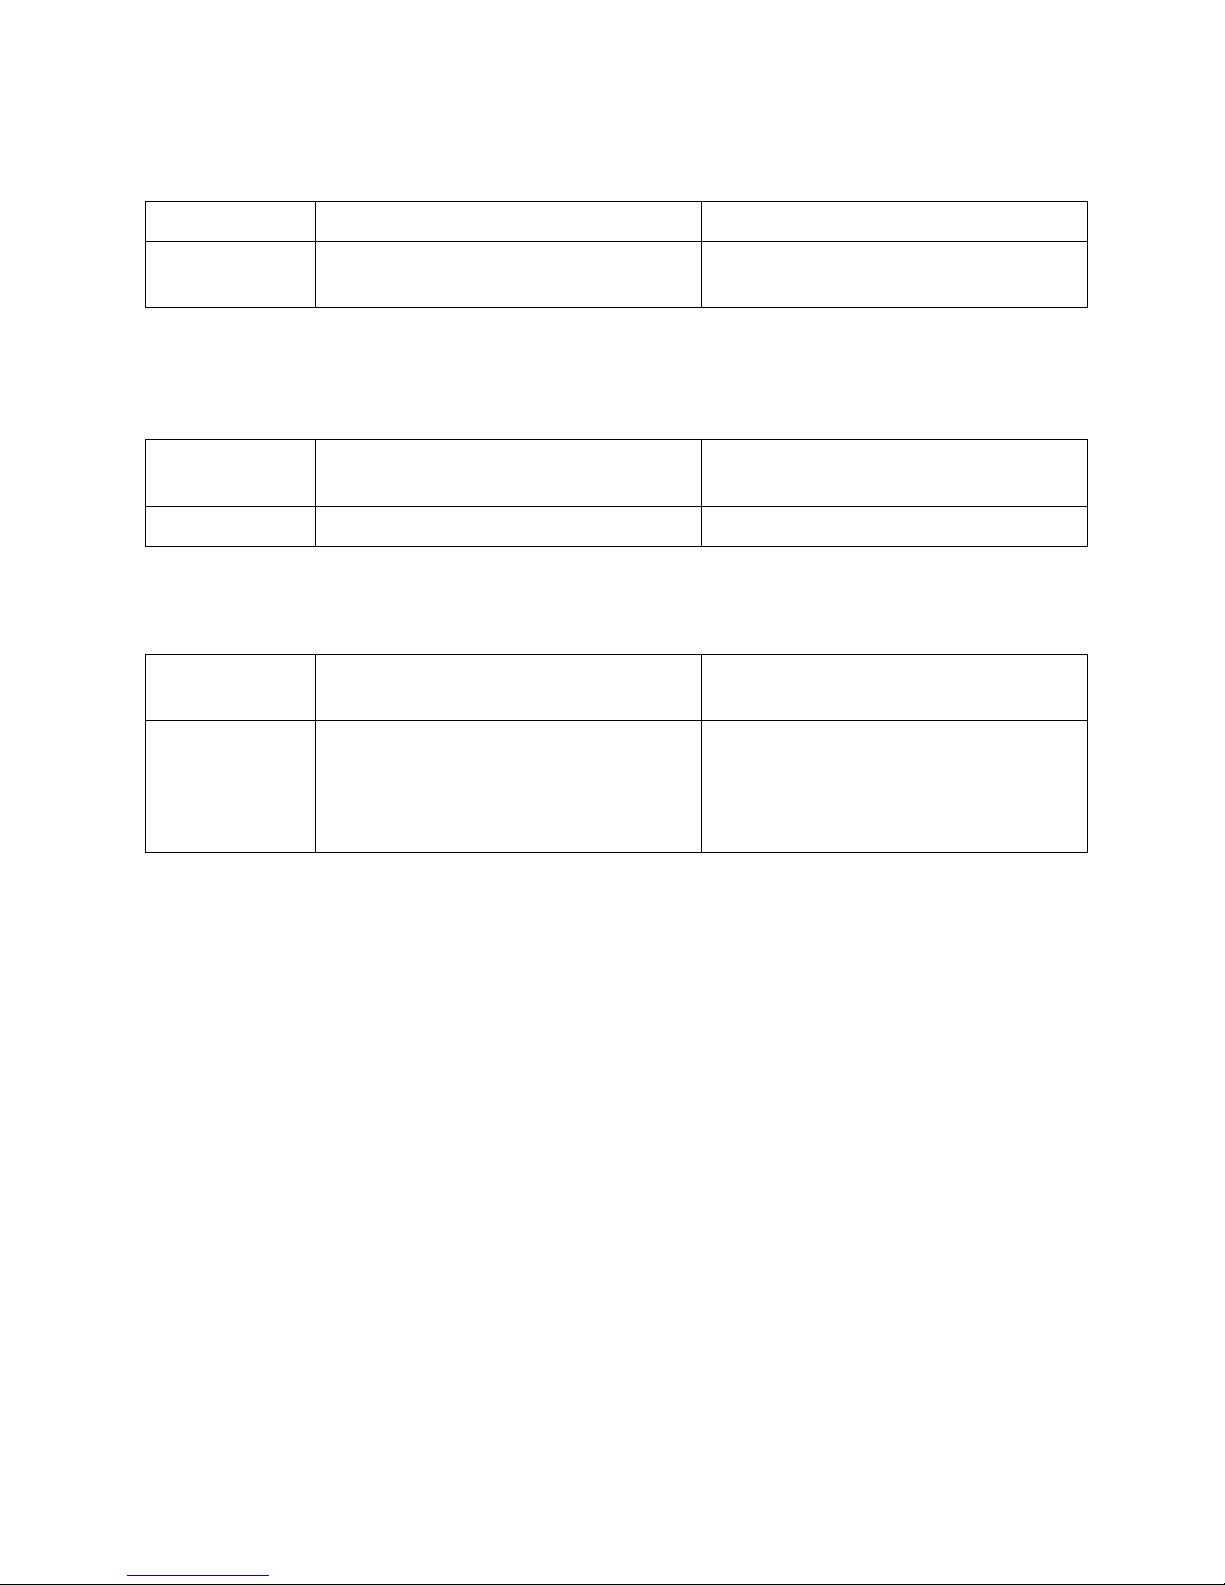
1.2 LED Indicator
1. Power Status LED:
LED Orange Red
State TR-203 is connected to charger or
Battery power is low
USB cable
2. GPS LED:
LED Blink Quickly (Once per second) Blink Slowly (Once every 3
seconds)
State TR-203 does not get GPS fix TR-203 gets GPS fix
3. GSM LED:
LED Blink Quickly (Once per second) Blink Slowly (Once every 3
seconds)
State No SIM card inserted
Standby Mode
TR-203 is searching GSM network
SIM card is registering to GSM
network
Page 7
6
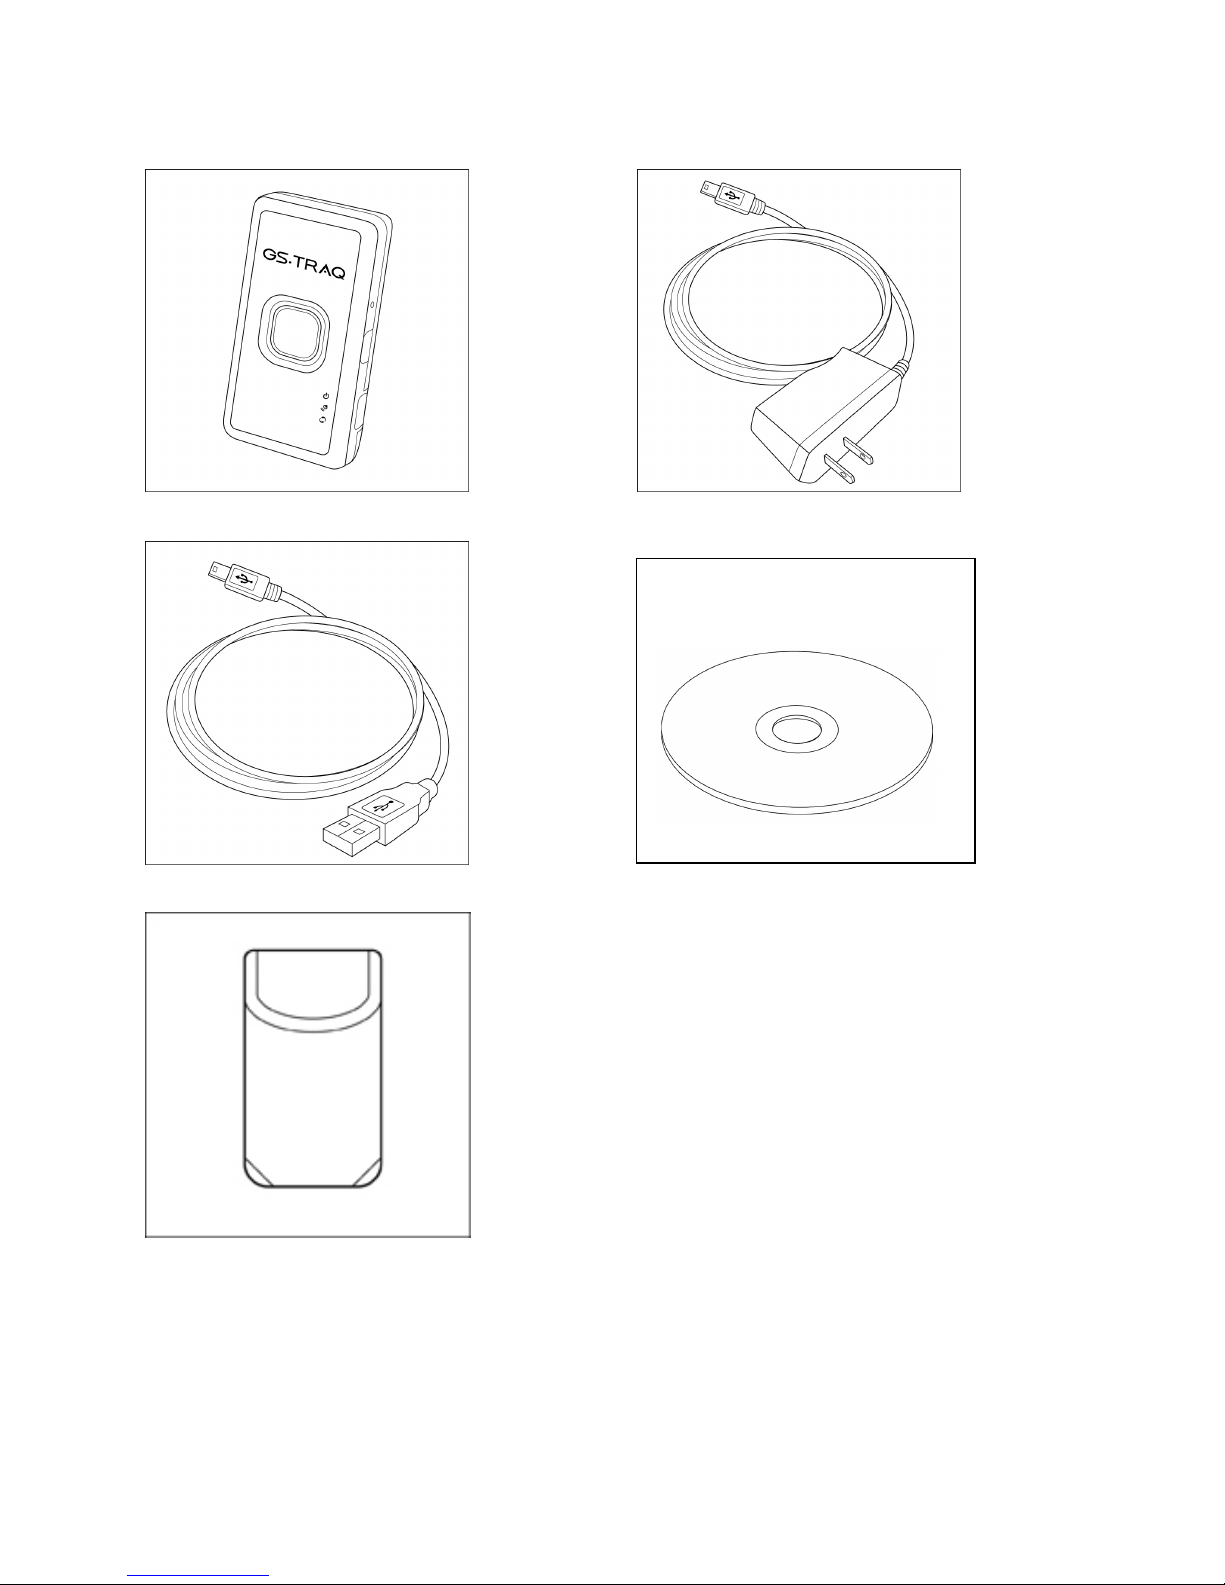
1.3 Accessories
TR-203 AC charger
USB cable CD Utility
Carry Bag
Page 8
7
2 TR-203 Operation
2.1 Charge the device
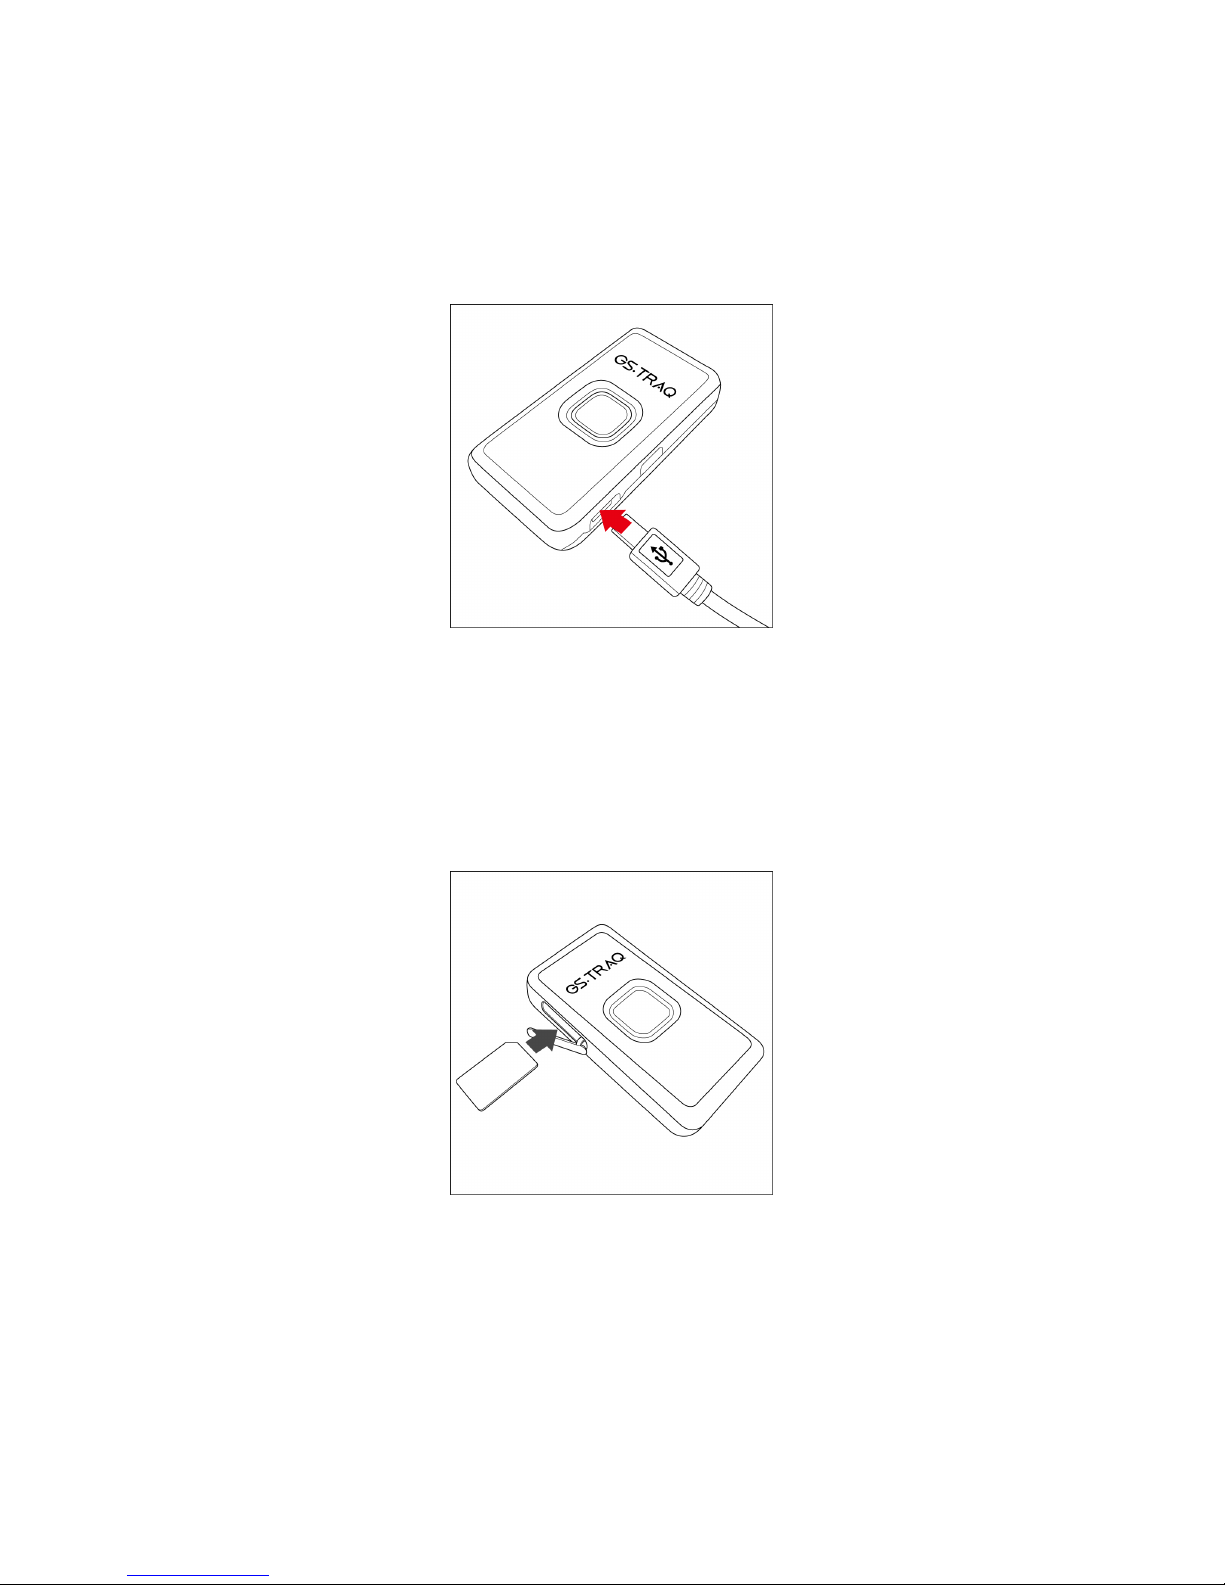
Before using TR-203 for the first time, please fully charge it by connecting AC power adapter
under the power-off condition. You can also charge TR-203 by connecting it to PC or
Notebook via USB cable. (The power of PC or of notebook should be turned on.)
The status LED will turn orange when the device is being charged. When the device is fully
charged, status LED will be off
2.2 Install SIM card
With the metal contacts facedown and the notch on the SIM card left side, insert the SIM card
into the SIM holder.
You could take out the SIM card by lightly pressing the SIM card with your nail.
Note:
Before installing or taking out SIM card, please power off TR-203.
Page 9
8
2.3 Emergency button
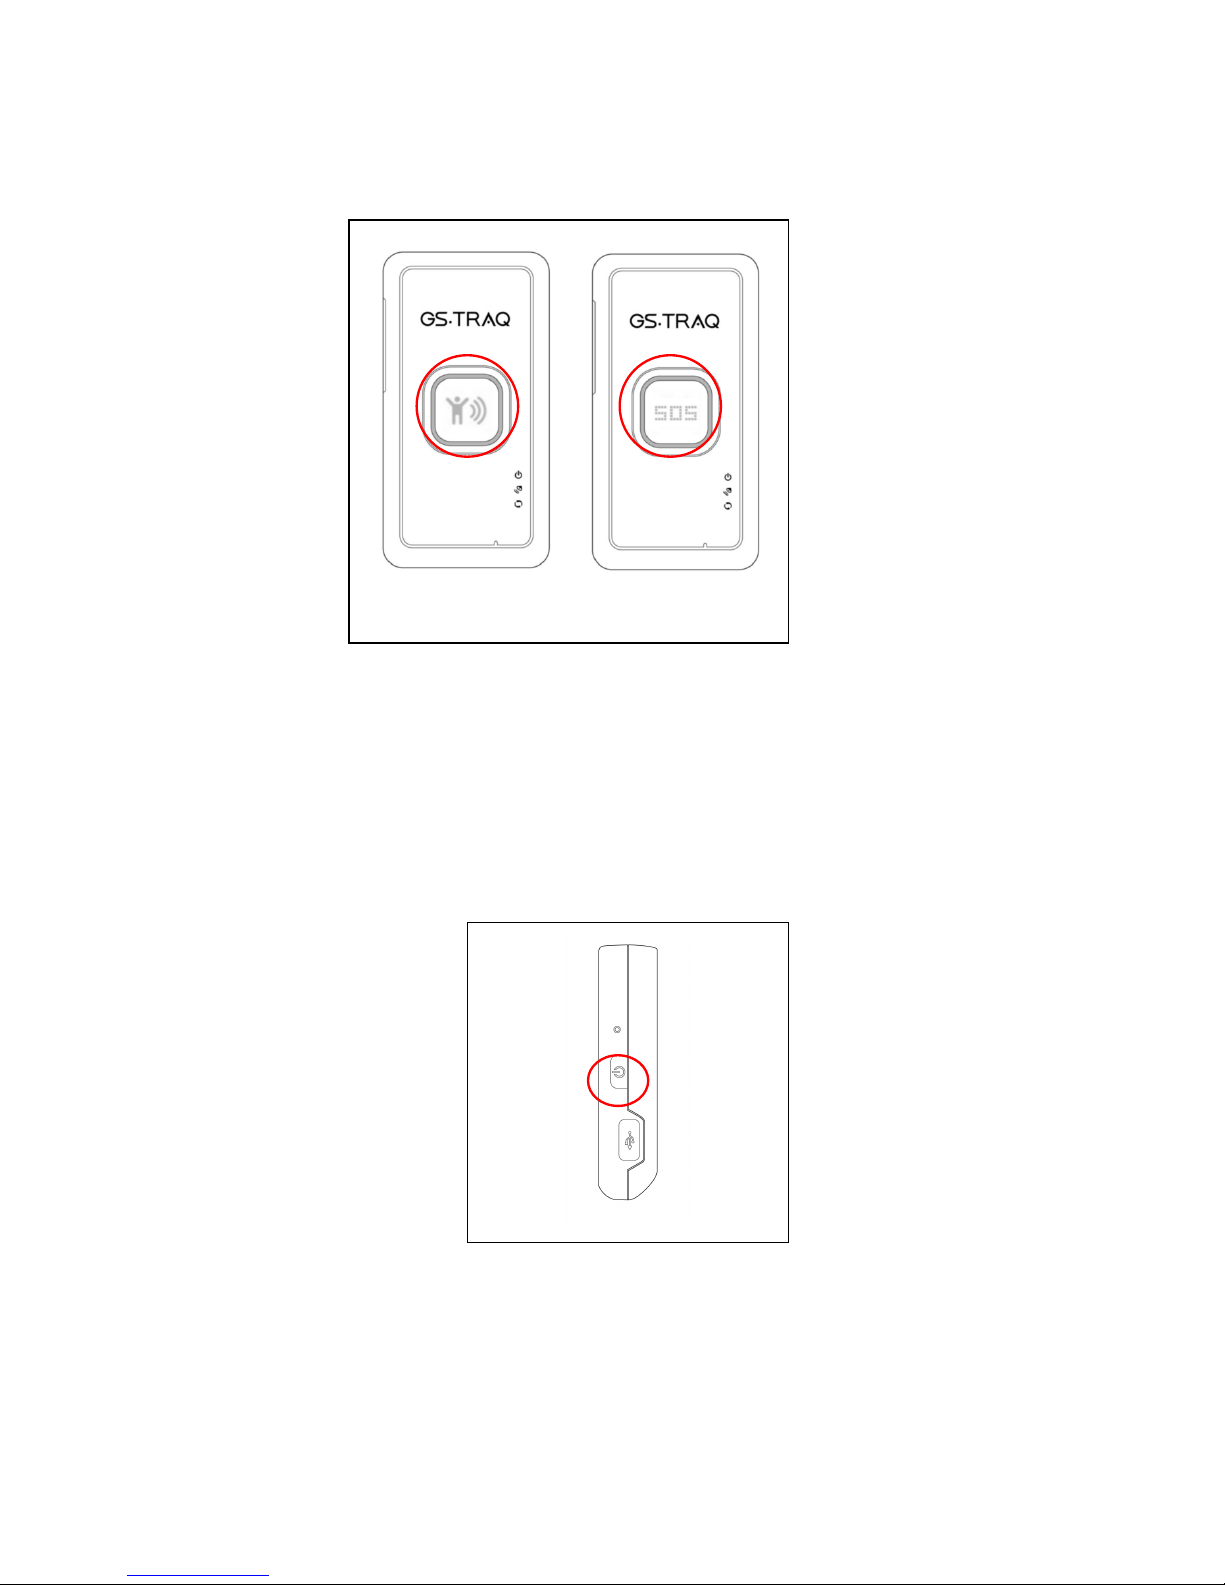
You could shortly press the emergency button to make TR-203 connect to TR Management
Center 203.
You could long press the emergency button to make TR-203 to send out emergency message
to TR Management Center or the phone number.
2.4 Turn on/off the device
You could turn on the device by pressing and holding the power button until you feel the
device vibrating.
You could turn off the device by pressing and holding the power button until you feel the
device vibrating.
Page 10
9
2.5 Use the carry bag
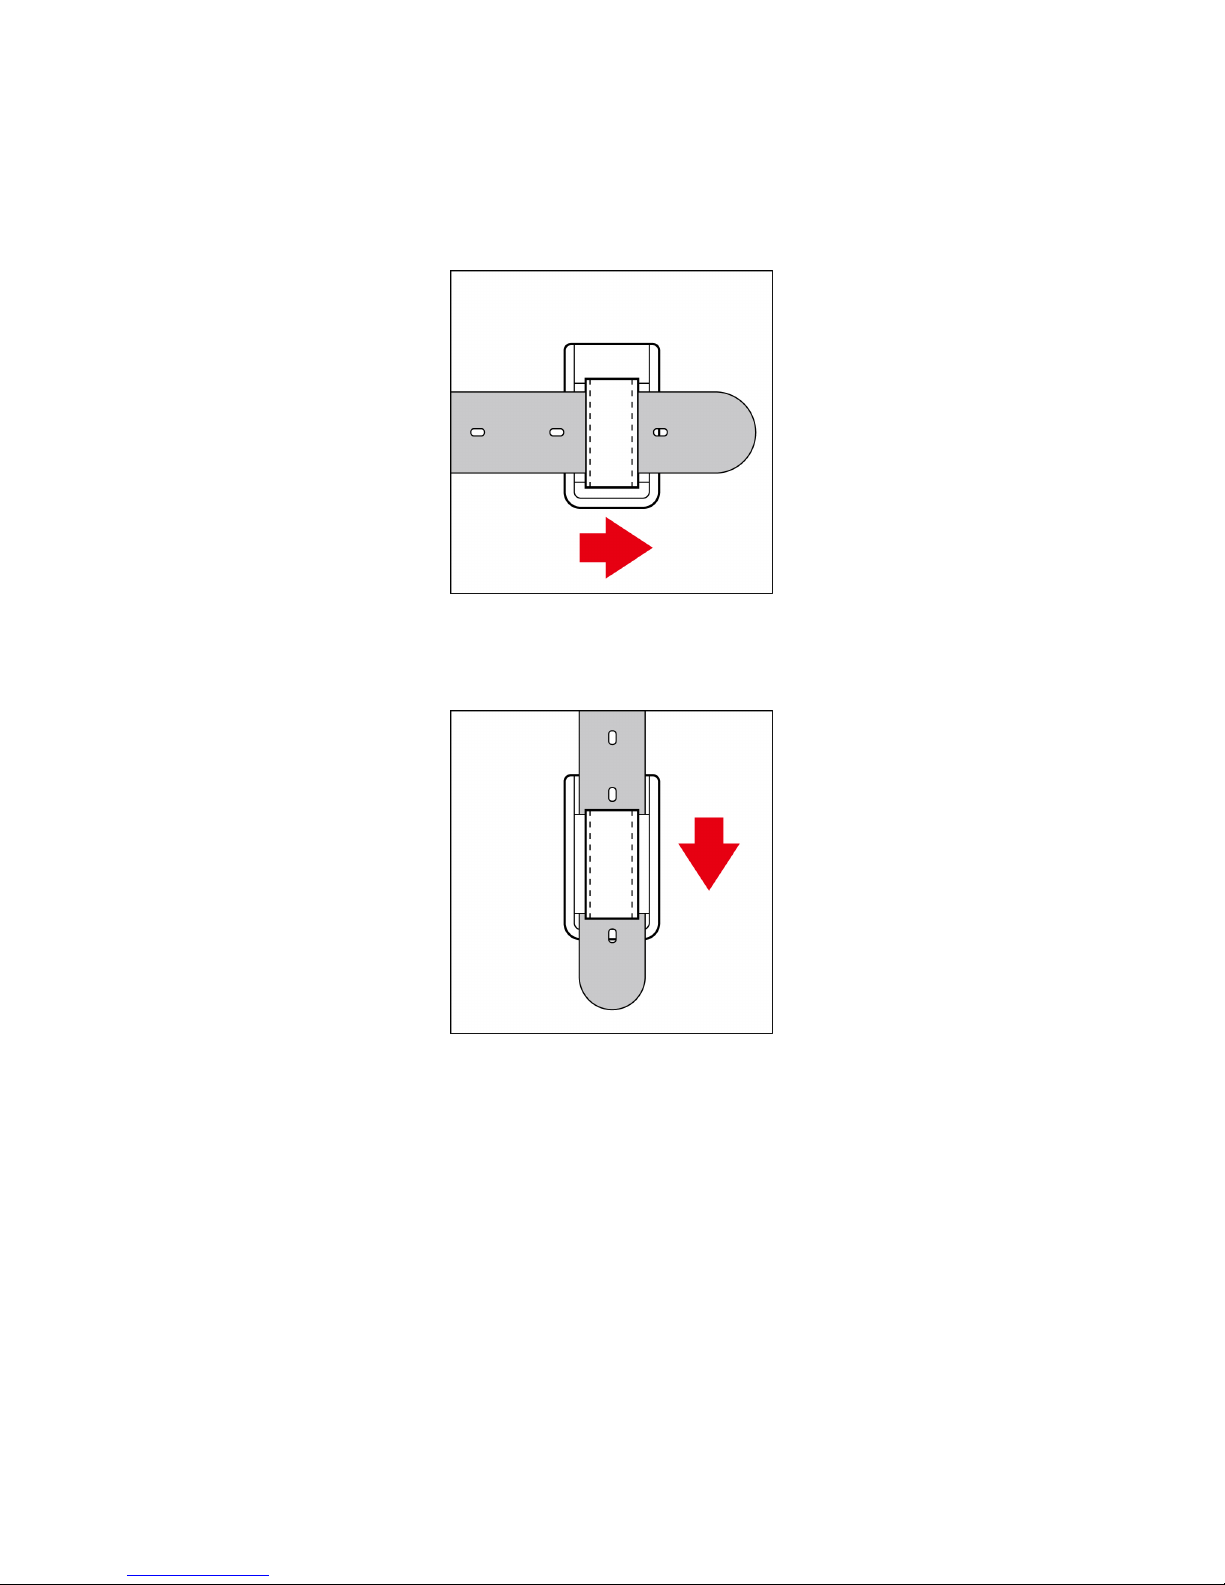
For human use, you could wear the carry bag on the belt like the picture above.
For pet use, you could wear the carry bag like the picture above.
Page 11
10
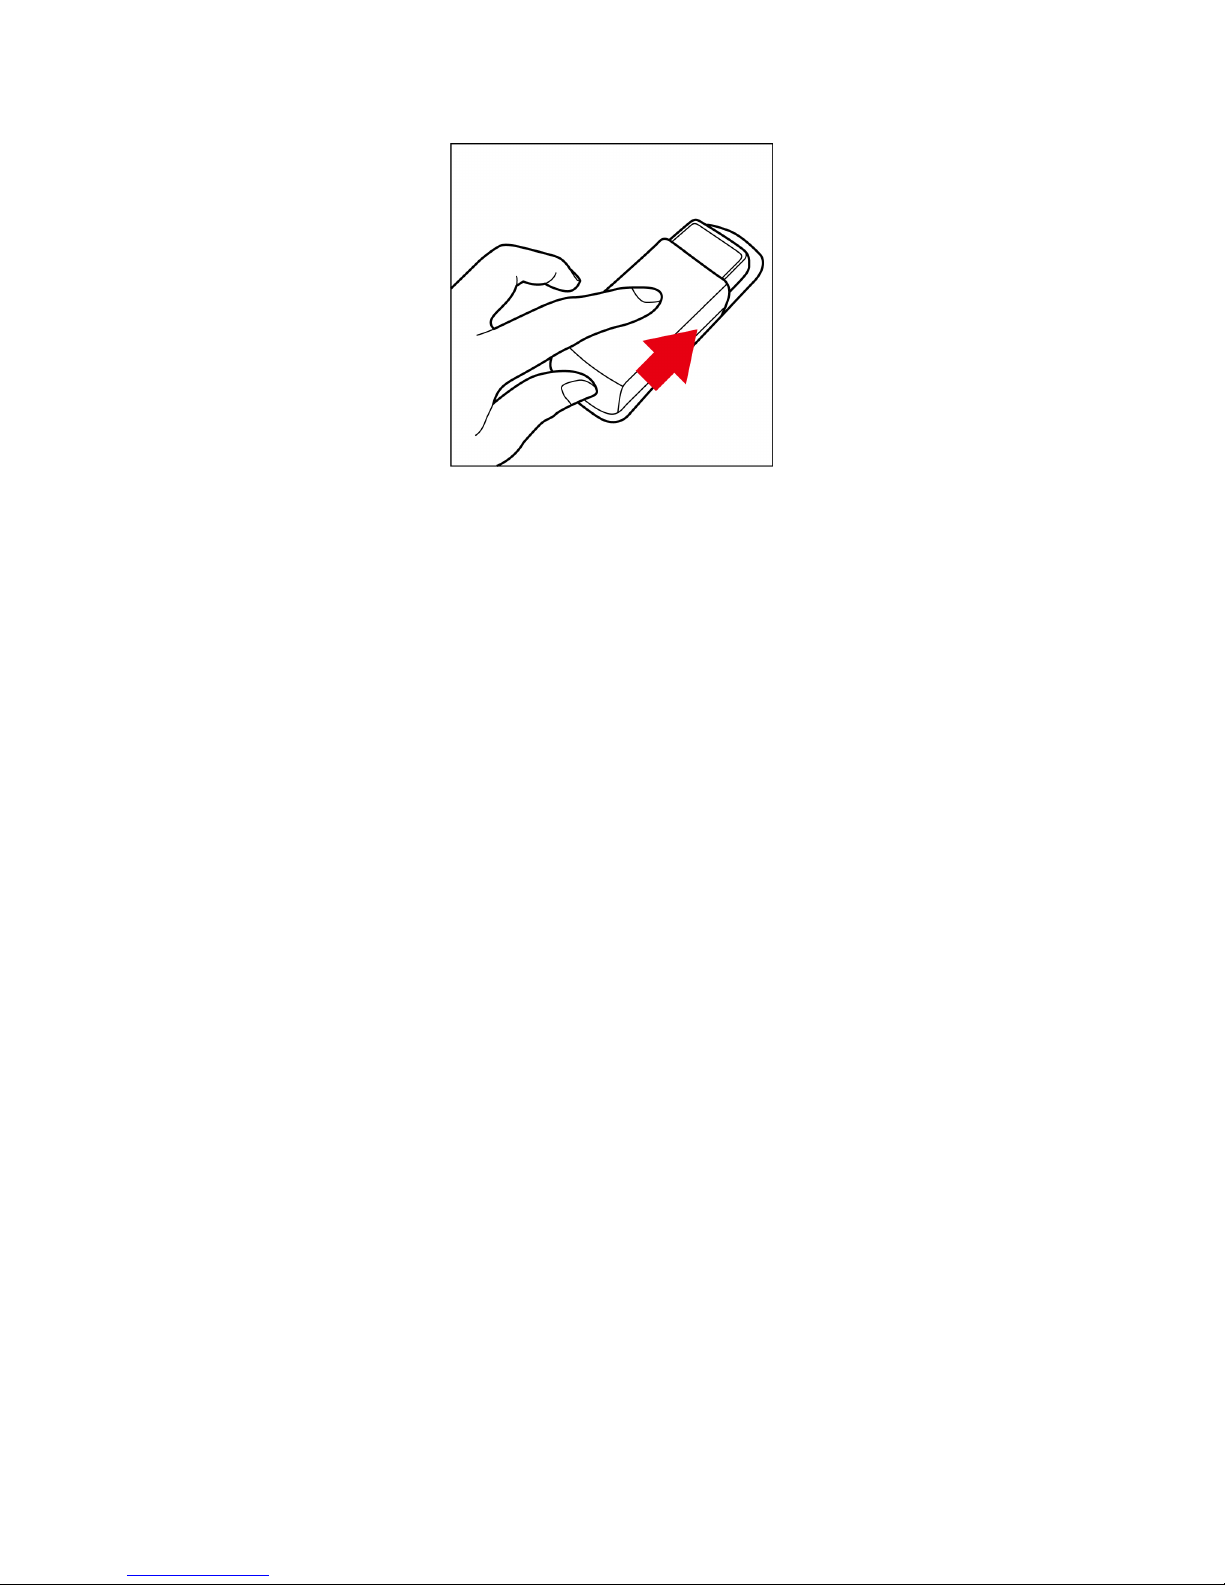
After putting TR-203 in the carry bag, you could take out it by pressing on the bottom of the
bag and pushing outward TR-203 according to the direction on the picture.
Page 12

11
3 TR Management Center 203 Setting
TR Management Center 203 is the PC application software for user to set up, manage, and
send commands to TR-203. With TR Management Center 203, you can easily set up, ping,
and ask TR-203 make periodic report, etc.
3.1 The computer system requirements of the TR Management Center 203 program
1. The computer must be equipped with at least an Intel Pentium IV or equivalent AMD
CPU, 256MB of RAM and a network card.
2. Supports the following operating systems: Windows XP, Windows 2000, Windows
Server 2003 or Windows Vista. The graphics card must support at least 256 colors
and a resolution of 800x600 or higher.
3. Skype must be version 3.6 or higher. The latest version can be downloaded from
www.Skype.com.
3.2 The network requirements of the TR Management Center 203 program
1.) STATIC IP
If your internet provider is configured to use a static IP, then you are all set and can go on to
#2. If your internet provider uses a DHCP Client, PPPoE, or PPTP, you will need to get a
static IP. This can be easily accomplished by visiting the following website:
www.dyndns.com. They provide a free service that routes your computer to a static IP address.
First you will need to create an account and then download the necessary software.
2.) ROUTER CONFIGURATION
If you are using a router, it must be configured to allow the TR-203 to connect to your PC.
Please contact your router’s manufacturer or download your models user manual to find out
how you can configure these settings for your particular model:
Look for
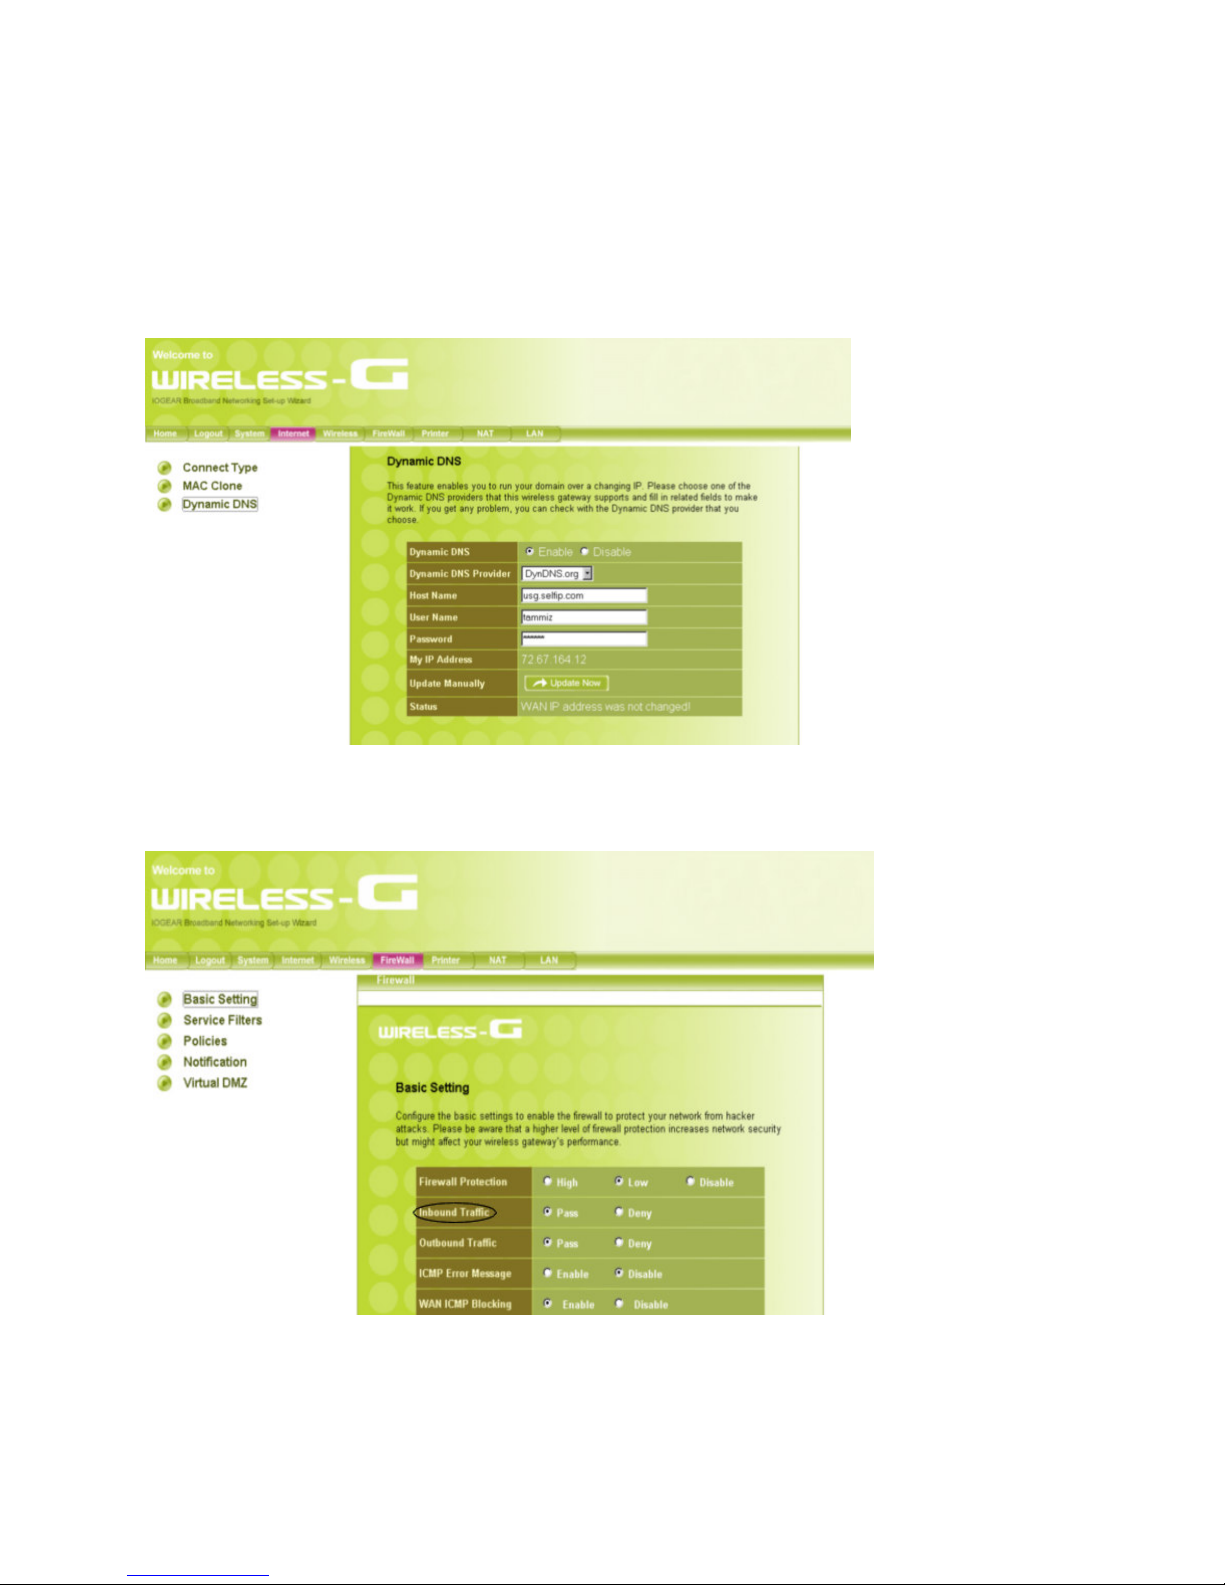
Dynamic DNS Provider: Here is where you can input the information relating to your static IP
obtained from Dyndns (Optional)
Firewall: Must be set up to allow incoming traffic.
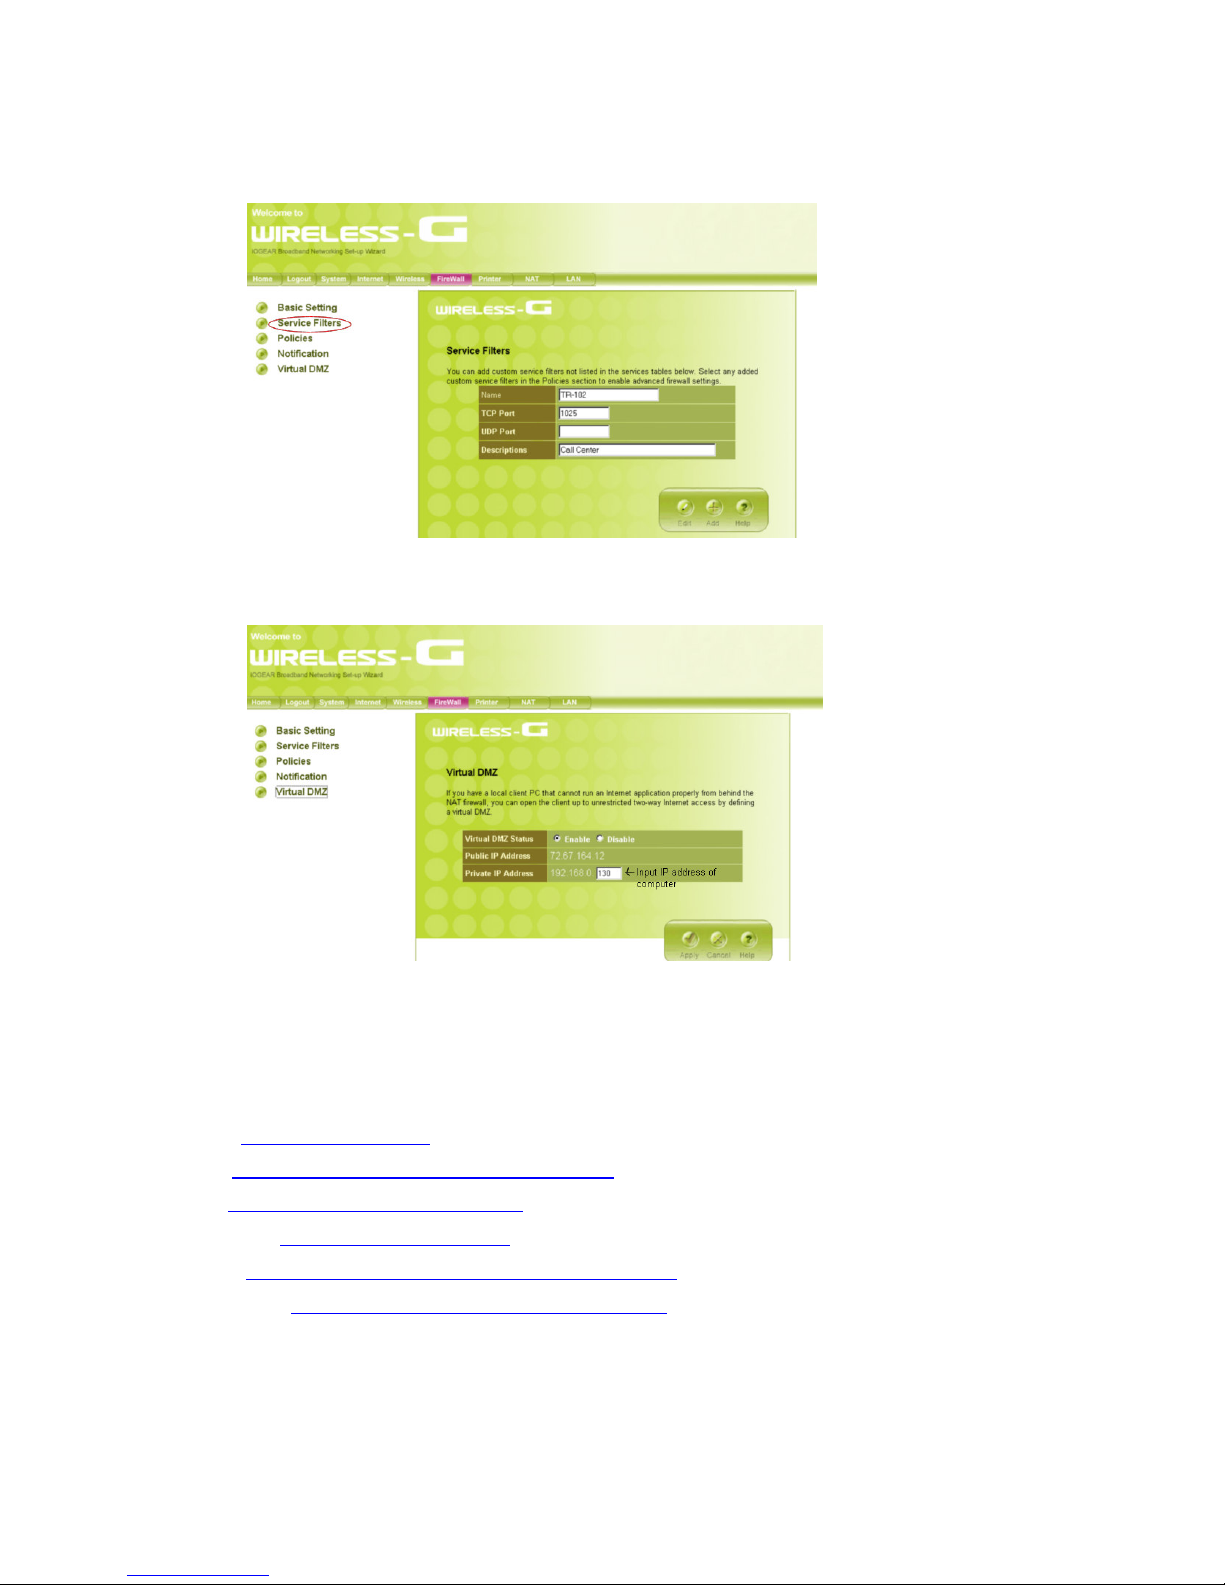
Virtual DMZ: Here you input the static IP of the computer running the TR Management
Page 13
12
Center 203.
Custom Service Filter: Here you open a TCP Port for the Call Center.
Here are some screenshots of these settings using a Netgear Router.
Input Dynamic DNS Provider
Open Inbound Traffic
Page 14
13
Create TCP port for TR Management Center 203
Input IP of computer with TR Management Center 203
NOTE: Not all router configurations are the same. These screenshots are just an example of
the settings that need to be configured in your router.
Popular Router Manufacturers and Links
Linksys - http://www.linksys.com
Belkin – http://www.belkin.com/support/browse/?lid=en
D-link – http://support.dlink.com/downloads/
TRENDnet – http://trendnet.com/support/
Netgear - http://kbserver.netgear.com/downloads_support.asp
US Robotics - http://www.usr.com/support/s-main-menu.asp
Page 15
14
3.) FIREWALL
If you have a firewall on your computer, you will need to allow access to your computer by
opening the same TCP port that you configured in your router setup.
For Windows XP:
a.) Go to Control Panel > Windows Firewall.
b.) Under Exceptions tab, select “Add Program”. If you don’t see the TR Management
Center listed, browse for it.
c.) Next, go to “Add Port”. Input a name and TCP port.
4.) GPRS SETTINGS
GPRS settings can be obtained from the carrier of the SIM you are using in your TR-203.
Your SIM carrier can provide you with the APN, user name and password, and DNS
addresses. Your carrier may use all these settings, or just one or two in which the remaining
should remain blank. You can also find this information for many popular carriers at Appendix
5.) SKYPE SETTINGS
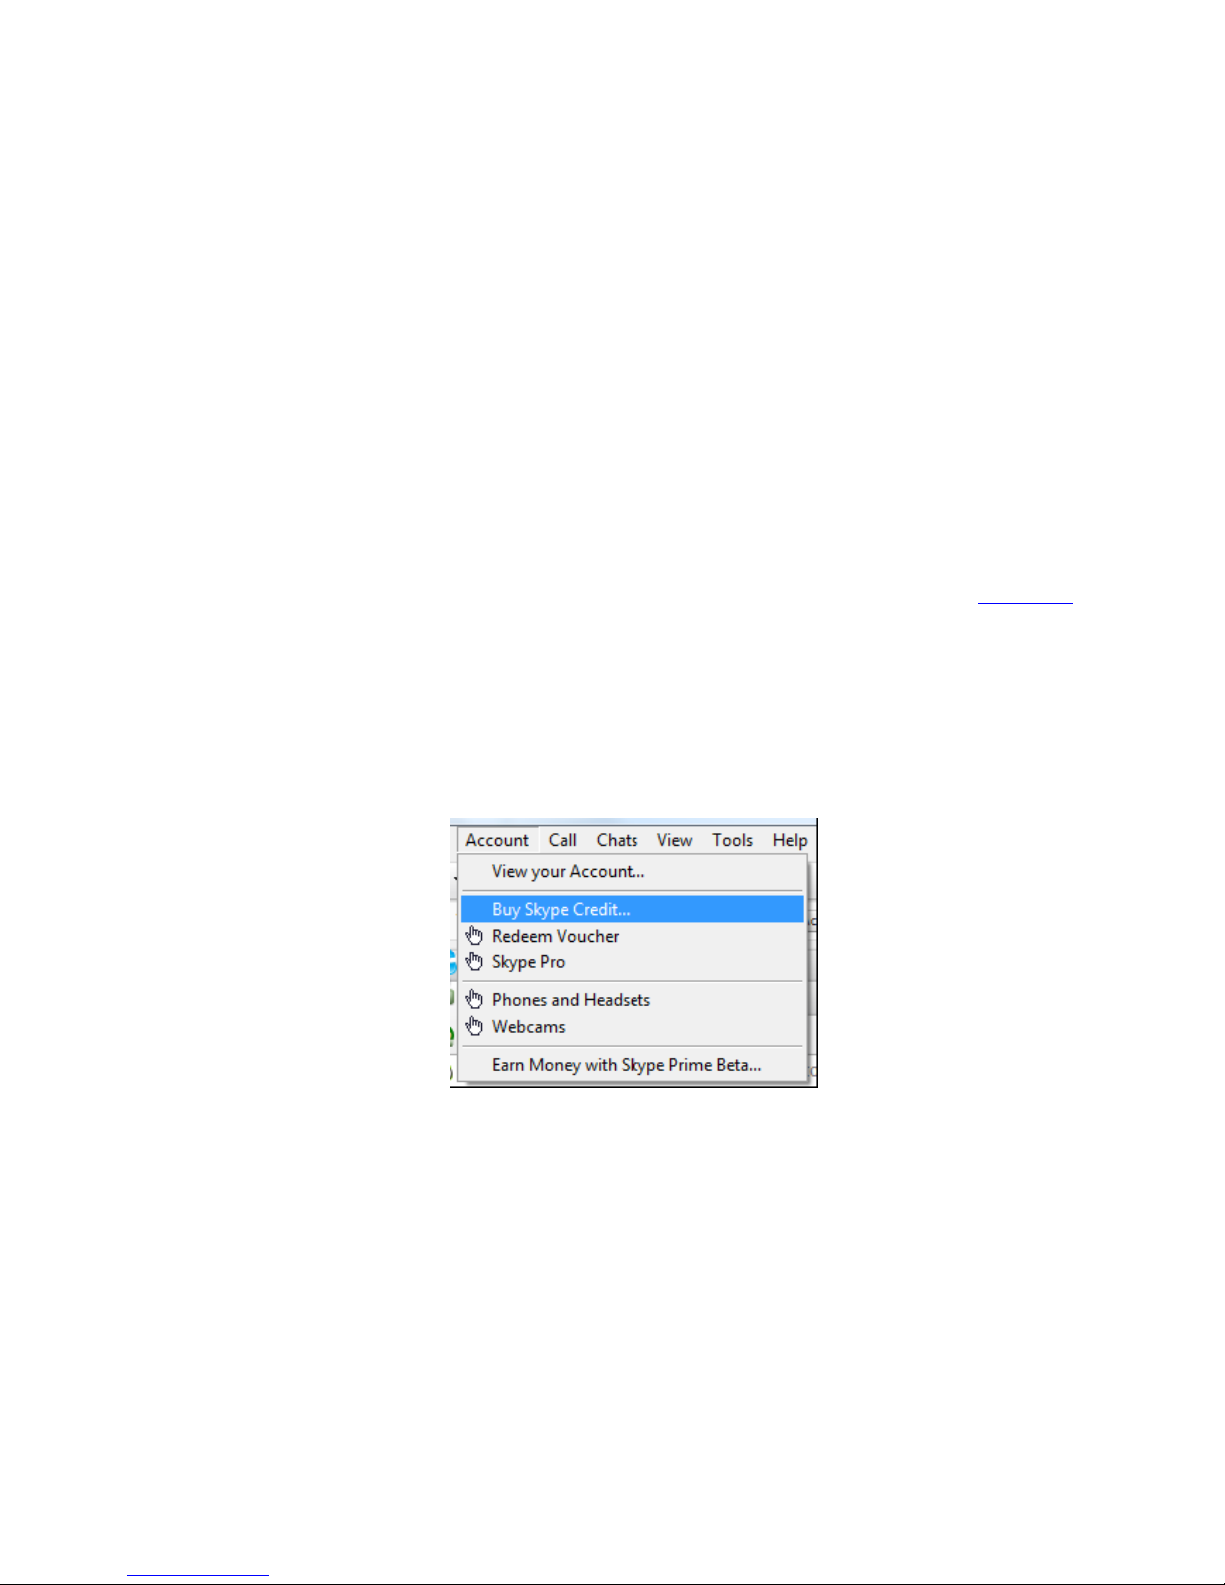
TR Management Center 203 program connects TR-203 by Skype out. Please buy Skype
credit. TR Management Center 203 cannot work if there is no Skype credit. You could buy
Skype credit by selecting Account Buy Skype Credit on the menu bar of Skype
3.3 Copyrights and Example Information
The copyright on all software and hardware mentioned in this manual belong to their
respective owners.
1. The copyright of Windows XP, Windows 2000, Windows 2003 and Windows Vista
belong to the Microsoft Corporation.
2. The copyright of the Skype program belongs to Skype Technologies S.A.
Page 16

15
3. The copyright of Google Map belongs to Google Inc.
4. The copyright of Intel Pentium belongs to the Intel Corporation.
5. The copyright of AMD belongs to Advanced Micro Devices, Inc.
All text and telephone numbers mentioned in this manual are used as an example only.
We apologize in advance for any coincidences.
Any copyrights not mentioned in this manual belong to their respective owners.
Page 17
16
3.4 Install TR Management Center 203
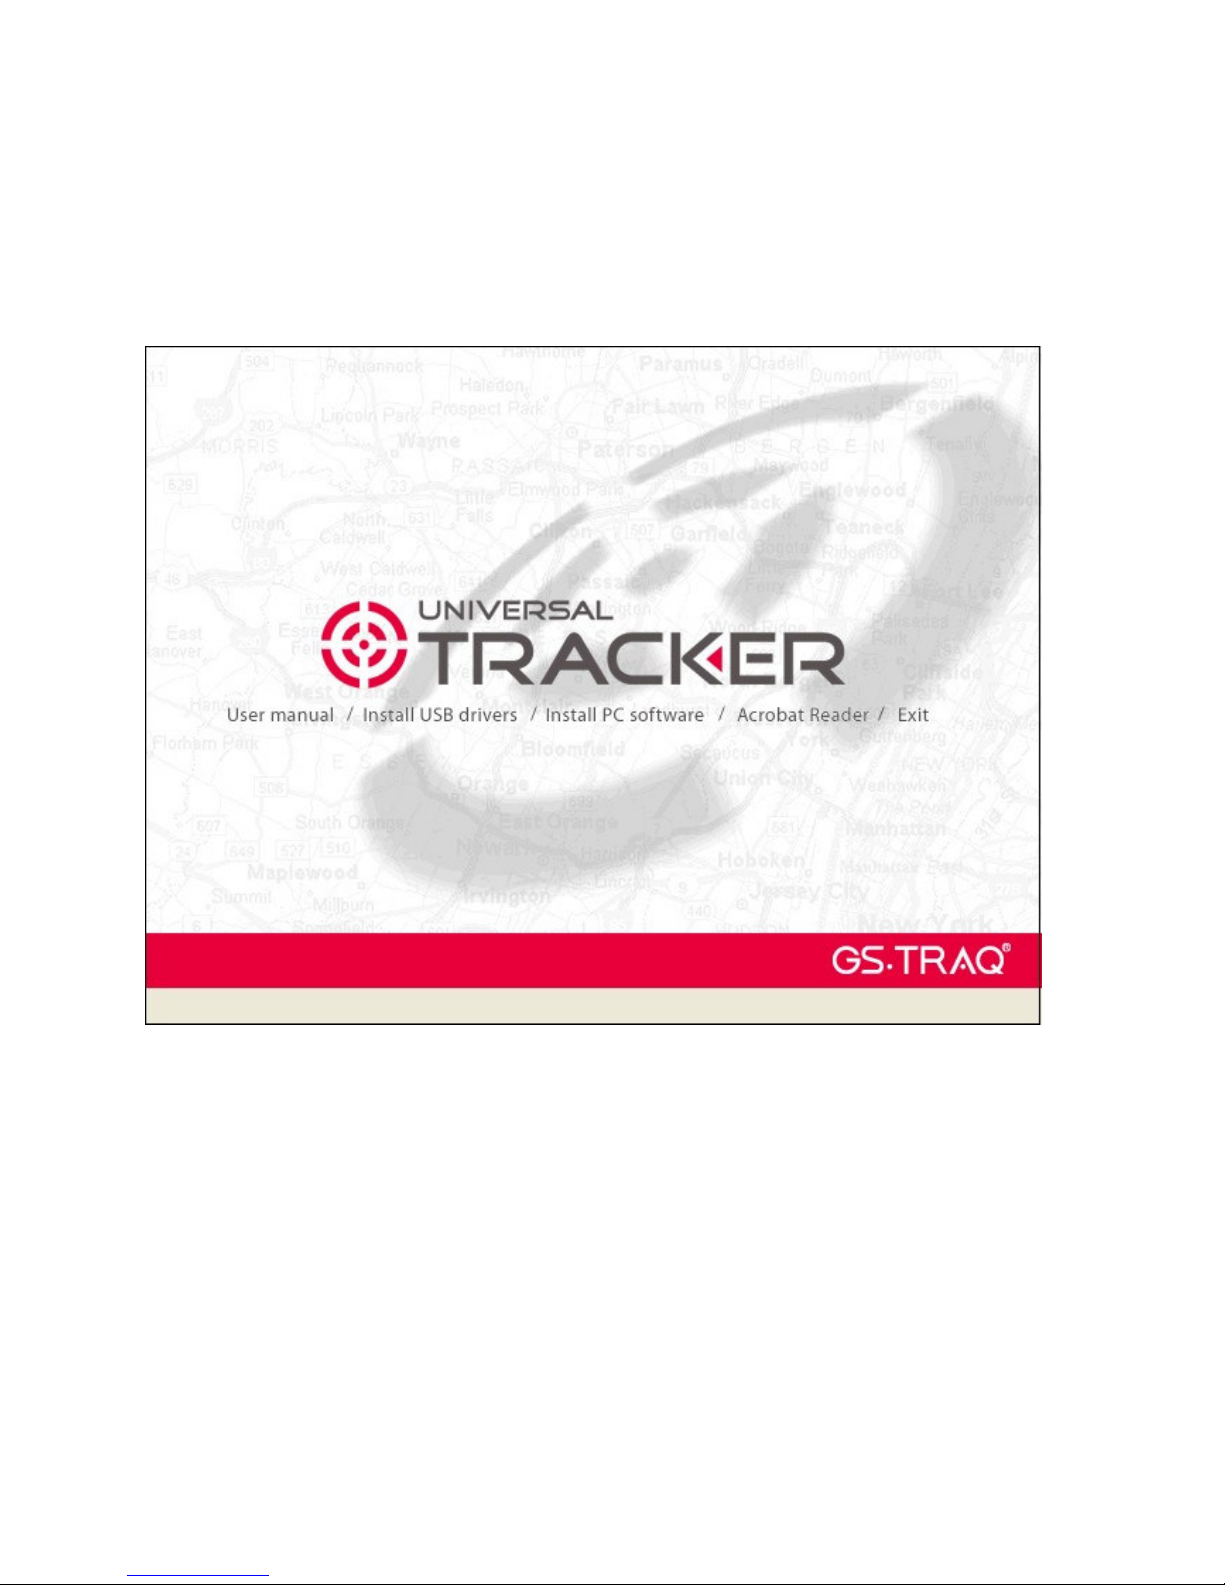
You could find the TR Management Center 203 Program in the Product CD.
Please install TR Management Center 203 by the steps below.
Step 1: Please insert the product CD in the CD ROM of the PC.
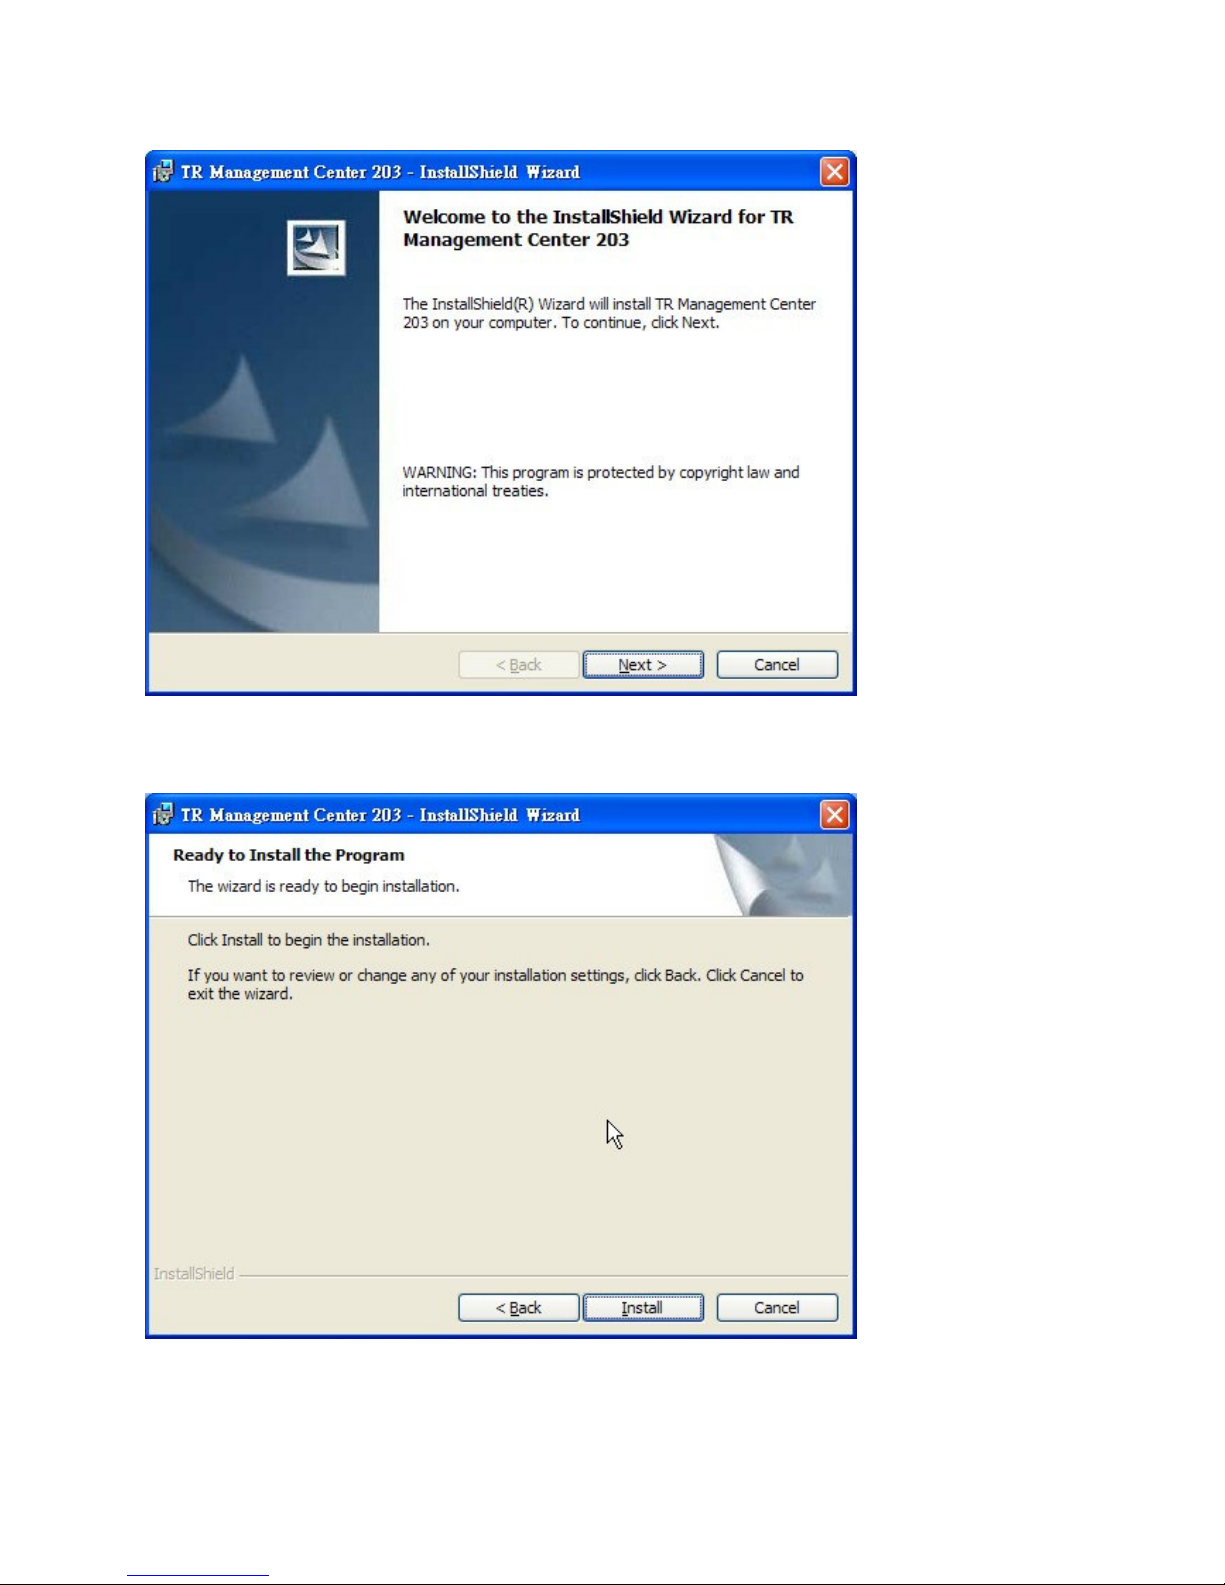
AutoRun installation window will be brought up as the screenshot
Step 2: Please click “Install PC software” to install TR Management Center 203
The “Install Shield Wizard” window will be shown as below.
Page 18
17
Step 3: Please click “Next” button.
Step4: Please click “Install” button.
Page 19
18
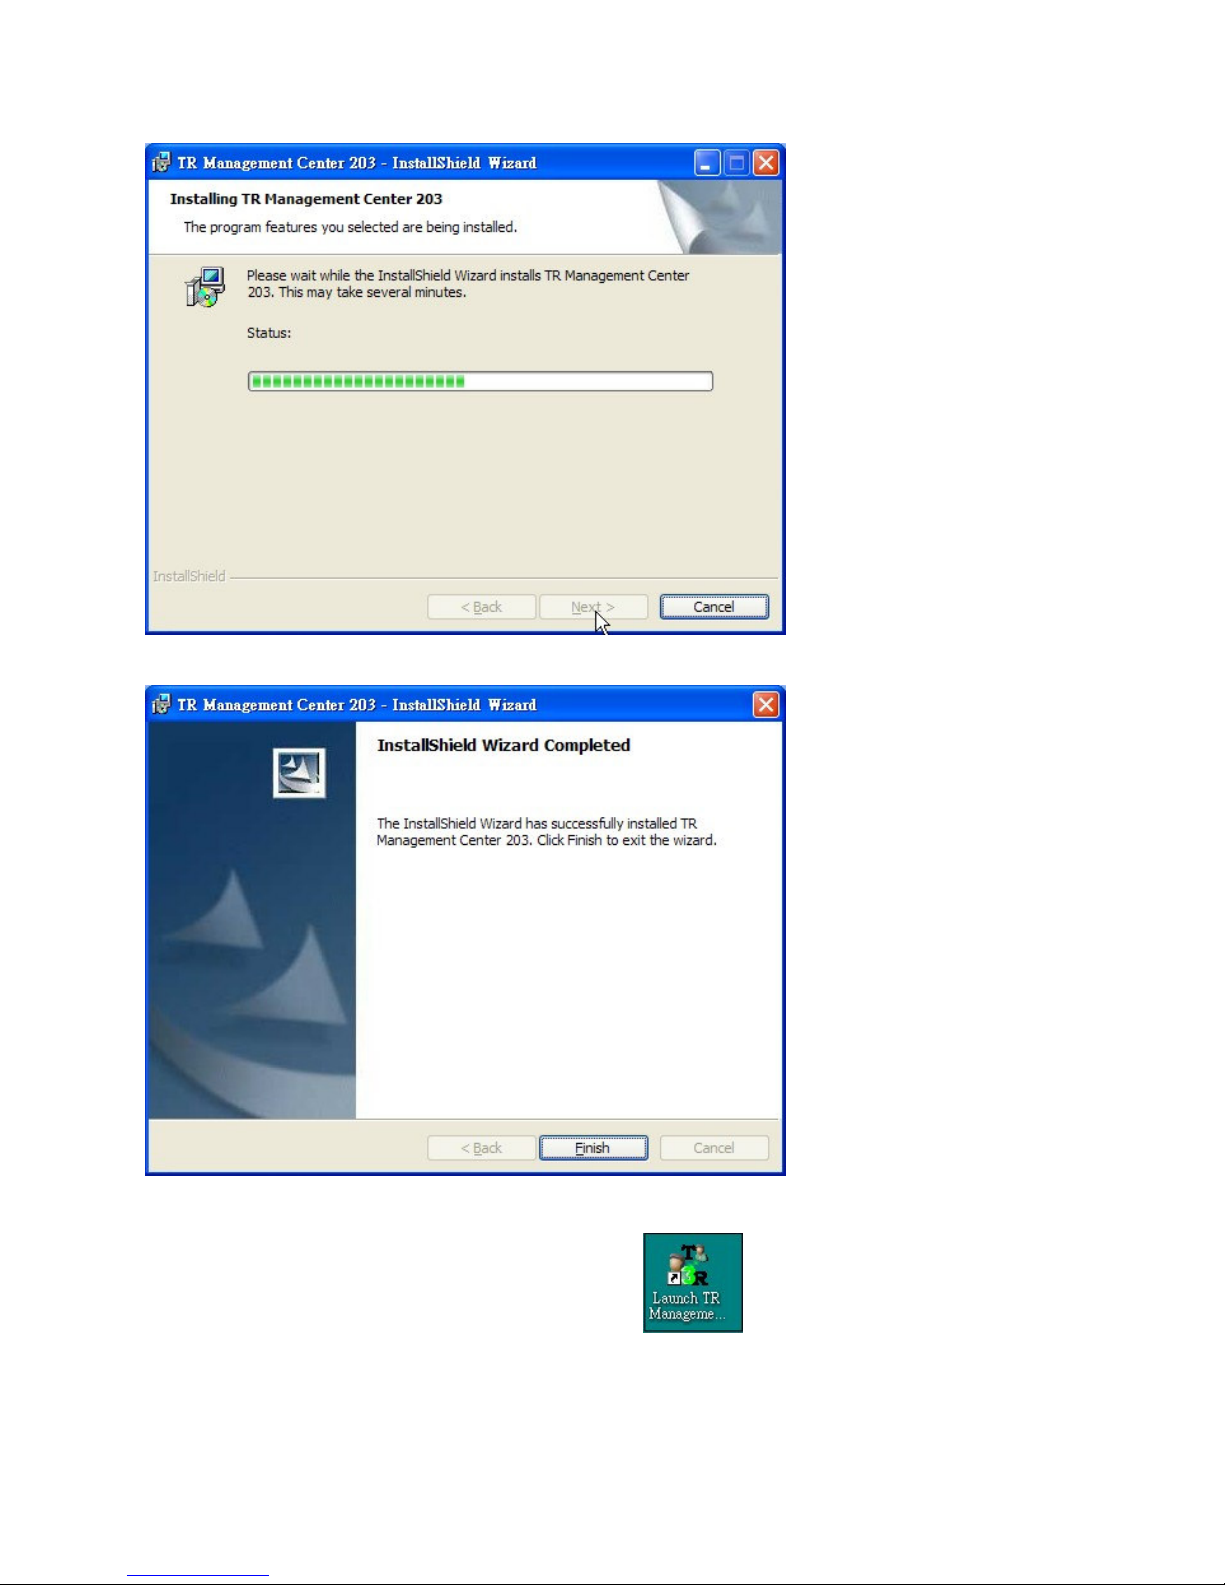
Step 5: Please wait while Install Shield Wizard install TR Management Center 203.
Step 6: Please click “Finish” button.
The shortcut icon of TR Management Center 203 will be built on the desktop of PC.
You could start TR Management Center 203 by clicking the icon or select Start Programs
Globalsat TR Management Center 203 Launch TR Management Center 203
Page 20
19
3.5 TR Management Center 203 Screen Introduction
Google Map Menu
You can click
Query Tool to
display Query Tool
Main Tool Data Output Area
Status Bar
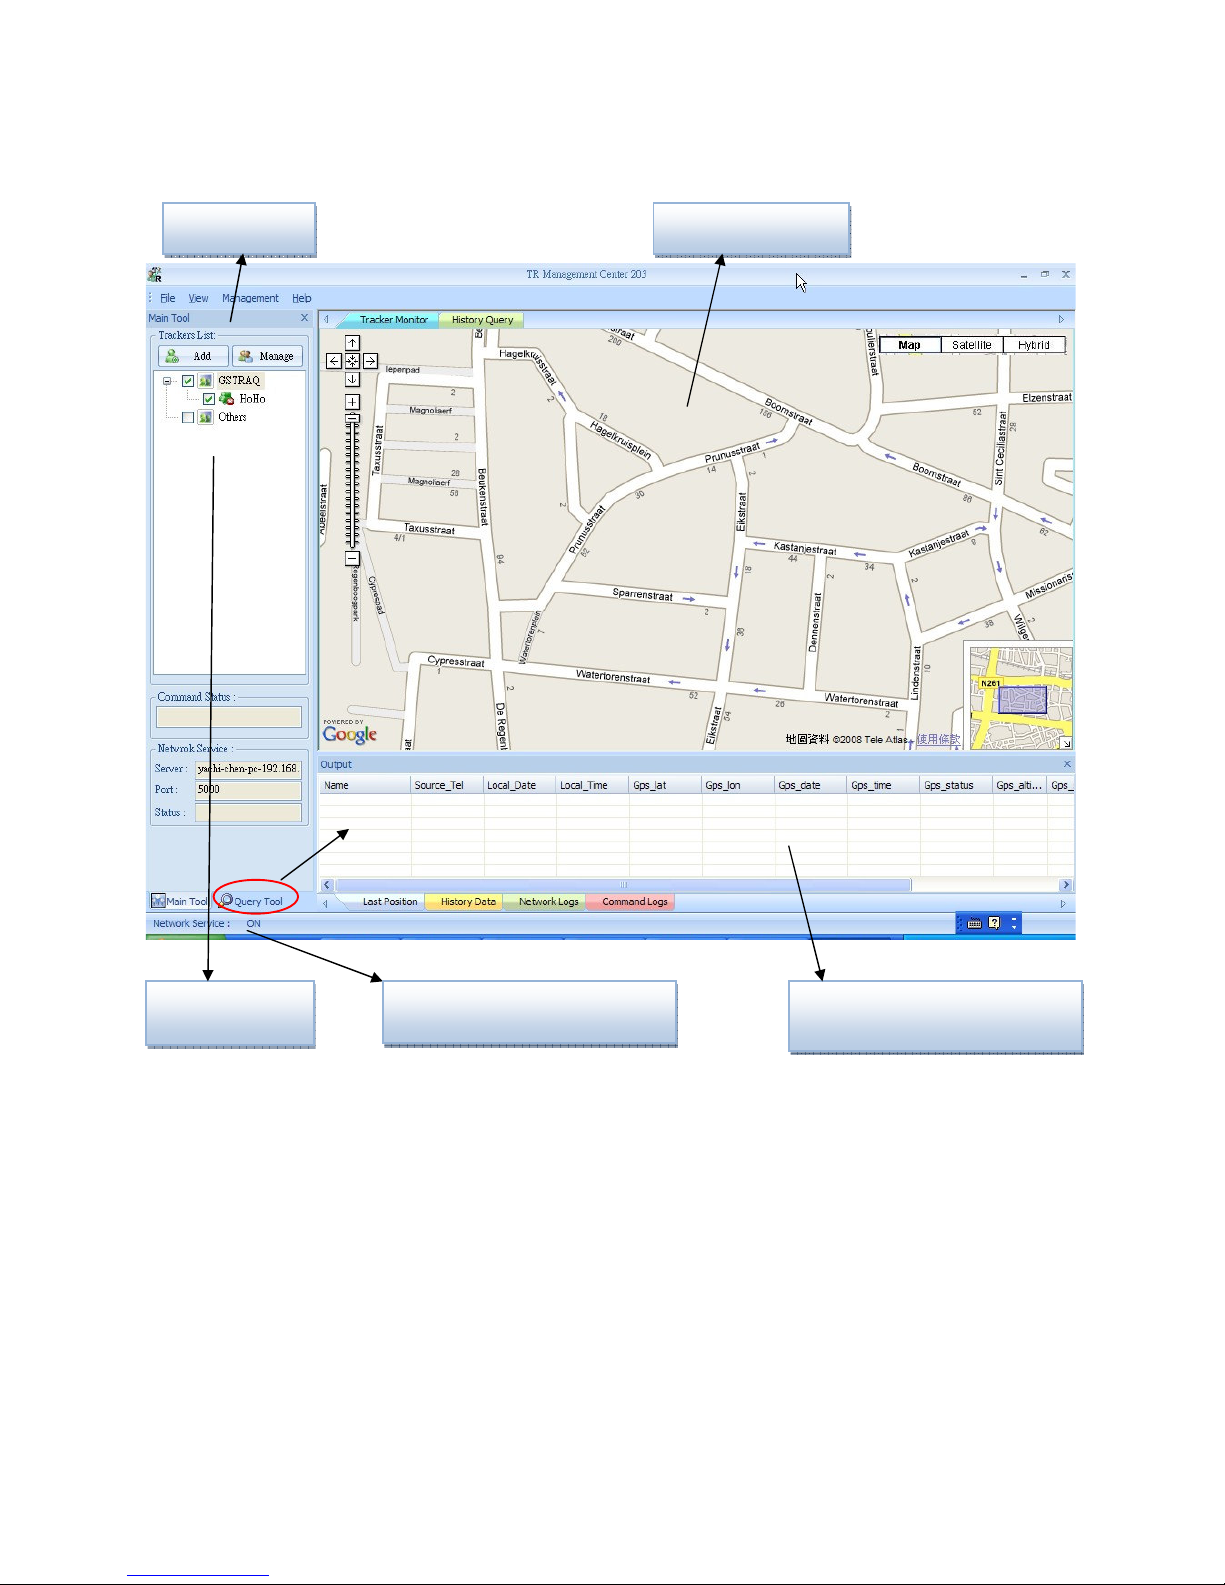
There are six parts of TR Management Center Screen as below.
Menu: The basic menu options
Main Tools: Shows the trackers' connection status, Network service status
Query Tool: Used for searching history data and finding coordinates
Data Output Area: Shows the tracker login status, received network data and query
results
Google Map: Shows the Google Map
Status Bar: Show the network Service status
The detailed description of each part is as following.
Page 21
20
managing trackers
3.5.1 Tracker and Main Tool Bar
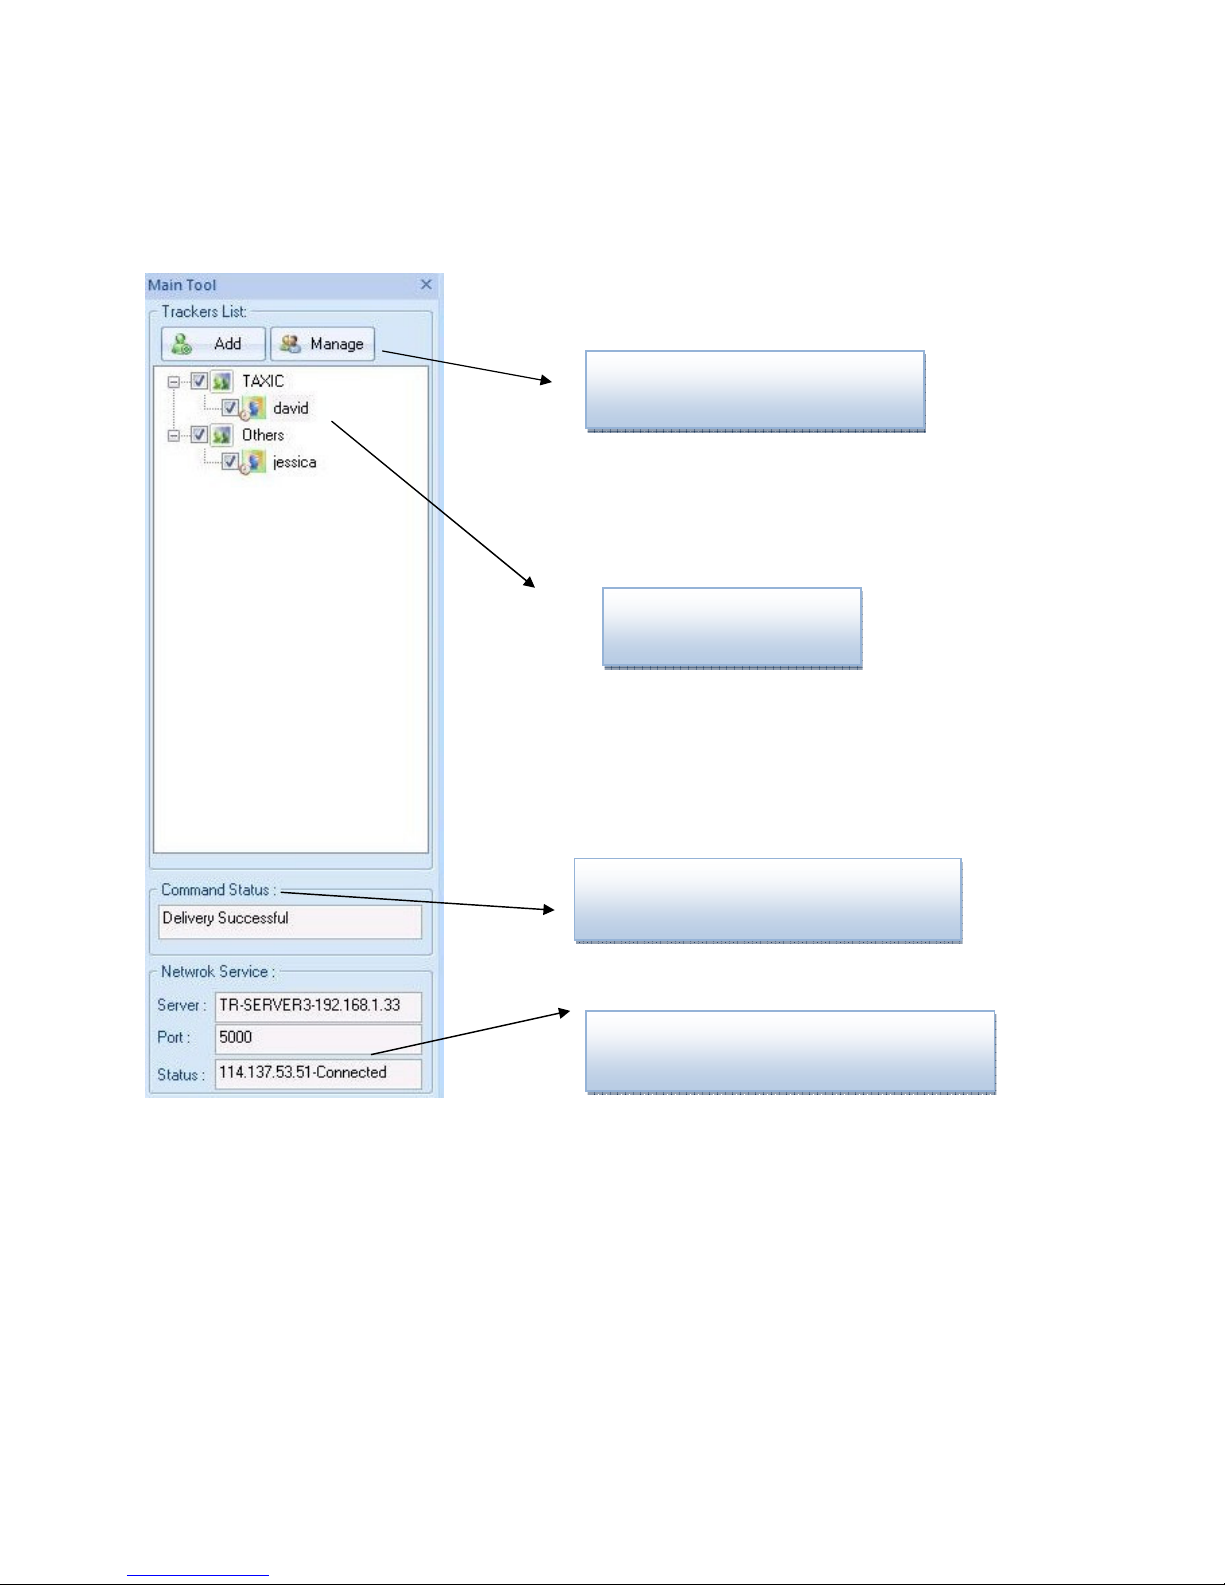
Main tool is for managing trackers and showing the server status
Buttons for adding and
Trackers List
Command Status
Network Service Status
Page 22
21
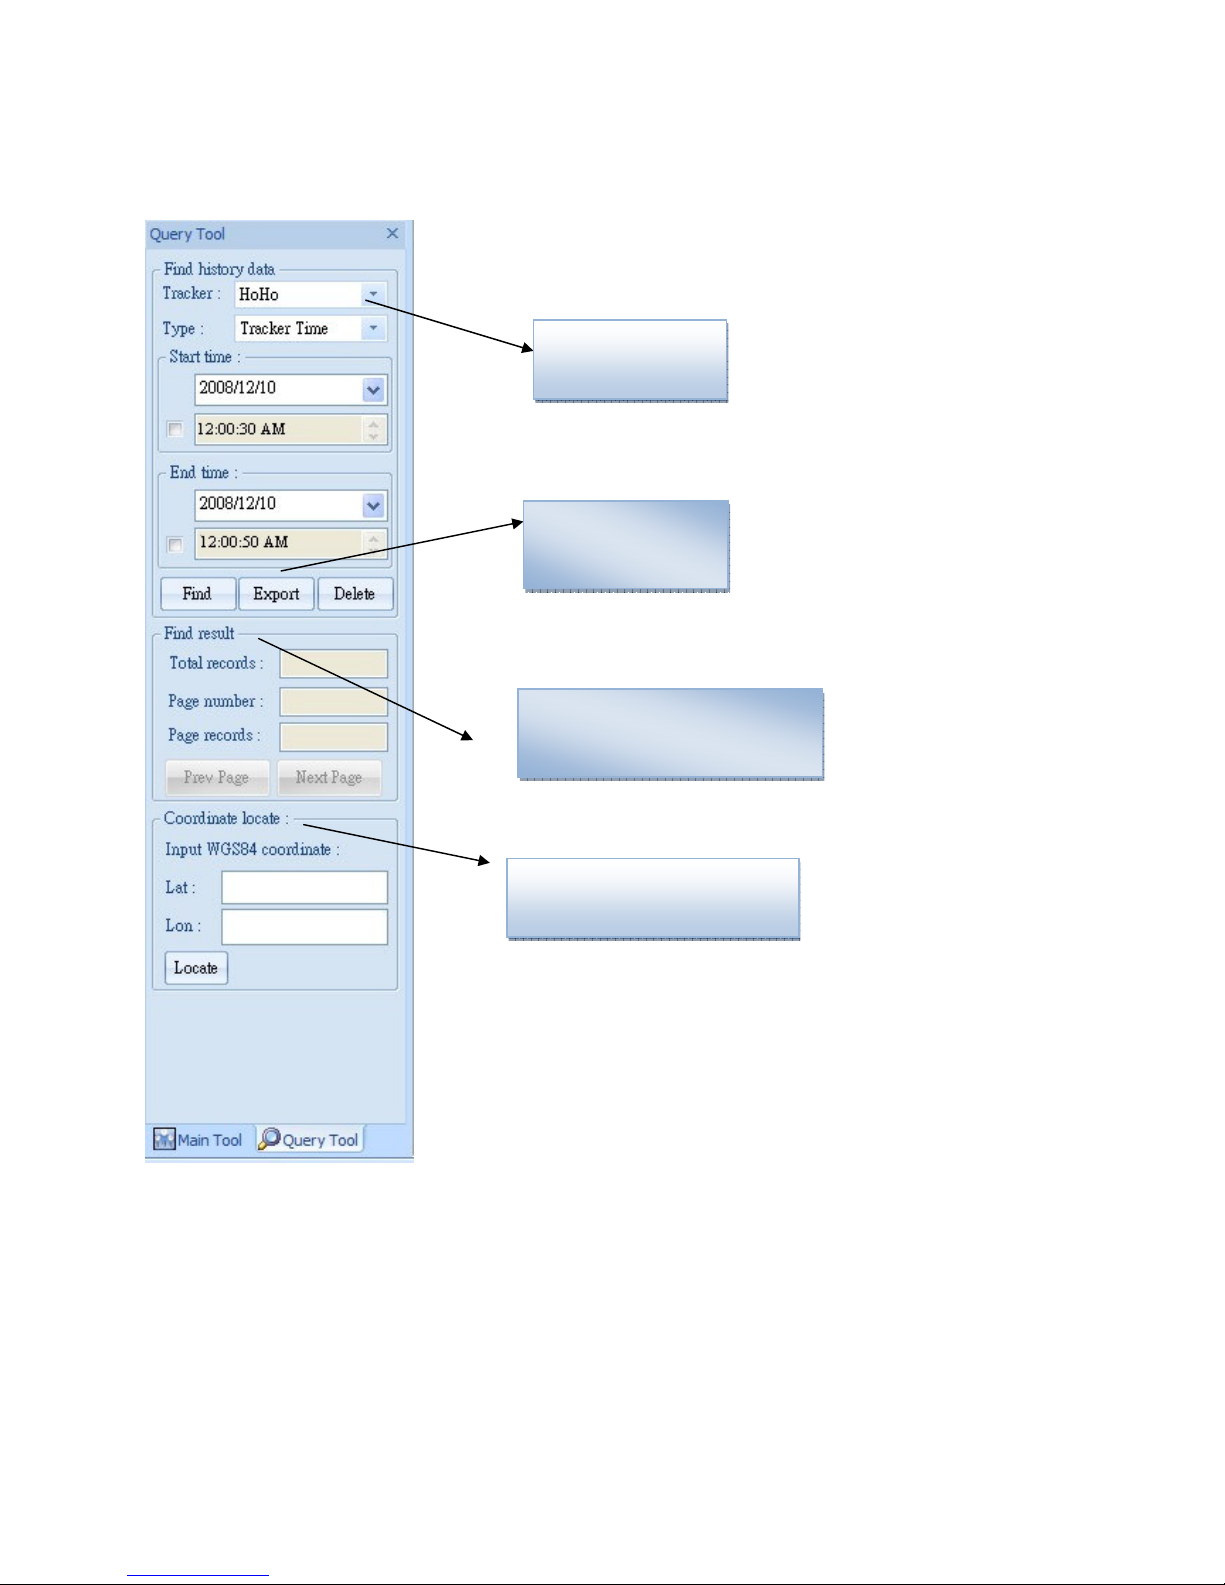
3.5.2 Query Tool
data
Tool
Query tool is for looking up for the history data and coordinate.
Find history
Data Tool
buttons
Find Result Tool
Coordinate Location
Page 23
22
3.5.3 Data Output Area
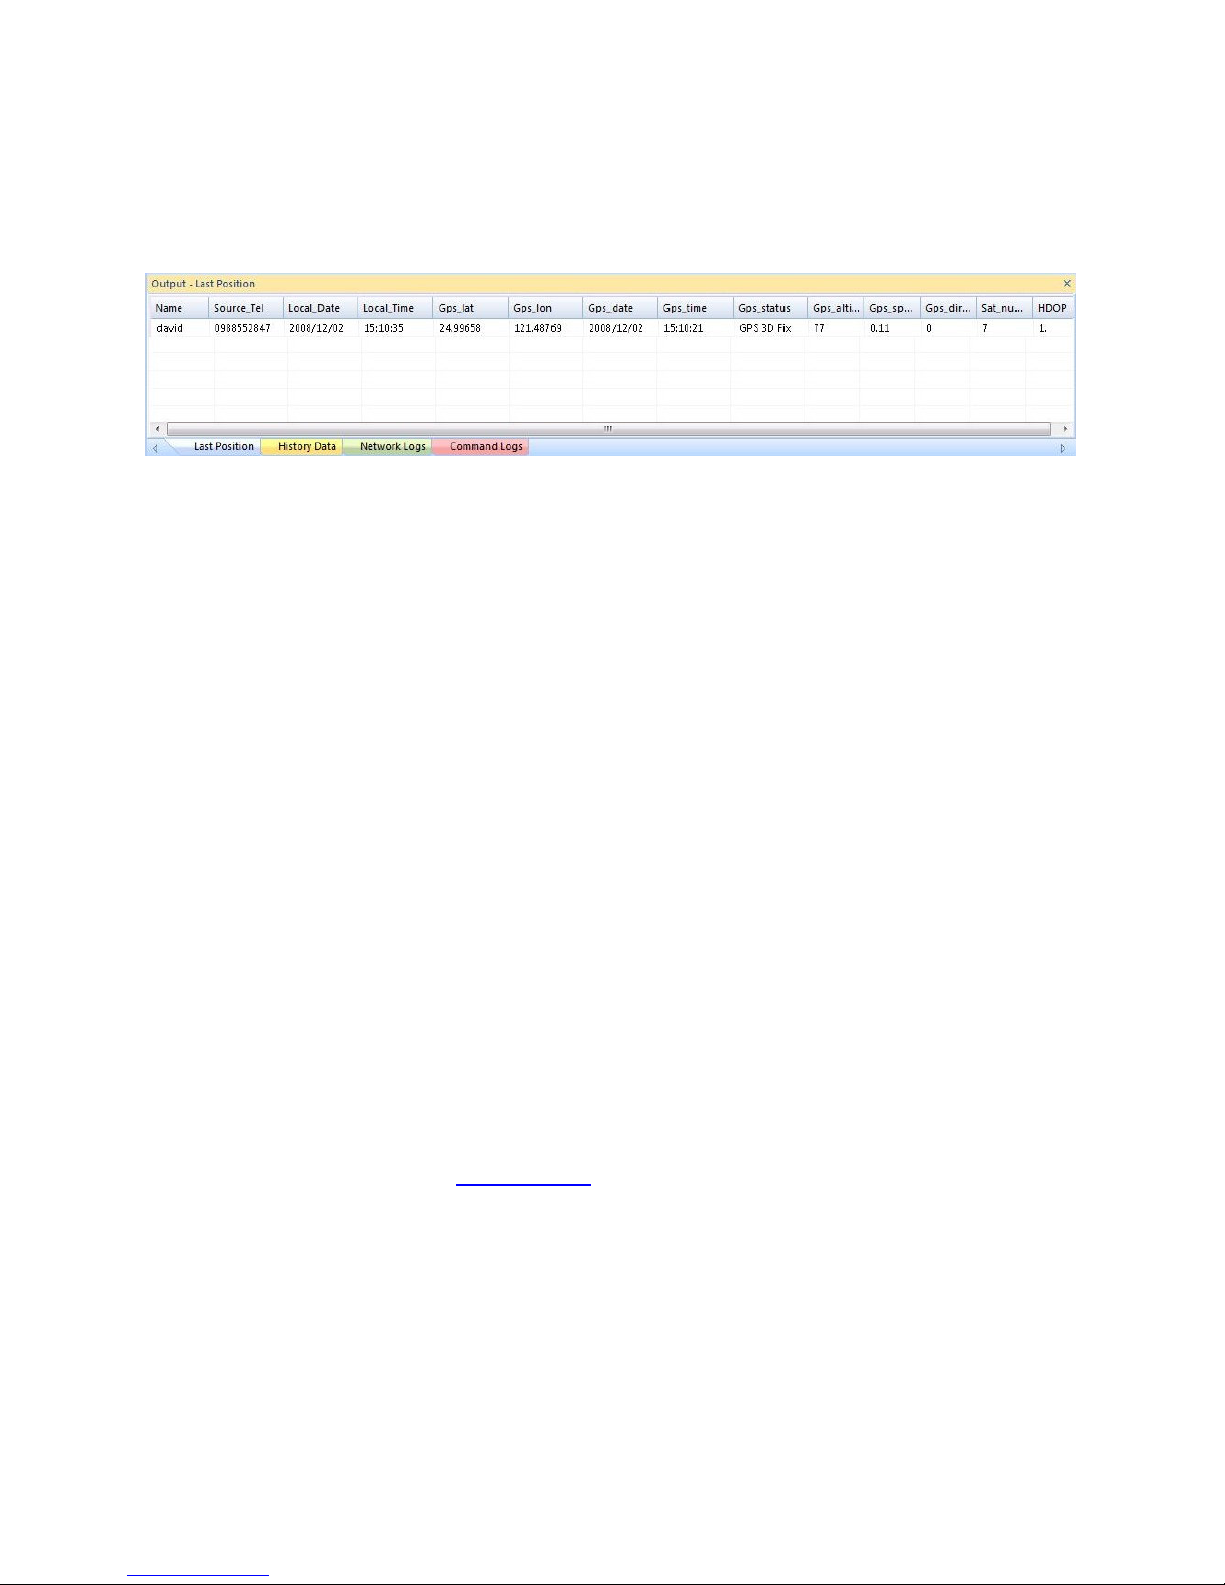
Data output area is for displaying the last position, history data, network logs, command logs.
Last Position: Shows each of the last position data sent from all the TR-203 trackers on
tracker list.
History Data: Shows all the position data sent from all the TR-203 trackers on tracker list.
If you turned off the TR Management Center 203, all the history data will be deleted. You
could look for the data by Query Tool.
Network Logs: Shows the data logs that TR-203 sent to TR Management Center 203
Command Logs: Show the command logs that TR Management Center 203 sent to
TR-203
3.6 Skype Setup
In stead of sending SMS to trackers by mobile phones, TR Management Center 203 sends
SMS to trackers by Skype. You can not only send SMS to trackers for asking report by Skype,
but send SMS to set the parameters of TR-203’s function.
In order to send SMS by Skype, please complete the following steps to activate the SMS
function of Skype.
Step 1: Install Skype Software
You can download Skype from www.skype.com or the website of the local Skype distributor.
Please refer to the instruction of Skype to install the software.
Note: The pictures and instructions provided in this manual are based on Skype version
3.6.1.xxx. If they do not match the version of Skype you are currently using, please download
and upgrade to the latest version from the Skype website.
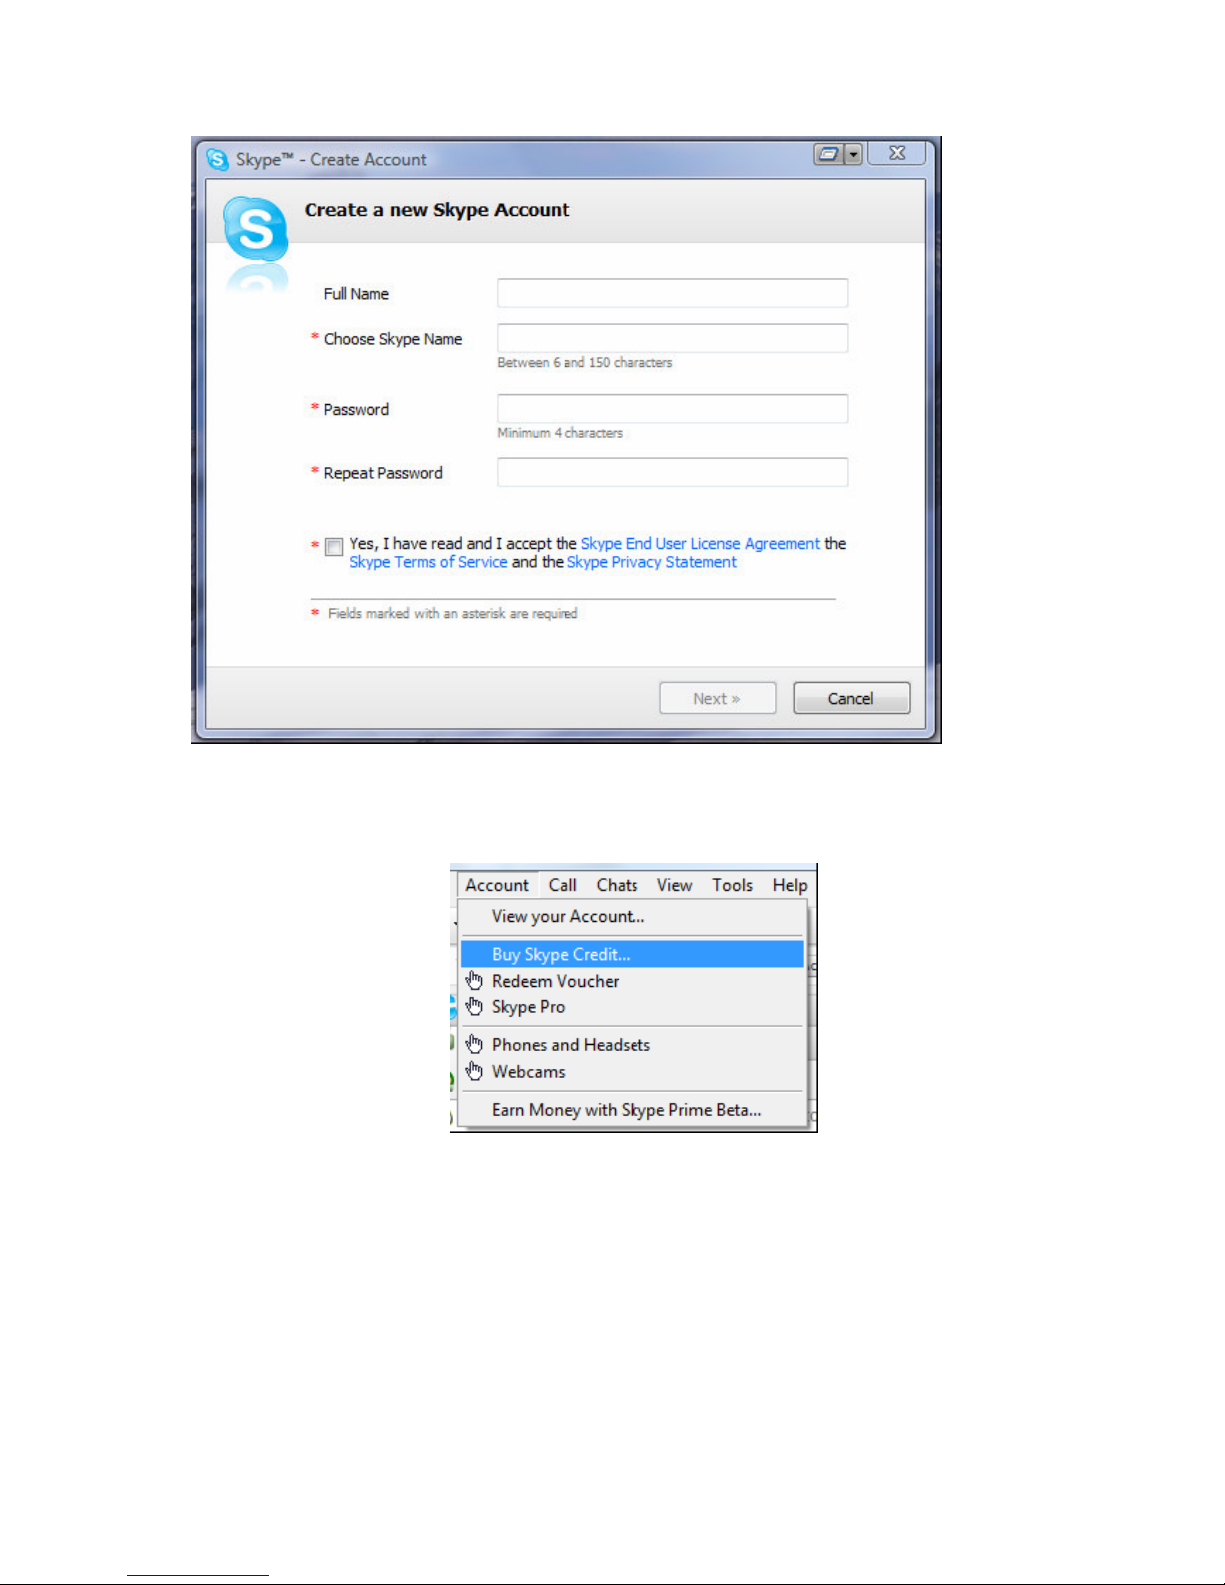
Step 2: Please create a user account.
Page 24
23
Once you have created an account, you can login and use Skype's basic functions.
Step 3: Buy Skype credit
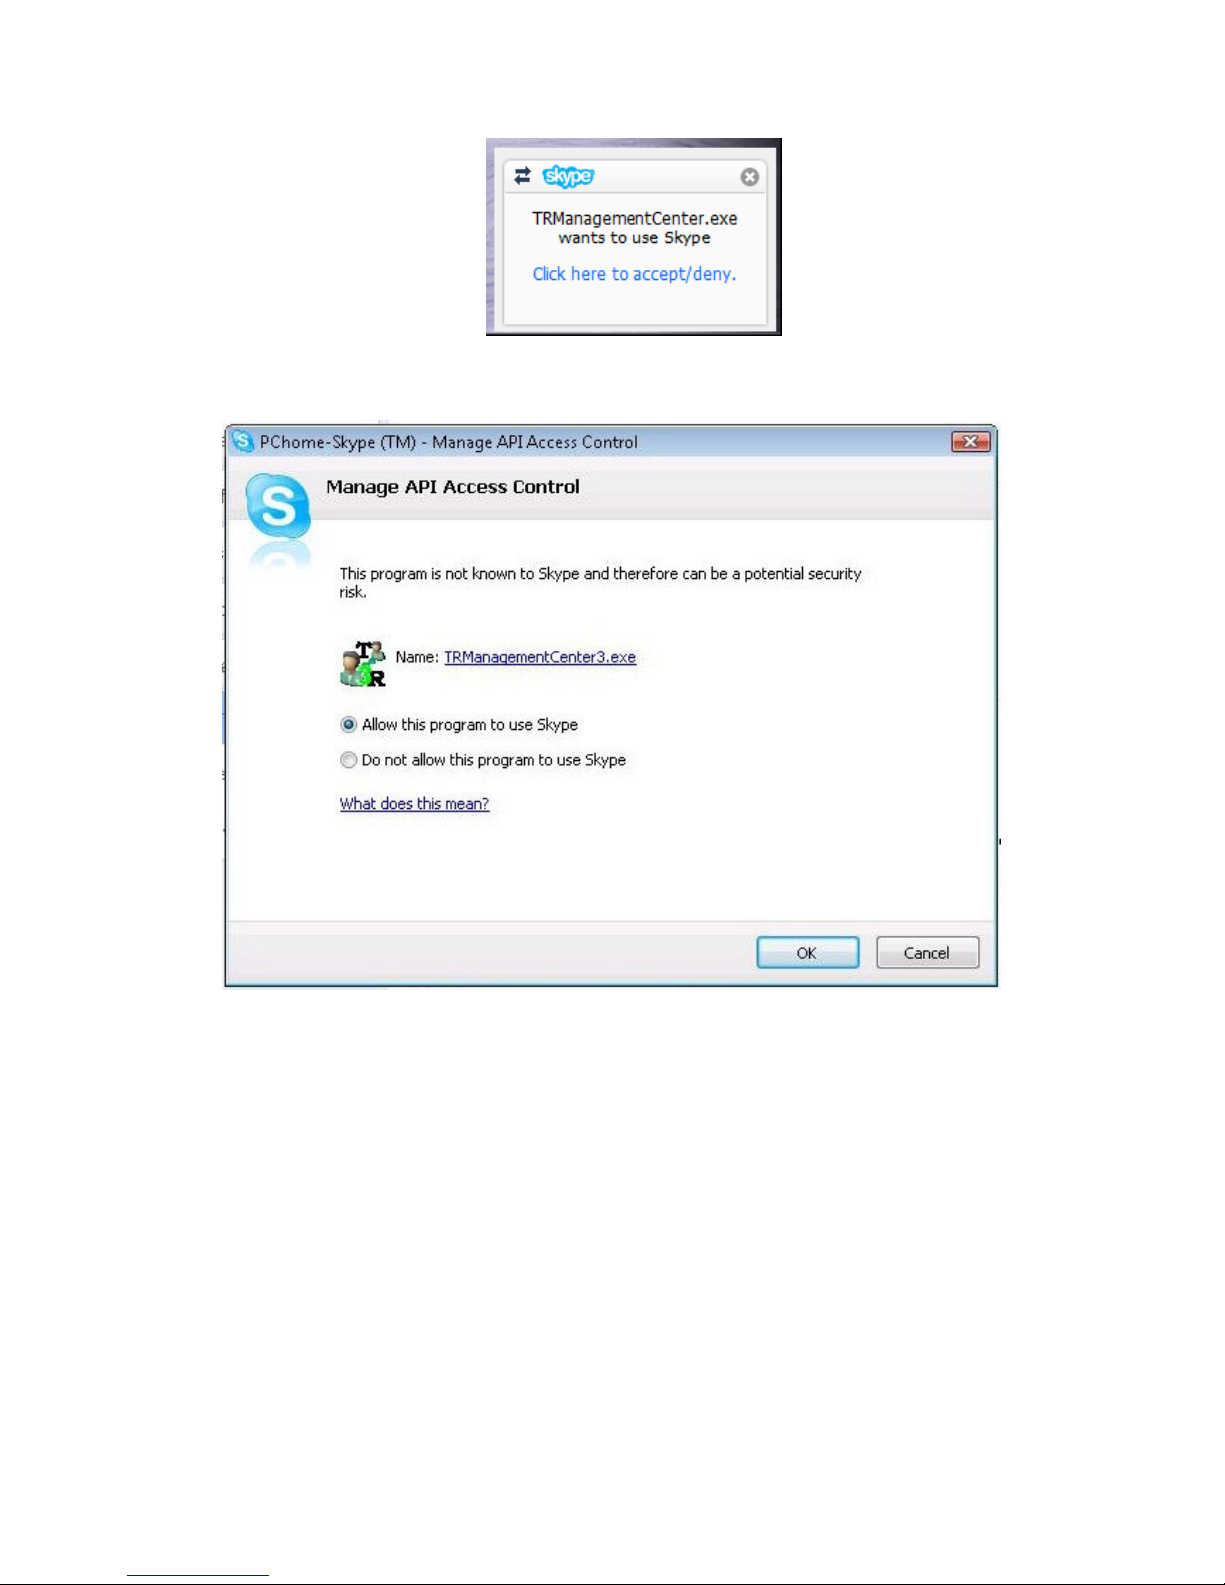
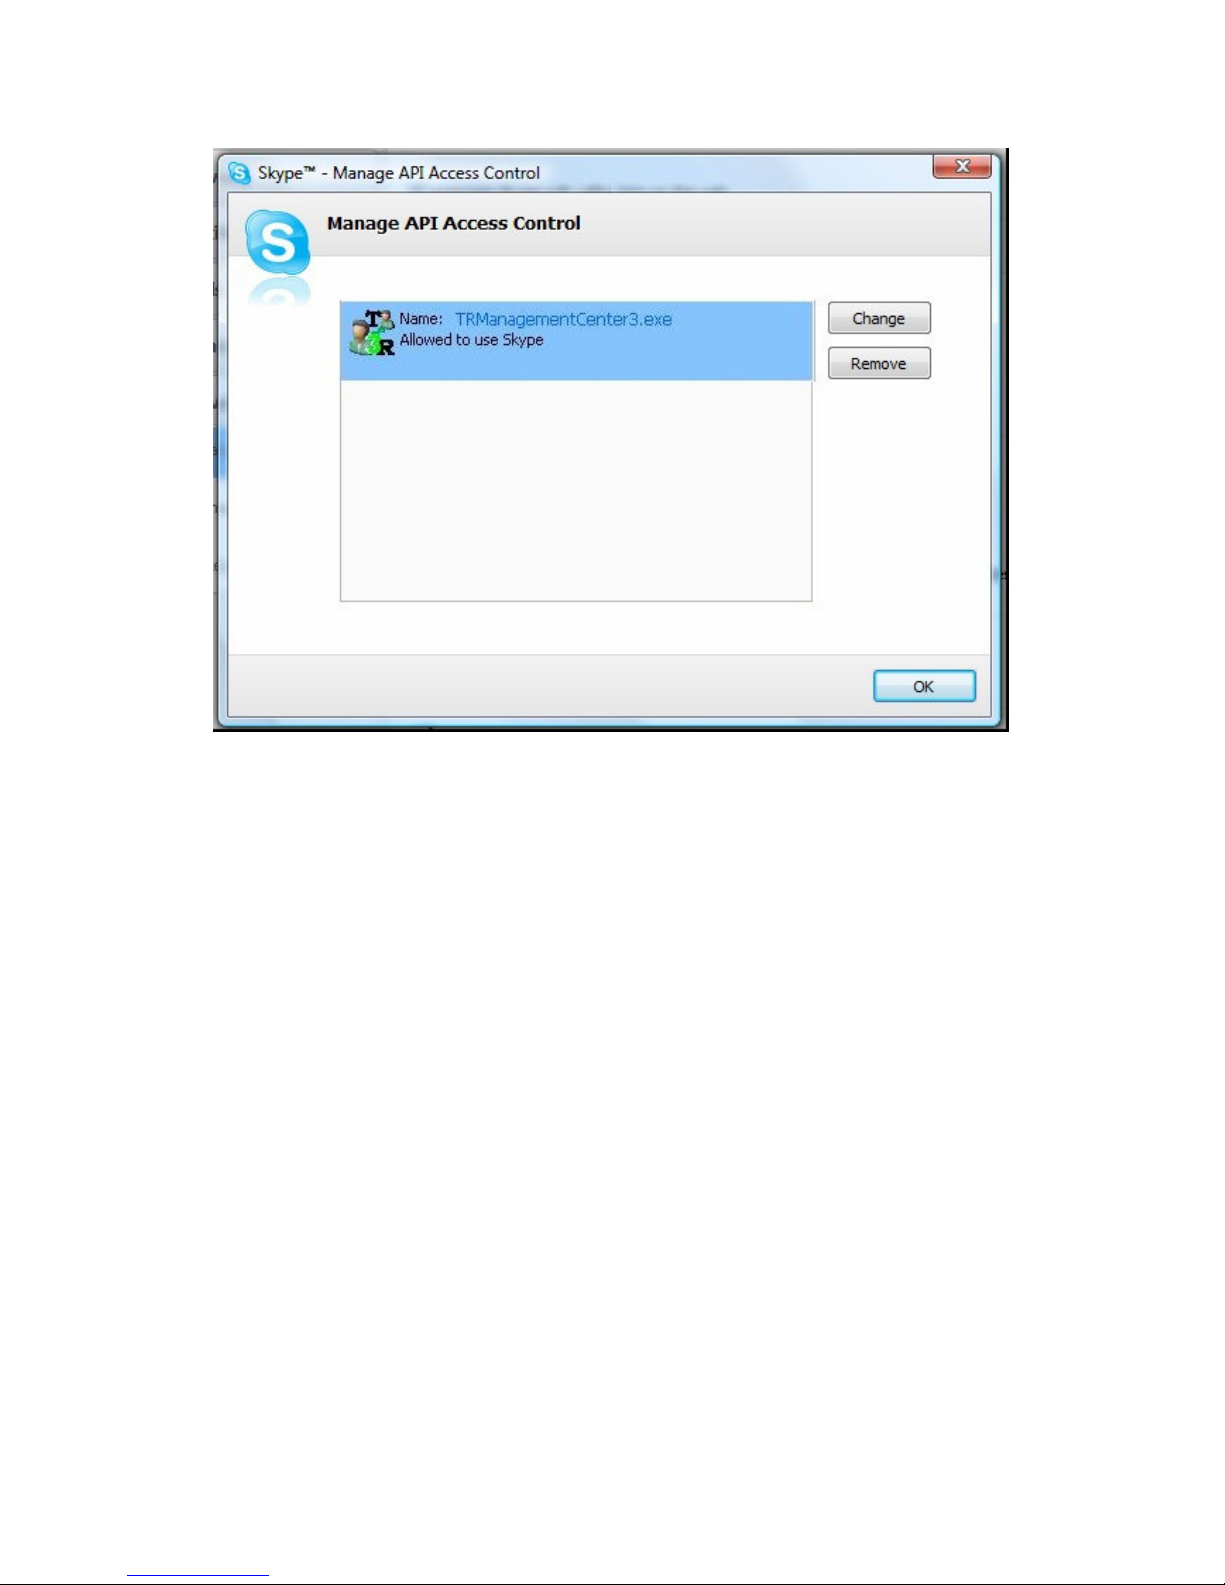
Step 4: When you launch the TR Management Center 203 program, the following
security verification pop-up window will appear in the lower right corner of the screen asking
you to allow the TR Management Center to use Skype functions.
Page 25
24
Click the blue text to request Skype access.
Select "Allow this program to use Skype"
If you accidentally select "Do not allow this program to use Skype", please change this
from within the Skype program at "Options -> "Advanced"
Note:
The exact procedure may vary from the version of Skype. Please refer to the Skype
manual for more information.
Page 26
25
Page 27
26
4 TR Management Center 203 Operation
4.1 TR Management Center Basic Setup
Before operating the TR Management Center 203, please set the operation parameters of the
TR Management Center 203 in the Basic Setup. It will make the afterward operation work
properly.
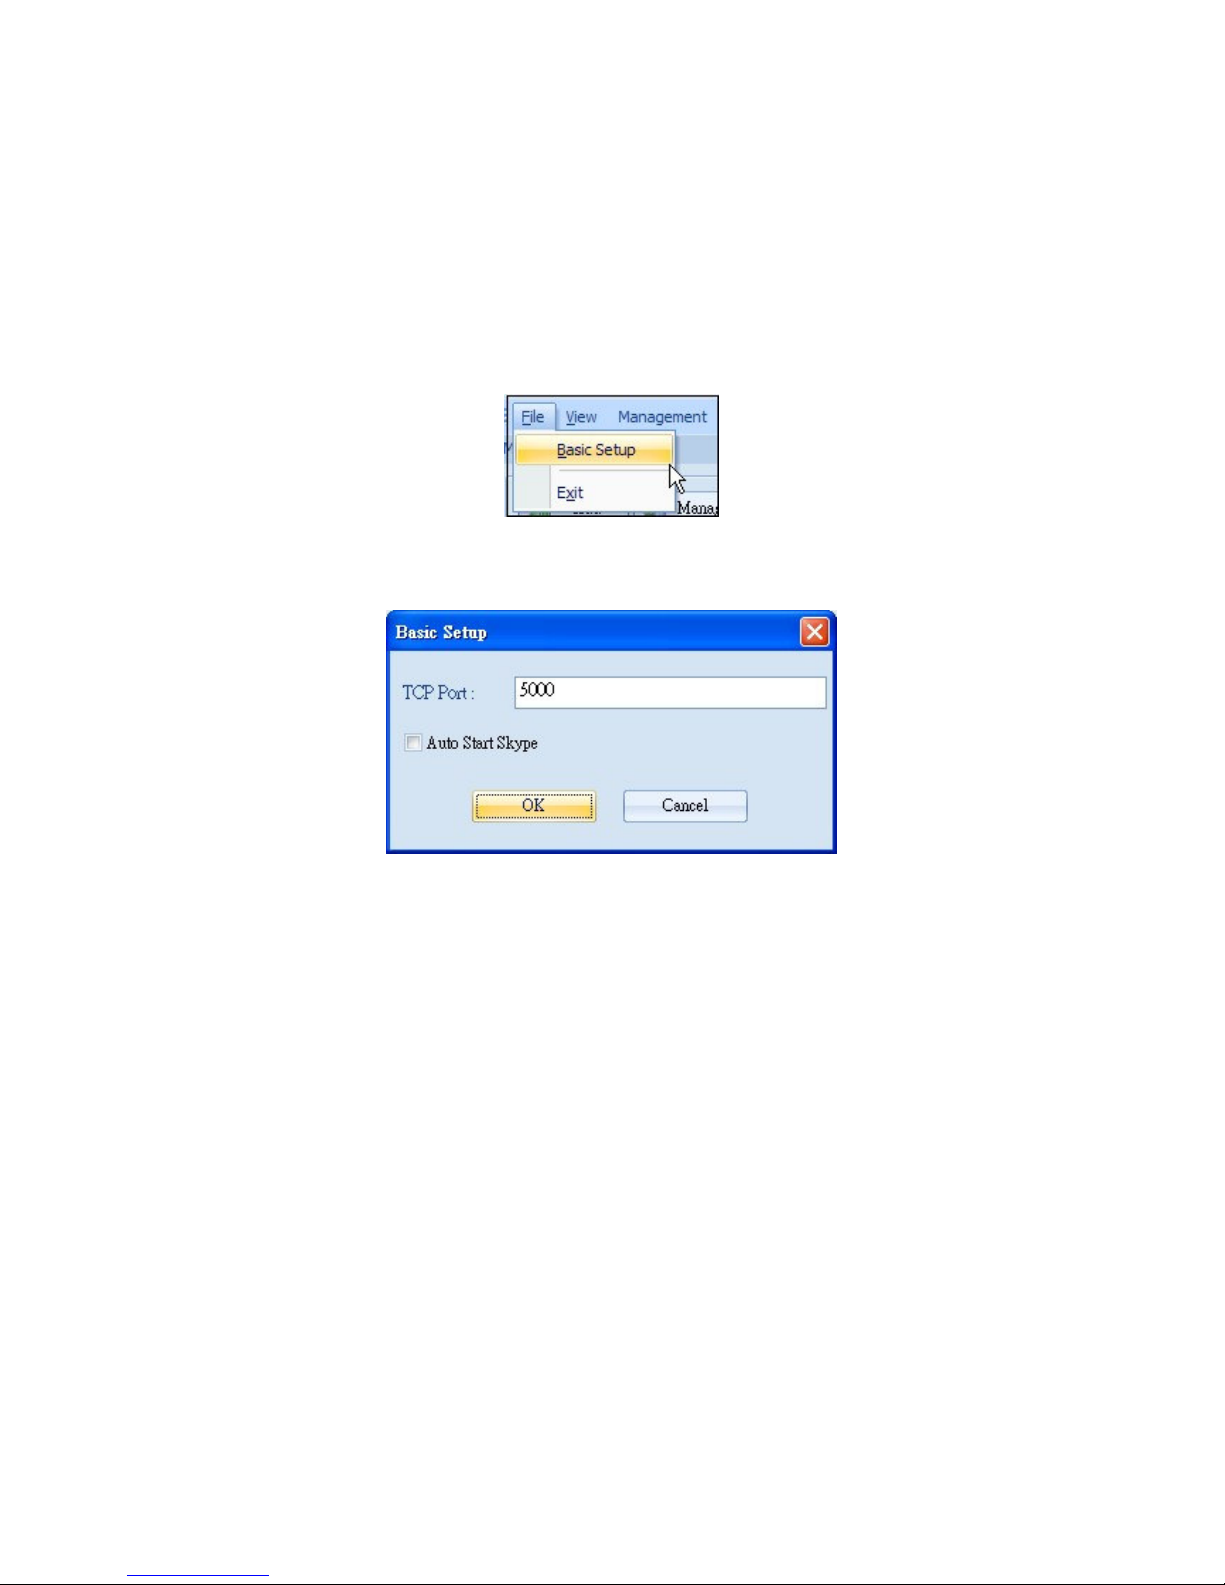
Basic Setup
Basic Setup Interface
Please set the communication port for connecting network for the first time of using TR
Management Center 203. Please check “Auto Start Skype.”
Please click OK button.
4.2 Tracker Management
TR Management Center 203 can track and manage up to 5 trackers. You have to set the
parameters of TR-203 while adding a set of TR-203 in the TR Management Center.
The tracker’s information and parameters must be properly configured before using other
functions of TR Management Center 203. Then your tracker can correctly send report back to
the TR Management Center 203 and that the program can correctly display the tracker's
current location on the map.
Page 28
27
4.2.1 Set up TR-203
You can remotely or connect TR-203 to PC to set the parameters of TR-203 by TR
Management Center 203.
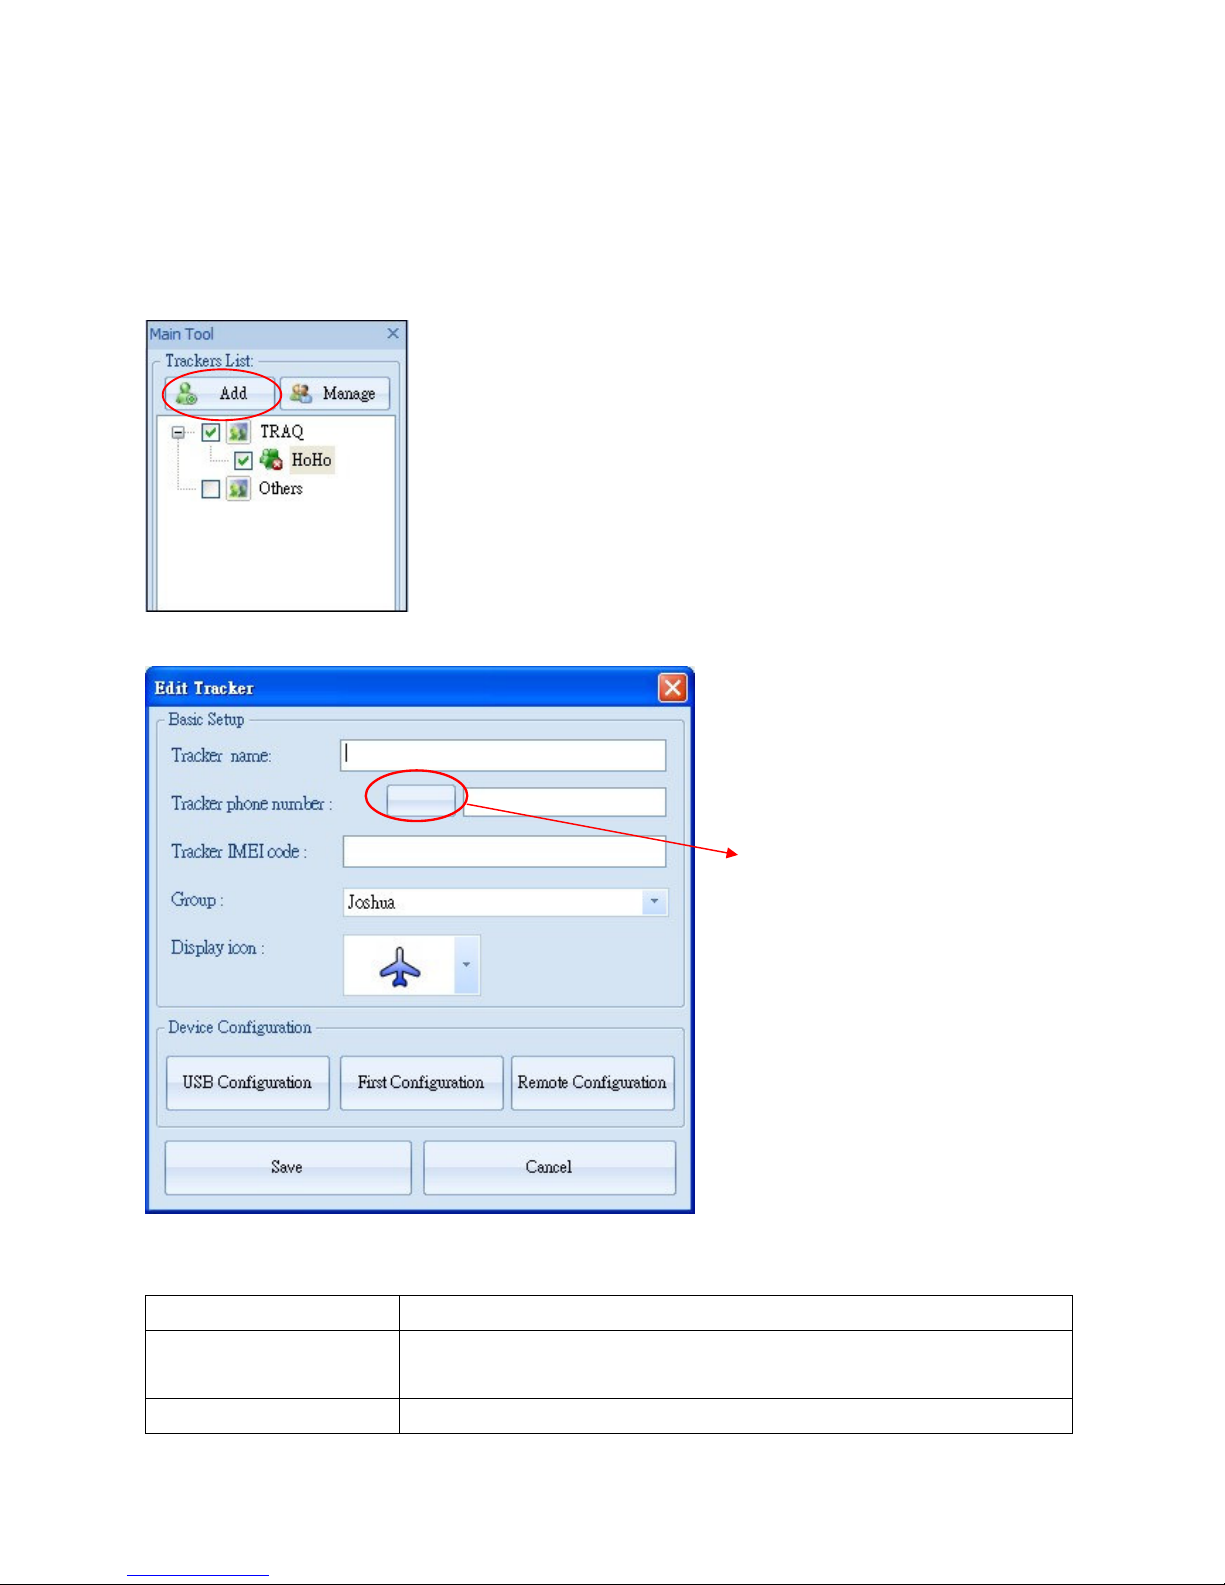
Step 1: Add your TR-203 in the Tracker list by clicking the Add button.
You will see the window below.
Step 2: Please enter the information of the TR-203 in the fields.
Tracker name
Tracker phone
number
Tracker IMEI code
Give a name to TR-203 by entering the name here
The phone number of the SIM card in this TR-203. Select the
country/area code by clicking the button beside the field.
IMEI code of TR-203. You can find IMEI code on the back cover
Select country
code by clicking
this button
Page 29
28
of TR-203
Group
Display icon
Select the group which TR-203 will be classified to
Select an icon for TR-203 to be shown on the map
Step 3: If you would connect TR-203 to PC by USB cable to set TR-203, please click “USB
Configuration” button after you connect TR-203 to PC by USB cable. Then please click SOS
button and go to Step 6
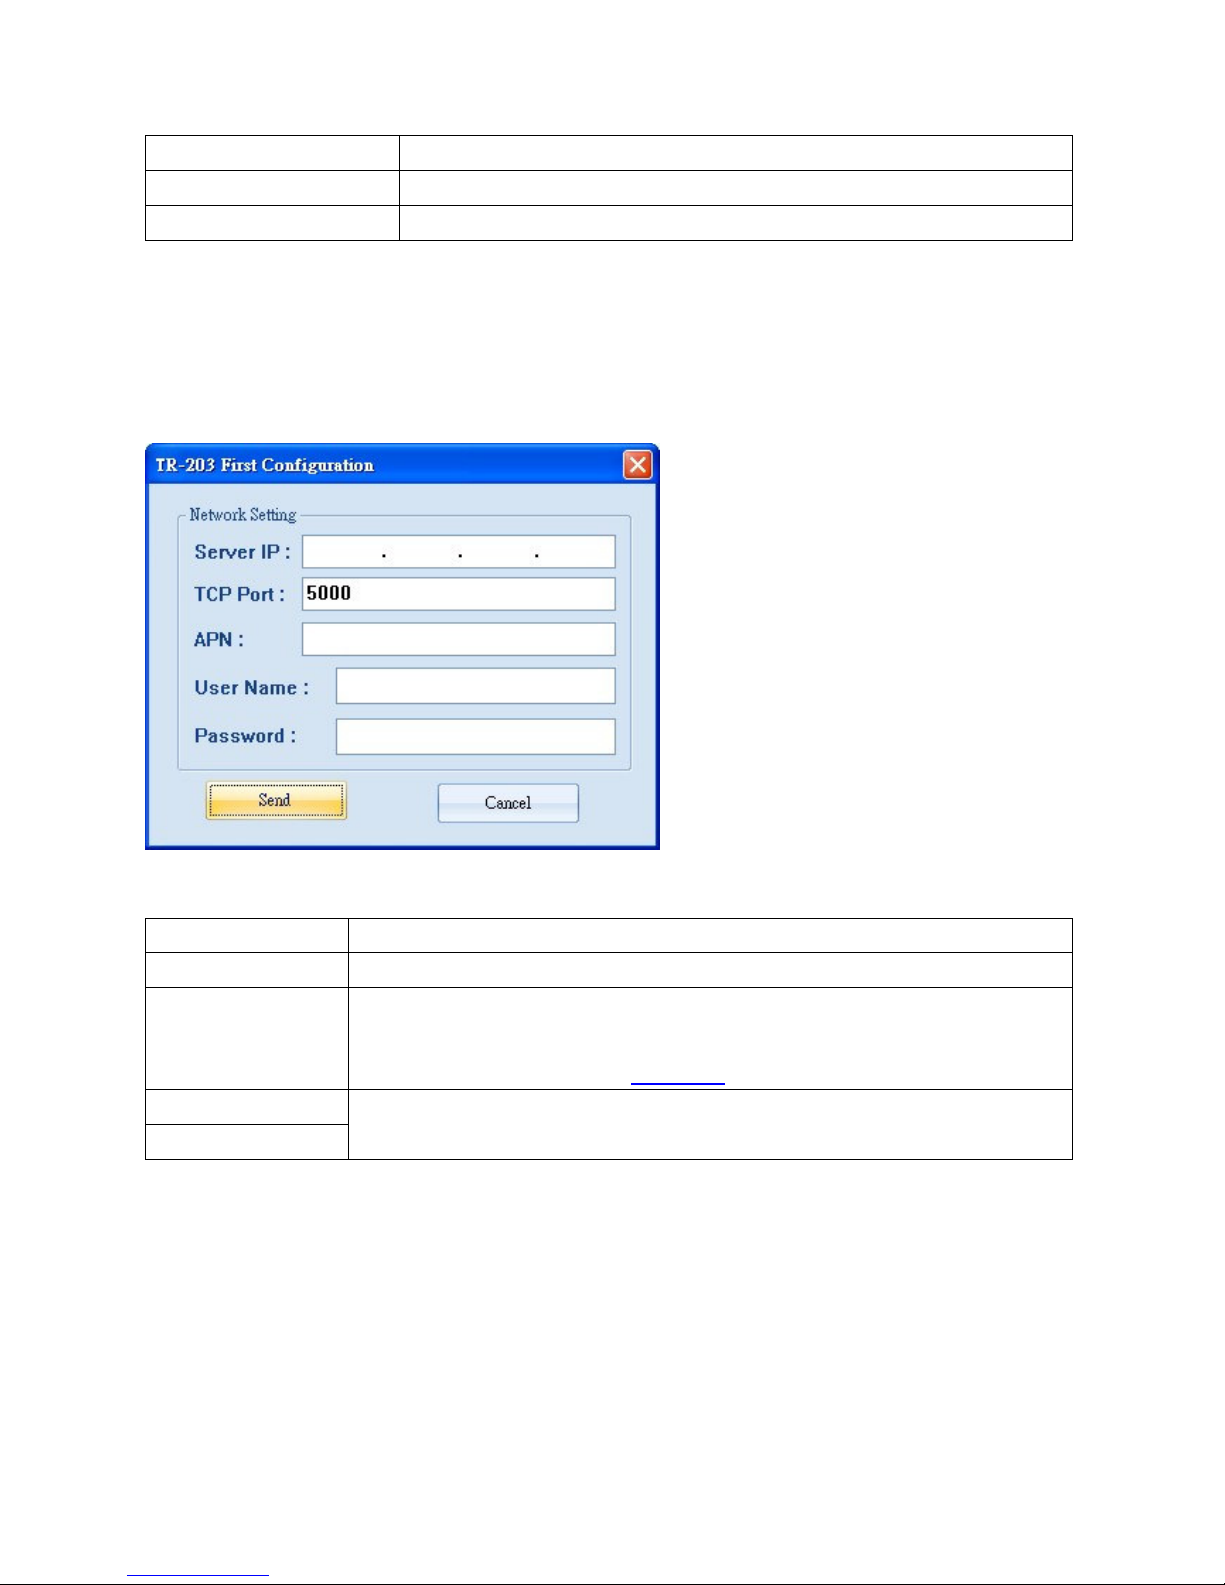
If you would remotely set TR-203, please click “First Configuration” button.
You will see the window below.
Step 4: Please enter the field on the window.
Server IP
TCP Port
APN
The fixed IP for the computer running the TR Management Center 203
Set the communication port for connecting network. Default is 5000.
The APN depends on the SIM card for the telecommunication service
provider used by your TR-203 (The list below is for service providers in
Taiwan. Please refer to the Appendix for your APN.)
User Name
Password
Contact your GSM/GPRS network service provider
Step 5: Please click “Send” button.
You will see the window below.
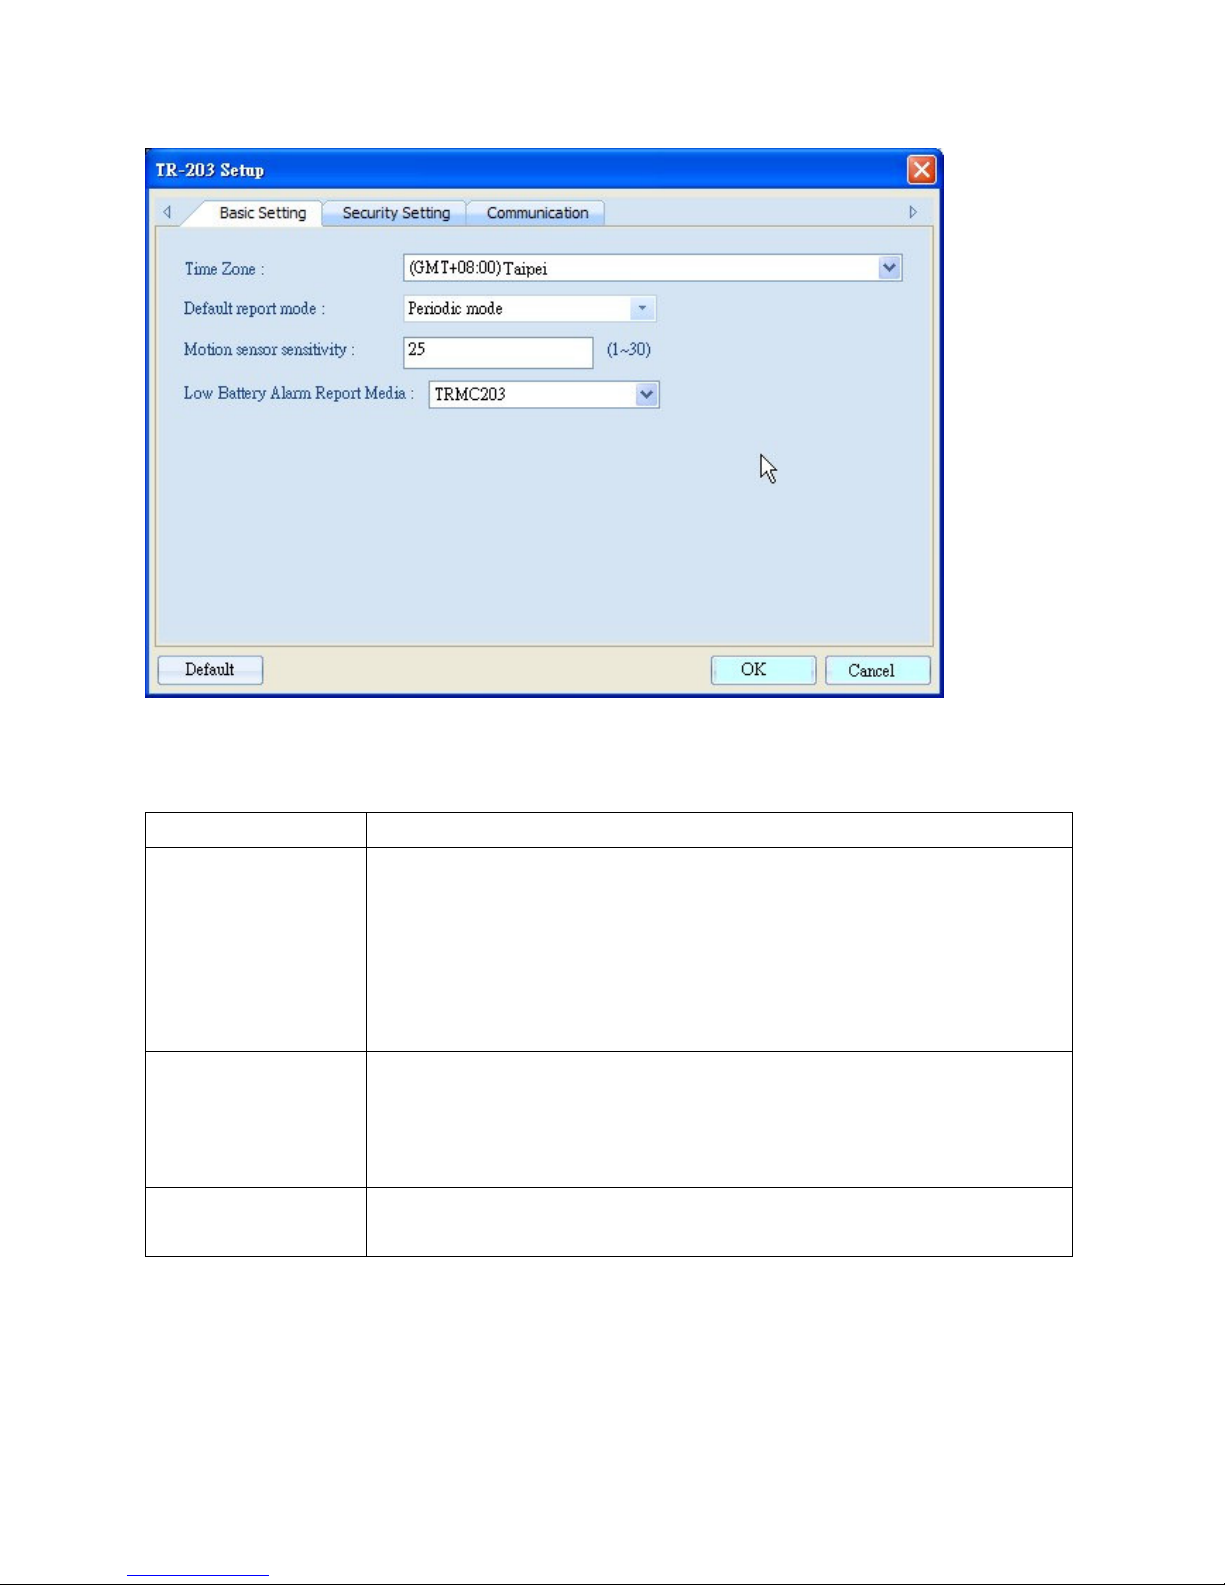
There are 3 tags on the window. You could click the tag to set the parameters. It takes about 2
minutes for TR Management Center 203 to get the parameters from TR-203.
Page 30
29
Step 6: Please set the parameters of Basic Setting.
Time Zone
Default report
mode
Motion Sensor
Sensitivity
Low Battery Alarm
Report Media
Select your local time zone
TR-203 will automatically go into the "Default report mode" when it
is powered on.
There are 3 report modes:
Periodic mode
Motion mode
Standby mode
The number of vibration which activates TR-203 to send alarm report
under parking mode, sleeping mode and moving report under motion
mode. The value range is 1~30. The larger the number is, the less
sensitive the device is.
Choose device to send out low battery alarm report to mobile phone
or to TR Management Center 203 or to both of the two.
Page 31
30
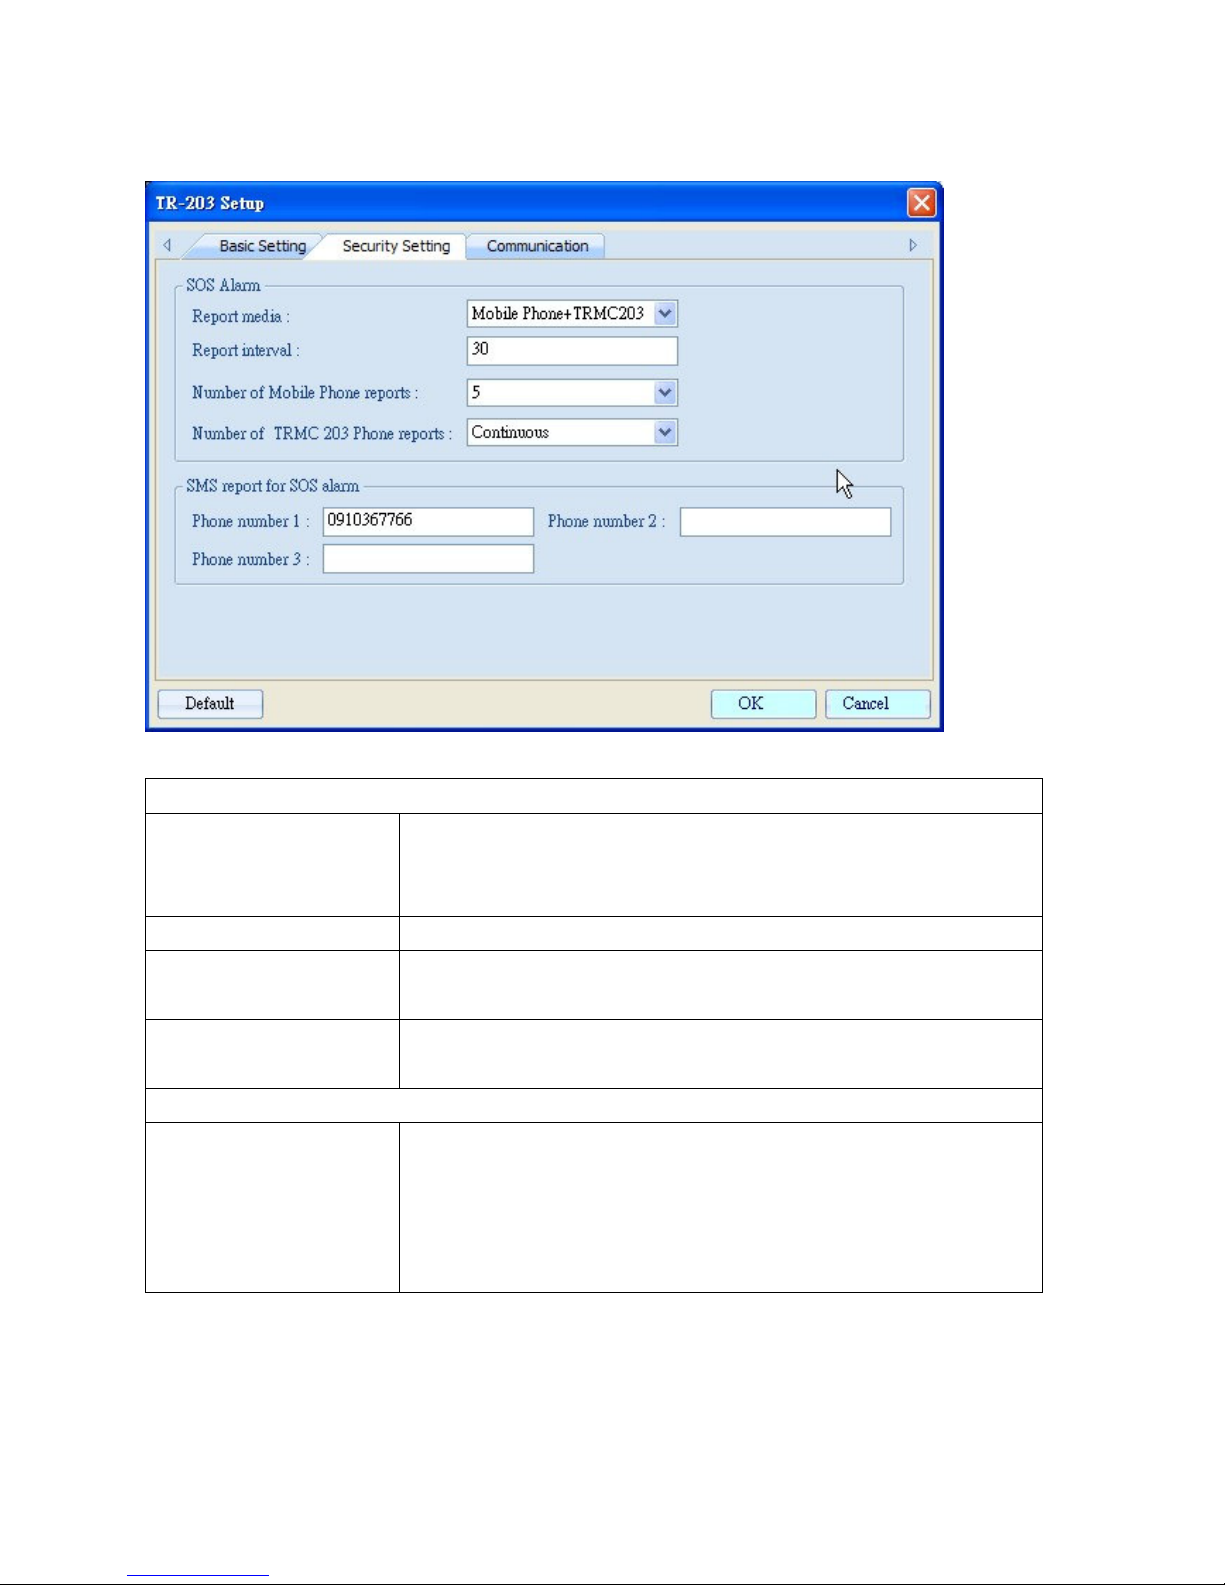
Step 7: Please set the parameters of Security Setting.
SOS Alarm
Report Media
Report Interval
Number of mobile
phone reports
Number of TRMC203
reports
SMS report for SOS alarm
Phone number 1~3
Choose TR-203 to send SOS alarm report to mobile phone or
TRMC203 (TR Management Center 203) or to mobile phone +
TRMC203
Set the interval between sending 2 SOS alarm report
Select how many SOS alarm report TR-203 will send to mobile
phone
Select TR-203 to send SOS alarm report to TR Management
Center 203 once or continuously
Set the 3 phone numbers for receiving SOS alarm report while
the Report Media is Mobile Phone or Mobile Phone +
TRMC203
Note: Phone number 1 will also be the phone number for
receiving the phone call of voice monitor
Page 32
31
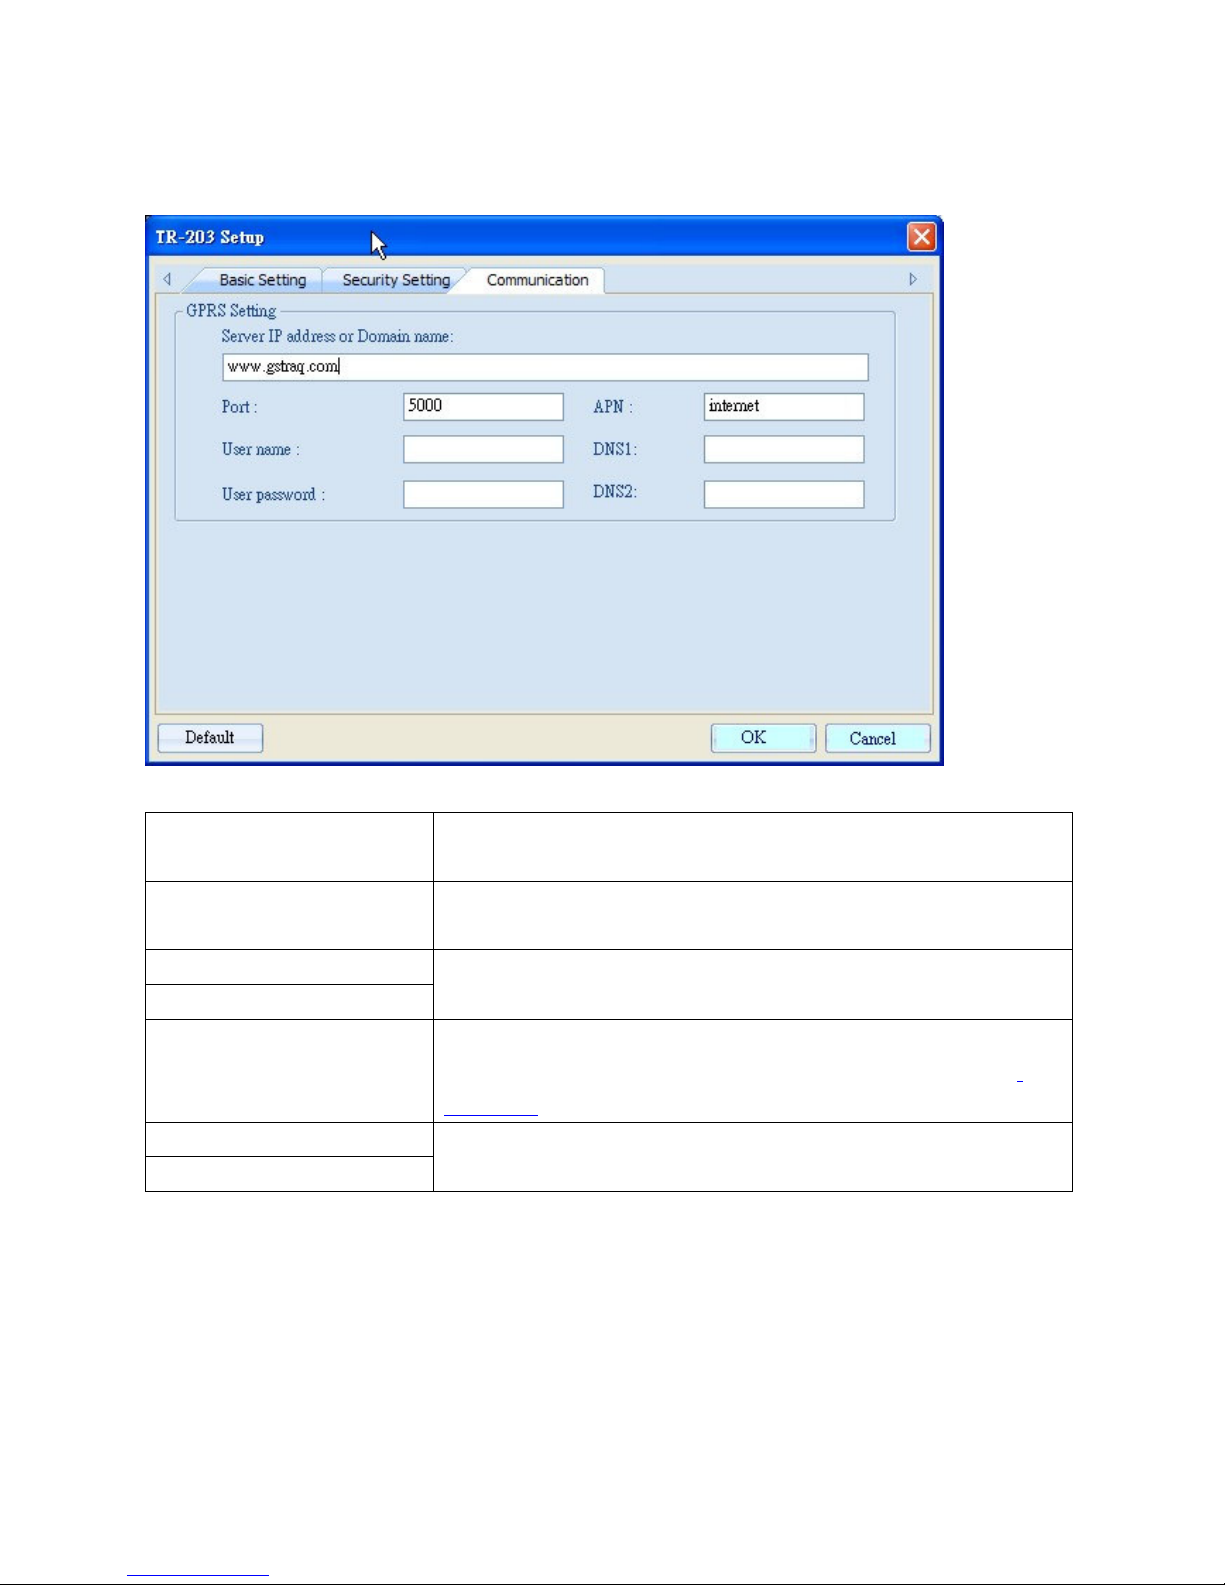
Step 8: Please set the parameters of Communication.
Server IP address or
Domain name
Port
User Name
User Password
APN
DNS1
DNS2
Step 9: Please click OK.
The fixed IP or domain name for the computer running the TR
Management Center 203
Set the communication port for connecting network. Default is
5000.
The 2 value depend on the SIM card for the
telecommunication service provider used by your TR-203
The APN depends on the SIM card for the telecommunication
service provider used by your TR-203 (Please refer to the
Appendix for your APN.)
Please contact your telecommunication service provider about
DNS.
Page 33
32
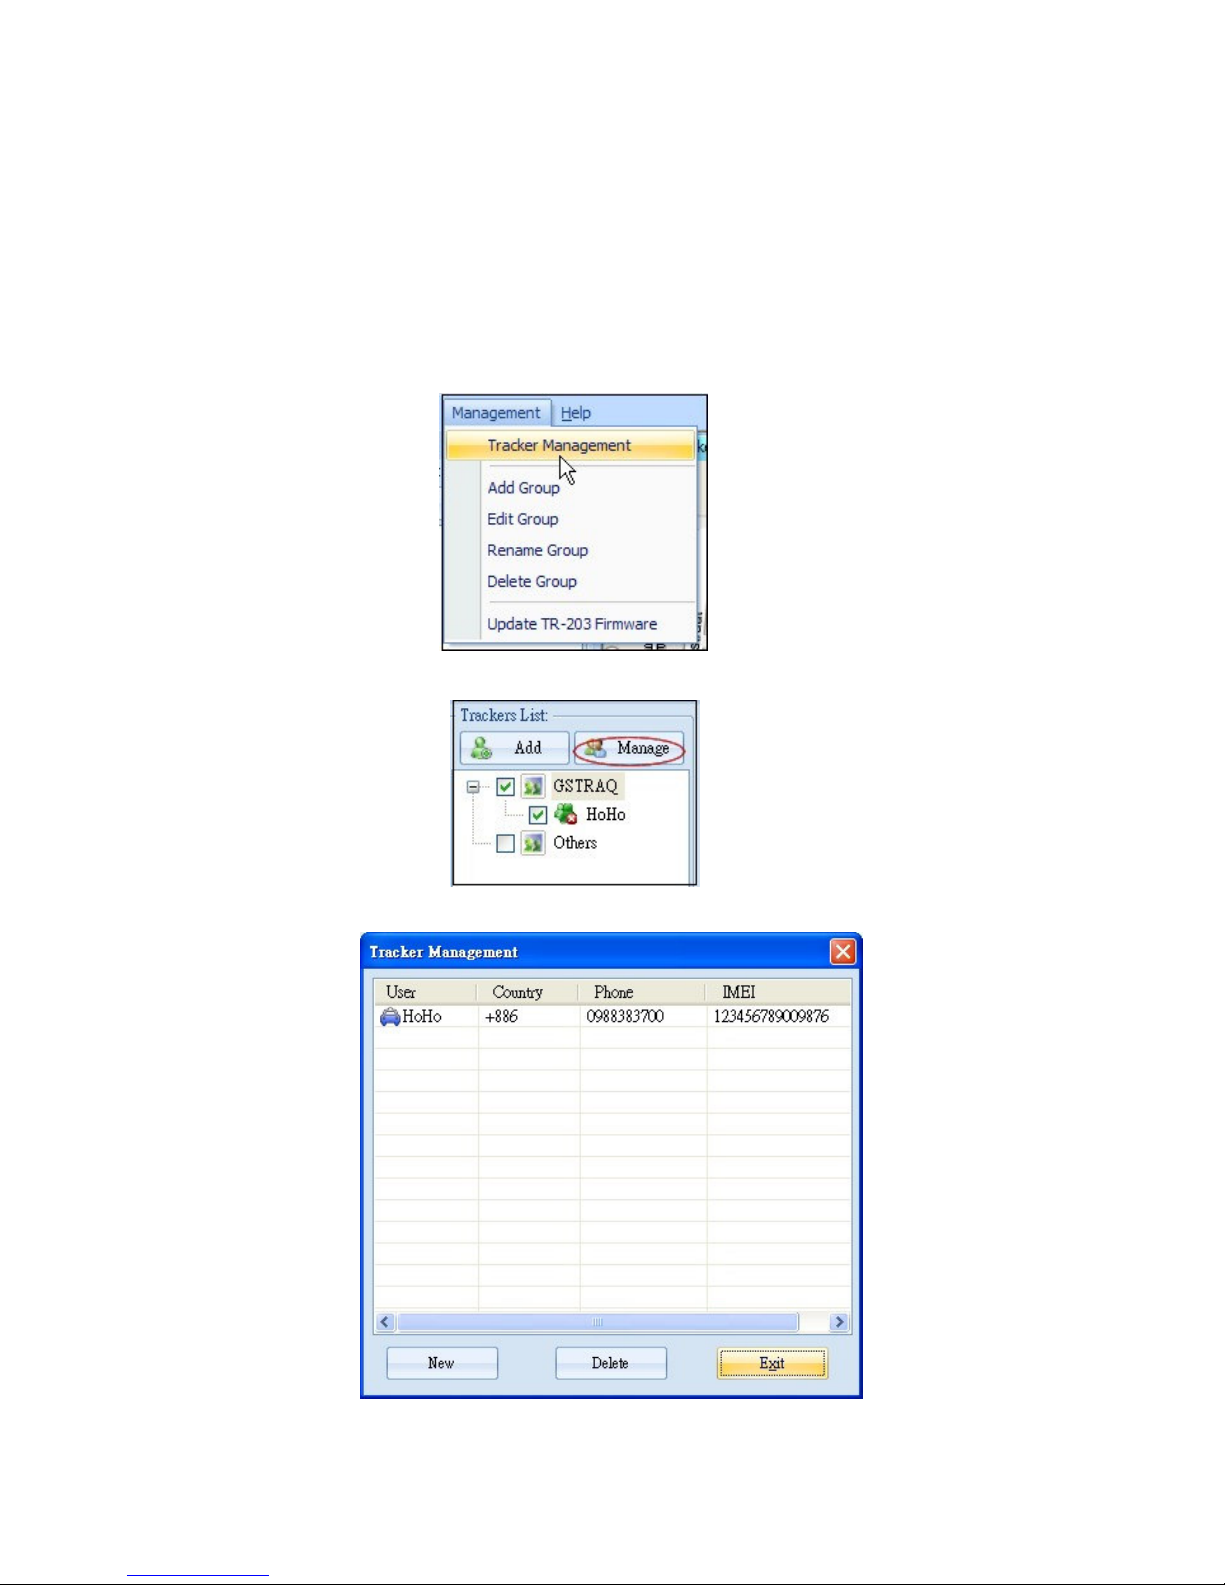
4.2.2 Tracker Management
Tracker Management is used to manage registered or previously configured trackers. In
Tracker Management, you can edit or delete trackers.
You can find Tracker Management from the Menu "Management" "Tracker
Management". Or you can click the Manage button.
The Tracker Management option under Management in Menu
Manage button under Trackers List
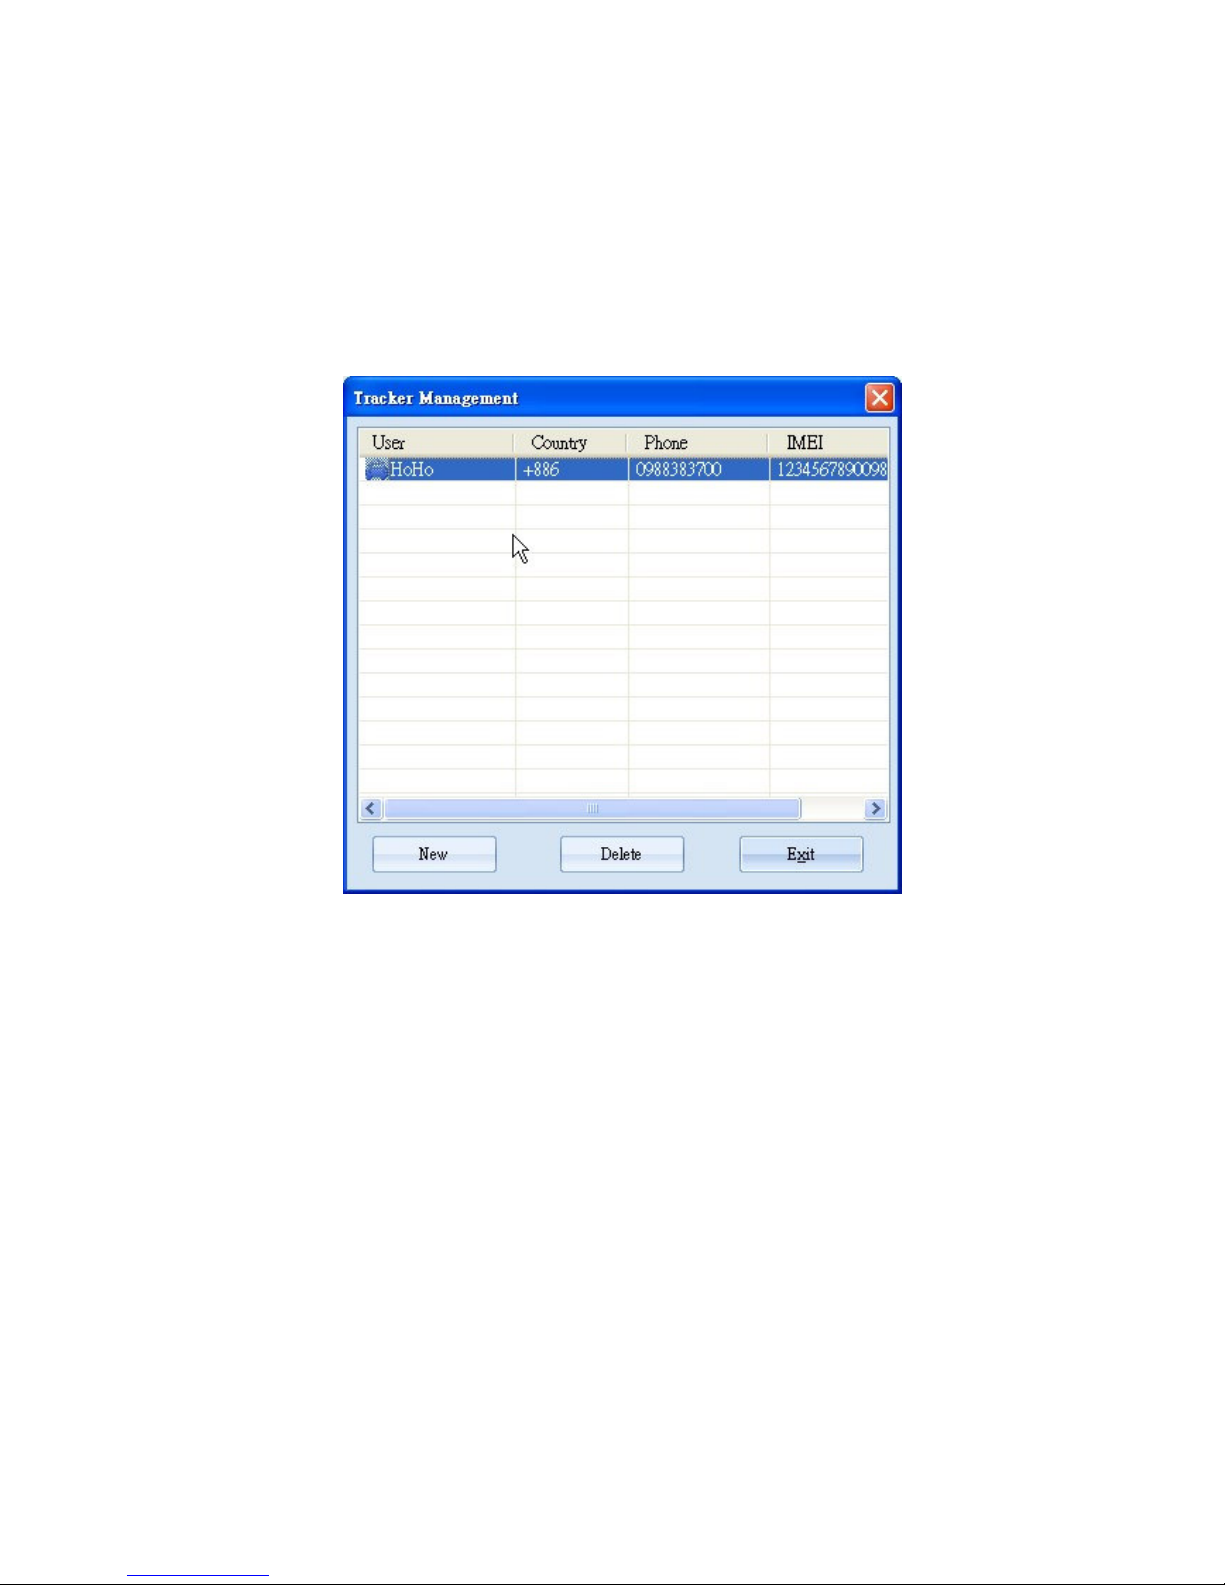
Tracker Management interface
Page 34
33
4.2.3 Deleting a TR-203 tracker
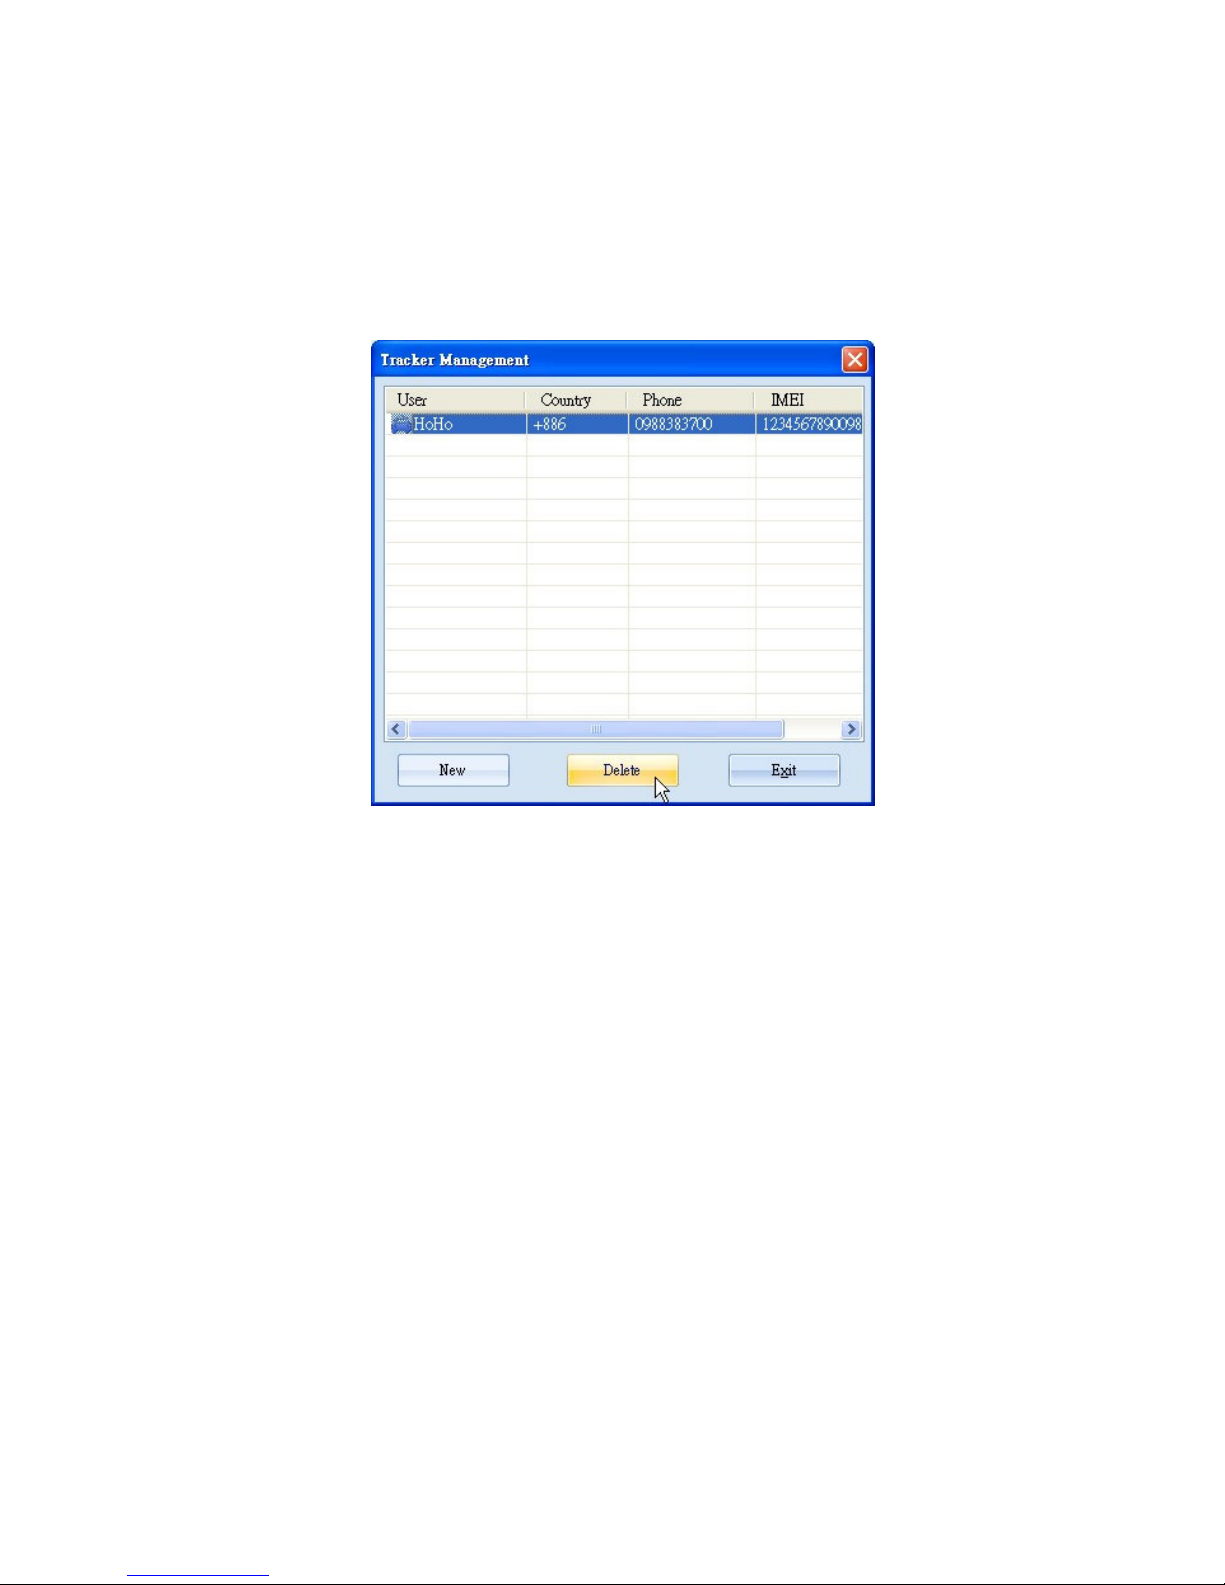
There are two ways for deleting TR-203 trackers in the TR Management Center 203
1. Select "Management" "Tracker Management" from menu bar.
Choose the TR-203 you want to delete, and then click on the "Delete" button.
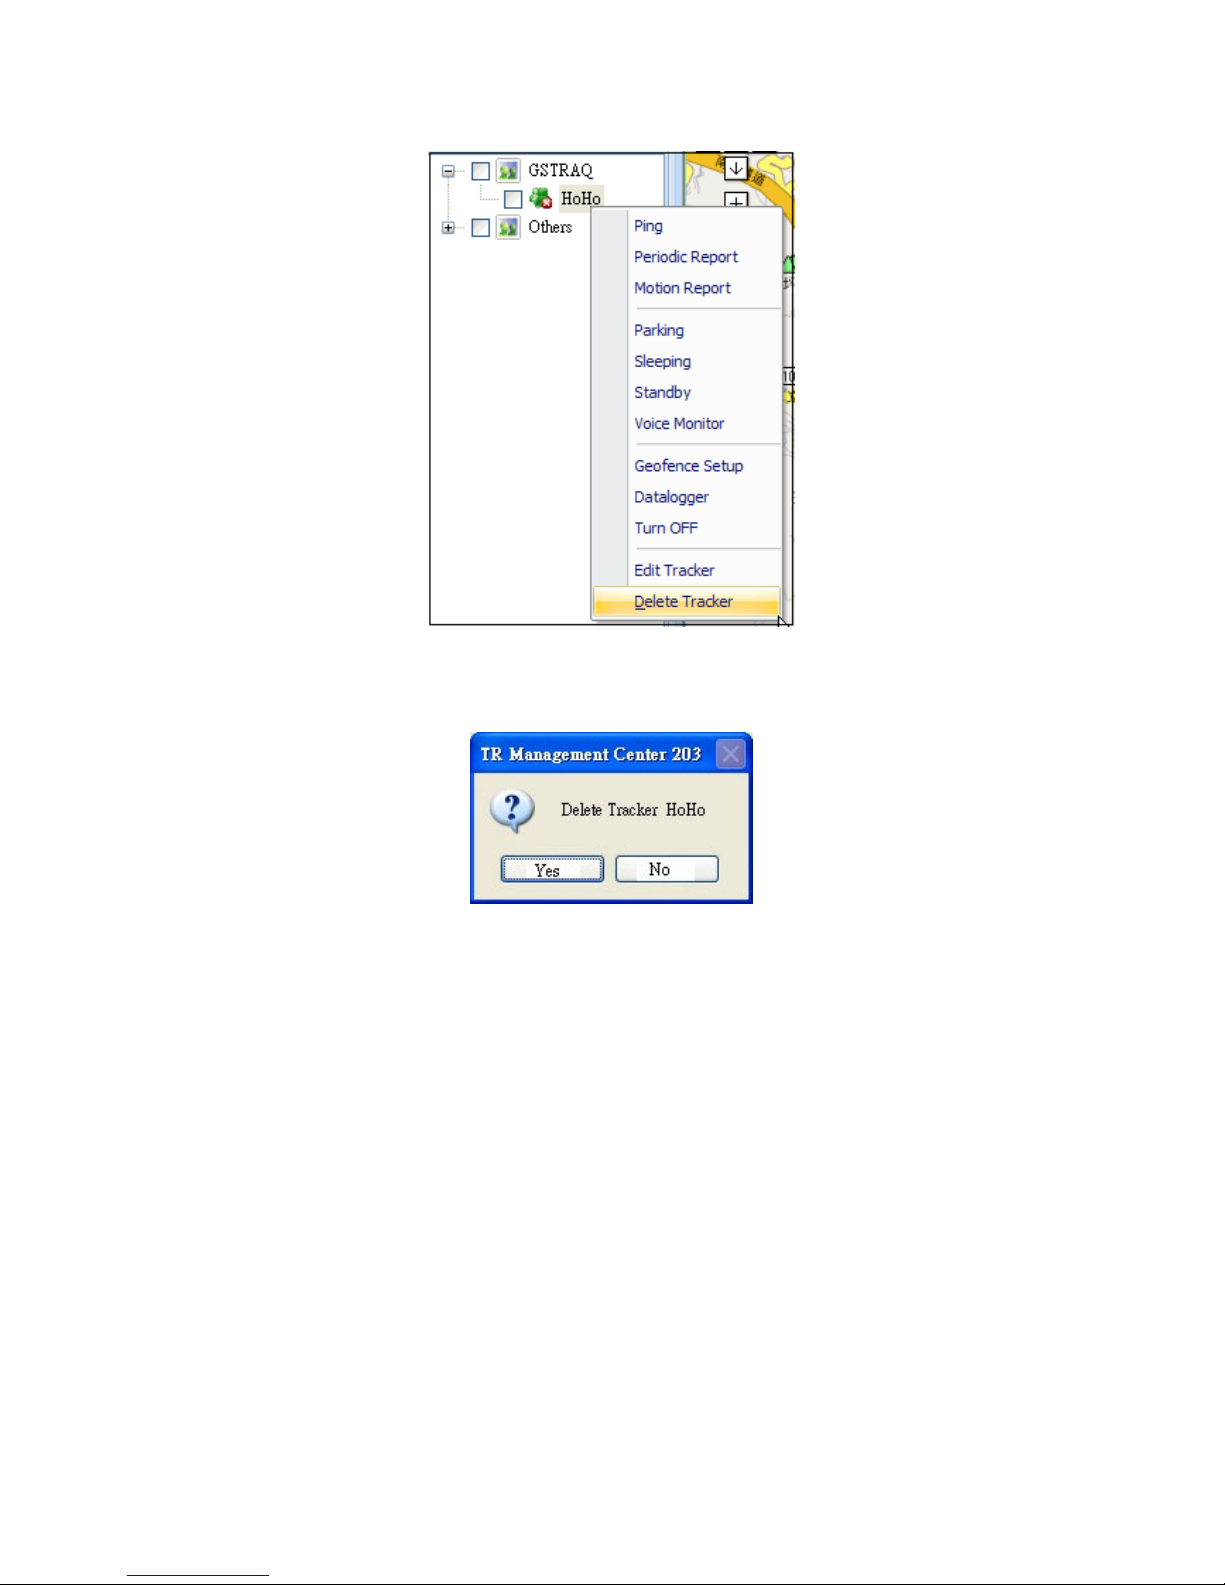
2. The other way of deleting TR-203 tracker is selecting a tracker from the Trackers List and
right clicking the mouse button to bring the tracker menu. Now click on Delete Tracker to
delete the selected tracker.
Page 35
34
Method 2 for deleting a tracker
A confirmation window will appear when deleting a tracker
Note: Deleting a tracker does not actually delete its history data from the database. To
delete all history data, please use the editing features in Microsoft Access.
Page 36
35
4.2.4 Editing a TR-203 tracker
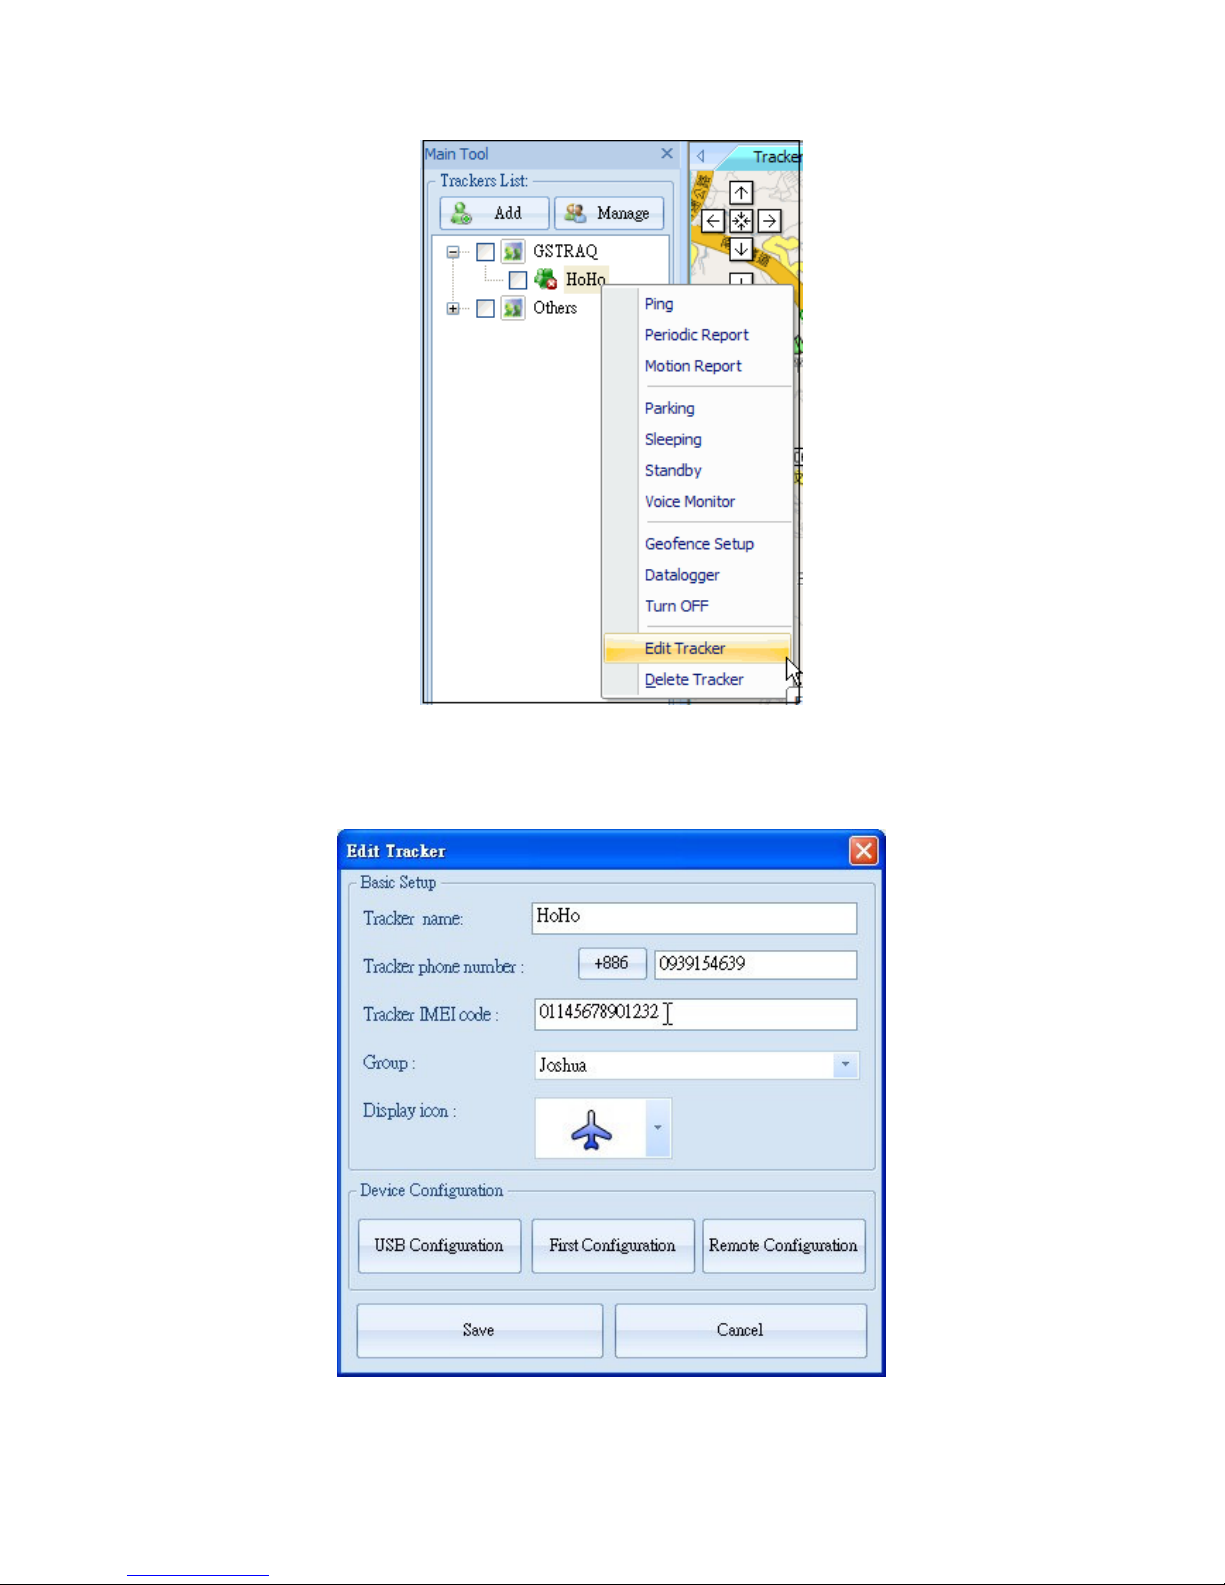
If you want to change the information of TR-203 tracker, you can edit the information by
“Edit tracker”
There are two ways of bring up “Edit tracker”
1. Click “Management” “Tracker Management” from menu.
Double click a tracker, and then the window of “Edit tracker” will be brought up.
The other way of bringing “Edit tracker” is selecting a tracker from the Trackers List and right
clicking the mouse button to bring the tracker menu. Click on Edit Tracker
Page 37
36
Edit Tracker window
After editing the information, click Save to save the setting.
Page 38
37
4.3 Tracker Group Management
You could classify trackers to different groups for convenient tracker management.
4.3.1 Add a Group
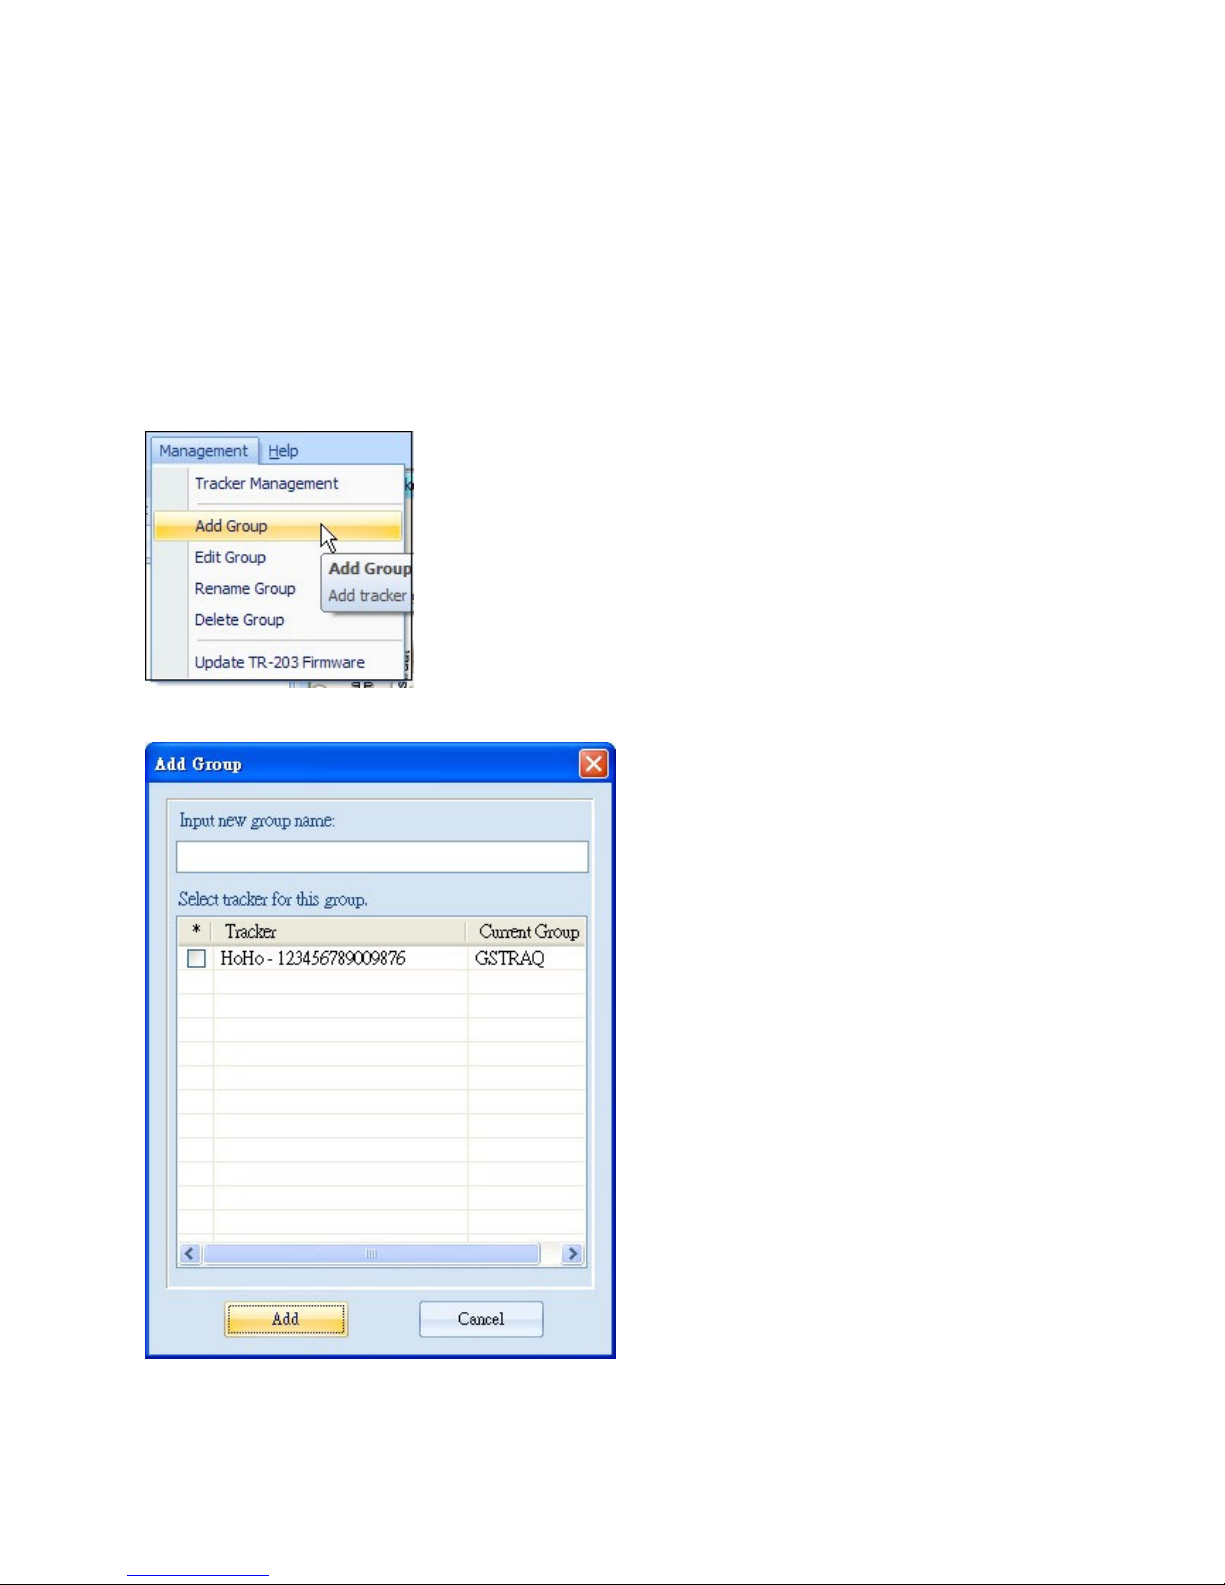
You could add a group from the Menu "Management" "Add Group".
The window of Add Group will be brought up.
Please enter the name of the new group in the field of “Input new group name”
Please click Add button. The new group will be listed on the Trackers List.
Page 39
38
4.3.2 Edit Group
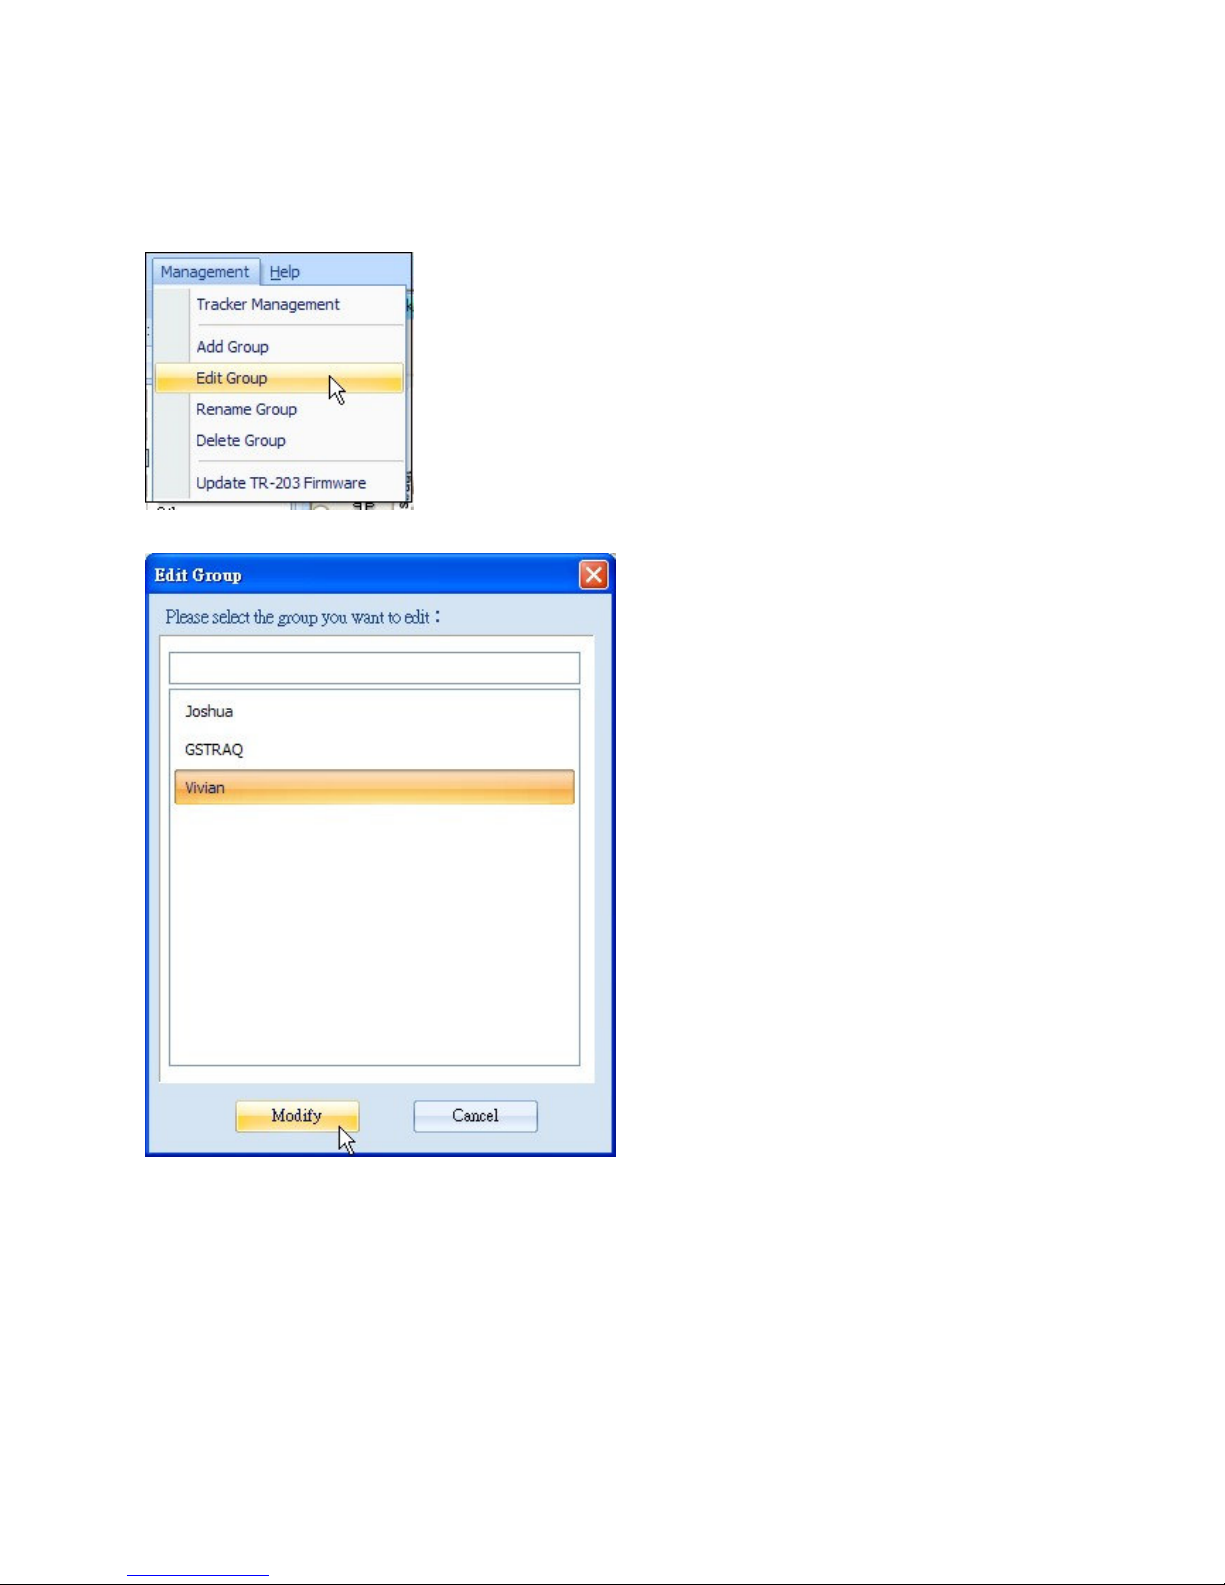
You could change the trackers to different group from the Menu "Management" "Edit
Group"
The window of Edit Group will be brought up.
Please select the group that you want to add trackers. And then please click Modify button.
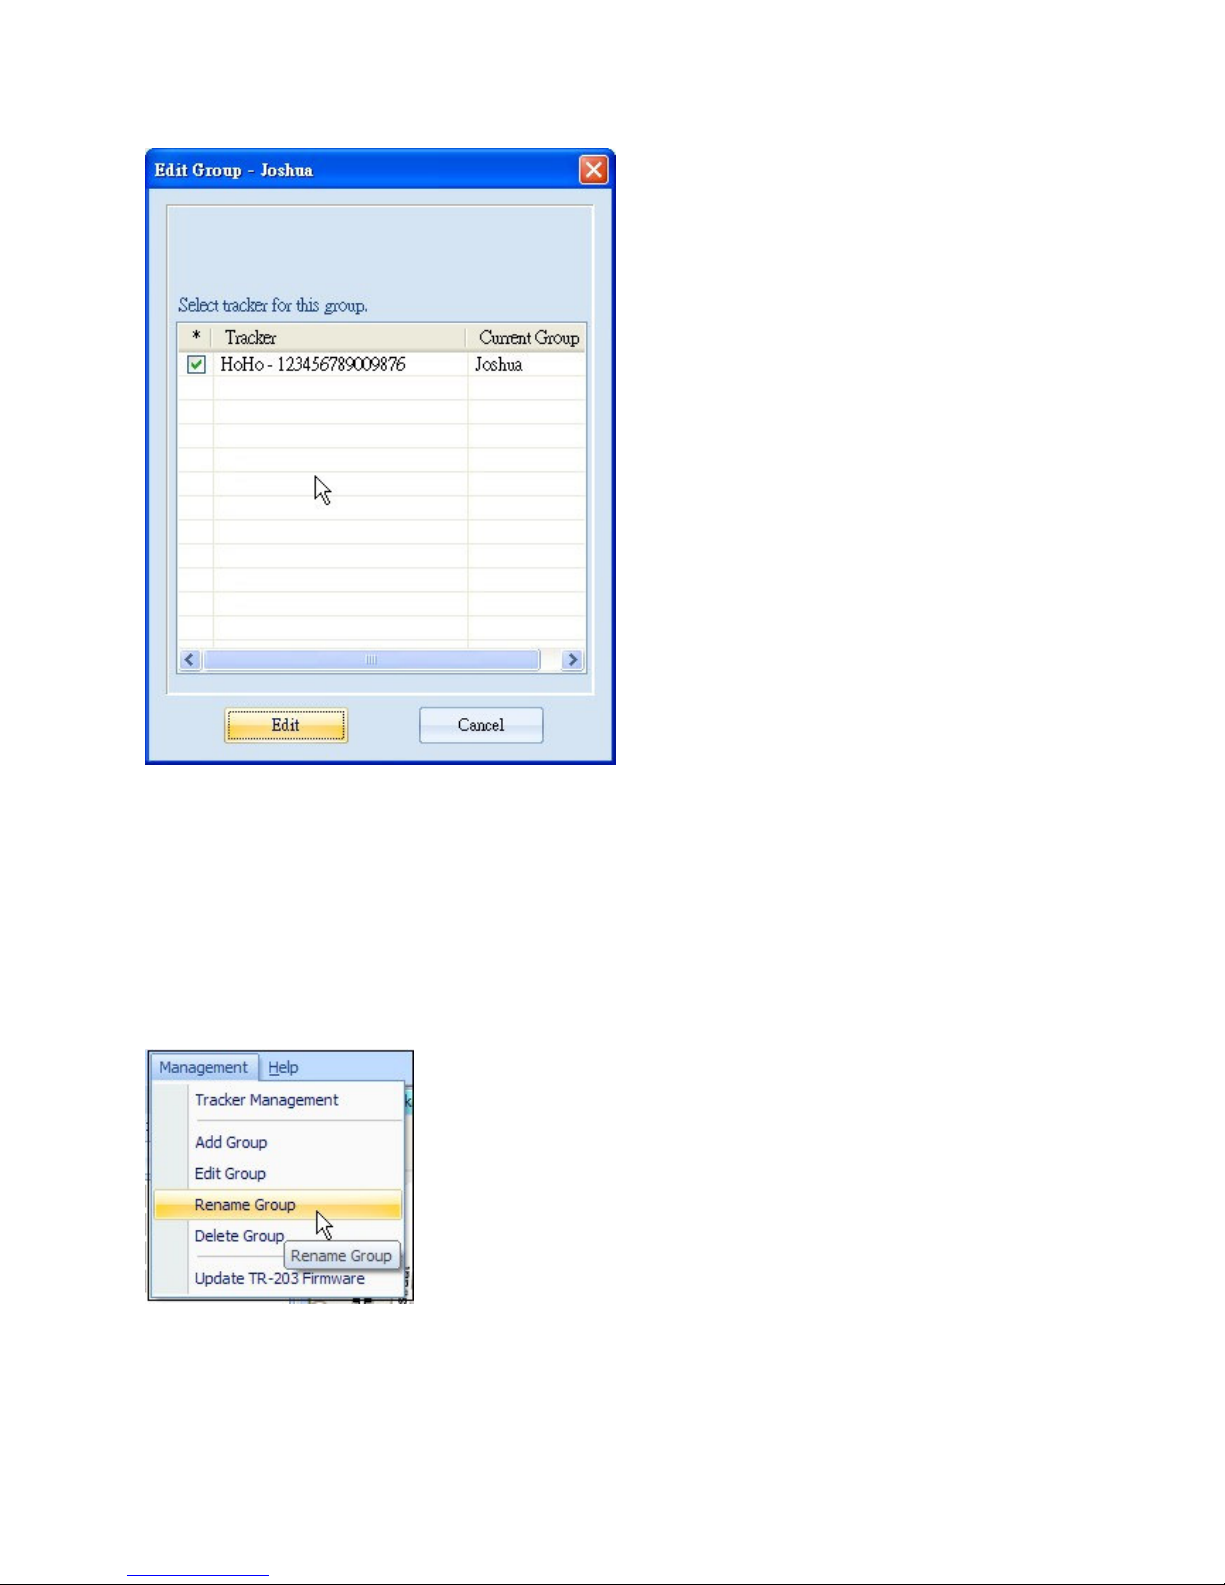
Then you could add trackers to this group in the window below.
Page 40
39
Please select the trackers for adding them in this group.
Please click the Edit button.
4.3.3 Rename Group
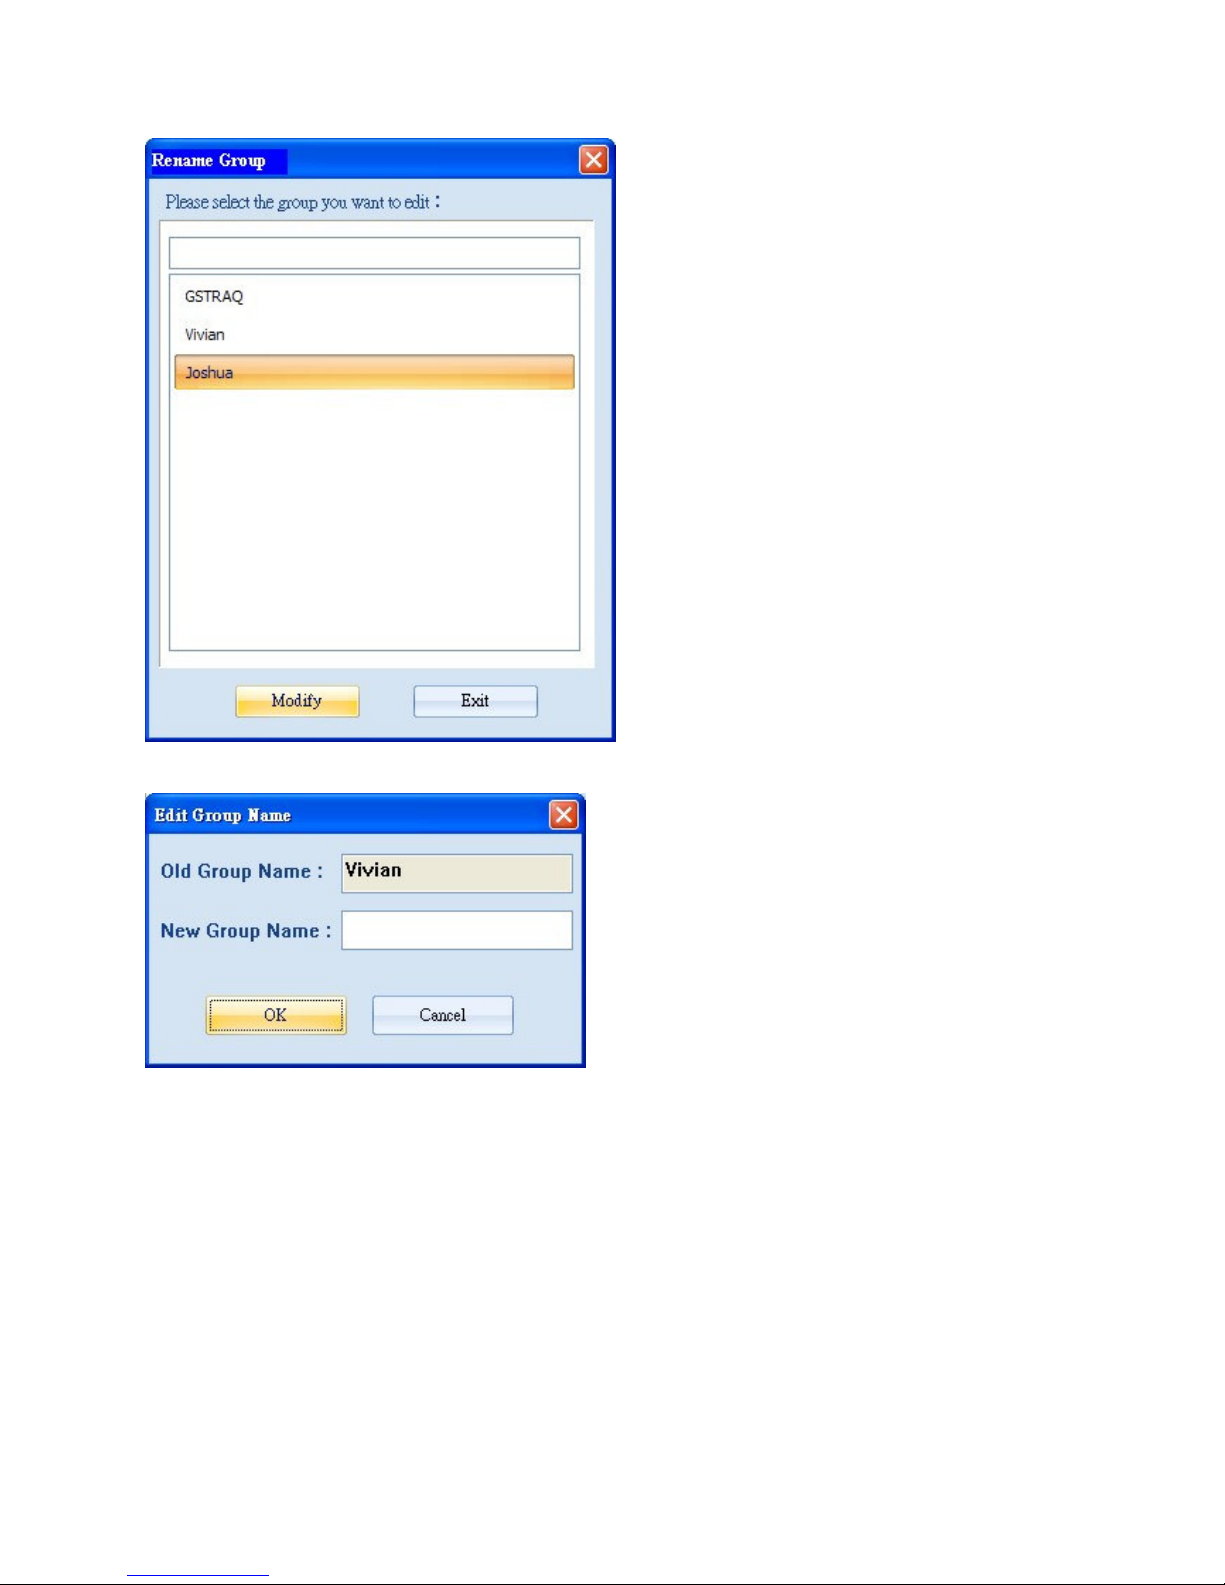
You could change the name of the tracker group from menu “Management” “Rename
Group”
The window of Rename Group will be brought up.
Page 41
40
Please select the group you want to change name. And then click Modify button.
Please enter the new name in the field of New Group Name.
Please click OK.
Page 42
41
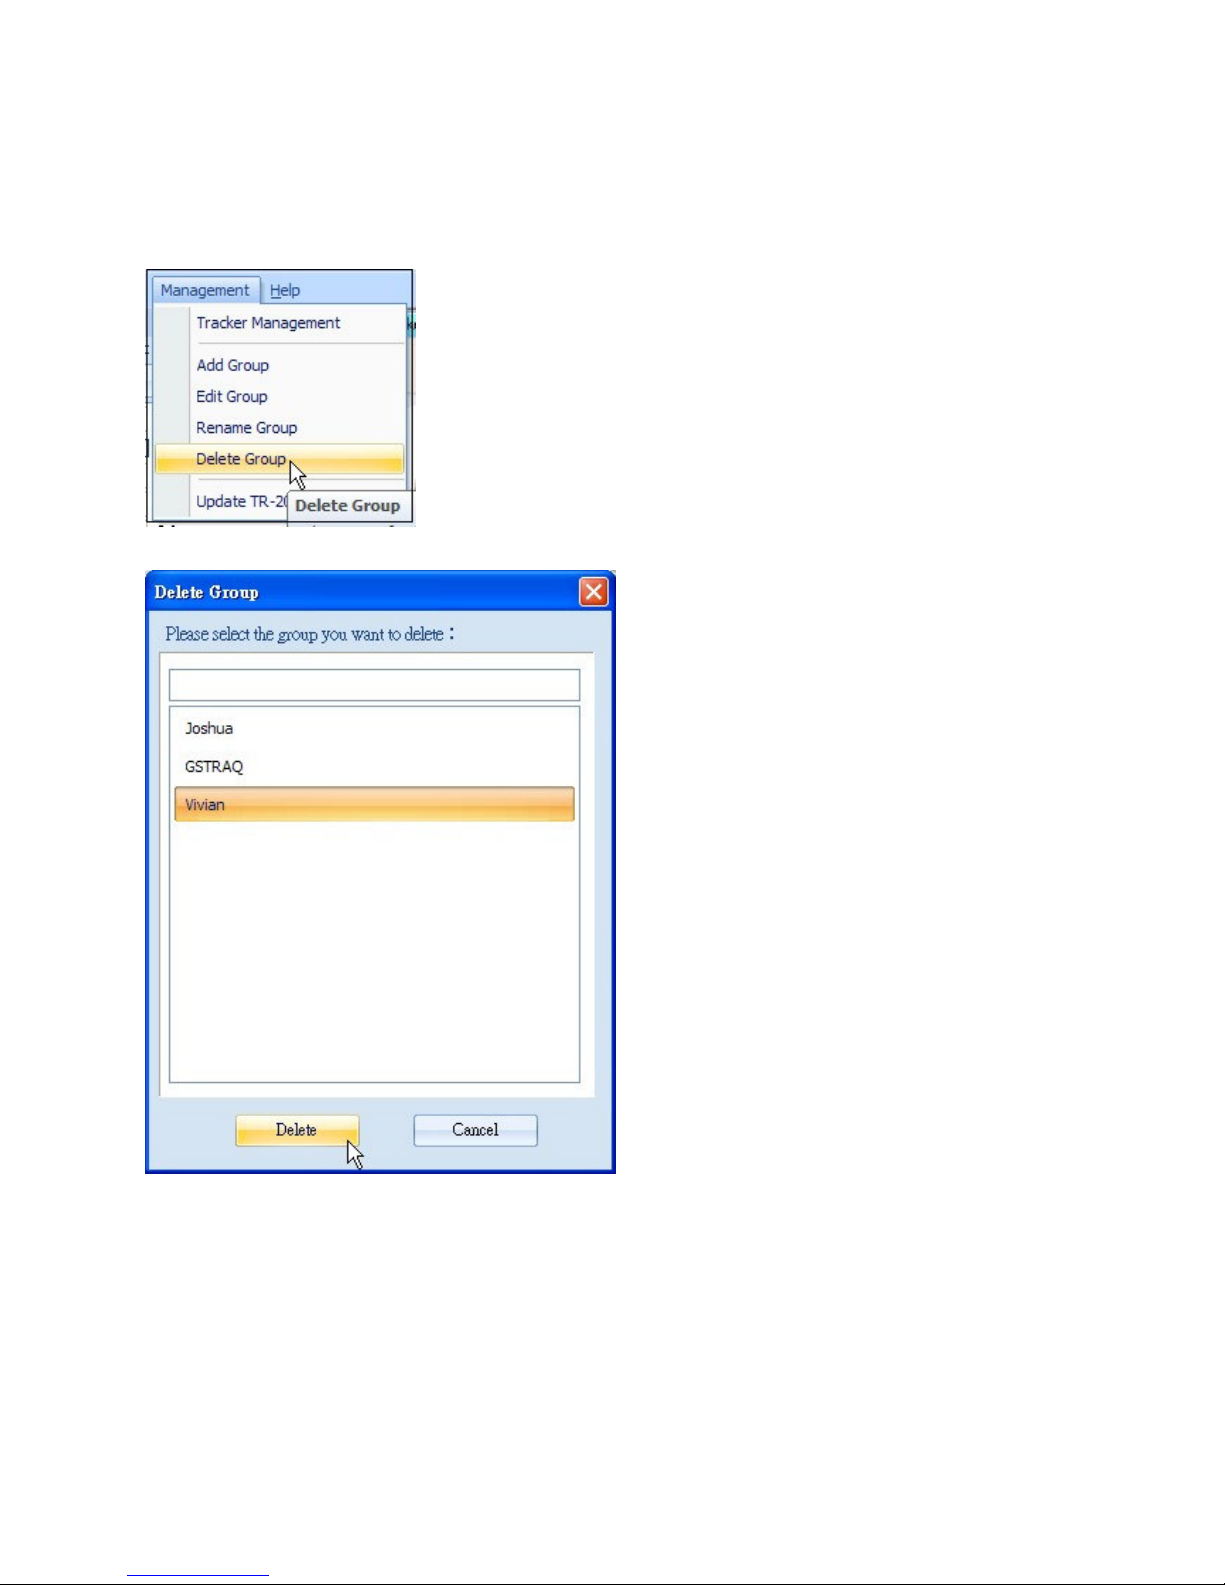
4.3.4 Delete Group
You could delete group from “Management” “Delete Group”
The window of Rename Group will be brought up.
Please select the group you want to delete and then click Delete button.
You will see the window below.
Page 43

42
Please click Yes button to delete the group. The trackers under this group will be classified to
“Other” group.
Page 44
43
4.4 Instruction of using TR Management Center
4.4.1 Ping TR-203
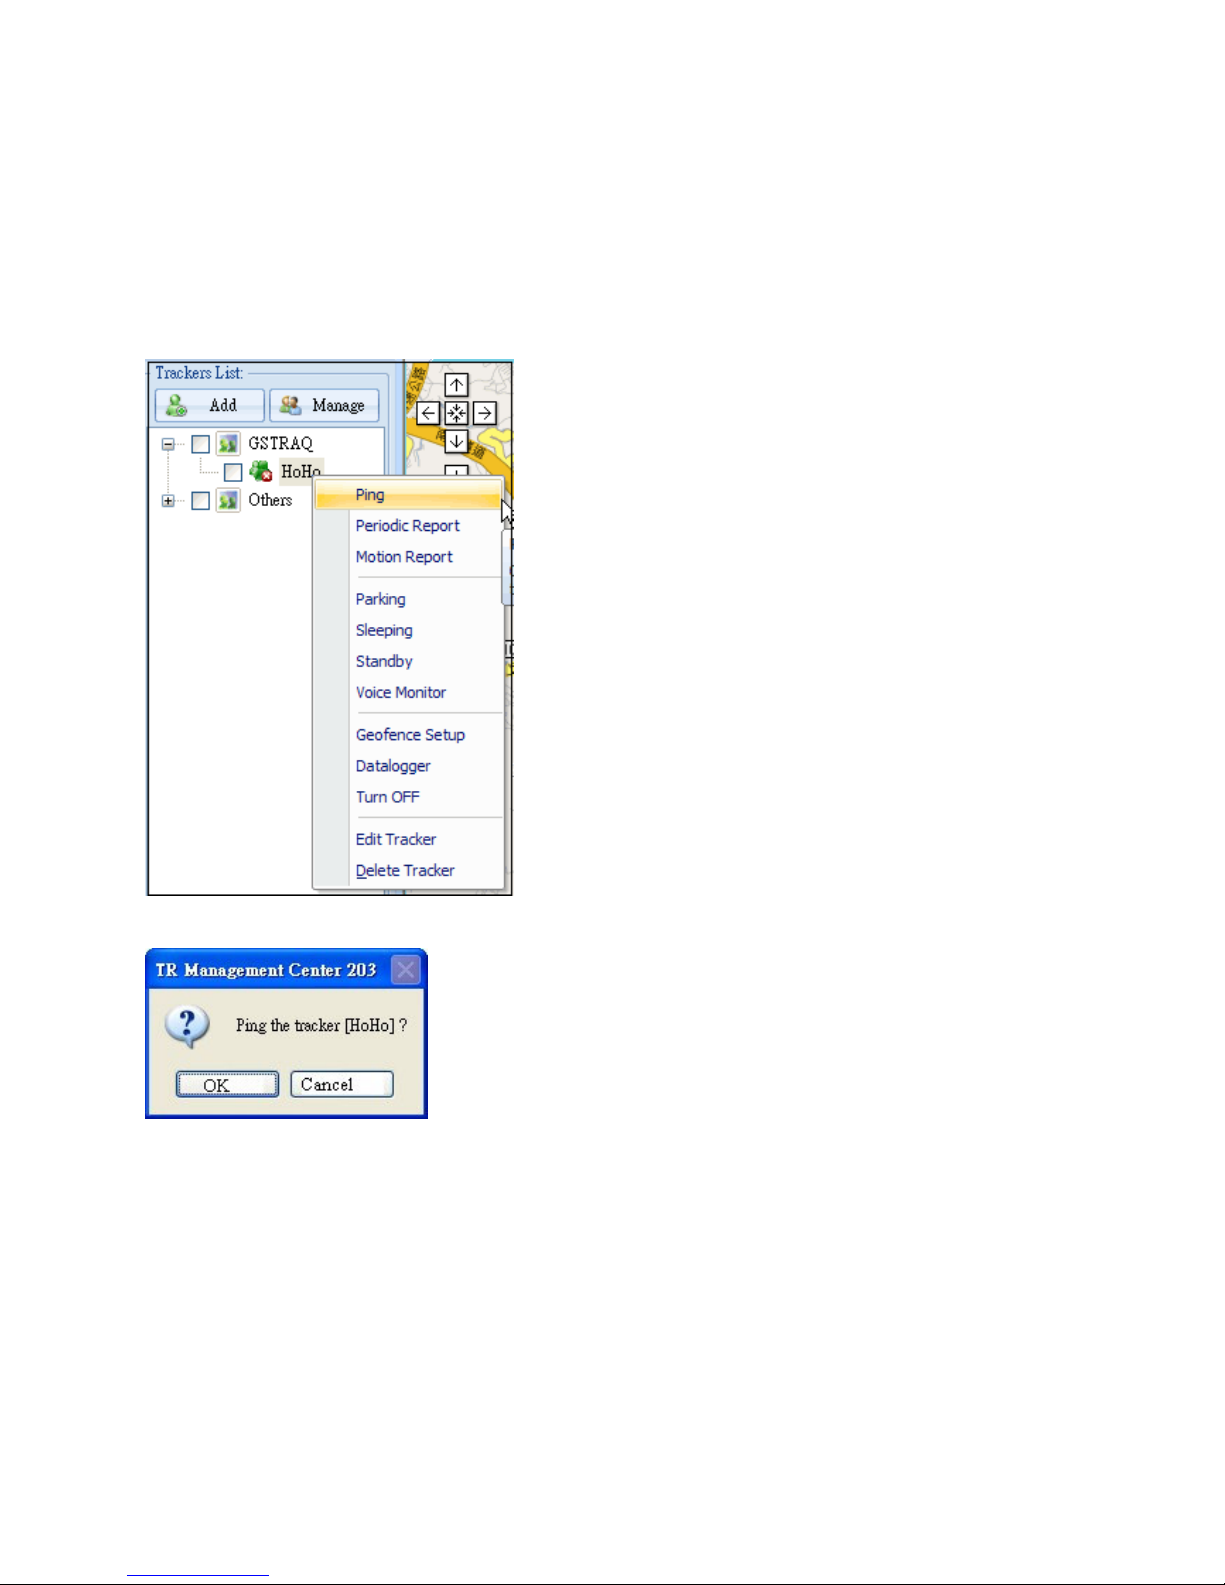
You could ping TR-203 by TR Management Center 203.
Step 1: Please right click on the TR-203.
Step 2: Please select Ping. You will see the window below.
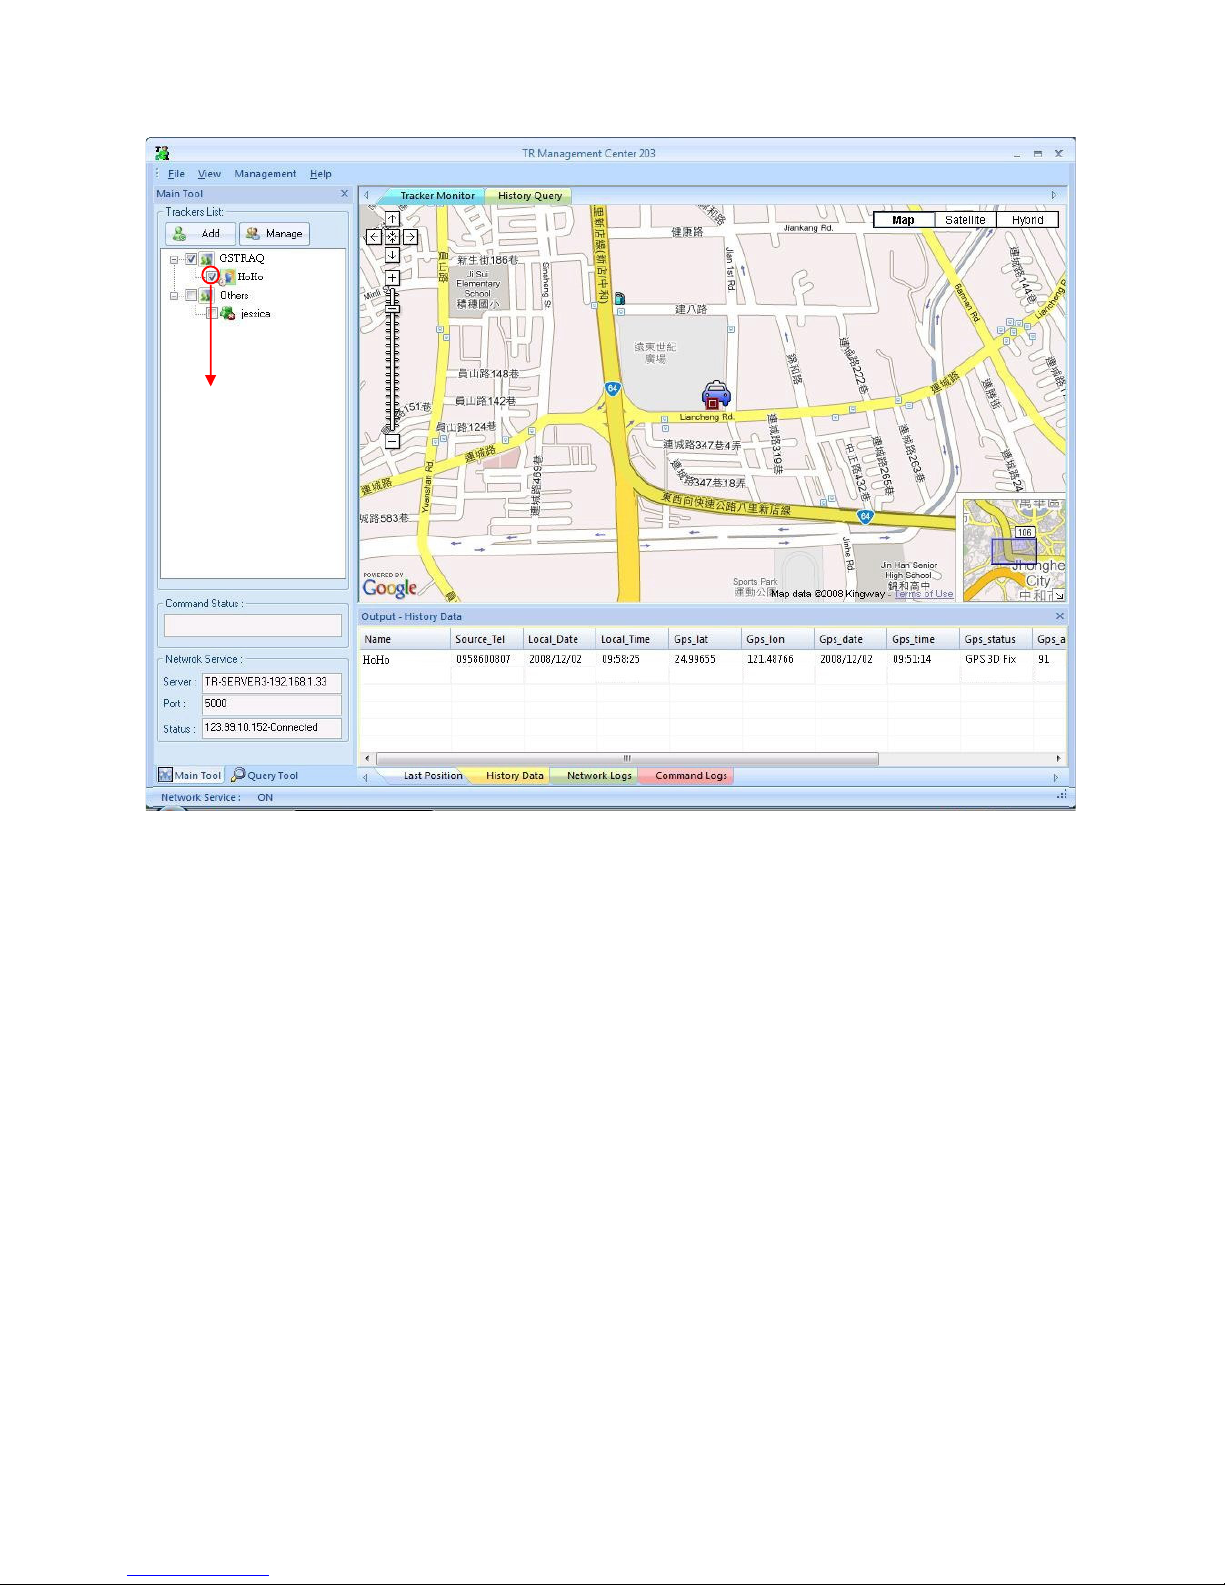
Step 3: Please click OK. TR-203 will send its location to TR Management Center 203 like the
screenshot below.
Page 45
44
You could check
the tracker to
display its
location on the
map by the icon
Page 46
45
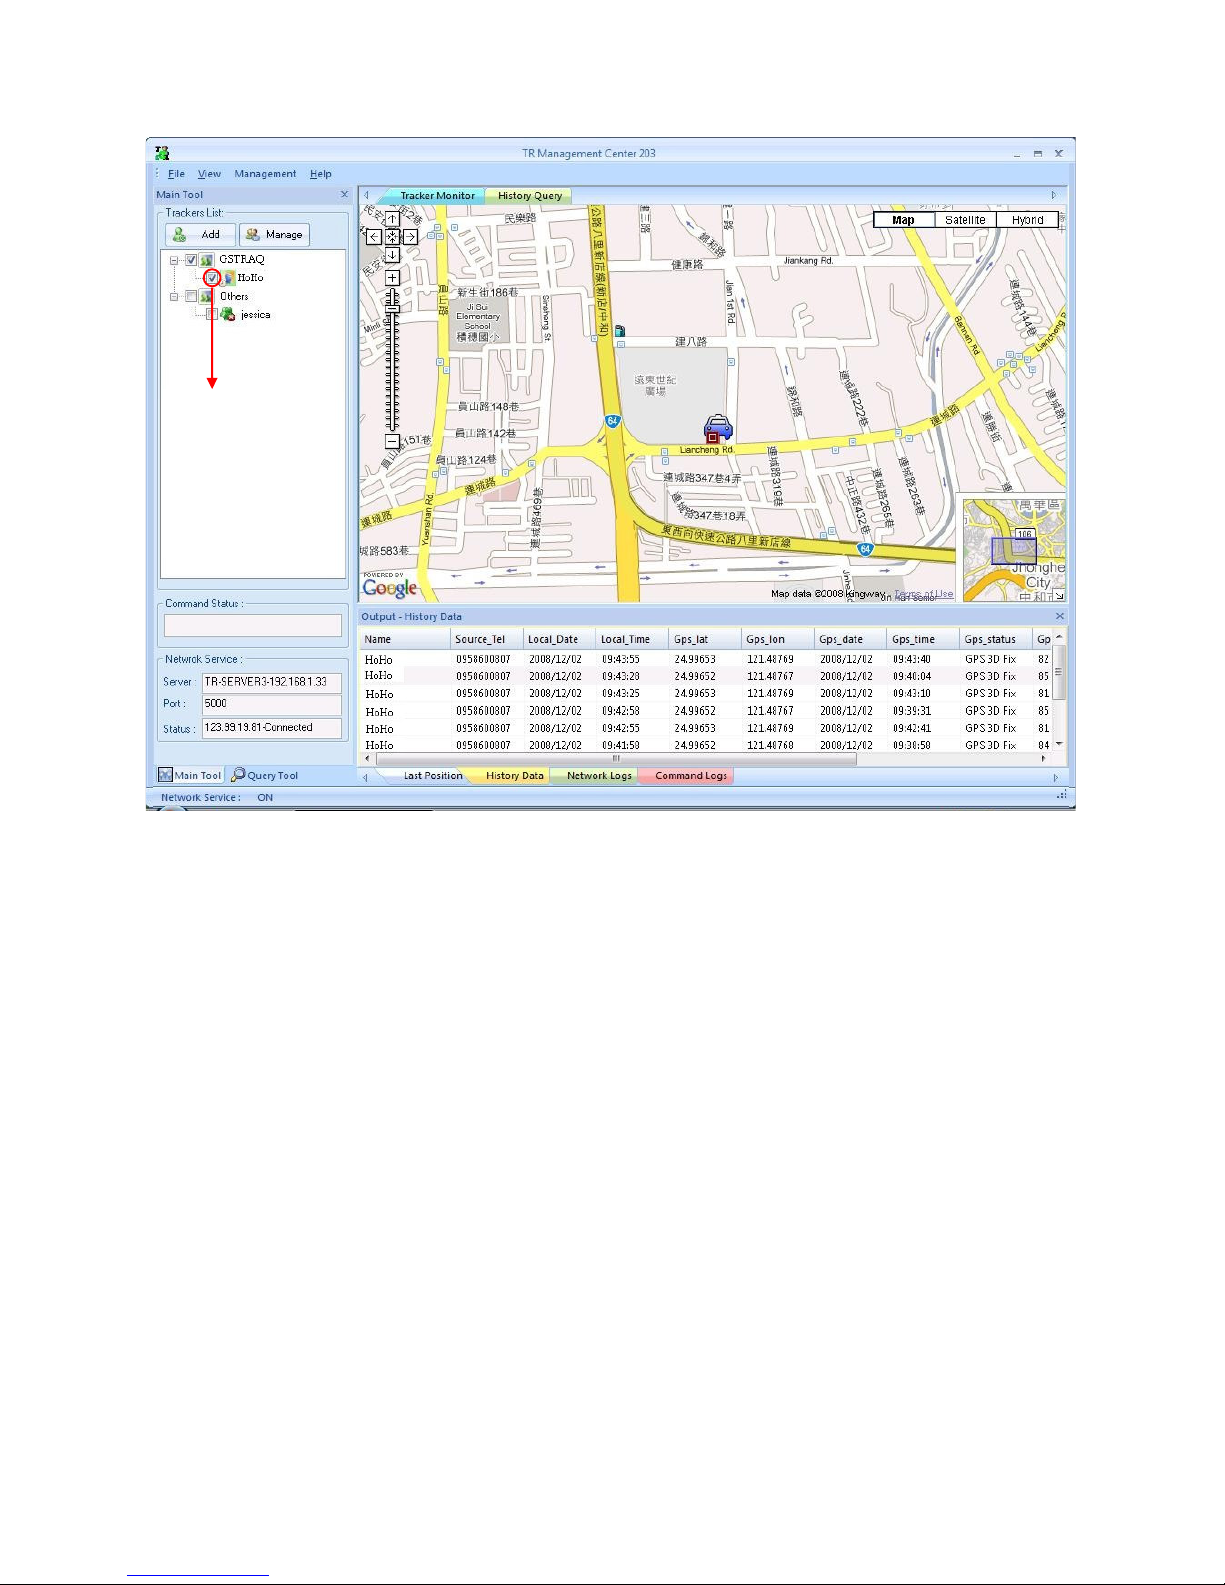
4.4.2 TR-203 Periodic Report
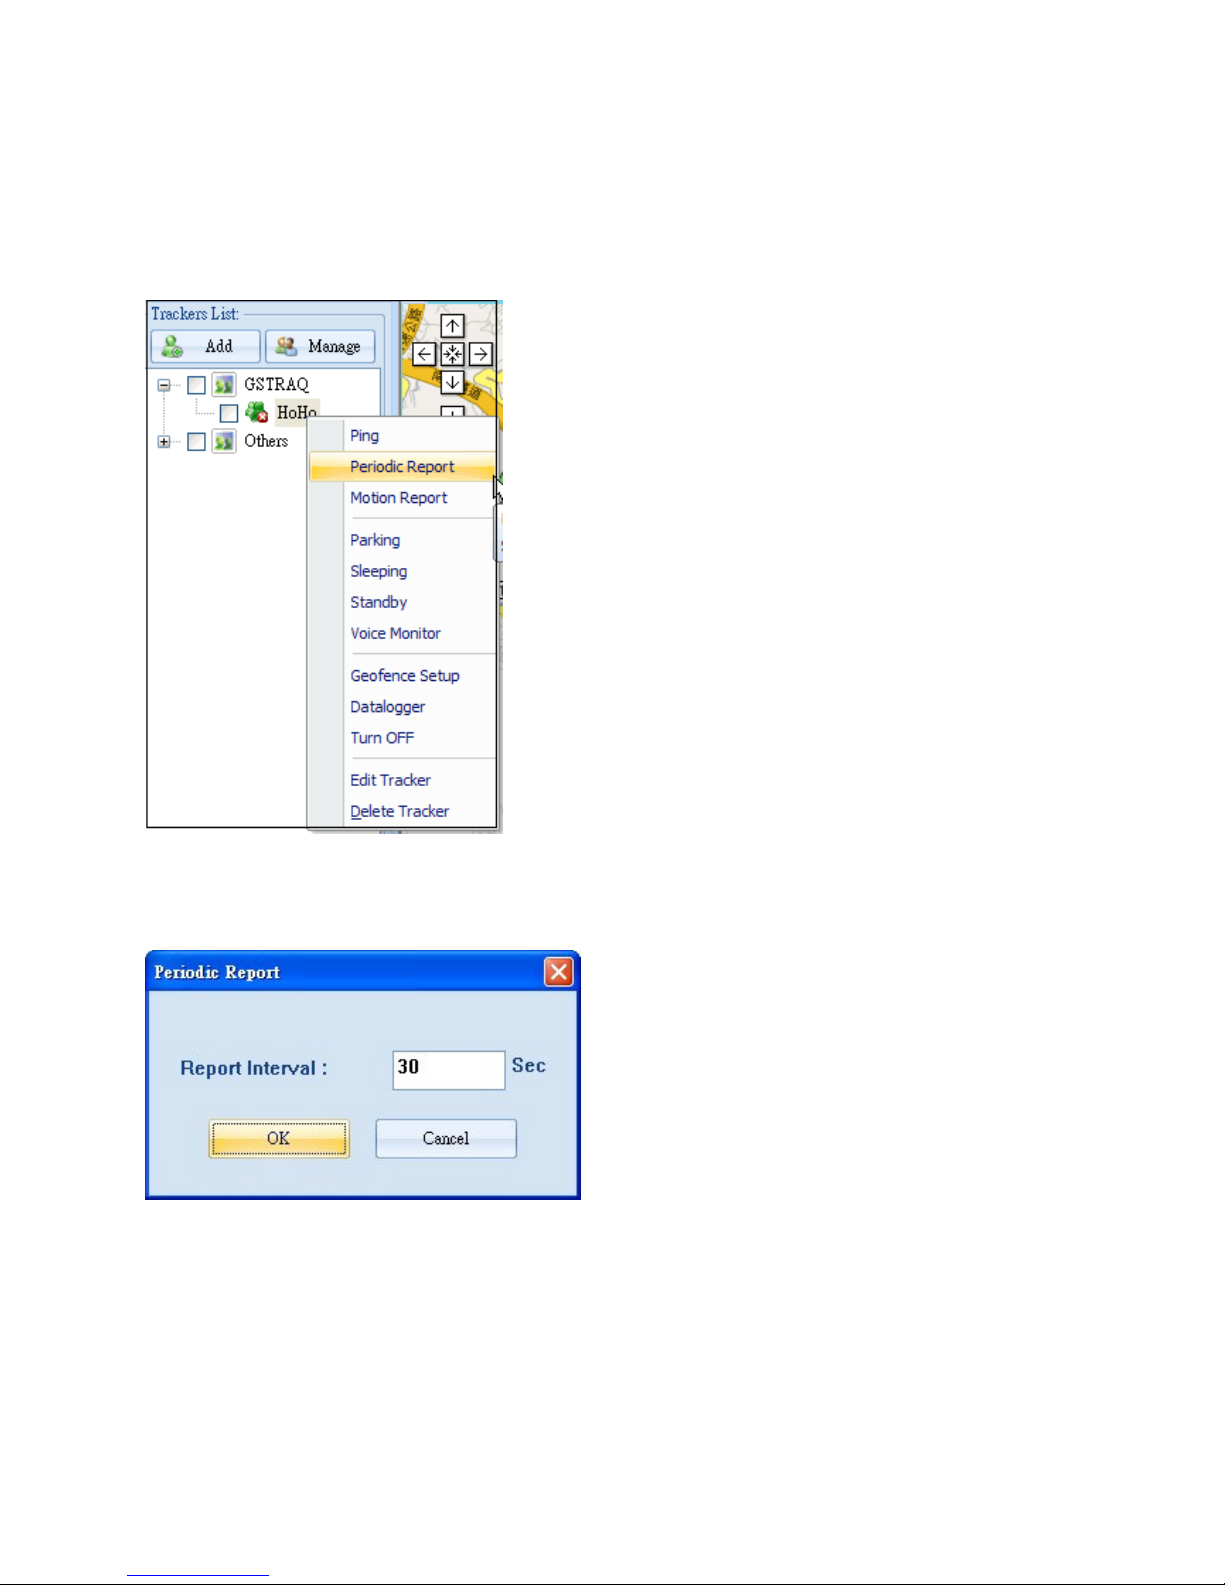
You could make TR-203 periodically send its location to TR Management Center 203.
Step 1: Please right click on the TR-203.
Step 2: Please select Periodic Report. You will see the window below.
Step 3: Please set the Report Interval. And then click OK.
TR-203 will send its location to TR Management Center like the screen below.
Page 47
46
You could check
the tracker to
display its
location on the
map by the icon
You could make TR-203 exit from Periodic Report by making it enter standby mode or motion
mode or sleeping mode.
Enter standby mode
Step 1: Please right click on the TR-203.
Page 48
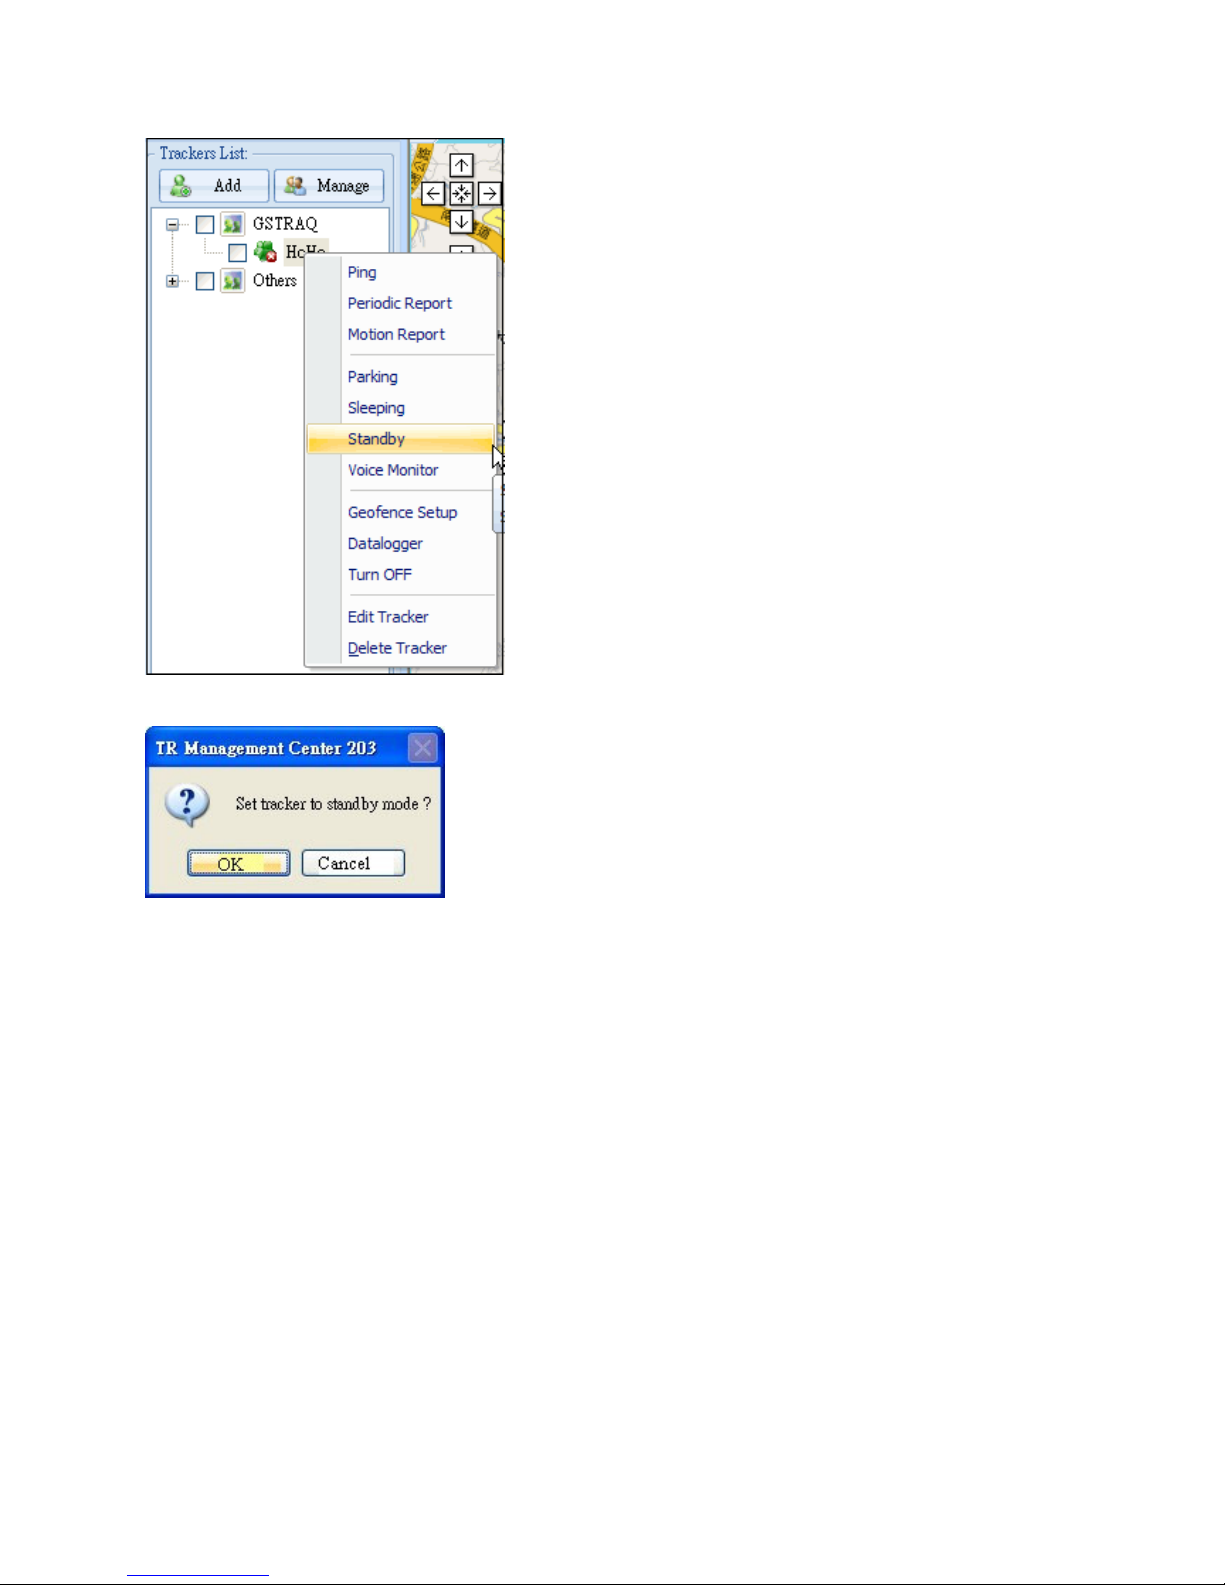
47
Step 2: Please select Standby. You will see the window below.
Step 3: Please click OK button. TR-203 will exit from Periodic Report Mode.
Page 49
48
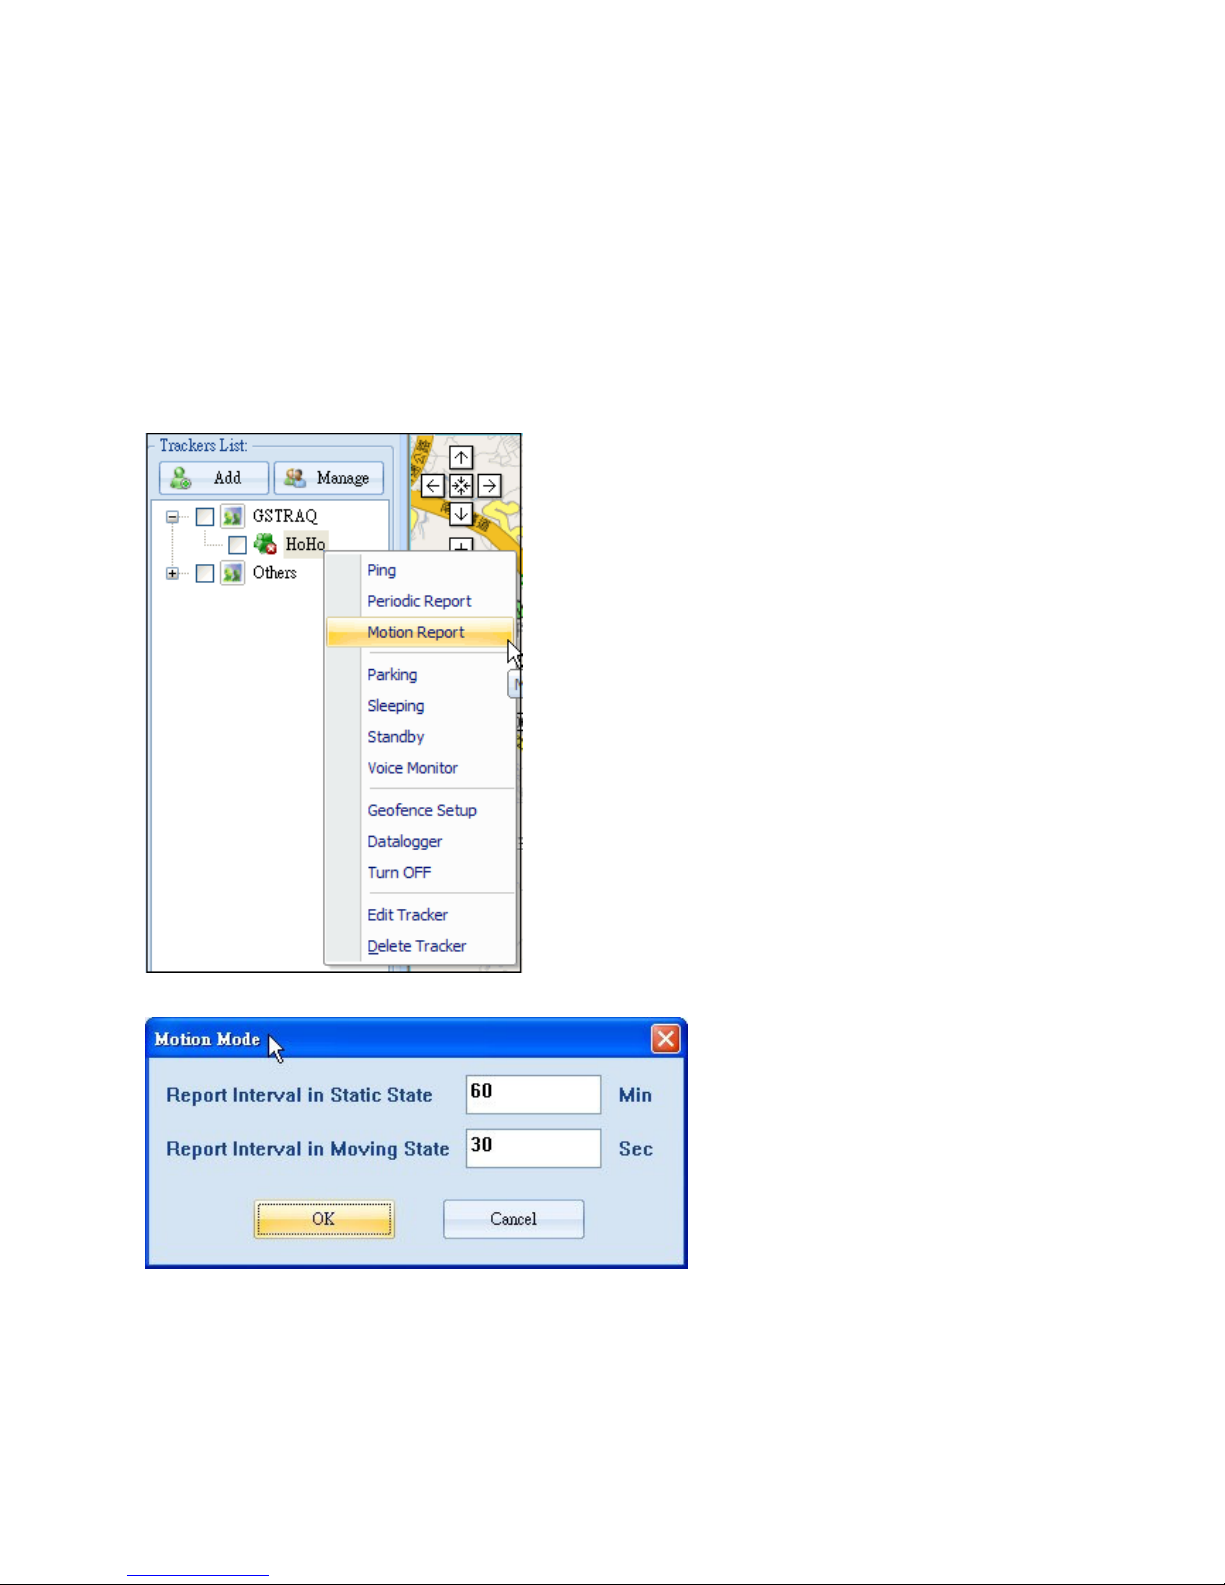
4.4.3 TR-203 Motion Report
Motion mode is for user to get the continual location report when the vehicle installed with
TR-203 is moving. In addition to the continual location report, TR-203 will also send regular
location report when the vehicle installed with TR-203 is not moving.
You could make TR-203 enter motion mode by the steps below.
Step 1: Please right click on the TR-203.
Step 2: Please select Motion Report. You will see the window below.
Step 3: Please set the Report Interval in Static State and the Report Interval in Moving
State. And then please click OK.
You could make TR-203 exit from Motion Report by making it enter standby mode or periodic
mode or sleeping mode.
Page 50
49
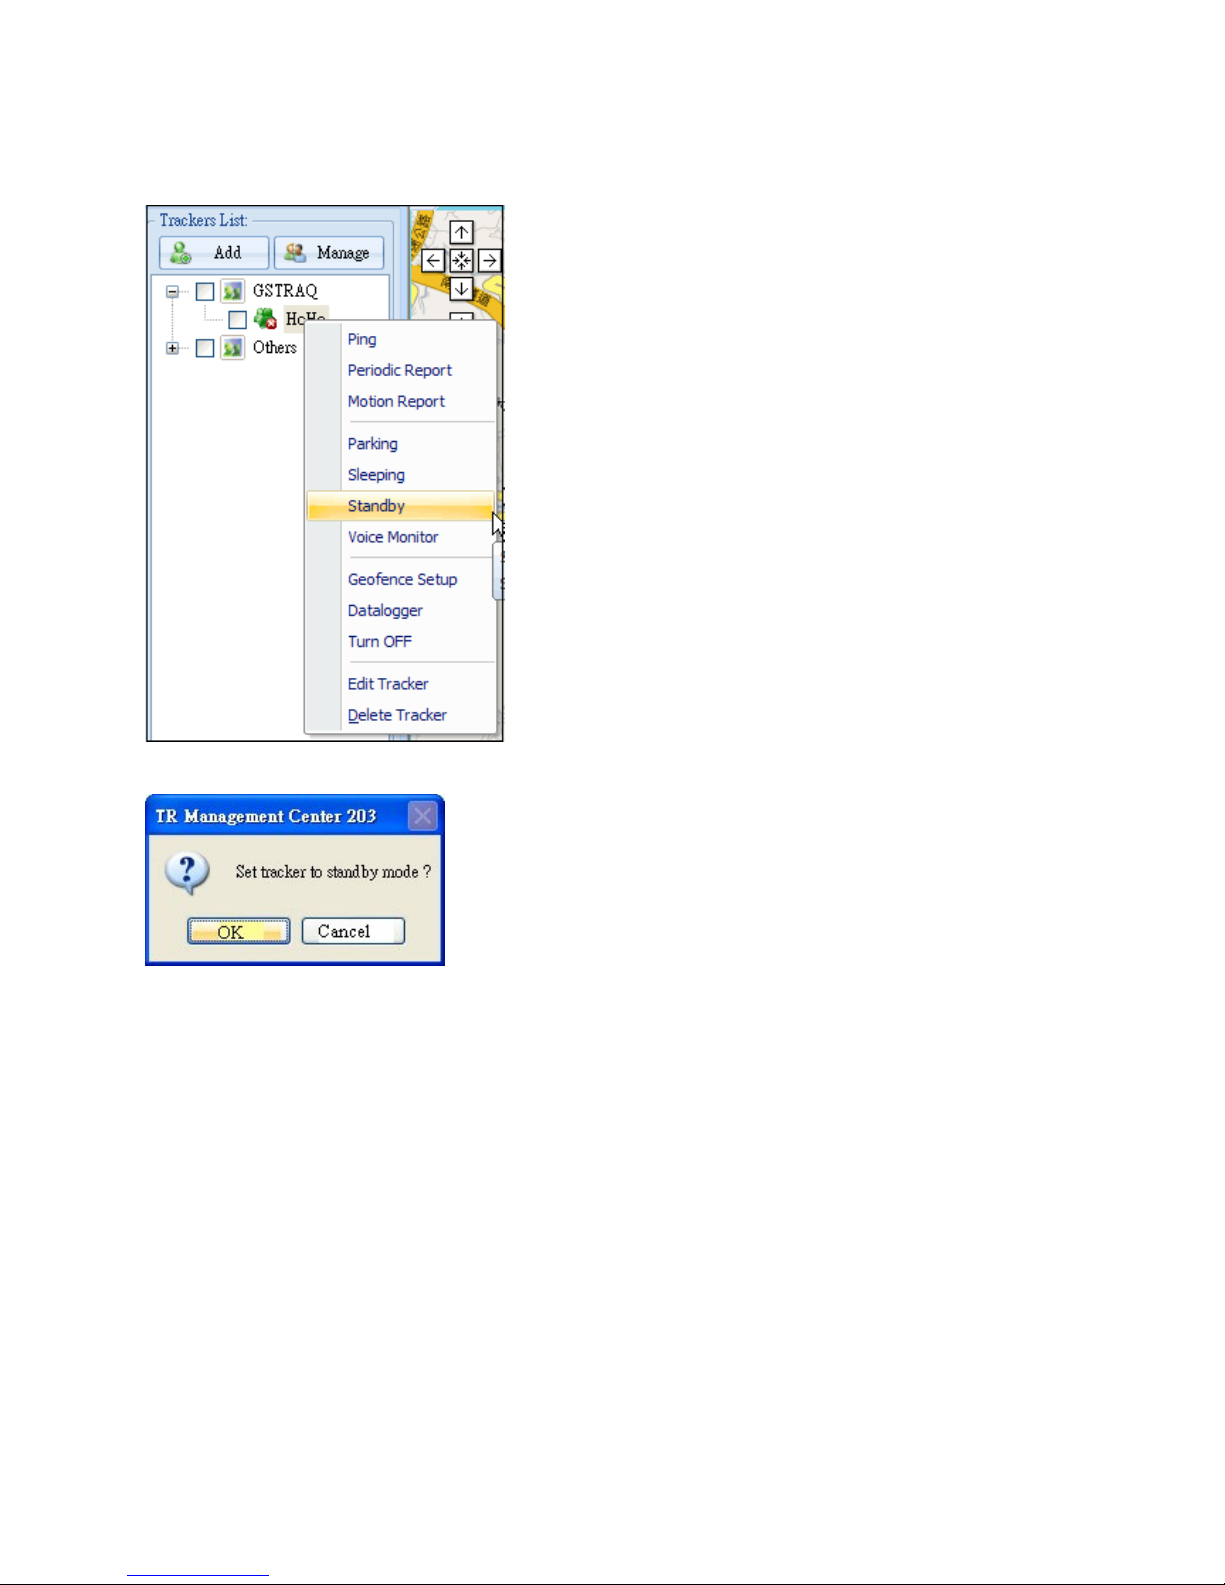
Enter standby mode
Step 1: Please right click on the TR-203.
Step 2: Please select Standby. You will see the window below.
Step 3: Please click OK button. TR-203 will exit from Motion Report Mode.
Page 51
50
4.4.4 TR-203 Parking Mode
Park mode is for user to make TR-203 send alarm location report when the vehicle installed
with TR-203 is moved. In addition to the alarm location report, TR-203 will also send regular
location report when the vehicle installed with TR-203 is parked.
You could make TR-203 enter parking mode by the steps below.
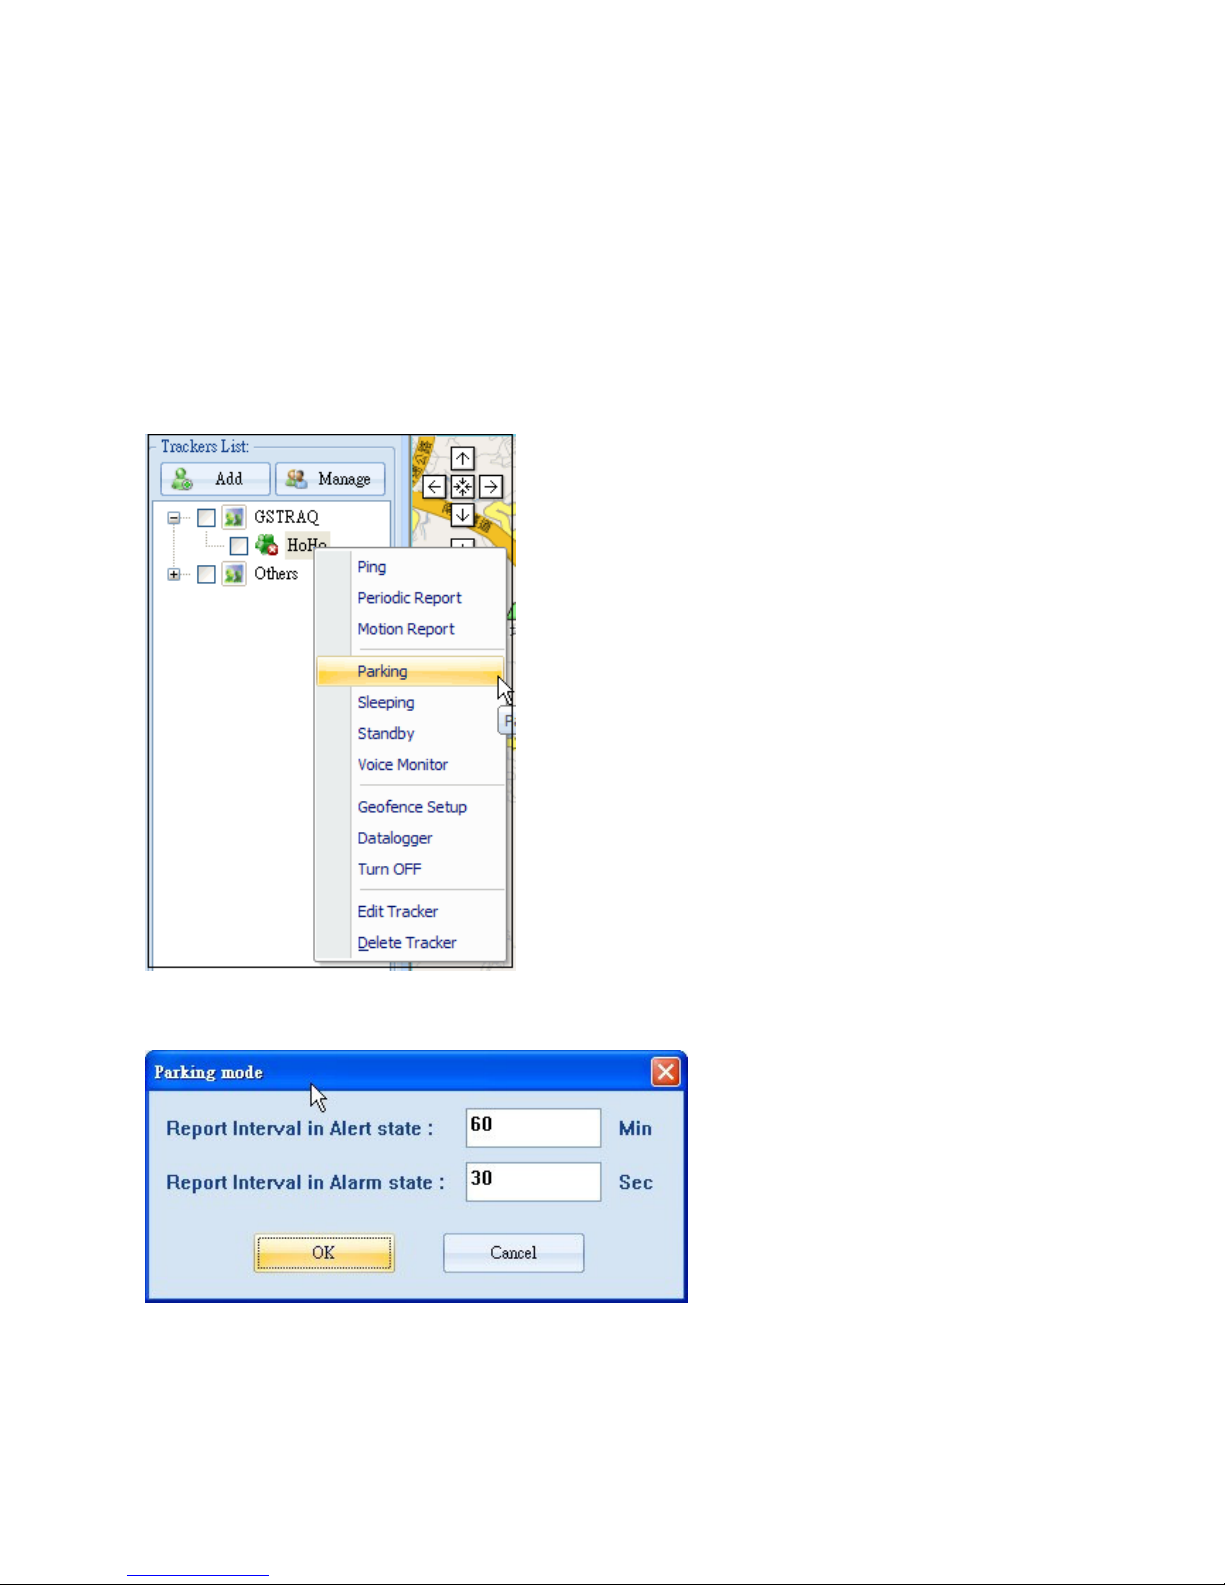
Step 1: Please right click on the TR-203.
Step 2: Please select Parking. You will see the window below.
Alert state is when TR-203 is static.
Alarm state is when TR-203 is moving.
Step 3: Please set the Report Interval in Alert state and the Report Interval in Alarm state.
Page 52
51
And then please click OK button.
You could make TR-203 exit from Parking Mode by making it enter standby mode or periodic
mode or motion mode.
Enter standby mode
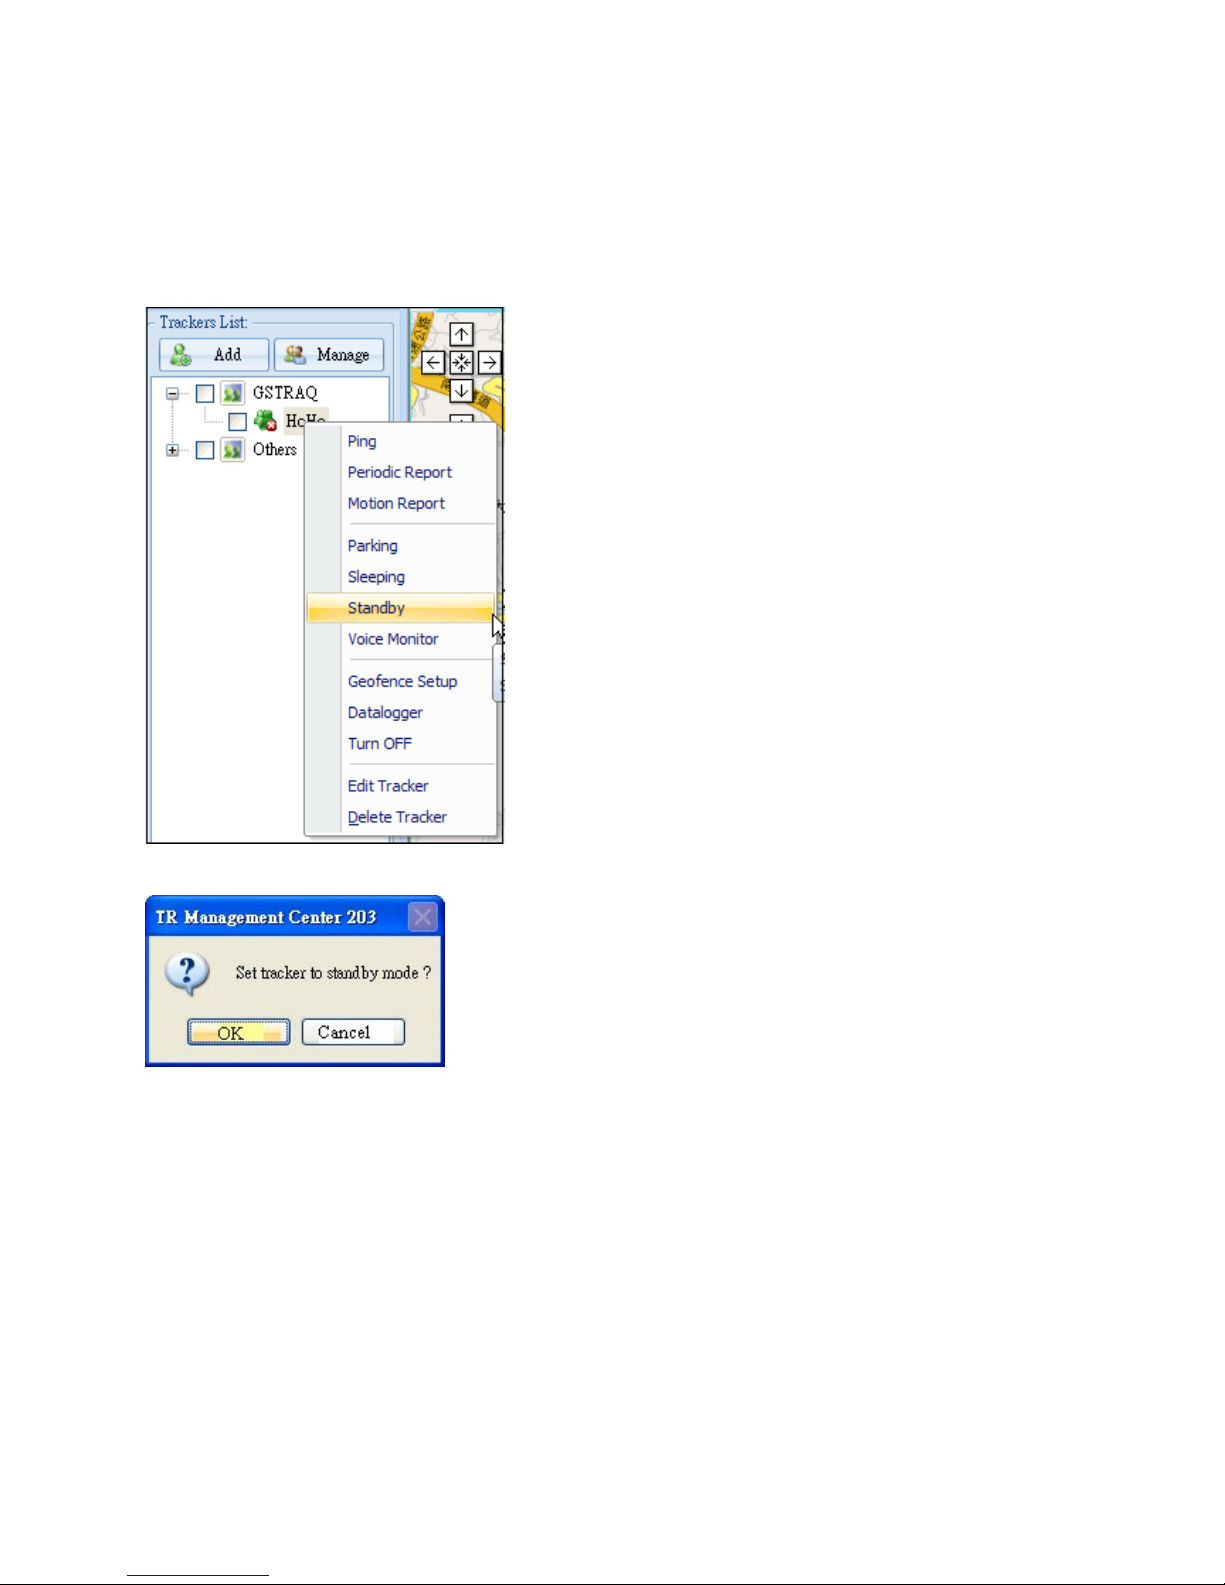
Step 1: Please right click on the TR-203.
Step 2: Please select Standby. You will see the window below.
Step 3: Please click OK button. TR-203 will exit from Parking Mode.
Page 53
52
4.4.5 TR-203 Sleeping Mode
In order to save the power of TR-203, you could make TR-203 enter sleeping mode. When
TR-203 is under sleeping mode, its GSM module and GPS module will be turned off, the
motion sensor will be turned on. TR-203 will also regularly send report to TR Management
Center 203 according to the Report Interval in Alert State. When TR-203 senses vibration, it
will send alarm report to TR Management Center 203 according to the Report Interval in
Alarm State.
You could make TR-203 enter sleeping mode by the steps below.
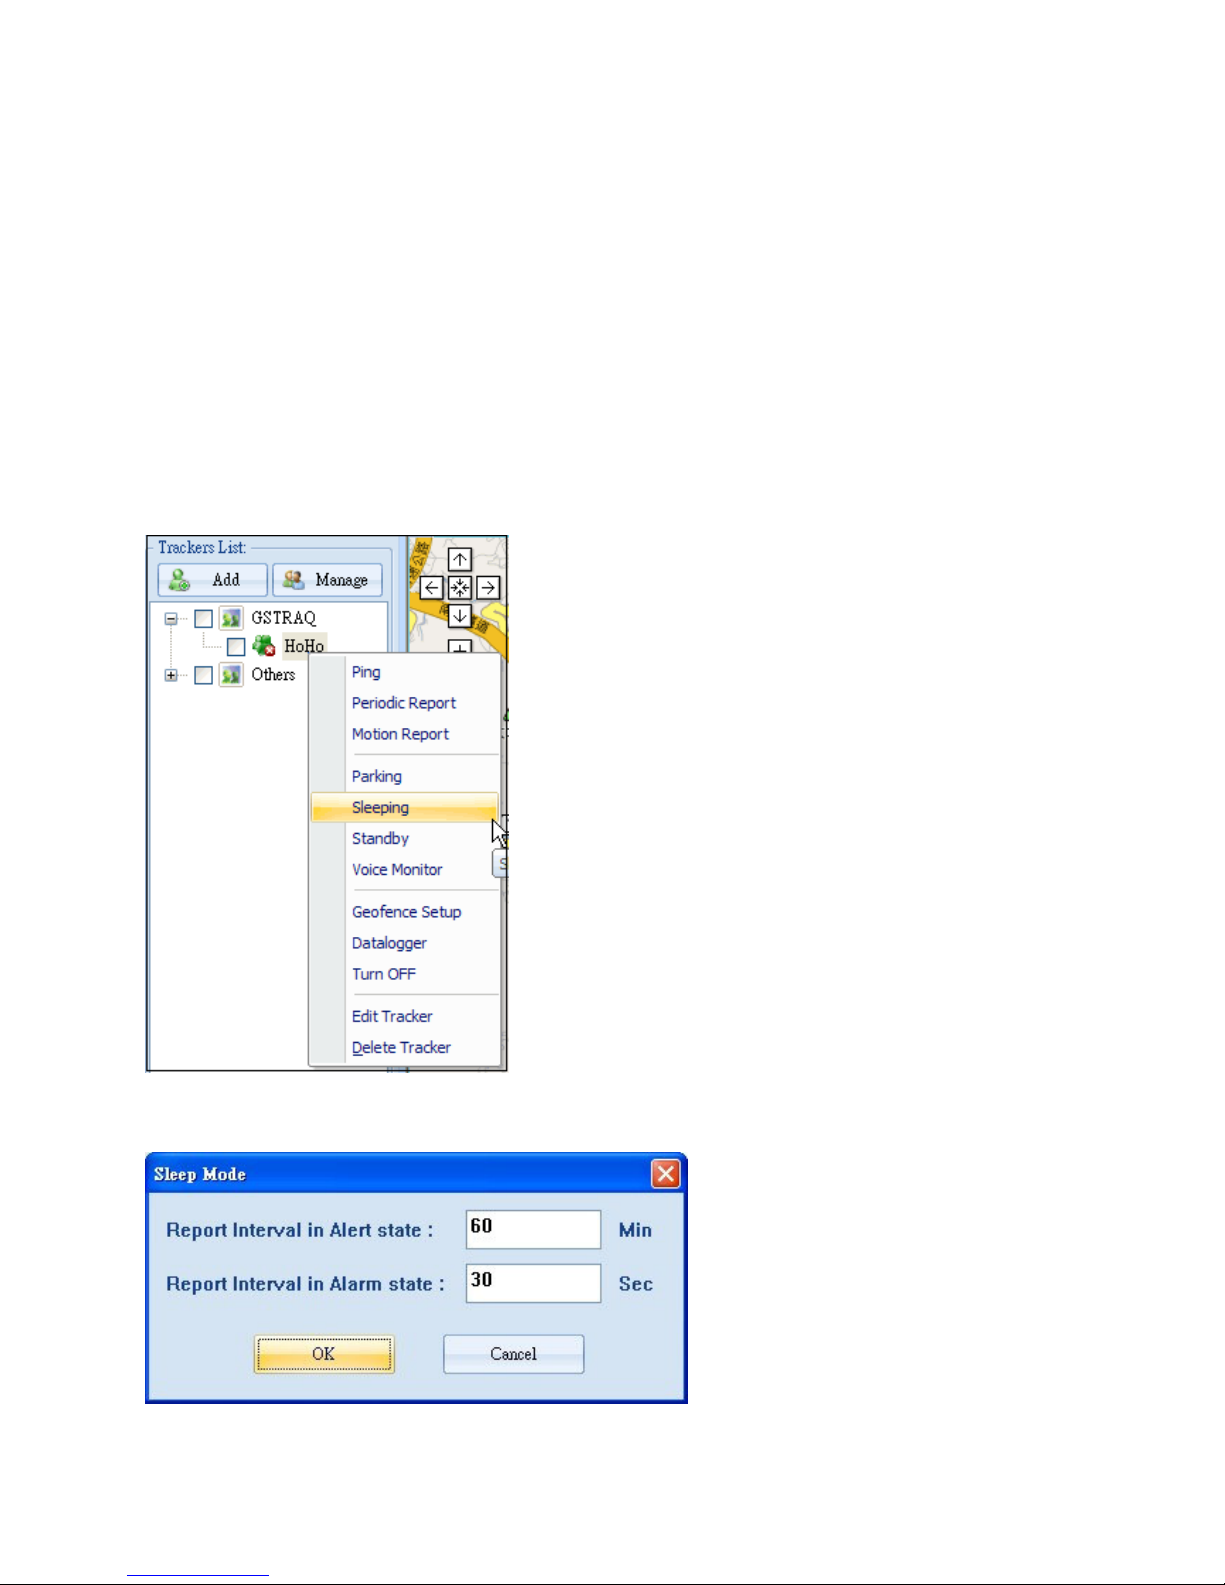
Step 1: Please right click on the TR-203.
Step 2: Please select Sleeping. You will see the window below.
Page 54
53
Alert state is when TR-203 is static.
Alarm state is when TR-203 is moving.
Step 3: Please set the Report Interval in Alert state and the Report Interval in Alarm state.
And then please click OK button.
You could make TR-203 exit from Sleeping Mode by making it enter standby mode or periodic
mode or motion mode or parking mode.
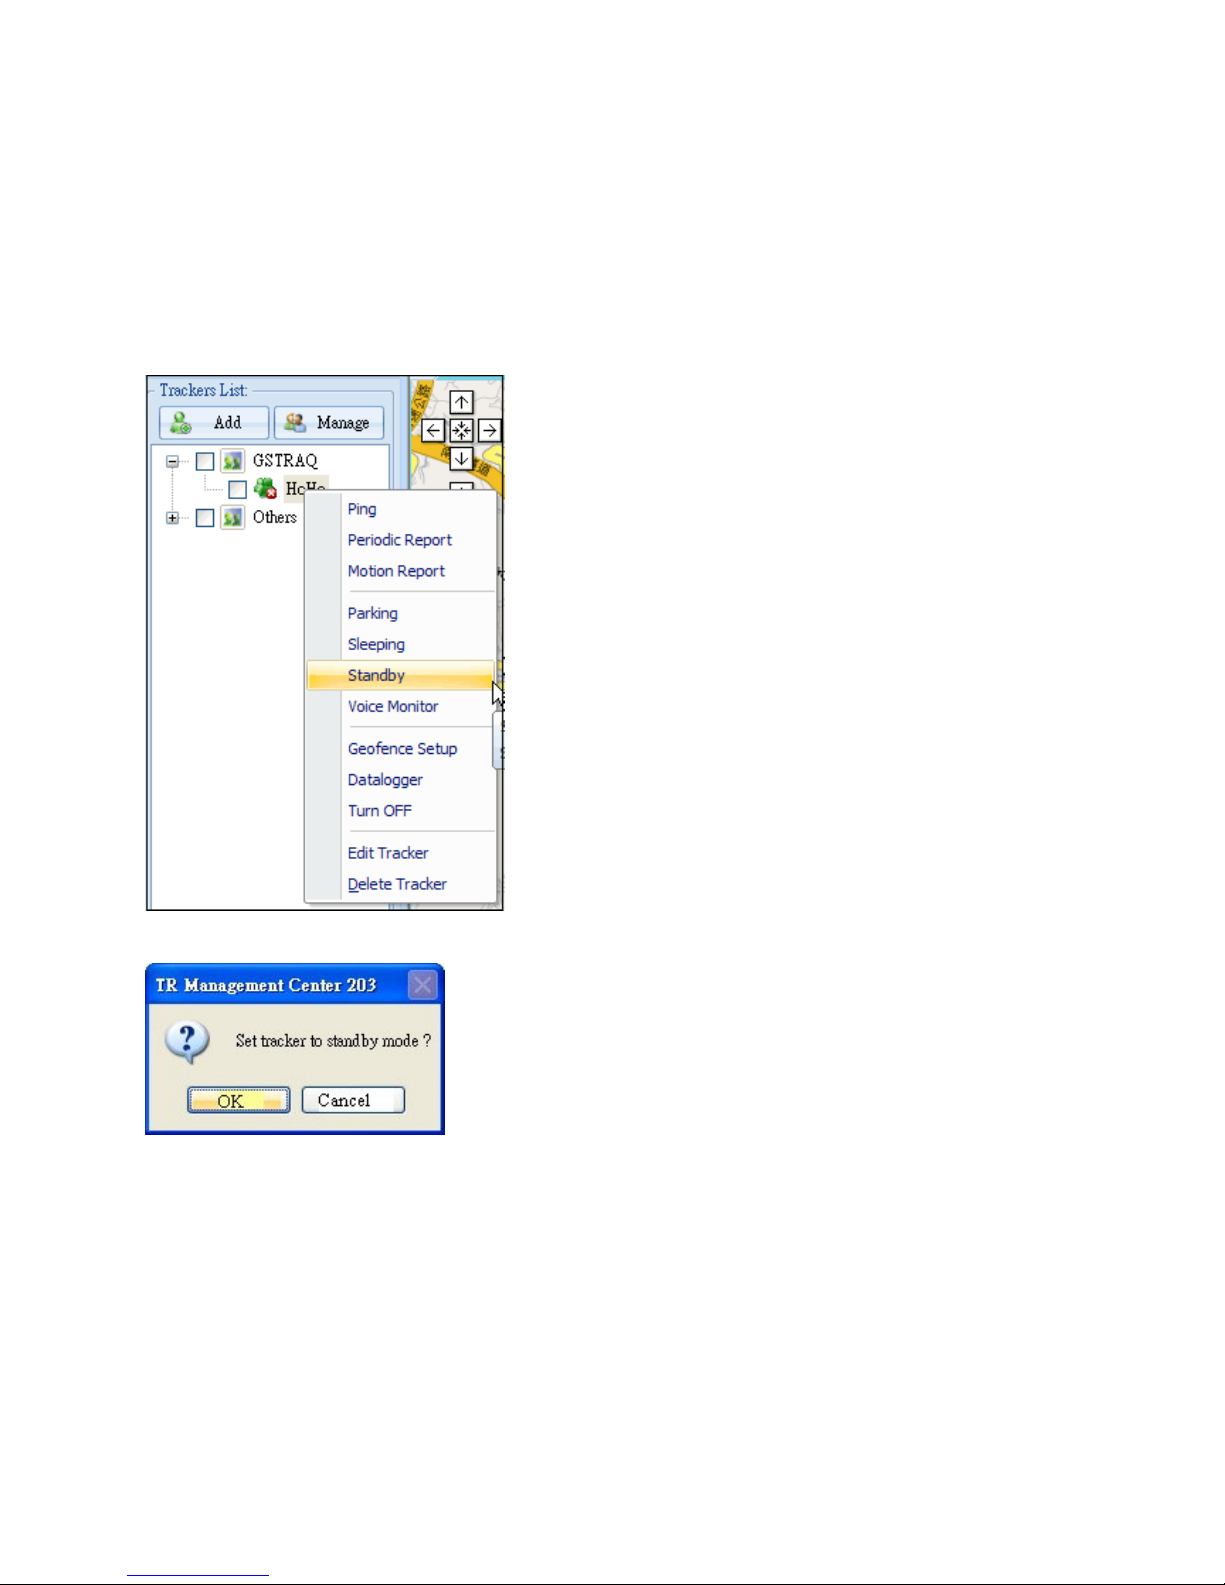
Step 1: Please right click on the TR-203.
Step 2: Please select Standby. You will see the window below.
Step 3: Please click OK button. TR-203 will exit from Sleeping Mode.
Page 55
54
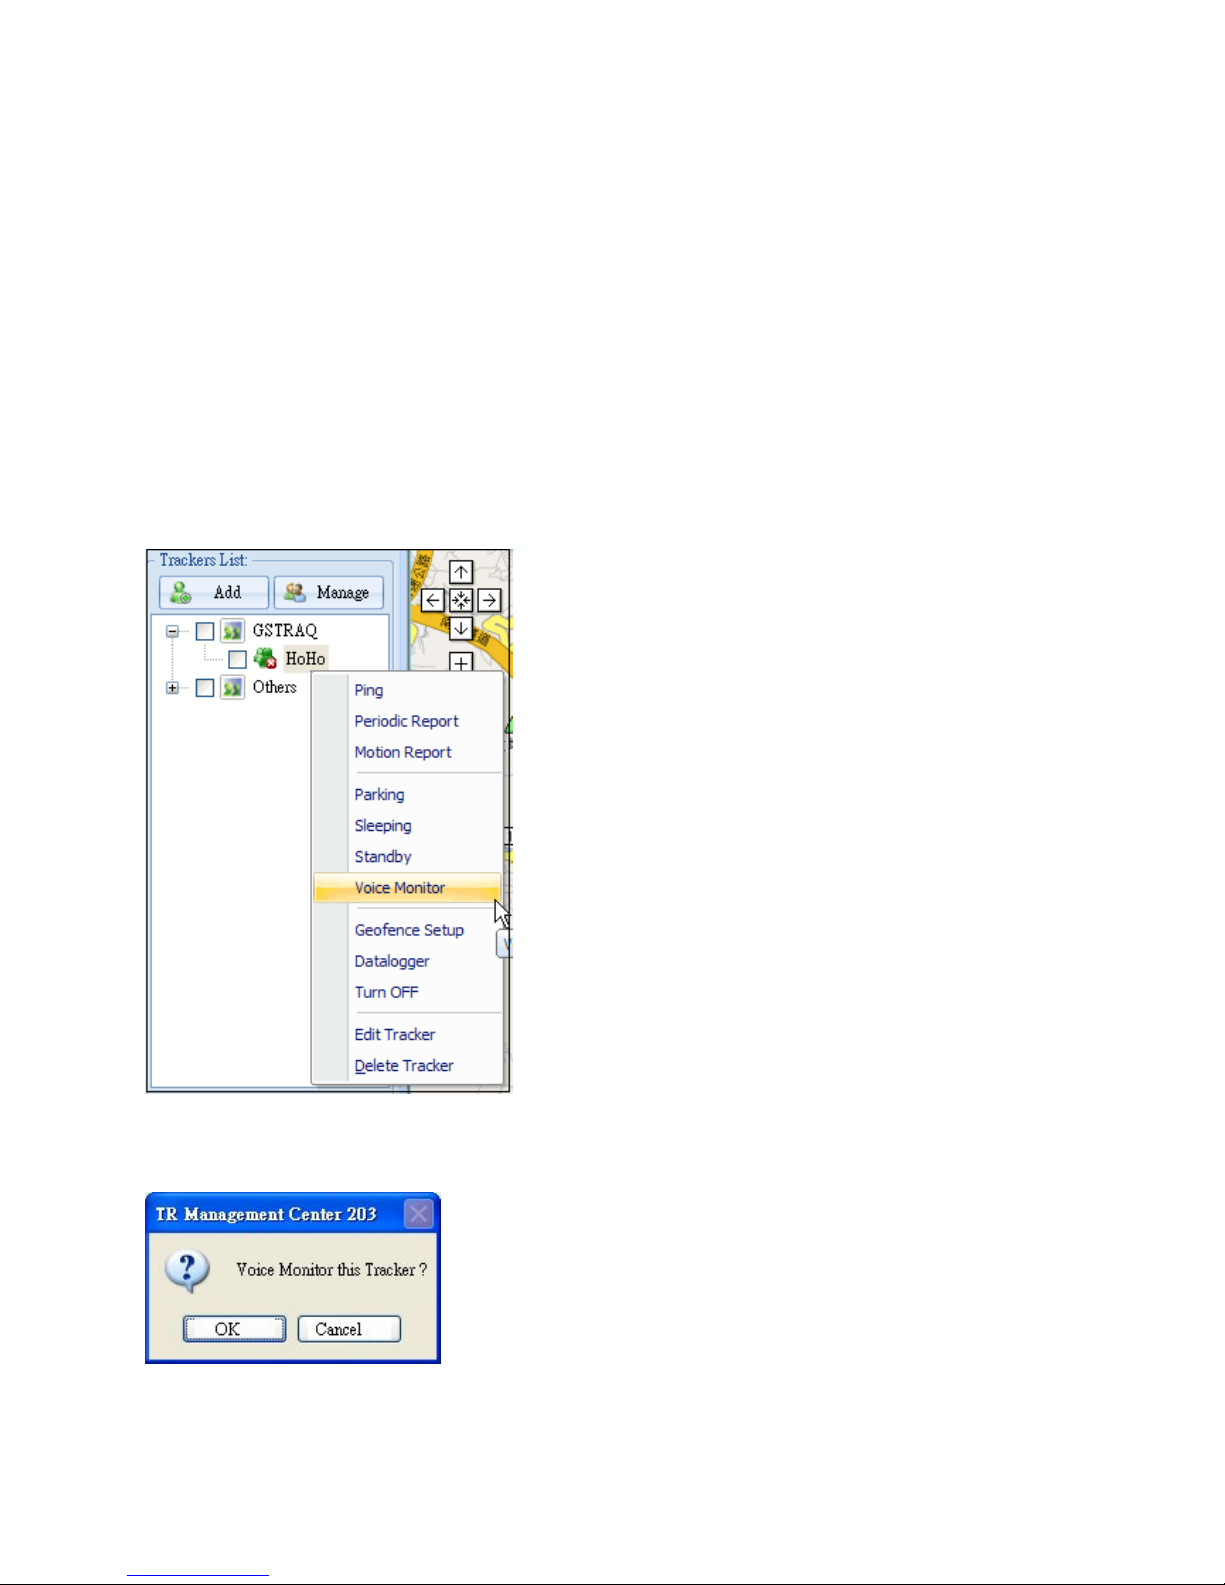
4.4.6 TR-203 Voice Monitor
You could send a command to TR-203 to make it call the phone number you set for SOS
alarm phone number 1. Then you could listen to the sounds around TR-203 from SOS phone
number 1.
Note: In order to avoid wasting unnecessary phone call cost, it is suggested to turn off the
voice mail box of the SOS phone number 1.
You could make TR-203 start voice monitor by the steps below.
Step 1: Please right click on the TR-203.
Step 2: Please select Voice Monitor. You will see the window below.
Step 3: Click OK button. TR-203 will call the SOS phone number 1.
You could stop voice monitor by hanging up the phone call.
Page 56
55
4.4.7 TR-203 Geo-fence
Geo-fence is for you to set up to 10 areas as permissible areas or restricted areas for TR-203.
TR-203 will start to get fixed of the location as soon as it enters Geo-fence mode. TR-203 will
keep fixing the location. Once TR-203 detects it enters restricted area or gets out the
permissible area, it will send its location to TR Management center 203.
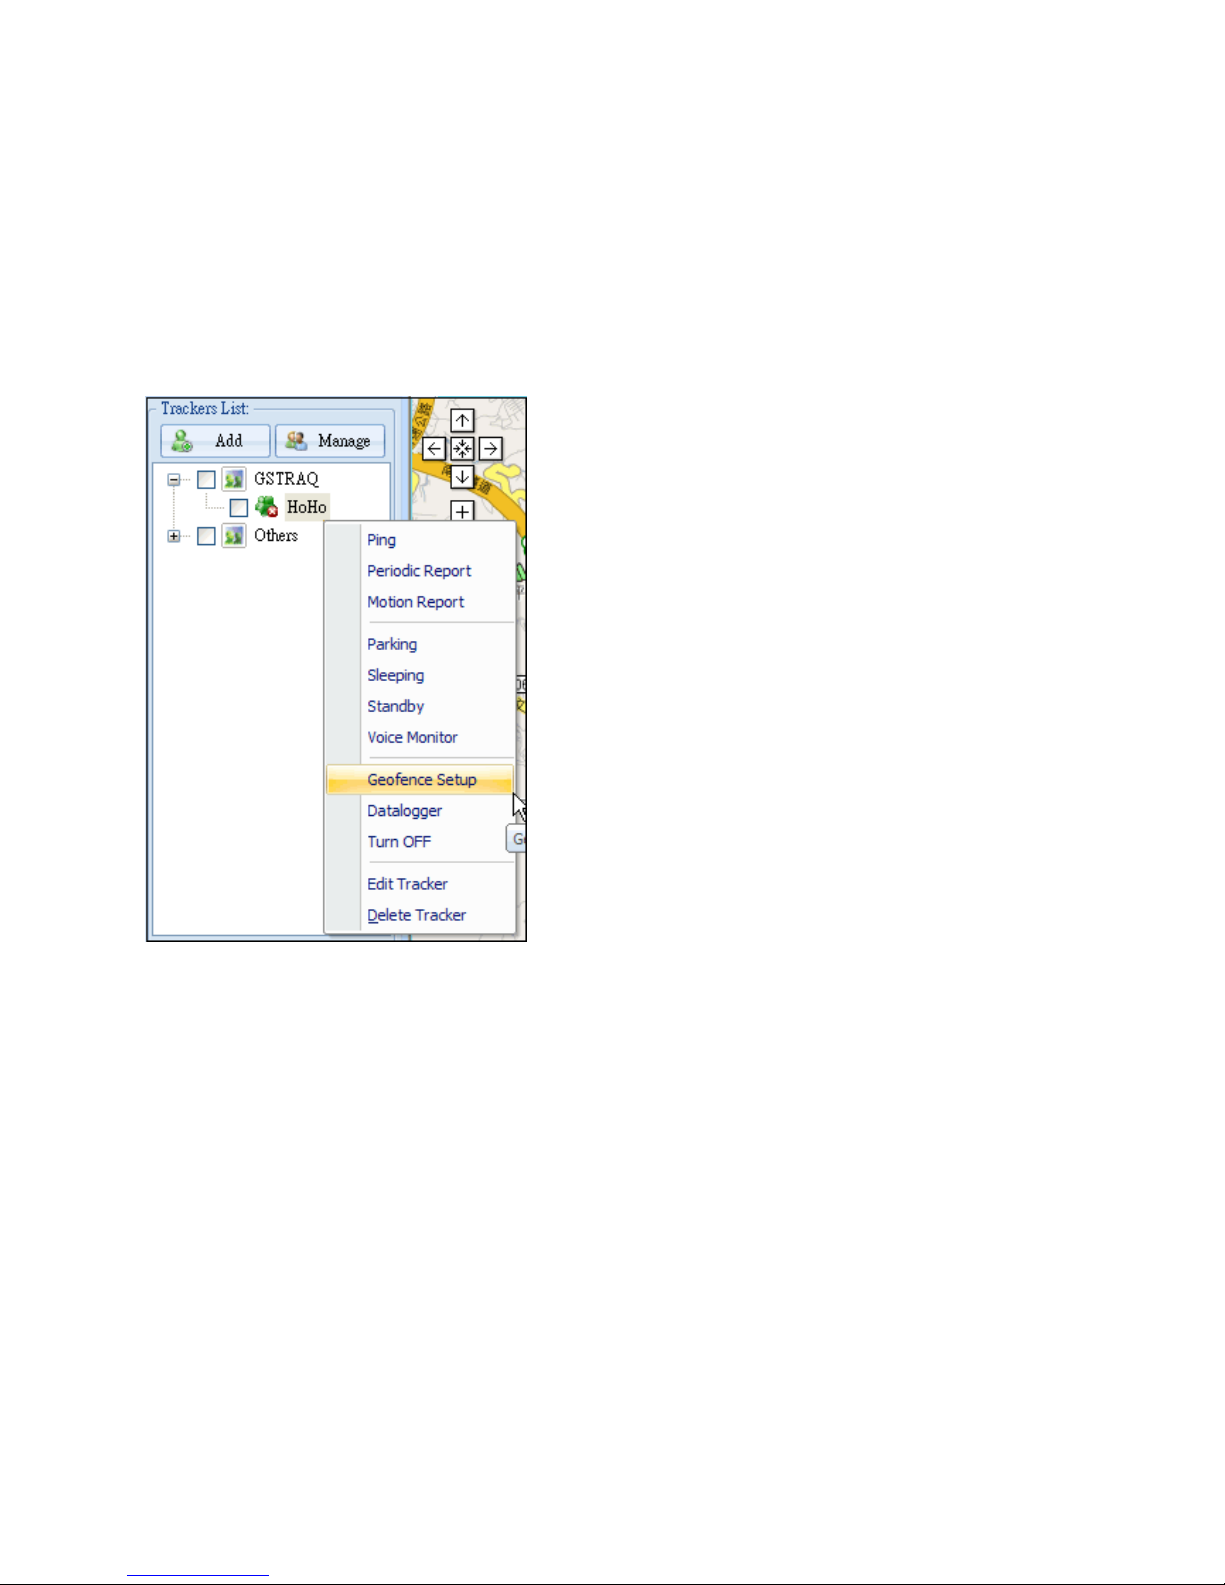
Step 1: Please right click on the TR-203.
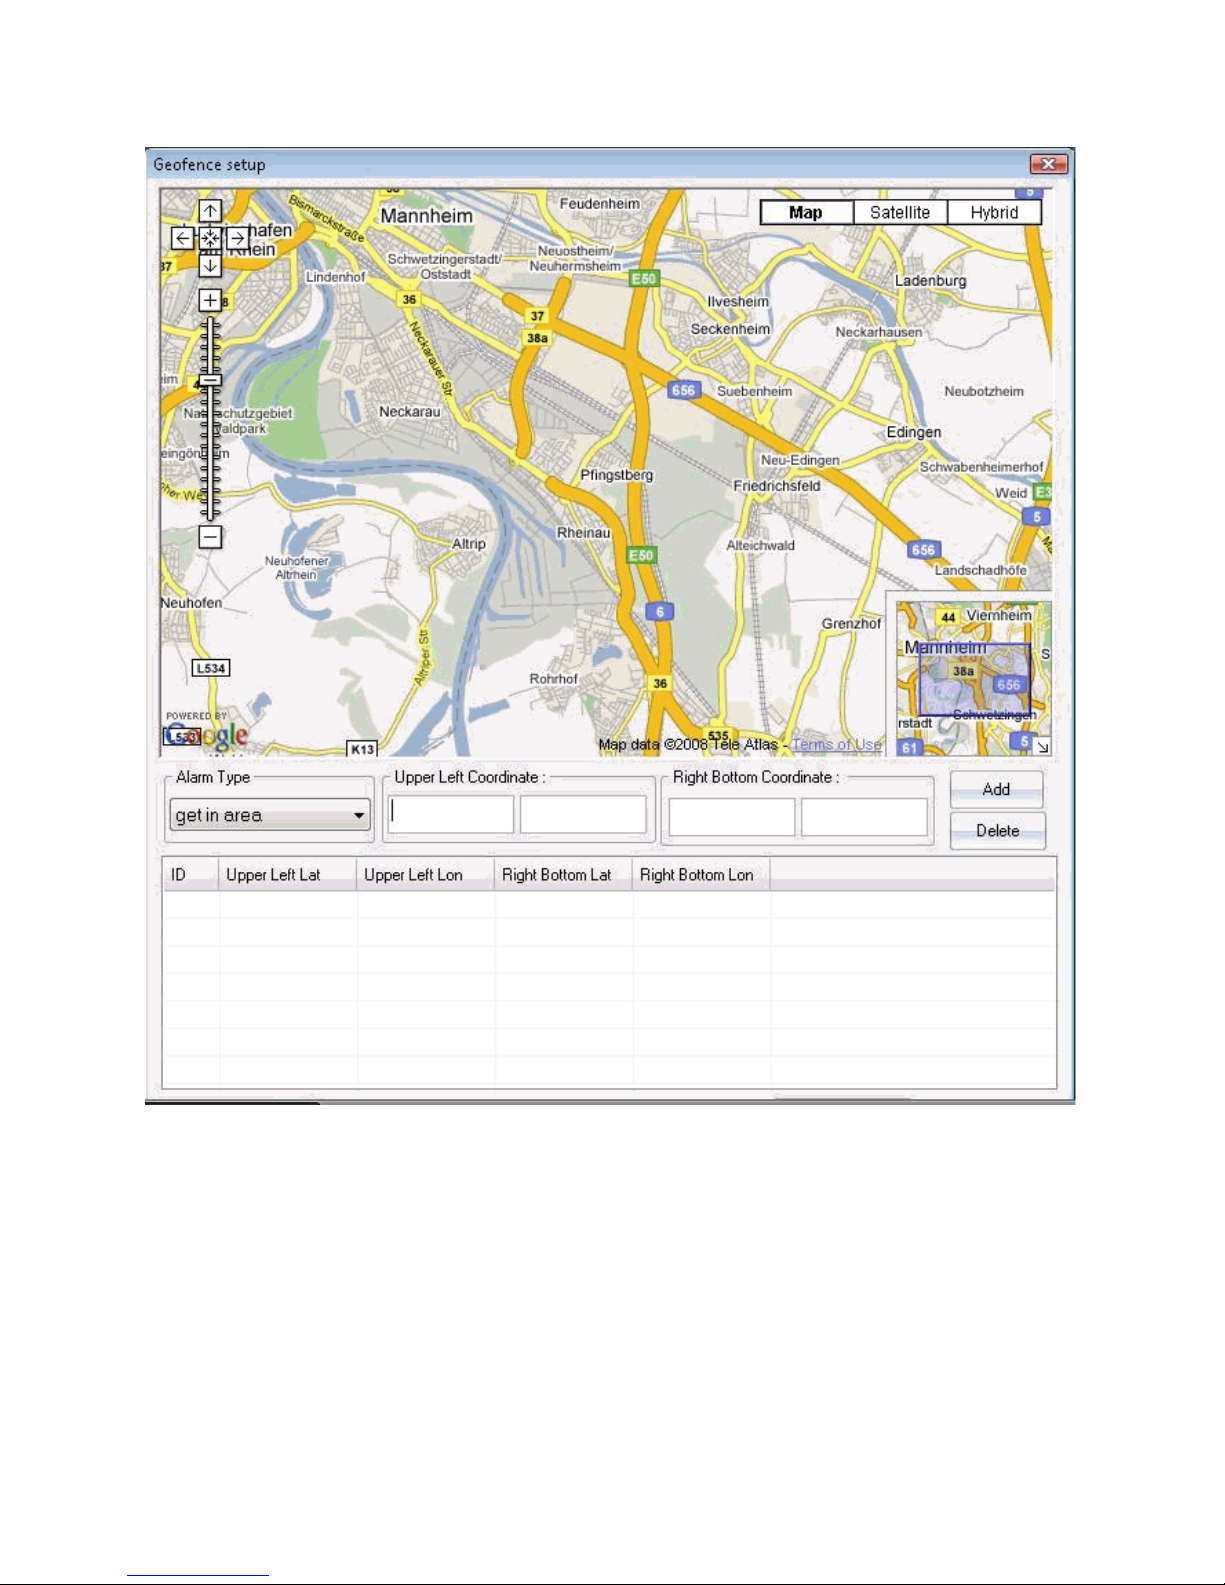
Step 2: Please select Geofence Setup. You will see the window below.
Page 57
56
Step 3: Click Add button. Click and drag the mouse on the Google map to draw a rectangle as
the Geo-fence range. The coordinates of the upper left corner and right bottom corner will be
automatically loaded to the field of coordinate.
Please choose the Alarm Type.
4.4.8 TR-203 Data Logger
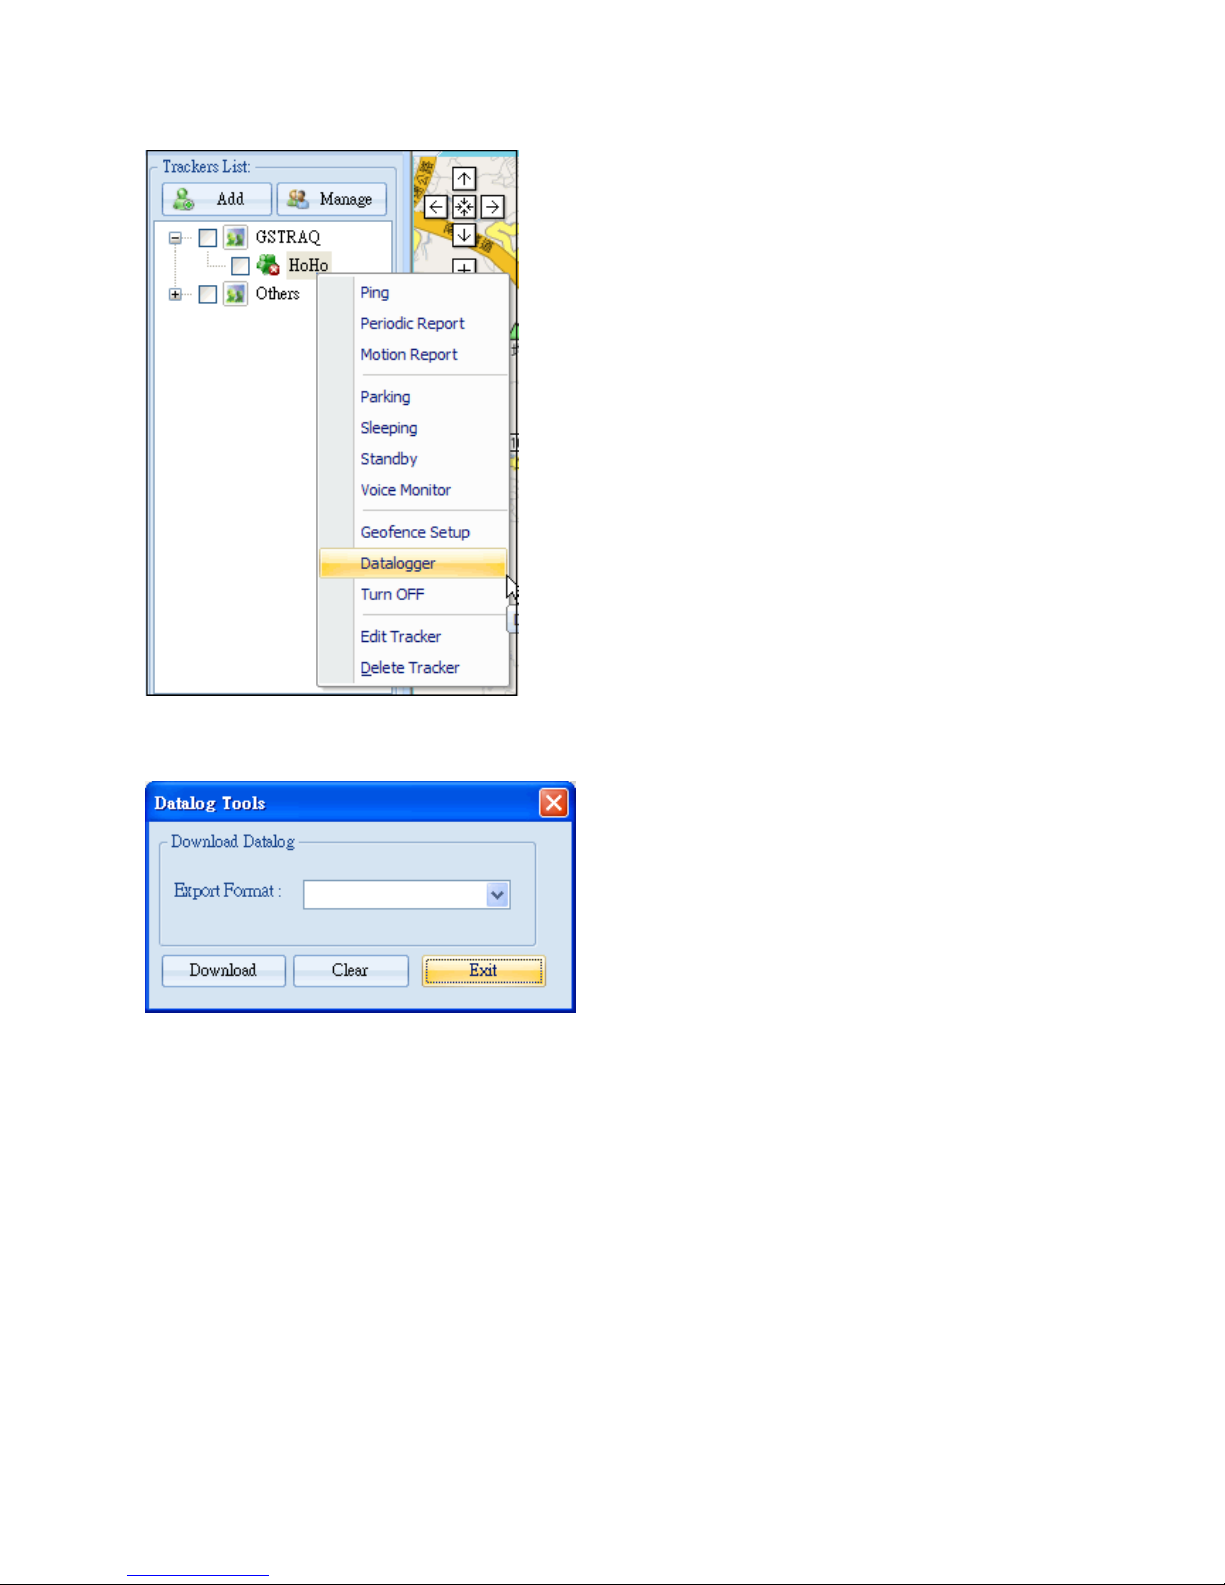
Data logger
Step 1: Please right click on the TR-203.
Page 58
57
Step 2: Please select Data logger. You will see the window below.
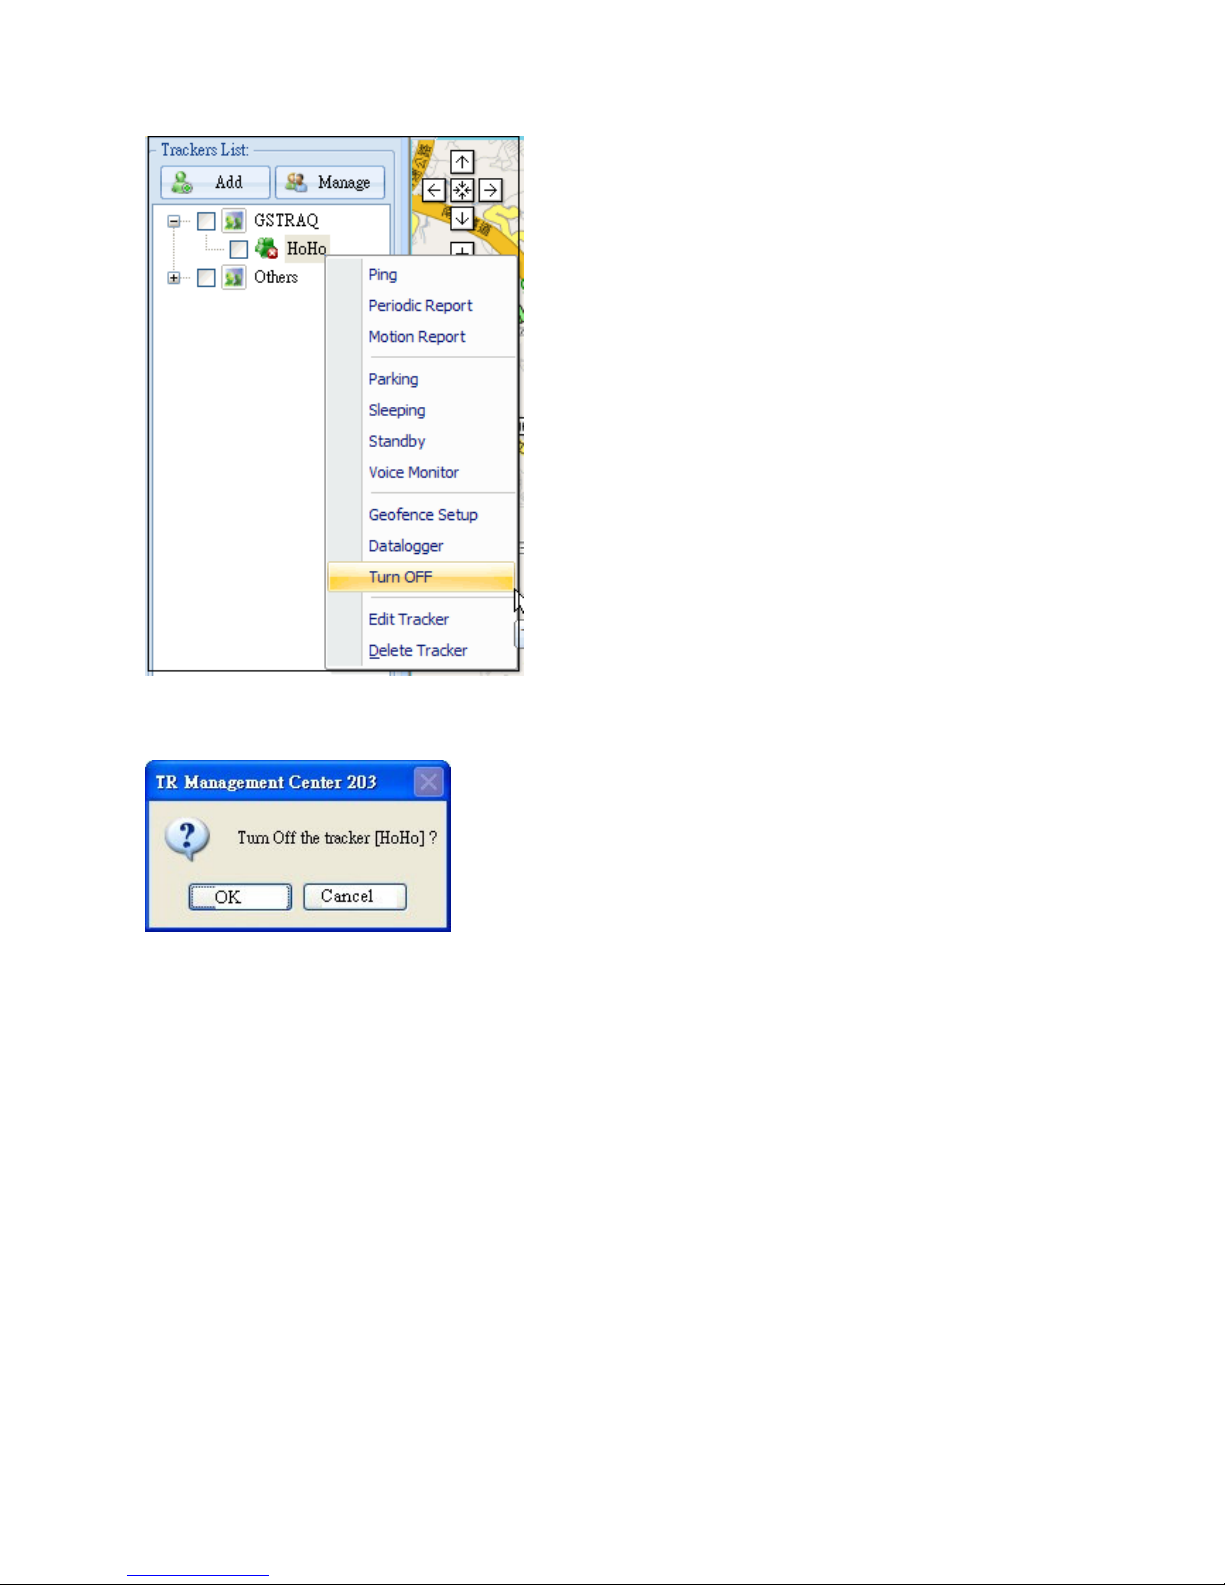
4.4.9 Turn off TR-203
You could remotely turn off TR-203 by TR Management Center 203.
Below please find the steps.
Step 1: Please right click on the TR-203.
Page 59
58
Step 2: Please select Turn OFF. You will see the window below.
Step 3: Please click OK button.
TR-203 will be turned off.
If you would like to turn on TR-203, please press the power key on the device.
Page 60
59
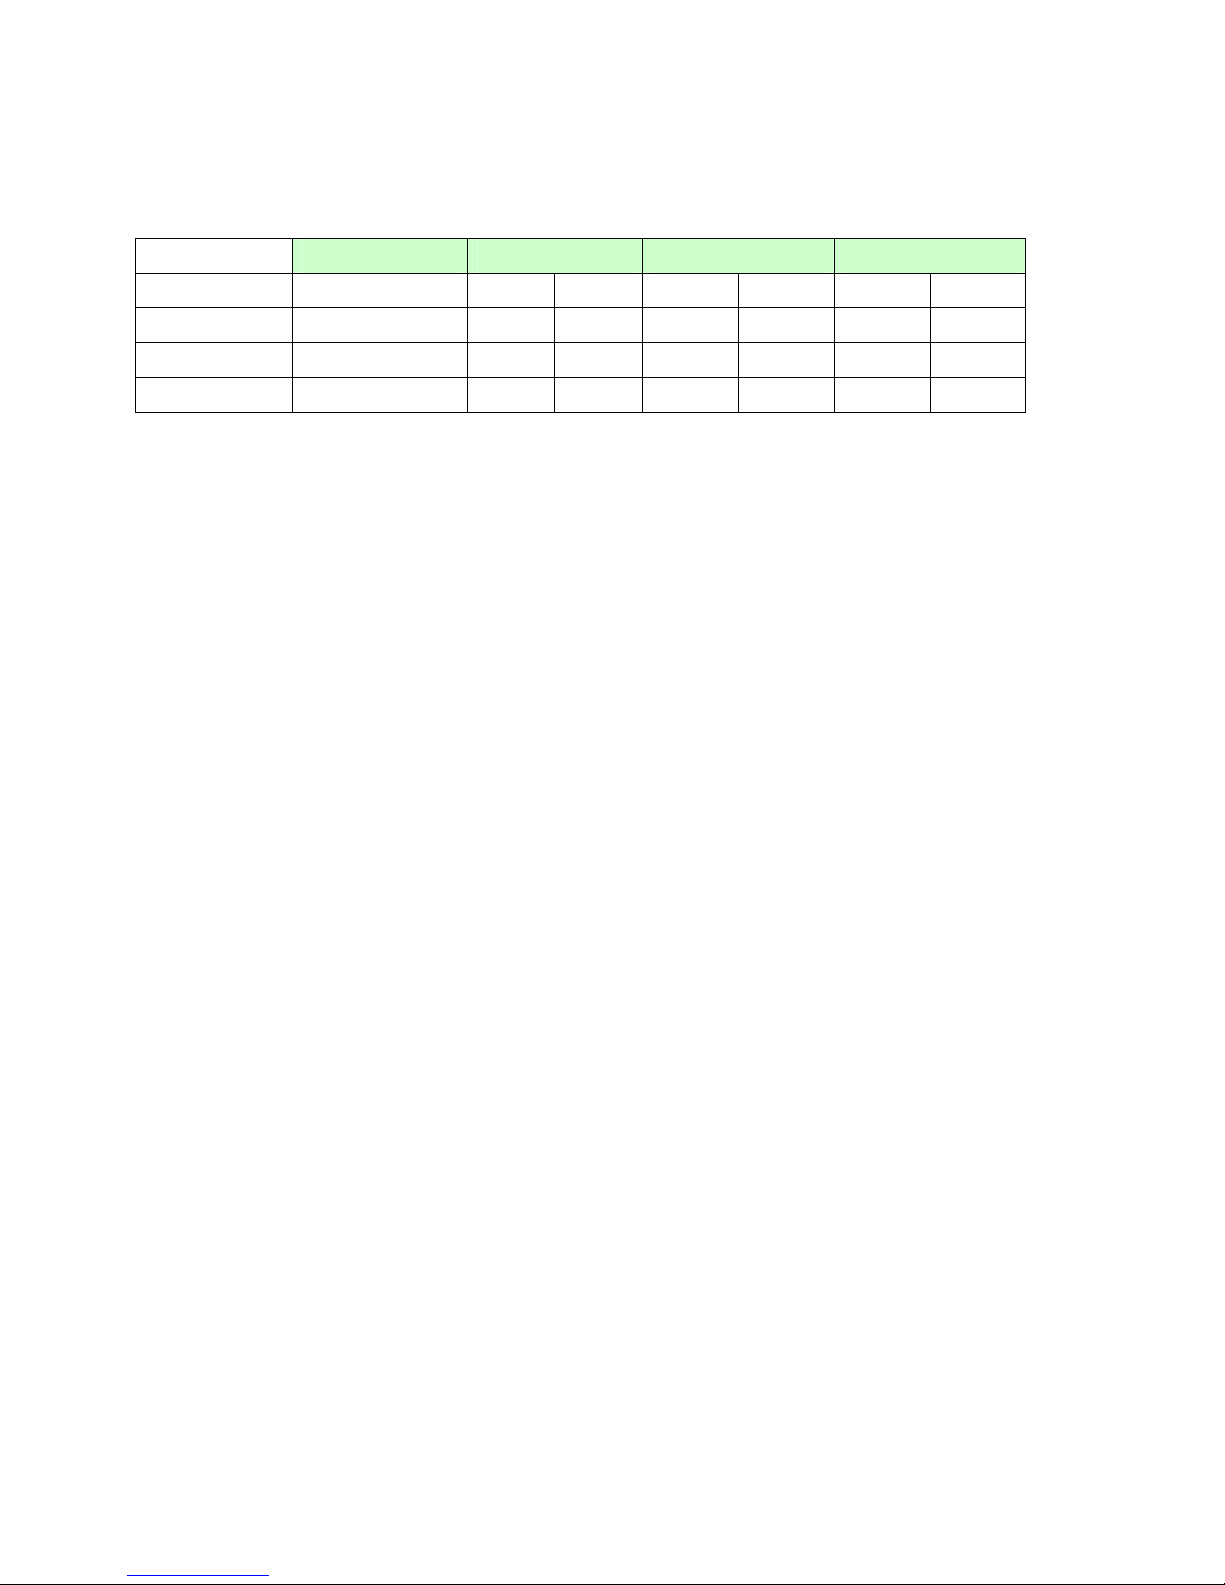
4.4.8 Comparison between parking mode, motion mode, sleeping mode, and
standby mode
Function/Mode
Standby mode Motion mode Parking mode Sleeping mode
Static Moving Alert Alarm Alert Alarm
GPS
GSM
Motion sensor
Off Off On Off On Off On
On On On On On Off On
Off On On On On On On
Page 61
60
4.5 TR Management Center Data Query
All the data sent from TR-203 will be stored in the database of TR Management center 203.
You can make this data show on Google map or export them into KML format.
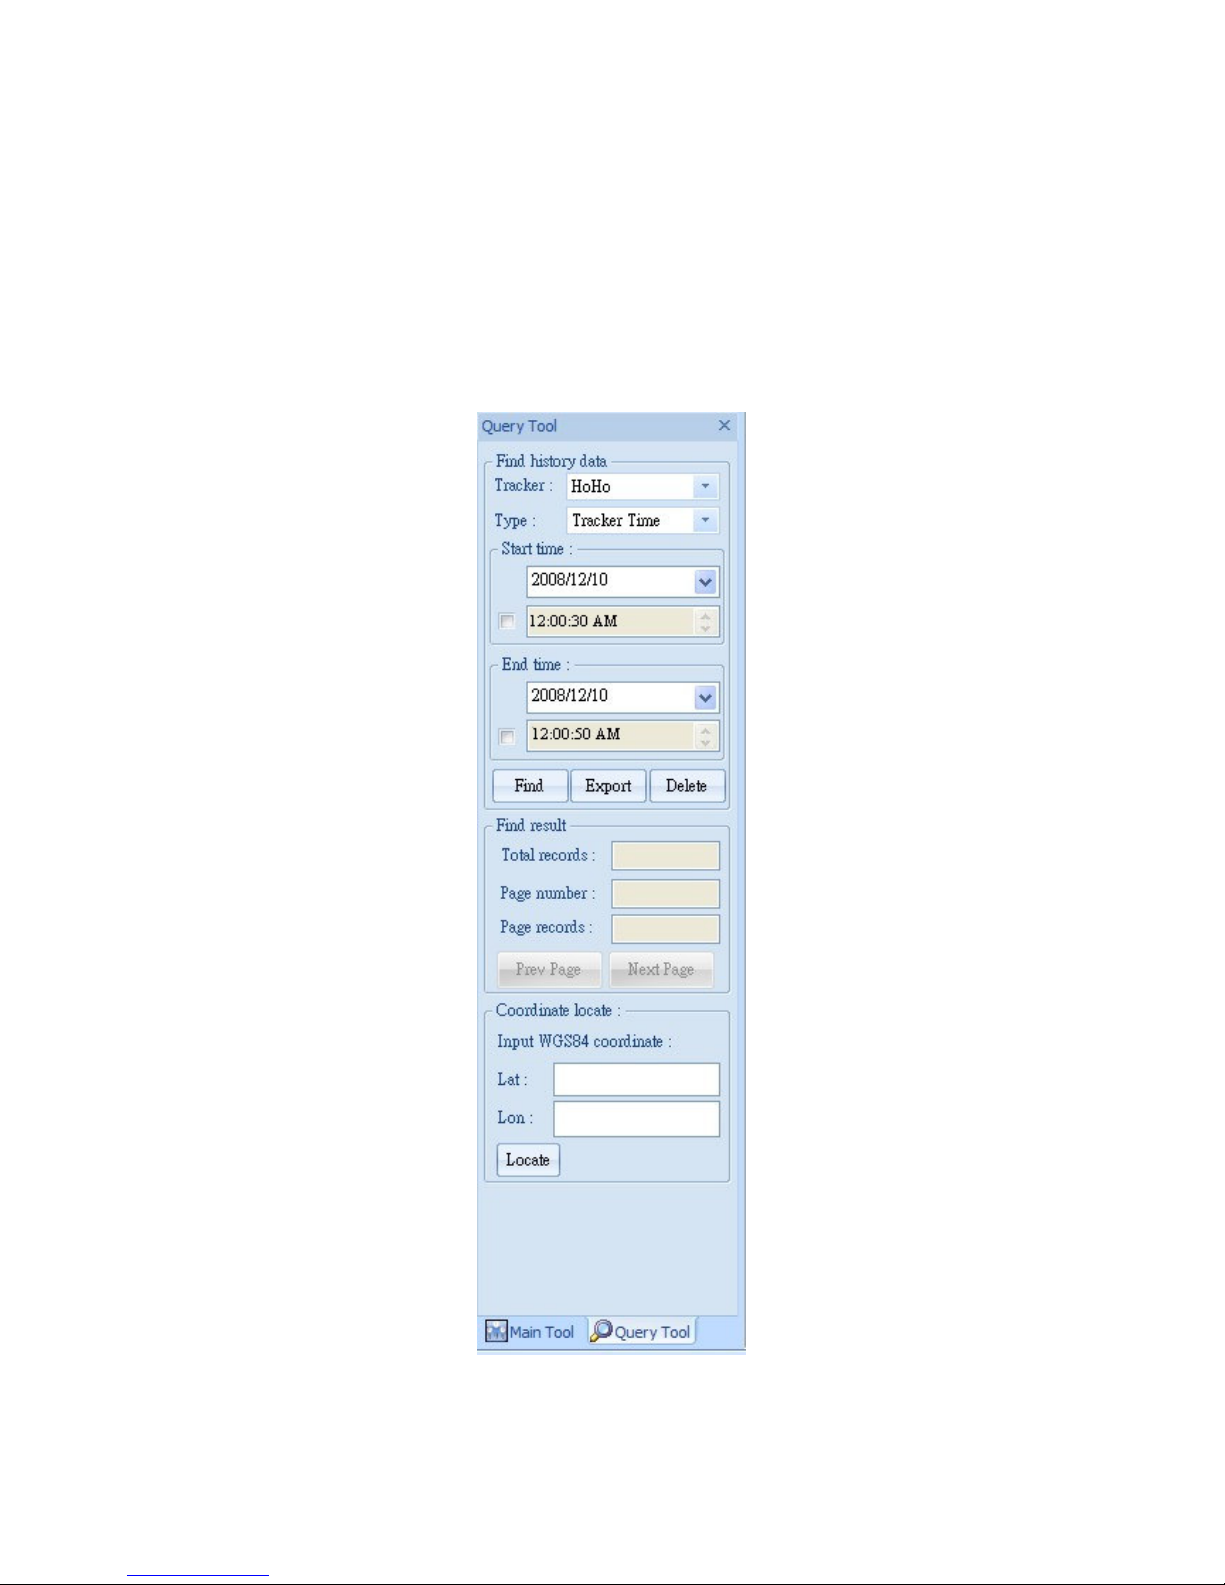
4.5.1 Look up for history data
You can look up for the history data that TR-203 sent to TR Management center 203 by Query
Tool.
"Query Tool"
Page 62
61
Item Description
Tracker Select the tracker whose history data you’d like to look up for
Type To look up for the data according to the time of Tracker’s
timer (Tracker Time) or the receiving time of the PC (Local
Time)
Start time The start time of the period of looking up the history data
End Time The end time of the period of looking up the history data
Find Start to look up for the data
Export Export the data into KML format
Delete Delete query results
Total records Display the quantity of the history data between the Start time
and End time
Page number Display the page of the history data (Each page has 200
records)
Prev Page Go to the previous page
Next Page Go to the next page
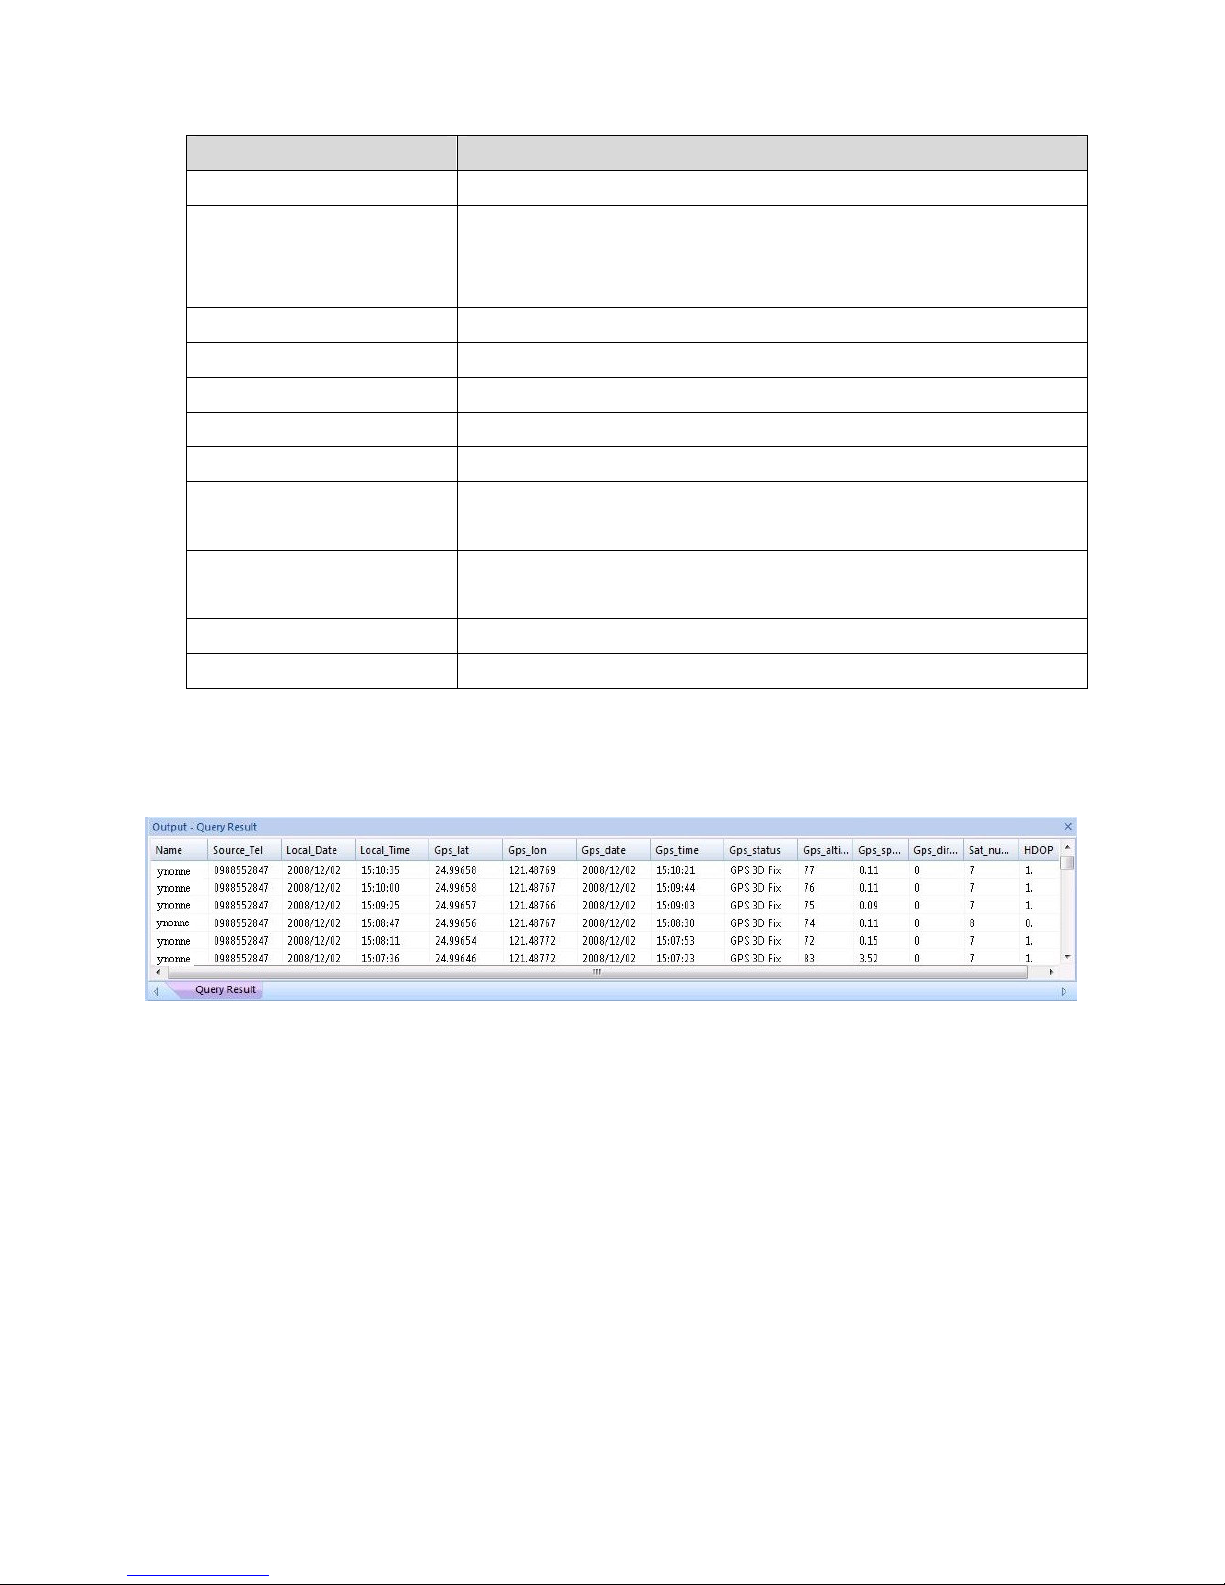
After specifying all the queried conditions, click the Find button and the query results will be
shown on the Data Output Area.
Query Result list
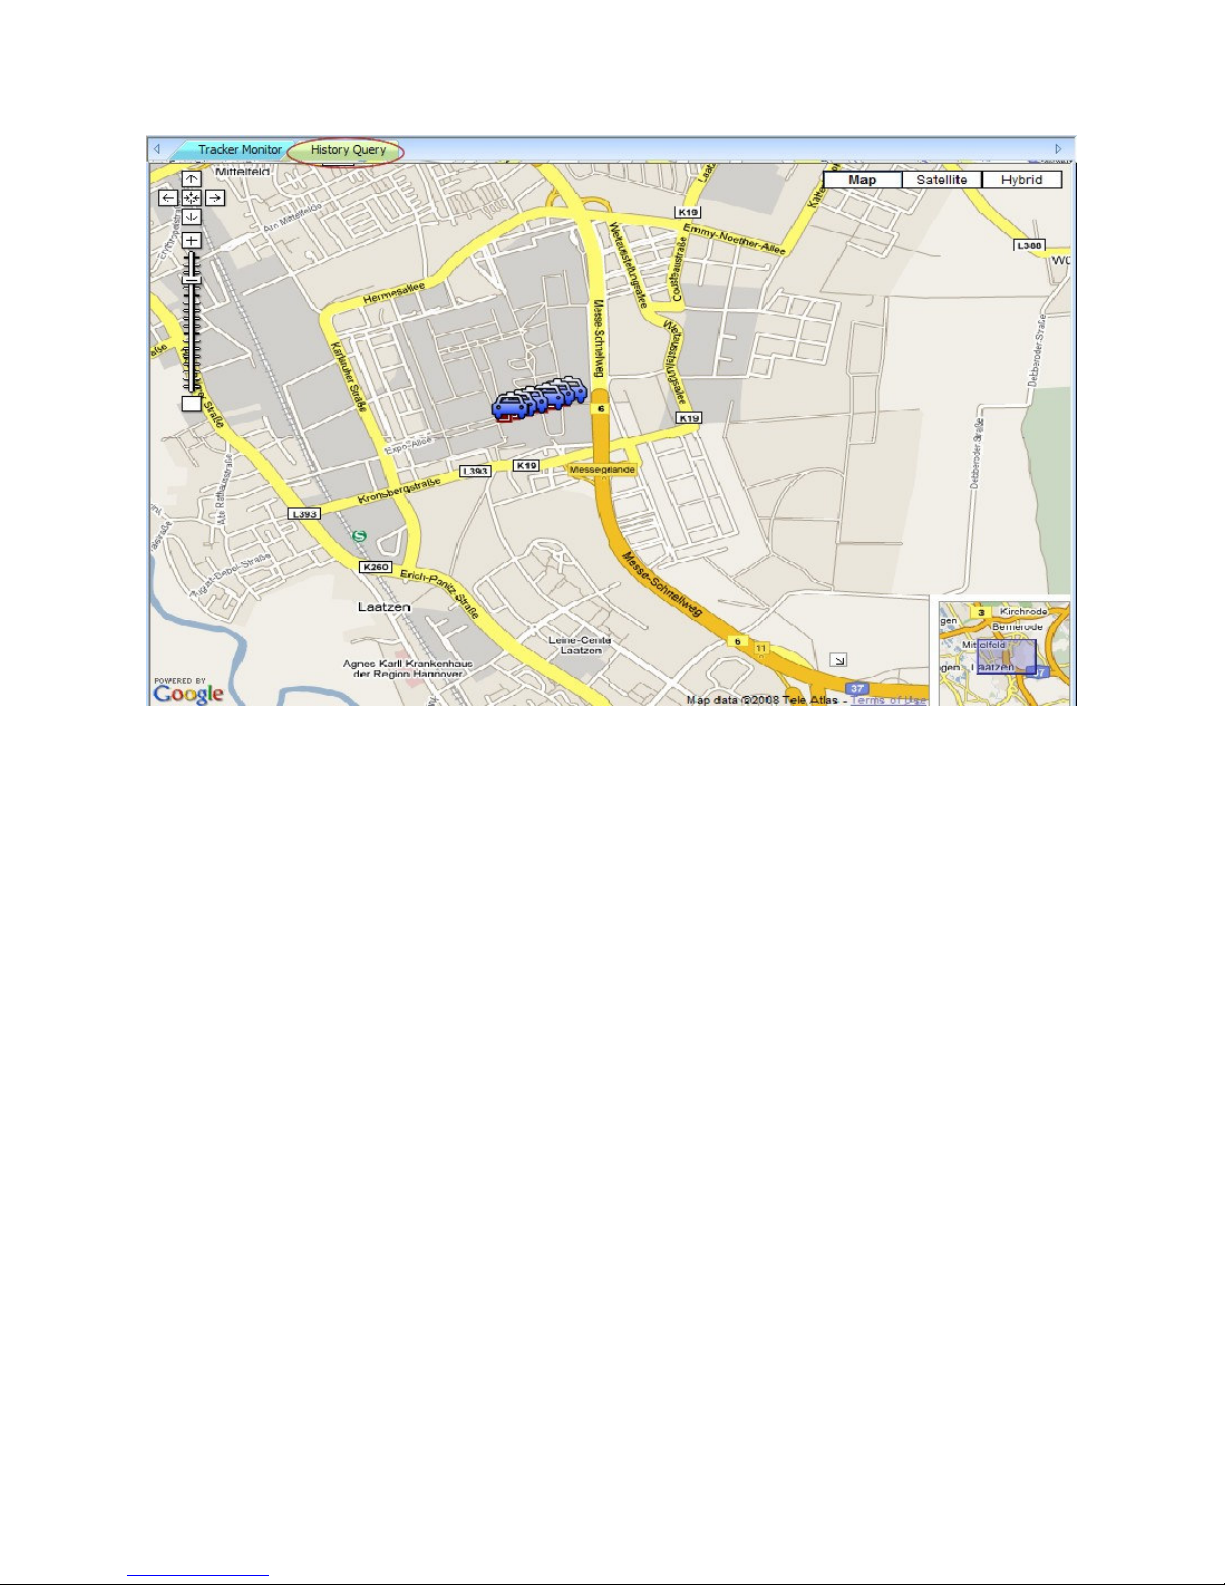
The results will also be shown on the Google Map. Please click the History Query tag on
top of the Google Map to show the results.
Page 63
62
Query results displayed on the Google Map
Page 64
63
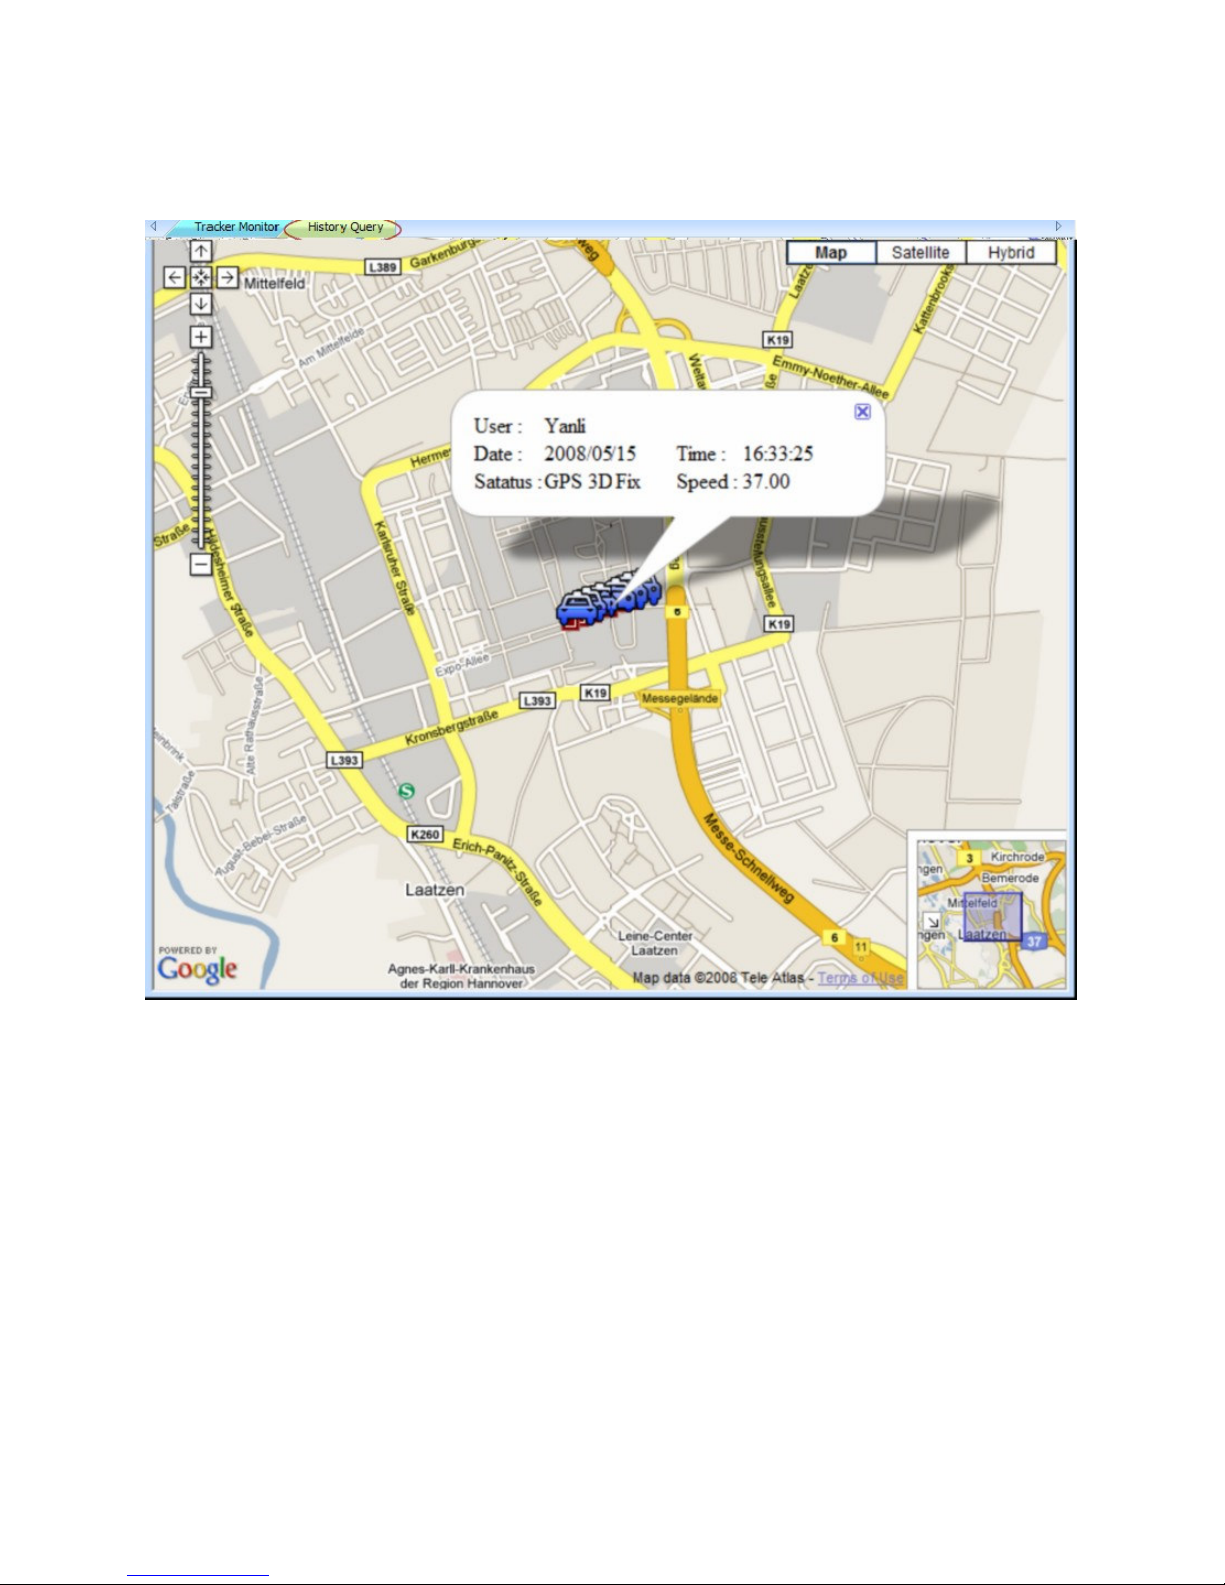
If you select a piece of result under the Data Output Area, its location and corresponding
details will be shown on the Google Map.
If you click on one of the tracker icon on the Google map, the selected tracker’s data under
Data Output Area will be highlighted.
4.5.2 Export the data into KML format
You can export the queried data into KML format for others to show the data on the Google
map or Google earth.
Step 1: Please refer to 4.5.1 to look up for the history data.
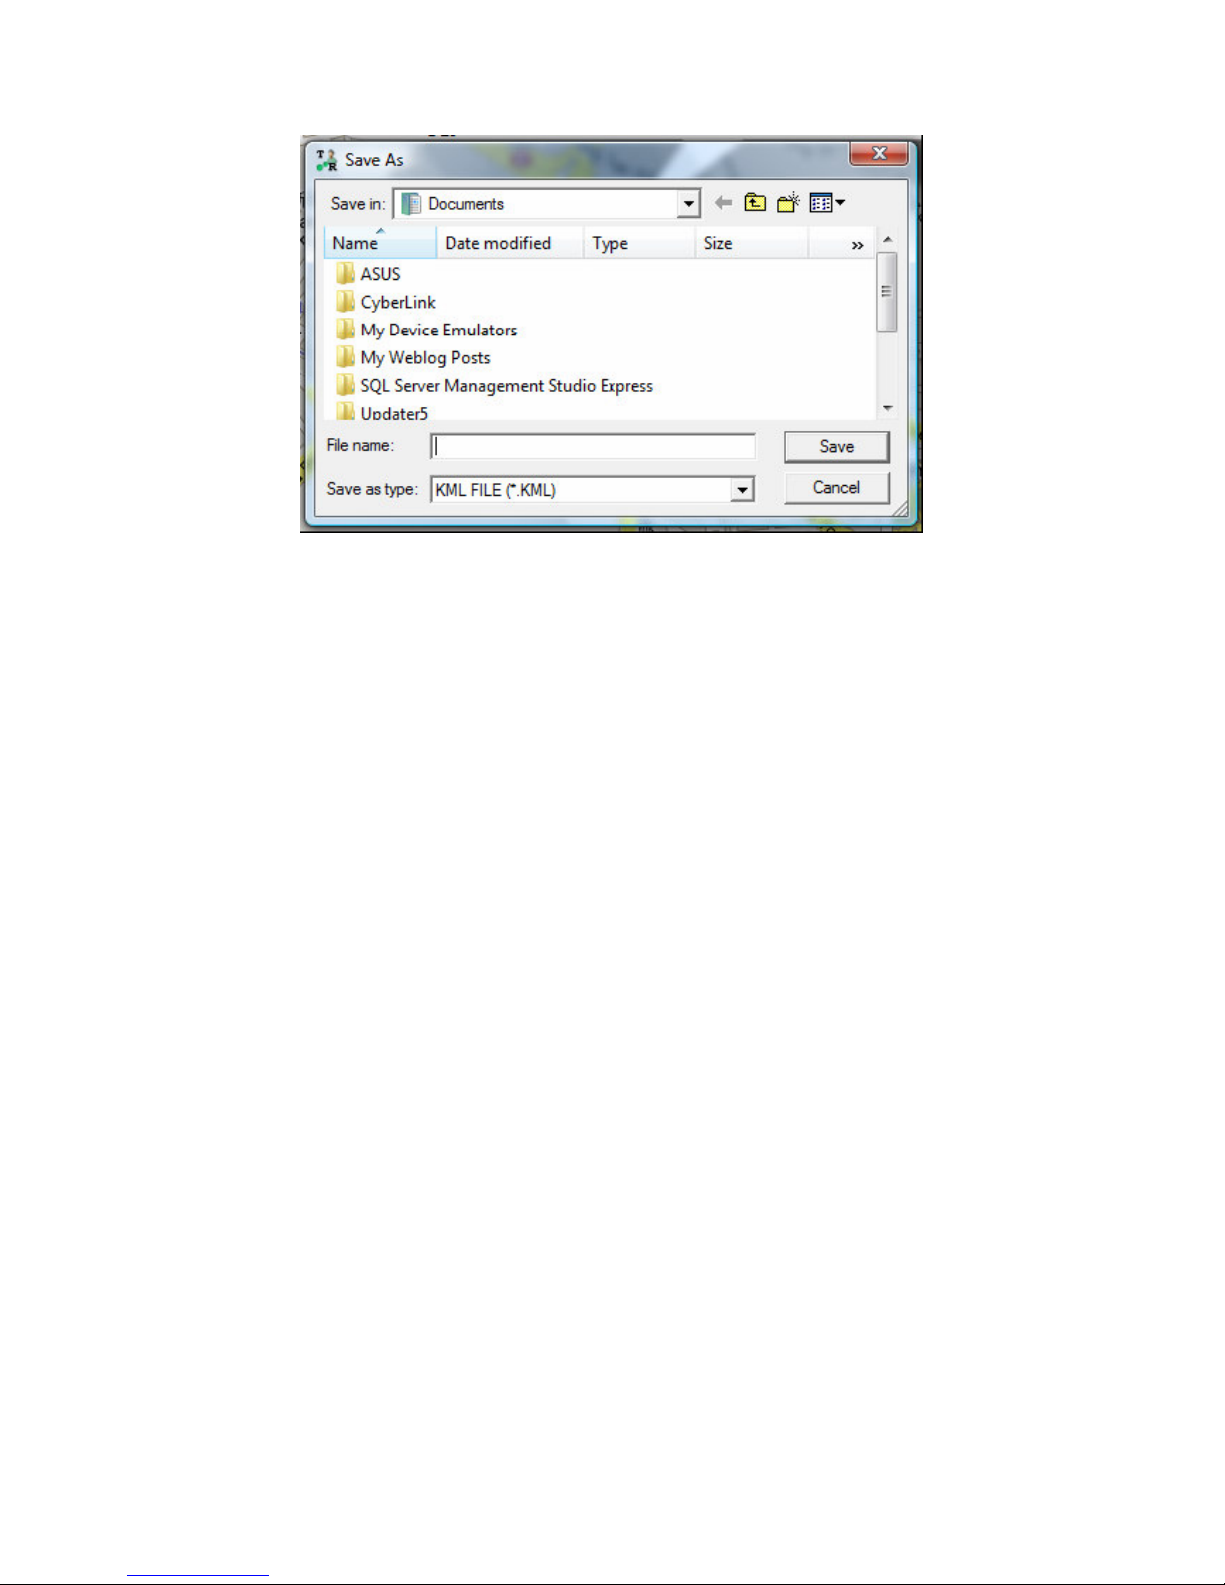
Step 2: Please click the Export button on the Query Tool. And then enter a name for the
exported data in the field of File name.
Page 65
64
Enter a name for the exported KML file
4.5.3 Delete the history data in the database
You can delete the history data in the database.
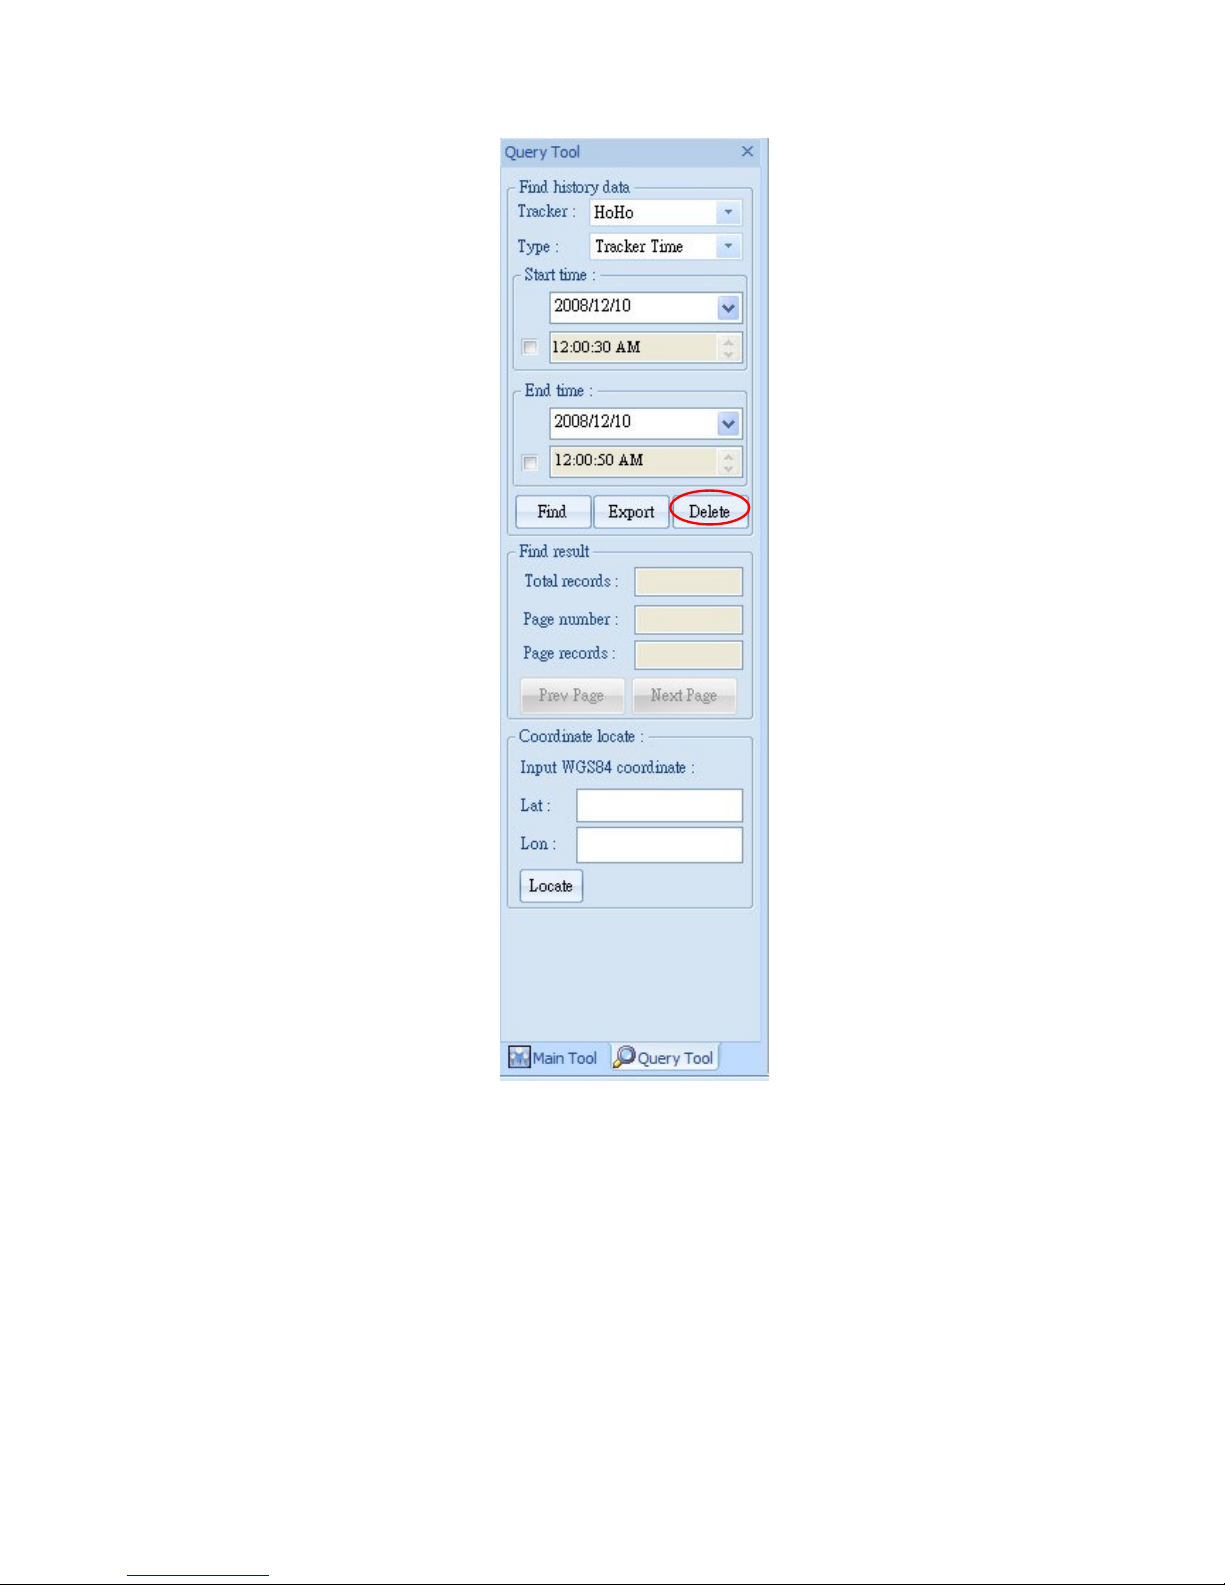
Step 1: Select the name of the tracker and time interval whose data you’d like to delete.
Page 66
65
Step 2: Click the Delete button.
Page 67
66
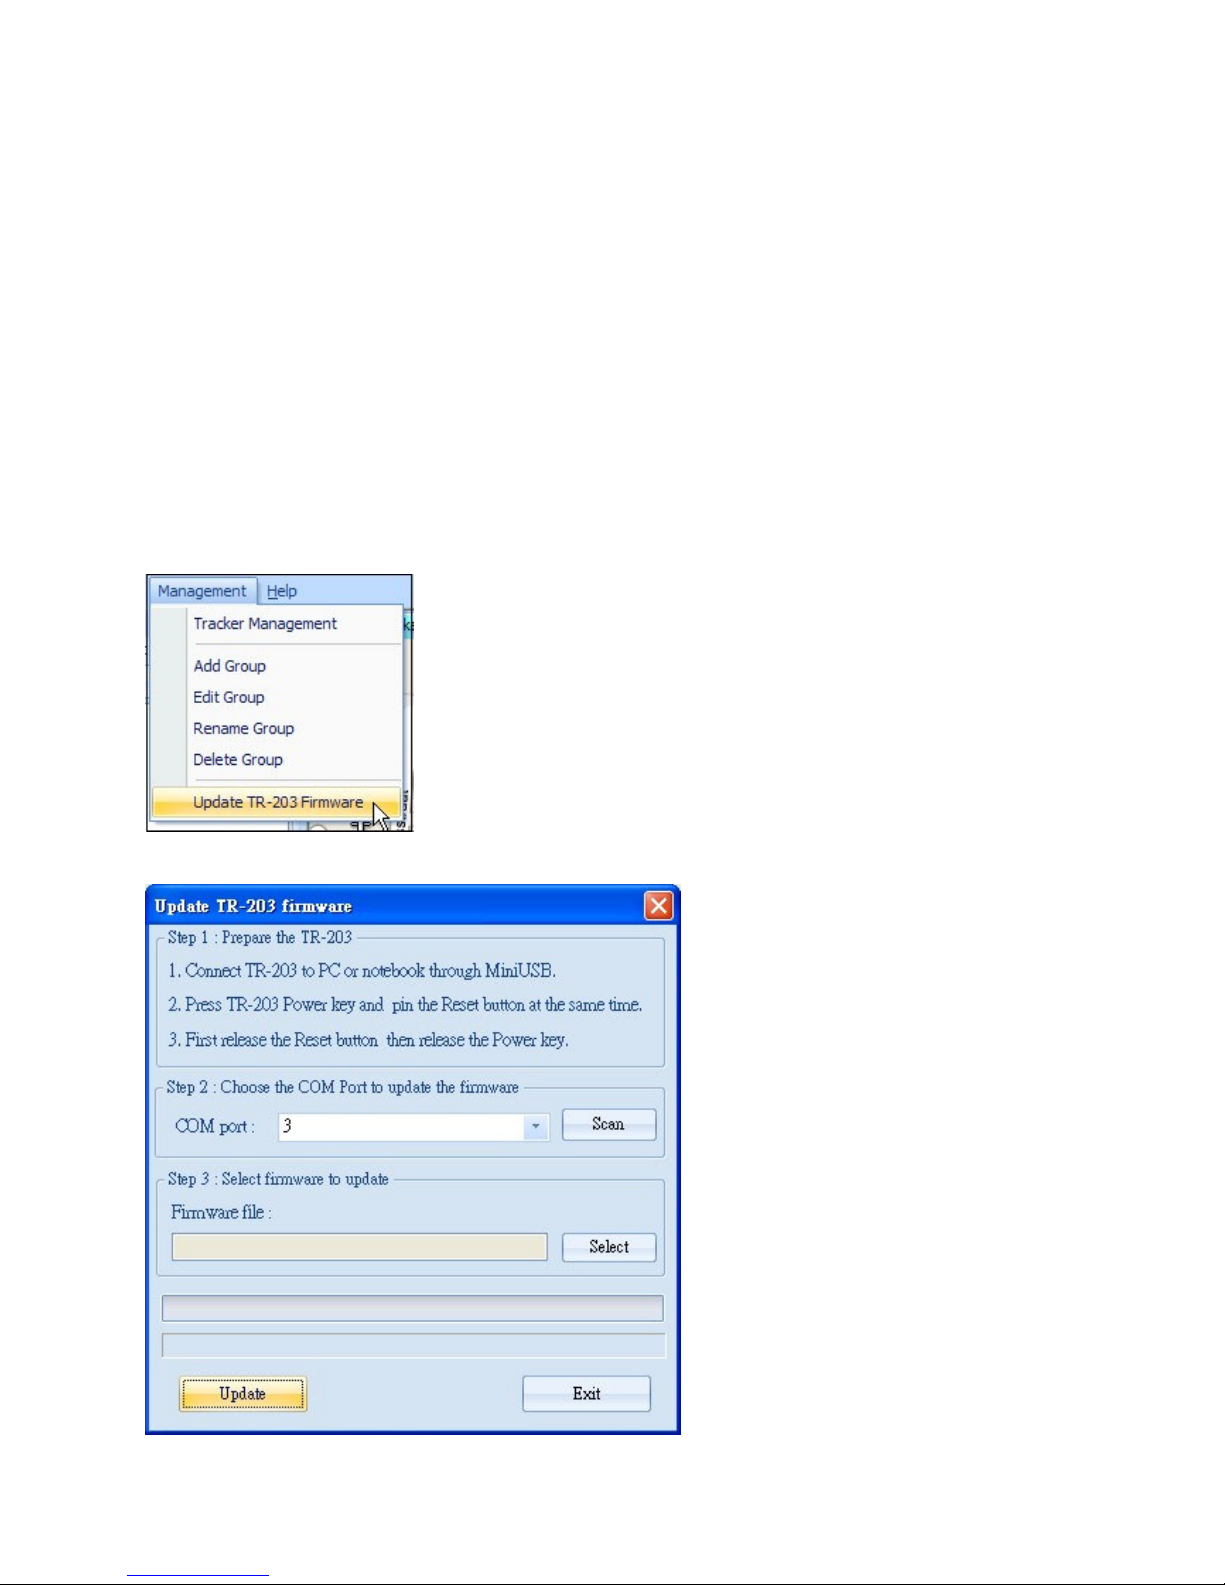
4.6 Update TR-203’s Firmware
You can update TR-203’s firmware by the TR Management Center 203.
Step 1: Please connect TR-203 and PC by the USB cable.
Step 2: Please press Power button and pin the reset key at the same time.
Step 3: Please release Reset key and then release Power button.
Step 4: Please run the “TR Management Center 203” program.
Step 5: Please select Management Update TR-203 Firmware
The window of Update TR-203 Firmware will be brought up.
Page 68
67
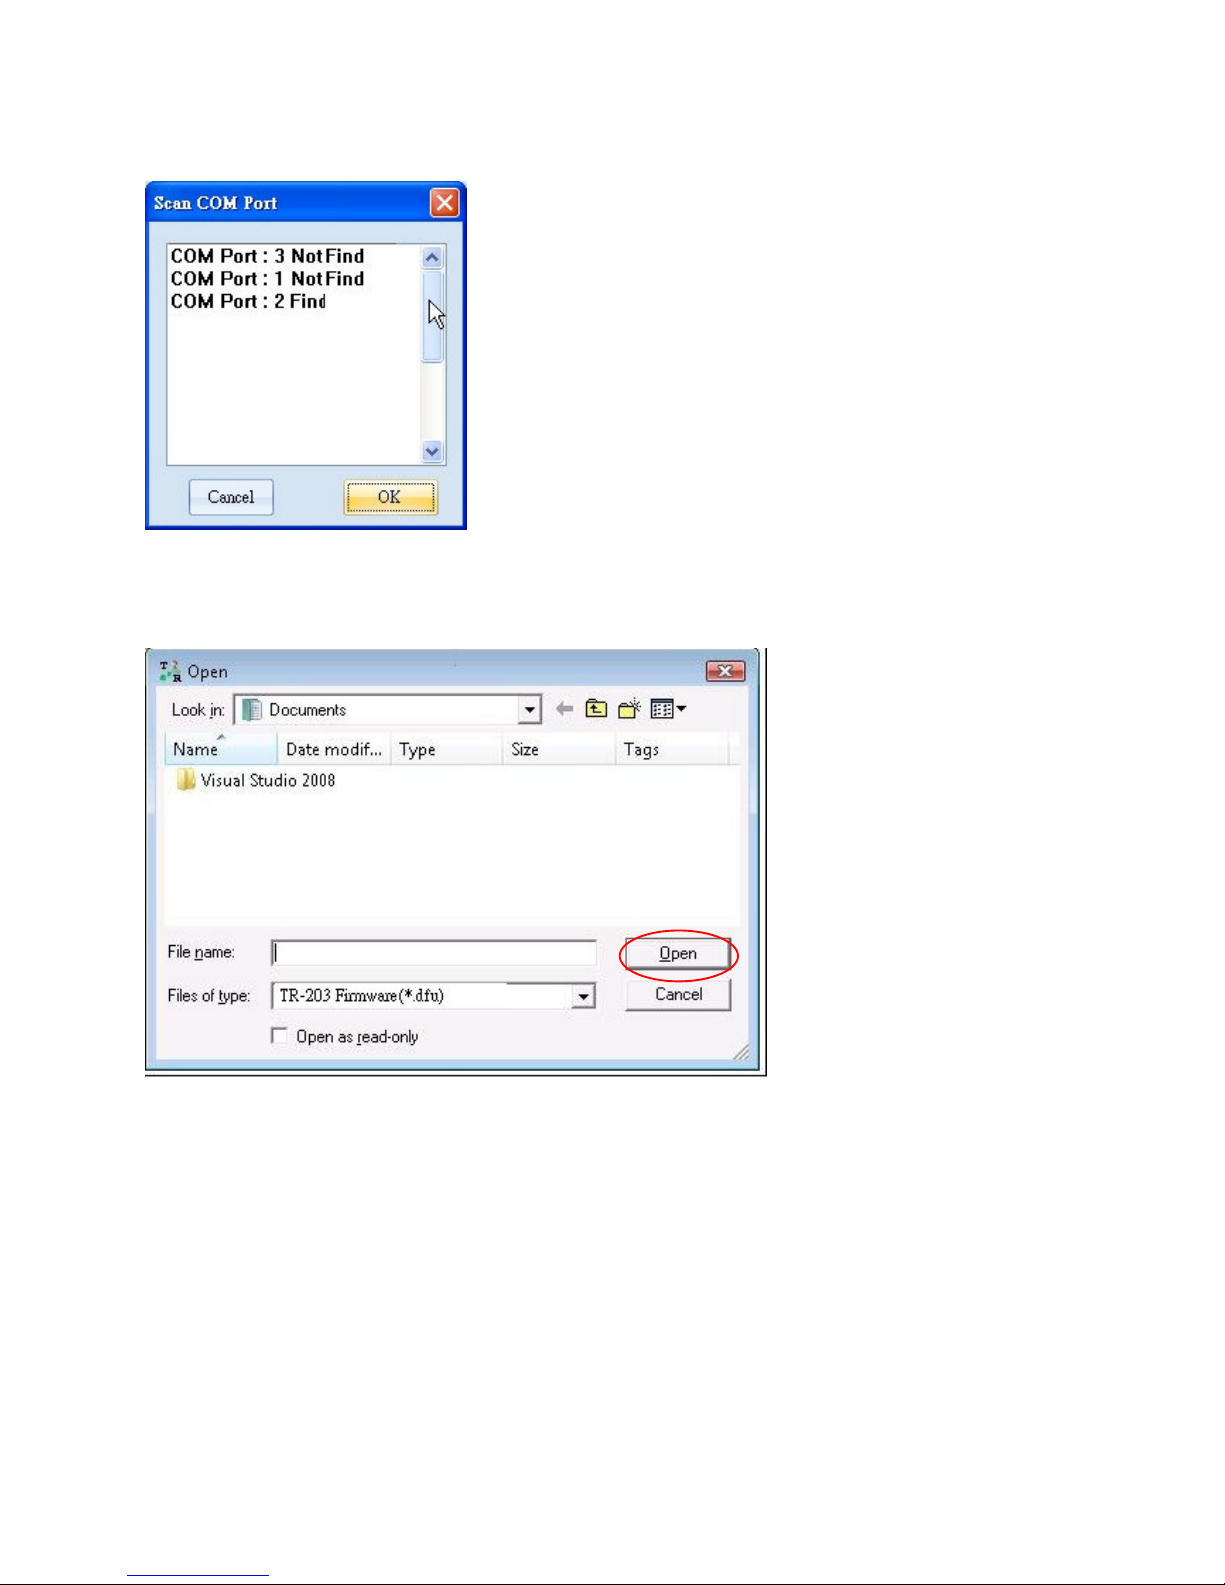
Step 5: Please click Scan to scan the COM port.
Step 6: Please click OK button.
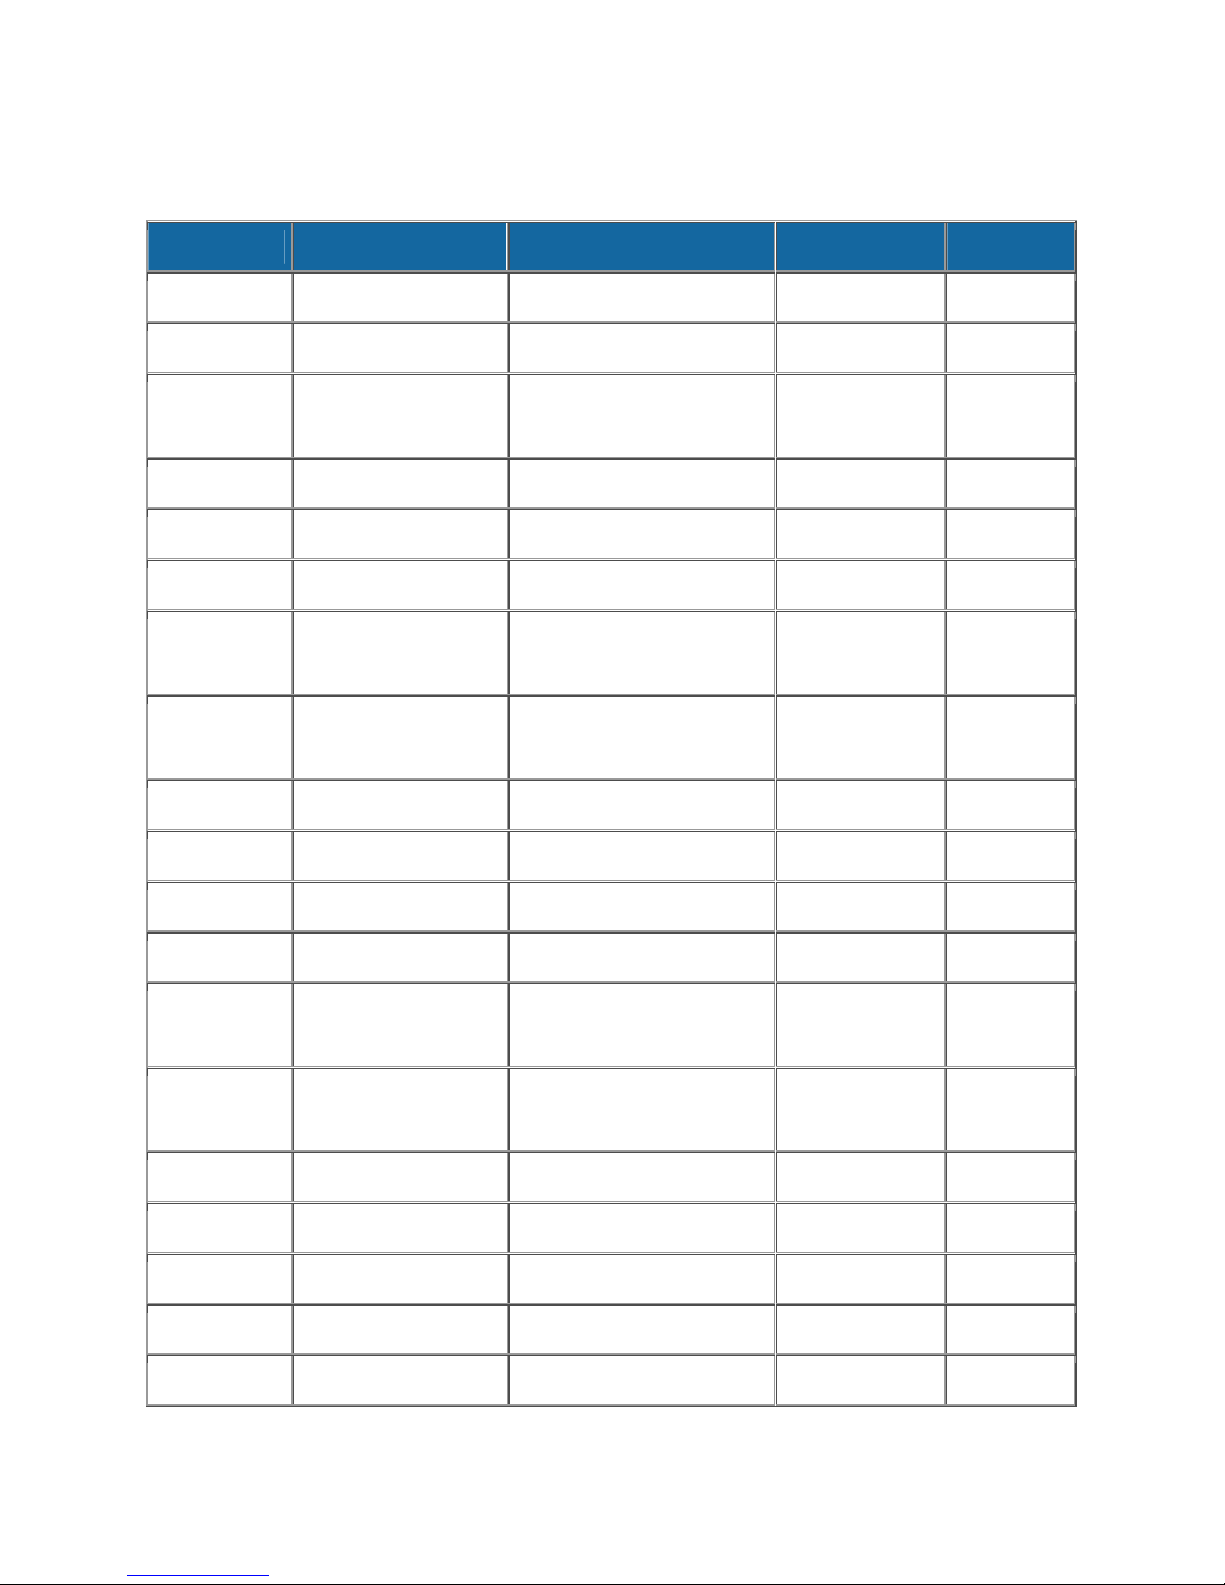
Step 7: Please click Select and locate the firmware file, once found click Open.
Step 8: Please click Update to update TR-203’s firmware.
Page 69
68
Appendix
Country Network APN User Name Password
Albania Vodafone Twa guest guest
Argentina CTI internet.ctimovil.com.ar guest guest
Argentina Movistar internet.gprs.unifon.com.ar
internet.unifon
Argentina Personal gprs.personal.com [mobile number] adgj
Australia Optus internet guest guest
Australia Telstra telstra.internet guest guest
Australia Telstra
(data bundles)
Australia Telstra
(pay by time)
Australia Three 3netaccess a a
Australia Vodafone vfinternet.au guest guest
Austria Drei drei.at guest guest
Austria Max Online gprsinternet GPRS [blank]
telstra.datapack [blank] Telstra
telstra.pcpack [blank] Telstra
wap wap
Austria Max Online
(Business)
Austria Max Online
(Metro)
Austria OneNet web.one.at web web
Azerbaijan Azercell internet guest guest
Bangladesh Grameen Phone gpinternet [blank] [blank]
business.gprsinternet GPRS [blank]
gprsmetro GPRS [blank]
Page 70
69
Belarus VELCOM web.velcom.by
unlim.velcom.by
web
unlim
web
unlim
Belgium Mobistar
(personal)
Belgium Mobistar
(business)
Belgium Orange orangeinternet guest guest
Belgium Proximus
(Internet)
Belgium Proximus
(intranet)
Botswana Mascom Wireless internet.mascom guest guest
Brazil Claro claro.com.br claro claro
Brazil Oi gprs.oi.com.br guest guest
Brazil Oi (WAP) wapgprs.oi.com.br oiwap oioioi
internet.be mobistar mobistar
web.pro.be mobistar mobistar
internet.proximus.be guest guest
intraprox.be guest guest
Brazil TIM tim.br tim tim
Brazil Velox wap.telcel.com iesgprs iesgprs2002
Bulgaria GloBul internet.globul.bg globul [none]
Bulgaria M-Tel mms-gprs.mtel.bg mtel mtel
Cameroon MTN Cameroon INTERNET guest guest
Canada KORE Wireless apn.zerogravitywireless.com [blank] [blank]
Canada Microcell
(Fido)
Canada Rogers AT&T internet.com wapuser1 wap
Chile Entel PCS imovil.entelpcs.cl entelpcs entelpcs
Chile Telefonica
Movil
China China Mobile cmnet guest guest
internet.fido.ca fido fido
web.tmovil.cl web web
Page 71
70
China China Unicom [none] guest guest
Croatia T-Mobile web.htgpr 38591 38591
Croatia VIPNET START gprs0.vipnet.hr 38591 38591
Croatia VIPNET PRO gprs5.vipnet.hr 38591 38591
Croatia VIPNET 3G 3g.vip.hr 38591 38591
Colombia Movistar internet.movistar.com.co movistar movistar
Congo Vodacom vodanet vodalive [blank]
Costa Rica IceCelular icecelular guest guest
Czech
Republic
Czech
Republic
Czech
Republic
Czech
Republic
Czech
Republic
Czech
Republic
Czech
Republic
Cesky Mobil
(contract)
Cesky Mobil
(CM Prepay)
Telefonica
(contract)
Telefonica
(Go)
Vodafone
(contract)
Vodafone
(pre-pay)
T-Mobile internet.t-mobile.cz guest guest
internet guest guest
cinternet guest guest
internet guest guest
gointernet guest guest
internet guest guest
ointernet guest guest
Denmark 3 [none] guest guest
Denmark Orange web.orange.dk guest guest
Denmark Sonofon [none] guest guest
Denmark TDC internet guest guest
Dominican
Republic
Orange orangenet.com.do guest guest
Page 72
71
Egypt Click Vodafone internet.vodafone.net internet internet
Egypt MobiNil mobinilweb guest guest
Estonia EMT internet.emt.ee guest guest
Estonia RLE internet guest guest
Finland Dna internet guest guest
Finland Elisa
(Radiolinja)
Finland Saunalahti internet.saunalahti guest guest
Finland Sonera internet [blank] [blank]
Finland Song internet.song.fi song@internet songnet
France Bouygues ebouygtel.com guest guest
France Bouygues
(B2Bouygtel)
France Orange
(contract)
France Orange MIB orange-mib mportail mib
France Orange
Mobicarte
internet rlnet internet
b2bouygtel.com guest guest
orange.fr orange orange
orange-acte orange orange
France SFR websfr guest guest
Germany D2 Vodafone web.vodafone.de guest guest
Germany E-Plus internet.eplus.de eplus gprs
Germany O2 (3G) surfo2 guest guest
Germany O2 (GPRS) internet guest guest
Germany Quam quam.de quam quam
Germany T-Mobile D1 internet.t-mobile internet.t-d1.de t-mobile
Ghana Areeba
(formerly Spacefon)
internet.spacefon.com guest guest
Page 73
72
Greece Cosmote internet guest guest
Greece Telestet gnet.b-online.gr MSISDN, e.g.
3093XXXXXXX
Greece TIM gint.b-online.gr web web
Greece Vodafone internet.vodafone.gr guest guest
Guatemala Comcel Wap.tigo.gt Wap Wap
Guatemala PCS Digital ideasalo guest guest
Guyana GT&T Cellink Plus wap.cellinkgy.com test test
Hong Kong CSL hkcsl or
internet
Hong Kong New World internet guest guest
Hong Kong Orange web.orangehk.com guest guest
Hong Kong People internet guest guest
Hong Kong SmarTone internet guest guest
guest guest
24680
Hong Kong Sunday internet guest guest
Hong Kong Three web-g.three.com.hk guest guest
Hungary Pannon
(normal)
Hungary Pannon
(flat rate)
Hungary Pannon
(compressed)
Hungary T-Mobile
(subscription)
Hungary T-Mobile
(non-sub.)
Hungary T-Mobile
(MMS)
net guest guest
netx guest guest
snet guest guest
internet [supplied] [supplied]
internet wap Wap
mms-westel mms [supplied]
Page 74
73
Hungary Vodafone
(contract)
(compr.)
internet.vodafone.net guest guest
Hungary Vodafone
(contract)
(un-comp.)
Hungary Vodafone
(pre-pay)
(comp.)
Hungary Vodafone
(pre-pay)
(un-comp.)
India AirTel airtelgprs.com guest guest
India BPL bplgprs.com bplmobile [blank]
India BSNL celloneportal guest guest
India Hutch
(normal)
standardnet.vodafone.net guest guest
vitamax.internet.vodafone.net guest guest
vitamax.snet.vodafone.net guest guest
www guest guest
India Hutch
(Gujarat)
India Idea Cellular internet guest guest
India MTNL Mumbai mmsmtnlmum mtnl mtnl123
India MTNL Mumbai
(Plan 2)
Indonesia Excelcomindo www.xlgprs.net xlgprs proxl
Indonesia IM3 www.indosat-m3.net
Indonesia Indosat
(Matrix)
Indonesia Telkomsel internet
web guest guest
gprsmtnlmum mtnl mtnl123
gprs im3
wap.indosat-m3.net
satelindogprs.com
indosatgprs
telkomsel
guest guest
wap wap123
Page 75
74
Ireland Meteor isp.mymeteor.ie my meteor
Ireland O2
(contract)
Ireland O2
(pre-pay)
Ireland Vodafone
(contract)
Ireland Vodafone
(pre-pay)
Israel Cellcom internetg guest guest
Israel MTC-Vodafone apn01 guest guest
Israel Orange orangeinternet guest guest
Italy Blu INTERNET guest guest
Italy H3G tre.it guest guest
open.internet gprs gprs
pp.internet gprs gprs
isp.vodafone.ie vodafone vodafone
live.vodafone.com vodafone vodafone
Italy TIM ibox.tim.it guest guest
Italy Vodafone
(Omnitel)
Italy Wind internet.wind
Jamaica Cable & Wireless wap guest guest
Jamaica Digicel web.digiceljamaica.com wapuser wap03jam
Japan Vodafone
(J-Phone)
Jersey (See UK)
Kazakhstan Beeline internet.beeline.kz internet.beeline [blank]
Kenya Safaricom web.safaricom.com web web
Laos ETL etlnet guest guest
web.omnitel.it guest guest
Wind Wind
internet.wind.biz
vodafone ai@vodafone vodafone
Latvia LMT internet.lmt.lv [blank] [blank]
Page 76
75
Latvia Tele2 internet.tele2.lv gprs internet
Lebannon Cellis FTML internet.ftml.com.lb plugged plugged
Lebannon MTC Touch gprs.mtctouch.com.lb guest guest
Lithuania Bite GSM banga guest guest
Lithuania Omnitel
(contract)
Lithuania Omnitel
(no contract)
Luxembourg LUXGSM web.pt.lu guest guest
Luxembourg Tango internet tango tango
Luxembourg VOXmobile vox.lu guest guest
Macau CTM ctm-mobile guest guest
Macau Macau Hutchison
Telecom (Internet)
Macau Macau Hutchison
Telecom (MMS)
Malaysia DIGI diginet guest guest
gprs.omnitel.net guest guest
gprs.startas.lt omni omni
web.hutchisonmacau.com hutchison 1234
mms.hutchisonmacau.com hutchison 1234
Malaysia Celcom celcom.net.my guest guest
Malaysia Maxis 2G
(contract)
Malaysia Maxis 3G
(contract)
Malaysia Maxis
(pre-pay)
Malaysia Timecel timenett.com.my
Malaysia TM Touch internet guest guest
Malta Go Mobile gosurfing guest guest
internet.gprs.maxis guest guest
unet maxis wap
net maxis net
guest guest
(timenet.com.my?)
Page 77
76
(contract)
Malta Go Mobile
(pre-pay)
Mexico Telcel internet.itelcel.com webgprs webgprs2002
Moldavia Moldcell internet gprs gprs
Morocco Maroc Telecom iam wac 1987
Morocco Medi Telecom wap.meditel.ma MEDIWAP MEDIWAP
Netherlands KPN Mobile internet KPN gprs
Netherlands O2 internet guest guest
Netherlands T-Mobile (Ben)
active
Netherlands Telfort internet telfortnl password
Netherlands Vodafone
(normal)
rtgsurfing guest guest
internet guest guest
web.vodafone.nl vodafone vodafone
Netherlands Vodafone
(business)
New Zealand Vodafone
(unrestricted)
New Zealand Vodafone
(restricted)
Nicaragua Alo Pcs internet.ideasalo.ni internet internet
Nigeria Globacom
(Internet)
Nigeria Globacom
(WAP)
Nigeria MTN Nigeria web.gprs.mtnnigeria.net wap gprs
Nigeria Vmobile wap.vmobile wap wap
Norway Netcom internet.netcom.no netcom netcom
office.vodafone.nl vodafone vodafone
internet guest guest
www.vodafone.net.nz guest guest
gprs wap [blank]
glowap wap wap
Page 78
77
Norway TalkMore (same as Netcom)
Norway Telenor Mobil
(Vodafone)
Pakistan UFone ufone.internet ufone ufone
Panama Cable & Wireless apn01.cwpanama.com.pa xxx xxx
Paraguy CTI internet.ctimovil.com.py ctigprs ctigprs999
Peru Claro (TIM) tim.pe tim tulibertad
Philippines Globe Telecoms
(Web)
Philippines Globe Telecoms
(WAP)
Philippines Smart internet witsductoor banonoy
Philippines Sun Cellular minternet guest guest
Poland ERA erainternet erainternet erainternet
Internet
internet.vodafone.net
internet.globe.com.ph globe globe
www.globe.com.ph globe globe
guest guest
Poland Heyah heyah.pl heyah heyah
Poland Orange internet internet internet
Poland Polkomtel www.plusgsm.pl guest guest
Portugal Optimus internet guest guest
Portugal TMN internet guest guest
Portugal Vodafone
(Telecel)
Russia BeeLine internet.beeline.ru beeline beeline
Romania Connex
(Vodafone)
Romania Orange internet guest guest
Russia Megafon
(dv)
internet.vodafone.pt guest guest
internet.connex.ro internet.connex.ro connex
internet.dv guest guest
Page 79
78
Russia Megafon
(kvk)
internet.kvk guest guest
Russia Megafon
(ltmsk)
Russia Megafon
(Moscow)
Russia Megafon
(mc)
Russia Megafon
(NWGSM)
Russia Megafon
(Siberia)
Russia Megafon
(UGSM)
Russia Megafon
(usi)
internet.ltmsk guest guest
internet.msk gdata gdata
internet.mc guest guest
internet.nw guest guest
internet.sib guest guest
internet.ugsm guest guest
internet.usi.ru guest guest
Russia Megafon
(Volga)
Russia Motiv
(uses BeeLine)
Russia MTS internet.mts.ru
Russia NCC internet ncc [supplied]
Russia NTC internet.ntc guest guest
Russia PrimTel internet.primtel.ru guest guest
Saint Lucia Cable & Wireless internet guest guest
Saint Vincent &
the Grenadines
Saudi Arabia STC jawalnet.com.sa guest guest
Digicel wap.digiceloecs.com wapoecs wap03oecs
internet.volga guest guest
internet.beeline.ru beeline beeline
mts mts
internet.kuban
Page 80
79
SÈnÈgal Tigo wap.sentelgsm.com guest guest
Serbia-
Montenegro
Serbia-
Montenegro
Serbia-
Montenegro
Serbia-
Montenegro
Singapore M1 mobilenet guest guest
Singapore SingTel internet guest guest
Singapore Starhub shwapint guest guest
Slovakia Eurotel internet guest guest
Slovakia Globtel internet guest guest
Mobtel Srbija internet mobtel gprs
Telekom Srbija gprsinternet mts 064
Telekom Srbija
(MMS service)
Telekom Srbija
(WAP service)
mms mts 064
gprswap mts 064
Slovakia Orange internet jusernejm pasvord
Slovenia Mobitel
(Internet)
Slovenia Mobitel
(Internet Pro)
Slovenia Simobil [none] guest guest
South Africa Cell-C internet guest guest
South Africa MTN internet guest guest
South Africa Vodacom internet guest guest
South Africa Virgin Mobile vdata guest guest
Spain Amena internet CLIENTE AMENA
Spain Telefonica
(Movistar)
internet mobitel internet
internetpro mobitel internet
movistar.es movistar movistar
Sri Lanka Dialog GSM www.dialogsl.com guest guest
Page 81
80
(contract)
Sri Lanka Dialog GSM
(pre-pay)
Sri Lanka Mobitel isp guest guest
Spain Vodafone
(Airtel)
Sweden Tele2, Comviq isplnk1.swip.net gprs internet
Sweden Tele2 (3G) internet.tele2.se wap wap
Sweden Telenor
(GPRS)
Sweden Telenor
(3G)
Sweden Telia online.telia.se guest guest
Sweden Tre (3G) data.tre.se void void
ppwap guest guest
airtelnet.es vodafone vodafone
internet.vodafone.net guest guest
services.vodafone.net guest guest
Switzerland Orange internet guest guest
Switzerland Sunrise internet internet internet
Switzerland Swisscom gprs.swisscom.ch guest guest
Taiwan Chunghwa
Telecom
Taiwan Far EasTone fetnet01 guest guest
Taiwan KG Telecom internet guest guest
Taiwan Taiwan Cellular internet guest guest
Thailand AIS internet ais ais
Thailand DTAC www.dtac.co.th guest guest
Turkey Aycell aycell guest guest
Turkey Telsim telsim telsim telsim
emome or
internet
guest guest
Turkey Türkcell internet gprs gprs
Page 82
81
UAE Etisalat mnet mnet mnet
UK 3 three.co.uk guest guest
UK Jersey
Telecom
UK O2
(contract)
UK O2
(contract)
-faster-
UK O2
(pre-pay)
UK Orange
(Pay Monthly)
UK Orange
(Pay and Go)
UK T-Mobile general.t-mobile.uk user pass
pepper abc abc
mobile.o2.co.uk web password
mobile.o2.co.uk faster password
payandgo.o2.co.uk payandgo payandgo
orangeinternet user pass
orangewap Multimedia Orange
UK Virgin Mobile goto.virginmobile.com user [space]
UK Vodafone
(contract)
UK Vodafone
(pre-pay)
Ukraine Djuice www.djuice.com.ua igprs igprs
Ukraine Jeans www.jeans.ua guest guest
Ukraine Kyivstar www.kyivstar.net igprs internet
Ukraine Mobi-GSM internet.urs guest guest
Ukraine UMC www.umc.ua guest guest
Uruguay ANCEL gprs.ancel guest guest
Uruguay CTI internet.ctimovil.com.uy ctiweb ctiweb999
internet web webs
pp.vodafone.co.uk wap wap
Page 83
82
Uruguay Movistar webapn.movistar.com.uy movistar movistar
USA Cingular
(ex AT&T)
USA Cingular
(With acceleration)
USA Cingular
(NO acceleration)
USA Cingular
(non-contract)
USA T-Mobile (Internet) internet2.voicestream.com guest guest
USA T-Mobile (VPN) internet3.voicestream.com guest guest
USA T-Mobile (non-contract) wap.voicestream.com guest guest
proxy guest guest
ISP.CINGULAR ISPDA@
CINGULARGPRS
.COM
ISP.CINGULAR ISP@
CINGULARGPRS
.COM
WAP.CINGULAR WAP@
CINGULARGPRS
.COM
CINGULAR1
CINGULAR1
CINGULAR1
Uzbekistan Uzdunrobita net.urd.uz user pass
Venezuela Digitel TIM gprsweb.digitel.ve guest guest
 Loading...