

Page 1

P2P WiFi Bulb Surveillance camera
This user manual will introduce how to use this product briefly, and provide you
with detailed information of each step operation. Please read carefully before using
this camera. And also keep this manual well, we hope that this product will satisfy
your various daily life needs and long-term service to you!
Product Quality Assurance
This product is in line with the FCC & CE certification authority standards, which
well guarantee customers safety use.
I-Product Features
1.Stylish apperance,camera body with three-dimensional UV treatment
2. With 24 pieces infrared night vision LED light
3.Remote control to record video by mobile APP.
4. Remote control to take photo by mobile APP.
5.7*24 hours uninterruptible working
6.Photo taking, video recording,great night vision,motion detection function alarm
7. Point-to-point connection, can work without a network connection
Page 2

Instruction for quick operation of network
surveillance bulb camera
This product is a 25-frame HD (1,080P/720P) network surveillance bulb camera with
an external micro SD card and a multi-functional high-tech product integrating
functions of video recording, photographing, night vision, motion detection alarm,
APP real-time monitoring, and file storage . It is equipped with high-capacity batteries,
and has functions of 5 megapixel HD recording. It supports up to 32GB micro SD
card, 7*24 hours uninterruptible long-time work and with APP convenient control.
Moreover, it works as the best anti-theft and evidence-gathering tool with strong
concealment.
I-APP software download
For Android phones, please search in Google Play :P2PLiveCam to download the
APP.
For iphone, please search in AppStore:P2PliveCam to download the APP.
II-Wifi connection medthod one
1.Open the wifi function of your mobile,and then turn on the bulb camera(30 seconds
later,blue indicator light start flickering,then the bulb camera is turned on , and then
red indicator light will keep on flickering, wchich means the bulb wifi signal is
opened )
2. Open APP software that is downloaded and installed in your mobile phone.
(Specific operation steps are shown in below pictures.)
Page 3
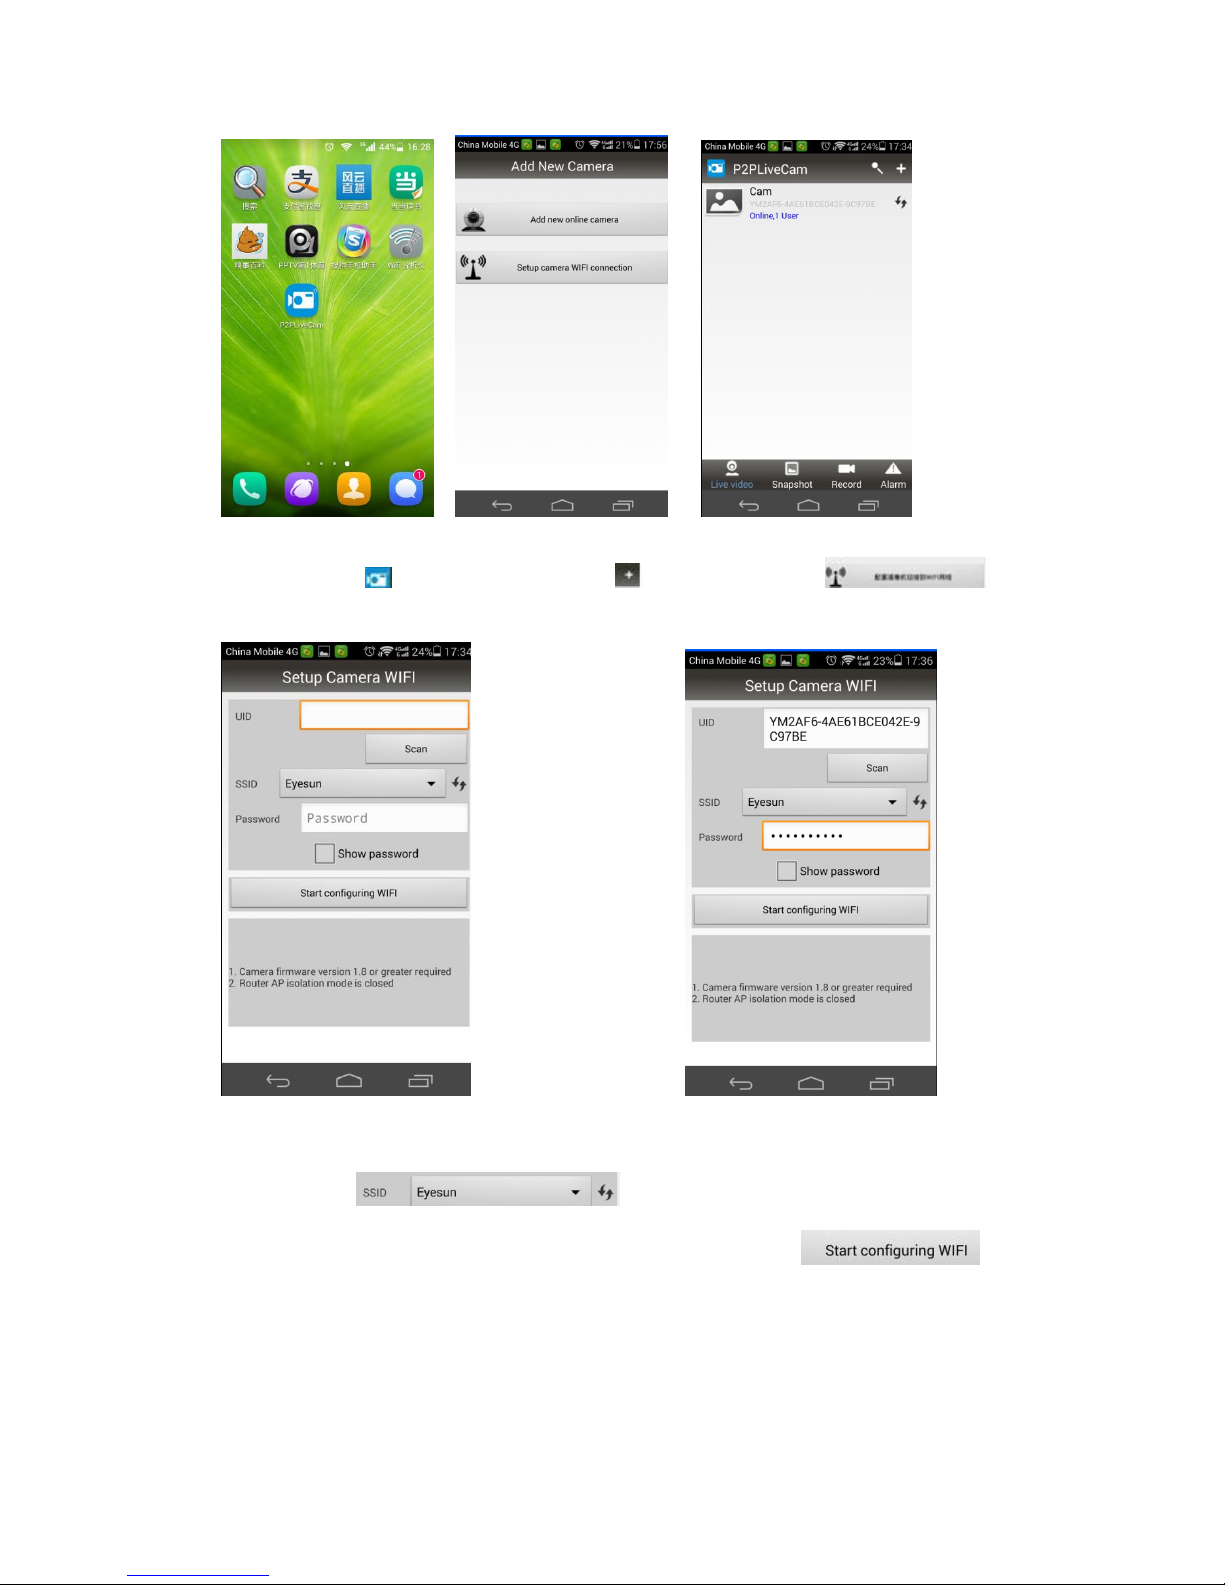
Step 1 (Open ) Step2(click ) Step3(Click )
Step4(Input the UID number or scan the QR code of this bulb camera
Step5(Click to choose the available WIFI signal
from your home router and input the password,Click )
3.After you finish the WIFI connection successfully, you will be able to see the live
video in the APP.
4.When the bulb camera is connect successfully to your home router wifi signal, the
red indicator light will keep on.
III-Wifi connection method two
Page 4

1. Then turn on the bulb camera( 30 seconds later,blue indicator light start
flickering,then the bulb camera is turned on , and then red indicator light will keep on
flickering, wchich means the bulb wifi signal is opened )
2.Turn on the WLAN of your mobile. Then use your mobile to search the WIFI
signal(WIFI name is the UID number on the bulb camera ) sended out by this bulb
camera, and input the password to connect.(You need wait about three minutes to
connect.
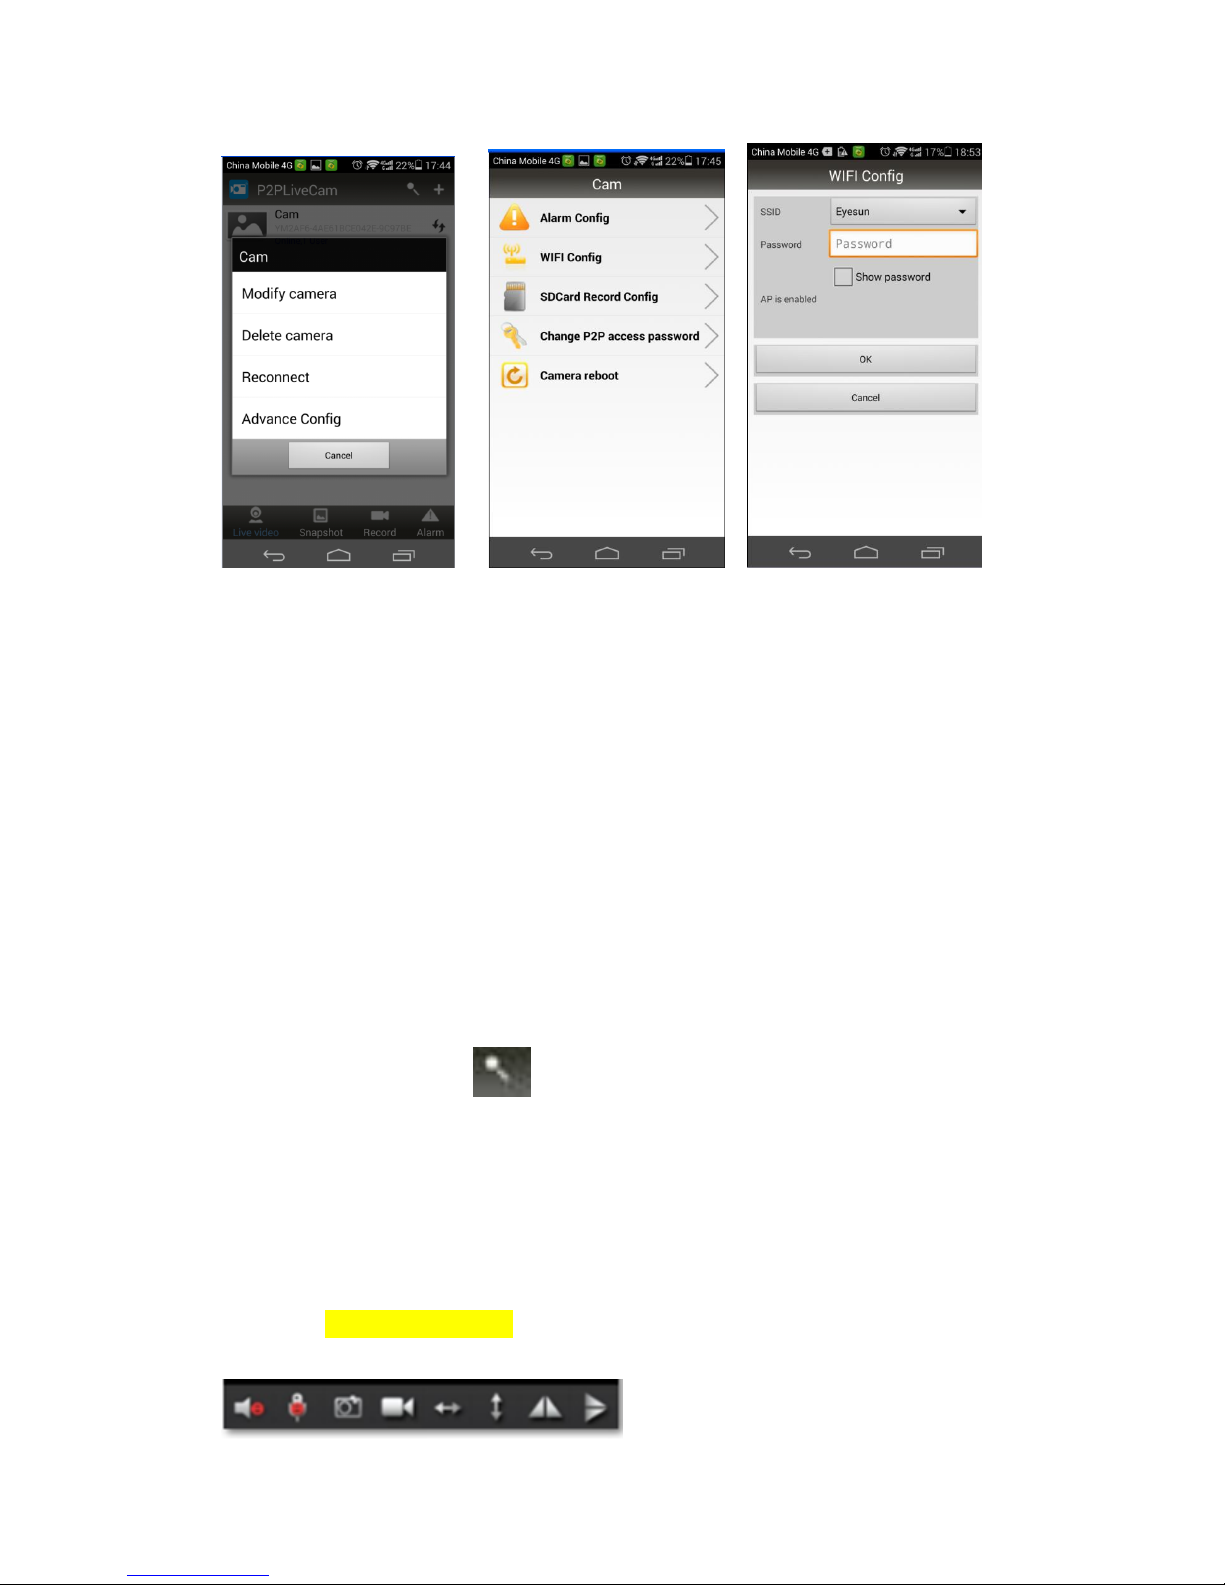
4.After your mobile connect to the WIFI signal(sended out by this bulb camera). Then
you open the APP, then click to search the
camera ,then click .
5. long click ,then click
, click .
Select the SSID then input the password .click .
Page 5
IV-Point-to-point AP direct connection(when you are in your home,
and do not need the internet to control the bulb camera, you can just
connect your mobile with the wifi sended out by the bulb camera to
control the bulb camera in your home.)
1. You turn on the bulb camera, then you search the WIFI signal(WIFI name is the
UID number on the light bulb camera) sended out by the bulb camera with your
mobile, and input the password to connect to this wifi signal( It takes about three
minutes to finishi connection)
2. After your mobile connect to the WIFI signal sended out by the bulb camera,
then open the APP, click , then you can control the bulb camera on your
APP.
V-Screen shot, video recording and alarm
1.In the APP, open the live video as below picture, you can see on the top of the
screen with”1080P, 720P, 480P” this three options, you can choose according to your
own preference. Also you can adjust the color contrast degree and brightness.
,here from left to right respectively
Page 6

represent the function: monitor, photograph, video recording, left/right, up/down. By
clicking “photograph” or “video recording”, the images or videos will be saved in the
phone memory (as shown below).
2.Long press as below the “Cam” , to start more setting options.
Page 7

3. Advanced configuration(To remotely change basic functions of the device)
Administrator operation guide
Page 8

1. Install the search tool (which in the disc) on the computer. (Note:
administrator setting can only be made within LAN).
2.Click to display the devices connected to network (as below)
3.Double click the searched IP. Enter in the next page to type in user name (admin)
and click to confirm it. (Note: the original user name is admin, with no password)
4. Enter in setting page after completing the above steps. Download the plug-in and
select a language for first use (click
to download and install).
Page 9

5. Click
again to enter in setting page (as shown below).
6. Click to start setting (as shown
Page 10

below)
7. System management setting: to select the item to be set (as shown below).
Page 11
Computer remote surveillance of the bulb camra:
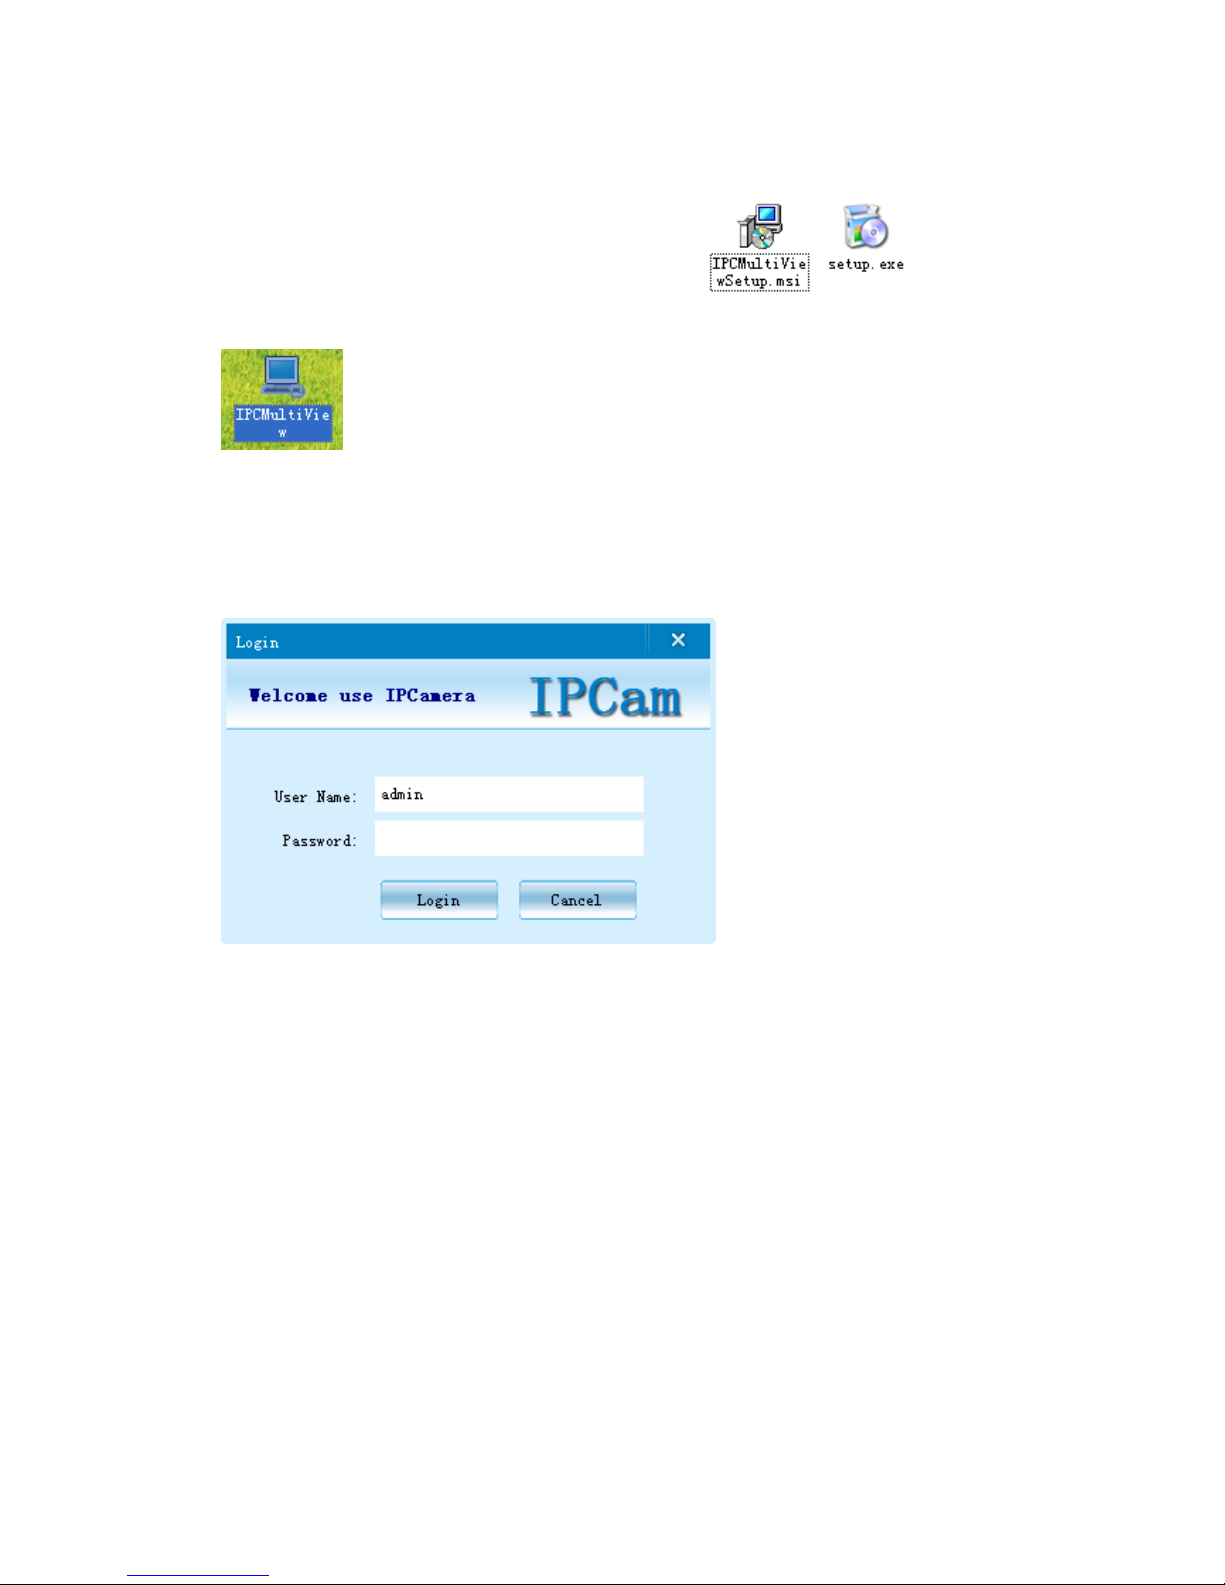
1.You should install the computer client software first
2.After finish install, you can find below in your computer
3.Doulb clikc on above , and then you will see below
4.User name(Account):admin
You do not need to input password, just left empty.
5.Then ,as above the picture, click “1”(with red circle), then click”2”, then click to
start search. Then you will find an IP as below picture, and input the UID number and
Page 12

user name. click “OK”
Then you will see the live video 。
Change the password:
Page 13

Main function description
1. Time setting
Open system management page——click time setting——select time
zone——synchronize with host ——save.
2. Administrator password setting
Open “change password” ——type in the new password——confirm the new
password——save.
3.Change the password of device (original password: 8888)
Open “network setting” ——P2P setting——type in the new
password——save——return to system management to reboot the device. (it can also
be set remotely by APP).
4.Alarm setting
Open “alarm setting” ——start alarm setting——click IP Camera built-in——select
the required sensitivity. (Option 6 is suggested)
5. SD card setting
SD card should be formatted for the first time to insert——enter in SD card setting to
select the needed function before setting other functions.
6. View the content of SD card
method 1:Plug out the card and read with a card reader.
method 2:IE client——setting——SD card recording——SD files——select the
file to download .
.
Page 14
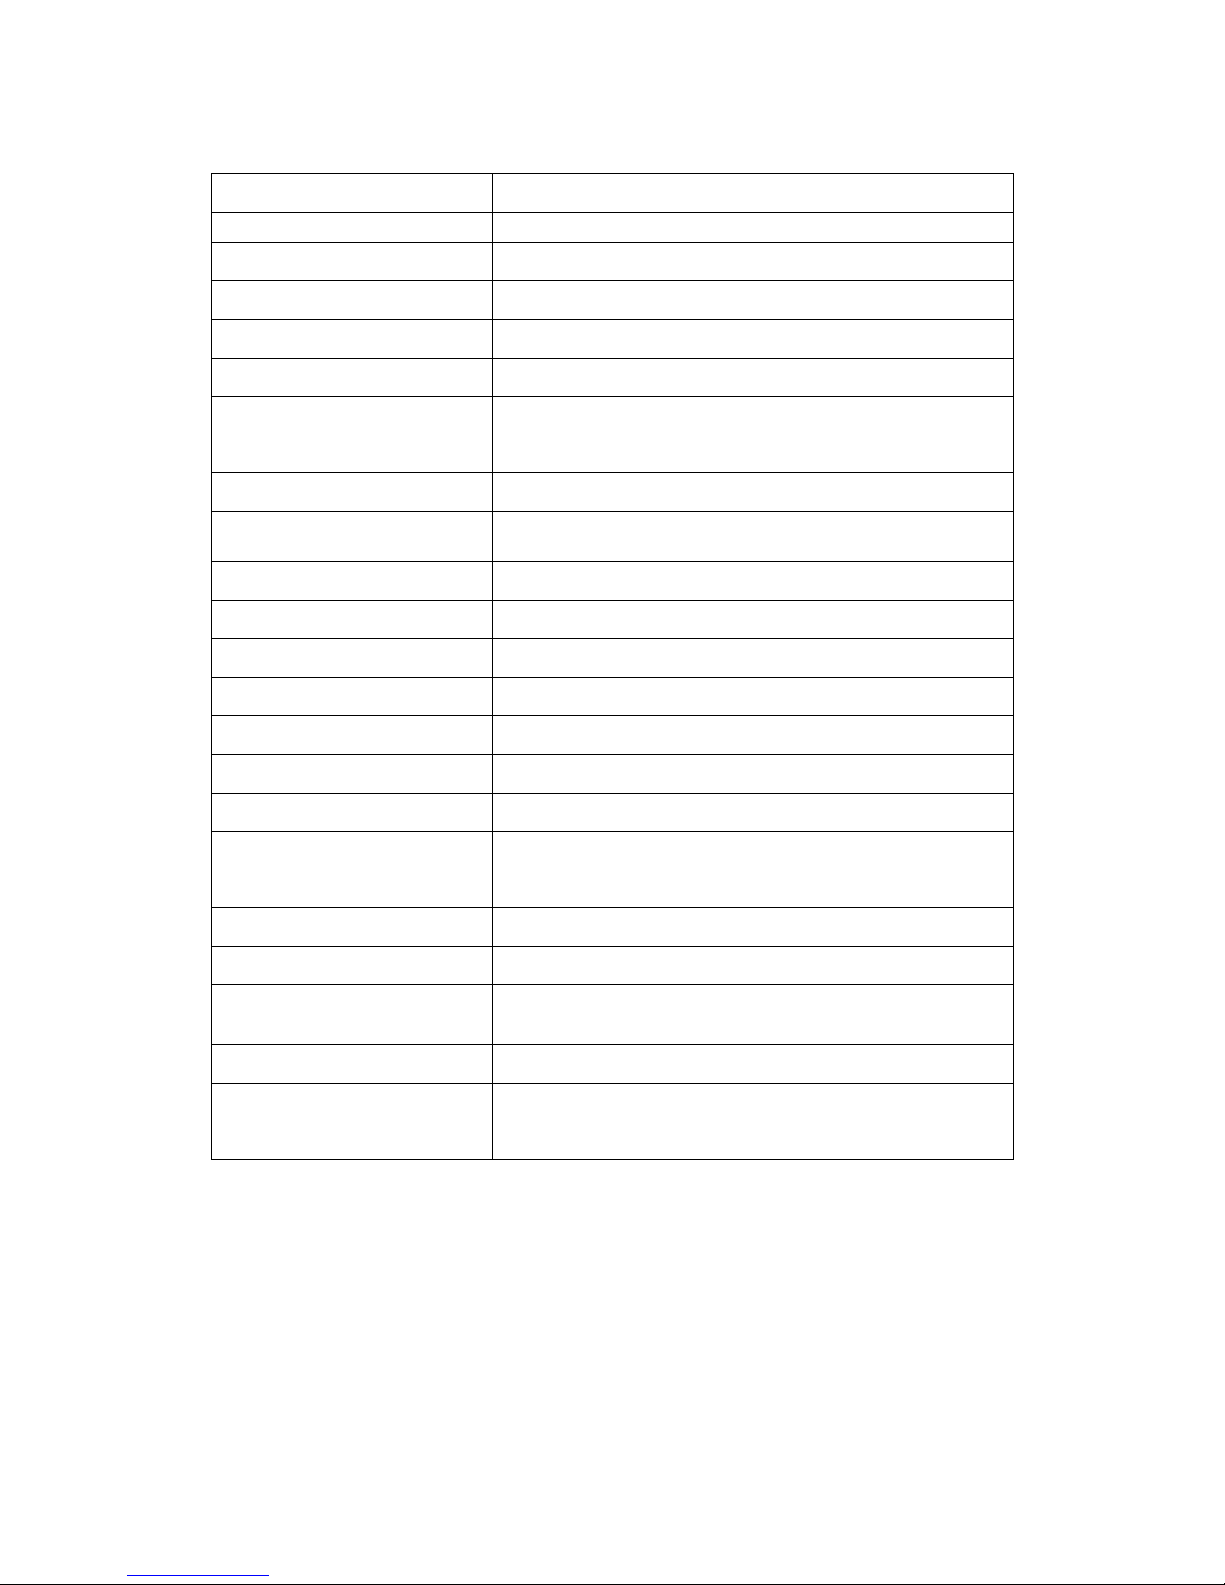
Specifications
Pixl
5 megapixel CMOS
Resolution
720P
Video format
ASF
Frames
25
View angle
120°
Night vision lamp
24 super strong night vision lamps
Distance of motion
detection shooting
6 m straight-line distance
Minimum illumination
1LUX
Continuous recording time
7*24 hour uninterruptible working
Compressed format
H.264
Sound recording range
15㎡
Power consumption
350MA/3.7V
Storage temperature
-20-80℃
Operating temperature
-10-60℃
Operating humidity
15-85%RH
Type of memory card
Micro SD card
Maximum capacity of
memory card
32GB
Play software
VLCPlayer/SMPlayer
Computer operation system
Windows/Mac OS X
Mobile phone operation
system
Android/iOS
Web browser
IE7 and above,chrome,firefox safari.etc
support limited pieces client
software onlie at same time
Can support 4 client software online the same
time
Trouble shooting
1. Remote control is not enough.
Please select the most suitable definition according to the current network
environment.
2.SD card cannot save files.
SD must be formatted for first use.
Page 15

3.The device cannot be connected to network.
Please select the proper connection method according to the network nature.
4.The video in SD card cannot be played fluently on APP.
It is due to different decoding capacity of mobile phones. You can adjust the
definition of recording device to fit your mobile phone.
5.The passwords are forgotten.
Directly click the reset key of device for 10 seconds to restore factory settings.
Page 16

Precautions
Use occasions: please strictly comply with relevant state decrees and do not use it any
other illegal purposes at your own risks.
Software upgrade: to achieve better product performance, the manufacturer will make
continuous improvement to the software. This product is designed for convenient
software upgrade by customers. Please ask your local distributor for the information
and upgrading method of latest version of software.
Working temperature: please use it under natural temperature. Do not operate it under
a temperature that is not adapted for human body.
Working humidity: please use it under an environmental humidity that is suitable for
human life. Do not put the product in a moist working environment since the product
is not designed with waterproof function.
 Loading...