

Page 1
Clear
Tubing
Pump
Barbed
Fitting
C
u
t
s
i
n
A
n
y
D
i
r
e
c
t
i
o
n
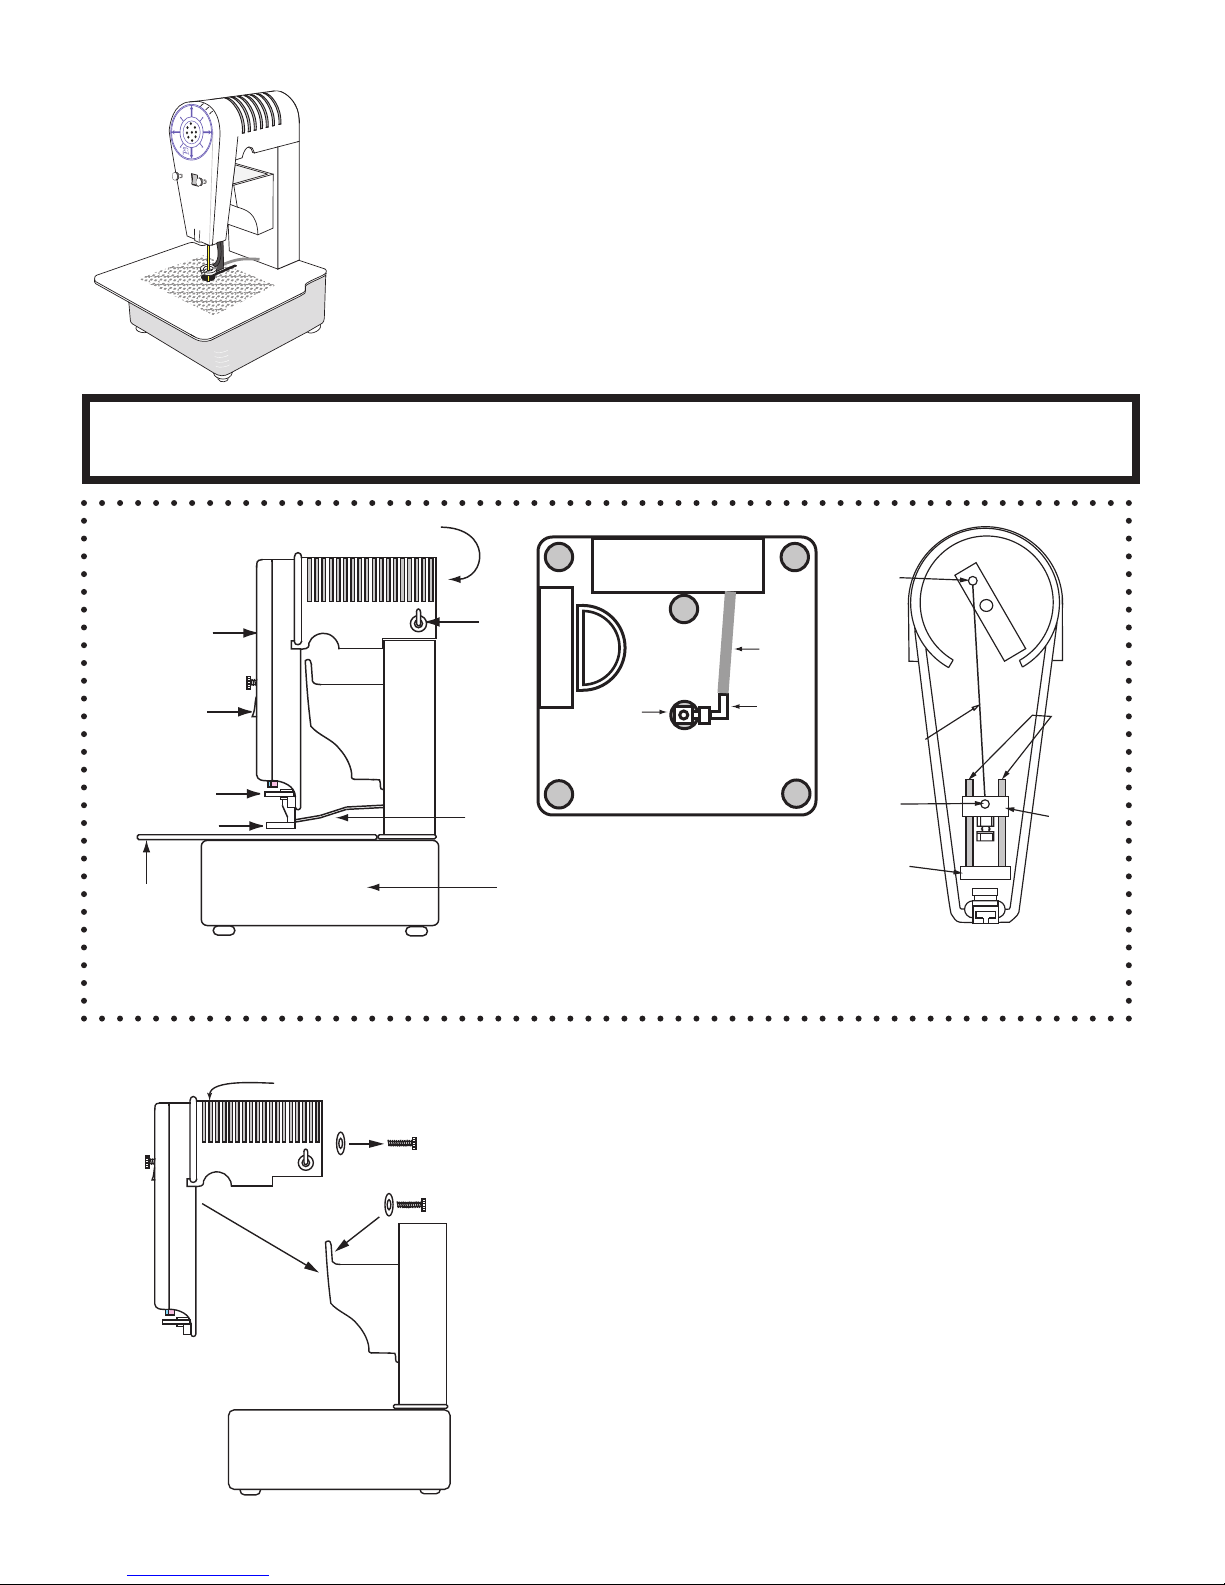
Instructions
Front
Cover
Motor Housing
Motor
Switch
Light
Switch
Upper
Blade Guide
Base
Platform
Finger Guard
Tubing
Vertical
Shafts
Blade
Chuck
Connecting
Rod
Aluminum
Block
Lower
Wrist
Pin
Upper
Wrist
Pin
Motor Assembly
Gryphon Diamond Wire Saw model Omni-2 Plus+
• Always wear eye protection •
• Do not run blade dry- use plenty of water •
• Keep ngers clear of moving parts •
• Do not operate with nger guard removed •
• Do not operate with front cover removed •
• Unplug saw when changing blades or guides •
Important - Fill Base completely with water before use
Right side of assembled saw
Gryphon Wire Saw Parts Identication
Base of saw viewed from above
Upper Housing with Cover removed
Assembly Step 1
Place motor assembly on top of base. Slip a plastic washer onto each of the two
plastic thumbscrews found in your parts bag. Insert thumbscrews into blue
vibration grommets at the upper outside corners of the housing. Tighten screws
into motor assembly snug tight only (do not overtighten in order to minimize
vibration).
Page 2
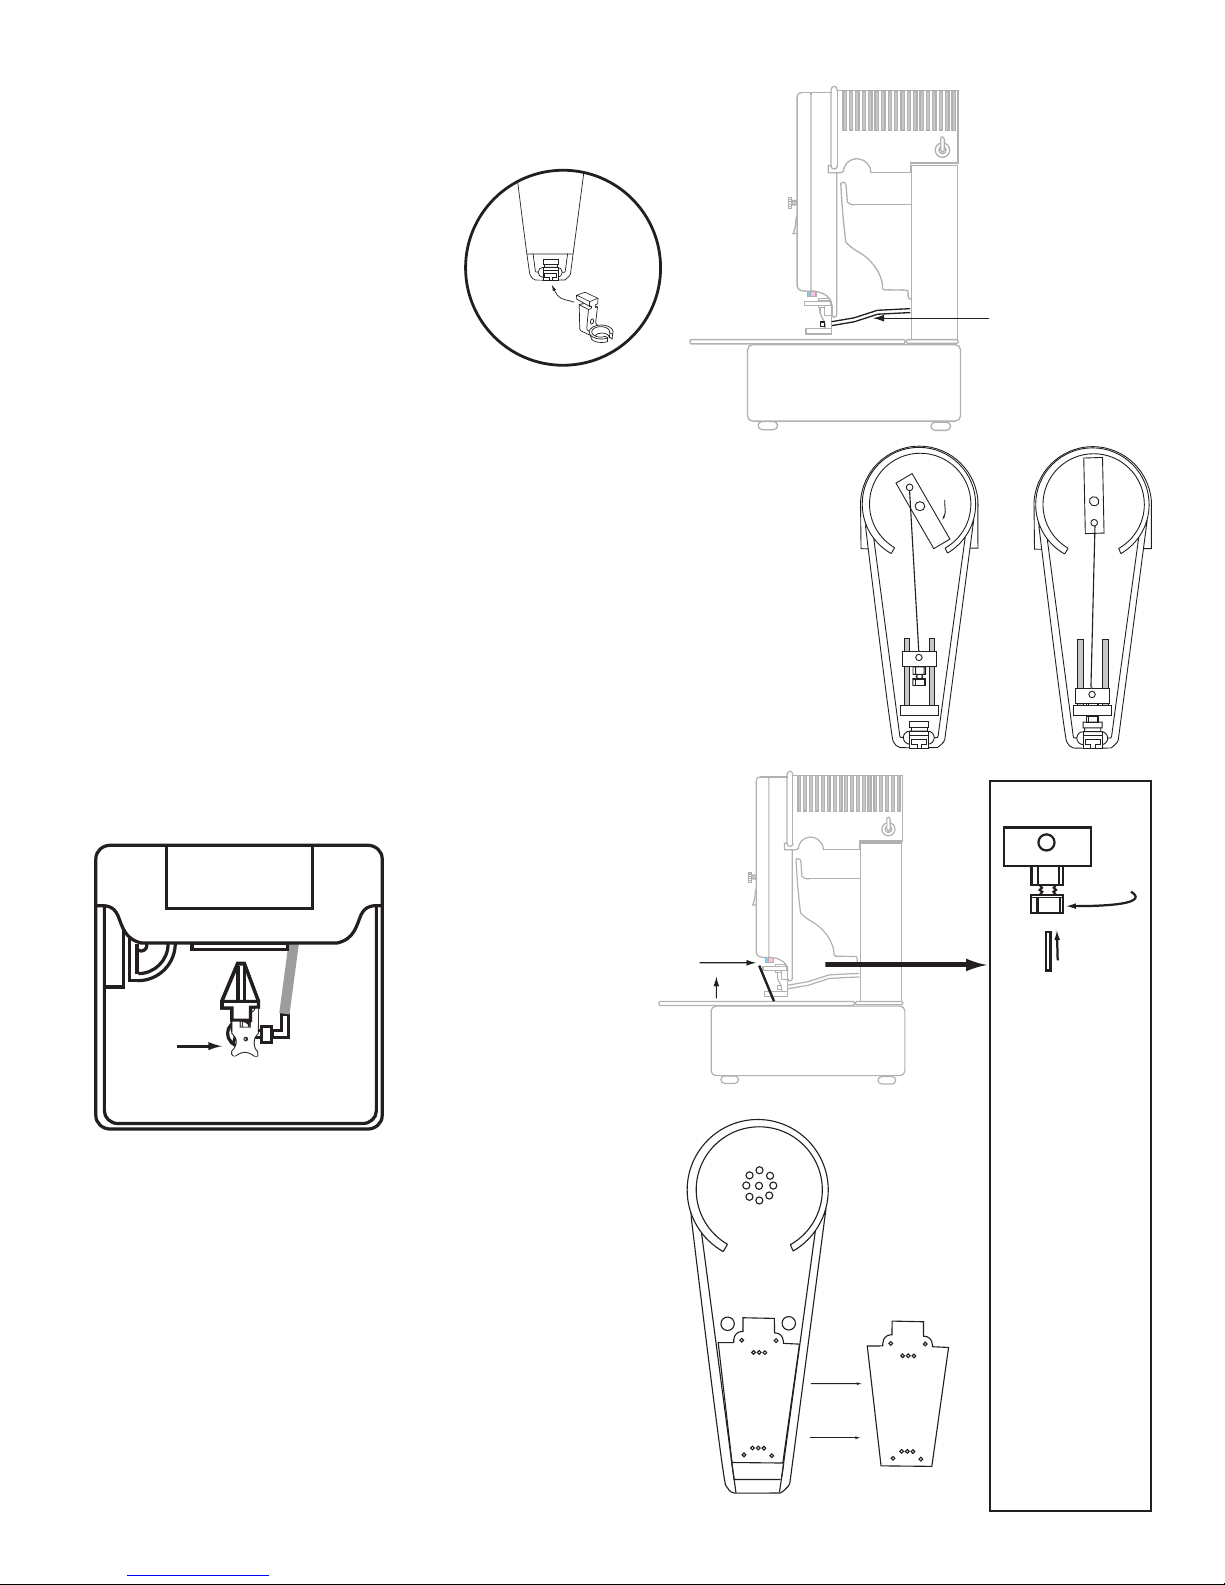
Insert
Finger
Guard
in Slot
Motor
Assembly
Rotor
Assembly Step 2- Installing the Finger
Lower
Blade
Guide
Blade Chuck
7/16" Nut
Insert
Blade
D
Front View
Battery
Holder
Lid
Tubing
Snap blade in
this direction,
then push up
to chuck
Guard and Tubing
Take the nger guard from your parts bag and push it into
the “T” shaped slot at the bottom of the motor assembly.
Push the upper end of the tubing through the hole in the
Finger Guard. The end of the tubing will touch the blade
once you have installed the blade. To facilitate installing the
tubing, you may want to apply a little lubricant (Vaseline,
etc.) to the end of the tubing.
Assembly Step 3 - Installing your rst blade
Note that you saw includes both Standard and Fine blades. We recommend that you start by using
the Standard blade, as it is a good all-around choice. The Fine blade is useful for especially delicate
glass, such as dichroic.
Remove the two nylon screws from the Front Cover and lift off the Front Cover.
The Rotor may stop in any position (A). Turn the Rotor by hand until the Blade Chuck is in its
lowest position (B). (Note: for safety, always unplug the saw when changing blades, guides and
other parts).
A B
Insert the bottom guide by snapping it into the holder (the bottom guide is
the one without the slot in the front). Drop the unpainted end of a new blade
through the bottom guide hole and into the top of the pump (C).
Snap the top painted end of the
blade into the slot in the top
guide. Push the blade up into
the blade chuck until it stops (D).
Tighten the 7/16” nut snugly with
the provided wrench. To remove
a worn blade reverse this process.
Assembly Step 4 - Installing batteries
Turn the Front Cover face down. Remove the four screws that secure the Battery Holder
Lid. Lift off the Battery Holder Lid.
Install two AA ashlight batteries (not included) into the battery holder. Be careful to
follow the polarity shown on the battery holder. Turn the switch on. If the lamp does
not light, one or both of your batteries may be installed backwards.
Re-install the Battery Holder Lid. Start screws by twisting counter-clockwise until you feel
the threads drop into place. Then twist the screws clockwise until they are snug tight.
Over tightening will strip the treads. Never operate the saw with the Battery Holder Lid
removed, as the batteries may fall into the mechanism.
Re-install the Front Cover and tighten the two plastic screws which you removed earlier.
Note: the very rst
time a blade is
inserted into the
chuck, it may be
difcult to push in
the blade fully. Start
by removing the nut
entirely and inserting
and removing the
blade several times
to loosen the grip of
the Chuck. You want
to insert the Blade
into the Chuck to the
point where 75% of
the red paint on the
blade is inside the
Chuck. When you
install the nut, do
not overtighten. You
should not tighten
the nut to the point
that the threads on
the Chuck extend past
the nut.
Page 3

Preparing to Saw
Vertical
Shafts
Blade
Chuck
G
r
y
p
h
o
n
O
m
n
i
-
2
D
i
a
m
o
n
d
W
i
r
e
S
a
w
C
u
t
s
i
n
A
n
y
D
i
r
e
c
t
i
o
n
Lower
Blade
Guide
Important: Fill the base with
water to a level that covers
the lower guide . The water
provides cooling for the blade
and extends guide life.
Wear eye protection. Turn the switch on and observe
that the pump is supplying water to the blade. If no
water is observed, turn off the saw, disconnect the
tubing at the pump and blow the water out of the tube
from the bottom end. Reconnect the tubing, turn the
saw on and water ow should be restored. Once the
blade has good water ow, you may begin sawing. You
Water ow is automatic when the saw is running.
Occasionally, air bubbles in the line may prevent
proper ow, requiring that the line be blown free
of bubbles as described at left. You can also use
any small suction device to draw water through the
tube and remove the air bubbles.
may push the glass in any direction.
It is a good idea to empty and clean the base every now
and then to remove the glass sludge.
Fill the water tray with water to level indicated
Start up Maintenance
It is necessary to keep the two steel vertical shafts lubricated with light oil. If your shafts do not feel oily to the touch, wipe
light motor oil (such as sewing machine oil or clock oil) on them with your ngers. DO NOT use 3-in-1 oil. DO NOT use
vegetable oil. DO NOT use spray lubricants.
These shafts are ground to micro nish in order to make your blade chuck last a long time. If you allow your shafts to rust
or become dry you will drastically reduce the blade chuck life.
Sawing
Put on eye protection. Turn on the saw to start the water ow to the blade. The water feed tubing should touch the blade.
Saw in any direction.
As you near the end of your cut, ease off on the pressure you apply to the glass to minimize risk of glass breakage.
Page 4

Stretching your $$$$
Vertical
Shafts
Blade
Chuck
Connecting
Rod
Aluminum
Block
Lower
Wrist
Pin
Upper
Wrist
Pin
UP
Upper Blade Guide
Most cuts will be done by pushing away from you and from side-to-side. This will dull the diamond on the blade front and sides, but leave the back relatively sharp. By
loosening the Blade Chuck’s 7/16” nut and turning the blade 180 degrees, you can extend your useful blade life. Note that the blade should never be installed upsidedown. To do so will drastically shorten your guide and Blade Chuck life.
Just like a band saw, or any other diamond tool, these blades will become dull from use and you will have to push harder to make cuts. Pushing extremely hard can
break your blade. Finally the blade will need to be replaced. The beauty of the Gryphon Wire Saw is that the blades are inexpensive. The Gryphon Omni-2 Plus+
Diamond Wire Saw is far more economical to use that any other glass saw.
Replacement blades - Gryphon Turbo Diamond Wire Blades
The Fine Blade is the nest grit, and offers the smoothest nish. It is recommended for dichroic or other delicate glass, and where the quality of the edge is important.
The Standard Blade is the most commonly used and is the best all-around blade choice. It offers excellent speed and long life.
The Super Power Blade offers the most aggressive cutting.
The Slitting Blade is thinner that the other blades, and is designed to cut front to back only. It is the fastest blade and removes the least material.
Changing parts
Blade Guides: Blade guides pull straight out toward the saw front. They snap in place,
so expect a little resistance when removing and replacing them. Replace the guides when the
blade hole becomes sloppy. Note that the upper and lower blade guides are not
interchangeable. The upper blade guide has a slot in the front.
Chuck: If the blade chuck wears from use the saw will become quite loud when running.
To change:
1. Remove blade.
2. Loosen set screw in upper wrist pin.
3. Slide connecting rod out of upper wrist pin.
4. Pull connecting rod and blade chuck up and out of saw.
5. Loosen set screw in lower wrist pin and pull out connecting rod.
6. Put the wrist pin into a new blade chuck.
7. Push connecting rod into lower wrist pin hole until it stops, then tighten set screw with 5/64” Allen
Wrench.
8. Replace assembly onto the two vertical shafts and thread connecting rod into the upper wrist pin.
9. Turn the rotor to down position as shown in the diagram to the right.
10. Insert the thin (gauge) end of your chuck wrench between the top of the aluminum block and the blade
chuck. The wrench will create a 1/8” gap between the chuck and the aluminum block.
11. Push the blade chuck downward until the thin end of the chuck wrench is wedged snugly between the chuck and the aluminum block.
12. Tighten the set screw on the upper wrist pin and remove the chuck wrench. Oil both vertical shafts to complete the replacement.
Thin (gauge) end of wrench
Pump: Unplug saw, remove old pump by disconnecting hose and pulling old pump straight up. Place new pump into white retaining ring in the
recess in the base. Attach tubing coming from the tower to the barbed tting on the pump.
Unclogging the water line
If you do not observe good water ow at the blade, turn off the saw, disconnect the tubing at the pump and blow the water out of the tube from the bottom end (blow
the water towards the blade). Reconnect the tubing, turn the saw on and water ow should be restored.
For more information and hints, visit www.gryphoncorp.com/OmniFAQ.html
Your new Gryphon Diamond Wire Saw is warranted for ve years from date of purchase. All mechanical parts with the exception of
the normal wear parts (blades, blade guides, chuck and pump) are guaranteed against failure for ve years. If such a failure occurs
for any reason other than abuse or misuse during this period, it will be repaired (or at our option replaced) free of charge FOB our
factory. Retain your sales receipt for proof of purchase. Should repairs ever be required, return the saw to Gryphon Corporation.
© 2008 Gryphon Corporation • 12417 Foothill Blvd. • Sylmar • California • 91342 • (818) 890-7770 • www.gryphoncorp.com
Warranty
 Loading...