

Grupo Azkoyen Xpression Series, Spression Series Installation, Starting-up And Operation Manual
COFFEE MACHINES
«Xpression/Spression»
INSTALLATION, STARTING-UP AND OPERATION MANUAL
Manual referencia: 81019670-1; Editado en MARZO 2005

37
12.5 “EC” Declaration of Conformity.
EC DECLARATION OF CONFORMITY
THE SIGNATORY AZKOYEN INDUSTRIAL S.A.
Avda. San Silvestre S/N
31350 PERALTA (NAVARRA)-ESPAÑA
AS THE MANUFACTURER
DECLARES, UNDER ITS OWN RESPONSIBILITY, THAT THE PRODUCT AUTOMATIC
COFFEE MACHINE Models: Xpression 1C, 2C, 1CV, 2CV, 1CI, 2CI, 1CVI, 2CVI, 1CL, 2CL,
1CVL, 2CVL, 1CIL, 2CIL, 1CVIL, 2CVIL and Spression , I, L, LI, AS CONTAINED IN THIS
DECLARATION, COMPLY TO STANDARDS:
EN 60 335-1(88)+A2(88)+A5(89)+A6(89)+A51(91)+A52(92)+A53(92)+A54(92)+A55(93)
EN 60 335-2-63:93
EN 55014 (1993)
EN 61000-3-2 (1996)
EN 61000-3-3 (1995)
EN 55014-2 (1995)
THIS DECLARATION IS ISSUED IN COMPLIANCE WITH THAT SET OUT IN EC BOARD
DIRECTIVE 93/68, OF 27th JULY 1993, WHICH MODIFIES DIRECTIVES 73/23/EEC
(ELECTRICAL MATERIAL DESTINED FOR USE WITH SPECIFIC VOLTAGE LIMITS) AND 89/
336/EEC (ELECTROMAGNETIC COMPATIBILITY).
YEAR OF “EC” MARK:
04
AZKOYEN Industrial, S.A. reserves the right to introduce in these models, without prior notice,
any technical improvements deriving from its ongoing research.
136
Index
1. Index 1
2. Illustrations chart 3
3. General information. 4
4. General instructions 5
4.1 Failures. 5
4.2 Quality of Coffee. 5
5. Safety mechanisms. 6
6. Installation 7
6.1 Levelling. 7
6.2 Water and Wastewater Installation. 7
6.3 Electrical Installation. 7
7. Starting up. 9
8. Instructions for use 10
8.1 Turning on the Machine. 10
8.2 Hopper Selection Key. 10
8.3 Serving Keys. 10
8.3.1 Espresso Coffee Servings. 11
8.3.2 Servings with Milk. 12
8.3.3 Jar Servings. 12
8.3.4 American Servings. 12
8.3.5 Infusion Servings. 12
8.4 STOP/Continuous Preparation key. 12
8.5 Hot Water Key (optional). 12
8.6 Steam Serving (only in Xp models, optional). 13
9. Programming instructions. 14
9.1 Programming the lenguage 15
9.2 Programmed Factory Details. 15
9.3 Programming of the Grams of Coffee. 16
9.4 Common Programming of the Water/Milk Volumes for the Servings. 16
9.5 Programming per Hopper of the Water/Milk Volumes for the Servings. 17
9.6 Programming the clock. 17
9.7 Programming of On/Off Times for the Machine. 18
9.8 Programming of Hopper Name. 19
9.9 Programming the Name of the Servings. 19
9.10 Programming of Defect Message. 19
9.11 Programming of Access Codes. 20
9.12 Modification of the Access Code in Use. 20
9.13 Cost Accounting or per Hopper. 21
9.13.1 Total Counters. 21
9.13.2 Partial Counters. 21
9.13.3 Reset the Partial Counters. 21
9.14 Sales Accounting or per key. 22
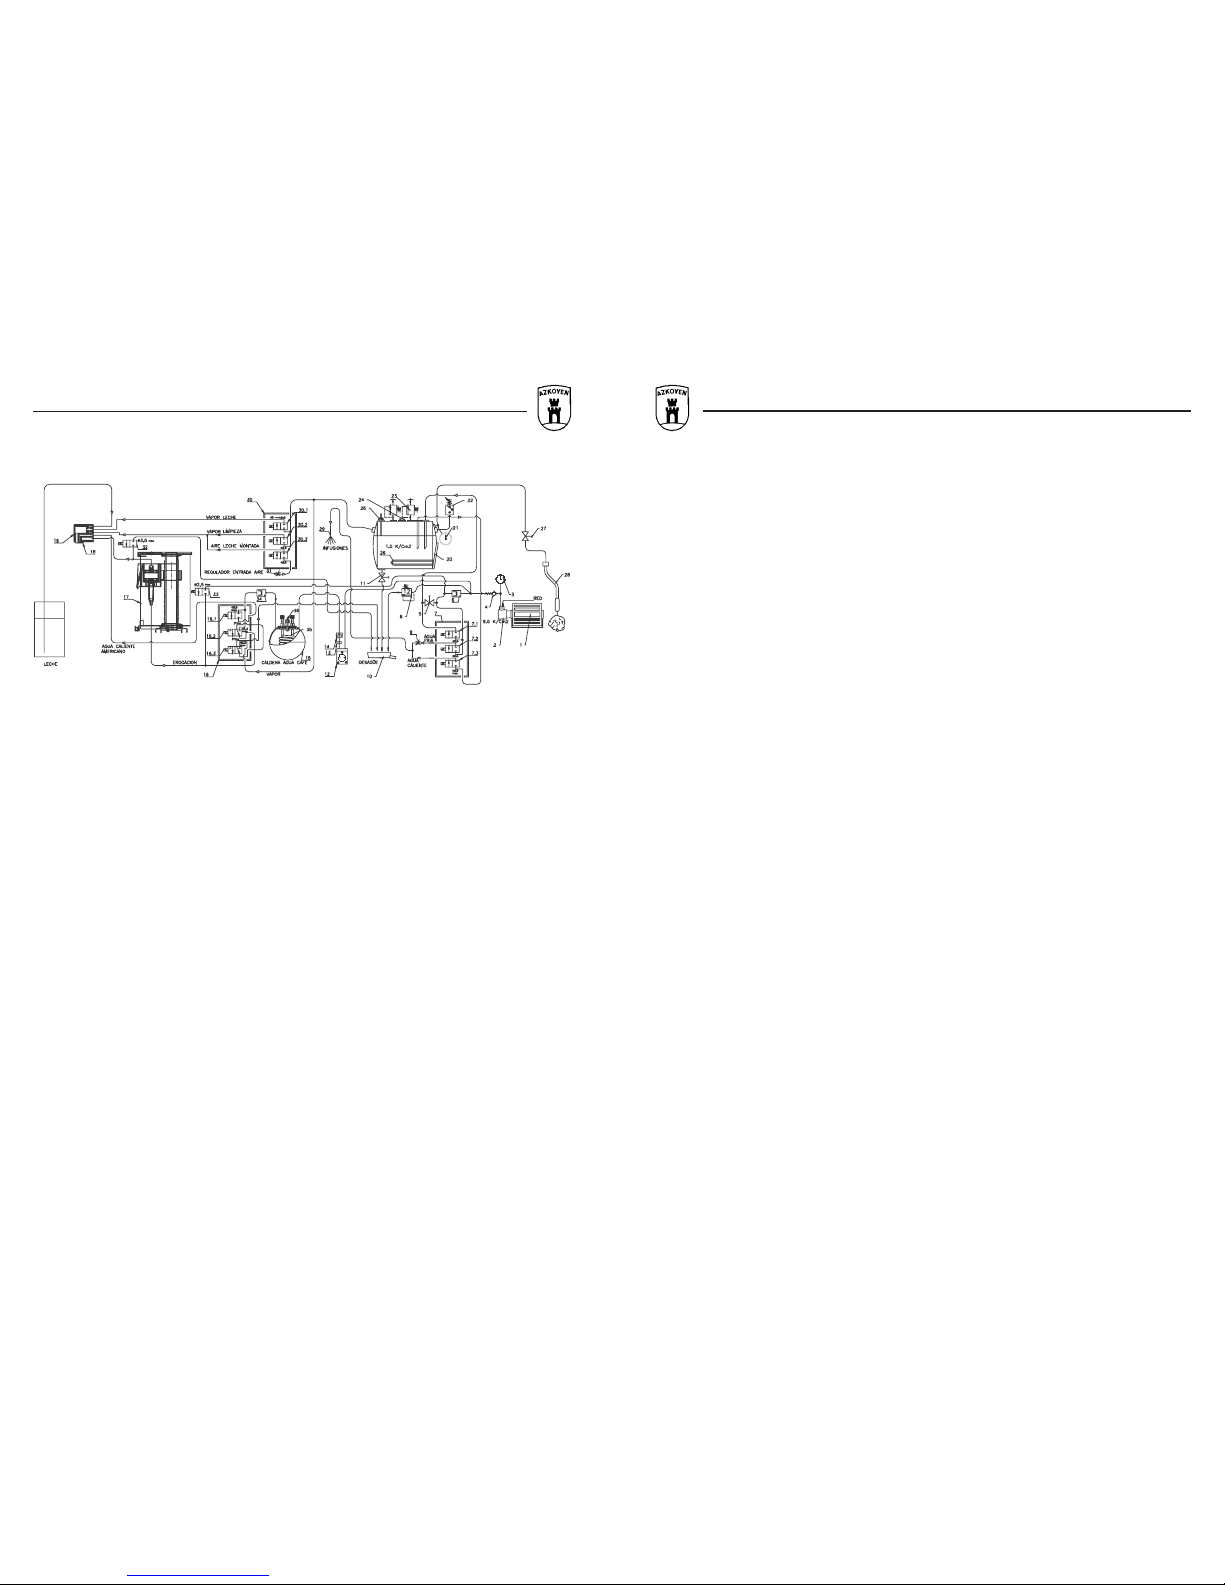
12.4 Hydraulic Outline.
Fig. 19. Hydraulic outline
1. Engine 18. Coffee Dispenser
2. Pump 19. Milk Dispenser
3. Grid Gauge 20. Steam Generator
4. Device Preventing Reverse Rotation 21. Steam Gauge
5. Fill Steam Generator Cock 22. Presostat
6. Steam Generator Filling Filter 23. Boiler Safety Valve
7. Block Steam Generator Fill 24. Anti-depression Valve
7.1. Ev Steam Generator Filling 25. Boiler Level Gauges
7.2. Ev Cold Water Infusions 26. Steam Generator Resistor
7.3. Ev Infusions 27. Steam Cock
8. Boiler Safety Valve 28. Steam Arm
9. Infusions Cold Water Regulator 29. Infusions Dispenser
10. Waste Water Tray 30. Block Ev Milk
11. Empty Steam Generator Cock 30.1. Ev Steam Milk
12. Volume Counter 30.2. Ev Steam Cleaning
13. Gigleur Mesh Filter 30.3. Ev Air Whipped Milk
14. Pre-preparation Gigleur 31. Whipped Milk Air Regulator
15. Coffee Water Boiler 32. Ev Drying Tab And Non-drip
16. Block Ev Preparation 33. Ev Self-cleaning
16.1. Ev American Water 34. Dispenser Filter
16.2. Ev 3/2 Filtering 35. Coffee Boiler Resistor
16.3. Ev 3/2 Head Warmer 36. Temperature Gauge
17. Coffee Head
2
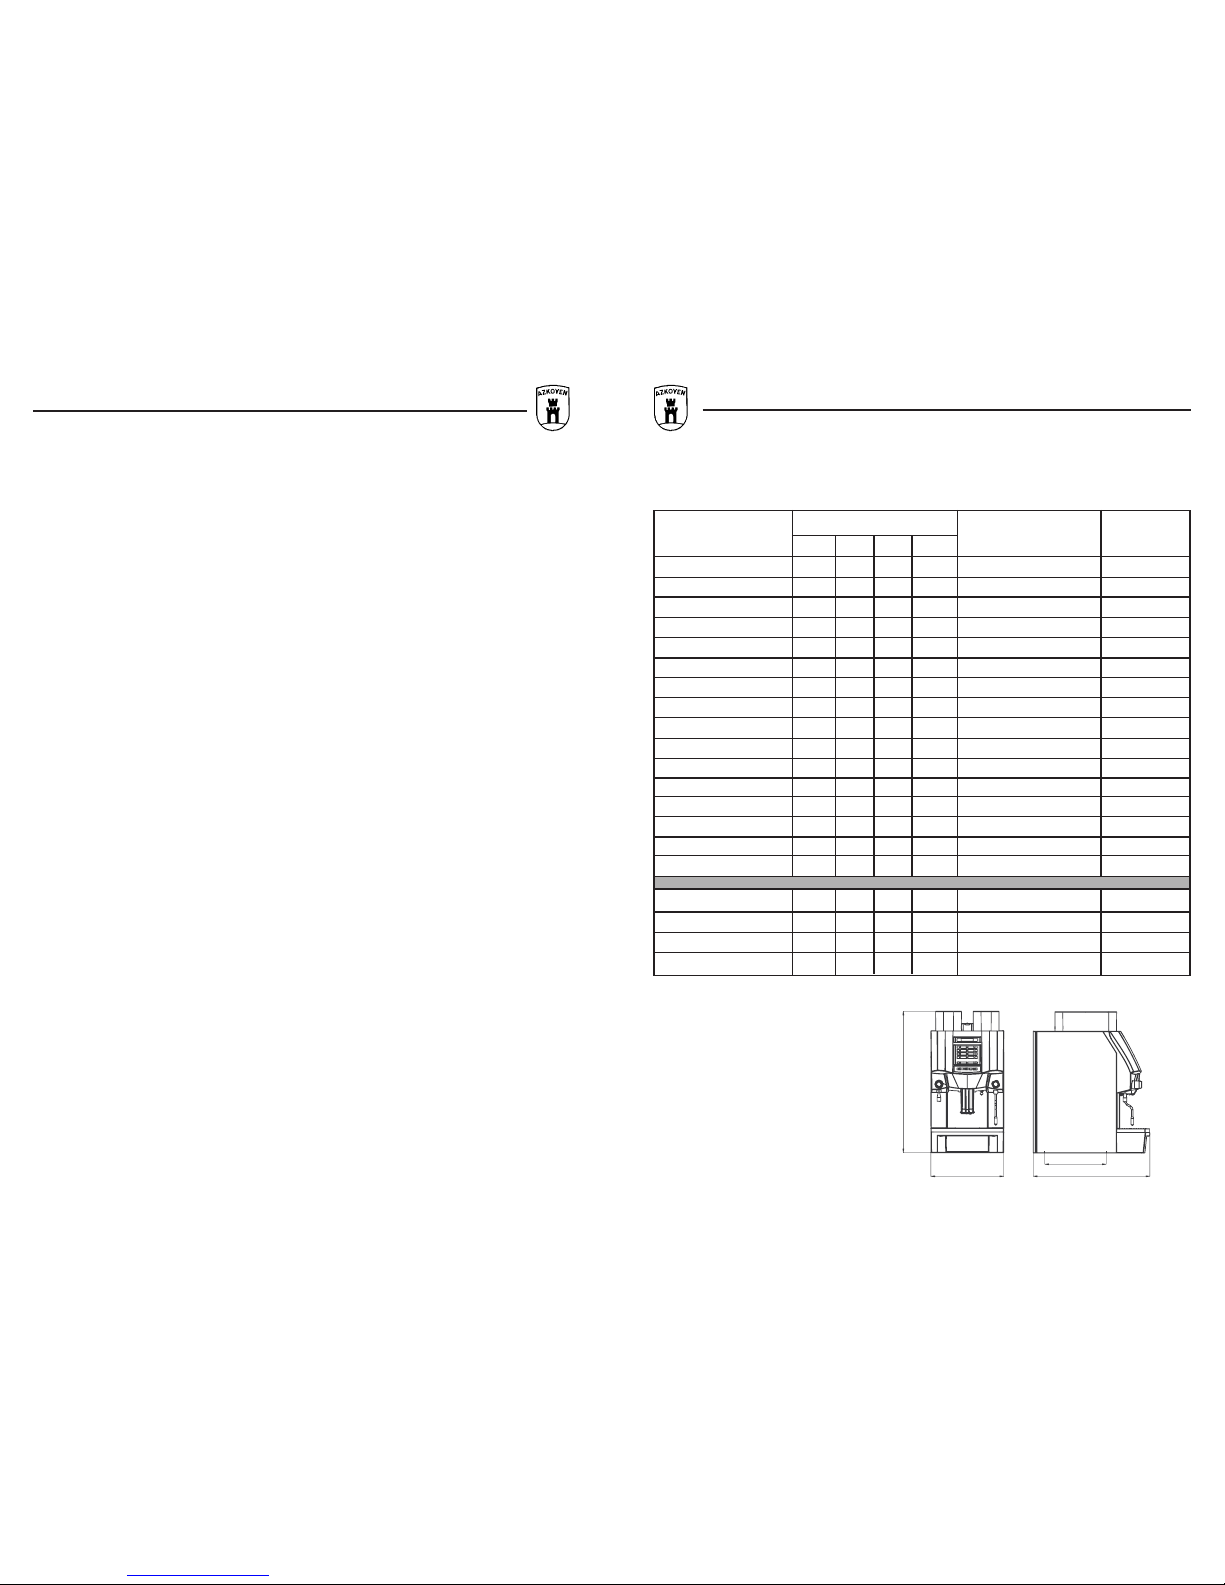
12.3 Characteristics Chart.
1C = 1 Grinder V = Steam L = Milk
2C = 2 Grinders I = Hot water (infusion)
Machine Model Power (W) Coffee Capacity (g) Weight (kg)
Eur USA AU JP
Xpression 1C 1600 1500 1735 1235 1200 70
Xpression 2C 1600 1500 1735 1235 2400 75
Xpression 1CV 4000 3700 4350 3050 1200 75
Xpression 2CV 4000 3700 4350 3050 2400 80
Xpression 1CI 4000 3700 4350 3050 1200 75
Xpression 2CI 4000 3700 4350 3050 2400 80
Xpression 1CVI 4000 3700 4350 3050 1200 75
Xpression 2CVI 4000 3700 4350 3050 2400 80
Xpression 1CL 4000 3700 4350 3050 1200 75
Xpression 2CL 4000 3700 4350 3050 2400 80
Xpression 1CVL 4000 3700 4350 3050 1200 75
Xpression 2CVL 4000 3700 4350 3050 2400 80
Xpression 1CIL 4000 3700 4350 3050 1200 75
Xpression 2CIL 4000 3700 4350 3050 2400 80
Xpression 1CVIL 4000 3700 4350 3050 1200 75
Xpression 2CVIL 4000 3700 4350 3050 2400 80
Spression 4000 3700 4350 3050 1200 75
Spression I 4000 3700 4350 3050 1200 75
Spression L 4000 3700 4350 3050 1200 75
Spression LI 4000 3700 4350 3050 1200 7 5
Size (mm)
H (Height) 722
L (Width) 3 7 2
A- (Depth) 595
T (between feet) 320
Fig. 18. Size of the coffee machine
35
9.14.1 Total counters. 22
9.14.2 Partial Counters. 22
9.14.3 Reset the Partial Counters. 22
9.18 Reset Accounting. 22
9.16 View Incidents. 23
9.17 Delete Incidents. 23
9.18 Programme Versions. 23
9.19 Configuration of the Serving Keys. 23
9.20 Programming of the Boiler Temperature. 24
9.21 Programming of the Preparation Time for the Coffee. 24
9.22 Ground Coffee Control. 25
9.23 Presence of Dregs Tray. 25
9.24 Programming of Hopper Operation. 25
9.25 Acoustic Signal Control. 2 6
9.26 Programming the Number of Grinders. 26
9.27 Stop Clock and Factory Settings. 26
9.28 Automat Parameters. 26
9.29 Programming the press twice 26
9.30 Programming the milk services 27
9.31 Programming the hot water serving 2 7
9.32 Intensive Test. 28
9.33 Exit. 28
10. Cleaning instructions. 29
10.1 Cleaning the Milk Circuit. 29
10.2 Cleaning the Coffee Head and the Coffee Loading Tube. 29
10.3 Cleaning the Dregs Tray. 30
10.4 Cleaning the Trays. 30
10.5 Cleaning the Milk Device. 30
10.6 Cleaning the Steam Arm. 31
10.7 Cleaning the Water Softener Filter. 31
11. Warning messages. 32
12. Annexes. 33
12.1 General Interior View. 33
12.2 General Exterior View. 34
12.3 Characteristics Chart. 3 5
12.4 Hydraulic Outline. 36
12.5 “EC” Declaration of Conformity. 37
H
L
T
A
3
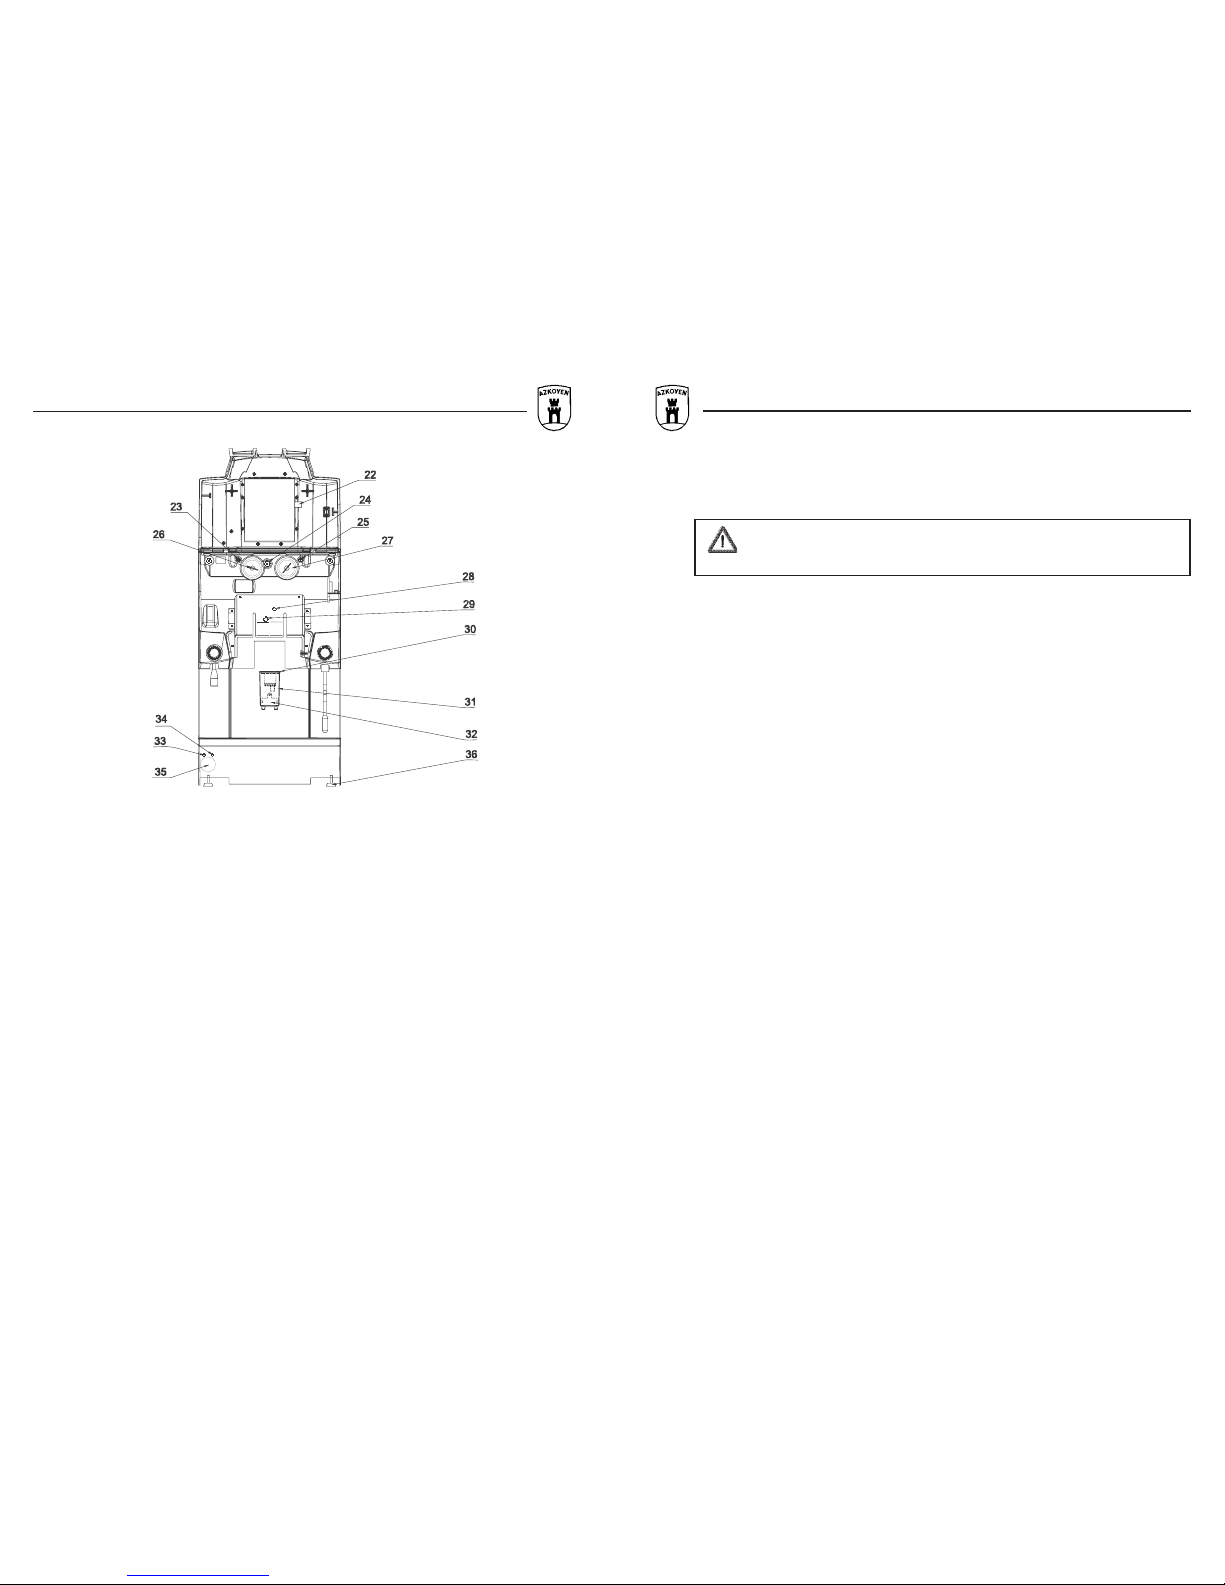
12.2 General Interior View.
Fig. 17. General interior view
22. Serving Label
23. Left Hopper Blocking Screw.
24. Pre-ground Coffee Conduct Blocking Screw
25. Right Hopper Blocking Screw
26. Grinding Regulator Handle, Left Grinder.
27. Grinding Regulator Handle, Right Grinder.
28. Cold Water Infusionsregulator Screw
29. Whipped Milk Air Regulator
30. Milk Device Cover
31. Milk Dispenser (REMOVABLE)
32. Coffee Dispenser (UNALTERABLE)
33. Working Pilot Level Steam Generator
34. Minimum Pilot Level Steam Generator
35. Steam Gauge
36. Adjustable Foot
34
3. GENERAL INFORMATION.
3.1.- The reading of this manual is essential for the correct installation, use and maintenance
of the machine, and in order to obtain the maximum performance of the system. This
should be kept safe for future reference.
THE MANUFACTURER SHALL NOT BE HELD RESPONSIBLE FOR ANY
FAILURES BROUGHT ABOUT THROUGH FAILURE TO OBSERVE THE
RULES INDICATED IN THIS MANUAL
3.2.- The installation and starting up of the machine should always be carried out by our
Technical Service.
3.3.- After checking that the packaging has not been damaged, remove the machine and
inspect it to make sure it is in perfect condition for use and contains all the necessary
elements.
The packaging items must be collected immediately and set apart from the components
(nails, strips, etc) where they cannot cause any damage.
3.4.- The power supply requires a plug or other means to power off the machine. The contact
separation for the said plug or other means shall be at least 3mm in all the poles, and
shall guarantee that the poles remain disconnected.
3.5.- If the flexible power cable for the machine is damaged, replace it with another one,
Reference AZKOYEN: 43215140-0 in Europe and Japan, 43215200-0 in the USA and
similar, 43215780-0 in Australia, its after sales service or similarly qualified staff.
3.6.- The use of any electrical equipment shall require that fundamental safety rules be
observed.
a) Do not touch the mechanisms with wet hands or feet.
b) Do not connect or operate machine whilst barefoot.
c) Do not pull on the power cable in order to unplug the machine.
d) Do not leave the machine exposed to atmospheric agents such as the sun,
rain, etc.
e) Do not allow the machine to be used by children or people not sufficiently
trained.
f) Remove the power supply before carrying out any repair.
g) In order to avoid overheating, make sure the service cables are completely
uncoiled.
h) Contact our Technical Service immediately should you detect any kind of
anomaly.
i) If the length of the power cord supplied is insufficient, another one, of similar
characteristics to the original, shall be connected.
334
12. ANNEXES.
12.1 General Exterior View.
Fig. 16. General exterior view
1. Left Hopper 12. On/Off Key
2. Pre-ground Coffee Conduct 13. Hot Water Key
3. Right Hopper 14. Hot Water Dispenser
4. Display 15. Steam Handle
5. Serving Keys (8 In Xp), (6 In Sp) 16. Steam Arm
6. Hopper Selection Key (Only In Xp) 17. Doorlock
7. Stop Key 18. Dispenser Cover
8. Programming Key 19. Cup Tray
9. More Key (Forward) 20. Water Collector Tray
10. Less Key (Back) 21. Dregs Tray
11. Cleaning Key
4. GENERAL INSTRUCTIONS
4.1 Failures.
In the event of failure, do not try to solve the problem yourself:
CONTACT OUR TECHNICAL SERVICE
4.2 Quality of Coffee.
In order to obtain good quality coffee, it is important to pay attention to the grinding, which will
depend on the type of coffee used, the type of mix used and the sharpness of the blades in the
grinder.
Coffee preparation should take around 15 to 20 seconds for 1 weak coffee.
Coarse grinding will bring about quick preparation and clear coffee, with little cream and poor
consistence.
On the other hand, excessively fine grinding will cause the preparation to be too slow, resulting
in dark coffee with hardly any cream.
 Loading...