

Page 1
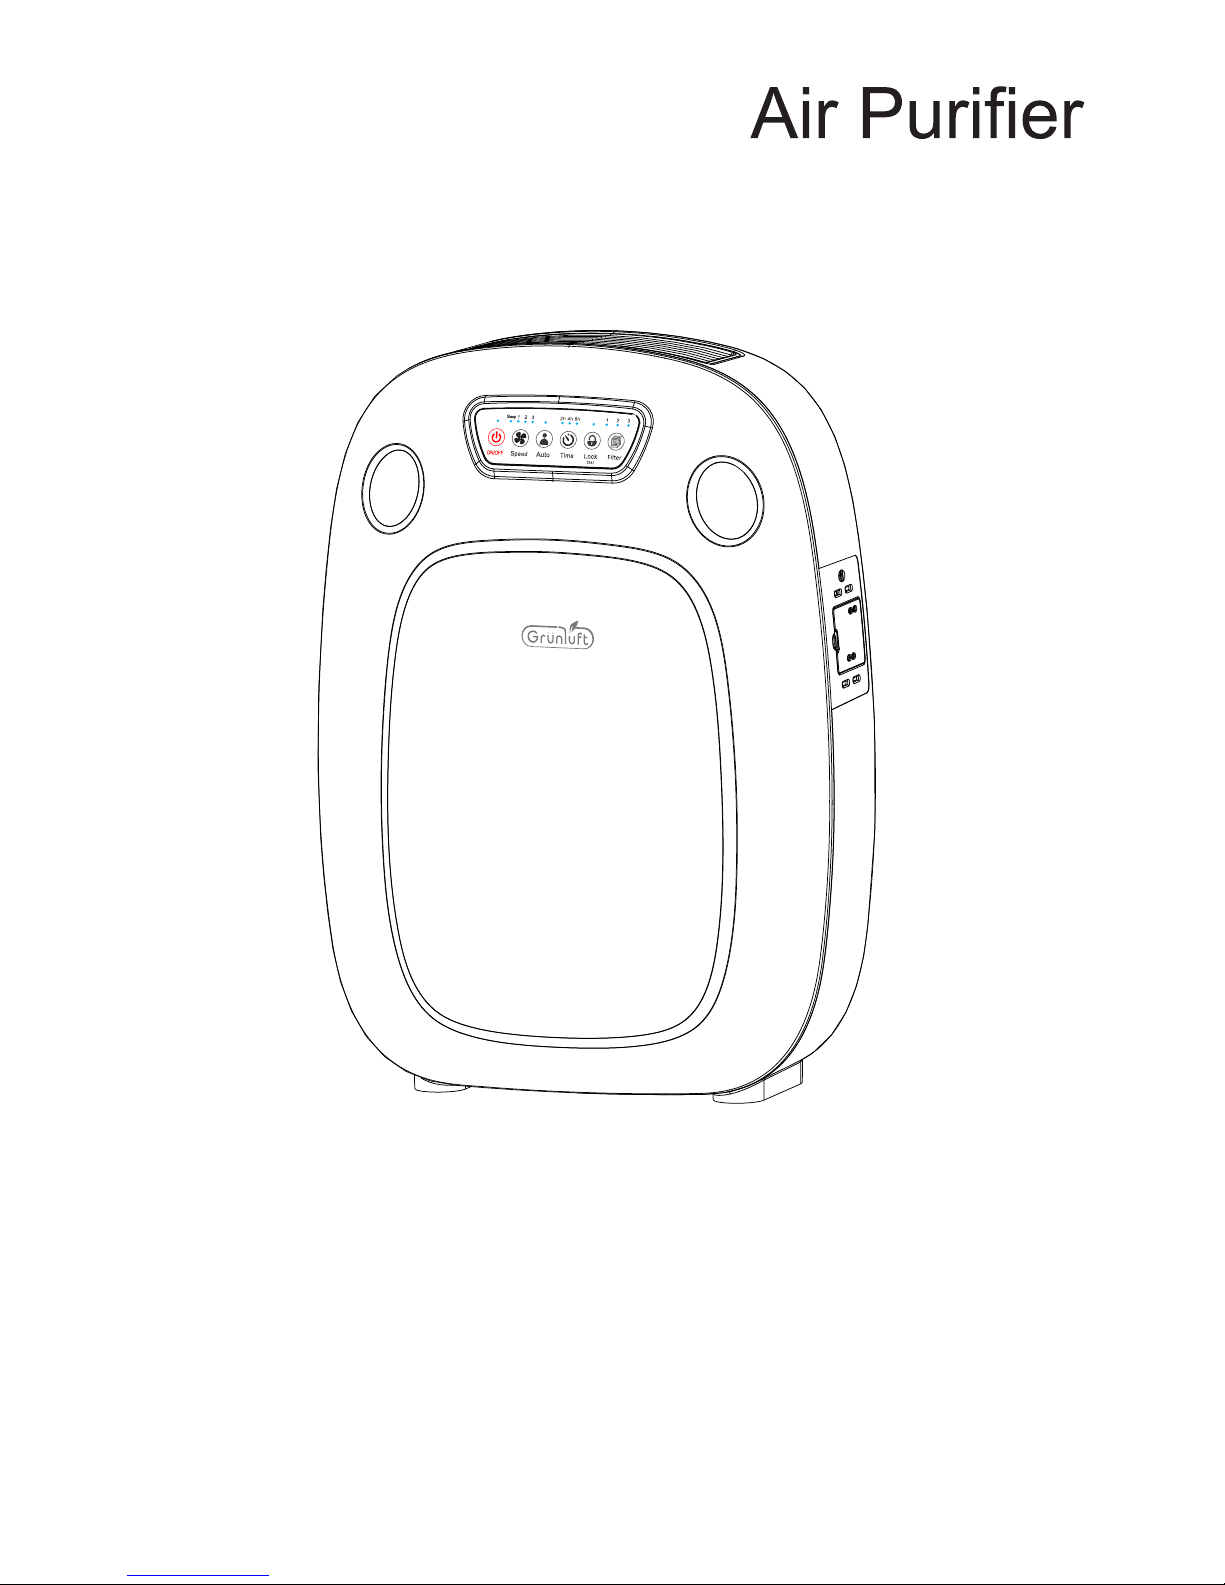
VK-6010
User Manual
Page 2

Contents
1. Important safety information … … … … … …… …… …… … … …01
2. Product Structure… … …… …… …… … … … … … …… …… …… …02
3. Before first use …… …… …… … … … … … …… …… …… … … … …03
4. Using the appliance… … …… …… …… … … … … … …… …… ……05
5. Cleaning … … … … … …… …… …… … … … … … …… …… …… … …07
6. Filter Replacement … … … … … …… …… …… … … … … … …… …10
7. Storage … … …… …… …… … … … … … …… …… …… …… … … … …12
8. Environment … … …… …… …… … … … … … …… …… …… …… … 12
9. Troubleshooting…… …… …… … … … … … …… …… …… ……… …13
Page 3

1. Important safety information
Read this user manual carefully before you use the appliance and save it for future
reference.
● Do not let water o r any o ther liquid or flamm abl e detergent enter th e app liance to avoid elec tric shock
and/or a fire ha zar d.
● Do not clean the a ppl iance with water or an y oth er liquid or a (flamma ble ) detergent to avoid e lec tric
shock and/or a f ire h azard.
● Check if the vol tag e indicated on the bot tom o f the appliance corr esp onds to the local m ain s voltage
before you con nec t the appliance.
● If the mains cor d is da maged, you must have i t rep laced by distribut or, or a service center a uth orized by
distributo r or si milarly qualifie d per sons in order to avoid a h aza rd.
● Do not use the app lia nce if the plug, the mai ns co rd or the appliance it sel f is damaged.
● This applian ce is n ot intended for use by p ers ons (including chi ldr en) with reduced phy sic al, sensory or
mental capab ili ties, or lack of exper ien ce and knowledge, un les s they have been given s upe rvision or
instructio n con cerning use of the app lia nce by a person respon sib le for their safety.
● Children sho uld b e supervised to ensu re th at they do not play with t he ap pliance.
● Do not block the a ir in let and outlet, e.g. b y pla cing items on the air ou tlet or in front of the ai r inl et.
● This applian ce is n ot a substitute for pr ope r ventilation, reg ula r vacuum cleani ng or u se of an extractor
hood or fan whil e coo king.
● If the wall sock et us ed to power the applia nce h as poor connection s, th e plug of the applianc e becomes
hot. Make sure y ou pl ug the appliance int o a pro perly connected wa ll so cket.
● Always place a nd us e the appliance on a dry, stable , lev el and horizontal su rfa ce.
● Leave at least 4 0cm f ree space behind and o n bot h sides of the applian ce an d leave at least 40cm fr ee
space above th e app liance.
● Do not place any thi ng on top of the applian ce an d do not sit on the applia nce .
● Do not place the a ppl iance directly bel ow an a ir conditioner to pr eve nt condensation fr om dr ipping onto
the applianc e.
● Make sure all fi lte rs are properly inst all ed before you switch o n the a ppliance.
● Only use the ori gin al filters special ly in tended for this appl ian ce. Do not use any other f ilters.
● Avoi d knocking against t he appliance (the ai r inl et and outlet in parti cul ar) with hard object s.
● Always lift or m ove t he appliance by the ha ndl e at the back of the appli anc e.
● Do not insert yo ur fi ngers or objects int o the a ir outlet.
● Do not use this ap pli ance when you have use d ind oor smoke-type ins ect r epellents or in plac es wi th oily
residues, bu rni ng incense or chemic al fu mes.
● Do not use the app lia nce near gas applian ces , heating devices or f ire places.
● Always unplu g the a ppliance after use a nd be fore you clean it.
● Do not use the app lia nce in a room with major t emp erature changes, a s thi s may cause conde nsa tion
inside the app lia nce.
● The applianc e is on ly intended for hous eho ld use under normal op era ting conditions.
● Do not use the app lia nce in wet surroundi ngs o r in surroundings wi th hi gh ambient tempera tur es, such
as the bathroo m, to ilet or kitchen.
● The applianc e doe s not remove carbon mo nox ide (CO) or radon (Rn) . It ca nnot be used as a saf ety
device in case o f acc idents with combus tio n processes and haza rdo us chemicals.
● To prevent is inte rfe rence , should be kept a t lea st 2 meters distance b etween the product a nd th e use
of radio waves e lec trical.
01
Danger
Warning
Caution
Page 4
2. Product Structure
02
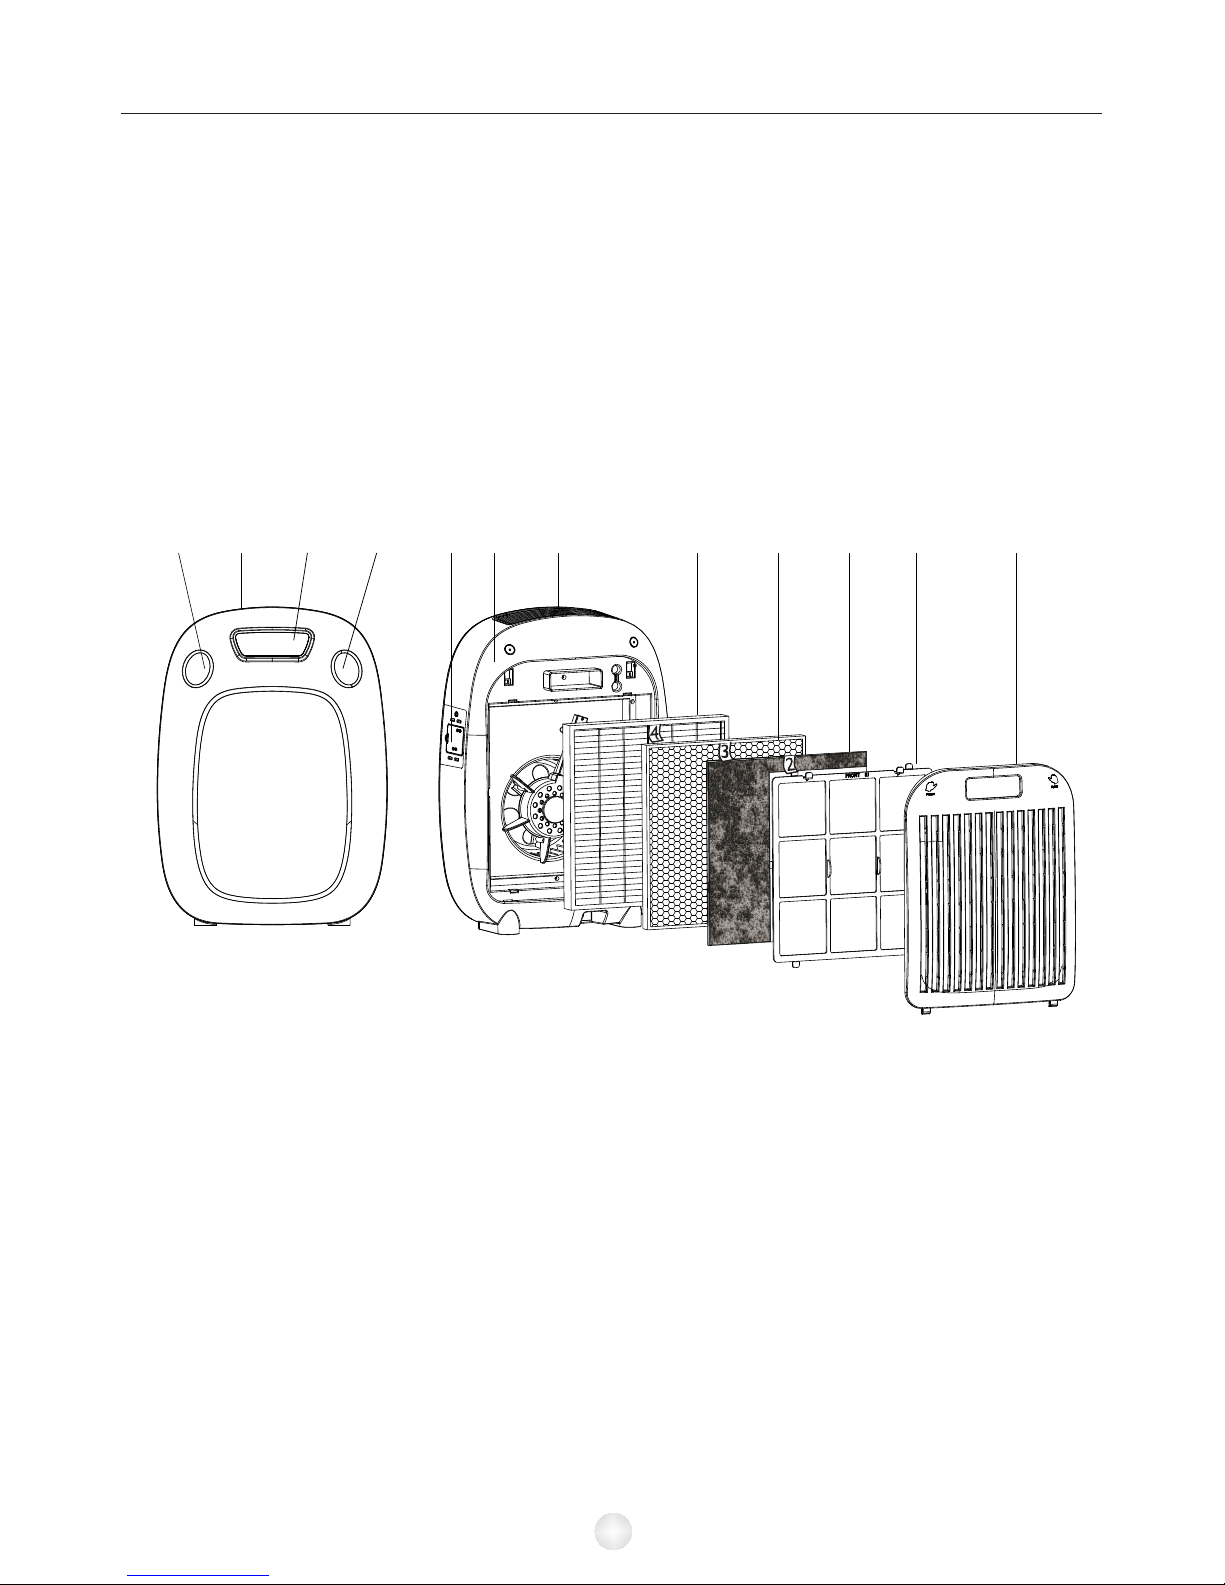
Welcome using our company air purifier,before using,please read this manual
carefully to operatate the product correctly.
1. AQ indicator
2.
3.
4.AQ indicator
5.
6.
Front cover
Control panel
Dust sensor
Back housing
7.
8.
9.
10.
11.
12.
Air outlet
Filter 4: HEPA filter
Filter 3:Activated carbon filter
Filter 2:Charcoal filter
Filter 1:Pre-filter
Back cover
31 42
65 7 8 9 10 11 12
Page 5
3. Before first use
03
Placing the filters
The appliance comes with all filters fitted inside, but you have to remove the
packaging of the filters before you can use the appliance. Remove all filters,
unpack them and place them back into the appliance as described below.
Tip: Place the appliance against a wall for more stability when you remove or
insert filters.
Note: Make sure you insert the filters in the correct position.
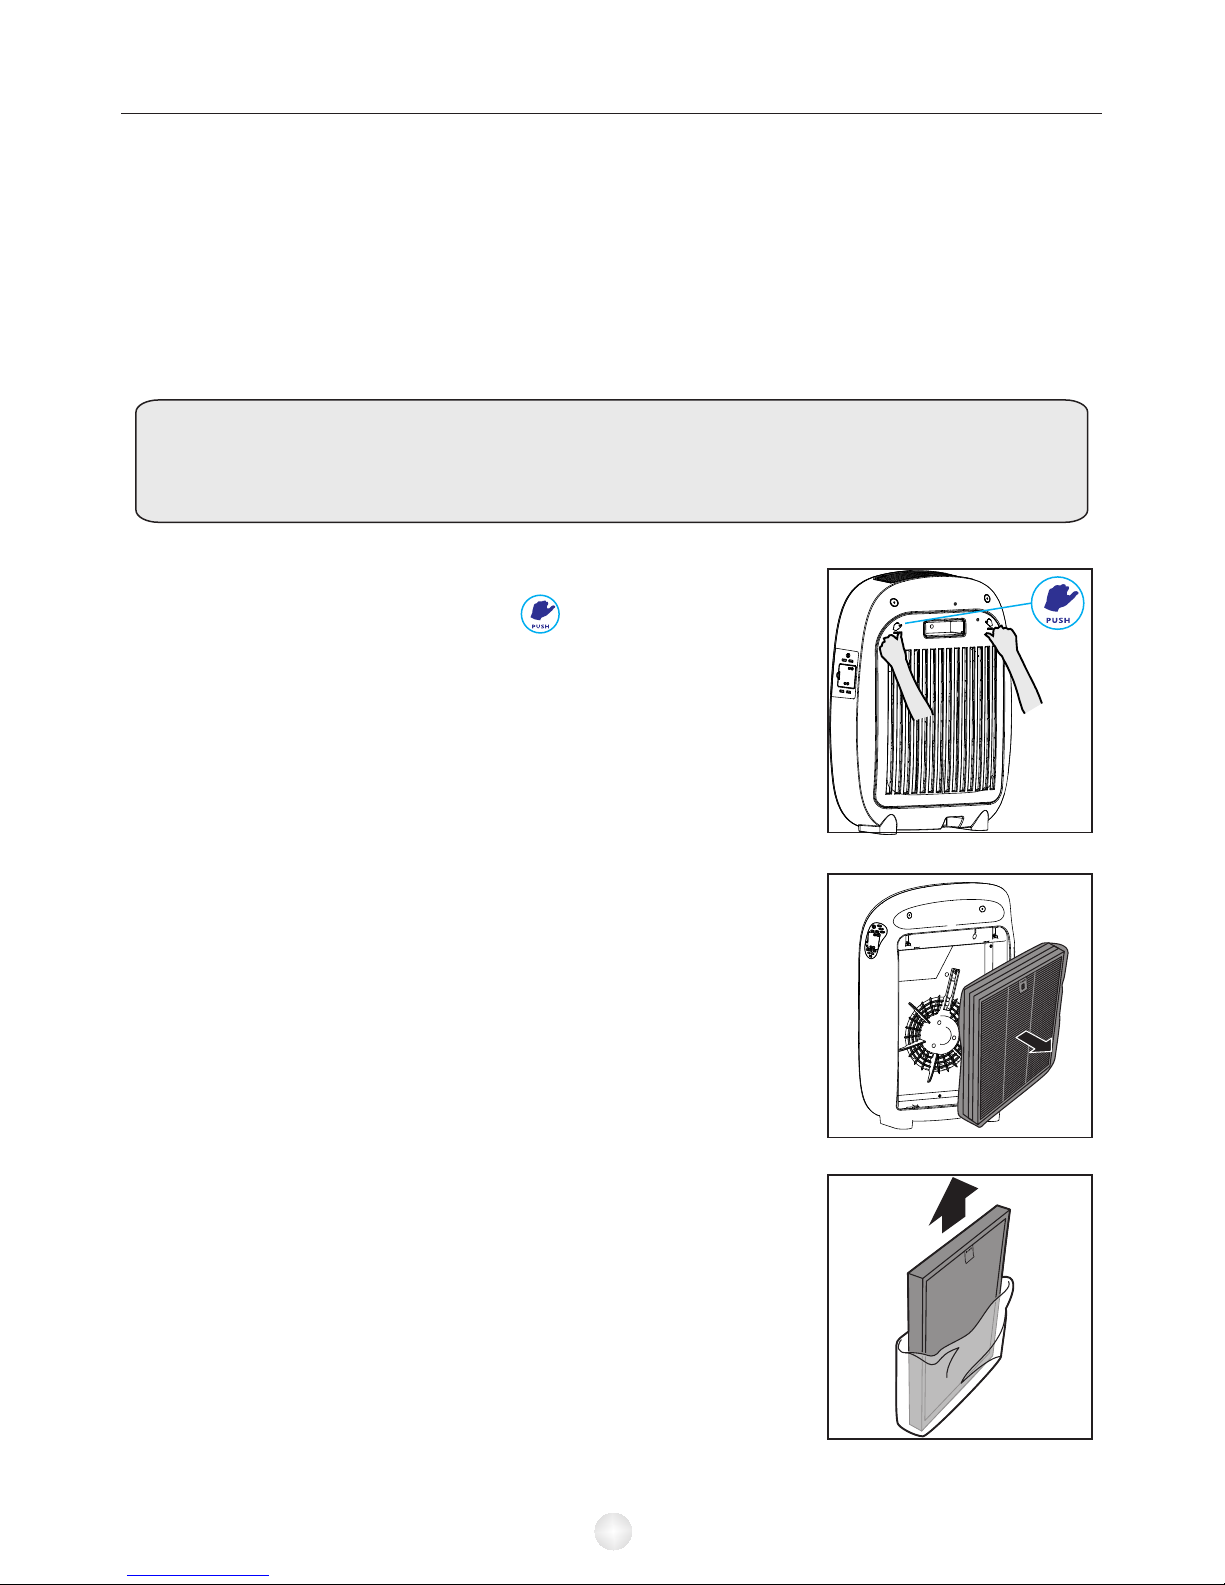
1. Place your fingers on the sign of back
cover at both sides, press down and open the
back cover. Then lift the hooks at the bottom
of the cover out of the bottom of the appliance.
Then lift the hooks at the bottom of the cover
out of the bottom of the appliance.
2. Remove all the filters from the appliance.
3. Remove all packaging material from the filters.
Page 6
04
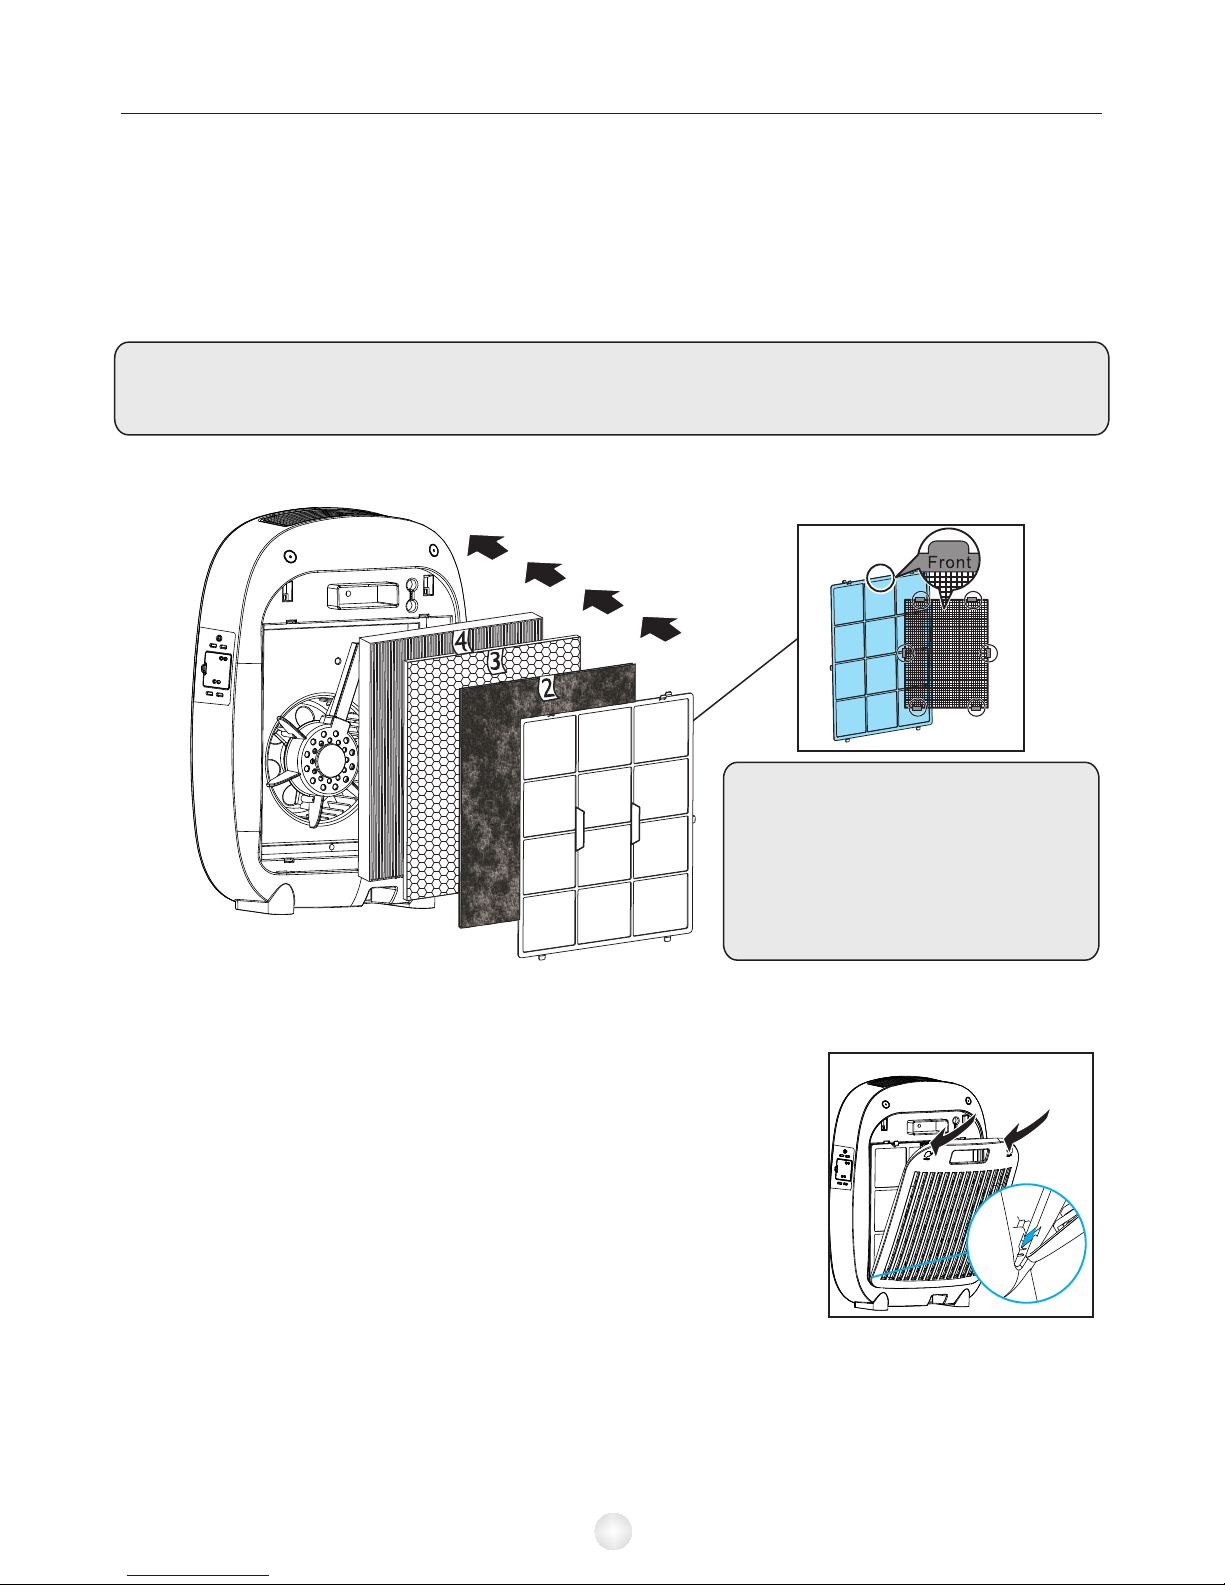
4. Put filter 4(HEPA filter), filter 3(Activated carbon filter), filter 2(Charcoal filter),
filter 1(Pre-filter) back into the appliance.Specific operation see Chapter 6 "Filter
replacement" .
Note:
Make sure that the side with the tag is pointing towards you (Filter 4、3、2).
5. To reattach the , insert the bottom
hooks into the bottom of the appliance first . Then
push the back cover against the body of the
appliance.
back cover
1) Make sure that the side
with the two projections is
pointing towards you.
2) Make sure that all hooks
are properly attached to the
appliance.
Page 7
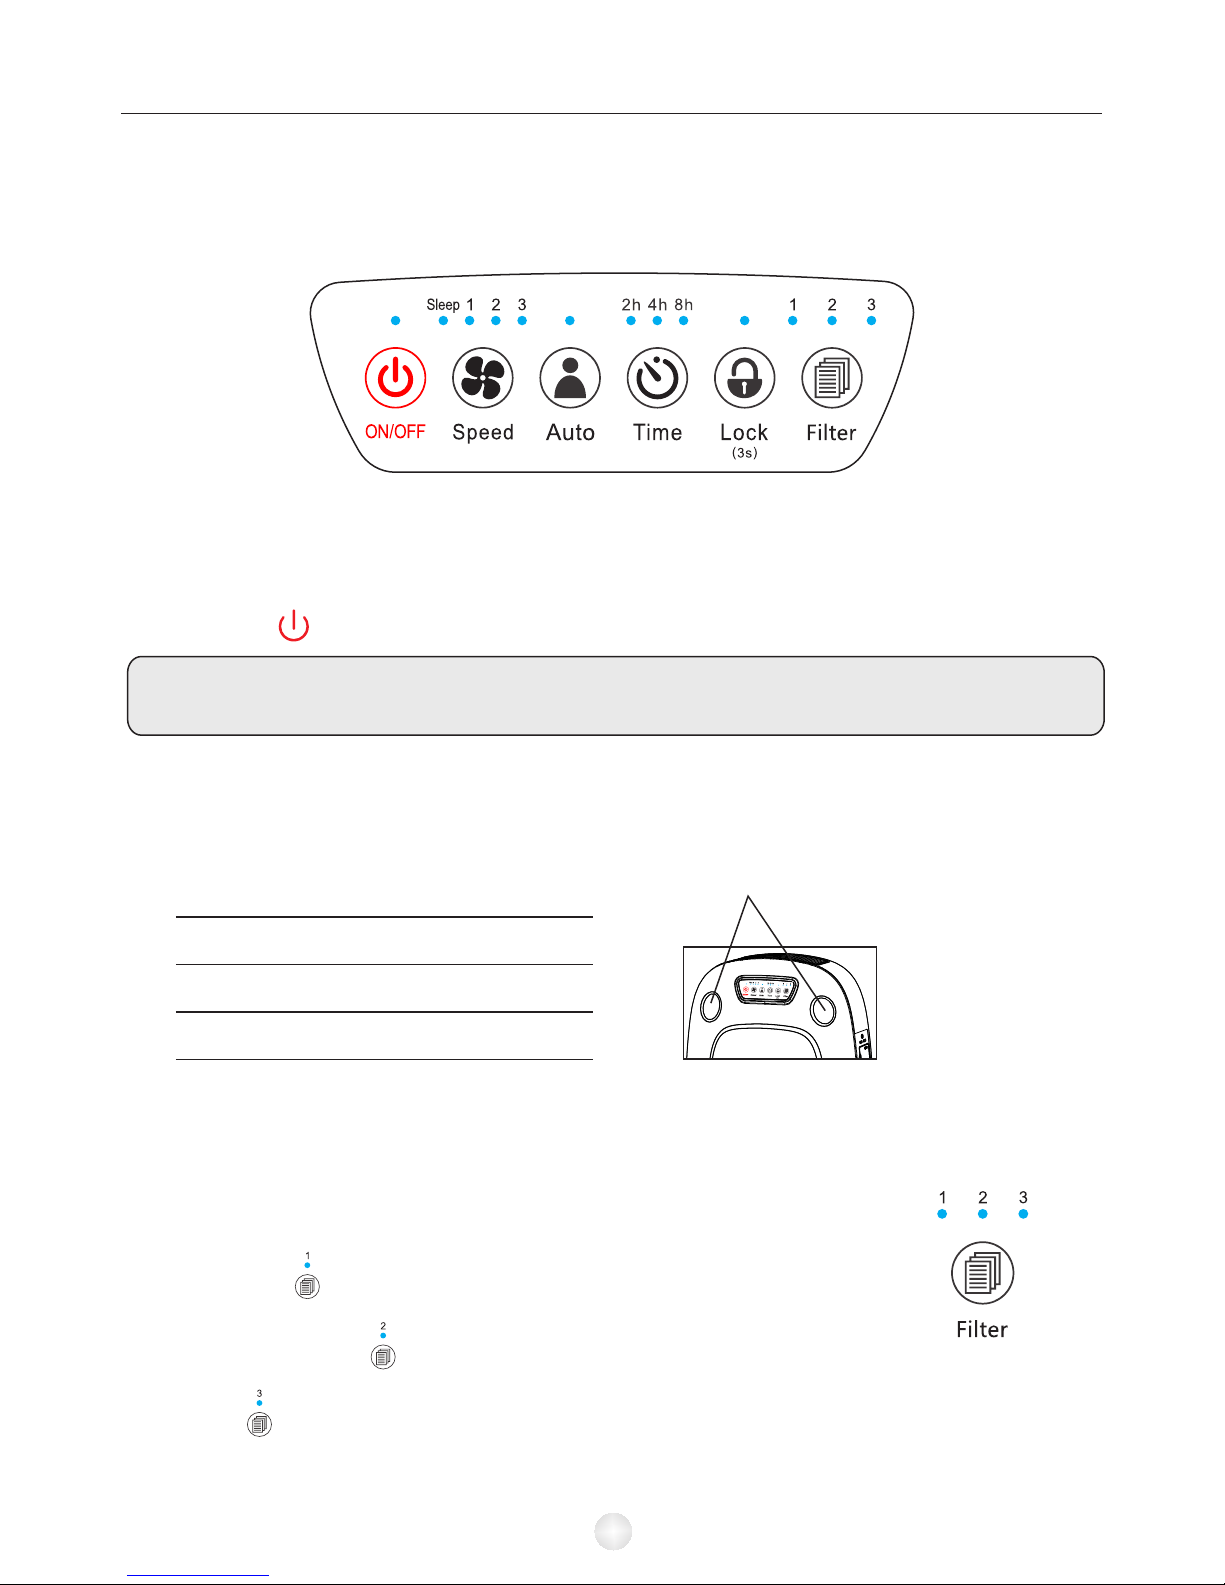
4. Using the appliance
4.1 Put the plug in the wall socket
All lights go on once and you hear a beep.Then the lights go out again.
4.2 Press the on/off button to switch on the appliance.
The power light and FAN SPEED 1 (lowest) light on the control panel .
Tips: the appliance is equiped with anion generator, when the appliance is
switched on, the anion generator starts working automatically.
4.3 AQ(Air Quality)
Built-in air quality sensor can detect air quality, after switching on the applicance,
it will show the quality of the air automatically throuth the different colors. Please
see the following information .
4.4 Filter replacement lights
There are total 4 filters as follows:
1)Pre-filter, we suggest you clean it every month.
Because it's washable, so it doesn't filter light.
2 ) Charcoal filter, we suggest you replace it every 3 months.
When the flash, you have to replace it.
3 ) Activated carbon filter, we suggest you replace it every
6 months. when flash,you have to replace it.
4) HEPA filter, we suggest you replace it every 6 months.
when flash, you have to replace HEPA filter.
05
AQ indiacator color
Air quality level
Blue
Good
Yellow Fair
BadRed
AQ indiacator
Page 8
Fan Speed
Speed 1
AQI indicator
Color
Blue Yellow Red
Speed 2 Speed 3
Note: The filters’ lifetime is based to your house air quality and using time(we
calculate 24h working), the above our suggested period is just for your reference.
Using the appliance in a humid environment will reduce the lifetime of activated
carbon filter and HEPA filter.
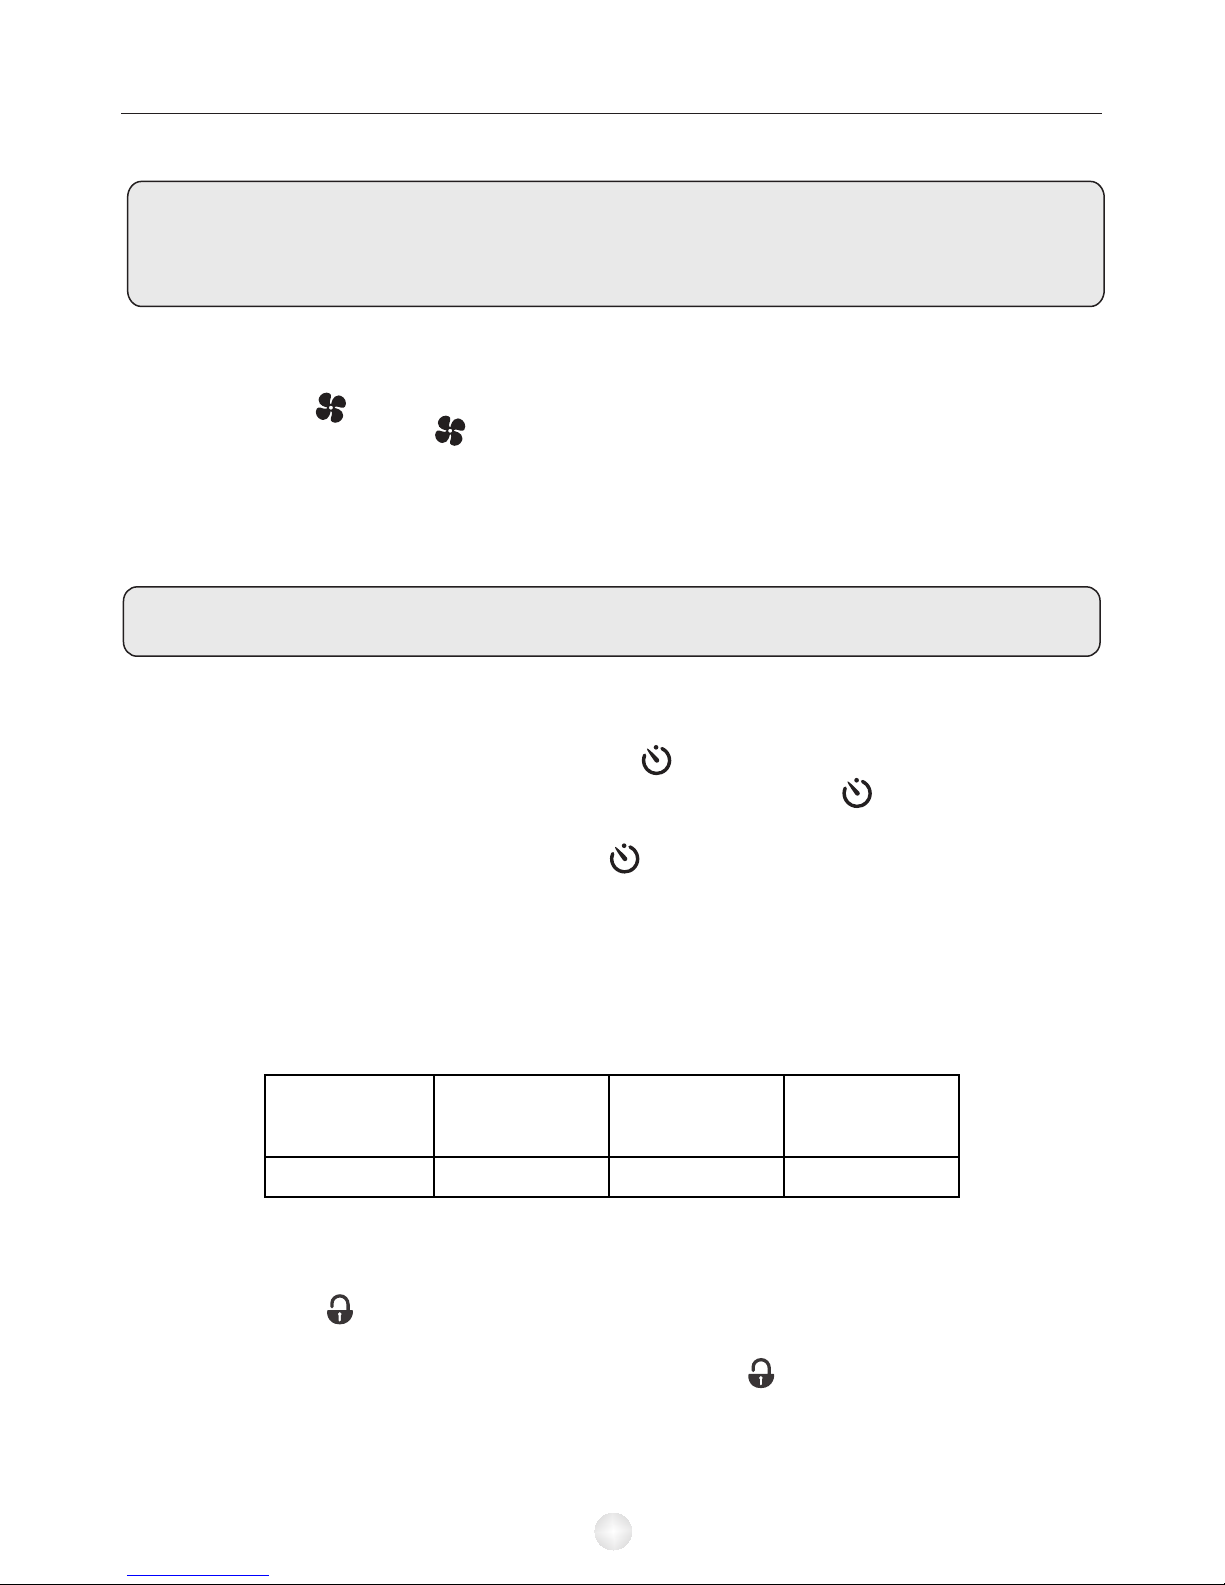
4.5 Fan speed adjustment and Sleep Mode
The fan speed light indicates at which fan speed the appliance is operating. Press
Speed button to adjust 1~3(refers to low, medium, high) fan speed level.
Press the Speed button again, it enters Sleep mode, the fan speed will be
automatically adjusted low level. The AQ indicator will turn off.
To exit the Sleep mode, just press the Speed button, the appliance will back to
manual control mode , the Sleep mode light turns off.
Tips :
When the appliance is switched on, the fan speed is at the low level.
4.6 Setting timer
When the appliance is switched on, press button to start timer function, you
can set the working time 2h, 4h or 8h by pressing the button , after this time,
your appliance will switch off automatically.
To cancel the Timer function, just press button repeatedly till light turns off.
4.7 Auto mode
When the appliance is switched on, the build-in air quality sensor automatically
measures the ambient air quality. When the Auto mode is activated, the fan speed
will be automatically adjusted according to AQI level as below:
4.8 Keylock mode
1) Long press button for 3 seconds to activate Keylock mode , all buttons are
locked at this mode; If your house has young child, we suggest use this mode.
2) To cancel the keylock mode, just press and hold button for 3 seconds.
06
Page 9
5. Cleaning
● Always unplug the appliance before you clean it.
● Never immerse the appliance in water or any other liquid.
● Never use aggressive or flammable cleaning agents such as bleach or alcohol
to clean any part of the appliance.
● Only the pre-filter is washable. All other filters are NOT washable.
5.1 Body of the appliance
Regularly clean the inside and outside of the body to prevent dust from collecting
on the inside and outside.
1) Wipe away dust with a soft dry cloth from the body of the appliance.
2) Clean the air inlet and the air outlet with a soft dry cloth.
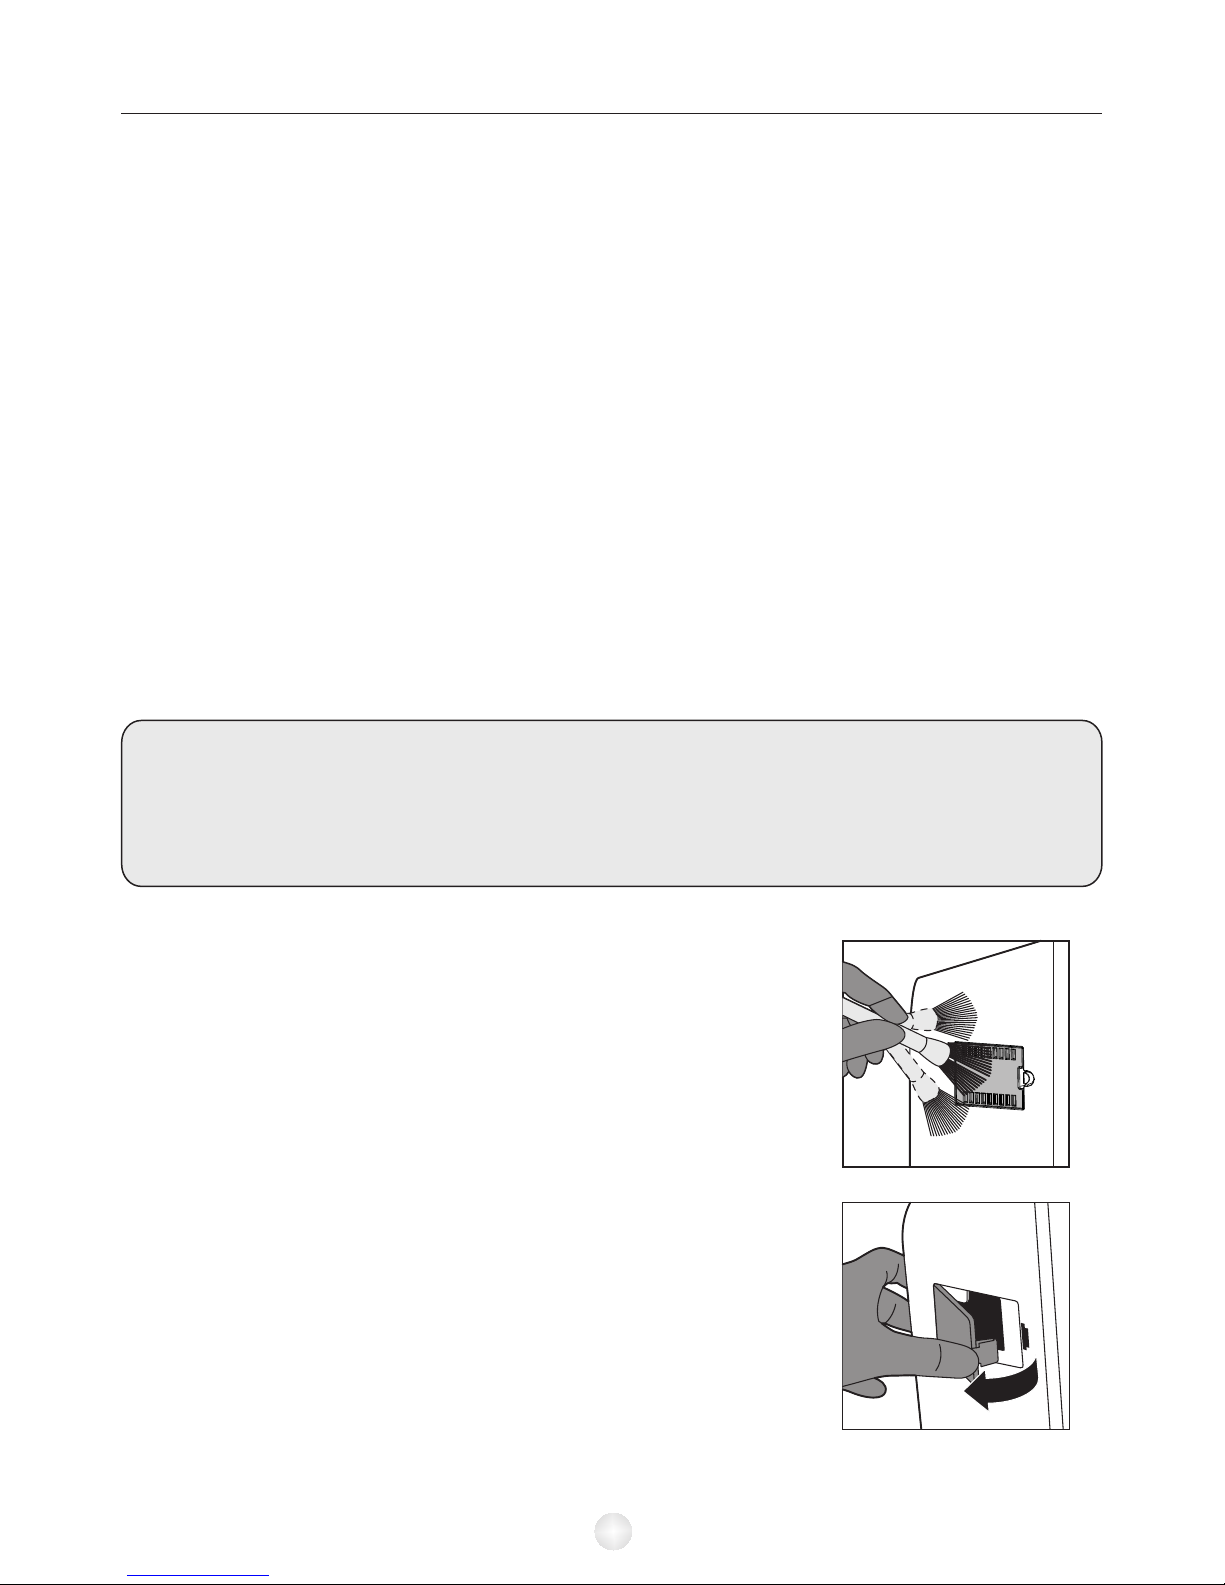
5.2 Air quality sensor
Clean the air quality sensor every 2 months for optimal functioning of the
appliance. Clean it more frequently if you use the appliance in a dusty
environment.
Note: When the humidity level in the room is very high, it is possible that
condensation develops on the air quality sensor. As a result, the Air Quality light
on the control panel and the air quality indicator may show that the air quality is
bad even though the air quality is good. In this case you have to clean the air
quality sensor or use one of the manual speed settings.
1) Clean the air quality sensor inlet and outlet
with a soft brush.
2) Remove the air quality sensor cover.
07
Page 10
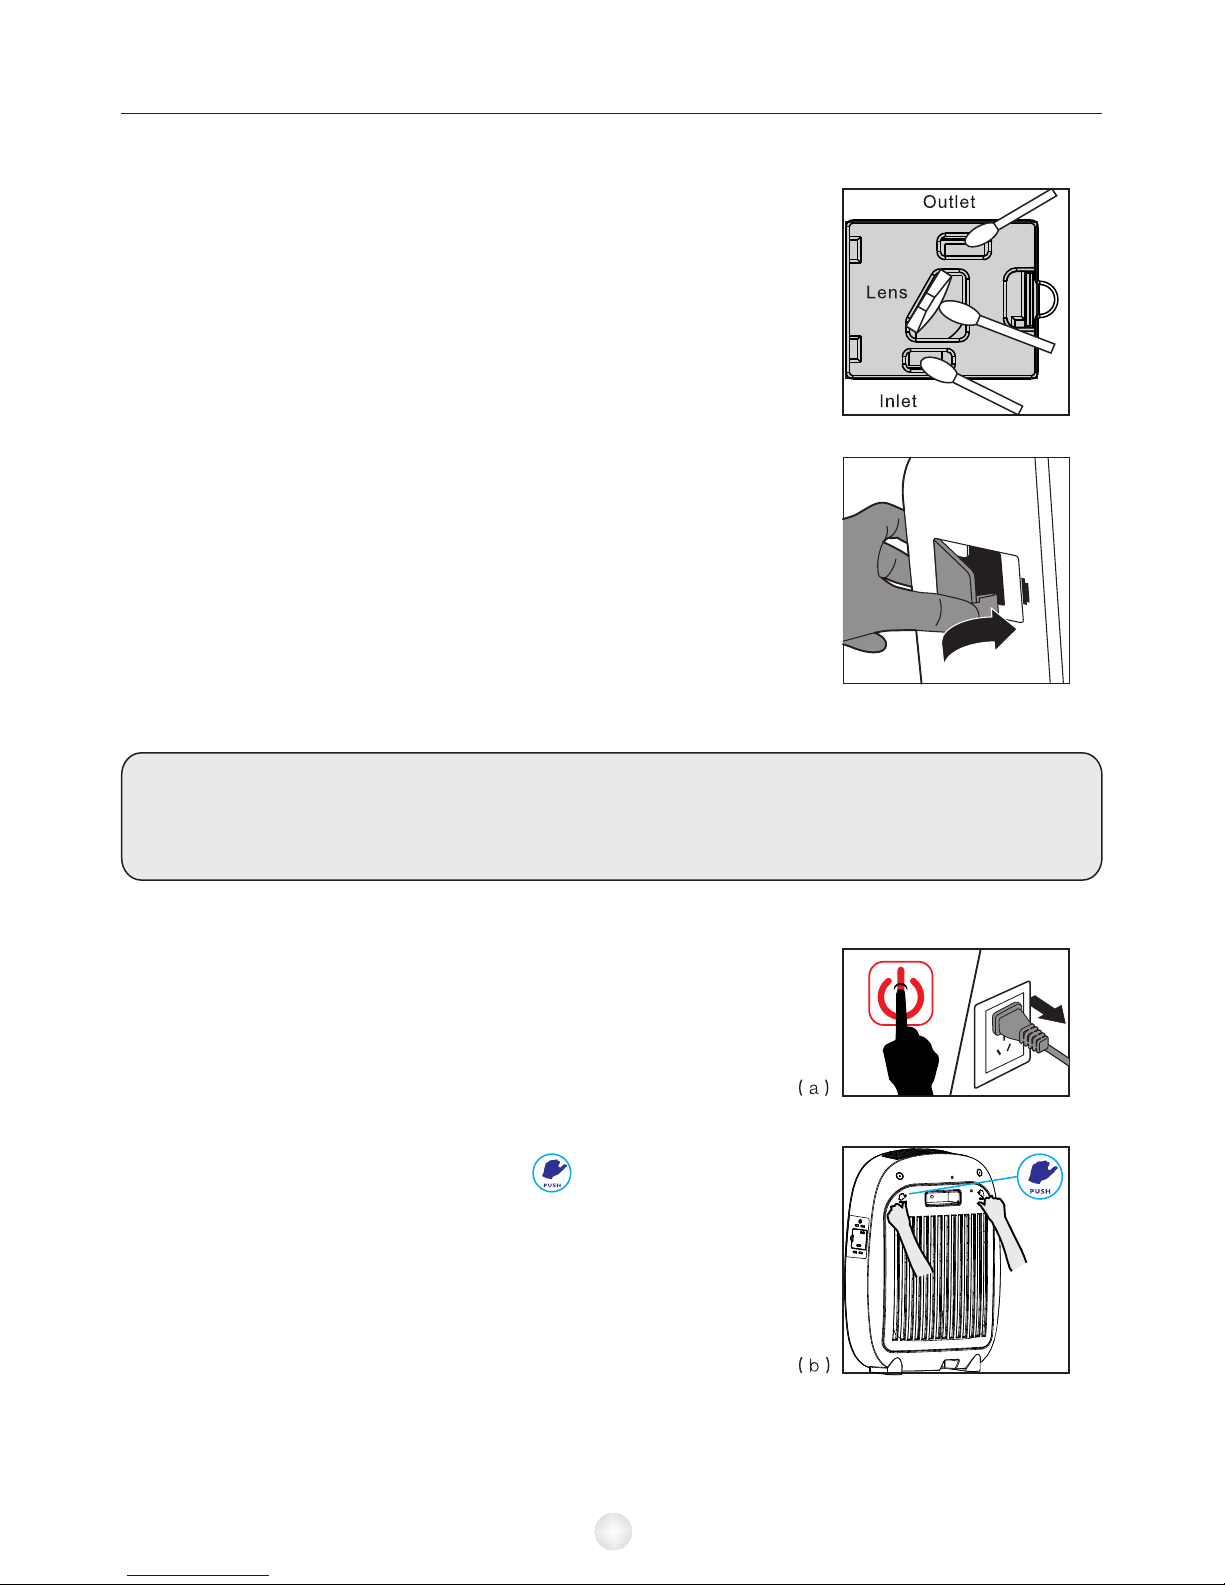
3) Clean the air quality sensor ,the dust inlet and
the dust outlet with a lightly moistened cotton swab.
4) Dry them with a dry cotton swab.
5) Reattach the air quality sensor cover.
5.3 Pre-filter
Note:
Only the pre- filter is washable, it has no replacement indicating light.
Clean the Pre-filter 30 days once, ensure your air purifier running at optimal
performance.
1) Switch off the appliance and unplug it. (a)
2) Place your fingers on the sign of back
cover at both sides, press down and open the
back cover. Then lift the hooks at the bottom
of the cover out of the bottom of the appliance.
Then lift the hooks at the bottom of the cover
out of the bottom of the appliance. (b)
08
Page 11
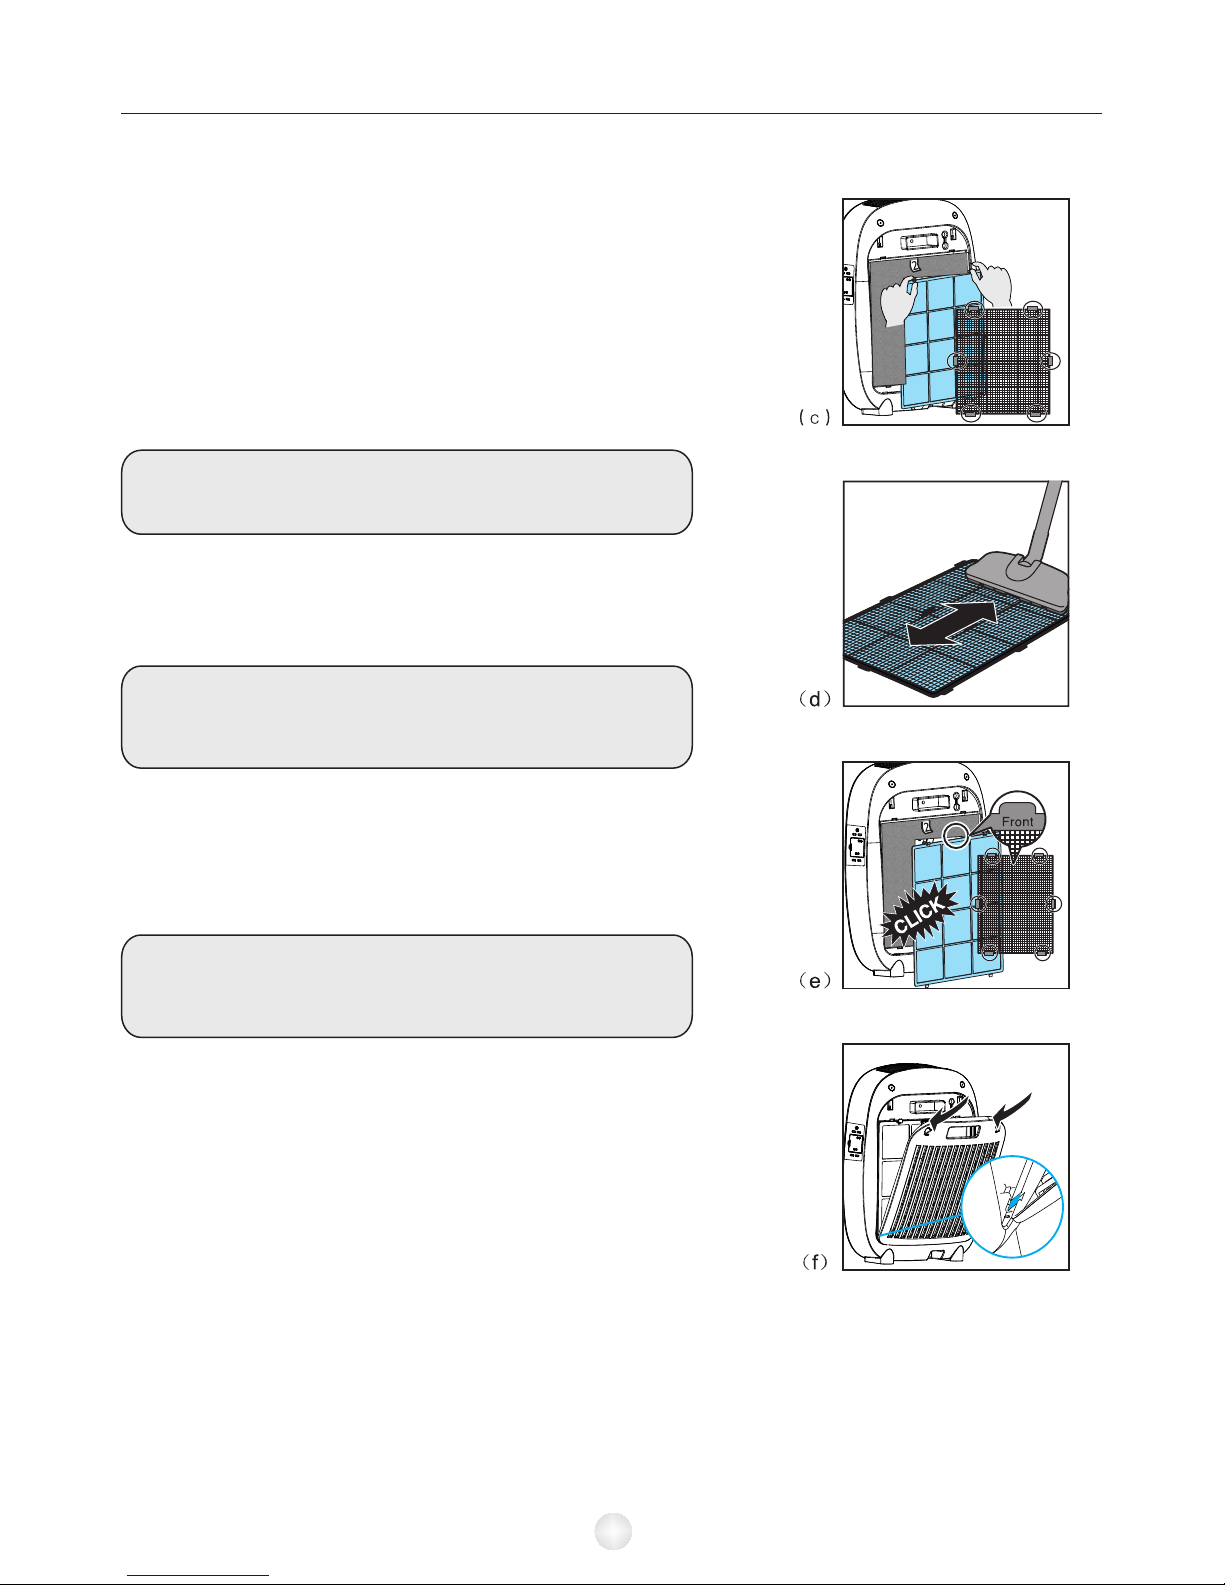
3) To remove the pre-filter , grab the two
projection at the top and pull the filter towards
you. (c)
4) Wash the pre-filter under a running tap ,
If the pre-filter is very dirty, use a soft brush
to brush away the dust. (d)
Tip: Alternatively, you can clean the pre-filter
by removing the dust with a vacuum cleaner.
5) Air-dry the pre-filter.
Note: Make sure that the pre-filter is completely
dry. If it is still wet, bacteria may multiply in it
and shorten the lifetime of the pre-filter.
6) Put the pre-filter back into the appliance.
Attach all hooks properly to the appliance. (e)
Note: Make sure that the side with the two
projections is pointing towards you.You also
can find word“Front”towards you.
7) To reattach the , insert the bottom
hooks into the bottom of the appliance first . Then
push the back cover against the body of the
appliance.(f)
back cover
09
Page 12
6. Filter replacement
When one of the filters is almost full and has to be cleaned or replaced, the
appropriate filter replacement light starts to flash.
Filter replacement light 1 flashes: filter 2(charcoal filter) has to be replaced.
Filter replacement light 2 flashes: filter 3 (activated carbon filter) has to be
replaced.
Filter replacement light 3 flashes: filter 4 (HEPA filter) has to be replaced.
6.1 How to replacing the Charcoal filter, Activated carbon filter
and HEPA filter?
Tip: Place the appliance against a wall for more stability when you remove or
insert filters.
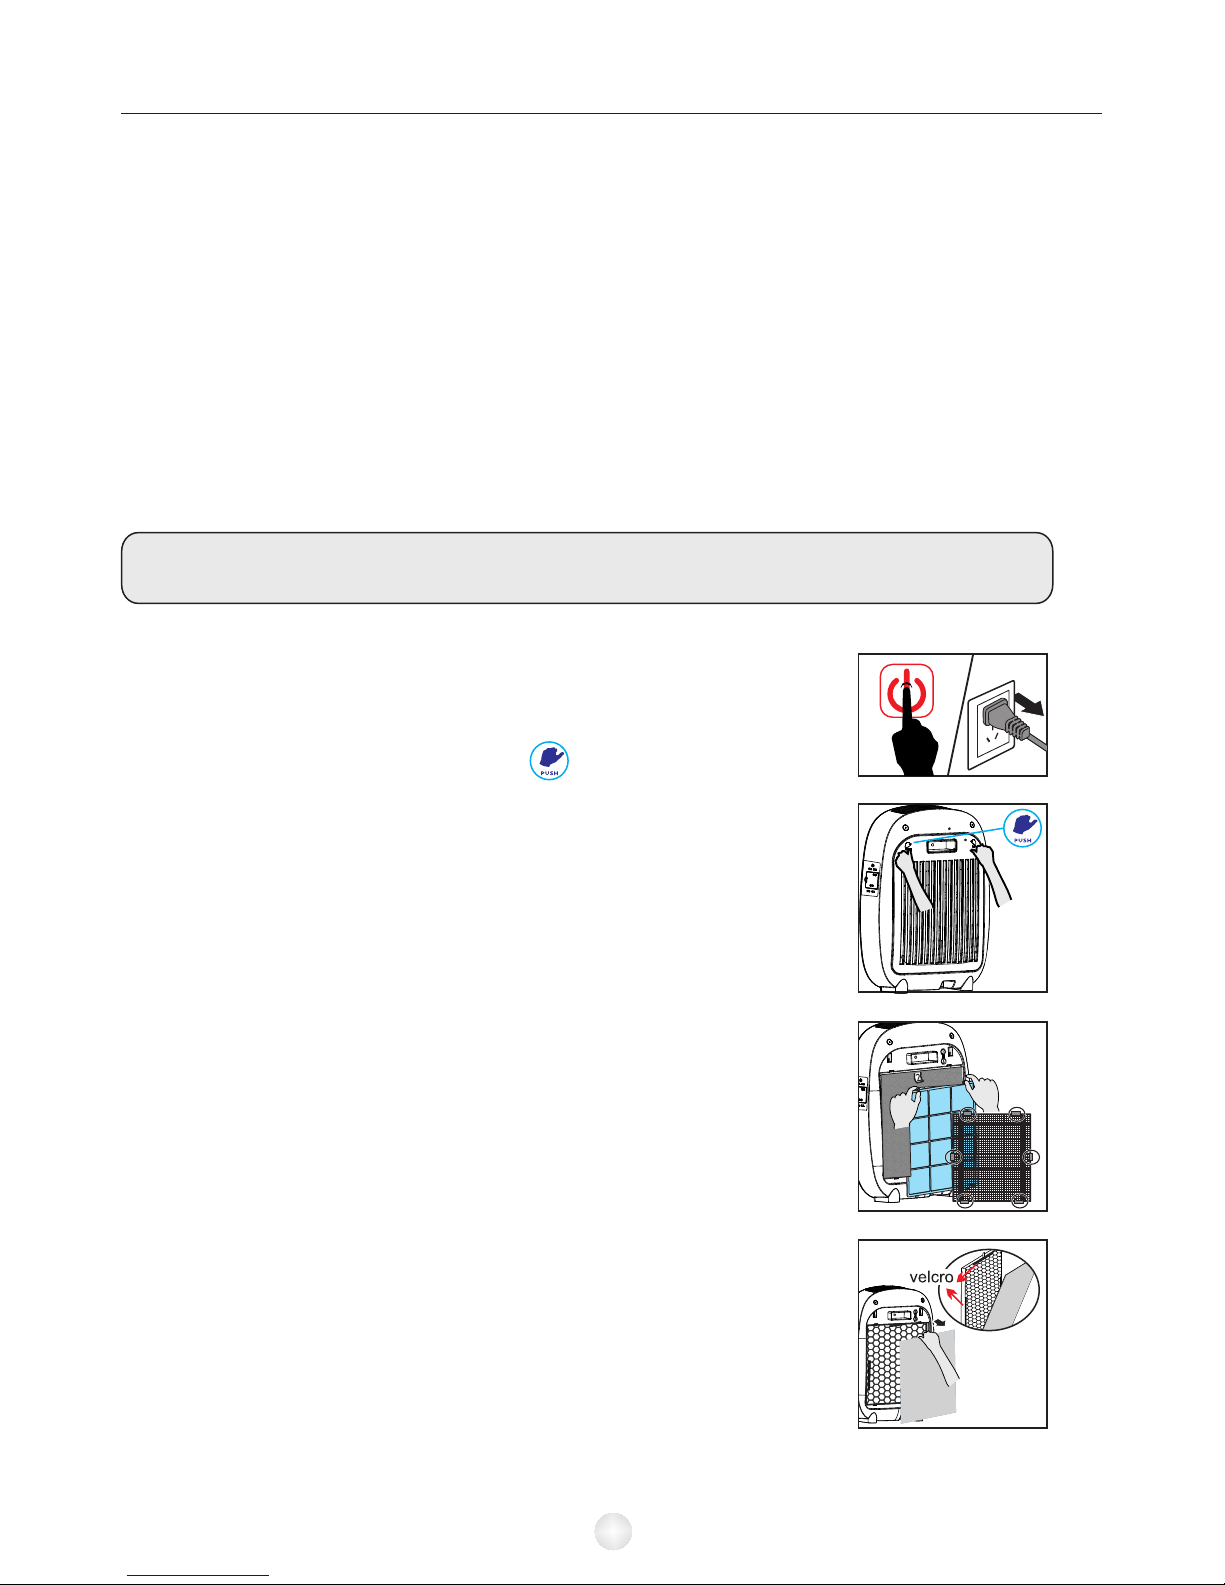
1) Switch off the appliance and unplug it. (a)
2) Place your fingers on the sign of back
cover at both sides, press down and open the
back cover. Then lift the hooks at the bottom
of the cover out of the bottom of the appliance.
Then lift the hooks at the bottom of the cover
out of the bottom of the appliance. (b)
3) To remove filter 1 (pre-filter), grab the two
projections at the top and pull the filter towards
you. (c)
4) To remove the filter 2 (charcoal filter) which
fixed by velcro with filter 3, just tear it off and
replace the new charcoal filter. (d)
10
( c )
( b )
( a )
( d )
Page 13
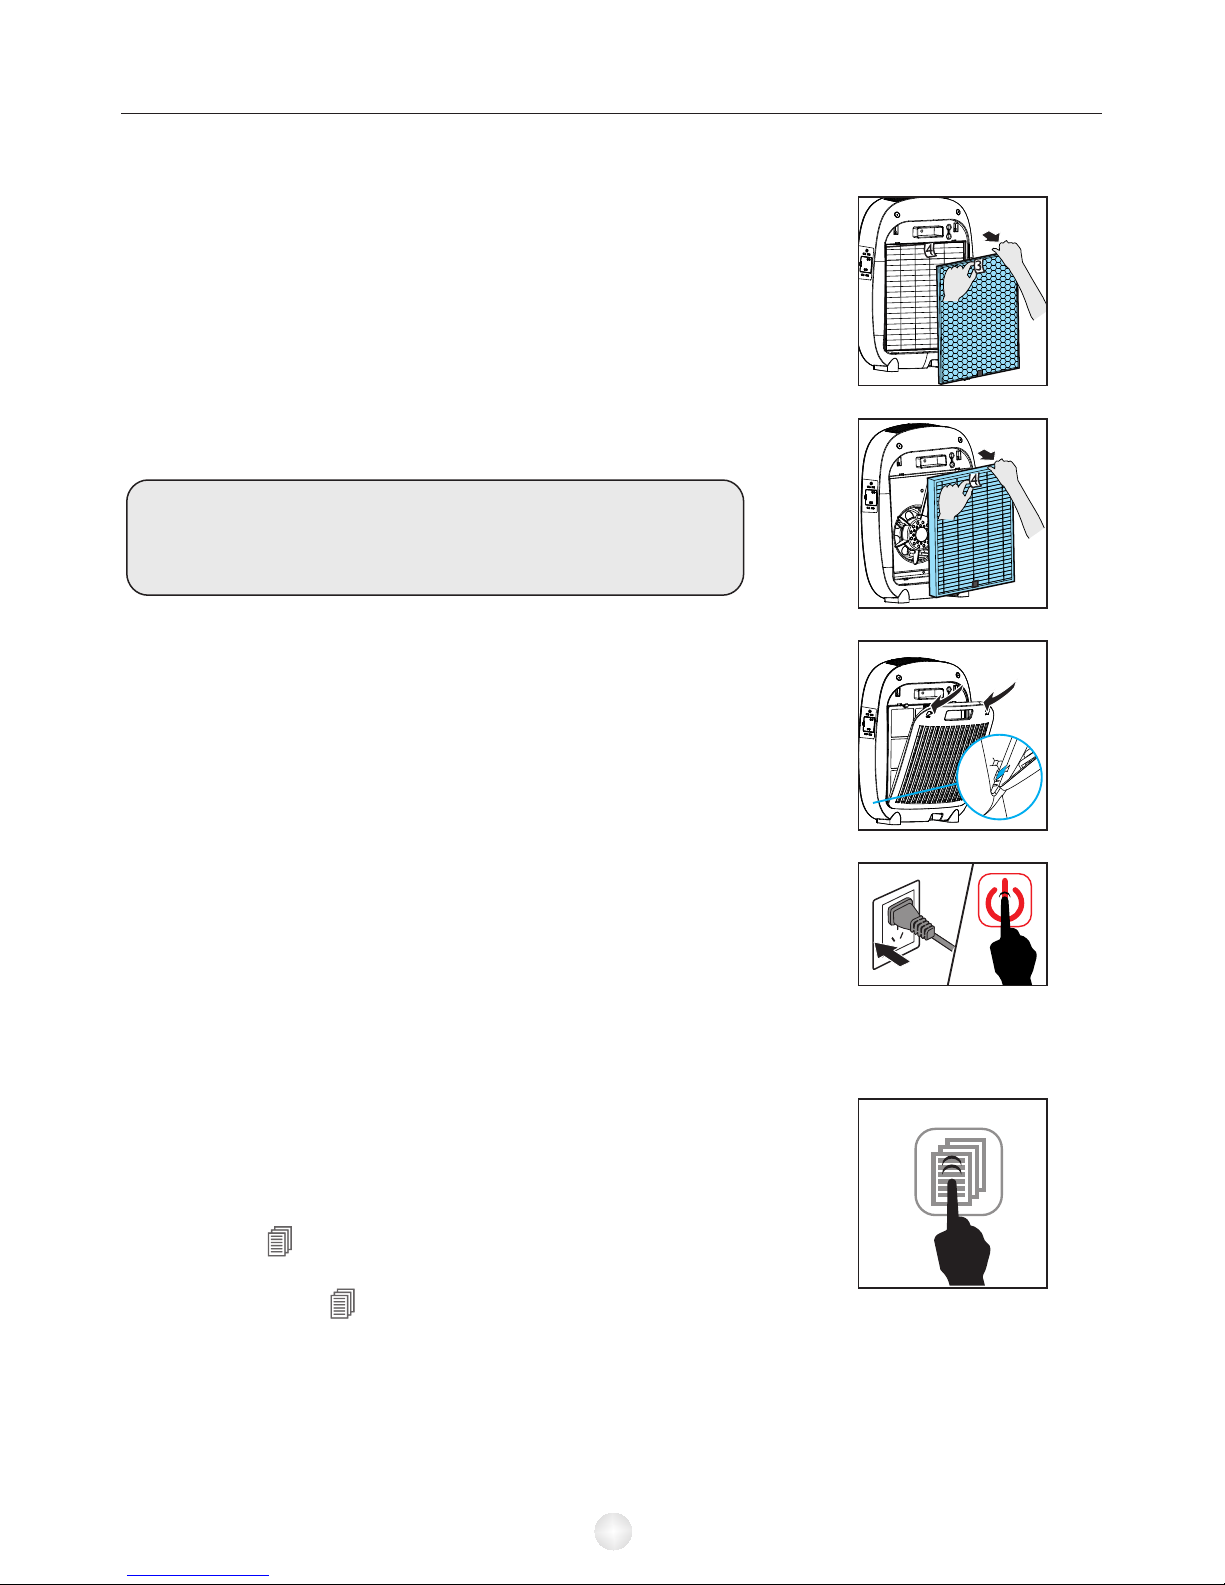
5) To remove the filter 3 (activated carbon filter),
grab its tag and pull it towards you, then replace
the new activated carbon filter. (e)
6) To remove the filter 4 (HEPA filter), grab its tag
and pull it towards you, then replace the new HEPA
filter. (f)
Note: The sequencing to put filters back into the
appliance, please refers to the drawing of page 2 -“product structure”.
7) To reattach the back panel, insert the bottom
hooks into the bottom of the appliance first, then
push the panel against the body of the appliance.
(g)
8) Put the plug in the wall socket and switch on the
appliance again. (h)
6.2 Reset Filter's lifetime.
Even you replace the new filters, when you switch
on the appliance, the light of filter icon still flash,
you need to reset thefilter’s lifetime, so that the
appliance can cycle to calculate the filters’ working
time.
Press the button, the light still turn on but not
flash, it means you choose this filter No. to reset,
press and hold button for 3 seconds, the light
of filter turn off, the reset finished.
11
3 S
( h )
( g )
( f )
( e)
Page 14
6.3 Filter replacement force mode
Suppose you use the appliance under air pollution environment, you can replace
these filters even the light does not flash, the filters replacing method is
same, please see chapter: Filter replacement.
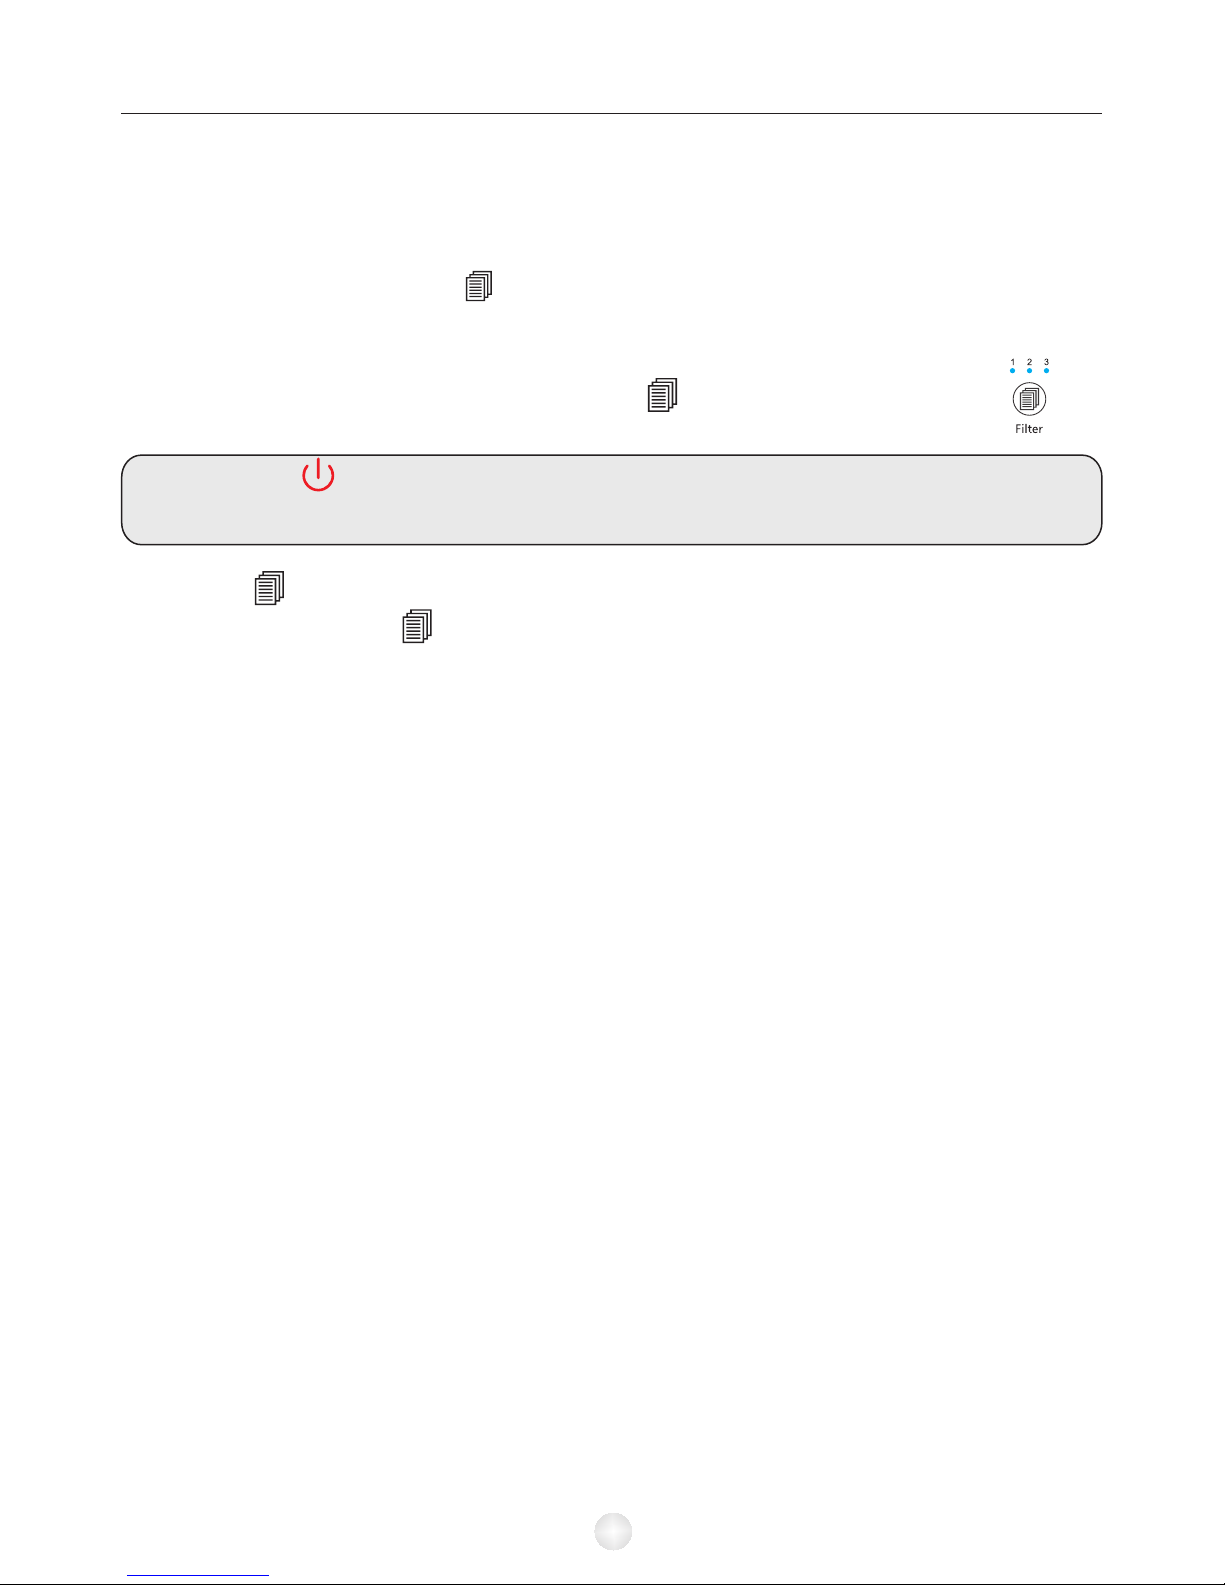
To force reset the filter ’s lifetime:
1) Switch on the appliance, press and hold for 3 seconds, filters light
will flash.
Note: Press button or without any operation for 60 seconds, the appliance
will exit the Filter replacement force mode.
2) Press button repeatedly to choose the filter, the chosen filter light will stop
flash, press and hold button for 3 seconds, this filter light turn off and the
reset finish.
3) You can repeat step 2 operation to turn off the other filters light and finish all
filters reset.
7. Storage
To store the mains cord, remove the back cover, wind it round the cord storage
facility at the bottom of the appliance,then reattach the back cover.
8. Environment
Do not throw away the appliance with the normal household waste at the end of its
life, but hand it in at an official collection point for recycling. By doing this, you help
to preserve the environment.
12
Page 15
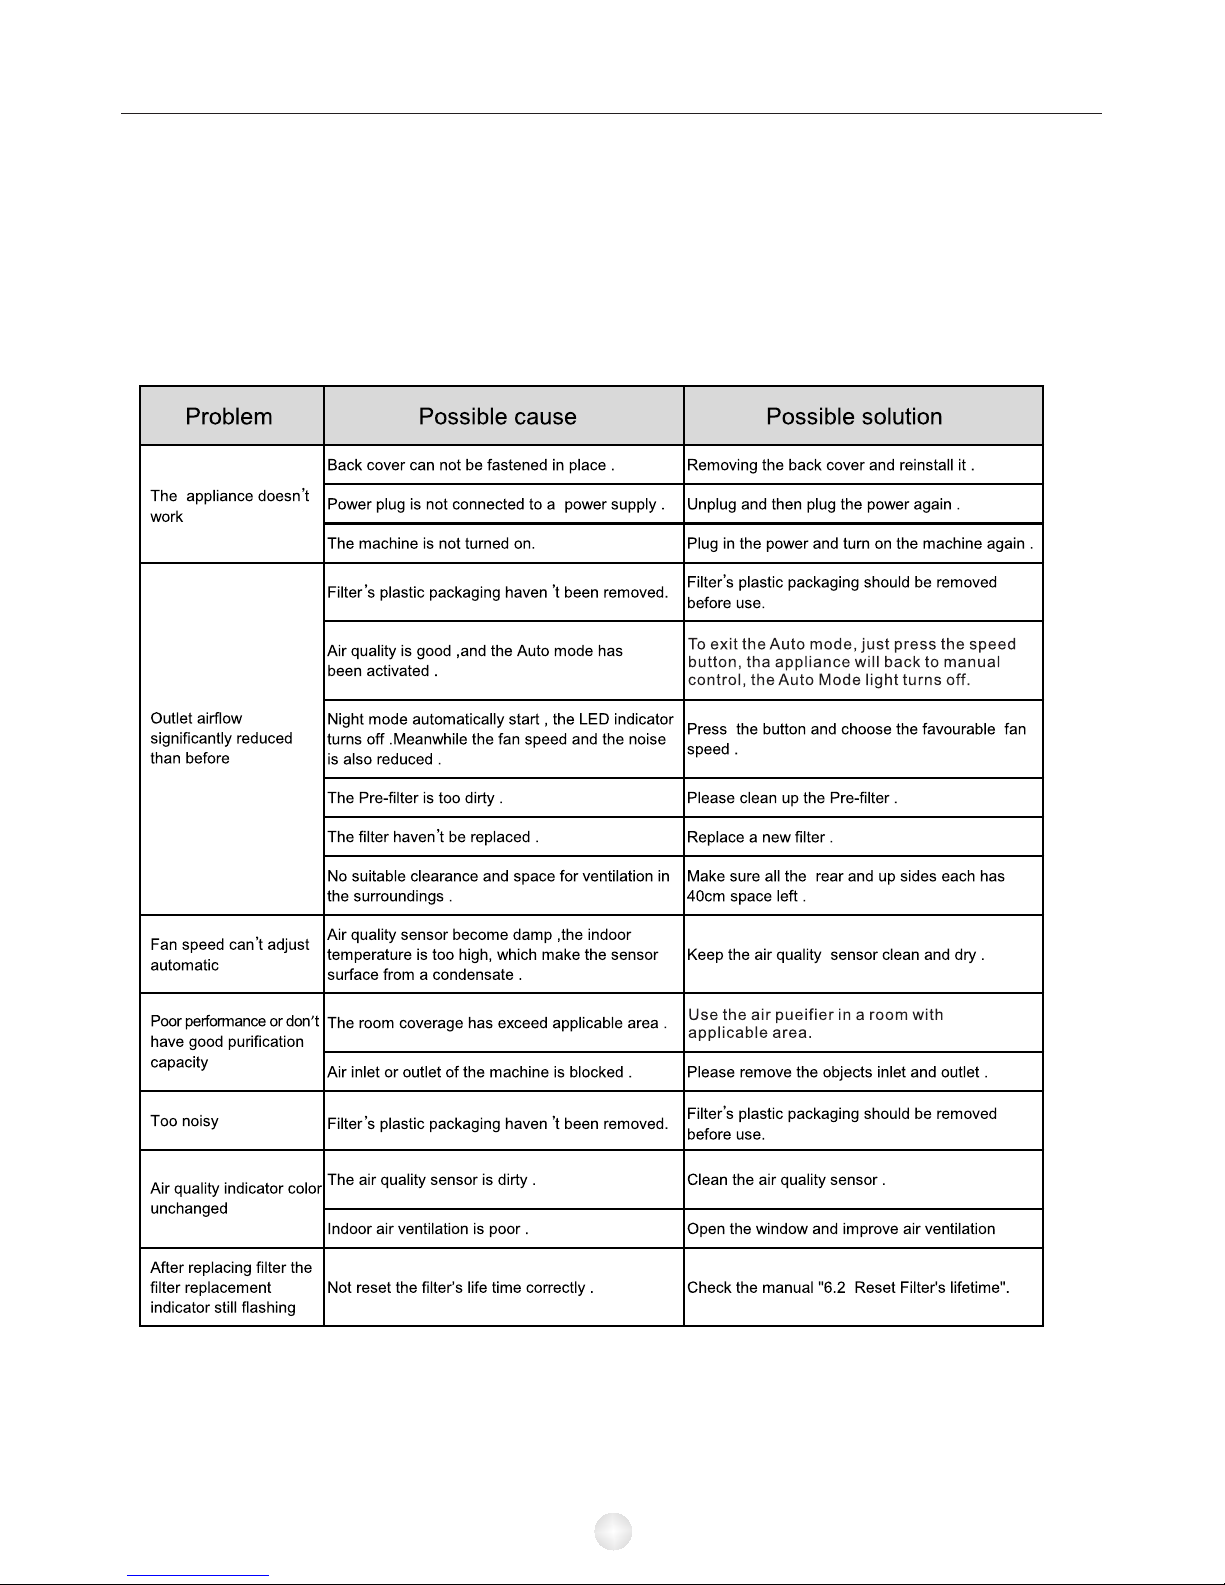
9. Troubleshooting
This chapter summaries the most common problems you could encounter with the
appliance. If you are unable to solve the problem with the information below,
contact the Consumer Care Centre in your country.
13
Page 16

#16, Xianghong Road, Xi ang an, Xiamen, 361101 China
Tel + 86 (0)592 7687698
Fax + 86 (0)592 7687690
Mail [email protected]
www.gruenluft.com
Xiamen Voke Health Technology Co.,Ltd.
 Loading...