

Page 1
COLOR TELEVISION
ST 55-800 text
Page 2
Ń
!
Stellen Sie das Gerät so auf, daß möglichst wenig
Fremdlicht auf den Bildschirm fällt.
Ń
!
Der ideale Betrachtungsabstand ist das Fünffache
der Bildschirmdiagonale.
Ń
!
Bei Betrieb im Schrankfach müssen Mindestabstände eingehalten werden.
Ń
!
Beachten Sie, daß die Lüftungsschlitze der Rückwand nicht abgedeckt werden.
Ń
!
Durch Wärmeaustausch im Gerät entsteht eine
Luftzirkulation. Dabei werden Staubpartikel (Teppich- und Gardinenfasern sowie Hausstaub) angesaugt. Diese lagern sich u.a. auch in den Lüftungsschlitzen ab, verengen sie im Laufe der Jahre und
können dadurch Wärmestaus verursachen.
Wärmestaus sind Gefahrenquellen und beeinträchtigen die Lebensdauer des Gerätes.
Lassen Sie sicherheitshalber von Zeit zu Zeit die
Ablagerungen vom Fachmann entfernen.
Ń
!
Stellen Sie keine Lautsprecherboxen neben das
Gerät.
Ń
!
Bitte achten Sie darauf, daß beim Aufstellen und
dem weiteren Betrieb die Netzanschlußleitung frei
liegt, weder eingeklemmt noch beschädigt wird.
Ń
!
Stellen Sie das Gerät nicht in die Nähe der Heizung.
Ń
!
Auch wenn das Gerät ausgeschaltet ist, können
durch Blitzschlag in das Stromnetz und/oder in die
Antennenleitung Beschädigungen auftreten.
Bei Gewitter sollten Sie deshalb den Netz- und
Antennenstecker ziehen.
Ń
!
Schützen Sie das Gerät vor Feuchtigkeit.
Ń
!
Stecken Sie keine Fremdkörper in die Lüftungsschlitze der Rückwand.
Vorsicht Hochspannung!
Batterie in die Fernbedienung
einlegen
Beiliegende Batterie einsetzen, dabei Polung der
Batterie beachten (im Batteriefachboden markiert).
Ń
!
Bei verbrauchter Batterie erscheint am Bildschirm
die Einblendung: » BATTERY«.
Verbrauchte Batterie unbedingt entfernen.
Für Schäden, die durch eine ausgelaufene Batterie
entstehen, kann nicht gehaftet werden.
Entsorgen Sie verbrauchte Batterien umweltgerecht.
Gerät anschließen
Stecker des Antennenkabels in die Antennenbuchse
É des Fernsehgerätes stecken.
Stecker des Netzkabels in die Steckdose stecken.
Gerät ein-/ausschalten
Am Gerät die Taste
¢
IO
drücken.
In Bereitschaft (Stand-by) schalten: An der Fernbedienung die Taste
Ǽ
drücken.
Ń
!
Wenn Sie das Gerät längere Zeit (zum Beispiel
nachts) nicht benützen, so schalten Sie es mit dieser Taste aus.
Die Dialogzeile als Bedienhilfe
Ń
!
In der Zeile am unteren Bildrand der Menü-Einblendungen sehen Sie mit welchen Tasten der Fernbedienung Veränderungen vorgenommen werden können.
Die Zeichen
>, <,
ʺʺ, ɶɶ
am Bildschirm sind
Sympole für folgende Tasten der Fernbedienung:
ʺʺ, ɶɶ
= Tasten P+ und P–. Bewegen des
farbigen Balkens (Cursor) nach
oben/unten zur Funktionsanwahl.
<, > = Tasten ņ – und + ŀ. Bewegen der
farbigen Schreibmarke (Cursor) nach
rechts/links zur Funktionsauswahl.
In den Texten werden anstelle der Symbole die
Tasten der Fernbedienung abgebildet.
2
1
2
1
1
Ķ
2
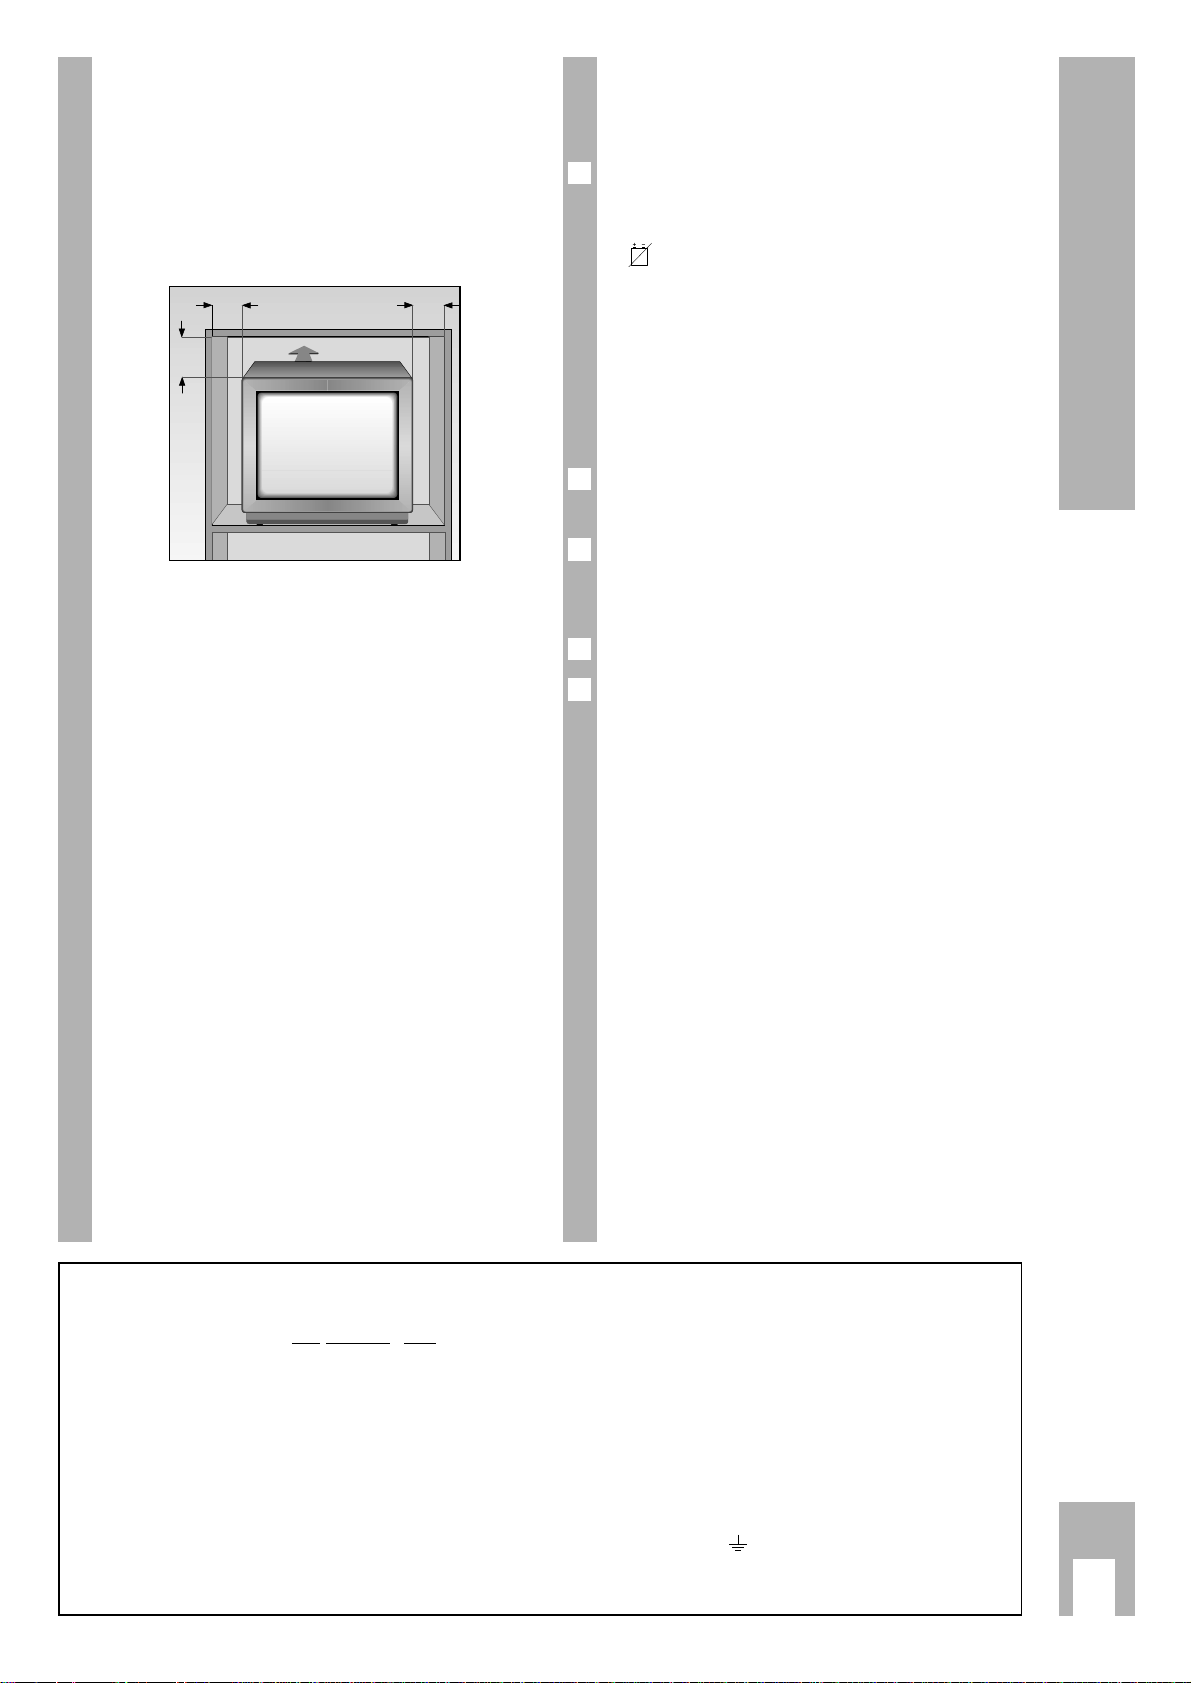
Sicherheit und Aufstellen
10
cm
20
cm
10
cm
20 cm
Page 3
1.Möglichkeit
r
Das Senderspeicher-System »ATS«
Der ATS-Programme-Suchlauf tastet den gesamten
Empfangsbereich ab und speichert alle gefundenen
Programme automatisch.
Vor
gehensweise:
Gerät mit den Tasten 1…9 aus Bereitschaft einschalten.
Taste P/C ca. 4 sec. drücken, bis das ATS-Menü
erscheint.
Suchlauf mit Taste OK starten.
Der Suchlauf-Vorgang kann über eine Minute
dauern. Die Geräteeinstellung ist nun abgeschlossen. Wir wünschen Ihnen viel Spaß beim Fernsehen.
Wenn Ihnen die automatische Programmplatz-Belegung nicht zusagt, können Sie die auf den
Programmplätzen gespeicherten Programme nach
Ihren Wünschen austauschen (umschichten).
Ń
!
Werden einige Programme vom ATS-Suchlauf nicht
erfaßt, können Sie diese mit der 2.Möglichkeit –
Durch direktes Eingeben der Kanalzahlen – auf die
Programmplätze legen.
Ń
!
Mit Taste ǺǺkann der Suchlauf abgebrochen
werden.
r
Programmplatzbelegung ändern
Beispiel: Das Programm von Programmplatz 5 soll
auf Programmplatz 2.
Programmplatz 2 anwählen.
Taste P/C drücken. Das Programm-Menü blendet
sich ein.
Unter »PR« neuen Programmplatz 05 mit den
Tasten 1…9 zweistellig eingeben.
Taste OK drücken. Der Vorgang ist abge-
schlossen.
Mit Taste
ǺǺ
zurück zum Fernsehbetrieb.
5
4
3
2
1
3
2
1
2. Möglichkeit
r
Durch direktes Eingeben der Kanalzahlen
Dies ist nur sinnvoll, wenn Ihnen die Kanalzahlen
der Programme bekannt sind.
Ń
!
Wurde die Belegung der Programmplätze mit dem
ATS-Kanalsuchlauf durchgeführt, ist es nicht
erforderlich diese Einstellung durchzuführen.
V
orgehensweise:
Taste P/C drücken, das Programm-Menü blendet
sich ein.
Ń
!
Achtung – in AV-Stellung nicht möglich.
Bewegen der farbigen Schreibmarke mit Tasten
ņ – und + ŀ.
Unter »PR« mit P+/P- zu belegenden Programm-
platz wählen.
" »CH« Kanalzahl eingeben, (bei Sonderkanal
mit Taste P+ anstatt »C«ein »S«).
Taste +
ŀ drücken. Mit den Ziffernta-
sten die gewünschte Kanalzahl eingeben.
Wird eine der Tasten P+ oder P-
gedrückt gehalten, startet der Kanalsuchlauf. Der Kanalsuchlauf stoppt bei
jedem Programm, das Sie empfangen
können.
" »DEC«Wird auf diesen Programmplatz ein
verschlüsseltes Programm gelegt und
ein entsprechender Descrambler
(Decoder) angeschlossen, dann ist
»ON« zu wählen.
" »FT« Ist nach dem Belegen Feinabstimmen
notwendig, dann
Taste
ņ – drücken bis die Ziffern
unter FT grün sind.
Taste P+ oder P- drücken und damit
besten Bild- und Toneindruck wählen.
Mit Taste OK die veränderten Werte speichern.
Die Programm-Daten des nächsten Programmplatzes werden eingeblendet.
Zurückschalten ins TV-Programm mit Taste
ǺǺ
.
Ń
!
Wird auf einen Programmplatz Kanal 00 eingegeben, können mit den Tasten P+ und P- alle nachfolgenden Programmplätze nicht mehr angewählt
werden.
4
3
2
PR CH DEC FT
22 S06 ON 00
0-9
ɶɶʺʺ
ɼɦ OK i
1
Ķ
3
Programmplätze belegen
ĵ
Die Dialogzeile
Page 4
Ķ
4
Die Fernbedienung
V
ideo-Recorder fernbedienen
Mit der Fernbedienung dieses Fernsehgerätes können Sie auch Grundig-Video-Recorder fernbedienen. Welche hierzu geeignet sind, sagt Ihnen Ihr
Fachhändler.
Taste VIDEO drücken und gedrückt halten.
Damit schalten Sie die Fernbedienung auf VideoRecorder-Betrieb.
Anschließend die gewünschte Taste drücken.
Entnehmen Sie der folgenden Aufstellung, mit welchen Tasten die Recorderfunktionen ausgelöst werden können.
ĵķ (Ziffern-Taste 1) = Bildsuchlauf rückwärts
ĶŁ (Ziffern-Taste 2) = Bildsuchlauf vorwärts
l (Taste – i) = Aufnahmestart
n (Taste i +) = Stop
ĵĵ (Ziffern-Taste 7) = schneller Rücklauf
ŁŁ (Ziffern-Taste 8) = schneller Vorlauf
ll ll (Taste – v) = Pause
ı (Taste
v
+) = Wiedergabestart
Ľ (Ziffern-Taste 4) = Programmplatz –
Ń (Ziffern-Taste 5) = Programmplatz +
Ń
!
Jeder veränderte Wert wird automatisch nach
ca. 8 Sekunden oder durch Schalten in Stand-by
gespeichert.
Ń
!
Das Fernsehgerät wurde mit maximalem Kontrast
getestet. Abhängig vom Gerätestandort und der
Raumhelligkeit ist es jedoch sinnvoll, den Kontrast
etwas zu reduzieren um den subjektiv besten Bildeindruck zu erhalten.
Ń
!
Mit Taste ǺǺkann die Programmanzeige auf Dauer
eingeblendet werden.
Ausblenden durch erneutes Drücken der Taste
ǺǺ
.
1…9 Programmplatz wählen (am Gerät
– P +) und
0/AV Gerät einschalten aus der
Bereitschaft (Stand-by); oder
AV-Stellung wählen
P+ / P– Programmplätze schrittweise wei-
terschalten: P+: (1, 2, 3 …), P-:
(…3, 2, 1) Stand-by
P+: aus Stand-by einschalten auf
zuletzt gewählten Programmplatz.
Cursor (Schreibmarke) Bewegung nach oben
beziehungsweise nach unten.
OK Ändern und Aktivieren verschiede-
ner Funktionen. Taste OK zweimal
drücken – Optimalwert-Einstellung.
ņ –,+ŀ Lautstärke oder Cursor (Schreib-
marke) – Bewegung nach links
oder rechts.
Videotext: Nächste 10er Seite.
Videotext: Aktuelle
Seitennummer –1 Seite
Ȅ
Uhrzeit ein/aus.
Videotext: Aktuelle
Seitennummer +1 Seite
i
+/– Farbkontrast ändern.
VIDEO Videorecorder fernbedienen
(dazu Taste VIDEO gedrückt
halten).
AUX Videotext: Dialogzeile aufrufen
Ǽ
In Bereitschaft schalten (Standby) und einschalten auf zuletzt
gewählten Programmplatz.
ʀ
Ton ein/aus (stummschalten).
Ǻ Programm-Nummer ein-/
ausblenden (Status-Seite).
Ändern SW Kontrast:
Ǻ, OK,
ņ – oder + ŀ drücken.
Sleep Timer (Ausschaltzeit
01…99 Min.) eingeben:
Ǻ, OK, Ǻ, und Ziffern-Tasten
0…9 drücken.
Automatische Frequenznachstimmung ein/aus:
Ǻ, OK, Ǻ, Ǻ, ņ – oder + ŀ.
Audio-Menü aufrufen: Ǻ, ʀ
TXT Videotext/Teletext-Betrieb
ɫ TV-Betrieb.
Videotext: Nächste 100er Seite.
v
+/– Helligkeit ändern.
SAT Satelliten-Receiver
fernbedienen (dazu Taste SAT
gedrückt halten)
P/C Programmdaten aufrufen.
Taste 4 Sekunden gedrückt
halten: ATS aufrufen.
TP 712
123
456
89
7
AV
0
P
OK
–
+
P
Ǽ
ʀ
TXT
Ȅ
+
–
iv
VIDEO AUX P/C SAT
+
–
Ǻ
Page 5

Ķ
5
Ton ändern, Videotext-Betrieb
Das Audio-Menü
r
Audio-Menü aufrufen
Die Taste ǺǺund danach Tasteʀdrücken; die Seite
»Audio-Menü« wird eingeblendet.
Stereo, Mono, Zweiton –
Stereobreite –
Höhen –
Bässe –
Balance –
Dialogzeile –
Ń
!
Das »Audio-Menü« können Sie nach jeder Einstellung mit Taste ǺǺausblenden.
r
Stereo-, Mono- und Zweiton-Sendung
Empfängt das Gerät Zweiton-Sendungen, – z. B.
einen Spielfilm mit Originalton auf Tonkanal 2
(DUAL B) und die synchronisierte Fassung auf
Tonkanal 1, – (DUAL A) – so können Sie den
Tonkanal wählen.
Mit der Taste P+ oder P- die erste Zeile anwählen.
Mit den Tasten
ņ –, + ŀ den Tonkanal wählen.
Empfängt das Gerät Stereo-Sendungen, schaltet es
automatisch auf Stereo-Tonwiedergabe.
Ń
!
Bei schlechter Stereo-Tonwiedergabe können Sie
mit den Tasten ņ –, + ŀ auf Ton »Mono« schalten
Ń
!
Die Einstellung »Mono« kann durch drücken
der Taste OK programmplatzbezogen gespeichert
und wieder gelöscht werden.
Anzei
ge der Tonübertra
gungsart
Immer wenn vom Sender die Tonübertragungsart
gewechselt wird (z. Beispiel von Mono in Stereo)
erfolgt ca 4 sec. die entsprechende Anzeige.
Sie erfolgt auch bei Programmwechsel, jedoch nur
bei Ton-Übertragungsarten die von Mono abweichen.
r
Stereobreite
Verbreitert bei Stereo-Sendungen das Klangbild
und verbessert es bei Mono-Sendungen.
Mit der Taste P+ oder P- die entsprechende Zeile
anwählen.
Ändern mit Taste
ņ – oder + ŀ (Die Einstellung der
Stereobreite bleibt auch nach einem Programmwechsel erhalten).
r
Höhen, Bässe, Balance
Die Einstellungen dieser Funktionen sind nach
Bedarf korrigierbar.
Mit den Taste P+, P- die entsprechende Zeile
anwählen.
Korrigieren mit der Taste
ņ – oder + ŀ.
2
1
2
1
2
1
STEREO MONO
ʀǁ ʀ…ǁ
ɦ
ɼ
f
ɶʺ < > Ǻ
1
Der Videotext-Betrieb
r
Videotext aufrufen: Taste TXT drücken.
r
Seiten mit Tasten 1…9 direkt anwählen
(Vorhandene Seiten: 100-899)
r
Übersichtseite aufrufen
Taste ǺǺdrücken.
r
Dialogzeile aufrufen: Taste AUX drücken.
= Zeichenhöhe vergrößern
= Wartezeit überbrücken (Aktuell-Betrieb).
= Unterseite direkt abrufen
= Antwortfreigabe
= Seiten-STOP
Funktionen mit Taste
ņ – oder + ŀ anwählen und
mit Taste OK aufrufen.
Die Funktionen , , und können auch
ohne Aufrufen der Dialogzeile folgendermaßen ausgeführt werden.
Zeichenhöhe vergrößern: Die Taste +
i drücken.
Unterseiten direkt abrufen: Die Taste –
i drücken.
Antwort-Freigabe: Die Taste +
ŀ drücken.
Seiten-Stop: Die Taste
ņ – drücken.
r
Seiten mittels Cursor anwählen
(Page Catching)
d.h. Seiten wählen ohne die Seitennummer einzutippen. Mittels Cursor können Sie die gewünschte
Videotext-Seite aus Übersichts-Seiten (Seiten, in
denen sich dreistellige Seitennummern befinden)
direkt anwählen.
Taste P- oder P+ drücken.
Am oberen Bildrand wird »Page Catching« einge-
blendet.
Bei der ersten bzw. letzten Seitennummer der Übersicht blinkt ein rechteckiger Lichtpunkt (Cursor).
Mit den Tasten P- oder P+ den Cursor zur
gewünschten Seitennummer bringen.
Taste OK drücken.
Die Seite erscheint im Bildschirm.
r
Floftext
Die Farbtasten führen zu den, in der Dialogzeile eingeblendeten Themen.
3
2
1
5
4
3
1
5431
5
4
3
2
1
54321
ķ
ʄʄ
ķX /00 ķ? STOP
Page 6
Ķ
6
Anschlußmöglichkeiten
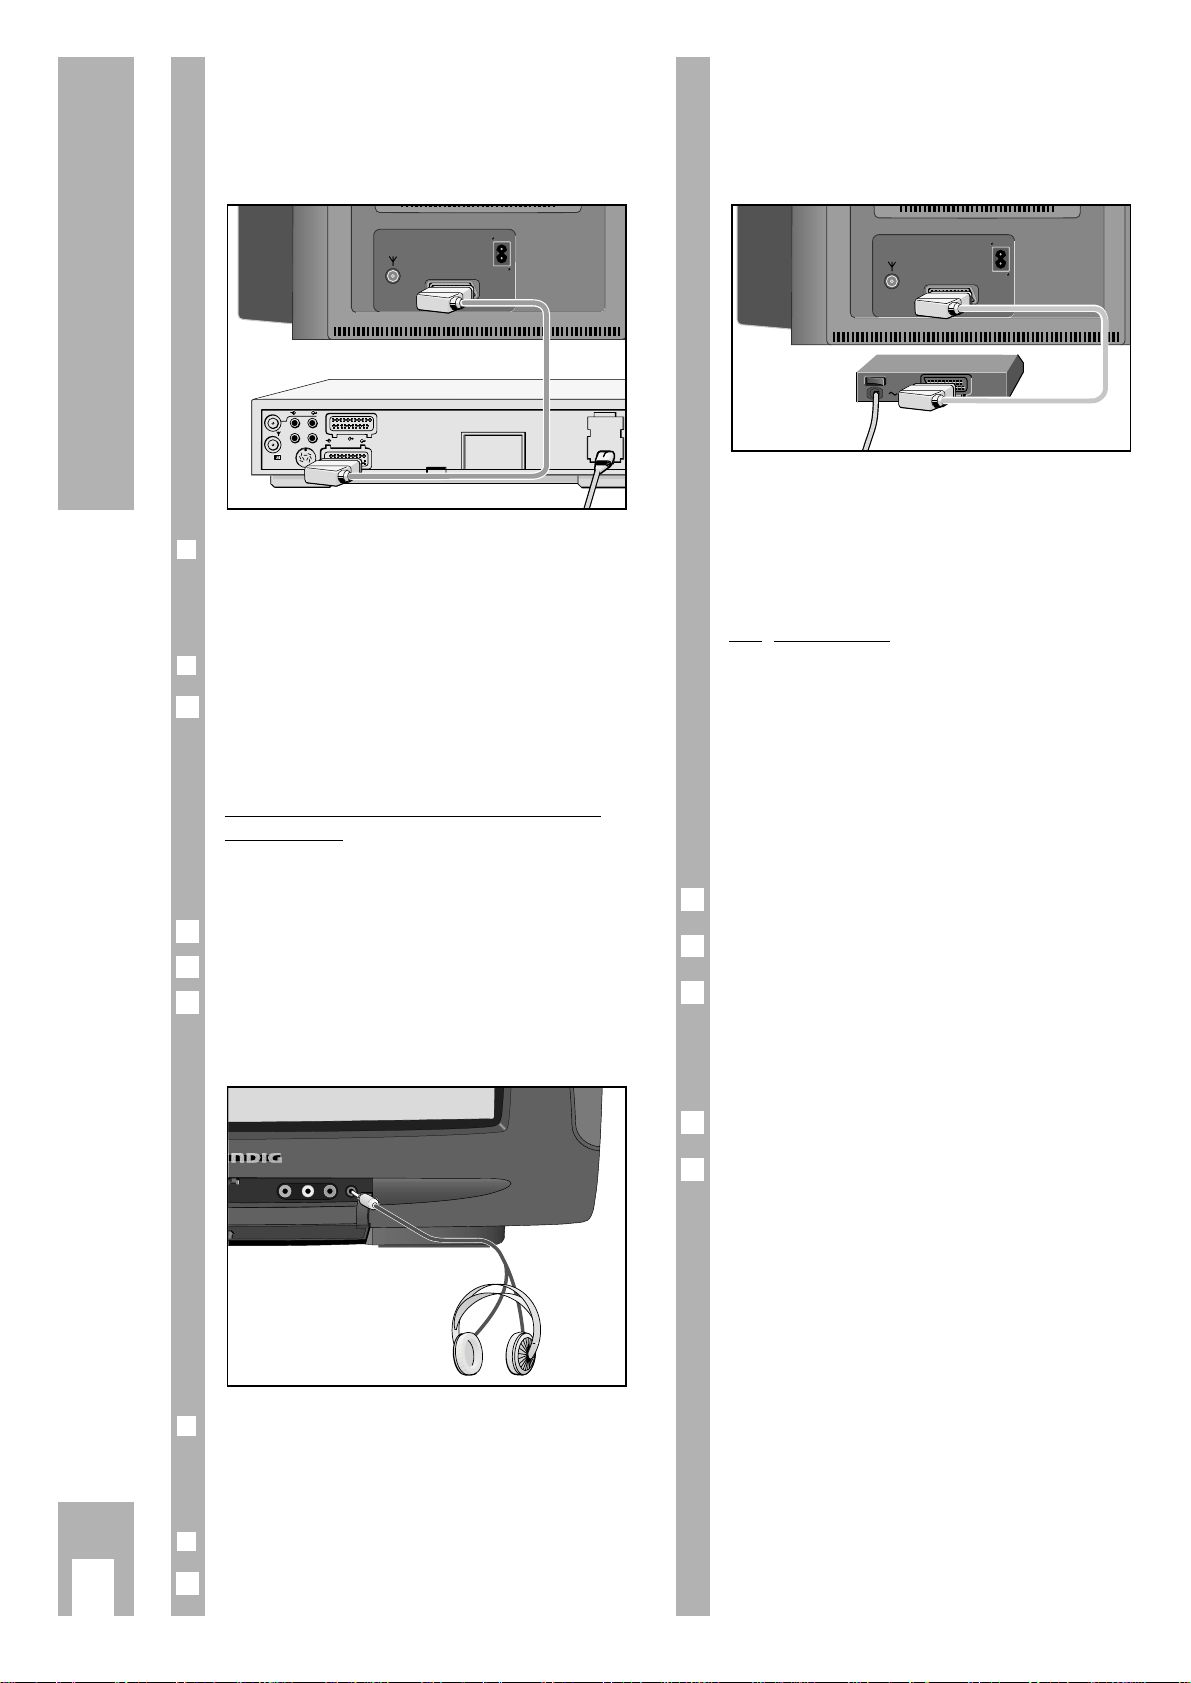
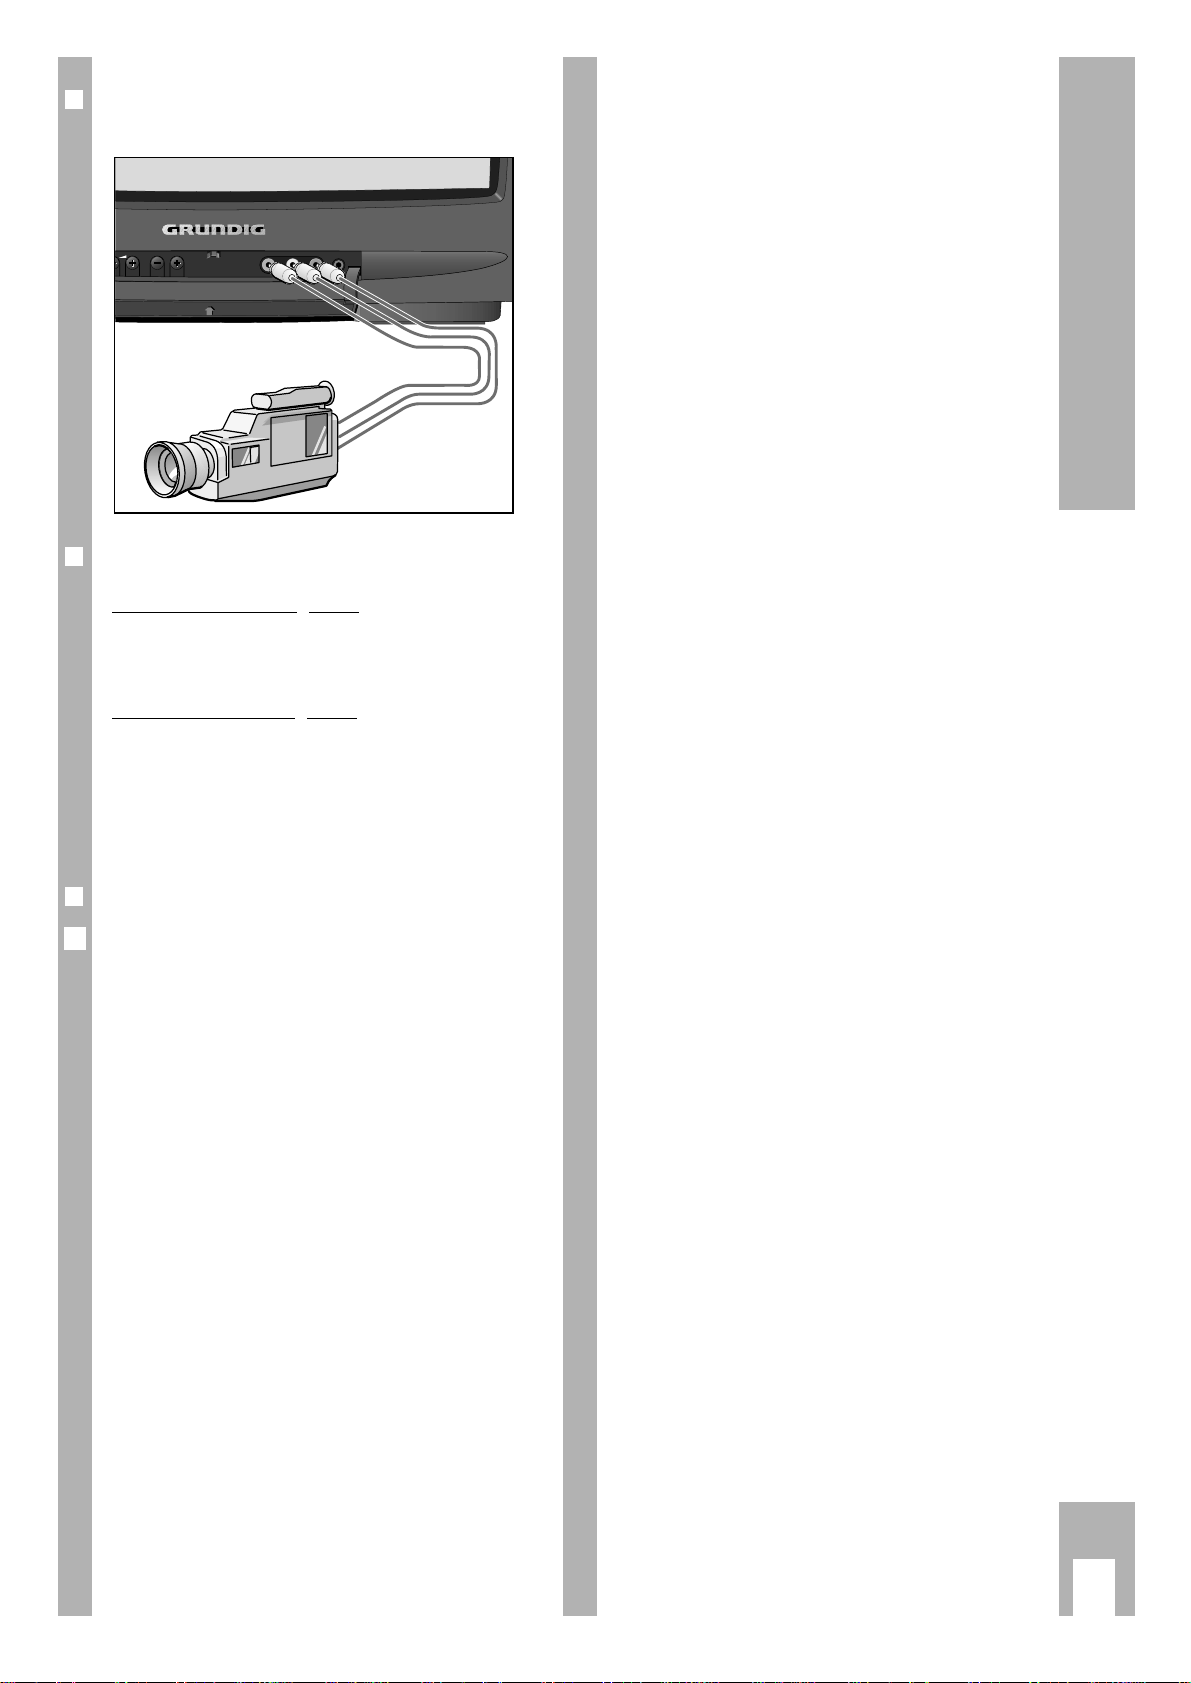
Anschluß eines Video-Recorders,
Camera-Recorders oder SatellitenReceivers
r
Anschließen
Video-Recorder mit AV-Kabel an die Buchse AV
anschließen.
r
Bedienen des Video-Recorders
Taste 0AV so oft drücken, bis AV 1 angezeigt wird.
Wiedergabe des Video-Recorders starten.
Am Bildschirm sehen Sie die Recorder-Wiedergabe.
Sie können auch einen S-VHS-Recorder
anschließen.
Hierzu muß die Buchse AV auf S-VIDEO umgeschaltet werden.
Die Taste P/C drücken.
Mit der Taste
ņ – oder + ŀ S-VIDEO anwählen.
Menü mit der Taste
ǺǺ
verlassen.
Kopfhörer
r
Anschließen
Kopfhörer (3,5 mm ø Klinke) mit Buchse m verbinden (die Lautsprecher sind abgeschaltet).
r
Kopfhörer-Lautstärke verändern
Verändern mit Tasten ņ –, + ŀ
.
1
FBAS L – Audio – R
3
2
1
1
EURO-AV
EURO-AV
AUDIO
Anschluß eines Descramblers
(Decoder) oder eines externen
Gerätes (Videorecorder)
Einige Sender – deren Programme über Kabelanlagen oder Satelliten-Receiver zugeführt werden –
verschlüsseln ihre Sendungen. Bild und Ton sind
damit unkenntlich. Mit einem Decoderkönnen Sie
derartige Programme entschlüsseln.
Vorgehensweise:
Schließen Sie den Decoder/Videorecorder an der
EURO-AV-Buchse an.
Decoder:
Wählen Sie den Programmplatz, mit dem das
verschlüsselte Programm belegt ist.
Videorecorder:
Wählen Sie den Programmplatz, auf dem Sie die
Wiedergabe des Videorecorders sehen wollen.
Die Taste P/C drücken.
Mit der Taste
ņ – oder + ŀ DEC anwählen.
Taste P+ oder P- drücken, um auf ON zu schalten.
Einen für Decoderbetrieb vorbereiteten Programm-
platz erkennen Sie am Punkt nach dem P bei Programmwechsel.
Mit der Taste OK speichern.
Menü mit der Taste
ǺǺ
verlassen.
5
4
3
2
1
EURO-AV
m
Page 7
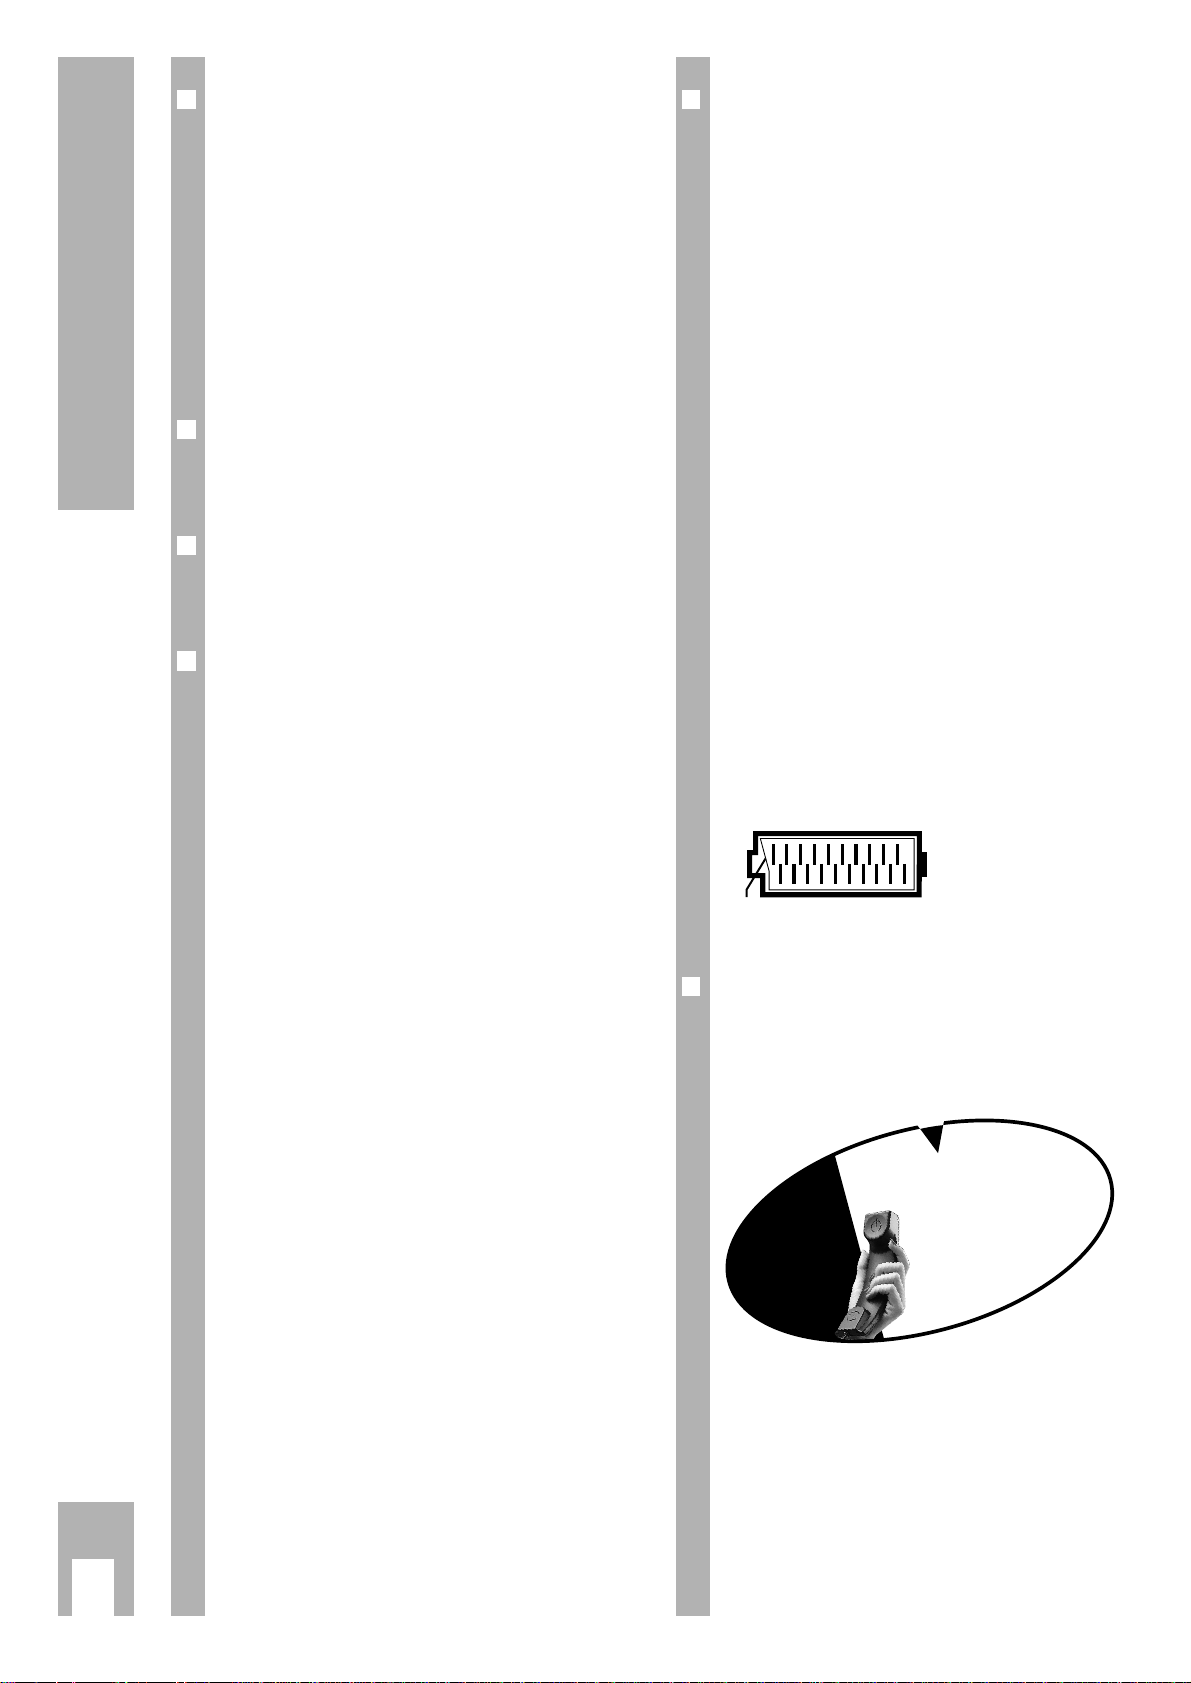
r
Anschluß eines Camera-Recorder
(VHS, Video 8).
r
Anschließen
Anschluß des Bildsi
gnales
Verbinden Sie die Buchse VIDEO IN mit der entsprechenden Bild-Buchse des Camera-Recorders.
Anschluß des Tonsignales
Verbinden Sie die Buchsen L AUDIO IN R mit den
Tonbuchsen des Camera-Recorders. Bei MonoWiedergabe ist die Buchse L AUDIO IN mit der entsprechenden Tonbuchse am Camera-Recorder zu
verbinden.
r
Bedienen des Camera-Recorders
Taste 0AV so oft drücken, bis AV 2 angezeigt wird.
Wiedergabe des Video-Recorders starten.
Am Bildschirm sehen Sie die Recorder-Wiedergabe.
(Kein überspielen zur Euro-AV-Buchse möglich!).
1
FBAS L – Audio – R
P
Ķ
7
Anschlußmöglichkeiten
m
Page 8
r
Netzspannung:
220 – 240V, 50/60Hz
(Regelbereich des Netzteiles 165 … 265V)
»Das Gerät darf nur mit dem beiliegenden
Netzkabelset betrieben werden. Es verhindert
Störungen aus dem Netz und ist Bestandteil der
Gerätezulassung.
Für Ersatzzwecke bestellen Sie bitte bei einer
Kunden-dienst-Stelle nur das Netzkabelset mit
der Bezeichnung GWN 9.22/Sachnummer
8290.991-316«.
r
Aufnahme:
ca. 70 W
In Bereitschaft (stand by) 9 W
r
Empfangsbereiche:
C01 … C99
Sonderkanäle S01 … S41
r
Tonendstufe:
2 x 8 W Musikleistung (2 x 4 W Sinus)
Das Gerät entspricht den VDE-Sicherheitsbestim-
mungen und den Vorschriften der Deutschen Bundespost (Zulassungs-Zeichen siehe Typenaufkleber
auf der Geräterückseite), ferner der Verordnung
über den Schutz vor Schäden durch Röntgenstrahlen. Die Röntgenstrahlung – verursacht durch die
Bildröhre – ist ausreichend abgeschirmt und darum
völlig ungefährlich. Beschleunigungsspannung
max. 29kV/mittlerer Strahlstrom 1,0mA.
Unsachgemäße Eingriffe, insbesondere Verändern
der Hochspannung oder Einbau eines anderen
Bildröhrentyps, können dazu führen, daß Röntgenstrahlung in erheblicher Stärke auftritt. So
veränderte Geräte entsprechen nicht mehr dieser
Zulassung und dürfen nicht betrieben werden.
r
Kontaktbelegung EURO-AV-Buchse
Wenn Sie an das Fernsehgerät Zusatzgeräte anschließen wollen (z. B. Computer, Verstärkeranlage),
dann kann Ihr Fachhändler anhand der folgenden
Anschlußtabelle eine normgerechte Verbindung
herstellen:
Stift Signal
11 = Audio Ausgang rechts
12 = Audio Eingang rechts
13 = Audio Ausgang links
14 = Audio Masse
15 = Blau Masse
16 = Audio Eingang links
17 = RGB Blau Eingang
18 = Schaltspannung
19 = Grün Masse
10 = –
11 = RGB Grün Eingang
12 = –
13 = Rot Masse
14 = Masse
15 = RGB Rot Eingang (Chroma bei SVideo)
16 = RGB Schaltspannung
17 = Video Masse
18 = RGB Schaltspannung Masse
19 = Video Ausgang
20 = Video Eingang
21 = Abschirmung/Masse
r
GRUNDIG Kundenberatungszentrum
Haben Sie Fragen?
Unser Kundenberatungszentrum steht Ihnen werk-
tags stets von 8.00 – 19.00 Uhr zur Verfügung.
montags bis freitags
von 8.00 – 19.00 Uhr
* Gebührenpflichtig –
in Deutschland und
Österreich möglich
STETS FÜR SIE DA!
DEUTSCHLAND
01 80/5 30 21 22*
ÖSTERREICH
06 60/66 99*
GRUNDIG
KUNDENBERATUNGS-
ZENTRUM
Ķ
8
Technische Daten
220
21
119
Page 9
ķ
9
Safety and Installation
Inserting the Battery into the
Remote Control Handset
Insert the battery supplied. Make sure it is inserted
correctly (markings in the battery compartment).
Ń
!
When the battery is dead, the message
” BATTERY” appears on the picture screen.
Remove the dead battery immediately.
We assume no responsibility for damage resulting
from battery leakage.
Dead batteries must be disposed of properly.
Connecting the TV Set
Insert the plug of the aerial lead into the aerial
socket É of the TV set.
Insert the plug of the mains lead into a wall outlet.
Switching the TV Set On/Off
Press the
¢
IO
button on the unit.
The unit can be switched off from stand-by mode
by pressing the
Ǽ
button on the remote control.
Ń
!
If you do not use the TV set for extended periods of
time (e.g. at night), turn it off with this button.
This helps you to save energy.
The dialogue line as user’s guide
Ń
!
The line which is displayed at the bottom of the
menus shows you which buttons on the remote
control handset are to be used to change settings..
The
>, <,
ʺʺ, ɶɶ
signs on the picture screen are
symbols for the following buttons on the remote
control handset:
ʺʺ, ɶɶ
= P+ and P– buttons. Cursor movement
up/down for function selection.
<, > = ņ – and + ŀ buttons: Cursor move-
ment left/right for function selection.
In the following text, the buttons instead of the
symbols will be shown.
2
1
2
1
1
Additional Information for Units sold in Great Britain
Units sold in GB are suitable for operation from a 240 V AC, 50 Hz mains supply.
In case this appliance is supplied with a Safet
y Standard Approved mains lead fitted with a non-rewireable 13 Amp mains plug which, if unsuitable for your
socket, should be cut off and an appropriate plug fitted by a
qualified electrician. The fuse and fuse holder must be removed from the plug as
accidental insertion of the redundant plug into a 13 Amp socket is likely to cause
an electrical hazard.
Note: The severed plug must be destroyed to avoid a possible shock hazard
should it be inserted into a 13 Amp socket elsewhere.
If it is necessary to change the fuse in the non-rewireable plug, the correct type
and rating (5 Amp ASTA or BSI approved BS 1362) must be used and the fuse
cover must be refitted. If the fuse cover is lost or damaged the lead and plug must
not be used until a replacement is obtained. Replacement fuse covers should be
obtained from your dealer.
If a non-rewireable plug or a rewireable 13 Amp (BS 1363) plug is used, it must
be fitted with a 5 Amp ASTA or BSI approved BS 1362 fuse. If any othe type of
plug is used it must be protected by a 5 Amp fuse either in the plug or at the distribution board.
Important:
The wires in the mains lead are coloured in accordance with the follow-ing code:
BLUE – NEUTRAL
BROWN – LIVE
As the colours of the wires in the mains lead of your appliance may not correspond with the coloured marking identifying the terminals in your plug, proceed
as follows:
Connect the BLUE coloured wire to plug terminal marked with the letter "N" or
coloured black.
Connect the BROWN coloured wire to the plug terminal marked with a letter "L" or
coloured red.
In no circumstance must any of the wires be connected to the terminal marked
with a letter "E", earth symbol , coloured green or green and yellow.
Replacement mains lead can be obtained from your dealer.
Ń
!
When setting up your television, select a location
where as little light as possible falls on the screen.
Ń
!
The ideal viewing distance is five times the diagonal
width of the screen.
Ń
!
If the television is to be built into a compartment or
similarly enclosed, minimum distances must be
maintained.
Ń
!
Do not cover the ventilation openings on the back.
Ń
!
The heat exchange inside the unit generates an air
circulation which attracts dust particles (carpet and
curtain fibres and home dust). These particles
accumulate inside the ventilation slots obstructing
these over the years and causing a build-up of heat.
Heat build-up can reduce the service life of your
television, and can also be dangerous.
For your own safety, let remove the dust deposits
by a specialist from time to time.
Ń
!
Never set up speakers next to the unit.
Ń
!
When setting up and using this unit, please make
sure that the mains connection wire is free and not
jammed in order to avoid damage.
Ń
!
Never place the television near heat sources.
Ń
!
Even if your television is switched off, it can still be
damaged by lightning striking the mains and/or
aerial cables.
For this reason, you should always disconnect your
television from the mains and the aerial system
during electrical storms.
Ń
!
Never expose the unit to moisture.
Ń
!
Do not insert foreign objects into the ventilation
openings on the back.
Caution! High voltage!
10
cm
20
cm
20 cm
10
cm
Page 10
ķ
10
Programme Position Allocation
1st Possibility
r
The Automatic Tuning System ATS
This automatic tuning system scans the entire
reception range and automatically stores the
channels found in memory.
How to pr
oceed:
Switch the TV set on from standby with one of the
buttons 1...9.
Press for approximately 4 seconds on the P/C but-
ton to display the ATS menu.
Press the
OK
-button to start the search function.
The search can last longer than one minute. When it
has stopped, setting of the TV set is completed.
If you do not like the order in which the programmes are stored on the programme positions, you
can change this according to your preferences.
Ń
!
The search can be aborted using the ǺǺbutton.
r
Changing the Programme Order
Example: you wish to move the programme stored
on position 2 to position 5.
Select programme position 2.
Press the P/C button. The programme menu is dis-
played.
Under ”PR”, enter the new programme position
number 05 as two digits with the buttons 1...9.
Press the OK-button to terminate the adjustment.
Press the
ǺǺ
button to return to TV mode.
5
4
3
2
1
3
2
1
2nd Possibility
r
Direct Channel Entry
For this, you need to know the channel numbers of
the TV prgrammes.
Ń
!
If you have already assigned the programmes to the
programme positons with the help of the ATS function, this procedure is not required.
How to
proceed:
Press the P/C-button to display the programme
menu.
Ń
!
Attention – this is not possible in the AV position.
Press the
ņ – or + ŀ button to select the desired
item.
Under ”PR” press P+/P- to select the desired pro-
gramme position.
" "CH" enter channel number, (for special
channel, press P+ or P- to select ”S”
instead of ”C”).
Press the +
ŀ button. Use the numbe-
red buttons to enter the required
channel number.
Hold down P+ or P- to start the channel search. This stops at each programme being received.
" "DEC" If an encrypted prgramme is allo-
cated to the programme position and
a corresponding decoder connected,
select ”ON”.
" "FT" If fine tuning should be necessary
after programme allocating, then
press P+ or P- until the best picture
and sound quality is obtained.
Press OK to store the modified settings.
The programme data of the next programme position is displayed.
Press ǺǺto return to the television picture.
Ń
!
If the channel number 00 is entered with P+ or P-
on one programme position, all following programme positions can no longer be selected.
4
3
2
PR CH DEC FT
22 S06 ON 00
0-9
ɶɶʺʺ
ɼɦ OK i
1
ĵ
Dialogue line
Page 11
ķ
11
The Remote Control Handset
1…9 Select programme position
(– P + on set) and
0/AV switch the TV set on from
standby
or select AV position.
P+ / P– Select programme positions step
by step: P+ : (1, 2, 3 …),
P– : (…3, 2, 1) or
P+ : switch on from standby with
last selected programme position.
Move cursor up or down.
OK
Modify and activate various
functions. Press
OK-
button twice:
optimum setting.
ņ –,+ ŀSet volume or move cursor to the
left and to the right.
Teletext: current page number
+ 10 pages.
Teletext: current page number – 1
Ȅ
Time on/off.
Teletext: current page number + 1
i
+/– Colour contrast.
VIDEO Video recorder remote control
(press and hold down VIDEO button).
AUX Teletext: call up dialogue line.
Ǽ
Switch to standby and switch
on with last selected programme position.
ʀ
Sound on/off (mute).
Ǻ
Display/suppress programme
number (status page).
Set b/w contrast: press
Ǻ, OK,
ņ – or + ŀ.
Set Sleep Timer (switch-off
time 01…99 min: press
Ǻ, OK,
Ǻ, and numeric buttons 1…9.
Automatic frequency control
on/off: press
Ǻ, OK, Ǻ, Ǻ, ņ –
or + ŀ.
Call up Audio menu: Ǻ, ʀ
TXT Teletext ɫ TV mode
Teletext: next hundreds page.
v
+/– Brightness.
SAT Satellite receiver remote
control (press and hold down
SAT button).
P/C Call up programme data.
Keep pressed for 4 seconds:
call up ATS.
Ń
!
Every changed value is stored after 8 seconds automatically or when switching to standby.
Ń
!
This television was tested with maximum contrast.
It is advisable to turn down the contrast to offer you
the best picture quality depending on lighting conditions or on the location where your TV is set up.
Ń
!
If you wish to have the programme position number permanently displayed, press the Ǻ button.
To supress the display, press the
Ǻ button once
again.
Remote Control of a Video Recorder
The remote control handset of your television enables also remote control of Grundig video
recorders. Your specialized dealer can tell you
which video recorders are suited for this.
Press and hold down the VIDEO button.
This switches the remote control handset into the
video recorder mode.
Then press the desired function button.
The following table shows you which buttons are
to be used for the different recorder functions.
ĵķ
(Numeric button 1) = Reverse picture search
ĶŁ
(Numeric button 2) = Forward picture search
•
( – i button) = Start recording
n
( i + button) = Stop
ĵĵ
(Numeric button 7) = Fast rewind
ŁŁ
(Numeric button 8) = Fast forward wind
II
( – v button) = Pause
ı
( v + button) = Start playback
Ľ
(Numeric button 4) = Programme position –
Ń (Numeric button 5) = Programme position +
TP 712
123
456
89
7
AV
0
P
OK
–
+
P
Ȅ
Ǽ
ʀ
Ǻ
TXT
+
–
iv
VIDEO AUX P/C SAT
+
–
Page 12

ķ
12
Adjusting the Sound, Teletext
The Audio Menu
r
Calling Up the Audio Menu
Press the
ǺǺ
and then theʀbutton to display the
Audio menu.
Stereo, mono, two-channel–
Stereo expansion –
Treble –
Bass –
Balance –
Dialogue line –
Ń
!
After any adjustment, the Audio menu can be exited
by pressing the ǺǺbutton.
r
Stereo, Mono and Two-channel Sound
Broadcasts
If your television receives two-channel sound transmissions, for example, when a film is broadcast in
the original sound track on sound channel 2 (DUAL
B) and the synchronized version is broadcast on
sound channel 1 (DUAL A), you can select the
desired channel.
Press P+ or P- to select the first menu line.
Press
ņ –, + ŀ to select the desired sound
channel.
If a stereo broadcast is received, the set switches
automatically to stereo sound.
Ń
!
If the stereo sound is poor (weak signal), press
ņ –, + ŀ to switch to mono.
Ń
!
The mono setting can be stored separately for every
programme position by pressing the OK-button.
Indication of the sound mode
Each time the station changes the sound transmission mode (e.g. from mono to stereo), the mode is
displayed for approx. 4 seconds.
This indication takes also place when changing the
programme, however only if the mode differs from
the mono mode.
r
Stereo Expansion
This function improves the acoustic pattern during
stereo broadcasts and improves the sound of mono
broadcasts.
Use the P+ or P- button to select the corresponding
menu line.
Adjust with the
ņ – or + ŀ button (the set stereo
expansion is retained even when changing the programme position).
r
Treble, Bass, Balance
The settings of these functions can be corrected as
required.
Use the P+ or P- button to select the corresponding
menu line.
Adjust with the P+ or P- button.
2
1
2
1
2
1
STEREO MONO
ʀǁ ʀ…ǁ
ɦ
ɼ
f
ɶʺ < > Ǻ
1
Teletext
r
Call up Teletext: press the TXT button.
r
Select pages directly with the
1…9
buttons.
(Available pages: 100-899)
r
Calling up contents page
Press ǺǺbutton.
r
Call up dialogue line: press the AUX button.
= Enlarge character height
= Bypass waiting times (actual mode).
= Directly call up subpage
= Reveal answer
= Stop page
Select the functions with the
ņ – or + ŀ button and
call them up with the OK-button.
The functions 1, 3, 4, and 5 can also be selected
without calling up the dialogue line:
Enlarge character height: press the +
i button.
Directly call up subpage: press the –
i button.
Reveal answer: press the +
ŀ button.
Stop page: press the
ņ – button.
r
Selecting Pages by Means of the Cursor
(Page Catching)
i.e. without entering the page numbers. Move the
cursor to the desired Teletext page in an overview
page (pages containing three-digit page numbers).
Using this function, you need not type in the threedigit page numbers.
Press the P+ or P- button.
"Page Catching" is displayed on the top screen
border.
A light spot (cursor) is flashing on the first or last
page number of the overview page.
Use the P+ or P- button to move the cursor to the
desired page number.
Press the OK-button.
The page appears on the picture screen.
r
Floftext
With Floftext the coloured buttons provide access
to the subjects indicated in the dialogue line.
3
2
1
5
4
3
1
5
4
3
2
1
54321
ķ
ʄʄ
ķX /00 ķ? STOP
Page 13
ķ
13
Connection Possibilities
Connecting a Video Recorder or
Satellite Receiver
r
Connection
Connect the video recorder or satellite receiver with
an AV lead to the AV socket.
r
Operating the Video Recorder
Press the 0AV button.
Until AV1 is indicated.
Start playback on the video recorder.
The video playback is visible on the TV set.
You can also connect an S-VHS video
recorder
For this, the AV socket must be switched to
S-VIDEO.
Press the P/C button.
Use the
ņ – or + ŀ button to select S-VIDEO.
Press the
ǺǺ
button to exit the menu.
Connecting a Headphone
r
Connection
Connect the headphone (3.5 mm ø jack) with the m
socket (the speakers of the TV set ar switched off).
r
Adjusting the Headphone Volume
Adjust with the ņ –, + ŀ
buttons.
1
FBAS L – Audio – R
3
2
1
1
EURO-AV
EURO-AV
AUDIO
Connecting a Descrambler
(Decoder) or an External Unit
(Video Recorder)
Some providers which offer their programmes via
the cable TV system ”scramble” the picture and
sound signals so that you need a pay-TV decoder
(descrambler) if you wish to receive these programmes in a normal way.
How to proceed:
Connect the decoder/video recorder to the EUROAV socket.
Decoder:
Select the programme position on which the
encrypted programme is received.
Video recorder:
Select the programme position on which you wish
to see the video playback.
Press the P/C-button.
Press the
ņ – or + ŀ button to select DEC.
Press the P+ or P- button to select ON.
A programme position prepared for decoder operation can be recognized at a fullstop appearing after
the P when changing the programme position.
Press OK to store the setting.
Press
ǺǺ
to exit the menu.
5
4
3
2
1
EURO-AV
m
Page 14
ķ
14
Connection Possibilities
Connecting a Camcorder
(VHS, Video 8)
r
Connection
Connectin
g the video signal
Connect the VIDEO IN socket with the corresponding video socket on the camcorder.
Connectin
g the audio signal
Connect the L AUDIO IN R sockets with the audio
sockets on the camcorder. For mono playback,
connect the L AUDIO IN socket with the corresponding audio socket on the camcorder.
r
Operating the Camcorder
Use the 0
AV
button to select AV 2.
Start playback on the camcorder.
The video playback is visible on the TV set.
(It is not possible to copy to the Euro-AV socket!)
1
FBAS L – Audio – R
P
m
Page 15

ķ
15
Specification
r
Mains voltage:
220 – 240V, 50/60Hz
(power supply control range 165 … 265V)
This unit may only be operated with the power
supply cable set which has been supplied. It prevents interference from the mains, and is considered an obligatory component of this unit.
For a replacement, contact the nearest customer
service center and order only the power supply
cable set with the following designation:
GWN 9.22/article number 8290.991-316.
r
Power consumption:
approx. 70 W
Standby: 9 W
r
Channel coverage:
C01 … C99
Special channels S01 … S41
r
Sound output:
2 x 8 W music power (2 x 4 W sine power)
This unit conforms to VDE safety regulations and
directives of the Deutsche Bundespost (German
Federal Post Office; see certification mark on the
type sticker on the rear of the unit), as well as all
relevant ordinances governing X-ray emissions.
The picture tube, which emits X-rays, is sufficiently
shielded and therefore represents no danger.
Accelerating voltage is max. 29kV with a mean
beam current of 1,0mA.
Unauthorized tampering with the unit, in particular
making adjustments to the high voltage system, or
installing a different picture tube, can considerably
increase X-ray emissions. Units so altered no
longer conform to applicable safety regulations and
may not be operated.
Subject to alterations. E. and O.E.
r
Pin Assignment of EURO-AV Socket
If you want to connect other devices to your television (for example, a computer or amplifier), your
dealer can provide you with a normed standard
connection by means of the following table:
Pin Signal
1 = Audio output right
2 = Audio input right
3 = Audio output left
4 = Audio, earth
5 = Blue, earth
6 = Audio input left
7 = RGB blue input
8 = Switching voltage
9 = Green, earth
10 = –
11 = RGB green input
12 = –
13 = Red, earth
14 = Earth
15 = RGB red input (chroma for SVideo)
16 = RGB switching voltage
17 = Video, earth
18 = RGB switching voltage, earth
19 = Video output
20 = Video input
21 = Shielding/earth
220
21
119
Page 16

ƴ
16
Sicurezza e installazione
Ń
!
Posizionare l’apparecchio in modo tale che lo
schermo venga investito dalla minor quantità possibile di luce esterna.
Ń
!
La distanza ideale per guardare il televisore è pari a
cinque volte la diagonale dello schermo.
Ń
!
Se il televisore viene sistemato all’interno di un
mobile, è necessario comunque rispettare delle
distanze minime.
Ń
!
Controllare che le fessure di ventilazione del pannello posteriore non vengano coperte.
Ń
!
A causa dello scambio di calore che ha luogo
all’interno dell’apparecchio, si forma una circolazione d’aria che provoca l’aspirazione di particelle di
polvere (fibre di tappeti e tendine o semplice polvere). Queste si depositano anche sulle fessure di
ventilazione, che col tempo si otturano e ciò può
portare ad accumulo di calore.
L’accumulo di calore può essere pericoloso e può
avere effetti negativi sulla durata dell’apparecchio.
Per sicurezza, fare eliminare ogni tanto i depositi di
polvere da un tecnico.
Ń
!
Tenere le casse dell’impianto stereo lontane dal
televisore.
Ń
!
Fare attenzione che, durante l’installazione ed anche
in seguito, il cavo di alimentazione sia libero e non
incastrato e che non venga danneggiato.
Ń
!
Tenere l’apparecchio lontano da fonti di calore.
Ń
!
Anche quando è spento, il televisore potrebbe essere danneggiato da un fulmine attraverso la rete di
corrente e/o il cavo dell’antenna.
Pertanto, in caso di temporale, è consigliabile
estrarre la spina del cavo d’alimentazione e
dell’antenna.
Ń
!
Proteggere il televisore dall’umidità.
Ń
!
Non introdurre corpi estranei nelle fessure di ventilazione del pannello posteriore.
Attenzione! Alta tensione!
Inserimento della pila nel
telecomando
Inserire la pila in dotazione, facendo attenzione alla
polarità (indicata sul fondo del vano pile).
Ń
!
In caso di batterie scariche, sullo schermo appare la
scritta: » BATTERY«.
Rimuovere immediatamente le pile scariche.
Non sono coperti da garanzia i danni provocati dalla
fuoriuscita di liquido dalle pile scariche.
Gettare le pile scariche negli appositi contenitori.
Collegamento del televisore
Inserire la spina del cavo dell’antenna nella presa
É, posta sul televisore.
Inserire la spina del cavo d’alimentazione nella
presa di corrente.
Accensione/spegnimento del
televisore
Premere il tasto
¢
IO
sul televisore.
Commutazione nel modo di attesa (Stand-by): Premere sul telecomando il tasto
Ǽ
.
Ń
!
Quando il televisore non viene utilizzato per lungo
tempo (per es. durante la notte), spegnerlo premendo questo tasto.
In tal modo si risparmia energia.
La riga di dialogo come guida
Ń
!
Nella riga visualizzata sul bordo inferiore dei menu,
vengono indicati i tasti del telecomando con i quali è
possibile eseguire le modifiche.
I simboli
>, <,
ʺʺ, ɶɶ
, visualizzati sullo schermo, si
riferiscono ai seguenti tasti del telecomando:
ʺʺ, ɶɶ
= tasti P- e P+: spostamento della barra
colorata (cursore) verso l’alto/il
basso, per la selezione delle funzioni;
<, > = tasti ņ – e + ŀ: spostamento della
marcatura colorata (cursore) verso
destra/sinistra, per la selezione delle
funzioni.
All’interno dei testi, invece dei simboli vengono rappresentati i tasti veri e propri del telecomando.
2
1
2
1
1
10
cm
20
cm
10
cm
20 cm
Page 17

ƴ
17
Memorizzazione dei programmi
1ª possibilità
r
Il sistema di memoria delle emittenti
»ATS«
Il sistema di ricerca automatica dei programmi ATS
esplora l’intera gamma di ricezione e memorizza
automaticamente tutti i programmi trovati.
Procedura:
Se il televisore si trova nel modo di attesa (standby), accenderlo premendo i tasti 1...9.
Premere il tasto P/C per ca. 4 secondi, finché non
appare il menu ATS.
Avviare la ricerca automatica con il tasto OK.
La procedura di ricerca automatica può durare
anche più di un minuto. Al termine della ricerca, le
regolazioni del televisore sono concluse. Vi auguriamo buon divertimento e buona visione.
Se la sequenza in base alla quale sono state automaticamente memorizzate le posizioni di programma non corrisponde ai propri gusti personali, è
possibile sostituire a piacere i programmi memorizzati su tali posizioni.
Ń
!
Con il tasto ǺǺsi può interrompere la ricerca
automatica.
r
Modificare l’ordine dei programmi
Esempio: supponiamo che si voglia «spostare» un
programma dalla posizione 5 alla posizione 2.
Selezionare la posizione di programma 2.
Premere il tasto P/C Sullo schermo appare il menu
Programma.
Alla voce »PR«, digitare la posizione di programma
05, a due cifre, con i tasti 0…9.
Premere il tasto OK La procedura è conclusa.
Per ritornare al normale funzionamento del televi-
sore, premere il tasto
ǺǺ
.
5
4
3
2
1
3
2
1
2ª possibilità
r
Mediante immissione diretta dei numeri
di canale
Questa funzione è consigliabile solamente nel caso in
cui si conoscano i numeri di canale dei programmi.
Ń
!
Se la memorizzazione dei programmi è stata eseguita con la ricerca automatica ATS, questa regolazione non è necessaria.
Procedura
Premere il tasto P/C; sullo schermo appare il menu
Programma.
Ń
!
Attenzione: ciò non è possibile nella posizione AV.
Selezionare la posizione desiderata con il
tasto
ņ – o + ŀ:
»PR«selezionare la posizione di programma da
memorizzare con i tasti P+/P-;
»CH« digitare il numero di canale (per i canali spe-
ciali: »S« invece »C«, con il tasto P+).
Premere il tasto +
ŀ. Digitare il numero del
canale desiderato servendosi dei tasti numerici.
Tenendo premuto il tasto P+ o P- viene avviata la ricerca automatica dei canali, che si
arresta ad ogni programma ricevibile.
»DEC« Se in questa posizione di programma viene
memorizzato un programma codificato, ed è
stato collegato un Descrambler (decodificatore) idoneo, occorre selezionare »ON«.
»FT« Se dopo aver memorizzato un programma si
rende necessaria una sintonizzazione di precisione:
Premere il tasto P+ o P- fino ad ottenere la
qualità d’immagine e di suono soggettivamente migliori.
Memorizzare i valori modificati con OK.
Sullo schermo appaiono i dati relativi alla posizione
di programma seguente.
Per ritornare al normale programma TV, premere il
tasto ǺǺ.
Ń
!
Se su una posizione di programma viene memorizzato il numero di canale 00, tutte le posizioni di
programma seguenti non potranno più essere selezionate con i tasti P+ / P-.
4
3
2
PR CH DEC FT
22 S06 ON 00
0-9
ɶɶʺʺ
ɼɦ OK i
1
ĵ
Riga di dialogo
Page 18

ƴ
18
Il telecomando
Ń
!
Ogni valore modificato viene automaticamente
memorizzato dopo ca. 8 secondi, oppure quando si
spegne il televisore (in stand-by).
Ń
!
Il televisore è stato collaudato con il massimo contrasto. A seconda del luogo d’installazione e della
luminosità dell’ambiente in cui si trova il televisore,
è opportuno ridurre leggermente il contrasto, in
modo da ottenere una qualità ottimale dell’immagine.
Ń
!
Con il tasto ǺǺè possibile visualizzare in modo
continuo l’indicazione del programma.
Per disattivare l’indicazione, premere di nuovo il
tasto
ǺǺ
.
Operazioni preliminari:
Tenendo premuto il tasto VIDEO attivate il
telecomando per il funzionamento video. Premete
successivamente il tasto della funzione desiderata.
La seguente lista indica come utilizzare le diverse
funzioni.
ĵķ (tasto numerico 1)= ricerca d‘immagine in
avanti
ĶŁ (tasto numerico 2)= ricerca d‘immagine indie-
tro
l (tasto – i) = inizio registrazione
n (tasto + i) = arresto
ĵĵ (tasto numerico 7)= riavvolgimento veloce
ŁŁ (tasto numerico 8)= avanzamento veloce
lll (tasto – v) = pausa
ı (tasto – v) = inizio riproduzione
Ľ (tasto numerico 4)= posizione di programma -
Ń (tasto numerico 5) = posizione di programma +
1…9 Selezione delle posizioni di pro-
gramma (sul televisore – P +) e
0/AV accensione del televisore quando
si trova nel modo di attesa (standby), oppure selezione della
posizione AV.
P+ / P– Selezione progressiva delle posi-
zioni di programma: P+: (1, 2, 3
…), P-: (…3, 2, 1) oppure
P+: accensione dal modo di atte-
sa (stand-by), sull’ultima posizione di programma selezionata.
Spostamento del cursore verso
l’alto o il basso.
OK Modifica e attivazione di diverse
funzioni. Premendo due volte il
tasto OK: regolazione ottimale.
ņ –,+ŀ Volume, oppure spostamento del
cursore verso sinistra o destra.
senza funzione
Televideo: numero di pagina atuale -1 pagina
Ȅ
Visualizzazione/disattivazione orologio, seleziona la pagina succesiva.
i
+/– Modifica del contrasto di colore.
VIDEO Comando a distanza del
videoregistratore (tenendo
premuto il tasto VIDEO).
AUX senza funzione
Ǽ
Spegnimento televisore, nel
modo di attesa (stand-by), e
accensione sull’ultima posizione di programma selezionata.
ʀ
Attivazione/disattivazione audio.
Ǻ Visualizzazione/disattivazione
del numero di programma.
Regolazione Tint in caso di
ricezione NTSC: premere:
Ǻ, OK,
ņ – o + ŀ.
Immissione Sleep Timer (ora
di spegnimento, 01…99 min.):
premere
Ǻ, OK, Ǻ, e i tasti
numerici 1…9.
Modifica del contrasto b/n:
premere
Ǻ, OK, Ǻ, Ǻ, ņ –o + ŀ.
Audio-Menü aufrufen: Ǻ, ʀ
TXT Commutazione Televideo
ɫ TV.
senza funzione
v
+/– Modifica della luminosità.
SAT Comando a distanza del ricevi-
tore da satellite (tenendo
premuto il tasto SAT).
P/C Richiamo dei dati del program-
ma. Tenendo premuto il tasto
per 4 secondi: richiamo di ATS.
TP 712
123
456
89
7
AV
0
P
OK
–
+
P
Ǽ
ʀ
TXT
Ȅ
+
–
iv
VIDEO AUX P/C SAT
+
–
Ǻ
Page 19

ƴ
19
Modifica dell’audio, Televideo
Il menu Audio
r
Richiamare il menu Audio
Premere il tasto ǺǺe poi il tastoʀ; sullo schermo
appare la pagina »Menu Audio«.
Stereo, Mono, Bicanale –
Ampiezza stereo –
Toni alti –
Toni bassi –
Bilanciamento –
Riga di dialogo –
Ń
!
Il »Menu Audio« può essere disattivato, dopo ogni
regolazione, con il tasto ǺǺ.
r
Trasmissione Stereo, Mono, Bicanale
Se il televisore riceve trasmissioni bicanale, come
per es. un film in lingua originale sul canale audio 2
(DUAL B) e la versione doppiata sul canale audio 1
(DUAL A), è possibile selezionare il canale audio.
Selezionare la prima riga con il tasto P- o P+.
Selezionare il canale audio con i tasti
ņ –, + ŀ .
Quando il televisore riceve trasmissioni in stereofonia, esso commuta automaticamente sulla riproduzione stereo.
Ń
!
Nel caso in cui la riproduzione audio stereo non sia
ottimale, con i tasti ņ –, + ŀ è possibile commuta-
re su »Mono«.
Ń
!
La regolazione «Mono» può essere memorizzata in
corrispondenza di una posizione di programma,
premendo il tasto OK .
Indicazione del tipo di trasmissione audio
Ogni volta che l’emittente cambia il tipo di trasmissione audio (per esempio da Mono a Stereo), sullo
schermo appare per ca. 4 secondi l’indicazione
corrispondente.
Essa appare anche quando si cambia programma,
tuttavia solamente per i tipi di trasmissione audio
che differiscono da quello Mono.
r
Ampiezza stereo
Allarga lo spettro acustico durante le trasmissioni stereo e lo migliora durante le trasmissioni in mono.
Selezionare la riga corrispondente con il tasto
P- o P+.
Eseguire la modifica con il tasto
ņ – o +ŀ (la rego-
lazione dell’ampiezza stereo rimane impostata
anche quando si cambia programma).
r
Alti, bassi, bilanciamento
Le regolazioni di queste funzioni possono essere
modificate secondo i gusti personali.
Selezionare la riga corrispondente con i tasti P-, P+.
Eseguire le correzioni con il tasto
ņ – o + ŀ.
2
1
2
1
2
1
STEREO MONO
ʀǁ ʀ…ǁ
ɦ
ɼ
f
ɶʺ < > Ǻ
1
Televideo
r
Richiamo del Televideo:
premere il tasto TXT.
r
Selezione diretta delle pagine con i
tasti 0 …9
(pagine disponibili: 100-899)
r
Richiamare il sommario
Premere il tasto ǺǺ.
r
Richiamo della riga di dialogo: premere il
tasto AUX.
= Raddoppiare l’altezza dei caratteri
= Trascorrere i tempi di attesa (funzionamento
attuale).
= Richiamare direttamente una sottopagina
= Visualizzare le risposte
= Arresto delle pagine
Selezionare le funzioni con il tasto
ņ – o + ŀ e
richiamarle con il tasto OK.
Le funzioni 1, 3, 4 e 5 sono eseguibili anche senza
richiamare la riga di dialogo, nel modo seguente.
Raddoppiare la grandezza dei caratteri: premere il
tasto +
i .
Richiamare direttamente le sottopagine: premere il
tasto –
i.
Visualizzare le risposte: premere il tasto +
ŀ.
Arresto delle pagine: premere il tasto
ņ –.
r
Page catching
significa che si possono selezionare le pagine senza
dover inserire i relativi numeri. Per mezzo del cursore si possono scegliere le pagine Televideo desiderate direttamente dai sommari (pagine i cui
numeri sono a tre cifre). Con questa funzione si
risparmia il fastidio di dover sempre immettere il
numero di pagina a tre cifre.
Premere il tasto P+ o P-.
Sul bordo superiore dell´immagine viene visualizza-
to «Page-Catching».
In corrispondenza del primo e/o dell´ultimo numero
di pagina del sommario lampeggia un punto luminoso rettangolare (cursore).
Per mezzo dei tasti P+ o P- posizionare il cursore
sul numero di pagina desiderato.
Premere il tasto OK.
La pagina appare sullo schermo.
r
Floftext
Con Floftext i tasti colorati conducono ai temi
sovraimpressi sulla riga dialogo.
3
2
1
5
4
3
1
5
4
3
2
1
54321
ķ
ʄʄ
ķX /00 ķ? STOP
Page 20

ƴ
20
Possibilità di collegamento
Collegamento di un videoregistratore o di un ricevitore da satellite
r
Collegamento
Collegare il videoregistratore o il ricevitore da satellite alla presa AV del televisore, usando un cavo AV
corrispondente.
r
Azionamento del videoregistratore
Premere il tasto 0AVfinché non appare AV 1.
Avviare la riproduzione del videoregistratore.
Sullo schermo appaiono le immagini riprodotte dal
videoregistratore.
E’ anche
possibile collegar
e un
videor
egistrator
e S-VHS
In questo caso, occorre commutare la presa AV su
S-VIDEO.
Premere il tasto P/C.
Selezionare S-VIDEO con il tasto
ņ – o + ŀ.
Per uscire dal menu, premere il tasto
ǺǺ
.
Cuffie
r
Collegamento
Collegare un paio di cuffie (con spinotto di ø 3,5 mm)
alla presa m (gli altoparlanti vengono disattivati).
r
Modificare il volume d’ascolto delle cuffie
Eseguire la modifica con i tasti ņ –, + ŀ
.
1
FBAS L – Audio – R
3
2
1
1
EURO-AV
EURO-AV
AUDIO
Collegamento di un Descrambler
(decodificatore) o di un apparecchio
esterno (videoregistratore)
Alcune emittenti, i cui programmi vengono trasmessi via cavo o tramite satellite, codificano le loro
trasmissioni. In questo modo, il televisore non è in
grado di riconoscere i segnali dell’immagine e del
suono. Con un decodificatore è possibile decodificare questo tipo di programmi.
Procedura
Collegare il decodificatore/videoregistratore alla
presa EURO-AV.
Decodificatore:
selezionare la posizione di programma in cui è
memorizzato il programma codificato.
Videoregistratore:
selezionare la posizione di programma sulla quale
si desidera osservare la riproduzione del videoregistratore.
Premere il tasto P/C.
Selezionare DEC con il tasto
ņ – o + ŀ.
Premere il tasto P+ o P- per commutare su ON.
Memorizzare con il tasto OK.
Per uscire dal menu, premere il tasto
ǺǺ
.
5
4
3
2
1
EURO-AV
m
Page 21

ƴ
21
Possibilità di collegamento
Collegamento di una videocamera
(VHS, Video 8)
r
Collegamento
Se
gnale video
Collegare la presa VIDEO IN alla presa corrispondente della videocamera.
Se
gnale audio
Collegare le prese L AUDIO IN R alle prese audio
della videocamera. In caso di riproduzione Mono,
occorre collegare la presa L AUDIO IN alla presa
audio corrispondente della videocamera.
r
Azionamento della videocamera
Con il tasto 0AVselezionare – AV 2
Avviare la riproduzione della videocamera.
Sullo schermo appaiono le immagini riprodotte
dalla videocamera.
(Non è possibile la duplicazione attraverso la presa
Euro-AV!)
1
FBAS L – Audio – R
P
m
Page 22

ƴ
22
Dati tecnici
r
Tensione di rete:
220 – 240V, 50/60Hz
(campo di regolazione dell’alimentatore:
165 … 265V)
«Questo apparecchio può essere utilizzato solamente con il cavo d’alimentazione in dotazione, il
quale impedisce eventuali disturbi derivanti dalla
rete ed è parte integrante dell’apparecchio omologato.
In caso di sostituzione, ordinare solamente il kit
per il cavo d’alimentazione con la denominazione
GWN 9.22/numero di codice 8290.991-316, presso un Centro di Assistenza autorizzato».
r
Potenza assorbita:
ca. 70 W
nel modo di attesa (stand by): 9 W
r
Gamme di ricezione:
C01 … C99
Canali speciali S01 … S41
r
Stadio finale audio:
2 x 8 W potenza musicale (2 x 4 W sinusoidale)
Il presente apparecchio è conforme alle normative
di sicurez-za VDE e alle norme prescritte dalle Poste
Tedesche (vedi adesivo con marchio di omologazione sul retro dell'apparecchio) nonché alla direttiva per la prevenzione di danni causati dai raggi X.
L'emissione di raggi X attraverso il tubo catodico è
sufficientemente schermata e perciò completamente innocua. Tensione d'accelerazione max. 29kV/
corrente del fascio media 1,0mA.
Interventi inadeguati sull'apparecchio, in particolare
la modifica dell'alta tensione o il montaggio di un
tubo a raggi catodici di tipo diverso, possono causare un'emissione di raggi X molto più intensa rispetto a quella normale. Gli apparecchi così modificati non corrispondono più a questa omologazione
e non possono pertanto essere utilizzati.
r
Disposizione dei contatti nella presa
EURO-AV
Se si vogliono collegare apparecchi supplementari
(ad es. computer, amplificatore) al televisore, il
rivenditore di fiducia potrà eseguire un collegamento standard in base alla seguente tabella:
Pin Segnale
11 = Uscita audio destra
12 = Ingresso audio destra
13 = Uscita audio sinistra
14 = Massa audio
15 = Massa blu
16 = Ingresso audio sinistra
17 = Ingresso blu RGB
18 = Tensione di commutazione
19 = Massa verde
10 = –
11 = Ingresso verde RGB
12 = –
13 = Massa rossa
14 = Massa
15 = Ingresso rosso RGB
16 = Tensione di commutazione RGB
17 = Massa video
18 = Massa tensione di commutazione RGB
19 = Uscita video
20 = Ingresso video
21 = Schermatura/massa
Dichiarazione di conformità ai sensi del D.M. 28.08.95, n. 548.
Si dichiara che l'apparecchio illustrato nel presente libretto di
istruzioni per l'uso risponde alle prescrizioni dell'articolo 2,
comma 1 del D.M. 28 Agosto 1995, n. 548.
Fatto a: Fuerth il 16.12.1996
GRUNDIG AG
Kurgartenstrasse 37
D – 90762 Fuerth Bayern
DICHIRAZIONE DI CONFORMITA ' EX ART. 2 PAR. b)- D.M.
26.03.1992
Questo apparecchio è fabbricato nella Comunità Economica
Europea nel rispetto delle disposizioni di cui al D.M. 26.03.1992
ed in particolare è conforme alle prescrizioni dell'art. 1 dello
stesso D.M.
L’apparecchio è conforme alle direttive europee
89/336 CEE. 73/23 CEE e 93/68 CEE.
220
21
119
Page 23

ń
23
Veiligheid en opstellen
Ń
!
Stel het toestel zo op, dat zo min mogelijk licht van
buitenaf op het beeldscherm valt.
Ń
!
De ideale kijkafstand is de vijfvoudige beeldbuisdiagonaal.
Ń
!
Bij gebruik in een kast moeten de minimumafstanden in acht genomen worden.
Ń
!
Let erop, dat de ventiliatiesleuven van de achterwand nicht afgedekt worden.
Ń
!
Door warmte-uitwisseling in het toestel ontstaat er
een luchtcirculatie. Daarbij worden stofdeeltjes
(tapijt- en gordijnvezels en huisstof) aangezogen.
Deze deeltjes slaan o.a. in de ventilatiesleuven neer,
vernauwen de sleuven in de loop der jaren en kunnen daardoor een ophoping van warmte veroorzaken.
Ophopingen van warmte zijn een bron van gevaar
en verkorten de levensduur van het toestel.
Laat voor alle zekerheid af en toe de neerslag door
een vakman verwijderen.
Ń
!
Plaats geen luidsprekerboxen naast het toestel.
Ń
!
Let er a.u.b. op, dat tijdens het opstellen en het verdere gebruik het netsnoer vrij ligt, niet afgekneld of
beschadigd wordt.
Ń
!
Plaats het toetsel niet in de buurt van de verwarming.
Ń
!
Ook als het toestel uitgeschakeld is, kunnen door
blikseminslag in het stroomnet en/of in de antenneleiding beschadigingen optreden.
Bij onweer moet u daarom de net- en antenne-stekker eruit trekken.
Ń
!
Bescherm het toestel tegen vocht.
Ń
!
Steek geen vreemde voorwerpen in de ventilatiesleuven in de achterwand.
Opgelet hoogspanning!
Batterij in de afstandsbediening
plaatsen
Bijgevoegde batterij plaatsen, daarbij op de polen
van de batterij letten (in de bodem van het batterijvakje gemarkeerd).
Ń
!
Bij een lege batterij verschijnt op het beeldscherm
de melding: » BATTERY«.
Lege batterij beslist verwijderen.
Voor schaden, die door een lekkende batterij ontstaan, stellen wij ons niet aansprakelijk.
Voer lege batterijen mileuvriendelijk af.
Toestel aansluiten
Stekker van het antennesnoer in de antennebus É
van het TV-toestel steken.
Stekker van het netsnoer in het stopcontact steken.
Toestel in-/uitschakelen
Op het toestel de toest
¢
IO
indrukken.
In klaar voor gebruik (Stand-by) schakelen: =p de
afstandsbediening van de toets
Ǽ
indrukken.
Ń
!
Als u het toestel langdurig (bijvoorbeeld ‘s nachts)
niet gebruikt, dan schakelt u het met deze toets uit.
U bespaart daardoor energie.
De dialoogregel als hulpmiddel
Ń
!
In de regel op de onderste rand van het beeld van de
menu-meldingen ziet u met welke toetsen van de
afstandsbediening veranderingen verricht kunnen
worden.
De tekens
>, <,
ʺʺ, ɶɶ
op het beeldscherm zijn
symbolen voor de volgende toetsen van de
afstandsbediening:
ʺʺ, ɶɶ
= Toetsen P+ en P-. Bewegen van de
balk (cursor) naar boven/beneden
voor het oproepen van de functie.
<, > = Toetsen ņ – en + ŀ. Bewegen van de
aanwijzer (cursor) naar rechts/ links
voor het oproepen van de functie.
In de teksten worden in plaats van de symbolen de
toetsen van de afstandsbediening afgebeeld.
2
1
2
1
1
10
cm
20
cm
20 cm
10
cm
Bij dit produkt zijn batterijen geleverd.
Wanneer deze leeg zijn, moet u ze niet
weggooien maar inleveren als KCA.
Page 24

ń
24
Zenderplaatsen indelen
1e mogelijkheid
r
Het zendergeheugen-systeem »ATS«
De ATS-programma-zoekfunctie zoekt het gehele
ontvangstgebied af en legt alle gevonden zenders
automatisch vast.
Gaat u als volgt te werk:
Toestel met de toetsen 1…9 vanuit standby
inschakelen.
Toets P/C ca. 4 sec. indrukken, tot het ATS-menu
verschijnt.
Zoekfunctie met toets OK starten.
Het zoeken kan langer dan een minuut
duren. De instelling van het toestel is nu afgesloten.
Wij wensen u veel plezier tijdens het televisiekijken.
Als de automatische indeling van de zenderplaatsen
u niet bevalt, kunt u de op de zenderplaatsen vastgelegde zenders naar wens verwisselen (omzetten).
Ń
!
Worden sommige zenders door de ATS-zoekfunctie
niet gevonden, dan kunt u die met de 2e mogelijkheid – door direct invoeren van de kanaalgetallen –
op de zenderplaatsen zetten.
Ń
!
Met toets ǺǺkan de zoekfunctie afgebroken worden.
r
Indeling van de zenderplaats veranderen
Voorbeeld: De zender van zenderplaats 2 moet naar
zenderplaats 5.
Zenderplaats 2 kiezen.
Toets P/C indrukken. Het zender-menu verschijnt in
beeld.
Onder »PR « nieuwe zenderplaats 05 met de toet-
sen 0…9 met twee cijfers invoeren.
Toets OK indrukken. De handeling is afgesloten.
Met toets
ǺǺ
terug naar televisie-modus.
5
4
3
2
1
3
2
1
2e mogelijkheid
r
Door direct invoeren van de kanaalnummers
Dit is alleen zinvol, als u de kanaalnummers van de
zenders kent.
Ń
!
Werd de indeling van de zenderplaatsen met de
ATS-kanaalzoekfunctie uitgevoerd, dan is het niet
nodig deze instelling te verrichten.
Gaat u als vol
gt te werk:
Toets P/C indrukken, het zender-menu verschijnt in
beeld.
Ń
!
Attentie – in AV-stand niet mogelijk.
Met toets
ņ – of + ŀ de gewenste positie kiezen.
Onder »PR«met P+/P- in te delen zenderplaats
kiezen.
" »CH« Kanaalnummer invoeren, (bij speciaal
kanaal met toets P+ in plaats van
»C«een »S«).
Toets +
ŀ indrukken. Met de cijfer-
toetsen het gewenste Kanaalnummer
invoeren.
Wordt één van de toetsen P+ of P-
ingedrukt gehouden, dan start de
kanaalzoekfunctie. De kanaalzoek-functie stopt bij elke zender, die u kunt
ontvangen.
" »DEC«Wordt op deze zenderplaats een geco-
deerde zender gezet en een bijpassende descrambler (decoder) aangesloten, dan moet »ON« gekozen worden.
" »FT« Is, na het idelen, fijn afstemmen
nodig, dan
Toets P+ of P- indruken en daarmee
beste beeld- en geluidsindruk kiezen.
Met toets OK de veranderde waarden vastleggen.
De zendergegevens van de volgende zenderplaats
worden weergegeven.
Met toets
ǺǺ
terug naar de televisiemodus.
Ń
!
Wordt op een zenderplaats kanaal 00 ingevoerd,
dan kunnen met de toetsen P+ of P- alle daarop volgende zenderplaatsen niet meer gekozen worden.
4
3
2
PR CH DEC FT
22 S06 ON 00
0-9
ɶɶʺʺ
ɼɦ OK i
1
ĵ
De dialoogregel
Page 25

ń
25
De afstandsbediening
Ń
!
Elk veranderde waarde wordt automatisch na ca. 8
seconden of door schakelen in standby vastgelegd.
Ń
!
Het TV-toestel werd met maximaal contrast getest.
Afhankelijk van de plaats van het toestel en het licht
in de ruimte is het echter zinvol, het contrast iets te
reduceren om de subjectief beste beeldindruk te
verkrijgen.
Ń
!
Wilt u de zenderplaats permanent weergegeven
hebben, druk dan op de toets Ǻ.
Laten verdwijnen door opnieuw indrukken van de
toets
Ǻ.
Videorecorder op afstand bedienen
Met de afstandsbediening van dit televisietoestel
kunt u ook Grundig-videorecorders op afstand
bedienen. Welke hiervoor geschikt zijn, kan uw dealer u vertellen.
Toets VIDEO indrukken en ingedrukt houden.
Daarme schakelt u de afstandsbediening op videorecorder-modus.
Vervolgens de gewenste toets indrukken.
Uit het volgende overzicht kunt u halen, met welke
toetsen de recorderfuncties in werking gezet kunnen worden.
ĵķ
(Cijfertoets 1) = Beeldzoekfunctie achteruit
ĶŁ
(Cijfertoets 2) = Beeldzoekfunctie vooruit
l (Toets – i) = Opnamestart
n (Toets i +) = Stop
ĵĵ
(Cijfertoets 7) = Snel terugspoelen
ŁŁ
(Cijfertoets 8) = Snel vooruitspoelen
ll l (Toets – v) = Pauze
ı
(Toets v +) = Weergavestart
Ľ
(Cijfertoets 4) = Programmaplaats –
Ń (Cijfertoets 5) = Programmaplaats +
1…9 Zenderplaats kiezen (op toestel
– P +) en
0/AV toestel inschakelen vanuit stand-
by); of
AV-stand kiezen
P+ / P– Zenderplaatsen stap voor stap
doorschakelen: P+: (1, 2, 3 …),
P–: (…3, 2, 1) of
P+: vanuit standby inschakelen op
laatst gekozen zenderplaats.
Cursor (aanwijzer) – beweging naar
boven respectievelijk naar beneden.
OK
Veranderen en activeren verschillende functies. Toets
OK
twee
keer indrukken – instelling van de
optimale waarde.
ņ –,+ŀVolume of cursor (aanwijzer) –
Beweging naar links of rechts.
Teletekst: Huidige paginanummer
+10 pagina’s.
Teletekst: Huidige paginanummer
–1 pagina
Ȅ
Tijd aan/uit.
teletekst: Huidige paginanummer
+1 pagina
i
+/– Kleurcontrast veranderen.
VIDEO Videorecorder op afstand bedienen
(daarvoor toets VIDEO ingedrukt
houden).
AUX Teletekst: Dialoogregel oproepen
Ǽ
In standby schakelen en
inschakelen op laatst gekozen
zenderplaats.
ʀ
Geluid aan/uit (geluidloos
schakelen).
Ǻ Zendernummer weergeven/
laten verdwijnen (status-kant).
Veranderen ZW contrast:
Ǻ,
OK,
ņ – of +ŀ indrukken
.
Sleep timer (uitschakeltijd
01…99 min.) invoeren:
Ǻ, OK,
Ǻ, en cijfertoetsen 0…9 indruk-
ken.
Automatische frequentiebijstelling aan/uit:
Ǻ, OK, Ǻ, Ǻ,
ņ – of + ŀ indrukken.
Audio-menu oproepen:
Ǻ,
ʀ
TXT Teletekst-modus ɫ TV-modus.
Teletekst: volgende 100 pagina.
v
+/– Helderheid veranderen.
SAT Satelliet-receiver op afstand
bedienen (daarvoor toets SAT
ingedrukt houden).
P/C Zendergegevens oproepen.
Toets 4 seconden ingedrukt
houden: ATS oproepen
TP 712
123
456
89
7
AV
0
P
OK
–
+
P
Ǽ
ʀ
Ǻ
TXT
Ȅ
+
–
iv
VIDEO AUX P/C SAT
+
–
Page 26

ń
26
Geluid veranderen, teletekst-modus
Het audio-menu
r
Audio-menu oproepen
De toets ǺǺen daarna toets ʀindrukken; de pagina
»Audio-menu« wordt weergegeven.
Stereo, mono, tweetalig–
Stereobreedte –
Hoge tonen –
Lage tonen –
Balance –
Dialoogregel –
Ń
!
Het » audio-menu « kunt u na elke instelling met
toets
ǺǺ
laten verdwijnen.
r
Stereo-, mono- en tweetalige uitzending
Ontvangt het toestel tweetalige uitzendingen, – b.v.
een speelfilm met origineel geluid op geluidskanaal
2 (DUAL B) en de gesynchroniseerde versie op
geluidskanaal 1, – (DUAL A) – dan kunt u het
geluidskanaal kiezen.
Met de toets P+ of P- de eerste regel oproepen.
Met de toetsen
ņ –, + ŀ het geluidskanaal kiezen.
Ontvangt het toestel stereo-uitzendingen, dan schakelt het automatisch op stereogeluids-weergave.
Ń
!
Bij slechte stereo-geluidsweergave kunt u met de
toetsen ņ –, + ŀ naar geluid »mono« schakelen
Ń
!
De instelling »mono« kan door indrukken
van de toets OK voor een bepaalde zenderplaats
vastgelegd worden.
Weergave van de soort geluidstransmissie
Steeds als door de zender de soort geluids-transmissie gewisseld wordt (bijvoorbeeld van mono
naar stereo) volgt ca 4 sec. de overeenkomstige
weergave.
Dit gebeurt ook na het wisselen van zender, echter
alleen bij ander soorten geluidstransmissie dan mono.
r
Stereobreedte
Verbreedt bij stereo-uitzendingen de klankkleur en
verbetert dit bij mono-uitzendingen.
Met de toets P+ of P-
de passende regel oproepen.
Veranderen met toets ņ – of + ŀ (De instelling van
de stereobreedte blijft ook na een zenderwissel
behouden).
r
Hoge tonen, lage tonen, balance
De instellingen van deze functies kunnen indien
nodig gecorrigeerd worden.
Met de toets P+, P- de passende regel oproepen.
Corrigeren met de toets
ņ – of + ŀ.
2
1
2
1
2
1
STEREO MONO
ʀǁ ʀ…ǁ
ɦ
ɼ
f
ɶʺ < > Ǻ
1
De teletekst-modus
r
Teletekst oproepen
Toets TXT indrukken.
r
Pagina’s oproepen
Pagina’s met toetsen 0…9 direct oproepen
(Voorhanden pagina’s: 100-899)
r
Overzichtspagina oproepen
Toets ǺǺindrukken.
r
Dialoogregel oproepen
Toets AUX indrukken.
= Tekenhoogte vergroten
= Wachttijd overbruggen (actuele modus).
= Subpagina direct oproepen
= Antwoord geven
= Pagina-STOP
Functies met toets
ņ – of + ŀ oproepen en met
toets OK oproepen.
De functies , , en kunnen ook zonder
oproepen van de dialoogregel als volgt uitgevoerd
worden.
Tekenhoogte vergroten: De toets +
i indrukken.
Subpagina’s direct oproepen: De toets –
i indrukken.
Antwoord geven: De toets +
ŀ indrukken.
Pagina-stop: De toets
ņ – indrukken.
r
Pagina’s met de cursor oproepen
(page catching)
d.w.z. pagina’s kiezen zonder het paginanummer in
te typen. Met de cursor kunt u de gewenste teletekstpagina uit de overzichts-pagina’s (pagina’s,
waarin de uit drie cijfers bestaande paginanummers
staan) direct oproepen.
Toets P+ of P- indrukken.
Op de bovenste rand van het beeld wordt » Page
Catching« weergegeven.
Bij het eerste resp. laatste paginanummer van het
overzicht knippert een rechthoekige lichtpunt (cursor).
Met de toetsen P+ of P- de cursor naar het gewenste paginanummer brengen.
Toets OK indrukken.
De pagina verschijnt op het beeldscherm.
r
Flof – teletekst
Bij Floftekst leiden de gekleurde toetsen naar de, in
de dialoogregel weergegeven, thema’s.
3
2
1
5
4
3
1
5431
5
4
3
2
1
54321
ķ
ʄʄ
ķX /00 ķ? STOP
Page 27

ń
27
Aansluitmogelijkheden
Aansluiten van een videorecorder,
camcorder of satellietreceiver
r
Aansluiten
Videorecorder, camcorder of satellietreceiver met
AV-snoer op de bus AV aansluiten.
r
Bedienen van de videorecorder
Toets 0AV zo vaak indrukken, tot AV 1 te zien is.
Weergave van de videorecorder starten.
Op het beeldscherm ziet u de recorder-weergave.
U kunt ook een S-VHS-recorder aansluiten.
Hiervoor moet de bus AV op S-VIDEO omgeschakeld worden.
De toets P/C indrukken.
Met de toets
ņ – of + ŀ S-VIDEO oproepen.
Menu met de toets
ǺǺ
verlaten.
Aansluiten van een hoofdtelefoon
r
Aansluiten
Hoofdtelefoon (3,5 mm ø klink) met bus m verbinden (de luidsprekers zijn uitgeschakeld).
r
Volume van de hoofdtelefoon veranderen
Veranderen met toetsen ņ –, + ŀ
.
1
FBAS L – Audio – R
3
2
1
1
EURO-AV
EURO-AV
AUDIO
Aansluiten van een descrambler
(decoder) of een extern toestel
(videorecorder)
Sommige zenders – waarvan de programma’s via
kabelnetten of satellietreceiver doorgegeven worden – coderen hun uitzendingen. Beeld en geluid
zijn daardoor onherkenbaar. Met een decoder kunt
u dergelijke programma’s decoderen.
Gaat u als volgt te werk:
Sluit de decoder/videorecorder op de EURO-AV-bus
aan.
Decoder:
Kies de zenderplaats, waarop het gecodeerde programma ingedeeld is.
Videorecorder:
Kies de zenderplaats, waarop u de weergave van de
videorecorder wilt zien.
De toets P/C indrukken.
Met de toets
ņ – of + ŀ DEC oproepen.
Toets P+ of P- indrukken, om op ON te schakelen.
Een voor decodergebruik voorbereide zenderplaats
herkent u aan de punt na de P bij zenderwissel.
Met de toets OK vastleggen.
Menu met de toets
ǺǺ
verlaten.
5
4
3
2
1
EURO-AV
m
Page 28

ń
28
Aansluitmogelijkheden
Aansluiten van een camcorder
(VHS, Video 8)
r
Aansluiten
Aansluitin
g van het beeldsignaal
Verbind de bus VIDEO IN met een geschikt snoer
met de desbetreffende beeld-bus van de camcorder.
Aansluiting van het geluidssignaal
Verbind de bussen L AUDIO IN R met de geluidsbussen van de camcorder. Bij mono-weergave met
de bussen L AUDIO IN.
r
Bedienen van de camcorder
Met toets 0AV – AV 2 oproepen.
Weergave van de camcorder starten.
Op het beeldscherm ziet u de recorder-weergave.
(Geen kopiâren naar de Euro-AV-bus mogelijk)
1
FBAS L – Audio – R
P
m
Page 29

ń
29
Technische gegevens
r
Netspanning:
220 – 240 V, 50/60 Hz
(Regelgebied van de adapter 165 … 265V)
„Het toestel mag alleen met het bijgevoegde
netsnoerset gebruikt worden. Het voorkomt storingen uit het net en is onderdeel van de goedkeuring van het toestel.
Voor vervanging bestelt u a.u.b. bij één van de servicecentra alleen het netsnoerset met de aanduiding
GWN 9.22/coderingummer 8290.991-316”.
r
Opgenomen vermogen:
ca. 70 W
In standby 9 W
r
Ontvangstgebieden:
C01 … C99
Speciale kanalen S01 … S41
r
Geluidseindtrap:
2 x 8 W muziekvermogen (2 x 4 W sinus)
Het toestel voldoet aan de VDE-veiligheids-bepalin-
gen en de voorschriften van de Duitse Post (goedkeuringsbewijs zie typesticker op de achter-kant
van het toestel), verder aan de verordening inzake
de bescherming tegen schaden door rönt-genstralen. De röntgenstraling – veroorzaakt door de
beeldbuis – is voldoende afgeschermd en is daarom geheel ongevaarlijk. Versnellingsspanning
max. 29kV/gemiddelde straalstroom 1,0mA.
Ondeskundige ingrepen, met name veranderen van
de hoogspanning of inbouwen van een ander beeldbuistype, kunnen ertoe leiden, dat röntgen-straling
in aanzienlijke sterkte optreedt. Op die manier gewijzigde toestellen voldoen niet meer aan deze goedkeuring en mogen niet gebruikt worden.
r
Pennenschema EURO-AV-bus
Als u op het TV-toestel extra apparaten wilt aansluiten (b.v. computer, versterkerinstallatie), dan kan
uw dealer aan de hand van de volgende aansluittabel een genormaliseerde verbinding tot stand brengen:
Pen Signaal
11 = Audio uitgang rechts
12 = Audio ingang rechts
13 = Audio uitgang links
14 = Audio massa
15 = Blauw massa
16 = Audio ingang links
17 = RGB blauw ingang
18 = Schakelspanning
19 = Groen massa
10 = –
11 = RGB groen ingang
12 = –
13 = Rood massa
14 = massa
15 = RGB rood ingang
16 = RGB schakelspanning
17 = Video massa
18 = RGB Schakelspanning massa
19 = Video uitgang
20 = Video ingang
21 = Afscherming/massa
220
21
119
Page 30

Ń
!
Installez l’appareil de manière que le minimum
possible de lumière se réfléchisse sur l’écran.
Ń
!
L’éloignement idéal par rapport à l’appareil correspond à cinq fois la diagonale de l’écran.
Ń
!
Pour le fonctionnement sur une étagère, des écartements minimas doivent être respectés.
Ń
!
Veillez à ce que les fentes d’aération dans le
panneau arrière ne soient pas obstruées.
Ń
!
Par l’échange de chaleur dans le téléviseur une
circulation d’air se produit. Cette circulation aspire
des particules de poussière (fibres de tapis et de
rideaux ainsi que poussière domestique) qui se
déposent dans le fentes d’aération et les rétrécissent dans les années, causant ainsi une accumulation de chaleur.
L’accumulation de chaleur dans l’appareil est une
source de danger et réduit la durée de vie de
l’appareil!
Pour des raisons de sécurité, les dépôts de poussière devraient être enlevés de temps à autre par un
spécialiste.
Ń
!
Ne posez pas de haut-parleurs à proximité de
l’appareil.
Ń
!
Lors de la mise en place ou de l’utilisation de
l’appareil, veillez à ce que le câble d’alimentation
électrique ne risque pas d’être coincé et abîmé.
Ń
!
N’installez pas votre appareil à proximité d’un
radiateur.
Ń
!
Même quand l’appareil est à l’arrêt, des coups de
foudre peuvent endommager le réseau d’alimentation et/ou le circuit de l’antenne.
Lors d’un orage, retirez les prises d’antenne et du
secteur.
Ń
!
Préservez l’appareil de l’humidité.
Ń
!
N’introduisez pas de corps étrangers dans les
fentes d’aération de la cloison arrière.
Attention: haute tension!
Placer la pile dans la
télécommande
Placer la pile fournie en prenant garde aux pôles de
la pile (indiquées sur le fond du logement pile).
Ń
!
Lorsque la pile est usée, le message
« BATTERY» s’affiche sur l’écran.
Il est absolument nécessaire d’enlever la pile usée.
Les dommages causés par une pile qui a coulé ne
sont pas couverts par la garantie.
Jetez les piles usagées selon les lois sur l’environ-
nement.
Raccorder l'appareil
Introduire la fiche du câble d’antenne dans la prise
antenne É du téléviseur.
Brancher le câble secteur dans la prise secteur.
Marche/arrêt de l'appareil
Appuyer sur la touche
¢
IO
sur l’appareil.
Pour commuter en position veille (Stand-by):
appuyez sur la touche
Ǽ
de la télécommande.
Ń
!
Si vous n’utilisez pas l’appareil pendant un temps
prolongé (p.ex. pendant la nuit), éteignez-le par
cette touche.
Vous économiserez ainsi de l’énergie.
La ligne de dialogue comme aide
Ń
!
La ligne de dialogue dans la partie inférieure des
menus affichés sur l’écran vous indique les touches
sur la télécommande à utiliser pour modifier des
réglages.
Les signes
>, <,
ʺʺ, ɶɶ
sont des symboles pour les
touches suivantes sur la télécommande:
ʺʺ, ɶɶ
= touches P+ et P–. Déplacement de la
barre de couleur (curseur) vers le haut
et vers le bas pour sélectionner des
fonctions.
<, > = Touches ņ – et + ŀ. Déplacement de
la barre de couleur (curseur) vers la
gauche et vers la droite pour sélectionner des fonctions.
Dans le texte qui suit ce sont les touches de la télécommande qui sont illustrées au lieu des symboles.
2
1
2
1
1
ĸ
30
Sécurité et installation
20
cm
10
cm
20 cm
cm
10
Page 31

1ère possibilité
r
Le système de mémorisation «ATS»
Le système de mise en mémoire automatique «ATS»
(Auto Tuning System) balaye la plage de réception
dans la totalité et mémorise les chaînes trouvés sur
les positions de programme.
Procédez comme suit:
Mettez le téléviseur en service à partir de la veille
par l’une des touches 1…9.
Appuyez pendant 4 secondes environ sur la touche
P/C jusqu’à ce que le menu ATS s’affiche.
Appuyez sur OK pour démarrer la recherche.
L'opération ATS peut durer une minute ou plus
longtemps. Le réglage de l'appareil est alors
terminé. Nous vous souhaitons beaucoup de plaisir
en regardant la télé.
Si l'ordre des émetteurs sur les positions de
programme ne vous convient pas, vous pouvez
déplacer les émetteurs sur les positions de
programme de votre choix.
Ń
!
Appuyez sur ǺǺpour quiller le »ATS«.
r
Placer les programmes dans l'ordre
désiré
Exemple: L'émetteur reçu sur la position de
programme 2 doit être déplacé sur la position de
programme 5.
Sélectionnez la position de programme 2.
Appuyez sur la touche P/C. Le menu programmes
s'affiche.
Sous «PR», entrez la nouvelle position de program-
me 05 en deux chiffres avec les touches 1…9.
Appuyez sur la touche OK. L'opération est
terminée.
Appuyez sur
ǺǺ
pour retourner au mode TV.
5
4
3
2
1
3
2
1
2ème possibilité
r
Entrée directe des numéros de canal
Ce mode de réglage n’est d’intérêt que lorsque vous
connaissez les numéros de canal des chaînes TV.
Ń
!
Si l’attribution des positions de programme a déjà
été effectuée par la recherche ATS, il n’est plus
nécessaire de faire ce réglage.
Procédez comme suit:
Appuyez sur la touche P/C pour afficher le menu
programmes.
Ń
!
Attention! Ne pas possible sur la position AV.
Sélectionnez l'option souhaitée du menu par la
touche
ņ – ou + ŀ.
Sous «PR» sélectionnez la position de program-
me à affecter avec la touche P+/P–.
" »CH« entrez le numéro de canal (pour un
canal spécial, sélectionnez «C» au lieu
de «S» avec la touche P+).
Appuyez sur la touche +
ŀ. Entrez le
numéro de canal souhaité à l’aide des
touches numériques.
Si la touche P+ ou P- est maintenue
enfoncée, la recherche des canaux
démarre. Elle s’arrête sur chaque programme qui peut être reçu.
Appuyez sur
ǺǺ
pour quitter le menu.
"
»DEC«
Si un programme crypté est affecté à
cette position de programme et un
désembrouilleur correspondant est
raccordé, il faut choisir «ON».
" »FT« Si un accord fin du canal est néces-
saire sur la position de programme
affectée appuyez sur la touche
ņ –
jusqu'à ce que les chiffres sous FT
deviennent vert.
Appuyez sur la touche P+ ou P–
jusqu’à ce que la qualité de l’image et
du son vous convient.
Appuyez sur la touche OK pour mémoriser le réglage
modifié.
Les données de la position de programme suivante
sont affichées.
Appuyez sur la touche
ǺǺ
pour revenir à la fonc-
tion TV.
Ń
!
Si le canal 00 est mémorisé sur une position de
programme, il n’est plus possible de sélectionner
les positions suivantes par la touche P+ ou P–.
4
3
2
PR CH S DEC FT
22 S06 O ON 00
0…9
ɶɶʺʺ
ɼɦ OK i
1
ĸ
31
Attribuer les positions de programme
ĵ
Ligne de dialogue
Page 32

Télécommander un magnétoscope
Avec la télécommande de ce téléviseur, vous pouvez aussi télécommander un magnétoscope Grundig. Votre revendeur vous indiquera ceux qui s´y
rapportent.
Appuyer sur la touche VIDEO et maintenir la pression. Vous commutez ainsi la télécommande en
mode magnétoscope.
Appuyer ensuite sur les touches désirées.
La table suivante vous indique avec quelles touches
vous pouvez commander votre magnétoscope.
ĵķ (Touche 1) = recherche visuelle arrière
ĶŁ (Touche 2) = recherche visuelle avant
l (Touche – i) = début de l´enregistrement
n (Touche i +) = arrêt
ĵĵ (Touche 7) = retour rapide
ŁŁ (Touche 8) = avance rapide
ll ll (Touche – v) = pause
ı (Touche
v
+) = début de la lecture
Ľ (Touche 4) = position de programme –
Ń (Touche 5) = position de programme +
ĸ
32
La télécommande
Ń
!
Chaque réglage modifié est mémorisé automatiquement après 8 secondes ou en commutant en veille.
Ń
!
L’appareil a été testé avec un contraste maximum.
Selon le lieu et la luminosité de la pièce (lumière
ambiante), il est toutefois logique de réduire un peu
le contraste pour obtenir la meilleure rendu d’image
possible.
Ń
!
Si vous souhaitez que le numéro de la position de
programme soit affiché en permanence, appuyez
sur la touche Ǻ puis, pendant 10 secondes environ,
ne touchez aucune touche.
Pour supprimer l’affichage, appuyez une nouvelle
fois sur la touche
Ǻ.
1…9 Choix de programmes (– P + sur
l'appareil) et
0/AV mise en service à partir de la
veille (standby) ou
choix de la position AV.
P+ / P– Choix en pas à pas des position
de programme: P+: (1, 2, 3 …),
P-: (…3, 2, 1) ou
P+: à partir de la veille sur la
position de programme sélectionnée en dernier.
Déplacement du curseur vers
le haut et vers le bas.
OK Modifier et activer certaines fonc-
tions. Appuyer deux fois sur OK
:
Réglage de la valeur optimale.
ņ –,+ŀ Volume ou déplacement du cur-
seur vers la gauche ou vers
la droite.
Télétexte: Page courante
+10 pages.
Télétexte: Page courante
- 1 page.
Ȅ
Heure marche/arrêt.
Télétexte: Page courante
+ 1 pages.
i
+/– Contraste couleur.
VIDEO Télécommander un magnétosco-
pe (maintenir enfoncée la touche
VIDEO).
AUX Télétexte: Appeler la ligne de
dialogue
Ǽ
Commutation en veille et mise
en service avec la position de
programme choisie en dernier.
ʀ
Commutation en silence
Ǻ
Afficher/supprimer le numéro
de programme.
Modifier le contraste n/b: Appuyer sur
Ǻ, OK, ņ – ou + ŀ.
Entrer une heure d'arrêt de
01…99 minutes: Appuyer sur
Ǻ, OK, Ǻ, et 0…9.
Réglage automatique de fréquence marche/arrêt: Appuyer
sur
Ǻ, OK, Ǻ, Ǻ, ņ – ou + ŀ.
Appeler le menu Audio: Ǻ, ʀ
TXT Télétexte ɫTV
Télétexte: Page de centaines
suivante.
v
+/– Luminosité.
SAT Télécommander un récepteur
SAT (maintenir enfoncée la touche SAT).
P/C Appel des données de progr.
Maintenir enfoncée pendant 4
s: Appel ATS.
TP 712
123
456
89
7
AV
0
P
OK
–
+
P
Ȅ
+
–
iv
VIDEO AUX P/C SAT
Ǽ
ʀ
Ǻ
TXT
+
–
Page 33
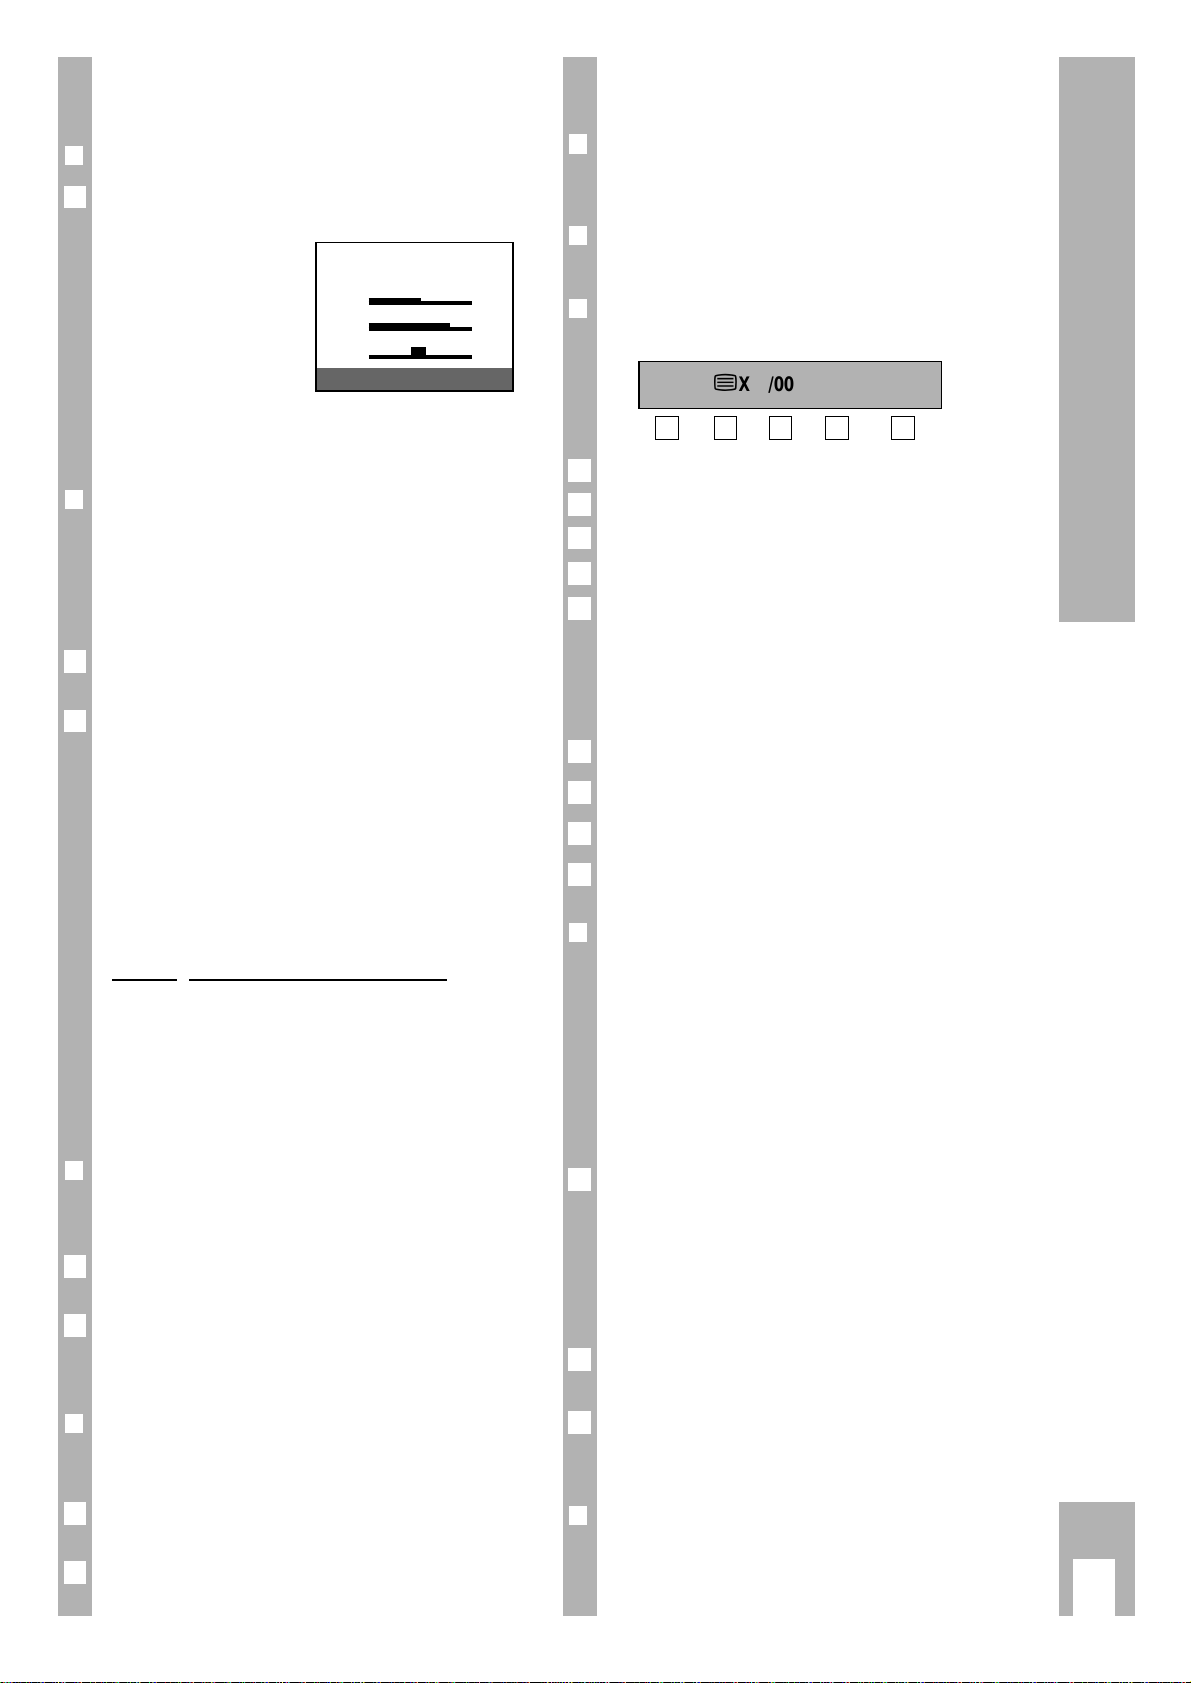
ĸ
33
Régler le son, Télétexte
Le menu audio
r
Appeler le menu audio
Appuyez sur la touche Ǻ puis sur la touche
ʀ
pour afficher le menu audio.
Fonction audio –
Largeur stéréo –
Aiguës –
Graves–
Balance –
Ligne de dialogue –
Ń
!
Vous pouvez supprimer le menu audio après
chaque réglage en appuyant sur la touche Ǻ.
r
Stéréo, mono et double-son
Si le téléviseur reçoit des émissions en double-son,
par exemple un film de cinéma avec le son original
sur le canal 2 du son (DUAL B) et la version sychronisée sur le canal 1 du son (DUAL A), vous pouvez
sélectionner le canal du son.
Sélectionnez la première ligne par la touche
P+ ou P–.
Sélectionnez le canal avec les touches
ņ –, + ŀ.
Si le téléviseur capte des émissions stéréo, il
commute automatiquement sur stéréo.
Ń
!
Si le son stéréo est d’une mauvaise qualité,
commutez sur «Mono» par les touches ņ –, + ŀ.
Ń
!
Le réglage mono peut être mémorisé individuellement pour chaque position de programme en
appuyant sur la touche OK.
Af
fichage du mode de transmission
Chaque fois où l’émetteur change le mode de transmission (p.ex. de mono sur stéréo), une indication
correspondante apparaît pour env. 4 secondes. Cet
affichage s’effectue également dans le cas de
changement de programme, mais uniquement pour
les modes autres que mono.
r
Largeur stéréo
Cette fonction élargie la tonalité des émissions
stéréo et l’améliore pour des émissions en mono.
Sélectionnez la ligne correspondante par la touche
P+ ou P–.
Modifiez le réglage par la touche
ņ – ou + ŀ
(le réglage est maintenu lorsque l’on change de
programme).
r
Aiguës, graves, balance
Les réglages du son peuvent être corrigés comme
bon vous semble.
Avec la touche P+ ou P–, sélectionnez la ligne
correspondante.
Corrigez avec les touches
ņ – ou + ŀ.
2
1
2
1
2
1
STEREO MONO
ʀǁ ʀ…ǁ
ɦ
ɼ
f
ɶʺ < > Ǻ
1
Télétexte
r
Appeler Télétexte
Appuyez sur la touche TXT.
r
Choix direct des pages par les touches
1…9
(pages prévues: 100-899)
r
Appeler la ligne de dialogue: Appuyez sur la
touche AUX.
= Augmenter la taille des caractères.
= Remplir les temps d'attente (mode actuel).
= Appel directe d'une sous-page.
= Répondre
= Arrêt sur page.
Sélectionnez la fonction par la touche
ņ – ou + ŀ et
activer-la par la touche OK.
Les fonctions 1, 3, 4 et 5 peuvent également être
exécutées sans faire appel à la ligne de dialogue.
Taille des caractères: Appuyez sur la touche + i.
Sous-page: Appuyez sur la touche –
i.
Répondre: Appuyez sur la touche +
ŀ .
Arrêt sur page: Appuyez sur la touche ņ – .
r
Sélectionner des pages avec le curseur
(Page Catching)
C’est - à - dire choisir les pages sans taper le
numéro de page. Dans ce cas, vous sélectionnez la
page souhaitée directement à l’aide d’un curseur
dans des pages-sommaire (pages contenant des
numéros de page à trois chiffres). Cette fonction
vous épargne la frappe des numéros de page à trois
chiffres.
Appuyez sur la touche P+ ou P–.
Le message «Page Catching» est affiché au bord
supérieur de l’écran.
Un point rectangulaire lumineux (le curseur) clignote à la position du premier ou dernier numéro de
page dans la page-sommaire.
Appuyez sur la touche P+ ou P– pour déplacer le
curseur vers le numéro de page souhaité.
Appuyez sur la touche OK.
La page est affichée sur l’écran.
r
Flof-Texte
Pour le texte (Flof), les touches de couleur permettent d’accéderaux sujets affichés dans la ligne de
dialogue.
3
2
1
4
3
2
1
5
4
3
2
1
54321
ķ
ʄʄ
ķX /00 ķ? STOP
Page 34

ĸ
34
Raccordements possibles
Raccordement d'un
magnétoscope,
d'un caméscope ou d'un récepteur
satellite
r
Raccordement
Raccordez le magnétoscope, le caméscope ou le
récepteur satellite à l’aide d’un câble péritélévision à
la prise AV.
r
Emploi du magnétoscope
Appuyez de manière répétée sur la touche 0AVjusqu'à ce que AV 1 soit affiché.
Démarrez la lecture sur le magnétoscope.
La lecture vidéo est visible sur l'écran.
Vous pouvez également raccorder un
ma
gnétoscope S-VHS
Pour cela, il faut commuter la prise AV sur S-VIDEO.
Appuyez sur la touche P/C.
Sélectionnez S-VIDEO avec la touche
ņ – ou + ŀ.
Quittez le menu avec la touche Ǻ.
Raccordement d’un casque
r
Raccordement
Brancher la casque (3,5 mm ø jack) dans la prise m
(les haut-parleurs sont mis hors service).
r
Régler le niveau de volume du casque
Modifier le réglage avec les touches ņ –, + ŀ
1
FBAS L – Audio – R
3
2
1
1
EURO-AV
EURO-AV
AUDIO
Raccordement d'un désembrouilleur (décodeur) ou d'un appareil
externe (magnétoscope)
Quelques émetteurs dont les programmes sont
reçus par le réseau câblé ou un récepteur satellite
embrouillent leurs émissions. Le son et l’image
deviennent ainsi brouillés. Avec un désembrouilleur
(décodeur), vous pouvez décoder ces programmes.
Comment pr
océder:
Raccordez le décodeur/magnétoscope à la prise
péritélévision (EURO-AV).
Décodeur:
Sélectionnez la position de programme sur laquelle
le programme crypté est reçu.
Magnétoscope:
Sélectionnez la position de programme sur laquelle
vous souhaitez voir la lecture vidéo.
Appuyez sur la touche P/C.
Sélectionnez DEC avec la touche
ņ – ou + ŀ.
Commutez sur ON (marche) avec la touche P+
ou P–.
Une position de programme qui est préparée pour
un décodeur est à reconnaître à un point qui apparaît derrière le P lorsque l’on change de programme.
Mémorisez avec la touche OK.
Quittez le menu avec la touche
Ǻ.
5
4
3
2
1
EURO-AV
m
Page 35

Raccordement … pour caméscope
(VHS, Vidéo 8)
r
Raccordement
Raccor
der le signal vidéo
Reliez la prise VIDEO IN (FBAS) avec un câble
approprié à la prise vidéo correspondante du
caméscope.
Raccorder le signal audio
Reliez les prises L AUDIO R avec les prises audio
du caméscope. Dans le cas de lecture en mono,
reliez la prise L AUDIO sur la prise audio du caméscope.
r
Emploi du caméscope
Sélectionnez – AV 2 – à l’aide de la touche
0
AV
.
Démarrez la lecture sur le caméscope.
La lecture vidéo est visible sur l'écran. (Aucune
copie n’est possible vers la prise péritélévision !)
1
FBAS L – Audio – R
P
ĸ
35
Raccordements possibles
m
Page 36

ĸ
36
Caractéristiques techniques
r
Tension secteur:
220-240V, 50/60Hz
(plage de réglage du bloc secteur165 … 265V)
L’appareil ne doit être mis en service qu’avec le
jeu de câbles secteur approprié. Cela évite les
perturbations dans le secteur et fait partie
intégrale de l’autorisation de l’appareil.
Pour le remplacement, ne commandez, auprès
d’un service après-vente, que la référence
GWN 9.22/numéro de produit 8290.991-316
r
Consommation en puissance:
env. 70 W
En veille: 9 W
r
Gammes de réception:
C01 … C99
Canaux spéciaux S01 … S41
r
Puissance de sortie:
2 x 8 W puissance musicale (2 x 4 W sinusoïdale)
L’appareil est conforme aux consignes de sécurité
VDE et aux règlements de la poste allemande
(référence de l’autorisation: voir autocollant
signalétique sur la face arrière de l’appareil), concernant la réglementation sur la protection contre
les dommages causés par des rayonnements X. Le
rayonnement X - émis par le tube cathodique - est
complètement arrêté et rendu ainsi totalement inoffensif. Tension d’accélération max. 29kV/courant
du faisceau moyen 1,0mA.
Des interventions inappropriées et notamment la
modification de la haute-tension ou le montage
d’un autre type de tube cathodique, peuvent provoquer une forte augmentation du rayonnement X.
Les appareils ainsi modifiés ne correspondent plus
à cette autorisation et ne doivent plus être mis en
service.
Sous réserve de toutes modifications.
S.E. ou O.
r
Répartition des broches de la prise
péritélévision
Si vous voulez raccorder à votre téléviseur des
appareils supplémentaires (ordinateur, amplificateur par ex.), votre revendeur spécialisé peut effectuer une connexion conforme aux normes au
moyen du tableau de raccordement suivant :
Broche Signal
11 = sortie audio droite
12 = entrée audio droite
13 = sortie audio gauche
14 = masse audio
15 = masse, bleu
16 = entrée audio gauche
17 = entrée, bleu, RVB
18 = tension de commutation
19 = masse, vert
10 = –
11 = entrée, RVB, vert
12 = –
13 = masse, rouge
14 = masse
15 = entrée, rouge, RVB
16 = tension de commutation RVB
17 = masse vidéo
18 = masse, tension de commutation, RVB
19 = sortie vidéo
20 = entrée vidéo
21 = masse/blindage
220
21
119
Page 37
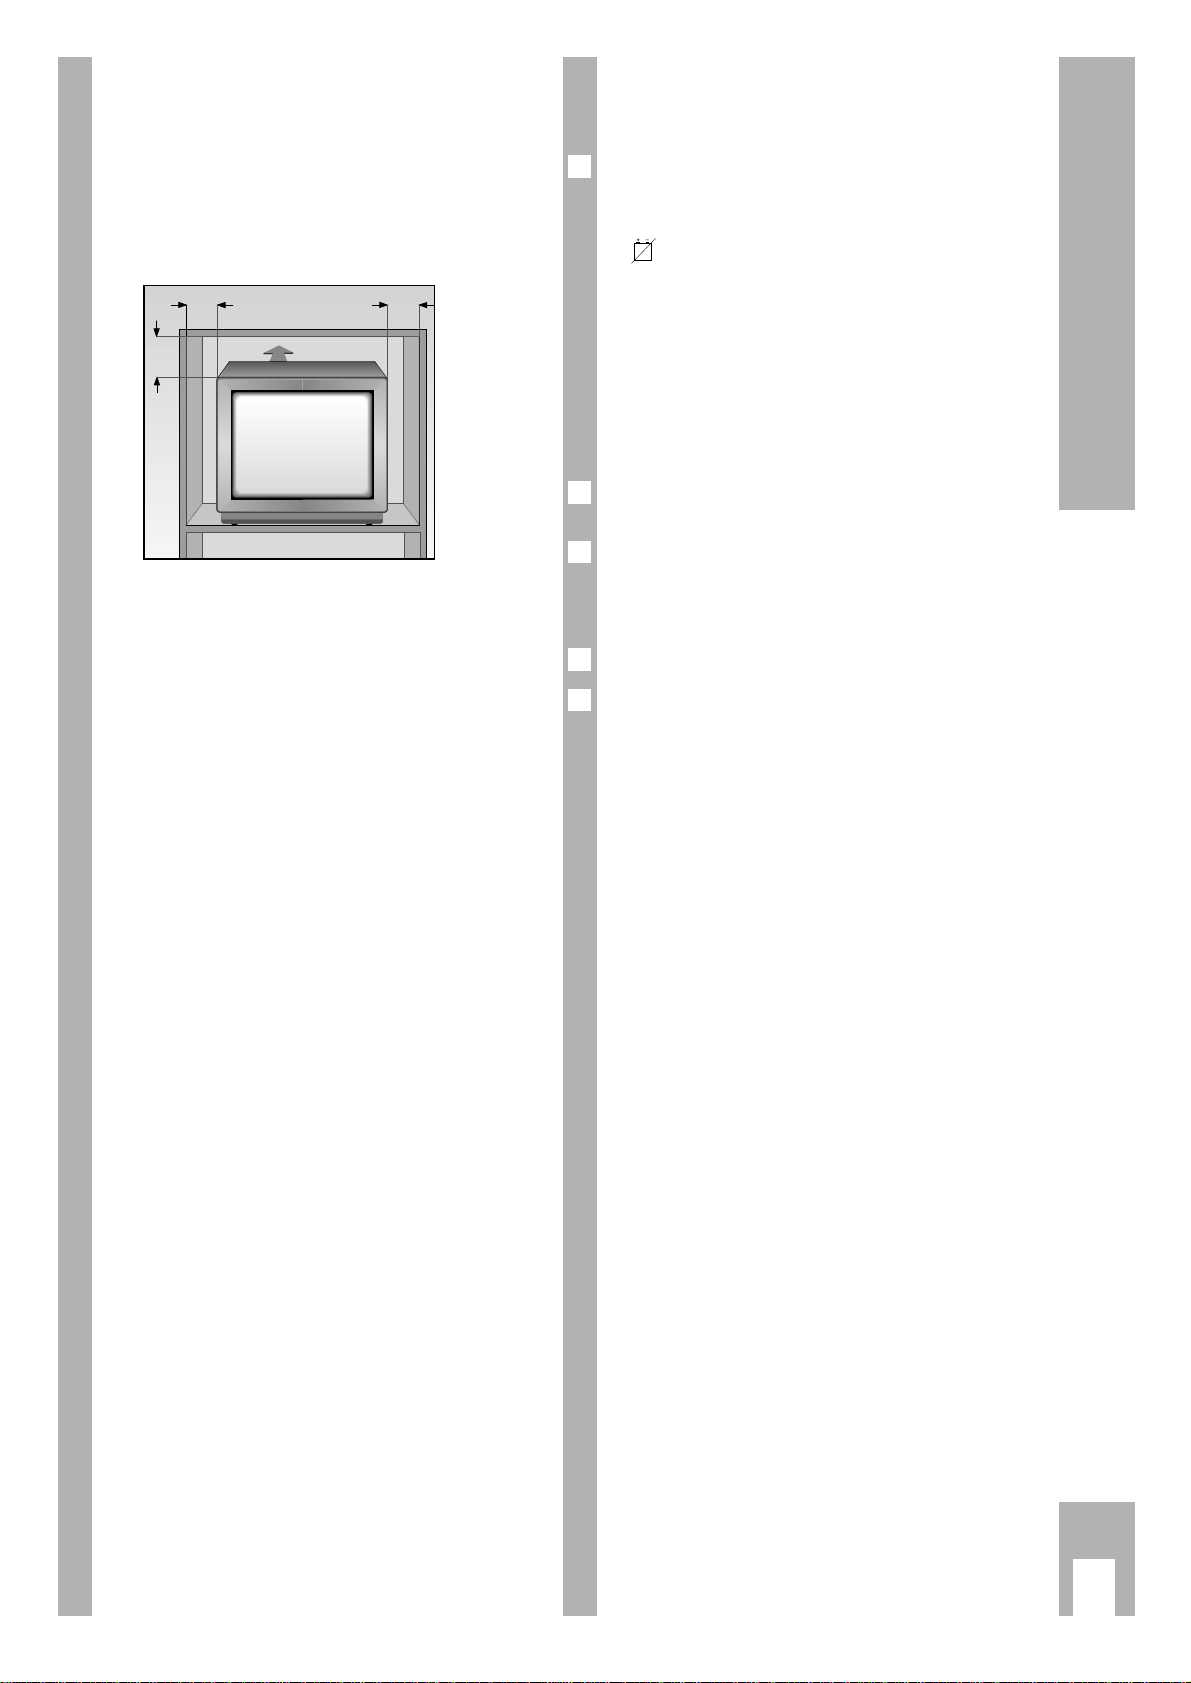
e
37
Bezpeãnost a instalace
Ń
!
Postavte pfiístroj tak, aby dopadalo na obrazovku co
moÏná nejménû svûtla.
Ń
!
Ideální odstup osob sledujících televizor je pûtinásobek diagonály obrazovky.
Ń
!
Pfii provozu ve stûnû musí b˘t dodrÏeny minimální
vzdálenosti.
Ń
!
Dbejte na to, aby nebyly vûtrací ‰tûrbiny na zadní
stranû televizoru zakryty.
Ń
!
Pfii v˘mûnû tepla v pfiístroji dochází k cirkulaci vzduchu. Pfii tom vniknou ãásteãky prachu (vlákna
z koberce a záclon, jakoÏ i prach) do pfiístroje. Tyto
ãásteãky se usadí kromû jiného také ve vûtracích
‰tûrbinách. Bûhem nûkolika let se ‰tûrbiny zmen‰í
a mÛÏe tak dojít k nahromadûní tepla.
Nahromadûní tepla je zdroj nebezpeãí a ovlivÀuje
negativnû Ïivotnost stroje.
Pro jistotu nechte ãas od ãasu tyto usazeniny
odstranit odborníkem.
Ń
!
Nestavte reproduktory do blízkosti pfiístroje.
Ń
!
Dbejte prosím na to, aby pfii instalaci a dal‰ím provozu leÏel síÈov˘ pfiípoj volnû, aby nebyl pfiiskfiípnut
nebo po‰kozen.
Ń
!
Nestavte pfiístroj do blízkosti topení.
Ń
!
I kdyÏ je pfiístroj vypnut˘, mÛÏe dojít k po‰kození
úderem blesku do sítû a/nebo do vedení antény.
Proto byste mûli pfii boufice síÈovou a anténní zásuvku vytáhnout ze zdi.
Ń
!
ChraÀte pfiístroj pfied vlhkem.
Ń
!
Nestrkejte Ïádná cizí tûlesa do vûtrací ‰tûrbiny na
zadní stranû.
Pozor vysoké napûtí!
VloÏení baterie do dálkového
ovládání
VloÏit pfiiloÏenou baterii, pfii tom dodrÏet její pólo-
vání (oznaãeno na dnû bateriové pfiihrádky).
Ń
!
U vybité baterie se objeví na obrazovce hlá‰ení:
» BATTERY«.
Vybitou baterii bezpodmíneãnû odstranit.
Za ‰kody zpÛsobené vyteãením staré baterie se
neruãí.
Starou baterii odstraÀte ekologicky.
Pfiipojení pfiístroje
Zástrãku anténního kabelu zastrãit do anténní zá-
suvky É televizoru.
Zástrãku síÈového kabelu zastrãit do zásuvky.
Pfiístroj zapnout / vypnout
Stisknout tlaãítko
¢
IO
na pfiístroji.
Zapnout pfiístroj do pohotovosti (Stand-by): Na dál-
kovém ovládání stisknout tlaãítko
Ǽ
.
Ń
!
Pokud pfiístroj del‰í dobu nepouÏíváte (napfi.
v noci), pak jej tímto tlaãítkem vypnûte.
Dialogov˘ fiádek – pomoc pro
obsluhu
Ń
!
V fiádce menu na spodním okraji obrazovky je moÏno
vidût jak˘m tlaãítkem dálkového ovládání je moÏno
zmûny provádût.
Znaãky
>, <,
ʺʺ, ɶɶ
na obrazovce jsou
symboly následujících tlaãítek dálkového ovládání:
ʺʺ, ɶɶ
= Tlaãítka P+ a P–. Pohyb barevného
znaménka (kursoru) nahoru/ dolÛ ke
zvolení funkce.
<, > = Tlaãítka ņ – a + ŀ. Pohyb barevného
znaménka (kursoru) doprava/doleva
ke zvolení funkce.
V textu jsou místo symbolÛ zobrazena tlaãítka dálkového ovládání.
2
1
2
1
1
10
cm
20
cm
10
cm
20 cm
Page 38

e
38
Obsazení programov˘ch míst
2. MoÏnost
r
Pfiímé zadání ãísla kanálu
Tento postup má smysl jen tehdy, kdyÏ znáte ãísla
kanálu programu.
Ń
!
Pokud se uskuteãnilo obsazení programov˘ch míst
prostfiednictvím vyhledávání ATS, není zapotfiebí
toto nastavení provádût.
Postup:
Stisknout tlaãítko P/C, objeví se programové menu.
Ń
!
Pozor – v poloze AV není moÏné.
Pohyb barevného znaménka tlaãítky
ņ – a + ŀ.
Pod »PR « tlaãítky P+/P- zvolit programové
místo, které má b˘t obsazeno.
" » CH « Zadat ãíslo kanálu (u z vá‰tního kanálu
tlaãítkem P+ místo »C« písmeno
» S «).
Stisknout tlaãítko +
ŀ. âíslicov˘mi
tlaãítky zadat zvolené ãíslo kanálu.
Je-li jedno z tlaãítek P+ nebo P- déle
stisknuto, spustí se vyhedávání
kanálu. Vyhledávání kanálu se zastaví
u kaÏdého programu, kter˘ lze pfiijímat.
" »DEC«Je-li na toto programové místo uloÏen
zakódovan˘ program a je-li zapojen
pfiíslu‰n˘ descrambler (dekodér), pak
je tfieba zvolit » ON «.
" » FT « Je-li po obsazení programÛ nuté
jemné doladûní, pak
stisknout tlaãítko
ņ – dokud nejsou
ãíslice pod FT zelené.
Tlaãítko P+ nebo P- stisknout a tím
zvolit lep‰í obrazov˘ a zvukov˘ dojem.
Tlaãítkem OK uloÏit zmûnûné hodnoty do pamûti.
Zobrazí se údaje programu následujícího progra-
mového místa.
Tlaãítkem
ǺǺ
.pfiepojit zpût na TV-program.
Ń
!
Pokud byl na jedno programové místo zvolen
kanál 00, není moÏno tlaãítky P+ a P- volit v‰echna
následující programová místa.
4
3
2
PR CH DEC FT
22 S06 ON 00
0-9
ɶɶʺʺ
ɼɦ OK i
1
ĵ
Dialogová fiádka
1.MoÏnost
r
Systém ukládání programÛ do pamûti
»ATS«
Vyhledávání programu ATS prohledá celou oblast
pfiíjmu a uloÏí automaticky do pamûti v‰echny nalezené programy.
Postup:
Televizor spustit tlaãítky 1… 9 z pohotovosti.
Tlaãítko P/C tisknout po dobu cca. 4 sek., dokud se
neobjeví ATS-menu.
Prohledávání spustit tlaãítkem OK.
Prohledávání mÛÏe probíhat déle neÏ minutu.
Nastavení pfiístroje je jiÏ ukonãeno. Pfiejeme Vám
pfiíjemné sledování televizních pofiadÛ.
Pokud se Vám automatické obsazení programov˘ch
míst nezamlouvá, mÛÏete programy uloÏené na programov˘ch místech podle Va‰eho pfiání vymûnit
(pfievrstvit).
Ń
!
Pokud nebyly nûkteré programy ATS-prohledáváním zaregistrovány, máte 2. moÏnost, jak je
uloÏit na programová místa – pfiímé zadání ãísla
kanálu.
Ń
!
Tlaãítkem ǺǺje moÏno prohledávání pfieru‰it.
r
Zmûna obsazení programového místa
Pfiíklad: Program z programového místa 5 uloÏit na
programové místo 2.
Zvolit programové místo 2.
Stisknout tlaãítko P/C
. Objeví se programové menu.
Pod » PR « zadat dvojmístnû nové programové
místo 05 pomocí tlaãítek 1… 9.
Stisknout tlaãítko OK
. Proces je ukonãen.
Tlaãítkem
ǺǺ
zpût k televiznímu provozu.
5
4
3
2
1
3
2
1
Page 39

e
39
Dálkové ovládání
Dálkové ovládání videorekordéru
Dálkov˘m ovládáním tohoto televizoru je moÏno téÏ
ovládat videorekordér znaãky Grundig. Která
ovládání jsou k tomu vhodná, Vám sdûlí odborník.
Stlaãit tlaãítko VIDEO a drÏet stlaãené.
Tím spustíte dálkové ovládání na provoz videorekordéru.
Nakonec stisknout zvolené tlaãítko.
Z následujícího nastavení lze vyãíst, jak˘mi tlaãítky
mohou b˘t funkce rekordéru spu‰tûny.
ĵķ (ãíslicové tlaãítko 1) = vyhledávání obrazu
zpût
ĶŁ (ãíslicové tlaãítko 2) = vyhledávání obrazu
vpfied
l (tlaãítko – i) = spu‰tûní záznamu
n (tlaãítko i +) = stop
ĵĵ (ãíslicové tlaãítko 7) = zrychlen˘ zpûtn˘ chod
ŁŁ (ãíslicové tlaãítko 8) = zrychlen˘ chod vpfied
ll ll (tlaãítko – v) = pfiestávka
ı (tlaãítko
v
+) = spu‰tûní reprodukce
Ľ (ãíslicové tlaãítko 4) = program. místo –
Ń (ãíslicové tlaãítko 5) = program. místo +
Ń
!
KaÏdá hodnota se automaticky po cca. 8 sekundách
nebo pfiepínáním do Stand-by uloÏí do pamûti.
Ń
!
Televizor je testován maximálním kontrastem.
V závislosti na umístûní pfiístroje a na svûtlosti
místnosti je dobré kontrast zredukovat, aby byl
docílen subjektivnû nejlep‰í obrazov˘ dojem.
Ń
!
Tlaãítkem ǺǺmÛÏe b˘t ukazatel programu trvale zobrazen.
Vymazání nastane opakovan˘m stisknutím
tlaãítka
ǺǺ
.
1…9 Zvolit programové místo (na
pfiístroji – P +) a
0/AV pfiístroj zapnout z pohotovostní
polohy (Stand-by); nebo zvolit
polohu AV
P+ / P– Programová místa krokovû dále
pfiepínat: P+: (1, 2, 3 …), P-:
(…3, 2, 1) Stand-by
P+: ze Stand-by zapnout na pos-
lední zvolené programové místo.
Kurzor (poziãní ukazatel) - Pohyb
nahoru popfi dolÛ.
OK Zmûna a aktivace rÛzn˘ch funkcí.
Tlaãítko OK dvakrát stisknout –
nastavení optimálních hodnot.
ņ –,+ ŀ Hlasitost nebo kurzor (poziãní
ukazatel) – Pohyb doleva nebo
doprava.
Videotext: Dal‰í 10.str.
Videotext: Aktuální
ãíslo stránky –1 stránka
Ȅ
âas zap/vyp.
Videotext: Aktuální
ãíslo stránky +1 stránka
i
+/– Zmûna kontrastu.
VIDEO Dálkové ovládání videorekordéru
(k tomu drÏet stlaãené tlaãítko
VIDEO).
AUX Videotext: Vyvolat dialogov˘
fiádek
Ǽ
Zapnout do pohotovosti
(Stand-by) a zapnout poslední
zvolené programové místo.
ʀ
Zvuk zap/vyp (vypnout zvuk).
Ǻ Programové ãíslo zobrazit/
vymazat (status stránky).
Zmûnit SW kontrast: stisknout
Ǻ, OK, ņ – nebo ŀ.
Zadat:Sleep Timer (doba vypnutí 01…99 min.) :stisknout
Ǻ, OK, Ǻ, nebo ãíslicová tlaãítka
0…9.
Automatické doladûní frekvence zap/vyp:
Ǻ, OK, Ǻ, Ǻ, ņ – nebo + ŀ.
Audio-menu vyvolat: Ǻ, ʀ
TXT Videotext/Teletext-provoz
ɫ TV-provoz.
Videotext: Dal‰í 100. str.
v
+/– Zmûna svûtlosti.
SAT Satellite-receiver dálkovû ovlá-
dat (k tomu drÏet stlaãené
tlaãítko SAT)
P/C Vyvolat programová data.
Tlaãítko drÏet 4 sekundy
stlaãené : ATS vyvolat.
TP 712
123
456
89
7
AV
0
P
OK
–
+
P
Ǽ
ʀ
Ǻ
TXT
Ȅ
+
–
iv
VIDEO AUX P/C SAT
+
–
Page 40

e
40
Zmûna tónu, provoz videotextu
Audio-menu
r
Audio-menu vyvolat
Stisknout tlaãítko ǺǺa poté tlaãítko ʀ; zobrazí se
stránka »Audio-menu «.
Stereo, mono, dvoutón –
Stereofonní ‰ífika –
V˘‰ka –
Bas –
Balance –
Dialogov˘ fiádek –
Ń
!
»Audio-menu « mÛÏete po kaÏdém nastavení vymazate tlaãítkem ǺǺ.
r
Stereo-, mono- a dvoutónové vysílání
Pfiijímá-li pfiístroj dvoutónová vysílání, – napfi. film
s originálním zvukem na zvukovém kanálu 2
(DUAL B) a synchronizovanou podobu na zvukovém kanálu 1, – (DUAL A) – pak si mÛÏete zvukov˘
kanál zvolit.
Tlaãítkem P+ nebo P- zvolit první fiádek.
Tlaãítky
ņ –, + ŀ zvolit zvukov˘ kanál.
Pfiijímá-li pfiístroj stereofonní vysílání, pfiepne automaticky na stereofonní reprodukci zvuku.
Ń
!
Pfii ‰patné stereofonní reprodukci zvuku mÛÏete
pfiepnout tlaãítky ņ –, + ŀ na tón »mono«.
Ń
!
Nastavení » mono « je moÏno stlaãením tlaãítka
OK uloÏit do pamûti v souvislosti s urãit˘m programem a téÏ je moÏno jej z pamûti vymazat.
Ukazatel druhu zvukového pfienosu
PokaÏdé, kdyÏ dojde ke zmûnû druhu zvukového
pfienosu (napfi z mono na stereo) objeví se cca
4 sek. pfiíslu‰n˘ ukazatel.
Ten se objeví i pfii zmûnû programu, av‰ak jen
u druhÛ zvukového pfienosu, které se li‰í od mono.
r
Stereofonní ‰ífika
Roz‰ifiuje u streofonního vysílání zvukov˘ obraz
a u monofonních vysílání jej zlep‰uje.
Tlaãítkem P+ nebo P- zvolit pfiíslu‰n˘ fiádek.
Zmûnit tlaãítkem
ņ – nebo+ ŀ (Nastavení stereo-
fonní ‰ífiky zÛstane zachováno i po zmûnû programu).
r
V˘‰ka, bas, balance
Nastavení tûchto funkcí je moÏno dle potfieby
sefiídit.
Tlaãítky P+, P- zvolit pfiíslu‰n˘ fiádek.
Sefiízení tlaãítkem
ņ – nebo+ ŀ.
2
1
2
1
2
1
STEREO MONO
ʀǁ ʀ…ǁ
ɦ
ɼ
f
ɶʺ < > Ǻ
1
Provoz videotextu
r
Videotext vyvolat: Stisknout tlaãítko TXT.
r
Stránky zvolit pfiímo tlaãítky 1…9
(existující stránky: 100-899)
r
Vyvolat pfiehled stránek
Stisknout tlaãítko ǺǺ.
r
Vyvolat dialogov˘ fiádek: Stisknout tlaãítko
AUX.
= Zvût‰it v˘‰ku písmen
= Pfiemostit ãekací dobu (aktuální provoz).
= Pfiímo vyvolat podstránku
= Potvrzení odpovûdi
= Stránky-STOP
Funkce zvolit tlaãítkem
ņ – nebo + ŀ a tlaãítkem
OK vyvolat.
Funkce , , a je moÏno provést následovnû i bez vyvolání dialogového fiádku.
Zvût‰it v˘‰ku písmen: Stisknout tlaãítko +
i.
Pfiímo vyvolat podstránky: Stisknout tlaãítko –
i.
Potvrzení odpovûdi: Stisknout tlaãítko + Ń.
Stránky-stop: Stisknout tlaãítko
ņ –.
r
Stránky zvolit pomocí kurzoru
(Page Catching)
tzn. zvolit stránky bez zadání ãísla stránky. Pomocí
kurzoru je moÏno urãitou stránku videotextu vybrat
pfiímo z pfiehledu stránek (stránky, na kter˘ch se
nacházejí trojmístná ãísla stránek).
Stisknout tlaãítko P- nebo P+.
Na horním okraji obrazovky se objeví » Page
Catching«.
U prvního popfi. posledního ãísla stránky pfiehledu
bliká obdélníkov˘ bod (kurzor).
Tlaãítky P- nebor P+ umístit kurzor ke zvolenému
ãíslu stránky.
Stisknout tlaãítko OK.
Stránka se objeví na obrazovce.
r
Floftext
Barevná tlaãítka odpovídají tématÛm zobrazen˘m
v dialogovém fiádku.
3
2
1
5
4
3
1
5431
5
4
3
2
1
54321
ķ
ʄʄ
ķX /00 ķ? STOP
Page 41

e
41
MoÏnosti zapojení
Pfiipojit videorekordér,
kamerorekordér nebo satellite
receiver (satelitního pfiijímaãe)
r
Pfiipojení
Videorekordér pfiipojit kabelem AV do zdífiky AV.
r
Ovládání videorekordéru
Tlaãítko 0AV tisknout tak dlouho, dokud se neobjeví
AV 1.
Spustit reprodukci videorekordéru.
Na obrazovce vidíte reprodukci videorekordéru.
Pfiipo
jit mÛÏete také S-VHS-rekordér
.
K tomu je tfieba pfiepnout zdífiku AV na S-VIDEO.
Stisknout tlaãítko P/C.
Tlaãítkem
ņ – nebo + ŀ zvolit S-VIDEO.
Menu opustit tlaãítkem
ǺǺ
.
Sluchátka
r
Pfiipojení
Sluchátka (3,5 mm ø západka) spojit se zdífikou m
(reproduktory jsou odpojeny).
r
Zmûnit hlasitost sluchátek
Zmûnit pomocí tlaãítek ņ –, + ŀ
.
1
FBAS L – Audio – R
3
2
1
1
EURO-AV
EURO-AV
AUDIO
Pfiipojit descrambler (dekodér)
nebo externí pfiístroj
(videorekordér)
Nûkteré vysílaãe – jejichÏ programy jsou pfiivádûny
pfies satelit – kódují svá vysílání. Obraz a zvuk nelze
proto rozpoznat. Pomocí dekodéru je moÏno programy tohoto druhu dekódovat.
Postup:
Pfiipojte dekodér/videorekordér na zdífiku EURO-AV.
Dekodér:
Zvolte programové místo, na kterém se nachází
zakódovan˘ program.
Videorekordér:
Zvolte programové místo, na kterém chcete sledovat reprodukci videorekordéru.
Stisknout tlaãítko P/C.
Tlaãítkem
ņ – nebo + ŀ zvolit DEC.
Stisknutím tlaãítka P+ nebo P- se umoÏní pfiepnutí
na ON.
Programové místo pfiipravené pro provoz dekodéru
rozpoznáte podle teãky za P pfii zmûnû programu.
Tlaãítkem OK uloÏit do pamûti.
Menu opustit tlaãítkem
ǺǺ
.
5
4
3
2
1
EURO-AV
m
Page 42

e
42
MoÏnosti pfiipojení
r
Pfiípoj kamerorekordéru (VHS, Video 8).
r
Pfiipojení
Pfii
pojení obrazového signálu
Spojte zdífiku VIDEO IN s odpovídající obrazovou
zdífikou kamerorekordéru.
Pfiipojení zvukového signálu
Spojte zdífiky L AUDIO IN R se zvukov˘mi zdífikami
kamerorekordéru. Pfii monofonní reprodukci je
tfieba spojit zdífiku L AUDIO IN s pfiíslu‰nou zdífikou
na kamerorekordéru.
r
Ovládání kamerorekordéru
Tlaãítko 0AV tisknout tak dlouho, dokud se neobjeví
AV 2.
Spustit reprodukci videorekordéru.
Na obrazovce vidíte reprodukci videorekordéru.
(Pfiehrávání na zdífiku Euro-AV není moÏné!).
1
FBAS L – Audio – R
P
m
Page 43

e
43
Technické údaje
r
SíÈové napûtí:
220-240V, 50/60 Hz
(regulaãní rozsah síÈové ãásti 165 … 265 V)
» Pfiístroj smí b˘t provozován pouze s pfiiloÏenou
sadou kabelÛ. To zabraÀuje poruchám ze sítû a je
souãástí pfiipu‰tûní stroje.
Za úãelem v˘mûny objednávejte v˘luãnû sadu
síÈov˘ch kabelÛ s oznaãením GWN 9.22/ãíslo
8290.991-316 u zákaznické sluÏby.«
r
Snímání:
cca. 70 W
V pohotovostním stavu (stand by) 9 W
r
Oblasti pfiíjmu:
C01 … C99
Zvlá‰tní kanály S01 … S41
r
Konvov˘ zesilovaã:
2 x 8 W hudební v˘kon (2 x 4 W Sinus)
Pfiístroj splÀuje bezpeãnostní pfiedpisy Svazu
nûmeck˘ch elektrotechnikÛ (VDE) a pfiedpisy
Nûmecké spolkové po‰ty (registraãní znaãka viz.
nálepka na zadní stranû pfiístroje), dále nafiízení
o ochranû proti ‰kodám zpÛsoben˘m rentgenov˘mi
paprsky. Rentgenové záfiení – zpÛsobené obrazovkou – je dostateãnû odstínûné a tím zcela ne‰kodné.
Zrychlovací napûtí max. 29kV/stfiední proud záfiení
1,0mA.
Neodborné zásahy, obvzlá‰tû zmûna vysokého
napûtí nebo motáÏ jiného typu obrazovky, mohou
vést k tomu, Ïe dojde ke vzniku velmi silného rentgenového záfiení. Takto zmûnûné pfiístroje jiÏ neodpovídají uveden˘m pfiedpisÛm a nesmí b˘t provozovány.
Zmûny a omyly jsou vyhrazeny!
r
Obsazení kontaktÛ zdífiky EURO-AV
Chcete-li na svÛj televizní pfiístroj zapojit doplÀkové
pfiístroje (napfi. poãítaã, zesilovací zafiízení), pak
Vám zhotoví odborníci na základû následující tabulky zapojení vyhovující normû:
kolík signál
11 = prav˘ v˘stup audio
12 = prav˘ vstup audio
13 = lev˘ v˘stup audio
14 = Audio zem
15 = modrá zem
16 = lev˘ v˘stup audio
17 = RGB modrá-vstup
18 = spínací napûtí
19 = zelená zem
10 = –
11 = RGB zelená-vstup
12 = –
13 = ãervená zem
14 = zem
15 = RGB ãervená-vstup (Chroma u SVideo)
16 = RGB spínací napûtí
17 = Video zem
18 = RGB spínací napûtí-zem
19 = v˘stup video
20 = vstup video
21 = odstínûní/zem
r
GRUNDIG poradenské centrum pro
zákazníky
Máte otázky?
Na‰e poradenské centrum je Vám k dispozici ve
v‰ední den vÏdy od 8.00 – 19.00 hod.
montags bis freitags
von 8.00 – 19.00 Uhr
* Gebührenpflichtig –
in Deutschland und
Österreich möglich
STETS FÜR SIE DA!
DEUTSCHLAND
01 80/5 30 21 22*
ÖSTERREICH
06 60/66 99*
GRUNDIG
KUNDENBERATUNGS-
ZENTRUM
220
21
119
Page 44

GRUNDIG AG ••D-90762 FÜRTH Printed in Austria
0 1 2 3 4 5 6 7 8 9
21610-941.01
Ķ
= Seite 2-8
ķ
= Page 9-15
ƴ
= Pagina 16-22
ń
= Pagina 23-29
ĸ
= Page 30-36
e = Strana 37-43
 Loading...