

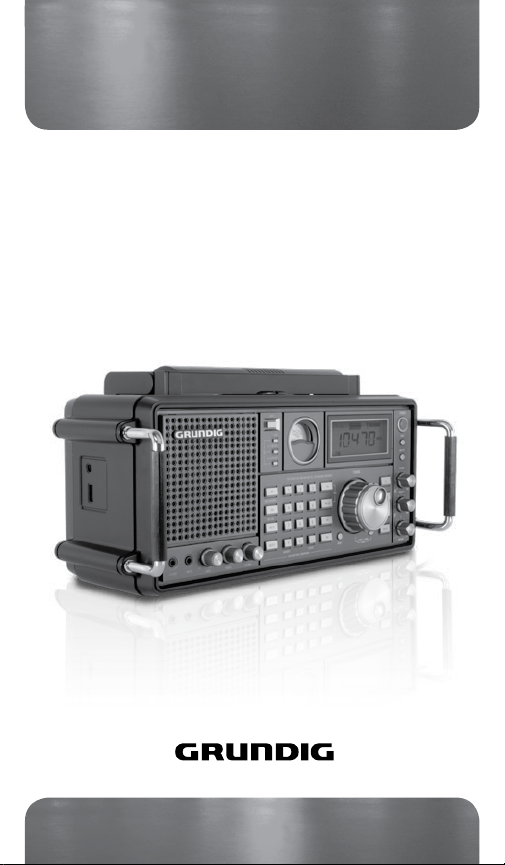
Satellit 750
AM/FM-stereo/Shortwave/Airwave Band Radio
with SSB (Single Side Band)
OWNER’S MANUAL
Grundig Radio Line By etón re_inventing radio www.etoncorp.com


SATELLIT 750 OWNER’S MANUAL
Grundig Radio Line By
DO YOU NEED HELP? Contact Us
Etón Corporation, 1015 Corporation Way, Palo Alto, CA 94303,
USA. 1-800-872-2228 (U.S.); 1-800-637-1648 (Canada);
650-903-3866 (worldwide); M-F, 8:30-4:00, Pacific Standard Time;
www.etoncorp.com.
WARNING
• Do not expose this appliance to rain or moisture.
• Do not submerge or expose for extended period to water.
• Protect from high humidity and rain.
• Only operate within specied temperature range (0 °C to 40 °C).
• Unplug immediately if liquid has been spilled or objects have
fallen into the apparatus.
• Clean only with a dry cloth. Do not use detergents or chemical
solvents as this might damage the nish.
• Unplug and disconnect external antennas (not included) during
lightning storms.
• Do not remove cover [or back].
• Refer servicing to qualied service personnel.
ENVIRONMENT
Disposal
According to the European Directive 2002/96/EC all
electrical and electronic products must be collected
separately by a local collection system.
Please act according to your local rules and do not dispose of your
old products with your normal household waste.
3

SATELLIT 750 OWNER’S MANUAL
FEATURES
Thank you for purchasing the Satellit 750. Its features and capabilities are shown below:
• Shortwave (1711-30000 KHz) with SSB (single sideband), LW, AM,
FM and Aircraft Band (118-137 MHz)
• Set 9/10 KHz AM tuning; set FM tuning range starting at 87 or
88 MHz
• Dual Conversion and Single Side Band (SSB)
• 1000 station memories
• 360 degree, rotating AM antenna
• Auto/Manual/Direct frequency key-in and station memory tuning
• Auto Tuning Storage function (ATS) for FM/AM/Shortwave
• Mute function
• 24 hour Clock and Dual alarm clock function
• Line in socket (can be used as speaker for MP3)
• Line out socket (radio broadcasting can be transferred to other
device)
• External antenna jacks for SW, AM and FM
• Power source: 4D alkaline batteries; AC/DC-6V power supply
• Dimensions: 14.65” x 7.24” x 5.75” and 372mm x 184mm x
146mm (W x H x D)
• Weight: 5.25 lbs (2.38 kg)
• Accessories: owner’s manual, warranty card
• Specications subject to change
WHAT’S INCLUDED?
AC adapter; Owner’s manual
4

SATELLIT 750 OWNER’S MANUAL
POWER SOURCES
Power the SATELLIT 750 by installing 4 D alkaline, lithium or Ni-MH
batteries or by plugging in the included 6 VDC AC adapter. The AC
adapter plugs into the 6 Volt DC socket on the left side of the radio.
A battery symbol appears in the lower right of the LCD, indicating
battery or AC adapter power. If there’s a power failure with the AC
adapter attached and batteries installed, the batteries will take over
and supply power to the radio.
PREVENTING BATTERY LEAKAGE
To minimize the possibility of battery acid leakage, only use high
quality alkaline, lithium or rechargeable nickel-metal-hydride batteries. Never intermix old with new, or different brands or types of
batteries. Damage caused by battery acid leakage is not covered by
this product’s warranty.
SETTING UP AM AND FM OUTSIDE OF
NORTH AMERICA
To use the SATELLIT 750 in North America (U.S. or Canada), no
changes to the initial factory settings are needed.
In North America, AM stations are spaced by 10 KHz. In Europe and
other areas, they are spaced by 9 KHz. In North America, the FM
band begins at 88 MHz. In other parts of the world, it may begin at
76 MHz or 87 MHz. Follow these steps to set this for your area:
To change these settings for your area turn the SATELLIT 750 off.
Press the ENTER button and notice that -- appears in the upper
right corner of the display. While -- appears, enter 09 or 10 with the
numeric keypad and press ENTER. Repeat this procedure and press
88, 87 or 76 and press ENTER.
5

SATELLIT 750 OWNER’S MANUAL
TURNING THE SATELLIT 750 ON AND OFF
Press the POWER button to turn it on and off.
VOLUME CONTROL
With the SATELLIT 750 on, turn the VOLUME knob, located in the
lower left front, clockwise to increase the volume, counterclockwise
to decrease the volume.
SELECTING FM, MW(AM), LW, SHORTWAVE
AND AIRCRAFT BAND
The Satellit 750 receives FM on 88-108 MHz, AM on 520-1710 KHz,
Longwave on 100-519 KHz, Shortwave on 1711-29999 KHz and
Aircraft on 118 -137 MHz.
Turn the Satellit 750 on. Select FM by pressing the FM button,
MW(AM) and Longwave by pressing the MW/LW button (press it
twice if necessary), Shortwave by pressing the SW button sequentially until you have selected the desired band (the band number
ashes in the upper right corner of the display) and the Aircraft
band by pressing the AIR button.
NOTE: Be sure to fully extend the telescopic antenna when listening
to SW, FM and AIR. The swivel AM antenna is located at the top of
the radio; swivel it for best AM reception.
6

SATELLIT 750 OWNER’S MANUAL
SHORTWAVE LISTENING
To learn about shortwave we recommend the two publications
below, published yearly and available from major booksellers.
Additionally, the Internet is a great resource for learning about
shortwave.
PASSPORT TO WORLD BAND RADIO Published by International
Broadcasting Services (IBS); IBS North America, Box 300, Penn’s Park
PA 18943. Phone: (215) 598-9018. www.passband.com.
WORLD RADIO TV HANDBOOK Published in the USA by WatsonGuptill Publications, 770 Broadway, 7th Floor, New York, NY
10003-9595. www.watsonguptill.com.
OPTIMIZING SHORTWAVE RECEPTION
Shortwave enables listening to broadcasts over vast distances
including other countries and continents. The following information
will help you get the best results.
• During the day, use bands with frequencies above 13000 KHz.
• At night, use bands with frequencies below 13000 KHz.
• Around sunset and sunrise, use bands with the entire shortwave
range.
• Getting very close to a window improves shortwave reception.
SSB (SINGLE SIDE BAND) TUNING
SSB enables listening to shortwave two way communications
using the single sideband mode such as amateur radio, Morse
code, weather-fax transmissions and other signals often referred
to as ‘utility’ signals. The Internet and your local library are great
7

SATELLIT 750 OWNER’S MANUAL
SSB (SINGLE SIDE BAND) TUNING continued
resources to learn more. Type ‘amateur radio frequencies’ or ‘sideband’ into an Internet search engine.
To use the SSB control, turn on the SATELLIT 750 and go into Shortwave. Press the SSB button and notice that USB appears in the display, to the right of SW. Press the SSB button again and notice that
LSB appears to the right of SW. USB is the abbreviation for Upper
Sideband, LSB is the abbreviation for Lower Sideband. You will need
to use one of these methods to tune in signals. Also notice that on
the lower right front of the radio is a control knob labeled SSB BFO.
BFO stands for Beat Frequency Oscillator. This control knob is used
to ne tune a sideband signal.
ANTENNA ATTENUATOR (ANT.ATT) BUTTON
The ANT.ATT button, located on the upper right front of the radio,
is used to attenuate a signal. Tune into a station, then press the
ANT.ATT button and notice that the signal strength indicator,
located on the left side of the display, changes at three levels. The
maximum level is the highest gain and the lowest level is minimum
gain. Use the lowest level if the signal is extremely strong and local.
Use the intermediate level for average signals and use the highest
level for weak signals. Experiment with this control to see how it
works best with the signals you listen to and use it to your liking.
RF GAIN CONTROL
On the right front of the radio is the RF Gain control knob. You
can leave it fully counterclockwise in the AUTO position, where it
will function automatically, or you can turn it clockwise and use it
manually to control the RF (radio frequency) gain. Using it manually
8
SATELLIT 750 OWNER’S MANUAL
RF GAIN CONTROL continued
may improve the radio’s rejection of interference from adjacent
frequencies that may interfere, especially on Shortwave. This switch
does not work in FM.
SQUELCH CONTROL
Using the squelch control eliminates background noise. This control
is used mainly in the aircraft band. It does not work in the FM band.
This control is on the lower right front of the radio. To engage it,
turn it on by turning the knob clockwise. Turn it off by clicking the
knob fully counterclockwise.
TUNING IN STATIONS
Stations are tuned using Direct Frequency Entry, the
the Tuning Knob, as described below.
Buttons and
DIRECT FREQUENCY ENTRY TUNING
Use this method when the desired frequency of a radio station
is known. Turn on the SATELLIT 750 and select the band of your
choice. AM and SW frequencies are entered in kilohertz (KHz), e.g.
810 KHz or 9475 KHz.; FM frequencies are entered in megahertz
(MHz), e.g. 102.9 MHz, ignoring the decimal point. Use the numeric
keypad to enter the frequency.
9

SATELLIT 750 OWNER’S MANUAL
BUTTON TUNING
Turn on the Satellit 750 and select the band of your choice. Quick,
short, sequential presses of the
down frequency. A longer press engages Auto Tuning. In Auto Tuning the radio scans from one station to the next, stays on the new
station for 5 seconds and then moves on. To stop Auto Tuning, press
either of the
buttons.
buttons enables tuning up or
TUNING KNOB
The tuning knob can also be used to tune stations. Select FAST or
SLOW tuning with the STEP button, under the tuning knob. FAST/
SLOW tuning is shown in the chart below for each band. If you
want to LOCK the tuning knob press the STEP button for about 3
seconds. Do a quick, short press to unlock it.
FM AM SW AIR SSB
FAST .1 MHz 10 KHz 5 KHz .025 MHz 5 KHz
SLOW .01 MHz 1 KHz 1 KHz .001 MHz 1 KHz/BFO
BW (BANDWIDTH) BUTTON
Use the BANDWIDTH button to choose wide or narrow selectivity,
which is shown in the lower right corner of the display as WIDE or
NARROW. This may help reduce interference on some frequencies. Using WIDE usually results in better audio delity, while using
narrow limits the audio delity somewhat.
10

SATELLIT 750 OWNER’S MANUAL
FM ST. (FM STEREO) BUTTON
Press the FM ST. button when in the FM band to take the radio in
or out of stereo reception mode. When it’s in stereo mode, STEREO
appears under the left side of the frequency in the display, next to
FM. As long as you are not using headphones or earphones, it can
be left in mono mode.
BASS AND TREBLE KNOBS
Use these knobs to control the Bass and Treble to your liking. Turning clockwise increases bass or treble. Turning counterclockwise
decreases bass or treble.
STORING FREQUENCIES INTO MEMORY
There are two separate sets of 500 memories, allowing for great
exibility of memory storage. Note the chart, below.
Memory PAGE 0, noted as ‘P0’, consists of 500 memories, 100 assigned for MW, SW, SSB and Air Band; 50 memories each assigned
for FM and LW.
Memory PAGE 1 – 10, noted as ‘P1’, ‘P2’, etc., consists of 50
memories per page, 500 memories total.
To manually store a frequency into a memory, rst choose the page,
then the memory location and then store the frequency. In the
instructions below note that MEMORY=PRESET. See the instructions
below.
• Turn on the radio and tune to a station that you want to store
into memory.
11

SATELLIT 750 OWNER’S MANUAL
STORING FREQUENCIES INTO MEMORY
continued
• Shortly press the MEMORY button (the address page will ash in
the right corner of the LCD.
• Shortly press the PAGE button and use the “
select the page that you want to store into; press PAGE again to
confirm.
• Use “
/ ” to select the memory location while it is ashing.
• Press the MEMORY button to conrm it (or it will automatically
conrm after 3 seconds).
To automatically store a frequency into the next available memory
on the page that you’ve selected, press and release ‘M’. Note that
PRESET ashes with the next available memory number. Press ‘M’
to automatically store it into the next available memory or when it
stops ashing it’s stored into the memory number that was ashing.
Storage space in P0 page
Store
Band
(FM) 100
P0 (page) ATS
√
(SW) 100
(SSB) 100
(AIR) 100
(MW) 50
(LW) 50
√
√
/ ” buttons to
Other storage space
500 MEMORIES
10 pages each with 50 memories
20 pages each with 25 memories
25 pages each with 20 memories
50 pages each with 10 memories
(See the system setting chart to change
above pages)
LISTENING TO WHAT’S STORED
• Turn on the radio and go to the correct page by pressing PAGE
and entering it with the numeric keypad.
• Press and release the VM/VF button and notice that the PAGE
and PRESET show in the display’s upper right corner.
12
SATELLIT 750 OWNER’S MANUAL
LISTENING TO WHAT’S STORED continued
• To go from one memory to another give a quick, short press
to either the up or down tuning button , or use the tuning
knob.
• To auto-scan memory press one of the up or down tuning
buttons for about 2 seconds and notice that PRESET ashes.
The radio scans from one memory to another, staying on each
memory for about 5 seconds. To stop the scan give the up or
down tuning button a quick, short press.
DELETE ONE MEMORY
• Turn on the radio and press the VM/VF button, causing PAGE and
PRESET to appear in the display’s upper right corner.
• Use the numeric keypad, the tuning knob or the up/down tuning
buttons (
delete the memory press the DELETE button for about
) to select the memory that you want to delete. To
DELETE A MEMORY PAGE
• Turn on the radio and select the page that you want to delete
by pressing PAGE, note that page ashes in the display’s upper
right. While it’s ashing use the numeric keypad, the tuning knob
or the up or down tuning buttons (
you wish to delete.
• Press and release the VM/VF button so that PAGE and PRESET
appear in the display’s upper right corner. If - - appears above
PRESET in the display’s upper right corner, the page is already
deleted and you don’t have to continue.
• Press DELETE for about 3 seconds or until PAGE starts blinking
and press DELETE again.
) to select the page that
13

SATELLIT 750 OWNER’S MANUAL
ATS (AUTO TUNING STORAGE)
MEMORY STORAGE
One can automatically store the strongest LW, AM or FM stations
into Page 0.
Turn on the radio and select the band that you want ATS to take
place in, either MW/LW or FM. Press the MW/LW or FM for 2
seconds. Notice that page 0 (P0) appears in the display’s upper
right corner with the presets to the right increasing as the band is
scanned and frequencies are stored into the memory.
ACCESSING STORED MEMORIES
The SATELLIT 750’s clock is in 24-hour format and can be set with
the radio on or off. When the radio is turned off the clock shows
in mid-display. When the radio is turned on the clock shows in the
upper right corner of the display.
To set the clock:
1. Press the TIME button for about a second or until you see the
hour ashing.
2. While it’s ashing turn the TUNING knob to set it to the correct
hour, then press TIME and note that the minutes are ashing.
3. While it’s ashing turn the TUNING knob to set it to the correct
minutes, then press TIME.
Note that after setting the hour or minutes you can simply let the
ashing number time-out, without pressing the TIME button.
14

SATELLIT 750 OWNER’S MANUAL
ALARM SETTING
The SATELLIT 750 has two, independently programmable alarm timers to turn it on and off at a specied time.
To set an alarm:
1. Press the AL.1 or AL.2 button for a second or until you see the
alarm hour ashing in the upper right corner of the display. While
it’s ashing adjust the hour with the TUNING knob and press the
AL.1 or AL.2 button. Notice that the alarm minutes are ashing.
2. While it’s ashing adjust the alarm minutes with the TUNING
knob and press the AL.1 or AL.2 button. Notice the sleep timer
ashing in the box at the top of the display.
3. While it’s ashing adjust the time that the radio is to play with
the TUNING knob and press the AL.1 or AL.2 button.
Note that after setting the hour or minutes you can simply let the
ashing number time-out, without pressing the AL.1 or AL.2 but-
ton.
Once the alarm is on (by radio or buzzer), only the POWER, SLEEP,
LIGHT/SNOOZE and RESET can be operated. Press the POWER or
SLEEP buttons to turn off the alarm.
ALARM BY BUZZER
Press on [AL.1 on/off] key to select “
the alarm will be on by the buzzer.
” in “Timer A” section. Now,
Note: In “Timer A” section:
“
” Means timer is set by radio.
“
” Means timer is set by buzzer.
“ ” Means Timer is off.
15

SATELLIT 750 OWNER’S MANUAL
LIGHT/SNOOZE BUTTON
When the alarm is activated, press the LIGHT/SNOOZE button to
temporarily deactivate the timer for 10 minutes. You can press the
LIGHT/SNOOZE button 3 times within the alarm period, after that
you can turn off the alarm by press it again.
ALARM ACTIVATION/DEACTIVATION
For the alarm to turn on the radio, it must be activated. To activate
the alarm the SATELLIT 750 can be turned on or off.
To activate the alarm, look at the top of the display, to the right of
where it reads TIMER A and TIMER B. Use quick, short presses of the
AL.1 ON/OFF or AL.2 ON/OFF buttons. When the speaker is there,
it wakes you to the radio playing; when the bell is there, it wakes
you to an electronic beeper; when nothing is there, the alarm is
deactivated.
SLEEP TIMER
The sleep timer enables the SATELLIT 750 to play any length of time
from 1 – 120 minutes and then turn off.
To turn on the sleep timer, press the SLEEP button on the upper,
right front of the radio. Notice that the number of minutes to play
appears in the display. While they appear there, press the SLEEP
button over and over and it sequences through 1 to 120 minutes.
Leave it on the minutes that you want it to play.
16

SATELLIT 750 OWNER’S MANUAL
USING THE LIGHT BUTTON
A quick press of the LIGHT button gives about 5 seconds of illumination to the SIGNAL strength indicator and the display. A long
press lights these for as long as the radio is turned on, so be careful
if you’re operating on batteries, because it will make them drain
faster. If you’re AC adapter is connected, it’s ne to keep the light
on while the radio plays.
EARPHONE SOCKET
The earphone socket is on the lower left front of the radio and is labeled EAR. Plug in earphones and headphones using a 3.5 mm (1/8
inch) stereo plug. Turn the volume down before plugging them in.
LINE-IN SOCKET
The LINE-IN socket is on the lower left front of the radio and allows
you to route the sound from another device to the Satellit 750. Use
a cord with a 3.5 mm (1/8 inch) stereo plug. This socket uses an
industry standard line level input.
LINE OUT SOCKETS
On the back of the radio are the left and right line-out sockets,
labeled LINE OUT. These sockets use an industry standard line level
output and can be routed to any industry standard line level input.
The external antenna sockets are used to connect the SATELLIT 750
to advanced performance antennas.
17

SATELLIT 750 OWNER’S MANUAL
EXTERNAL ANTENNA SOCKETS
On the right side of the radio are the 50 Ohm BNC sockets for FM
and Shortwave. 50 or 75 Ohm coaxial cable can be used to feed the
properly designed antenna. To nd antennas we recommend that
you perform a web search by typing ‘FM antennas’ or ‘shortwave
antennas’ into an Internet search engine.
There is also a black and red socket, labeled 500 Ohms, designed to
work with a high impedance Shortwave antenna, 300-600 Ohms,
such as a long wire antenna. Plug a long piece of wire, 10 to 35
meters or 30 to 100 feet, into the red socket and position it above
ground, running in as much a straight line as possible, not touching
any other metal objects. If you do this indoors, position the wire
as close to windows as possible. Plug a 10 to 20 meter or 30 to 60
foot wire into the black socket and let it run on the oor or ground.
Or attach the black socket to a cold water pipe with as short a piece
of wire as possible.
On the rotateable AM antenna, at the top of the radio, is a socket
for 50 or 75 Ohm plug-in AM antennas.
When using external sockets select EXTERNAL with the selector
switch on the right side of the radio. When using the internal
antennas of the radio, switch it to ANTENNA.
NOTE: always unplug all antennas that are mounted outside when
a lightning storm is predicted.
18

SATELLIT 750 OWNER’S MANUAL
RESET BUTTON
The reset button is located to the left under the TUNING knob. Press
it only when the radio seems to stop functioning properly. After it’s
pressed the AM station spacing will have to be set again for North
America.
EMPTY COMPARTMENT ON BACK OF
THE RADIO
Use the small, empty compartment next to the battery compartment as you wish.
SYSTEM CODE SETTING
To enter different system codes turn off the radio and perform a
quick, short press of the ENTER button. “_ _” appears on the upper right corner of the display. Enter the system code as below, then
push ENTER to conrm the system code.
19

SATELLIT 750 OWNER’S MANUAL
SYSTEM CODE SETTING continued
For memory page setting (500 memories)
CODE
00 10 pages; each page 50 memories
20 20 pages; each page 25 memories
25 25 pages; each page 20 memories
50 50 pages; each page 10 memories
Step (AM)
09 9kHz
10 10kHz (North America)
Type of batteries
29 Normal D size batteries (1.5V each battery)
28 Rechargeable batteries (1.2V each battery)
FM frequency range
76 76-108 MHz (Japan)
87 87-108 MHz
20
SPECIFICATIONS
Frequency range
LW
MW
SW
AIR
FM
speaker
Earphone jack
Power consumption
Operation Temp.
Weight
Measurements
Power
SATELLIT 750 OWNER’S MANUAL
100-519 kHz
522-1620 kHz – system code “09”
520-1710 kHz (America) -system code “10”
1711-29999 kHz
118-137MHz
87-108MHz
76-108MHz
8 ohm / 2W
4 inches
3.5mm, stereo
without back light 80mAh
with back light 90 mAh
-5 to +50 C
2.66 kg, not including batteries
L: 372 mm
H: 183 mm
W: 153 mm
Batteries : UM1 (alkaline) x 4
DC: 6V/500mA, negative polarity
21

SATELLIT 750 OWNER’S MANUAL
WARRANTY REGISTRATION
To ensure full warranty coverage or product updates, registration
of your product should be completed as soon as possible after
purchase or receipt. You may use one of the following options to
register your product:
1. By visiting our website at http://www.etoncorp.com
2. Mail in enclosed warranty card.
3. Mail your warranty card or information to following address;
include your name, full mailing address, phone number, email
address, model purchased, date purchased, retail vendor name:
Etón Corporation
1015 Corporation Way
Palo Alto, CA 94303 USA
LIMITED WARRANTY
Retain the warranty information from your warranty card with your
proof of purchase or the Limited Warranty information can also be
viewed at www.etoncorp.com.
SERVICE FOR YOUR PRODUCT
To obtain service for your product, we recommend rst contacting an Etón service representative at 1-800-872-2228 US,
1-800-637-1648 Canada, (650) 903-3866, customersvc@etoncorp.
com or your respective country distributor in Europe (see enclosed
22

SATELLIT 750 OWNER’S MANUAL
SERVICE FOR YOUR PRODUCT continued
list) for problem determination and trouble-shooting. If further
service is required, the technical staff will instruct how to proceed
based on whether the radio is still under warranty or needs nonwarranty service.
WARRANTY – If your product is still in warranty and the Etón service representative determines warranty service is needed, a return
authorization will be issued and instructions will be given. DO NOT
ship your radio back without obtaining the return authorization.
NON-WARRANTY – If your product is no longer under warranty
and requires service, the Etón service representative will refer you to
the nearest repair facility that will best handle the repair.
For service outside North America, please refer to the distributor
information included at time of purchase/receipt.
FCC NOTE
The manufacturer is not responsible for any radio or tv interference
caused by unauthorized modications to this equipment. Such
modications could void the user’s authority to operate the equip-
ment.
23


SATELLIT 750 MANUAL D’OPÉRATION
Grundig Radio Line By
Vous avez besoin d’aide?
N’HESITEZ PAS A NOUS CONTACTER.
Eton Corporation, 1015 Corporation Way, Palo Alto, CA 94303,
USA. 1-800-872-2228 (États-Unis) ; 1-800-637-1648 (Canada) ;
650-903-3866 (international) ; du lundi au vendredi de 8h30 à
16h00, heure du Pacique ; www.etoncorp.com.
AVERTISSEMENT
• Ne pas exposer cet appareil à la pluie à l’humidité.
• Ne pas plonger l’appareil dans l’eau ou le mettre en contact de l’eau pendant une
période prolongée.
• Protéger l’appareil en cas de pluie et de taux d’humidité élevé.
• Utiliser l’appareil uniquement en respectant la gamme de température spéciée
(0 °C à 40 °C).
• Débranchez immédiatement l’appareil si du liquide a été renversé ou si un objet est
tombé dans l’appareil.
• Nettoyer uniquement avec un chiffon sec. Ne pas utiliser de détergents ou de solvants
chimiques, vous risqueriez d’endommager le revêtement.
• Débrancher et déconnecter les antennes externes (non fournies) pendant les orages.
• Ne pas enlever le couvercle [ou l’arrière].
• Faire appel à un spécialiste pour d’éventuelles réparations.
ENVIRONNEMENT
Élimination
Selon la Directive Européenne 2002/96/EC, tous les
produits électriques et électroniques doivent être collectés séparément par un centre de tri proche de votre
domicile local.
Veuillez agir conformément à la réglementation locale en vigueur et ne
pas éliminer vos produits usagés avec vos déchets ménagers.
25

SATELLIT 750 MANUAL D’OPÉRATION
FONCTIONNALITES
Nous vous remercions d’avoir effectué l’achat du Satellit 750. Ses
fonctionnalités et capacités sont décrites ci-dessous :
• Ondes Courtes (1 711 à 30 000 kHz) avec SSB (bande latérale
unique), LW (grandes ondes), AM (modulation d’amplitude), FM
(modulation de fréquence) et Aircraft Band (118 à 137 MHz)
• paramétrage du pas de réglage AM sur 9 ou 10 kHz AM ; la
gamme des fréquences FM démarre au choix à 87 ou 88 MHz
• Double conversion et bande latérale unique (SSB)
• 1000 mémoires de présélections de stations
• Antenne AM rotative à 360 degrés
• Saisie des fréquences et réglage des mémoires des stations Auto/
Manuelle/Directe
• Fonction ATS (Auto Tuning Storage, Enregistrement des réglages
automatique) pour FM/AM/SW
• Fonction silence
• Fonction horloge sur 24 heures et double réveil
• Prise Line in (peut être utilisé comme haut-parleur pour un lecteur
MP3)
• Prise Line out (une émission de radio peut être transférée vers un
autre appareil)
• Prises d’antennes externes pour SW, AM et FM
• Alimentation : 4 piles alcalines types 4 D ; bloc d’alimentation CA/
CC-6 V
• Dimensions : 14,65” x 7,24” x 5,75” et 372 mm x 184 mm x 146
mm (L x H x P)
• Poids : 5,25 livres (2,38 kg)
• Accessoires : manuel du propriétaire, carte de garantie
• Caractéristiques sujettes à modications
26

SATELLIT 750 MANUAL D’OPÉRATION
CE QUI EST INCLUS
Alimentation CA ; manuel du propriétaire
SOURCES D’ALIMENTATION
Alimentez le SATELLIT 750 en insérant 4 piles alcalines 4 D, lithium
ou Ni-MH, ou en branchant le transformateur 6 Vcc/ca inclus. Le
transformateur CA (courant alternatif) se branche à la prise 6 Volt
CC située sur le côté gauche de la radio. Le symbole d’une batterie
apparaît dans l’angle inférieur droit de l’écran à cristaux liquides. En
cas de coupure de courant avec le transformateur CA et si des piles
sont installées, celles-ci prennent le relai et alimentent la radio.
PREVENTION DES FUITES DES PILES
Pour réduire le risque d’une fuite d’acide provenant des piles,
utilisez uniquement des piles alcalines lithium haute qualité ou
des batteries rechargeables au nickel-métal-hydrure. Ne mélangez
jamais de piles usagées avec des nouvelles, ou différentes marques
de piles. Les dommages causés par des fuites d’acide ne sont pas
couverts par la garantie de ce produit.
REGLER AM ET FM EN DEHORS DE L’AMERIQUE
DU NORD
Aucune modication des réglages d’usine n’est nécessaire pour utiliser le SATELLIT 750 en Amérique-du-Nord (États-Unis ou Canada).
En Amérique-du-Nord, les stations AM sont espacées de 10 kHz. En
Europe et dans d’autres régions, elles sont espacées de 9 kHz. En
Amérique-du-Nord, la bande FM débute à 88 MHz. Dans d’autres
27

SATELLIT 750 MANUAL D’OPÉRATION
REGLER AM ET FM EN DEHORS DE L’AMERIQUE
DU NORD continué
régions du Monde, elle peut commencer à 76 MHz ou 87 MHz.
Suivez les étapes suivantes pour régler ce paramètre pour votre
région :
Pour corriger ces paramètres pour votre région, éteignez le SATELLIT
750. Appuyez sur la touche ENTER et remarquez que – apparaît
dans l’angle supérieur droit de l’écran. À l’apparition de --, saisissez
09 ou 10 à l’aide du pavé numérique puis appuyez sur ENTER. Répétez cette procédure, saisissez 88, 87 ou 76 puis appuyez sur ENTER.
ALLUMER OU ETEINDRE LE SATELLIT 750
Appuyez sur la touche POWER pour allumer ou éteindre l’unité..
CONTROLE DU VOLUME
Le SATELLIT 750 allumé, tournez le bouton VOLUME, situé sur
l’avant en bas à gauche, dans le sens des aiguilles d’une montre
pour augmenter le volume, ou dans le sens inverse pour diminuer
le volume.
SELECTIONNER LA BANDE FM, MW(AM), LW,
OC OU AIRCRAFT
Le Satellit 750 reçoit la FM entre 88 et 108 MHz, AM entre 520 et
1710 KHz, les grandes ondes entre 100 et 519 KHz, les Ondes courtes entre 1711 et 29999 kHz et Aircraft entre 118 et 137 MHz.
Allumez le Satellit 750. Sélectionnez la bande FM en appuyant sur
28

SATELLIT 750 MANUAL D’OPÉRATION
SELECTIONNER LA BANDE FM, MW(AM), LW,
OC OU AIRCRAFT continué
la touche FM, MW(AM), grandes ondes en appuyant sur la touche
MW/LW (appuyez deux fois si nécessaire), ondes courtes en appuyant su la touche SW séquentiellement jusqu’à la bande désirée (le
numéro de bande clignote dans le coin supérieugauche) et la bande
Aircraft en appuyant sur la touche AIR.
REMARQUE : assurez-vous de sortir totalement l’antenne
téléscopique lorsque vous écoutez SW, FM ou AIR. L’antenne AM
sur rotule se trouve sur le dessus de la radio ; la rotule permet une
meilleure réception AM.
ECOUTER LES ONDES COURTES
Pour en savoir plus sur les ondes courtes, nous vous recommandons
les deux publications ci-dessous, éditées tous les ans et disponibles
dans la majorité des librairies. En outre, Internet est une source
importante d’informations pour vous documenter sur les ondes
courtes.
PASSPORT TO WORLD BAND RADIO publié par International
Broadcasting Services (IBS) ; IBS North America, Box 300, Penn’s
Park PA 18943. Téléphone : (215) 598-9018. www.passband.com.
WORLD RADIO TV HANDBOOK publié aux États-Unis par
Watson-Guptill Publications, 770 Broadway, 7th Floor, New York,
NY 10003-9595. www.watsonguptill.com.
29

SATELLIT 750 MANUAL D’OPÉRATION
OPTIMISER LA RECEPTION DES ONDES COURTES
Les ondes courtes permettent d’écouter des programmes diffusés
sur des grandes distances, y compris d’autres pays ou continents.
Les informations suivantes vont vous aider à obtenir les meilleurs
résultats.
• Le jour, utilisez les fréquences supérieures à 13 000 kHz.
• La nuit, utilisez les fréquences inférieures à 13 000 kHz.
• Au coucher et au lever du soleil, utilisez la largeur complète de la
bande de fréquences en ondes courtes.
• Se placer à proximité d’une fenêtre et tenir la radio, améliorent la
réception des ondes courtes.
RÉGLAGE SSB (SINGLE SIDE BAND)
SSB permet d’écouter les communications en ondes courtes deux
voies en utilisant le mode bande latérale unique comme la radio
amateur, le code Morse, les transmissions weather-fax et les autres
signaux souvent référencés comme les signaux « polyvalents ».
Internet et la bibliothèque de votre quartier sont des sources importantes d’information pour en savoir plus. Saisissez « fréquences
radio amateurs » ou « sideband » dans un moteur de recherche
Internet.
Pour utiliser le contrôle SSB, allumez le SATELLIT 750, allez dans
Ondes Courtes et remarquez l’apparition d’USB à l’écran, à droite de
SW. Appuyez sur la touche SSB à nouveau et remarquez maintenant
l’apparition de LSB à droite de SW. USB est l’abréviation d’Upper
Sideband (bande latérale supérieure). Vous devez utiliser l’une de
ces méthodes pour régler les signaux. Notez en outre qu’un bouton
de commande étiqueté SSB BFO se trouve en bas à droite de la
radio. BFO signie Beat Frequency Oscillator (oscillateur de battements). Ce bouton de commande est utilisé pour régler nement un
signal à bande latérale.
30

SATELLIT 750 MANUAL D’OPÉRATION
TOUCHE ANT.ATT, ATTENUATEUR D’ANTENNE
La touche ANT.ATT, située dans l’angle avant droit supérieur de
la radio, est utilisée pour atténuer un signal, puis appuyez sur la
touche ANT.ATT et remarquez que l’indicateur de la force du signal,
situé sur le côté gauche de l’afchage, change selon trois niveaux.
Le niveau maximum correspond au gain maximal et le niveau minimum est le gain minimal. Utilisez le niveau minimum si le signal est
particulièrement fort et proche. Utilisez le niveau intermédiaire pour
les signaux moyens et utilisez le niveau le plus élevé pour les signaux
les plus faibles. Faites des essais avec cette commande et découvrez
son fonctionnement optimal avec les signaux que vous écoutez, puis
utilisez-la selon vos goûts.
COMMANDE DE GAIN RF
Sur le côté droit de la radio, vous trouverez le bouton de gain RF.
Vous pouvez le laisser au maximum dans le sens inverse des aiguilles
d’une montre dans la position AUTO, où le fonctionnement sera
automatique, ou vous pouvez le tourner dans le sens des aiguilles
d’une montre pour contrôler le gain RF (radio fréquence) manuellement. L’utilisation manuelle améliore la ltration des interférences
des fréquences adjacentes, particulièrement en Ondes Courtes. Ce
commutateur ne fonctionne pas en FM.
SILENCIEUX
L’utilisation du silencieux permet d’éliminer le bruit de fond. Ce
contrôle est principalement utilisé en bande aircraft. Il n’est pas
disponible en bande FM. Cette commande se trouve dans l’angle
avant inférieur droit de la radio. Pour l’enclencher, activez-le en tournant le bouton dans le sens des aiguilles d’une montre. Eteignez-le
en tournant le bouton totalement dans le sens inverse des aiguilles
d’une montre.
31

SATELLIT 750 MANUAL D’OPÉRATION
REGLAGE DES STATIONS
Les stations sont réglées à l’aide de la saisie de la fréquence directe,
des touches
et du bouton Tuning, comme décrit ci-dessous.
SAISIE DIRECTE DE LA FREQUENCE
Utilisez cette méthode si la fréquence de la station de radio que
vous souhaitez est connue. Allumez le SATELLIT 750 et sélectionnez
la bande de votre choix. Les fréquences AM et SW sont saisies en
kilohertz (kHz), par exemple : 810 kHz ou 9475 kHz ; les fréquences
FM sont saisies en mégahertz (MHz), par exemple : 102,9 MHz, en
ignorant la virgule décimale. Utilisez le pavé numérique pour saisir
une fréquence.
REGLER LES STATIONS AVEC LES TOUCHES
Allumez le Satellit 750 et sélectionnez la bande de votre choix. Des
appuis rapides, courts et séquentiels sur les touches
d’augmenter ou de diminuer la fréquence. Un appui long enclenche
l’accord automatique. En mode accord automatique, la radio balaye
d’une station à la suivante, reste 5 secondes sur la nouvelle station,
puis continue. Pour arrêter l’accord automatique, appuyez sur l’une
des touches
.
permettent
BOUTON ACCORD
Le bouton d’accord peut également être utilisé pour accorder les
stations. Sélectionnez la vitesse RAPIDE ou LENTE de l’accord avec
le bouton STEP, sous le bouton d’accord. L’accord RAPIDE/LENT est
représenté dans le tableau ci-dessous pour chaque bande. Si vous
souhaitez verrouiller le bouton d’accord, appuyez environ 3 secondes sur STEP. Appuyez une fois rapidement, pour le verrouiller.
32

SATELLIT 750 MANUAL D’OPÉRATION
BOUTON ACCORD continué
FM AM SW AIR SSB
RAPIDE 0,1 MHz 10 KHz 5 KHz 0,025 MHz 5 KHz
LENT 0,01 MHz 1 KHz 1 KHz 0,001 MHz 1 KHz/BFO
TOUCHE BW (BANDWIDTH)
Utilisez la touche BANDWIDTH (largeur de bande) pour sélectionner une sélectivité large ou étroite, comme indiqué dans l’angle
inférieur droit de l’écran sous la forme WIDE (large) ou NARROW
(étroit). Ceci peut contribuer à réduire les interférences sur certaines
fréquences. L’utilisation de WIDE améliore généralement la délité
audio, alors que l’utilisation des limites étroites limite quelque peu
la délité audio.
TOUCHE FM ST. (FM STEREO)
Appuyez sur la touche FM ST. en mode FM pour accéder ou sortir
du mode de réception stéréo. En mode stéréo, STEREO apparaît
sous le côté gauche de la fréquence sur l’écran, à côté de FM. Tant
que vous n’utilisez pas de casque ni d’écouteurs, vous pouvez rester
en mode mono.
BOUTONS BASS (GRAVES) ET TREBLE (AIGUS)
Utilisez ces boutons pour contrôler les basses et les aigus selon
vos préférences. Tourner dans le sens des aiguilles d’une montre
augmente les basses ou les aigus. Tourner dans le sens inverse des
aiguilles d’une montre réduit les basses ou les aigus.
33

SATELLIT 750 MANUAL D’OPÉRATION
ENREGISTRER DES FREQUENCES EN MEMOIRE
Il existe deux jeux séparés de 500 mémoires, permettant une grande
exibilité de la gestion de la mémoire. Prenez connaissance du
tableau ci-dessous.
PAGE Mémoire 0, noté « P0 », se compose de 500 mémoires, 100
sont affectées aux bandes MW, SW, SSB et Air Band ; 50 sont affectées aux bandes FM et LW.
PAGE Mémoire 1 à 10, notées « P1 », « P2 », etc., se composent de
50 mémoires par page, soient 500 mémoires au total.
Pour sauvegarder manuellement une fréquence en mémoire,
commencez par choisir la page, puis l’emplacement mémoire, puis
enregistrez la fréquence. Dans les instructions qui suivent, remarquez que MEMORY = PRESET (présélections). Suivez les instructions
ci-dessous.
• Allumez la radio et réglez une station de radio que vous souhaitez
sauvegarder.
• Appuyez rapidement sur la touche MEMORY (la page d’adresse
clignote dans l’angle droit de l’écran à cristaux liquides).
• Appuyez rapidement sur la touche PAGE et utilisez les touches «
/ » pour sélectionner la page de votre choix pour sauveg-
arder la station ; appuyez à nouveau sur PAGE pour conrmer.
• Utilisez «
pendant qu’il clignote.
• Appuyez sur la touche MEMORY pour le conrmer (ou la conr-
mation sera automatique après 3 secondes).
/ » pour sélectionner l’emplacement mémoire
Pour sauvegarder automatiquement une fréquence dans la
prochaine mémoire disponible de la page sélectionnée, appuyez
sur « M » puis relâchez. Remarquez que PRESET clignote avec le
numéro de la prochaine mémoire disponible. Appuyez sur « M »
34

SATELLIT 750 MANUAL D’OPÉRATION
ENREGISTRER DES FREQUENCES EN MEMOIRE
continué
pour la sauvegarder automatiquement dans la prochaine mémoire
disponible, ou elle sera sauvegardée à l’arrêt du clignotement dans
le numéro de mémoire qui clignotait.
Sauvegarde
Bande
(FM) 100
(SW) 100
(SSB) 100
(AIR) 100
(MW) 50
(LW) 50
Espace de sauvegarde
dans la page P0
P0 (page) ATS
Autres espaces de sauvegarde
√
√
√
500 mémoires
10 pages chacune avec 50 mémoires
20 pages chacune avec 25 mémoires
25 pages chacune avec 20 mémoires
50 pages chacune avec 10 mémoires
(reportez-vous au tableau de réglage du
système pour changer les pages ci-dessus)
ECOUTER LES RADIOS SAUVEGARDEES
• Allumez la radio et accédez à la page correcte en appuyant sur
PAGE et en saisissant le numéro avec le pavé numérique.
• Appuyez et relâchez la touche VM/VF et remarquez que PAGE et
PRESET apparaissent dans l’angle supérieur droit de l’écran.
• Pour passer d’une mémoire à l’autre, appuyez rapidement soit
sur les touches d’accord haut ou bas
d’accord.
• Pour balayer automatiquement les mémoires, appuyez sur l’une
ou l’autre des touches d’accord haut/bas environ 2 secondes et remarquez que PRESET clignote. La radio balaye les mémoires l’une
après l’autre, restant environ 5 secondes sur chaque mémoire.
Pour interrompre le balayage, appuyez rapidement sur l’une des
touches d’accord haut ou bas.
, ou utilisez le bouton
35

SATELLIT 750 MANUAL D’OPÉRATION
SUPPRESSION D’UNE MEMOIRE
• Allumez la radio et appuyez sur la touche VM/VF, faisant apparaî-
tre PAGE et PRESET dans l’angle supérieur droit de l’écran.
• Utilisez le pavé numérique, le bouton d’accord ou les touches
d’accord haut/bas (
souhaitez supprimer. Pour supprimer la mémoire, appuyez environ
1 seconde sur la touche DELETE, puis relâchez-la, et appuyez à
nouveau.
) pour sélectionner la mémoire que vous
SUPPRESSION D’UNE MEMOIRE PAGE
• Allumez la radio et sélectionnez la page que vous souhaitez
supprimer en appuyant sur PAGE, remarquez que PAGE clignote
dans l’angle supérieur droit de l’écran. Pendant que PAGE clignote,
utilisez le pavé numérique, le bouton d’accord ou les touches
d’accord haut/bas (
souhaitez supprimer.
• Appuyez et relâchez la touche VM/VF pour faire apparaître PAGE
et PRESET dans l’angle supérieur droit de l’écran. L’apparition de
- - au-dessus de PRESET dans l’angle supérieur droit signie que la
page est déjà supprimée, vous n’avez pas besoin de continuer.
• Appuyez sur DELETE environ 3 secondes ou jusqu’à ce que PAGE
commence à clignoter et appuyez à nouveau sur DELETE.
) pour sélectionner la page que vous
SAUVEGARDE AUTOMATIQUE (AUTO TUNING
STORAGE)
La radio peut sauvegarder automatiquement les fréquences les plus
fortes des bandes AM, FM ou ondes courtes sur la page 0.
36

SATELLIT 750 MANUAL D’OPÉRATION
SAUVEGARDE AUTOMATIQUE (AUTO TUNING
STORAGE) continué
Allumez la radio et sélectionnez la bande avec laquelle vous souhaitez appliquer la fonction ATS, soit MW/LW ou FM. Appuyez 2
secondes sur MW/LW ou FM. Remarquez que page 0 (P0) apparaît
dans l’angle supérieur droit avec les présélections s’incrémentant au
fur et à mesure que la bande de fréquence est balayée et que les
fréquences sont sauvegardées dans la mémoire.
REGLAGE DE L’HORLOGE
L’horloge du SATELLIT 750 est au format 24 heures et peut être
réglée que la radio soit allumée ou éteinte. Si la radio est éteinte,
l’horloge est afchée au milieu de l’écran. Si la radio est allumée,
l’horloge s’afche dans l’angle supérieur droit de l’écran.
Pour régler l’horloge :
1. Appuyez sur la touche TIME environ une seconde ou jusqu’à ce
que vous voyiez les heures clignoter.
2. Pendant que les heures clignotent, tournez le bouton TUNING
pour les régler à l’heure correcte, puis appuyez sur TIME et remarquez que les minutes clignotent.
3. Pendant que les minutes clignotent, tournez le bouton TUNING
pour les régler, puis appuyez sur TIME.
Remarquez qu’après avoir réglé les heures ou les minutes, vous
pouvez simplement laisser le nombre clignoter sans avoir à appuyer
sur la touche TIME.
37

SATELLIT 750 MANUAL D’OPÉRATION
REGLAGE DE L’ALARME
Le SATELLIT 750 dispose de deux alarmes programmables indépendamment, qui s’allument et s’éteignent à des heures programmées.
Pour régler l’alarme :
1. Appuyez une seconde sur la touche AL.1 ou AL.2 ou jusqu’à ce
que l’heure de l’alarme clignote dans l’angle supérieur droit de
l’afchage. Pendant que l’heure clignote, réglez l’heure avec le
bouton TUNING et appuyez sur la touche AL.1 ou AL.2. Remarquez que les minutes de l’alarme clignotent.
2. Pendant que les minutes clignotent, réglez les minutes de l’alarme
avec le bouton TUNING et appuyez sur la touche AL.1 ou AL.2.
Remarquez que la minuterie de mise en veille clignote dans le
cadre en haut de l’écran.
3. Pendant le clignotement, réglez avec le bouton TUNING le temps
pendant lequel la radio restera allumée et appuyez sur le touche
AL.1 ou AL.2.
Notez qu’après avoir réglé les heures ou les minutes, vous pouvez
simplement laisser le nombre clignoter sans avoir à appuyer sur la
touche AL.1 ou AL.2.
Une fois que l’alarme est activée (par radio ou buzzer), seules les
touches POWER, SLEEP, LIGHT/SNOOZE et RESET peuvent être
activées. Appuyez sur les touches POWER ou SLEEP pour désactiver
l’alarme.
38

SATELLIT 750 MANUAL D’OPÉRATION
ALARME PAR BUZZER
Appuyez sur la touche [AL.1 on/off] pour sélectionner « » dans la
section « Timer A ». L’alarme est alors réglée en mode buzzer.
Remarque : Dans la section « Timer A » :
«
» signie que l’alarme est réglée sur Radio.
«
» signie que l’alarme est réglée sur Buzzer.
« » signie que la minuterie est désactivée.
TOUCHE LIGHT/SNOOZE
Lorsque l’alarme est activée, appuyez sur la touche LIGHT/SNOOZE
pour désactiver temporairement la minuterie pour 10 minutes. Vous
pouvez appuyer 3 fois sur la touche LIGHT/SNOOZE dans le délai
déni pour l’alarme, ensuite vous pouvez arrêter l’alarme en appuyant à nouveau sur cette touche.
ACTIVATION/DESACTIVATION DE L’ALARME
Pour que l’alarme vous permette d’allumer la radio, elle doit être
activée. L’activation de l’alarme peut être réalisée avec le SATELLIT
750 allumé ou éteint.
Pour activer l’alarme, regardez le haut de l’écran, sur la droite on
peut voir TIMER A et TIMER B. Appuyez rapidement sur les touches
AL.1 ON/OFF ou AL.2 ON/OFF. Si le haut-parleur est afché, vous
serez réveillé par le son de la radio ; si la cloche est afchée, vous
serez réveillé par un son électronique ; si rien n’est afché, l’alarme
correspondante est désactivée.
39

SATELLIT 750 MANUAL D’OPÉRATION
MINUTERIE DE MISE EN VEILLE
La minuterie de mise en veille permet au SATELLIT 750 de rester
allumer pendant une période comprise entre 1 et 120 minutes avant
de s’éteindre.
Pour allumer la minuterie de mise en veille, appuyez sur la touche
SLEEP en haut à droite de la radio. Remarquez que le nombre de
minutes restantes apparaît à l’écran. Pendant que ces minutes sont
afchées, appuyez sur la touche SLEEP autant de fois que nécessaire
pour faire dérouler séquentiellement de 1 à 120 minutes. Laissez
l’afchage sur la valeur que vous souhaitez.
UTILISATION DE LA TOUCHE LIGHT
Un appui rapide sur la touche LIGHT permet d’illuminer environ 5
secondes le témoin de force du SIGNAL et l’écran. Un appui long
illumine ces fonctions aussi longtemps que la radio reste allumée,
faites alors attention si vous fonctionnez sur les piles, qui pourraient
s’épuiser plus rapidement. Vous ne rencontrerez aucun problème à
laisser l’éclairage tout le temps d’écoute de la radio si le transformateur CA est branché.
PRISE ECOUTEURS
La prise écouteurs se trouve en bas à gauche de la radio et est
référencée EAR. Branchez les écouteurs ou un casque en utilisant
une prise stéréo 3,5 mm (1/8 pouces). Baissez le niveau du volume
avant de les brancher.
40

SATELLIT 750 MANUAL D’OPÉRATION
PRISE LINE-IN
La prise LINE-IN se trouve en bas à gauche de la radio et permet au
Satellit 750 d’accepter le son d’un autre appareil. Utilisez un câble
muni d’une prise 3,5 mm (1/8 pouces). Cette prise utilise une entrée
de niveau de ligne aux normes de l’industrie.
PRISES LINE OUT
A l’arrière de la radio, se trouvent les prises line-o gauche et droite,
référencées LINE OUT. Ces prises utilisent une sortie de niveau de
ligne aux normes de l’industrie, et peuvent être acheminées vers
toute entrée de niveau de ligne aux normes de l’industrie.
PRISES DES ANTENNES EXTERNES
Les prises des antennes externes sont utilisées pour raccorder le
SATELLIT 750 à des antennes haute performance.
Sur le côté droit de la radio, se trouvent des prises BNC 50 ohms
pour FM et SW. Un câble coaxial peut être utilisé pour alimenter
une antenne correctement conçue. Nous vous recommandons de
taper dans un moteur de recherche Internet « Antennes FM » ou «
Antennes SW » pour trouver des antennes.
Il y a également une prise noire et rouge, étiquetée 500 ohms, conçue pour fonctionner avec une antenne SW à grande impédance,
300 à 600 ohms, comme une antenne à long câble. Branchez un
long câble, 10 à 35 mètres ou 30 à 100 pieds, dans la prise rouge
et positionnez- le au-dessus du sol, parcourant autant de lignes
droites que possible, et ne touchant aucun autre objet métallique.
Si vous êtes en intérieur, positionnez le câble aussi proche que
possible d’une fenêtre. Branchez un câble de 10 à 20 mètres ou 30
à 60 pieds dans la prise noire et laissez-le parcourir le sol. Ou xez
41

SATELLIT 750 MANUAL D’OPÉRATION
PRISES DES ANTENNES EXTERNES continué
la prise noire à une conduite d’eau froide avec un câble aussi court
que possible.
Sur l’antenne AM rotative, sur le dessus de la radio se trouve une
prise pour les antennes AM 50 ou 75 ohms, à brancher.
Si vous utilisez des prises externes, sélectionnez EXTERNAL sur le
sélecteur du côté droit de la radio. Si vous utilisez une antenne
interne, commutez-le sur ANTENNA.
REMARQUE : débranchez toutes les antennes montées en extérieur
lorsqu’un orage est prévu.
TOUCHE DE REINITIALISATION
La touche de réinitialisation se trouve à gauche, sous le bouton
TUNING. Appuyez dessus uniquement lorsque la radio semble ne
pas fonctionner correctement. Après l’appui sur la touche, le pas
entre les stations de radio AM devra être re-réglé pour l’Amérique-
du-Nord.
42

SATELLIT 750 MANUAL D’OPÉRATION
COMPARTIMENT VIDE A L’ARRIERE DE LA RADIO
Utilisez le petit compartiment vide situé à côté du compartiment à
piles comme vous le souhaitez.
REGLAGE DU CODE SYSTEME
Pour saisir des codes systèmes différents, éteignez la radio et
appuyez rapidement sur la touche ENTER. « _ _ » apparaît dans
l’angle supérieur droit de l’écran. Saisissez le code système comme
ci-dessous, puis appuyez sur ENTER pour conrmer le code système.
Réglage des pages mémoire (500 mémoires)
CODE
00 10 pages ; chaque page 50 mémoires
20 20 pages ; chaque page 25 mémoires
25 25 pages ; chaque page 20 mémoires
50 50 pages ; chaque page 10 mémoires
Pas (AM)
09 9 kHz
10 10 kHz (Amérique du Nord)
43

SATELLIT 750 MANUAL D’OPÉRATION
REGLAGE DU CODE SYSTEME continué
Type de piles
29 Piles normales taille D (1,5 V par pile)
28 Batteries rechargeables (1,2 V par batterie)
Gamme de fréquence FM
76 76 à 108 MHz (Japon)
87 87 à 108 MHz
CARACTERISTIQUES
Gammes de
fréquences
LW
MW
SW
AIR
FM
Haut-parleur
Prise casque
Consom-
mation de
puissance
100 à 519 kHz
522 à 1620 kHz – code système « 09 »
520 à 1710 kHz (Amérique) - code système « 10 »
1711 à 29999 kHz
118 à 137 MHz
87 à 108 MHz
76 à 108 MHz
8 ohms / 2 W
4 pouces
3,5 mm, stéréo
Sans rétro éclairage 80 mAh
Avec rétro éclairage 90 mAh
44

SATELLIT 750 MANUAL D’OPÉRATION
CARACTERISTIQUES continué
Temp. d’utilisation
Poids
Dimensions
Alimentation
- 5 à + 50°C
2,66 kg, piles non incluses
L : 372 mm
H : 183 mm
P : 153 mm
Piles : UM1 (alcalines) x 4
CC : 6 V/500 mA, polarité négative
ENREGISTREMENT DE LA GARANTIE
Il est conseillé d’effectuer l’enregistrement de votre produit dès que
possible après l’achat ou la réception an d’assurer une couverture
de garantie complète ou les mises à jour du produit. Vous pouvez
enregistrer votre produit de trois manières différentes :
1. En consultant notre site web http://www.etoncorp.com.
2. En renvoyant la carte de garantie ci-jointe par courrier.
3. En renvoyant votre carte ou votre information d’enregistrement
à l’adresse suivante ; inscrivez votre nom, votre adresse postale
complète, votre numéro de téléphone, votre adresse e-mail, le
nom du modèle acheté, la date d’achat, le nom du revendeur :
Etón Corporation
1015 Corporation Way
Palo Alto, CA 94303 USA
45

SATELLIT 750 MANUAL D’OPÉRATION
GARANTIE LIMITÉE
Conservez l’information de garantie de votre carte de garantie avec
votre preuve d’achat ou consultez l’information de garantie limitée
sur www.etoncorp.com.
SERVICE DE GARANTIE POUR VOTRE PRODUIT
Pour bénécier d’un service de garantie pour votre produit, nous
vous conseillons de contacter en premier lieu un représentant du
service de garantie Etón au 1-800-872-2228 pour les États-Unis,
1-800-637-1648 pour le Canada ou (650) 903-3866, customersvc@
etoncorp.com ou le revendeur dans votre pays en Europe (voir liste
ci-jointe) qui constatera le problème et vous dépannera. Si une
intervention supplémentaire s’avère nécessaire, le personnel technique vous informera de la marche à suivre. Elle diffère si votre radio
est toujours sous garantie ou si elle est soumise à une réparation
hors garantie.
GARANTIE – Une autorisation de retour sera émise et des instructions seront données si votre produit est toujours sous garantie et
que le représentant du service de garantie Etón justie la nécessité
d’une réparation sous garantie. NE renvoyez PAS votre radio tant
que vous n’avez pas encore reçu le numéro d’autorisation de retour.
HORS GARANTIE – Si votre produit n’est plus sous garantie et
doit être réparé, notre représentant du service de garantie Etón vous
conseillera l’atelier de réparation le plus proche qui sera en mesure
de réparer votre produit.
Pour le service de réparation hors Amérique du Nord, consultez
l’information fournie par le revendeur au moment de l’achat/de la
réception.
46

SATELLIT 750 MANUAL D’OPÉRATION
NOTE FCC
Le fabricant ne peut être en aucun cas tenu responsable des interférences radio ou télé causées par des modications non autorisées
effectuées sur cet appareil. De telles modications peuvent entraîner
l’annulation du droit de l’utilisateur à manipuler l’appareil.
47


GUÍA DE FUNCIONADMIENTO DE SATELLIT 750
Grundig Radio Line By
¿NECESITA AYUDA?
Si necesita ayuda, contáctenos de lunes a viernes, de 8:30 a.m. a
4:00 p.m., hora estándar del Pacíco de EE. UU. 1-800-872-2228
desde los EE UU; 1-800-637-1648 desde Canadá; 650-903-3866
desde el resto del mundo; FAX: 650-903-3867; sitio Web, www.
etoncorp.com; Etón Corporation, 1015 Corporation Way, Palo Alto,
CA 94303, EE UU.
ADVERTENCIA
• No exponga este aparato a la lluvia o a la humedad.
• No exponga o sumerja este aparato al agua durante un periodo largo.
• Proteja el aparato de gran humedad y lluvia.
• Utilice la radio solamente dentro de un rango de temperatura especicado (0 °C a 40 °C).
• Desenchufe el aparato inmediatamente si ha caído líquido u objetos dentro de la radio.
• Limpie la radio solamente con un paño seco. No utilice detergentes o disolventes que
puedan dañar la cubierta del aparato.
• Desenchufe y desconecte las antenas externas (no incluidas) durante tormentas
eléctricas..
• No quite la cubierta [o la parte posterior].
• Si este producto muestra algún problema, póngase en contacto con personal cuali-
cado de servicio.
MEDIO AMBIENTE
los aparatos eléctricos y electrónicos deben ser
recolectados en forma separada por un sistema local de recolección.
Por favor, actúe según las normas de su localidad y no elimine los
aparatos antiguos en su basura del hogar usual.
ELIMINACIÓN DE APARATOS ELÉCTRICOS
Y ELECTRÓNICOS
De acuerdo a la Directiva Europea 2002/96/EC todos
49

GUÍA DE FUNCIONADMIENTO DE SATELLIT 750
CARACTERÍSTICAS
Muchas gracias por su adquisición de la radio Satellit 750. Sus
funciones y características son las siguientes:
• Onda corta (1711-30000 KHz) con SSB (banda lateral única), LW,
AM, FM y banda aérea (118-137 MHz)
• Ajuste de sintonización AM con 9/10 KHz; ajuste de rango de
sintonización de FM en 87 ó 88 MHz
• Conversión dual y banda lateral única (SSB)
• 1000 memorias de estación
• Antena AM giratoria de 360 grados
• Entrada de frecuencia automática/manual directa y sintonización
de memoria de estación
• Función de almacenamiento de sintonización automática (ATS)
para FM/AM/onda corta
• Función Mute (mudo)
• Reloj de 24 horas y función de reloj de alarma dual
• Enchufe de entrada (puede usarse como parlante para MP3)
• Enchufe de línea de salida (transmisión de radio puede transferirse
a otro dispositivo)
• Enchufes para antena externa para onda corta, AM y FM
• Fuente de alimentación de energía: 4 baterías alcalinas D; alimentación de energía AC/DC-6V
• Dimensiones: 14,65” x 7,24” x 5,75” y 372mm x 184mm x
146mm (Ancho x Altura x Profundidad)
• Peso: 5,25 lbs (2,38 kg)
• Accesorios: Manual de Usuario, tarjeta de garantía
• Especicaciones están sujetas a cambios.
VOLUMEN DE SUMINISTRO
Alimentation CA ; manuel du propriétaire
50

GUÍA DE FUNCIONADMIENTO DE SATELLIT 750
FUENTES DE ALIMENTACIÓN
Alimentación del SATELLIT 750 mediante instalación de 4 baterías
alcalinas del tipo D, de litio o de Ni-MH o bien mediante enchufe
del adaptador AC 6 VDC. Enchufe el adaptador AC en el zócalo
DC de 6 voltios, ubicado en la parte izquierda de la radio. Se indica
un símbolo de batería en la esquina derecha inferior del LCD que
muestra la alimentación por batería o adaptador AC. En caso de
haber un fallo en la alimentación con el adaptador AC conectado
y las baterías instaladas, las baterías realizan automáticamente la
alimentación de la radio.
PREVENCIÓN DE FUGA DE BATERÍA
Para minimizar la posibilidad de una fuga de ácido de la batería,
deben usarse exclusivamente baterías alcalinas de alta calidad, de
litio o baterías recargables de níquel-metal-hidruro. Nunca se deben
mezclar baterías viejas con nuevas o bien diferentes marcas o tipos
de baterías. Un eventual daño causado por una fuga de ácido de
batería no está cubierto por la garantía del producto.
AJUSTE DE AM Y FM FUERA DE
NORTEAMÉRICA
Para usar el SATELLIT 750 en Norteamérica (EE.UU. o Canadá), no se
requiere ningún cambio de los ajustes iniciales por fábrica.
En Norteamérica, las estaciones AM están separadas por10 KHz
respectivamente. En Europa y otras regiones, están separadas por 9
KHz. En Norteamérica, la banda FM comienza con 88 MHz. En otras
partes del mundo, puede empezar con 76 MHz ó 87 MHz. Siga
estos pasos para realizar el ajuste requerido para su área.
51

GUÍA DE FUNCIONADMIENTO DE SATELLIT 750
AJUSTE DE AM Y FM FUERA DE
NORTEAMÉRICA continuado
Para cambiar estos ajustes para su área, debe apagarse su radio
SATELLIT 750. Pulse el botón ENTER y ponga atención en el símbolo
que se indica en la derecha superior de la pantalla. Mientras se
indica -- , debe ingresarse el valor 09 ó 10 con el teclado numérico,
para pulsar luego ENTER. Repita este procedimiento y pulse 88, 87
ó 76 y pulse ENTER.
ACTIVACIÓN Y DESACTIVACIÓN DEL
SATELLIT 750
Pulse el botón POWER para activar y desactivar la radio.
CONTROL DE VOLUMEN
Con el SATELLIT 750 activado, mueva la perilla VOLUME que se
encuentra en la parte frontal, en la izquierda inferior, en dirección
de las agujas del reloj, para aumentar el volumen, y en contra de las
agujas del reloj para reducir el volumen.
SELECCIÓN DE FM, MW (AM), ONDA LARGA,
ONDA CORTA Y BANDA AÉREA
La radio Satellit 750 sintoniza la FM en 88-108 MHz, la AM
en 520-1710 KHz, onda larga en 100-519 KHz, onda corta en
1711-29999 KHz y banda aérea en 118 -137 MHz.
Encienda la radio Satellit 750. Seleccione FM mediante pulsación del
botón FM, o bien MW (AM) u onda corta con la pulsación del botón
52

GUÍA DE FUNCIONADMIENTO DE SATELLIT 750
SELECCIÓN DE FM, MW (AM), ONDA LARGA,
ONDA CORTA Y BANDA AÉREA continuado
MW/LW (pulse docs veces en caso necesario), onda corta mediante
pulsación repetida del botón SW hasta haber seleccionado la banda
requerida (el número de banda parpadea en la esquina derecha superior de la pantalla), así como la banda aérea mediante pulsación
del botón AIR.
NOTA: Asegúrese de extender completamente la antena telescópica
cuando desea sintonizar SW, FM o AIR. La antena AM giratoria
se encuentra en la parte superior de la radio y se debe girar para
alcanzar la mejor recepción AM.
ESCUCHAR LA ONDA CORTA
Para aprender más sobre la onda corta, recomendamos las
siguientes dos publicaciones que se editan anualmente y que están
disponibles en las grandes librerías. Adicionalmente, la Internet es
una gran fuente para aprender más sobre la onda corta.
PASSPORT TO WORLD BAND RADIO Publicado por International
Broadcasting Services (IBS); IBS North America, Box 300, Penn’s Park
PA 18943. Teléfono: (215) 598-9018. www.passband.com.
WORLD RADIO TV HANDBOOK Publicado en EE.UU. por WatsonGuptill Publications, 770 Broadway, 7th Floor, New York, NY
10003-9595. www.watsonguptill.com.
53

GUÍA DE FUNCIONADMIENTO DE SATELLIT 750
OPTIMIZACIÓN DE LA RECEPCIÓN DE ONDA
CORTA
La onda corta permite escuchar emisiones a través de grandes
distancias, incluyendo otros países y continentes. La siguiente información le ayudará para obtener los mejores resultados.
• Durante el día, deben usarse bandas con frecuencias superiores a
13000 KHz.
• En las noches deben usarse bandas con frecuencias inferiores a
13000 KHz.
• En las horas de crepúsculo, deben usarse bandas con el completo
rango de onda corta.
• Al acercarse a una ventana, se puede mejorar considerablemente
la calidad de la recepción.
SINTONIZACIÓN DE SBB (BANDA LATERAL ÚNICA)
La SSB permite escuchar la onda corta en comunicaciones de dos
vías mediante el uso del modo de banda lateral única, como radio
amateur, código de morse, transmisiones de fax u otras señales
de utilidad. La Internet y su librería local ofrecen mucho material
de información. Ingrese ‘frecuencias de radio acionada’ o ‘banda
lateral’ en un buscador de Internet.
Para usar el control de SSB, active la radio SATELLIT 750 y conmute
a onda corta. Pulse el botón SSB y asegúrese que se indique USB en
la pantalla, en la parte derecha de SW. Pulse nuevamente el botón
SSB y asegúrese que se indique LSB en la pantalla, en la parte derecha de SW. USB es la abreviación para banda lateral superior, LSB es
la abreviación para banda lateral inferior. Usted necesita usar uno de
estos métodos para sintonizar las señales. También se debe observar
que en la parte frontal, en la derecha inferior de la radio, se encuentra un botón de control rotulado con SSB BFO. BFO es la abreviación
para Beat Frequency Oscillator (Oscilador de frecuencia de batido).
Este botón de control se usa para sintonizar precisamente la señal
de banda lateral.
54

GUÍA DE FUNCIONADMIENTO DE SATELLIT 750
BOTÓN ATENUADOR DE ANTENA
El botón ANT.ATT se encuentra en la parte derecha superior de la
radio y se usa para atenuar una señal. Sintonice una estación, pulse
luego el botón ANT.ATT y observe el indicador de intensidad de
señal que se encuentra en la parte izquierda de la pantalla y que
cambia en tres niveles. El nivel máximo es el aumento más alto y el
nivel más bajo corresponde al aumento mínimo. Utilice el nivel más
bajo si la señal es especialmente fuerte y de origen local. Use el nivel
intermedio para señales medios y use el nivel más alto para señales
débiles. Haga pruebas con este control para ver como trabaja de
la mejor manera posible con las señales que desea escuchar, para
usarlas según sus requerimientos.
CONTROL DE AUMENTO DE RADIOFRECUENCIA
En la parte derecha frontal de la radio se encuentra el botón
de control de aumento de radiofrecuencia. Es posible girarlo
completamente en dirección de las agujas del reloj en la posición
AUTO donde trabaja automáticamente, o bien es posible girarlo
contra el sentido de las agujas del reloj para controlar el aumento
de la radiofrecuencia). Mediante su uso manual se puede mejorar
el rechazo de la radio frente a las interferencias de frecuencias
adyacentes que pueden interferir, especialmente en onda corta. Esto
conmutador no trabaja en FM.
CONTROL DE REDUCTOR DE RUIDO
Con el control de reducción de ruido se pueden eliminar los sonidos
de fondo. Este control se usa principalmente en la banda aérea. No
funciona en la banda FM. Este control se encuentra en la derecha
inferior de la parte frontal de la radio. Para habilitar la función, debe
girarse su botón en dirección de las agujas del reloj. Se apaga mediante giro del botón contra el sentido de las agujas del reloj.
55

GUÍA DE FUNCIONADMIENTO DE SATELLIT 750
SINTONIZACIÓN DE ESTACIONES
Las estaciones se sintonizan con la entrada de frecuencia directa, los
botones
y el botón de sintonización, como se describe abajo.
SINTONIZACIÓN DE ENTRADA DE FRECUENCIA
DIRECTA
Use este método cuando conoce la frecuencia requerida de la
estación de radio. Active la radio SATELLIT 750 y seleccione la banda
que desea sintonizar. Las frecuencias AM y SW se ingresan en kilohertzios (KHz), o sea 810 KHz ó 9475 KHz.; las frecuencias de FM se
ingresan en megahertzios (MHz), o sea 102,9 MHz, sin considerar el
punto decimal. Use el teclado numérico para ingresar la frecuencia.
SINTONIZACIÓN CON BOTONES
Active la radio Satellit 750 y seleccione la banda que desea
sintonizar. Con pulsaciones breves y secuenciales de los botones
se habilita la sintonización de la frecuencia hacia arriba o abajo.
Mediante una pulsación prolongada se habilita la sintonización
automática. En la sintonización automática, la radio escanea de
una estación a la siguiente, permanece durante 5 segundos en
una estación y continúa luego con el escaneo. Para detener la
sintonización automática, pulse uno de los botones .
BOTÓN DE SINTONIZACIÓN
Press the FM ST. button when in the FM band to take the radio in
or out of stereo reception mode. When it’s in stereo mode, STEREO
appears under the left side of the frequency in the display, next to
56

GUÍA DE FUNCIONADMIENTO DE SATELLIT 750
BOTÓN DE SINTONIZACIÓN continuado
FM. As long as you are not using headphones or earphones, it can
be left in mono mode.
FM AM SW AIR SSB
FAST 0,1 MHz 10 KHz 5 KHz 0,025 MHz 5 KHz
SLOW 0,01 MHz 1 KHz 1 KHz 0,001 MHz 1 KHz/BFO
BOTÓN BW (ANCHO DE BANDA)
Utilice el botón BANDWIDTH para seleccionar la ltración amplia
o estrecha, la cual se muestra en la esquina derecha inferior de la
pantalla, indicándose como WIDE o NARROW. Esto puede ayudar
para reducir las interferencias de algunas frecuencias. Con la
opción WIDE, se obtienen generalmente mejores resultados en la
delidad del audio, mientras la opción NARROW limita levemente
la fidelidad.
BOTÓN FM ST. (FM ESTÉREO)
Pulse el botón FM ST. en la banda FM para activar o desactivar el
modo de recepción en estéreo de la radio. Cuando está en el modo
estéreo, se indica STEREO en la parte izquierda de la pantalla de
frecuencia, al lado de FM. Cuando no está usando auriculares,
puede dejar la radio en el modo mono.then the memory location
and then store the frequency. In the instructions below note that
MEMORY=PRESET. See the instructions below.
57

GUÍA DE FUNCIONADMIENTO DE SATELLIT 750
BOTONES PARA TONOS BAJOS Y AGUDOS
Utilice estos botones para ajustar los tonos bajos y agudos según
su preferencia. Con un giro en dirección de las agujas del reloj se
aumentan los bajos o agudos. Con un giro en contra de la dirección
de las agujas del reloj se reducen los bajos o agudos.
ALMACENAMIENTO DE FRECUENCIAS EN
LA MEMORIA
Hay dos opciones o ajustes diferentes de 500 memorias que per-
miten una gran exibilidad de espacio de almacenamiento. Revise
la información en la tabla abajo.
La página de memoria PAGE 0, anotada como ‘P0’, consiste de 500
memorias, 100 asignadas para MW, onda corta, SSB y banda aérea;
50 memorias respectivamente asignadas para FM y onda larga.
Las páginas de memoria PAGE 1 – 10, anotadas como ‘P1’, ‘P2’,
etc., consisten de 50 memorias por página, con un total de 500
memorias.
Para almacenar manualmente una frecuencia en una memoria,
debe seleccionarse primero la página, luego la ubicación de la
memoria, para almacenar nalmente la frecuencia. Observe que en
las siguientes instrucciones, el término MEMORY es igual a PRESET.
Véase las siguientes instrucciones.
• Active la radio y sintonice una estación que desea almacenar en
una memoria.
• Pulse brevemente el botón MEMORY (la página de dirección
parpadeará en la esquina derecha del LCD.
• Pulse brevemente el botón PAGE y use los botones “
para seleccionar la página en la cual desea almacenar la estación;
pulse luego PAGE para conrmar.
/ ”
58

GUÍA DE FUNCIONADMIENTO DE SATELLIT 750
ALMACENAMIENTO DE FRECUENCIAS EN
LA MEMORIA continuado
• Use “ / ” para seleccionar la ubicación de memoria mientras
se indica parpadeando.
• Pulse el botón MEMORY para conrmar el ajuste (o bien se conrma automáticamente después de 3 segundos).
Para almacenar automáticamente una frecuencia en la siguiente
memoria disponible en la página previamente seleccionada, debe
pulsarse brevemente ‘M’. Observe que PRESET se indicará parpadeando con el siguiente número de memoria disponible. Pulse ‘M’
para almacenar la estación automáticamente en la siguiente memoria disponible. En forma alternativa se almacena bajo el número de
memoria que se había indicado parpadeando.
Almacenar
Banda
namiento en la página P0
P0 (página) ATS
(FM) 100
(SW) 100
(SSB) 100
(AIR) 100
(MW) 50
(LW) 50
Espacio de almace-
Otro espacio de almacenamiento
√
√
√
500 MEMORIAS
10 páginas con 50 memorias respect.
20 páginas con 25 memorias respect.
25 páginas con 20 memorias respect.
50 páginas con 10 memorias respect
(Véase la tabla con el ajuste de sistema para
cambiar estas páginas)
59

GUÍA DE FUNCIONADMIENTO DE SATELLIT 750
SINTONIZAR UNA ESTACIÓN PREVIAMENTE
ALMACENADA
• Active la radio y conmute a la página correcta mediante pulsación
de PAGE y entrada de la página con el teclado numérico.
• Pulse brevemente el botón VM/VF y observe que se indican PAGE
y PRESET en la esquina derecha superior de la pantalla.
• Para conmutar de una memoria a otra, debe pulsarse brevemente
para subir o bajar, alternativamente se puede usar el botón de
sintonización.
• Para la memoria de auto-escaneo, debe pulsarse durante aprox.
2 segundos uno de los botones de sintonización hacia arriba o
abajo. Luego parpadea PRESET. La radio escanea de una memoria
a otra, permaneciendo en cada memoria durante aprox. 5 segundos. Para detener el escaneo, se puede pulsar brevemente uno de
los botones de sintonización.
ELIMINAR UNA MEMORIA
• Active la radio y pulse el botón VM/VF para que se indiquen
PAGE y PRESET en la esquina derecha superior de la pantalla.
• Use el teclado numérico, el botón de sintonización o los botones
de sintonización hacia arriba/abajo (
memoria que desea eliminar. Para eliminar la memoria, pulse
luego el botón DELETE durante aprox. 1 segundo. Suelte luego el
botón y púlselo nuevamente.
) para seleccionar la
60

GUÍA DE FUNCIONADMIENTO DE SATELLIT 750
ELIMINAR UNA PÁGINA DE MEMORIA
• Active la radio y seleccione la página que desea eliminar,
mediante pulsación de PAGE. Esta página se indica a continuación parpadeando en la parte derecha superior de la pantalla.
Mientras está parpadenado, use el teclado numérico, el botón de
sintonización o los botones de sintonización hacia arriba/abajo
(
) para seleccionar la página que desea eliminar.
• Pulse brevemente el botón VM/VF y observe que se indican PAGE
y PRESET en la esquina derecha superior de la pantalla. En caso
que se indique - - sobre PRESET en la esquina derecha superior
de la pantalla, la página ya se ha eliminado y no es necesario
seguir con el procedimiento.
• Pulse DELETE durante aprox. 3 segundos o bien hasta que se
indique PAGE parpadenado. Pulse luego nuevamente DELETE.
ALMACENAMIENTO DE MEMORIA ATS (ALMACENAMIENTO DE SINTONIZACIÓN AUTOMÁTICA)
Es posible almacenar automáticamente las estaciónes de onda
corta, AM o FM con las señales más intensas, en la Page 0.
Active la radio y seleccione la banda que preere utilizar para la función ATS, o sea MW/LW o FM. Pulse luego MW/LW o FM durante
2 segundos. Observe que la página 0 (P0) se indica en la esquina
derecha superior de la pantalla con los preajustes aumentado
hacia la derecha, mientras se escanea la banda y se almacenan las
frecuencias en la memoria.
61

GUÍA DE FUNCIONADMIENTO DE SATELLIT 750
AJUSTE DE RELOJ
El reloj de SATELLIT 750 trabaja en formato de 24 horas y puede ser
ajustado con la radio apagada o activada. Cuando la radio está desactivada, el reloj se indica en la parte central de la pantalla. Cuando
la radio está activada, el reloj se encuentra en la esquina derecha
superior de la pantalla.
Para el ajuste del reloj:
1. Pulse el botón TIME durante aprox. un segundo o bien hasta que
se indique la hora parpadeando.
2. Mientras está parpadeando, debe girarse el botón de sinton-
ización para ajustar la hora correcta, luego debe pulsarse TIME
para que se indican los minutos parpadeando.
3. Mientras está parpadeando, debe girarse el botón de sinton-
ización para ajustar los minutos correctos, luego debe pulsarse
TIME.
Observe que después del ajuste de la hora o de los minutos, es posible dejar parpadeando el número hasta que termine de parpadear,
sin pulsar el botón TIME.
AJUSTE DE ALARMA
El SATELLIT 750 tiene dos temporizadores de alarma individualmente programables, para activar y desactivar la radio en una hora
especíca.
Para el ajuste de la alarma:
1. Pulse el botón AL.1 o AL.2 durante un segundo o bien hasta
que se indique parpadeando la hora de alarma en la esquina
derecha superior de la pantalla. Mientras sigue parpadeando,
debe ajustarse la hora con el botón de sintonización, para pulsar
a continuación el botón AL.1 ó AL.2. Observe que los minutos de
62

GUÍA DE FUNCIONADMIENTO DE SATELLIT 750
AJUSTE DE ALARMA continuado
alarma se indiquen parpadeando.
2. Mientras sigue parpadeando, deben ajustarse los minutos con
el botón de sintonización, para pulsar a continuación el botón
AL.1 ó AL.2. Observe que el temporizador parpadea en el cuadro
ubicado por debajo de la pantalla.
3. Mientras sigue parpadeando, puede ajustar el tiempo que la
radio debe seguir reproduciendo, con el botón de sintonización,
para pulsar a continuación el botón AL.1 ó AL.2.
Observe que después del ajuste de la hora o de los minutos, es posible dejar parpadeando el número hasta que termine de parpadear,
sin pulsar el botón AL.1 ó AL.2.
Después de haber activado la alarma (con la radio o el zumbador),
se pueden usar solamente las funciones POWER, SLEEP, LIGHT/
SNOOZE y RESET. Pulse el botón POWER o SLEEP para desactivar la
alarma.
ALARMA CON ZUMBADOR
Pulse la tecla [AL.1 on/off] para seleccionar “
“Timer A”. Ahora, la alarma se activa con el zumbador.
Nota: En la sección “Timer A”:
“
” signica que el temporizador está ajustado con la
radio.
“
” signica que el temporizador está ajustado con el
zumbador.
“ ” signica que el temporizador está desactivado.
” en la sección
63

GUÍA DE FUNCIONADMIENTO DE SATELLIT 750
BOTÓN DE LUZ/SNOOZE
Con la alarma activada, pulse el botón LIGHT/SNOOZE para desactivar transitoriamente el temporizador durante 10 minutos. Es
posible pulsar el botón LIGHT/SNOOZE 3 veces durante el período
de alarma, luego se desactiva la alarma tras su nueva pulsación.
ACTIVACIÓN/DESACTIVACIÓN DE ALARMA
Para que la alarma pueda encender la radio, debe estar activada.
Para activar la alarma, la radio SATELLIT 750 puede estar activada o
desactivada.
Para activar la alarma, revise en la parte derecha superior de la
pantalla si se indica TIMER A o TIMER B. Pulse brevemente el
botón AL.1 ON/OFF o AL.2 ON/OFF. Cuando se indica el parlante,
la función de despertar trabaja con la radio. Cuando se indica
la campanilla, el despertador trabaja con un sonido electrónico.
Cuando no se indica ningún símbolo, signica que el temporizador
está desactivado.
TEMPORIZADOR
El temporizador permite que la radio SATELLIT 750 pueda trabajar
durante un período de 1 a 120 minutos, para apagarse luego
automáticamente.
Para activar el temporizador, pulse el botón SLEEP ubicado en la
derecha superior de la parte frontal de la radio. Observe que en la
pantalla se indica el número de minutos de reproducción. Mientras
se indica este número, pulse repetidamente el botón SLEEP para
64

GUÍA DE FUNCIONADMIENTO DE SATELLIT 750
TEMPORIZADOR continuado
que se pueda ajustar el tiempo entre 1 y 120 minutos. Suelte el
botón en el número de minutos que desea ajustar.
USO DEL BOTÓN DE LUZ
Con una breve pulsación en el botón LIGHT, se activa durante aprox.
5 segundos la iluminación del indicador de intensidad de señal y
de la pantalla. Con una pulsación larga se activa esta iluminación
durante el período que la radio esté activada, de modo que debe
proceder con cuidado en caso de usar baterías, ya que éstas se
agotarán más rápidamente usando esta función. En caso de tener
conectado el adaptador AC, sin problema alguno se puede mantener la iluminación activada durante la reproducción de la radio.
ENCHUFE DE AURICULARES
El enchufe de auriculares se encuentra en la izquierda inferior de la
parte frontal de la radio y está rotulado con EAR. Utilice auriculares
con un enchufe estéreo de 3,5 mm (1/8 pulgada). Se recomienda
bajar el volumen antes de enchufarlos.
ENCHUFE DE LÍNEA DE ENTRADA
El enchufe LINE-IN se encuentra en la izquierda inferior de la parte
frontal de la radio y permite reproducir el sonido de otro equipo en
la radio Satellit 750. Use un cable con un enchufe estéreo de 3,5
mm (1/8 pulgada). Este enchufe usa una entrada de nivel de línea
estándar industrial.
65

GUÍA DE FUNCIONADMIENTO DE SATELLIT 750
ENCHUFE DE LÍNEA DE SALIDA
En la parte posterior de la radio se encuentran enchufes de salida
izquierda y derecha, rotuladas con LINE OUT. Estos enchufes corresponden al nivel de línea de salida estándar industrial y se pueden
direccionar a cualquier entrada de línea estándar industrial.
ENCHUFES DE ANTENA EXTERNA
Los enchufes de antena externa se usan para conectar el SATELLIT
750 con antenas de rendimiento superior.
En la parte derecha de la radio se encuentran los enchufes BNC de
50 ohmios para FM y onda corta. Se puede usar un cable coaxial de
50 ó 75 ohmios para conectar la antena con diseño correspondiente. Para usar una antena apropiada, recomendamos realizar una
búsqueda en la Internet por ‘antenas FM’ o ‘antenas de onda corta’.
Además existe un enchufe negro y rojo, rotulado con 500 ohmios,
diseñado para trabajar con una antena de onda corta de alta impedancia, 300-600 ohmios, como por ejemplo una antena de cable
largo. Enchufe un cable largo con una extensión de 10 a 35 metros
o bien 30 a 100 pies, en el enchufe rojo y posicione éste en el suelo,
observando que el tendido de cable se aplique lo más recto posible,
sin tocar otros objetos metálicos. En caso de tender el cable en el
interior de una casa, intente colocar el cable lo más cercano posible
a una ventana. Enchufe un cable de 10 a 20 metros o de 30 a 60
pies, en el enchufe negro, para tenderlo sobre el suelo o la tierra. En
forma alternativa, puede conectar una tubería de agua fría, con un
tramo de cable que sea lo más corto posible.
66

GUÍA DE FUNCIONADMIENTO DE SATELLIT 750
ENCHUFES DE ANTENA EXTERNA continuado
En la antena AM girable, ubicada en la parte superior de la radio, se
encuentra un enchufe para antenas AM de 50 ó 75 ohmios.
En caso de usar enchufes externos, debe seleccionarse la opción
EXTERNAL con el conmutador selector ubicado en el lado derecho
de la radio. En caso de usar la antena interna de la radio, conmute
la radio a ANTENNA.
NOTA: Se deben desenchufar todas las antenas que están exteriormente montadas en la radio, en caso de un pronóstico climático
que indica tormentas con relámpagos.
BOTÓN RESET
El botón de reset se encuentra en la parte izquierda, debajo del
botón de sintonización. Se debe pulsar solamente cuando parece
que la radio dejó de funcionar correctamente. Después de su
pulsación, la separación de estación AM debe ajustarse nuevamente
para Norteamérica.
COMPARTIMENTO VACÍO EN LA PARTE
POSTERIOR DE LA RADIO
El pequeño compartimento vacío que se encuentra al lado del
compartimento de batería, puede usarse libremente.
67

GUÍA DE FUNCIONADMIENTO DE SATELLIT 750
AJUSTE DE CÓDIGO DE SISTEMA
Para ingresar diferentes códigos de sistema, debe apagarse la radio
para pulsar luego brevemente el botón ENTER. “_ _” se indica en
la esquina derecha superior de la pantalla. Ingrese el código de
sistema según la siguiente información y pulse luego ENTER para
conrmar el código de sistema.
Para el ajuste de la página de memoria (500 memorias)
CÓDIGO
00 10 páginas con 50 memorias respectivamente
20 20 páginas con 25 memorias respectivamente
25 25 páginas con 20 memorias respectivamente
50 50 páginas con 10 memorias respectivamente
Paso (AM)
09 9 kHz
10 10 kHz (Norteamérica)
Tipo de baterías
29 Baterías normales de tipo D (1,5 V respectivamente)
28 Baterías recargables (1,2 V respectivamente)
Rango de frecuencia de FM
76 76-108 MHz (Japón)
87 87 -108 MHz
68

ESPECIFICACIONES
Rango de frecuencia
LW
MW
SW
AIR
FM
Altoparlantes
Entrada de auriculares
Consumo de potencia
Temp. de oper.
Peso:
Dimensiones
Potencia
GUÍA DE FUNCIONADMIENTO DE SATELLIT 750
100 -519 kHz
522-1620 kHz – Código de sistema “09”
520-1710 kHz (América) – Código de
sistema “10”
1711 -29999 kHz
118 -137MHz
87 -108MHz
8 ohmios / 2W
10,16 cm
3,5 mm, estéreo
Sin luz de fondo: 80 mAh
Con luz de fondo: 90 mAh
-5 a +50 C4 inches
2,66 kg, sin baterías
Largo: 372 mm
Alto: 183 mm
Ancho: 153 mm
Baterías: UM1 (alcalina) x 4
DC: 6V/500mA, polaridad negativa
69

GUÍA DE FUNCIONADMIENTO DE SATELLIT 750
REGISTRO DE GARANTÍA
Para asegurar la cobertura completa de la garantía o adquirir
actualizaciones del producto, debe registrar su producto tan pronto
posible después de la compra o recibo del producto. Usted puede
utilizar una de las siguientes opciones para registrar su producto:
1. Ya sea visitando nuestro sitio Web en http://www.etoncorp.com.
2. Enviando por correo la tarjeta de garantía suministrada.
3. Envíe por correo su tarjeta de garantía suministrada o infor-
mación a la dirección siguiente; escriba su nombre, dirección
postal completa, número de teléfono, dirección de e-mail,
modelo comprado, fecha de compra, nombre del distribuidor del
producto donde ha adquirido el producto:
Etón Corporation
1015 Corporation Way
Palo Alto, CA 94303 EE.UU.
GARANTÍA LIMITADA
Conserve la información de garantía de su tarjeta de garantía con
su comprobante de compra. La información de Garantía Limitada
puede ser también leída en www.etoncorp.com.
70

GUÍA DE FUNCIONADMIENTO DE SATELLIT 750
SERVICIO PARA SU PRODUCTO
Para solicitar algún servicio para su producto, le recomendamos
contactar primero al representante de servicio de Etón llamando al
número de teléfono 1-800-872-2228 para los EE.UU., o al número
de teléfono 1-800-637-1648 para Canadá ó (650) 903-3866,
customersvc@etoncorp.com o bien su distribuidor respectivo del
país dentro de Europa (véase la lista adjunta) para la localización y
resolución del problema. Si requiere un servicio adicional, el equipo
técnico lo instruirá de como proceder considerando si la radio aún
posee garantía o si necesita servicio técnico para un producto que
ya no posee garantía.
GARANTÍA – Si su producto aún posee garantía y el representante de servicio de Etón determina que el servicio de garantía sea
necesario, se le enviará una autorización de retorno e instrucciones
de envío a una unidad de servicio de reparación autorizada de la
garantía. NO ENVÍE su radio de regreso sin haber recibido el número
de autorización de retorno.
SIN GARANTÍA – Si su producto ya no posee garantía y requiere
servicio de nuestro equipo técnico, el representante de servicio de
Etón le indicará la unidad de reparación más cercana de su localidad
que pueda ofrecer el mejor servicio de reparación.
For service outside North America, please refer to the distributor
information included at time of purchase/receipt.
NOTA FCC
El fabricante no asume la responsabilidad para cualquier tipo de interferencia de radio o TV causada por modicaciones no autorizadas
en este equipo. Estas modicaciones podrían anular la autorización
del usuario para operar el equipo.
71

Grundig Radio Line By
Etón Corporation
Corporate Headquarters
1015 Corporation Way
Palo Alto, California 94303 USA
tel +1 650-903-3866
tel +1 800-872-2228
fax +1 650-903-3867
Etón Canada
1 Yonge Street, Suite 1801
Toronto, Ontario M5E 1W7 Canada
tel +1 416-214-6885
Designed by Etón Corporation and assembled in China. I © Copyright 2008 Etón Corporation. All rights reserved.
v. 06-10-08
 Loading...