

Page 1

OB 350 page 1
1
World Receiver
Ocean Boy 350
Page 2
OB 350 page 2
2
Dichiarazione di conformità ai sensi del
D.M. 28.08.95, n. 548
Si dichiara che l'apparecchio illustrato nel presente libretto di istruzioni
per l'uso risponde alle prescrizioni dell'articolo 2, comma 1, del Decreto
Ministeriale 28 Agosto 1995, n. 548.
Fatto a Braga il 02/03/1998
GRUNDIG AUDIO INTERNACIONAL, LDA.
Apartado 34
4701 Braga Codex – Portugal
GRUNDIG A.G.
Kurgartenstrasse, 37
90762 FUERTH
GERMANIA
i
NOTE
Deutsch ................................................. 6D
English ................................................ 12
GB
Français .............................................. 18 F
Italiano................................................ 24 I
Português............................................ 30 P
Español............................................... 36 E
Nederlands ......................................... 42
NL
Dansk.................................................. 48
DK
Svenska .............................................. 54 S
Suomi.................................................. 60
FIN
Page 3
OB 350 page 3
3
E VOL.
DC 6 V
->+
y
SNOOZE
+ / –
E
Z
O
O
N
S
L
E
B
R
A
A
T
D
R
I
O
P
L
L
P
p
FM
5
O
O
C
E
A
N
B
O
Y
3
5
0
T
H
M
G
I
L
F
F
O
M
R
MHz
A
L
A
E
D
O
M
P
E
E
L
S
3
4
O
EM
M
1
2
MEMO
LIGHT
DIST/LOCAL
RADIO/BUZZER
ALARM OFF
Band
MODE
SLEEP
1…5
Key Lock
Page 4

Deutsch Seite
Bedienelemente ...............................6
Stromversorgung ..............................7
Uhrenbetrieb ...................................8
Wecker..........................................8
Radio ........................................9-10
Allgemein.................................10-11
Fehlerbehebung .............................11
English Page
Controls .......................................12
Power Supply ................................13
Clock...........................................14
Alarm ..........................................14
Radio ......................................15-16
General...................................16-17
Troubleshooting..............................17
Français Page
Commandes..................................18
Alimentation ..................................19
Horloge........................................20
Réveil...........................................20
Radio ......................................21-22
Généralités...............................22-23
Dépannage...................................23
Italiano Pagina
Controlli .......................................24
Alimentazione................................25
Orologio ......................................26
Sveglia.........................................26
Radio ......................................27-28
Generalità................................28-29
Elenco Ricerca Guasti .....................29
Português Página
Controlos......................................30
Alimentação..................................31
Relógio ........................................32
Despertador ..................................32
Rádio ......................................33-34
Generalidades..........................34-35
Detecção de avarias ......................35
Español Página
Controles......................................36
Alimentación .................................37
Reloj ............................................38
Despertar......................................38
Radio ......................................39-40
General...................................40-41
Localización de Averías ..................41
OB 350 page 4
4
INDEX
D
GB
F
I
P
E
NL
DK
S
FIN
Page 5

Nederlands Pagina
Knoppen ......................................42
Stroomvoorziening..........................43
Klok.............................................44
Wekken .......................................44
Radio ......................................45-46
Algemeen ................................46-47
Problemen oplossen........................47
Dansk Side
Kontroller ......................................48
Forsyning......................................49
Ur ...............................................50
Vækning.......................................50
Radio ......................................51-52
Generelt ..................................52-53
Fejlfinding.....................................53
Svenska Sida
Kontroller ......................................54
Strömförsörjning .............................55
Klocka .........................................56
Väckning ......................................56
Radio ......................................57-58
Allmänt ....................................58-59
Felsökning.....................................59
Suomi Sivu
Säätimet.......................................60
Käyttöjännite .................................61
Kello............................................62
Herätys ........................................62
Radio ......................................63-64
Yleistä .....................................64-65
Vianetsintä ....................................65
OB 350 page 5
5
INDEX
D
GB
F
I
P
E
NL
DK
S
FIN
Page 6

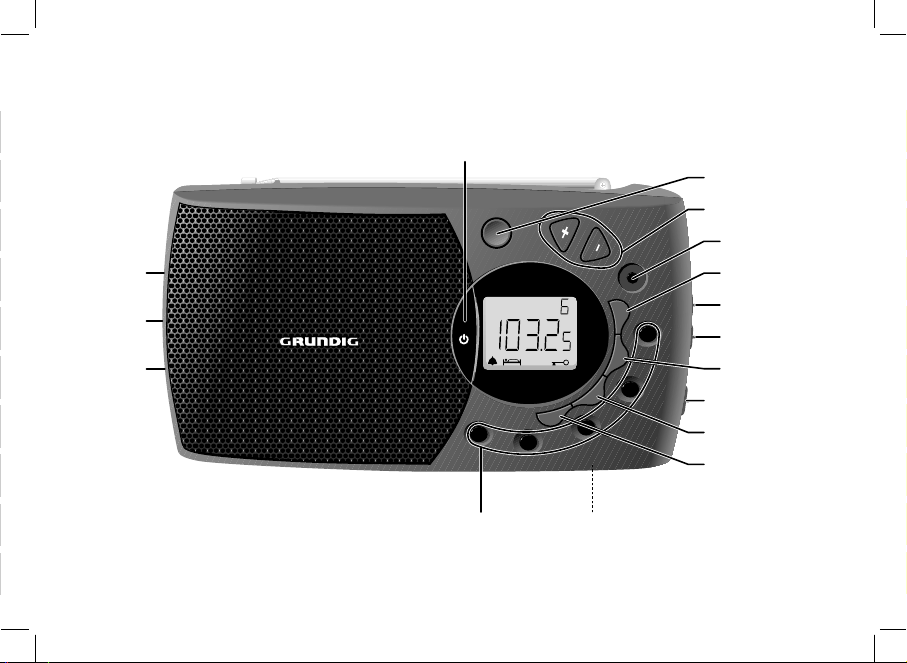
y – to switch the radio on and off
– to switch off the alarm (radio or buzzer) when
alarm function is activated
– to switch off the radio before the preset 'sleep'
time has elapsed
SNOOZE – to interrupt the alarm for approximately 5
minutes
+/– – for setting the clock time and alarm time
– when the radio is on, to start the station search
(
AUTO TUNING) or to advance the frequency
step by step (
MANUAL TUNING)
MEMO – this button is used to store the tuned station in
the memory position you choose
LIGHT – for illuminating the display
DIST/LOCAL – to reduce interference during FM or SW
reception
RADIO/BUZZ – for setting the alarm mode to radio or buzzer
ALARM OFF – to switch the alarm function on and off
BAND – to select the waveband:
MW = Mediumwave;
LW = Longwave;
SW = Shortwave;
FM = VHF
MODE – to enter the time and alarm time setting modes
– to change the display information
SLEEP – to switch on the radio for max. 90 minutes
OB 350 page 12
12
CONTROLS
GB
Key Lock – (base of the set) to lock all buttons
1…5
– station memory presets
DC 6 V – connection socket for a mains adapter
->+
p –
you can connect headphones having
a 3.5 mm
plug to the socket p.
The loudspeaker is then muted.
E VOL. – to adjust the volume
Back of the set:
– Battery compartment
– Fold-out stand
Display
• Pressing the MODE button briefly
changes the display mode:
– When the radio is off, the
display indication toggles
between time and alarm time.
– When the radio is on, the
display indication toggles
between radio frequency, time
and alarm time.
– If no button is pressed within 5 seconds, the display returns
to the original indication.
MW
LW
FM
SW
MHz
M
kHz
Page 7

Battery supply
• Open the battery compartment
and insert as shown 4 batteries,
type LR6, UM3 or AA-cells.
• Remove the batteries if
exhausted or if they will not be
used again for a long period.
• The indicator lights up on
the display, when the batteries
are nearly exhausted.
Back-up batteries for preset memory.
In order to keep the presets stored in the memory during the
time that the unit is switched off, it is necessary to insert two
additional back-up batteries.
• Place these batteries size
R03, AAA, alkaline type in the
battery compartment.
• These batteries should always
be inserted, regardless of the
power supply (mains voltage or batteries).
Note on Environmental Protection
Do not throw exhausted batteries in the household
refuse.
Hand over the old batteries to your dealer or
public collecting points when buying new ones.
AC Mains adapter (not included)
You can connect the set to the mains using a mains adapter.
Only use a mains adapter which supplies DC 6 V with the
negative pole at the centre pin of the plug (->+).
Before connecting the mains adapter
• Check that the mains voltage indicated on the type plate of
the adapter matches your local mains voltage.
• If the mains adapter is equipped with a voltage selector, set
this to the local voltage.
• Connect the mains adapter
to the DC 6 V socket of the set
and to the wall socket.
– The mains supply is switched
on.
Note:
If the DC 6 V socket is in use, the battery supply will
switch off automatically.
Note:
The unit remains connected to the mains even when it is
switched off. The unit is only fully isolated from the mains if
the mains plug is removed from the wall socket.
DC 6 V
->+
OB 350 page 13
13
POWER SUPPLY
GB
Page 8

Setting the clock time
• While the time is being displayed, press the
MODE button and hold it pressed, until the
time indication starts flashing.
• Use the – button to set the hours and the +
button to set the minutes.
– A single press of the – or + button advances the setting by
1 hour or 1 minute respectively. If the button is held pressed,
the setting advances rapidly.
– The minutes will not be carried over to the hours if, for
example, the minutes indication changes from '59' to '00'.
• Press the MODE button once more to store the setting.
– If no button is pressed within 5 seconds, the time setting
mode stops and the setting is stored automatically.
Setting the alarm time
• Press the MODE button briefly until the
display shows the current alarm time.
–
The alarm indicator 'ʍ' flashes on the display.
• While the alarm time is being indicated,
press and hold down the MODE button until
the
alarm time indication starts flashing.
•
Use the – button to set the hours and the +
button to set the
minutes (in the same way as the clock time).
• Press the MODE button once more to store the setting.
– If no button is pressed within 5 seconds, the alarm time
setting mode stops and the setting is stored automatically.
OB 350 page 14
14
CLOCK ALARM
GB
Switching the alarm on
• Press the ALARM OFF button once until the
alarm indicator '
ʍ' appears steadily on the
display.
• Select the desired alarm mode (with radio or
with sound signal) with the switch RADIO/BUZZ.
• If you select alarm with radio, tune to a station which will
be broadcasting at the alarm time and adjust the volume to
the required level.
– At the preselected alarm time, the alarm will switch on and
switch off again automatically 90 minutes later.
Interrupting and repeating the alarm
• The alarm can be interrupted with the SNOOZE button.
– After 5 minutes, the alarm comes on again.
• It is possible to interrupt the alarm function several times
during the switch-on period.
Switching the alarm off
• The alarm function can be switched off by pressing the y or
ALARM OFF button.
The alarm remains set to operate the next day.
• If you wish to switch off the alarm completely, press the
ALARM OFF button briefly, until the alarm indicator '
ʍ'
disappears.
Page 9

Radio reception
• Switch the radio on and off with the y button.
– The frequency and the wave band will
appear on the display.
• Select the desired waveband with the BAND
switch.
• Adjust the volume with the rotary control E VOL..
Aerials
• For FM reception extend the telescopic aerial fully. To
improve the reception you can incline and rotate the aerial.
If the FM signal received is too strong (in the direct vicinity
of the transmitter) you can retract the aerial.
• For MW and LW reception, the set has a built-in aerial, so
the telescopic aerial is not needed. You can direct the aerial
by turning the set itself.
• For short wave reception (SW) extend the telescopic aerial
and position it vertically.
Selecting Distant or Local
• Slide the
DIST/LOCAL
selector to the
LOCAL
position to
reduce interference and distortion when listening to strong
FM or SW stations. This causes the signal to be weakened,
thus reducing interference.
FM
MHz
Automatic tuning
• To activate automatic station search (AUTO TUNING), press +
or – until the frequency display begins 'to run'; then release
the button.
– The search stops as soon as a station is
found and tuned to.
– Stations which are received with a weak
field strength may be skipped. These can be
tuned to manually.
Manual tuning
• Briefly press the + or – button to tune in the corresponding
direction in individual steps.
• If you keep the button depressed, you can rapidly scan
large frequency ranges.
– When you release the button,
AUTO TUNING is automatically
switched to.
• If you briefly press one of the + or – buttons, manual tuning
is switched to.
Last Station Memory
• Your unit is provided with the function 'LAST STATION MEMORY',
which means that the station that was playing when the set
was switched off will be selected again when the unit is
switched back on.
MW
kHz
OB 350 page 15
15
RADIO
GB
Page 10

Storing stations
You can programme 20 stations into the memory, 5 on each
waveband.
• Select the waveband with the BAND switch.
• Tune to the station you want to store.
• Press MEMO.
– The indication 'M' starts flashing on the
display for 5 seconds.
• Press the number (1…5) you want to
assign the station to.
• Press MEMO again to store the station.
• Select and store in this way all desired
stations.
Note:
If no station is stored within the 5 seconds that 'M' is flashing,
the storing mode is abandoned with no change to the current
memory.
Calling up a stored station
• Select the waveband with the BAND switch.
• To call up a stored station, simply press the corresponding
button.
– The unit switches to the station and the
display indicates the waveband, frequency,
'M' and the memory location number.
LW
M
kHz
SW
M
MHz
SW
M
MHz
OB 350 page 16
16
RADIO GENERAL
GB
SLEEP Function
• Press the SLEEP button briefly.
– The unit switches on the radio and the display
will show the previously set 'sleep' period.
• The 'sleep' time can be adjusted from 90
minutes --> 10 minutes by pressing the SLEEP
button continuously.
– After the preset sleep time has elapsed, the radio will switch
off automatically.
• The SLEEP function can be terminated prematurely by
pressing the
y button.
Key Lock
The Key Lock function is used to prevent accidental operation
or changes to the settings (e.g. when travelling, etc.).
• Set the Key Lock switch to the
t position.
– The '
t' indication lights up on the display.
• Now you can only adjust E VOL..,
BAND, DIST/LOCAL and RADIO/BUZZ.
• To disable this function, set the Key Lock switch back to the
tX position.
– The '
t' indication disappears from the display.
Use of the stand
• Fold out the stand on the rear of the set. You can now use
the set in an inclined position.
FM
MHz
Page 11

If a fault occurs, first check the points listed below before taking the set for repair.
If you are unable to remedy a problem by following these hints, consult your dealer
or service centre.
WARNING:
Under no circumstances should you try to repair the set yourself, as this
would invalidate the guarantee.
Problem Possible cause Solution
y
button Key Lock switch is activated Switch off the Key Lock function
does not work
No sound E VOL. is not adjusted Adjust the E VOL.
Headphones are connected Disconnect the headphones
Batteries are exhausted Insert new batteries
Batteries are incorrectly inserted Insert the batteries correctly
Mains adapter is not securely Connect the mains adapter properly
connected
Poor sound Batteries are nearly exhausted Insert new batteries or use a mains
quality ( indicator lights up) adapter
Poor radio Weak radio aerial signal Aim the aerial for best reception:
reception
FM: incline and rotate telescopic aerial
MW/LW: rotate the entire set
SW: extend telescopic aerial vertically
Set too close to TV, VCR or Keep the set away from electrical
computer equipment
Alarm does Alarm time is not adjusted Adjust the alarm time
not work Headphones are connected Disconnect the headphones
Set does not Electrostatic discharge Switch off the set, disconnect the
react to mains adapter/remove batteries,
operation of reconnect after a few minutes.
any button Key Lock switch is activated Switch off the Key Lock function
OB 350 page 17
17
GENERAL TROUBLESHOOTING
GB
Further notes:
• Only a soft cloth which picks up dust
should be used to clean the cabinet.
Do not use aggresive polishes or
cleaning agents.
• Do not expose the unit to moisture
(e.g. dripping or splashing).
• The type label is on the bottom of the
unit.
Technical specifications
Wavebands: MW .......522 – 1620 kHz
LW...........144 – 281 kHz
SW.5.950 – 15.600 MHz
FM .......87.5 – 108 MHz
Power output:......800 mW peak power
The unit meets the CEE regulations
concerning interference radiation.
This product fulfills European directives
89/336/EEC, 73/23/EEC and
93/68/EEC.
This set complies with the safety
regulations according to VDE 0860 /
BS 415 and thus with the international
safety regulations according to IEC 65.
Subject to technical alterations and
alterations in styling. E & O.E.
 Loading...