

Page 1
All-in-One
Dolby Atmos
Soundbar
User Manual
DSB 1000
GSB 930
DE - EN -ES - FR - PL
01M-GSS1090-4620-01
01M-GSS1070-4620-01
Page 2

DEUTSCH 8-20
ENGLISH 21-32
ESPAÑOL 33-44
FRANÇAIS 45-57
POLSKI 58-69
2
Page 3
A
3 4 5
1
2
6
B
1
7 8
9 10 12 1311
C
D
2
3
4
7
8
5
6
9
E
F
G
H
3
Page 4
Normal Placement
A
B
Wall Mounting
~3mm/0.12”
4mm/
0.16”
~50mm/2.0"
1
2
3
8
09.5
m
m
/ 31.9
"
1 2 3
AAA
AAA
>25mm/0.98”
~3mm/0.12’’
AAA
AAA
4
Page 5
1 2 3
4
HDMI OUT
HDMI IN
HDMI (ARC)
OR
A
B
5
or
or
or
15
min.
Auto-Off
A
or
MODE
AUX
BT
USB
OPT
COA
HDMI
HDMI
ARC
A
Auto-Wake
If a device
is connected...
FR
1
2
EQ
5
Page 6
1
no device found
BASS
LEVEL
TREBLE
LEVEL
ON/OFF
or
3
1 2
5
2
ANDROID IPHONE
BLUETOOTH
if
Grundig GSB 93 0
ON
or
Grundig DSB 1000
or
2-3 sec.
or
6
Page 7
DE
MONTAGE ANSCHLÜSSE
BETRIEB
EN
MOUNTING CONNECTIONS
FR
MONTAGE CONNEXIONS
ES
MONTAJE CONEXIONES FUNCIONAMIENTO
PL
MONTAŻ PODŁĄCZENIE STEROWANIE
DE
BLUETOOTH USB
EN
BLUETOOTH USB
FR
BLUETOOTH USB
ES
BLUETOOTH USB
PL
BLUETOOTH USB
OPERATION
FONCTIONNEMENT
7
Page 8
SICHERHEIT ________________________________
VORSICHT
GEFAHR EINES STROMSCHLAGS
NICHT ÖFFNEN
VORSICHT: UM DAS RISIKO EINES STROMSCHLAGS ZU VERRINGERN,
DARF DIE ABDECKUNG (ODER DIE RÜCKSEITE) NICHT ENTFERNT
WERDEN. KEINE VOM BENUTZER ZU WARTENDEN TEILE IM INNEREN.
DIE WARTUNG AN QUALIFIZIERTES WARTUNGSPERSONAL VERWEISEN.
Das Blitzsymbol mit Pfeilspitze in
einem gleichseitigen Dreieck soll
den Benutzer auf das Vorhandensein einer
nicht installierten "gefährlichen Spannung"
innerhalb des Gehäuses des Produkts
aufmerksam machen, die so groß sein
kann, dass die Gefahr eines Stromschlags
für Personen besteht.
Das Ausrufezeichen in einem
gleichseitigen Dreieck soll den
Benutzer darauf aufmerksam machen,
dass in der dem Gerät beiliegenden
Literatur wichtige Betriebs- und Wartungs(Service-) Anweisungen vorhanden sind.
Sicherheit
• Lesen Sie diese Anweisungen - Alle
Sicherheits- und Betriebsanweisungen
sollten gelesen werden, bevor dieses
Produkt in Betrieb genommen wird.
• Bewahren Sie diese Anweisungen
auf - Die Sicherheits- und
Betriebsanweisungen sollten zum
späteren Nachschlagen aufbewahrt
werden.
• Alle Warnhinweise beachten - Alle
Warnhinweise auf dem Gerät und in der
Bedienungsanleitung sind zu beachten.
• Befolgen Sie alle Anweisungen - Alle
Betriebs- und Gebrauchsanweisungen
sollten befolgt werden.
• Verwenden Sie dieses Gerät nicht in
der Nähe von Wasser - Das Gerät sollte
nicht in der Nähe von Wasser oder
Feuchtigkeit verwendet werden - z.B. in
einem nassen Keller oder in der Nähe
eines Schwimmbad und ähnlichem.
• Nur mit einem trockenen Tuch reinigen.
• Blockieren Sie keine Lüftungsöffnungen.
• Installieren Sie das Gerät gemäß den
Anweisungen des Herstellers.
• Installieren Sie das Gerät nicht in
der Nähe von Wärmequellen wie
Heizkörpern, Heizgeräten, Öfen oder
anderen Geräten (einschließlich
Verstärkern), die Wärme erzeugen.
• Umgehen Sie nicht den Sicherheitszweck
des polarisierten oder geerdeten
Steckers. Ein polarisierter Stecker hat
zwei Klinge, von denen eine breiter ist als
die andere. Ein Erdungsstecker hat zwei
Klinge und einen dritten Erdungszinken.
Die breite Klinge oder der dritte Zinken
ist zu Ihrer Sicherheit vorgesehen.
Wenn der mitgelieferte Stecker nicht in
Ihre Steckdose passt, wenden Sie sich
an einen Elektriker, um die veraltete
Steckdose zu ersetzen.
• Schützen Sie das Netzkabel vor
8
DEUTSCH
Page 9

SICHERHEIT ________________________________
dem Betreten oder Einklemmen,
insbesondere an Steckern, Steckdosen
und der Stelle, an der sie aus dem Gerät
austreten.
• Verwenden Sie nur vom Hersteller
angegebene Anhänge/Zubehörteile.
• Nur mit dem vom Hersteller
angegebenen oder mit dem
Gerät verkauften Wagen,
Ständer, Stativ, Bügel oder Tisch
verwenden. Wenn ein Wagen oder
Gestell verwendet wird, ist beim
Bewegen der Wagen/Gerätekombination
Vorsicht geboten, um Verletzungen
durch Umkippen zu vermeiden.
• Ziehen Sie bei Gewittern oder bei längerer
Nichtbenutzung den Netzstecker.
• Überlassen Sie alle Wartungsarbeiten
qualifiziertem Personal. Eine Wartung
ist erforderlich, wenn das Gerät in
irgendeiner Weise beschädigt wurde,
z. B. wenn das Netzkabel oder der
Netzstecker beschädigt ist, Flüssigkeit
verschüttet wurde oder Gegenstände
in das Gerät gefallen sind, das Gerät
Regen oder Feuchtigkeit ausgesetzt
war, nicht normal funktioniert oder
heruntergefallen ist.
• Dieses Gerät ist ein elektrisches
Gerät der Klasse II oder ein doppelt
elektrisches Gerät. Dieses Gerät ist
so gebaut, das es keinen Schutzleiter
(elektrische Erdung) für die Verbindung
zum Stromnetz erfordert.
• Das Gerät darf keinen Tropfen oder
Spritzern ausgesetzt werden. Es dürfen
keine mit Flüssigkeiten gefüllten
Gegenstände, wie z.B. Vasen, auf den
Apparat gestellt werden.
• Der Mindestabstand um den Apparat für
eine ausreichende Belüftung beträgt 5
cm.
• Die Belüftung sollte nicht durch
Abdecken der Lüftungsöffnungen
mit Gegenständen wie Zeitungen,
Tischdecken, Vorhängen usw. behindert
werden.
• Stellen Sie keine offenen Flammen (z.B.
brennende Kerzen) auf das Gerät.
• Batterien sollten gemäß den staatlichen
und lokalen Richtlinien recycelt oder
entsorgt werden.
• Der Einsatz von Geräten in gemäßigten
Klimazonen.
Vorsicht
• Die Verwendung von Bedienelementen
oder Einstellungen oder die
Durchführung von Verfahren, die
nicht hierin beschrieben sind, kann zu
gefährlicher Strahlenexposition oder
einem anderen unsicheren Betrieb
führen.
• Um die Gefahr eines Brandes oder
Stromschlags zu verringern, darf
dieses Gerät weder Regen noch
Feuchtigkeit ausgesetzt werden.
DEUTSCH
9
Page 10

SICHERHEIT ________________________________
Das Gerät darf keinem Tropf- oder
Spritzwasser ausgesetzt werden, und
mit Flüssigkeiten gefüllte Gegenstände,
wie z.B. Vasen, dürfen nicht auf das
Gerät gestellt werden.
• Der Stecker des Netz-/Gerätes wird
als Trennvorrichtung verwendet, die
Trennvorrichtung muss leicht bedienbar
bleiben.
• Explosionsgefahr bei falschem
Austausch der Batterie. Nur durch den
gleichen oder einen gleichwertigen Typ
ersetzen.
Warnung
• Die Batterie (Batterien oder Batteriesatz)
darf nicht übermäßiger Hitze wie
Sonneneinstrahlung, Feuer oder
ähnlichem ausgesetzt werden.
• Bevor Sie dieses System in Betrieb
nehmen, überprüfen Sie die Spannung
dieses Systems, um festzustellen, ob
sie mit der Spannung Ihrer örtlichen
Stromversorgung identisch ist.
• Stellen Sie dieses Gerät nicht in der
Nähe von starken Magnetfeldern auf.
• Stellen Sie dieses Gerät nicht auf den
Verstärker oder Empfänger.
• Stellen Sie dieses Gerät nicht in der
Nähe von feuchten Bereichen auf, da
die Feuchtigkeit die Lebensdauer des
Laserkopfes beeinträchtigt.
• Sollte ein fester Gegenstand oder
eine Flüssigkeit in das System fallen,
trennen Sie das System vom Netz
und lassen Sie es von qualifiziertem
Personal überprüfen, bevor Sie es weiter
betreiben.
• Versuchen Sie nicht, das Gerät mit
chemischen Lösungsmitteln zu reinigen,
da dies die Oberfläche beschädigen
kann. Verwenden Sie ein sauberes,
trockenes oder leicht feuchtes Tuch.
• Wenn Sie den Netzstecker aus der
Steckdose ziehen, ziehen Sie immer
direkt am Stecker, niemals am Kabel.
• Änderungen oder Modifikationen an
diesem Gerät, die nicht ausdrücklich von
der für die Einhaltung der Vorschriften
verantwortlichen Partei genehmigt
wurden, führen zum Erlöschen der
Berechtigung des Benutzers zum Betrieb
des Geräts.
• Das Typenschild wird auf der Unterseite
oder Rückseite des Geräts aufgeklebt.
VORSICHT bei der Verwendung
von Batterien
Um ein Auslaufen der Batterie zu
verhindern, das zu
Körperverletzungen, Sachschäden oder
Schäden am Gerät führen kann:
• Legen Sie alle Batterien korrekt ein, +
und - wie auf dem Gerät gekennzeichnet.
• Alte und neue Batterien dürfen nicht
gemischt werden.
10
DEUTSCH
Page 11

SICHERHEIT ________________________________
• Mischen Sie keine Alkali-,
Standard- (Kohlenstoff-Zink) oder
wiederaufladbaren Batterien (Ni-Cd, NiMH, etc.).
• Entfernen Sie die Batterien, wenn das
Gerät für längere Zeit nicht benutzt wird.
Die Bluetooth Wortmarke und Logos sind
eingetragene Warenzeichen im Besitz von
Bluetooth SIG,. Inc.
Die übernommenen Marken HDMI, HDMI
High-Definition Multimedia Interface
und das HDMI-Logo sind Marken oder
eingetragene Marken von HDMI Licensing
Administrator, Inc. in den USA und anderen
Ländern.
Dolby, Dolby Atmos und das DoppelD-Symbol sind eingetragene Marken
der Dolby Laboratories Licensing
Corporation. Hergestellt unter Lizenz
von Dolby Laboratories. Vertrauliche
unveröffentlichte Werke. Copyright ©
2012-2020 Dolby Laboratories. Alle
Rechte vorbehalten.
DEUTSCH
11
Page 12
AUF EINEN BLICK: ____________________________
Lieber Kunde,
Herzlichen Glückwunsch zum Kauf Ihrer neuen
GRUNDIG All-in-One Dolby Atmos Soundbar DSB
1000/GSB 930.
Bitte lesen Sie die folgenden Benutzungshinweise
sorgfältig durch, damit Sie noch viele Jahre Freude
an Ihrem hochwertigen GRUNDIG Produkt haben.
Ein verantwortungsvoller Ansatz!
GRUNDIG setzt auf vertraglich vereinbarte soziale Arbeitsbedingungen
mit angemessenen Löhnen sowohl
für interne Mitarbeiter als auch für
Lieferanten. Wir legen auch großen
Wert auf die effiziente Nutzung von Rohstoffen mit
einer kontinuierlichen Abfallreduzierung von mehreren Tonnen Kunststoff pro Jahr. Außerdem ist
unser gesamtes Zubehör mindestens 5 Jahre lang
erhältlich.
Für eine lebenswerte Zukunft.
Grundig.
Steuerungen und Teile
Siehe die Abbildung auf Seite 3.
A Haupt-Einheit
1. Fernbedienungs sensor
2. Anzeigefenster
3. (EIN/AUS)-Taste
4. (Quelle) Taste
5. VOL+/- Tasten
6. Wandhalterung Schrauben
7. AUX-Buchse
8. USB-Buchse
9. OPTISCHE Buchse
10. COAXIAL Buchse
11. HDMI OUT (ARC) Buchse
12. HDMI 1/HDMI 2 Buchse
13. AC~ Buchse
B Fernsteuerung
1. Schalten Sie das Gerät zwischen
EIN und STANDBY-Modus um.
2. Wählen Sie die
Wiedergabefunktion.
3. /
4. BASS +/- Stellen Sie den Basspegel ein.
5. TREBLE +/- Stellen Sie den Treblepegel ein.
6.
VOL +/-
7. VERTIKAL /
SURROUND
8. EQ Wählen Sie Equalizer (EQ)
9. DIMMER Stellen Sie die Helligkeit des
C AC-Netzkabel x1
D HDMI Kabel x1
E Audio Kabel x1
F Optisches Kabel x1
G Wandhalterung x2
Schrauben/Gummi Abdeckung x2
H AAA-Batterien x2
Wechseln Sie im Bluetooth /
USB-Modus zum vorherigen /
nächsten Titel.
Wiedergabe/Pause/Wiedergabe
im Bluetooth/USB Modus.
Halten Sie gedrückt, um die
Pairing Funktion im Bluetooth
Modus zu aktivieren oder das
vorhandene gekoppelte Bluetooth
Gerät zu trennen.
Stumm Schalten oder den Ton
wieder aufnehmen.
Erhöhen/Verringern des
Lautstärkepegels.
Stellen Sie den Surround Modus
EIN/AUS.
Effekt.
Displays ein.
12
DEUTSCH
Page 13

VORBEREITUNGEN ___________________________
Bereiten Sie die Fernbedienung vor
Mit der mitgelieferten Fernbedienung kann das Gerät auch
aus der Ferne bedient werden.
•
Selbst wenn die Fernbedienung innerhalb der effektiven
Reichweite von 6 m (19,7 Fuß) betrieben wird, kann der
Betrieb der Fernbedienung unmöglich sein, wenn sich
Hindernisse zwischen dem Gerät und der Fernbedienung
befinden.
•
Wenn die Fernbedienung in der Nähe anderer Produkte
betrieben wird, die Infrarotstrahlen erzeugen, oder wenn
andere Fernbedienungen mit Infrarotstrahlen in der
Nähe des Geräts verwendet werden, funktioniert sie
möglicherweise nicht richtig. Umgekehrt können die
anderen Produkte fehlerhaft funktionieren.
Vorsichtsmaßnahmen in Bezug auf
Batterien
•
Achten Sie darauf, die Batterien mit der richtigen
positiven " "- und negativen " "-Polarität einzulegen.
•
Verwenden Sie Batterien desselben Typs. Verwenden Sie
niemals verschiedene Batterietypen zusammen.
•
Es können entweder wiederaufladbare oder nicht
wiederaufladbare Batterien verwendet werden. Beachten
Sie die Vorsichtsmaßnahmen auf ihren Etiketten.
•
Seien Sie vorsichtig mit Ihren Fingernägeln, wenn Sie den
Batteriedeckel und die Batterie entfernen.
•
Lassen Sie die Fernbedienung nicht fallen.
•
Lassen Sie nichts auf die Fernbedienung einwirken.
•
Verschütten Sie kein Wasser oder irgendeine Flüssigkeit
auf die Fernbedienung.
•
Legen Sie die Fernbedienung nicht auf einen nassen
Gegenstand.
•
Stellen Sie die Fernbedienung nicht unter direktes
Sonnenlicht oder in die Nähe von übermäßigen
Wärmequellen.
•
Entfernen Sie die Batterie aus der Fernbedienung, wenn
sie über einen längeren Zeitraum nicht benutzt wird, da
Korrosion oder Auslaufen der Batterie auftreten und zu
Körperverletzungen und/oder Sachschäden und/oder
Feuer führen kann.
•
Verwenden Sie keine anderen als die angegebenen
Batterien.
•
Mischen Sie keine neuen Batterien mit alten.
•
Laden Sie niemals eine Batterie auf, wenn nicht bestätigt
ist, dass es sich um einen wiederaufladbaren Typ handelt.
PLATZIERUNG UND MONTAGE ___________________
Normale Platzierung (Option A)
• Stellen Sie den Soundbar auf eine ebene Fläche
vor dem Fernseher.
Wandmontage (Option-B)
Anmerkung:
• Die Installation darf nur von qualifiziertem
Personal durchgeführt werden. Eine falsche
Montage kann zu schweren Personen- und
Sachschäden führen (wenn Sie beabsichtigen,
dieses Produkt selbst zu installieren, müssen
Sie prüfen, ob Installationen wie elektrische
Leitungen und Klempnerarbeiten möglicherweise
in der Wand vergraben sind). Es liegt in der
Verantwortung des Installateurs, zu überprüfen,
ob die Wand die Gesamtlast des Geräts und der
Wandhalterungen sicher trägt.
• Für die Installation sind zusätzliche Werkzeuge
(nicht im Lieferumfang enthalten) erforderlich.
• Ziehen Sie die Schrauben nicht zu fest an.
• Bewahren Sie diese Bedienungsanleitung zum
späteren Nachschlagen auf.
• Verwenden Sie einen elektronischen
Bolzensucher, um den Wandtyp vor dem Bohren
und Montieren zu überprüfen.
DEUTSCH
13
Page 14

VERBINDUNG _______________________________
Dolby Atmos ®
Dolby Atmos bietet Ihnen eine erstaunliche
Erfahrung, die Sie noch nie zuvor mit Overhead
Sound gemacht haben, und all den Reichtum, die
Klarheit und die Kraft von Dolby Sound.
Zur Verwendung von Dolby Atmos ®
1. Dolby Atmos® ist nur im HDMI Modus
verfügbar. Einzelheiten zur Verbindung finden
Sie unter „HDMI ANSCHLUSS".
Um Dolby Atmos® im HDMI 1 und HDMI 2 Modus
verwenden zu können, muss Ihr Fernsehgerät
Dolby Atmos® unterstützen.
2. Stellen Sie sicher, dass für den Bitstream
im Audioausgang des angeschlossenen
externen Geräts (z. B. Blu-ray DVD Player,
Fernseher usw.) "No Encoding" gewählt ist.
3. Wenn Sie das Format Dolby Atmos / Dolby
Digital / PCM eingeben, zeigt die Soundbar
DOLBY ATMOS / DOLBY AUDIO / PCM AUDIO
an.
Tipps:
• Das volle Dolby Atmos Erlebnis steht nur dann
zur Verfügung, wenn die Soundbar über ein
HDMI 2.0 Kabel an die Quelle angeschlossen ist.
• Die Soundbar funktioniert auch dann, wenn
sie über andere Methoden (z. B. ein digitales
optisches Kabel) angeschlossen ist, aber diese
können nicht alle Dolby Funktionen unterstützen.
Aus diesem Grund empfehlen wir den Anschluss
über HDMI, um eine vollständige Dolby
Unterstützung zu erhalten.
Demo Modus:
Drücken Sie im Standby Modus gleichzeitig die
(VOL +) und (VOL -) Taste auf der Soundbar lang.
Die soundbar wird eingeschaltet und der Demoton
kann aktiviert werden. Der Demoton wird etwa 20
Sekunden lang abgespielt.
Hinweis:
1. Wenn der Demoton aktiviert ist, können Sie
die Taste drücken, um ihn stumm zu
schalten.
2. Wenn Sie sich den Demoton länger anhören
möchten, können Sie auf um den Demoton zu wiederholen.
3. Drücken Sie (VOL +) oder (VOL -), um den
Lautstärkepegel zu erhöhen oder zu verringern.
4. Drücken Sie um den Demo Modus zu
verlassen und das Gerät geht in den Standby
Modus.
HDMI Verbindung
Bei einigen 4K HDR Fernsehern müssen der HDMI
Eingang oder die Bildeinstellungen für den Empfang
von HDR Inhalten eingestellt werden. Weitere
Einzelheiten zur Einstellung der HDR Displays entnehmen Sie bitte der Bedienungsanleitung Ihres
Fernsehers.
Verwendung von HDMI zum Anschluss der
Soundbar, der AV Geräte und des Fernsehers:
Methode 1: ARC (Audio Rückkanal)
Die ARC-Funktion (Audio-Rückkanal) ermöglicht es
Ihnen, Audiosignale von Ihrem ARC-kompatiblen
Fernseher über eine einzige HDMI-Verbindung an
Ihren Soundbar zu senden. Um in den Genuss der
ARC-Funktion zu kommen, stellen Sie bitte sicher,
dass Ihr Fernseher sowohl HDMI-CEC- als auch
ARC-kompatibel ist und entsprechend eingerichtet wurde. Bei korrekter Einstellung können Sie die
Lautstärke (VOL +/- und MUTE) des Tonbalkens
mit Ihrer TV-Fernbedienung einstellen.
• Schließen Sie das HDMI-Kabel (im Lieferumfang
enthalten) von der HDMI (ARC)-Buchse des
Geräts an die HDMI (ARC)-Buchse Ihres ARCkompatiblen Fernsehgeräts an. Drücken Sie
dann die Fernbedienung, um HDMI ARC zu
wählen.
14
DEUTSCH
Page 15

VERBINDUNG _______________________________
Tipps:
• Ihr Fernseher muss die HDMI-CEC- und ARC-
Funktion unterstützen. HDMI-CEC und ARC
müssen auf Ein eingestellt sein.
• Die Einstellmethode von HDMI-CEC und ARC
kann je nach Fernsehgerät unterschiedlich sein.
Einzelheiten zur ARC-Funktion entnehmen Sie
bitte dem Benutzerhandbuch.
• Nur Kabel mit HDMI 1.4 oder einer höheren
Version können die ARC-Funktion unterstützen.
• Die Einstellung für den S/PDIF-Modus des
digitalen TV-Tonausgangs muss auf PCM oder
Dolby Digital eingestellt sein.
Methode 2: Standard HDMI
• Wenn Ihr Fernsehgerät nicht HDMI ARC
kompatibel ist, schließen Sie Ihre Soundbar
über eine Standard HDMI Verbindung an das
Fernsehgerät an.
Verwenden Sie ein HDMI Kabel (im Lieferumfang
enthalten), um die HDMI OUT Buchse der Soundbar
mit der HDMI IN Buchse des Fernsehers zu verbinden.
Verwenden Sie ein HDMI Kabel (im Lieferumfang
enthalten), um den HDMI IN Anschluss (1 oder
2) der Soundbar mit Ihren externen Geräten (z.B.
Spielkonsolen, DVD Player und Blu Ray) zu verbinden.
Verwenden Sie die OPTISCHE
Buchse
• Entfernen Sie die Schutzabdeckung der
OPTISCHEN Buchse und schließen Sie dann ein
OPTISCHES Kabel (im Lieferumfang enthalten)
an die OPTISCHE OUT Buchse des Fernsehers
und die OPTISCHE Buchse am Gerät an.
Verwenden Sie die COAXIAL
Buchse
• Sie können auch das COAXIAL Kabel (nicht
mitgeliefert) verwenden, um die COAXIAL
OUT Buchse des Fernsehers und die COAXIAL
Buchse am Gerät zu verbinden.
• Tipp: Das Gerät kann möglicherweise nicht alle
digitalen Audioformate von der Eingangsquelle
dekodieren. In diesem Fall wird das Gerät
stumm geschaltet. Dies ist keine Fehlfunktion.
Stellen Sie sicher, dass die Audio Einstellung der
Eingangsquelle (z. B. Fernseher, Spielkonsole,
DVD Player usw.) auf PCM oder Dolby Digital
eingestellt ist (Einzelheiten zu den Audio
Einstellungen finden Sie im Benutzerhandbuch
des Eingangsquellgerätes) mit HDMI / OPTICAL
/ COAXIAL Eingang.
Verwenden Sie die AUX-Buchse
• Verwenden Sie ein RCA-zu-3,5-mm-
Audiokabel (nicht mitgeliefert), um die
Audioausgangsbuchsen des Fernsehers mit der
AUX-Buchse am Gerät zu verbinden.
• Verwenden Sie ein RCA-zu-3,5-mm-
Audiokabel (nicht mitgeliefert), um die
Audioausgangsbuchsen des Fernsehers mit der
AUX-Buchse am Gerät zu verbinden.
Stromversorgung anschließen
GEFAHR VON PRODUKTSCHÄDEN!
• Stellen Sie sicher, dass die Versorgungsspannung
mit der auf der Rückseite oder Unterseite des
Geräts aufgedruckten Spannung übereinstimmt.
• Bevor Sie das Netzkabel anschließen,
vergewissern Sie sich, dass Sie alle anderen
Anschlüsse vorgenommen haben.
Soundbar
Schließen Sie das Netzkabel an die AC~-Buchse
der Haupteinheit und dann an eine Netzsteckdose
an.
DEUTSCH
15
Page 16

BLUETOOTH BETRIEB _________________________
Bluetooth Verbindung herstellen
Wenn Sie Ihr Bluetooth Gerät zum ersten Mal mit
diesem Player verbinden, müssen Sie Ihr Gerät mit
diesem Player verbinden.
Hinweis:
• Die Betriebsreichweite zwischen diesem Player
und einem Bluetooth Gerät beträgt ca. 8 Meter
(ohne irgendeinen Gegenstand zwischen einen
Bluetooth Gerät und dem Gerät).
• Bevor Sie ein Bluetooth Gerät mit diesem Gerät
verbinden, stellen Sie sicher, dass Sie die
Fähigkeiten des Geräts kennen.
• Die Kompatibilität mit allen Bluetooth Geräten ist
nicht garantiert.
• Jedes Hindernis zwischen diesem Gerät
und einem Bluetooth Gerät kann die
Betriebsreichweite verringern.
• Wenn die Signalstärke schwach ist, kann Ihr
Bluetooth Empfänger die Verbindung trennen,
aber er wird automatisch wieder in den
Paarungsmodus eintreten.
Tipps:
• Geben Sie bei Bedarf "0000" für das Passwort
ein.
• Wenn sich innerhalb von zwei Minuten kein
anderes Bluetooth Gerät mit diesem Player
koppelt, stellt der Player seine vorherige
Verbindung wieder her.
• Die Verbindung des Players wird auch getrennt,
wenn Ihr Gerät aus der Betriebsreichweite
gebracht wird.
• Wenn Sie Ihr Gerät wieder mit diesem Player
verbinden möchten, bringen Sie es in den
Betriebsbereich.
• Wenn das Gerät aus der Betriebsreichweite
gebracht wird, überprüfen Sie bitte beim
Zurückbringen, ob das Gerät noch an den Player
angeschlossen ist.
• Wenn die Verbindung verloren geht, befolgen Sie
die oben stehenden Anweisungen, um Ihr Gerät
wieder mit dem Player zu paaren.
Musik von einem Bluetooth Gerät hören
• Wenn das angeschlossene Bluetooth Gerät
das Advanced Audio Distribution Profile (A2DP)
unterstützt, können Sie die auf dem Gerät
gespeicherte Musik über den Player anhören.
• Wenn das Gerät auch das Audio Video Remote
Control Profile (AVRCP) unterstützt, können Sie
die Fernbedienung des Players verwenden, um
auf dem Gerät gespeicherte Musik abzuspielen.
1. Paaren Sie Ihr Gerät mit dem Player.
2. Spielen Sie Musik über Ihr Gerät ab (wenn es
A2DP unterstützt).
3. Verwenden Sie die mitgelieferte Fernbedienung zur Steuerung der Wiedergabe (wenn
es AVRCP unterstützt).
• Um die Wiedergabe anzuhalten/fortzusetzen,
drücken Sie die Taste auf der Fernbedienung.
• Um zu einem Titel zu springen, drücken Sie die
/ Tasten auf der Fernbedienung.
16
DEUTSCH
Page 17

USB BETRIEB _______________________________
• Um die Wiedergabe zu unterbrechen oder
fortzusetzen, drücken Sie die Taste auf der
Fernbedienung.
• Um zur vorherigen/nächsten Datei zu springen,
drücken Sie die / Tasten / auf der
Fernbedienung.
• Wählen Sie Wiederholungs/
Zufallswiedergabeoptionen.
Drücken Sie im USB Modus wiederholt die
USB Taste auf der Fernbedienung, um einen
Wiedergabemodus der Option REPEAT/SHUFFLE
zu wählen.
Wiederholen Sie einen:
Ordner wiederholen:
(wenn es mehrere Ordner gibt)
Wiederholen Sie alles:
Shuffle Play:
Wiederholen aus:
SHUFFLE
Tipps:
• Das Gerät kann USB Geräte mit bis zu 64 GB
Speicher unterstützen.
• Dieses Gerät kann MP3 abspielen.
• Das USB Dateisystem sollte FAT32 oder FAT16
sein.
ONE
FOLDER
ALL
OFF
DEUTSCH
17
Page 18

FEHLERBEHEBUNG ___________________________
Versuchen Sie niemals, das System selbst zu reparieren, damit die Garantie gültig bleibt. Wenn Sie
bei der Verwendung dieses Geräts auf Probleme
stoßen, überprüfen Sie die folgenden Punkte, bevor Sie den Service anfordern.
Keine Stromversorgung
• Stellen Sie sicher, dass das Netzkabel des Geräts
richtig angeschlossen ist.
• Prüfen Sie, ob an der Netzsteckdose Strom
vorhanden ist.
• Drücken Sie die Standby Taste, um das Gerät
einzuschalten.
Die Fernbedienung funktioniert
nicht
• Bevor Sie eine Taste zur Wiedergabesteuerung
drücken, wählen Sie zuerst die richtige Quelle
• Verringern Sie den Abstand zwischen der
Fernbedienung und dem Gerät.
• Legen Sie die Batterie so ein, dass die Polaritäten
(+/-) wie angegeben ausgerichtet sind.
• Ersetzen Sie die Batterie.
• Richten Sie die Fernbedienung direkt auf den
Sensor an der Vorderseite des Geräts.
Kein Ton.
• Stellen Sie sicher, dass das Gerät nicht stumm
geschaltet ist.Stellen Sie sicher, dass der
Schalter auf AUS steht. Drücken Sie die Taste
MUTE oder VOL+/-, um das normale Hören
fortzusetzen.
• Drücken Sie am Gerät oder auf der
Fernbedienung, um die Soundbar in den Standby
Modus zu schalten. Drücken Sie dann die
Taste erneut, um die Soundbar einzuschalten.
• Ziehen Sie sowohl die Soundbar aus der
Netzsteckdose und schließen Sie sie wieder an.
Schalten Sie die Soundbar ein.
18
DEUTSCH
• Prüfen Sie, ob die Audioeinstellung der
Eingangsquelle (z.B. Fernseher, Spielkonsole,
DVD Player usw.) auf PCM oder Dolby Digital
Modus eingestellt ist, während Sie eine digitale
(z.B. HDMI, OPTISCHE, COAXIAL) Verbindung
verwenden.
• Das Gerät kann möglicherweise nicht alle
digitalen Audioformate von der Eingangsquelle
dekodieren. In diesem Fall wird das Gerät stumm
geschaltet. Dies ist keine Fehlfunktion. Das Gerät
ist nicht stumm geschaltet.
Das Fernsehgerät hat
Darstellungsprobleme beim
Anzeigen von HDR Inhalten von
einer HDMI Quelle.
• Bei einigen 4K HDR Fernsehern müssen der
HDMI Eingang oder die Bildeinstellungen für
den Empfang von HDR Inhalten eingestellt
werden. Weitere Einzelheiten zur Einstellung
der HDR Displays entnehmen Sie bitte der
Bedienungsanleitung Ihres Fernsehers.
Ich kann den Bluetooth Namen
dieses Geräts auf meinem
Bluetooth Gerät für die Bluetooth
Verbindung nicht finden
• Stellen Sie sicher, dass die Bluetooth Funktion
auf Ihrem Bluetooth Gerät aktiviert ist.
• Achten Sie darauf, dass Sie das Gerät mit Ihrem
Bluetooth Gerät gepaart haben.
Dies ist eine 15minütige
Abschaltfunktion, eine der ERPII
Standardanforderungen zum
Stromsparen
• Wenn der Pegel des externen Eingangssignals
des Geräts zu niedrig ist, wird das Gerät nach
15 Minuten automatisch abgeschaltet. Bitte
erhöhen Sie den Lautstärkepegel Ihres externen
Geräts.
Page 19
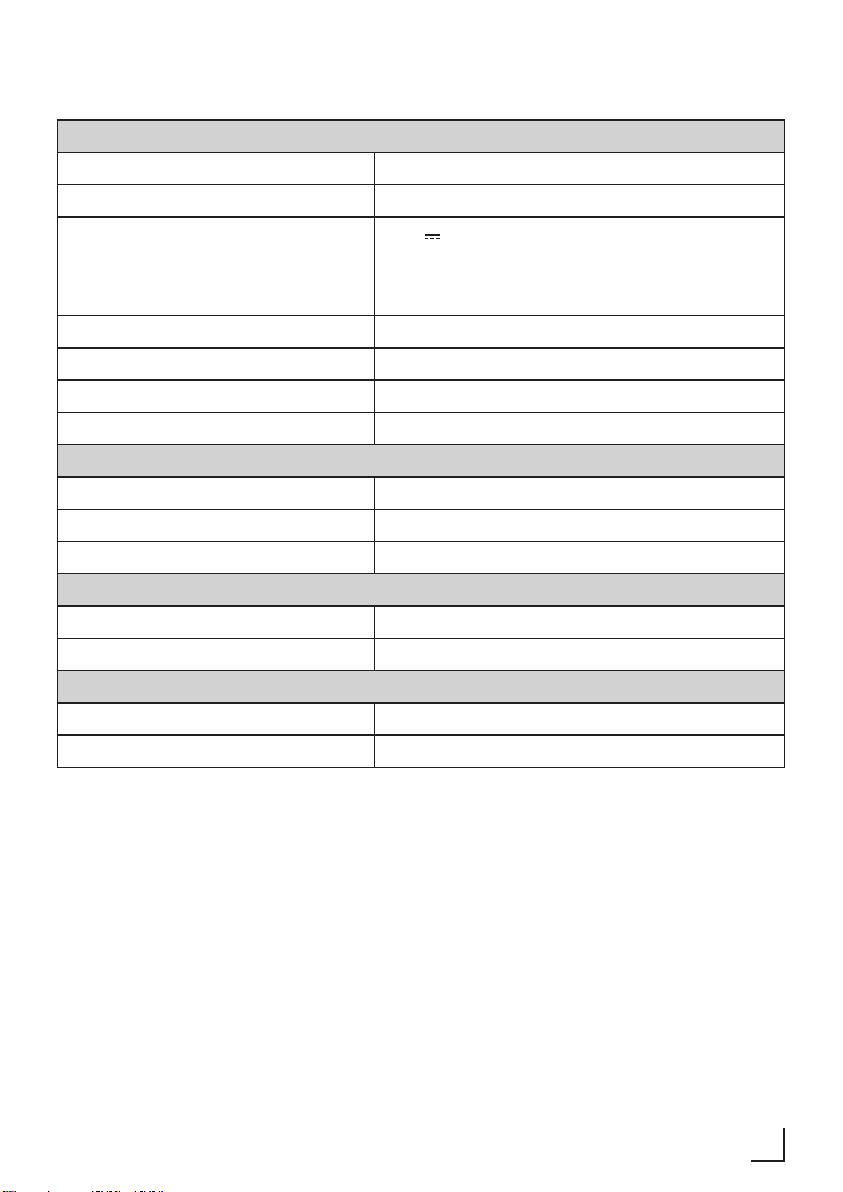
SPEZIFIKATIONEN ____________________________
Soundbar
Stromversorgung 220-240V~ 50/60Hz
Leistungsaufnahme 30W / < 0,5 W (Standby)
5.0 V 0.5 A
USB
Abmessungen (BxHxT) 880mm x 60mm x 127.5mm
Nettogewicht 3.3 kg
Audio-Eingangsempfindlichkeit 250mV
Frequenzgang 40Hz - 20KHz
Bluetooth/Wireless Spezifikation
Bluetooth Version/Profile V 4.2 (A2DP, AVRCP)
Bluetooth Maximale Sendeleistung 5 dBm
Bluetooth Frequenzbänder 2402 MHz ~ 2480 MHz
Verstärker (Max. Gesamtausgangsleistung)
Insgesamt 120W
Impedanz 8Ω x 2 + 4Ω
Fernsteuerung
Abstand/Winkel 6m/30°
Batterietyp: AAA (1.5V x 2)
Hi-Speed USB (2.0)/FAT32/FAT16
64G (max), MP3
DEUTSCH
19
Page 20
INFORMATIONEN ____________________________
Entsorgung von Altgeräten:
Dieses Produkt erfüllt die Vorgaben der EU-WEEEDirektive (2012/19/EU). Das Produkt wurde mit
einem Klassifizierungssymbol für elektrische und
elektronische Altgeräte (WEEE) gekennzeichnet.
Dieses Symbol zeigt an, dass dieses
Gerät am Ende seiner Einsatzzeit nicht
mit anderem Hausmüll entsorgt werden
darf. Altgeräte müssen an offizielle
Sammelstellen zum Recycling elektrischer und elektronischer Geräte abgegeben werden. Nähere Angaben zu diesen Sammelstellen
erhalten Sie von Ihrer Stadtverwaltung oder dem
Händler, bei dem Sie das Gerät erworben haben.
Der Beitrag jedes Haushalts zum Umweltschutz ist
wichtig. Eine angemessene Entsorgung von
Altgeräten hilft bei der Verhinderung negativer
Auswirkungen auf Umwelt und menschliche
Gesundheit.
Einhaltung von RoHS-Vorgaben:
Das von Ihnen erworbene Produkt erfüllt die
Vorgaben der EU-RoHS Direktive (2011/65/EU).
Es enthält keine in der Direktive angegebenen gefährlichen und unzulässigen Materialien.
Technische Informationen
Dieses Gerät ist gemäß den geltenden EURichtlinien geräuschunterdrückt. Dieses Produkt
erfüllt die europäischen Richtlinien 2014/53/EU,
2009/125/EC und 2011/65/EU.
Die CE Konformitätserklärung für das Gerät finden Sie in Form einer pdf-Datei auf der Grundig
Homepage www.grundig.com/downloads/doc.
Informationen zur Verpackung
Die Verpackung des Produkts wurde gemäß unserer nationalen Gesetzgebung
aus recyclingfähigen Materialien herge-
stellt. Entsorgen Sie die
Verpackungsmaterialien nicht mit dem Hausmüll
oder anderem Müll. Bringen Sie sie zu einer von
der Stadtverwaltung bereitgestellten Sammelstelle
für Verpackungsmaterial.
20
DEUTSCH
Page 21
SAFETY ___________________________________
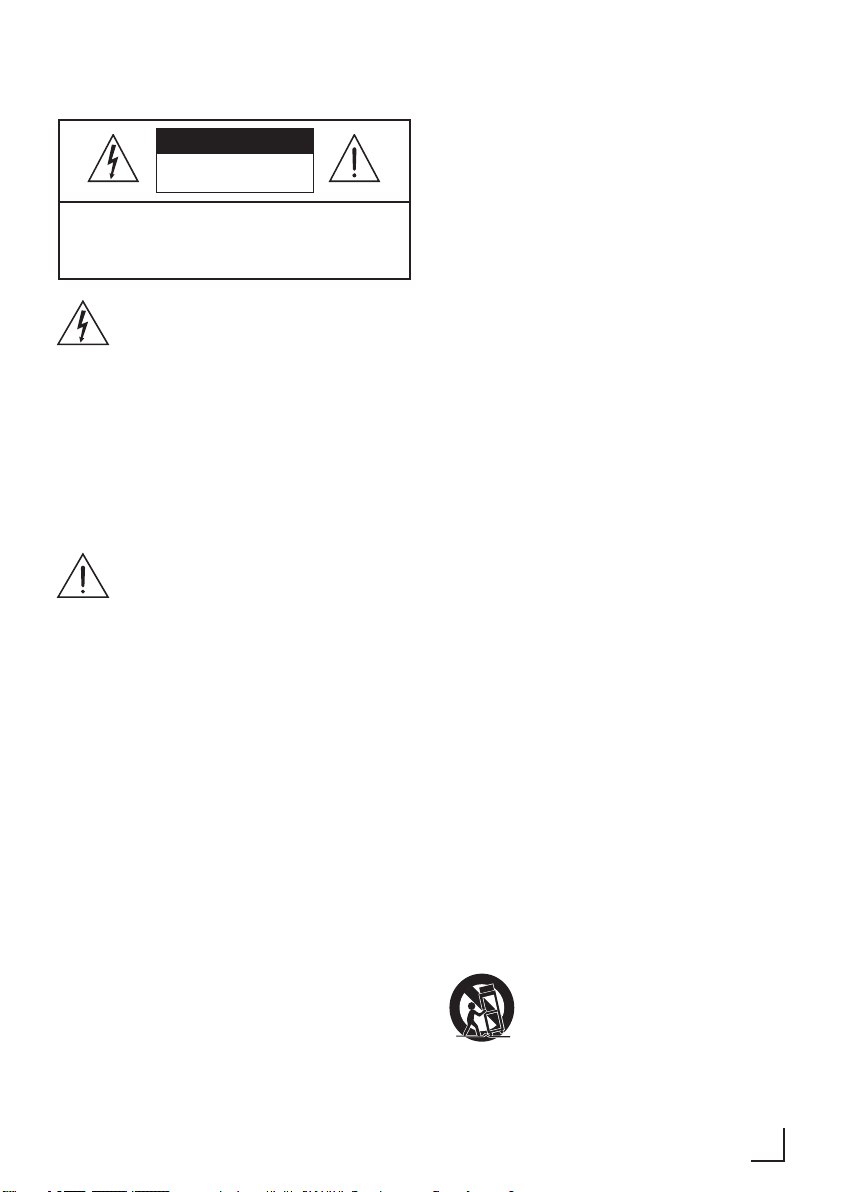
CAUTION
RISK OF ELECTRIC SHOCK DO
NOT OPEN
CAUTION: TO REDUCE THE RISK OF ELECTRIC SHOCK, DO
NOT REMOVE COVER (OR BACK). NO USER-SERVICEABLE
PARTS INSIDE. REFER SERVICING TO QUALIFIED SERVICE
PERSONNEL.
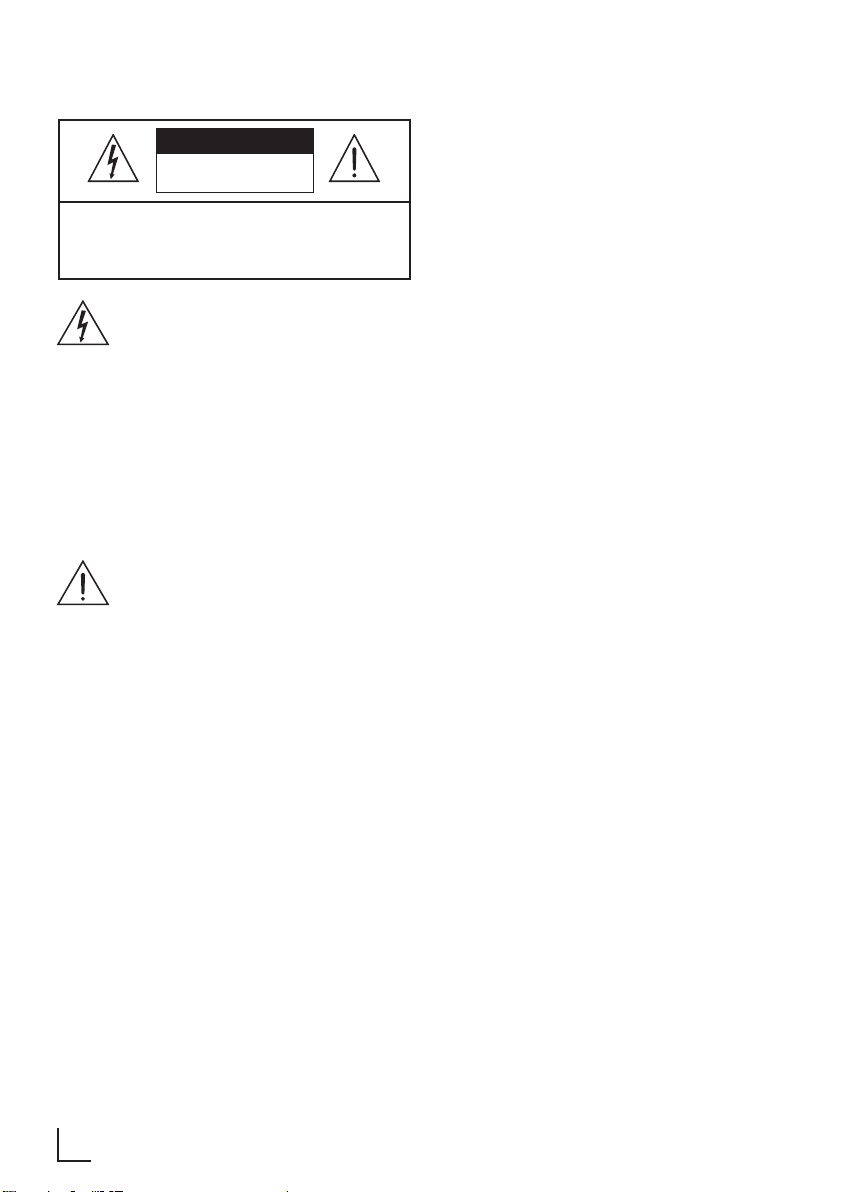
The lightning flash with arrowhead
symbol, within an equilateral
triangle, is intended to alert the user to the
presence of uninsulated “dangerous
voltage” within the product’s enclosure
that may be of sufficient magnitude as to
constitute a risk of electric shock to
persons.
The exclamation point within an
equilateral triangle is intended to
alert the user to the presence of important
operating and maintenance (servicing)
instructions in the literature accompanying
the appliance.
Safety
• Read these instructions – All the safety
and operating instructions should be
read before this product is operated.
• Keep these instructions – The safety
and operating instructions should be
retained for future reference.
• Heed all warnings – All warnings on
the appliance and in the operating
instructions should be adhered to.
• Follow all instructions – All operating and
usage instructions should be followed.
• Do not use this apparatus near water –
The appliance should not be used near
water or moisture – for example, in a
wet basement or near a swimming pool
and the like.
• Clean only with a dry cloth.
• Do not block any ventilation openings.
• Install in accordance with the
manufacturer’s instructions.
• Do not install near any heat sources
such as radiators, heaters, stoves, or
other apparatus (including amplifiers)
that produce heat.
• Do not defeat the safety purpose of the
polarized or grounding plug. A polarized
plug has two blades with one wider than
the other. A grounding plug has two
blades and a third grounding prong.
The wide blade or the third prong is
provided for your safety. If the provided
plug does not fit into your outlet, consult
an electrician for replacement of the
obsolete outlet.
• Protect the power cord from being
walked on or pinched particularly at
plugs, convenience receptacles, and the
point where they exit from the apparatus.
• Only use attachments/accessories
specified by the manufacturer.
• Use only with the cart, stand,
tripod, bracket or table
specified by the manufacturer,
or sold with the apparatus. When a cart
or rack is used, use caution when
ENGLISH
21
Page 22

SAFETY ___________________________________
moving the cart/apparatus combination
to avoid injury from tip-over.
• Unplug the apparatus during lightning
storms or when unused for long periods
of time.
• Refer all servicing to qualified personnel.
Servicing is required when the apparatus
has been damaged in any way, such as
power supply cord or plug is damaged,
liquid has been spilled or objects have
fallen into the apparatus, the unit has
been exposed to rain or moisture,
does not operate normally, or has been
dropped.
• This equipment is a Class II or
double insulated electrical appliance. It
has been designed in such a way that it
does not require a safety connection to
electrical earth.
• The apparatus shall not be exposed to
dripping or splashing. No objects filled
with liquids, such as vases, shall be
placed on the apparatus.
• Minimum distance around the apparatus
for sufficient ventilation is 5cm.
• The ventilation should not be impeded
by covering the ventilation openings with
items, such as newspapers,table-cloths,
curtains, etc…
• No naked flame sources, such as
lighted candles, should be placed on the
apparatus.
• Batteries should be recycled or disposed
of as per state and local guidelines.
• The use of apparatus in moderate
climates.
Caution
• Use of controls or adjustments or
performance of procedures other than
those described herein, may result in
hazardous radiation exposure or other
unsafe operation.
• To reduce the risk of fire or electric
shock, do not expose this apparatus to
rain or moisture. The apparatus must not
be exposed to dripping or splashing and
objects filled with liquids, such as vases,
must not be placed on apparatus.
• The mains plug/appliance coupler is
used as the disconnect device, the
disconnect device must remain readily
operable.
• Danger of explosion if battery is
incorrectly replaced. Replace only with
the same or equivalent type.
Warning
• The battery (batteries or battery pack)
shall not be exposed to excessive heat
such as sunshine, fire or the like.
• Before operating this system, check
the voltage of this system to see if it
is identical to the voltage of your local
power supply.
• Do not place this unit close to strong
magnetic fields.
• Do not place this unit on the amplifier
or receiver.
22
ENGLISH
Page 23
SAFETY ___________________________________
• Do not place this unit close to damp
areas as the moisture will affect the life
of the laser head.
• If any solid object or liquid falls into the
system, unplug the system and have it
checked by qualified personnel before
operating it any further.
• Do not attempt to clean the unit with
chemical solvents as this may damage
the finish. Use a clean, dry or slightly
damp cloth.
• When removing the power plug from the
wall outlet, always pull directly on the
plug, never yank on the cord.
• Changes or modifications to this unit
not expressly approved by the party
responsible for compliance will void
the user’s authority to operate the
equipment.
• The rating label is pasted on the bottom
or back of the equipment.
The Bluetooth word mark and logos are
registered trademarks owned by Bluetooth
SIG,. Inc.
The Adopted Trademarks HDMI, HDMI
High-Definition Multimedia Interface,
and the HDMI Logo are trademarks or
registered trademarks of HDMI Licensing
Administrator, Inc. in the United States and
other countries.
Dolby, Dolby Atmos, and the double-D
symbol are registered trademarks of
Dolby Laboratories Licensing Corporation.
Manufactured under license from Dolby
Laboratories. Confidential unpublished
works. Copyright © 2012-2020 Dolby
Laboratories. All rights reserved.
Battery usage CAUTION
To prevent battery leakage which
may result in bodily injury, property
damage, or damage to the apparatus:
• Install all batteries correctly, + and - as
marked on the apparatus.
• Do not mix old and new batteries.
• Do not mix alkaline, standard (Carbon-
Zinc) or rechargeable (Ni-Cd, Ni- MH,
etc.) batteries.
• Remove batteries when the unit is not
used for a long time.
ENGLISH
23
Page 24
AT A GLANCE _______________________________
Dear Customer,
Congratulations on the purchase of your new
GRUNDIG All-in-One Dolby Atmos Soundbar DSB
1000/GSB 930.
Please read the following user notes carefully to
ensure full enjoyment of your quality GRUNDIG
product for many years to come.
A responsible approach!
GRUNDIG focuses on contractually
agreed social working conditions
with fair wages for both internal employees and suppliers. We also at-
tach great importance to the efficient use of raw materials with continuous waste
reduction of several tonnes of plastic every year.
Furthermore, all our accessories are available for
at least 5 years.
For a future worth living.
Grundig.
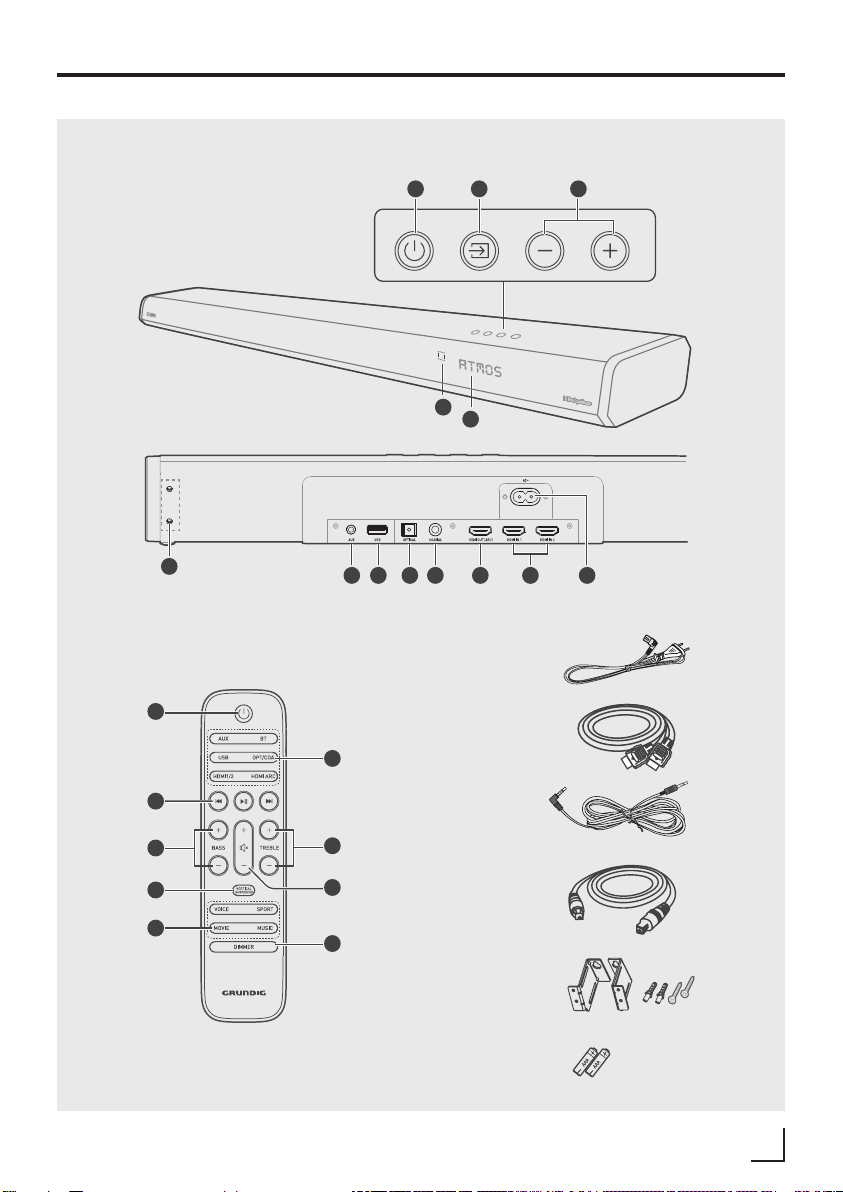
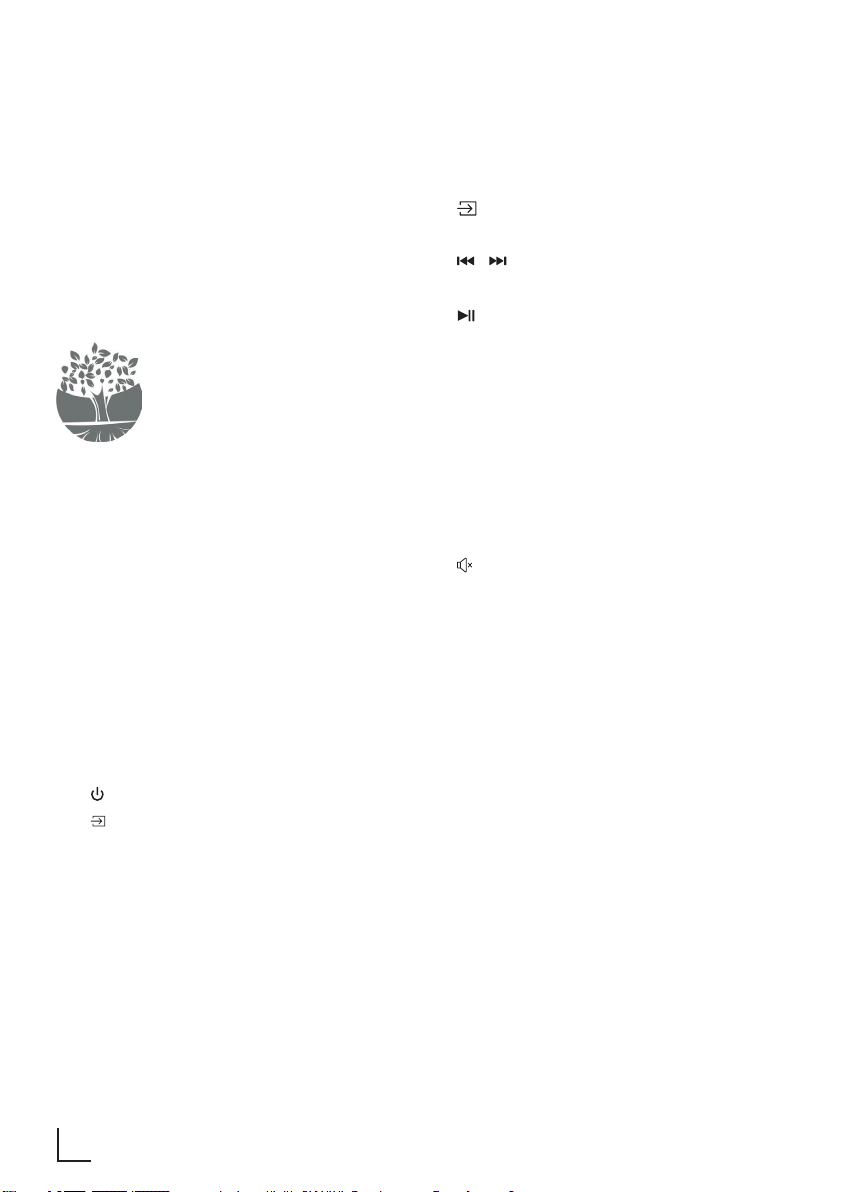
Controls and parts
See the figure on page 3.
A Main-Unit
1. Remote Control Sensor
2. Display Window
3. (ON/OFF) Button
4. (Source) Button
5. VOL+/- Buttons
6. Wall Bracket Screws
7. AUX Socket
8. USB Socket
9. OPTICAL Socket
10. COAXIAL Socket
11. HDMI OUT (ARC) Socket
12. HDMI 1/HDMI 2 Socket
13. AC~ Socket
B Remote Control
1.
2. Select the play function.
3. /
4. BASS +/- Adjust bass level.
5. TREBLE +/- Adjust treble level.
6.
VOL +/-
7. VERTICAL /
SURROUND
8. EQ Select Equalizer (EQ) Effect.
9. DIMMER Adjust display brightness.
C AC Power Cord x1
D HDMI Cable x1
E Audio Cable x1
F Optical Cable x1
G Wall Bracket x2
Screws/Gum Cover x2
H AAA Batteries x2
Switch the unit between ON
and STANDBY mode.
Skip to previous/next track in
Bluetooth/USB mode.
Play/pause/resume playback in
Bluetooth/USB mode.
Press and hold to activate the
pairing function in Bluetooth
mode or disconnect the existing paired Bluetooth device.
Mute or resume the sound.
Increase/decrease the volume
level.
Adjust the surround ON/OFF.
24
ENGLISH
Page 25

PREPARATIONS _____________________________
Prepare the Remote Control
The provided Remote Control allows the unit to be
operated from a distance.
• Even if the Remote Control is operated within
the effective range 19.7 feet (6m), remote
control operation may be impossible if there are
any obstacles between the unit and the remote
control.
• If the Remote Control is operated near other
products which generate infrared rays, or if other
remote control devices using infra-red rays are
used near the unit, it may operate incorrectly.
Conversely, the other products may operate
incorrectly.
Precautions Concerning Batteries
• Be sure to insert the batteries with correct
positive “ ” and negative “ ” polarities.
• Use batteries of the same type. Never use
different types of batteries together.
• Either rechargeable or non-rechargeable
batteries can be used. Refer to the precautions
on their labels.
• Be aware of your fingernails when removing the
battery cover and the battery.
• Do not drop the remote control.
• Do not allow anything to impact the remote
control.
• Do not spill water or any liquid on the remote
control.
• Do not place the remote control on a wet object.
• Do not place the remote control under direct
sunlight or near sources of excessive heat.
• Remove the battery from the remote control
when not in use for a long period of time, as
corrosion or battery leakage may occur and
result in physical injury, and/or property damage,
and/or fire.
• Do not use any batteries other than those
specified.
• Do not mix new batteries with old ones.
• Never recharge a battery unless it is confirmed
to be a rechargeable type.
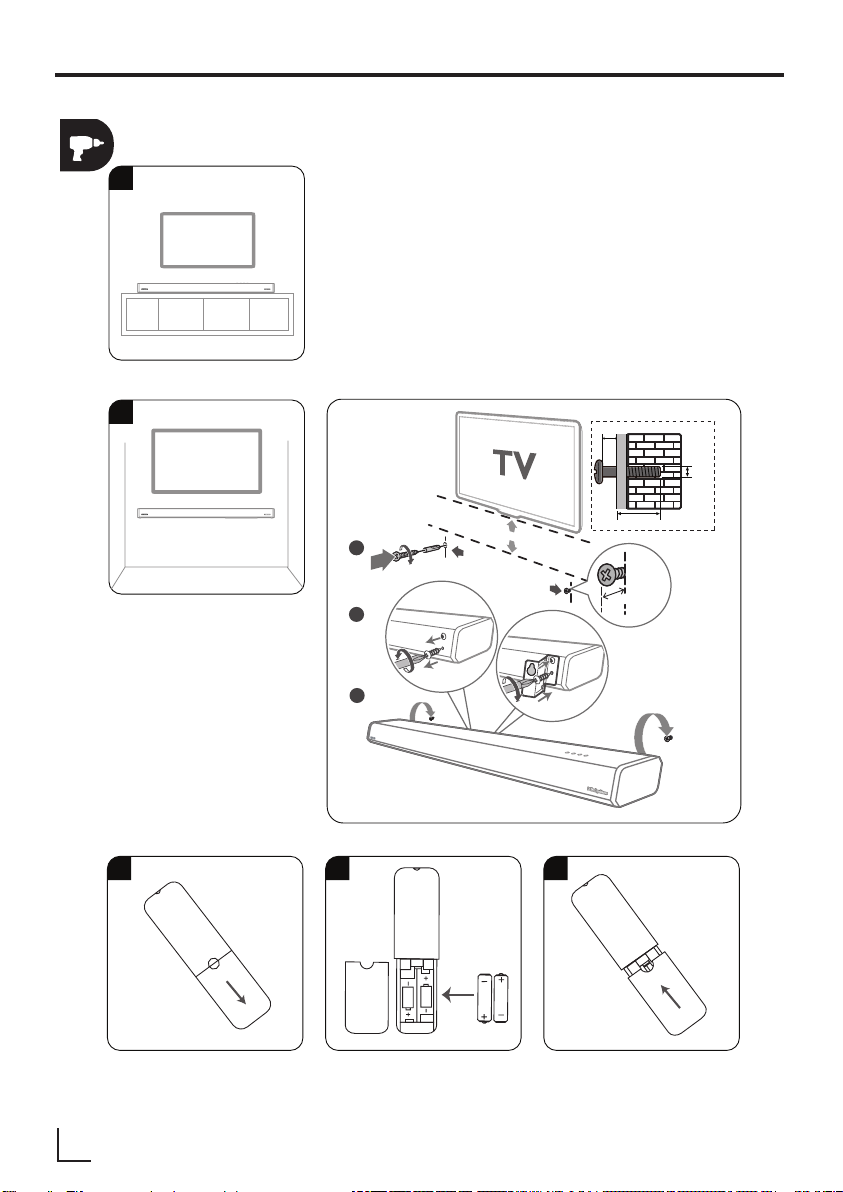
PLACEMENT AND MOUNTING ___________________
Normal Placement (option A)
• Place Soundbar on leveled surfacein front of TV.
Wall Mounting (option-B)
Note:
• Installation must be carried out by qualified
personnel only. Incorrect assembly can result in
severe personal injury and property damage (if
you intend to install this product yourself, you
must check for installations such as electrical
wiring and plumbing that may be buried inside
the wall). It is the installer’s responsibility to
verify that the wall will safely support the total
load of the unit and wall brackets.
• Additional tools (not included) are required for
the installation.
• Do not overtighten screws.
• Keep this instruction manual for future reference.
• Use an electronic stud finder to check the wall
type before drilling and mounting.
ENGLISH
25
Page 26

CONNECTION _______________________________
Dolby Atmos ®
Dolby Atmos gives you amazing experience you
have never before by overhead sound, and all the
richness, clarity, and power of Dolby sound.
For using Dolby Atmos ®
1. Dolby Atmos® is available only in HDMI
mode. For the details of the connection,
please refer to “HDMI CONNECTION”.
To use Dolby Atmos® in HDMI 1 and HDMI 2
mode, your TV has to support Dolby Atmos®.
2. Make sure that “No Encoding“ is selected
for bitstream in the audio output of the
connected external device (e.g. Blu-ray DVD
player, TV etc.).
3. While entering Dolby Atmos / Dolby Digital /
PCM format, the soundbar will show DOLBY
ATMOS / DOLBY AUDIO / PCM AUDIO.
Tips:
• The full Dolby Atmos experience is only available
when the Soundbar is connected to the source
via a HDMI 2.0 cable.
• The Soundbar will still function when connected
via other methods (such as a Digital Optical
cable) but these are unable to support all of the
Dolby features. Given this, our recommendation
is to connect via HDMI, in order to ensure full
Dolby support.
Demo mode:
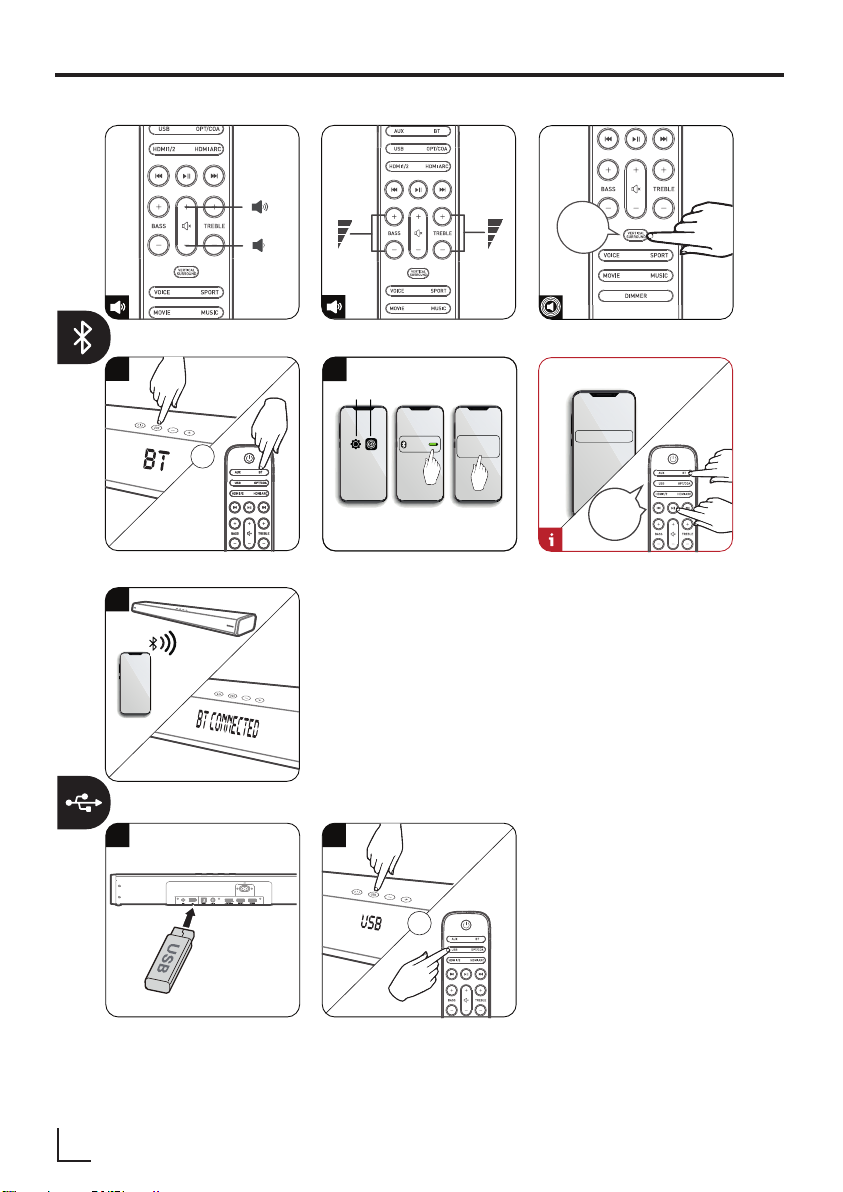
In standby mode, Long press (VOL +) and (VOL -)
button on soundbar at the same time. The soundbar will power on and demo sound can be activated. The demo sound will play around 20 seconds.
Note:
1. When demo sound be activated, you can
press button to mute it.
2. If you want to listen the demo sound longer,
you can press to repeat the demo sound.
3. Press (VOL +) or (VOL -) to increase or
decrease the demo sound volume level.
4. Press button to exit demo mode and the
unit will go to standby mode.
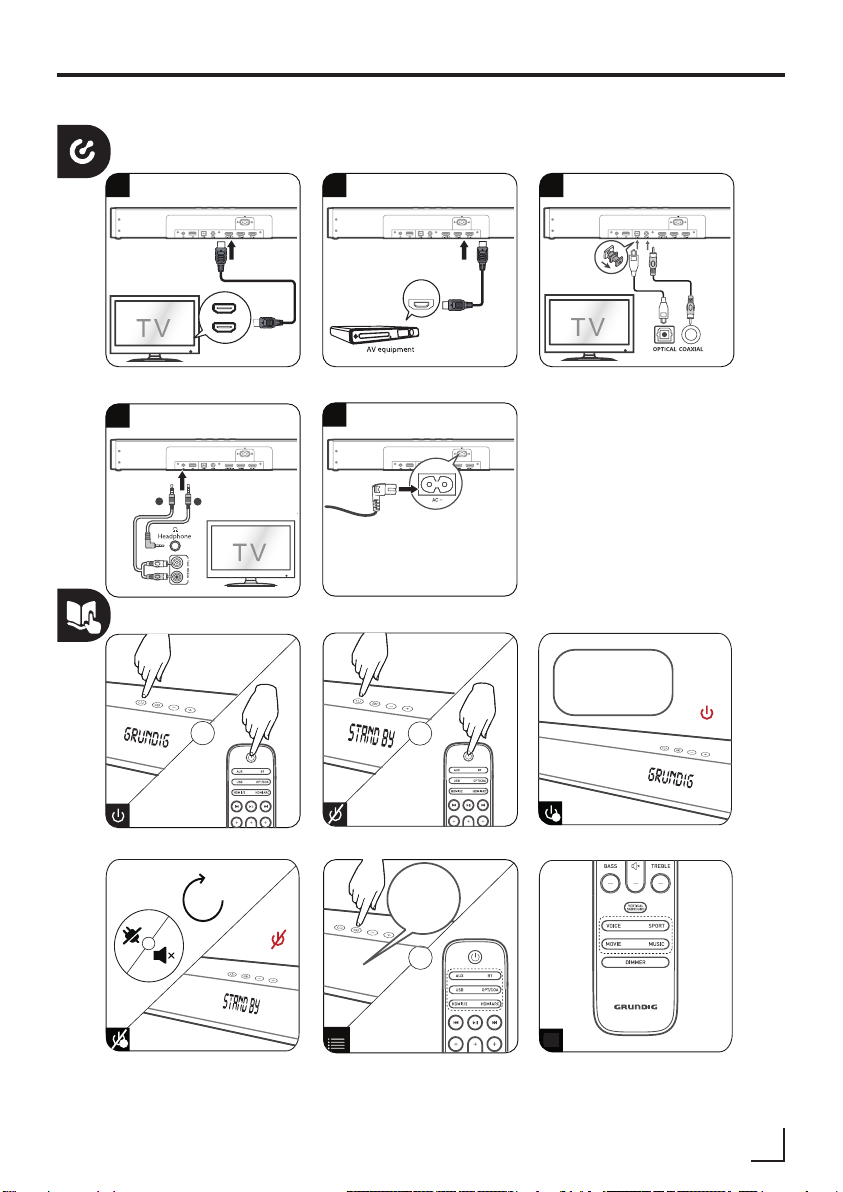
HDMI Connection
Some 4K HDR TVs require the HDMI input or picture settings to be set for HDR content reception. For
further setup details on HDR display, please refer
to the instruction manual of your TV.
Using HDMI to connect the soundbar, AV equipment and TV:
Method 1: ARC (Audio Return Channel)
The ARC (Audio Return Channel) function allows
you to send audio from your ARC- compliant TV to
your sound bar through a single HDMI connection.
To enjoy the ARC function, please ensure your TV
is both HDMI-CEC and ARC compliant and set up
accordingly. When correctly set up, you can use
your TV remote control to adjust the volume output
(VOL +/- and MUTE) of the sound bar.
• Connect the HDMI cable ( included ) from unit's
HDMI (ARC) socket to the HDMI (ARC) socket on
your ARC compliant TV. Then press the remote
control to select HDMI ARC.
Tips:
• Your TV must support the HDMI-CEC and ARC
function. HDMI-CEC and ARC must be set to On.
• The setting method of HDMI-CEC and ARC may
differ depending on the TV. For details about ARC
function, please refer to the owner’s manual.
• Only HDMI 1.4 or higher version cable can
support the ARC function.
• Your TV digital sound output S/PDIF mode setting
must be PCM or Dolby Digital.
26
ENGLISH
Page 27

CONNECTION _______________________________
Method 2: Standard HDMI
• If your TV is not HDMI ARC-compliant, connect
your soundbar to the TV through a standard
HDMI connection.
Use an HDMI cable (included) to connect the
soundbar's HDMI OUT socket to the TV’s HDMI IN
socket.
Use an HDMI cable (included) to connect the
soundbar's HDMI IN (1 or 2) socket to your external devices (e.g. games consoles, DVD players
and blu ray).
Use the OPTICAL Socket
• Remove the protective cap of the OPTICAL
socket, then connect an OPTICAL cable
(included) to the TV’s OPTICAL OUT socket and
the OPTICAL socket on the unit.
Use the COAXIAL Socket
• You also can use the COAXIAL cable (not
included) to connect the TV's COAXIAL OUT
socket and COAXIAL socket on the unit.
• Tip: The unit may not be able to decode all
digital audio formats from the input source.
In this case, the unit will mute. This is NOT a
defect. Ensure that the audio setting of the input
source (e.g. TV, game console, DVD player, etc.)
is set to PCM or Dolby Digital (Refer to the user
manual of the input source device for its audio
setting details) with HDMI / OPTICAL / COAXIAL
input.
Connect Power
Risk of product damage!
• Ensure that the power supply voltage
corresponds to the voltage printed on the back
or the underside of the unit.
• Before connecting the AC power cord, ensure
you have completed all other connections.
Soundbar
Connect the mains cable to the AC~ socket of the
main unit and then into a mains socket.
Use the AUX Socket
• Use a RCA to 3.5mm audio cable (not included)
to connect the TV’s audio output sockets to the
AUX socket on the unit.
• Use a 3.5mm to 3.5mm audio cable (included)
to connect the TV’s or external audio device
headphone socket to the AUX socket on the unit.
ENGLISH
27
Page 28

BLUETOOTH OPERATION _______________________
Pair Bluetooth-enabled Devices
The first time you connect your bluetooth device
to this player, you need to pair your device to this
player.
Note:
• The operational range between this player and
a Bluetooth device is approximately 8 meters
(without any object between the Bluetooth
device and the unit).
• Before you connect a Bluetooth device to this
unit, ensure you know the device’s capabilities.
• Compatibility with all Bluetooth devices is not
guaranteed.
• Any obstacle between this unit and a Bluetooth
device can reduce the operational range.
• If the signal strength is weak, your Bluetooth
receiver may disconnect, but it will re-enter
pairing mode automatically.
Tips:
• Enter "0000" for the password if necessary.
• If no other Bluetooth device pairs with this player
within two minutes, the player will recover its
previous connection.
• The player will also be disconnected when your
device is moved beyond the operational range.
• If you want to reconnect your device to this
player, place it within the operational range.
• If the device is moved beyond the operational
range, when it is brought back, please check if
the device is still connected to the player.
• If the connection is lost, follow the instructions
above to pair your device to the player again.
Listen to Music from Bluetooth Device
• If the connected Bluetooth device supports
Advanced Audio Distribution Profile (A2DP), you
can listen to the music stored on the device
through the player.
• If the device also supports Audio Video Remote
Control Profile (AVRCP), you can use the player's
remote control to play music stored on the
device.
1. Pair your device with the player.
2. Play music via your device (if it supports
A2DP).
3. Use supplied remote control to control play (if
it supports AVRCP).
• To pause/resume play, press the button on
the remote control.
• To skip to a track, press the / buttons on
the remote control.
28
ENGLISH
Page 29

USB OPERATION _____________________________
• To pause or resume play, press the button on
the remote control.
• To skip to the previous/next file, press the
/ buttons on the remote control.
• Select Repeat/Random Play Options
In USB mode, press the USB button on the remote
control repeatedly to select a REPEAT/SHUFFLE
option play mode.
Repeat one:
Repeat folder:
(if there are multiple folders)
Repeat all:
Shuffle Play:
Repeat off:
Tips:
• The unit can support USB devices with up to 64
GB of memory.
• This unit can play MP3.
• USB file system should be FAT32 or FAT16.
ONE
FOLDER
ALL
SHUFFLE
OFF
ENGLISH
29
Page 30

TROUBLESHOOTING __________________________
To keep the warranty valid, never try to repair the
system yourself. If you encounter problems when
using this unit, check the following points before
requesting service.
No power
• Ensure that the AC cord of the apparatus is
properly connected .
• Ensure that there is power at the AC outlet.
• Press standby button to turn the unit on.
Remote control does not work
• Before you press any playback control button,
first select the correct source.
• Reduce the distance between the remote control
and the unit.
• Insert the battery with its polarities (+/-) aligned
as indicated.
• Replace the battery.
• Aim the remote control directly at the sensor on
the front of the unit.
No sound
• Make sure that the unit is not muted. Press
MUTE or VOL+/- button to resume normal
listening.
• Press on the unit or on the remote control
to switch the soundbar to standby mode. Then
press the button again to switch the soundbar
on.
• Unplug both the soundbar from the mains
socket, then plug them again. Switch on the
soundbar.
• Ensure the audio setting of the input source (e.g.
TV, game console, DVD player, etc.) is set to PCM
or Dolby Digital mode while using digital (e.g.
HDMI, OPTICAL, COAXIAL) connection.
• The unit may not be able to decode all digital
audio formats from the input source. In this
case, the unit will mute. This is NOT a defect.
device is not muted.
TV has display problem while
viewing HDR content from HDMI
source.
• Some 4K HDR TVs require the HDMI input
or picture settings to be set for HDR content
reception. For further setup details on HDR
display, please refer to the instruction manual
of your TV.
I can’t find the Bluetooth name of
this unit on my Bluetooth device
for Bluetooth pairing
• Ensure the Bluetooth function is activated on
your Bluetooth device.
• Ensure you have paired the unit with your
Bluetooth device.
This is a 15 mins power off
function, one of the ERPII
standard requirement for saving
power
• When the unit's external input signal level is too
low, the unit will be turned off automatically in
15 minutes. Please increase the volume level of
your external device.
30
ENGLISH
Page 31
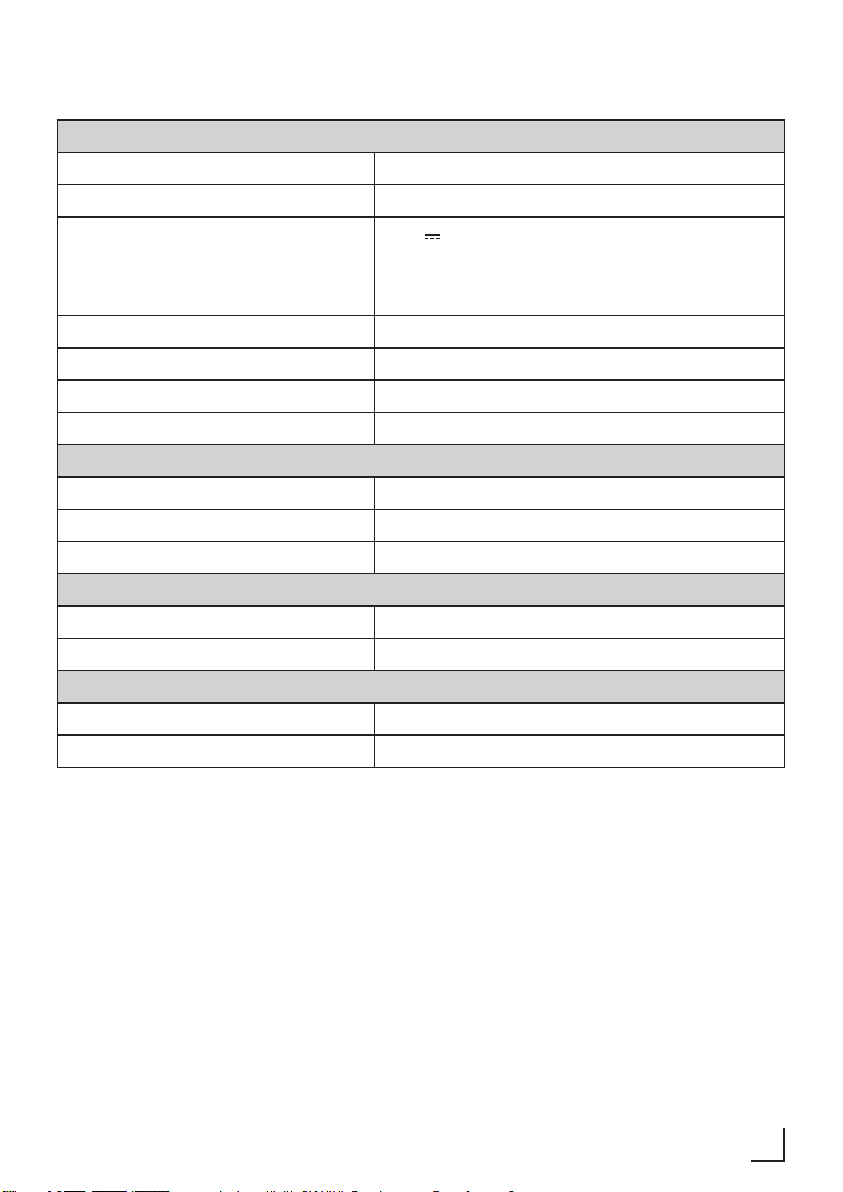
SPECIFICATIONS _____________________________
Soundbar
Power Supply 220-240V~ 50/60Hz
Power Consumption 30W / < 0.5 W (Standby)
5.0 V 0.5 A
USB
Dimension (WxHxD) 880mm x 60mm x 127.5mm
Net weight 3.3 kg
Audio input sensitivity 250mV
Frequency Response 40Hz - 20KHz
Bluetooth/Wireless Specification
Bluetooth Version/profiles V 4.2 (A2DP, AVRCP)
Bluetooth Maximum power transmitted 5 dBm
Bluetooth Frequency bands 2402 MHz ~ 2480 MHz
Amplifier (Total Max. output power)
Total 120W
Impedance 8Ω x 2 + 4Ω
Remote Control
Distance/Angle 6m/30°
Battery type AAA (1.5V x 2)
Hi-Speed USB (2.0)/FAT32/FAT16
64G (max), MP3
ENGLISH
31
Page 32
INFORMATION ______________________________
Compliance with the WEEE
Directive and Disposing of the
Waste Product:
This product complies with EU WEEE Directive
(2012/19/EU). This product bears a classification
symbol for waste electrical and electronic equipment (WEEE).
This symbol indicates that this product
shall not be disposed with other
household wastes at the end of its ser-
vice life. Used device must be returned
to offical collection point for recycling of electrical
and electronic devices. To find these collection systems please contact to your local authorities or
retailer where the product was puchased. Each
household performs important role in recovering
and recycling of old appliance. Appropriate disposal of used appliance helps prevent potential negative consequences for the environment and human
health.
Compliance with RoHS Directive
The product you have purchased complies with EU
RoHS Directive (2011/65/EU). It does not contain
harmful and prohibited materials specified in the
Directive.
Technical Information
This device is noise-suppressed according to the
applicable EU directives. This product fulfils the
European directives 2014/53/EU, 2009/125/EC
and 2011/65/EU.
You can find the CE declaration of conformity for
the device in the form of a pdf file on the Grundig
Homepage www.grundig.com/downloads/doc.
Package information
Packaging materials of the product are
manufactured from recyclable materials
in accordance with our National
Environment Regulations. Do not dispose of the
packaging materials together with the domestic or
other wastes. Take them to the packaging material
collection points designated by the local authorities.
32
ENGLISH
Page 33
SEGURIDAD ________________________________
PRECAUCIÓN
RIESGO DE DESCARGA
ELÉCTRICA; NO ABRIR
PRECAUCIÓN: PARA REDUCIR EL RIESGO DE DESCARGAS ELÉCTRICAS,
NO RETIRE LA CUBIERTA (O LA PARTE POSTERIOR). NO HAY PIEZAS
QUE SEAN REPARABLES POR EL USUARIO EN EL INTERIOR. PARA
REPARACIONES COMUNÍQUESE CON EL SERVICIO TÉCNICO AUTORIZADO.
El símbolo del relámpago con
punta de flecha, dentro de un
triángulo equilátero, tiene por
objeto alertar al usuario de la presencia de
"voltaje peligroso" sin aislar dentro de la
caja del producto que puede ser de
magnitud suficiente como para constituir
un riesgo de descarga eléctrica para las
personas.
El signo de exclamación dentro de
un triángulo equilátero tiene por
objeto advertir al usuario de la
presencia de importantes instrucciones
de funcionamiento y mantenimiento
(servicio) en la literatura que acompaña al
aparato.
Seguridad
• Lea estas instrucciones - Todas
las instrucciones de seguridad y
funcionamiento deben ser leídas antes
de que este producto sea utilizado.
• Guarde estas instrucciones - Las
instrucciones de seguridad y de uso
deben guardarse para poder consultarlas
en el futuro.
• Preste atención a todas las advertencias
- Deben respetarse todas las
advertencias del aparato y del manual
de instrucciones.
• Siga todas las instrucciones - Deben
seguirse todas las instrucciones de
funcionamiento y de uso.
• No utilice este aparato cerca del agua -
El aparato no debe utilizarse cerca del
agua o de la humedad - por ejemplo,
en un sótano húmedo o cerca de una
piscina y similares.
• Límpielo sólo con un paño seco.
• No bloquee ninguna de las aberturas de
ventilación.
• Instale el aparato de acuerdo con las
instrucciones del fabricante.
• No lo instale cerca de fuentes de
calor como radiadores, calentadores,
estufas u otros aparatos (incluidos los
amplificadores) que produzcan calor.
• No anule el propósito de seguridad del
enchufe polarizado o con conexión a
tierra. Un enchufe polarizado tiene dos
clavijas, una más ancha que la otra.
Un enchufe con conexión a tierra tiene
dos patas y una tercera clavija con
conexión a tierra. La clavija ancha o la
tercera clavija se proporciona para su
seguridad. Si el enchufe suministrado no
encaja en su toma de corriente, consulte
a un electricista para que sustituya la
toma de corriente obsoleta.
• Proteja el cable de alimentación para que
no lo pisen o lo aprieten, especialmente
en los enchufes, los receptáculos de
conveniencia y el punto en el que salen
del aparato.
• Utilice únicamente los accesorios
ESPAÑOL
33
Page 34

SEGURIDAD ________________________________
especificados por el fabricante.
• Utilícelo sólo con el carro,
soporte, trípode, soporte o
mesa especificados por el
fabricante, o vendidos con el aparato.
Cuando se utilice un carro o un soporte,
tenga cuidado al mover la combinación
carro/aparato para evitar lesiones por
vuelco.
• Desenchufe el aparato durante las
tormentas eléctricas o cuando no
lo utilice durante largos períodos de
tiempo.
• Remita todas las tareas de
mantenimiento a personal cualificado.
Será necesario realizar una reparación
cuando el aparato haya sufrido algún
tipo de daño, como por ejemplo si el
cable de alimentación o el enchufe están
dañados, si se ha derramado líquido o
han caído objetos en el aparato, si la
unidad ha sido expuesta a la lluvia o a la
humedad, si no funciona normalmente o
si se ha caído.
• Este equipo es un aparato eléctrico de
clase II o de doble aislamiento. Ha
sido diseñado de tal manera que no
requiere una conexión de seguridad a la
tierra eléctrica.
• El aparato no estará expuesto a goteo o
salpicaduras. No se colocarán sobre el
aparato objetos llenos de líquidos, como
jarrones.
• La distancia mínima alrededor del
aparato para que haya suficiente
ventilación es de 5 cm.
• La ventilación no debe impedirse
cubriendo las aberturas de ventilación
con artículos como periódicos, manteles,
cortinas, etc...
• No se deben colocar en el aparato
fuentes de llamas desnudas, como velas
encendidas.
• Las baterías deben ser recicladas
o eliminadas según las directrices
estatales y locales.
• El uso de los aparatos en climas
moderados.
Precaución
• El uso de controles o ajustes o la
realización de procedimientos distintos a
los descritos en este documento, puede
dar lugar a una exposición peligrosa a la
radiación u otro tipo de funcionamiento
inseguro.
• Para reducir el riesgo de incendio o
descarga eléctrica, no exponga este
aparato a la lluvia o la humedad. El
aparato no debe exponerse a goteos
ni salpicaduras y no deben colocarse
objetos llenos de líquidos, como
jarrones, sobre el aparato.
• El enchufe de la red/acoplador del
aparato se utiliza como dispositivo
de desconexión, el dispositivo de
desconexión debe permanecer
fácilmente operativo.
• Peligro de explosión si la batería se
cambia incorrectamente. Reemplácela
sólo por una del mismo tipo o
equivalente.
34
ESPAÑOL
Page 35
SEGURIDAD ________________________________
Advertencia
• La batería (pilas o paquete de pilas) no
debe exponerse a un calor excesivo
como el del sol, el fuego o similar.
• Antes de utilizar este sistema,
compruebe el voltaje de este sistema
para ver si es idéntico al voltaje de su
fuente de alimentación local.
• No coloque esta unidad cerca de
campos magnéticos fuertes.
• No coloque esta unidad sobre el
amplificador o el receptor.
• No coloque esta unidad cerca de áreas
húmedas ya que la humedad afectará a
la vida del cabezal láser.
• Si cae algún objeto sólido o líquido en el
sistema, desenchufe el sistema y hágalo
revisar por personal cualificado antes de
seguir utilizándolo.
• No intente limpiar la unidad con
disolventes químicos, ya que esto podría
dañar el acabado. Utilice un paño limpio,
seco o ligeramente húmedo.
• Cuando retire el enchufe de la toma de
corriente, tire siempre directamente del
enchufe, nunca tire del cable.
• Los cambios o modificaciones a esta
unidad que no hayan sido expresamente
aprobados por la parte responsable de
su cumplimiento anularán la autoridad
del usuario para operar el equipo.
• La etiqueta de clasificación está pegada
en la parte inferior o posterior del equipo.
Uso de la batería PRECAUCIÓN
Para evitar fugas en la batería que
puedan provocar lesiones
corporales, daños a la propiedad o daños
al aparato:
• Instale todas las pilas correctamente, +
y - como se indica en el aparato.
• No mezcle las pilas viejas con las
nuevas.
• No mezcle pilas alcalinas, estándar
(Carbono-Zinc) o recargables (Ni-Cd,
Ni- MH, etc.).
• Retire las pilas cuando la unidad no
se utilice durante un largo período de
tiempo.
La marca denominativa y los logotipos
de Bluetooth son marcas registradas
propiedad de Bluetooth SIG,. Inc.
Las Marcas Comerciales Adoptadas
HDMI, HDMI High-Definition Multimedia
Interface, y Logotipo HDMI son marcas
comerciales o marcas registradas de
HDMI Licensing Administrator, Inc. en los
Estados Unidos y otros países.
Dolby, Dolby Atmos y el símbolo de
la doble-D son marcas comerciales
registradas de Dolby Laboratories
Licensing Corporation. Fabricado bajo la
licencia de Dolby Laboratories. Trabajos
confidenciales no publicados. Derechos de
Autor © 2012-2020 Dolby Laboratories.
Todos los derechos reservados.
ESPAÑOL
35
Page 36
PRIMER VISTAZO ____________________________
Estimado cliente,
Le felicitamos por la compra de su nueva barra
de sonido GRUNDIG All-in-One Dolby Atmos DSB
1000/GSB 930.
Por favor, lea atentamente las siguientes notas de
usuario para asegurarse de disfrutar plenamente
del aparato GRUNDIG de calidad durante muchos
años.
¡Un enfoque responsable!
GRUNDIG se centra en las condiciones de trabajo social acordadas
contractualmente con salarios justos
tanto para los empleados internos
como para los proveedores. También
damos gran importancia al uso eficiente de las
materias primas con una continua reducción de
residuos de varias toneladas de plástico cada año.
Además, todos nuestros accesorios están disponibles por lo menos durante 5 años.
Para un futuro que vale la pena vivir.
Grundig.
Controles y partes
Ver la figura de la página 3.
A Unidad principal
1. Sensor del Mando a Distancia
2. Ventana de visualización
3. (ON/OFF) Botón
4. (Fuente) Botón
5. Botones VOL+/-
6. Tornillos del soporte de pared
7. Conector AUX
8. Conector USB
9. Enchufe óptico OPTICAL
10. Enchufe COAXIAL
11. Enchufe de HDMI de salida (HDMI OUT (ARC))
12. Enchufe HDMI 1/HDMI 2
13. Conector AC~
B Mando a distancia
1.
2. Seleccione la función de repro-
3. /
4. BASS +/- Ajusta el nivel de graves.
5. TREBLE +/- Ajusta el nivel de agudos.
6.
VOL +/-
7. VERTICAL /
SURROUND
8. EQ Selecciona el efecto de ecua-
9. DIMMER Ajusta el brillo de la pantalla.
C Cable de corriente AC x1
D 1 cable HDMI
E 1 cable de audio
F 1 cable óptico
G 2 soportes de pared
2 tornillos/tapas de goma
H Pilas AAA x2
Cambie la unidad entre el modo
ON y el modo STANDBY.
ducción.
Saltar a la pista anterior/siguien-
te en modo Bluetooth/USB.
Reproducir/Pausar/Reanudar la
reproducción en modo Bluetooth
/ USB.
Mantenga presionado para activar la función de emparejamiento en modo Bluetooth o desconecte el dispositivo Bluetooth
emparejado existente.
Silenciar o reanudar el sonido.
Aumentar/disminuir el nivel de
volumen.
Ajusta el Encendido/Apagado
del surround.
lizador.
36
ESPAÑOL
Page 37

PREPARACIONES ____________________________
Prepare el control remoto
El mando a distancia suministrado permite manejar la unidad a distancia.
• Incluso si el mando a distancia se maneja
dentro del alcance efectivo de 6 m (19,7 pies),
la operación del mismo puede ser difícil si hay
algún obstáculo entre éste y la unidad.
• Si el mando a distancia se utiliza cerca de
otros productos que generan rayos infrarrojos,
o si se utilizan otros dispositivos de mando a
distancia que utilizan rayos infrarrojos cerca de
la unidad, puede funcionar incorrectamente. A
la inversa, los otros productos pueden funcionar
incorrectamente.
Precauciones relativas a las pilas
• Asegúrate de insertar las baterías con las
polaridades positivas " " y negativas " "
correctas.
• Use baterías del mismo tipo. Nunca use
diferentes tipos de pilas juntas.
• Se pueden utilizar tanto pilas recargables como
no recargables. Consulte las precauciones en
sus etiquetas.
• Tenga cuidado con las uñas al retirar la tapa de
la pila y la batería.
• No deje caer el mando a distancia.
• No permita que nada impacte en el mando a
distancia.
• No derrame agua ni ningún líquido sobre el
mando a distancia.
• No coloque el mando a distancia sobre un objeto
húmedo.
• No coloque el mando a distancia bajo la luz
directa del sol o cerca de fuentes de calor
excesivo.
• Retire la pila del mando a distancia cuando no lo
utilice durante un período de tiempo prolongado,
ya que puede producirse corrosión o fuga de la
pila y provocar lesiones físicas, y/o daños a la
propiedad, y/o fuego.
• No utilice otras baterías que no sean las
especificadas.
• No mezcle las pilas nuevas con las viejas.
• Nunca recargue una pila a menos que se
confirme que es de tipo recargable.
COLOCACIÓN Y MONTAJE ______________________
Colocación normal (opción A)
•
Coloque la barra de sonido en una superficie
nivelada frente al televisor.
Montaje en la pared (opción-B)
Nota:
•
La instalación debe ser llevada a cabo sólo por
personal cualificado. Un montaje incorrecto puede
provocar lesiones personales graves y daños a
la propiedad (si tiene intención de instalar este
producto usted mismo, debe comprobar si hay
instalaciones como cables eléctricos y tuberías
que puedan estar enterradas dentro de la pared).
Es responsabilidad del instalador verificar que la
pared soportará con seguridad la carga total de la
unidad y de los soportes de la pared.
•
Se requieren herramientas adicionales (no
incluidas) para la instalación.
•
No apriete demasiado los tornillos.
•
Guarde este manual de instrucciones para futuras
consultas.
•
Utilice un localizador electrónico de clavos para
comprobar el tipo de pared antes de taladrar y
montar.
ESPAÑOL
37
Page 38

CONEXIÓN _________________________________
Dolby Atmos ®
Dolby Atmos le brinda una experiencia increíble que
no ha experimentado antes con un sonido superior
con toda la riqueza, claridad y potencia del sonido
Dolby.
Para usar Dolby Atmos ®
1. Dolby Atmos® solamente está disponible en
modo HDMI. Para los detalles de la conexión,
consulte "CONEXIÓN HDMI".
Para usar Dolby Atmos® en el modo HDMI 1 y HDMI
2, su televisor tiene que ser compatible con Dolby
Atmos®.
2. Asegúrese de que esté seleccionada la opción
"No Encoding" (Sin codificación) para flujo
de bits en la salida de audio del dispositivo
externo conectado (por ejemplo, reproductor
de DVD Blu-ray, TV, etc.).
3. Al ingresar al formato Dolby Atmos / Dolby
Digital / PCM, la barra de sonido mostrará
DOLBY ATMOS / DOLBY AUDIO / PCM AUDIO.
Consejos:
•
La experiencia completa de Dolby Atmos solo está
disponible cuando Soundbar está conectado a la
fuente a través de un cable HDMI 2.0.
•
La barra de sonido seguirá funcionando cuando
se conecte a través de otros métodos (como un
cable óptico digital), pero estos no pueden admitir
todas las funciones de Dolby. Ante esto, nuestra
recomendación es conectarse a través de HDMI,
para garantizar la compatibilidad total con Dolby.
Modo Demo:
En el modo de espera, mantenga presionado el botón (VOL +) y el botón (VOL -) en la barra de sonido
al mismo tiempo. La barra de sonido se encenderá
y se puede activar el sonido de demostración. El sonido de demostración se reproducirá alrededor de
20 segundos.
Nota:
1. Cuando se active el sonido de demostración,
puede presionar el botón para silenciarlo.
2. Si desea escuchar el sonido de demostración
por más tiempo, puede presionar para
repetir el sonido de demostración.
3. Pulse (VOL +) o (VOL -) para aumentar o
disminuir el nivel de volumen del sonido de
demostración.
4. Pulse el botón para salir del modo de
demostración y la unidad pasará al modo de
espera.
Conexión HDMI
Algunos televisores 4K HDR requieren la configuración de entrada o imagen HDMI para la recepción
de contenido HDR. Para obtener más detalles sobre la configuración de la pantalla HDR, consulte el
Manual de Instrucciones de su televisor.
Usando HDMI para conectar la barra de sonido,
equipo AV y TV:
Método 1: ARC (Canal de retorno de
sonido)
La función ARC (Canal de retorno de sonido) permite
enviar el sonido del televisor compatible con ARC a
la barra de sonido a través de una única conexión
HDMI. Para disfrutar de la función ARC, asegúrate
de que tu televisor sea compatible con HDMI-CEC
y ARC y configúrelo en consecuencia. Cuando esté
correctamente configurado, puede utilizar el control
remoto de su televisor para ajustar la salida de volumen (VOL +/- y MUTE) de la barra de sonido.
•
Conecte el cable HDMI ( incluido ) de la toma
HDMI (ARC) de la unidad a la toma HDMI (ARC) de
su televisor compatible con ARC. A continuación,
pulse el mando a distancia para seleccionar HDMI
ARC.
38
ESPAÑOL
Page 39

CONEXIÓN _________________________________
Consejos:
•
Su televisor debe ser compatible con la función
HDMI-CEC y ARC. HDMI-CEC y ARC deben estar
activadas.
•
El método de configuración de HDMI-CEC y ARC
puede variar según el televisor. Para obtener más
detalles sobre la función ARC, consulte el manual
del propietario.
•
Sólo el cable HDMI 1.4 o de versión superior
puede admitir la función ARC.
•
El ajuste del modo S/PDIF de la salida de sonido
digital de su televisor debe ser PCM o Dolby
Digital.
Método 2: HDMI estándar
•
Si su televisor no es compatible con HDMI ARC,
conecte su barra de sonido al televisor a través de
una conexión HDMI estándar.
Use un cable HDMI (incluido) para conectar el enchufe HDMI OUT (Salida de HDMI) de la barra de
sonido al enchufe HDMI IN (Entrada de HDMI) del
televisor.
Use un cable HDMI (incluido) para conectar la toma
HDMI IN (1 o 2) de la barra de sonido a sus dispositivos externos (por ejemplo, consolas de juegos,
reproductores de DVD y Blu Ray).
Utilice la toma COAXIAL
•
También puede usar el cable COAXIAL (no
incluido) para conectar la toma COAXIAL OUT
(SALIDA DE COAXIAL) del televisor y la toma
COAXIAL de la unidad.
•
Consejo: Es posible que la unidad no pueda
decodificar todos los formatos de audio digital
de la fuente de entrada. En este caso, la unidad
se silenciará. Esto no es un defecto. Asegúrese
de que la configuración de audio de la fuente de
entrada (por ej., TV, consola de juegos, reproductor
de DVD, etc.) esté configurada en PCM o Dolby
Digital (consulte el Manual del usuario del
dispositivo de fuente de entrada para conocer
los detalles de configuración de audio) con la(s)
toma(s) de entrada HDMI/OPTICAL/COAXIAL.
Utilice la toma AUX
•
Utilice un cable de sonido RCA a 3,5 mm (no
incluido) para conectar las tomas de salida de
sonido del televisor a la toma AUX de la unidad.
•
Utilice un cable de sonido de 3,5 mm a 3,5 mm
(incluido) para conectar la toma de auriculares del
televisor o del dispositivo de sonido externo a la
toma AUX de la unidad.
Conectar a la electricidad
Utilice la toma OPTICAL (ÓPTICA)
•
Retire la tapa protectora de la toma OPTICAL,
luego conecte un cable óptico (incluido) a la toma
OPTICAL OUT (SALIDA ÓPTICA) del televisor y
a la toma OPTICAL de la unidad.Retire la tapa
protectora de la toma OPTICAL, luego conecte
un cable OPTICAL (incluido) a la toma OPTICAL
OUT (SALIDA ÓPTICA) del televisor y a la toma
OPTICAL de la unidad.
¡Riesgo de daños al producto!
•
Asegúrese de que el voltaje de la fuente de
alimentación se corresponde con el voltaje
impreso en la parte posterior o inferior de la
unidad.
•
Antes de conectar el cable de alimentación de CA,
asegúrese de que ha completado todas las demás
conexiones.
Barra de sonido
Conecte el cable de alimentación a la toma AC~ de
la unidad principal y luego a una toma de corriente.
ESPAÑOL
39
Page 40

FUNCIONAMIENTO DEL BLUETOOTH ______________
Emparejar dispositivos con
Bluetooth
La primera vez que conecte su dispositivo bluetooth a este reproductor, debe emparejar su dispositivo a este reproductor.
Nota:
• El rango operativo entre este reproductor y un
dispositivo Bluetooth es de aproximadamente
8 metros (sin ningún objeto entre el dispositivo
Bluetooth y la unidad).
• Antes de conectar un dispositivo Bluetooth a esta
unidad, asegúrese de conocer las capacidades
del dispositivo.
• No se garantiza la compatibilidad con todos los
dispositivos Bluetooth.
• Cualquier obstáculo entre esta unidad y un
dispositivo Bluetooth puede reducir el alcance
en el funcionamiento.
• Si la intensidad de la señal es débil, su
receptor Bluetooth puede desconectarse, pero
volverá a ingresar al modo de emparejamiento
automáticamente.
Consejos:
• Ingrese el código "0000" como la contraseña si
se le solicita.
• Si ningún otro dispositivo Bluetooth se empareja
con este reproductor en dos minutos, el
reproductor recuperará su conexión anterior.
• El reproductor también se desconectará cuando
su dispositivo se mueva más allá del rango de
funcionamiento.
• Si desea volver a conectar su dispositivo a este
reproductor, colóquelo dentro del rango de
funcionamiento.
• Si el dispositivo se mueve más allá del rango
operativo, cuando lo devuelva, verifique si el
dispositivo todavía está conectado al reproductor.
• Si se pierde la conexión, siga las instrucciones
anteriores para vincular su dispositivo con el
reproductor nuevamente.
Escuchar música desde un dispositivo
Bluetooth
• Si el dispositivo Bluetooth conectado admite el
Perfil de distribución de audio avanzado (A2DP),
puede escuchar la música almacenada en el
dispositivo a través del reproductor.
• Si el dispositivo también es compatible con
el Perfil de control remoto de audio y video
(AVRCP), puede usar el control remoto del
reproductor para reproducir música almacenada
en el dispositivo.
1. Empareje su dispositivo con el reproductor.
2. Reproduzca música a través de su dispositivo (si es compatible con A2DP).
3. Use el control remoto suministrado para
controlar la reproducción (si es compatible
con AVRCP).
• Para pausar/reanudar la reproducción, pulse el
botón en el control remoto.
• Para saltar una pista, pulse el botón / en
el control remoto.
40
ESPAÑOL
Page 41

FUNCIONAMIENTO USB ________________________
• Para pausar o reanudar la reproducción, pulse el
botón en el control remoto.
• Para saltar al archivo anterior / siguiente, pulse
los botones / en el control remoto.
• Seleccione las opciones de repetición /
reproducción aleatoria
En modo USB, pulse el botón USB en el control
remoto varias veces para seleccionar un modo
de reproducción opcional REPEAT/SHUFFLE
(REPETIR/ALEATORIO).
Repetir uno:
Repetir carpeta:
(en caso de contener varias carpetas)
Repetir todo:
Reproducción aleatoria:
Repetir apagado:
Consejos:
• La unidad puede admitir dispositivos USB con
hasta 64 GB de memoria.
• Esta unidad puede reproducir MP3.
• El sistema de archivos USB debe ser FAT32 o
FAT16.
ONE
FOLDER
ALL
SHUFFLE
OFF
ESPAÑOL
41
Page 42

SOLUCIÓN DE PROBLEMAS _____________________
Para mantener la garantía válida, nunca intente reparar el sistema usted mismo. Si encuentra problemas al
utilizar esta unidad, compruebe los siguientes puntos
antes de solicitar el servicio.
Sin corriente
•
Asegúrese de que el cable de CA del aparato esté
conectado correctamente.
•
Asegúrese de que haya energía en la toma de
corriente alterna.
•
Pulse el botón de espera para encender la unidad.
El control remoto no funciona
•
Antes de presionar cualquier botón de control de
reproducción, primero seleccione la fuente correcta.
•
Reduzca la distancia entre el control remoto y la
unidad.
•
Inserte la batería con sus polaridades (+/-) alineadas
como se indica.
•
Sustitución de las pilas.
•
Apunte el control remoto directamente al sensor en
la parte frontal de la unidad.
No hay sonido
•
Asegúrese de que la unidad no esté silenciada.
Pulse el botón MUTE o VOL +/- para reanudar la
sonorización.
•
Pulse en la unidad o en el control remoto para
cambiar la barra de sonido al modo de espera. Luego
pulse el botón nuevamente para encender la barra
de sonido.
•
Desenchufe la barra de sonido de la toma de
corriente, luego vuelva a enchufarlos. Encienda la
barra de sonido.
•
Asegúrese de que la configuración de audio de la
fuente de entrada (por ejemplo, TV, consola de
juegos, reproductor de DVD, etc.) esté configurada en
modo PCM o Dolby Digital mientras usa la conexión
digital (por ejemplo, HDMI, OPTICAL, COAXIAL).
•
Es posible que la unidad no pueda decodificar todos
los formatos de audio digital de la fuente de entrada.
En este caso, la unidad se silenciará. Esto NO es un
defecto. El dispositivo no está silenciado.
El televisor tiene un problema de
visualización al ver contenido HDR
desde una fuente HDMI.
•
Algunos televisores 4K HDR requieren la configuración
de entrada o imagen HDMI para la recepción de
contenido HDR. Para obtener más detalles sobre la
configuración de la pantalla HDR, consulte el Manual
de Instrucciones de su televisor.
No puedo encontrar el nombre de
Bluetooth de esta unidad en mi
dispositivo Bluetooth para emparejar
Bluetooth
•
Asegúrese de que la función Bluetooth esté activada
en su dispositivo Bluetooth.
•
Asegúrese de haber emparejado la unidad con su
dispositivo Bluetooth.
Esta es una función de apagado de
15 minutos, uno de los requisitos
estándar de ERPII para ahorrar
energía
•
Cuando el nivel de señal de entrada externa de la
unidad es demasiado bajo, la unidad se apagará
automáticamente en 15 minutos. Aumente el nivel
de volumen de su dispositivo externo.
42
ESPAÑOL
Page 43
ESPECIFICACIONES __________________________
Barra de sonido
Corriente eléctrica 220-240 V~ 50/60Hz
Consumo de energía 30W / < 0,5 W (En modo de espera)
5,0 V 0,5 A
USB
Dimensiones (Anchura x Altura x
Profundidad)
Peso neto 3,3 kg
Sensibilidad de la entrada de sonido 250mV
Respuesta de frecuencia 40Hz - 20KHz
Especificación Inalámbrica/Bluetooth
Versión/Perfiles Bluetooth V 4.2 (A2DP, AVRCP)
Potencia máxima transmitida de Bluetooth 5 dBm
Bandas de frecuencia Bluetooth 2402 MHz ~ 2480 MHz
Amplificador (Potencia de salida máxima total)
Total 120W
Impedancia 8Ω x 2 + 4Ω
Mando a distancia
Distancia/ángulo 6m/30°
Tipo de batería AAA (1.5V x 2)
USB de alta velocidad (2.0)/FAT32/FAT16
64G (máx), MP3
880mm x 60mm x 127,5mm
ESPAÑOL
43
Page 44
INFORMACIÓN ______________________________
Conformidad con la normativa
WEEE y eliminación del aparato al
final de su vida útil:
Este producto es conforme con la directiva de la
UE sobre residuos de aparatos eléctricos y electrónicos (WEEE) (2012/19/UE). Este producto incorpora el símbolo de la clasificación selectiva para
los residuos de aparatos eléctricos y electrónicos
(WEEE).
Este símbolo indica que este producto
no debe eliminarse con otros desechos
domésticos al final de su vida útil. El
dispositivo usado debe ser devuelto al
punto de recogida oficial para el reciclaje de los dispositivos eléctricos y electrónicos.
Para encontrar estos sistemas de recogida, por
favor, póngase en contacto con las autoridades
locales o con el distribuidor donde se compró el
producto. Cada hogar desempeña un papel importante en la recuperación y el reciclaje de los aparatos antiguos. La eliminación adecuada de los
aparatos usados ayuda a prevenir las posibles
consecuencias negativas para el medio ambiente
y la salud humana.
otro tipo. Llévelos a los puntos de recogida de
material de embalaje designados por las
autoridades locales.
Información Técnica
Este dispositivo tiene supresión de ruido de acuerdo con las Directivas de la UE aplicables. Este
producto cumple con las directivas europeas
2014/53/EU, 2009/125/EC y 2011/65/EU.
Puede encontrar la declaración de conformidad
CE para el dispositivo en forma de archivo pdf en
la página principal de Grundig www.grundig.com/
downloads/doc.
Cumplimiento de la directiva
RoHS:
El producto que ha adquirido es conforme con la
directiva de la UE sobre la restricción de sustancias peligrosas (RoHS) (2011/65/EU). No contiene
ninguno de los materiales nocivos o prohibidos
especificados en la directiva.
Información de embalaje
El embalaje del producto está fabricado
con material reciclable de acuerdo con
las normativas nacionales sobre medio
ambiente. No se deshaga del material
de embalaje ni de los desechos domésticos o de
44
ESPAÑOL
Page 45
SÉCURITÉ __________________________________
ATTENTION
RISQUE DE CHOC ÉLECTRIQUE
NE PAS OUVRIR
ATTENTION! POUR REDUIRE TOUT RISQUE DELECTROCUTION,
NE PAS RETIRER LE COUVERCLE ARRIERE. LENTRETIEN DES
PIECES INTERNES EST INTERDIT AUX UTILISATEURS. VEUILLEZ
CONFIER L’ENTRETIEN A UN PERSONNEL QUALIFIÉ.
Cet éclair avec un symbole en forme
de flèche à l'intérieur d'un triangle
équilatéral est destiné à alerter l'utilisateur
de la présence d'une « tension dangereuse »
non isolée dans l'enceinte du produit, qui
peut être d'une amplitude suffisante pour
constituer un risque de choc électrique.
Le point d'exclamation situé dans le
triangle équilatéral a pour objectif
d'alerter l'utilisateur de la présence
d'importantes instructions de fonctionnement
et de maintenance dans la littérature
accompagnant l'appareil.
Sécurité
•
Lisez ces instructions - Toutes les
instructions de sécurité et d'utilisation
doivent être lues avant d'utiliser ce produit.
•
Conservez ces instructions - Les
instructions de sécurité et d'utilisation
doivent être conservées pour référence
ultérieure.
•
Tenez compte de tous les avertissements
- Tous les avertissements figurant
sur l'appareil et dans les instructions
d'utilisation doivent être respectés.
•
Respectez toutes les instructions -
Toutes les instructions d'utilisation et de
fonctionnement doivent être respectées.
•
N'utilisez pas cet appareil à proximité de
l'eau - L'appareil ne doit pas être utilisé
à proximité de l'eau ou de l'humidité,
par exemple dans une cave humide ou à
proximité d'une piscine, etc.
•
Cet appareil peut être utilisé par des
enfants âgés d’au moins 8 ans et par
des personnes ayant des capacités
physiques, sensorielles ou mentales
réduites ou dénuées d’expérience ou
de connaissance, s’ils (si elles) sont
correctement surveillé(es) ou si des
instructions relatives à l’utilisation de
l’appareil en toute sécurité leur ont été
données et si les risques encourus ont
été appréhendés. Les enfants ne doivent
pas jouer avec l’appareil. Le nettoyage
et l’entretien par l’usager de doivent
pas être effectués par des enfants sans
surveillance.
•
Nettoyez-le uniquement avec un chiffon
sec.
•
N'obstruez pas les ouvertures de
ventilation.
•
Installez l'appareil conformément aux
instructions du fabricant.
•
N'installez pas à proximité de sources de
chaleur telles que radiateurs, appareils de
chauffage, poêles ou autres appareils (y
compris les amplificateurs) qui produisent
de la chaleur.
•
Ne contrecarrez pas l’objectif de sécurité
FRANÇAIS
45
Page 46

SÉCURITÉ __________________________________
de la fiche polarisée ou de la fiche de terre.
Une fiche polarisée a deux lames dont
l'une est plus large que l'autre. Une fiche
de terre a deux lames et une troisième
broche de mise à la terre. La lame large ou
la troisième broche est prévue pour votre
sécurité. Si la fiche fournie ne s'adapte
pas à votre prise de courant, consultez
un électricien pour remplacer la prise
obsolète.
•
Protégez le cordon d'alimentation pour
éviter qu'on marche dessus ou qu'il soit
pincé, en particulier au niveau des fiches,
des prises de courant et du point de sortie
de l'appareil.
•
Utilisez uniquement les accessoires
spécifiés par le fabricant.
•
Utilisez uniquement le chariot, le
support, le trépied, la console
ou la table spécifiés par le
fabricant, ou vendus avec l'appareil.
Lorsqu'un chariot ou un support est utilisé,
soyez prudent lorsque vous déplacez la
combinaison chariot/appareil afin d'éviter
les blessures dues au renversement.
•
Débranchez l'appareil pendant les orages
ou lorsqu'il n'est pas utilisé pendant une
longue période.
•
Confiez l'entretien de l'appareil à un
personnel qualifié. L'entretien est
nécessaire lorsque l'appareil a été
endommagé de quelque manière que
ce soit, par exemple lorsque le cordon
d'alimentation ou la fiche est endommagé,
lorsqu'un liquide a été renversé ou que
des objets sont tombés dans l'appareil,
lorsque l'appareil a été exposé à la pluie
ou à l'humidité, lorsqu'il ne fonctionne pas
normalement ou lorsqu'il est tombé.
•
Cet appareil est un appareil électrique
de classe II ou à double isolation. Il a été
conçu de telle manière qu'il ne nécessite
pas de connexion de sécurité à la terre.
•
L'appareil ne doit pas être exposé à des
gouttes ou à des éclaboussures. Aucun
objet rempli de liquide, tel qu'un vase, ne
doit être placé sur l'appareil.
•
La distance minimale autour de l'appareil
pour une ventilation suffisante est de 5
cm.
•
Veillez à ne pas gêner l'aération en
couvrant les ouvertures avec des journaux,
une nappe, un rideau, etc.
•
Ne placez aucune flamme nue, par exemple
une bougie allumée, sur l’appareil.
•
Les piles doivent être recyclées ou
éliminées conformément aux directives
nationales et locales.
•
L'utilisation d'appareils dans des climats
modérés.
Attention
•
L'utilisation de contrôles ou d'ajustements
ou l'exécution de procédures autres que
celles décrites dans le présent document
peuvent entraîner une exposition
dangereuse aux radiations ou une autre
opération dangereuse.
46
FRANÇAIS
Page 47

SÉCURITÉ __________________________________
•
•
Pour réduire le risque d'incendie ou de
choc électrique, n'exposez pas cet appareil
à la pluie ou à l'humidité. L'appareil ne doit
pas être exposé à des gouttes ou à des
éclaboussures et les objets remplis de
liquides, tels que les vases, ne doivent pas
être placés sur l'appareil.
•
La fiche secteur/le coupleur de
l'appareil est utilisé comme dispositif de
déconnexion, le dispositif de déconnexion
doit rester facilement utilisable.
•
Danger d'explosion si la pile n'est pas
correctement remplacée. Remplacez-la
uniquement par une pile de type identique
ou équivalent.
Avertissement
•
La pile (piles ou bloc-piles) ne doit pas être
exposée à une chaleur excessive telle que
le soleil, le feu ou autre.
•
Avant d'utiliser ce système, vérifiez sa
tension pour voir si elle est identique à
celle de votre alimentation électrique
locale.
•
Ne placez pas cet appareil à proximité de
champs magnétiques forts.
•
Ne placez pas cet appareil sur
l'amplificateur ou le récepteur.
•
Ne placez pas cet appareil à proximité de
zones humides, car l'humidité affectera la
durée de vie de la tête laser.
•
Si un objet solide ou un liquide tombe
dans le système, débranchez le système et
faites-le vérifier par un personnel qualifié
avant de continuer à l'utiliser.
N'essayez pas de nettoyer l'appareil avec
des solvants chimiques, car cela pourrait
endommager la finition. Utilisez un chiffon
propre, sec ou légèrement humide.
•
Lorsque vous retirez la fiche d'alimentation
de la prise murale, tirez toujours
directement sur la fiche, ne tirez jamais
sur le cordon.
•
Tout changement ou modification de cet
appareil non expressément approuvé par
la partie responsable de la conformité
annulera l'autorité de l'utilisateur à faire
fonctionner l'appareil.
•
L'étiquette de classification est collée sur
le fond ou le dos de l'équipement.
FRANÇAIS
47
Page 48

SÉCURITÉ __________________________________
ATTENTION Utilisation de la pile
Pour éviter les fuites de piles qui
peuvent entraîner des blessures
corporelles, des dommages matériels ou
des dégâts à l'appareil :
•
Installez toutes les piles correctement, +
et - comme indiqué sur l'appareil.
•
Ne mélangez pas les piles neuves et les
piles usagées.
•
Ne mélangez pas de piles alcalines,
standard (carbone-zinc) ou rechargeables
(Ni-Cd, Ni-MH, etc.).
•
Retirez les piles lorsque l'appareil n'est
pas utilisé pendant une longue période.
La marque verbale et les logos Bluetooth sont
des marques déposées appartenant à Bluetooth
SIG,. Inc.
Dolby, Dolby Atmos et le symbole du double
D sont des marques déposées de Dolby
Laboratories Licensing Corporation. Fabriqué
sous licence des Laboratoires Dolby. Œuvres
confidentielles non publiées. Copyright ©
2012-2020 Dolby Laboratories. Tous droits
réservés.
Les marques commerciales adoptées HDMI,
HDMI High-Definition Multimedia Interface et
le logo HDMI sont des marques commerciales
ou des marques déposées de HDMI Licensing
Administrator, Inc. aux États-Unis et dans
d'autres pays.
48
FRANÇAIS
Page 49

EN BREF : __________________________________
Cher client,
Félicitations pour l'achat de votre nouvelle barre
de son multimédia GRUNDIG DSB 1000/GSB 930.
Veuillez lire attentivement les notes d'utilisation
suivantes afin de pouvoir profiter pleinement de
votre produit GRUNDIG de qualité pendant de
nombreuses années.
Une approche responsable !
GRUNDIG se concentre sur des conditions de travail sociales convenues
par contrat, avec des salaires équitables pour les employés internes et
les fournisseurs. Nous attachons
également une grande importance à l'utilisation
efficace des matières premières avec une réduction continue des déchets de plusieurs tonnes de
plastique chaque année. De plus, tous nos accessoires sont disponibles pendant au moins 5 ans.
Pour un avenir qui vaut la peine d'être vécu.
Grundig.
Commandes et pièces
Voir le schéma de la page 3.
A Unité principale
1. Capteur de télécommande
2. Fenêtre d'affichage
3. Bouton marche/arrêt
4. Bouton source
5. Boutons VOL+/-
6. Vis du support mural
7. Prise AUX
8. Prise USB
9. Prise OPTIQUE
10. Prise COAXIALE
11. Prise HDMI OUT (ARC)
12. Prise HDMI 1/HDMI 2
13. Prise ~ AC
B Télécommande
1
2 Sélectionner la source de lec-
3. /
4 BASS +/- Ajuster le niveau des basses.
5 TREBLE +/- Ajuster le niveau des basses.
6
VOL +/-
7. VERTICAL/
SURROUND
8 EQ Sélectionner l'effet
9 VARIATEUR Ajustez la luminosité de l'écran.
C Cordon d'alimentation CA x1
D Câble HDMI x1
E Câble audio x1
F Câble optique x1
G Support mural x2
Vis/Chevilles x2
H Piles AAA x2
Basculer l'appareil entre le
mode ON et le mode STANDBY.
ture.
Passer à la piste précédente/
suivante en mode Bluetooth/
USB.
Lecture/pause/reprise de la
lecture en mode Bluetooth/
USB.
Maintenir la touche enfoncée
pour activer la fonction de
couplage en mode Bluetooth
ou pour déconnecter l'appareil
Bluetooth couplé existant.
Couper ou reprendre le son.
Augmenter ou diminuer le ni-
veau du volume.
Ajuster l'activation/désactivati-
on de l'environnement sonore.
d'égalisation (EQ)
FRANÇAIS
49
Page 50

PREPARATIONS _____________________________
Préparer la télécommande
La télécommande fournie permet de faire fonctionner l'appareil à distance.
•
Même si la télécommande est utilisée dans la
portée effective de 6 mètres, le fonctionnement
de la télécommande peut être impossible
s'il y a des obstacles entre l'appareil et la
télécommande.
•
Si la télécommande est utilisée à proximité
d'autres produits qui génèrent des rayons
infrarouges, ou si d'autres dispositifs de
commande à distance utilisant des rayons
infrarouges sont utilisés à proximité de l'unité,
elle peut fonctionner de manière incorrecte.
Inversement, les autres produits peuvent
fonctionner de manière incorrecte.
Précautions concernant les piles
•
Veillez à insérer les piles en respectant les
polarités positives “ ” et négatives “ ”.
•
Utilisez des piles du même type. N'utilisez jamais
différents types de piles ensemble.
•
Vous pouvez utiliser des piles rechargeables
ou non rechargeables. Reportez-vous aux
précautions figurant sur leurs étiquettes.
•
Faites attention à vos ongles lorsque vous retirez
le couvercle et la pile.
•
Ne faites pas tomber la télécommande.
•
Ne laissez rien heurter la télécommande.
•
Ne renversez pas d'eau ou de liquide sur la
télécommande.
•
Ne posez pas la télécommande sur un objet
humide.
•
Ne placez pas la télécommande sous la lumière
directe du soleil ou à proximité de sources de
chaleur excessive.
•
Retirez les piles de la télécommande lorsqu'elle
n'est pas utilisée pendant une longue période,
car la corrosion ou la fuite les piles peuvent se
produire et entraîner des blessures physiques, et/
ou des dommages matériels, et/ou un incendie.
•
N'utilisez pas d'autres piles que celles spécifiées.
•
Ne mélangez pas des piles neuves avec des piles
usagées.
•
Ne rechargez jamais une pile à moins qu'il soit
confirmé qu'elle est de type rechargeable.
PLACEMENT ET MONTAGE _____________________
Placement normal (option A)
• Placez la barre de son sur une surface nivelée
devant la télévision.
Montage mural (option-B)
Remarque :
• L'installation doit être effectuée par du personnel
qualifié uniquement. Un montage incorrect peut
entraîner de graves blessures et des dommages
matériels (si vous avez l'intention d'installer ce
produit vous-même, vous devez vérifier si des
installations telles que le câblage électrique
et la plomberie peuvent être enfouies dans le
50
FRANÇAIS
mur). Il incombe à l'installateur de vérifier que le
mur supportera sans danger la charge totale de
l'appareil et des supports muraux
• Des outils supplémentaires (non inclus) sont
nécessaires pour l'installation.
• Ne serrez pas trop les vis.
• Conservez ce manuel d'instructions pour pouvoir
vous y référer ultérieurement.
• Utilisez un détecteur électronique de goujons
pour vérifier le type de mur avant de percer et
de monter.
Page 51

CONNEXION ________________________________
Dolby Atmos ®
Dolby Atmos vous fait vivre une expérience incroyable que vous n'avez jamais vécue auparavant
grâce à un son aérien, et à toute la richesse, la
clarté et la puissance du son Dolby.
Pour l'utilisation du Dolby Atmos ®
1. Dolby Atmos® est disponible uniquement en
mode HDMI. Pour les détails de la connexion,
veuillez vous référer à la section « CONNEXION HDMI ».
Pour utiliser Dolby Atmos® en mode HDMI 1 et
HDMI 2, votre téléviseur doit être compatible avec
Dolby Atmos®.
2. Assurez-vous que « No Encoding » (Pas
d'encodage) est sélectionné pour le flux
binaire dans la sortie audio de l'appareil
externe connecté (par exemple, un lecteur
DVD Blu-ray, un téléviseur, etc.).
3. En entrant au format Dolby Atmos/Dolby
Digital/PCM, la barre de son affichera DOLBY
ATMOS/DOLBY AUDIO/PCM AUDIO.
Conseils :
• L'expérience Dolby Atmos complète n'est
disponible que lorsque la barre de son est
connectée à la source via un câble HDMI 2.0.
• La barre de son fonctionnera toujours lorsqu'elle
est connectée par d'autres méthodes (comme
un câble optique numérique), mais celles-ci
ne peuvent pas prendre en charge toutes
les fonctions Dolby. C'est pourquoi nous
recommandons de se connecter via HDMI, afin
de garantir une prise en charge complète du
Dolby.
Mode démo :
En mode veille, appuyez simultanément sur les
boutons (VOL +) et (VOL -) de la barre de son. La
barre de son s'allume et le son de démonstration
peut être activé. Le son de la démo jouera environ
20 secondes.
Remarque :
1. Lorsque le son de démonstration est activé,
vous pouvez appuyer le bouton pour le
mettre en sourdine.
2. Si vous voulez écouter le son de démonstration plus longtemps, vous pouvez appuyer
sur pour répéter le son de démonstration.
3. Appuyer sur (VOL +) ou (VOL -) pour augmenter ou diminuer le niveau de volume du
son de démonstration.
4. Appuyer sur le bouton pour quitter le
mode démo et l'appareil se mettra en mode
veille.
Connexion HDMI
Certains téléviseurs HDR 4K nécessitent que
l'entrée HDMI ou les paramètres de l'image soient réglés pour la réception de contenu HDR. Pour
plus de détails sur la configuration de l'affichage
HDR, veuillez vous référer au manuel d'utilisation
de votre téléviseur.
Utilisation du HDMI pour connecter la barre de son,
l'équipement audiovisuel et la télévision :
Méthode 1 : ARC (Audio Return Channel)
La fonction ARC (canal de retour audio) vous permet d'envoyer l'audio de votre téléviseur compatible ARC à votre barre de son via une simple
connexion HDMI. Pour profiter de la fonction ARC,
veuillez vous assurer que votre téléviseur est à la
fois compatible HDMI-CEC et ARC et configuré en
conséquence. Lorsque la configuration est correcte, vous pouvez utiliser la télécommande de votre
téléviseur pour régler le volume de sortie (VOL +/et MUTE) de la barre audio.
•
Connectez le câble HDMI (inclus) de la prise HDMI
(ARC) de l'appareil à la prise HDMI (ARC) de votre
téléviseur compatible ARC. Appuyez ensuite sur
la télécommande pour sélectionner HDMI ARC.
FRANÇAIS
51
Page 52

CONNEXION ________________________________
Conseils :
• Votre téléviseur doit prendre en charge la
fonction HDMI-CEC et ARC. Les fonctions HDMICEC et ARC doivent être réglées sur On.
• La méthode de réglage des fonctions HDMI-
CEC et ARC peut varier selon le téléviseur. Pour
plus de détails sur la fonction ARC, veuillez vous
référer au manuel d'utilisation.
• Seul le câble HDMI 1.4 ou une version supérieure
peut prendre en charge la fonction ARC.
• Le mode S/PDIF de la sortie sonore numérique
de votre téléviseur doit être réglé sur PCM ou
Dolby Digital.
Méthode 2 : HDMI standard
• Si votre téléviseur n'est pas conforme à la norme
HDMI ARC, connectez votre barre de son au
téléviseur via une connexion HDMI standard.
Utiliser un câble HDMI (inclus) pour connecter la
prise HDMI OUT de la barre de son à la prise HDMI
IN du téléviseur.
Utiliser un câble HDMI (inclus) pour connecter la
prise HDMI IN (1 ou 2) de la barre de son à vos
appareils externes (par exemple, consoles de jeux,
lecteurs DVD et blu ray).
Utiliser la prise OPTIQUE
• Retirez le capuchon de protection de la prise
OPTIQUE, puis connectez un câble OPTIQUE
(inclus) à la prise OPTICAL OUT du téléviseur et
à la prise OPTIQUE de l'appareil.
Utiliser la prise COAXIALE
• Vous pouvez également utiliser un câble
COAXIAL (non fourni) pour brancher la prise
COAXIAL OUT du téléviseur et la prise COAXIALE
de l'appareil.
• Astuce : L'appareil peut ne pas être capable de
décoder tous les formats audio numériques à
partir de la source d'entrée. Dans ce cas, l'unité
sera mise en sourdine. Ce n'est pas un défaut.
Assurez-vous que le réglage audio de la source
d'entrée (par exemple, télévision, console de
jeux, lecteur DVD, etc.) est réglé sur PCM ou
Dolby Digital (consultez le manuel d'utilisation
de l'appareil source d'entrée pour les détails
du réglage audio) avec entrée HDMI/OPTICAL/
COAXIAL.
Utilisez la prise AUX
• Utilisez un câble audio RCA à 3,5 mm (non
fourni) pour relier les prises de sortie audio du
téléviseur à la prise AUX de l'appareil.
• Utilisez un câble audio de 3,5 mm à 3,5 mm
(inclus) pour connecter la prise casque du
téléviseur ou d'un appareil audio externe à la
prise AUX de l'appareil.
Connecter l'alimentation
Risque d'endommagement du produit !
• Assurez-vous que la tension d'alimentation
correspond à la tension imprimée au dos ou au
dessous de l'appareil.
• Avant de brancher le cordon d'alimentation,
assurez-vous d'avoir effectué tous les autres
branchements.
Barre de son
Branchez le câble d'alimentation à la prise AC~
de l'appareil principal, puis dans une prise de courant.
52
FRANÇAIS
Page 53

FONCTIONNEMENT DU BLUETOOTH ______________
Jumelage de dispositifs Bluetooth
La première fois que vous connectez votre appareil
bluetooth à ce lecteur, vous devez coupler votre
appareil à ce lecteur.
Remarque :
• La portée opérationnelle entre ce lecteur et
un appareil Bluetooth est d'environ 8 mètres
(sans aucun objet entre l'appareil Bluetooth et
l'appareil).
• Avant de connecter un appareil Bluetooth à cette
unité, assurez-vous de connaître les capacités
de l'appareil.
• La compatibilité avec tous les appareils
Bluetooth n'est pas garantie.
• Tout obstacle entre cet appareil et un appareil
Bluetooth peut réduire la portée opérationnelle.
• Si la puissance du signal est faible, votre
récepteur Bluetooth peut se déconnecter, mais
il repasse automatiquement en mode jumelage.
Conseils :
• Entrez « 0000 » pour le mot de passe si
nécessaire.
• Si aucun autre appareil Bluetooth ne se couple
avec ce lecteur dans les deux minutes, le lecteur
récupère sa connexion précédente.
• Le lecteur sera également déconnecté lorsque
votre appareil sera déplacé au-delà de la portée
opérationnelle.
• Si vous voulez reconnecter votre appareil à ce
lecteur, placez-le dans le rayon d'action.
• Si l'appareil est déplacé au-delà de la portée
opérationnelle, lorsqu'il est ramené, veuillez
vérifier si l'appareil est toujours connecté au
lecteur.
• Si la connexion est perdue, suivez les instructions
ci-dessus pour coupler à nouveau votre appareil
au lecteur.
Écouter de la musique à partir d'un
appareil Bluetooth
• Si l'appareil Bluetooth connecté prend en charge
le profil A2DP (Advanced Audio Distribution
Profile), vous pouvez écouter la musique stockée
sur l'appareil via le lecteur.
• Si l'appareil prend également en charge le
Audio Video Remote Control Profile (Profil de
télécommande audio-vidéo - AVRCP), vous
pouvez utiliser la télécommande du lecteur pour
lire la musique stockée sur l'appareil.
1. Jumeler votre appareil avec le lecteur.
2. Écouter de la musique via votre appareil (s'il
prend en charge l'A2DP).
3. Utilisez la télécommande fournie pour
contrôler la lecture (si elle prend en charge
l'AVRCP).
• Pour mettre en pause/reprendre la lecture,
appuyez sur le bouton de la télécommande.
• Pour passe une piste, appuyez sur les touches
/ de la télécommande.
FRANÇAIS
53
Page 54

FONCTIONNEMENT USB _______________________
• Pour mettre en pause ou reprendre la lecture,
appuyez sur le bouton de la télécommande.
• Pour passer au fichier précédent ou suivant,
appuyez sur les touches / de la
télécommande.
• Sélectionnez les options de Repeat/Random Play
En mode USB, appuyez plusieurs fois sur la touche USB de la télécommande pour sélectionner un
mode de lecture avec l'option REPEAT/SHUFFLE.
Répéter une fois :
Répéter le dossier :
(s'il y a plusieurs dossiers)
Répéter tout :
Lecture aléatoire :
Répétez la procédure d'arrêt :
Conseils :
• L'unité peut prendre en charge des dispositifs
USB avec une mémoire allant jusqu'à 64 Go.
• Cet appareil peut lire les MP3.
• Le système de fichiers USB doit être FAT32 ou
FAT16.
ONE
FOLDER
ALL
SHUFFLE
OFF
54
FRANÇAIS
Page 55

DÉPANNAGE ________________________________
Pour que la garantie reste valable, n'essayez jamais
de réparer le système vous-même. Si vous rencontrez des problèmes lors de l'utilisation de cet appareil, vérifiez les points suivants avant de demander
une réparation.
L'appareil n'est pas alimenté
•
Assurez-vous que le cordon d'alimentation de
l'appareil soit correctement branché.
•
Assurez-vous qu'il y a du courant à la source
d'alimentation.
•
Appuyez sur le bouton de veille pour mettre
l'appareil en marche.
La télécommande ne fonctionne pas
•
Avant d'appuyer sur un bouton de commande de
lecture, sélectionnez d'abord la source correcte.
•
Réduire la distance entre la télécommande et
l'appareil.
•
Insérer les piles avec ses polarités (+/-) alignées
comme indiqué.
•
Remplacez-les.
•
Pointez la télécommande directement sur le
capteur situé à l'avant de l'appareil.
Pas de son
•
Veillez à ce que l'unité ne soit pas mise en
sourdine. Appuyer ur la touche MUTE ou VOL+/pour reprendre l'écoute normale.
•
Appuyer sur sur l'appareil ou sur la
télécommande pour mettre la barre de son en
mode veille. Appuyer ensuite à nouveau sur le
bouton pour activer la barre de son.
•
Débrancher la barre de son de la prise de courant,
puis rebranchez-la. Allumer la barre de son.
•
Assurez-vous que le réglage audio de la source
d'entrée (par exemple, télévision, console de jeux,
lecteur DVD, etc.) soit réglé sur le mode PCM ou
Dolby Digital lors de l'utilisation d'une connexion
numérique (par exemple, HDMI, OPTIQUE,
COAXIALE).
•
L'appareil peut ne pas être capable de décoder
tous les formats audio numériques à partir de la
source d'entrée. Dans ce cas, l'unité sera mise en
sourdine. Ce n'est PAS un défaut. L'appareil n'est
pas mis en sourdine.
La télévision a un problème
d'affichage lorsqu'elle regarde du
contenu HDR à partir d'une source
HDMI.
•
Certains téléviseurs HDR 4K nécessitent que
l'entrée HDMI ou les paramètres de l'image soient
réglés pour la réception de contenu HDR. Pour
plus de détails sur la configuration de l'affichage
HDR, veuillez vous référer au manuel d'utilisation
de votre téléviseur.
Je ne trouve pas le nom Bluetooth
de cet appareil sur mon appareil
Bluetooth pour le jumelage Bluetooth
•
Assurez-vous que la fonction Bluetooth soit activée
sur votre appareil Bluetooth.
•
Assurez-vous que vous avez bien jumelé l'appareil
avec votre appareil Bluetooth.
Il s'agit d'une fonction de mise hors
tension pendant 15 minutes, une
des exigences de la norme ERPII
pour économiser l'énergie
•
Lorsque le niveau du signal d'entrée externe
de l'appareil est trop faible, l'appareil s'éteint
automatiquement pendant 15 minutes. Veuillez
augmenter le niveau de signal de votre appareil
externe.
FRANÇAIS
55
Page 56
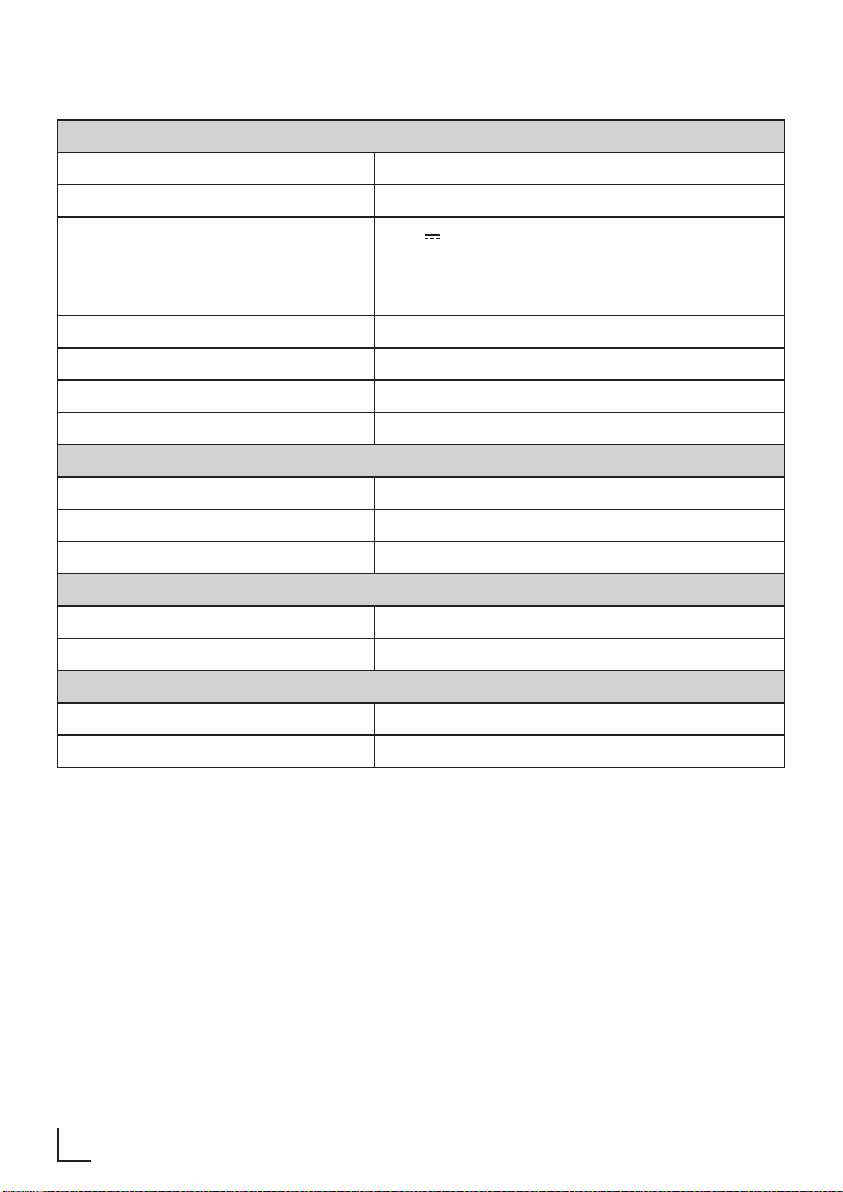
SPÉCIFICATIONS _____________________________
Barre de son
Source d’Alimentation 220-240V~ 50/60Hz
Consommation d’énergie 30W / < 0,5 W (en veille)
5,0 V 0,5 A
USB
Dimension (LxHxP) 880 mm x 60 mm x 127,5 mm
Poids net 3,3 kg
Sensibilité de l'entrée audio 250mV
Réponse de fréquence 40Hz/20KHz
Spécification Bluetooth/Sans fil
Version/profils Bluetooth V 4.2 (A2DP, AVRCP)
Bluetooth Puissance maximale transmise 5 dBm
Bandes de fréquences Bluetooth 2402 MHz ~ 2480 MHz
Amplificateur (Puissance de sortie totale max.)
Total 120W
Impédance 8Ω x 2 + 4Ω
Télécommande
Distance/Angle 6m/30°
Type de batterie AAA (1.5V x 2)
USB haut débit (2.0)/FAT32/FAT16
64G (max), MP3
56
FRANÇAIS
Page 57
INFORMATIONS _____________________________
Conformité avec la directive DEEE
et mise au rebut des déchets :
Ce produit est conforme à la directive DEEE
(2012/19/UE) de l’Union européenne). Ce produit
porte un symbole de classification pour la mise
au rebut des équipements électriques et électroniques (DEEE).
Ce symbole indique que ce produit ne
doit pas être jeté avec les déchets ménagers à la fin de sa vie utile. Les appareils usagés doivent être retournés au
point de collecte officiel destiné au recyclage des appareils électriques et électroniques.
Pour trouver ces systèmes de collecte, veuillez
contacter les autorités locales ou le détaillant auprès duquel vous avez acheté le produit. Chaque
ménage joue un rôle important dans la récupération et le recyclage des appareils ménagers usagés. L’élimination appropriée des appareils usagés
aide à prévenir les conséquences négatives potentielles pour l’environnement et la santé humaine.
Conformité avec la directive LdSD:
L’appareil que vous avez acheté est conforme à
la directive LdSD (2011/65/EU de l’Union européenne. Il ne comporte pas les matériels dangereux et interdits mentionnés dans la directive.
Cet appareil est insonorisé conformément aux directives européennes applicables. Ce produit est
conforme aux directives européennes 2014/53/
EU, 2009/125/EC et 2011/65/EU.
Vous trouverez la déclaration CE de conformité du
dispositif sous la forme d'un fichier pdf sur la page
d'accueil de Grundig www.grundig.com/downloads/doc.
Information sur l’emballage
L’emballage du produit est composé de
matériaux recyclables, conformément à
notre réglementation nationale. Ne jetez
pas les éléments d’emballage avec les
déchets domestiques et autres déchets. Déposezles dans un des points de collecte d’éléments
d’emballage que vous indiquera l’autorité locale
dont vous dépendez.
Information technique
FRANÇAIS
57
Page 58
BEZPIECZEŃSTWO ___________________________
UWAGA
RYZYKO PORAŻENIA PRĄDEM
ELEKTRYCZNYM NIE OTWIERAĆ
UWAGA: ABY ZMNIEJSZYĆ RYZYKO PORAŻENIA PRĄDEM, NIE ZDEJMUJ
POKRYWY (LUB TYŁU). WEWNĄTRZ NIE MA CZĘŚCI, KTÓRE MOGĄ BYĆ
NAPRAWIANE PRZEZ UŻYTKOWNIKA. CZYNNOŚCI SERWISOWE NALEŻY
POWIERZYĆ WYKWALIFIKOWANEMU PERSONELOWI.
Błysk pioruna z symbolem grotu
strzałki w trójkącie równobocznym
ma za zadanie ostrzec użytkownika o
obecności nieizolowanego
„niebezpiecznego napięcia” w obudowie
produktu, które może mieć wystarczającą
moc, aby stanowić ryzyko porażenia
prądem.
Wykrzyknik w trójkącie
równobocznym ma za zadanie
ostrzec użytkownika o obecności ważnych
instrukcji obsługi i konserwacji (obsługi) w
książkach dołączonych do urządzenia.
wszystkich instrukcji obsługi i
użytkowania.
•
Nie używaj tego urządzenia w pobliżu
wody - Urządzenia nie należy używać w
pobliżu wody lub wilgoci - na przykład w
mokrej piwnicy lub w pobliżu basenu itp.
•
Czyść tylko suchą szmatką.
•
Nie blokuj otworów wentylacyjnych.
•
Zamontuj zgodnie z instrukcjami
producenta.
•
Nie instaluj w pobliżu źródeł ciepła, takich
jak kaloryfery, ogrzewacze, kuchenki lub
inne urządzenia (w tym wzmacniacze),
które wytwarzają ciepło.
•
Nie należy podważać bezpieczeństwa
wtyczki spolaryzowanej lub uziemiającej.
Wtyczka spolaryzowana ma dwa bolce,
z których jedno jest szersze niż drugie.
Wtyczka uziemiająca ma dwa bolce i trzeci
bolec uziemiający. Szerokie ostrze lub
trzeci bolec zapewnia bezpieczeństwo.
Bezpieczeństwo
•
Przeczytaj niniejszą instrukcję - Przed
uruchomieniem produktu należy
przeczytać wszystkie instrukcje
bezpieczeństwa i obsługi.
•
Zachowaj instrukcje - Instrukcje
bezpieczeństwa i obsługi należy
zachować na przyszłość.
•
Przestrzegaj wszystkich ostrzeżeń należy przestrzegać wszystkich ostrzeżeń
na urządzeniu i w instrukcji obsługi.
•
Postępuj zgodnie ze wszystkimi
Jeśli dostarczona wtyczka nie pasuje do
gniazdka, skonsultuj się z elektrykiem w
celu wymiany przestarzałego gniazdka.
•
Chroń przewód zasilający przed
nadepnięciem lub ściśnięciem,
szczególnie przy wtyczkach, gniazdach
i miejscach, w których wychodzą z
urządzenia.
•
Używaj tylko dodatków/akcesoriów
określonych przez producenta.
•
Używaj tylko z wózkiem,
stojakiem, statywem,
instrukcjami - należy przestrzegać
58
POLSKI
Page 59

BEZPIECZEŃSTWO ___________________________
wspornikiem lub stołem określonym
przez producenta lub sprzedawanym z
urządzeniem. W przypadku używania
wózka lub stojaka należy zachować
ostrożność podczas przenoszenia wózka
z urządzeniem, aby uniknąć uszkodzeń
spowodowanych przewróceniem.
•
Odłączaj urządzenie od zasilania podczas
burzy lub gdy nie jest używane przez
długi czas.
•
Wszystkie czynności serwisowe
należy powierzyć wykwalifikowanemu
personelowi. Serwisowanie jest
wymagane, gdy urządzenie zostanie
w jakikolwiek sposób uszkodzone,
na przykład uszkodzony zostanie
przewód zasilający lub wtyczka, rozlana
zostanie ciecz lub przedmioty wpadną
do urządzenia, urządzenie zostało
wystawione na działanie deszczu lub
wilgoci, nie działa normalnie, lub został
upuszczony.
•
To urządzenie jest urządzeniem
elektrycznym klasy II lub podwójnie
izolowanym. Został zaprojektowany w
taki sposób, że nie wymaga bezpiecznego
podłączenia do uziemienia.
•
Urządzenie nie może być narażone
na kapiącą wodę lub zachlapanie. Na
urządzeniu nie należy kłaść żadnych
przedmiotów wypełnionych płynami, np.
wazonów.
•
Minimalna odległość wokół urządzenia
dla odpowiedniej wentylacji wynosi 5 cm.
•
Nie należy utrudniać wentylacji,
zakrywając otwory wentylacyjne
przedmiotami, takimi jak gazety, obrusy,
zasłony itp.
•
Na urządzeniu nie należy kłaść źródeł
otwartego ognia, takich jak zapalone
świece.
•
Baterie należy poddać recyklingowi
lub zutylizować zgodnie z krajowymi i
lokalnymi przepisami.
•
Urządzenia należy używać w
umiarkowanym klimacie.
Uwaga
•
Korzystanie z elementów sterujących
lub regulacji, lub wykonywanie procedur
innych niż opisane może narazić na
niebezpieczne promieniowanie lub inne
niebezpieczne działanie.
•
Aby zmniejszyć ryzyko pożaru lub
porażenia prądem, nie narażaj urządzenia
na deszcz lub wilgoć. Urządzenie nie
może znajdować się pod kapiącą wodą
lub być ochlapane, a na nim nie wolno
stawiać przedmiotów wypełnionych
płynami, np. wazonów.
•
Wtyczka sieciowa / łącznik urządzenia są
używane jako urządzenie rozłączające,
urządzenie rozłączające musi być łatwo
dostępne.
•
Niebezpieczeństwo wybuchu w przypadku
nieprawidłowej wymiany baterii. Wymień
baterię na taką samą lub równoważnego
typu.
POLSKI
59
Page 60
BEZPIECZEŃSTWO ___________________________
Ostrzeżenie
•
Baterii (baterii lub zestawu baterii) nie należy
wystawiać na działanie nadmiernego ciepła,
takiego jak słońce, ogień itp.
•
Przed uruchomieniem tego systemu sprawdź
napięcie tego systemu, aby sprawdzić, czy
jest ono identyczne z zasilaniem.
•
Nie umieszczaj urządzenia w pobliżu silnych
pól magnetycznych.
•
Nie umieszczaj urządzenia na wzmacniaczu
lub odbiorniku.
•
Nie umieszczaj urządzenia w pobliżu
wilgotnych miejsc, ponieważ wilgoć wpłynie
na żywotność głowicy laserowej.
•
Jeśli jakikolwiek przedmiot stały lub ciecz
dostanie się do systemu, odłącz system
od zasilania i przekaż wykwalifikowanemu
personelowi do sprawdzenia przed dalszym
użyciem.
•
Nie należy czyścić urządzenia
rozpuszczalnikami chemicznymi, ponieważ
może to uszkodzić wykończenie. Użyj czystej,
suchej lub lekko wilgotnej szmatki.
•
Podczas wyjmowania wtyczki z gniazdka
zawsze ciągnij bezpośrednio za wtyczkę,
nigdy nie szarp za przewód.
•
Zmiany lub modyfikacje urządzenia, które nie
zostały wyraźnie zatwierdzone przez stronę
odpowiedzialną za zgodność, unieważnią
prawo użytkownika do obsługi urządzenia.
•
Tabliczka znamionowa znajduje się na
spodzie lub z tyłu urządzenia.
60
POLSKI
Zużycie baterii OSTRZEŻENIE
Aby zapobiec wyciekom baterii,
które mogą spowodować obrażenia
ciała, zniszczenie mienia lub uszkodzenie
urządzenia:
•
Zainstaluj poprawnie wszystkie baterie +
i - zgodnie z oznaczeniami na urządzeniu.
•
Nie mieszaj starych i nowych baterii.
•
Nie należy mieszać baterii alkalicznych,
standardowych (węglowo-cynkowych)
lub akumulatorów (Ni-Cd, Ni-MH itp.).
•
Wyjmij baterie, gdy urządzenie nie będzie
używane przez dłuższy czas.
Znak towarowy i logo Bluetooth są
zastrzeżonymi znakami towarowymi
będącymi własnością Bluetooth SIG,. Inc.
Znaki towarowe HDMI, HDMI HighDefinition Multimedia Interface i logo
HDMI są znakami towarowymi lub
zastrzeżonymi znakami towarowymi HDMI
Licensing Administrator, Inc. w Stanach
Zjednoczonych i innych krajach.
Dolby, Dolby Atmos i symbol podwójnego
D są zastrzeżonymi znakami towarowymi
firmy Dolby Laboratories Licensing
Corporation. Wyprodukowano na licencji
Dolby Laboratories. Zawiera poufne i
nieupublicznione informacje. Copyright ©
2012-2020 Dolby Laboratories. Wszelkie
prawa zastrzeżone.
Page 61
W SKRÓCIE _________________________________
Szanowni Klienci,
Gratulujemy zakupu nowego GRUNDIG All-in-One
Dolby Atmos Soundbar DSB 1000/GSB 930.
Należy uważnie przeczytać poniższe uwagi, aby
zapewnić w pełni korzystanie z wysokiej jakości
produktu GRUNDIG przez wiele lat.
Odpowiedzialne podejście!
GRUNDIG koncentruje się na umownych społecznych warunkach
pracy, zapewniając uczciwe wynagrodzenie zarówno pracownikom
wewnętrznym, jak i dostawcom.
Przywiązujemy również dużą wagę do efektywnego
wykorzystania surowców przy ciągłej redukcji odpadów o kilka ton plastiku każdego roku. Ponadto
wszystkie nasze akcesoria są dostępne przez co
najmniej 5 lat.
Dla przyszłości wartej życia.
Grundig.
Sterowanie i części
Zobacz rysunek na stronie 3.
A Jednostka podstawowa
1. Czujnik pilota
2. Wyświetl okno
3. Przycisk WŁ./WYŁ.
4. Przycisk źródła sygnału
5. Przycisk głośności +/-
6. Śruby do uchwytu ściennego
7. Wejście AUX
8. Gniazdo USB
9. Wejście optyczne
10. Wejście koncentryczne
11. Wyjście HDMI (ARC)
12. Wejście HDMI 1/HDMI 2
13. Gniazdo prądu
B Pilot
1.
2. Wybierz funkcję odtwarzania.
3. /
4. BASY +/- Dostosuj poziom basów.
5. TONY
WYSOKIE +/-
6.
VOL +/-
7. PIONOWY/
SURROUND
8. Korektor
dźwięku
9. ŚCIEMNIACZ
ŚWIATŁA
C Przewód zasilający x1
D Kabel HDMI 1x
E Kabel audio 1x
F Kabel optyczny 1x
G Uchwyt ścienny 2x
Śruby/osłona gumowa 2x
H AAA Baterie x2
Przełącz urządzenie między
trybem WŁĄCZONYM a
CZUWANIA.
Przejdź do poprzedniego/
następnego utworu w trybie
Bluetooth/USB.
Odtwórz/wstrzymaj/wznów odtwarzanie w trybie Bluetooth/
USB.
Naciśnij i przytrzymaj, aby
włączyć funkcję parowania w
trybie Bluetooth lub odłączyć
istniejące sparowane urządzenie
Bluetooth.
Dostosuj poziom tonów wysokich.
Wycisz lub wznów dźwięk.
Zwiększ/zmniejsz poziom
głośności.
Ustaw dźwięk surround
Włączony/Wyłączony
Wybierz efekt korektora dźwięku
(EQ).
Ustaw jasność wyświetlacza.
POLSKI
61
Page 62

PRZYGOTOWANIE ____________________________
Przygotuj pilota
Dołączony pilot umożliwia obsługę urządzenia na
odległość.
• Nawet jeśli zasięg pilota wynosi 6 m (19,7 stóp),
to może nie działać, jeżeli między urządzeniem a
pilotem będą przeszkody.
• Jeśli pilot działa w pobliżu innych produktów
wytwarzających promienie podczerwieni lub w
pobliżu innych urządzeń sterowanych pilotem
wykorzystujących promienie podczerwieni,
może on działać nieprawidłowo. I odwrotnie, inne
urządzenia mogą działać nieprawidłowo.
Środki ostrożności dotyczące
baterii
• Pamiętaj o włożeniu baterii z prawidłową
biegunowością dodatnią „ ” i ujemną „ ”.
• Używaj baterii tego samego typu. Nigdy nie
używaj różnych rodzajów baterii jednocześnie.
• Można stosować baterie do ponownego
ładowania i jednorazowe. Zapoznaj się ze
środkami ostrożności na ich etykietach.
• Uważaj na paznokcie podczas zdejmowania
pokrywy baterii i baterii.
• Nie upuszczaj pilota.
• Nie pozwól, aby cokolwiek miało wpływ na pilota.
• Nie rozlewaj wody ani żadnych płynów na pilota.
• Nie umieszczaj pilota na mokrym przedmiocie.
• Nie umieszczaj pilota w bezpośrednim świetle
słonecznym lub w pobliżu źródeł nadmiernego
ciepła.
• Wyjmij baterię z pilota, gdy nie jest używany przez
dłuższy czas, ponieważ może dojść do korozji lub
wycieku baterii i spowodować obrażenia ciała i/
lub zniszczenie mienia i/lub pożar.
• Nie używaj baterii innych niż określone.
• Nie wkładaj nowych baterii ze starymi.
• Nigdy nie ładuj baterii, chyba że potwierdzono, że
jest to bateria wielokrotnego ładowania.
UMIESZCZENIE I MONTAŻ ______________________
Normalne umieszczenie (opcja A)
• Umieść Soundbar na poziomej powierzchni z
przodu telewizora.
Montaż naścienny (opcja B)
Uwaga:
• Instalację może wykonywać wyłącznie
wykwalifikowany personel. Nieprawidłowy
montaż może spowodować poważne obrażenia
ciała i szkody materialne (jeśli zamierzasz
samodzielnie zainstalować ten produkt, musisz
sprawdzić, czy nie ma instalacji takich jak
przewody elektryczne i hydrauliczne, które
62
POLSKI
mogą być umieszczone w ścianie). Obowiązkiem
montera jest sprawdzenie, czy ściana
bezpiecznie wytrzyma całkowite obciążenie
urządzenia i uchwytów ściennych.
• Do instalacji wymagane są dodatkowe narzędzia
(nie wchodzą w skład zestawu).
• Nie dokręcaj śrub zbyt mocno.
• Zachowaj tę instrukcję obsługi do wykorzystania
w przyszłości.
• Użyj elektronicznego wykrywacza metali,
aby sprawdzić typ ściany przed wierceniem i
montażem.
Page 63

POŁĄCZENIE ________________________________
Dolby Atmos ®
Dolby Atmos zapewnia niesamowite wrażenia,
których nigdy wcześniej nie słyszałeś dzięki
dźwiękowi górnemu oraz całe bogactwo, czystość i
mocy dźwięku Dolby.
Do użytku Dolby Atmos ®
1. Dolby Atmos® jest dostępny tylko w
trybie HDMI. Szczegółowe informacje na
temat połączenia znajdują się w rozdziale
„PODŁĄCZENIE HDMI”.
Aby korzystać z Dolby Atmos® w trybie HDMI 1 i
HDMI 2, telewizor musi obsługiwać Dolby Atmos®.
2. Upewnij się, że dla strumienia bitów na
wyjściu audio podłączonego urządzenia
zewnętrznego (np. odtwarzacza DVD Bluray, telewizora itp.) wybrano opcję „Brak
kodowania”.
3. Po przejściu do formatu Dolby Atmos / Dolby
Digital / PCM, soundbar pokaże DOLBY
ATMOS / DOLBY AUDIO / PCM AUDIO.
Wskazówki:
• Pełna jakość Dolby Atmos jest dostępna tylko
wtedy, gdy soundbar jest podłączony za pomocą
kabla HDMI 2.0.
• Soundbar nadal będzie działać po podłączeniu
innymi metodami (takimi jak cyfrowy kabel
optyczny), ale nie są one w stanie obsługiwać
wszystkich funkcji Dolby. Biorąc to pod uwagę,
aby zapewnić pełną obsługę Dolby, zalecamy
połączenie przez HDMI.
Tryb „demo“:
W trybie gotowości naciśnij i przytrzymaj
jednocześnie przyciski (VOL +) i (VOL -) na soundbarze. Soundbar włączy się i można włączyć dźwięk
demonstracyjny. Dźwięk demonstracyjny zostanie
odtworzony przez około 20 sekund.
Uwaga:
1. Gdy dźwięk demonstracyjny jest włączony,
możesz nacisnąć , aby go wyciszyć.
2. Jeśli chcesz dłużej słuchać dźwięku demonstracyjnego, możesz nacisnąć , aby
powtórzyć dźwięk demonstracyjny.
3. Naciśnij (VOL +) lub (VOL -), aby zwiększyć
lub zmniejszyć poziom głośności dźwięku
demonstracyjnego.
4. Naciśnij , aby wyjść z trybu demonstracyjnego, a urządzenie przejdzie w tryb
gotowości.
Połączenie HDMI
Niektóre telewizory 4K HDR wymagają ustawienia wejścia HDMI lub obrazu do odbioru treści
HDR. Więcej informacji na temat konfiguracji
wyświetlacza HDR znajduje się w instrukcji obsługi
telewizora.
Używanie HDMI do podłączenia soundbaru, sprzętu
AV i telewizora:
Metoda 1: ARC (kanał zwrotny audio)
Funkcja ARC (kanał zwrotny audio) umożliwia
przesyłanie dźwięku z telewizora zgodnego z ARC
do soundbar za pomocą jednego połączenia HDMI.
Aby korzystać z funkcji ARC, upewnij się, że telewizor jest zgodny zarówno z HDMI-CEC, jak i ARC,
i odpowiednio go skonfiguruj. Po prawidłowym
skonfigurowaniu można użyć pilota do telewizora, aby wyregulować głośności (VOL +/- i MUTE)
soundbar.
• Podłącz kabel HDMI (w zestawie) do gniazda
HDMI (ARC) urządzenia do wejścia HDMI (ARC) w
telewizorze zgodnym z ARC. Następnie naciśnij
pilot, aby wybrać HDMI ARC.
Wskazówki:
• Telewizor musi obsługiwać funkcje HDMI-CEC i
ARC. HDMI-CEC i ARC muszą być włączone.
POLSKI
63
Page 64

POŁĄCZENIE ________________________________
• Sposób ustawienia HDMI-CEC i ARC może się
różnić w zależności od telewizora. Szczegółowe
informacje na temat funkcji ARC można znaleźć
w instrukcji obsługi.
• Tylko kabel HDMI w wersji 1.4 lub wyższej może
obsługiwać funkcję ARC.
• Cyfrowe ustawienie dźwięku S/PDIF w
telewizorze musi być ustawione na PCM lub
Dolby Digital.
Metoda 2: Standardowe HDMI
• Jeśli telewizor nie jest zgodny ze standardem
HDMI ARC, podłącz listwę dźwiękową do
telewizora za pomocą standardowego połączenia
HDMI.
Użyj kabla HDMI (w zestawie), aby połączyć wyjście
HDMI soundbaru z wejściem HDMI telewizora.
Użyj kabla HDMI (w zestawie), aby podłączyć
wejście HDMI (1 lub 2) soundbaru do urządzeń
zewnętrznych (np. klonsol do gier, odtwarzaczy
DVD i Blu-ray).
Użyj wejścia optycznego
• Zdejmij zaślepkę ochronną z wejścia optycznego,
a następnie podłącz kabel optyczny (w zestawie)
do wyjścia optycznego telewizora i wejścia
optycznego w urządzeniu.
Użyj wejścia koncentrycznego
• Możesz również użyć kabla koncentrycznego
(brak w zestawie), aby podłączyć wyjście
koncentryczne telewizora i wejście
koncentryczne urządzenia.
• Porada: Urządzenie może nie być w stanie
rozszyfrować wszystkich cyfrowych formatów
audio ze źródła wejściowego. W takim przypadku
urządzenie przejdzie w tryb wyciszenia. Nie jest
to oznaką niesprawności urządzenia. Upewnij
się, że ustawienie audio źródła wejściowego (np.
telewizora, konsoli do gier, odtwarzacza DVD
itp.) jest ustawione na PCM lub Dolby Digital
(szczegółowe informacje na temat ustawień
audio można znaleźć w instrukcji obsługi
urządzenia źródłowego) za pomocą HDMI/
wejścia optycznego/koncentrycznego.
Użyj wejścia AUX
• Użyj kabla audio RCA do 3,5 mm (brak w
zestawie), aby połączyć gniazda wyjściowe audio
telewizora z gniazdem AUX urządzenia.
• Użyj kabla audio 3,5 mm do 3,5 mm (w
zestawie), aby podłączyć gniazdo słuchawkowe
telewizora lub zewnętrznego urządzenia audio do
gniazda AUX urządzenia.
Podłącz zasilanie
Ryzyko uszkodzenia produktu!
• Upewnij się, że napięcie zasilania odpowiada
napięciu podanemu na tabliczce znamionowej
znajdującej się z tyłu lub na spodzie urządzenia.
• Przed podłączeniem przewodu zasilającego
upewnij się, że wykonałeś wszystkie pozostałe
połączenia.
Soundbar
Podłącz kabel sieciowy do gniazda prądu jednostki
głównej, a następnie do gniazdka sieciowego.
64
POLSKI
Page 65

OBSŁUGA BLUETOOTH ________________________
Połącz urządzenia obsługujące
Bluetooth
Przy pierwszym podłączeniu urządzenia Bluetooth
do odtwarzacza musisz połączyć urządzenie z tym
odtwarzaczem.
Uwaga:
• Zasięg działania między tym odtwarzaczem a
urządzeniem Bluetooth wynosi około 8 metrów
(bez żadnych przedmiotów między urządzeniem
Bluetooth a urządzeniem).
• Przed podłączeniem Bluetooth do tego
urządzenia upewnij się, że znasz jego możliwości.
• Kompatybilność ze wszystkimi urządzeniami
Bluetooth nie jest gwarantowana.
• Wszelkie przeszkody między tym urządzeniem a
urządzeniem Bluetooth mogą zmniejszyć zasięg
działania.
• Jeśli siła sygnału jest słaba, odbiornik Bluetooth
może się rozłączyć, ale automatycznie przejdzie
ponownie w tryb parowania.
Wskazówki:
• W razie potrzeby wprowadź hasło „0000”.
• Jeśli żadne inne urządzenie Bluetooth nie sparuje
się z tym odtwarzaczem w ciągu dwóch minut,
odtwarzacz przywróci poprzednie połączenie.
• Odtwarzacz zostanie również odłączony, gdy
urządzenie znajdzie się poza zasięgiem.
• Jeśli chcesz ponownie podłączyć urządzenie do
tego odtwarzacza, umieść je w zasięgu działania.
• Jeśli urządzenie zostanie przeniesione poza
zasięg, gdy zostanie przywrócone, sprawdź,
czy urządzenie jest nadal podłączone do
odtwarzacza.
• W przypadku utraty połączenia postępuj zgodnie
z instrukcjami powyżej, aby ponownie sparować
urządzenie z odtwarzaczem.
Słuchaj muzyki z urządzenia Bluetooth
• Jeśli podłączone urządzenie Bluetooth obsługuje
profil Advanced Audio Distribution Profile (A2DP),
możesz słuchać muzyki zapisanej na urządzeniu
za pośrednictwem odtwarzacza.
• Jeśli urządzenie obsługuje również profil
zdalnego sterowania audio-wideo (AVRCP),
można użyć pilota do odtwarzania muzyki
zapisanej na urządzeniu.
1. Sparuj urządzenie z odtwarzaczem.
2. Odtwarzaj muzykę za pomocą urządzenia
(jeśli obsługuje A2DP).
3. Użyj dołączonego pilota do sterowania odtwarzaniem (jeśli obsługuje AVRCP).
• Aby wstrzymać/wznowić odtwarzanie, naciśnij
na pilocie.
• Aby przejść do utworu, naciśnij / na
pilocie.
POLSKI
65
Page 66

OBSŁUGA USB ______________________________
• Aby wstrzymać lub wznowić odtwarzanie,
naciśnij na pilocie.
• Aby przejść do poprzedniego/następnego
utworu, naciśnij / na pilocie.
• Wybierz opcje powtarzania/odtwarzania
losowego
W trybie USB naciśnij kilkakrotnie przycisk USB
na pilocie, aby wybrać tryb odtwarzania opcji
POWTÓRZ/LOSOWO.
Powtórz raz:
Powtórz folder:
(jeśli istnieje wiele folderów)
Powtórz wszystko:
Odtwarzanie w kolejności losowej:
Wyłącz powtarzanie:
Wskazówki:
• Urządzenie może obsługiwać urządzenia USB o
pojemności do 64 GB.
• Urządzenie może odtwarzać pliki MP3.
• System plików USB powinien być FAT32 lub
FAT16.
one
FOLDER
all
shuffle
off
66
POLSKI
Page 67

ROZWIĄZYWANIE PROBLEMÓW _________________
Aby zachować ważność gwarancji, nigdy nie próbuj
samodzielnie naprawiać systemu. Jeśli wystąpią
problemy podczas korzystania z tego urządzenia,
przed skontaktowaniem się z serwisem sprawdź
następujące punkty.
Brak zasilania
•
Upewnij się, że przewód zasilający urządzenia jest
prawidłowo podłączony.
•
Upewnij się, że gniazdko elektryczne jest pod
napięciem.
•
Naciśnij przycisk gotowości, aby włączyć
urządzenie.
Pilot nie działa
•
Przed naciśnięciem dowolnego przycisku pilota
najpierw wybierz właściwe źródło.
•
Zmniejsz odległość między pilotem a urządzeniem.
•
Włóż baterię z biegunami (+/-) ustawionymi
zgodnie z oznaczeniami.
•
Wymień baterię.
•
Skieruj pilota bezpośrednio na czujnik z przodu
urządzenia.
Brak dźwięku
•
Upewnij się, że urządzenie nie jest wyciszone.
Naciśnij przycisk MUTE lub VOL +/-, aby
przywrócić dźwięk.
•
Naciśnij na urządzeniu lub pilocie, aby
przełączyć soundbar w tryb gotowości. Następnie
ponownie naciśnij aby włączyć soundbar.
•
Odłącz soundbar od gniazdka sieciowego, a
następnie podłącz je ponownie. Włącz soundbar
•
Upewnij się, że ustawienie audio źródła
wejściowego (np. TV, konsola do gier,
odtwarzacz DVD itp.) Jest ustawione na tryb
PCM lub Dolby Digital podczas korzystania z
połączenia cyfrowego (np. HDMI, optycznego,
koncentrycznego).
•
Urządzenie może nie być w stanie rozszyfrować
wszystkich cyfrowych formatów audio ze źródła
wejściowego. W takim przypadku urządzenie
przejdzie w tryb wyciszenia. To NIE jest wada.
Urządzenie nie jest wyciszone.
Telewizor ma problem z
wyświetlaniem podczas oglądania
treści HDR ze źródła HDMI.
•
Niektóre telewizory 4K HDR wymagają ustawienia
wejścia HDMI lub obrazu do odbioru treści
HDR. Więcej informacji na temat konfiguracji
wyświetlacza HDR znajduje się w instrukcji
obsługi telewizora.
Nie mogę znaleźć nazwy Bluetooth
tego urządzenia na moim
urządzeniu, aby sparować.
•
Upewnij się, że funkcja Bluetooth jest włączona.
•
Upewnij się, że urządzenie zostało sparowane z
urządzeniem Bluetooth.
Jest to funkcja wyłączania
zasilania na 15 minut, jedno ze
standardowych wymagań ERPII
dotyczących oszczędzania energii
•
Gdy poziom zewnętrznego sygnału wejściowego
urządzenia jest zbyt niski, urządzenie wyłączy się
automatycznie po 15 minutach. Zwiększ poziom
głośności urządzenia zewnętrznego.
POLSKI
67
Page 68
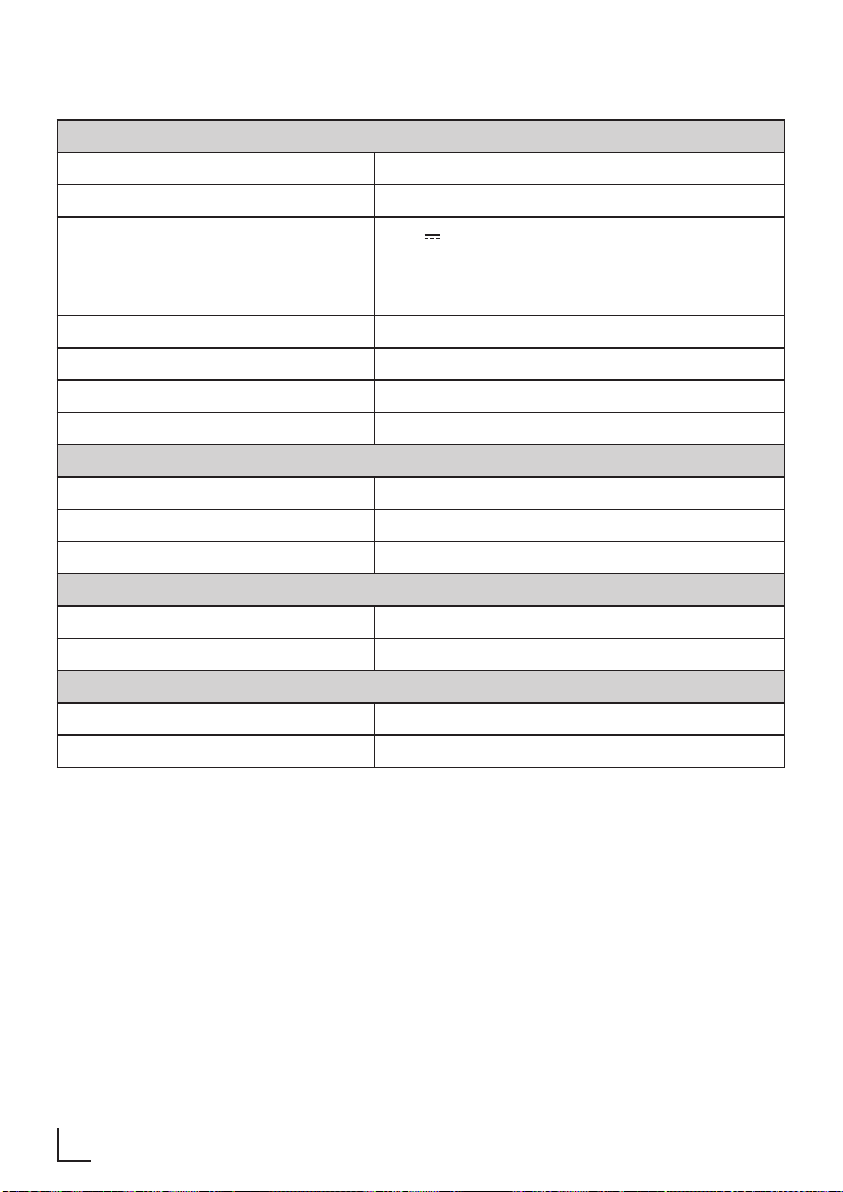
PARAMETRY ________________________________
Soundbar
Zasilanie 220-240V~ 50/60Hz
Zużycie energii 30W / < 0,5 W (tryb gotowości)
5.0 V 0.5 A
USB
Wymiary (Szer.xWys.xGł.) 880mm x 60mm x 127.5mm
Waga netto 3.3 kg
Czułość wejściowa audio 250mV
Pasmo przenoszenia 40Hz - 20KHz
Parametry Bluetooth/Wireless
Wersja/profile Bluetooth V 4.2 (A2DP, AVRCP)
Bluetooth Maksymalna przesyłana moc 5 dBm
Pasma częstotliwości Bluetooth 2402 MHz ~ 2480 MHz
Wzmacniacz (całkowita maksymalna moc wyjściowa)
Całkowita 120W
Impedancja 8Ω x 2 + 4Ω
Pilot
Odległość/kąt 6m/30°
Typ baterii AAA (1.5V x 2)
Hi-Speed USB (2.0)/FAT32/FAT16
64G (max), MP3
68
POLSKI
Page 69
INFORMACJE _______________________________
Zgodność z dyrektywą WEEE i
usuwanie odpadów:
Niniejszy wyrób jest zgodny z dyrektywą Parlamentu
Europejskiego i Rady (2012/19/WE). Wyrób ten
oznaczony jest symbolem klasyfikacji zużytych
urządzeń elektrycznych i elektronicznych (WEEE).
Ten symbol oznacza, że sprzęt nie może
być umieszczany łącznie z innymi odpadami gospodarstwa domowego po
okresie jego użytkowania. Zużyte urzą-
dzenie należy oddać do specjalnego
punktu zbiórki zużytego sprzętu elektrycznego i
elektronicznego w celu utylizacji. Aby uzyskać informacje o punktach zbiórki w swojej okolicy należy skontaktować się z lokalnymi władzami lub
punktem sprzedaży tego produktu. Gospodarstwo
domowe spełnia ważną rolę w przyczynianiu się do
ponownego użycia i odzysku zużytego sprzętu.
Odpowiednie postępowanie ze zużytym sprzętem
zapobiega potencjalnym negatywnym konsekwencjom dla środowiska naturalnego i ludzkiego zdrowia.
Zgodność z dyrektywą RoHS:
Niniejszy wyrób jest zgodny z dyrektywą Parlamentu
Europejskiego i Rady RoHS (Ograniczenie użycia
substancji niebezpiecznych) (2011/65/EU). Nie
zawiera szkodliwych i zakazanych materiałów, podanych w tej dyrektywie.
Specyfikacja
Urządzenie jest wyciszone zgodnie z
obowiązującymi dyrektywami UE. Produkt spełnia
europejskie dyrektywy 2014/53/EU, 2009/125/EC
i 2011/65/EU.
Deklarację zgodności CE urządzenia można
znaleźć w formie pliku pdf na stronie głównej
Grundig www.grundig.com/downloads/doc.
Informacje o opakowaniu
Opakowanie tego wyrobu wykonano z
materiałów nadających się do recyklingu, zgodnie z naszym ustawodawstwem
krajowym. Nie wyrzucaj materiałów
opakowaniowych do śmieci wraz z innymi odpadkami domowymi. Oddaj je w jednym z wyznaczonych przez władze lokalne punktów zbiórki materiałów opakowaniowych.
POLSKI
69
Page 70

Beko Grundig Deutschland GmbH
Thomas-Edison-Platz 3
D-63263 Neu-Isenburg
www.grundig.com
 Loading...