

Page 1
Digital TV Recorder
INSTRUCTION MANUAL
GPVR1250
Grundig Helpline: 1800 509 394 Australia
Grundig Helpline: 0800 450 259 New Zealand
Page 2

Table of Contents
Table of Contents ------------------------------------------------------------------------- 1
Introduction------------------------------------------------------------------------------- 2
Safety Information------------------------------------------------------------------------ 3
Remote Control--------------------------------------------------------------------------- 4
Front and Rear Panel Illustration------------------------------------------------------- 6
Connecting to Television Aerial and RF cable---------------------------------------- 7
Connecting to a Television ----------- --------------------------------------------------- 8
Connecting to a Surround Sound System------------------------------------------- 9
Getting Started -------------------------------------------------------------------------- 10
Channel Setting-------------------------------------------------------------------------- 10
System Setting -------------------------------------------------------------------------- 12
Channel List------------------------------------------------------------------------------- 18
Favourite List----------------------------------------------------------------------------- 19
Booking List------------------------------------------------------------------------------ 20
EPG Menu ---------------------------------------------------------------------------------21
Record Operations-----------------------------------------------------------------------22
Help and Advice-------------------------------------------------------------------------- 23
Technical Specifications ----------------------------------------------------------------24
Guarantee ---------------------------------------------------------------------------------25
11
Page 3
Introduction
About This Manual
This contains all the information you need to know about how to setup
User Guide
and watch free view channels using your set top box.
What is DVB-T?
It works like traditional TV, but because the signals are digital you need a set
top box to convert them. This means more channels can be transmitted with
extra features such as interactivity and wide screen pictures.
Accessories In the Box
Remove your digital set top box carefully from the box and remove the
packaging from each part.
You will find the following items:
Digital set top box with fitted mains plug
Remote control with 2xAAA batteries (not installed)
Instruction Manual
AV cable
R
F loop through cable
Look out for this symbol. It indicates useful and important tips.
Trademark of the DVB Digital Video Broadcasting
Digital Video
Broadcasting
Project(1991 to 1996)
22
Page 4

Safety Information
Safety is Important
To ensure your safety and the safety of others, please ensure
you read the Safety Instructions before you operate this product.
Keep this information in a safe place for future reference.
Please read all the safety information before use.
Safety Considerations
Position the cables so that they cannot be walked on or pinched by items
placed on or against them.
Do not use the set top box in humid or damp conditions.
Do not allow the set top box to get wet.
Do not expose the set top box to dripping or splashing.
Do not place water filled objects such as vases on top of the set top box.
Do not place naked flame sources, such as candles, on top of the
set top box.
Cleaning
Always unplug the set top box before you clean it.
Do not use liquid or aerosol cleaners.
Clean the set top box with a soft, damp (not wet) cloth.
Ventilation
The slots and openings on the set top box are for ventilation.
Do not cover or block them as it may cause overheating.
Never let children push anything into the holes or slots on the case.
Servicing
There are no user serviceable parts in this set top box.
When servicing refer to qualified service personnel.
Contact the Bush helpline on 1800 509 394
in Australia or 0800 450 259 in New Zealand if you are ever in doubt about
the installation, operation or safety of this unit.
Battery Disposal
Please ensure batteries are disposed of safely.
Never dispose of batteries in the fire or with household waste.
Check with your local authority for disposal regulations.
33
Page 5
Remote Control
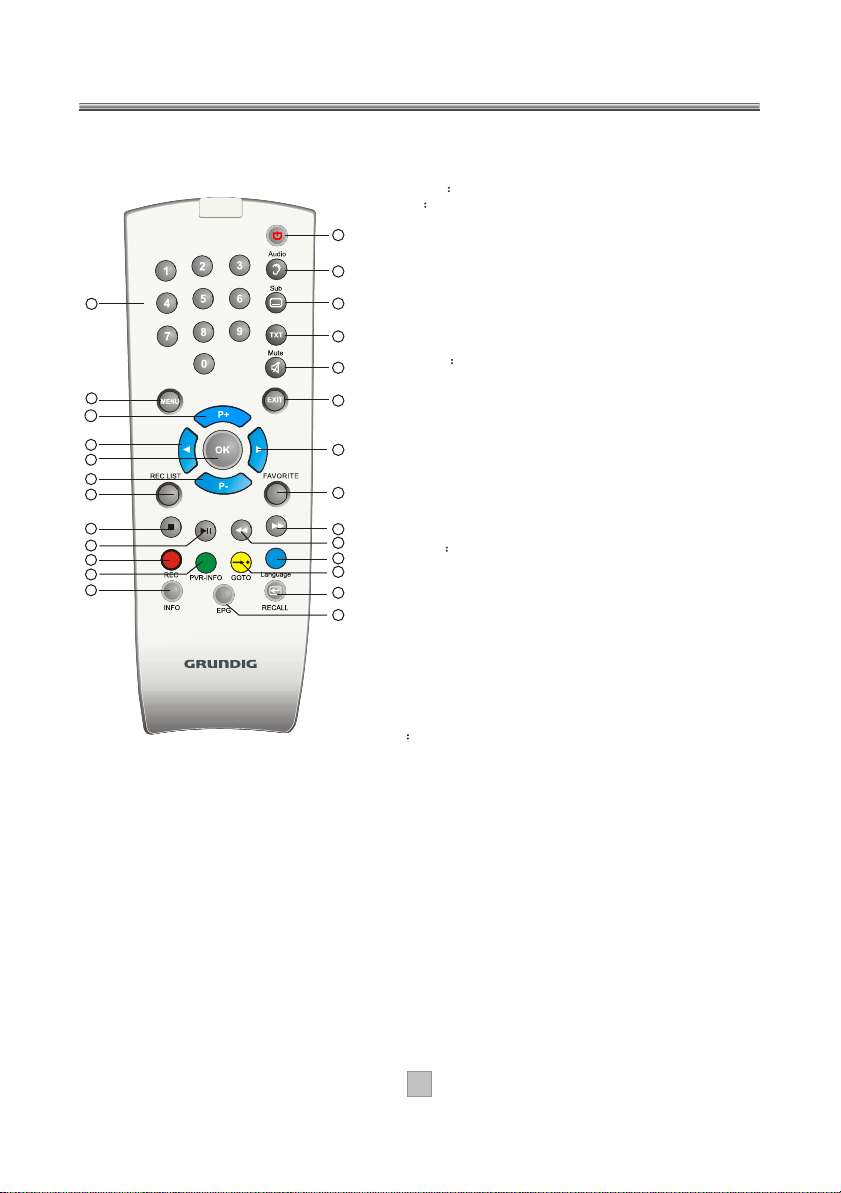
Remote Key Function:
1) STANDBY Used to switch the set top box to on or standby.
2) AUDIO Used to set the sound output, the available
settings are STEREO, LEFT, RIGHT, MONO.
1
3) SUBTITLE: Used to switch among different subtitles
that are broadcasted.
4) TEXT: Used to open teletext OSD display if teletext
2
available in the broadcasted stream.
5) MUTE: Used to turn the sound on or off.
15
16
17
18
19
20
21
22
23
24
25
26
22) STOP: Used to stop the current recording or stop the HDD playback back to DTV mode.
23) PLAY/PAUSE: Used to resume the playback if stopped or in time shifting mode(FF,FB, PAUSE etc)
or pause the the current picture or do time-shifting.
24) RECORD: Used to implement different functions in menus according to the help information,
or record the current viewed channel directly, or select the record duration if pressed again in
non-menu state.
25) PVR INFO: Used to implement different functions in menus according to the help information or
display the time information and progress bar and play state in HDD playback mode.
26) INFO: Used to display information about the channel being viewed or further information
about the program when in small EPG screen.
Note: SUBTITLE/TEXT/LANGUAGE may not available for all channels.
3
6) EXIT: Used to return to the previous screen or menu.
7) VOL+: Used to move around the menu screens or
4
changing the volume in non-menu state.
8) FAVORITE Used to access your favourite channels.
5
9) FAST FORWARD: Used to adjust the fast forward speed
if in HDD playback mode.
6
10) FAST BACKWARD: Used to adjust the fast backward
speed in HDD playback mode.
11) BLUE key / LANGUAGE: Used to implement different
7
functions in menus according to the help information
or switch among different audio languages that are
broadcasted in non-menu state.
8
12) YELLOW key / GOTO: Used to implement different
functions in menus according to the help information
9
or select the playback start time in HDD playback mode.
10
13) RECALL Used to switch between the last two viewed
11
channels.
12
14) EPG: Used to display information about the program
13
being viewed and what's on next.
15) NUMBER KEYS: Used to select channel numbers or
14
input numbers in menus.
16) MENU: Used to open the main menu window or return to
the previous screen or menu.
17) CH+: Used to move around the menu screens or
selecting the channels in non-menu state.
18) VOL-: Used to move around the menu screens or
changing the volume in non-menu state.
19) OK Used to confirm a selection within a menu.
20) CH-: Used to move around the menu screens or selecting
the channels in non-menu state.
21) RECORD LIST: Used to view the recorded program list.
44
Page 6
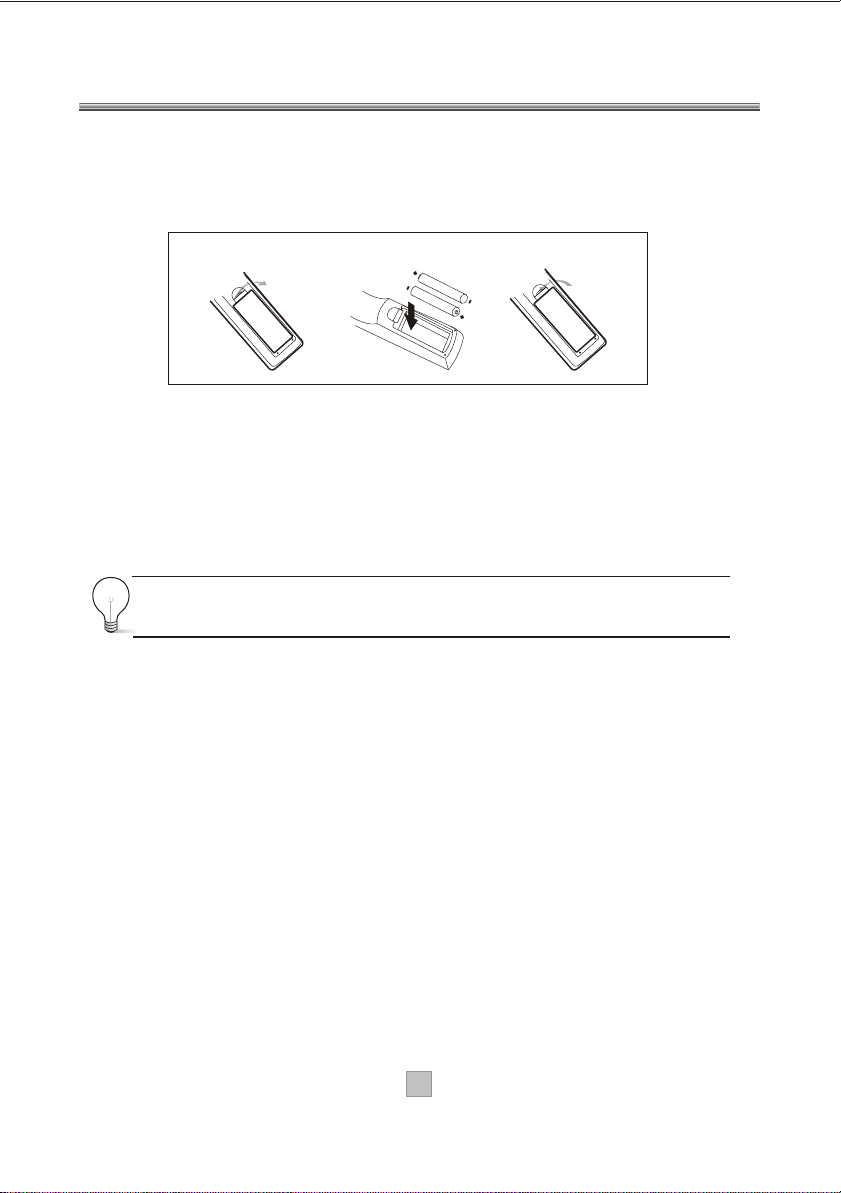
Installing the Batteries
Remove the battery cover from the remote control and put place 2 x AAA size
batteries inside the compartment. Make sure to match the + and - of the batteries with the
marks inside the battery compartment
1.Open the cover
N
PE
O
2.Install batteries
3.Close the cover
N
E
P
O
Using the Remote Control
To use the remote control, point it towards the front of the digital set top box.
The remote control has a range of up to 7 metres from the set top box at an
angle of up to 60 degrees.
The remote control will not operate if its path is blocked.
Sunlight or very bright light will decrease the sensitivity of the
remote control.
55
Page 7
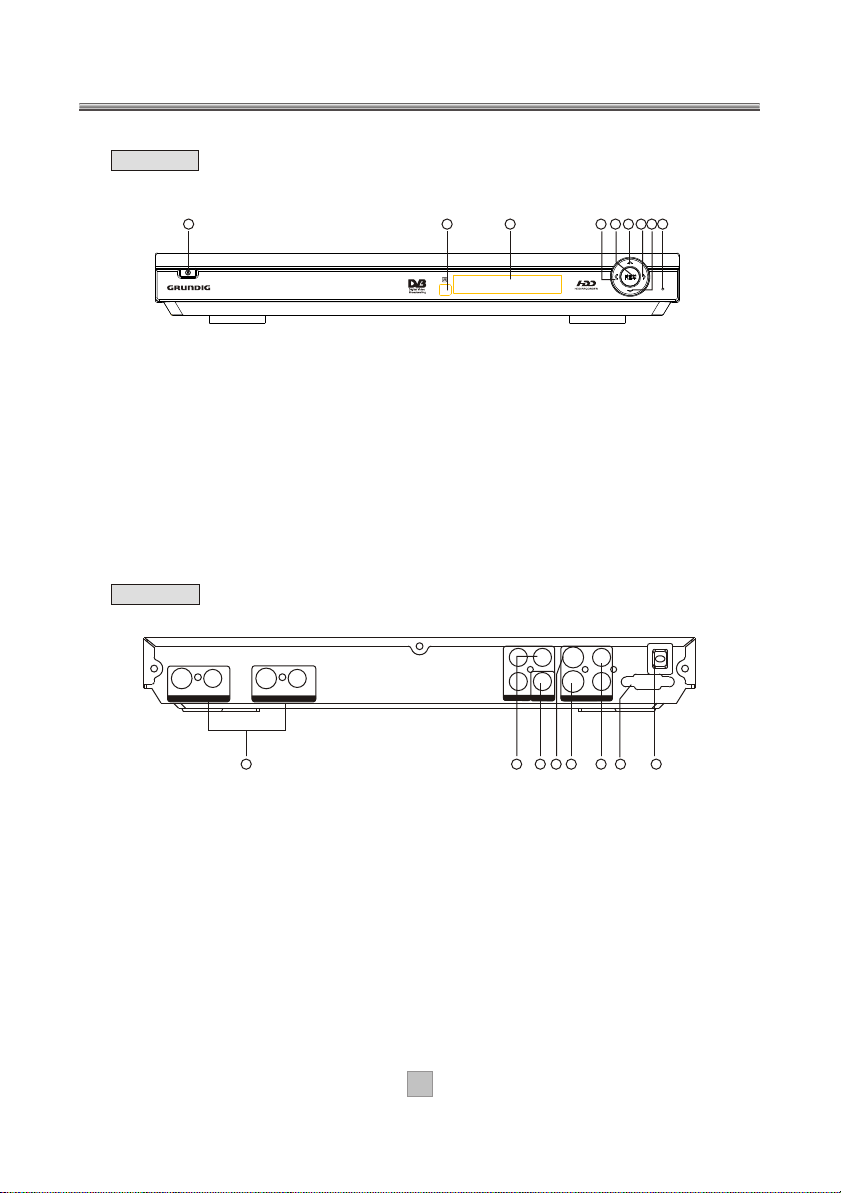
Front Panel and Rear Panel Illustration
1. Front panel
1 2
1) POWER BUTTON: Used to switch the main power of the set top box to on and off.
2) REMOTE CONTROL SENSOR: Used to receive the signal from the remote control.
3) LED DISPLAY: Used to display the channel number and time information and other play states.
4) VOLUME DOWN: Used to decrease the volume without using the remote control.
5) RECORD: Used to record the program manually, and select the record duration if pressed it again.
The user can change the watching channel if recording the specific program
6) CHANNEL UP: Used to change channels without using the remote control.
7) VOLUME UP: Used to increase the volume without using the remote control.
8) CHANNEL DOWN: Used to change channels without using the remote control.
9) STANDBY INDICATOR: Used to visually show power state of the set top box,
the red LED will be lit if the set top box entered standby mode.
3
5
7
8
6 9
4
2. Rear panel
100-240V~
50/60Hz
L
VIDEO
YCb
LOOPLOOPRR FF
ININR RF F
THROUGHTHROUGH
TV TUNERTV TUNER
LOOPLOOPR RFF
IN INRRFF
THROUGHTHROUGH
PVR TUNERPVR TUNER
1
VIDEO
COMPONENT OUT
2
COAXIAL
Cr
DIGITAL
AUDIO OUT
3
R
S-VIDEO
AUDIO/VIDEO OUT
5
4
RS-232
87
6
1) RF IN / RF LOOP THROUGH (PVR and TV tuner)
PVR/TV RF IN socket connects to your external aerial. PVR/TV RF LOOP THROUGH socket
will bypass the input RF signal to another tuner or your TV or another video system.
See connection pages for details
2) VIDEO COMPONENT (Y,Cb,Cr): These sockets output component video signal.
3) COAXIAL: This socket connects to a coaxial socket on your surround sound system to output
digital audio.
4) VIDEO: This socket outputs composite video signal.
5) S-Video: This socket outputs separate Y/C video signal.
6) AUDIO L/R: This socket outputs analog audio L/R signal.
7) RS-232 PORT: This socket is only used for software upgrade.
8) MAIN POWER CABLE:This is used to connect to your main power supply.
66
Page 8
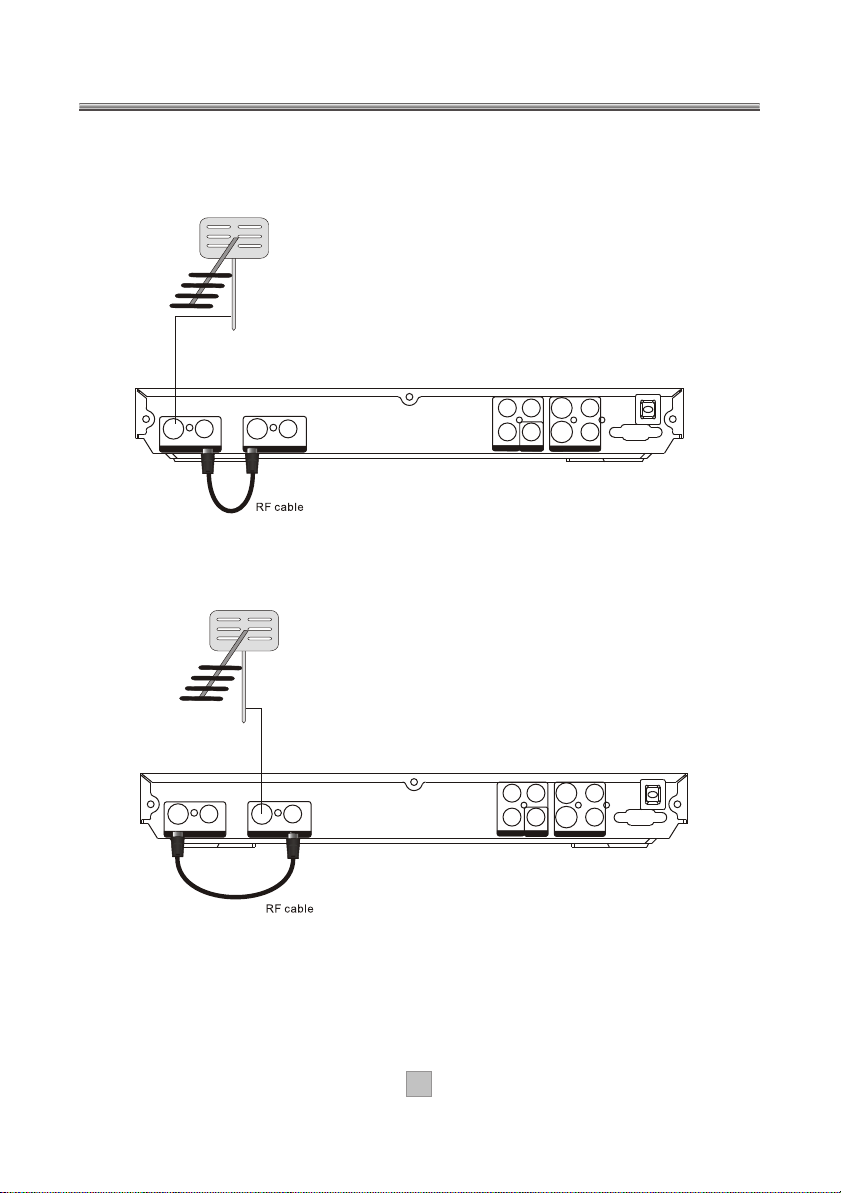
Connecting to Television and RF cableAerial
There are 2 kinds of connections for the TV aerial and RF cable presented below:
1.
2.
TV Aerial
100-240V~
50/60Hz
L
VIDEO
YCb
LOOPLOOPRR F F
ININR RF F
THROUGHTHROUGH
TV TUNERTV TUNER
LOOPLOOPR R F F
IN INRRFF
THROUGHTHROUGH
PVR TUNERPVR TUNER
VIDEO
COMPONENT OUT
COAXIAL
Cr
DIGITAL
AUDIO OUT
S-VIDEO
AUDIO/VIDEO OUT
R
RS-232
TV Aerial
100-240V~
50/60Hz
L
VIDEO
YCb
LOOPLOOPRR F F
ININR RF F
THROUGHTHROUGH
TV TUNERTV TUNER
LOOPLOOPR RFF
IN INRRFF
THROUGHTHROUGH
PVR TUNERPVR TUNER
VIDEO
COMPONENT OUT
COAXIAL
Cr
DIGITAL
AUDIO OUT
S-VIDEO
AUDIO/VIDEO OUT
R
RS-232
77
Page 9

100-240V~
50/60Hz
RS-232
VIDEO
S-VIDEO
L
R
COAXIAL
AUDIO/VIDEO OUT
YCb
Cr
VIDEO
COMPONENT OUT
DIGITAL
AUDIO OUT
Connecting to a Television
Component video
Cr
Cb
Y
88
Page 10

100-240V~
50/60Hz
RS-232
VIDEO
S-VIDEO
L
R
COAXIAL
AUDIO/VIDEO OUT
YCb
Cr
VIDEO
COMPONENT OUT
DIGITAL
AUDIO OUT
Connecting to a Surround Sound System
AUDIO IN
Coaxial cableCoaxial cable
Coaxial
Digital Amplifier
VOLUME
POWER
PRO LOGIC
MODE
3 STEREO
BYPASS
EXCITE
MIC
MIC VOL
211
2
INPUT SELECTOR
MUTE
CHANNEL
TEST
KARAOKE
DOWN UP
BASS
ECHO
MIC
TREBLE
99
Page 11

Getting Started
Switching On for the First Time
Ensure all connections have been made following the diagrams on the previous
pages for reference.
To switch on the set top box, press the button on the set top box.
(To turn the set top box to standby mode, press button on the remote control).
Switch on the TV and select the AV programme channel(EXT,AV, External Source
or similar). Your set top box will automatically scan.
Scan finished will display for a moment on TV after all stations are found and
automatically stored. If you want to scan again, follow the procedure below:
Press MENU button on the remote control, the set top box main menu will display.
System Setting
1. Channel setting
Select the Channel Setting menu by using the arrow buttons on the
remote control.
Press the button when the Channel Setting menu is highlighted.
Press button again when Channel Search is highlighted.
Confirm
Manual Scan
8M
Not Save
Append
Start Search
Exit
Exit
OK
OK
OK
Channel Search
C
Search Type
S
Channel No:
Bandwidth
Encrypted Service
Update Mode
Quality:
50%
Strength:
50%
Confirm
OK
1010
Page 12

Select the Auto Scan tab by using the arrow and the buttons
OK
on the remote control.
Press the button when the Start Search tab is highlighted.
OK
The following menu will display.
C
Search Type
S
Channel No
Bandwidth
Encrypted Service
Update Mode
Scan Process
System Setting
0%
Auto Scan
Radio 0
8M
Not Save
Append
Start Search
Exit
No Items
Channel No: 21 Frequency: 474MHz
Scan Process:
TV 0
No Items
The set top box will scan for all the available digital TV and radio
stations available in your area.
There is also a progress bar shown as a percentage.
Do not turn off the set top box until the digital TV and radio stations
have been stored. Otherwise you will need to scan them again.
You are now ready to start viewing and listening to your digital tv and
radio channels.
LCN On/Off
LCN(Logical Channel Number): A number that uniquely identifies a logical channel.
Select the LCN option in the Channel Setting menu using the arrow buttons.
Press the button when selected. The following menu will be displayed.
OK
Logical Channel Number
Channel Search
LCN
OFF
ON
Confirm
Exit
OK
The LCN On/Off option allows you to select how your channel number will be
displayed in the channel list or selected when pressed the digits key.
1111
Page 13

2. System Setting
From here you can set the Time, Sleep timer, Language, Parental
settings, A/V settings, PVR setting or revert to the factory settings.
Time Setting
Press the MENU button and select System Setting option using the arrow
buttons.
Press the button when selected. The following menu will display.
OK
System Setting
Time Setting
Language Settings
Parental Setting
A/V Setting
PVR Setting
Factory Setting
System Info
OK
Confirm
Exit
1212
Page 14

Time Zone Setting
Select Time Zone Setting option using the arrow button. Press the
button when selected. The following menu will display.
TimeZone Setting
Time Setting
Time Setting
Language Settings
TimeZone
Slep
Parental Setting
A/V Setting
PVR Setting
Factory Setting
System Info
OK
Confirm
GMT+0
GMT+0
GMT+1
GMT+2
GMT+3
GMT+4
Exit
Press the or buttons until the correct time zone is displayed.
OK
Press the button to confirm your selection.
The time zone can t be changed if the broadcast stream have time zone
OK
,
information. That means the user setting will only take effect if there is
no time zone information in the stream.
Sleep Timer Setting
Open the Time Setting menu as previously explained. Highlight the
Sleep Timer setting option using the arrow buttons.
Press the and .button and the menu below will be displayed
OK
SleepTimer Setting
Time Setting
Time Setting
Language Settings
Sleep After
SleepTimer Setting
Parental Setting
A/V Setting
PVR Setting
Factory Setting
System Info
OK
Confirm
No Sleep
No Sleep
5 Mins
10 Mins
20 Mins
30 Mins
Exit
Press the or button to select the sleep time.
Press the button to confirm your selection.
OK
1313
Page 15

2
Language Setting
Select the Language Setting option using the arrow buttons.
Press the button when selected. The following menu will display.
3
Parental Setting
Select the Parental Setting option using the arrow buttons. Press button
OK
Language Settings
Time Setting
Menu
Language Settings
Audio
Parental Setting
A/V Setting
PVR Setting
Factory Setting
System Info
OK
English
English
Confirm
English
Exit
OK
when selected.
Enter Pin Code
Time Setting
Language Settings
Parental Setting
Pin Code
A/V Setting
PVR Setting
Factory Setting
System Info
OK
Confirm
Exit
Enter the right Pin Code then press the button. If the Pin code is
OK
entered incorrectly, Pin Code Error will be displayed.
Use the or buttons to select the required option, then press
OK
the button to confirm.
1414
Page 16

Change Pin Code
The Change Pin Code menu allows you to change the password,
which currently defaults as 6666 .
Enter you new PIN code using the numerical buttons on the remote
control.
Press the button and enter the new PIN code again.
Press the button to confirm the new PIN code.
OK
Please note that your new PIN code must contain 4 digits.
4
A/V Setting
Select the A/V Setting option using the arrow buttons. Press the
OK
button when selected. The following menu will display.
A/V Setting
Time Setting
TV Shape
Language Settings
Conversion
Parental Setting
TV Standard
A/V Setting
Video Output
PVR Setting
Bright&Contrast
Factory Setting
Saturation
System Info
OK
Confirm
4:3
Letter Box
AUTO
RGB
50%
50%
Exit
4:3
16:9
To change the settings, first use the or buttons to select the
required menu, then use the or buttons to select the new option
required.
TV Shape
You can select either 4:3 or 16:9 format. 4:3 should be used for standard
square shaped television screens, and 16:9 should be used for wide screen
rectangular shaped television screens.
Conversion
You can select Full Frame, Pan Scan or Letterbox. Choose the
setting which best matches your television.
Standard
The standard setting is used to set the signal input to your TV. There are two
different standards available on your set top box, PAL and NTSC.
If you are .In Australia PAL is the standard format
1515
Page 17

If NTSC is chosen for your televisions you may experience
interference and picture rolling.
Video Output
The Video Output setting is used to set the colour signal to your TV. There are
3 different settings available on your set top box: S-Video, CVBS, YCbCr.
If you are unsure which setting to use consult the manufacturer s manual for
,
your television.
If S-Video/YCbCr is chosen for a non compatible television,
you will typically experience a washed out or a ghosted effect picture.
Brightness and Contrast/Saturation
You can use and buttons to adjust the brightness and
contrast or saturation of the video output.
5
PVR Setting
Select the PVR setting option using the arrow buttons. Press the
OK
button when selected. The following menu will display.
PVR Setting
Time Setting
Language Settings
Parental Setting
A/V Setting
Time Shift Enabled
PVR Setting
Format Hard Disk
Factory Setting
HDD Information
System Info
OK
Confirm
Time Shift Enabled
Time Shift Disabled
Exit
Time Shift Enabled/Disabled
. The duration is up to 1 hour.This enables or disables the time shift function
Format Hard Disk
Formatting is necessary when using the hard disk for the first time.
The system will auto reset after the successful formatting
HDD Information
It will show the HDD capacity.
1616
Page 18

6
Factory Setting
Select the Factory Setting option using the arrow buttons. Press
the button when selected. The following menu will display.
OK
OK
Factory Setting
Confirm
Restore Default
Clear Channels
Exit
Time Setting
Language Settings
Parental Setting
A/V Setting
PVR Setting
Factory Setting
System Info
Restore Default
The Restore Default menu allows you to reset the menu settings.
Clear Channels
The Clear Channels menu removes all channels from the Channel list.
To restore the channel list, you will need to rescan.
System Info
7
The System Info menu displays the software version and hardware version.
Time Setting
Language Settings
Parental Setting
A/V Setting
PVR Setting
Factory Setting
System Info
System Info
Software Version
Hardware Version
OK
Confirm
Exit
1717
Page 19

3. Channel List
The channel list is used to look at all the broadcasting TV or Radio channels
received by the set top box.
To access the channel list press the button in the non-menu state
OK
.
To edit the channel list, press the MENU button and select Channel List using
the arrow keys, press the button when it's highlighted.
OK
Channel List TV
A/V Setting
No Items
BandWidth
Frequency
TV/Radio
Quality:
50%
Strength:
50%
Confirm
Exit
Popup Menu
OK
To view a different channel, press either the or button,
each channel selected will be previewed in the upper right hand box.
To switch between TV and Radio channels, press the RED button.
To view/listen to a channel, press the button.
OK
To Lock&Unlock/Delete/Move a channel, press the button.
To lock a channel and prevent people from watching it, highlight the
channel that you want to lock by using either or button,
press the button, press the button when highlight Lock&Unlock
OK
in the pop up menu. Enter the right PIN code in the following PIN code form,
the channel will be locked, a lock icon will be displayed at the back of the
channel name after a successful lock operation. If the PIN code is
entered incorrectly, the Pin Code Error message will be displayed which
indicate the operation failed. Unlock operations work similar to the
above lock operations.
1818
Page 20

4. Favourite List
The favourite list is used to store your frequently watched channels without
having to search them in the Channel List or EPG menus.
To edit the favourite list, press the MENU button and select Favourite List using
the arrow keys, press the button when it's highlighted.
OK
Favorites List
Favorite Group: News
No Items
FAV
Favorite Switch
Right-Popup Menu
Adding a Favourite Channel
First use the RED button to select a favourite group, the choices are News, Movie,
MTV, Finance, Other. Then press the button and button to enter the
OK
pop up Add menu, select the channel you want to add to the specific favourite
group then press the button, the added channel will be displayed in the left
OK
hand column. Repeat the same procedure until all your desired channels have
been added to the specific favourite group.
Deleting a Favourite Channel
First use the RED button to select a favourite group. Select the channel that you
want to delete in the favourite list menu using the or button,
press the and button to enter the pop up Delete menu, then press
the button to enter delete confirmation menu, press the button to
OKOK
delete the selected channel from the favourite list and press the EXIT button to
cancel the delete.
Viewing a Favourite Channel
To access the favourite list quickly without edit, press the FAVOURITE button directly
in non-menu state or other menus.
To change the favourite group, press the RED button.
Select the desired favourite
press the button to confirm when highlighted, now you can watch the
OK
channel using the or button,
selected channel.
1919
Page 21

5. Booking List
The booking list is used to display all the booking events you have in the EPG
menu or you have added manually. The booking list menu is displayed below:
Booking List
ID
15
Start Time
2005.12.28 23:59
Duration(Mins)
120
Type
Playback
Exit
OK
No Items
Confirm
It will display the event ID, start time, duration, purpose(playback or record)
for each event.
To add a booking event manually, press the button in booking list menu,
OK
the event list menu will display:
Event List
Booking List
1
Event ID
Service
Type
Start Time
Start date
Duration
Purpose
Booking
No Items
OK
ONCE
24:59
12/22/2004
Playback
OFF
Book
Event ID
OK
15
Start Time
2005.12.28 23:59
HH:MM
Duration(Minutes):
DD/MM/YYYY
120
Minutes
Exit
The user can change the event ID using the button to start a new booking
event, press the button to select the booking channel, the booking type can
OK
be ONCE, DAILY, WEEKLY. The start time and start date and duration should be
valid, the booking purpose can be Record or Playback, after all the above
selection is ok, switch the booking to on, the booking will take effect if no
invalid selection, otherwise the related error message will display.
2020
Page 22

6. EPG Menu (Electronic Programme Guide)
The EPG menu is used to look at what is being broadcast on a TV or
Radio channel later in the day.
To access the EPG menu, press the MENU button and select the EPG
menu using the arrow keys. When it is highlighted press the button
OK
to access.
The following menu will display:
Channel Schedule
Program Information
SERVICE NAME 9:00 9:30 10:00 10:30
Channel
Program Event
OK
Booking
Exit
A preview of your current channel will be displayed in the upper left hand box.
The detailed program information of your current viewed channel will be
displayed .
in the upper right hand box
To see what is going to be broadcast after this programme, press
the button to change the time. Each press of the button will
increase by half an hour. Pressing the will move the time back half
an hour.
To view a different channel press either the button or button.
Each channel selected will be previewed .
To book a desired channel for later watching or recording, press the button.
in the upper left hand box
OK
To exit the EPG menu and watch the selected channel, press the MENU
or EXIT button.
2121
Page 23

Record Operations
Before using the record operations, please check the two tuner(TV/PVR tuner)
connections in connection pages.
Watch One Channel While Recording Another
The recording will receive the digital TV signal from the PVR tuner and the watching
will receive the digital TV signal from TV tuner, this makes it possible to watch one
channel while recording another channel.
There are 3 kinds of methods to start a recording:
1).Press the RECORD key while watching the live TV, the recording of the current
channel will start in several seconds, you can press the RECORD key again while
recording started to set the duration of the recording, the default duration is 2 hours.
2).Schedule Recording in full EPG menu, press the OK button to booking a recording
once you selected a valid column.
3).Schedule Recording in Booking List menu, press the OK button to start a new
booking event. Please prefer to former Booking List page for detail.
Once recording takes effect, the user can change the current viewed channel as
they want while the system is still recording at the background.
Time-Shifting Function
Have you been interrupted with a phone call or the doorbell while watching live TV
programs, inevitably missing out on a crucial scene? Pause and replay live TV shows
by simply pressing the Pause button and then Play button to pick up right where you
left off. Just like the live TV mode, This PVR recorder provides a slew of file playback
functions such as pause, instant replay, time-shifting with the scroll bar, fast-forward,
rewind and so on.
Changing the viewed channel while recording
Press the CH+/- keys to change the watching channel while the PVR is doing
background recording.
The user can only record the programs they want from the PVR TUNER.
The RECORD button.
Pressing the RECORD button, the record will start, you can press and
to change your watching channel while recording the specific program.
The STOP button
Press the STOP button will stop the current recording.
The PVR INFO button
Press this button and time information and progress bar will be displayed when
recording or playback of the program.
The REC List button
Press this button and the recorded program list will be displayed. You can Play/
Continue/Rename/Delete/Lock&Unlock the recorded program.
The button , SLOW and PAUSE button.
If the Time Shift function is enabled in System Setting/PVR Setting, you can use
these buttons to do time shifting feature.
2222
Page 24

Help and Advice
Problem
Standby light not lit
No signal found
No picture or sound
Encrypted channel message
No response from remote
control
Square blocks in picture or
picture freezes
Probable cause
Mains lead unplugged
Mains fuse blown
Aerial is disconnected
Aerial is damaged/misaligned
Out of digital signal area
AV connect error
It is a pay per view channel
Set top box is switched off
Remote control is not aimed correctly
Front panel obstructed
Remote control batteries inserted incorrectly
Remote control batteries exhausted
Aerial may not be compatable
Aerial is damaged/misaligned
What to do
Check mains lead
Check fuse
Check aerial lead
Check aerial
Check with dealer
Check AV cable
Select an alternative channel
Plug in and turn on set top box
Aim remote control at front panel
Check for obstructions
Check batteries are inserted correctly
Replace remote control batteries
Check with dealer
Check aerial
If none of the above suggestions seem to work, try switching your set top box off and
then on again. If this does not work, .contact the service helpline
2323
Page 25

Technical Specifications
Power Supply
Input Voltage
Power Consumption
Decoder
Video Formats
Audio Format
Video Outputs
Connections
Main Power Cable
Tuner
RS-232
RCA
S-VIDEO
100-240V~ 50/60Hz.
Maximum 15W, Standby 5W.
SD, 4:3/16:9 Switchable.
MPEG Layer l & ll,32/44.1/48Khz.
CVBS, S-Video, YCbCr
Fixed Type
2 Antenna Input/ 2 Therefore Output
1 for software upgrade
1 CVBS output
1 R/L output
1 COAXIAL SPDIF digital audio output
1 YCbCr output
1 S-VIDEO output
2424
Page 26

Guarantee
Please keep your receipt as proof of purchase. This product is warranted for any defect
in materials or workmanship for one year after the original date of purchase. This product is
for normal domestic and office use only. This warranty does not cover damage from misuse
or neglect, accidental damage, vermin infestation, excessive voltages such as lightning or
power surges or any alteration that affects the performance or reliability of the product.
If guarantee is required please contact the Grundig Helpline 1800 509 394 (within Australia)
or 0800 450 259 (within New Zealand). Have your receipt of purchase on hand
This guarantee is subject to the following provisions:
l It is only valid within the boundaries of the country of purchase.
l The product must be correctly assembled and operated in accordance with the
instructions contained in this manual.
l The product must be used solely for domestic purposes.
l The guarantee does not cover accidental damage, misuse, cabinet parts or consumable
items.
l The guarantee will rendered invalid if the product is resold or has been damaged
by inexpert repair.
l The manufacturer disclaims any liability for incidental or consequential damages.
This guarantee is in addition to, and does not diminish, your statutory or legal rights.
PO BOX 6287
Silverwater NSW 1811
http://www.grundig.net.au
Grundig Helpline: 1800 509 394 Australia
Grundig Helpline: 0800 450 259 New Zealand
2525
 Loading...