

Page 1

Owner's Manual
HD Video Cameras
GCT-K2326T 2 Megapixel Full HD-TVI Bullet Camera IR 42 LED WDR
GCT-K2326T.167.1.26.06.2015
© ASP AG
EN
Page 2

Page 3

Content:
1. Important Safety Instructions
1
2. Package Contents
nstallation
3. I
4. Part Names
5. Control Stick
6. OSD Menu
1. LENS 4
2. EXPOSURE 4
3. WHITE BAL (White Balance) 5
4. BACKLIGHT 6
5. DNR (Digital Noise Reduction) 7
6. DAY/NIGHT 7
7. IMAGE 9
8. MOTION 11
9. SYSTEM 11
10. EXIT 12
1. Important Safety Instructions
Be sure to use only the standard adapter that is specified in the specification sheet.
Using any other adapter could cause fire, electrical shock, or damage to the product.
Incorrectly connecting the power supply may cause explosion, fire, electric shock, or
damage to the product. Do not connect multiple products to one single adapter.
Exceeding the capacity may cause abnormal heat generation or fire.
Do not place conductive objects (e.g. screwdrivers, coins or any metal items) or
containers filled with water on top of the product. Doing so may cause personal injury
due to fire, electric shock, or falling objects.
If any unusual smells or smoke comes out of the unit, stop using the product. In this
case, immediately disconnect the power source and contact the service center.
Continued use in such a condition may cause fire or electric shock.
2
2
3
3
3
English
1
Page 4

If this product fails to operate normally, contact the nearest service center. Never
disassemble or modify this product in any way. (GRUNDIG is not liable for problems
caused by unauthorised modifications or attempted repair.)
To prevent fire or electric shock, do not expose the inside of this device to rain or
moisture.
2. Package Contents
These parts are included:
3. Installation
Do not install this product in a location subject to high temperature (over 55°C), low
temperature (below -25°C), or high humidity. Doing so may cause fire or electric shock.
Keep out of direct sunlight and heat radiation sources. This may cause fire.
Do not install the unit in humid, dusty or sooty locations. Doing so may cause fire or
electric shock. Install it in a place with good ventilation.
When installing the unit, fasten it securely and firmly. A falling unit may cause personal
injury.
If you want to relocate the already installed product, be sure to turn the power off and
then move or reinstall it.
2
English
Page 5

4. Part Names
5. Control Stick
- Pressing the SET UP stick: Accesses the menu mode or confirms the setting.
- UP / DOWN: Chooses the desired menu.
- LEFT / RIGHT: Sets up the value of the selected menu and changes the settings.
6. OSD Menu
1. Press the SET UP stick to access the menu mode.
2. Select the desired feature by using UP/DOWN.
3. If there is a setting for this feature on the right side of the screen, use LEFT/RIGHT to
switch between the settings and confirm your choice by pressing the stick. If an ENTER
) is displayed, press the stick to access the according submenu.
↵
arrow (
4. In the sub-menus, please press with the stick on RETURN to return to the previous
menu.
5. To exit the menu, please press the stick on EXIT in the main menu.
English
3
Page 6

When you press the SET UP stick for the first time, the MENU page will be displayed on
the monitor.
LENS: You can choose between Indoor or
Outdoor mode.
EXPOSURE: This function is used to
control the light exposure.
WHITE BAL: You can control the white
balance under different lighting conditions
here.
BACKLIGHT: You can control the backlight
compensation here.
DNR: This noise reduction function is to decrease the noise which can be generated
under low light conditions.
DAY&NIGHT: This function is used to improve the camera's sensitivity at night or when
the brightness level of the ambient environment is low.
IMAGE: You can set different picture related settings like mirroring, sharpness, hue and
gain.
MOTION: This function is used to detect moving objects in the monitoring area.
SYSTEM: Configures camera related functions and data.
EXIT: Here you can exit the menu.
6.1. LENS
Here you can configure the lens setting.
LENS [DC, MANUAL] :
If you are using a lens with manual Iris, set this item to MANUAL. If you are using a DC
controlled lens, set it to DC.
- DC [INDOOR, OUTDOOR, DEBLUR]: You can select a mode depending on the
installation environment.
- MANUAL [NORMAL, DEBLUR]: You can select a mode depending on the installation
environment.
6.2. EXPOSURE
This function is used to control the light exposure.
4
English
Page 7

BRIGHTNESS [0~20] :
Sets the value of auto exposure operations.
As the value increases, the screen gets
brighter.
SHUTTER [AUTO, MANUAL, FLICKER] :
Adjust the electronic shutter speed by selecting one of modes. If you select MANUAL,
the following sub-menu will appear.
- SPEED [for 25 fps: 1/25~1/30,000 / for 30
fps: 1/30~1/30,000]: Control the image
brightness by adjusting the shutter speed.
SENS-UP [x2~x32] :
This feature ensures clear images at night or under low light conditions.
AGC [0~20] :
This function is used to create brighter images. As the AGC value increases, the overall
screen gets brighter but the level of noise is also increasing.
6.3. WHITE BAL (White Balance)
This function is used to control the white balance under different lighting conditions.
Adjusting the setting calibrates the camera for correct and natural colour rendering.
WHITE BAL [ATW, AWB, AWC
- ATW: Select this mode when the colour temperature is between 1,800˚K and 10,500˚K.
- AWB: This function is used to search for colours that match the ambient environment
well. Select this mode when the colour temperature is between 3,000˚K and 7,000˚K.
→SET: To find the optimal luminance level for the current environment, point the
- AWC
camera towards a sheet of white paper and press the SET UP stick. If the environment
changes, re-adjust this setting.
→SET, MANUAL] :
English
5
Page 8

- MANUAL: Select this option to fine-tune
the White Balance manually. Set the White
Balance first by using the ATW or the AWC
mode. After that switch to MANUAL mode
and press the SET UP stick. Fine-tune the
White Balance (KELVIN) and change the
BLUE and RED values to meet the best
result.
NOTE:
The White Balance may not work properly under the following conditions. If that is the
case, select the ATW or AWB mode (automatic mode).
1. When the colour temperature of the environment surrounding the subject is out of the
control range (e.g. clear sky or sunset).
2. When the ambient illumination of the subject is dim.
3. When the camera is directed towards a fluorescent light or is installed in a place
where the illumination changes dramatically, the White Balance operation may become
unstable.
6.4. BACKLIGHT
To overcome difficult light situations, this GRUNDIG camera features different options to
improve the image quality. You can choose between HLC, BLC, WDR, OFF.
This function is used for backlight compensation. Please choose from OFF, WDR, BLC
and HLC.
OFF: Deactivated.
HLC (High Light Compensation):
This function is used to surpress or mask a
strong light source (for example, headlights
of cars during night-time) so that other
subjects can be seen in more detail.
- LEVEL: Adjust the brightness level from
which on the light source is to be masked
out.
- MODE: Choose the mode.
6
English
Page 9
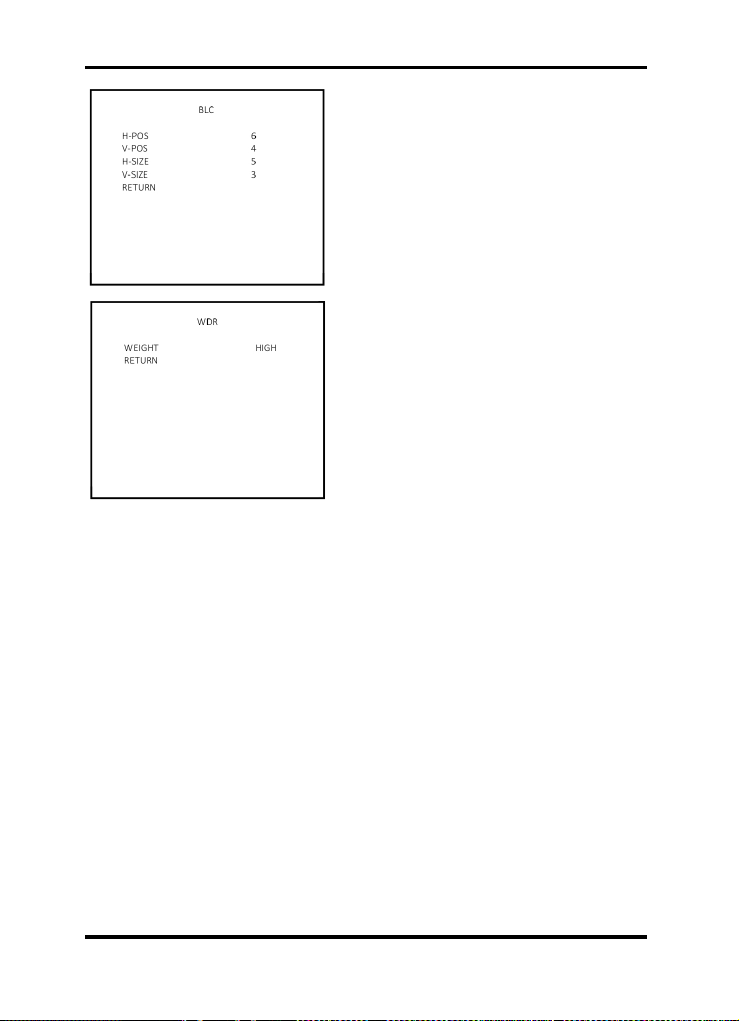
BLC (Back Light Compensation):
This function is used to counterbalance the
screen image by increasing the brightness
so that a subject which appears dark due to
a strong backlight can be displayed in more
detail. If you select BLC, a submenu
appears where you can make finer
adjustments.
- H-POS/ V-POS/ H-SIZE/ V-SIZE: Define
the position and size of the area of interest
by changing the position & size.
WDR:
The WDR (Wide Dynamic Range) function
works to correct excessive light within the
frame to produce a usable image. When the
image has simultaneous bright and dark
areas, it makes both areas distinct. If you
select WDR, a submenu appears where you
can make finer adjustments.
- WEIGHT [MIDDLE, HIGH, LOW]: Select
the WDR level of the camera.
NOTE: The WDR function might lead to a reduced framerate and “ghost” effects in areas
with very bright background.
6.5. DNR (Digital Noise Reduction)
This function is used to improve the picture quality by filtering the noise which is
generated under low bright light conditions. You can set 3 different levels [LOW,
MIDDLE, HIGH] here.
DNR [OFF, LOW, MIDDLE, HIGH] :
Using DNR (Digital Noise Reduction), you can control the noise on the screen. This is
especially useful when the image is very noisy due to low light.
NOTE: If the DNR function is used, the cancellation of the noise will be excellent. The
higher the compensation proportion is raised, the better the effect of noise cancellation
will be, but a ghost effect may also occur.
6.6. DAY/NIGHT
This function is used to improve the camera's sensitivity at night or when the brigthness
level of the ambient environment is low.
DAY & NIGHT [AUTO, COLOR, B/W, EXTERN] :
- EXTERN: The Day and Night function will be adjusted by the built-in Light Sensor.
English
7
Page 10

> SMART IR [0~20] : This option controls
the IR LED (bright portion base), saturation
is not expected.
> EXTERN S / W [HIGH, LOW]: Set the
setting of the external Switch to HIGH or
LOW.
> DELAY [LOW, MIDDLE, HIGH]: Set the
working time of the D/N filter.
- AUTO: This mode switches to ‘Colour’ in a
normal environment, but switches to ‘B/W’
mode when the ambient illumination is low.
To set up the switching time for AUTO
mode, press the SET UP stick. In B/W
mode, you can turn the BURST signal ON
or OFF.
> SMART IR [0~20]: This option controls the IR LED (bright portion base), saturation is
not expected.
> AGC THRES [0-20]: Execute the Day/Night switch depending on the AGC level that is
used to increase the brightness of the image. Higher values require a darker illumination
to execute the switch.
> AGC MARGIN [0-20]: Define the difference between the Day/Night & Night/Day switch
based on AGC THRES. Higher values will increase this distance and can help to prevent
continuous switching between Day & Night mode.
> DELAY [LOW, MIDDLE, HIGH]: Set the working time of the D/N filter.
- COLOR: The picture will be always displayed in colour.
- B / W: The picture will be always displayed in black & white. In B/W mode, you can turn
the BURST signal ON or OFF.
8
English
Page 11

> SMART IR [0~20]: This option controls
the IR LED (bright portion base), saturation
is not expected.
6.7. IMAGE
Here you can optimise the image quality by
adjusting different options.
SHARPNESS [0 ~ 20] :
Adjusts the image sharpness. If the level
goes up excessively, it may affect the video
image and generate a noise.
GAMMA [0.45 ~ 0.65] :
Changes the gamma curve of the camera.
COLOR GAIN [0 ~ 20] :
Control the saturation of colour of the video image.
MIRROR [ON, OFF] :
Mirrors the image horizontally on the screen.
FLIP [ON, OFF] :
Flips the image vertically on the screen.
D-ZOOM [1.0x~8.0x] :
You can use the up to x8 bi-cubic linear digital zoom.
NOTE: Please note that the higher the digital zoom magnification is, the lower the
resolution will be.
ACE [OFF, LOW, MIDDLE, HIGH] :
This is an intelligent light level control to over come even strong backlight conditions. If
strong back light occurs, please set accordingly a higher value.
DEFOG [ON, OFF] :
This function helps to improve the image in a foggy or dusty weather condition. If you
choose ON, a sub-menu will appear. Here you can adjust the position, level and size of
the area where the defogging will be adjusted.
English
9
Page 12

- MODE [AUTO, MANUAL] : Please
choose a mode for the DEFOG function.
- LEVEL [LOW, MIDDLE, HIGH] : Please
choose a level for the DEFOG function.
SHADING [ON, OFF] :
Compensates the shading effects of lenses
when the lens is set to a very wide angle.
This function will reduce the brightness
difference between the centre and the
edges. If you select ON, a submenu
appears where you can make finer
adjustments.
- WEIGHT [0%~100%] : You can set
different levels here.
PRIVACY [ON, OFF] :
Masks areas that you want to hide on the
screen. Switch between ON and OFF to
activate or deactivate this function.
- ZONE NUM [0 ~ 15]: Select a mask out of the 15 mask areas and set the options
below for the selected mask.
- ZONE DISP [ON, OFF]: Choose ON to activate privacy masks and press OFF to
deactivate masks.
- H-POS [0 ~ 60]: Define the horizontal start position of the privacy mask.
- V-POS [0 ~ 33]: Define the vertical start position of the privacy mask.
- H-SIZE [0 ~ 60]: Define the horizontal size of the privacy mask.
- V-SIZE [0 ~ 33]: Define the vertical size of the privacy mask.
- Y LEVEL [0 ~ 20]: Define the brightness of the mask colour.
- CR LEVEL [0 ~ 20]: Define the red amount of the mask colour.
- CB LEVEL [0 ~ 20]: Define the blue amount of the mask colour.
10
English
Page 13

6.8. MOTION
This function is used to detect moving
objects in the monitored area.
> SENSITIVITY [0~20]: Set the sensitivity of the motion detection.
> WINDOW TONE [0~6]: Here you can set up the tone of the mask area.
> WINDOW USE [0~3]: Here you can set up the zone of the mask area.
> WINDOW ZONE [ON, OFF]: Here you can set the usage of the mask area to ON or
OFF.
> DET H-POS [0~60]: Moves the Detect area horizontally.
> DET V-POS [0~34]: Moves the Detect area vertically.
> DET H-SIZE [0~60]: Defines the horizontal size of the Detect area.
> DET V-SIZE [0~34]: Defines the vertical size of the Detect area.
> ALARM [ON, OFF]: No function in this camera model.
NOTE: After the area setting is done, you can change back the WINDOW TONE to ‘0’
so that the border does not show. Setting the area to Full screen is highly recommended.
6.9. SYSTEM
Here you can configure camera related
functions and data.
COM.:
No function in this camera model.
English
11
Page 14

IMAGE RANGE [FULL, COMP, USER] :
This is a control function for the video signal for monitors. Here you can adjust the rate
of the YC signal to 100%(FULL), 75%(COMP) or 100%~75%(USER). Through adjusting
this function, you can find the most suitable signal value for your monitor type. When
selecting "USER", you can make finer adjustments in a sub-menu that will appear.
OUTPUT MODE [720P, 720P CROP, 1080P] :
This camera model supports the following resolutions for the video output:
1920x1080(1080p) & 1280x720(720p). Choose a suitable output type (resolution) for the
screen you want to use.
COLOR SPACE [YUV, SD-CBCR, HD-CBCR] :
Select a suitable colour setting to obtain a warmer or a colder image.
FRAME RATE [25 FPS, 30 FPS] :
Choose a frame rate.
CVBS [PAL, NTSC] :
The TV system can be manually switched to 'PAL' or 'NTSC' under the menu item
"CVBS" (Composite Video Blanking and Sync).
LANGUAGE [ENG] :
Currently only the English language is available for the OSD menu.
COLORBAR [OFF, ON] :
Check the current condition of the monitor with the colour bar.
RESET [ON
↓] :
All settings will be restored to factory default.
6.10. EXIT
Exits the menu setting.
12
English
Page 15

Specifications GCT-K2326T
Image Sensor 1/2.8" CMOS Progressive Scan Sony Exmor™
Pixels - Effective 1920(H) x 1080(V)
Col/B&W Auto (ICR) / Color / B/W / External
Sensitivity C olour 0.9 lux@50IRE (AGC max, Sensup OFF)
Sensitivity B&W 0 Lux LED IR on
Video Outputs 1 CH HD-TVI (BNC), 1 ch Composite 1.0Vp-p 75Ω (BNC)
High Speed Shutter 1/25 ~ 1/30.000 sec, auto, Flicker
S/N Ratio >50dB (AGC off)
Lens Focal Length 2.8 ~ 12 mm
Viewing Angle 120.9°(H) ~ 37.1°(H) / 61.4°(V) ~ 20.7°(V)
Lens Drive Type Auto iris (DC)
Iris F-Number F= 1.4 ~ 360
Sens Up Off ~ x32, auto
AGC 0~20 adjustable, 20=default
WDR Off/Low/Middle/High
BLC Back Light On/ Off/ Area/ Level
De-Fog Off/On
BLC Back Light On/ Off/ Area/ Level
White Balance ATW, AW B, AWC, Manual
Digital Noise Reduction (DNR) 2DNR/ 3DNR (Off/O n)
Digital Zoom Off ~ 8x
Motion Detection On/ Off/ Sensitivity/ 4 Area setting
Number of Privacy Zones 16 programmable zones
Reverse Off/ H-REV/ V-REV
OSD English
IR LED 42 pcs.
Optical W avelength 850 nm
Max. IR Distance 30/45 m (according to scene reflexion)
Smart IR Off / On (1~20)
Coaxial control Pelco-C (Coaxitron®)
Protection Rating IP66
Humidity less than 90%, non condensing
Operating Temperature -25°C ~ +55°C
Supply Voltage 24 Vac / 12 Vdc
8.5 (LED on) WPower Consumption
1.15 kgWeight
Ø 99 x 223.5 mmDimensions (wxhxd)
13English
Page 16

Dimensions
14 English
Page 17

EC Declaration of Conformity
GCT-K2326T 2 Megapixel Full HD-TVI Bullet Camera IR 42 LED WDR
It is hereby certified that the products meet the standards in the following relevant
provisions:
EC EMC Directive 2004/108/EC
Applied harmonised standards and technical specifications:
EN 55022: 2010 / AC: 2011
EN 61000-3-2: 2014
EN 61000-3-3: 2013
EN 50130-4: 2011
ASP AG
Lüttringhauser Str. 9
42897 Remscheid
Germany
Remscheid, 26.06.2015
Ludwig Bergschneider
CEO
15English
 Loading...