

Page 1

COLOR TELEVISION
XENTIA 55
ST 55-405/8 DOLBY
ǵ
ENGLISH
21964 - 941.0301
;
Page 2

2
CONTENTS
_________________________________________________________________________
4 Installation and safety
6 At a glance
The front of the TV set
The back of the TV set
The remote control
8 Connection and preparation
Connecting aerial and mains cable
Putting batteries into the remote control
9 Settings
Setting TV channels – automatically
(
with ATS searching)
Picture settings
Sound settings
14 Television mode
Basic functions
16 Teletext mode
TOP or FLOF text mode
Normal text mode
Additional functions
Selecting functions – from the symbol bar
20 Convenience functions
... in the »SPECIAL FUNCTIONS« menu
Setting switch-off time with the »SLEEP TIMER« menu
Page 3

CONTENTS
__________________________________________________________________________________
ENGLISH
3
22 Child-proof lock
23 Operating with external appliances
Decoder or satellite receiver
Video recorder or SET-TOP box
Camcorder
Headphones
27 Special settings
Limiting channel selection
Set TV channels
Manually adjusting colour standards
31 Information
Technical data
Service information for the dealer
EURO-AV (Scart) socket contact assignment
Customer information
Rectifying malfunctions
Page 4
4
INSTALLATION AND SAFETY
_______________________________
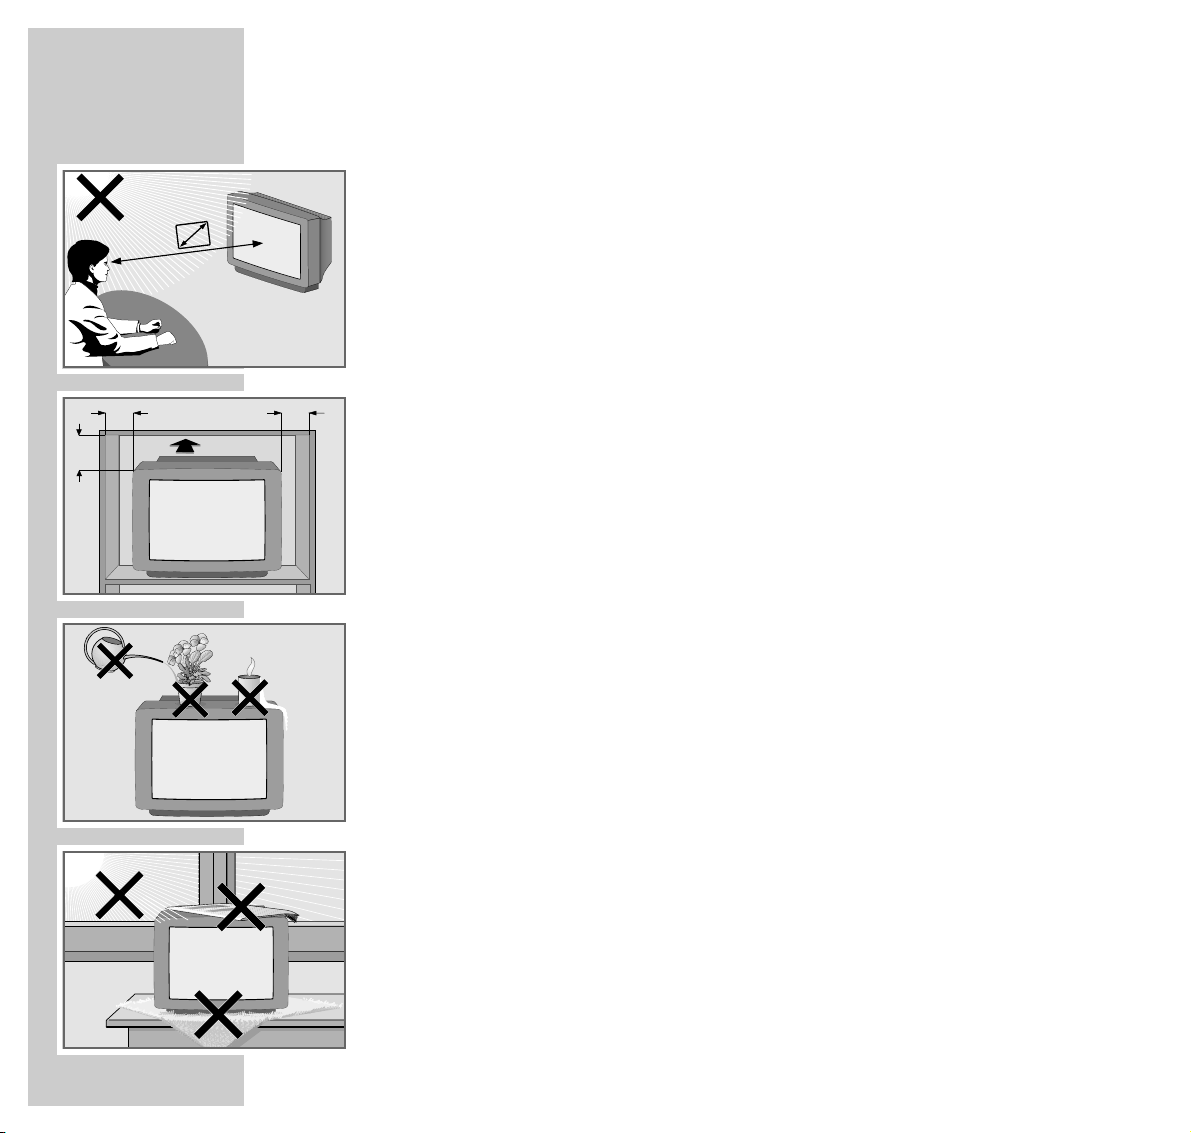
Please observe the following notes when setting up and connecting the TV set:
This set has been designed for the reception and reproduction of picture and
sound signals.
Any other use is explicitly forbidden.
The ideal viewing distance from the screen is 5 times the diagonal width of the
screen.
External light shining on the screen adversely affects picture quality.
Assure that there is enough space inside the cabinet.
The TV set is designated for operation in dry rooms. Should you nevertheless
operate it outside, make absolutely sure that it is protected against dampness
(rain, water splashes). Never expose the TV set to moisture of any sort.
Do not place vessels filled with fluid (vases or similar) on the TV set. The vessel
may tip over and the fluid may cause an electrical hazard.
Put the TV set on an even and hard surface. Do not place objects (for example,
newspapers) on the TV set and do not place the set on a mat or similar object.
Do not place the TV set close to the heating or in direct sunlight, as it could
overheat.
Heat buildup can be dangerous and is detrimental to the service life of the
equipment. From time to time, have a technician come to clean the inside of the set.
Keep the TV set away from magnetic fields (for example, stereo speakers).
10
cm
10
cm
20
cm
20 cm
Krieg am Golf
5 x
Page 5
ENGLISH
5
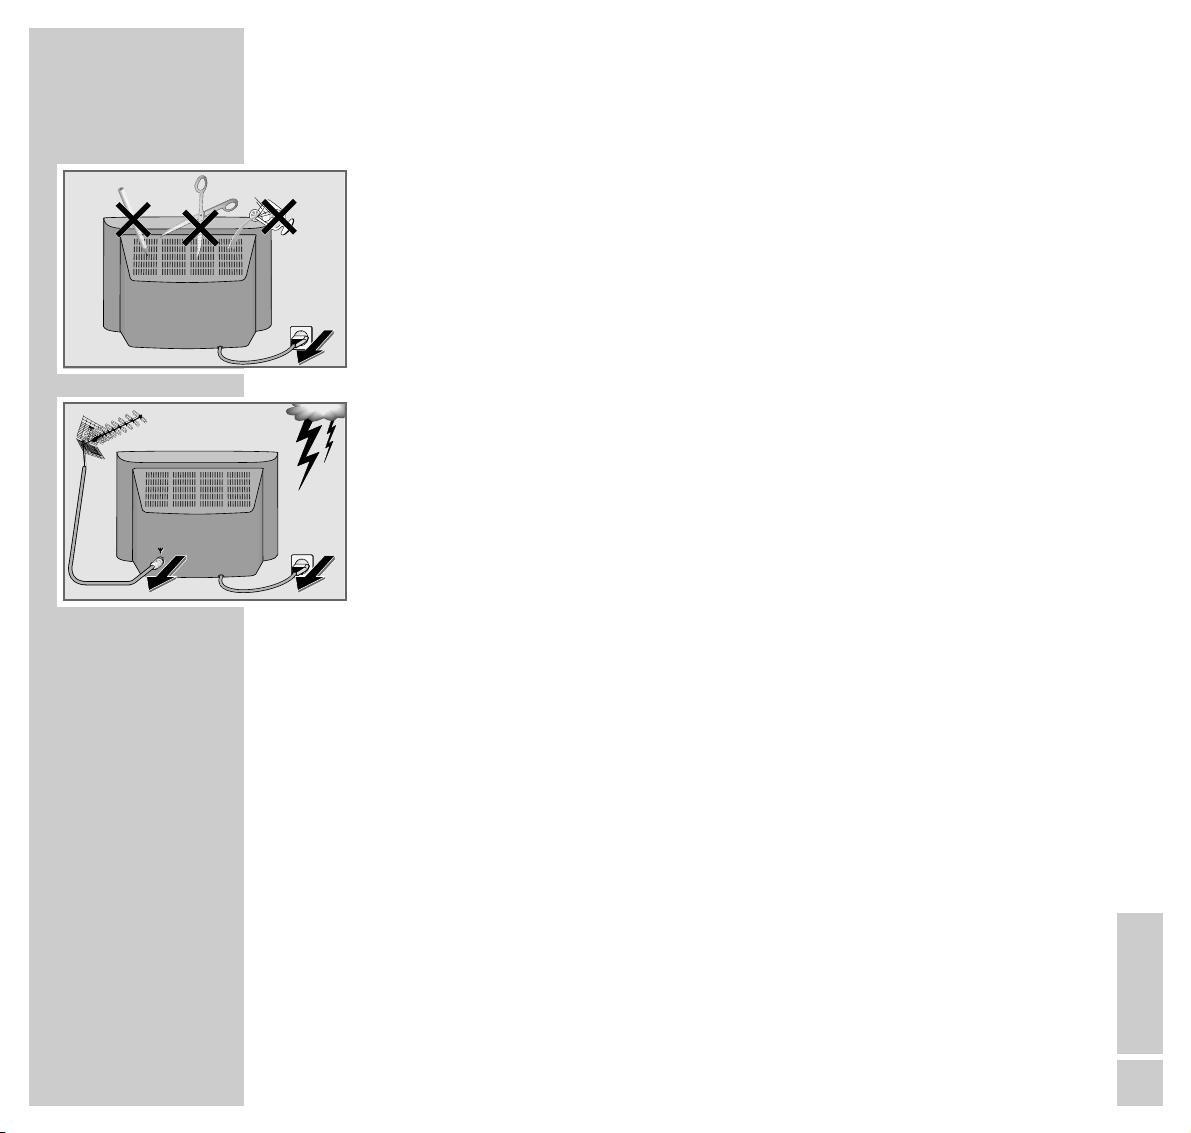
Do not open the TV set under any circumstance. The manufacturer accepts no
liability for damage resulting from unauthorised tampering.
Make sure that the mains cable does not become damaged.
The TV set may only be operated using the mains cable supplied.
Electrical storms represent a danger for every type of electrical device. Even if
the set is switched off, it could be damaged by a lightning strike hitting the
mains and/or the aerial lead. Therefore, always disconnect the mains plug and
aerial plug when there is an electrical storm.
When cleaning the screen, use only a soft, damp cloth. Use clean water only.
! SERVICE !! SERVICE !! SERVICE !
INSTALLATION AND SAFETY
___________________________________________________
Page 6
6
AT A GLANCE
___________________________________________________________________
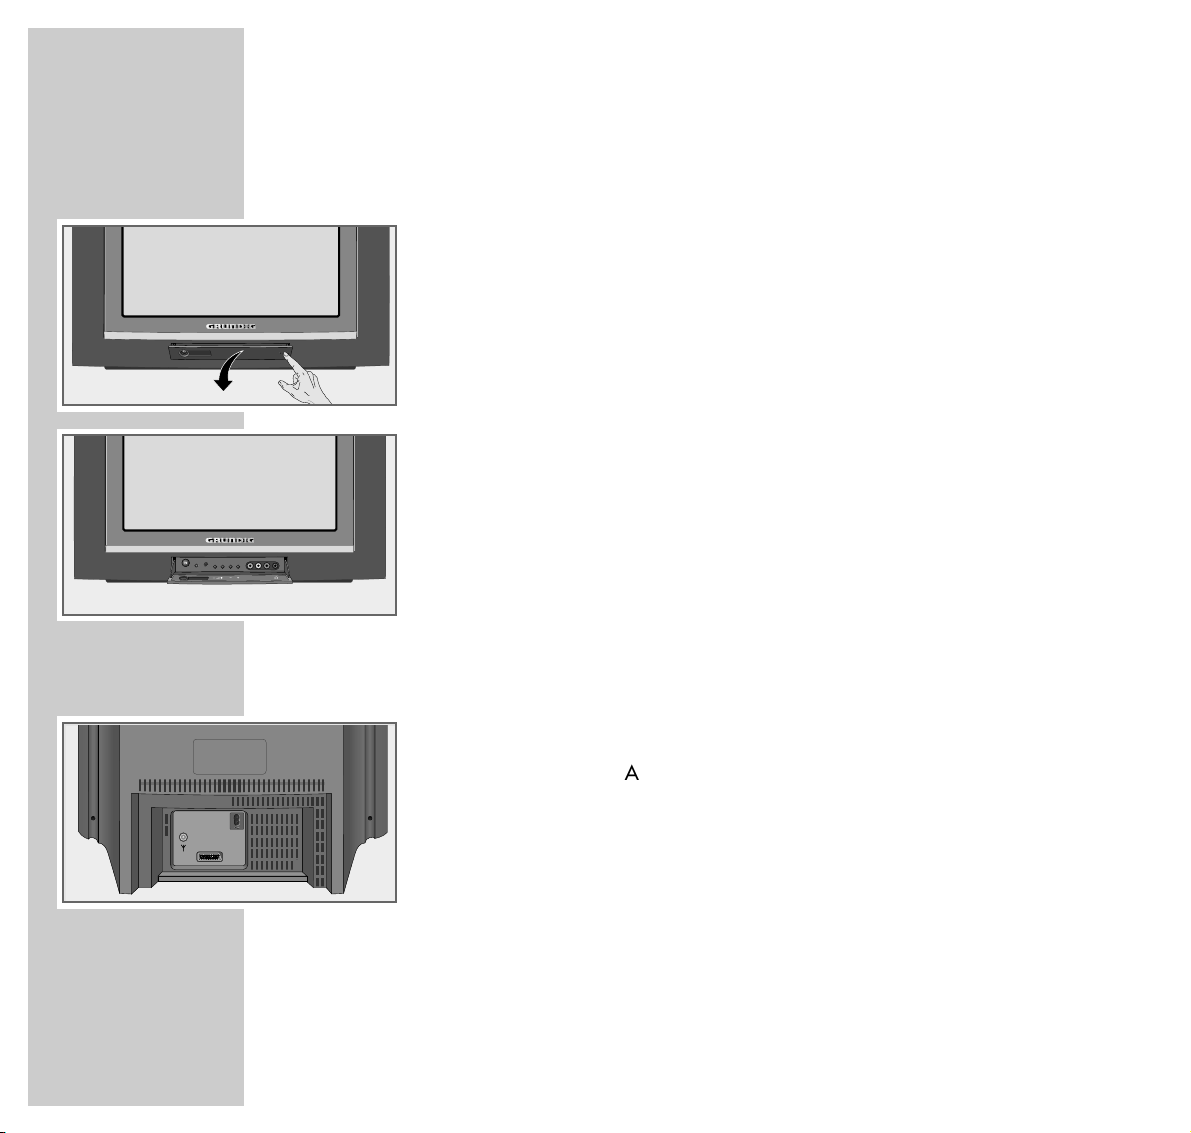
The front of the TV set
IO
Switches the TV set on/off
–
z + Volume
–
P +
Channel selection
Switches the TV set to standby mode (»P+« only)
VIDEO IN Video input for camcorder.
L AUDIO IN R Audio input for camcorder.
yy
Headphone connection
Connections on the back of the set
ʋʋ
Mains cable to the socket
ÉÉ
Aerial socket
EURO-AV EURO-AV (Scart) socket (CSCC, SVHS)
VIDEO IN
L AUDIO R
P
AV1
Page 7
ENGLISH
7
AT A GLANCE
_____________________________________________________________________________
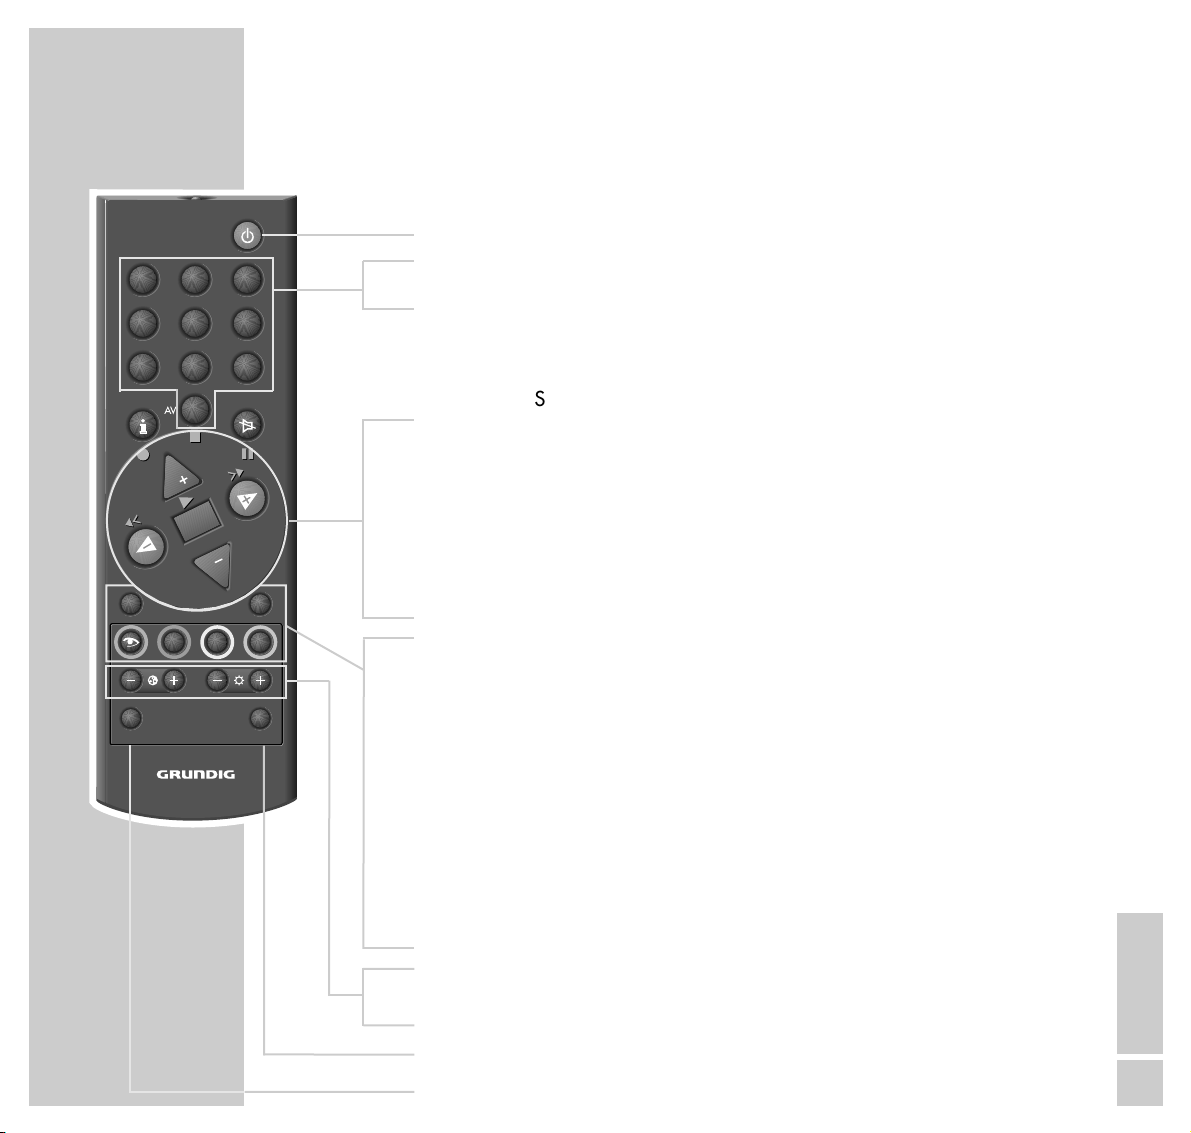
The remote control
ǼǼ
Switches off the TV set (standby).
1…9 Switches the TV set on from standby mode;
AV 0 selects channels and AV channel positions directly.
i Calls up the »DIALOG CENTER« (with »i « and »OK«);
selects previous menu page.
ĭĭ
Sound on/off (mute).
,,..
Switches the TV set on from standby mode (»,,« only);
selects channels step by step;
moves the cursor up/down.
FF EE
Changes the volume;
moves the cursor to the left/right.
OK Changes and activates various functions;
calls up the channel selection list.
AUX Selection button for various functions.
TXT Switches between teletext mode and television mode;
completes menu function.
zz
Calls up the »PICTURE« menu;
turns one page back in teletext mode.
ȄȄ
Clock on/off;
turns to the next available page in teletext mode.
E
Selects chapter or held page desired in teletext mode.
FF
Calls up the »SOUND« menu.
Selects topic desired, or fill in waiting time, in teletext mode.
– i
+
Adjusts the colour.
–
vv
+
Adjusts the brightness.
SAT Switches to the operation of a GRUNDIG satellite receiver.
VIDEO Switches to the operation of a GRUNDIG video recorder.
TELEP ILOT 750C
VIDEO
VIDEO
21
3
654
987
0
P
OK
P
TXTAUX
E
Ȅ
F
SAT/TV
Page 8

8
CONNECTION AND PREPARATION
_______________
Connecting aerial and mains cable
1 Insert the aerial cable of the house aerial into aerial socket »
ÉÉ
« on the
TV set.
2 Insert the mains cable supplied into socket »
~
« on the TV set.
3 Insert the mains cable plug into the mains socket.
Putting batteries into the remote control
1 Open the battery compartment by pulling off the cover.
2 Insert batteries (UM-3 or AA, 2 x1.5 V).
Observe the polarity when inserting the batteries (marked on base of battery
compartment).
Note:
When a battery is dead, the indication »Battery« appears.
If your television does not react to the remote control commands correctly,
then the batteries could be dead. Always remove empty batteries. There is no
liability for damage caused by leaking batteries.
TV R
AV1
Page 9

ENGLISH
9
SETTINGS
____________________________________________________________________________
Setting TV channels –
automatically (with ATS searching)
The set is equipped with an automatic channel search system.
You start the ATS search and can then sort the television channels into an order
of your choice.
There are 99 channel positions available, which can be assigned to television
channels from the aerial or from the cable connection as desired.
You can also delete from the channel list television channels which are found
more than once, or which have poor reception.
1 Switching on the TV set with »IO « on the TV set.
– The »LANGUAGE SELECTION« menu will be displayed.
2 Select a language with »
,,
«or»..« and confirm with »OK«.
– The »SELECT COUNTRY« menu will be displayed.
3 Select a country with »
,,
«or»..« and confirm with »OK«.
Note:
If your country is not displayed in, select the line »others« or »France«.
The »MANUAL TUNING« menu will be displayed.
Using »,,«or»..«, select either »Cable (frequency in MHz)
«
or
»Cable/Aerial (channel)«, and confirm with »OK«.
– The »AUTOMATIC TUNING SYSTEM« menu will be displayed, and the
automatic channel search will begin.
– Depending on the number of channels received, this may take a minute or
longer.
– Following the search, the TV set will switch to channel position 1 and the
menu »SORT« will be displayed.
LANGUAGE SELECTION
OK
CZ Cestina
D Deutsch
DK Dansk
E Espanol
F Francais
FIN Suomi
GB English
H Magyar
I Italiano
N Norge
NL Nederlands
P Portugues
PL Polski
S Svenska
SI Slovenija
SK Slovensky
ĵ
–-–-––––––––––––––––––––––––––––––
Ł
SELECT COUNTRY
OK
A Austria
B Belgique
CH Schweiz
CZ Ceska republ.
D Deutschland
DK Danmark
E Espana
F France
FIN Suomi
GB Great Britain
1/2
ĵ
––––––––––––––––––––––
Ł
AUTOMATIC TUNING SYSTEM
Please wait ...
■–
_–_–_–_–_–_–_–_–_–_–_–_–_–_–_–_–_–_
Page 10

10
SETTINGS
___________________________________________________________________________________
Deleting TV channels
1 In the »SORT« menu, select the TV channel to be deleted with »
,,
«or
»..«.
2 Delete the TV channel with »AUX «.
Note:
To delete further TV channels, repeat points 1 and 2.
Sorting TV channels
1 In the »SORT« menu, select the TV channel to be moved with »
,,
«or
»..«.
2 Mark the TV channel with »OK«.
3 Select a new channel position with »
,,
«or»..«.
4 Save the setting with »OK«.
Note:
To sort further TV channels, repeat points 1 to 4.
Completing the settings
1 Complete the settings with »TXT«.
SORT
OK Sort
AUX Delete
Ǻ Return
TXT TV
ĵ
–––––––––––––––––
Ł
P 01 ARD
P 02 ZDF
P 03 RTL
P 04 SAT1
P 05 PRO7
P 06 BR 4
P 07
P 08
P 09
P 10
SORT
OK Sort
AUX Delete
Ǻ Return
TXT TV
ĵ
–––––––––––––––––
Ł
P 01 ARD
P 02 ZDF
P 03 RTL
P 04 SAT1
P 05 PRO7
P 06 BR 3
P 07
P 08
P 09
P 10
Page 11

ENGLISH
11
SETTINGS
____________________________________________________________________________________
Picture settings
Setting brightness, colour, contrast, tint and definition
1 Call up the »PICTURE« menu with »z«.
– The »PICTURE« menu appears.
2 Select the line »Brightness«, »Color«, »Contrast«, »Sharpness« or »Tint« with
»,,«or»..« and set the value desired with »FF«or»EE«. (With transmissions in NTSC standard, will appear in addition in the picture menu and
can be adjusted.)
Note:
The set has been tested with maximum contrast in order to control the reliability of all modules. Depending on the location of the set and the light level in
the room (ambient light) it is nevertheless a good idea to reduce the contrast
slightly for optimum picture quality.
3 Complete the setting with »TXT«.
Perfect Clear
Perfect Clear increases contrast in dark areas of the picture. This gives the
picture depth.
1 Call up the »PICTURE« menu with »z«.
– The »PICTURE« menu appears.
2 Select the line »Perfect Clear« with »
,,
«or»..« and switch the function
on or off with »FF«or»EE«.
3 Complete the setting with »TXT«.
PICTURE
TXT
Brightness ľ ■■■■■■■■■ –
_–_–_
ı
Color ■■■■■■■–
_–_–_–_–_
Contrast ■■■■■■■–
_–_–_–_–_
Sharpness ■■■■■■■–
_–_–_–_–_
n
Perfect Clear on
ĵ
–––––––––––
Ł
PICTURE
TXT
Brigthness ■■■■■■■■■ –
_–_–_
Color ■■■■■■■–
_–_–_–_–_
Contrast ■■■■■■■–
_–_–_–_–_
Sharpness ■■■■■■■–
_–_–_–_–_
n
Perfect Clear ľ on ı
ĵ
––––––––––
Ł
Page 12

12
SETTINGS
____________________________________________________________________________________
Sound settings
Stereo depth
Widens the acoustic pattern for stereo programmes and improves it for mono
programmes.
1 Call up the »SOUND« menu with »
FF
«.
2 Select the »
ʀ. ǁ
» lines with »,,«or»..«.
3 Select »
ʀ
.......
ǁ
« with »FF«or»EE«.
4 Complete the setting with »TXT«.
Dolby Surround*
Dolby Surround is an electronic solution which is fully integrated in the TV and
requires only 2 additional speakers to create Dolby Surround effects.
1 Call up the »SOUND« menu with »
FF
«.
2 Select the »
ʀ. ǁ
» lines with »,,«or»..«.
3 Select »Dolby Surround« with »
FF
«or»EE«.
4 Complete the setting with »TXT«.
* Under license from the Dolby Laboratories Licensing Corporation.
DOLBY and the double D symbol ij are trademarks of the Dolby Laboratories Licensing
Corporation.
SOUND
TXT
ʀʀ. ǁǁ
ľ
ʀ
. . . . . .
ǁ
ı
ʀʀ
P01 MONO
yy
MONO
u
ɼɼ
ɦɦ
ĵ
––––––––––––––––--–––
Ł
SOUND
TXT
ʀʀ. ǁǁ
ľ Dolby Surround ı
ʀʀ
P01 MONO
yy
MONO
u
ɼɼ
ɦɦ
ĵ
––––––––––––––––--–––
Ł
Page 13

ENGLISH
13
SETTINGS
____________________________________________________________________________________
Changing the balance, the bass and the treble
1 Call up the »SOUND« menu with »
FF
«.
2 Select the lines required »
uu
« – balance, »ɼ « – bass or »ɦ« – treble with
»,,«or»..« and set the required value with »FF«or»EE«.
3 Complete the setting with »TXT«.
Stereo (two-channel), mono
If the device receives two-channel transmissions – e.g. a film in the original on
sound channel B (display: »MONO B«) and the synchronised version on sound
channel A (display: »MONO A«) – you can select your preferred sound channel.
If the device receives stereo broadcasts, it automatically switches to stereo sound
playback (display: »Stereo«).
The sound setting last selected will be stored according to the channel.
1 Call up the »SOUND« menu with »
FF
«.
2 Select line »
ʀ
P01« with »,,«or»..«.
3
If the sound reproduction of a particular channel is constantly mono, select the
lines »ʀP..« with »,,«or»..« and confirm with »OK«.
4 Complete the setting with »TXT«.
Note:
Repeat the setting to cancel this function.
SOUND
TXT
ʀʀ. ǁǁ
ʀ
..
ǁ
ʀʀ
P01 MONO
yy
MONO
u
ɼɼ
ɦɦ
ľı
ĵ
––––––––––––––––--–––
Ł
SOUND
OK Mono Fix TXT
ʀʀ. ǁǁ
Dolby Surround
ʀʀ
P01 ľ MONO ı
yy
MONO
u
ɼɼ
ɦɦ
ĵ
––––––––––––––––--–––
Ł
Page 14

14
TELEVISION MODE
_______________________________________________________
Basic functions
Switching on/off
1 Switch on the TV set with »IO « on the TV set.
– The TV set switches on with the last channel position viewed.
2 Switch TV set to standby mode with »
ǼǼ
«.
Switch the TV set on from standby mode with »1…AV 0« or »PP«.
3 Turn the TV set completely off with »IO « on the TV set.
This saves energy.
Selecting channel positions
1 Select channel positions (including AV) directly with » 1…AV 0«.
or
2 Select channel positions step by step with »
,,
«or»..«;
or
3 Blend the channel selection list in and out with »OK«, select the TV channel
desired (not including »AV«) with »,,«or»..« or with »FF«or»EE«.
Adjusting volume, brightness and color contrast
1 Adjust the volume with »
FF
«or»EE«.
2 Adjust the brightness with »–
v
« or »v+«.
3 Adjust the colour contrast with »– i « or »i +«.
Notes:
Each value changed is saved after a few seconds.
Reset to the factory setting by pressing »AUX « and then »OK«.
TELEP ILOT 750C
VIDEO
VIDEO
21
3
654
987
0
P
OK
P
TXTAUX
E
Ȅ
F
SAT/TV
Page 15

ENGLISH
15
ENGLISH
TELEVISION MODE
____________________________________________________________________
Switching sound on/off
1 Switch the sound on or off with »
ĭĭ
« (mute).
Blending clock display in/out
1 Blend the clock display in or out with »
ȄȄ
« (only for TV channels with tele-
text).
Blending-in channel position number briefly
1 Blend the channel position number in or out with »i«.
– The station name is also displayed with some television channels.
Displaying channel position number constantly
1 Press »i« and wait until the »OK DIALOG CENTER« display disappears.
– The channel position number will remain on the screen.
2 Position the channel position number before the »OK DIALOG CENTER« dis-
appears by selecting the desired position with »FF«or»EE« (upper left or
right).
3 Blend out the channel display number by briefly pressing »i« twice.
TELEP ILOT 750C
VIDEO
VIDEO
21
3
654
987
0
P
OK
P
TXTAUX
E
Ȅ
F
SAT/TV
Page 16

16
TELETEXT MODE
______________________________________________________________
TOP text or FLOF text mode
1 Switch to teletext with »TXT«.
Either the contents page 100 or the teletext page last viewed will appear.
2 The teletext pages can also be selected directly with »1...0« (return to con-
tents page 100 with »i «).
Note:
An information line consisting of a red, green, yellow and blue lettering field
is located at the bottom of the screen. The remote control has corresponding
colour-coded buttons.
3 Turn back one page or select the chapter desired using »
zz
« (red).
4 Turn forward one page or select the topic desired with » Ȅ « (green).
5 Select the chapter desired with »
E
« (yellow).
6 Select the topic desired with »
FF
« (blue).
7 Switch off teletext mode with »TXT«.
Switching TOP/FLOF text on/off
If TOP/FLOF text is not available, you can switch to normal text (Basictext).
1 Call up »VIDEOTEXT MENU« with »i« and »OK«.
2 Select the line »TOP/FLOF« with »
,,
«or»..« and switch »TOP/FLOF«
on or off with »FF«or»EE«.
3 Complete the setting with »TXT«.
VIDEOTEXT MENU
TXT
TOP/FLOF ľ on ı
Lang. Group P01 West+GR+TR
ĵ
–––––
Ł
TELEP ILOT 750C
VIDEO
VIDEO
21
3
654
987
0
P
OK
P
TXTAUX
E
Ȅ
F
SAT/TV
Page 17

ENGLISH
17
ENGLISH
TELETEXT MODE
_________________________________________________________________________
Normal text mode (Basictext)
1 Switch to teletext with »TXT«.
– Either the contents page 100 or the teletext page last viewed will appear.
2 The teletext pages can also be selected directly with »1...0« (return to con-
tents page 100 with »i «).
3 Turn back one page with »
zz
« (red).
4 Turn to the next page available with »Ȅ « (green).
5 Hold multiple pages with »
E
« (yellow).
6 Filling in waiting time with »
FF
« (blue).
– This switches temporarily to the current programme.
7 Select the desired sub-page with »0« and »;« or »:«.
– The sub-page selected will appear after a short time.
8 Switch off teletext mode with »TXT«.
Additional functions
Select teletext pages directly (Page-Catching)
Many contents pages contain three-digit page numbers which may be selected
directly.
1 Select the page number desired with »
,,
«or»..«.
– »Pagecatching OK« will appear on the upper edge of the picture; a cursor
will be positioned on the first or last page number.
2 Confirm with »OK«.
– The page will appear after a short time.
TELEP ILOT 750C
VIDEO
VIDEO
21
3
654
987
0
P
OK
P
TXTAUX
E
Ȅ
F
SAT/TV
Page 18

18
TELETEXT MODE
_________________________________________________________________________
Filling in waiting time
The waiting period before a teletext page appears can be filled in.
1 Enter the teletext page number with three digits using the »0… 9«.
2 Call up the “Symbol bar” with »AUX«. Select the »X« symbol using »
FF
«
or »EE« then press »OK«.
– You will see the television picture and the »X« symbol appears in the top
part of the screen. As soon as the page number appears instead of the »X«
symbol, the page has been found.
3 Display the page found by pressing »OK«.
Enlarging the teletext page
1 Enlarge the teletext page by pressing »
i
+
«.
Calling up sub-pages
1 Call up sub-pages with »–
i
« (not in normal text mode).
2 Select the four digit of the sub-page desired with »0...9«.
– The sub-page selected will appear after a short time.
Page hold for multiple pages
A multi-page display can contain several sub-pages which are automatically
paged forward by the broadcasting station.
1 Hold the sub-page with »–
v
«.
Page 19

ENGLISH
19
ENGLISH
TELETEXT MODE
_________________________________________________________________________
Reveal answer
Some teletext pages contain “hidden answers” or information. These can be
called up.
1 Reveal the information with »
v
+«.
2 Hide the information with »
v
+«.
Selecting functions – from the symbol bar
1 Switch to teletext mode with »TXT«.
2 Call up the “Symbol bar” with »AUX«.
– The symbol bar will appear at the bottom of the screen.
The symbol bar has the following functions:
Double character size
Fill waiting time
Call up sub-page directly
Reveal answer
Hold page
3 Select the function with »F« or »E« and call up with »OK«.
4 Switch off teletext mode with »TXT«.
00
D
X
STOP
Page 20

20
... in the »SPECIAL FUNCTIONS« menu
1 Call up »DIALOG CENTER« by pressing »i « and then »OK«.
2 Select the line »SPECIAL FUNCTIONS« with »
,,
«or»..« and confirm
with »OK«.
Note:
Further operating instructions can be found in the chapters which follow.
Switch picture/sound scales on/off
When adjusting volume, brightness and colour contrast, the corresponding
scale appears on the screen. This scale can be switched off.
1 Select the line »Pic./sound opt.« with »
,,
«or»..« and select »off« with
»FF«or»EE«.
2 Complete the setting with »TXT«.
Equalise volume
The volume of normal TV broadcasts and commercials may be different. This
volume fluctuation can be equalised.
1 Select the line »Volume Limiter« with »
,,
«or»..« and select »on« with
»FF«or»EE«.
Note:
The line »Volume Limiter« will not appear when »Dolby Surround« has been
selected in the »SOUND« menu.
2 Complete the setting with »TXT«.
CONVENIENCE FUNCTIONS
_________________________________
DIALOG CENTER
OK TXT
LANGUAGE SELECTION
SLEEP TIMER
PARENTAL LOCK
SPECIAL FUNCTIONS
PROGRAM SORT
MANUAL TUNING
AUTOMATIC TUNING SYSTEM
SERVICE
ĵ
–––––––––––––––––––––––––––
Ł
SPECIAL FUNCTIONS
Ǻ TXT
Pic./sound opt. ľ on ı
Volume Limiter off
Decoder P01 off
ĵ
–––––––
Ł
SPECIAL FUNCTIONS
Ǻ TXT
Pic./sound opt. on
Volume Limiter ľ off ı
Decoder P01 off
ĵ
–––––––
Ł
Page 21

ENGLISH
21
ENGLISH
CONVENIENCE FUNCTIONS
___________________________________________________
Setting switch-off time with the »SLEEP TIMER« menu
A switch-off time can be entered for the TV set using the »SLEEP TIMER « menu.
The TV set switches to standby mode when the set time has elapsed.
1 Call up »DIALOG CENTER« by pressing »i « and then »OK«.
2 Select the line »SLEEP TIMER« with »
,,
«or»..« and confirm with »OK«.
3 Enter the switch-off time desired with two digits (from 01 to 99 minutes) with
»1… 0«.
Note:
The switch-off time can be deleted with »AUX«.
4 Complete the setting with »TXT«.
SLEEP TIMER
Ǻ 0-9 TXT
Ȅ
–– ––
Ȅ
min.
Page 22

22
Activating child-proof lock
1 Call up »DIALOG CENTER« by pressing »i« and then »OK«.
2 Select the line »PARENTAL LOCK« with »
,,
«or»..« and confirm with
»OK«.
3 Enter four-digit PIN »1...0 « and save with »OK«.
– The key symbol will appear in red.
4 Complete the setting with »TXT«.
– When the TV set has been turned off and turned on again, the child-proof
lock will be activated. The page »PARENTAL LOCK« will appear, and all
functions are locked.
Switching off child-proof lock briefly
1 Turn television set on and enter the four-digit PIN with »1...0 «.
– The set switches to the TV picture. When the set has been switched off and
then on once more, the lock reactivates.
Switching off child-proof lock
1 Switch TV set on.
2 Enter four-digit PIN with »1...0 «.
3 Call up »DIALOG CENTER« by pressing »i« and then »OK«.
4 Select the line »PARENTAL LOCK« with »
,,
«or»..« and confirm with
»OK«.
5 Enter four-digit PIN with »1...0 «.
– The key symbol appears in black: the child-proof lock has been cleared.
6 Complete the setting with »TXT«.
Note:
If you have forgotten your PIN, you can use the digit combination given in
the section “Rectifying malfunctions” on page 32.
CHILD-PROOF LOCK
___________________________________________________
DIALOG CENTER
OK TXT
LANGUAGE SELECTION
SLEEP TIMER
PARENTAL LOCK
SPECIAL FUNCTIONS
PROGRAM SORT
MANUAL TUNING
AUTOMATIC TUNING SYSTEM
SERVICE
ĵ
–––––––––––––––––––––––––––
Ł
PARENTAL LOCK
Ǻ 0-9 TXT
v
7
– – – –
PARENTAL LOCK
Ǻ 0-9 TXT
v
7
– – – –
Page 23

ENGLISH
23
ENGLISH
Decoder or satellite receiver
A decoder is required if the TV set is to receive coded channels from private
broadcasting companies.
Connecting a decoder or satellite receiver
1 Connect the »AV 1« socket of the TV set to the corresponding socket on the
decoder with a EURO-AV (Scart) cable.
Notes:
Alternatively, a satellite receiver can be connected to this socket.
If a satellite receiver and a decoder are to be operated, the decoder must be
connected to the satellite receiver.
Settings for operating with a decoder
1 Select the channel position to which the encoded programme is assigned.
– The TV set automatically switches to channel position »AV1«.
2 Call up »DIALOG CENTER« by pressing »i « and then »OK«.
3 Select the line »SPECIAL FUNCTIONS« with »
,,
«or»..« and confirm
with »OK«.
4 Select the line »Decoder P ..« with »
,,
«or»..«.
– »P ..« shows the channel position selected.
5 Select the setting »ON 1«, »ON 2« or »ON 3« with »
FF
«or»EE«.
– This setting depends on the decoder connected.
– If a decoder is not connected, set to »off«.
– In the background, the TV set switches to the last channel position set.
6 Complete the setting with »TXT«.
OPERATING WITH EXTERNAL APPLIANCES
_____
SPECIAL FUNCTIONS
Ǻ TXT
Pic./sound opt. on
Volume Limiter off
Decoder P01 ľ ON 1 ı
Video AV 1 VHS
ĵ
–––––––––
Ł
AV1
PAY-TV
Page 24

24
Video recorder or SET-TOP box
Connecting a video recorder or SET-TOP box
1 Connect the »AV 1« socket of the TV set to the corresponding socket on the
video recorder or the SET-TOP box with a EURO-AV (Scart) cable.
Notes:
Alternatively, a satellite receiver can be connected to this socket.
If a satellite receiver and a decoder are to be operated, the decoder must be
connected to the satellite receiver.
Set video standard (VHS or SVHS)
This setting depends on the video recorder connected.
1 Press »AV 0« repeatedly until »AV 1 « is displayed on the set.
2 Call up »DIALOG CENTER« by pressing »i « and then »OK«.
3 Select the line »SPECIAL FUNCTIONS« with »
,,
«or»..« and confirm
with »OK«.
4 Select the line »VIDEO « with »
,,
«or»..« and use »FF«or»EE« to
select »VHS « or »S-VHS «.
5 Complete the setting with »TXT«.
Operating with a video recorder or SET-TOP box
1 Switch on the video recorder or SET-TOP box and select the function desired.
2 Select channel position »AV1« with »0 AV«.
– The picture and tone information from the video recorder or SET-TOP box
can be heard and seen via the TV set.
OPERATING WITH EXTERNAL APPLIANCES
________________________
SPECIAL FUNCTIONS
Ǻ TXT
Pic./sound opt. on
Volume Limiter off
Decoder P 01 off
Video AV 1 ľ VHS ı
ĵ
–––––––––
Ł
AV1
2 EXTERNAL / DEC. - AV 2
AUDIO
L
L
O
I
1 EXTERNAL / EURO - AV 1
U
N
T
R
R
ń
Page 25

ENGLISH
25
Camcorder
Connect the camcorder
1 Connect the yellow socket (VIDEO IN – picture signal) on the TV set and the
corresponding sockets on the camcorder with the RCA cable.
2 Connect the white and red sockets (L AUDIO IN R – sound signal) on the
TV set and the corresponding sockets on the camcorder with the RCA cable.
Note:
The Mono-Camera-Recorder delivers the mono sound signal via the white
socket (L) on the TV set.
Operating with a camcorder
1 Switch on the camcorder and start playback.
2 Select channel position »AV2« with »AV 0 «.
– The picture and sound information from the camcorder can be seen and
heard on the TV set (it is not possible to re-record to the EURO-AV socket).
OPERATING WITH EXTERNAL APPLIANCES
________________________
VIDEO IN
L AUDIO R
P
Page 26

26
Headphones
Connecting the headphones
1 Insert the headphone plug (3,5 mm ø jack plug) into the front of the TV set.
– The speaker is switched off.
Select Stereo (two-channel), mono for the headphones
1 Call up the »SOUND« menu with »
FF
«.
2 Select the line » y « with »
,,
«or»..« and select the required sound type
with »FF«or»EE«; »Mono« or »Stereo« and for two-channel broadcasts,
select »DUAL A« or »DUAL B«.
3 Complete the setting with »TXT«.
Changing the volume of the headphones
1 Call up the »SOUND« menu with »
FF
«.
2 Select the lines » y « with »
,,
«or»..« and press »FF«.
– The
»SOUND« menu is closed and a scale appears which can be used to
control the headphones.
3 Set the volume with »
FF
«or»EE«.
– The altered value is displayed on a scale.
OPERATING WITH EXTERNAL APPLIANCES
________________________
SOUND
OK Mono Fix TXT
ʀʀ ǁǁ
Dolby Surround
ʀʀ
P01 ľ MONO ı
yy
MONO
u
ɼɼ
ɦɦ
ĵ
––––––––––––––––--–––
Ł
VIDEO IN
L AUDIO R
P
Page 27

ENGLISH
27
ENGLISH
SPECIAL SETTINGS
________________________________________________________
Limiting channel selection
The ATS search saves all television channels found and automatically “blocks”
the first non-assigned channel position. This means that only the television channels which were found can be selected using channel selection. This feature can
also be defined manually. In the example, all channels from channel position 6
have been “blocked”.
1 Call up »DIALOG CENTER« by pressing »i « and then »OK«.
2 Select the line »MANUAL TUNING« with »
,,
«or»..« and confirm with
»OK«.
3 Select the channel position (in the example, 6) with »
FF
«, »EE« or
»1...0«.
4 Select the line »C/S « with »
,,
«or»..« and use »FF«or»EE« to select
the »Channel « display.
Note:
The line »C/S« will not appear if the »SELECT COUNTRY« preselection
»FRANCE« or »others« and then »Cable (frequency in MHz)« were
selected.
5 Select the line »Channel « with »
,,
«or»..« and use »1...0« to enter
»00« or, in the case of frequency selection, »000« (dependent on the »SELECT COUNTRY« preselection).
6 Save the setting with »OK«.
– Now, only the first five channel positions (and the »AV« channel position)
can be selected.
– After the direct selection of the first blocked channel position »1... 0 « (in
the example, 6), the “blocked” channel positions can be selected with
»,,«or»..«.
7 Complete the setting with »TXT«.
Note:
If the blocked channel position is reallocated, the channel position limitation
set is cleared.
MANUAL TUNING
Ǻ OK Memorize TXT
Program 06
C/S ľ Channel ı
Channel 34
Finetun. 00
Norm B/G (Universal)
Name RTL2
ĵ
–––––––––––––
Ł
MANUAL TUNING
Ǻ OK Memorize 0-9 •Tune TXT
Program 06
C/S Channel
Channel ľ 00 ı
Finetun. 00
Norm B/G (Universal)
Name RTL2
ĵ
–––––––––––––
Ł
Page 28

28
SPECIAL SETTINGS
____________________________________________________________________
Setting TV channels
This setting is only necessary if a new TV channel is added and you wish to
maintain your own particular order for the channel positions. The TV channel
can be set directly or via the automatic channel search.
1 Call up »DIALOG CENTER« by pressing »i « and then »OK«.
2 Select the line »MANUAL TUNING« with »
,,
«or»..«, and confirm with
»OK«.
3 Select the channel position with »
FF
«, »EE« or »1...0«.
4 Select the line »C/S « with »
,,
«or»..«, and use »FF«or»EE« to select
the display »Channel« or »S-channel «.
Note:
The line »C/S« will not appear if the »SELECT COUNTRY« preselection
»FRANCE« or »others« and then »Cable (frequency in MHz)« were selected.
5 Select the line »Channel« with »
,,
«or»..«, and use »FF«
, »
EE
« or
»1...0« to enter the channel number desired (or the frequency, dependent
on the »SELECT COUNTRY« preselection);
or
start the ATS search with »FF« (blue).
Notes:
Repeat the automatic channel search until the channel desired appears.
Cancel the automatic channel search with »TXT«.
MANUAL TUNING
Ǻ OK Memorize 0-9 TXT
Program ľ 06 ı
C/S Channel
Channel 34
Finetun. 00
Norm B/G (Universal)
Name RTL2
ĵ
–––––––––––––
Ł
MANUAL TUNING
Ǻ OK Memorize TXT
Program 06
C/S ľ Channel ı
Channel 00
Finetun. 00
Norm B/G (Universal)
Name RTL2
ĵ
–––––––––––––
Ł
MANUAL TUNING
Ǻ OK Memorize 0-9 •Tune TXT
Program 06
C/S Channel
Channel ľ 00 ı
Finetun. 00
Norm B/G (Universal)
Name RTL2
ĵ
–––––––––––––
Ł
Page 29

ENGLISH
29
ENGLISH
SPECIAL SETTINGS
____________________________________________________________________
Note:
The colour and sound standards are allocated automatically. If the colour
and/or the sound are not correct, select the line »Standard« with »,,«or
»..«. Select the setting required with »FF«or»EE«.
6 Select the line »Name« with »
,,
«or»..«, and confirm with »FF« (blue).
Select the position required with »EE«, use »,,«or»..« to select the letters
or digits required, and confirm with »FF« (blue).
7 To fine tune the picture (when necessary), select the line »Finetun.« with
»,,«or»..« and modify the fine tuning with »FF«or»EE«.
8 Save the setting with »OK«.
Note:
To set further TV channels, repeat points 3 to 8.
9 Complete the setting with »TXT«.
MANUAL TUNING
Ǻ OK Memorize •Change TXT
Program 06
C/S Channel
Channel 34
Finetun. 00
Norm B/G (Universal)
Name RTL2
ĵ
–––––––––––––
Ł
MANUAL TUNING
Ǻ OK Memorize •Exit TXT
Program 06
C/S Channel
Channel 34
Finetun. 00
Norm B/G (Universal)
Name ľ RTL2 ı
ĵ
–––––––––––––
Ł
Page 30

30
SPECIAL SETTINGS
____________________________________________________________________
Resetting all TV channels
All the TV channels can be reset (e.g. when you move town).
1 Call up »DIALOG CENTER« by pressing »i« and then »OK«.
2 Select the line »AUTOMATIC TUNING SYSTEM« with »
,,
«or»..« and
confirm with »OK«.
– The »SELECT COUNTRY« menu will be blended in.
3 Select a country with »
,,
«or»..« and confirm with »OK«.
– The ATS search will start.
Adjusting colour standards manually
When the ATS search is used to set the TV channels, the colour standards are
allocated automatically. Do not carry out this setting if the colour is already well
adjusted on the various channels.
1 Call up »DIALOG CENTER« by pressing »i« and then »OK«.
2 Select the line »SERVICE« with »
,,
«or»..« and confirm with »OK«.
3 Select the line »Color« with »
,,
«or»..« and select the colour standard
required with »FF«or»EE«.
4 Complete the setting with »TXT«.
Note:
The lines »IDP2« and » Service Code« are for the exclusive use of the authorised dealer.
DIALOG CENTER
OK TXT
LANGUAGE SELECTION
SLEEP TIMER
PARENTAL LOCK
SPECIAL FUNCTIONS
PROGRAM SORT
MANUAL TUNING
AUTOMATIC TUNING SYSTEM
SERVICE
ĵ
–––––––––––––––––––––––––––
Ł
SERVICE
Ǻ TXT
Color P 01 ľ auto ı
IDP2
Service Code ––––
ĵ
–––––––
Ł
Page 31

ENGLISH
31
ENGLISH
INFORMATION
________________________________________________________________
Technical data
Mains voltage: 220 – 240 V, 50/60 Hz,
(range of adjustment in the mains supply circuit 190 … 264 V)
Power requirement: in operating mode 65 W, in standby mode 5 W
Final sound stage: 2x8 Watt music (2x4 Watt sine)
Frequency area: C01 … C99, special channels S01 … S41, frequencies band 1 ... 4
Channel positions: 99 and 2 AV
Service notes for the authorised dealer
The TV set may only be operated using the mains cable set supplied. It prevents mains interference
and is an integral part of the appliance approval. For replacement purposes, please only order the
mains cable set with the designation “GWN 9.22/part number 8290.991-316” from an approved
service specialist.
The product conforms to the following RU guidelines:
73/23/EEC guideline on electrical equipment for use within certain voltage limits. 89/336/EEC
guideline on electromagnetic compatibility.
The appliance complies with the standards: EN 60065, EN 55013, EN 55020
Contact assignment for the EURO-AV (Scart) socket
Pin Signal Pin Signal
11 = Audio output right 12 = –
12 = Audio input right 13 = Red earth
13 = Audio output left 14 = Earth
14 = Audio earth 15 = RGB red input, (S-Video = Chroma)
15 = Blue earth 16 = RGB switching voltage
16 = Audio input left 17 = Video earth
17 = RGB blue input 18 = RGB switching voltage earth
18 = Switching voltage 19 = Video output
19 = Green earth 20 = Video input, (S-Video = Luminanz)
10 = Data line (MEGALOGIC) 21 = Shield/earth
11 = RGB green input
21
220
119
Page 32

32
CUSTOMER INFORMATION
_____________________________________________________
Additional Information for Units sold in Great Britain
Units sold in GB are suitable for operation from a 240 V AC, 50 Hz mains supply.
In case this appliance is supplied with a Safety Standard Approved mains lead
fitted with a non-rewireable 13 Amp mains plug which, if unsuitable for your
socket, should be cut off and an appropriate plug fitted by a qualified electrician. The fuse and fuse holder must be removed from the plug as accidental insertion of the redundant plug into a 13 Amp socket is likely to cause an electrical hazard.
Note:
The severed plug must be destroyed to avoid a possible shock hazard should it
be inserted into a 13 Amp socket elsewhere.
If it is necessary to change the fuse in the non-rewireable plug, the correct type
and rating (5 Amp ASTA or BSI approved BS 1362) must be used and the fuse
cover must be refitted. If the fuse cover is lost or damaged the lead and plug
must not be used until a replacement is obtained. Replacement fuse covers
should be obtained from your dealer.
If a non-rewireable plug or a rewireable 13 Amp (BS 1363) plug is used, it must
be fitted with a 5 Amp ASTA or BSI approved BS 1362 fuse. If any other type of
plug is used it must be protected by a 5 Amp fuse either in the plug or at the distribution board.
Important:
The wires in the mains lead are coloured in accordance with the following code:
BLUE – NEUTRAL
BROWN – LIVE
As the colours of the wires in the mains lead of your appliance may not correspond with the
coloured marking identifying the terminals in your plug, proceed as follows:
Connect the BLUE coloured wire to plug terminal marked with the letter "N" or coloured black.
Connect the BROWN coloured wire to the plug terminal marked with a letter "L" or coloured
red.
In no circumstance must any of the wires be connected to the terminal marked with a letter "E",
earth symbol , coloured green or green and yellow.
Replacement mains lead can be obtained from your dealer.
Page 33

ENGLISH
33
INFORMATION
__________________________________________________________________________
Possible causes
Aerial cable
No TV channel programmed
Picture settings adjusted wrongly
Problem is with the transmitter
Malfunctions caused by other appliances
Channel settings
Aerial
Colour intensity set to mininum
TV standard setting (if setting options
available)
Problem is with the channel
Strong magnetic field from speakers or
similar
Volume set to minimum
Headphones connected
Problem is with the channel
TV channel (has no teletext) or aerial
system
Transmission signal too weak
No optical connection
Remote control batteries
Undefined operating status
Child-proof lock is activated
Remedy
Aerial cable connected?
Start automatic channel search
Adjust settings for brightness, contrast
and colour
Test another channel
Change the position of the appliances
Automatic or manual
channel setting/fine tuning
Have aerial cable or aerial system
checked
Raise the colour setting
Select the correct colour standard
Test another channel
Increase the distance between the
speakers and the TV set
if the coloured spots remain, turn the TV
set off at the mains and turn on again
after 10 minutes
Increase/switch on volume
Remove headphones
Test another channel
Check another channel, fine tuning,
ghosting
Check aerial system
Direct remote control at the TV set
Check/replace batteries
Turn TV set off with the main power
button for approx. 2 min
Enter PIN or digit combination »7038«
Malfunction
Picture bright (interference) but no programme visible
Picture contrast poor
Picture and/or sound disturbed
Ghosting, reflection
No colour
Wrong colours, coloured flecks
Picture visible, no sound
No teletext, or teletext is disturbed
Remote control not working
After switching on, Child-proof lock
menu appears
Rectifying malfunctions
If the remedial measures listed below do not lead to a satisfactory result, please consult a GRUNDIG
authorised dealer. Please consider that problems can also be caused by external appliances, such as video
recorders and satellite receivers.
In the case of misadjusted picture values, it may help to reset the TV set to the factory settings: to do this, press
»i« and then »OK«.
Page 34

Grundig AG • Beuthener Str. 41 • D-90471 Nürnberg • http://www.grundig.com
 Loading...