

Page 1

COLOR TELEVISION
DAVIO 37
P 37-2102
1
DEUTSCH
ENGLISH
NEDERLANDS
NORSK
ESPANOL
PORTUGUES
21937-941.0200
Page 2

2
3 Set-up and safety
4 Connection and preparation
Connection
Inserting batteries in the remote control
5 Settings
Assigning channel positions automatically with the ATS channel search
The »Manual Tuning« menu
Deleting TV channels in the »Manual Tuning« menu
Sorting television channels
7 Television mode
Using the television controls
Using the remote control
Entering the switch-off time for the sleep timer
9 Connection options
Video recorder, satellite receiver or camcorder
Headphones
Decoder
Settings for operation with a decoder
11 Special settings
Limiting channel position selection
Re-tuning all television channels
Manually assigning channel positions
Manually setting the colour norm
13 Information
Service information for dealers
Technical data
Additional Information for Units sold in Great Britain
Rectifying minor problems
CONTENTS
________________________________________
Page 3
ENGLISH
3
This television set is designed to receive and display video and
audio signals.
Any other use is expressly prohibited.
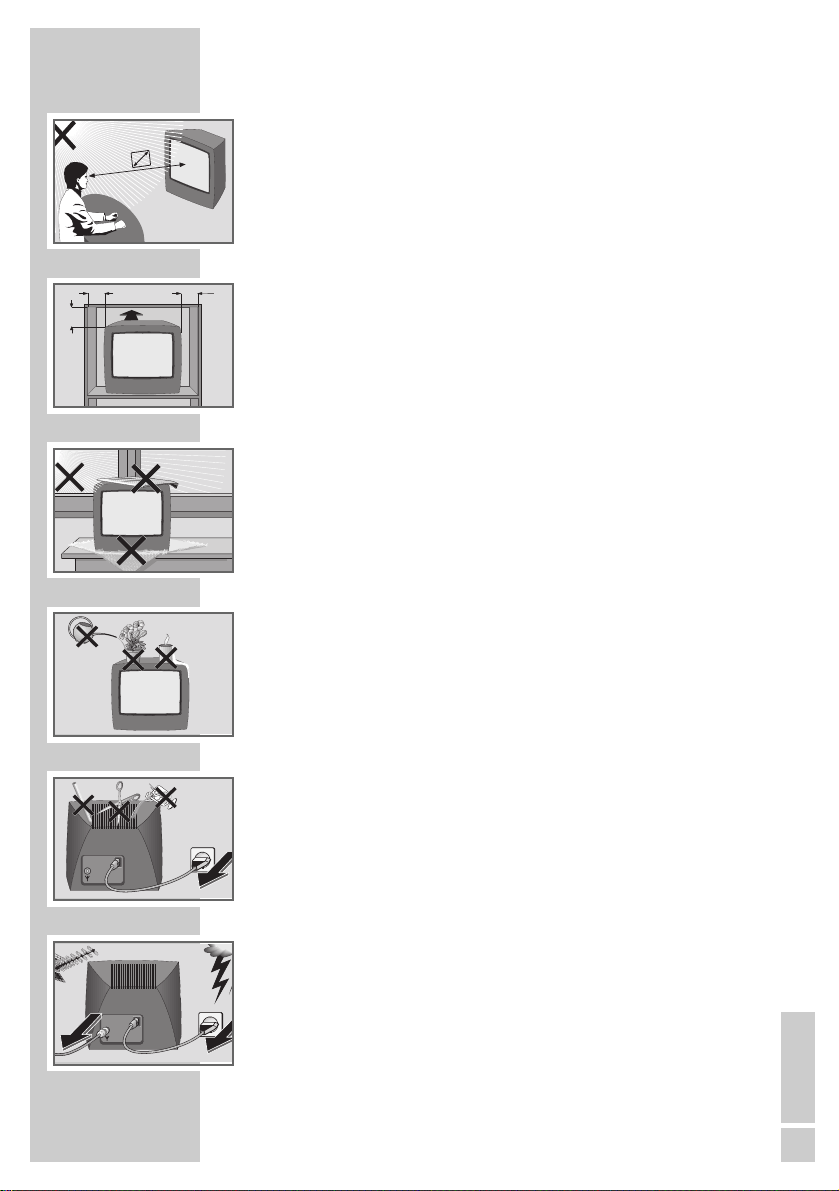
The ideal viewing distance is 5 times the screen diagonal.
External light falling on the screen impairs picture quality. Ensure
sufficient clearance between the TV and the wall cabinet.
The television set is designed for use in dry rooms. If you do use it
in the open, please ensure that it is protected from moisture, such
as rain or splashing water.
Do not place any vessels such as vases on the television, as they
may spill fluid on the electrical components, thus presenting a
safety risk.
Place the television set on an solid, level surface. Do not place any
objects such as newspapers on the television set or cloth or similar
items beneath it.
Do not place the television set close to heating units or in direct
sunlight. This will impair cooling.
Heat build-up can be dangerous and shortens the operating life of
the television set. For reasons of safety, have a specialist remove
any dirt deposits in the set from time to time.
Keep the television set away from magnetic fields (loudspeaker
boxes, for example).
Do not open the television set under any circumstances. The manufacturer accepts no liability for damage resulting from improper
handling.
Ensure that the mains cable is not damaged.
The television set must only be operated with the mains cable set
supplied.
Thunderstorms are a danger to all electrical devices. Even if the
television set is switched off, it can be damaged by a lightning
strike to the mains or the antenna cable. Always disconnect the
mains and antenna plugs during a storm.
Clean the screen with a soft, damp cloth. Only use plain water.
SET-UP AND SAFETY
________________________
5 x
10
cm
10
cm
20
cm
20 cm
Krieg am Golf
! SERVICE !! SERVICE !! SERVICE !
Page 4
4
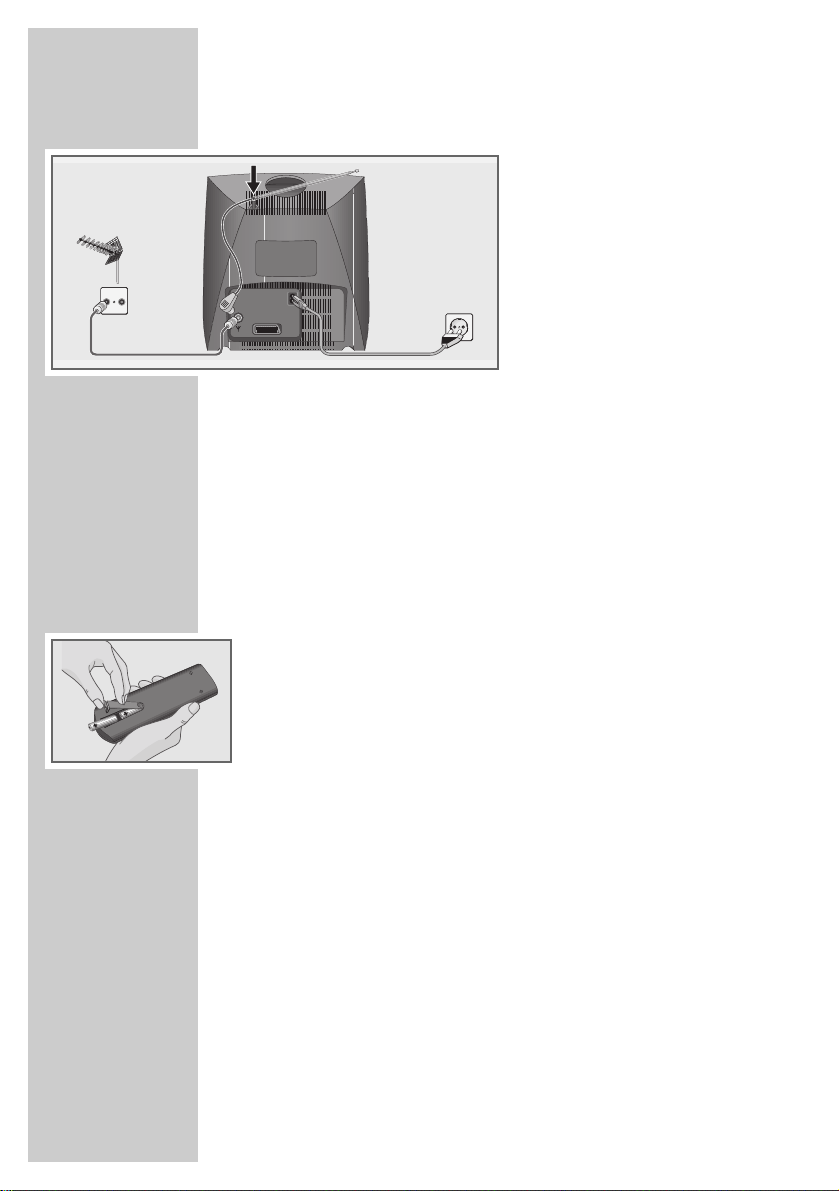
Connection
1 Insert the telescopic antenna in the recess in the rear panel.
2 Plug the roof antenna cable or the telescopic antenna into the
antenna socket »
« on the television set.
3 Plug the mains cable supplied into the »
~« socket on the
television set.
4 Plug the mains cable into the wall socket.
Inserting batteries in the remote control
1 Open the battery compartment by removing the lid.
2 Insert the batteries (UM-3 or AA, 2 x 1.5 V), observing the
polarity marked on the base of the battery compartment.
Note:
When the batteries are flat the following message appears on
the screen: »Battery«.
If the television no longer reacts properly to remote control
commands, the batteries may be flat. Always remove flat
batteries. No liability is accepted for damage resulting from
leaking batteries.
CONNECTION AND PREPARATION
_
TV R
EURO-AV
Page 5

ENGLISH
5
Assigning channel positions automatically
with the ATS channel search
The television set is equipped with an automatic channel search
system. You can start the ATS search and then sort the television
channels into the order of your preference.
There are 99 channel positions for you to assign television stations
from the antenna or from the cable connection as required.
You can also delete stations from the list if they are found more than
once or the reception is poor.
1 Switch on the television by pressing the »IO« button on the set.
– The »ATS« (Automatic Tuning System) menu appears.
2 Start the Automatic Tuning System with the »OK« button.
– The station search starts.
– The automatic search may last a minute or longer, depending
on the number of television channels received.
– After the search the television switches to channel position 1
and the »Manual Tuning« menu appears.
The »Manual Tuning« menu
The menu uses the following abbreviations:
P Channel position
C/S Channel or special channel
– – Channel number
FT Fine tuning
S Video/audio standard (without function)
DEC Decoder 0 Off
1 On
SETTINGS
__________________________________________
ATS
■
Page 6

6
Deleting TV channels in the »Manual
Tuning« menu
1 In the »Manual Tuning« menu, select the »P« line using »
..
«
or »,,«.
2 Select the station to delete using »FF« or »EE«.
3 To delete the TV station, press »
zz
« (red) and then »OK«.
Sorting television channels
1 In the »Manual Tuning« menu, select the »P« line using »..«
or »,,«.
2 Select the station to swap using »FF« or »EE«.
3 To swap the station press »AUX« and then enter the new two-
digit channel position using »0...9«.
4 Click »OK« to save the setting.
– The two stations swap channel positions.
Concluding the settings
1 Select »i « to conclude the settings.
SETTINGS
______________________________________________
i 0-9 AUX •TXT
P r 02 e
C/S C
-- 06
FT 00
S 0
DEC 0
i
–––––––––––––
u
i 0-9 TXT
P Ç 03
C/S C
-- 06
FT 00
S 0
DEC 0
i
–––––––––––––
u
Page 7

ENGLISH
7
Using the television controls
IO Switches the television on
and off.
–
V
+ Volume setting.
– P + Channel selection
Switches on the television
from stand-by mode (only
»P +«).
Using the remote control
1 Press »0...9« or »,,« to switch on from stand-by mode.
2 Press the »
88
« button to switch the television set to stand-by mode.
Selecting channel positions
1 Select the channel positions (including AV1) using the »0...9«
buttons.
2 Press »..« or »,,« to move up and down channel positions
one at a time.
Adjusting the volume
1 Adjust the volume using the »FF« or »EE« buttons.
Muting
1 Press »aa« to mute the sound or switch it on again.
Showing/hiding the channel position number
1 Press » i « for the television to show the channel position
number.
2 Press »
i « twice for the television to hide the channel position
number.
Setting the contrast
1 Press »zz« once to select the contrast setting (display: »W«)
and press »FF« or »EE« to change it.
TELEVISION MODE
___________________________
TE L E P ILOT 750C
VIDEO
VIDEO
P
U
21
3
654
987
0
P
OK
P
TXTAUX
E
´
F
SAT/TV
Page 8

8
Setting the brightness
1 Press »zz« twice to select the brightness setting, (display: »R«
)
and press »FF« or »EE« to change it
or
Press »–R« or »R+ « to change the brightness.
Setting the colour
1 Press »zz« three times to select the colour setting (display:
»
E
«) and press »FF« or »EE« to change it
or
Press »– E « or »E + « to change the colour setting.
Setting the tint
1 Press »zz« four times to select the tint setting (display: »º«)
and press »FF« or »EE« to change the tint. (This setting only
applies to NTSC stations.)
Note:
Every altered setting is saved after a few seconds.
Press »AUX« and then »OK « to reset to the factory settings.
Entering the switch-off time for the sleep
timer
Using the »SLEEP TIMER« menu you can enter a time for the
television to switch off. After the set time has elapsed, the television
switches to stand-by mode.
1 Call up the »SLEEP TIMER« menu by pressing »
´´
« (green).
– The »SLEEP TIMER« menu appears.
2 Enter the switch-off time (01 to 99 minutes) using »0...9 «
(two digits)
.
Note:
The switch-off time can be deleted with »AUX«.
3 Conclude the setting by pressing »TXT«.
TELEVISION MODE
___________________________________
TE L E P ILOT 750C
i 0-9 TXT
´
– –
´
i 0-9 AUX
´24´
VIDEO
VIDEO
21
3
654
987
0
P
OK
P
TXTAUX
E
´
F
SAT/TV
Page 9

ENGLISH
9
CONNECTION OPTIONS
__________________
Video recorder, satellite receiver or
camcorder
Connection
1 Connect the »EURO-AV « socket of
the television set and the appropriate
socket of the video recorder or
satellite receiver using a EURO-AV
cable.
Use a standard adapter cable to
connect a camcorder.
Operation
1 Switch on the connected device and select the function you
require.
2 Select channel position »AV« using the »0 « button.
– The television will show audio and video information from the
connected devices.
Headphones
Connecting headphones
1 Insert the headphone jack
(3.5 mm Ø jack plug) in the headphone socket on the television.
– This deactivates the loudspeaker.
Adjusting the headphone volume
1 Adjust the volume using the »FF« or »EE« buttons.
EURO-AV
2 EXTERNAL / DEC. - AV 2
AUDIO
L
L
O
I
U
T
R
1 EXTERNAL / EURO - AV 1
N
R
x
P
U
Page 10

10
CONNECTION OPTIONS
____________________________
Decoder
Some cable and satellite stations encode their programmes.
This makes the picture – and in some cases the sound – unrecognisable. You can decode these television programmes with a
decoder.
Connection
1 Connect the »EURO-AV « socket
on the television set and the appropriate socket on the decoder using
a EURO-AV cable.
Note:
A satellite receiver can also be connected to this socket. If you
want to use both a satellite receiver and a decoder, the decoder
must be connected to the satellite receiver.
Settings for operation with a decoder
1 Call up the »Manual Tuning« menu by pressing »i« and then
»OK«.
2 Select the »DEC« line by pressing »..« or »,,«.
3 Switch the decoder on or off using »FF« or »EE« (display: »1«
or »0«).
4 Press »OK« to confirm the setting.
5 Press »TXT« to conclude the setting.
i OK TXT
P 02
C/S C
-- 06
FT 00
S 0
DEC r 1 e
i
–––––––––––––
u
EURO-AV
PAY-TV
Page 11

ENGLISH
11
Limiting channel position selection
The station search stores all the television channels it finds and
automatically ”blocks” the first non-assigned channel position. This
means that you can only move up and down between assigned
channel positions. This restriction can also be entered manually.
The example shows ”blocking” after channel position 5.
1 Call up the »Manual Tuning« menu by pressing »
i« and then
»OK«.
2 Select channel position (in this example 6) using »FF«, »EE«
or »1...0«.
3 Select the »C/S« line by pressing »..« or »,,« and select
the »C« display (channel) by pressing »FF« or »EE«.
4 Select the »– –« line using »..« or »,,« and then use
»1...0« to enter »00«.
5 Press »OK« to save the setting.
– Now only the first 5 channel positions can be selected using
»..« or »,,«.
– The »AV« channel position can only be selected using »..«.
– All the channel positions set – including the ”blocked” ones –
can still be selected using the »1...0« buttons.
– If everything after channel position 11 is blocked, all channel
positions can be selected using the »1...0« buttons.
6 Conclude the setting by pressing »TXT«.
Note:
If a blocked channel position is assigned to a new station, the
set limitation is lifted.
Re-tuning all television channels
You can re-tune all the television stations, for example if you move
to another town.
1 Call up the »ATS« (Automatic Tuning System) menu by holding
down the »
F
F
« (blue) button for 3 seconds.
2 Start the Automatic Tuning System with the »OK« button.
– The station search starts.
Note:
You can stop the search by pressing »TXT«.
SPECIAL SETTINGS
___________________________
i TXT
P 02
C/S r C e
-- 06
FT 00
S 0
DEC 0
i
–––––––––––––
u
i • 0-9 TXT
P 02
C/S C
-- r 06 e
FT 00
S 0
DEC 0
i
–––––––––––––
u
TXT
ATS
■
Page 12

12
Manually assigning channel positions
This setting is only necessary if a new television station becomes
available and you want to retain your specific channel position
sequence (e.g. BBC1 = 1, BBC2 = 2 etc.).
1 Call up the »Manual Tunuing« menu by pressing »i« and then
»OK«.
2 Select the channel position using »FF« or »EE« or »1...0«.
3 Select the »C/S« line using »,,« or »..«. Then press »FF«
or »EE« to select »C« (channel) or »S« (special channel).
4 Select the »– –« line using »,,« or »..« and then use »FF«,
»EE« or »1...0« to enter the required channel number
or
Start a station search by pressing »
F
F
« (blue).
5 To fine tune the picture (if necessary), select the »FT« line using
»,,« or »..« and then use »FF« or »EE« to adjust the fine
tuning.
6 Press »OK« to save the setting.
Note:
To fine tune more television stations, repeat steps 2 to 6.
7 Conclude the setting by pressing »TXT«.
Manually setting the colour norm
The station search automatically sets the colour norm for television
stations. If there is no problem with the colour of the stations, do not
perform this setting.
1 Call up the »SERVICE« menu by holding down the »i« button
for 3 seconds.
2 Select the »Color« line using »,,« or »..« and then use
»FF« or »EE« to select the colour norm you require.
3 Conclude the setting by pressing »TXT«.
SPECIAL SETTINGS
___________________________________
i OK TXT
P 02
C/S r C e
-- 06
FT 00
S 0
DEC 0
i
–––––––––––––
u
i OK TXT
P 02
C/S C
-- 06
FT r 00 e
S 0
DEC 0
i
–––––––––––––
u
i OK •0-9 TXT
P 02
C/S C
-- r 06 e
FT 00
S 0
DEC 0
i
–––––––––––––
u
SERVICE
i TXT
Color P01 r autoe
IDP2
Service Code
––––
i
–––––––
u
Page 13

ENGLISH
13
Service information for dealers:
The television set may only be operated with the mains cable set
supplied. It prevents problems from the mains supply and is part of
the device certification.
Please order only replacement mains cable sets with the »GWN
9.22/part number 8290.991-220« designation from customer
service locations.
The product complies with the following EU directives:
73/23/EEC directive for electrical equipment to be used within
defined voltage ranges.
89/336/EEC directive on electromagnetic compatibility.
The device complies with the following standards:
EN 60065, EN 55013, EN 55020
Technical data
Mains voltage: 220 – 240 V, 50/60 Hz, (power
pack control range 165 ... 265 V)
Power consumption: During operation ~ 38 W,
in stand-by ~ 9 W
Reception bands: C01 ... C99
Special channels S01 ... S41
Sound output: 6 W music power (3 W sine)
Colour norms: PAL, NTSC 4,43
INFORMATION
_________________________________
Page 14

14
INFORMATION
_______________________________________
Additional Information for Units
sold in Great Britain
Units sold in GB are suitable for operation from a 240 V AC, 50 Hz
mains supply.
In case this appliance is supplied with a Safety Standard Approved
mains lead fitted with a non-rewireable 13 Amp mains plug which,
if unsuitable for your socket, should be cut off and an appropriate
plug fitted by a qualified electrician. The fuse and fuse holder must
be removed from the plug as accidental insertion of the redundant
plug into a 13 Amp socket is likely to cause an electrical hazard.
Note:
The severed plug must be destroyed to avoid a possible shock
hazard should it be inserted into a 13 Amp socket elsewhere.
If it is necessary to change the fuse in the non-rewireable plug,
the correct type and rating (5 Amp ASTA or BSI approved BS
1362) must be used and the fuse cover must be refitted. If the
fuse cover is lost or damaged the lead and plug must not be
used until a replacement is obtained. Replacement fuse covers
should be obtained from your dealer.
If a non-rewireable plug or a rewireable 13 Amp (BS 1363)
plug is used, it must be fitted with a 5 Amp ASTA or BSI
approved BS 1362 fuse. If any other type of plug is used it must
be protected by a 5 Amp fuse either in the plug or at the
distribution board.
Important:
The wires in the mains lead are coloured in accordance with the
following code:
BLUE – NEUTRAL
BROWN – LIVE
As the colours of the wires in the mains lead of your appliance may not
correspond with the coloured marking identifying the terminals in your
plug, proceed as follows:
Connect the BLUE coloured wire to plug terminal marked with the letter
"N" or coloured black.
Connect the BROWN coloured wire to the plug terminal marked with a
letter "L" or coloured red.
In no circumstance must any of the wires be connected to the terminal
marked with a letter "E", earth symbol , coloured green or green
and yellow.
Replacement mains lead can be obtained from your dealer.
Page 15

ENGLISH
15
INFORMATION
_______________________________________
Fault
Screen lit (snow or
blue) but no
transmission visible
Poor picture contrast
Interference to picture
and/or sound
Ghosting,
reflection
No colour
Incorrect colour,
colour spots
Picture but
no sound
Remote control
does not work
Possible cause
Antenna cable
No television station
programmed
Picture settings incorrectly set
Problem at station
Interference from other devices
(household devices, mobile
phones, etc.)
Channel setting
Antenna
Colour intensity at minimum
TV norm setting (if setting option
available)
Problem at station
Strong magnetic field due for
example to loudspeakers
Earth’s magnetic field
Volume set to minimum or
loudspeaker switched off
Problem caused by station
SAT mode
No optical connection
Remote control batteries
Operating condition undefined
Remedy
Is antenna cable
connected?
Check antenna system
Start station search
Adjust brightness, contrast
or colour setting
Test with another station
Move the devices
Automatic or manual
channel setting/fine tuning
Have antenna cable or
system checked
Turn colour up
Select correct colour norm
Test with another station
Move the loudspeakers
away from the television. If
colour spots remain, switch
off the television set at the
mains and switch it on
again after 10 minutes
Move the devices
Turn up/switch on
loudspeaker
Test with another station
Check AV cable between
television and receiver
Point the remote control at
the television set
Check or replace the
batteries,
observing the
polarity
Switch off the television with
the main power button for
around 2 min
Rectifying minor problems
If the remedies below are not successful, please consult an authorised
GRUNDIG dealer. Please bear in mind that malfunctions can also be caused
by external devices such as video recorders or satellite receivers.
If the picture is poor, it may help to reset the television to the factory picture
settings by pressing »i« and then »OK«.
Page 16

Grundig AG • Beuthener Str. 41 • D-90471 Nürnberg • http://www.grundig.com
 Loading...