

Page 1

1
ENGLISH
TV/ Video-Combi
72010 537 0500
TVR 3740 FT/GB
Page 2

2
CONTENTS
__________________________________________________________________________
4 Scope of delivery
5 Set-up and safety
8 Overview
The front of the combined TV/video unit, the back of the combined TV/video unit
Remote control
12 Connection and preparation
Connecting the aerial and the mains cable
Inserting batteries in the remote control
Switching the combined TV/video unit on/off
14 Settings
Setting television channels
The dialog center
Setting contrast
18 Television mode
19 Playback
Basic playback functions
Additional playback functions
Continuous playback
23 Recording
Three options for recording
The video programme system (VPS/PDC)
Immediate recording
Seamless compilation of recordings (Assemble)
Finding specific recordings
Delayed recording – by entering the VIDEO Plus + number
Page 3

CONTENTS
__________________________________________________________________________________
ENGLISH
3
Delayed recording – by entering data for the desired TV channel
Checking or deleting recording data
Interrupting TIMER recording of the combined TV/video unit
33 Teletext mode
Basic teletext functions
Other functions with the dialogue line
38 Convenience functions
Convenience functions with the »SPECIAL FUNCTIONS« menu
Entering switch-off time with the »SLEEP TIMER« menu
Entering switch-on time with the »ON TIMER« menu
Convenience functions with the »SERVICE« menu
Setting the tape display
43 Security system
45 Operation with external devices
Decoder or satellite receiver
Video recorder or SET-TOP box
Camcorder
Headphones
49 Special settings
Manually assigning channel positions
Setting the time and date
52 Information
Technical data
Servicing notes for dealers
Rectifying malfunctions yourself
GRUNDIG customer service points
Page 4
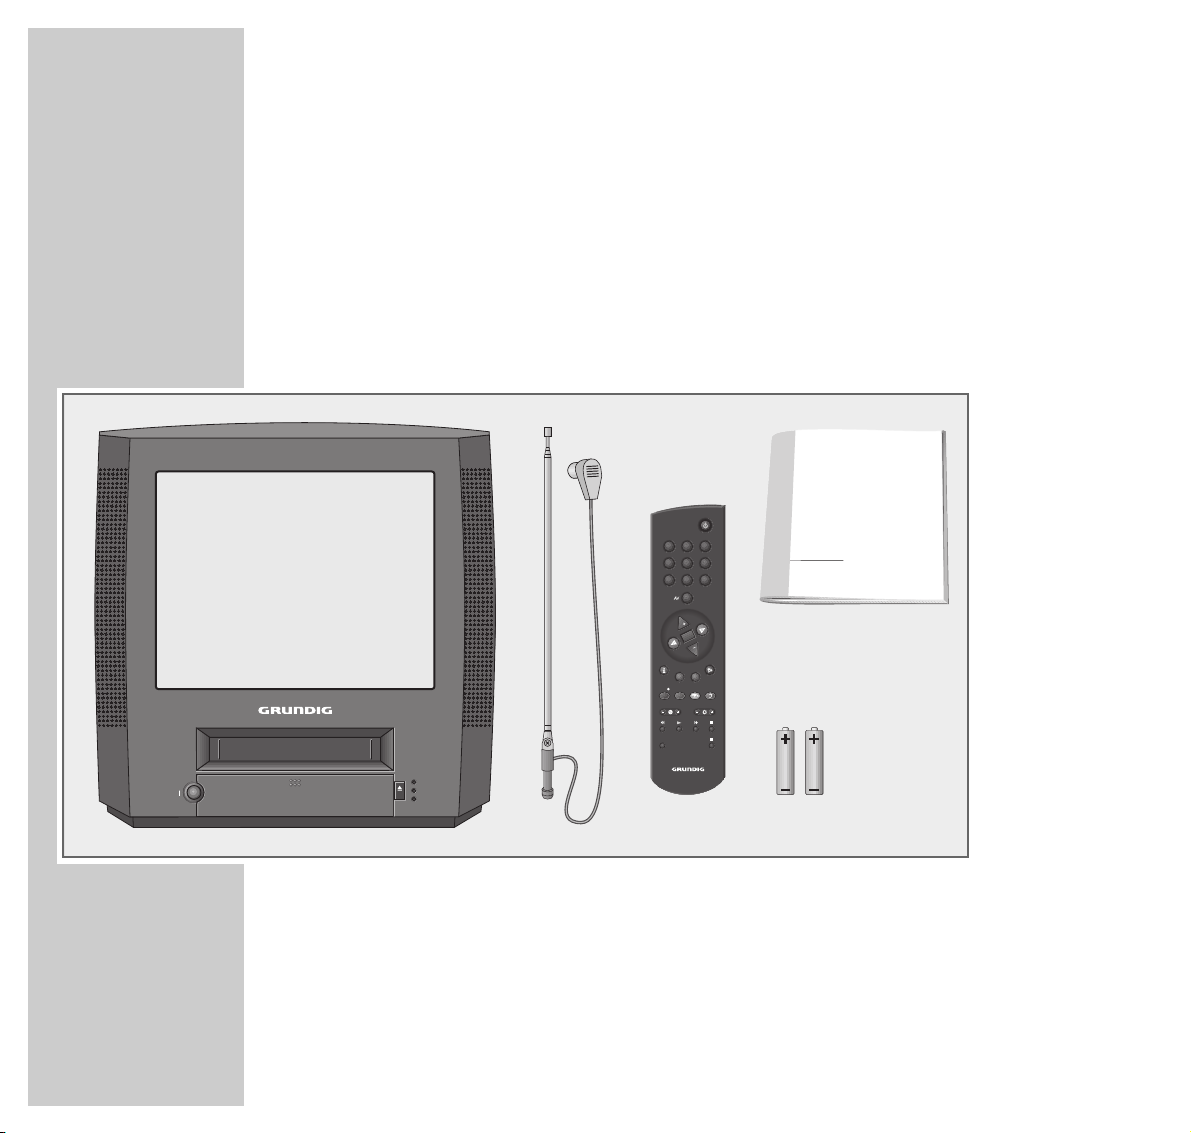
4
SCOPE OF DELIVERY
___________________________________________________
1 Combined TV/video unit TVR 3740 FT/GB
2 Telescopic aerial
3 Remote control
4 2 batteries, 1.5 V, type round cell
5 Operating manual
1
TV/VIDEO-COMBI
INDEX
321
654
987
0
TXT
TELEPILOT 870T
OK
P
P
CL
REC TIMER
8
STAND BY
TIMER
RECORD
EJECT
8
123
5
4
Page 5
ENGLISH
5
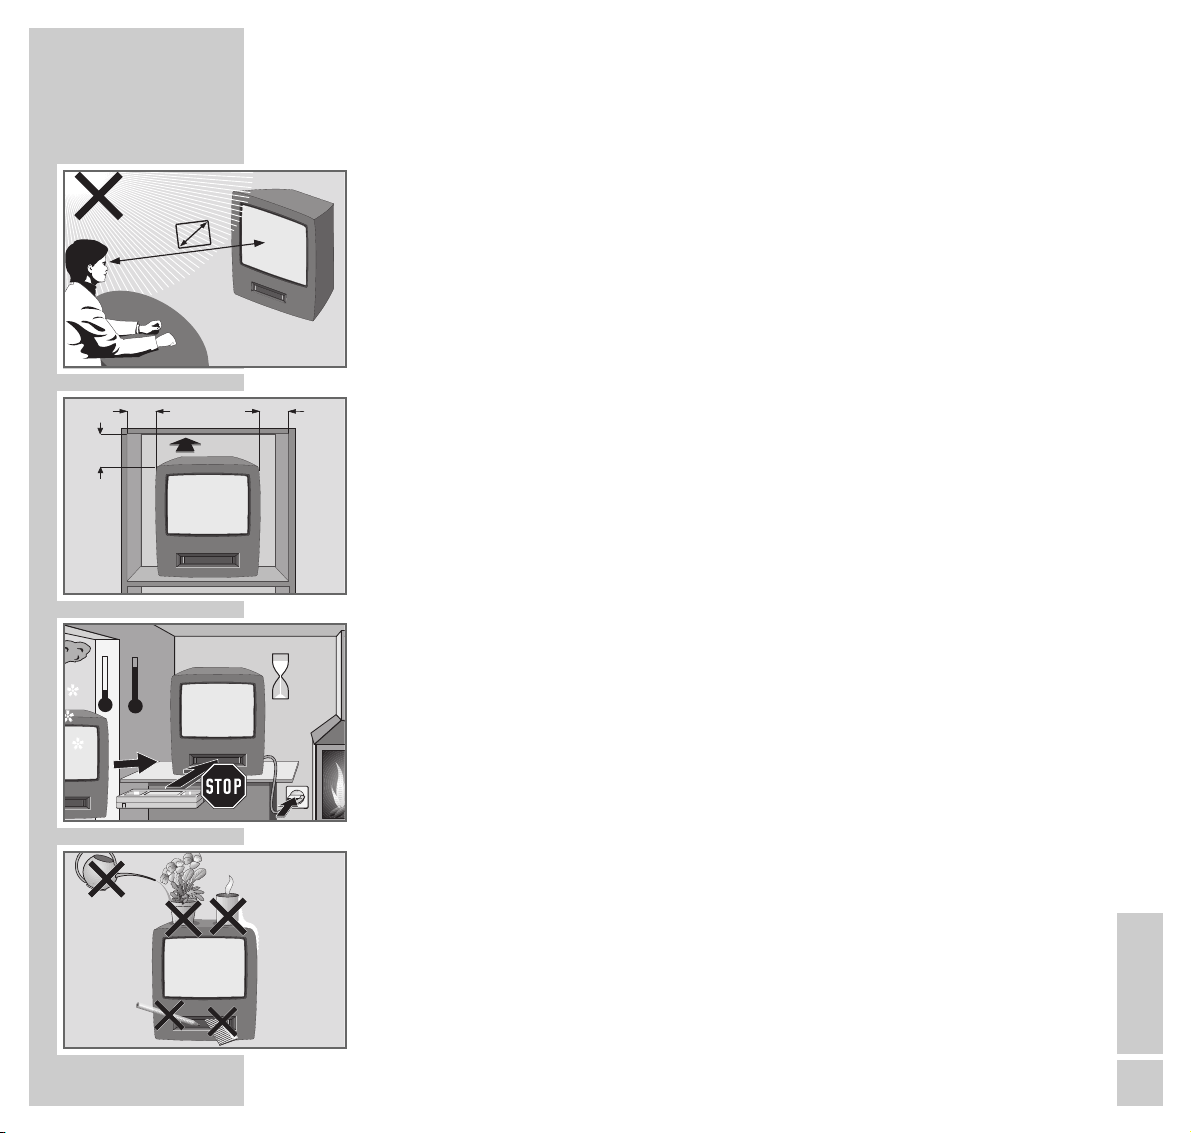
SET-UP AND SAFETY
___________________________________________________
In order to ensure that this high-quality, easy-to-use combined TV/video unit
continues to provide you with satisfaction and entertainment, please observe the
following instructions when setting it up:
The combined TV/video unit is designed for the reception, recording and
playback of video and audio signals.
Any other use is expressly prohibited.
The ideal viewing distance is 5 times the screen diagonal.
External light falling on the screen impairs picture quality.
Ensure sufficient clearance between the TV and the wall cabinet.
When the combined TV/video unit is subject to extreme variations in
temperature, for example during transportation from a cold area to a warm
one, connect it to the mains supply and let it stand for at least two hours without
an inserted cassette.
The combined TV/video unit is designed for use in dry places. If, however, you
use it in the open, it is essential to ensure that it is protected from moisture (rain,
lawn sprinklers). Do not expose the combined TV/video unit to any moisture.
Do not place any containers filled with liquids (vases or similar) on the
combined TV/video unit. The container could fall over and the liquid may
present an electrical safety risk.
Do not insert any foreign bodies in the cassette compartment of the combined
TV/video unit, since this may damage its precision mechanics.
10
cm
10
cm
20
cm
20 cm
2h
°C
°C
5 x
Page 6

66
SET-UP AND SAFETY
_________________________________________________________________
Place the combined TV/video unit on an even and solid surface. Do not place
any objects (newspapers, for example) on the combined TV/video unit or any
cloth or similar articles underneath the combined TV/video unit.
Do not place the combined TV/video unit close to heating units or in direct
sunlight. This will impair cooling.
Heat build-up can be dangerous and diminishes the service life of the combined
TV/video unit. For reasons of safety, have any accumulations in the combined
TV/video unit removed by a trained person from time to time.
Keep the combined TV/video unit away from magnetic fields (loudspeaker
boxes, for example).
Do not open the combined TV/video unit under any circumstances. The manufacturer accepts no liability for damage arising from improper handling.
Ensure that the mains cable is not damaged.
Thunderstorms present a danger to all electrical devices. Even if the combined
TV/video unit is switched off, it can be damaged by a lightning strike to the
mains and/or the aerial cable. Always disconnect the mains and aerial plugs
before a storm.
Clean the screen with a soft, damp cloth. Only use clear water.
Krieg am Golf
! SERVICE !! SERVICE !! SERVICE !
Page 7

ENGLISH
7
SET-UP AND SAFETY
_________________________________________________________________
Warning
In case this appliance is supplied with a Safety Standard Approved mains lead
fitted with a non-rewireable 13 Amp mains plug which, if unsuitable for your
socket, should be cut off and an appropriate plug fitted by a qualified
electrician. The fuse and fuse holder must be removed from the plug as
accidental insertion of the redundant plug into a 13 Amp socket is likely to
cause an electrical hazard.
Note:
The severed plug must be destroyed to avoid a possible shock hazard should it
be inserted into a 13 Amp socket elsewhere.
If it is necessary to change the fuse in the non-rewireable plug, the correct type
and rating (5 Amp ASTA or BSI approved BS 1362) must be used and the fuse
cover must be refitted. If the fuse cover is lost or damaged the lead and plug
must not be used until a replacement is obtained. Replacement fuse covers
should be obtained from your dealer.
If a non-rewireable plug or a rewireable 13 Amp (BS 1363) plug is used, it must
be fitted with a 5 Amp ASTA or BSI approved BS 1362 fuse. If any other type of
plug is used it must be protected by a 5 Amp fuse either in the plug or at the
distribution board.
Important:
The wires in the mains lead are coloured in accordance with the following code:
BLUE – NEUTRAL
BROWN – LIVE
As the colours of the wires in the mains lead of your appliance may not correspond
with the coloured marking identifying the terminals in your plug, proceed as follows:
Connect the BLUE coloured wire to plug terminal marked with the letter "N" or
coloured black.
Connect the BROWN coloured wire to the plug terminal marked with a letter "L" or
coloured red.
In no circumstance must any of the wires be connected to the terminal marked with a
letter "E", earth symbol , coloured green or green and yellow.
Replacement mains lead can be obtained from your dealer.
Page 8

8
OVERVIEW
__________________________________________________________________________
The front of the combined TV/video unit
88
I Switches the combined TV/video unit on/off.
–
V + Volume.
–
P +
Selects channels up/down.
● Starts recording.
rr
During playback: Frame search backwards;
after stop: rewind tape.
e
Starts playback.
ee
During playback: Frame search forwards;
after stop: advance tape.
■ Terminates all drive functions.
UU
Headphone jack.
VIDEO IN Video signal input for camcorder.
AUDIO IN Audio signal input for camcorder.
.
EJECT
Ejects cassette.
● STAND BY
88
Mode indicator.
● TIMER
Indicator for record standby mode.
● RECORD
Indicator for recording mode.
8
P
STAND BY
VIDEO IN
AUDIO IN
U
EJECT
8
TIMER
RECORD
Page 9
ENGLISH
9
OVERVIEW
__________________________________________________________________________________
The back of the combined TV/video unit
–II–
Aerial input jack
(for the house aerial).
EURO-AV Euro/AV socket.
ÜÜ
Mains cable for wall socket.
EURO-AV
Page 10
10
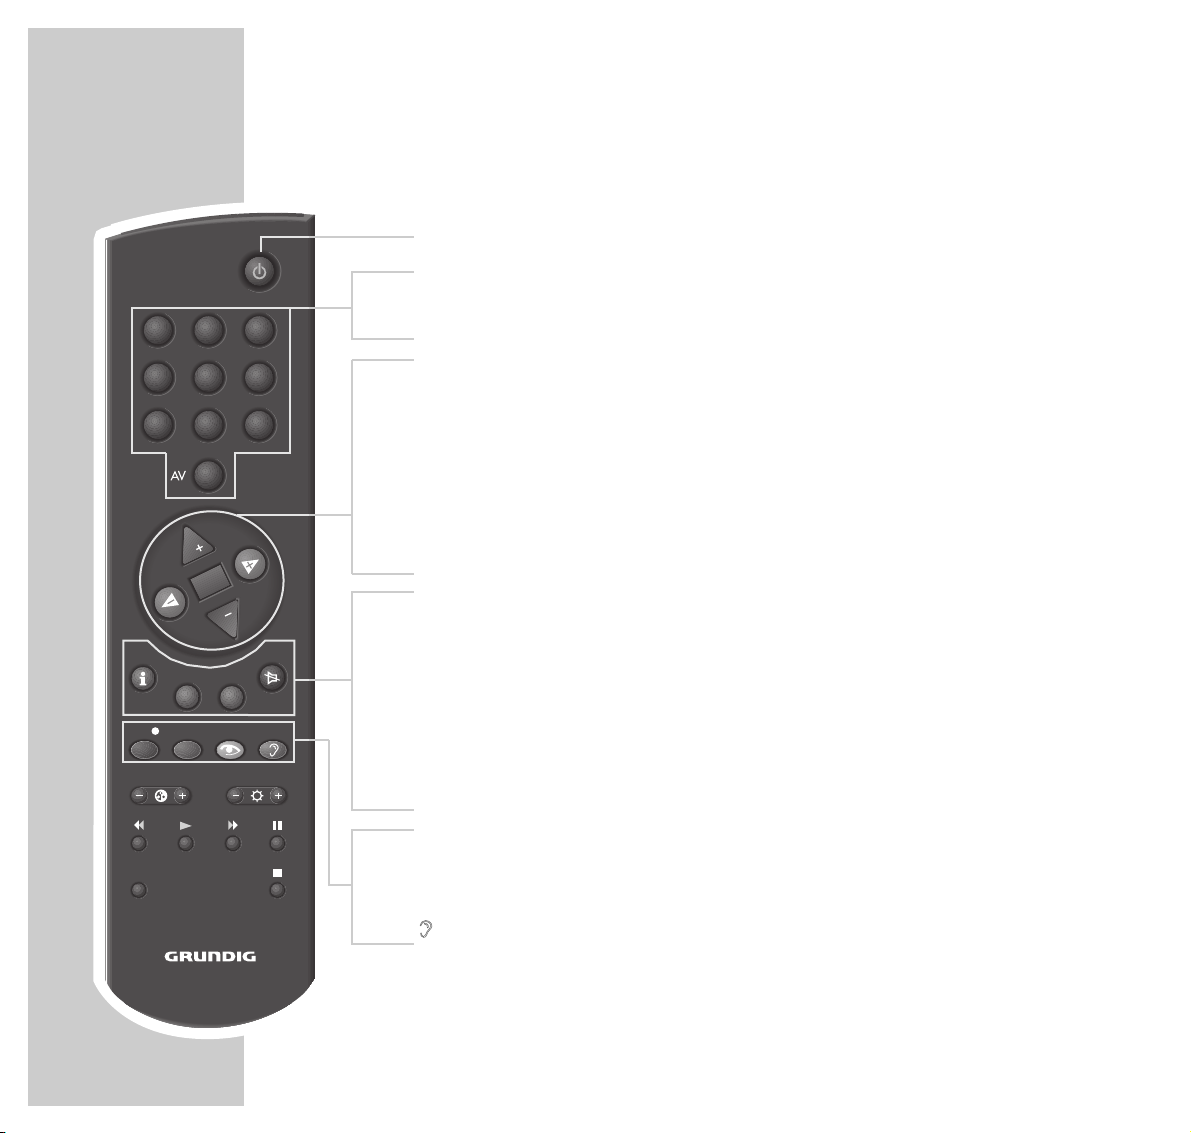
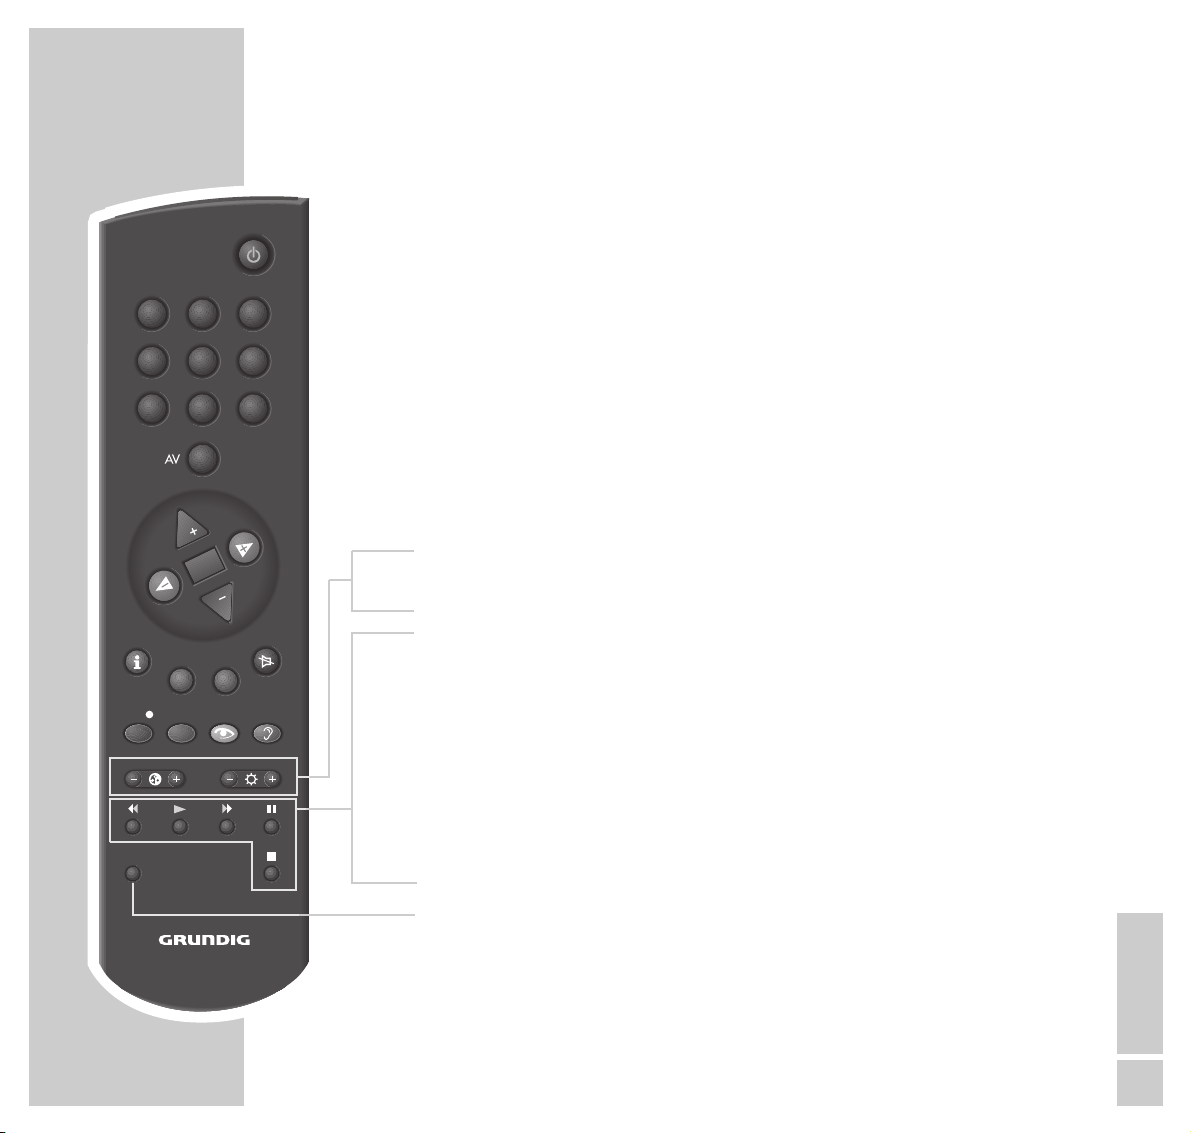
Remote control
88
Switches off the combined TV/video unit (standby).
1...0 AV Switch on the combined TV/video unit from standby;
directly select channels and the AV channel position;
enter teletext page numbers.
,, ..
Switch on the combined TV/video unit from standby (only »,,«);
select channels step-by-step;
move cursor up/down.
FF EE
Adjust the volume;
move cursor left/right.
OK Calls up the program selection bar;
adjusts and activates various functions.
i Calls up the » DIALOG CENTER« (with »i« and »OK«).
CL Deletes data, activates inputs, sets the playing time indicator to
»
0:00:00
«.
TXT Switches between teletext mode and TV mode.
aa
Sound on/off (mute).
REC ● Starts recording.
TIMER Calls up the »TIMER« menu.
zz
Calls up the »PICTURE« menu.
F
F
No function.
INDEX
321
654
987
0
TXT
TELEPILOT 870T
OK
P
P
CL
REC TIMER
OVERVIEW
__________________________________________________________________________________
Page 11
ENGLISH
11
– E
+
Adjusts the colour.
–
RR
+
Adjusts the brightness.
rr Backward frame search during playback;
tape rewind in ”Stop” mode.
e
Starts playback.
ee Forward frame search during playback;
tape advance in ”Stop” mode.
II Pause during recording, freeze-frame during playback.
■ Terminates all drive functions and switches to ”Stop”.
INDEX Activates the INDEX search functions.
INDEX
321
654
987
0
TXT
TELEPILOT 870T
OK
P
P
CL
REC TIMER
OVERVIEW
__________________________________________________________________________________
Page 12
12
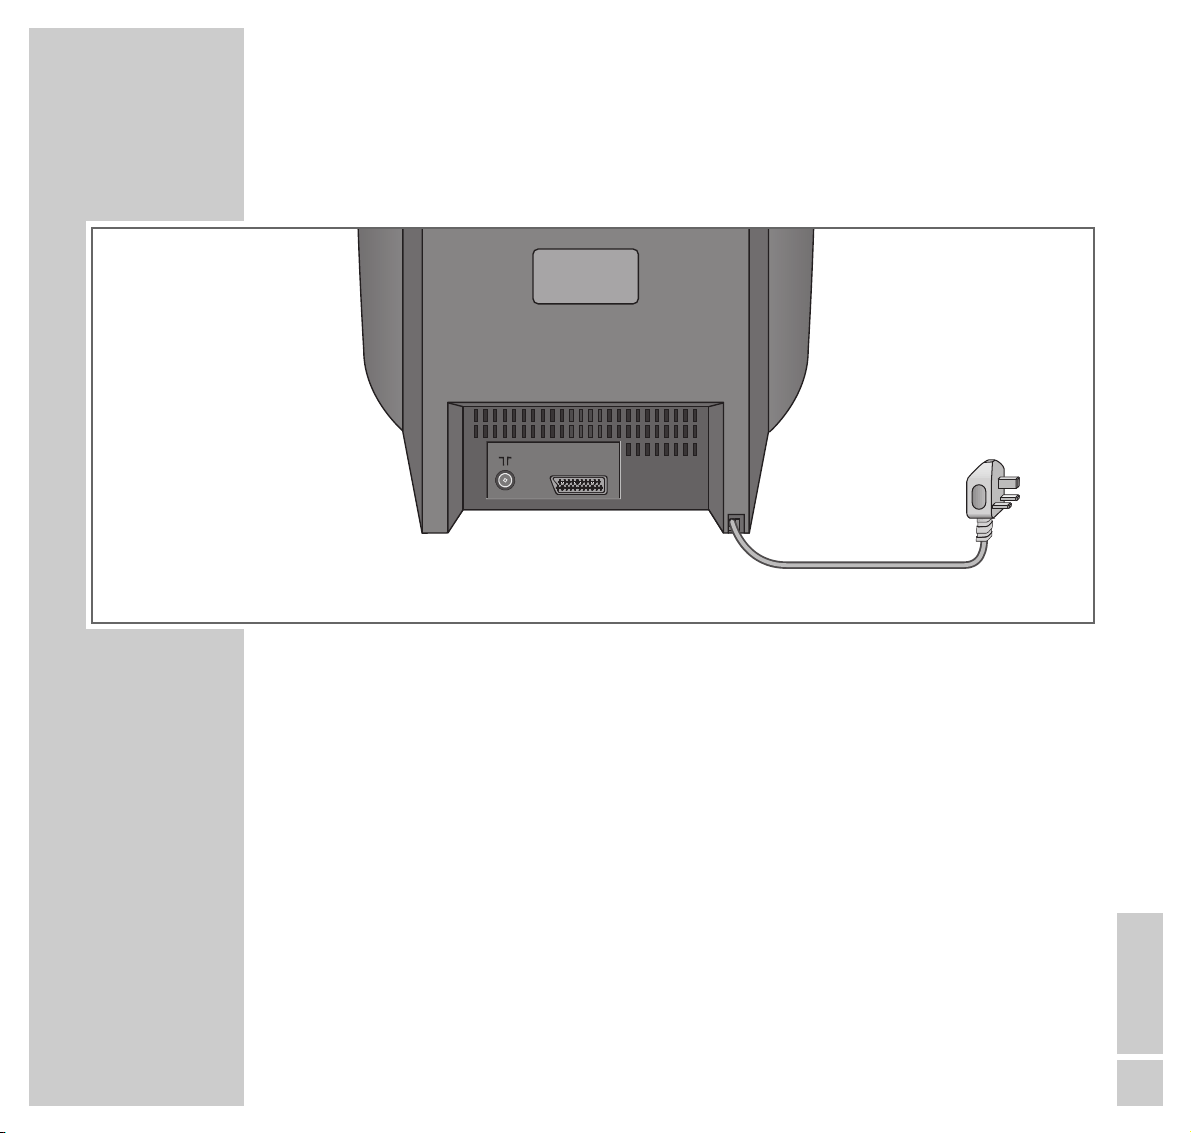
CONNECTION AND PREPARATION
_______________
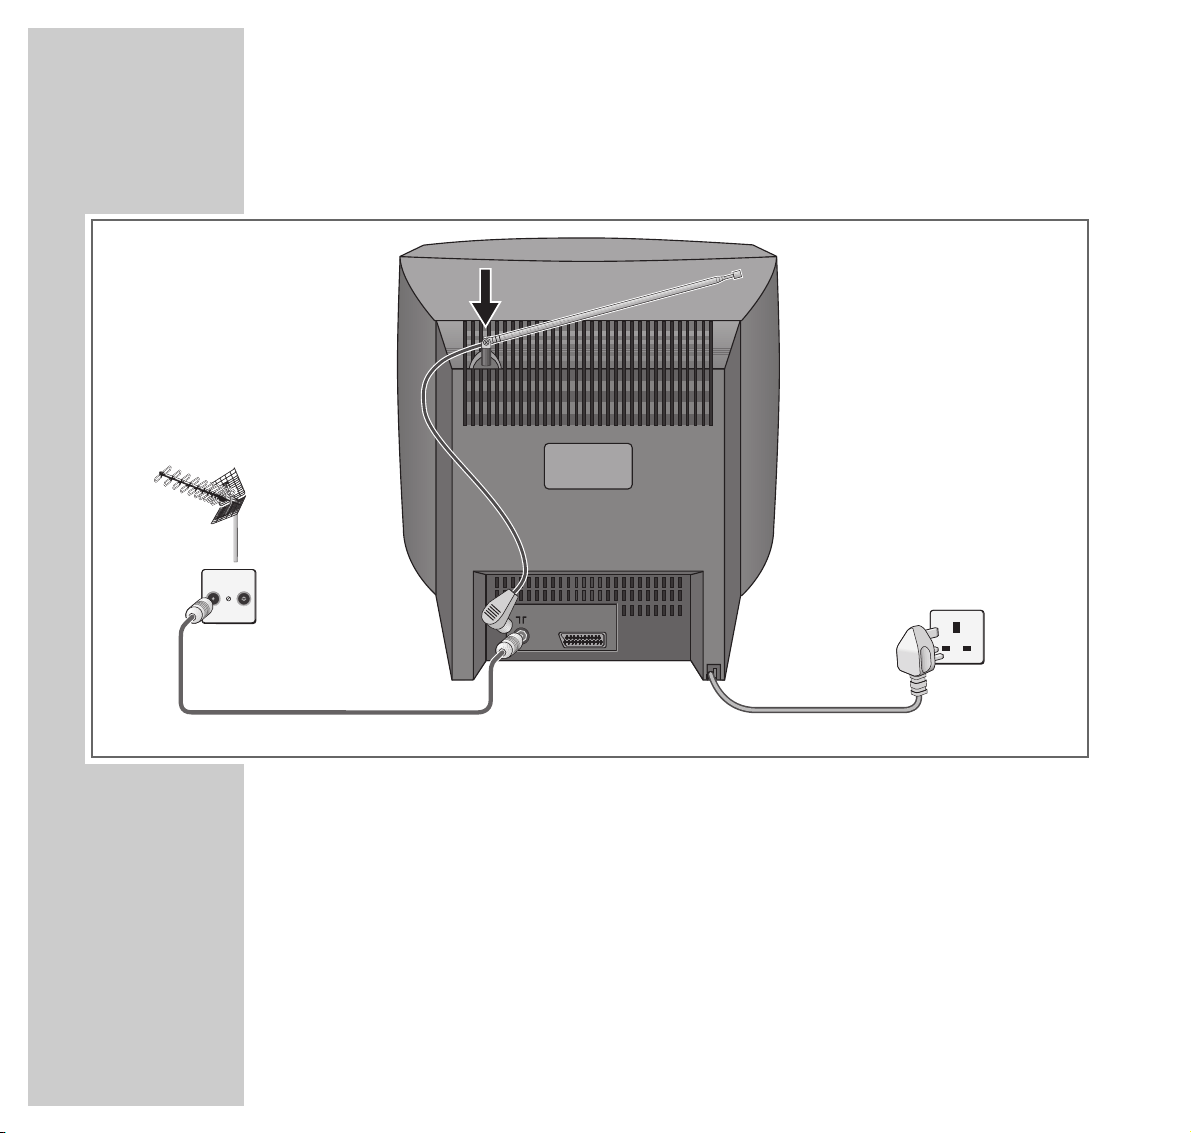
Connecting the aerial and the mains cable
1 Insert the telescopic aerial in the recess in the rear wall.
2 Insert the aerial cable plug of the house aerial or telescopic aerial in the aerial
socket »
–II–
« of the combined TV/video unit.
3 Insert the mains cable plug in the socket.
Caution:
The only way to isolate the combined TV/video unit from the mains supply is
to pull the plug.
TV R
EURO-AV
Page 13
ENGLISH
13
CONNECTION AND PREPARATION
_______________________________________
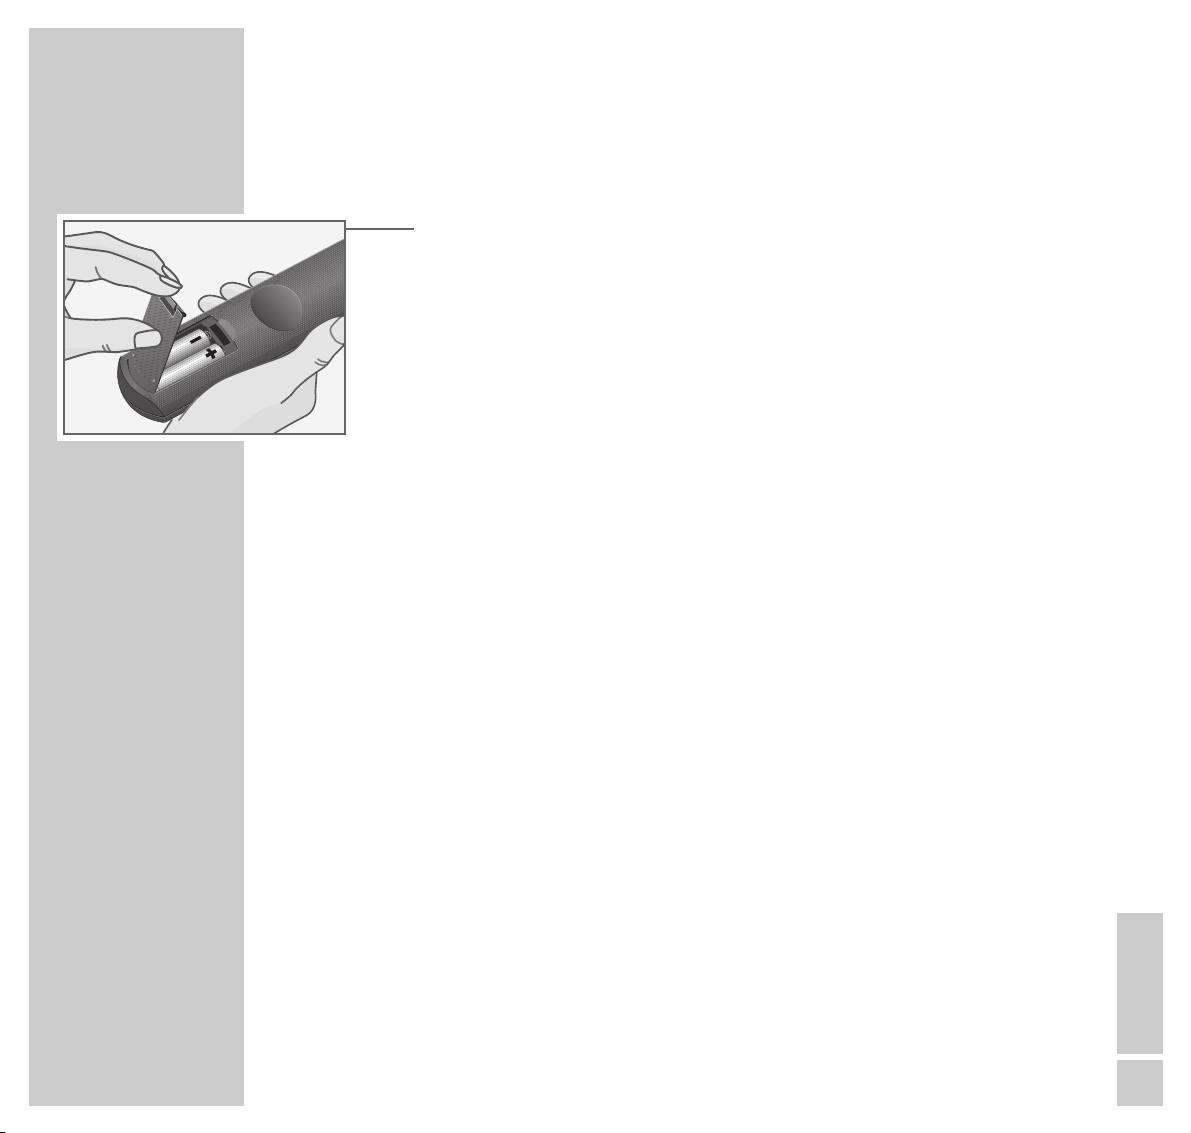
Inserting batteries in the remote control
1 Open the battery compartment by removing the lid.
2 Insert batteries (type round cell, for example, UM-3 or AA, 2 x1.5 V).
Observe the polarity (marked on the base of the battery compartment).
Note:
If the battery is flat, »Batterie« (Battery) will appear on the television screen.
Always remove flat batteries. There is no liability for damage resulting from
flat batteries.
Environmental note:
Batteries, including those which are heavy metal-free, may not be disposed
of along with household waste. Please ensure the environmentally sound
disposal of the used batteries, e.g. via public recycling sites. Find out about
the legal regulations which apply to you.
Switching the combined TV/video unit on/off
1 Press »
88
I« on the combined TV/video unit.
– The »● STAND BY 88« display lights up.
Note:
When the »● STAND BY 88« display illuminates more brightly, then the
combined TV/video unit is ready for use.
Switch on the combined TV/video unit with the »1...0« button on the
remote control.
The combined TV/video unit can only be switched to ready (standby) mode
with »88« when TIMER recordings have been programmed.
Page 14
14
SETTINGS
______________________________________________________________________________
Setting television channels
The combined TV/video unit is equipped with an automatic search option.
The automatic search may last a few minutes - depending on the number of
television channels received.
There are 69 channel positions available for television channels.
After the search, you can sort the television channels into the order you prefer.
You can also delete from the channel list television channels which were found
more than once or which have poor reception.
The combined TV/video unit has its own receiver for the video unit. It can
receive and record from television stations with this receiver, independently of
the television unit.
Setting television channels – with the
automatic search
1 Switch on the combined TV/video unit with »
88
I« on the combined
TV/video unit.
– The »ADJUST COUNTRY« menu appears.
Hint:
If the »ADJUST COUNTRY« menu does not appear, call up the »DIALOG
CENTER« by pressing »
i« and then »OK«.
Select the »INSTALLATION« line with »,,«or»..« and then press »OK«.
Select the »Automatic Tuning System« line with »,,«or»..« and then
press »OK« and resume operation from step 2.
2 Select country (site of installation) with »
,,
«or»..«.
Confirm country with » OK«.
ADJUST COUNTRY
OK
GB England
IR Ireland
i
––––––––––––––––––––
u
Page 15

ENGLISH
15
SETTINGS
____________________________________________________________________________________
3
Activate automatic channel search with
»OK«.
– The combined TV/video unit searches all television channels for television
stations, then sorts and saves them. The search may last a few minutes.
Then the combined TV/video unit switches to channel position 1 and the
»SORT« menu appears.
Sorting or deleting television channels
1 Select the channel to be sorted or deleted from the »SORT« menu by
pressing »,,«or»..«.
2 Highlight channel with »OK« or delete with »CL«.
3 Select new channel position with »
,,
«or»..«.
4 Confirm setting with »OK« and exit with »TXT«.
– The »CLOCK« menu appears, the »Time« display is highlighted.
Setting the data
1 Enter the time as four digits with »1... 0 «.
2 Select the » Year« line with »
..
« and enter as four digits with »1...0 «.
3 Select the » Month« line with »
..
« and enter as two digits with »1...0 «.
4 Select the » Day« line with »
..
« and enter as two digits with »1...0 «.
5 Quit setting with » TXT«.
Note:
Additional settings - such as manual search or naming a television channel are described starting on Page 49.
The settings “Delete channel” and “Sort channel” can also be selected from
the »DIALOG CENTER« (menu items »INSTALLATION« and »SORT«).
AUTOMATIC TUNING SYSTEM
OK
■–
_–_–_–_–_–_–_–_–_–_–_–_–_–_–_–_–_–_
SORT
OK Confirm
6 Return
TXT TV
P 01 BBC1
P 02 C34
P 03 ITV
P 04 CH4
P 0 5 – – – –
P 06 r – – – –
P 0 7 – – – –
P 0 8 – – – –
P 0 9 – – – –
P 1 0 – – – –
i
–––––––––––––––––
u
CLOCK
6 0-9 TXT
Time r – –:–– e
Year 2000
Month 01
Day 01
i
––––––––––
u
Page 16

16
SETTINGS
____________________________________________________________________________________
The dialog center
In the dialog center, you can perform various settings, and call up information
and tips to help with the operation of your combined TV/video unit.
1 Call up the »DIALOG CENTER« by pressing »i « and then » OK «.
– The key symbols and dialog lines indicate the possible operating steps.
– The characters on the screen are symbols for the following buttons on the
remote control:
Symbol Button Function
6
hh
Calls up the »DIALOG CENTER« (»i « and
»OK«) and switches from the menus back to the
»DIALOG CENTER«.
w
,, ..
For step-by-step selection of lines or
q functions on a menu.
re
FFEE
For adjusting settings.
OK OK Confirms functions.
TXT TXT Ends settings.
2 Switch off the »DIALOG CENTER« by pressing »TXT«.
DIALOG CENTER
OK TXT
VIDEO PLUS
TIMER
SPECIAL FUNCTION
INSTALLATION
CLOCK
i
–––––––––––––––
u
Page 17

ENGLISH
17
SETTINGS
____________________________________________________________________________________
Setting contrast
1 Call up the »PICTURE« menu with the »z« button.
– The »PICTURE« menu appears.
2 Adjust the »Contrast«, with »
FF
«or»EE«.
Note:
The combined TV/video unit has been tested at maximum contrast, in order
to check the reliability of all its subassemblies. It is nevertheless
recommended, depending on the position of the set and the room brightness
(ambient light), to reduce the contrast somewhat to obtain the best possible
screen image.
3 Save and quit setting by pressing »TXT«.
PICTURE
TXT
Contrast r ■■■■■■■■■–
_–_–_
e
i
–– –
u
Page 18

18
TELEVISION MODE
_______________________________________________________
Switching on/off
1 Switch on the combined TV/video unit by pressing »
88
I« on the combined
TV/video unit.
– The »● STAND BY 88« indicator on the combined TV/video unit lights up.
2 Switch the television set to ready (standby) mode with the »
88
« button.
– The »● STAND BY 88« indicator on the combined TV/video unit
illuminates more brightly.
Bring the combined TV/video unit out of ready (standby) mode with the
»1...0 AV« or »
PP
« button.
3 Switch off the combined TV/video unit with»
88
I« on the combined TV/video
unit.
– The »● STAND BY 88« indicator disappears.
Selecting channel positions
1 Select channel positions directly (including AV) with the »1...0 AV«
buttons.
2 Select channel positions step-by-step with the »
,,
«or»..« buttons.
Note:
The channel positions can also be selected with the »Program selection bar«.
Call up »Program selection bar« with »OK« and select channel with »,,«
or »..«.
Switching sound on/off
1 Switch the sound off (mute) with the »
aa
« button (mute).
– Display: »aa«.
2 Switch the sound on with the »
aa
« button.
– The »aa« display disappears.
INDEX
321
654
987
0
TXT
TELEPILOT 870T
OK
P
P
CL
REC TIMER
Page 19

ENGLISH
19
TELEVISION MODE
____________________________________________________________________
Displaying/concealing channel position number
1 Display/conceal the channel position number with the »i« button.
– Many television channels also display the station name.
Adjusting the volume, brightness, and contrast
1 Adjust volume with »
FF
«or»EE«.
2 Adjust the brightness with the »–
R
« or »R+« buttons.
3 Adjust the contrast with the »–E « or »E +« buttons.
– Every reset value is saved after a short delay.
Factory setting for volume, brightness, and contrast
You can re-establish the factory setting.
1 Call up the »DIALOG CENTER« by pressing »i« and then »OK«.
2 In the »DIALOG CENTER«, select the »SPECIAL FUNCTION« line with
»,,« or »..« and confirm with »OK«.
3 Select the »Factory preset« line with »
,,
« or »..« and confirm with
»OK«.
4 Quit setting by pressing »TXT«.
SPECIAL FUNCTION
6 OK TXT
Osd function Off
Tape speed SP
Volume limiter Off
Factory preset
Service
i
–––––––––––––––
u
Page 20

20
PLAYBACK
_________________________________________________________________________
Basic playback functions
Preparation
Switch on the combined TV/video unit.
Insert store-bought cassette in the cassette compartment – with the window
facing upwards – until it is automatically drawn in.
Note:
If a cassette with a broken tab is inserted, the combined TV/video unit automatically switches to playback.
1 Press »
e
« to start playback.
– The tape display in hours, minutes and seconds, or the remaining playing
time of the tape, appears briefly on the screen. The display depends on the
setting in the »COUNTER SETTINGS« menu, see ”Convenience functions,
setting the tape display” on page 41.
2 Switch to freeze-frame*/pause by pressing »II«.
Repeated pressing advances the freeze-frame step-by-step.
3 Select backwards frame search* during playback with »
rr
«
.
Select forward frame search* during playback with »
ee
«
.
4 End playback with »■«.
5 Rewind tape by pressing »rr«, advance tape with »
ee
«.
6 Eject cassette by pressing »
.
EJECT« on the combined TV/video unit.
Note:
The tape display can be set to »
0:00:00
« by pressing »CL«.
The combined TV/video unit automatically switches off the freeze-frame
function after some time has elapsed.
INDEX
321
654
987
0
TXT
TELEPILOT 870T
OK
P
P
CL
REC TIMER
* Freeze-frame and frame search with unwanted lines. In LP mode, freeze frames only appear in black-and-white.
Page 21

ENGLISH
21
PLAYBACK
__________________________________________________________________________________
Additional playback functions
Advancing freeze-frames step-by-step
1 During the freeze-frame (playback/pause), press » II« repeatedly.
2 Resume playback by pressing »
e
«.
Improving the quality of the freeze-frame image
If the freeze-frame image flickers or is unsteady, it can be optimised:
1 During the freeze-frame (playback/pause), call up the »DIALOG CENTER«
by pressing »i« and then »OK«.
2 Select the »VERTICAL STABILITY« line by pressing »
,,
« or »..«.
3 Adjust the screen to obtain the best possible image by pressing »
FF
«or
»EE«.
4 Save and quit setting with »TXT«.
Eliminating picture disturbances (adjusting tracking
position)
1 During playback, call up the »DIALOG CENTER« by pressing »i« and then
»OK«.
2 Select the »TRACKING« line by pressing »
,,
« or »..«.
3 Adjust the screen to obtain the best possible image by pressing »
FF
«or
»EE«.
– Your setting is retained until you remove the cassette.
4 Save and quit setting with »TXT«.
Note:
The adjustment can be set to “Middle” with »CL«.
DIALOG CENTER
re CL TXT
VIDEO PLUS
TIMER
SPECIAL FUNCTION
INSTALLATION
CLOCK
TRACKING
i
–––––––––––––––––––
u
DIALOG CENTER
re CL TXT
VIDEO PLUS
TIMER
SPECIAL FUNCTION
INSTALLATION
CLOCK
VERTICAL STABILITY
i
–––––––––––––––––––
u
Page 22

22
PLAYBACK
__________________________________________________________________________________
Playback of recordings according to the
NTSC colour norm
During playback of NTSC recordings, the combined TV/video unit automatically
switches over to this system.
Note:
The freeze-frame function is not possible during NTSC playback.
Continuous playback
When this function is activated, the combined TV/video unit automatically
rewinds the cassette when it reaches its end, and starts playback again.
1 Call up the »DIALOG CENTER« by pressing »i« and then »OK«.
2 Select the »TIMER« line with »
,,
« or »..« and confirm with »OK«.
3 Select »Continuous Play« line with »
,,
« or »..« and activate continuous
playback with »EE« or »FF« (display »On«).
4 Quit setting with the »TXT« button.
5 Insert store-bought cassette in the cassette compartment and start playback
by pressing » e«.
– On-screen display: »eREP«.
Note:
To end continuous playback, press »■«, repeat steps 1 to 3 and switch off
continuous playback with »EE« or »FF« (display »Off«).
TIMER
6 TXT
Record Timer
On Timer
Sleep Timer
Counter Settings
Continuous Play r Off e
i
––––––––––––––
u
Page 23

ENGLISH
23
RECORDING
____________________________________________________________________
Three options for recording:
With your combined TV/video unit, you have three different options for recording television programmes:
1 Immediate recording, in which you select the desired channel on the com-
bined TV/video unit and start recording immediately.
2 Delayed recording – with use of the VIDEO Plus + numbers.
3 Delayed recording – by entering the data for the desired television channel –
if you do not know the VIDEO Plus + numbers.
For recording types 2 and 3, you can input the recording data for six
programmes within a time period of one year,
or record programmes daily or weekly at the same time.
The programmes of your choice are recorded via the video programme
system (PDC) – controlled by the television stations.
Note:
The combined TV/video unit has two reception units. Thus you can switch to
a different channel while recording without affecting the previously selected
television channel.
Note:
If you have programmed a TIMER recording and you want to play back a
cassette in which the erase protection has been removed, you must cancel
the TIMER recording.
Page 24

24
RECORDING
_______________________________________________________________________________
The video programme system (PDC)
When making a delayed recording, control by this system ensures the totally
reliable recording of the programme.
Information about the video programme system
Many television stations transmit a supplementary signal (PDC signal) which
indicates the start and duration of each television programme. It is therefore
important when programming the combined TV/video unit that the switch-on
and switch-off times are entered precisely, to the nearest minute.
If television programmes are changed or re-scheduled, then special PDC times
which must be entered instead of the scheduled times are detailed in the
programme indexes.
The combined TV/video unit switches on at the entered time and – controlled by
the PDC signal – switches off at the end of the programme. To ensure that the
programme is recorded in full, make sure that the recording duration of the
cassette used is adequate.
Television programmes without PDC signals
In the case of television stations which do not transmit a PDC signal, recording is
only started via the switch-on time and ended via the switch-off time.
This is regardless of whether the PDC signal is confirmed or deleted during
programming of the combined TV/video unit.
Programming several television programmes on one
day
If you want to pre-program several programmes from different television
stations, you must decide which programme should be recorded completely, if
you are concerned about a time lag.
Page 25

ENGLISH
25
RECORDING
_______________________________________________________________________________
Immediate recording
Preparation
Switch on the combined TV/video unit.
Insert a cassette with sufficient playing time and intact tabs (cassette not blocked)
in the cassette compartment until it is automatically drawn in.
Operation
1 Before recording select the desired channel with »
,,
«or»
..
« or
»– P +«or»1...0 AV «.
2 If it is required, select long-playing mode, see the section entitled ”Selecting
tape speed” on Page 38.
3 Start recording by pressing »REC ●«.
– The »● RECORD « display on the combined TV/video unit lights up.
Note:
To enter the switch-off time, press »REC ●« and enter the switch-off time in
30-minute intervals with »FF«or»EE« and confirm with »TXT«.
4 To select recording pause, press »II« . Resume recording with »II«.
5 To end recording, press »■«.
6 To rewind tape, press »rr«, to advance tape, press »
ee
«.
7 Eject cassette by pressing »
.
EJECT« on the combined TV/video unit.
Note:
The tape display can be set to »
0:00:00
« by pressing »CL«.
INDEX
321
654
987
0
TXT
TELEPILOT 870T
OK
P
P
CL
REC TIMER
Page 26

26
RECORDING
_______________________________________________________________________________
Seamless compilation of recordings (Assemble)
This function allows you to obtain seamless transitions during playback, without
disturbance zones between the recordings.
1 During playback, locate the end of the scene, where the new recording
should be added, and press »II« at this tape position.
2 Switch the combined TV/video unit to recording pause by pressing
»REC ●«.
3 Enter the desired channel as one or two digits with »1...0 AV« and start
the new recording by pressing »REC ●«.
4 End recording with »■«.
Finding specific recordings
This search system enables you to precisely and quickly find the start of each
recording you have made. The required ”markers” are automatically put on the
tape - at the start of each recording you make.
1 Press and hold down » INDEX «.
2 Select the desired marker with »
rr
« or »e«.
– The marker is displayed on the screen and the tape is rewound or fast
forwarded to the recording, playback starts here.
Page 27

ENGLISH
27
RECORDING
_______________________________________________________________________________
Delayed recording –
by entering the VIDEO Plus+ number
Note:
The time and date on the combined TV/video unit must be accurate.
You can find the VIDEO Plus + numbers for the television programmes in the
programme guides.
You can input the recording data for six programmes within a time period of
one year.
If all TIMER positions are occupied, the »RECORD TIMER« menu appears on
the screen and you must delete a TIMER position, see the section entitled
“Deleting recording data” on Page 32.
Operation can be interrupted at any time with the » TXT« button.
VIDEO Plus +
®
is a registered trademark of the Gemstar Development
Corporation. The VIDEO Plus + system was manufactured under the licence
of the Gemstar Development Corporation.
Preparation
Switch on the combined TV/video unit.
Insert a cassette with sufficient playing time and intact tabs (cassette not blocked)
in the cassette compartment until it is automatically drawn in.
Example
1 Call up the »DIALOG CENTER« by pressing »i« and then »OK«.
2 Confirm the »VIDEO PLUS« line with »OK«.
3 Enter the VIDEO Plus + number for the desired television programme with
»1...0 AV «.
VIDEO PLUS
6 OK CL 0 – 9 TXT
Code 1 2 5 5 5 – – – –
Daily/Weekly Once
i
––––––––
u
Page 28

28
RECORDING
_______________________________________________________________________________
Note:
In the case of an incorrect entry, the VIDEO Plus+ number can be deleted
with »CL«.
If the program should be recorded ”daily” or ”weekly” at the same time,
select the » Daily/Weekly Once« line with »..« and select the desired
function with »FF« or »EE«.
The ”daily” function is not
possible for recordings on Saturday or Sunday.
4 Confirm the VIDEO Plus + number with »OK «.
– The current recording data appears on the screen.
Note:
When a television channel is programmed for the first time, the » Prg. Nbr.«
display in the »VIDEO PLUS« menu is highlighted. The combined TV/video
unit must first ”learn” at which of its program positions the individual
channels have been saved.
Select the desired channel (for example, »02«) with »FF« or »EE« and confirm with »OK«.
Channel selection is no longer necessary for all further programming with
this channel.
The exception is if you have switched channel positions after the initial
programming, in which case you must check the channel position.
If a television channel from an installed satellite receiver is programmed,
select the » AV« channel position with »..«. The satellite receiver must be
switched on at the selected recording time and for the duration of the TIMER
recording.
5 Select PDC control (if desired) by selecting the »VPS PDC« display with
»EE« and selecting » On« with »,,« or »..«.
6 Select long-playing mode (if desired) by selecting the » SP LP« display with
»EE« and switching to » LP« with »CC« or »DD«.
VIDEO PLUS
6 OK TXT
Code 1 2 5 5 5 – – – –
Daily/Weekly Once
Prg.Nbr. r AV e
VIDEO PLUS
6 OK re wq TXT
VPS SP
Date DW Pr Start End PDC LP
10 – 01BBC1 22:10 22:40 Off SP
VIDEO PLUS
6 OK TXT
Code 1 2 5 5 5 – – – –
Daily/Weekly r Once e
i
–––––––––––
ui
––––––––
u
Page 29

ENGLISH
29
RECORDING
_______________________________________________________________________________
7 Save recording data with » OK « and end operation with » TXT«.
– The message »TIMER READY« appears on the screen and then once again
the »VIDEO PLUS« menu.
For further recordings, repeat procedure from step 3 of the example
or
8 Switch off the »VIDEO PLUS« menu with » TXT«.
– The » ● TIMER« display on the combined TV/video unit lights up, the
combined TV/video unit is now in record standby mode.
Note:
If there is no cassette in the combined TV/video unit, the » NO TAPE
RECORD NOT POSSIBLE« message appears. If there is no cassette in the
combined TV/video unit and it has been turned off (Stand-by), the display
»
● TIMER« will flash.
Insert a cassette in the cassette compartment.
RECORD TIMER
TIMER READY
VPS SP
Date DW Pr Start End PDC LP
10 – 01BBC1 22:10 22:40 Off SP
Page 30

30
RECORDING
_______________________________________________________________________________
Delayed recording – by entering data for the desired
TV channel
Employ this method of recording if you do not know the VIDEO Plus + numbers
for the television channels.
You can input the recording data for six programmes within a time period of
one year.
Note:
The time and date on the combined TV/video unit must be accurate.
Operation can be interrupted at any time with the » TXT« button.
Preparation
Switch on the combined TV/video unit.
Insert a cassette with sufficient playing time and intact tabs (cassette not blocked)
in the cassette compartment until it is automatically drawn in.
Example
1 Call up the »RECORD TIMER« menu with the »TIMER« button.
– The »RECORD TIMER« menu appears on the screen.
2 Start data entry with »
EE
«.
– The current data is displayed.
3 Enter the date with »
,,
« or »..«.
Note:
If the program should be recorded ”daily” or ”weekly” at the same time,
select the »DW« display with »EE« and select the » D« (daily) or » W«
(weekly) display with »,,« or »..«.
– The ”daily” function is not possible for recordings on Saturday or Sunday.
Confirm entry with »EE«.
RECORD TIMER
6 OK re wq TXT
VPS SP
Date DW Pr Start End PDC LP
15 – 01BBC1 20:00 21:20 Off SP
RECORD TIMER
6 OK CL re TXT
VPS SP
Date DW Pr Start End PDC LP
–– – ––––– ––:–– ––:–– ––– ––
i
––––––––––––––––––
u
Page 31

ENGLISH
31
RECORDING
_______________________________________________________________________________
4 Change channels (Pr) with »
,,
« or »..« and confirm with »EE«.
Note:
If a television channel from an installed satellite receiver is programmed, select the » AV« channel position with »,,« or »..«. The satellite receiver
must be switched on at the selected recording time and for the duration of
the TIMER recording.
5 Enter switch-on time (Start) with »1...0 AV « as four digits and confirm with
»EE«.
6 Enter the switch-off time (End) with »1...0 AV « as four digits.
7 Select PDC control (if required) by selecting the »VPS PDC« display with
»EE« and selecting »On« with »,,« or »..«.
8 Select tape speed (if required) by selecting the »SP LP« display with »
EE
«
and selecting standard play mode »SP« or long-playing mode »LP« with
»,,« or »..«.
9 Save recording data with » OK «.
– For further recordings, repeat procedure from step 2 or end procedure
with step 10.
10 End operation with » TXT«.
– The message »TIMER READY« appears briefly on the screen.
– The » ● TIMER« indicator on the combined TV/video unit lights up, the
combined TV/video unit is now in record standby mode.
Note:
If there is no cassette in the combined TV/video unit, the » NO TAPE
RECORD NOT POSSIBLE« message appears. If there is no cassette in the
combined TV/video unit and it has been turned off (Stand-by), the display
»
● TIMER« will flash.
Insert a cassette in the cassette compartment.
RECORD TIMER
6 OK re wq TXT
VPS SP
Date DW Pr Start End PDC LP
15 – 01BBC1 20:00 21:30 Off SP
RECORD TIMER
6 OK re wq TXT
VPS SP
Date DW Pr Start End PDC LP
15 – 01BBC1 21:00 21:30 Off SP
RECORD TIMER
6 OK CL re TXT
VPS SP
Date DW Pr Start End PDC LP
15 – 01BBC1 21:00 22:00 On SP
–– – ––––– ––:–– ––:–– ––– ––
i
––––––––––––––––––
u
Page 32

32
RECORDING
_______________________________________________________________________________
Checking or deleting recording data
Checking recording data
1 Call up the »RECORD TIMER« menu with the »TIMER« button.
– Check the recording data.
2 Switch off the »RECORD TIMER« menu with the » TXT« button.
Deleting recording data
1 Call up the »RECORD TIMER« menu with the »TIMER« button.
The »RECORD TIMER« menu appears on the screen.
2 Select the TIMER position in question with »
,,
« or »..« and delete with
» CL«.
3 Switch off the »RECORD TIMER« menu with the » TXT« button.
Interrupting TIMER recording of the combined
TV/video unit
1 Call up the »RECORD TIMER« menu with the »TIMER« button.
2 Interrupt TIMER recording by pressing the » CL« button.
– The TIMER recording is ended.
RECORD TIMER
6 OK CL re TXT
VPS SP
Date DW Pr Start End PDC LP
15 – 01BBC1 21:00 21:30 Off SP
RECORD TIMER
6 OK CL re TXT
VPS SP
Date DW Pr Start End PDC LP
15 – 01BBC1 21:00 22:00 On SP
–– – ––––– ––:–– ––:–– ––– ––
i
––––––––––––––––––
ui
––––––––––––––––––
u
Page 33

ENGLISH
33
TELETEXT MODE
______________________________________________________________
Basic teletext functions
Teletext consists of a large number of separate text pages, for example sports
and political news, market prices, weather reports and many other kinds of
information.
Teletext features, as well as the layout and design of the individual pages, varies
from station to station.
Various topics and pages can be called up from the menu page by pressing a
button.
1 Switch on teletext mode with the »TXT« button.
– Menu Page 100 or the last teletext page viewed appears.
– At the bottom of the page you will see an info line consisting of a red,
green, yellow and blue text field. You will also find these colours on four
buttons on the remote control.
2 Select the topic/page of your choice with »
F
F
« (blue), »zz« (yellow),
»TIMER« (green) and »REC ●« (red).
– The info line displays your next options.
Note:
Teletext pages can also be selected directly with »1...0 «.
Return to the menu page by pressing »
■«.
3 Switch off teletext with the »TXT« button.
INDEX
321
654
987
0
TXT
TELEPILOT 870T
OK
P
P
CL
REC TIMER
Page 34

34
Other functions with the dialogue line
Selecting dialogue line
1 Switch on teletext with the »TXT« button.
2 Select the dialogue line with »i«.
Note:
You will select the various functions from this dialogue line.
Operation is explained in the following sections.
Enlarging teletext page
1 Select the »G « display with »
FF
«or»EE«.
2 Enlarge teletext page by repeatedly pressing »OK«.
Page stop for multiple pages
A multiple page may contain several sub-pages, which are automatically
scrolled in a particular order by the transmitting station.
Multiple pages are marked with an indicator, for example »3/6« indicates that
page three of a total of six pages is being displayed.
If you wish to view a sub-page for a longer period, the page can be ”stopped”.
1 Select the »I « display by pressing »
FF
«or»EE« and ”stop” the page with
»OK«.
– »STOP« appears on the screen and scrolling is discontinued.
2 To return to the automatic scrolling cycle, press »OK« again.
TELETEXT MODE
_________________________________________________________________________
G
I
Page 35

ENGLISH
35
Directly calling up the sub-page
1 Select the »H « display by pressing »
FF
«or»EE« and call up the subpage with »OK«.
– The selected teletext page number appears in the symbol line; for example,
»155/0001«.
2 Enter the sub-page number as four digits with »1...0 «.
– The sub-page appears after a brief delay.
3 To return to the automatic scrolling cycle, press »OK«.
Reveal answer
On certain teletext pages, you can display (reveal) ”hidden” answers or
information, for example to solve puzzles, or to check the VPS times in order to
program a video recorder.
1 Select the »L« display by pressing »
FF
«or»EE« and call up the
information with »OK«.
– The ”hidden” information is displayed.
2 Switch off ”Reveal answer” with the »OK« button.
TELETEXT MODE
_________________________________________________________________________
H
L
Page 36

36
Overriding wait time
While a page is being searched for, you can switch to the television channel:
1 Select the »K« display by pressing »
FF
«or»EE« and then press »OK«.
– The television image appears and at the top of the screen the display
»k«.
2 Enter the teletext page number as three digits with »1... 0 « and then press
»OK«.
– The display »k« flashes. When a page number is displayed instead of the
»k« display, this means the page has been found.
3 Press »OK« to display the teletext page.
Switching off teletext
1 Switch off teletext with the »TXT« button.
TELETEXT MODE
_________________________________________________________________________
K
Page 37

ENGLISH
37
Other functions with the remote control keys
1 Switch on teletext mode with the »TXT« button.
Enlarging teletext page
1 Enlarge teletext page by repeatedly pressing »E
+
«.
Page stop for multiple pages
1 Stop teletext page by repeatedly pressing »–
RR
«.
2 Return to automatic scrolling cycle by pressing »–
RR
«.
Directly calling up sub-pages
1 Select a sub-page with the »– E « button.
2 Enter the sub-page number as four digits with »1...0«.
– The sub-page appears after a brief delay.
3 To return to the automatic scrolling cycle, press »– E «.
Reveal answer
1 Call up “hidden” information with the »
RR
+
« button.
2 To return to the automatic scrolling cycle, press »
RR
+
«.
TELETEXT MODE
_________________________________________________________________________
INDEX
321
654
987
0
TXT
TELEPILOT 870T
OK
P
P
CL
REC TIMER
Page 38

38
Convenience functions with the
»SPECIAL FUNCTIONS« menu
1 Call up the »DIALOG CENTER« by pressing »i« and then »OK«.
2 From the »DIALOG CENTER«, select the » SPECIAL FUNCTION« line with
»,,« or »..« and confirm with »OK«.
Note:
Further operation is explained in the following sections.
Concealing or displaying screen displays
1 In the »SPECIAL FUNCTION« menu, select the » OSD-Funktion« line with
»,,« or »..«.
2 Select function with »
EE
« or »FF«.
»Off«: no display;
»Counter«: tape length is continuously displayed;
»Auto.«: displays are shown for approximately three seconds.
3 Quit setting with the »TXT« button.
Adjusting the volume
The volume level of normal television programs may differ from that of advertisements. You can compensate for this.
1 In the »SPECIAL FUNCTION«, select the »Volume limiter« line with »
,,
«or
»..«.
2 Adjust volume by selecting »On« with »
FF
«or»EE«.
3 Quit setting with the »TXT« button.
CONVENIENCE FUNCTIONS
_________________________________
SPECIAL FUNCTIONS
6 TXT
Osd function r Off e
Tape speed SP
Volume limiter Off
Factory preset
Service
SPECIAL FUNCTIONS
6 TXT
OSD function Off
Tape speed SP
Volume limiter r On e
Factory preset
Service
i
–––––––––––––––
ui
–––––––––––––––
u
DIALOG CENTER
OK TXT
VIDEO PLUS
TIMER
SPECIAL FUNCTION
INSTALLATION
CLOCK
i
–––––––––––––––
u
Page 39

ENGLISH
39
Selecting tape speed (SP, LP)
The selected tape speed remains in effect for the recording function until you adjust
this setting to a different tape speed.
1 In the »SPECIAL FUNCTION« menu, select the »Tape Speed« line with
»,,«or»..«.
2 Select tape speed »SP« or » LP« by pressing »
FF
«or»EE«.
3 Quit setting with the »TXT« button.
Entering switch-off time with the »SLEEP TIMER«
menu
You can enter a switch-off time for your combined TV/video unit with the
»SLEEP TIMER « menu. After the set time has elapsed, the combined TV/video
unit switches to standby mode.
1 Call up the »DIALOG CENTER« by pressing »i« and then »OK«.
2 Select the »TIMER« line with »
,,
«or»..« and confirm with »OK«.
3 Select the »Sleep Timer« line with »
,,
«or»..« and confirm with »OK«.
– The »SLEEP TIMER« menu is displayed.
4 Enter the desired switch-off time (from 00 to 180 minutes) in 15-minute
intervals with »FF« or »EE«.
Note:
The switch-off time can be deleted with »CL«.
5 Quit setting with »TXT«.
CONVENIENCE FUNCTIONS
___________________________________________________
SPECIAL FUNCTIONS
6 TXT
OSD function Off
Tape speed r SP e
Volume limiter On
Factory preset
Service
SLEEP TIMER
6 re CL
´
15
´
min.
DIALOG CENTER
OK TXT
VIDEO PLUS
TIMER
SPECIAL FUNCTION
INSTALLATION
CLOCK
i
–––––––––––––––
ui
–––––––––––––––
u
Page 40

40
Entering switch-on time with the »ON TIMER« menu
You can enter a switch-on time for your combined TV/video unit with the »ON
TIMER« menu. When the set time arrives, the combined TV/video unit switches
on from standby mode.
1 Call up the »DIALOG CENTER« by pressing »i« and then »OK«.
2 Select the »TIMER« line with »
,,
«or»..« and confirm with »OK«.
3 Select the »ON TIMER« line with »
,,
«or»..« and confirm with »OK«.
– The »ON TIMER« menu is displayed.
4 Enter the desired switch-on time (over 24 hours) step-by-step with »
FF
« or
»EE«, or enter as four digits with »1...0 «.
5 Select the »Prg. Nbr.« line with »
,,
«or»
..
«, and enter the desired
channel position step-by-step with »FF« or »EE«, or as two digits with
»1...0 «.
6 Select the »Wake up« line with »
,,
«or»..« and activate the function
with »FF« or »EE« (»On«).
7 Quit setting with the »TXT« button.
Note:
In order for the combined TV/video unit to switch on when the set time
arrives, it may only be switched to standby mode.
CONVENIENCE FUNCTIONS
___________________________________________________
ON TIMER
6 0 – 9 TXT
Time r 2 0: 0 0 e
Prg. Nbr. – – – – –
Wake up Off
ON TIMER
6 0 – 9 TXT
Time 2 0: 0 0
Prg. Nbr. r 0 1 BBC1 e
Wake up Off
ON TIMER
6 TXT
Time 2 0: 0 0
Prg. Nbr. 0 1 BBC1
Wake up r On e
i
––––––––
ui
––––––––
ui
––––––––
u
Page 41

ENGLISH
41
Convenience functions with the »SERVICE« menu
Note:
The function of the »Service code« line is reserved for the authorised dealer.
Selecting the blue screen
This setting switches to a blue screen when the picture is grainy.
1 Call up the »DIALOG CENTER« by pressing »i« and then »OK«.
2 Select the »SPECIAL FUNCTION« line with »
,,
« or »..« and confirm with
»OK«.
3 Select the »Service « line with »
,,
« or »..« and confirm with »OK«.
4 Select the »Blue Screen« line by pressing »
,,
«or»..« and select »On«
by pressing »FF«or»EE«.
5 Quit setting with »TXT«.
CONVENIENCE FUNCTIONS
___________________________________________________
SERVICE
6 TXT
Blue Screen r On e
Service code – – – –
i
–––––
u
Page 42

42
Setting the tape display
In order for the tape length to be correctly displayed during playback and recording, the tape length for E 30 to E 180 cassettes or for E 240 cassettes must
be selected with this function.
1 Call up the »DIALOG CENTER« by pressing »i« and then »OK«.
2 Select the »TIMER« line with »
,,
« or »..« and confirm with »OK«.
3 Select the »Counter Settings« line with »
,,
« or »..« and confirm with
»OK«.
4 Select the »Length« line by pressing »
,,
«or»
..
« and select
»E 30 – E 180« or »E 240« by pressing »FF«or»EE«.
5 Select the »Time« line by pressing »
,,
«or»..« and select »Used« (for
tape display) or »Remain« (for elapsed playing time) by pressing »FF«or
»EE«.
6 Quit setting with the »TXT« button.
CONVENIENCE FUNCTIONS
___________________________________________________
COUNTER SETTING
6 TXT
Length r E30 – E180 e
Time Remain
i
–––––
u
Page 43

ENGLISH
43
Activating the security system
The security system allows you to protect the combined TV/video unit from unauthorised use.
1 Call up the »DIALOG CENTER« by pressing »i« and then »OK«.
2 Select the »INSTALLATION« line by pressing »
,,
«or»..« and confirm
with »OK«.
3 Select the »Child lock« line by pressing »
,,
«or»..« and confirm with
»OK«.
4 Enter four-digit code number with »1...0 « and save with »OK«.
– The code number appears in ”red”.
5 Switch off combined TV/video unit with »
88
«.
– When the combined TV/video unit is switched off and then on again, the
security system is activated. The »Child lock« page is displayed, all
functions are blocked.
Temporarily switching off the security system
1 Switch on the combined TV/video unit and enter the four-digit code number
with »1...0 «.
– The combined TV/video unit switches to the TV picture. When the
combined TV/video unit is switched off and on again, the security system
is again activated.
Note:
If you forget the code number, a number combination given in
”INFORMATION, rectifying malfunctions yourself”, on Page 55, will help
you along.
SECURITY SYSTEM
________________________________________________________
CHILD LOCK
6 0-9 TXT
vv
7– – – –
INSTALLATION
6 OK TXT
Child lock
Program Sort
Manual Tuning
Automatic Tuning System
CHILD LOCK
0-9
vv
7– – – –
i
––––––––––
u
Page 44

44
Switching off the security system
1 Switch on the combined TV/video unit.
2 Enter the four-digit code number with »1...0 «.
3 Call up the »DIALOG CENTER« by pressing »i« and then »OK«.
4 Select the »INSTALLATION« line by pressing »
,,
«or»..« and confirm
with »OK«.
5 Select the »Child lock« line by pressing »
,,
«or»..« and confirm with
»OK«.
– The code number appears in ”red”.
6 Enter four-digit code number with »1...0 « and delete with »CL«.
– The security system is de-activated.
7 Quit setting with the »TXT« button.
SECURITY SYSTEM
_____________________________________________________________________
CHILD LOCK
6 0-9 CL
vv
7– – – –
Page 45

ENGLISH
45
Decoder or satellite receiver
A decoder is necessary when the combined TV/video unit receives encoded
programmes from a privately operated station.
Connecting a decoder or satellite receiver to the
»EURO-AV« socket.
1 Connect the »EURO-AV« socket of the combined TV/video unit and the
appropriate jack of the decoder with a EURO/AV cable.
Note:
A satellite receiver can also be installed in this socket.
If you want to connect a satellite receiver and a decoder, the decoder must
be connected to the satellite receiver.
If a decoder is connected to the »EURO-AV« socket, the channel position
where the combined TV/video unit receives the encoded channel must be
activated for the decoder. For the setting, see ”SPECIAL SETTINGS –
Manually assigning channel positions” on Pages 49-50.
OPERATION WITH EXTERNAL DEVICES
______
EURO-AV
PAY-TV
Page 46

46
Video recorder or SET-TOP box
Connecting a video recorder or SET-TOP box to the
»EURO-AV« socket
1 Connect the »EURO-AV« socket on the combined TV/video unit and the
appropriate jack on the video recorder or the SET-TOP box with a EURO/AV
(Scart) cable.
Operation with video recorder or SET-TOP box
1 Switch on the video recorder or SET-TOP box and select the desired function.
2 Select channel position »AV« with the »0AV« button.
– View the picture and and listen to sound output from the video recorder or
the SET-TOP box.
Note:
It is possible to record from the video recorder onto the combined TV/video
unit; to do this, select channel position »AV« with »0AV«, start playback
on the video recorder and recording on the combined TV/video unit by
pressing »REC ●«.
OPERATION WITH EXTERNAL DEVICES
________________________________
EURO-AV
x
R
L
AUDIO
R
L
I
N
O
U
T
2 EXTERNAL / DEC. - AV 2
1 EXTERNAL / EURO - AV 1
Page 47

ENGLISH
47
Camcorder
Connecting camcorder to the »VIDEO IN« and
»AUDIO IN« jacks
1 Connect the yellow jack (VIDEO IN – picture signal) from the combined
TV/video unit and the appropriate jack from the camcorder with a cinch
cable.
2 Connect the white jack (AUDIO IN – sound signal) from the combined
TV/video unit and the appropriate jack from the camcorder with a cinch
cable.
Operation with a camcorder
1 Switch on camcorder, insert cassette and start playback.
2 Select channel position »AV« with the »0AV« button.
– View the picture and and listen to the sound output from the combined
TV/video unit.
OPERATION WITH EXTERNAL DEVICES
________________________________
STAND BY
VIDEO IN
AUDIO IN
8
P
U
8
TIMER
EJECT
RECORD
Page 48

48
Note:
It is possible to record from the camcorder onto the combined TV/video unit;
to do this, select channel position »AV« with »0AV«, start playback on the
camcorder and start recording on the combined TV/video unit by pressing
»REC ● «.
It is not possible to record via the EURO-AV socket.
Headphones
Connecting headphones
1 Insert the headphone jack (3.5 mm ø jack plug) in the »
UU
« socket of the
combined TV/video unit.
Adjusting headphone volume
1 Press »
aa
« and adjust the volume of the headphones with »FF«or»EE«.
– The adjusted value is displayed on a scale.
OPERATION WITH EXTERNAL DEVICES
________________________________
STAND BY
VIDEO IN
AUDIO IN
8
P
U
8
TIMER
EJECT
RECORD
Page 49

ENGLISH
49
SPECIAL SETTINGS
________________________________________________________
Manually assigning channel positions
You’ll only need this setting if a new channel is added and you want to retain
your specific channel position sequence.
1 Call up the »DIALOG CENTER« by pressing »i « and then »OK«.
2 Select the »INSTALLATION« line by pressing »
,,
«or»..« and confirm
with »OK«.
3 Select the »Manual Tuning« line by pressing »
,,
«or»..« and confirm
with »OK«.
4 In the »Program« line, select the channel position with »
FF
«or»EE« or
»1...0«.
5 Select the »Frequ.« line by pressing »
,,
«or»..« and start the automatic
search with »
F
F
« (blue).
– The channel search stops at each television channel received.
– Repeat the search until the desired television channel appears on the
screen.
6 Fine-tune the picture (if necessary) by selecting the » Finetun.« line with
»,,«or»..« and adjusting the fine-tuning with »FF«or»EE«.
MANUAL TUNING
6 OK Memorize 0-9 TXT
Program r 01 e
Frequ. 183
Finetun. 00
Name ––––
Decoder Off
VT-Language West + TR
i
–––––––––––––––
u
MANUAL TUNING
6 OK Memorize
❚
Search TXT
Program 01
Frequ. r 183 e
Finetun. 00
Name ––––
Decoder Off
VT-Language West + TR
i
–––––––––––––––
u
Page 50

50
7 Select the » Name« line by pressing »
,,
«or»..« and then press »
F
F
«
(blue).
– The first character of the name is marked.
Enter the character with »,,«or»..«, select the next character with »
FF
«
or »EE« and repeat the entries for the rest of the characters (max. 4
characters).
Save setting with »
F
F
« (blue).
8 If a decoder is necessary for this channel, select the » Decoder« line with
»,,«or»..« and select the »On « display with »FF«or»EE«.
9 To adjust the character style, select the »VT-Language« line with »
,,
«or
»..« and select the required setting with »FF«or»EE«:
– » East« for teletext from stations in most Eastern European countries;
– »West + TR« for teletext from stations in most Western European
countries and Turkey;
– » West + CZ, SK« for teletext from stations in the Czech Republic and
Slovakia.
10 Save setting with »OK«.
Note:
Set further television channels by repeating steps 4 to 10.
11 Quit setting with the »TXT« button.
SPECIAL SETTINGS
____________________________________________________________________
MANUAL TUNING
6 OK Memorize
❚
Change TXT
Program 01
Frequ. 183
Finetun. 00
Name r –––– e
Decoder Off
VT-Language West + TR
i
–––––––––––––––
u
MANUAL TUNING
6 OK 0-9 TXT
Program 01
Frequ. 183
Finetun. 00
Name ––––
Decoder Off
VT-Language r West + TR e
i
–––––––––––––––
u
Page 51

ENGLISH
51
SPECIAL SETTINGS
____________________________________________________________________
Setting the time and date
The digital clock on the combined TV/video continues to function for one hour
after the combined TV/video unit has been disconnected from the mains.
Automatic update of time and date
If a channel with teletext is set for channel position 1 of the combined TV/video
unit, the combined TV/video unit uses this to actualise its ”internal” clock.
The update process is carried out regularly every Sunday between 3 and 6
o’clock; thus the combined TV/video unit also responds to the daylight saving
time switch-over.
To update the time and date, switch off the combined TV/video unit with »88«
(standby mode).
Manually setting the time and date
1 Call up the »DIALOG CENTER« by pressing »i« and then »OK«.
2 Select the »CLOCK« line with »
,,
«or»..« and confirm with »OK«.
– The »CLOCK« menu appears on the screen, and the »Uhrzeit« (Time)
display is highlighted.
3 Enter the time as four digits with »1... 0 «.
4 Select the » Year « line with »
..
« and enter as four digits with »1...0 «.
5 Select the » Month« line with »
..
« and enter as four digits with »1...0 «.
6 Select the » Day« line with »
..
« and enter as four digits with »1...0 «.
7 Quit setting with the » TXT« button.
CLOCK
6 0-9 TXT
Time 09:00
Year 1999
Month 01
Day r 01 e
DIALOG CENTER
OK TXT
VIDEO PLUS
TIMER
SPECIAL FUNCTION
INSTALLATION
CLOCK
i
–––––––––––––––
u
i
––––––––––
u
Page 52

52
INFORMATION
________________________________________________________________
Technical data
Mains voltage: 220 – 240V, 50/60Hz, (regulated range of power
supply 165...264 V).
Power consumption: during operation 59 W, during standby ≤ 4 W,
during recording ≤ 25 W (screen switched off).
Sound output: 6 Watts music, 3 Watts sinusoidal.
Reception ranges: C01 ... C99, Special channels S01 ... S41.
Channel positions: 69 and AV.
Norm: PAL I
NTSC 4.4 MHz via EURO-AV socket.
Ambient temperature: +5°C to +40°C.
Relative humidity: up to 80%.
Rewind time: normally 100 seconds for E 180 cassettes.
Servicing notes for dealers:
The product complies with the following EU Directives:
73/23/EEC Directive for electrical equipment to be used within defined voltage
ranges.
89/336/EEC Directive on electromagnetic compatibility.
The device complies with the standards: EN 60065, EN 55013, EN 55020, EN 55022
Page 53

ENGLISH
53
Malfunction
No picture or sound
Screen lit (snow or blue)
but no transmission visible
Poor picture contrast
Interference to picture and/or
sound
Ghosting, reflection
Possible cause
No mains voltage
Combined TV/video unit in standby
Combined TV/video unit at a nonoccupied AV channel position
Aerial cable
No channel programmed
Picture settings incorrectly adjusted
Problem caused by station
Malfunctions due to other devices
(household devices, mobile phones,
etc.)
Channel setting
Aerial
Remedy
Is mains cable connected?
Is mains switch on?
Switch on with remote control
Switch to a different channel
position
Is aerial cable connected?
Check position of aerial?
Start channel search
Adjust brightness, contrast or
colour setting
Test with another channel
Change the position of the set,
check aerial cable
Automatic or manual channel
setting/fine-tuning
Have aerial cable or system
checked
INFORMATION
__________________________________________________________________________
Rectifying malfunctions yourself
If the remedies below are not successful, please consult an authorised GRUNDIG dealer.
Please bear in mind that malfunctions can also be caused by external devices such as
video recorders or satellite receivers.
Page 54

54
Remedy
Turn colour up
Select proper colour norm
Test with another channel
Increase distance between
combined TV/video unit and
loudspeakers
If colour spots remain, switch off
combined TV/video unit at
mains and switch on again after
10 minutes
Change position of set
Turn up/switch on loudspeaker
Select sound output via
loudspeaker
Test with another channel
Rectify sound setting
Check with another channel,
possibly ghosting or reflection or
fine-tuning
Check aerial system
Malfunction
No colour
Inappropriate colour, colour spots
Picture without sound
Sound indistinct
Teletext missing or faulty
Possible cause
Colour intensity set to minimum
TV- norm setting (if this setting
option is available)
Problem caused by station
Strong magnetic field due to, for
example, loudspeaker units
Malfunction due to the earth’s
magnetic field
Volume set to minimum or
loudspeaker switched off (mute)
Volume control via audio cinch
socket activated (if this option is
available)
Problem caused by station
Sound setting
Television channel (has no teletext)
or aerial system
Station signal too weak
(picture interference)
INFORMATION
__________________________________________________________________________
Page 55

ENGLISH
55
Remedy
Point the remote control at the
television set
C
heck or replace the batteries
Observe the polarity
Switch off the combined
TV/video unit with the mains
button for approximately 2
minutes
Enter code number or number
combination 7038
Set the time and date
Connect aerial cable
Set channel
Ask the neighbours if the
channel is currently being
transmitted
Cover over the opening on the
back of the cassette
Ajust track position, see
Page 20.
Consult your authorised dealer
Malfunction
Remote control does not work
Security system menu appears after
switching on
»
–:––
« appears on screen
instead of time
Recording from television channels
not possible (only snow is visible on
screen)
Recording not possible
TIMER recording was not carried
out
The quality of the playback image
is poor
Possible cause
No optical connection
Batteries of remote control
Indefinite operating condition
Security system was activated
Current time not available in
combined TV/video unit
Aerial cable is not connected
The channel has not been set on the
combined TV/video unit
Station not transmitting or aerial
system defective
T
he cassette is blocked for further
recording (tab is broken off)
The VIDEO Plus+ number or the
date was not correct
The VDC time was incorrectly
entered for PDC-programmed
recordings
The tracking position is badly
adjusted
The video heads are worn out
INFORMATION
__________________________________________________________________________
Page 56

56
GRUNDIG customer service points
GRUNDIG
Kundendienst Nord
Kolumbusstraße 14
D-22113 Hamburg
+49/40-7 33 31-0
GRUNDIG BELUX N.V.
Deltapark, Weihoek 3, Unit 3G
B-1930 Zaventem
+32/2-7 16 04 00
GRUNDIG UK LTD.
Elstree Way, Borehamwood,
Herts, WD6 1RX
GB Großbritannien/Great
Britain
+44/1 81-3 24 94 00
Technical Service
Unit 35, Woodside Park, Wood
Street
Rugby, Warwickshire, CV21
2NP
Großbritannien/Great Britain
+44/1 78-8 57 00 88
GRUNDIG
Kundendienst West
Horbeller Straße 19
D-50858 Köln
+49/22 34-95 81-2 51
GRUNDIG IRELAND LTD.
2 Waverley Office Park, Old
Naas Road
EIR Dublin 12
+3 53/1-4 50 97 17
GRUNDIG FRANCE S.A.
5 Boulevard Marcel Pourtout
F-92563 Rueil Malmaison
Cedex
+33/1-41 39 26 26
GRUNDIG SCHWEIZ AG
Steinacker Straße 28
CH-8302 Kloten
+41/1-8 15 81 11
GRUNDIG
Kundendienst Mitte
Dudenstraße 45-53
D-68167 Mannheim
+49/6 21-33-76-70
GRUNDIG PORTUGUESA
Comércio de Artigos
Electrónicos, Lda.
Rua Bento de Jesus Caraça 17
P-1495 Cruz Quebrada,
Lisboa
+3 51/1-4 19 75 70
GRUNDIG ESPAÑA S.A.
Solsonés, 2 planta baja B3
Edificio Muntadas (Mas Blau)
E-08820 El Prat De
Llobregat (Barcelona)
+34/93-4 79 92 00
GRUNDIG NORGE A.S.
Glynitveien 25, Postboks 234
N-1401 Ski
+47/64 87 82 00
GRUNDIG
Kundendienst Süd
Beuthener Straße 65
D-90471 Nürnberg
+49/9 11-7 03-0
GRUNDIG DANMARK A/S
Lejrvej 19
DK-3500 Værløse
+45/44 48 68 22
GRUNDIG OY
Luoteisrinne 5
SF-02271 Espoo
+3 58/9-8 04 39 00
GRUNDIG SVENSKA AB
Albygatan 109 d, Box 4050
S-17104 Solna
+46/8-6 29 85 30
GRUNDIG POLSKA SP.Z.O.O.
Ul. Czéstochowska 140
PL-62800 Kalisz
+48/62-7 66 77 70
GRUNDIG
Kundendienst Ost
Wittestraße 30e
D-13509 Berlin
+49/30-4 38 03-21
GRUNDIG AUSTRIA Ges.m.b.H.
Breitenfurter Straße 43-45
A-1120 Wien
+43/1-81 11 70
GRUNDIG NEDERLAND B.V.
Gebouw Amstelveste
Joan Muyskenweg 22
NL-1096 CJ Amsterdam
+31/20-5 68 15 68
GRUNDIG ITALIANA S.P.A.
Via G.B. Trener, 8
I-38100 Trento
+39/4 61-89 31 11
INFORMATION
__________________________________________________________________________
Page 57

Grundig UK Limited
Elstree Way, Borehamwood
Hertfordshire WD6 1RX
 Loading...