

Page 1

1
COLOR TELEVISION
P 37-080 IR
ENGLISH
V
Page 2

CONTENTS
_______________________________________________________________________
4 Set-up and safety
7 Connection and preparation
Connection
Inserting the batteries in the remote control
9 Operation on the television set
10 Settings
Assigning channel positions with the ATS Automatic Channel Search and Memory System
Deleting television channels from the channel table
Sorting television channels
12 Television mode
Basic functions
Further functions
14 Connection possibilities
Videorecorder, satellite receiver or camrecorder (on EURO-AV sockets)
Videorecorder or satellite receiver (on aerial socket)
Headphones
Decoder
2
Page 3

CONTENTS
____________________________________________________________________________
17 Special settings
Limiting channel selection
Manually assigning channel positions
20 Remote control of external devices
Remote control of a Grundig video recorder
Remote control of a Grundig satellite receiver
21 Technical data
Servicing notes for dealers
Technical data
22 Rectifying malfunctions yourself
24 Help on malfunctions
GRUNDIG customer service points
ENGLISH
3
Page 4
4
SET-UP AND SAFETY
______________________________________________________
So that this quality, easy-to-use television set continues to provide you with satisfaction and
entertainment, please observe the following when setting it up.
This television set is designed to receive and replay picture and sound signals.
Any other use is expressly prohibited.
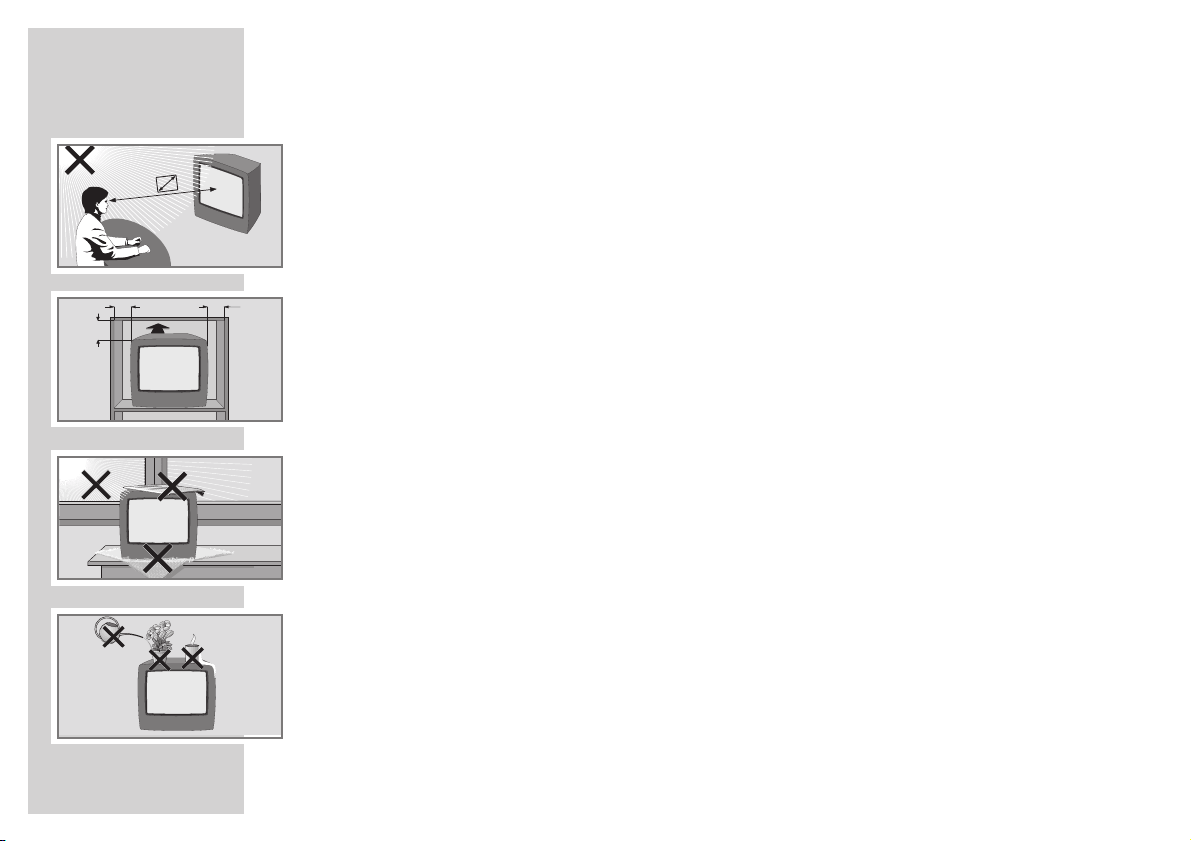
The ideal viewing distance is 5 times the screen diagonal.
External light falling on the screen impairs picture quality.
Ensure sufficient gaps to the side walls of the cabinet.
The television set is designed for use in a dry place. If, however, you use it in the open, ensure
without fail that it is protected from moisture (rain, lawn sprinklers). Do not expose the television set
to any moisture.
Do not place any containers filled with fluids (vases or similar) on the television set. The container
could fall over and the fluid compromise electrical safety.
Place the television set on an even and firm surface. Do not place any objects (newspapers, for
example) on the television set or any cloth or similar underneath the television set.
Do not place the television set close to heating units or in direct sunlight. This will affect cooling.
Heat build-up can be dangerous and reduces the service life of the set. As a safety precaution, have
any deposits in the set removed by a specialist from time to time.
Keep the television set away from magnetic fields (loudspeaker units, for example).
5 x
20 cm
10
cm
10
cm
20
cm
Krieg am Golf
Page 5

ENGLISH
5
SET-UP AND SAFETY
______________________________________________________________
Do not open the television set under any circumstances. The manufacturer accepts no liability for
damage arising from inappropriate treatment.
Ensure that the mains cable is not damaged.
The television set must only be operated with the mains cable set supplied.
Thunderstorms may present a danger to all electrical devices. Even if the television set is switched off,
it can be damaged by a lightning strike in the mains and/or to the aerial cable. Always remove the
mains and aerial plugs when a thunderstorm is imminent.
Clean the screen with a soft, damp cloth. Only use pure water.
This television set sucessfully fuses technology and environmental friendliness into a coherent total
package. Predominantly ecologically compatible, high quality materials have been used. A high
proportion of the casing is of recycled plastic and it is painted with ecologically compatible waterbased laquers including recycled laquer. Optimum design obviates the need for flame retardants in
the casing. The range of materials used has been deliberately reduced to a minimum and all the
larger plastic parts have been labelled to enable effective recycling at the end of the set´s service life.
This television set is easily disassembled to make servicing easier and optimise recycling.
! SERVICE !! SERVICE !! SERVICE !
Page 6

SET-UP AND SAFETY
______________________________________________________________
6
Warning
In case this appliance is supplied with a Safety Standard Approved mains lead fitted with a nonrewireable 13 Amp mains plug which, if unsuitable for your socket, should be cut off and an
appropriate plug fitted by a qualified electrician. The fuse and fuse holder must be removed from the
plug as accidental insertion of the redundant plug into a 13 Amp socket is likely to cause an
electrical hazard.
Note:
The severed plug must be destroyed to avoid a possible shock hazard should it be inserted into a 13
Amp socket elsewhere.
If it is necessary to change the fuse in the non-rewireable plug, the correct type and rating (5 Amp
ASTA or BSI approved BS 1362) must be used and the fuse cover must be refitted. If the fuse cover is
lost or damaged the lead and plug must not be used until a replacement is obtained. Replacement
fuse covers should be obtained from your dealer.
If a non-rewireable plug or a rewireable 13 Amp (BS 1363) plug is used, it must be fitted with a 5
Amp ASTA or BSI approved BS 1362 fuse. If any other type of plug is used it must be protected by a
5 Amp fuse either in the plug or at the distribution board.
Important:
The wires in the mains lead are coloured in accordance with the following code:
BLUE – NEUTRAL
BROWN – LIVE
As the colours of the wires in the mains lead of your appliance may not correspond with the coloured
marking identifying the terminals in your plug, proceed as follows:
Connect the BLUE coloured wire to plug terminal marked with the letter "N" or coloured black.
Connect the BROWN coloured wire to the plug terminal marked with a letter "L" or coloured red.
In no circumstance must any of the wires be connected to the terminal marked with a letter "E", earth symbol
, coloured green or green and yellow.
Replacement mains lead can be obtained from your dealer.
Page 7
ENGLISH
7
CONNECTION AND PREPARATION
____________________________
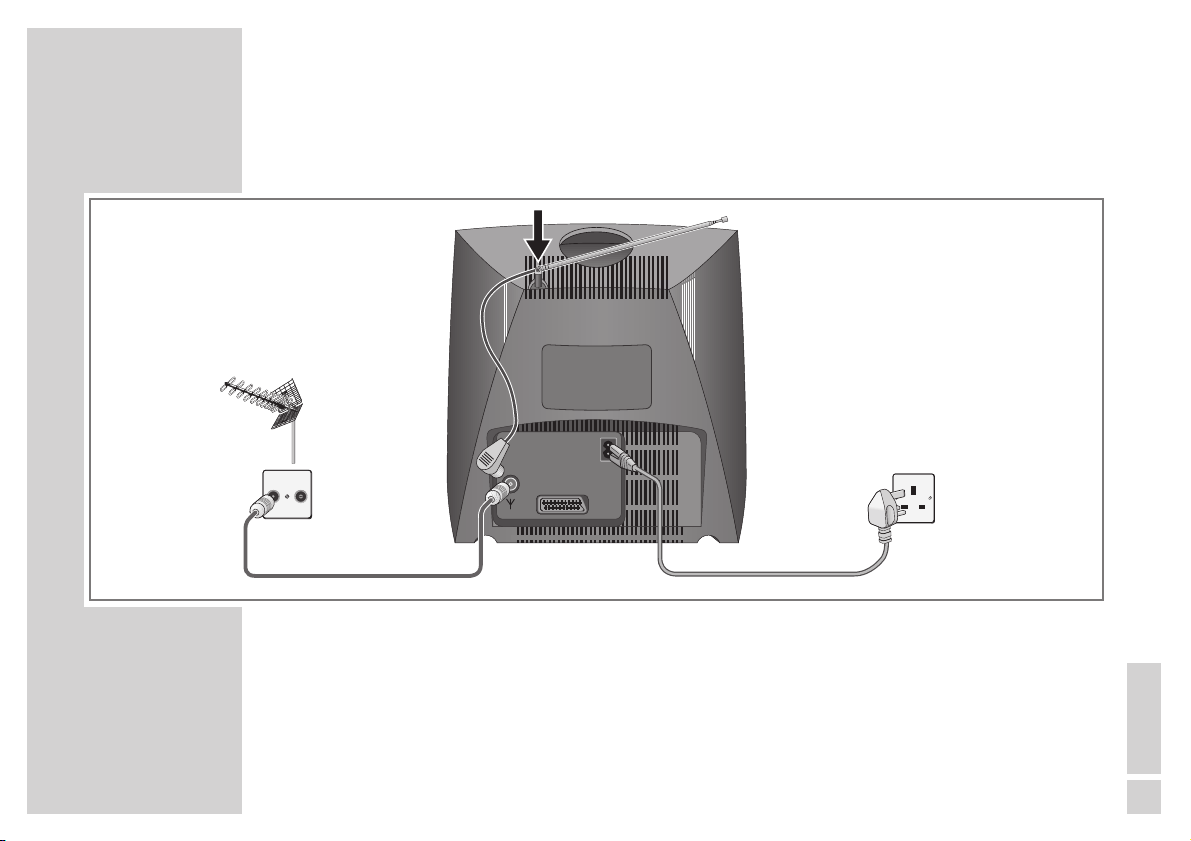
Connection
1 Insert the telescopic aerial in the recess in the back panel.
2 Insert the aerial cable plug or the telescopic aerial in the aerial socket »
« of the television set.
3 Connect the mains cable plugs to the mains socket of the television set and to the wall socket.
EURO-AV
TV R
Page 8
8
CONNECTION AND PREPARATION
__________________________________________
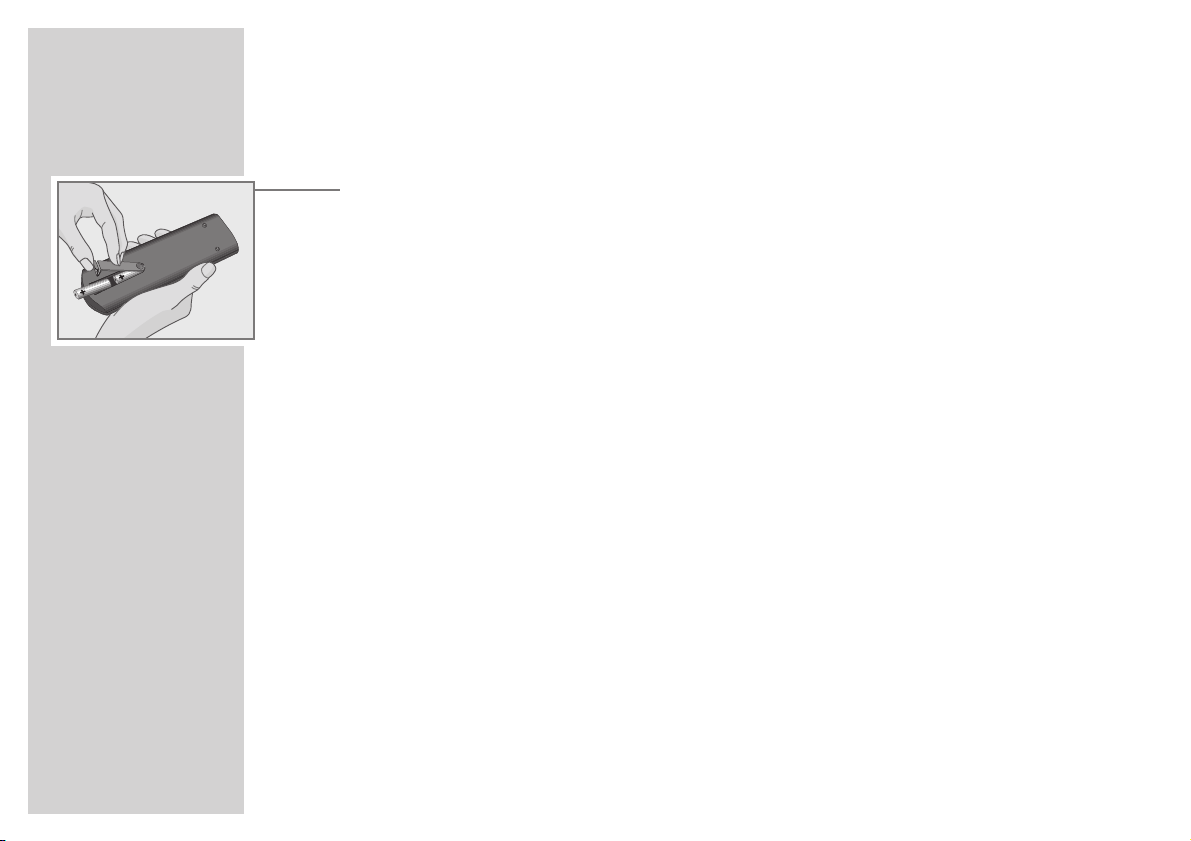
Inserting the batteries in the remote control
1 Open the battery compartment by pressing the snap catch and removing the lid.
2 Observe the polarity marked on the base of the battery compartment when inserting the batteries
(type round cell R6, e.g. UM-3 or AA, 2 x 1,5 V).
Note:
»Batter.« will appear on the television set screen when the battery is flat.
Ensure that used batteries are removed. There is no liability for damage occuring through dead
batteries.
Environmental note
Batteries including heavy-metal-free ones must not be disposed of with household waste. Please
ensure the environmentally sound disposal of the used batteries, e.g. via public collection points.
Get informtion on the applicable regulations.
Page 9

ENGLISH
9
OPERATION ON THE TELEVISION SET
_______________________
Switching on/off
1 Switch on the television set with the »IO « button.
– If the display lights up, the television set is in stand-by mode.
2 Switch on the television set completely with the »P+ « button.
3 Switch the television set off with the »I O « button.
Adjusting volume
1 Adjust the volume using the »–V + « buttons.
Selecting the channel
1 Select the channel using the »– P+« buttons.
P
U
Page 10

10
SETTINGS
__________________________________________________________________________
Assigning Channel Positions with the ATS Automatic Channel Search
and Memory System
The television set is equipped with an automatic channel search system.
You start the search and can then sort the television channels into order of preference.
There are 69 channel positions available which as required can be assigned television channels
from the aerial or from the cable connection.
You can also delete television channels from the channel list which were found more than once or
which have poor reception.
1 Switch the television set on with the »I O « button on the television set.
– »ATS« is displayed on the screen.
Note:
If »ATS« is not displayed, press »AUX« for approx. 4 seconds until the display appears.
2 Start the ATS search with the » OK« button.
– The ATS search procedure can take over a minute.
– Once the television set has stored all television channels it will switch to channel position 1.
Note:
Further settings – such as deleting unwanted television channels or changing the order of
television channels later – are described on the next page.
Details of limiting the channel position selection and manually inputting television channels can
be found in the ”SPECIAL SETTINGS” chapter on Page 21.
ATS
■
OK
ATS
■
Page 11

ENGLISH
11
SETTINGS
______________________________________________________________________________
Deleting television channels from the channel table
You can delete television channels with poor quality of reception.
1 Call up the menu by pressing the »i « and then the »OK« buttons.
– The »Channel display« menu appears.
2 Select channel position whose channels are to be deleted with the »
..
« or »,,« buttons.
3 Delete the channel by pressing the »TXT « and then the »OK« buttons.
– The remaining television channels will move one channel position forward.
Delete further television channels by repeating points 2 and 3.
4 End setting with the »i « button.
Sorting television channels
1 Select channel positions which is to be moved with the »
..
« or »,,« buttons.
2 Call up the menu by pressing the »i « and then the »OK« buttons.
– The »Channel display« menu appears.
3 Enter the new channel position with the »0 … 9« buttons (as two digits) and confirm with
»OK«
.
– The two channels will exchange their channel positions.
Exchange further channels by repeating points 2 and 3.
4 End setting with the »i « button.
0-9 TXT OK i
P+
w
1 VHF1➞■0 DEC1
r
-■-----■----------■--------■----■-------
e
0-9 TXT OK i
P+
w
1 VHF1➞■0 DEC1
r
-
■
-----■----------■--------■----■-------
e
Page 12

12
TELEVISION MODE
_________________________________________________________
Basic functions
Switching the television set on/off
1 Switch the television set on with the »IO « button on the television set.
2 Switch the television set to ready (stand-by) mode with the »
88
«
button.
The television set is switched out of stand-by mode again with the »0 … 9« or »,,« buttons.
3 Switch the television set off with the »I O « button on the television set.
Selecting channel positions
1 Select channel positions directly (including AV) with the »0 … 9 « buttons.
2 Select channel position step-by-step with the »
..
« or »,,« buttons.
Changing settings
1 Adjust the volume using the »
EE
« or »FF« buttons.
2 Adjust the brightness using the »–
R
« or »R+ « buttons.
3 Adjust the contrast using the »– E « or »E + « buttons.
Note:
Each altered value is stored after approx. 8 seconds.
Press »AUX« and then »OK « to reset to the factory settings.
TE L E P ILOT 750C
VIDEO
VIDEO
21
3
654
987
0
P
OK
P
TXTAUX
E
´
F
SAT/TV
Page 13

ENGLISH
13
TELEVISION MODE
_________________________________________________________________
Further functions
Displaying/concealing channel position number
1 Display/conceal the channel position number with the »i « button.
– With many television channels, the station name is also displayed.
Switching sound on/off
1 Switch the sound on/off with the »
aa
« button.
Adjusting the black/white contrast
1 First press »AUX«, and then alter the contrast with »–
R
« or »R+ «.
Entering the switch-off time for the Sleep Timer
1 First press »AUX« and then » TXT «.
– The »Sleep Timer« menu appears.
2 Enter sleep time (01 to 99 minutes) with » 0 … 9 «
(two digits)
.
3 Confirm the sleep time with the »i « button.
– The television set will switch off at the time entered.
0-9 i
´
_ _ min
Page 14

14
CONNECTION POSSIBILITIES
_______________________________________
Videorecorder, satellite receiver or camcorder
Connection
1 Connect the »EURO-AV « socket on the television set to the corresponding socket on the video
recorder or satellite receiver with a EURO/AV (Scart) cable.
Note:
Teletext mode is not possible if the satellite receiver is connected via the Euro-AV socket.
If the satellite receiver also has an HF aerial output, this socket can be used to enable teletext
mode.
Use a conventional adapter cable to connect a camcorder.
Operation
1 Select channel position »AV« with the » 0 « button.
2 Start play on the video or camera recorder, or switch on the satellite receiver.
– The recorder playback or the satellite programme can be seen on the screen.
AUDIO
L
O
U
T
R
2 EXTERNAL / DEC. - AV 2
L
I
1 EXTERNAL / EURO - AV 1
N
R
x
EURO-AV
Page 15

ENGLISH
15
CONNECTION POSSIBILITIES
___________________________________________________
Videorecorder or satellite receiver (on aerial socket)
Video recorders or satellite receivers can also be connected to the aerial socket »« of the television
set. The aerial must then be connected to the aerial socket of the video recorder or satellite receiver.
One of the television set´s channel positions must then be tuned into the video recorder or satellite
reciever. For details, see the settings in the chapter ”Manually Assigning Channel Positions” on
Page 21.
Headphones
Connection
1 Insert the plug the headphones (3.5 mm ø jack plug) in the socket »
UU
« of the television set.
– This switches off the loudspeakers of the television set.
Adjusting headphone volume
1 Adjust volume with »
FF
« or »EE«
.
P
U
Page 16

16
CONNECTION POSSIBILITIES
___________________________________________________
Decoder
Television programmes received from some cable or satellite stations are encoded. The picture and
with some stations the sound is unrecognisable. You can decode these television programmes with a
decoder.
Connection
1 Connect the »EURO-AV « socket of the television set and the appropriate socket of the decoder
with a EURO-AV cable.
Settings for operation with a decoder
1 Select channel position of the encoded television channel.
2 Call up the menu by pressing the »i « and then the »OK« buttons.
– The »Programmeinblendung« (Channel display) menu appears.
3 Select display »DEC 0« with »
EE
« and with »..« or »,,« select the setting »DEC1«.
4 Save setting with »OK « and end with »i «.
0-9 TXT OK i
P+
w
14 UHF ➞■0 DEC0
r
-
■
-----■----------■--------■----■-------
e
PAY-TV
EURO-AV
Page 17

ENGLISH
17
SPECIAL SETTINGS
__________________________________________________________
Limiting channel position selection
The ATS search stores all the television channels it finds and automatically ”blocks” onto the first nonassigned channel position.
This means that only the found television channels can be selected with the step-by-step channel
position selection using »..« or »,,«.
This limit can also be manually entered. The example shows ”blocking” after channel position 6.
1 Call up the menu by pressing the »i « and then the »OK« buttons.
– The »Channel display« menu appears.
2 Select channel position 6 with the »
..
« or »,,« buttons.
3 Select display »VHF 1«, »VHF 3« or »UHF« with »
EE
« and with »..« or »,,« select the
setting »----«.
4 Save setting with »OK « and end with »i «.
– Now only the first 5 channel positions (and channel position »AV«) can be selected with »..«
or »,,«.
– All the channel positions set including the ”blocked” ones can stil be selected with »0 … 9«.
– If everything after channel position 11 is blocked, all channel positions can be seleced with
»0 … 9«.
0-9 TXT OK i
P+
w
6 VHF1➞■0 DEC1
r
-
■
-----■----------■--------■----■-------
e
0-9 TXT OK i
P+
w
6 ---- ➞■0 DEC1
r
-
■
-----■----------■--------■----■-------
e
Page 18

18
SPECIAL SETTINGS
_________________________________________________________________
Manually Assigning Channel Positions
You only need this setting if, for example a new cable channel is offered and you want to retain your
specific channel position sequence (e.g. BBC1 = 1, BBC2 = 2 etc.).
The example shows a new television channel in the frequeny band »UHF« to be set at channel
position »14«.
1 Call up the menu by pressing the »i « and then the »OK« buttons.
The settings are made with the help of the menu.
Positions can be selected with »FF« or »EE«:
P+ 1 – Channel position from 1 to 69;
VHF1 – Frequency band
VHF 1 (45 MHz – 137 MHz, C02 – C04, S01 – S05),
VHF 3 (137 MHz – 403 MHz, C05 – C12, S06 – S33),
UHF (403 MHz – 860 MHz, S34 – S41, C21 – C69),
---- channel position limitation;
DEC 0 – Decoder, DEC 1 – Decoder on, DEC 0 – Decoder off;
0 – Television norm; cannot be changed;
➞
■
– Search.
Select the current setting with »..« or »,,«.
0-9 TXT OK i
P+
w
14 VHF1➞■0 DEC0
r
-
■
-----■----------■--------■----■-------
e
Page 19

ENGLISH
19
SPECIAL SETTINGS
_________________________________________________________________
2 Select channel position »14« with »
..
« or »,,«.
3 Select display »VHF 1« with »
EE
« and with »..« or »,,« select the setting »UHF«.
4 Select display » ➞
■
« with »EE« and press »..« once.
– The display »Channel search« appears.
5 Start channel search by pressing »
FF
« or »EE« and holding down until the search starts.
– The channel search stops at each television channel received.
– Repeat the search until the desired television channel appears on the screen.
Note:
Picture and sound can be fine-tuned by pressing »FF« or »EE« briefly.
6 End channel search with »i «.
7 Save the setting for this channel position with »OK «.
– Set further television channels by repeating the procedure from step 2.
8 End setting with the »i « button.
P14 S34-S41, C21- C69
r
■
e
z –
+
t i
0-9 TXT OK i
P+
w
14 VHF1 ➞■0 DEC0
r
-
■
-----■----------■--------■----■-------
e
Page 20

20
REMOTE CONTROL OF EXTERNAL DEVICES
_____________
You can also use this remote control to operate GRUNDIG video recorders and satellite receivers.
Remote control of a Grundig video recorder
1 Point the remote control at the video recorder.
2 Press and hold down »VIDEO «.
3 The following list shows which buttons can be used to operate the functions of the video recorder.
»..« »,,« – Channel position up, down;
»
i « – Record;
»OK« – Play;
»
aa
« – Pause;
»FF« »EE« – Frame scan backwards, forwards;
»0 « – Stop.
Remote control of a Grundig satellite receiver
1 Point the remote control at the satellite receiver.
2 Press and hold down »SAT/TV«.
3 Select satellite channel with the »
..
« or »,,« buttons.
4 Switch the satellite receiver to ready (stand-by) mode with the »
88
« button.
5 Switch the satellite receiver out of ready (stand-by) mode with the »0 … 9 « or »
,,
« button.
TE L E P ILOT 750C
VIDEO
VIDEO
21
3
654
987
0
P
OK
P
TXTAUX
E
´
F
SAT/TV
Page 21

ENGLISH
21
TECHNICAL DATA
____________________________________________________________
Servicing notes for dealers:
The television set must only be operated with the mains cable set supplied. This prevents mains
malfunctions and is required for the device certification.
Please only order replacement cable sets with the designation »Part number 890-991-351«.
The product conforms to the following EU guidelines:
73/23/EWG guideline for electrical equipment to be used within defined voltage ranges.
89/336/EWG guideline on electromagnetic compatibility.
The device complies with the standards:
EN 60065, EN 55013, EN 55020
Unauthorised treatment and in particular alteration of the voltage or installation of a picture tube of
a different type may result in X-ray emissions of considerable strength. Such altered television sets no
longer conform to the certification and must not be used.
Technical data
Mains voltage: 220–240 V, 50/60 Hz, (Regulated range of power supply 165…265 V)
Power consumption: in operation, approx. 35 W, in ready mode approx. 9 W
Reception ranges: C01…C69, Special channels S01…S41
Final sound stage: 2 W Music power (1 W sine)
Page 22

22
CORRECTING MALFUNCTIONS YOURSELF
_______________
If the remedies below are not sucessful, please consult an authorised GRUNDIG dealer. Please bear
in mind that malfunctions can also be caused by external devices such as video recorders or satellite
receivers.
Malfunction
no picture or sound
Screen lit (
snow or blue)
but no
transmission visible
poor picture contrast
Interference to picture and/or
sound
Ghost image, reflection
no colour
Possible cause
no mains voltage
television set in ready mode
television set at a non-occupied AV
channel position
aerial cable
no television channel programmed
picture settings mis-set
Problem at station
Malfunctions due to other devices
(household devices, mobile ´phones, etc.)
Channel settings
aerial
Colour intensity at minimum
TV- norm setting
(if setting option available)
Problem at station
Remedy
Is mains cable connected?
Is mains switch on?
switch on with remote control
switch to a different channel position
Is aerial cable connected?
Is aerial system O.K.?
Start channel search
Alter brightnes, contrast or colour setting
test with another channel
Change the position of the set
automatic or manual channel setting/fine
tuning
have aerial or system checked
turn colour up
select correct colour norm
test with another channel
Page 23

ENGLISH
23
CORRECTING MALFUNCTIONS YOURSELF
________________________________
Malfunction
wrong colour or colour spots
picture but no sound
teletext missing or faulty
Remote control has no effect
Possible cause
strong magnetic field due to e.g.
loudspeaker units
Malfunction due to the earth´s magnetic
field
Volume set to minimum or loudspeaker
switched off
Volume control via audio cinch socket
active (if provided)
Problem at station
SAT mode
Television channel (has no teletext) or
aerial system
Station signal too weak
(picture interference)
no optical connection
batteries in the remote control
operating condition undefined
Remedy
Increase distance between
telvision set and loudspeaker
if colour spots remain, switch off television
set at mains and switch on again after
10 minutes
Alter position of set
Turn up/switch on loudspeaker
Select sound output via loudspeaker
test with another channel
Check AV cabling between television set
and satellite receiver
check with another television channel,
possibly ghost image or reflection or
finetuning
Check aerial system
Point the remote control at the television
set
Check or replace the batteries observing
polarity
Switch off television set at the mains switch
for approx. 2 mins.
Page 24

24
HELP WITH MALFUNCTIONS
_______________________________________
GRUNDIG customer service points
GRUNDIG
Kundendienst Nord
Kolumbusstraße 14
D-22113 Hamburg
+49/40-7 33 31-0
GRUNDIG
Kundendienst Mitte
Dudenstraße 45-53
D-68167 Mannheim
+49/6 21-33-76-70
GRUNDIG
Kundendienst West
Horbeller Straße 19
D-50858 Köln
+49/22 34-95 81-2 51
GRUNDIG BELUX N.V.
Deltapark, Weihoek 3, Unit 3G
B-1930 Zaventem
+32/2-7 16 04 00
GRUNDIG UK LTD.
Elstree Way, Borehamwood,
Herts, WD6 1RX
GB Großbritannien/Great
Britain
+44/1 81-3 24 94 00
Technical Service
Unit 35, Woodside Park, Wood
Street
Rugby, Warwickshire, CV21 2NP
Großbritannien/Great Britain
+44/1 78-8 57 00 88
GRUNDIG IRELAND LTD.
2 Waverley Office Park, Old
Naas Road
EIR Dublin 12
+3 53/1-4 50 97 17
GRUNDIG FRANCE S.A.
5 Boulevard Marcel Pourtout
F-92563 Rueil Malmaison
Cedex
+33/1-41 39 26 26
GRUNDIG SCHWEIZ AG
Steinacker Straße 28
CH-8302 Kloten
+41/1-8 15 81 11
GRUNDIG PORTUGUESA
Comércio de Artigos Electrónicos,
Lda.
Rua Bento de Jesus Caraça 17
P-1495 Cruz Quebrada,
Lisboa
+3 51/1-4 19 75 70
GRUNDIG ESPAÑA S.A.
Solsonés, 2 planta baja B3
Edificio Muntadas (Mas Blau)
E-08820 El Prat De
Llobregat (Barcelona)
+34/93-4 79 92 00
GRUNDIG
Kundendienst Süd
Beuthener Straße 65
D-90471 Nürnberg
+49/9 11-7 03-0
GRUNDIG
Kundendienst Ost
Wittestraße 30e
D-13509 Berlin
+49/30-4 38 03-21
GRUNDIG NORGE A.S.
Glynitveien 25, Postboks 234
N-1401 Ski
+47/64 87 82 00
GRUNDIG DANMARK A/S
Lejrvej 19
DK-3500 Værløse
+45/44 48 68 22
GRUNDIG OY
Luoteisrinne 5
SF-02271 Espoo
+3 58/9-8 04 39 00
GRUNDIG SVENSKA AB
Albygatan 109 d, Box 4050
S-17104 Solna
+46/8-6 29 85 30
GRUNDIG POLSKA SP.Z.O.O.
Ul. Czéstochowska 140
PL-62800 Kalisz
+48/62-7 66 77 70
GRUNDIG AUSTRIA Ges.m.b.H.
Breitenfurter Straße 43-45
A-1120 Wien
+43/1-81 11 70
GRUNDIG NEDERLAND B.V.
Gebouw Amstelveste
Joan Muyskenweg 22
NL-1096 CJ Amsterdam
+31/20-5 68 15 68
GRUNDIG ITALIANA S.P.A.
Via G.B. Trener, 8
I-38100 Trento
+39/4 61-89 31 11
Page 25

Grundig UK Limited
Elstree Way, Borehamwood
Hertfordshire WD6 1RX
21715-941.1100
 Loading...