

Grundig GCF4277E User Manual
COLOR TELEVISION
MW 82-100/9 PAL PLUS
❒
Verehrte Kundin, verehrter Kunde !
Damit dieses hochwertige und komfortable Fernsehgerät Ihnen lange Zeit Freude und Unterhaltung
bereitet, ist es sehr wichtig, daß Sie beim Aufstellen des Gerätes die folgenden Punkte beachten.
w
!
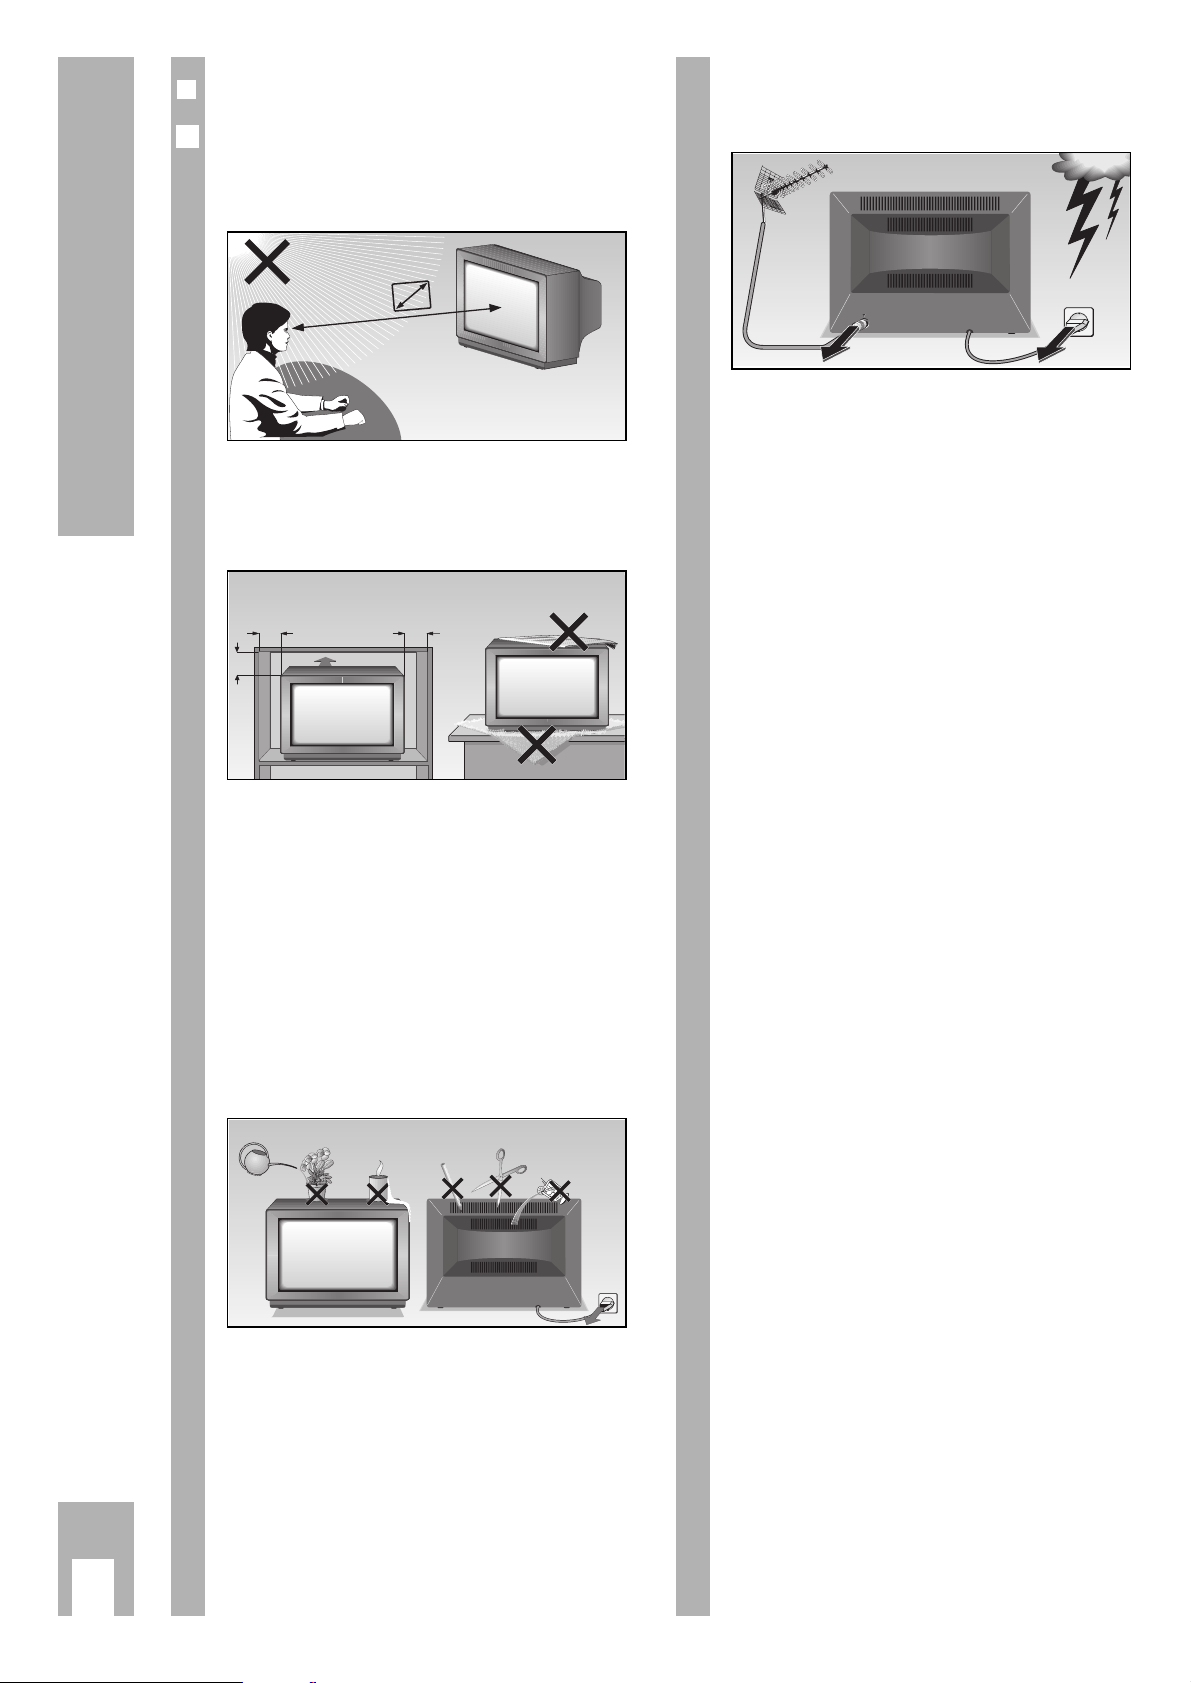
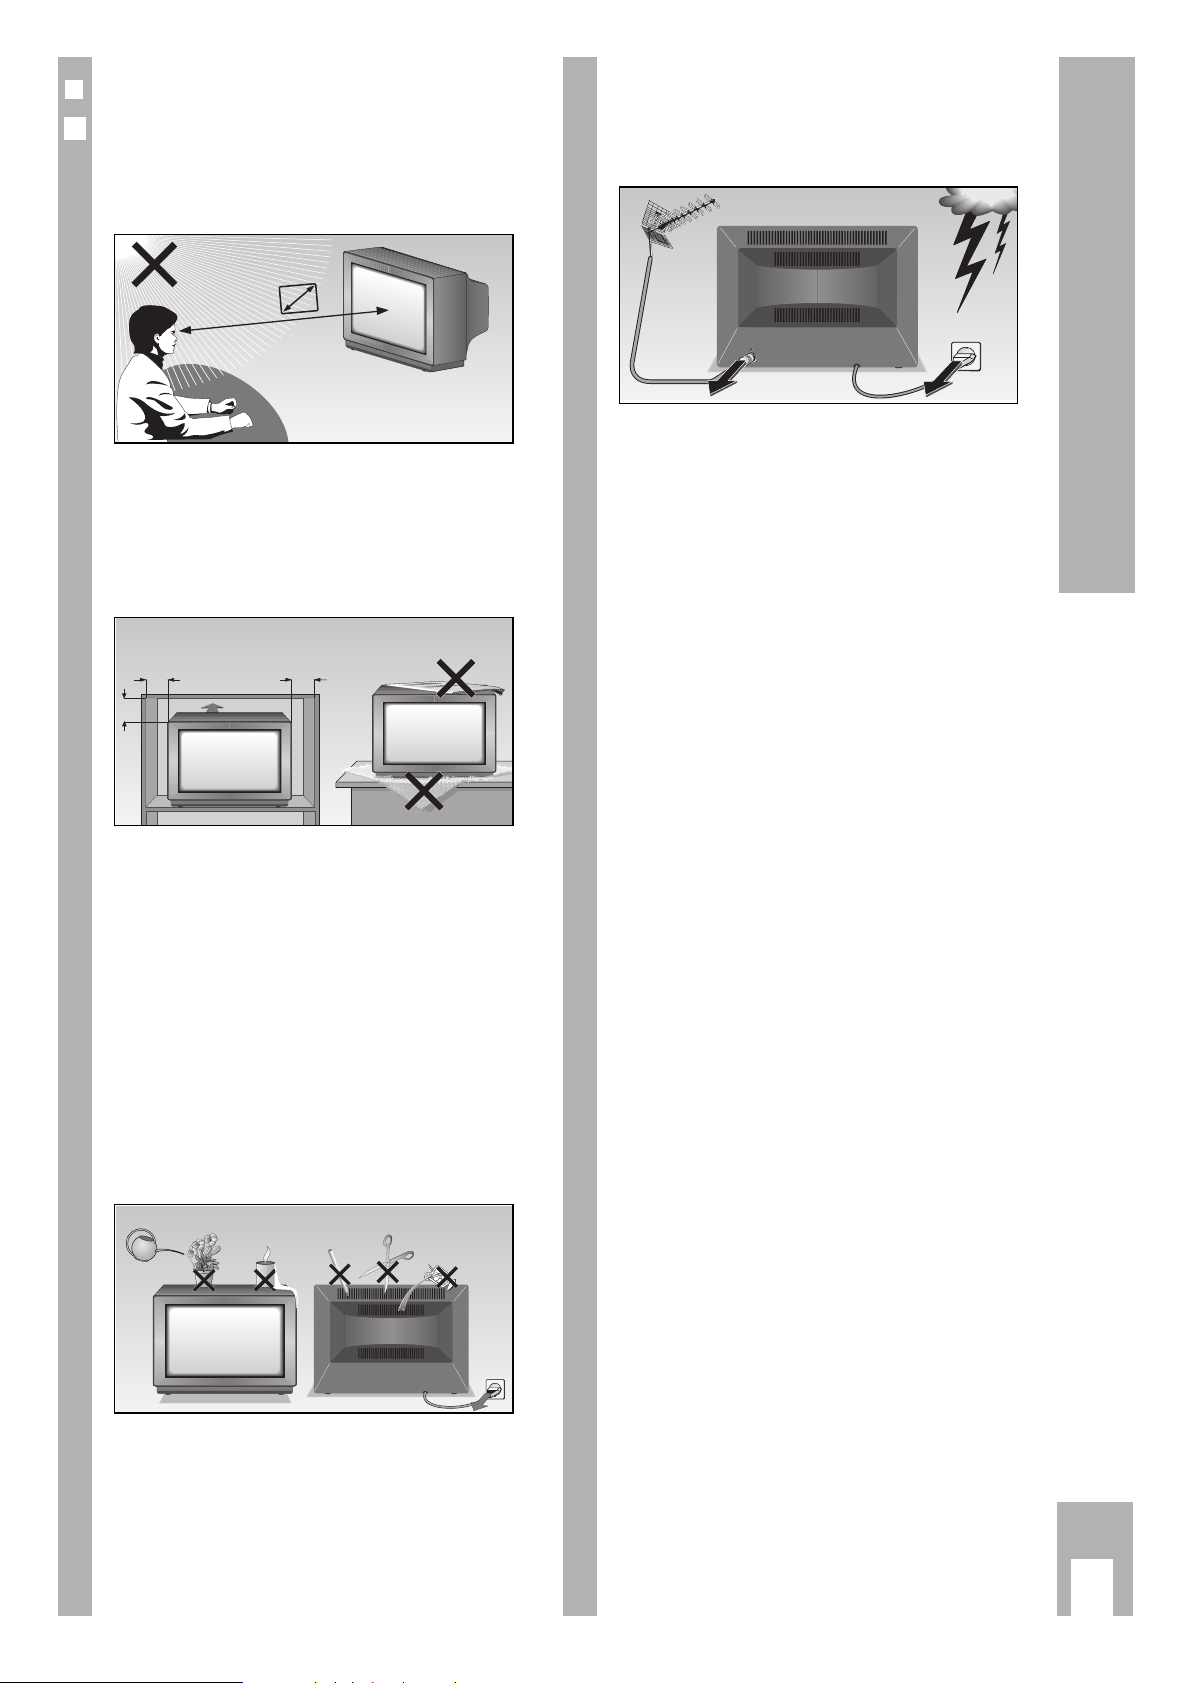
Der ideale Betrachtungsabstand beträgt 5x die Bildschirmdiagonale.
Fremdlicht auf den Bildschirm beeinträchtigt die
Bildqualität.
w
!
Genügend große Abstände in der Schrankwand bei
entsprechendem Standort.
w
!
Die Lüftungsschlitze nicht abdecken.
w
!
Im Gerät können Wärmestaus entstehen.
– Wärmestaus sind Gefahrenquellen und beein-
trächtigen die Lebensdauer des Gerätes.
Lassen Sie sicherheitshalber von Zeit zu Zeit die
Ablagerungen im Gerät vom Fachmann entfernen.
w
!
Das Netzkabel nicht beschädigen.
w
!
Keine magnetische Felder (z.B. Lautsprecherboxen)
in Gerätenähe.
w
!
Stellen Sie keine Blumenvasen oder Blumentöpfe
auf das Gerät.
w
!
Achten Sie darauf, daß keine Flüssigkeiten und
andere Gegenstände in das Innere des Gerätes
gelangen (Kurzschlußgefahr).
w
!
Das Gerät darf nur von autorisierten Fachpersonal
geöffnet und gewartet werden.
6
w
!
Reinigen Sie den Bildschirm nur mit einem feuchten,
weichen Tuch. Verwenden Sie nur klares Wasser.
w
!
Vermeiden Sie Blitzschäden durch Ziehen des Netzund Antennenkabels.
– Auch wenn das Gerät ausgeschaltet ist, können
durch Blitzschlag in das Stromnetz und/oder in
die Antennenleitung Beschädigungen auftreten.
w
!
Dieses Fernsehgerät ist für den Empfang und die
Wiedergabe von Bild- und Tonsignalen bestimmt.
Jede andere Verwendung ist ausdrücklich ausgeschlossen.
Sicherheit und Aufstellen
j
2
5 x
10
cm
20
cm
20 cm
10
cm
Krieg am Golf
! SERVICE !
Dieses hochdigitalisierte Fernsehgerät bietet
optimale Bild- und Tonqualität.
w
!
Die wesentlichen Voraussetzungen hierfür sind:
Einwandfrei funktionierende Antennenanlagen und
Antennenanschlußkabel mit hohem Schirmmaß
(85 dB) als Verbindung zwischen Fernsehgerät und
Antennensteckdose bzw. zwischen Fernsehgerät
und Videorecorder.
w
!
Vermeiden Sie auch Kabelschleifen in Gerätenähe.
w
!
Im Dialogcenter Menüteil »Audio-/Video-Anschlüsse« finden Sie weitere Hinweise zum Anschließen
von verschiedenen Zusatzgeräten (z. B. SAT-Receiver, Decoder).
❒
Das GRUNDIG MEGALOGIC-System
Das Fernsehgerät ist mit dem MEGALOGIC-System
ausgerüstet.
Wenn Sie einen GRUNDIG Video-Recorder mit
MEGALOGIC-System über das mitgelieferte
Megalogic-EURO/AV (Scart)-Kabel an dieses Fernsehgerät anschließen, dann werden bei jeder
„Neuprogrammierung der Fernsehprogramme“ die
terrestrischen Fernsehprogramme (und alle programmplatzbezogenen Daten) automatisch an den
Video-Recorder (VCR) übertragen.
Das „Einstellen der Fernsehprogramme am VideoRecorder“ ist nicht mehr notwendig.
6
❒
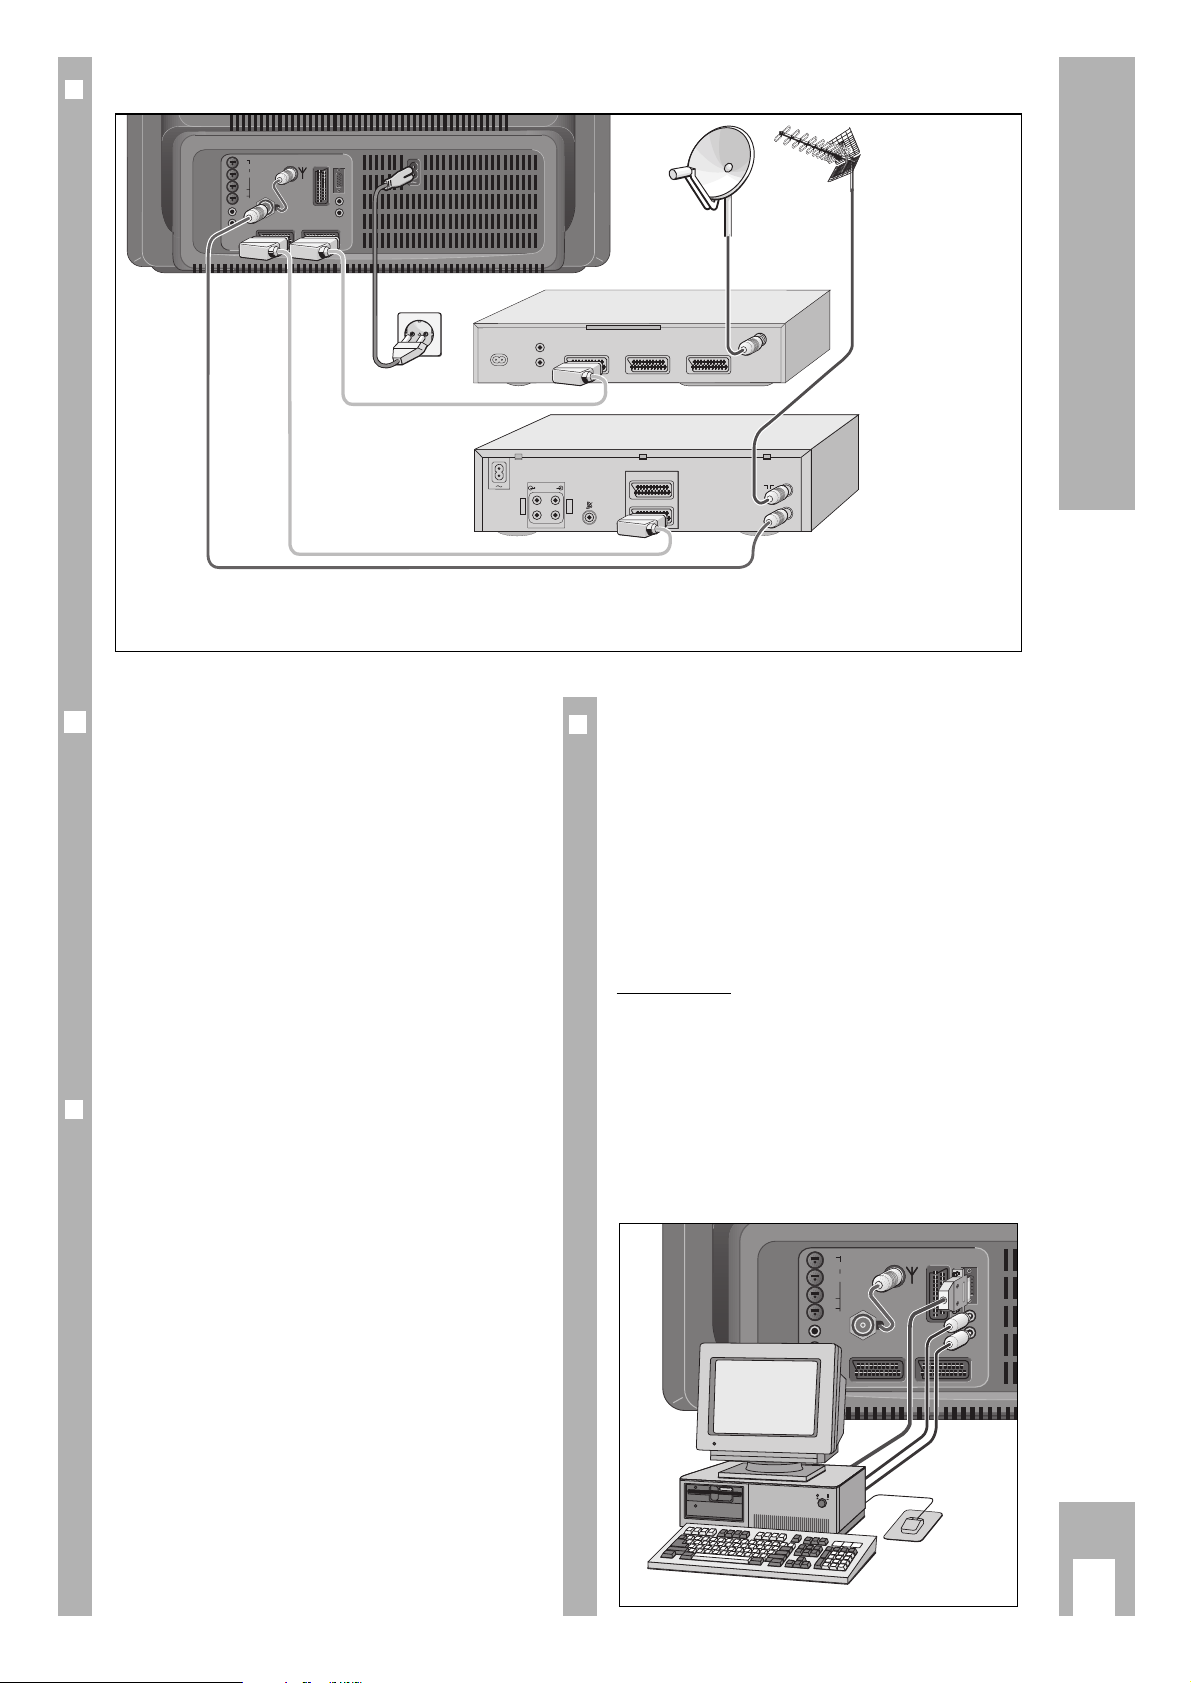
PC anschließen (VGA)
Das Fernsehgerät ist mit einer kompatiblen VGASchnittstelle ausgestattet und kann als PC-Monitor
verwendet werden.
Das Fernsehgerät kann sich im VGA-Betrieb auf folgende Eingangsignale einstellen:
640 x 480 Pixel, 60 Hz/31,5 kHz
640 x 400 Pixel, 70 Hz/31,5 kHz
640 x 350 Pixel, 70 Hz/31,5 kHz
Anschließen
Schließen Sie die VGA-Quelle (z.B. PC, Spiele-Konsole) mit einem handelsüblchen VGA-Kabel an der
Canon-Buchse des VGA-Moduls an. Wird ein
Laptop angeschlossen, sollte das Display des
Laptops ausgeschaltet werden.
Schließen Sie den Tonausgang (wenn vorhanden)
mit einem handelsüblichen Cinch-Kabel an die
Cinch-Buchsen des VGA-Moduls an.
AV1
AV2
VGA
AV3
SURROUND
CENTER
L
R
8Ω
AUDIO-OUT
L
R
AUDIO
IN
L
R
Subwoofer
Anschließen
j
3
❒
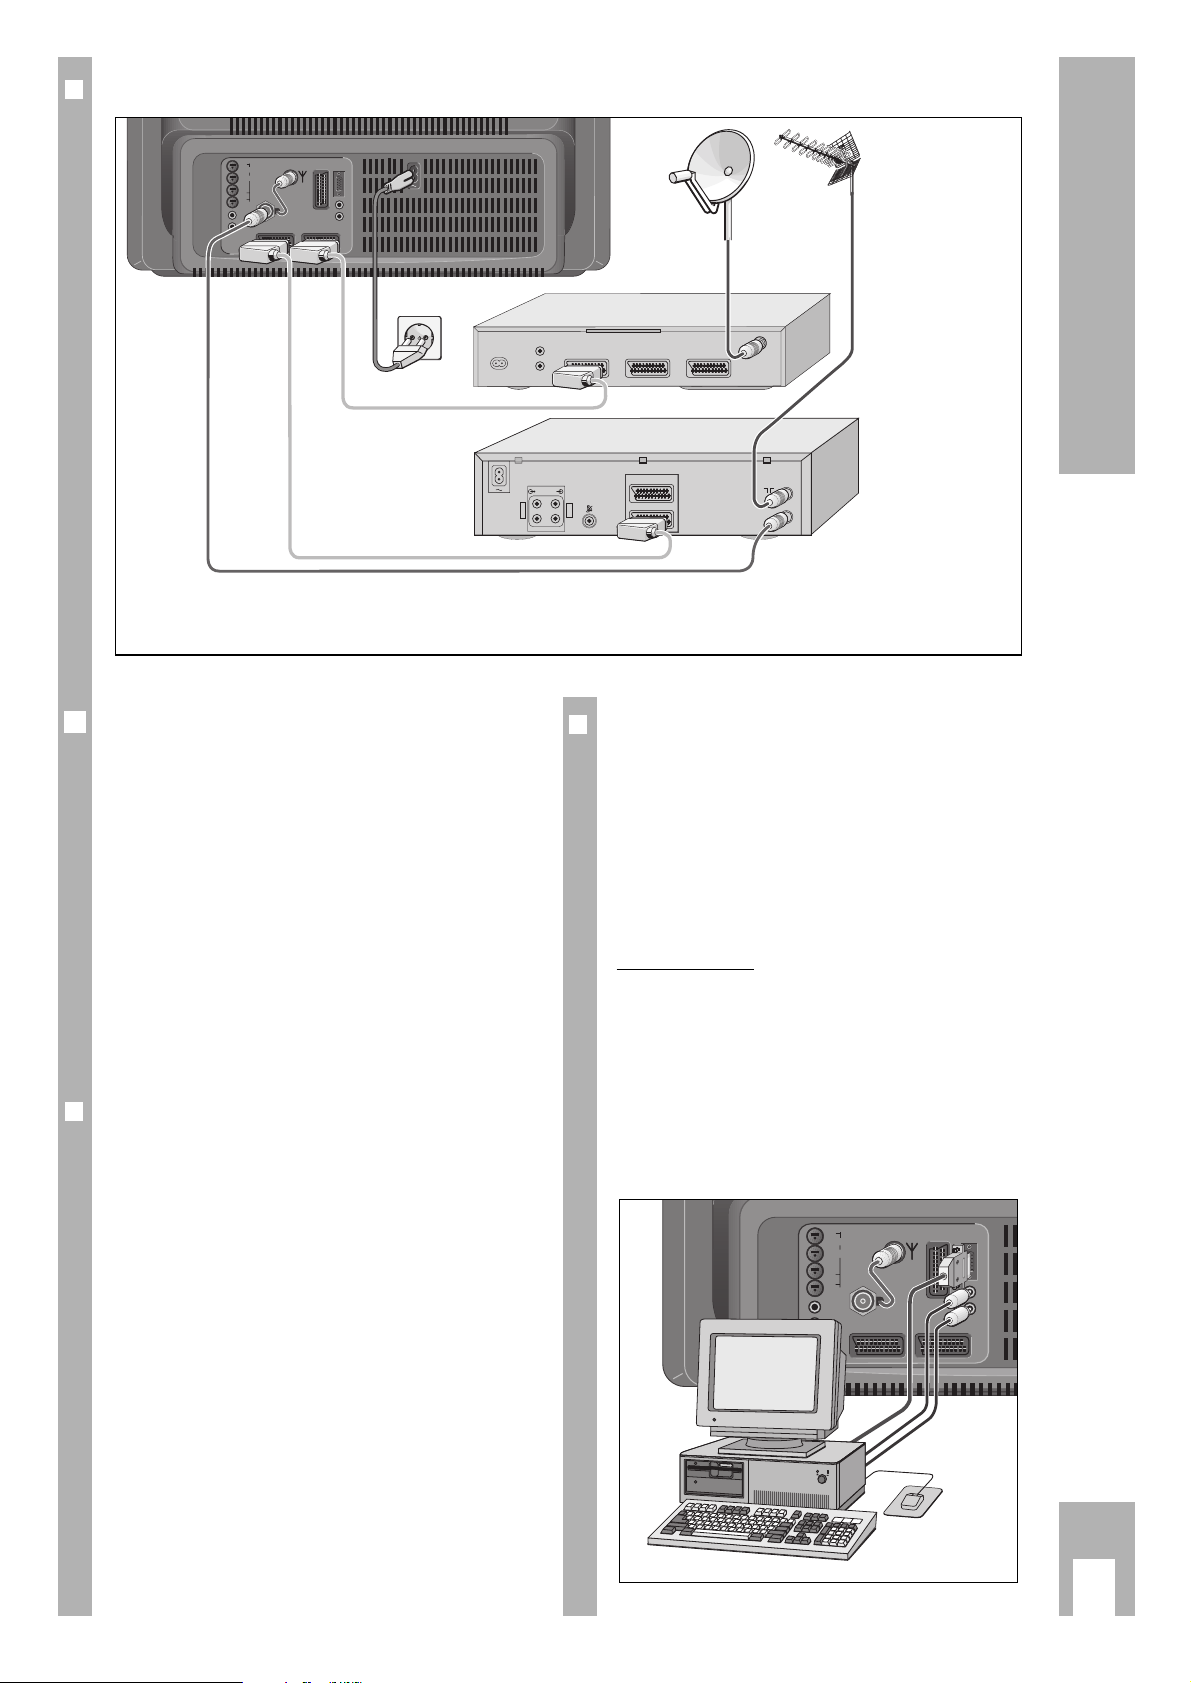
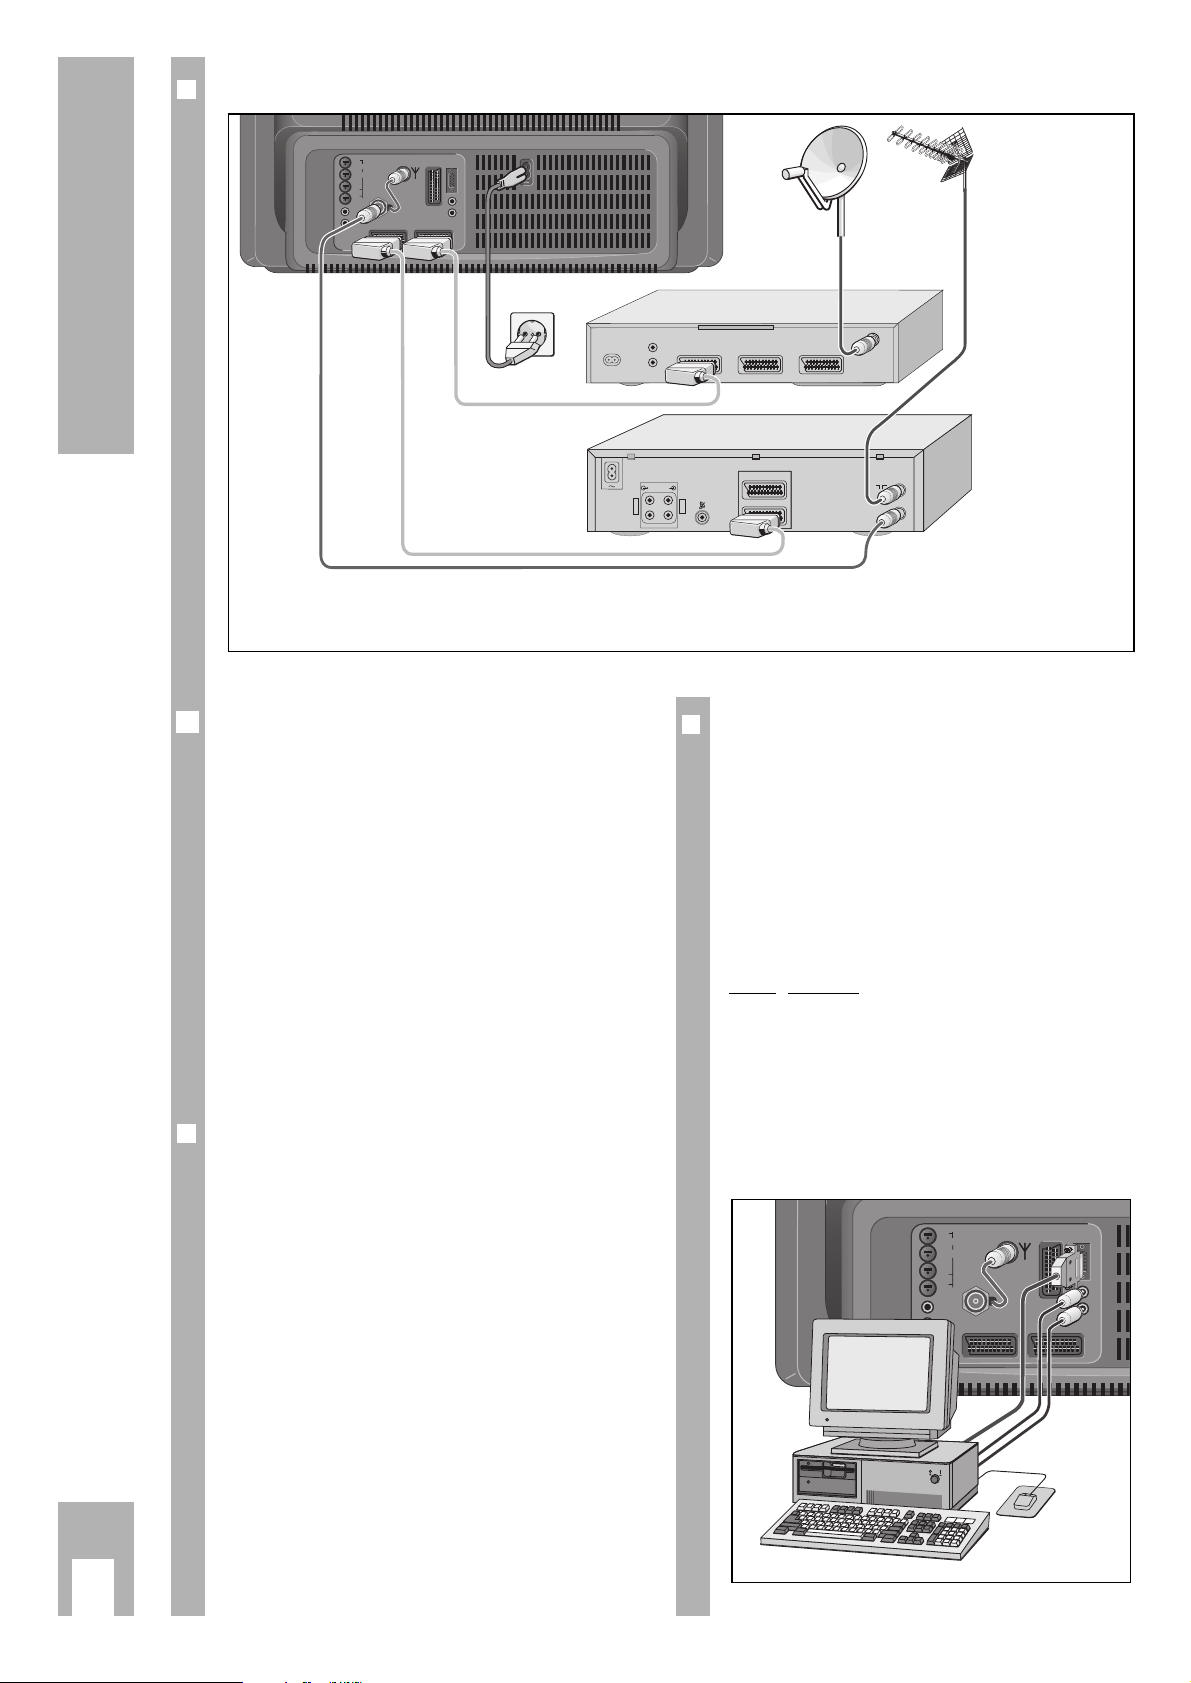
Anschlußbeispiel (Fernsehgerät, Video-Recorder und Satelliten-Receiver)
220-240 V
~
50-60 Hz
EURO AV VCREURO AV DECODEREURO AV TV
AUDIO OUT
R
L
INPUT-SAT
950-2150 MHz
14/18 V 450 mA
x
R
L
AUDIO
R
L
I
N
O
U
T
2 EXTERNAL / DEC. - AV 2
1 EXTERNAL / EURO - AV 1
AV1
AV2
VGA
AV3
SURROUND
CENTER
L
R
8Ω
AUDIO-OUT
L
R
AUDIO
IN
L
R
Subwoofer
Easy Dialog System
j
4
❒
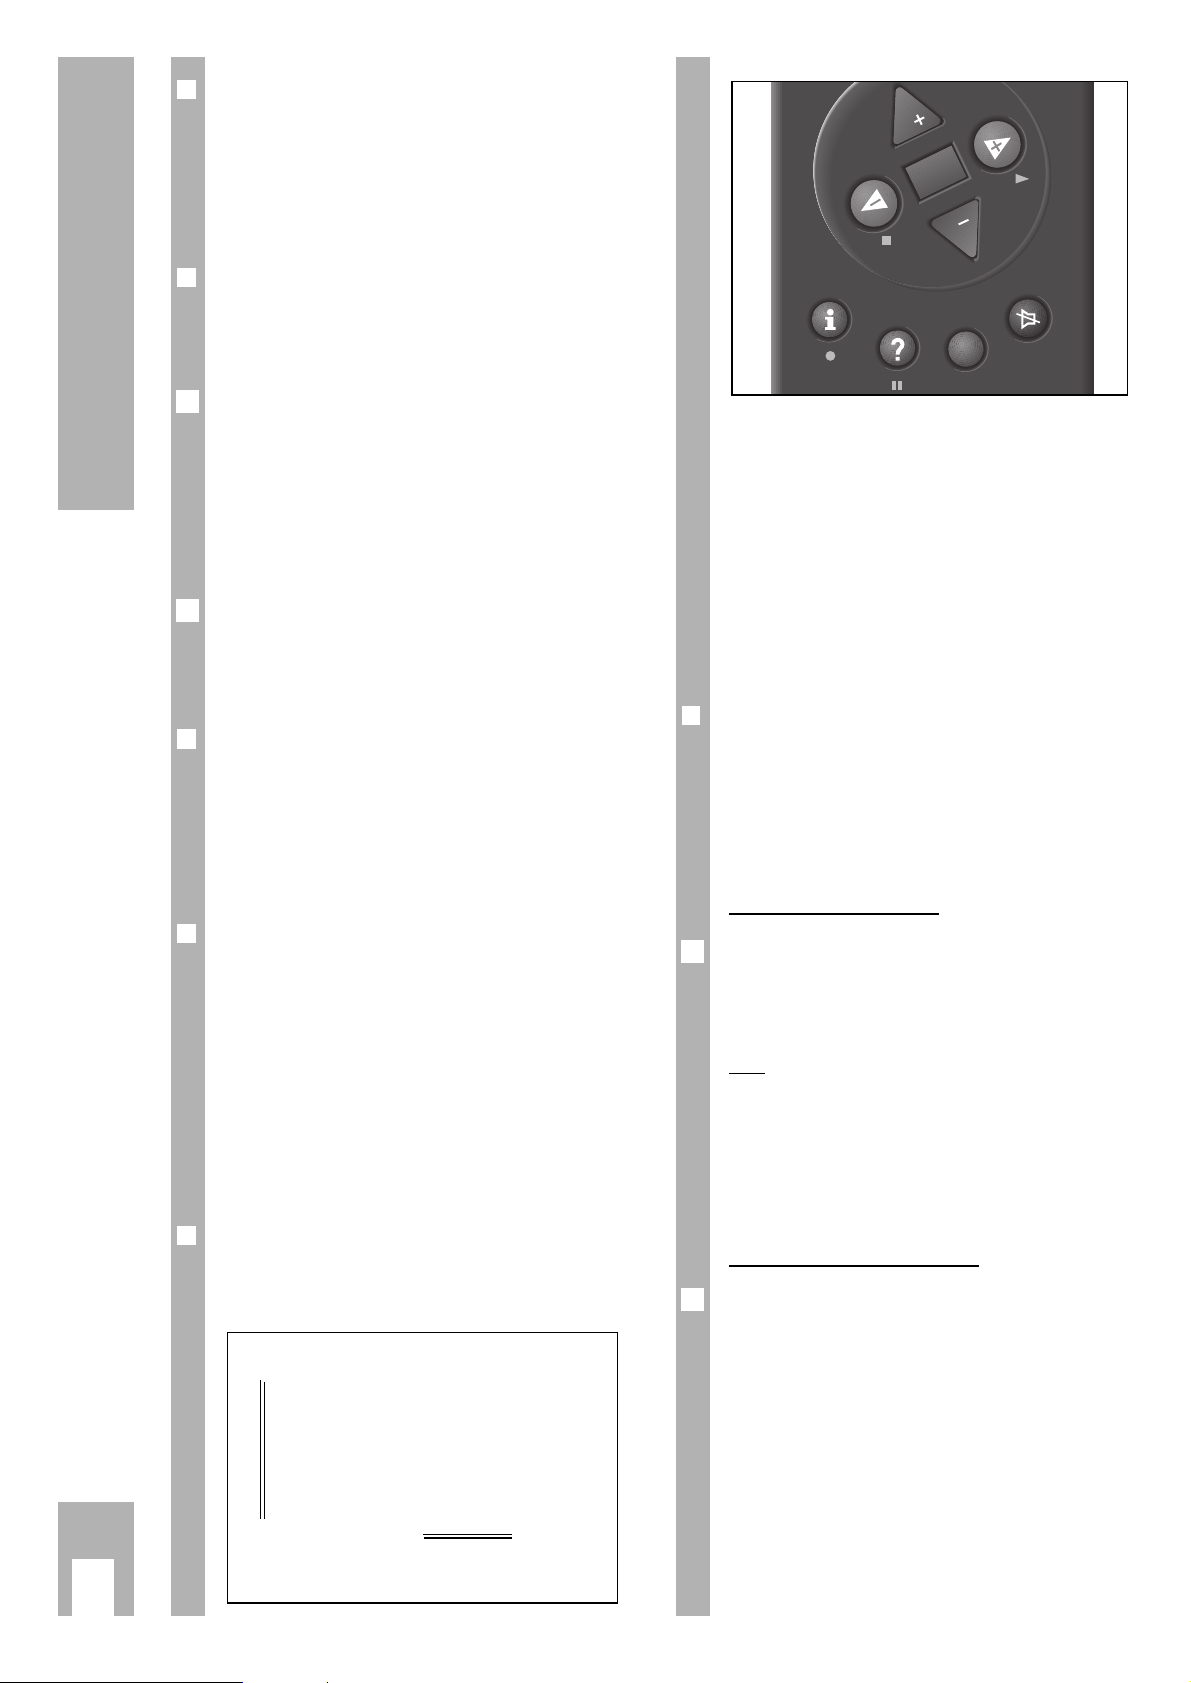
Gerät ein-/ausschalten
Die Taste
¢
IO
am Gerät drücken.
w
!
Leuchtet danach nur die LED in der Netztaste, dann
befindet sich das Gerät in Bereitschaft.
Schalten Sie dann mit der Fernbedienung – durch
Drücken der Taste 1– das Gerät ein.
❒
Programmplätze belegen
Das Gerät ist mit dem automatischen Programmsuchlauf ATS euro plus ausgestattet, der Ihnen die
Programmplatzbelegung abnimmt.
Nach dem Einschalten des Gerätes bestätigen Sie
die Dialogsprache »Deutsch« mit der Taste
O
.
Wenn die Seite »Dialogsprache wählen« nicht erscheint, drücken Sie die
Taste
.
und anschließend die Taste O.
Das Dialogcenter blendet sich ein.
Wählen Sie mit den Tasten
] oder | die Zeile »Automatische Pro-
grammierung« an.
Drücken Sie die Taste
O
.
Wählen Sie mit den Tasten
] oder | die Zeile »Komplette Neupro-
grammierung« an und drücken Sie die Taste
O
.
Bestätigen Sie den Gerätestandort mit der Taste O.
Nach Beenden der automatischen Programmplatzbe-
legung erhalten Sie Hinweise zum Easy Dialog
System.
❒
Das Easy Dialog System
Ihr Fernsehgerät ist mit einem »Easy Dialog
System« ausgestattet.
Das heißt, alle Bedienhinweise sind nicht wie sonst
in einer gedruckten Anleitung, sondern in Dialogfeldern enthalten, die in das Bild eingeblendet werden
können.
❒
Das Dialogcenter
Das Dialogcenter ist die Steuerzentrale Ihres Fernsehgerätes. Durch Drücken der Taste .und
anschließendes Bestätigen mit der Taste
O
rufen Sie das Dialogcenter auf. Hier können Sie vielfältige Einstellungen vornehmen, Informationen abrufen und gezielt Hilfen zur Bedienung Ihres Fernsehgerätes (z.B. Erklärung der Fernbedienung, Stichwortverzeichnis, Tips und Tricks) erhalten.
Probieren Sie es einfach aus. Sie können nichts
falsch machen
❒
Die Grundbedienung
Die Dialogzeichen zeigen bei jedem Bedienschritt
an, mit welchen Tasten bestimmte Funktionen ausgeführt werden können.
]
|
Zur 1. Seite
xc
O
Aufrufen
¢
?
Hilfe
¢
TXT
TV
2
1
]/ | Bewegen des gelben Balkens nach
oben/unten.
Bei zweiseitigen Menüs wird auf die zweite Seite
»umgeblättert«.
xc
Einstellen von Werten.
O
Aufrufen oder bestätigen der angewählten Funktion.
¢
TXT
Zurück zum Fernsehbild.
¢
?
Aufrufen der aktuellen Hilfe.
❒
Dolby Surround Pro Logic*
Um den optimalen Höreindruck von Dolby Surround Stereo zu erzielen, benötigen Sie zusätzliche
Lautsprecher-Boxen (siehe Abb. A letzte Seite).
Dazu empfehlen wir Ihnen folgende prinzipielle
Lösungen:
Anschluß Front-Boxen
Als Frontboxen können die bereits vorhandenen
Boxen Ihrer HiFi-Anlage verwendet werden.
Schließen Sie dazu Ihre HiFi-Anlage an die Buchsen
AUDIO OUT an (Abb. B).
oder
Schließen Sie zusätzliche Front-Boxen an die Buchsen L und R an. Die Center-Box schließen Sie an die
Buchse Center an (Abb. C).
w
!
Die Lautsprecher sollen eine Nennimpedanz von
4-8 Ohm haben.
Anschluß Surround-Boxen
Schließen Sie die Surround-Boxen an die Buchse
Surround an (Abb. D).
w
!
Werden mehrere Boxen am Surround-Kanal angeschlossen, achten Sie bitte darauf, daß die Nennimpedanz von 4 Ohm nicht unterschritten wird.
* Unter Lizenz von Dolby Laboratories Licensing
Corporation.
DOLBY und das Doppel-D-Symbol
g sind Waren-
zeichen der Dolby Laboratories Licensing Corporation.
1
1
P
OK
P
TXT
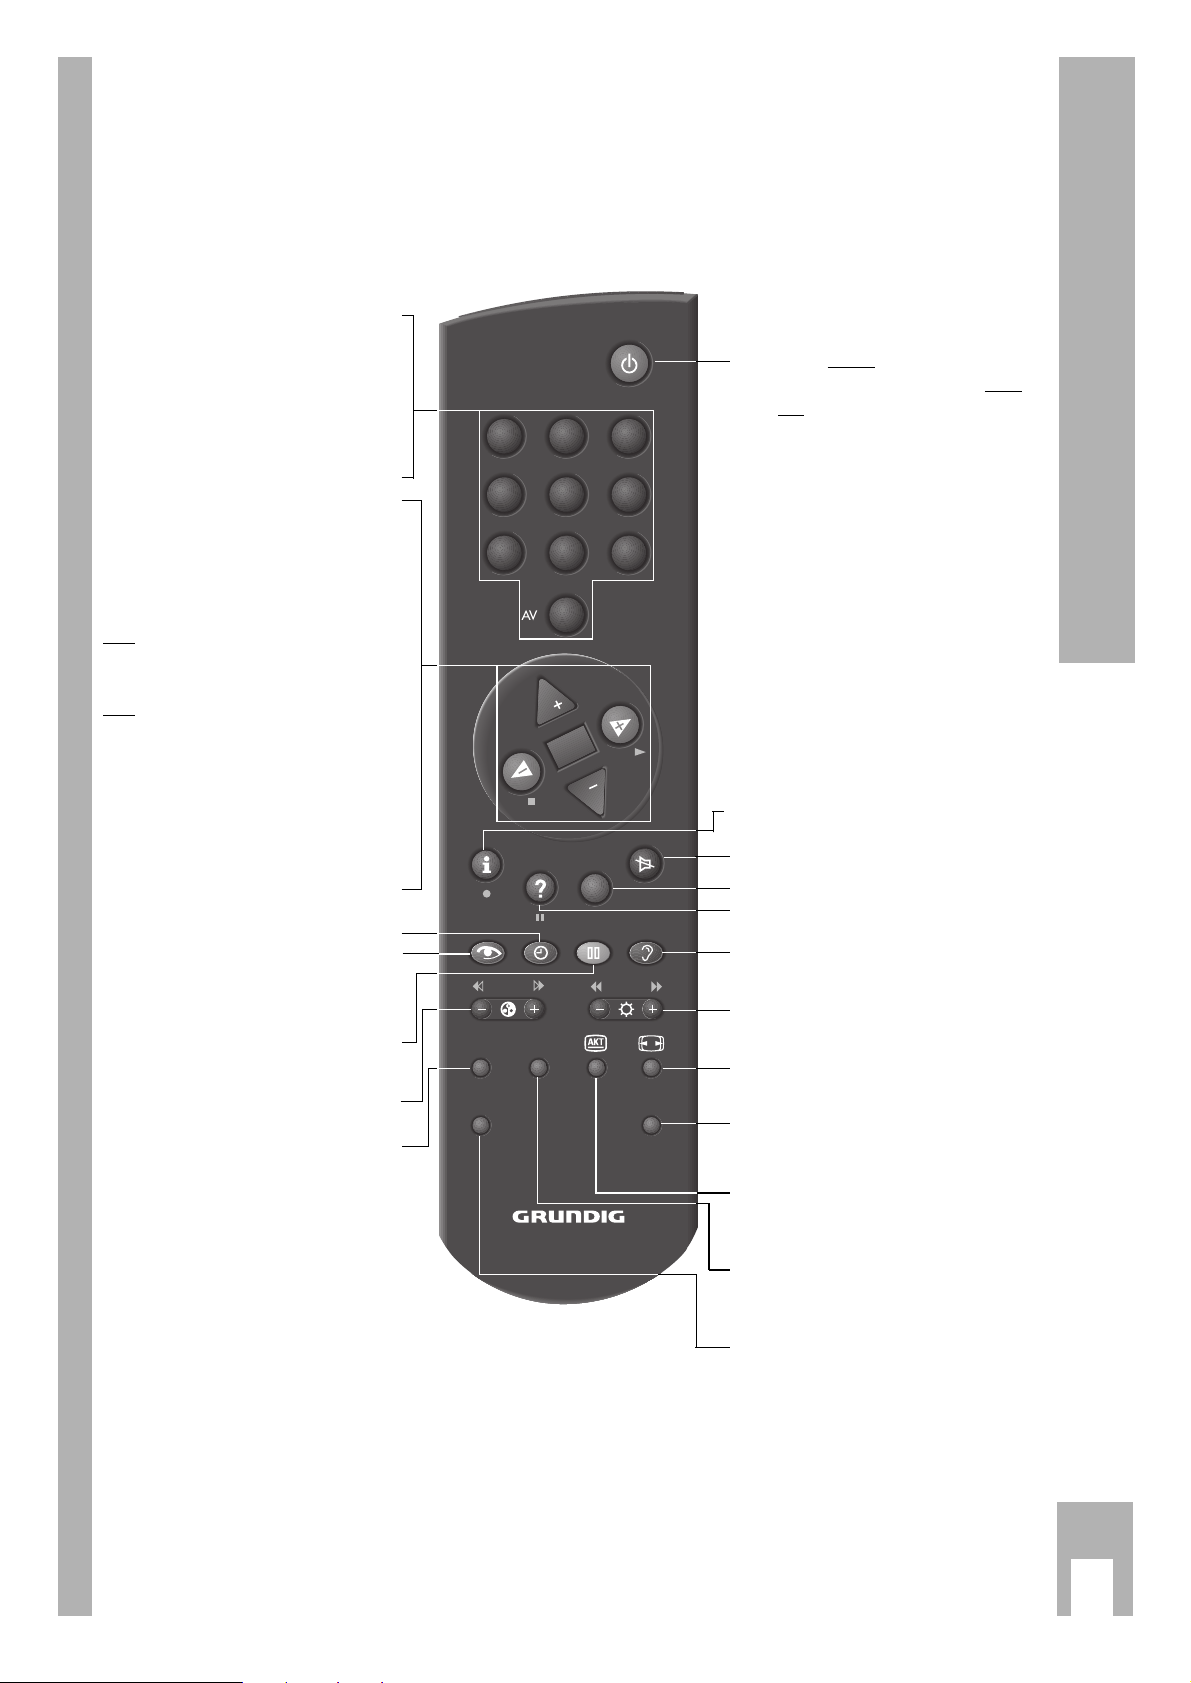
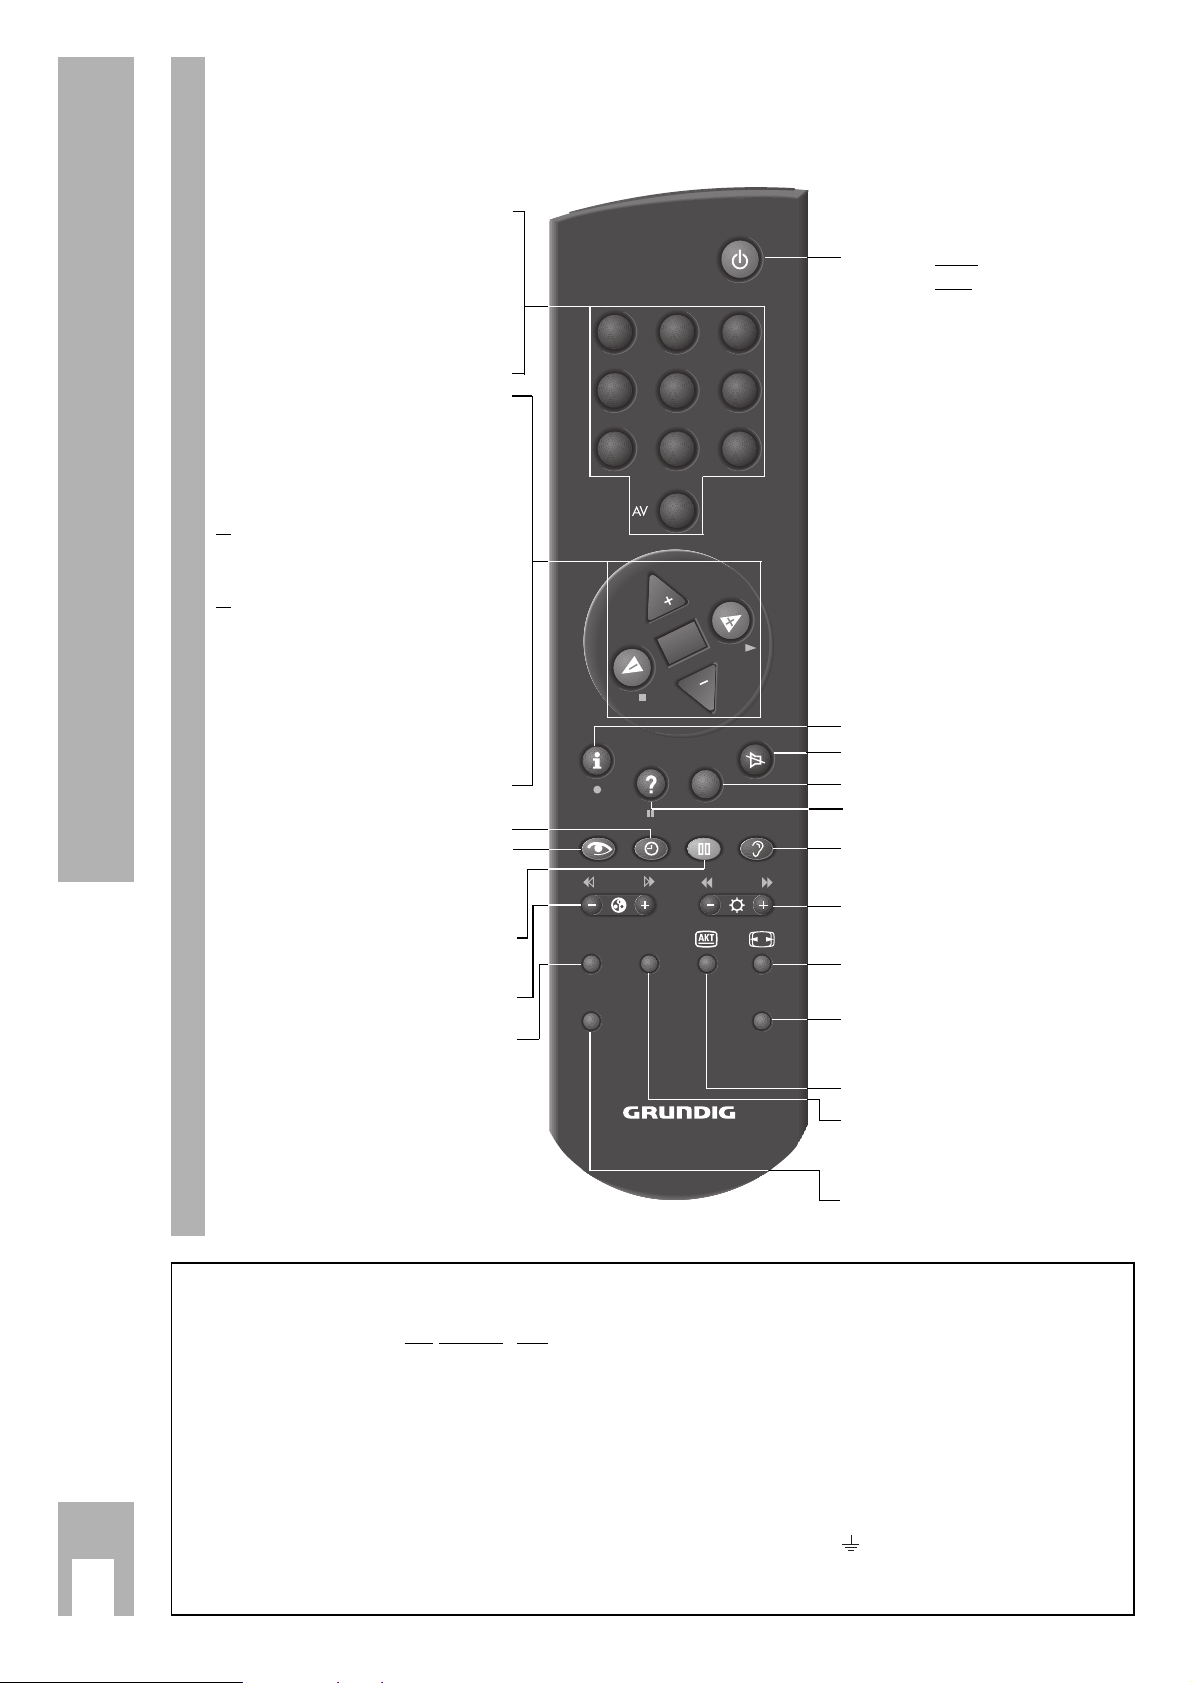
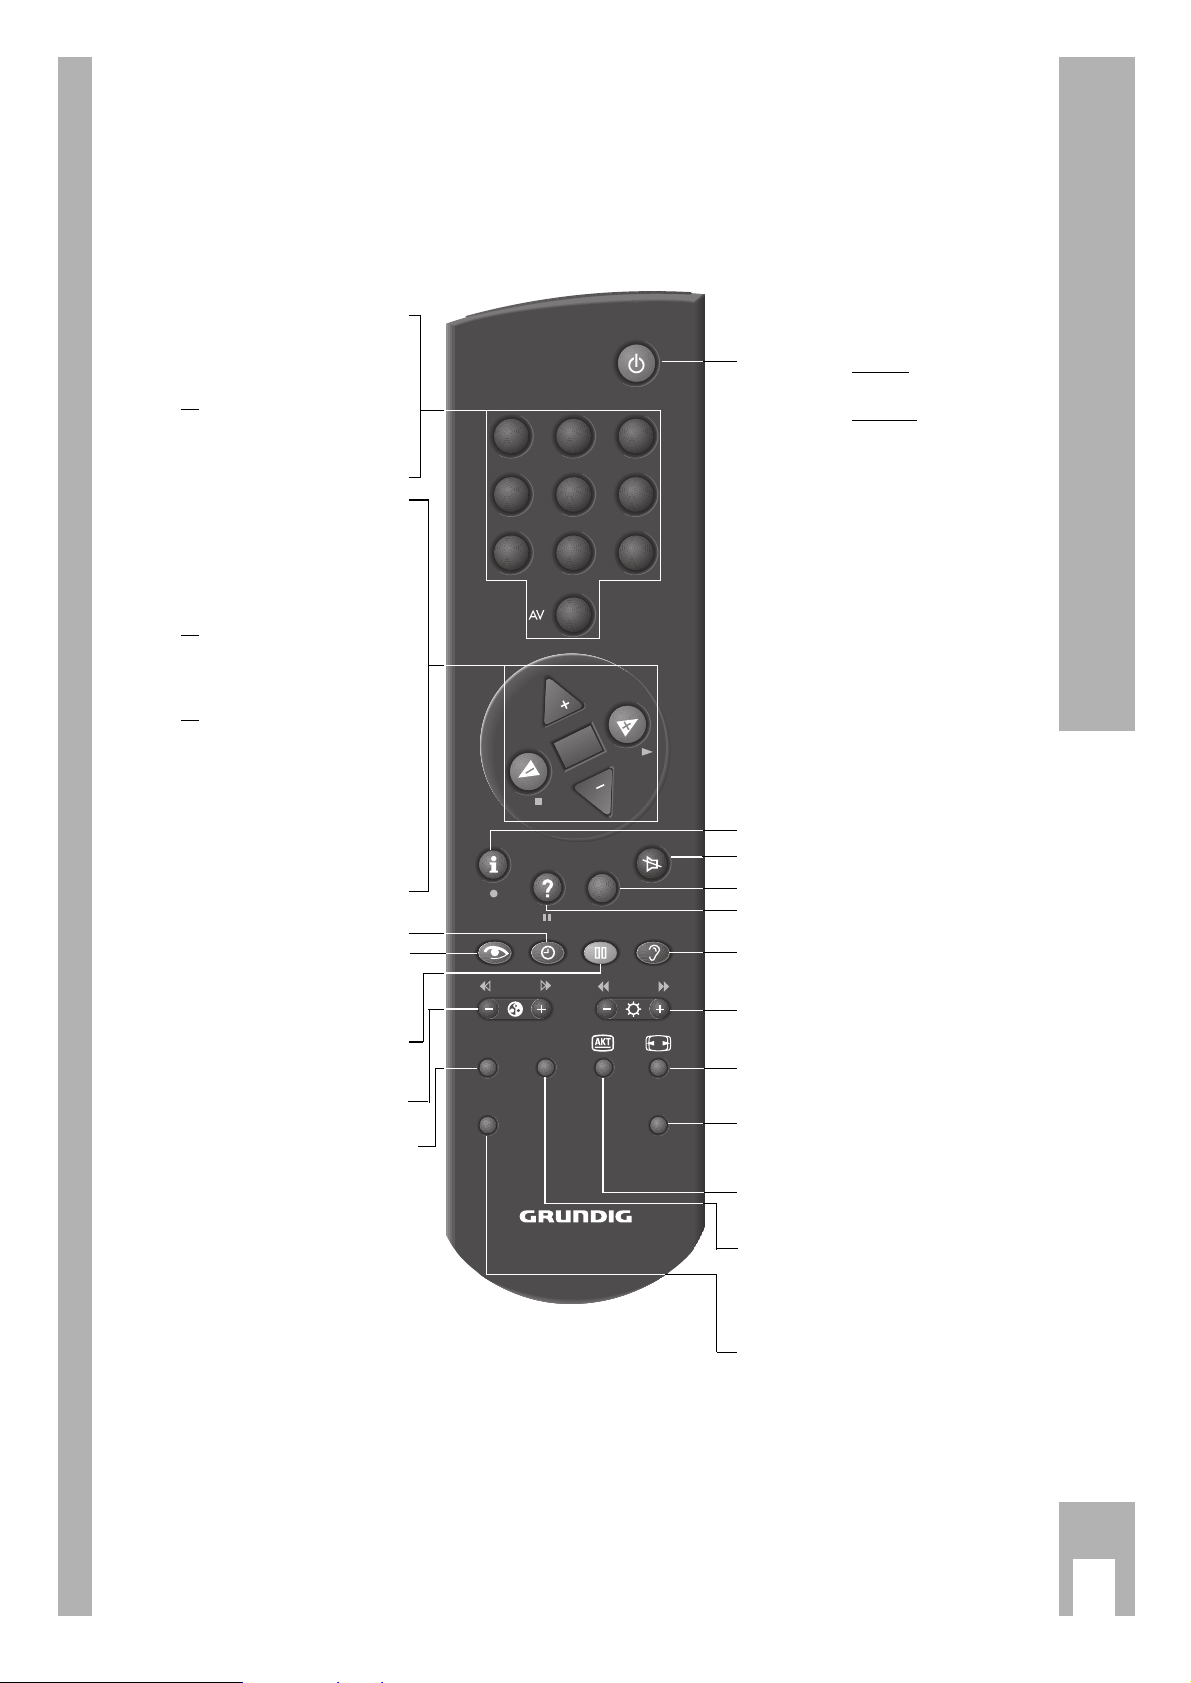
Die Tasten der Fernbedienung
j
5
Auf dieser Seite sind die Tasten der Fernbedienung
kurz erklärt.
Im Dialogcenter sind unter »Fernbedienung« alle
Funktionen der Fernbedienung erklärt.
Probieren Sie die Funktionen einfach aus.
1…9
Programmplatz-Wahl und
AV
0
Einschalten des Gerätes aus
Bereitschaft oder
– AV-Stellung wählen
– Eingeben der Seitennummern
im Videotext-Betrieb
P Einschalten des Gerätes aus
Bereitschaft. Programmplatz
schrittweise fortschalten
(1, 2, 3 ...)
p Programmplatz schrittweise
zurückschalten (... 3, 2, 1)
oder
p, P Cursor-Bewegung nach oben unten
xc
Lautstärke
oder
xc
Cursor nach links/rechts.
Wird eine der Tasten P oder p gedrückt
gehalten, werden die Programmplatzkennungen eingeblendet und schnell durchlaufen. Das Gerät schaltet nach Loslassen der
Taste auf den gewählten Programmplatz.
G Ändern und Aktivieren verschie-
dener Funktionen
h
Uhrzeit ein/aus.
k
Bildeinstellungen
Vorwahl zum Einstieg in das
Menü »Bildeinstellungen«
j
Standbild oder
¢
AUX und
j
ist Program scan
- E + Farbstärke ändern.
SAT Externen Grundig-Satelliten-
Receiver fernbedienen (dazu
Taste SAT gedrückt halten).
b
Taste einmal drücken: Gerät in
Bereitschaft schalten.Taste zwei
mal drücken: Gerät komplett ausschalten (vorausgesetzt der ÖkoNetzschalter ist aktiviert).
h Einstieg ins DIALOG CENTER
(mit
h und G )
¢
a
Ton ein/aus (stummschalten).
¢
TXT
Videotext/-Betrieb Ç TV-Betrieb.
¢
D
Kurzanleitung aufrufen
g
Toneinstellungen
Vorwahl zum Einstieg in das
Menü »Toneinstellungen«
- R +
Helligkeit ändern.
E
Bildformat-Umschaltung
AUX
Vorwahltaste für verschiedene
Funktionen, z.B.
¢
AUX und
j
ist Program scan
C
Info über die aktuelle Sendung
PIP Einmal drücken, um Double Win-
dow, zweimal drücken um Bild in
Bild aufzurufen.
VIDEO Video-Recorder fernbedienen
(dazu Taste VIDEO gedrückt
halten).
SAT PIP
VIDEO
321
654
987
0
P
OK
P
TXT
AUX
TP 800
Technische Daten
j
6
❒
Zusatzausstattung:
Das Gerät ist für Satellitenempfang vorbereitet. Fragen Sie Ihren Fachhändler.
❒
Kontaktbelegung EURO-AV-Buchse
Wenn Sie an das Fernsehgerät Zusatzgeräte anschließen wollen (z. B. Computer, Verstärkeranlage),
dann kann Ihr Fachhändler anhand der folgenden
Anschlußtabelle eine normgerechte Verbindung
herstellen:
Stift Signal
11 = Audio Ausgang rechts
12 = Audio Eingang rechts
13 = Audio Ausgang links
14 = Audio Masse
15 = Blau Masse
16 = Audio Eingang links
17 = RGB Blau Eingang
18 = Schaltspannung
19 = Grün Masse
10 = Datenleitung (MEGALOCIG)
11 = RGB Grün Eingang
12 = –
13 = Rot Masse
14 = Masse
15 = RGB Rot Eingang
(S-Video = Chroma)
16 = RGB Schaltspannung
17 = Video Masse
18 = RGB Schaltspannung Masse
19 = Video Ausgang
20 = Video Eingang
(S-Video = Luminanz)
21 = Abschirmung/Masse
Ohne externe Lautsprecher
Stereo 3-Kanal 80 W Musikleistung
80 W = 40 W Subwoofer, 2 x 20 Front-Lautsprecher
(40 W Sinus = 20 W + 2 x 10 W)
❒
Empfangsbereiche:
C01 … C99
Sonderkanäle S01 … S41
❒
Norm:
PAL B/G; SECAM L; PAL-I/NIC-GB; SECAM D/K;
NTSC M; NIC (E,B,DK); NIC (S,N,SF)
❒
Service-Hinweise für den Fachhandel:
Das Gerät darf nur mit dem beiliegenden Netzkabelset
betrieben werden. Es verhindert Störungen aus dem Netz
und ist Bestandteil der Gerätezulassung.
Für Ersatzzwecke bestellen Sie bitte bei einer Kundendienst-Stelle nur das Netzkabelset mit der Bezeichnung
»GWN 9.22/Sachnummer 8290.991-316«.
Das Produkt erfüllt die Forderungen folgender
EU-Richtlinien:
73/23/EWG Richtlinie betreffend elektrische Betriebsmittel zur Verwendung innerhalb bestimmter Spannungsgrenzen.
89/336/EWG Richtlinie über die elektromagnetische Verträglichkeit.
Das Gerät entspricht den Normen:
EN 60065, EN 55013, EN 55020
Das Gerät entspricht der Verordnung über den Schutz vor
Schäden durch Röntgenstrahlen. Die Röntgenstrahlung –
verursacht durch die Bildröhre – ist ausreichend abgeschirmt und darum völlig ungefährlich. Beschleunigungsspannung max. 34kV/mittlerer Strahlstrom 1,6mA.
Unsachgemäße Eingriffe, insbesondere Verändern der
Hochspannung oder Einbau eines anderen Bildröhrentyps, können dazu führen, daß Röntgenstrahlung in
erheblicher Stärke auftritt. So veränderte Geräte entsprechen nicht mehr dieser Zulassung und dürfen nicht
betrieben werden.
Änderungen und Irrtümer vorbehalten!
❒
Netzspannung:
220-240V, 50/60Hz
(Regelbereich des Netzteiles 190 … 264V)
❒
Aufnahme:
in Bereitschaft 6 W
im Betrieb 185 W
❒
Tonendstufe:
Dolb
y-Betrieb
Stereo 5-Kanal 120 W Musikleistung
Musikleistung Sinusleistung Nennimpedanz
Front 2 x 20 W 2 x 10 W 4-8 Ω
Center 20 W 10 W 4-8 Ω
Surround 20 W 10 W 4-8 Ω
Subwoofer (im Gerät) 40 W 20 W
❒
GRUNDIG Kundenberatungszentrum
Haben Sie Fragen?
Unser Kundenberatungszentrum steht Ihnen werk-
tags stets von 8.00 – 19.00 Uhr zur Verfügung.
STETS FÜR SIE DA!
montags bis freitags
von 8.00 – 19.00 Uhr
* Gebührenpflichtig –
in Deutschland und
Österreich möglich
DEUTSCHLAND
ÖSTERREICH
GRUNDIG
KUNDENBERATUNGS-
01 80/5 30 21 22*
06 60/66 99*
ZENTRUM
220
21
119
k
7
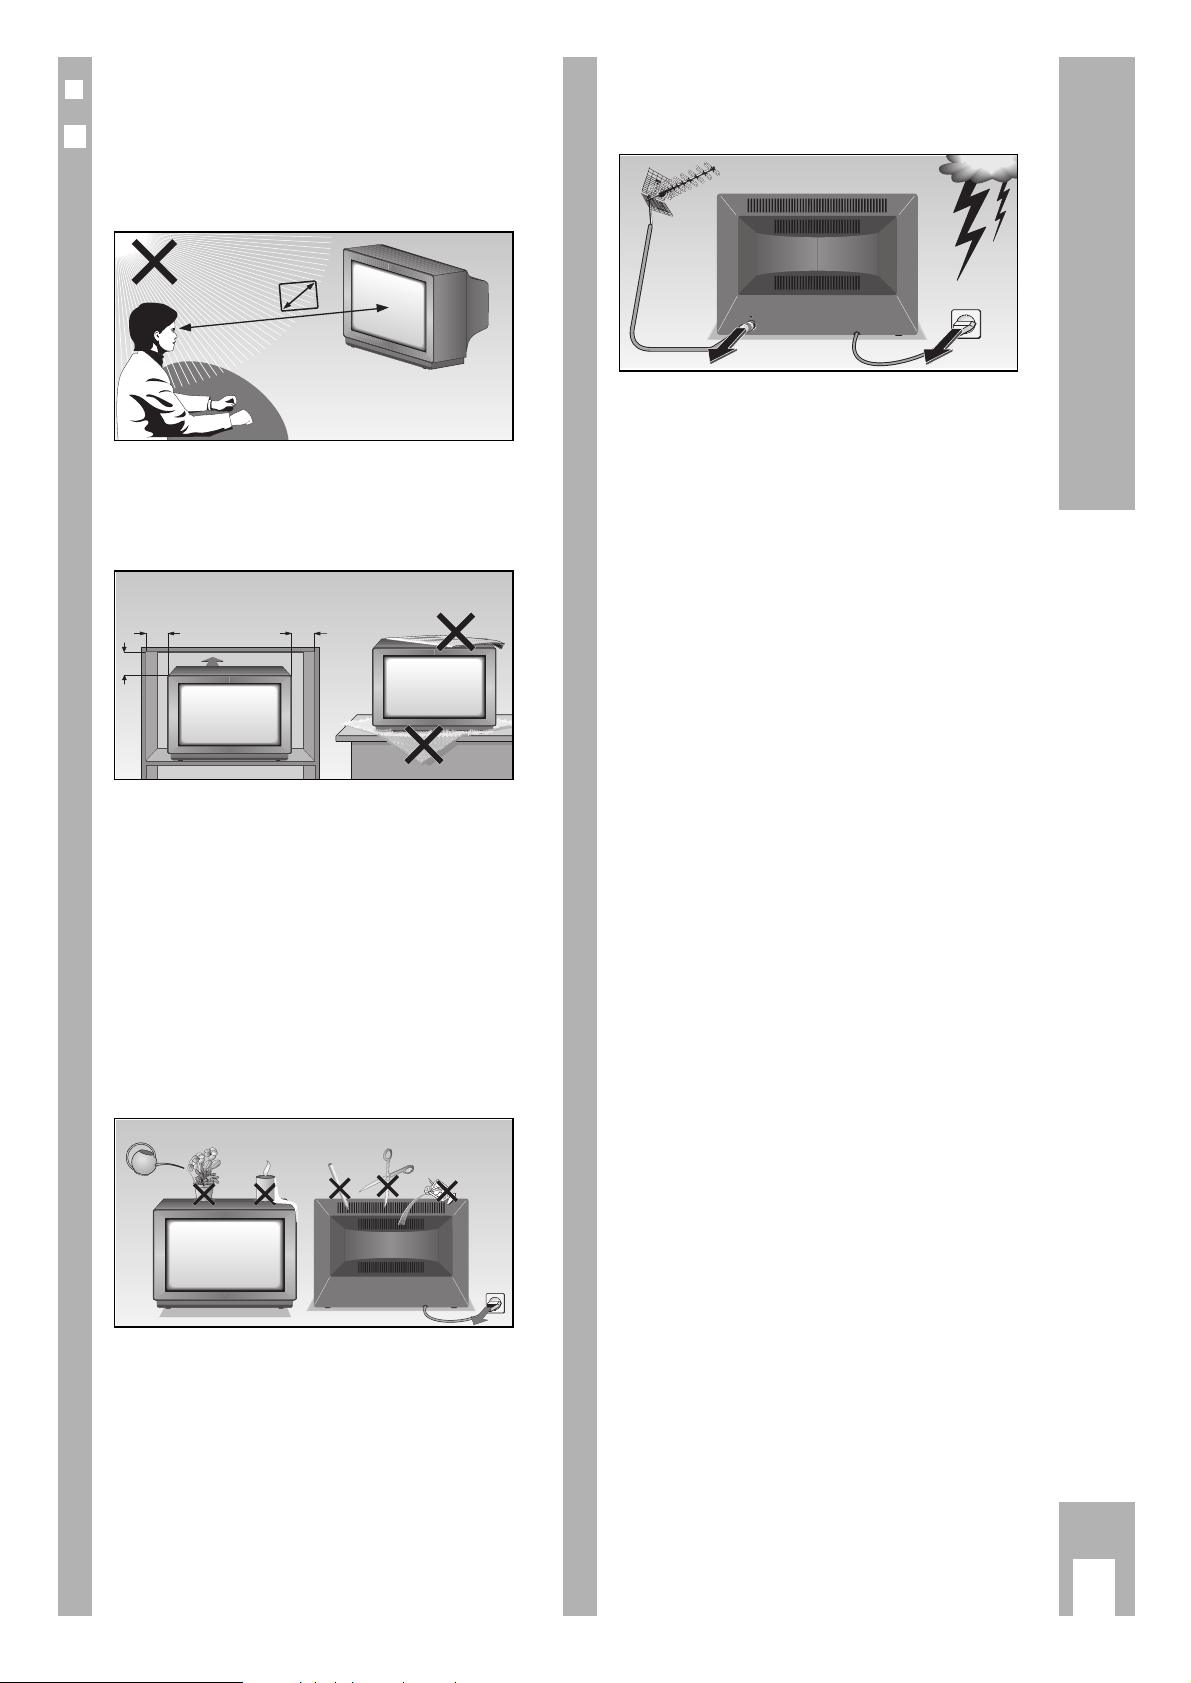
Safety, Setting up
w
!
The set may be opened and maintained by authorised experts only.
w
!
Avoid damage from lightning strikes by disconnecting the mains and aerial cables.
– Even if the set is switched off, damage may result
from a power surge due to lightning in the mains
or in the aerial cable.
w
!
This TV set is to be used for the reception and
reproduction of picture and audio signals. Any
other use is excluded.
❒
Dear Customer!
In order for this high-quality convenient TV set to
bring you viewing pleasure for many years, it is
necessary that you observe the following points
when setting it up.
w
!
Ideal viewing distance is 5x the length of the TV
screen diagonal
Light from external sources falling on the TV the
screen will impair the picture quality.
w
!
There must be sufficient clearance from the cabinet
walls at the appropriate location.
w
!
Do not cover the ventilation openings.
w
!
Heat build-ups may occur in the set.
– Heat build-ups are a source of danger and may
shorten the life span of the set.
For safety reasons, have an expert remove
deposits from the set occasionally.
w
!
Do not damage the mains cable.
w
!
Do not place any magnetic field sources in the vicinity of the set (speaker boxes for example).
w
!
Do not place flower vases or flower pots on top of
the set.
w
!
Ensure that liquids or other objects are not allowed
to enter the set (danger of short circuits).
w
!
Clean the TV screen with a moist, soft towel using
pure water only.
6
5 x
10
cm
20
cm
20 cm
10
cm
Krieg am Golf
! SERVICE !

This highly digitalised TV set offers you optimum
picture and sound quality.
w
!
The essential prerequisites for this are:
An aerial system and aerial connection cable in perfect working order with a high degree of shielding
(85dB) as a connection between the TV set and
aerial socket or between the TV set and video
recorder.
w
!
Avoid wear to the cable near the set.
w
!
You will find further information on connecting
various external units (e.g. SAT receiver, decoder)
in the dialog center menu section » Audio-/video
connections «.
❒
The GRUNDIG MEGALOGIC System
The TV set is equipped MEGALOGIC System.
If you connect a GRUNDIG video recorder to the
MEGALOGIC System using the supplied MegalogicEURO/AV (Scart) cable, terrestrial TV channels (and
all channel position related information) are automatically transferred to the video recorder (VCR)
with each “Reprogramming of the TV channel”.
“Setting the TV channel on the video recorder” is no
longer necessary.
6
❒
Branchement d’un ordinateur (VGA)
Le téléviseur est équipé d’une interface VGA compatible et il peut être utilisé comme moniteur PC.
Le téléviseur peut se régler en mode VGA sur les
signaux d’entrée suivants :
640 x 480 pixels, 60 Hz/31,5 kHz
640 x 400 pixels, 70 Hz/31,5 kHz
640 x 350 pixels, 70 Hz/31,5 kHz
Raccordement
Raccorder la source VGA (par ex. PC, console de
jeu) à la douille Canon du module VGA grâce à un
câble du commerce courant VGA. Si un ordinateur
portable est raccordé, son affichage doit être désactivé.
Raccorder la sortie du son (si disponible) aux douilles Cinch du module VGA à l’aide d’un câble Cinch
du commerce courant.
AV1
AV2
VGA
AV3
SURROUND
CENTER
L
R
8Ω
AUDIO-OUT
L
R
AUDIO
IN
L
R
Subwoofer
k
8
Connection
❒
Connection example (TV set, SAT receiver and Video recorder)
220-240 V
~
50-60 Hz
EURO AV VCREURO AV DECODEREURO AV TV
AUDIO OUT
R
L
INPUT-SAT
950-2150 MHz
14/18 V 450 mA
x
R
L
AUDIO
R
L
I
N
O
U
T
2 EXTERNAL / DEC. - AV 2
1 EXTERNAL / EURO - AV 1
AV1
AV2
VGA
AV3
SURROUND
CENTER
L
R
8Ω
AUDIO-OUT
L
R
AUDIO
IN
L
R
Subwoofer
k
9
❒
Switching the set on/off
Press the
¢
IO
button on the set.
w
!
If the LED in the mains button is now illuminated,
then the unit is in stand-by mode.
Switch the unit on using the remote control by
pressing the 1button.
❒
Assigning programme positions
This set is equipped with the automatic tuning
system ATS euro plus which performs the programme assignment for you.
After switching on the set, confirm the »English«
dialogue language by pressing the
O
button.
If the »Select dialog language« page does not appear, press the .button
and then the
O
button.
The dialogcenter appears on the screen.
Use the
] or | button to select the »Automatic programming« menu line.
Press the
O
button.
Use the
] or | button to select the »Completely new programming«
line and then press the
O
button.
Confirm your country with the Obutton.
When the automatic programme allocation is completed, hints to the Easy Dialog System are displayed.
❒
The Easy Dialog System
Your television is provided with the »Easy Dialog
System«.
With this system, all hints on operating the TV set
are no longer to be found in a printed instructions
manual but in dialog boxes which can be displayed
on the picture screen.
❒
The Dialogcenter
The Dialogcenter is the control centre of your TV
set. It is called up by pressing the .and then the
O
button. Via the displayed menu, you can make
settings, call up information and select precise help
for operating your TV set (for example an explanation
of the remote control handset, an index, tips and
tricks, etc.).
Simply try it out. You can do no harm!
❒
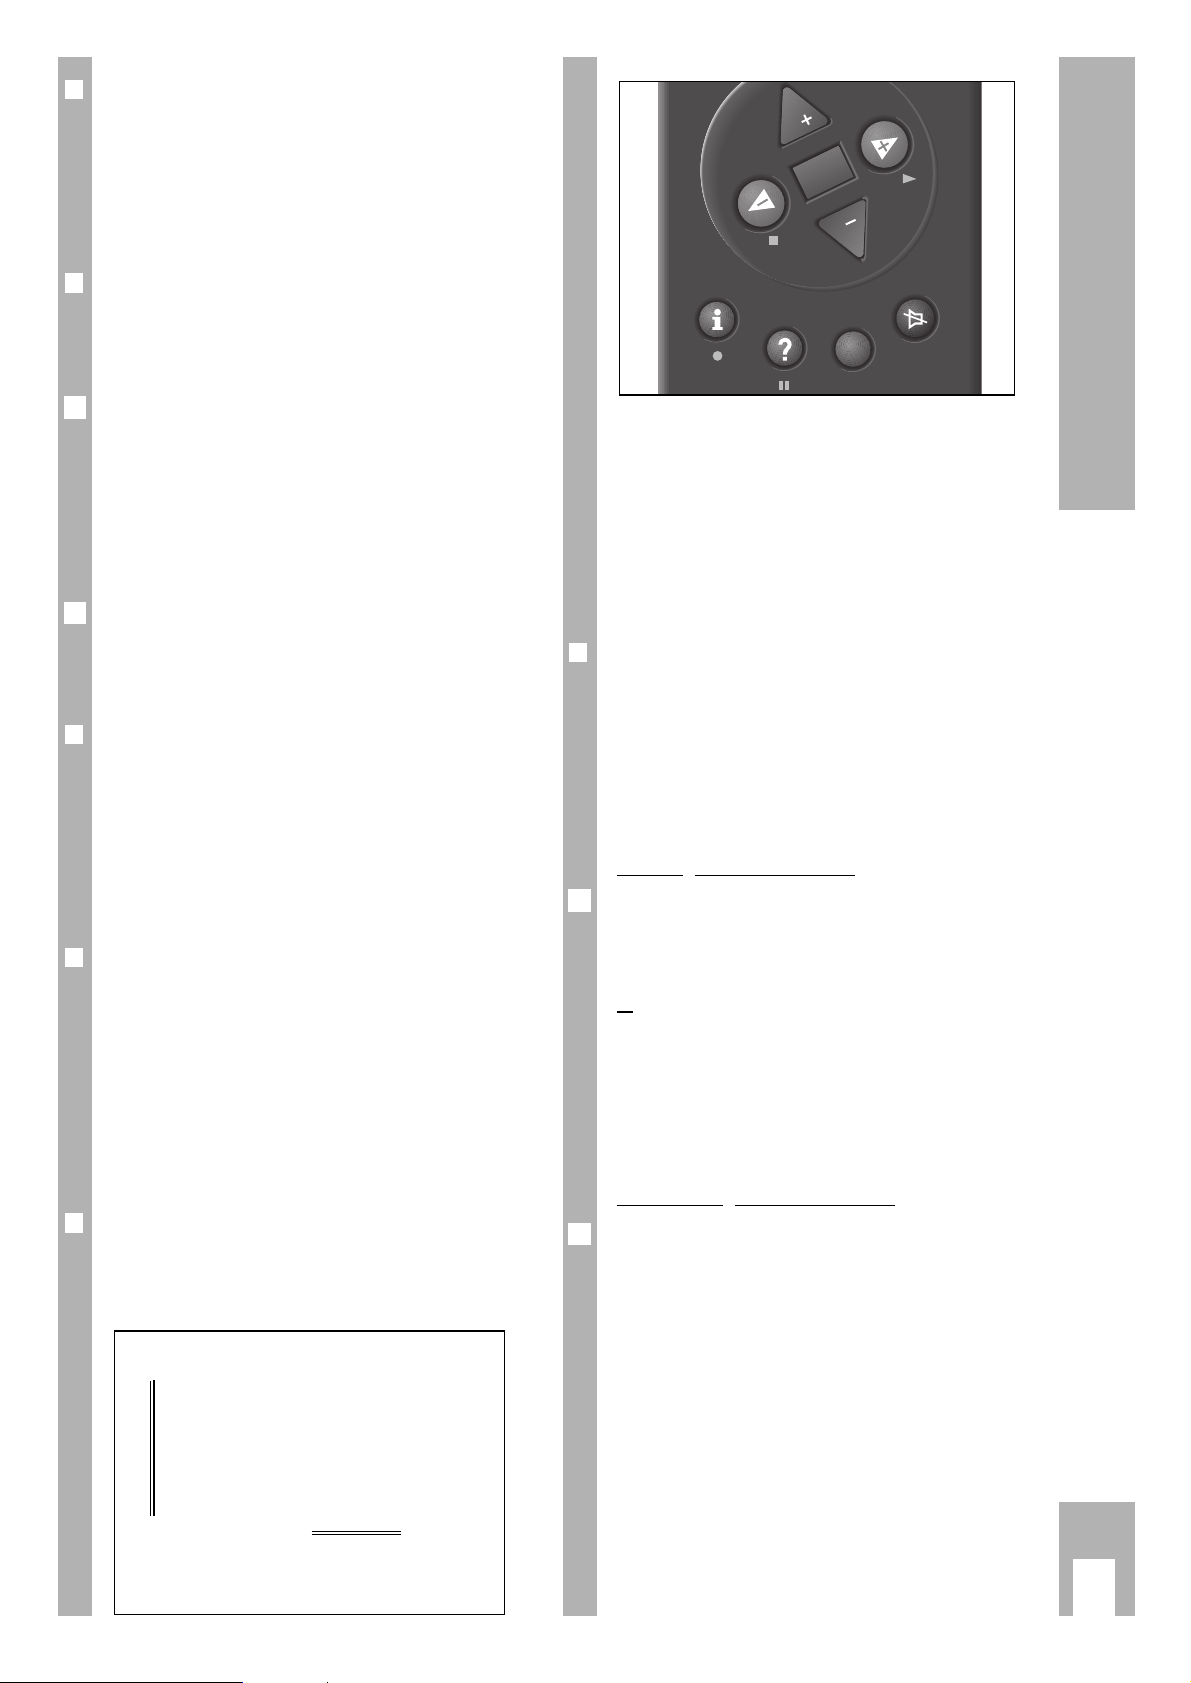
Basic operation
The dialogue symbols indicate for each operating
step with which buttons the different functions can
be carried out.
]
|
To 1st page
xc
O
Call up
¢
?
Help
¢
TXT
TV
2
1
]/ | Yellow bar up/down
In two-page menus, selection of the second page.
xc
Set values.
O
Confirm selected function.
¢
TXT
Return to TV picture.
¢
?
Help.
❒
Dolby Surround Pro Logic*
To obtain the optimum sound impression with
Dolby Surround Stereo broadcasts, you will require
additional loudspeaker boxes (see Fig. A on last
page).
For this, we recommend you the following
principal solutions:
Front speaker connection
As front speaker boxes, you can use the already
existing boxes of your hifi equipment. For this,
connect your hifi equipment to the AUDIO OUT
sockets (see Fig. B).
or
Additional front boxes are to be connected to the
sockets L and R. The centre box is to be connected
to the ”Center” socket (see Fig. C).
w
!
The loudspeakers must have a nominal impedance
of 4-8 Ohms.
Surround speaker connection
The Surround boxes are to be connected to the
”Surrround” socket (see Fig. D).
w
!
If several boxes are connected to the surround
channel, please make sure that the nominal impedance does not fall below 4 Ohms.
* Under licence from Dolby Laboratories Licencing
Corporation.
DOLBY and the double-D symbol
g are trademarks
of Dolby Laboratories Licencing Corporation.
1
1
Easy Dialog System
P
OK
P
TXT
k
10
The Buttons on the Remote Control Handset
This is a brief explanation of the remote control buttons.
All functions will be explained in detail under
»Remote control« in the Dialogcentre.
Simply try out the functions.
1…9
Select programme position
AV
0
and switch on the TV set from
standby,
or
– select AV position,
– enter page numbers in Teletext
mode.
P Switch on from standby. Select
programme positions step by
step
(1, 2, 3 ...)
p Select programme positions
step by step (... 3, 2, 1)
or
pP Move cursor up / down.
xc
Volume
or
xc
Move cursor to the left / right.
When holding down the P or p button,
the programme position identifications
will scroll on the screen. When releasing
the pressed button, the TV set switches to
the selected programme position.
G Modify and activate certain
functions.
h
Time display on/off.
k
Picture adjustments.
Access to the »Picture settings«
menu.
j
Still picture, or
¢
AUX plus
j
Program scan
- E + Colour contrast.
SAT To operate a Grundig external
satellite receiver by remote control, hold down the SAT button.
b
Press once: switch to standby.
Press twice
: switch definitively off
(provided the mains economy
switch is activated.)
h Access to the DIALOG CENTER
¢
+ Sound on/off (mute).
¢
TXT
Teletext mode Ç TV mode
¢
D
Call up brief instructions.
g
Sound adjustments.
Access to the »Sound settings«
menu.
- R +
Brightness
E
Picture format switching
AUX
Preselect button for certain functions, e.g.
¢
AUX plus
j
Program scan
C
Info about current broadcast
PIP Press PIP once, to call up double
window. Press PIP twice to call
up picture-in-picture.
VIDEO Video recorder remote control
(press and hold down the
VIDEO button).
Additional Information for Units sold in Great Britain
Units sold in GB are suitable for operation from a 240 V AC, 50 Hz mains supply.
In case this appliance is supplied with a Safet
y Standard Approved mains lead fitted with a non-rewireable 13 Amp mains plug which, if unsuitable for your
socket, should be cut off and an appropriate plug fitted by a
qualified electrician. The fuse and fuse holder must be removed from the plug as
accidental insertion of the redundant plug into a 13 Amp socket is likely to cause
an electrical hazard.
Note: The severed plug must be destroyed to avoid a possible shock hazard
should it be inserted into a 13 Amp socket elsewhere.
If it is necessary to change the fuse in the non-rewireable plug, the correct type
and rating (5 Amp ASTA or BSI approved BS 1362) must be used and the fuse
cover must be refitted. If the fuse cover is lost or damaged the lead and plug must
not be used until a replacement is obtained. Replacement fuse covers should be
obtained from your dealer.
If a non-rewireable plug or a rewireable 13 Amp (BS 1363) plug is used, it must
be fitted with a 5 Amp ASTA or BSI approved BS 1362 fuse. If any othe type of
plug is used it must be protected by a 5 Amp fuse either in the plug or at the distribution board.
Important:
The wires in the mains lead are coloured in accordance with the follow-ing code:
BLUE – NEUTRAL
BROWN – LIVE
As the colours of the wires in the mains lead of your appliance may not correspond with the coloured marking identifying the terminals in your plug, proceed
as follows:
Connect the BLUE coloured wire to plug terminal marked with the letter "N" or
coloured black.
Connect the BROWN coloured wire to the plug terminal marked with a letter "L" or
coloured red.
In no circumstance must any of the wires be connected to the terminal marked
with a letter "E", earth symbol , coloured green or green and yellow.
Replacement mains lead can be obtained from your dealer.
321
654
987
0
SAT PIP
VIDEO
P
OK
TP 800
P
TXT
AUX
k
11
No external speakers
3-channel stereo, 80 W musical output
80 W = 40 W Subwoofer, 2 x 20 front speakers
(40 W sinus = 20 W + 2 x 10 W)
❒
Channels:
C01 … C99
Special channels S01 … S41
❒
Norm:
PAL B/G; SECAM L; PAL-I/NIC-GB; SECAM D/K;
NTSC M; NIC (E-B-DK); NIC (S-N-SF)
❒
Service hint for the specialist:
The set may only be operated supplied power cable
set. It prevents interference from the mains and is an
integral component for the set’s approv-al.
For a replacement, consult your nearest customer
service centre and order only the power supply
cable set with the following designation » GWN
9.22/ number 8290.991-316 «.
The product fulfils the requirements of the
following EU guidelines:
73/23/EEC Guideline concerning electrical operating
units within certain voltage limits.
89/336/EEC guideline on electro-magnetic compatibility.
The unit is accordance with the norms:
EN 60065, EN 55013, EN 55020
Subject to alterations.
E. and O.E.
❒
Additional equipment:
The unit is prepared for satellite reception. Ask your
dealer.
❒❒
Pin assignment of EURO-AV socket
If you want to connect other devices to your television (for example, a computer or amplifier), your
dealer can provide you with a normed standard
connection by means of the following table:
Pin Signal
11 = Audio output, right
12 = Audio input, right
13 = Audio output, left
14 = Audio, earth
15 = Blue, earth
16 = Audio input left
17 = RGB blue input
18 = Switching voltage
19 = Green, earth
10 = Data line (MEGALOGIC)
11 = RGB green input
12 = –
13 = Red, earth
14 = Earth
15 = RGB red input
(S-Video = Chroma)
16 = RGB switching voltage
17 = Video, earth
18 = RGB switching voltage, earth
19 = Video output
20 = Video input
(S-Video = Luminanz)
21 Shielding/earth
Specifications
❒
Mains voltage:
220-240V, 50/60Hz
(control range of the power supply unit 190 … 264 V)
❒
Sound output
Dolb
y oberation
5-channel stereo, 120 W musical output
Musical output Sinusoidal output Nominal impedance
Front 2 x 20 W 2 x 10 W 4-8 Ω
Center 20 W 10 W 4-8 Ω
Surround 20 W 10 W 4-8 Ω
Subwoofer (in unit) 40 W 20 W
❒
Power consumption:
Set in standby 6 W
Set in operation 185 W
220
21
119

l
12
Sécurité, installation
w
!
L’appareil ne doit être ouvert et entretenu que par
du personnel spécialisé autorisé.
w
!
Evitez les dommages entraînés par la foudre en débranchant le câble secteur et le câble d’antenne.
– Même lorsqu’il est hors service, votre appareil est
susceptible d’être endommagé sous l’action de la
foudre dans le réseau électrique et/ou le câble
d’antenne.
w
!
Ce téléviseur est conçu pour la réception et la
lecture de signaux audio et vidéo.
Toute autre utilisation est expressément exclue.
❒
Cher client, chère cliente !
Afin que ce téléviseur confortable et particulièrement
performant vous procure plaisir et divertissement
pendant de longues années, il est essentiel d’observer
les points suivants lors de l’installation de l’appareil.
w
!
La distance idéale séparant l’appareil des téléspectateurs équivaut à 5x la diagonale de l’écran.
Les incidences de lumière sur l’écran affectent la
qualité de l’image.
w
!
Distances suffisamment grandes dans le meuble
sur le lieu d’installation respectif.
w
!
Ne couvrez pas les fentes d’aération.
w
!
Des accumulations de chaleur peuvent se former
dans l’appareil.
– Elles constituent des sources de danger et nui-
sent à la longévité de l’appareil. Pour plus de
sécurité, chargez un spécialiste de supprimer de
temps à autre les dépôts présents dans l’appareil.
w
!
N’endommagez pas le câble secteur.
w
!
Veillez à l’absence de champs magnétiques à proximité de l’appareil (enceintes acoustiques par ex.).
w
!
Ne posez pas de vases ou de pots de fleurs sur
l’appareil.
w
!
Veillez à ce qu’aucun liquide et aucun autre objet ne
s’introduise à l’intérieur de l’appareil (risque de
court-circuit).
w
!
Nettoyez l’écran uniquement à l’aide d’un chiffon
doux, humide. N’utilisez que de l’eau claire.
6
5 x
10
cm
20
cm
20 cm
10
cm
Krieg am Golf
! SERVICE !
l
13
Raccordement
Ce téléviseur hautement numérisé vous offre une
qualité vidéo et audio optimale.
w
!
Les principales conditions en sont les suivantes :
installations d’antennes en parfait fonctionnement
et câbles de raccordement d’antenne à effet d’écran
élevé (85 dB), en tant que connexion entre le téléviseur et la prise d’antenne ou le téléviseur et le
magnétoscope.
w
!
Evitez également les boucles de câble à proximité
de l’appareil.
w
!
Dans la section de menu Dialogcenter » Raccordements audio-/vidéo « figurent d’autres instructions
relatives à la connexion d’appareils supplémentaires (par ex. récepteur SAT, décodeur).
❒
Système MEGALOGIC GRUNDIG
Ce téléviseur est équipé du système MEGALOGIC.
Si vous raccordez un magnétoscope GRUNDIG
équipé du système MEGALOGIC à ce téléviseur, par
le biais du câble péritélévision Megalogic-EURO/AV
fourni, les chaînes de télévision terrestres (ainsi
que toutes les données spécifiques aux positions
de programme) sont automatiquement transmises
au magnétoscope au cours de chaque «Recherche
nouveaux prog. TV».
Une recherche ATS sur le magnétoscope devient
ainsi superflue.
6
❒
Branchement d’un ordinateur (VGA)
Le téléviseur est équipé d’une interface VGA compatible et il peut être utilisé comme moniteur PC.
Le téléviseur peut se régler en mode VGA sur les
signaux d’entrée suivants :
640 x 480 pixels, 60 Hz/31,5 kHz
640 x 400 pixels, 70 Hz/31,5 kHz
640 x 350 pixels, 70 Hz/31,5 kHz
Raccordement
Raccorder la source VGA (par ex. PC, console de
jeu) à la douille Canon du module VGA grâce à un
câble du commerce courant VGA. Si un ordinateur
portable est raccordé, son affichage doit être désactivé.
Raccorder la sortie du son (si disponible) aux douilles Cinch du module VGA à l’aide d’un câble Cinch
du commerce courant.
AV1
AV2
VGA
AV3
SURROUND
CENTER
L
R
8Ω
AUDIO-OUT
L
R
AUDIO
IN
L
R
Subwoofer
❒
Exemple de raccordement (téléviseur, récepteur SAT et magnétoscope)
220-240 V
~
50-60 Hz
EURO AV VCREURO AV DECODEREURO AV TV
AUDIO OUT
R
L
INPUT-SAT
950-2150 MHz
14/18 V 450 mA
x
R
L
AUDIO
R
L
I
N
O
U
T
2 EXTERNAL / DEC. - AV 2
1 EXTERNAL / EURO - AV 1
AV1
AV2
VGA
AV3
SURROUND
CENTER
L
R
8Ω
AUDIO-OUT
L
R
AUDIO
IN
L
R
Subwoofer

l
14
Easy Dialog System
❒
Mettre l’appareil en service/hors service
Appuyer sur la touche
¢
IO
sur l’appareil.
w
!
Si la DEL est ensuite allumée dans la touche de
réseau, l’appareil est alors prêt à fonctionner.
Mettez ensuite l’appareil en service à l’aide de la télécommande en appuyant sur l’une des touches 1, P.
❒
Affecter les positions de programmes
Cet appareil est muni d’un système de recherche
automatique d’émetteurs ATS euro plus qui effectue
l’affectation des positions de programmes pour vous.
Après la mise en service de l’appareil, confirmez la
langue de dialogue «Français» par la touche
O
.
Si la page «Sélectionner la langue de dialogue» n'apparaît pas, appuyez
sur la touche
.
et puis sur la toucheO.
Le «Dialogcenter» s'affiche.
Utilisez la touche
] ou | pour sélectionner la ligne «Programmation
automatique».
Appuyez sur la touche
O
.
Utilisez la touche ] ou | pour sélectionner la ligne «Nouvelle programmation» puis appuyez sur la touche
O
.
Confirmez votre pays par la touche
O
.
Une fois l’affectation automatique des positions de
programmes terminée, des informations sur le système «Easy Dialog» apparaissent à l’écran.
❒
Le système Easy Dialog
Votre téléviseur est équipé du nouveau système
d'aide «Easy Dialog System».
Avec ce système, toutes les informations sur
l'opération du téléviseur ne se trouvent plus dans
un mode d'emploi imprimé mais dans des boîtes de
dialogue pouvant être affichées sur l'écran.
❒
Le Dialogcenter
Le Dialogcenter constitue la centre de commande
de votre téléviseur. Il est appelé par la touche
.
et
puis sur la touche O.Dans le menu affiché, vous
pouvez effectuer de nombreux réglages, appeler des
informations et une aide précise sur la manipulation
de l’appareil (p.ex. une explication de la télécommande, un index, des astuces et trucs).
Expérimentez avec le Dialogcenter. Vous ne pouvez
pas causer du dommage.
❒
Les commandes de base
Les symboles de dialogue vous indiquent à chaque
étape les touches à utiliser pour les différentes
fonctions.
]
|
Vers page 1
xc
O
Appeler
¢
?
Aide
¢
TXT
TV
2
1
]/ | Déplacer la barre jaune vers le haut/vers
le bas.
Sur des menus à deux pages, choix de la deuxième page.
xc
Régler des valeurs.
O
Confirmer la fonction sélectionnée.
¢
TXT
Retourner à l’image télévisée.
¢
?
Aide contextuelle.
❒
Dolby Surround Pro Logic*
Pour obtenir la meilleure impression sonore lors de
la réception d’émissions en Dolby Surround Stéréo,
il est nécessaire d’utiliser des enceintes acoustiques supplémentaires (voir Fig. A à la
dernière page).
Pour cela, nous vous recommandons les
solutions principales suivantes:
Raccord de boîtiers frontaux
Comme enceintes avant, vous pouvez utiliser les
enceintes existantes de votre chaîne HiFi. Raccordez ces enceintes aux prises AUDIO OUT (voir
Fig. B).
ou
Des enceintes avant supplémentaires sont à raccorder aux prises L et R, et l’enceinte centrale à la prise
«Center» (voir Fig. C).
w
!
Les haut-parleurs doivent avoir une impédance
nominale de 4-8 Ohms.
Raccord de boîtiers périphériques
Les enceintes Surround sont à raccorder à la prise
«Surrround„ (voir Fig. D).
w
!
Lorsque plusieurs enceintes sont raccordées au
canal Surround, il faut veiller à ce que que
l’impédance nominale reste en dessus de 4 Ohms.
* Fabriqué sous licence de Dolby Laboratories
Licencing Corporation.
DOLBY et le symbole double-D
g sont des mar-
ques déposées de Dolby Laboratories Licencing
Corporation.
1
1
P
OK
P
TXT
l
15
Les touches de la télécommande
Sur cette page, les touches de la télécommande
sont brièvement expliquées.
Toutes les fonctions sont expliquées en détail sous
la rubrique «Télécommande» dans le Dialogcenter.
Essayez-les!
1…9
Choix des positions de
AV
0
programme et mise en
service à partir de la veille,
ou
– choix de la position AV,
– entrée de numéros de page en
mode télétexte
P Mise en service à partir de la
veille. Choix des positions de
programme pas à pas
(1, 2, 3 ...)
p Choix des positions de pro-
gramme pas à pas (... 3, 2, 1)
ou
pP déplacement du curseur vers le
haut et vers le bas
xc
Volume
ou
xc
déplacement du curseur vers la
gauche et vers la droite.
Lorsque vous maintenez enfoncée la
touche P ou p , les noms d'émetteurs
sont affichés en défilant. Si vous relâchez
la touche pressée, l'appareil commute sur
la position de programme sélectionnée.
G Modifier et activer certaines
fonctions.
h
Heure marche/arrêt.
k
Réglages d'image.
Accès au menu «Réglages
d'image».
j
Arrêt sur image.
¢
AUX plus
j
= Program scan.
- E + Contraste couleur
SAT Télécommander un récepteur
satellite Grundig externe (pour ce
faire, maintenir la touche SAT
enfoncée)
b
Appuyer une fois: commuter en
veille.
Appuyer deux fois
: mettre
l'appareil définitivement hors service (à condition que l'interrupteur
secteur écologique soit activé.)
h Accès au DIALOG CENTER.
¢
+ Son marche/arrêt
¢
TXT
Télétexte Ç TV.
¢
D
Appel du guide abrégé.
g
Réglages de son.
Accès au menu «Réglages de
son».
- R +
Luminosité
E
Commutation de format d'image
AUX
Présélection de certaines
fonctions, p.ex.
¢
AUX plus
j
= Program scan
C
Information sur l'émission en
cours
PIP Appuyer une fois sur PIP pour
Double fenêtre. Appuqer deux
fois sur PIP pour afficher image
dans image.
VIDEOTélécommander un magnétos-
cope (maintenir enfoncée la touche VIDEO).
SAT PIP
VIDEO
0
P
OK
TP 800
P
TXT
321
654
987
AUX
l
16
Caractéristiques techniques
❒
Equipement supplémentaire
Cet appareil a été configuré pour la réception satellite.
Veuillez contacter votre revendeur à ce sujet.
❒
Répartition des broches de la prise
péritélévision
Si vous voulez raccorder à votre téléviseur des
appareils supplémentaires (ordinateur, amplificateur par ex.), votre revendeur spécialisé peut effectuer une connexion conforme aux normes au
moyen du tableau de raccordement suivant :
Broche Signal
11 = sortie audio droite
12 = entrée audio droite
13 = sortie audio gauche
14 = masse audio
15 = masse, bleu
16 = entrée audio gauche
17 = entrée, bleu, RVB
18 = tension de commutation
19 = masse, vert
10 =
ligne de donées (MEGALOGIC)
11 = entrée, RVB, vert
12 = –
13 = masse, rouge
14 = masse
15 = entrée, rouge, RVB
(S-Video = Chroma)
16 = tension de commutation RVB
17 = masse vidéo
18 = masse, tension de commuta-
tion, RVB
19 = sortie vidéo
20 = entrée vidéo
(S-Video = Luminanz)
21 = masse/blindage
Sans haut-parleurs externes
Canal 3 stéréo, puissance musicale efficace 80 W
80 W = 40 W haut-parleur de basses, 2 x 20 hautparleurs avant (40 W sinus = 20 W + 2 x 10 W)
❒
Gammes de réception:
Canaux C01 … C99
Canaux spéciaux S01 … S41
❒
Norme:
PAL B/G; SECAM L; PAL-I/NIC-GB; SECAM D/K;
NTSC M; NIC (E,B,DK); NIC (S,N,SF)
❒
Remarques pour le spécialiste:
L’appareil doit être exclusivement utilisé à l’aide du
lot de câbles de réseau ci-joint. Cette consigne permet d’éviter les défaillances émanant du réseau et
fait partie intégrante du certificat d’homologation de
l’appareil .
A des fins de remplacement, veuillez ne commander que le lot de câbles de réseau portant la désignation » GWN 9.22/numéro de référence 8290.991316 « auprès d’un point de service après-vente.
Le produit est conforme aux exigences
des directives européennes suivantes :
La directive 73/23/CEE relative aux appareils électriques devant être utilisés dans des limites de tension déterminées.
La directive 89/336/CEE relative à la compatibilité
électromagnétique.
L’appareil est conforme aux normes :
NE 60065, NE 55013, NE 55020
Sous réserve d’erreurs et de modifications!
S.E. ou O.
❒
Tension secteur:
220-240V, 50/60Hz
(plage de réglage du bloc secteur 190 … 264V)
❒
Etage de sortie audio:
Mode Dolb
y
Canal 5 stéréo, puissance musicale efficace 120 W
Puissance Puissance sinus Impédance nominale
musicale efficace
Avant 2 x 20 W 2 x 10 W 4-8 Ω
Centre 20 W 10 W 4-8 Ω
Surround 20 W 10 W 4-8 Ω
Haut-parleur de basses
(dans l'appareil) 40 W 20 W
❒
Consommation en puissance:
En ville 6 W
En fonctionnement 185 W
220
21
119
Sicurezza, installazione
17
w
!
Il televisore può essere aperto e controllato per
eventuali interventi di manutenzione esclusivamente da personale specializzato.
w
!
Evitare che l’apparecchio venga danneggiato dai
fulmini, scollegando il cavo di alimentazione ed il
cavo dell’antenna.
– Anche se il televisore è spento, i fulmini potrebbe-
ro danneggiare l’apparecchio passando attraverso
la linea elettrica e/o l’antenna.
w
!
Questo apparecchio è stato concepito per la
ricezione e la riproduzione di segnali audio e video.
Qualsiasi altro impiego è espressamente vietato.
❒
Gentilissimi clienti!
Affinché questo televisore estremamente valido e
comodo possa garantirVi per lungo tempo divertimento ed intrattenimento, è molto importante che
osserviate le istruzioni di installazione riportate qui
di seguito.
w
!
La distanza ideale da rispettare fra il punto di osservazione ed il televisore corrisponde al quintuplo
della diagonale dello schermo.
Evitare che lo schermo venga colpito da luce diretta, poiché la qualità dell’immagine potrebbe esserne
compromessa.
w
!
Tenere delle distanze sufficientemente ampie tra il
televisore e le pareti del mobile nel quale il televisore viene sistemato.
w
!
Non coprire le fessure di aerazione.
w
!
All’interno del televisore può generarsi dello scambio di calore.
– Gli accumuli di calore costituiscono una fonte di
pericolo ed influiscono negativamente sulla
durata dell’apparecchio. Per sicurezza, incaricate
periodicamente un esperto a rimuovere i depositi
che si sono formati.
w
!
Non danneggiare il cavo di alimentazione.
w
!
Evitare la presenza di campi magnetici in prossimità
dell’apparecchio (per esempio le casse).
w
!
Non appoggiare vasi di fiori sull’apparecchio.
w
!
Fare attenzione che non entrino sostanze liquide o altri
oggetti nell’apparecchio (pericolo di corto-circuiti).
w
!
Per pulire lo schermo utilizzare un panno morbido
inumidito. Servirsi esclusivamente di acqua pura.
6
5 x
10
cm
20
cm
20 cm
10
cm
Krieg am Golf
! SERVICE !
Collegamento
18
Questo televisore ad alta tecnologia digitale offre
una qualità video e audio ottimale.
w
!
Le premesse essenziali per un funzionamento ottimale sono le seguenti:
Impianto antenna perfettamente funzionante e cavi
di collegamento dell’antenna ad alta schermatura
(85 dB), per il collegamento fra televisore e presa
dell’antenna o fra televisore e videoregistratore.
w
!
Evitare che i cavi facciano delle curve in prossimità
dell’apparecchio
w
!
Nella sezione di menu del Dialogcenter » collegamenti audio/video « si trovano ulteriori indicazioni
utili per il collegamento dei diversi apparecchi ausiliari (ad es. ricevitori SAT, decodificatori).
❒
Sistema GRUNDIG MEGALOGIC
Questo televisore è dotato di sistema MEGALOGIC.
Se si collega un videoregistratore GRUNDIG con
sistema MEGALOGIC a questo televisore, mediante
il cavo Megalogic-EURO/AV (Scart) fornito in dotazione, ogni volta che viene eseguita la funzione di
«Riprogrammazione dei programmi TV», i programmi televisivi terrestri (e tutti i dati relativi alle
rispettive posizioni di programma) vengono automaticamente trasferiti al videoregistratore (VCR).
La funzione di «Impostazione dei programmi televisivi sul videoregistratore» non è più necessaria.
6
❒
Collegamento al PC (VGA)
Il televisore è provvisto di un’interfaccia compatibile con il sistema VGA e può essere utilizzato come
monitor per il computer.
Nel funzionamento VGA il televisore può sintonizzarsi sui seguenti segnali d’ingresso:
640 x 480 Pixel, 60 Hz/31,5 kHz
640 x 400 Pixel, 70 Hz/31,5 kHz
640 x 350 Pixel, 70 Hz/31,5 kHz
Collegamento
Collegare la fonte VGA (ad es. PC, la consolle dei
giochi) alla presa Canon del modulo VGA con uno
dei cavi VGA in commercio. Quando si collega un
laptop, il display del laptop deve essere spento.
Collegare l’uscita audio (se presente) alle prese
Cinch del modulo VGA mediante un cavo Cinch
reperibile in commercio.
AV1
AV2
VGA
AV3
SURROUND
CENTER
L
R
8Ω
AUDIO-OUT
L
R
AUDIO
IN
L
R
Subwoofer
❒
Esempio di collegamento (Televisore, ricevitori SAT e Videoregistratore)
220-240 V
~
50-60 Hz
EURO AV VCREURO AV DECODEREURO AV TV
AUDIO OUT
R
L
INPUT-SAT
950-2150 MHz
14/18 V 450 mA
x
R
L
AUDIO
R
L
I
N
O
U
T
2 EXTERNAL / DEC. - AV 2
1 EXTERNAL / EURO - AV 1
AV1
AV2
VGA
AV3
SURROUND
CENTER
L
R
8Ω
AUDIO-OUT
L
R
AUDIO
IN
L
R
Subwoofer
 Loading...