

Page 1
PLANATRON-TV
PLANATRON 110/1 F
Page 2
ķ
2
Installation
Picture screen
Receiver
loudspeaker,
right
loudspeaker,
left
Subwoofer
Surround loudspeakers
Fixing
Connecting
Surround loudspeakers
1
2
1 1
CABLE
6
5 5
3
A7
A1
EXTERNAL
16 1
DISPLAY POWER
CONNECTION
SUBWOOFER
CONNECTION
8 Ω
INTERNAL
SPEAKERS
SPEAKERS
6 Ω
8 Ω
R
R
EXTERNAL
REAR
FRONT
SPEAKERS
SPEAKERS
L
L
AUDIO
AUDIO
L
L
R R
VGA
VGA
AUDIO AUDIO
IN
OUT
L
AUDIO
OUT
R
EXTERNAL 1
IN/OUT
CABLE
EXTERNAL 2
DISPLAY VIDEO
CONNECTION
EXTERNAL 3
IN/OUT
IN
2
MAINS
INLET
220-240V
~
4
7
Page 3
Change your views about your television set.
Becuase by buying a Grundig Planatron you have
fulfilled an exclusive dream:
A TV set with new dimensions – excitingly large,
extremely flat and easy to hang on the wall.
This Planatron was manufactured under constant
quality control and guaranties the most modern
technology and operating convenience.
Completely in keeping with our company philosophy:
Grundig – made for you.
Please read the Operating Instructions completely and follow the directions.
r
Important note
Ń
!
All connecting cables must be connected before
connecting to the mains electricity supply.
r
Preparing the picture screen
Fixin
g the loudspeakers
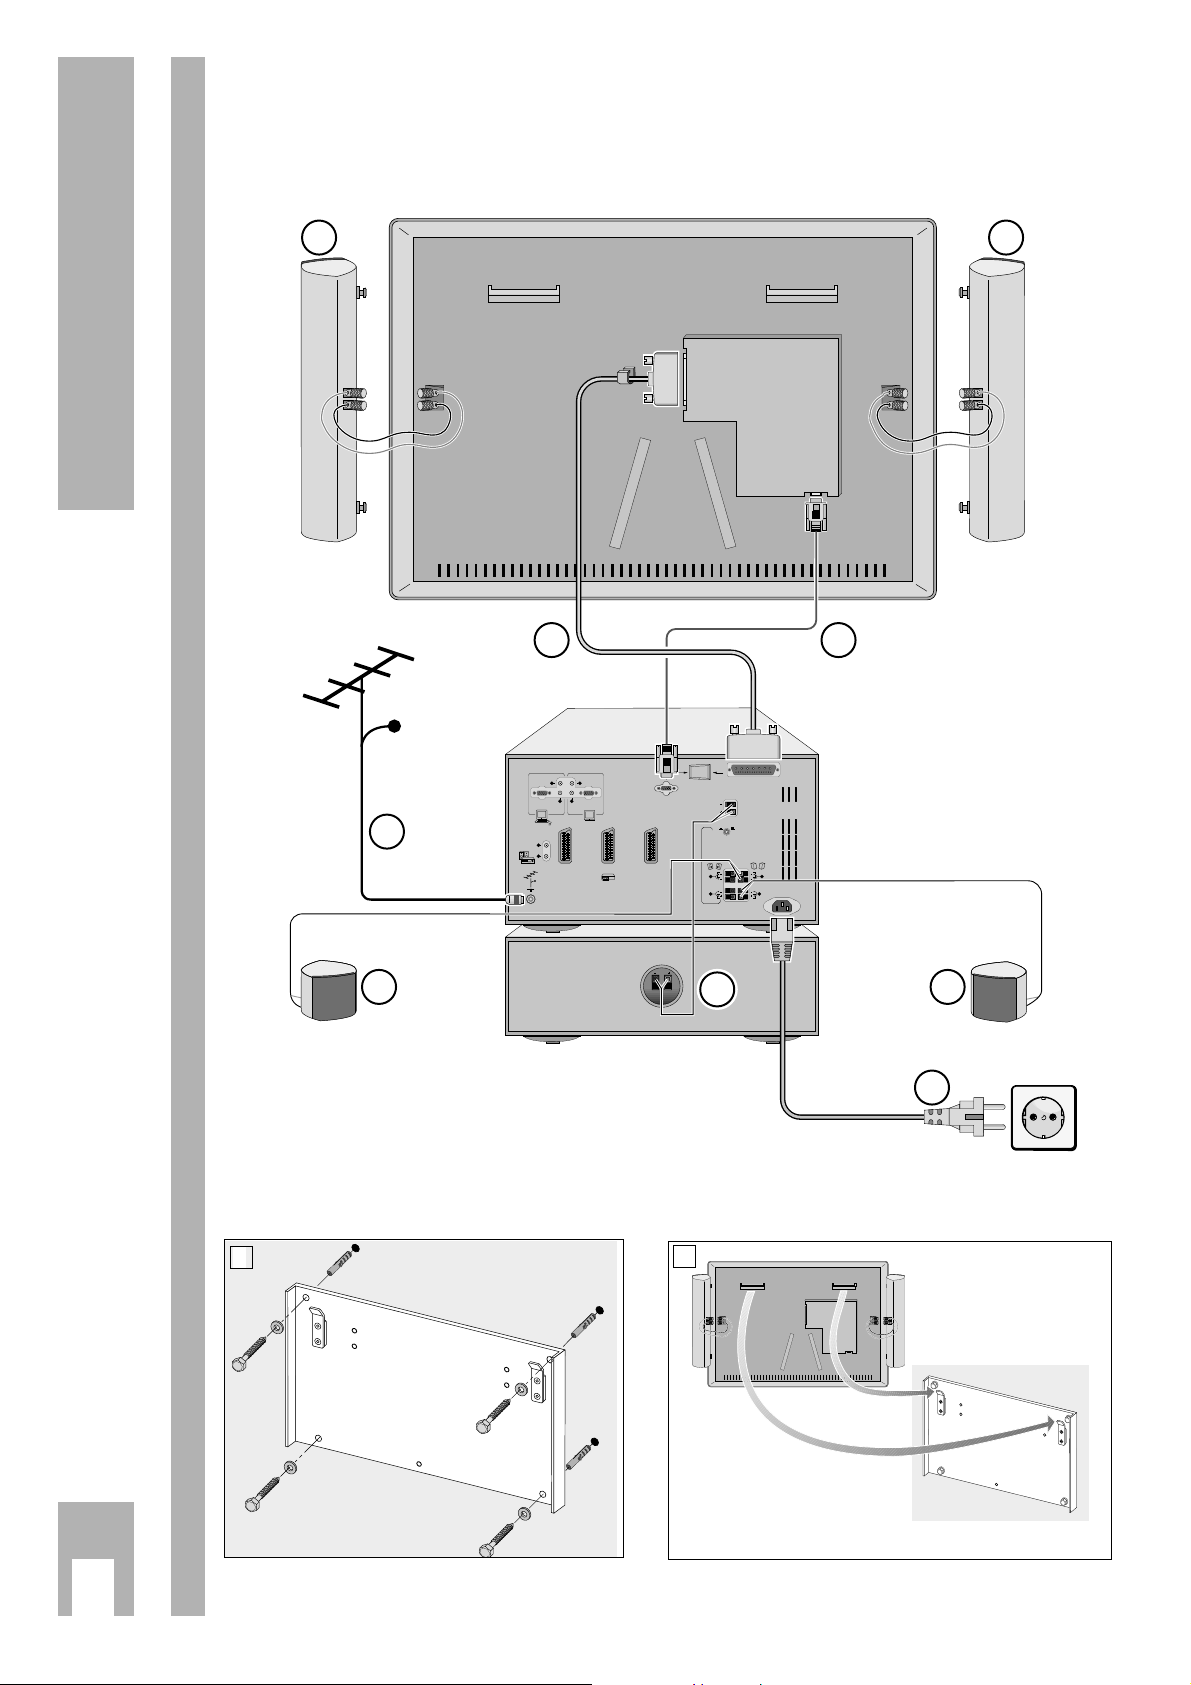
1
to the
picture
screen
Hook the left/right loudspeakers supplied into
the holes on the left and right sides of the picture
screen.
Connect the screw terminals of the loudspeakers
and of the picture screen with the loudspeaker
cables (black with black and red with red).
Connecting the cables 2 and 3 with the
picture screen
Connect the power supply cable 3and the VGA
cable 2to the picture screen (see Figure). For this,
insert the cable plugs into the corresponding
sockets and fix them manually with the screws
provided on the plugs.
Fixing the picture screen to the wall
Fix the mounting plate supplied to the wall. For this,
use the set of screws supplied.
If you have any questions, please ask your specialized dealer.
Hook the picture screen with the loudspeakers
connected into the mounting plate.
It is also possible to fix the picture screen to a rack
(optional accessory).
Ǻ
1
1
2
1
r
Connecting to the receiver
Pictur
e screen
Connect the power supply cable 3with the
“DISPLAY POWER” socket and the VGA cable
2
with the “DISPLAY VIDEO” socket on the receiver
(see Figure).
For this, insert the cable plugs into the corresponding sockets and fix them manually with the screws
provided on the plugs.
Louds
peakers
To connect the loudspeaker cables, press down the
clamp lever. Insert the “-” lead of the cable into the
black (–) terminal.
Insert the “+” lead (marked or coloured lead) of the
cable into the coloured (red or grey) terminal.
Connect the surround speakers supplied
5
to the
“REAR SPEAKERS” clamping terminals.
For technical reasons it is necessary to always
connect both surround loudspeakers.
Connect the Subwoofer supplied
4
to the “SUB-
WOOFER” clamping terminals.
If you wish to connect left/right loudspeakers in
addition to the loudspeakers supplied, insert the
connecting cables of these loudspeakers into the
“EXTERNAL FRONT SPEAKERs” terminals.
For adjusting the different loudspeaker configurations, see the chapter “Dolby Surround Pro Logic”
on the pages 15 – 19.
Ǻ
3
2
Ǻ
1
1
Installation
ķ
3
Page 4

Operation with the loudspeakers supplied and
additional left/right loudspeakers . . . . . . . . . . . 17
Operation with the loudspeakers supplied and an
additional amplifier with external left/right
loudspeakers . . . . . . . . . . . . . . . . . . . . . . . . . . 18
Adjusting the volume of the loudspeakers . . . . 19
r
Special Functions 20-21
Sleep Timer (automatic switch-off) . . . . . . . . . 20
Parental lock . . . . . . . . . . . . . . . . . . . . . . . . . . . 20
Customizing settings . . . . . . . . . . . . . . . . . . . . 20
Memo Box . . . . . . . . . . . . . . . . . . . . . . . . . . . . . 20
Timer . . . . . . . . . . . . . . . . . . . . . . . . . . . . . . . . . 21
r
Convenient Functions 22-23
Information display . . . . . . . . . . . . . . . . . . . . . 22
Double Window . . . . . . . . . . . . . . . . . . . . . . . . 22
Mosaic picture . . . . . . . . . . . . . . . . . . . . . . . . . . 23
Permanent subtitles . . . . . . . . . . . . . . . . . . . . . 23
r
Teletext Mode 24-26
The remote control unit in Teletext mode . . . . . 24
Normal Teletext mode . . . . . . . . . . . . . . . . . . . 25
TOP-Text or FLOF-Text mode . . . . . . . . . . . . . . 25
Enlarging a Teletext page . . . . . . . . . . . . . . . . . 26
Multi-pages . . . . . . . . . . . . . . . . . . . . . . . . . . . 26
Updating a Teletext page . . . . . . . . . . . . . . . . . 26
Mixed mode . . . . . . . . . . . . . . . . . . . . . . . . . . . 26
Answer reveal . . . . . . . . . . . . . . . . . . . . . . . . . . 26
r
Connections 27-31
Connecting a video recorder or satellite receiver
to the EXTERNAL1 or EXTERNAL 3 socket . . . . 27
Connecting a video recorder or satellite receiver
to the EXTERNAL 2 socket . . . . . . . . . . . . . . . . 27
Connecting a decoder (descrambler) . . . . . . . . 28
Connecting a camcorder . . . . . . . . . . . . . . . . . . 29
Connecting a DVD, CD-i or photo player . . . . . 29
Copying video recordings . . . . . . . . . . . . . . . . . 30
Connecting a computer . . . . . . . . . . . . . . . . . . 30
Connecting an external amplifier . . . . . . . . . . . 31
Connecting an external Dolby Surround
amplifier . . . . . . . . . . . . . . . . . . . . . . . . . . . . . . 31
r
Technical Data 32
Contents
ķ
4
If the dealer has already installed the TV set and
made adjustments, then begin on page 10 of this
instruction manual.
r
Fixing and connections
2-3
r
Safety and installation
5
Safety precautions . . . . . . . . . . . . . . . . . . . . . . . 5
r
Preparations and assigning
programmme positions 6-7
Inserting the battery in the remote control . . . . 6
Switching the set on and off . . . . . . . . . . . . . . . . 6
Assigning programme positions automatically
. 6-7
r
Changing the Programme Position
Assignment 8-9
Changing or entering a new station name . . . . . 8
Moving a programme position . . . . . . . . . . . . . . 8
Favourite programmes . . . . . . . . . . . . . . . . . . . .8
Activating a decoder (descrambler) . . . . . . . . . . 9
Assigning programme positions manually . . . . .9
r
The Remote Control Unit in TV Mode 10
The buttons on the remote control unit . . . . . . .10
Remote control of a video recorder . . . . . . . . . .10
Controls on the receiver . . . . . . . . . . . . . . . . . .10
r
Sound Settings 11-12
Customizing the sound settings . . . . . . . . . . . . 11
Volume, balance, equalizer, loudness . . . . . . . .11
Voice . . . . . . . . . . . . . . . . . . . . . . . . . . . . . . . . .11
Sound (mono, stereo/two-channel sound) . . . . 12
Stereo width . . . . . . . . . . . . . . . . . . . . . . . . . . . 12
Headphone . . . . . . . . . . . . . . . . . . . . . . . . . . . . 12
r
Picture Settings 13-14
Customizing the picture settings . . . . . . . . . . . 13
Adjusting the contrast, picture sharpness, white
balance, digital reference and dynamic contrast 13
Adjusting the brightness and colour contrast . . 13
Noise reduction . . . . . . . . . . . . . . . . . . . . . . . . 13
Picture format switching . . . . . . . . . . . . . . . . . . 14
r
Dolby Surround ProLogic 15-19
What is Dolby Surround ProLogic . . . . . . . . . . 15
Necessary loudspeaker equipment . . . . . . . . . . 15
Dolby ProLogic basic setting . . . . . . . . . . . . . . 16
Operation with the loudspeakers supplied . . . . 16
Page 5
ķ
5
Ń
!
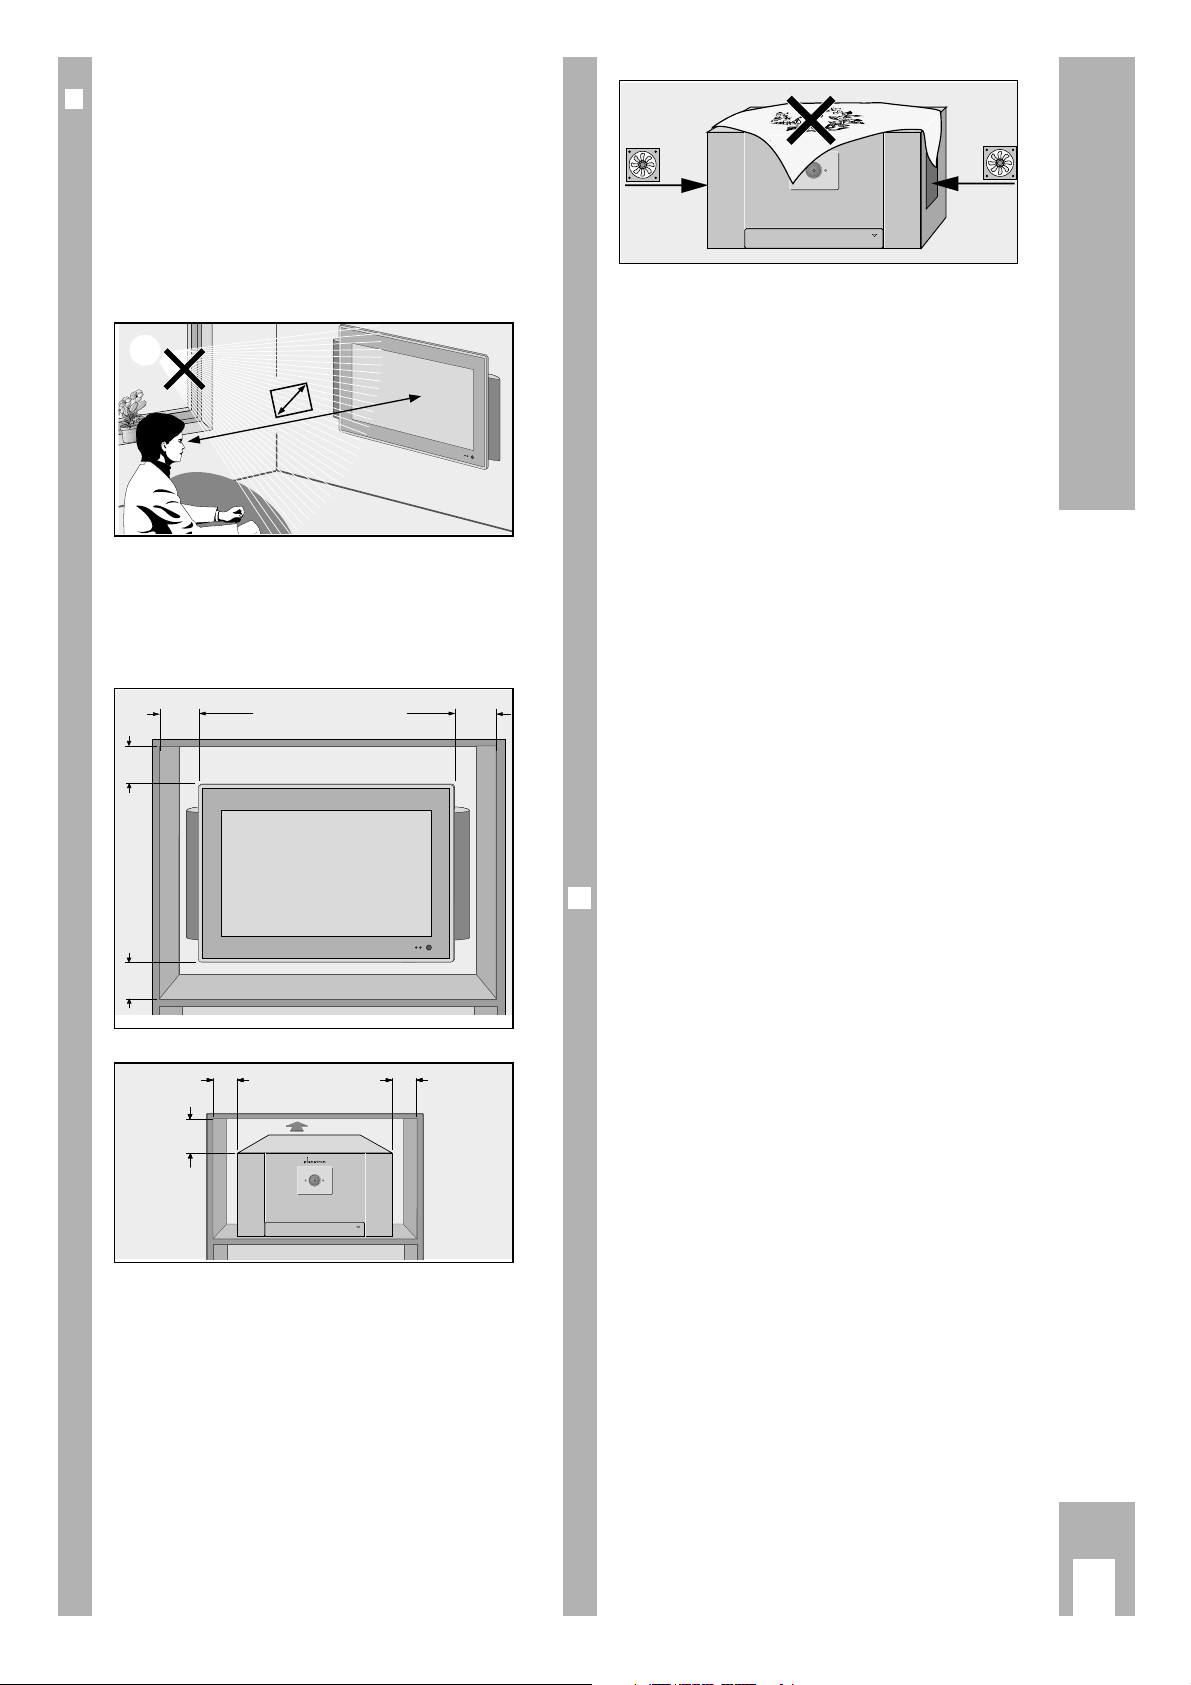
Do not place any covers on the ventilation slits.
Heat could build up inside the set.
– Heat building up inside the set causes danger and
has a negative influence on the life expectancy
of the set. From time to time, have a specialist
remove the particles which have collected inside
the set.
Ń
!
Do not damage the mains supply cable.
Ń
!
Use only original GRUNDIG connecting cables,
accessories and replacement parts.
Ń
!
Clean the TV screen with a moist, soft towel while it
is switched off. Use only clear water.
Ń
!
Avoid damage by lightning by removing the mains
and aerial cables.
– Even if the set is switched off, damage can occur
due to lightning striking the mains supply and/or
the aerial cable.
Ń
!
Opening and maintenance of the set may be carried
out only by authorized service personnel.
Ń
!
For connecting the reciever with the picture screen,
yous only the cables supplied.
This highly digitized TV set provides optimum
picture and sound quality.
Condition for this is a perfectly operating aerial
system and a high-quality aerial cable.
For this reason only use the aerial cable supplied or
an aerial cable of equivalent quality.
For the same reason, avoid cable loops near the TV
set.
Ǻ
Safety and Installation
r
Der Customer
In order that you may enjoy the entertainment of
this high-quality comfortable TV set for a long time
it is very important that you observe the following
points when installing the set.
Ń
!
This TV set is designed to receive and reproduce
picture and sound signals.
Any other use is expressly prohibited.
Ń
!
The ideal position for viewing is 5 times the diagonal width of the screen.
External lights in the direction of the screen have a
negative influence on picture quality.
Ń
!
Ensure sufficient space for the receiver and the
picture screen inside cabinets in a corresponding
location.
Ń
!
Do not place vases or flowerpots on top of the
receiver.
Ń
!
Make sure that no liquids or external objects penetrate the appliance (danger of shortcircuits).
5 x
>10 cm >10 cm
ǵ
ǵ
PUSH OPEN
cm
>10
ǵ
cm
>10
>10
cm
20 cm
cm
>10
>10 cm
ǵ
ǵ
>10
cm
PUSH OPEN
PUSH OPEN
Page 6

r
Inserting the battery into the remote
control unit
Ń
!
Observe the correct polarity in the battery case.
r
Switching on
Press the mains button ü on the receiver. The
green and red pilot lamps on the picture screen and
the green pilot lamp on the receiver light up.
If only the red pilot lamp lights up, the set is already
in stand-by.
Use the numeric buttons
1– 0
or the pP
buttons on the remote control unit to switch the
receiver on.
r
Switching the set to stand-by
Press the mains button A on the remote control
unit. The red pilot lamps on the receiver and on the
picture screen ligth up. The set is not definitely
switched off.
It can be switched on again with the remote control
unit.
rr
Switching definitely off
Press the ü button on the receiver.
1
1
Ǻ
1
r
Assigning programme positions
automatically
Selecting the dialogue language
A selection can be made from several languages for
the dialogue between you and the TV.
The user guide displays appear in the selected
language.
Press the
.
button.
The “MAIN MENU” appears.
Use the p button to select the “INSTALLATION”
menu line then confirm with the G button.
Use the p or P button to select the “MENU LANGUAGE” menu line then confirm with the G button.
Confirm the dialogue language with the G button
or use the p, P,F, E buttons to select another
language then confirm with G.
4
3
2
1
Ǻ
Preparations and Assigning Programme Positions
ķ
6
MAIN
MENUE
SOUND
FEATURES
PROGRAMMES
INSTALLATION
PICTURE
MENU
LANGUAGE
English Italiano Svenska
Deutsch Español Norsk
Français Portugués Suomi
Nederlands Dansk
INSTALLATION
Menu Language
Country
Automatic Installation
Manual Installation
Give Name
Reshuffle
Favourite Programmes
Decoder/Descrambler
Setup
Page 7
Selecting the country
Use the p or P button to select the “COUNTRY”
menu line then confirm with G.
Confirm the country with the G button,
or
use the p, P,F, E buttons to select another
country then confirm with G.
If the desired country is not listed, select “Other”
then confirm with G.
Assi
gning programme positions
Use the p or P button to select the “Automatic
Installation” menu line then confirm with G.
Use the F or E button to select “Automatic Installation on”.
The automatic programme search is started.
At the bottom picture border appears
“Search 0%
nnnnnnnnnnnnnn
100%”.
The length of the bar is an indicator for the searching progress.
Depending on the number of stations which can be
received, this procedure can take up to several
minutes.
Ǻ
2
1
2
1
If your TV receiver is connected to a cable TV
system providing ACI (Automatic Channel Indication), the TV set takes the channel numbers from
the information table offered by the cable provider
and stores them in memory. A table containing a
channel overview appears automatically on the picture screen.
To finish the settings repeatedly press the h
button until all menus are removed from the
picture screen.
r
Now you can watch television!
Adjust the volume, the brightness and the colour
contrast to suit your taste.
Adjust the volume with the F or E button.
Adjust the brightness with the
®
button.
Press on the “ – “ (minus) or “ + “ (plus) side of the
button until the desired setting is reached.
Adjust the colour contrast with the
™
button.
Press on the “ – “ (minus) or “ + “ (plus) side of the
button until the desired setting is reached.
This high-value TV receiver is provided with many
convenient functions.
For example, you can change the programme position assignment as follows:
Enter a station name
Change/sort programmes
Select your favourite programme
Ǻ
3
2
1
Ǻ
3
Ǻ
Preparations and Assigning Programme Positions
ķ
7
COUNTRY
UK Finland
Germany Spain
France Portugal
Italy Greece
Belgium Austria
Netherlands Switzerland
Sweden Luxemburg
Norway Ireland
Denmark Other
INSTALLATION
Menu Language
Country
Automatic Installation
Manual Installation
Give Name
Reshuffle
Favourite Programmes
Decoder/Descrambler
Setup
Page 8

r
Changing the programme position
assignment
Press the .button. The “MAIN MENU” appears.
Use the p or P button to select the “INSTALLATION” menu line then confirm with G.
Select the desired function in the “INSTALLATION”
menu using the p or P button.
Changing a station name or entering a
new one
You can change the station name (abbreviation) or
enter a new one.
Select the “Give name” menu line then confirm with
G.
Use the p, P, F or E button to select the desired
programme positon then confirm with G.
Use the p or P button to select the desired
letter/number.
Use the E button to move to the next position then
use the p or P button to select the desired
letter/number.
Repeat the steps to until the the desired
station name is completed then confirm with G.
Repeat the steps - for all programme positions on which you wish to change a station name or
enter a new one.
Finish the setting by pressing the
.
button.
The “INSTALLATION” menu appears.
7
52
6
43
5
4
3
2
1
Ǻ
2
1
Moving a programme position
You can change the order of the programme
positions.
Select the “Reshuffle” menu line then confirm with
G.
Use the p, P, F or E button to select the
desired programme position then confirm with
G. The line is highligthed by a grey background.
If you are not sure the TV programme selected is
that one you wish to move, press the G button.
The selected TV programme appears on the picture
screen. If it is the desired one, press the G button and continue with step ,
or
use the p, P, F or E button to select the next
programme positon. Confirm with the G button
Use the p, P, F or E button to move the TV pro-
gramme to the desired position then confirm with
G.
Repeat the procedure until the programme order is
to suit your taste.
Finish the setting by pressing the
.
button.
The “INSTALLATION” menu appears.
Favourite programmes
You can enter your favourite programmes into a
separate station table. These programmes then can
quickly be selected with the p or P button. All
other TV programmes are further selected with the
numeric buttons 1– 0.
Select the “Favourite programmes” menu line then
confirm with G.
Use the buttons
1– 0
, F or E to select the
desired programme position.
Use the p or P button to select the “Favourite programmes” menu line then use the F or E button
to select “Yes” or “No”.
Repeat the steps - until you have assigned
your favourite programmes to the desired programme positions.
Finish the setting by pressing the
.
button.
The “INSTALLATION” menu appears.
5
32
4
3
2
1
5
4
3
3
Ǻ
2
1
Changing the Programme Position Assignment
ķ
8
INSTALLATION
Menu Language
Country
Automatic Installation
Manual Installation
Give Name
Reshuffle
Favourite Programmes
Decoder/Descrambler
Setup
Page 9
Activating a decoder (descrambler)
If you have connected a decoder (descrambler)
required for certain TV programmes (Pay-TV), this
must be activated for the programme position concerned.
Use the p or P button to select the
“DECODER/DESCRAMBLER” menu line then confirm with G.
Use the buttons
1– 0
, F or E to select the
desired programme position.
Use the p or P button to select the “Decoder-status” menu line then use F or E button to select
the Euro-AV socket the decoder is connected to
(e.g., Scart socket “EXT1”).
Repeat the steps to until the decoder is
assigned to all programme positions concerned.
Terminating the “Changing the programme
position assignment” procedure
Repeatedly press the h button until all menus are
removed from the picture screen.
1
32
4
3
2
1
Ǻ
r
Assigning programme positions manually
In some cases it is of advantage to assign programme positions manually (e.g., if a new TV channel is added to the cable TV system).
Press the
.
button. The “MAIN MENU” appears.
Use the p or P button to select the
“INSTALLATION” menu line then confirm with
G.
The “INSTALLATION” menu appears.
Use the p or P button to select the “Manual
Installation” menu line then confirm with G.
If “France“ is not selected as the appliance location
(country), “Selection Mode” can be chosen with the
p or P keys and from here “C-channel” for Channel, “S-channel” for special channel or “Frequency”
for frequency input can be selected by pressing the
F or E key.
Use the p or P button to select the “System”
menu line then use the F or E button to select
West Europe (=PAL), GB (=PAL I) or France
(=SECAM).
Use the p or P button to select the “Search” menu
line then confirm with G.
The automatic station search is started. It stops at
every station worthy of reception.
If you know the channel number/frequency, you can
enter this directly with the numeric buttons
1– 0
.
Use the p or P button to select the “Programme
no.” menu line. Use the numeric buttons
1– 0
to
enter the desired programme position number.
Use the p or P button to select the “Store” menu
line then confirm with G.
To finish the setting, repeatedly press the h button
until all menus are removed from the picture
screen.
8
7
6
Ǻ
5
4
Ǻ
3
2
1
Changing the Programme Position Assignment
ķ
9
DECODER/
DESCRAMBLER
Programme 25 Prem.
Decoder Status TV
MANUAL
INSTALLATION
95 0 Video 5 RTL 2
96 1 ARD 6 PRO 7
97 2 ZDF 7 WDR
98 3 BR 3 8 MTV
99 4 SAT 1 9RTL
System West Europe
Search 102 MHz
Programme No. 1
Store
Page 10
r
Remote control of a video recorder
You can also use the remote control of this television to control a Grundig video recorder.
Keep the
¢VIDEO button pressed down.
This switches the remote control to video recorder
operation.
Now press the button (red lettering) for the desired
video recorder function.
Your specialized dealer can advise you as to which
video recorders are suitable.
Ǻ
r
Buttons on the receiver
The most important functions can also be co trolled
on the receiver.
Switch TV programmes with the “- PROGRAMM +”
buttons behind the flap.
Adjust the volume, brightness, colour contrast and
contrast with the “LOCAL MENUE” button behind
the flap. Repeatedly press the button until the
desired function is shown on the picture screen.
Use the “- VOLUME +” button to make the adjustments. The on-screen display disappears after
several seconds.
2
1
Ǻ
The Buttons on the Remote Control Unit
ķ
10
r
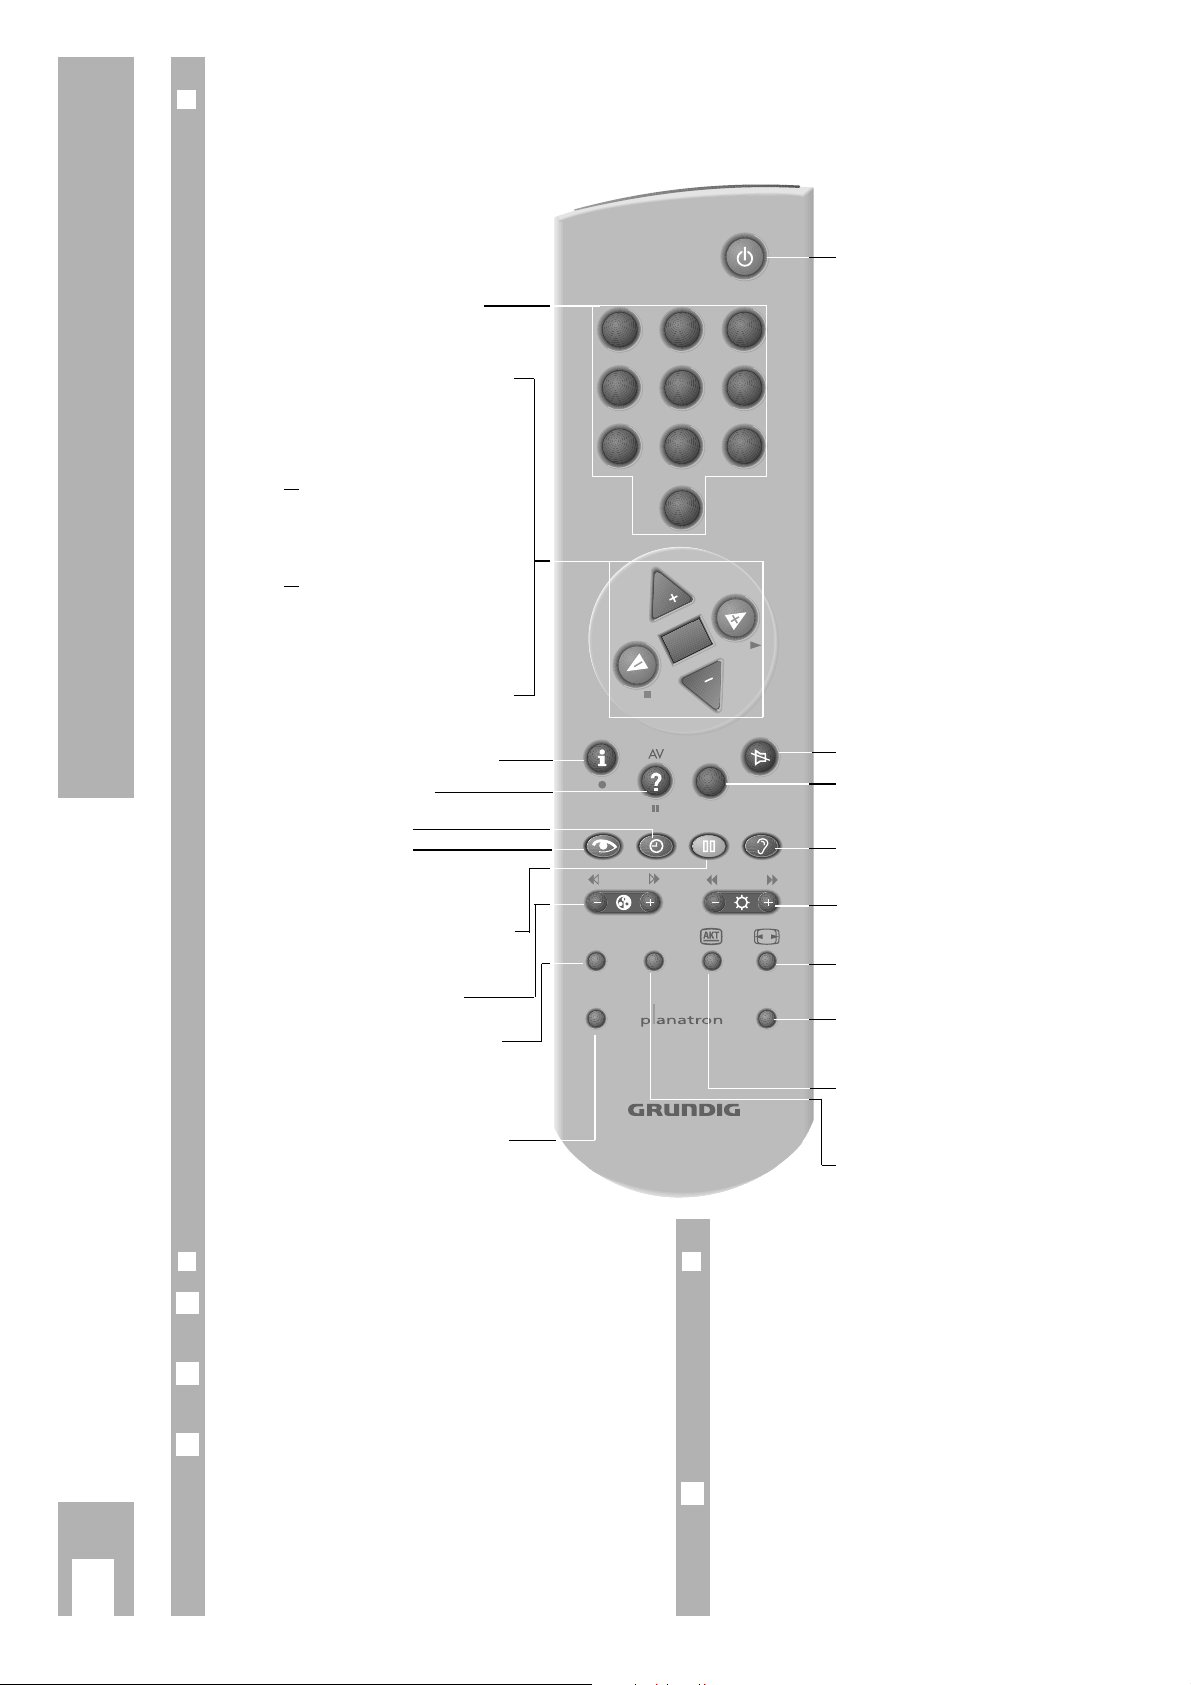
The remote contro unit in TV-mode
On this page you will find a brief description of the remote control buttons. Refer to the corresponding chapters
1…9
Select pogramme position
P Step through programme
positions (1, 2, 3 ...)
p Step through programme
positions (... 3, 2, 1)
or
p, P Move cursor up/down
xc
Volume
or
xc
Move cursor to the left/right
G Change and activate various
functions. Insert/remove information line.
h Call up “MAIN MENU”
¢
D
AV
Select AV position
h
Time on/off.
k
Adjust picture
j
Still picture in dual picture mode
™
Adjust colour contrast
SAT GRUNDIG Satellite Receiver
remote control (press and hold
down SAT button while selecting
the satellite programme).
VIDEO GRUNDIG Video Recorder
remote control (press and hold
down the VIDEO button).
b
Switch to stand-by
¢
ĭ
Sound on/off (mute)
¢
TXT
Teletext mode ɫ TV mode
g
Adjust sound
®
Adjust brigthness
E
Switch picture format
AUX
Preselect button for various functions, e.g.,
¢
AUX and
C
for
mosaic picture screen.
C
Permanent subtitles display
PIP Double Window on/off
1 2
4 5 6
7
8 9
0
P
OK
P
TXT
3
SAT PIP
VIDEO AUX
TP 800 PT
Page 11

Adjusting the sound
With the blue g button you can select one after
the other five fixed and one changeable sound settings.
“Personal” (changeable),
“In concert”,
“Classic”,
“Jazz”,
“Pop”,
“Stadium”
Select the setting appropriate for the current TV
programme.
You can make this selection also in the “Sound
style” menu line in the “SOUND”.
r
Customizing the sound settings (basic
setting)
Ń
!
These settings must be stored in memory (see right
column “Storing settings in memory”).
Press the h button. The “MAIN MENU” appears.
Use the p or P button to select the “SOUND”
menu line then confirm with G.
The “SOUND” appears.
Use the p or P button to select the desired function in the “SOUND” menu.
Volume, balance
Select the “Volume” or “Balance” menu line then
adjust with the F or E button.
1
Ǻ
2
1
Ǻ
Equalizer
Select the “Graphic Equalizer” menu line then confirm with the G button.
Use the F or E button to select the sound frequency you wish to change. Adjust the selected
sound frequency with the p or P button.
Press the
.
button. The “SOUND”-menu appears.
Loudness
This function is provided for improving the dynamic
tange by boosting the treble and bass tones at low
volume.
Select the “Loudness” menu line then use the F or
E button to switch the Loudness function on or
off.
Speech
This function is provided to improve the voice
reproduction (e.g., for talk programmes).
Select the “speech” menu line then use the F or
E button tow switch the Voice function on or off.
r
Storing settings in memory
Press the h button. The “MAIN MENU” appears.
Use the p or P button to select the “FEATURES”
menu line then confirm with G. The “FEATURES”
menu appears.
Use the p or P button to select the “General PP
store” menu line then confirm with G.
“Gespeichert” appears on the picture screen.
Finish the setting. For this repeatedly press the h
button until all menus are removed from the picture
screen.
4
3
2
1
1
Ǻ
1
Ǻ
3
2
1
Adjusting the Sound
ķ
11
SOUND
Volume
nnnnnnnnnnnnnnnn nn nn nn nn nn nn nn nn
Balance
nn nn nn nn nn nn nnnn nn nn nn nn nn nn
Graphic Equalizer
Sound style Personal
Sound Mode Stereo
Loudness On
Speech Off
Spatial Off
Headphone
Dolby Pro Logic Install
Page 12

r
Sound (stereo, two-channel sound, mono)
If the device receives two-channel sound broadcasts – e.g. a film in the original version on sound
channel 2 (display: Ton2) and the synchronized version on sound channel 1 (display: Ton1) – then you
may select the desired sound channel.
Your television automatically switches to stereo if
the programme is transmitted in stereo (indication:
Stereo).
If stereo reception is poor (noisy), you can switch
to "Mono" and thus improve the sound quality.
Press the
¢
AUX
button and then repeatedly the
numeric button
2
until the desired sound channel
is selected. On the picture screen appears “Mono”,
“Stereo”, “Dual1” or “Dual2”, respectively.
r
Stereo width
This function enlarges the stereo width of stereo
broadcasts and improves the acoustic pattern of
mono broadcasts. The sonority is increased.
You can make this setting for every programme
position.
Press the h button. The “MAIN MENU” appears.
Use the p or P button to select the “SOUND”
menu line then confirm with G.
The “SOUND” appears.
Use the p or P button to select the “Spatial” menu
line then use the F or E button to select “on” or
“off”.
Finish the setting. For this press the h button until
all menus are removed from the picture screen.
4
3
2
1
Ǻ
1
r
Headphones
Insert the headphones plug (3.5 mm ø jack) into the
headphones socket behind the flap at the front of
the receiver.
We recommend to use only cable or radio headphones but no infrared ones.
The loudspeakers can be switched off with the
¢
ĭ
button on the remote control unit.
Press the
.
button. The “MAIN MENU” appears.
Use the p or P button to select the “SOUND”
menu line then confirm with G.
The “SOUND” appears.
Select the “Headphone” menu line then confirm
with G. The “HEADPHONE menu appears.
V
olume
Use the p or P button to select the “Volume”
menu line then adjust with the F or E button.
Balance
Use the p or P button to select the “Balance”
menu line then adjust with the F or E button.
Source
You can select the picture source for the sound you
wish to hear via the headphones.
Use the p or P button to select the “Source”
menu line.
Select the desired setting with the F or E button.
“Automatic” = Your hear the sound of the current
programme via the headphones.
“TV” = You hear the sound of the selected TV pro-
gramme via the headphones and see the
pictures, for example, delivered by a video
recorder on the picture screen.
“EXT 1, EXT2, EXT3 “ = You hear the sound of an
external device connected to the selected
EURO-AV socket via the headphones.
2
1
1
1
3
2
1
Ǻ
Adjusting the Sound
ķ
12
HEADPHONE
Volume
nnnnnnnnnnnnnnnn nn nn nn nn nn nn nn nn
Balance
nn nn nn nn nn nn nnnn nn nn nn nn nn nn
Source Automatic
Dual I
SOUND
Volume
nnnnnnnnnnnnnnnn nn nn nn nn nn nn nn nn
Balance
nn nn nn nn nn nn nnnn nn nn nn nn nn nn
Graphic Equalizer
Sound style Personal
Sound Mode Stereo
Loudness On
Speech Off
Spatial Off
Headphone
Dolby Pro Logic Install
Page 13

Picture adjustments
With the red k button you can select one after
the other three fixed and one changeable picture
settings.
“Personal” (changeable)
“During the day”,
“In the evening”,
“Soft”
Select the setting appropriate for the day time or
the current TV programme.
r
Customizing the picture settings
(basic setting)
Press the h button. The “MAIN MENU” appears.
Use the p or P button to select the “PICTURE”
menu line then confirm with G.
The “PICTURE-MENUE” appears.
You can change the picture settings to suit your
taste.
Select the desired setting with the p or P button
then change the setting with the F or E button.
Contrast
The device was tested with maximum contrast to
verify the reliability of all components.
It is advisable to turn down the contrast to offer you
the best picture quality depending on the lighting
conditions or on the location where the TV is set
up.
Sharpness
You can adjust the picture sharpness to suit your
taste.
In VGA mode this setting can not be changed.
Tint
This function allows you to give the pictures a slight
red (warm) or blue (cool) shade.
Ǻ
1
2
1
Digital reference
This function is provided to improve the picture
qualtiy in the case of poor TV/video sources.
In addition, it allows to reduce system-related
colour distorsions (cross colour) occuring on fine
vertical black and white lines (not possible in VGA
mode).
Dynamic contrast
This function increases the contrast range. In dark
picture areas, the contrast is "streched". The picture
gains in depth and contour (not possible in VGA
mode).
r
Storing the settings in memory
Press the h button. The “MAIN MENU” appears.
Use the p or P button to select the “FEATURES”
menu line then confirm with G.
The “FEATURES” menu appears.
Use the p or P button to select the “General PP
store” menu line then confirm with G.
“stored” appears on the picture screen.
Finish the setting. For this press the h button until
all menus are removed from the picture screen.
r
Adjusting the brightness and colour
contrast
Use the
®
button to adjust the brightness.
Use the
™
button to adjust the colour contrast.
r
Noise reduction
This function improves the picture quality in the
case of poor TV/video sources.
Only the picture quality of the current programme is
changed.
Press the
¢
AUX button and then the red k button
to select between preset settings:
DNR off = with very good picture quality
DNR min. = with good picture quality
DNR med. = with sligthly noisy picture
DNR max. = with strongly noisy picture
1
Ǻ
2
1
4
3
2
1
Picture Adjustments
ķ
13
PICTURE
Contrast
nnnnnnnnnnnnnnnn nn nn nn nn nn nn nn nn
Brightness
nnnnnnnnnnnnnn nnnnnn nn nn nn nn nn nn nn
Colour
nnnnnnnnnnnnnn nnnnnnnn nn nn nn nn nn nn
Sharpness
nnnnnnnnnnnn nnnnnnnn nn nn nn nn nn nn
Tint Normal
Digital reference On
Dynamic Contrast Min
VGA
Page 14

r
Picture format switching
PALplus is the compatible further development of
the PAL colour TV standard with 16:9 picture format which has proved its reliability over tens of
years. In relevant programme guides and in Teletext
pages (ARD, ZDF), hints will be given with respect
to PALplus broadcasts.
In the case of PALplus broadcasts, the TV set automatically switches to the PALplus format.
With the
¢
E
button you can switch between the
picture formats “Panorama Zoom”, “Wide screen”,
“Auto Format”, “4:3”, “Zoom 14:9”, “Cinema
Zoom”, und “Sky Zoom”.
Auto Format
In the case of 16:9 broadcasts, the TV set automatically switches to the “16:9” picture format.
In the case of 4:3 broadcasts, the TV set automatically switches to full screen mode.
14:9
picture format or Widescreen
In the case of 4:3 broadcasts and with the function
“Widescreen” or “Zoom 14:9” selected, the picture
is horizontally enlarged.
The picture geometry is streched in horizontal
direction.
Widescreen
In “Zoom 14:9” mode, black stripes are visible at
the left and the right side of the picture.
Zoom 14:9
In the case of real 16:9 signal sources delivered by
an add-on decoder (e.g., Set-Top Box digital TV
system), the picture screen is fully filled and the
picture geometry is correct.
1
Ǻ
Cinema Zoom
This mode is especially appropriate for broadcasts
in 16:9 picture format.
The advantage of this mode is that the black stripes
at the top and the bottom of the picture are no
longer visible.
In this mode, 4:3 pictures are displayed over the
whole picture screen
The pictures are enlarged in such a degree that picture information is lost at the top and the bottom of
the picture, but the picture geometry is maintained.
Sky Zoom
Like Cinema Zoom.
The picture is slightly pushed up to make subtitles
visible.
Panorama Format
This mode is especially suited for cinema fims with
extreme width/height relations.
In the case of 4:3 broadcasts and with the function
“Panorama Format” selected, the picture is horizontally enlarged.
The picture geometry is streched in horizontal
direction.
Adjusting the Picture
ķ
14
Page 15

What is Dolby Surround Pro Logic?
This system has been developed to allow you to
enjoy the dramatic realism and impact of multi-channel Dolby movie theater sound in your own home.
For this, the sound is splitted into several channels.
The Dolby Surround Pro Logic sound signal comprises:
Ster
eo channels (left/right):
These channels provide for the left/right sound
information.
Centre channel:
The sound created by the conventional stereo channels (right/left) is improved by an additional centre
channel which makes it possible to precisely locate
the origin of the individual tones. This centre channel fixes the voices (dialogues) in the sound centre
(corresponding to the picture).
Sur
round channel:
The Surround channel (also called back channel)
completes the sound system. Two additional loudspeakers which are located behind the listener create the actual "Surround" sound, that is the realistic
sound atmosphere (depth of space, special effect
sounds). The listener is "placed inside the action".
With the Dolby Surround Pro Logic system, the
sound/picture sources can be video discs (DVD,
laser discs), video cassettes, and television broadcasts.
r
Loudspeaker equipment necessary for
the different Dolby Surround Pro Logic
functions
The diffent Dolby Surround functions depend on
the loudspeaker equipment available.
Equipment for Dolby Surround Pro Logic
To get the optimum sound quality from the Dolby
Surround Pro Logic system, five loudspeaker boxes
are necessary: left/right loudspeaker, centre loudspeaker, and 2 sourround loudspeakers.
If you cannot install five loudspeaker boxes, you
can still use the following Dolby operating modes:
Dolby 3 Stereo or
Hall.
However, with these operating modes, it is not possible to get the optimum sound impression such as
with Dolby Surround Pro Logic.
Equipment for Dolby 3 Stereo
Use this mode if you cannot install the surround
loudspeakers.
E
quipment for Hall
Use this mode if you can only install left/right and
sourround loudspeakers.
Dolby Surround Pro Logic*
ķ
15
ǵ
P
U
S
H
O
P
E
N
ǵ
ǵ
Centre
loudspeaker
Surround box
Front box,
right
Front box,
left
ǵ
P
U
S
H
O
P
E
N
ǵ
ǵ
Front box,
right
Centre
loudspeaker
Front box,
left
ǵ
P
U
S
H
O
P
E
N
ǵ
ǵ
Surround box
Front box,
right
Front box,
left
* Under license from Dolby Laboratories Licensing Corporation.
"DOLBY" and the double-D symbol
ij are trademarks of Dolby Labora-
tories Licensing Corporation.
Page 16

Dolby Pro Logic basic settings
The TV receiver comes with the following loudspeakers: left/right loudspeakers, subwoofer, 2 surround loudspeakers.
You can operate your TV receiver with different
loudspeaker equipments:
– a) with the loudspeakers supplied only,
– b) with the loudspeakers supplied and in addition
with external left/right loudspeakers,
– c) with the loudspeakers supplied and in addition
with an external amplifier with left/right loudspeakers connected.
According to the loudspekar configuration, different
Dolby-Surround modes are possible.
r
a) Operation with the loudspeakers
supplied
– The left/right loudspeakers supplied are con-
nected to the picture screen.
– The subwoofer and the two surround boxes are
connected to the receiver.
Ń
!
The red loudspeaker switch at the rear of the
receiver must be set to its “Intern” position (switch
not locked in).
Press the h button. The “MAIN MENU” appears.
Use the p or P button to select the “INSTALLATION” menu line then confirm with G.
2
1
Use the p or P button to select the “Setup” menu
line then confirm with G.
Use the p or P button to select the “Ext. VAmplifier” menu line then use the F or E button to select “no”.
Use the p or P button to select the “Surround
mode” menu line then use the
x
or cbutton to
select the desired Dolby mode:
“off”:
No Dolby Surround effects. The surround loudspeakers are switched off.
“Pro Logic”:
Dolby Surround Pro Logic sound effects.
The left/right loudspeakers reproduce the left/right
sound signal and the centre sound signal (= Dolby
Phantom).
“Hall”:
For Surround sound effects in the case of a mono
broadcast.
Finish the setting. For this press the h button until
all menus are removed from the picture screen.
6
5
4
3
Dolby Surround Pro Logic
ķ
16
SETUP
Audio Output Variable
Ext2 Output VHS Signal
DVD/photo CD Not Present
Surround Mode Pro Logic
Centre Mode
Ext. Amplifier No
Information Line On
EXT2 Input VCR
VCR type Non PALplus
Picture mute black
INSTALLATION
Menu Language
Country
Automatic Installation
Manual Installation
Give Name
Reshuffle
Favourite Programmes
Decoder/Descrambler
Setup
ǵ
ǵ
ǵ
PUSH OPEN
Page 17

r
b) Operation with the loudspeakers
supplied and additional left/right
loudspeakers
– The left/right loudspeakers supplied are con-
nected to the picture screen.
– The subwoofer, the two surround loudspeakers
and in addition external left/right loudspeakers
(to the “EXTERNAL FRONT SPEAKERS sockets”)
are connected to the receiver.
Ń
!
The red loudspeaker switch at the rear of the
receiver must be set to the “Extern” position
(switch locked in).
The left/right loudspeakers connected to the picture
screen operate as central loudspeakers.
In this mode, the subwoofer is switched off.
Press the h button. The “MAIN MENU” appears.
Use the p or P button to select the “INSTALLATION” menu line then confirm with G.
2
1
Ǻ
Use the p or P button to select the “Setup” menu
item then confirm with G.
Use the p or P button to select the “Ext. VAmplifier” menu line then use the F or E button to select “no”.
Use the p or P button to select the “Surround
mode” menu line
Use the F or E button to select the desried Dolby
mode:
“off”:
No Dolby Surround effects. The surround loudspeakers are switched off.
“Pro Logic”:
Dolby Surround Pro Logic sound effects.
The left/right loudspeakers connected to the picture
screen operate as central loudspeakers.
“Dolby 3 Stereo”:
Use this mode if you have connected no surround
loudspeakers.
“Hall”:
For Surround effects in the case of mono broadcasts.
The left/right loudspeakers supplied are switched
off.
Use the p or P button to select the “Centre-Mode”
menu line.
This setting can only be selected after selecting the
“Dolby Pro Logic” or “Dolby 3 Stereo” mode in step
.
Use the F or E button to select the desired setting for the centre loudspeaker:
“Phantom”:
The left/right loudspeakers supplied are switched
off.
The centre sound channel is reproduced by the
external left/right loudspeakers.
“Normal”:
The centre sound channel is reproduced by the
loudspeakers supplied.
Centre frequencies below 100 Hz are reproduced by
the external left/right loudspeakers.
If “Phantom” is selected as centre mode, it is not
possible to switch back to “Dolby 3 Stereo”.
Finish the setting. For this press the h button until
all menus are removed from the picture screen.
9
Ǻ
8
6
Ǻ
7
6
5
4
3
Dolby Surround Pro Logic
ķ
17
SETUP
Audio Output Variable
Ext2 Output VHS Signal
DVD/photo CD Not Present
Surround Mode Hall
Centre Mode
Ext. Amplifier No
Information Line On
EXT2 Input VCR
VCR type Non PALplus
Picture mute black
INSTALLATION
Menu Language
Country
Automatic Installation
Manual Installation
Give Name
Reshuffle
Favourite Programmes
Decoder/Descrambler
Setup
ǵ
ǵ
PUSH OPEN
ǵ
Page 18

r
c) Operation with the loudspeakers
supplied and in addition with an external amplifier with external left/right
loudspeakers connected
– The left/right loudspeakers supplied are connec-
ted to the picture screen.
– The subwoofer and the two surround loud-
speakers are connected to the receiver.
– An external amplifier with left/right loudspeakers
is connected to the Audio sockets of the receiver.
For connecting the external amplifier, refer to the
chapter “Connecting an external amplifier” on page
31.
The red loudspeaker switch at the rear of the
receiver must be set to the “Intern” position (switch
not locked in).
The lefft/right loudspeakers supplied and the subwoofer operate as centre loudspeakers.
Press the h button. The “MAIN MENU” appears.
Select the “INSTALLATION” menu line then confirm
with G.
2
1
Ǻ
Ǻ
Ǻ
Select the “Setup” menu line then confirm with
G. The “SETUP” menu appears.
Select the “Ext. Amplifier” menu line then use the
F or E button to select “yes”.
Select the “Surround mode” menu line.
Use the F or E button to select the desired Dolby
mode:
“off”:
No Dolby Surround Pro Logic effects.
The loudspeakers supplied are switched off.
“Pro Logic”:
Dolby Surround Pro Logic sound effects.
The left/right loudspeakers supplied and the subwoofer operate as centre loudspeakers.
“Dolby 3 Stereo”:
Use this mode if you have connected no surround
loudspeakers.
“Hall”:
For Surround effects in the case of mono broadcasts.
The left/right loudspeakers supplied and the subwoofer are switched off.
Use the p or P button to select the “Centre-Mode”
menu line.
This setting can only be selected after selecting the
“Dolby Pro Logic” or “Dolby 3 Stereo” mode in step
.
Use the F or E button to select the desired setting for the centre loudspeaker:
“Phantom”:
The left/right loudspeakers and the subwoofer supplied are switched off.
The external left/right loudspeakers reproduce the
left/right and
the centre sound signals.
“Normal”:
The centre sound signal is reproduced by the
left/right loudspeakers and the subwoofer supplied.
Frequencies below 100 Hz are reproduced by the
external left/right loudspeakers only.
“Wide”:
The entire frequency sprectrum of the centre sound
channel is reproduced by the left/right loudspeakers and the subwoofer supplied.
Finish the setting. For this press the h button until
all menus are removed from the picture screen.
9
8
6
Ǻ
7
6
5
4
3
Dolby Surround Pro Logic
ķ
18
SETUP
Audio Output Variable
Ext2 Output VHS Signal
DVD/photo CD Not Present
Surround Mode Hall
Centre Mode
Ext. Amplifier No
Information Line On
EXT2 Input VCR
VCR type Non PALplus
Picture mute black
INSTALLATION
Menu Language
Country
Automatic Installation
Manual Installation
Give Name
Reshuffle
Favourite Programmes
Decoder/Descrambler
Setup
ǵ
ǵ
PUSH OPEN
ǵ
Page 19

r
Adjusting the volume of the loudspeakers
Press the h button. The “MAIN MENU” appears.
Use the p or P button to select the “SOUND”
menu line then confirm with G.
The “SOUND” menu appears.
Select ”Dolby Pro Logic Install” then confirm with
G.
The menu for adjusting the loudspeaker volume
levels appears.
Use the p or P button to select the
“Test-Signal” menu item then the F or E button
to select “On”.
You will hear a test signal (noise) from the loudspeakers.
The test signal is emitted in the following order
(depends on the loudspeakers connected and the
sound effect selected):
left, centre loudspeaker, right, surround loudspeaker.
The coloured menu items indicate the currently
emitting loudspeakers.
Select the “Centre-Volume” menu line then use the
F or E button to adjust for the centre loudspeaker
the samel volume level (noise) as for the front loudspeakers.
Select the “Balance” menu line then use the F or
6
5
4
3
2
1
r
Storing the settings in memory
Repeatedly press the h button until the “MAIN
MENU” appears.
Use the p or P button to select the “FEATURES”
menu line then confirm with G. The “FEATURES”
menu appears.
Use the p or P button to select the “General PP
store” menu line then confirm with G. “Gespeichert” appears on the picture screen.
Finish the setting. For this repeatedly press the h
button until all menus are removed from the picture
screen.
4
3
2
1
Dolby Surround Pro Logic
ķ
19
DOLBY
PRO LOGIC
INSTALL
Test Signal Off
Centre Volume
nnnnnnnnnnnnnnnn nn nn nn nn nn nn nn nn
Balance
nn nn nn nn nn nn nnnn nn nn nn nn nn nn
Rear Volume
nnnnnnnnnnnnnnnn nn nn nn nn nn nn nn nn
Surround Mode Pro Logic
Left
Rear
Raer
Right
SOUND
Volume
nnnnnnnnnnnnnnnn nn nn nn nn nn nn nn nn
Balance
nn nn nn nn nn nn nnnn nn nn nn nn nn nn
Graphic Equalizer
Sound style Personal
Sound Mode Stereo
Loudness On
Speech Off
Spatial Off
Headphone
Dolby Pro Logic Install
Page 20

r
Use the special functions!
Press the h button. The “MAIN MENU” appears.
Select the “FEATURES” menu line then confirm
with G.
Use the p or P to select the desired function in the
menu.
r
Sleeptimer (automatic switch-off)
You can programme your TV so that it switches to
stand-by automatically after a specified time (max.
180 minutes.
Select the “Sleeptimer” menu line then use the F
or E button to select the desired switch-off time
(15-180 minutes) in 15 minutes steps.
One minute before the TV set switches off the message “Good Night” and the countdown of the last
60 seconds are displayed on the picture screen.
During this period you can switch off the TV set
earlier or change the swich-off time.
You call up the time remaining till the automatic
switching to stand-by. For this, press the
¢
AUX but-
ton and then the hbutton.
Finish the setting. For this press the h button until
all menus are removed from the picture screen.
2
Ǻ
Ǻ
1
Ǻ
2
1
r
The parental lock
This function is provided for locking the TV set.
Select the “Child lock” menu line then unse the F
or E button to select “On” or “Off”.
With “On” selected, the TV set can only be switched
on with the remote control unit.
It is recommended to keep the remote control unit
out of reach of your children after having activated
the parental lock.
The parental lock remains activated until you switch
it off.
Finish the setting. For this press the h button until
all menus are removed from the picture screen.
r
General PP store
With this function you can save your customized
picture and sound settings. How to do this is
described in the corresponding chapters.
r
Message
With this function you can enter a memo which will
automatically be displayed after switching on the
TV set.
The memo can comprise 2 lines of 27 characters
each.
Select the “Message” menu line then confirm with
G.
How to enter a memo
Select the “Change” menu line then confirm with
G.
Use the p or P button to select the desired
letter/number.
Use the E button to go to the next place then use
the the p or P button to select the desired
letter/number.
Repeat the entries until the memo is completed then
confirm with G.
4
3
2
1
1
2
Ǻ
1
Special Functions
ķ
20
FEATURES
Sleeptimer Off
Child Lock Off
General PP store
Message
Timers
VGA input Rear
MESSAGE
Message:
Change
Clear
Type Wipe
Run No
Page 21

Selecting the display mode
Select the “Type” menu line.
Use the F or E button to select the desired display mode.
With the “Fade” message type, the TV set
selects at random one of the display modes
“Fall”, “slide”, “Wipe” .
Star
ting a memo
Select the “run” menu line.
Use the F or E button to select the desired display duration:
continuously: the memo is continuously
displayed.
once: the memo disappears after approxi-
mately 30 seconds.
no: the memo is not displayed.
Confirm with G.
Displaying a memo
Finish the setting. For this press the h button until
all menus are removed from the picture screen.
Switch the TV set to stand-by. After switching on
the TV set, the memo appears on the picture
screen.
The memo does not appear if you have selected the
“ständige Untertitelung” function (see page 23).
Switching off a memo
Select the “run” menu line.
Use the F or E button to select “no”.
Confirm with G.
Finish the setting. For this press the h button until
all menus are removed from the picture screen.
4
3
2
1
Ǻ
2
1
3
2
1
Ǻ
2
1
r
Timer
With this function you can automatically switch on
the TV set.
Select the “Timers” menu line then confirm with
G.
Checking/setting the time
If a TV channel broadcasting Teletext is stored on
programme position 1, the time is set automatically. If not, set the time with the numeric buttons
on the remote control unit.
Select the “Aktual time” menu line then enter the
correct time with the numeric buttons
1– 0
.
Setting the timer
Select the “Programme” menu line then use the
numeric buttons 1– 0to select the number of the
programme position with which you wish the TV
set to be switched on.
Select the “Start Time” menu line then use the
numeric buttons
1– 0
to set the time when the
TV set is to be switched on.
Finish the setting. For this repeatedly press the h
button until all menus are removed from the picture
screen.
Switch the TV set to stand-by.
At the programmed time the TV switches on with
the desired programme.
Switching the timer off
Select the ”Cancel Timer” menu line then confirm
with G.
Finish the setting. For this press the h button until
all menus are removed from the picture screen.
2
1
4
3
2
1
1
Ǻ
1
Special Functions
ķ
21
TIMERS
Aktual Time 19:35
Programme 4 RTL
Start Time - -:- Cancel Timer
Page 22

r
Use the convenient functions!
r
Information display
Press the G button.
The following information is displayed on the picture screen:
– the picture format,
– the noise reduction mode selected (DNR min,
DNR med. DNR max or DNR off),
– the programme position number with the station
name,
– the remaining switch-off time if programmed,
– the audio mode (stereo or mono).
r
Time
Press the hbutton.
If “permanent subtitels” is activated, the time cannot be displayed.
r
Still picture
With this function you can “freeze” a picture of the
current programme on the TV screen.
Press the
j
button.
The picture is splitted into two halves. The left half
is the current programme and the right half is the
still picture. Pressing the same button once again
ends the function.
r
Double-Window
With this function the TV picture is splitted into two
halves. The left half shows the current programme
whereas the right half shows another programme
(e.g., left half: ARD, right half: RTL)
Press the
¢
PIP button. Press the button once again
to end the function.
1
1
Ǻ
1
1
Use the
¢
E
button to select the desired picture
format.
Programme selection
To select the programme for the left picture half use
the p or P button.
To select the programme for the right picture half
press the
¢
AUX button and then the p or P
button.
TV programmes received via a decoder cannot be
displayed in the right picture half.
PALplus is not possible.
VGA mode is not possible either.
Programme scan
With this function you can automatically scroll your
favourite programmes (see page 18).
Press the
¢
AUX button then keep pressed the p or
P button until the favourite programmes scroll in
the right picture half.
To end the function press the
¢
AUX and then the p
or P button.
Still
picture
With this function you can “freeze” a picture of the
current programme.
Press the
j
button.
The left picture half is “frozen” in the right picture
half.
Press the
¢
AUX
button and then the
j
button to
end the still picture function, or
press the
j
button to end the double window
function.
Exchanging the picture halves
Press the
¢
AUX button and then the G button.
1
2
1
2
1
Ǻ
2
1
2
Convenient Functions
ķ
22
Panorama Zoom
DNR med.
Mono
Off
1 ARD
ǼǼ
Page 23

r
Mosaic menu
With this function you select different display
modes for the TV picture.
Press the
¢
AUX button and then the
¢
C
button.
The “Mosaic” menu appears.
Use the F or E button to select the desired display mode. Activate the function with the G
button.
Programme scan
With this function, you can display 12 different programmes (still pictures without sound) with their
station names on the picture screen. In the centre
of the picture screen you see the current programme running.
If you wish to select one of the 12 programmes
shown, press the corresponding numeric button
1...9.
Press the
¢
AUX
button and then the
¢
C
button to
end the function.
Photo fin. – Display of twelve small
pictur
es
With this function, you can display eleven small still
pictures of the same programme in a time-shifted
way. In the centre of the picture screen you see the
current programme running.
Select the ”Photo fin..” menu item then confirm
with G.
Press the G button once again to select a new
picture sequence.
Press the
¢
AUX button and then the
¢
C
button
to end the function.
3
2
1
1
2
1
Stroboscope
With this function, one picture is shown after the
other at low speed.
Select the ”Strobe” menu item then confirm with
G.
Use the G button to select the following speeds:
low, fast and running picture.
Press the
¢
AUX and then the
¢
C
button to end
the function.
r
Permanent subtitles
TV programmes with Teletext often broadcast certain programmes with subtitles which then are displayed on the picture screen in addition to the normal picture.
Storing the subtiltes page in memory
It is necessary to store the subtitles page for the
desired TV programme in memory. The number of
the subtitles page is normally indicated before the
programme concerned or is to be found in the Teletext programme overview.
Select the desired TV programme.
Activate the Teletext mode with the
ǵ
TXT
button then
enter the desired subtiltes page number (e.g., 150)
as three digits with the numeric buttons 1– 0.
Press the
¢
AUX button and then the
ǵ
TXT
button.
The subtitles page is stored in memory.
Switch off Teletext with the
ǵ
TXT
button.
Activating the permanent subtitles function
Select the desired TV programme.
Press the
¢
C button. The message “Subtitle on”
is briefly displayed on the picture screen then the
subtitles appear at the bottom screen border.
If no subtitles are broadcast for the current TV programme, the Teletext symbol ķis displayed.
To switch off the ”Permanent subtitel” function,
press the
¢
C button. The message “Untertitel
aus” is briefly displayed on the picture screen then
the Teletext symbol ķdisappears.
3
2
1
4
3
2
1
3
2
1
Convenient Functions
ķ
23
MOSAIC Scan Photo Fin. Strobe
K1
RTL2
MTV
VOX
VIVA
DSF TM3 BR3
ARD ZDF RTL SAT
Page 24

Teletext Mode
ķ
24
1…0
Select Teletext pages.
xc
Call up next Teletext
page.
]|
Call up subpages.
ǵ
TXT
Telext ɫ TV mode
j (yell.) Go to next chapter with
passage to next topic.
g (blue) Page forward with pas-
sage to next chapter.
C Programme preview for
current broadcast (Teletext preselection) in
TV mode.
VIDEO AUX
SAT PIP
TP 800 PT
3
1 2
4 5 6
7
8 9
0
TXT
OK
P
P
h Teletext-Top overview.
k (red) Page backward.
h (green)
Select topic.
r
The remote contro unit in Teletext
Page 25

Teletext…
… is provided free of charge by television stations
and is transmitted together with the television signal in the form of texts, graphic representations and
subtitles which are visible on your picture screen.
Teletext consists of a large number of text pages,
for instance news from topics such as sport and
politics, exchange markets, weather reports and all
kinds of other information.
The scope of information offered by Teletext as well
as the way it is organised and the layout of individual pages varies from station to station.
Use the buttons on the remote control unit to call
up the various Teletext functions.
Switch on your TV set.
r
Normal Teletext mode
Switch on Teletext with the
ǵ
TXT
button. The overview
page 100 or the Teletext page last viewed appears.
Select the desired Teletext page by entering the
page number as three digits with the numeric buttons
1– 0
.
– After a brief waiting period, the page appears.
Use the F or E button to step backward or forward through the Teletext pages.
r
TOP-text (Table Of Pages) or
FLOF-text mode
Various topics, chapters and individual pages may
be called up from the overview page at the push of
a button.
Switch on Teletext with the
ǵ
TXT
button. The overview
page 100 appears.
At the right picture screen border appears an info
field consisting of a red symbol (
ķ), a green text
field (topic), a yellow text field (chapter) and a blue
symbol (ķ).
You will find correspondingly coloured buttons on
your remote control unit.
Use the green h button to select the desired
topic.
– The green text field indicates the next topic.
Use the yellow j button to select the desired
chapter inside the topic (with passage to the next
topic).
– The yellow text field indicates the next chapter
inside the topic selected.
3
2
Ǻ
1
Ǻ
3
2
1
1
Ǻ
If the chapter selected consists of several subpages, these can be called up separately. Use the
blue g button to go to the next existing page
(with passage to the next chapter).
Use the red k button to page back.
The Teletext pages can also directly be selected
with the numeric buttons
1– 0
or the
xc
buttons.
Table of pages TOP
Switch on Teletext with the
ǵ
TXT
button then press the
h button.
A page showing a table of pages of the topics available appears.
This table is an overview of the currently broadcasted pages of the Teletext service provider
selected.
Use the p, P, F or E button to select the desired
topic then activate it with the G button.
The page selected appears.
2
1
5
4
Teletext Mode
ķ
25
Page 26

r
Enlarging a Teletext page
Repeatedly pressing the G button results in:
– double-size letters in the top screen half;
– double-size letters in the bottom screen half;
– normal picture size.
r
Multiple pages
Several subpages can be combined under a single
page number which are then automatically scrolled
at an interval determined by the television station.
This is indicated by a combination of numbers, for
example, 3/6 indicates that you are looking at the
third of six subpages.
A text field showing the number of subpages available is displayed on the picture screen.
Call up the subpages with the P or p button.
r
Updating Teletext pages
Certain Teletext pages are constantly updated, such
as stock market reports and sporting events, as well
as the latest news.
If you wish to watch television and nevertheless remain informed, first select the page of your
choice, e.g., page 132; and then:
press the
¢
C button.
The TV picture is still visible, but at the top of the
screen the Teletext symbol
ķ
appears.
Press the
¢
C button.
The updated Teletext page appears.
End the function with the
ǵ
TXT
button.
3
2
1
Ǻ
1
Ǻ
1
r
Mixed mode
You can view the TV programme and a Teletext
page at the same time.
Press the
¢
AUX and the
¢
C button. The Teletext
page and the TV picture are mixed.
Press the
¢
AUX and the
¢
C button once again.
Only the Teletext picture is visible.
r
Answer reveal
It is possible to let “hidden” answers appear in certain videotext pages or insert information (release),
e.g. to solve puzzles,
or
to check VPS times for video recorder
programming.
Press the
¢
D
button. The “hidden” information is
inserted in the Teletext page.
1
Ǻ
2
1
Teletext Mode
ķ
26
ĵ
200
Ł
ļ
01
02
03
Ļ
Page 27

r
The AUDIO/VIDEO sockets
Your TV receiver is provided with various audio/
video sockets for the connection of external devices
such as camcorder, video recorder, satellite receiver,
SET-TOP box, pay-TV decoder, etc.
An AV device which is provided with the Megalogic
system must be connected via a Megalogic
EURO/AV (Scart) cable to the “EXTERNAL 2”
socket.
The distance between the AV device and the TV
receiver should not be less than 0.5 meters.
r
Connecting a video recorder, satellite
receiver, SET-TOP box etc. to the
“EXTERNAL 1” or “EXTERNAL 3” socket
Connect the “EXTERNAL 1” or “EXTERNAL 3”
socket on the TV set with the corresponding socket
on the AV unit unit using a EURO/AV (Scart) cable.
For more information contact your specialized dealer.
Reproduction
Repeatedly press the
¢
D
AV
button until “EXT1” or
“EXT3” is displayed on the picture screen.
Switch on the external AV device.
You see the picture and hear the sound on the TV
set of the AV device connected.
2
1
1
~
Ǻ
Ǻ
Ǻ
r
Connecting a video recorder, satellite
receiver, SET-TOP box etc. to the
“EXTERNAL 2” socket
The GRUNDIG MEGALOGIC s
ystem
The TV set is provided with the MEGALOGIC
system.
If you connect a GRUNDIG video recorder which is
also provided with the MEGALOGIC system via the
Megalogic-EURO/AV (Scart) cable to the “EXT2”
socket (centre Scart socket) on the receiver, the
terrestrial TV channels (with all channel-related
data) are automatically transferred to the video
recorder (VCR) when re-programming the receiver
or changing the programme position assignment.
It is no longer necessary to adjust the TV channels
on the video recorder.
Basic setting
Connect the “EXTERNAL 2” socket on the TV set
with the corresponding socket on the AV device
using a EURO/AV (Scart) cable.
Press the
.
button. The “MAIN MENU” appears.
Select the “INSTALLATION” menu line then confirm
with G. The “INSTALLATION” menu appears.
3
2
1
EURO-AV TV EURO-AV DECODER EURO-AV VCR
AUDIO
OUT
L
EXTERNAL 1
IN/OUT
DISPLAY VIDEO
CONNECTION
DISPLAY POWER
CONNECTION
R
A7
16 1
A1
EXTERNAL
SPEAKERS
INTERNAL
SPEAKERS
EXTERNAL 2
IN/OUT
EXTERNAL 3
IN
CABLE
8 Ω
SUBWOOFER
CONNECTION
8 Ω
6 Ω
VGA
IN
AUDIO
L
R R
AUDIO
AUDIO AUDIO
VGA
OUT
L
R
L
R
EXTERNAL
FRONT
SPEAKERS
MAINS
INLET
220-240V
~
Connections
ķ
27
INSTALLATION
Menu Language
Country
Automatic Installation
Manual Installation
Give Name
Reshuffle
Favourite Programmes
Decoder/Descrambler
Setup
AUDIO
L
O
U
T
R
AUDIO
OUT
EURO - AV 2
L
I
EURO - AV 1
N
R
AUDIO
AUDIO
L
L
R R
VGA
VGA
AUDIO AUDIO
IN
OUT
L
R
EXTERNAL 1
EXTERNAL 2
IN/OUT
CABLE
IN/OUT
EXTERNAL 3
IN
DISPLAY VIDEO
CONNECTION
ń
EXTERNAL
A7
A1
16 1
DISPLAY POWER
CONNECTION
SUBWOOFER
CONNECTION
8 Ω
INTERNAL
SPEAKERS
SPEAKERS
6 Ω
8 Ω
R
EXTERNAL
FRONT
SPEAKERS
L
R
MAINS
INLET
220-240V
Page 28

Select the “Setup” menu line then confirm with
G.
Select the “EXT2 Output” menu line.
Use the F or E button to select the “S-VHS
Signal” option if an S-VHS video recorder is
connected.
Select the “EXT2 Input” menu line.
Use the F or E button to select the “VCR” option
if a video recorder is connected, or
select the “andere” option if a satellite receiver or
similar device is connected.
Select the “VCR Typ” menu line.
Use the F or E button to select the “Non PALplus” option if a normal video recorder is connected, or
select the “PALplus” option if a PALplus video
recorder is connected.
Finish the setting. For this repeatedly press the h
button until all menus are removed from the picture
screen.
Re
production
Repeatedly press the
¢
D
AV
button until “EXT 2” is
displayed on the picture screen.
Switch on the device connected.
You see the picture and hear the sound on the TV
set of the AV device connected.
2
1
8
7
6
5
4
r
Connecting a decoder (descrambler)
Some stations – whose programs are received by
cable or satellite receiver – encode (scramble) their
broadcasts. Both picture and sound become unrecognizable. A decoder will allow you to decode
these programmes.
Connecting the decoder
Connect the “EXTERNAL 1” or “EXTERNAL 2”
socket of the TV set with the corresponding socket
on the decoder.
Operation
Switch the decoder on.
Select on the TV set the programme position
assigned to the encoded (scrambled) programme.
The decoder must be activated for the programme
position concerned. Refer to chapter “Changing the
programme position assignment”, section “Activating the decoder (descrambler)” on page 9.
Refer also to the user manual of the decoder.
Connectin
g a decoder and a satellite
receiver
Supposed that you have already connected a video
recorder to the “EXTERNAL 1” socket and a satellite
receiver to the “EXTERNAL 2” socket and you
wish to decode the programmes supplied by these
sources.
Connect the decoder to the corresponding socket
on the satellite receiver.
The decoder must be activated for the programme
position selected on the satellite receiver. Refer to
the user manual of the satellite receiver.
Connecting a decoder and a video recorder
Supposed that you wish to record decoded TV programmes.
Connect the decoder to the corresponding socket
on the video recorder.
The decoder must be activated for the programme
position selected on the video recorder. Refer to the
user manual of the video recorder.
Ǻ
1
Ǻ
1
Ǻ
Ǻ
2
1
1
Ǻ
Connections
ķ
28
SETUP
Audio Output Variable
Ext2 Output VHS Signal
DVD/photo CD Not Present
Surround Mode Pro Logic
Centre Mode
Ext. Amplifier No
Information Line On
EXT2 Input VCR
VCR type Non PALplus
Picture mute black
Page 29

r
Connecting a camcorder to the sockets at
the front side of the TV receiver
V
ideo signal
Connect the “VIDEO” socket on the TV set with the
corresponding video socket on the camcorder,
or
connect the S-VHS socket with the corresponding
socket on an S-VHS/Hi8 camcorder.
Audio signal (stereo or mono)
Connect the “L AUDIO R” sockets on the TV set
with the audio sockets on a stereo camcorder,
or
connect the “L AUDIO” socket on the TV set with
the audio socket on a mono camcorder. Switch the
audio input on the TV set to “Mono”. For this press
the
¢
AUX button and then the
2
button.
Re
production
Repeatedly press the
¢
D
AV
button until “FRONT” is
displayed on the picture screen.
Switch on the camcorder, insert a cassette and start
playback.
You see the picture and hear the sound of the
camcorder connected on the TV set.
2
1
1
1
ǵ
y
VIDEO IN
LR
AUDIO IN
S-VHS
VGA M
P
-+-
+
z
r
Connecting a DVD, CD-i or photo CD
player
Connect the “External 1” socket on the TV set with
the corresponding socket on the DVD, CD-i or
photo CD player using a EURO/AV (Scart) cable.
Press the
.
button. The “MAIN MENU” appears.
Select the “INSTALLATION” menu line then confirm
with G. The “INSTALLATION” menu appears.
Select the “Setup” menu line then confirm with
G.
Select the “DVD/photo CD” menu line.
Use the F or E button to select the “Present”
option.
Finish the setting. For this repeatedly press the h
button until all menus are removed from the picture
screen.
Reproduction
Repeatedly press the
¢
D
AV
button until “EXT1” is
displayed on the picture screen.
Switch on the DVD or CD-i/Photo CD player.
You see the picture and hear the sound of the DVD
or CD-i/photo CD player connected on the TV set.
2
1
6
5
4
3
2
1
~
Connections
ķ
29
SETUP
Audio Output Variable
Ext2 Output VHS Signal
DVD/photo CD Not Present
Surround Mode Pro Logic
Centre Mode
Ext. Amplifier No
Information Line On
EXT2 Input VCR
VCR type Non PALplus
Picture mute black
AUDIO
AUDIO
L
L
R R
VGA
VGA
AUDIO AUDIO
IN
OUT
L
AUDIO
OUT
R
EXTERNAL 1
EXTERNAL 2
IN/OUT
CABLE
DISPLAY VIDEO
CONNECTION
EXTERNAL 3
IN/OUT
IN
EXTERNAL
EXTERNAL
FRONT
SPEAKERS
A7
A1
16 1
DISPLAY POWER
CONNECTION
SUBWOOFER
CONNECTION
8 Ω
INTERNAL
SPEAKERS
SPEAKERS
6 Ω
8 Ω
R
L
R
MAINS
INLET
220-240V
Page 30

r
Copying video recordings via the TV set
You can copy
from a video recorder connected to the EXTERNAL
1 socket to a video recorder connected to the
EXTERNAL 2 socket,
or
from an S-VHS/Hi8 camcorder or video recorder
connected to the sockets on the front side of the
TV set to a video recorder connected to the EXTERNAL 2 socket.
For copying from an S-VHS/Hi8 video recorder or
camcorder the EXTERNAL 2 socket must be activated for S-VHS mode (see chapter “Connecting a
video recorder, satellite receiver, SET-TOP box etc.
to the EXTERNAL 2 socket” on page 27
).
Co
pying
Use the
¢
D
AV
button to select the desired programme position “EXT 1” or “FRONT” from which
you wish to copy to the video recorder connected to
the “EXT 2” socket.
Copying from a PC to a video recorder is not
possible.
During copying it is not allowed to change the programme position on the TV set or to switch the TV
set to stand-by.
If you use a Megalogic video recorder as target
recorder and you wish to switch the TV set to standby, the red and green pilot lamps on the TV set light
up to signal that copying is in progress.
r
Connectinga computer
You can connect a PC or an Apple Macintosh computer to your TV set.
The TV set recognizes automatically the resolution
of the VGA source.
The following resolutions are possible:
VGA 640 x 480 Pixel, 60 Hz/31.47 kHz
(VGA Standard)
VGA 640 x 400 Pixel, 70 Hz/31.47 kHz
VGA 640 x 350 Pixel, 70 Hz/31.47 kHz
MAC II 640 x 480 Pixel, 67Hz/35.00 kHz
If the VGA signal is not recognized, the indication
“VGA >35 KHz” appears in the top right corner of the
picture screen. In this case, change the resolution of
your graphics card.
Ǻ
Ǻ
Ǻ
Ǻ
1
Ǻ
Connecting a PC
Connect the “VGA IN” socket at the front or rear
side of the TV set with the corresponding VGA
socket on the computer using a VGA cable.
Connect the audio output of the computer (if provided) with the “L AUDIO IN R” Cinch sockets
using a commercially available audio cable.
Repeatedly press the
¢
D
AV
button until “VGA” is
displayed on the picture screen. The VGA mode is
activated.
Connecting an Apple Macintosh computer
With the adapter supplied is is possible to use
Macintosh computers with different H and V sync
signals.
For Macintosh computers with Composite Sync and
Sync on Green signals it may be necessary to use a
special adapter or cable. For more information, ask
your computer dealer.
Connect the adapter supplied to one end of the VGA
cable.
Set the DIP switch to the following positions:
1 = off, 2 = off, 3 = on, 4 = on
ON
ON
ON
OFF
OFF
OFF
ON DIP
1234
2
1
Ǻ
3
2
1
E
Connections
ķ
30
AUDIO
AUDIO
L
L
R R
VGA
IN
AUDIO AUDIO
VGA
OUT
L
AUDIO
OUT
R
EXTERNAL 1
IN/OUT
CABLE
EXTERNAL 2
IN/OUT
Page 31

Connect the “VGA IN” socket at the front or rear
side of the TV set with the corresponding VGA
socket on the computer using a VGA cable.
Connect the audio output of the computer (if provided) with the “L AUDIO IN R” Cinch sockets
using a commercially available audio cable.
Repeatedly press the
¢
D
AV
button until “VGA” is
displayed on the picture screen. The VGA mode is
activated.
Series connection
It is possible to connect a second computer
monitor.
Disconnect the TV set from the mains.
Use a second VGA cable to connect the “VGA OUT”
socket at the rear side of the TV set with the VGA
socket on the monitor.
Connect the audio output of the monitor (if provided) with the “L AUDIO IN R“L AUDIO R”
socket next to the “VGA OUT” socket using a commercially available audio cable.
Reconnect the TV set with the mains.
For the operation with the second monitor the TV set
must be switched on.
Settings
Press the .button. The “MAIN MENU” appears.
Select the “FEATURES” menu line then confirm
with G. The “FEATURES” menu appears.
Select the “VGA Input” menu line.
Use the F or E button to select the “Front” or
“Rear” option depending on the VGA socket on the
TV set to which the computer is connected.
Finish the setting. For this repeatedly press the h
button until all menus are removed from the picture
screen.
4
3
2
1
Ǻ
4
3
2
1
5
4
3
r
Connecting an external amplifier
For the settings to be made for the operation with
an external amplifier refer to page 18, section
“Operation with an external amplifier and the loudspeakers supplied”.
Connect the “AUDIO OUT L R” sockets at the rear
of the receiver with the audio input sockets of the
amplifier.
r
Connecting an external Dolby-Surround
amplifier
We assume that you already possess a Dolby Surround system and wish to operate your TV set via
this system.
For this, the red loudspeaker switch at the rear of
the receiver must be in the “extern” position
(switch locked in).
This switches off the loudspeakers connected to the
TV set.
The settings for the Dolby Surround Pro Logic
modes must be made on the external amplifier.
Connect the “L AUDIO OUT R” socket at the rear of
the TV receiver with the audio input sockets of the
amplifier.
Press the
.
button. The “MAIN MENU” appears.
Select the “INSTALLATION” menu line then confirm
with G.
Select the “Setup” menu line then confirm with
G.
Select the “Surround mode” menu line then use the
F or E button to select the “off” option.
Select the “Audio Output” menu line then use the
F or E button to select the desired setting.
“variable”:
if you wish to change the voume with the remote
control unit of the TV set.
“constant”:
if you wish to adjust the volume on the amplifier or
copy the sound on a cassette recorder.
6
5
4
3
2
1
Ǻ
Ǻ
1
Ǻ
Connections
ķ
31
FEATURES
Sleeptimer Off
Child Lock Off
General PP store
Message
Timers
VGA input Rear
SETUP
Audio Output Variable
Ext2 Output VHS Signal
DVD/photo CD Not Present
Surround Mode Pro Logic
Centre Mode
Ext. Amplifier No
Information Line On
EXT2 Input VCR
VCR type Non PALplus
Picture mute black
Page 32

r
Mains voltage:
220-240 V, 50/60 Hz
(power supply control range 165 … 265 V)
r
Power consumption:
approximately 400 Wh, in stand-by ≤ 2 Wh.
With activated copy function and the picture screen
switched off: approximately 80 Wh
r
Reception range:
channels C01 … C99, special channels S01 … S41
r
Sound output:
Without ext. spkrs: music/sine power:
2 × 40W / 2 × 20W (L/R)
80W / 40W (Subwoofer)
Dolby mode:: music/sine power:
2 × 40W / 2 × 20W (L/R)
80W / 40W (Subwoofer)
40W / 20W (Surround)
r
Pin assignment of the EURO-AV socket
If you intend to connect auxiliary appliances to the
TV set (e. g. computer, amplifier system), then your
specialized dealer will be able to make a connection
compatible with official standards by following the
connection table below:
Pin Signal
11 = Audio output, right
12 = Audio input, rightrechts
13 = Audio output, left
14 = Audio, ground
15 = Blue, ground
16 = Audio input, left
17 = RGB, blue input
18 = Switching voltage
19 = Green, ground
10 = MEGALOGIC data line
11 = RGB, green input
12 = –
13 = Red, ground
14 = Ground
15 = RGB, red input (Chroma; S VIDEO)
16 = RGB switching voltage
17 = Video, ground
18 = RGB switching voltage, ground
19 = Video output
20 = Video input
21 = Shielding/ground
The AV 1 socket is configured for RGB in and composite signal in/out.
The AV 2 socket is configured for RGB in, composite signal in/out, S-VHS in/out and Megalogic.
The AV 3 socket is configured for composite signal.
Ǻ
r
Service information for the specialist
This product complies with the following
EU guidelines:
73/23/EWG concerning electrical appliances for the
use within specified voltage limits.
89/336/EWG concerning electromagentic compatibility.
This product complies with the following
standards:
EN 60065, EN 55013, EN 55020, EN 60555-2
This product is authorised and carries the CEBEC
symbol.
It meets the highest requirements with respect to
safety, protection of persons and property, reliability and compatibility with the mains electrical
supply.
Technical Data / Customer Information
ķ
32
220
21
119
Page 33

GRUNDIG AG ••D-90762 FÜRTH Printed in Germany
0 1 2 3 4 5 6 7 8 9
21739-941.02
ĸ
ķ
 Loading...