

Page 1
COLOR TELEVISION
Boston ST 270/8 IDTV/LOG
Page 2

If your dealer has already installed and set up the
TV set, start at page 9 of these operating instructions.
r
Safety and Installation,
What to avoid … 3
r
Connection and Preparation 3
Connecting the unit . . . . . . . . . . . . . . . . . . . . . . 3
Inserting battery into the remote control . . . . . . 3
Switching the unit on/off . . . . . . . . . . . . . . . . . . 3
r
Assigning Channel Positions 4-7
The ATS euro plus station memory system . . . 4-7
Selecting dialogue language . . . . . . . . . . . . . . . . 4
Setting location (country) . . . . . . . . . . . . . . . . . . 4
Special information for France . . . . . . . . . . . . . . .4
The DIALOG CENTER . . . . . . . . . . . . . . . . . . . . . 5
Alterations to the channel position assignment . 5
ATS euro plus, automatic programming . . . . . . . 5
Transfer of TV PROGRAMME CHART from
TV set to video recorder . . . . . . . . . . . . . . . . . . . 6
Assigning channel positions manually . . . . . . . . 6
Fine tuning . . . . . . . . . . . . . . . . . . . . . . . . . . 7
Setting standard (norm) . . . . . . . . . . . . . . . . . . . .7
r
The Remote Control 8
The remote control . . . . . . . . . . . . . . . . . . . . . . . 8
Remote control of a video recorder . . . . . . . . . . .8
r
Altering the sound settings 9
Sound adjustments . . . . . . . . . . . . . . . . . . . . . . 9
Stereo expansion . . . . . . . . . . . . . . . . . . . . . . . . 9
Sound (Stereo, two-channel, mono) . . . . . . . . . 9
Treble, bass, balance . . . . . . . . . . . . . . . . . . . . . 9
Headphones . . . . . . . . . . . . . . . . . . . . . . . . . . . . 9
Altering the volume of a channel
position . . . . . . . . . . . . . . . . . . . . . . . . . . . . . . . 9
r
Adjusting the picture 10
Picture adjustments . . . . . . . . . . . . . . . . . . . . . 10
Altering contrast, picture definition,
white balance,
Perfect Clear and noise reduction . . . . . . . . . . . 10
Altering brightness and colour contrast . . . . . . 10
Picture format switching . . . . . . . . . . . . . . . . . .10
Colour registration . . . . . . . . . . . . . . . . . . . . . . . 10
r
Special Functions 11
Calling up special functions menu . . . . . . . . . . 11
Setting the dialogue language . . . . . . . . . . . . . 11
Mains economy switch . . . . . . . . . . . . . . . . . . . 11
Switching on with … . . . . . . . . . . . . . . . . . . . . 11
Picture/sound scale . . . . . . . . . . . . . . . . . . . . . 11
Megalogic info. . . . . . . . . . . . . . . . . . . . . . . . . . 11
Still picture . . . . . . . . . . . . . . . . . . . . . . . . . . . . 11
AV monitor – the TV set as a
monitoring system . . . . . . . . . . . . . . . . . . . . . . 11
r
Convenience Functions 12-13
Program scan . . . . . . . . . . . . . . . . . . . . . . . . . .12
Parental lock . . . . . . . . . . . . . . . . . . . . . . . . . .12
Entering code number . . . . . . . . . . . . . . . . . . . 12
Blocking programmes which are
unsuitable for children . . . . . . . . . . . . . . . . . . . 13
Blocking all prgrammes . . . . . . . . . . . . . . . . . . 13
r
Teletext 14-18
Teletext mode summary instructions . . . . . . . . 14
Teletext mode . . . . . . . . . . . . . . . . . . . . . . . . . . 14
TOP-FLOF teletext . . . . . . . . . . . . . . . . . . . . . . . 15
Current TV programme . . . . . . . . . . . . . . . . . . . 16
Selecting language group . . . . . . . . . . . . . . . . . 16
TOP mode . . . . . . . . . . . . . . . . . . . . . . . . . . . . 16
Calling up pages . . . . . . . . . . . . . . . . . . . . . . . . 17
Multiple pages/page stop . . . . . . . . . . . . . . . . . 17
Calling up sub-pages directly . . . . . . . . . . . . . . 17
Doubling character size . . . . . . . . . . . . . . . . . . 17
Reveal answer . . . . . . . . . . . . . . . . . . . . . . . . . 18
Watching television in teletext mode . . . . . . . . 18
Page catching . . . . . . . . . . . . . . . . . . . . . . . . . . 18
r
Connection Options
and Operation … 19-25
… for video recorders, remote control of
video recorder . . . . . . . . . . . . . . . . . . . . . . . 19
… for camcorders (VHS, Video 8) . . . . . . . . . . 20
… for S-VHS video recorders or S-VHS
camcorders or Hi 8 camcorders . . . . . . . . . 21
… for satellite receivers . . . . . . . . . . . . . . . . . . 21
… for descramblers (decoders) . . . . . . . . . . . . 22
… with several external units . . . . . . . . 22; 24-25
… for copying video recordings
via the TV set . . . . . . . . . . . . . . . . . . . . . . . . 23
r
Technical Data 26
Technical data . . . . . . . . . . . . . . . . . . . . . . . . . 26
Contents
ķ
2
Page 3
r
What to avoid …
Ń
!
… light from outside falling onto the screen.
The ideal viewing distance is five times the screen
diagonal.
Ń
!
… damage from lightening by disconnecting the
the mains and aerial leads.
Even when switched off, the set could be damaged
by lightening striking the mains and/or aerial lead.
Ń
!
… covering the ventilation slots.
Ń
!
… insufficient spacing when installed in wall unit.
Ń
!
… damage to the mains lead.
Ń
!
… magnetic fields (loudspeakers) near the set.
Ń
!
… rubbing and scratching the screen.
Ń
!
Only clean the screen with a damp, soft cloth. Only
use clear and clean water.
Ń
!
There is a circulation of air due to the heat exchange in the unit. This means that particles of dust
(carpet and curtain fibres and house dust) are
drawn on. These also collect in the ventilation slits,
amongst other places, close up the slits as time
goes by and can thereby cause heat build-ups.
Heat build-ups are a source of danger and influence
the service life of the set.
For safety reasons, these deposits should be removed by a professional from time to time.
Ń
!
… unqualified people opening and tampering with
the set.
Connecting aerial, mains and
video recorders
This highly digitalised television set features optimal picture and sound quality.
Ń
!
The basic requirements for this are:
A properly functioning aerial system and an aerial
lead with high shielding (85 dB) to connect the TV
set to the aerial socket or the videorecorder.
Ń
!
Also keep cable loops away from the set.
r
Inserting the battery in the remote
control
r
Switching the set on/off
Press the ü button on the set.
Ń
!
If the indicator next to the mains button is illuminated then the set is in stand-by mode.
Switch the TV set on with the remote control by
pressing the one of the
0…9
, P buttons.
1
Safety, Installation, Connecting and Preparation
ķ
3
5 x
AV1
AV1
10
cm
20
cm
20 cm
10
cm
Krieg am Golf
AUDIO
L
O
U
T
R
EURO - AV 2
L
I
N
R
EURO - AV 1
AV 1
ń
! SERVICE !
Page 4
r
The station memory system
»ATS euro plus«
Ń
!
This unit is equipped with » ATS euro plus « (Auto
Tuning System). The automatic channel position
allocation makes this new system particularly easy
to use.
This so-called channel memory system scans the
complete reception range, stores the located channels, and enters them in a table with the respective
station names (abbreviations).
After the set has been switched on the display
» Adjust language on screen« appears.
Ń
!
If the page does not appear then press the h and
G buttons on the remote control one after the
other.
The DIALOG CENTER appears (see ill. page 5, on
right). Proceed as described there from .
r
Selecting dialogue language
Ń
!
You can chose from a number of languages for the
dialogue between yourself and the TV set. The user
guide displays appear in the selected language.
GB is set at works. If you want to use this language,
you just have to confirm it with the G button.
r
Selecting location (country)
Select country using |, ]and confirm with G.
This will start the search.
1
2
r
Special information for France
If you have selected »F« for country, the following
menu is displayed.
In this menu, you can select between frequency and
channel for the ATS function using the ]button.
Ń
!
If you are in doubt, contact your specialized dealer.
Confirm your choice with the G button. This
starts the ATS function.
The following message will appear on the picture
screen:
Ń
!
The process can take a minute or longer depending
on the number of TV stations to be received.
After the search, the set switches to channel position 1 and the » Brief instructions « display appears.
Assigning Channel Positions
ķ
4
Adjust language on screen
OK
Confirm
TXT
TV-picture
n
D Deutsch
DK Dansk
E Espanol
F Francais
GB English
I Italiano
N Norge
NL Nederlands
P Portugues
S Svenska
SF Suomi
Select with P- button and
confirm with ok
Brief instructions
TXT
TV-picture
ǺǺ
Call up Dialog Center
p
P
Option bar up/down
FE Setting values
OK
Confirm or all up
TXT
Back to TV-picture
Please wait
–
–
All receivable stations are
automatically searched and
stored in the TV programme
chart
Adjust country
OK
Confirm
TXT
TV-picture
A Austria
B Belgium
CH Switzerland
n
D Germany
DK Denmark
E Spain
F France
GB Great Britain
I Italy
N Norway
NL Netherlands
P Portugal
S Sweden
SF Finland
* Others
Reception via:
OK
Confirm
TXT
TV picture
Cable (frequency selection./MHz.)
Cable/Aerial (channel selection)
Page 5
Assigning Channel Positions
ķ
5
Select the channel position to be changed using
p, P and press the coloured button for the corre-
sponding function (e.g. erase = red button).
End with
ǵ
TXT
once all changes have been made.
For the remaining functions, press the respective
coloured button on the remote control given in the
TV station table dialogue line, e.g. change name,
change channel, prepare channel position for
connected decoder (Decoder » on«).
Follow the instructions given in the dialogue lines
for any further alterations.
r
ATS euro plus
automatic programming
If you have already found and stored TV stations
with » ATS euro plus « and want to start a further
search – due to different reception conditions (e.g.
after moving house, with a new cable connection) –
then press the h and G buttons.
Display:
1
4
3
r
The DIALOG CENTER
Ń
!
The DIALOG CENTER is the TV set’s control centre.
You can call it up by pressing the h and G buttons. You can carry out various adjustments there.
The dialogue symbols are also explained on the
page » Brief Instructions «. At each operating step
they show which buttons on the remote control can
be used to carry out certain functions.
P
Move the coloured bar upwards/downwards.
p
With two-page tables (e.g. TV PROGRAMME CHART) the second page is
» turned to«.
FE Set values.
G Confirm the selected function.
ǵ
TXT
Return to television picture.
Ń
!
Dialogue symbols are given at the bottom of the
picture on most of the displays. They are signposts
in the dialogue between you – using the remote
control – and the set.
Now check which channel positions the stations
have been assigned to. If you are not happy with
something you can make alterations to the channel
position assignment (e.g. the order, delete channel
positions etc.).
Press the
ǵ
TXT
button and “scroll” through the
channel positions using p, P.
r
Alterations to the channel position
assignment
The TV Programme Chart will give you a complete
overview of the channel position assignment.
Call up the DIALOG CENTER using h and G.
Select » TV-PROGRAMME-CHART « using p or P
and call up with G.
2
1
TV-PROGRAMME-CHART
l Change name
l Move
TXT
TV-picture
l Change channel
l Delete
ǺǺ
Return
AUX
Decoder
Prog Name Chan. Decoder
AV
n
1 ARD C 06
2 ZDF C 34
3 BR 3 C 59
4 RTL C 36
5 SAT1 C 40
6 PRO7 C 21
7 RTL2 C 53
8 PREM C 12 on
9 –––– C 00
DIALOG CENTER
OK
Call up
TXT
TV-picture
n
PARENTAL LOCK
TV-PROGRAMME-CHART
AUTOMATIC PROGRAMMING
(ATS/ACI or MEGALOGIC)
AUDIO-/VIDEO-INPUTS
SPECIAL FUNCTIONS
SERVICE
P
OK
P
Page 6
Assigning Channel Positions
ķ
6
r
Assigning channel positions manually
Exam
ple
A TV station which is broadcast on special channel
S 08 in SECAM L/L' norm is to be allocated to channel position 15.
Procedure
Select channel position 15.
Press the h button and the G button.
The » DIALOG CENTER« appears.
Select the TV Programme Chart using p,P and
call up with G.
Select the » Change channel« function.
To do this, press the h button.
Proceed as described in the dialogue lines.
The ten position for the channel entry is underlined
in the assignment line.
In the example (setting special channel S 08) press
the F button and then the p or P buttons.
C for channel becomes S for special channel.
Afterwards press the buttons E,
0
and 8.
5
4
3
2
1
TV-PROGRAMME-CHART
l Change name
l Move
TXT
TV-picture
l Change channel
l Delete
ǺǺ
Return
AUX
Decoder
Prog Name Chan. Decoder
10 TV 5 C 26
11 ARD C 06
12 ZDF C 34
13 BR 3 C 59
14 RTL C 36
n
15 SAT1 C 40
16 PRO7 C 21
17 RTL2 C 53
18 PREM C 12 on
19 –––– C 00
PROG 15 S 08 -03
F
–
–
y
_
n
–––
–
y
–
–
y
E
OK
Confirm
TXT
Stop cancel
0–9
Channel entry
l Search mode
Finetuning
Press the p or P button until » Automatic Programming « has a coloured background and then
press the G button.
Display:
You can chose between » Search for new TV-stations « or »Complete reprogramming«.
Use the notes in the dialogue line for further setting.
Ń
!
If » Search for new TV-stations « was selected, the
displays for language and country will be omitted.
Ń
!
If » Complete reprogramming« was selected then a
new assignment is carried out. Previous channel
position data is erased.
Proceed as on page 4.
If a video recorder with MEGALOGIC functions is
connected to this TV set (this connection must be
made via the EURO-AV sockets – on TV set socket
AV1 – using a fully allocated EURO-AV cable) then
the display » TV programme chart transfer TV
→→
VCR « will also appear on the menu.
Transfer of TV Programme Chart
TV fi VCR
The TV set is equipped with the MEGALOGIC
system.
Using the TV set with MEGALOGIC video recorders
will mean extremely easy operation.
You can transfer the TV set channel position data
(stored TV stations) to the video recorder (VCR).
An ATS search is therefore not necessary on the
recorder.
The TV can be watched and video recordings can be
made from the TV set immediately afterwards.
To do this press the p or P button until
»Transfer of TV programme chart« has a coloured
back-ground and then press the G button.
3
2
AUTOMATIC PROGRAMMING
OK
Call up
TXT
TV-picture
n
Search for new TV-stations
Complete reprogramming
(when changing address)
Transfer of
TV programme chart TV →→VCR
Page 7
ķ
7
Assigning Channel Positions
r
Fine tuning
The set tunes itself automatically to the best picture.
If reception is poor, in some cases it might be
necessary to improve the picture by fine tuning.
The pP buttons are used for this. Make sure the
picture and sound are set properly.
You can vary from +63 to –64.
r
Setting standard (norm)
Press the E button twice.
A list of the norms that the set can receive and
show is added to the previous display.
Press the p or P button until the abbreviation L/L'
AM 6,5 NICAM (Standard) is selected.
The set will automatically tune to the best picture.
The procedure – assigning channel position 15 with
S 08 in SECAM L/L' norm – is completed.
A station identification (abbreviation) can also be
added to this channel position.
To do this press the G button.
The function »Change name« in the dialogue line of
the » TV PROGRAMME CHART « display is to be
selected by pressing the blue button.
Select the correct abbreviation using the pP but-
tons.
Continue as indicated in the dialogue line.
5
4
3
2
1
1
PROG 01 – ––––
IJ
n
–––
–
y
–
–
y
–
–
y
–
–
y
İ
OK
Confirm
TV
Stop/Cancel
n
––––
ARTE
BRT1
BRT1
CAN
+
C1
FNET
F2
F3
INFO
ITB
LIFE
PROG 15 S 08 -03 Standard
IJ
–
–
y
–
–
y
–
–
y
n
–
–
İ
OK
Confirm
TXT
Stop/Cancel
B/G FM 5.5 (A2 Stereo)
n
L/L’ AM 6.5 (NICAM)
I FM 6.0 (NICAM)
D/K/K’ FM 6.5/6, 258 (A2 Stereo)
B/G FM 5.5 (NICAM B, DK, E)
B/G FM 5.5 (NICAM N, S, SF)
D/K/K’ FM 6.5 (NICAM)
D/K/K’ FM 6.5/6, 742 (A2 Stereo)
Page 8
ķ
8
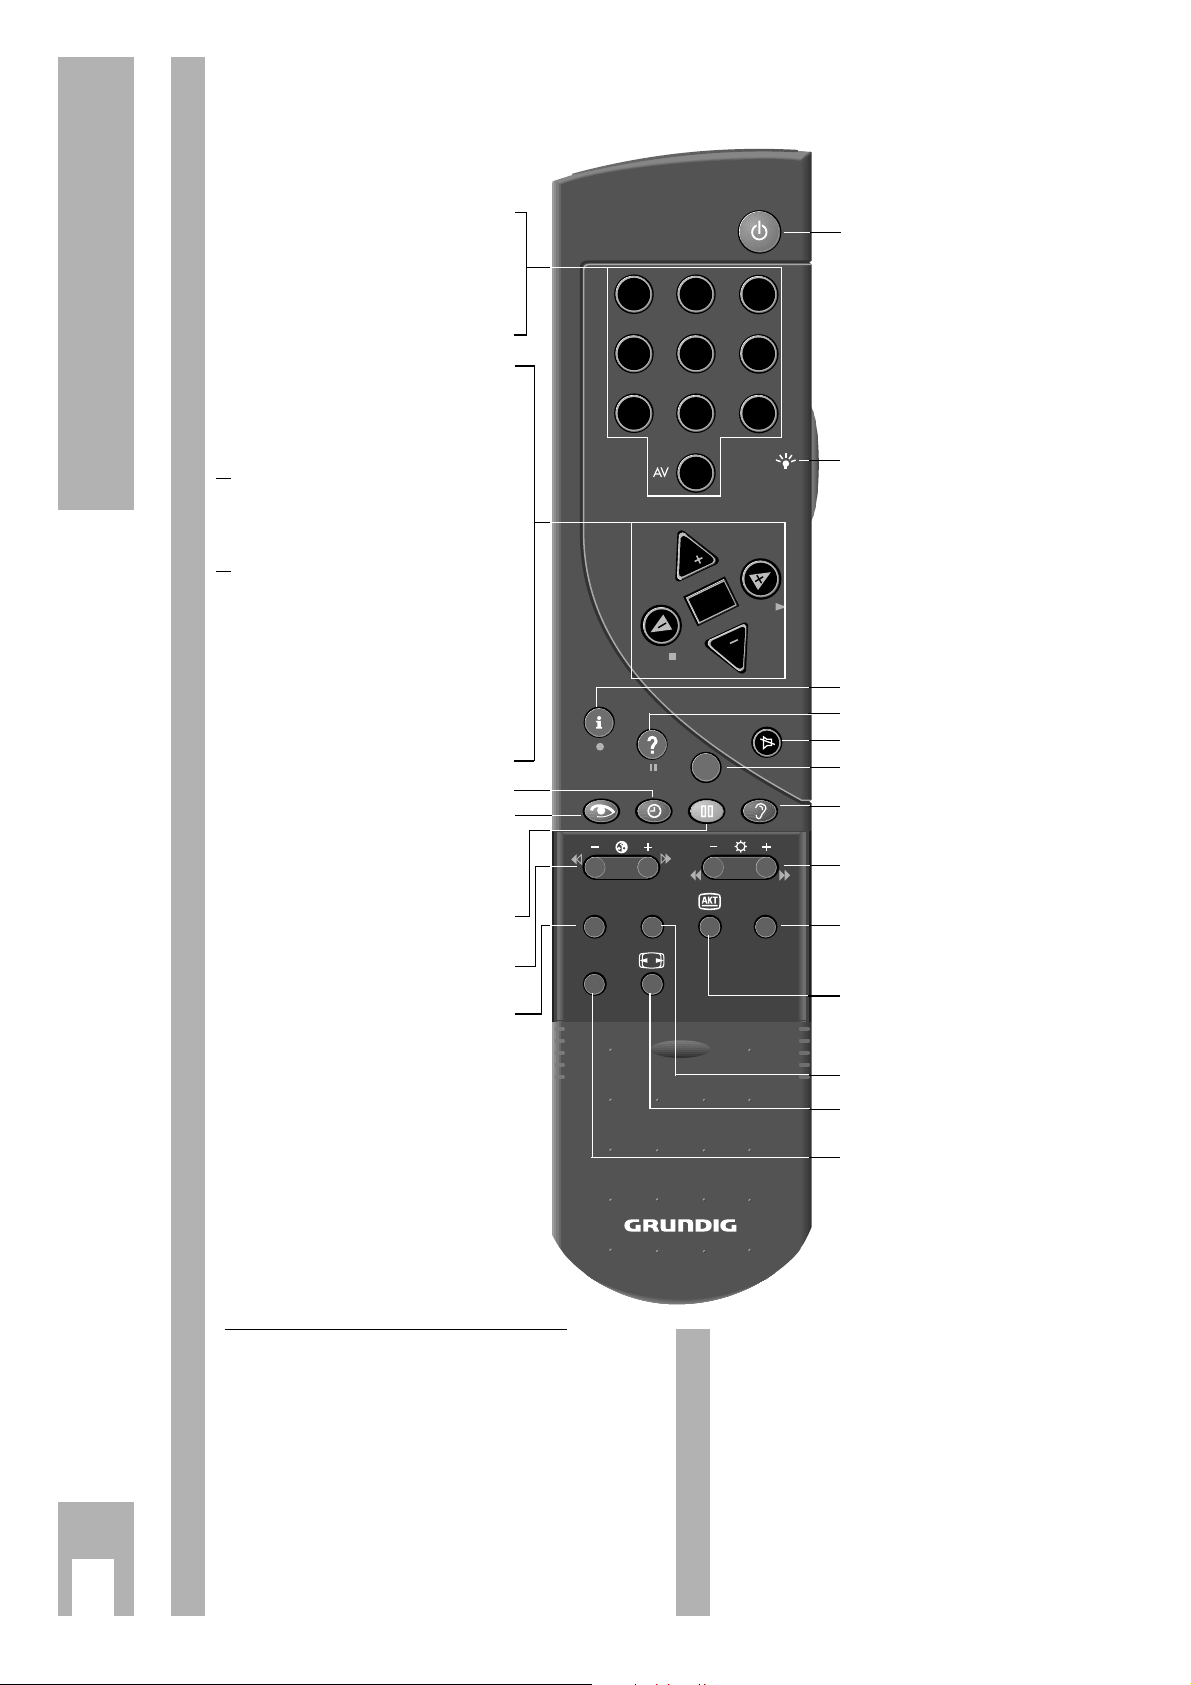
The Remote Control
On this page, the buttons on the remote control are
briefly explained. For detailled information see the
corresponding chapters in this booklet.
ĵķ ( – i button) = Reverse picture search
ĶŁ (i + button) = Forward picture search
l (h button) = Start recording
n ( F button) = Stop
ĵĵ ( –
v
button) = Fast rewind
ŁŁ (
v
+ button) = Fast forward wind
ll ll (
¢
D
button) = Pause
ı (E button) = Start playback
p = Programme position –
P = Programme position +
Remote Control of a Video Recorder
The remote control handset of your TV set enables
also the remote control of Grundig video recorders.
Your specialized dealer can tell you which video
recorders are suited for this.
Press and hold down the
¢
VIDEO button.
This switches the remote control handset into the
video recorder mode.
Then press the desired function button.
The following table shows you which buttons are to
be used for the various recorder functions..
1…0
Select programme and switch
0
AV
on from standby,
or
– select AV position,
– enter page numbers in Teletext
mode.
P Switch on from standby. Select
programmes step by step
(1, 2, 3 ...)
p Select programmes step by step
(... 3, 2, 1)
or
pP Move cursor up and down.
xc
Volume
or
xc
Move cursor to the left and
right.
When holding down the P or p button,
the station names will scroll on the screen. When releasing the pressed button,
the TV set switches to the selected programme position.
G Modify and activate certain
functions.
h
Time display on/off.
k
Picture adjustments.
Access to the »Picture settings«
menu.
j
Still picture, or
¢
AUX plus
j
= Program scan
- i +
Colour contrast.
SAT Satellite receiver remote control
(press and hold down the SAT
button).
b
Switch to standby.
R Button illumination on/off. After a
few moments, the illumination is
switched off automatically.
h Access to the DIALOG CENTER
¢
D
Call up brief instructions.
¢
ʀ Sound on/off (mute).
¢
TXT
Teletext mode ɫ TV mode
g
Sound adjustments.
Access to the »Sound settings«
menu.
- v +
Brightness
AUX
Preselect button for certain functions, e.g.
¢
AUX plus
j
= Program scan
C
Info about current broadcast
(see chapter »Current TV
programme« on page 16).
PIP Picture-in picture on/off.
E
Picture format switching
4:3 ɫ 16:9
VIDEO Video recorder remote control
(press and hold down the
VIDEO button).
21
4 5 6
7 8 9
0
P
OK
P
TXT
3
SAT PIP
VIDEO
TP 900
AUX
Page 9
ķ
9
r
Sound adjustments
Four different sound adjustments can be made one
after the other using the g button. The current
functions are briefly displayed after the button is
pressed.
You can chose between: » Language «, » Music «,
» Supersound« and »Personal«.
Select the corresponding function according to the
broadcasters TV programme offer.
To be able to set the »Personal«, you have to select
the function using the g button and press the
G button.
r
Stereo expansion
Deepens the acoustic pattern with stereo broadcasts and improves it with mono broadcasts.
Alter using the F or E button.
r
Sound (Stereo/two-channel, mono)
Ń
!
If the set receives two-channel broadcasts – e.g.
the original version of a film on sound channel B
(Mono B) and the dubbed version on sound channel A (Mono A) – then you can choose the sound
channel you prefer (Display indicators: Mono).
Ń
!
If the set receives stereo broadcasts, it will automatically switch to stereo sound reproduction (Display
indicators: Stereo).
If the stereo sound reception is poor then you can
switch the sound to » Mono « (see adjustment
example).
Adjustment example: switching sound from
» Stereo« to »Mono«;
Give the » Sound « function a coloured background
using the p or P buttons.
Select the display » Mono« using the E button.
2
1
1
r
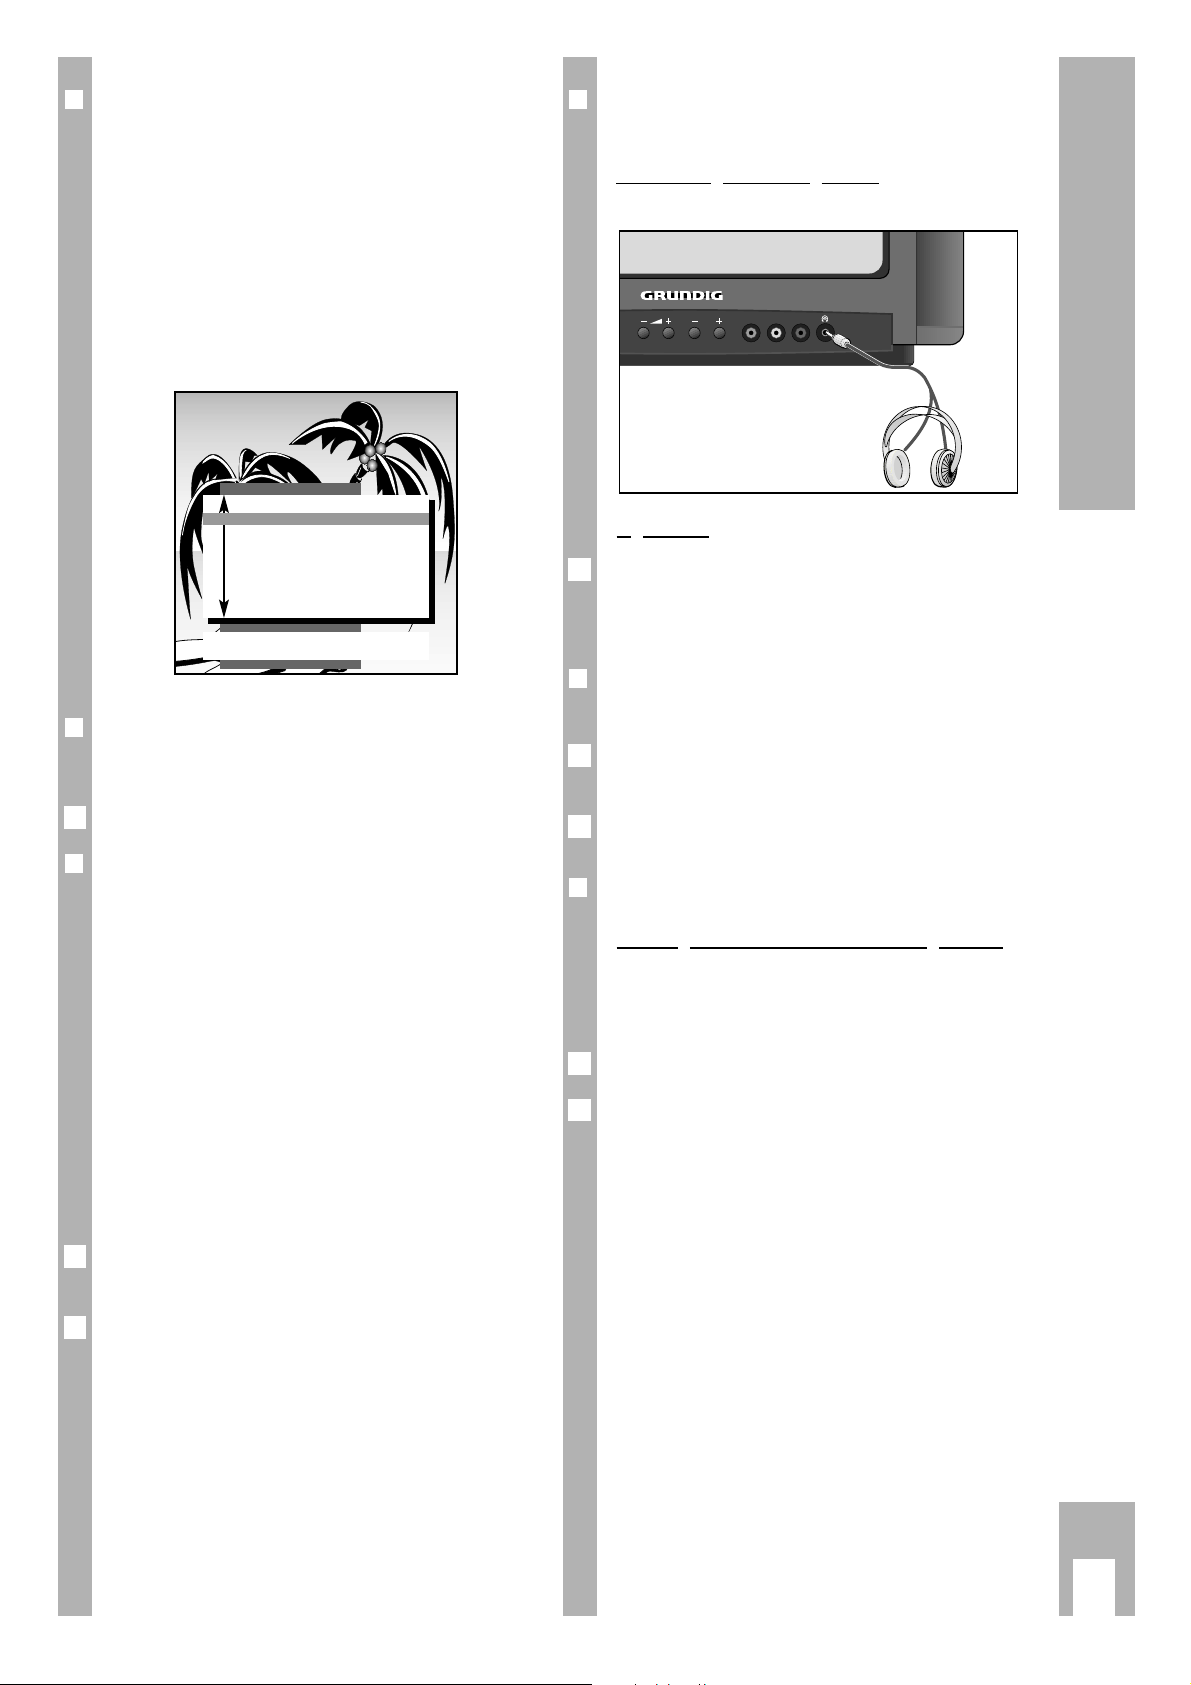
Headphones
For headphones proceed as with » Sound«.
Connectin
g the headphones
Headphone plug 3.5 mm diameter jack.
Operation
Press the
¢
AUX button and then alter the volume
using the F or E button.
The altered value is shown on a scale.
r
Treble, Bass, Balance
The sound setting can be altered as you wish.
Select the line » Treble «, » Bass « or » Balance «
using the p or P buttons.
Alter using the F or E button.
r
Volume P1
Alterin
g the volume of a channel position
If you receive a station whose volume differs from
others (too loud or too quiet), then you can change
this.
Select the » Volume « position using the p button.
Alter using the F or E button. Only the volume of
the station currently selected is altered.
This also applies for the AV channel positions.
2
1
2
1
1
VIDEO IN L – AUDIO IN – R
P
Altering Sound Settings
Sound -settings
TXT
TV-picture
n
Stereo expan
ʀ
........
ǁ
Sound Mono
Headphones
[
n
–
–
]
Treble
[
n
–
–
]
Bass
[
n
–
–
]
Balance
[
n
–
–
]
Volume P 1
[
n
–
–
]
Page 10

ķ
10
Adjusting Picture
r
Picture adjustments
Using the k button four different picture adjustments can be made one after the other. The current
functions are displayed briefly after the button is
pressed.
You can choose between:
» During the day «, » In the evening «, » Soft « and »
Personal «.
Select according to your desires and the time of
day.
To be able to set the » Personal « you have select
the function using the k button and press the
G button.
Select »Contrast«, »Sharpness«, »White balance«,
» Perfect Clear « or » Noise reduct. « using the
p or P button (give it a coloured background).
Alter the values using the F, E buttons.
r
Contrast
Ń
!
The TV set was tested with maximum contrast in
order to test the reliability of all components.
Depending on where the set is placed and the
brightness of the room (ambient light), it is a good
idea to reduce the contrast slightly in order to get
the subjectively best picture.
r
Sharpness
You can use this to set the picture definition optimally according to your desires.
r
White balance (Blue stretch)
You can use this to give the colour a slight red or
blue tint.
r
Perfect Clear
Increases the contrast range. The contrast is reduced in the dark areas of the picture giving the picture depth and definition.
r
Noise reduction
The noise reduction improves the picture quality
with poor TV/video signal sources.
3
2
1
You can chose between:
off = for good picture quality
autom. = for picture with slight interference
strong! = should only be used for a picture with a
lot of interference as tracers can appear
when there are quick movements o the
screen.
Press the
ǵ
TXT
button to close menu and return to
picture
r
Altering brightness and colour contrast
To do this press the minus (–) or plus (+) on the
corresponding rocker button (v, i) as long as it
takes to reach the desired value.
Brightness with the –
v
+ button.
Colour contrast (colour) with the –
i + button.
Brightness
-
nnnnnnnnnnnnn
–
–
+
Colour
-
nnnnnnnnnnnn
–
–
+
The coloured bar reacts when the corresponding
button is pressed.
In the case of broadcasts in NTSC norm, «Tint» is
added to the menu options. To adjust the Tint,
press the
¢
AUX and then the
™
button (– or +
according to your preferences).
rr
Picture format switching
If the TV set receives a recorded PALplus broadcast
via a video recorder, camcorder or PALplus decoder, the picture format must be switched to 16:9.
For this, press the
¢
E button until »16:9« is dis-
played.
r
Colour match
Call up DIALOG CENTER:
Press the h and G buttons.
Select » SERVICE « using p and call up with the
G button. » Colour match « has a coloured
background.
Call up using the G button.
Alter the colour registration using the F or E
button.
Only the colour registration of the channel position
currently selected is altered.
4
3
2
1
1
1
Picture settings
TXT
TV-picture
n
Contrast F nnnnnnnn
–
–
E
Sharpness
nnnnnnnnnn
White bal.
[
n
–
–
]
Perfect Clear off
Noise reduc.. off
Colour match
Colour match P 8 F
[
n
–
–
]
E
ǺǺ
Return
TXT
TV-picture
Page 11

ķ
11
Special Functions
r
Call up menu
Press h and G buttons.
The DIALOG CENTER appears.
Select » SPECIAL FUNCTIONS « using the p
button and call up with the G button.
r
Setting dialogue language
»Adjust language on screen« has a coloured background.
Press the G button.
Further explanations are on the display.
See also page 4 » Setting dialogue language«.
r
Mains economy switch
Here, the unit can be set so that it switches off
completely from stand-by after a given interval
(range 1 hour to 4 hours).
This saves energy.
To do this, select » Mains economy switch « with
the p, P button.
Use F, E to enter the desired switching off interval.
r
Switching on with...
If you often use the set as an AV monitor, for
example together with a camera as a monitoring
system or when it is used with a satellite receiver,
you can use this function to give the AV channel
position priority. i.e. when you switch on the AV
channel position appears instead of the channel
position last selected.
To do this select »Switch on with« using the p, P
buttons.
Select the desired channel position using F, E.
r
Picture/sound options
Select using the p, P button.
Use the F or E button to select whether scale displays – such as volume are desired.
Volume
F nnnnnnn
–
–
E
2
1
2
1
2
1
1
2
1
r
Megalogic info
Ń
!
Megalogic can be used to display information on
current video recorder operation.
You are informed briefly independent of TV operation which video recorder function is » running « at
the moment.
For example: Data transfer of TV Programme Chart,
playback, recording, fast forward etc.
To do this, select » Megalogic-Info « using the
p,P buttons.
Use the F or E button to choose whether displays
are wanted or not.
If a video recorder with Megalogic functions is not
connected then the » Megalogic-Info « display will
be omitted.
The special functions in
TV operation
r
Still picture
This can be used to » freeze « a picture from a currently running programme.
To do this press the j button.
Pressing the button again ends this function.
r
AV Monitor – Using the TV set as a monitoring system
Exam
ple:
You want to monitor a children’s room with a video
camera and watch television at the same time.
Proceed as follows:
Connect the video camera to socket AV1 or AV2.
Switch on the TV set and the camera.
Select the corresponding AV channel position (with
the camera playback) using the
AV
0
button.
Select desired TV station.
Press the
¢
PIP button.
Ń
!
The picture from the children’s room is displayed
as a stationary picture (micro-picture) and is constantly updated.
A video recorder can also be connected instead of
the video camera and its playback be displayed.
Press the
¢
PIP button to end the function.
5
4
3
2
1
2
1
SPECIAL FUNCTIONS
ǺǺ
Return
OK
Call up
TXT
TV-picture
n
Adjust language on screen
Mains economy sw. 1h
Switch on with Prog.
Pic./sound options On
Megalogic-Info On
Page 12

ķ
12
Convenience Functions
r
Program scan
Ń
!
This can be used to display nine different stations
as micro-pictures (as still pictures without sound)
in a block on the screen.
This gives you an overview of the programmes currently being broadcast.
The pictures are updated in short time intervals one
after the other.
Proceed as follows:
Press the
¢
AUX
and j buttons.
The station block 1–9 is set up gradually.
If you want to select one particular broadcast from
block, then press the corresponding numbered
button
1…9
.
If you have more than 9 assigned channel positions
then use p or P to switch to the next block (e.g.
channel positions 10-18).
To return to the single picture, press the h,
¢
D
or
ǵ
TXT
button.
r
Parental lock
With this function you can …
… enter a safety code (code number) which blocks
either programmes that are unsuitable for children or which blocks all stations;
… enter a TV set switching off time.
Proceed as follows
Press the h and G buttons.
The DIALOG CENTER will appear.
Select the function » PARENTAL LOCK « using
]
(give it a coloured background).
2
1
4
3
2
1
Call up the » Parental lock« function:
Press the G button.
r
Entering code number
For example 1111 (always four-digit!);
Display: xxxx.
The numbers are hidden when entered.
Then press the G button.
Ń
!
Please remember the code number well!
If you forget the code number, a key on the last
page (cover) will help you.
Now select the desired function.
2
1
3
PARENTAL LOCK
0–9
Insert code number
OK
Confirm
ǺǺ
Return
n
Code number
n
– –––
Lock programme no
unfit for children
All programmes blocked no
from: ––:––
DIALOG CENTER
OK
Call up
TXT
TV-picture
n
PARENTAL LOCK
TV-PROGRAMME-CHART
AUTOMATIC PROGRAMMING
(ATS/ACI or MEGALOGIC)
AUDIO-/VIDEO-INPUTS
SPECIAL FUNCTIONS
SERVICE
Page 13

ķ
13
Convenience Functions
r
Blocking programmes which are unsuitable for children.
Ń
!
The signal to block programmes is not yet broadcast by all TV stations.
Ń
!
If a programme which is unsuitable for children is
broadcast then a table with a corresponding message appears, for example:
rr
Blocking all channels at once
Enter code number.
Select »All programmes blocked yes«.
Switch off the set.
When switching the set on again, the following
message will be displayed.
Blocking all channels at a desired time
Enter code number.
Select »All programmes blocked from --:--«.
Enter a four-digit switching off time; (8:45 = 08:45)
The set switches off automatically once the entered
time is reached and cannot be used by unauthorised people.
Ń
!
The set an only be switched on again by entering
the previously stored code number.
3
2
1
4
3
2
1
PARENTAL LOCK
0–9
Insert code number
Programme selection
Code number
n
– –––
RTL blocked
Program unfit for children
ɫɫ
PARENTAL LOCK
0–9
Insert code number
Code number
n
– –––
All stations blockes!
Page 14

ķ
14
Teletext Mode - Summary Instructions
Page Catching
h Call up Teletext overview page.
ǵ
TXT
Teletext mode ɫTV mode.
j (yellow) Switch to next group with passage to next
block.
g (blue) Switch to next block.
¢
AUX Call up dialogue line (see below).
C Programme preview for current programme
(Text preselection) in TV mode.
With Floftext, the colour buttons are used to call up the
subjects shown in the dialogue line.
Dialogue Line
Display line with
¢
AUX (display for approx. 5 sec).
Select function with F or E.
Call up function with G.
Enlarge character height
Bypass waiting
times (in current
programme mode)
Directly call
up subpage
Reveal answer
Stop pages
Select language
group
G K H L I J
21
h (green) Go to next block with passage
to next group.
k (red) Go back.
1…0
Select Teletext pages.
Directly call up subpage:
Press - ibutton.
Enlarge character height:
Press
i
+ button.
Reveal answer:
Press
v
+ button.
Stop pages:
Press -
v
button.
4 5 6
7 8 9
0
P
OK
P
TXT
3
SAT PIP
VIDEO
TP 900
AUX
Page 15

ķ
15
General
Teletext is the name for additional information
transmitted alongside the television signal by television stations.
You can make the additional information visible on
the screen, with the aid of a teletext decoder which
is installed in your television set.
Teletext takes the form of text, graphic representations or subtitles for television programmes.
Subtitles serve as assistance for the hard of hearing.
Your television set offers you a simplified means of
operation, in the form of information pages and dialogue lines. The dialogue lines indicate functions
and the corresponding buttons.
r
TOP-FLOF teletext
TOP and FLOF are new methods for simple and
faster selection of teletext pages.
With TOP and FLOF you can select teletext pages
without knowing the page number. This is because
all teletext pages are sorted into topics – also
known as blocks – like in a » card index «.
For example, all news items are in the » News «
block. Other subjects (blocks) include » Sport «,
»TV Programmes« and »Services«. With TOP teletext these blocks are subdivided into groups;
» News « into politics, economics, culture etc. The
normal pages are to be found within these groups.
The user prompts on the screen make operation
extremely easy and reliable. A coloured comment
line appears at the bottom of the picture. The indicated colours are to be found on the remote control. In TOP mode the yellow field indicates the the
next group in the current block. The blue field indicates the next block.
NACHRICHTEN
SPORT
nächste Gruppe
nächster Block
- +
Ǻ
You can switch from block to block using the blue
button on the remote control, and from group to
group using the yellow button. You flip forwards
from page to page using the green button, and
backwards using the red button.
In FLOF mode, a selection of subjects appears in
coloured lettering. The coloured buttons on the
remote control call up the respective subjects.
TOP and FLOF thus take you quickly, simply and
reliably to your goal – the required teletext page.
If neither TOP or FLOF teletext is transmitted by the
station, a red coloured bar with a – and a green
coloured bar with a + appear in the comment line.
If the aerial signal is poor, e.g. snow on screen, the
teletext pages may be reproduced incorrectly. If fine
tuning the TV set does not improve this, then please
have the aerial system checked.
r
What you should know
that additional information is required from the
station for » TOP « teletext mode. For this reason
please wait a short time after switching on or changing channel, until the TOP decoder has read the
data into its memory and the information is available.
Using the
ǵ
TXT
button you can return to normal
TV mode from any other operating mode.
Please note the user prompts which appear at the
bottom of the screen.
Operation
Use the numbered buttons 1…0or Pp to select the channel from which you wish to call up teletext pages.
Ǻ
blau
WeatherNewsSportTV Guide
gelbgrünrot
Teletext Mode
NEWS
next group
next block
red green yellow blue
Page 16

ķ
16
r
Switching teletext on/off
Press the
ǵ
TXT
button on the remote control.
The contents page 100, or the last videotext page
which had been called up appears.
Press the
ǵ
TXT
button, teletext is switched off.
r
Current TV programme
You have just turned the TV set on and would like
to know “what is on at the moment”.
To do this press the
¢
C button.
» Programme search « appears on the screen.
Shortly afterwards the information appears in the
picture.
If the display » Program not available « appears
instead then you have to call up the teletext using
ǵ
TXT
.
Press the
¢
AUX button. The dialogue symbol line
appears.
Move the cursor (coloured square) onto the J
symbol using the E button Cursor and
Press the G button. Display:
4
3
2
1
2
1
In the » Programme preview « function, use the
1…0
buttons to enter the page number where
the programme preview is situated in the teletext of
the currently selected station.
For most stations it is page 300.
r
Selecting language group
You can choose between three language groups for
the dialogue with the teletext.
The language choice covers the following groups of
countries.
W. Europe Eastern Europe Europe +
Turkey
GB/ PO/ GB/
D/NL/B/ D/NL/B/ D/NL/B/
S/N,DK/SF/H/ S/N,DK/SF/H/ S/N,DK/SF/H/
I/F/E/IS/ I/F/YU/ I/F/E/IS/
CS/ CS/RO/ TR/
Proceed as follows:
Call up the » Language group« menu as in previous
chapter – described from onwards.
Select the function (give it a coloured background)
using the p button and leave with E.
Then press the h button and the chosen language
group is stored.
r
TOP mode
At the bottom of the picture, a red, green, yellow
and a blue field can be seen. There are corresponding coloured buttons on the remote control.
With the k (red) button, you flip back.
With the h (green) button, you flip forward to
the next available page (with overrun to the next
group).
With the j (yellow) you scroll to the next group.
After the end of the selected block you move automatically to the next block (overrun).
With the g (blue) button you scroll from block to
block.
4
3
2
1
3
2
2
1
5
Teletext Mode
Current program
l Program index
l Subtitle
l Program guide
TXT
TV-picture
09.03 Die Bambus-Bären-Bande
09.30 Der diebische König… 306
09:15:37
P1
ARD
303 303 ARD/ZDF Mi 27. 03.96 09 :15: 37
AA RR DD
TI
/
–
GUIDE
Mitwoch, 27. März 1996
18.49 Tagesschau-Telegramm
18.54 Frankenberg . . . . . . . . . . . . . . . . 312
19.53 Das Wetter im Ersten . . . . . . . . . 309
19.58 Heute abend im Ersten
20.00 Tagesschau (*) . . . . . . . . . . . . . . 310
20.15 Heimatmelodien
Die Schlagerparade der
Volksmusik
21.00 Monitor (*) . . . . . . . . . . . . . . . . 316
21.45 Heimatgeschichten . . . . . . . . . . . 317
22.30n Tagesthemen. . . . . . . . . . . . . . . 315
23.00 Jedem wohl und
keinem wehe . . . . . . . . . . . . . . . . 317
bis 23.45 Uhr
G K H L I J
Abend II auf 304
Inhalt 300
Text-Vorwahl für: P 1 ARD
0-9 Enter page number
•
Delete
ǺǺ
Return
n
Programm-preview S 300
Language group F Europa+Türkei E
Page 17

ķ
17
r
Calling up pages
Use the numbered buttons 1…0to enter the
required page number as a three-digit number.
– The page number appears at the top of the screen
and the page appears after a short interval.
Programme preview
You can also switch directly to the programme preview of the respective station.
Press the h button.
Page 100 appears.
r
Mulitple pages/page stop
A number of sub-pages can be combined under one
page number. They are » scrolled « at an interval
determined by the television station.
Sub-pages are indicated by a display below the
time, e.g. 3/6 means you are looking at the third of
six sub-pages.
If you wish to view a sub-page for longer, press the
¢
AUX button.
The dialogue symbol line is displayed.
Select the I symbol with the F or E button.
Press the G button.
The contents of the page shown is now »held«, not
updated and the unit does not switch to further
sub-pages.
Press the G button.
The » STOP « function is cancelled and the current
sub-page appears.
4
3
2
1
1
r
Calling up sub-pages directly
Press the
¢
AUX button (dialogue symbol line
appears).
Select the H symbol with the F or E button.
Press the G button.
The selected teletext page number e.g. 155/0001
appears in the info line.
Use the the numbered buttons to enter the required
sub-page as a four-digit number. If it is to be the
second page then 0002. The required sub-page is
searched for and displayed.
Press the G button,
the function is cancelled.
r
Doubling character size
Press the
¢
AUX button (dialogue symbol line is dis-
played).
Select the G symbol with the F or E button.
Pressing the G button successively gives:
– upper half of picture with double height of type
– lower half of picture with double height of type
– normal picture.
2
1
5
4
3
2
1
Teletext Mode
Page 18

ķ
18
r
Reveal answer
This function is used on certain teletext pages, for
instance to solve puzzles or with VPS pages for
programming a video recorder.
Press the
¢
AUX button (dialogue symbol line
appears).
Select the L symbol with the F or E button.
Press the G button,
the hidden information is revealed.
Press the G button,
the » Answer« function is cancelled.
r
Watching television during teletext
operation
r
Updating a page –
bypassing waiting periods
The teletext editors update certain teletext pages.
For example, exchange rates are updated, sports
news brought up to date or latest news added.
Assuming you want to watch television and still
want to be kept up to date, select the relevent
page – e.g. page 143 – and after press:
The
¢
AUX button (dialogue symbol line is displayed).
Select the K symbol with the
IJ or İ button.
Press the G button.
You will see the TV picture with the teletext symbol
ķ
at the top.
If p143 is displayed in the Info line instead of the
symbol then the page has been updated. Then
press the G button.
The teletext page appears with the updated information.
You can also use this function to bypass waiting
periods while your teletext decoder searches for a
page. If the page has been found, a message
appears in the info line, e.g. p143.
4
3
2
1
4
3
2
1
r
Page catching,
i.e. selecting pages without entering the page number. You can use the cursor to select required teletext pages directly from the contents pages (pages
where three-digit page numbers appear). With this
function you avoid entering the three-digit page
number.
Press the p or P button.
» Page Catching « appears at the top of the screen.
A highlighted square (cursor) appears at the first or
last page number.
Use the p or P button to move the cursor to the
required page number.
Press the G button.
The page appears on the screen.
3
2
1
Teletext Mode
Page 19

Connection Options and Operation ...
ķ
19
r
… for video recorders
Ń
!
The TV set is equipped with various sockets. Various
external units – such as video recorders, satellite
receivers, video cameras etc. – can be connected to
them. With these you can record, playback, copy etc.
But first some adjustments must be made for the
respective external unit.
Use the » AUDIO-/VIDEO-INPUTS« menu for this.
Calling up
Press h and G button;
Press the p or P button until » AUDIO-/ VIDEO-
INPUTS « has a coloured background, then press
the G button; the desired menu is displayed.
Here select which unit (or which units) you want to
connect and what type they are (e.g. VHS, Hi 8
etc.).
For video recorder operation press the p or P button until » Video recorder « has a coloured background.
Then select the type of the recorder to be connected
using the E button.
You have a choice of » MegLog «, »VHS «, » Hi8 «
and » SVHS«.
If you are not going to connect any further units,
select » no « for the remaining positions – first
press p or P to give it a coloured background – (as shown in the above AUDIO-/VIDEOINPUTS menu).
Press the G button. You will see a graphic representation of your chosen configuration.
5
4
3
2
1
Connection
Video recorders with Megalogic functions should
always be connected to the AV1 socket.
Connect the AV1 socket to the corresponding
socket on the recorder.
Playback
Press the
AV
0
button as often as it takes for AV1
to appear.
Start playback on the recorder.
The recorder playback apears on the screen.
r
Operating the video recorder with the
remote control
You can also operate a GRUNDIG video recorder
using the remote control. Your professional dealer
can advise you which appliances are suitable.
Press and hold down the
¢
VIDEO button.
This switches the remote control to video recorder
mode.
Then press the button required.
The following list tells you which recorder functions
can be operated by which buttons.
ĵķ (button – i) = picture search reverse
ĶŁ (button i +) = picture search forwards
l (button h ) = start recording
n (button F ) = stop
ĵĵ (button –
v
) = rewind
ŁŁ (button
v
+) = fast forward
ll ll (button
¢
D
) = pause
ı (button E) = start playback
p = programme position –
P = programme position +
AV2
VIDEORECORDER
AV1
RECEIVER / DECODER
ʐ
INPUT-SAT
950...2050MHz
14/18V 0,35A
EURO-AV
AUDIO
1
AUDIO-/VIDEO-INPUTS
OK
Connect. propos.
TXT
TV-picture
Camera-Recorder no
n
Video-Recorder F MegLog E
Megalogic, VHS, SVHS, Hi8
Video-Recorder2 no
VHS, SVHS, Hi8
Satellite Receiver no
Decoder no
AUDIO-/VIDEO-INPUTS
ǺǺ
Return
TV
TV-picture
Sockets Devices
AV3 l l l
AV2
AV1 ľ –ı
MegLog
Page 20

ķ
20
Connection Options and Operation ...
r
… for camcorders
(VHS, Video 8)
Ń
!
The TV set is equipped with various sockets. Various
external units – such as video recorders, satellite
receivers, video cameras etc. – can be connected to
them. With these you can record, playback, copy etc.
But first some adjustments must be made for the
respective external unit.
Use the » AUDIO-/VIDEO-INPUTS« menu for this.
Callin
g up
Press h and G button;
Press the p or P button until » AUDIO-/ VIDEO-
INPUTS « has a coloured background, then press
the G button; the desired menu is displayed.
Here select which unit (or which units) you want to
connect and what type they are (e.g. VHS, Hi 8
etc.).
For camcorder operation press the p or P button
until » Camcorder « has a coloured background and
then select »yes « using the E button.
As you are not going to connect any further units,
select » no « for the remaining positions – first give
it a coloured background using p (as shown in the
above AUDIO-/VIDEO-INPUTS menu).
4
3
2
1
Press the G button. You will see a graphic representation of your chosen configuration.
Connection
Pictur
e signal
Connect the VIDEO IN to the corresponding socket
on the camcorder.
Camcor
ders with mono sound
Connect the L socket to the camcorder sound
socket.
Press the
AV
0
button as often as it takes for AV3
to appear in the display.
Press the
¢
AUX button and then the
2
button.
» Mono« appears on the screen.
Camcorders with stereo sound
Connect the L and R sockets to the camcorder
sound sockets.
Press the
AV
0
button as often as it takes for AV3
to appear.
Playback
Start playback on the camcorder.
The camcorder playback appears on the screen.
1
2
1
4
3
2
1
VIDEO IN L – AUDIO IN – R
P
5
AUDIO-/VIDEO-INPUTS
OK
Connect. propos.
TXT
TV-picture
n
Camera-Recorder F yes E
Video-Recorder no
Megalogic, VHS, SVHS, Hi8
Satelliten-Receiver no
Decoder no
AUDIO-/VIDEO-INPUTS
ǺǺ
Return
TV
TV-picture
Sockets Devices
AV3 l l l ľ–ı
AV2
AV1
CAMERA
Page 21

ķ
21
Connection Options and Operation ...
r
… for S-VHS video recorders, S-VHS
camcorders or Hi8 camcorders
Call up the » AUDIO-/VIDEO-INPUTS « menu (see
page 19).
Carry out adjustments as shown in the following
display.
Press the G button and check whether the following connection diagram corresponds with your
wishes.
Connection
Playback
Connect the AV1 socket to the corresponding
sockets on the SVHS recorder.
Press the
AV
0
button as often as it takes for AV1
to appear in the display.
Start playback on the recorder.
You will see the recorder playback on the screen.
3
2
1
AV2
VIDEORECORDER
AV1
RECEIVER / DECODER
ʐ
INPUT-SAT
950...2050MHz
14/18V 0,35A
2
1
AUDIO-/VIDEO-INPUTS
OK
Connect. propos.
TXT
TV-picture
Camera-Recorder no
n
Video-Recorder IJ SVHS İ
Megalogic, VHS, SVHS, Hi8
Video-Recorder2 no
VHS, SVHS, Hi8
Satelliten-Receiver no
Decoder no
AUDIO-/VIDEO-INPUTS
ǺǺ
Return
TV
TV-picture
Sockets Devices
AV3 l l l
AV2
AV1 ľ –ı
SVHS
r
… for satellite receivers
Call up the » AUDIO-/VIDEO-INPUTS « menu (see
page 19).
Carry out adjustments as shown in the following
display.
Press the G button and check whether the following connection diagram corresponds with your
wishes.
Connection
Satellite receiver to socket AV2.
Operation
Switch on satellite receiver.
Press and hold down the
¢
SAT button and enter the
desired satellite receiver channel position using the
numbered keys 0…9.
2
1
AV2
VIDEORECORDER
AV1
RECEIVER / DECODER
ʐ
INPUT-SAT
950...2050MHz
14/18V 0,35A
EURO-AV EURO-AV
2
1
AUDIO-/VIDEO-INPUTS
OK
Connect. propos.
TXT
TV-picture
Camera-Recorder no
Video-Recorder no
Megalogic, VHS, SVHS, Hi8
n
Satelliten-Receiver IJ yes İ
Decoder no
AUDIO-/VIDEO-INPUTS
ǺǺ
Return
TV
TV-picture
Sockets Devices
AV3 l l l
AV2 ľ– ı
AV1
SATREC
AV2
AV1
AV2
AV1
Page 22

ķ
22
r
… for descramblers (decoders)
Ń
!
Some stations – whose programmes are transmitted via cable systems – scramble their programmes. The picture and sound cannot be distinguished. You can descramble channels like this
using a decoder.
The following adjustments are to be made in the
»AUDIO-/VIDEO-INPUTS« menu.
Calling up (see page 19)
Carry out the adjustments according to the following display.
Ń
!
If you have already connected a satellite receiver to
socket AV 2 – see “… for satellite receivers” – and
want to descramble (decode) TV stations received
via it, then select » Decoder yes « and the function
» only for SAT yes«.
Press the G button and check whether the
following connection diagram corresponds with
your wishes.
In this case the decoder has to be connected to the
satellite receiver.
Connection without a satellite receiver
Connect the decoder to the AV1 socket.
Operation
Select the channel position with the decoded TV
station on the unit. Set the decoder to » on « – as
described on page 5, (see line »Prog. 8 PREM
C12 on « in the illustration). Refer to the descrambler (decoder) operating instructions.
4
2
1
r
… with several external units
Ń
!
If you want to connect several external units – for
example a descrambler, satellite receiver, 2 video
recorders – then they should be connected as
recommended below.
Proceed as follows:
Call up the » AUDIO-/VIDEO-INPUTS « menu (see
page 19).
Carry out setting according to the units that are to
be connected.
Example: video recorder with Megalogic functions,
VHS video recorder, satellite receiver, decoder (fur-
ther examples on page 24-25).
Press the G button and the diagram will show
you how and where to make the connections.
Ń
!
Further examples on pages 24, 25.
2
1
Connection Options and Operation ...
AUDIO-/VIDEO-INPUTS
OK
Connect. propos.
TXT
TV-picture
Camera-Recorder no
Video-Recorder MegLog
Megalogic, VHS, SVHS, Hi8
Video-Recorder2 VHS
VHS, SVHS, Hi8
Satelliten-Receiver yes
Decoder yes
n
only for SAT IJ yes İ
AUDIO-/VIDEO-INPUTS
OK
Connect. propos.
TXT
TV-picture
Camera-Recorder no
Video-Recorder no
Megalogic, VHS, SVHS, Hi8
Satelliten-Receiver yes
n
Decoder IJ yes İ
only for SAT yes
AUDIO-/VIDEO-INPUTS
ǺǺ
Return
TV
TV-picture
Sockets Devices
AV3 l l l
AV2 ľ– ıľ–ı
AV1
DEC.SATREC
AUDIO-/VIDEO-INPUTS
ǺǺ
Return
TV
TV-picture
Sockets Devices
AV3 l l l
AV2 ľ– ıľ–ı
AV1 ľ –ıľ– ı
VCR 2MegLog
DEC.SATREC
Ń
I
––––––––––
I
Ľ
Page 23

ķ
23
r
Copying video recordings via the
TV set
You can copy from:
Example 1
Video recorder at AV1 socket to
video recorder at AV2 socket
Example 2
Video recorder at AV2 socket to
video recorder at AV1 socket
Example 3
Camcorder at AV3 socket (at the front) to
video recorder at AV1 socket and/or
video recorder at AV2 socket
Proceed as follows:
Call up the » AUDIO-/VIDEO-INPUTS « menu (see
page 19).
Select » yes « at camcorder function and » VHS « at
the video recorder functions.
2
1
Press the G button. You will see a graphic representation of your chosen configuration.
Connection (example 1 and 2)
For example 3 the camcorder must also be connected (see page 20/21).
r
Operation
Select the AV channel position of the respective
playback unit on the TV set using the AV0button.
For example 3 channel position AV3.
Start both recorders.
The recorder playback appears on the screen.
If you want to switch the TV set to a TV station
during the copying process, first press the
¢
AUX
and AV0buttons.
Display: » Copy on«
Now you can watch any TV station without disturbing the recording (copying process).
Once copying has finished, cancel the copy function
using the
¢
AUX
and AV
0
buttons.
Display: » Copy off«
3
2
1
AV2
VIDEORECORDER
AV1
RECEIVER / DECODER
ʐ
INPUT-SAT
950...2050MHz
14/18V 0,35A
EURO-AV
AUDIO
EURO-AV
AUDIO
3
Connection Options and Operation ...
AUDIO-/VIDEO-INPUTS
ǺǺ
Return
TV
TV-picture
Sockets Devices
AV3 l l l ľ–ı
AV2 ľ– ı
AV1 ľ –ı
VHS
VCR 2
CAMERA
AUDIO-/VIDEO-INPUTS
OK
Connect. propos.
TXT
TV-picture
Camera-Recorder yes
n
Video-Recorder IJ VHS İ
Megalogic, VHS, SVHS, Hi8
Video-Recorder2 VHS
VHS, SVHS, Hi8
Satelliten-Receiver no
Decoder no
Page 24

ķ
24
… with several external units
r
1 video recorder (all types)
r
Satellite receiver
r
Decoder
r
2 video recorders
Connection Options and Operation ...
AUDIO-/VIDEO-INPUTS
ǺǺ
Return
TV
TV-picture
Sockets Devices
AV3 l l l ľ–ı
AV2
AV1 ľ –ı
MegLog
CAMERA
AUDIO-/VIDEO-INPUTS
ǺǺ
Return
TV
TV-picture
Sockets Devices
AV3 l l l ľ–ı
AV2
AV1 ľ –ı
DEC.
CAMERA
AUDIO-/VIDEO-INPUTS
ǺǺ
Return
TV
TV-picture
Sockets Devices
AV3 l l l ľ–ı
AV2 ľ– ı
AV1 ľ –ı
MegLog
VCR 2
CAMERA
AUDIO-/VIDEO-INPUTS
ǺǺ
Return
TV
TV-picture
Sockets Devices
AV3 l l l ľ–ı
AV2 ľ– ı
AV1
SATREC
CAMERA
r
Video-recorder + satellite receiver
r
2 video recorders + satellite receiver
r
Video-recorder + decoder
r
Satellite receiver + decoder for
terrestrial reception
AUDIO-/VIDEO-INPUTS
ǺǺ
Return
TV
TV-picture
Sockets Devices
AV3 l l l ľ–ı
AV2
AV1 ľ –ıľ– ı
DEC.MegLog
CAMERA
AUDIO-/VIDEO-INPUTS
ǺǺ
Return
TV
TV-picture
Sockets Devices
AV3 l l l ľ–ı
AV2 ľ– ı
AV1 ľ –ı
DEC.
SATREC
CAMERA
AUDIO-/VIDEO-INPUTS
ǺǺ
Return
TV
TV-picture
Sockets Devices
AV3 l l l ľ–ı
AV2 ľ– ı
AV1 ľ –ı
MegLog
SATREC
CAMERA
AUDIO-/VIDEO-INPUTS
ǺǺ
Return
TV
TV-picture
Sockets Devices
AV3 l l l ľ–ı
AV2 ľ– ı
AV1 ľ –ıľ– ı
SATRECMegLog
VCR 2
CAMERA
Ń
I
––––––––––
I
Ľ
Page 25

ķ
25
Connection Options and Operation ...
r
2 video recorders + decoder
r
Video recorder + satellite receiver +
decoder for terrestrial reception
r
Video recorder + satellite receiver +
decoder for satellite reception
r
2 video recorders + satellite receiver +
decoder for terrestrial reception
AUDIO-/VIDEO-INPUTS
ǺǺ
Return
TV
TV-picture
Sockets Devices
AV3 l l l ľ–ı
AV2 ľ– ı
AV1 ľ –ıľ– ı
DEC.MegLog
VCR 2
CAMERA
AUDIO-/VIDEO-INPUTS
ǺǺ
Return
TV
TV-picture
Sockets Devices
AV3 l l l ľ–ı
AV2 ľ– ıľ–ı
AV1 ľ –ıľ– ı
DEC.MegLog
SATRECVCR 2
CAMERA
r
2 video recorders + satellite receiver +
decoder for satellite reception
AUDIO-/VIDEO-INPUTS
ǺǺ
Return
TV
TV-picture
Sockets Devices
AV3 l l l ľ–ı
AV2 ľ– ı
AV1 ľ –ıľ– ı
DEC.MegLog
SATREC
CAMERA
AUDIO-/VIDEO-INPUTS
ǺǺ
Return
TV
TV-picture
Sockets Devices
AV3 l l l ľ–ı
AV2 ľ– ıľ–ı
AV1 ľ –ı
MegLog
DEC.SATREC
CAMERA
AUDIO-/VIDEO-INPUTS
ǺǺ
Return
TV
TV-picture
Sockets Devices
AV3 l l l ľ–ı
AV2 ľ– ıľ–ı
AV1 ľ –ıľ– ı
VCR 2MegLog
DEC.SATREC
CAMERA
Ń
I
––––––––––
I
Ľ
Page 26

ķ
26
Technical Data
r
Mains voltage:
220-240 V, 50/60 Hz
(Power supply control range 190 … 264 V)
This unit may only be operated with the power
supply cable set which has been supplied. It prevents interference from the mains, and is considered an obligatory component of this unit.
For a replacement, contact the nearest customer
service center and order only the power supply
cable set with the following designation:
GWN 9.22/article number 8290.991-316.
r
Power consumption:
approx. 120 W
in stand-by 7 W
r
Reception ranges:
C01 … C99
Special channels S01 … S41
rr
Multi-norm reception:
B/G FM 5.5 (A2 Stereo)
L/L’ AM 6.5 (NICAM)
I FM 6.0 (NICAM)
D/K/K’ FM 6.5/6, 258 (A2 Stereo)
B/G FM 5.5 (NICAM B, DK, E)
B/G FM 5.5 (NICAM N, S, SF)
D/K/K' FM 6.5 (NICAM)
D/K/K' FM 6.5/6, 742 (A2 Stereo)
r
Sound output:
2 x 20 W peak performance (2 x 10 W sinus)
r
Service note for the dealer:
Unauthorised alterations, in particular of the high
voltage system or installation of a different type of
picture tube, can result in significant emissions of
X-rays. Units altered in this way no longer comply
with their approval and must not be operated.
Subject to alteration and error!
r
Pin assignment of EURO-AV socket
If you wish to connect other external units (e.g.
computer, amplifier) to your television set, your
dealer can provide you with a normed connection
with the assistance of the following table:
Pin Signal
11 = Audio output right
12 = Audio input right
13 = Audio output left
14 = Audio earth
15 = Blue earth
16 = Audio input left
17 = RGB blue input
18 = Switching voltage
19 = Green earth
10 = MEGALOGIC data line
11 = RGB green input
12 = –
13 = Red earth
14 = Earth
15 = RGB red input
16 = RGB switching voltage
17 = Video earth
18 = RGB switching voltage earth
19 = Video output
20 = Video input
21 = Shielding/earth
Additional Information for Units sold in Great Britain
Units sold in GB are suitable for operation from a 240 V AC, 50 Hz mains supply.
In case this appliance is supplied with a Safet
y Standard Approved mains lead fitted with a non-rewireable 13 Amp mains plug which, if unsuitable for your
socket, should be cut off and an appropriate plug fitted by a
qualified electrician. The fuse and fuse holder must be removed from the plug as
accidental insertion of the redundant plug into a 13 Amp socket is likely to cause
an electrical hazard.
Note: The severed plug must be destroyed to avoid a possible shock hazard
should it be inserted into a 13 Amp socket elsewhere.
If it is necessary to change the fuse in the non-rewireable plug, the correct type
and rating (5 Amp ASTA or BSI approved BS 1362) must be used and the fuse
cover must be refitted. If the fuse cover is lost or damaged the lead and plug must
not be used until a replacement is obtained. Replacement fuse covers should be
obtained from your dealer.
If a non-rewireable plug or a rewireable 13 Amp (BS 1363) plug is used, it must
be fitted with a 5 Amp ASTA or BSI approved BS 1362 fuse. If any othe type of
plug is used it must be protected by a 5 Amp fuse either in the plug or at the distribution board.
Important:
The wires in the mains lead are coloured in accordance with the follow-ing code:
BLUE – NEUTRAL
BROWN – LIVE
As the colours of the wires in the mains lead of your appliance may not correspond with the coloured marking identifying the terminals in your plug, proceed
as follows:
Connect the BLUE coloured wire to plug terminal marked with the letter "N" or
coloured black.
Connect the BROWN coloured wire to the plug terminal marked with a letter "L" or
coloured red.
In no circumstance must any of the wires be connected to the terminal marked
with a letter "E", earth symbol , coloured green or green and yellow.
Replacement mains lead can be obtained from your dealer.
220
21
119
Page 27

GRUNDIG AG ••D-90762 FÜRTH Printed in Austria 22/96
0 1 2 3 4 5 6 7 8 9
21530-941.02
 Loading...