

Page 1
COLOR TELEVISION
ST 70-778 text
Page 2
Ń
!
Stellen Sie das Gerät so auf, daß möglichst wenig
Fremdlicht auf den Bildschirm fällt.
Ń
!
Der ideale Betrachtungsabstand ist das Fünffache
der Bildschirmdiagonale.
Ń
!
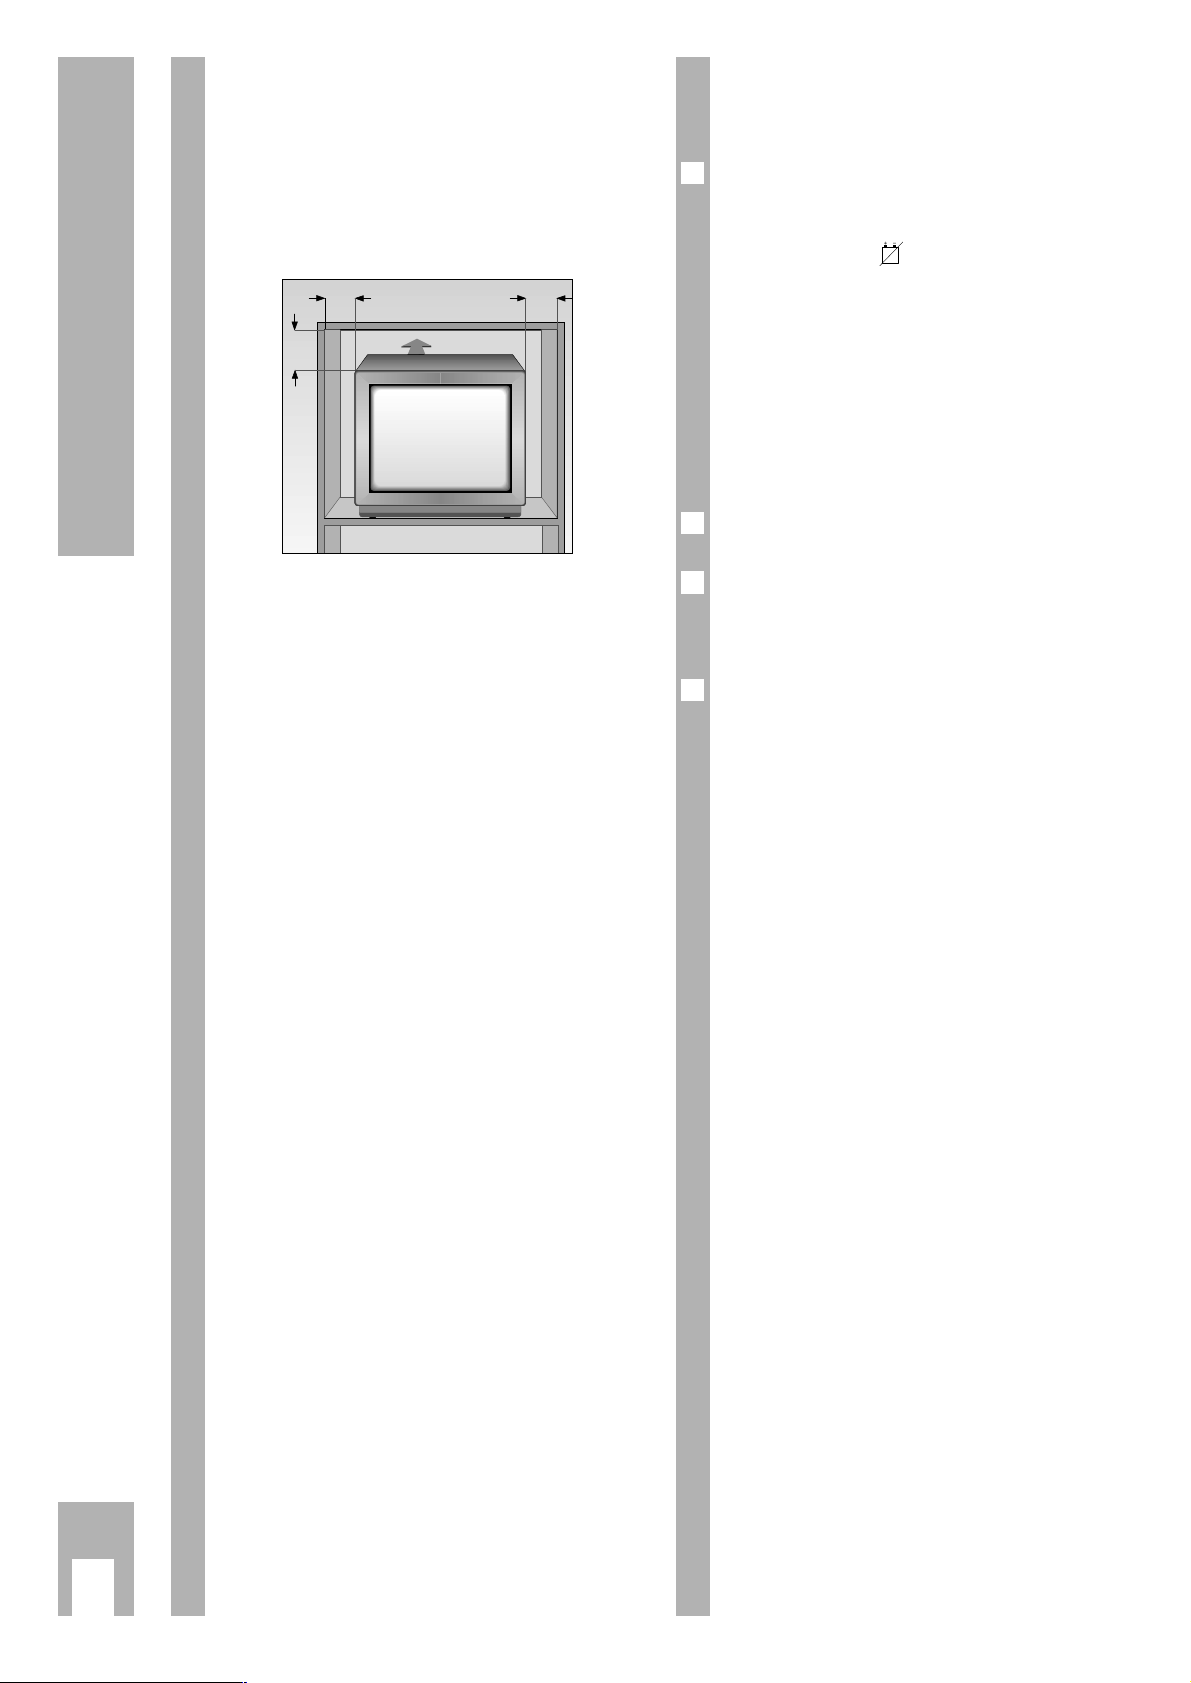
Bei Betrieb im Schrankfach müssen Mindestabstände eingehalten werden.
Ń
!
Beachten Sie, daß die Lüftungsschlitze der Rückwand nicht abgedeckt werden.
Ń
!
Durch Wärmeaustausch im Gerät entsteht eine
Luftzirkulation. Dabei werden Staubpartikel (Teppich- und Gardinenfasern sowie Hausstaub) angesaugt. Diese lagern sich u.a. auch in den Lüftungsschlitzen ab, verengen sie im Laufe der Jahre und
können dadurch Wärmestaus verursachen.
Wärmestaus sind Gefahrenquellen und beeinträchtigen die Lebensdauer des Gerätes.
Lassen Sie sicherheitshalber von Zeit zu Zeit die
Ablagerungen vom Fachmann entfernen.
Ń
!
Stellen Sie keine Lautsprecherboxen neben das
Gerät.
Ń
!
Bitte achten Sie darauf, daß beim Aufstellen und
dem weiteren Betrieb die Netzanschlußleitung frei
liegt, weder eingeklemmt noch beschädigt wird.
Ń
!
Stellen Sie das Gerät nicht in die Nähe der Heizung.
Ń
!
Auch wenn das Gerät ausgeschaltet ist, können
durch Blitzschlag in das Stromnetz und/oder in die
Antennenleitung Beschädigungen auftreten.
Bei Gewitter sollten Sie deshalb den Netz- und
Antennenstecker ziehen.
Ń
!
Schützen Sie das Gerät vor Feuchtigkeit.
Ń
!
Stecken Sie keine Fremdkörper in die Lüftungsschlitze der Rückwand.
Vorsicht Hochspannung!
Batterie in die Fernbedienung
einlegen
Beiliegende Batterie einsetzen, dabei Polung der
Batterie beachten (im Batteriefachboden markiert).
Ń
!
Bei verbrauchter Batterie erscheint am Bildschirm
die Einblendung: » BATTERY«.
Verbrauchte Batterie unbedingt entfernen.
Für Schäden, die durch eine ausgelaufene Batterie
entstehen, kann nicht gehaftet werden.
Entsorgen Sie verbrauchte Batterien umweltgerecht.
Gerät anschließen
Stecker des Antennenkabels in die Antennenbuchse
É des Fernsehgerätes stecken.
Stecker des Netzkabels in die Steckdose stecken.
Gerät ein-/ausschalten
Am Gerät die Taste
¢
IO
drücken.
Ń
!
Wenn Sie das Gerät längere Zeit (zum Beispiel
nachts) nicht benützen, so schalten Sie es mit
dieser Taste aus.
Sie sparen damit Energie.
Die Dialogzeile als Bedienhilfe
Ń
!
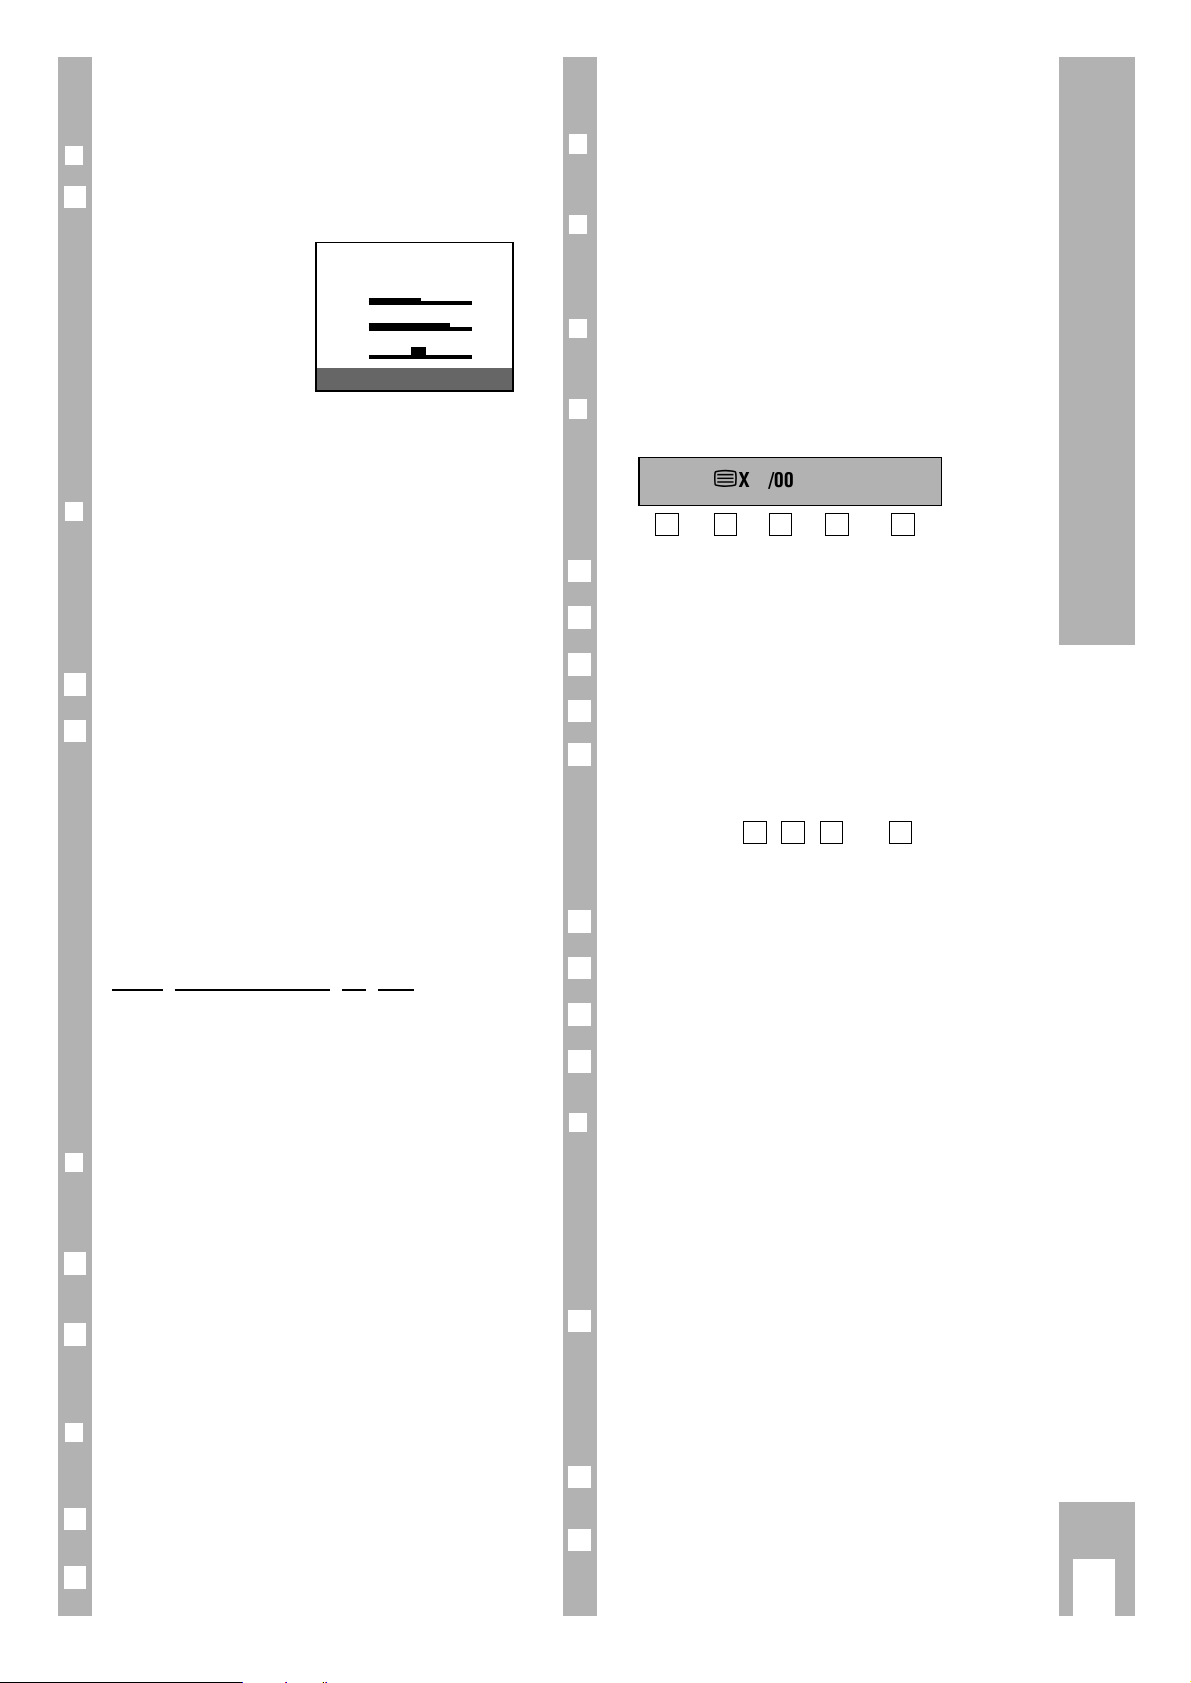
In der Zeile am unteren Bildrand der Menü-Einblendungen sehen Sie mit welchen Tasten der Fernbedienung Veränderungen vorgenommen werden können.
Die Zeichen
>, <,
ʺʺ, ɶɶ
am Bildschirm sind
Symbole für folgende Tasten der Fernbedienung:
ʺʺ, ɶɶ
= Tasten P- und P+. Bewegen des
Balkens (Cursor) nach oben/ unten zur
Funktionsanwahl.
<, > = Tasten ņ – und + ŀ. Bewegen der
Schreibmarke (Cursor) nach rechts/
links zur Funktionsauswahl.
In den Texten werden anstelle der Symbole die
Tasten der Fernbedienung abgebildet.
1
2
1
1
Ķ
2
Sicherheit und Aufstellen
10
cm
20
cm
10
cm
20 cm
Page 3
1. Möglichkeit
❒
Das Senderspeicher-System »ATS«
Der ATS-Programm-Suchlauf tastet den gesamten
Empfangsbereich ab und speichert alle gefundenen
Programme automatisch.
Vor
gehensweise:
Gerät mit den Tasten 1 ...9 aus Bereitschaft
einschalten.
Taste P/C ca. 4 Sek. drücken, bis das ATS-Menü
erscheint.
Suchlauf mit Taste OK starten.
Der Suchlauf-Vorgang kann über eine Minute
dauern. Die Geräteeinstellung ist nun abgeschlossen. Wir wünschen Ihnen viel Spaß beim Fernsehen.
Wenn Ihnen die automatische Programmplatz-Belegung nicht zusagt, können Sie die auf den
Programmplätzen gespeicherten Programme nach
Ihren Wünschen austauschen (umschichten).
Ń
!
Mit Taste ǺǺkann der Suchlauf abgebrochen werden.
❒
Programmplatzbelegung ändern
Beispiel: Das Programm von Programmplatz 2 soll
auf Programmplatz 5.
Programmplatz 2 anwählen.
Taste P/C drücken. Das Programm-Menü blendet
sich ein.
Unter »PR« neuen Programmplatz 05 mit den
Tasten 0…9 zweistellig eingeben.
Taste OK drücken. Der Vorgang ist abgeschlossen.
Mit Taste
ǺǺ
zurück zum Fernsehbetrieb.
5
4
3
2
1
3
2
1
2. Möglichkeit
❒
Durch direktes Eingeben der Kanalzahlen
Dies ist nur sinnvoll, wenn Ihnen die Kanalzahlen
der Programme bekannt sind.
Ń
!
Wurde die Belegung der Programmplätze mit dem
ATS-Kanalsuchlauf durchgeführt, ist es nicht
erforderlich diese Einstellung durchzuführen.
V
orgehensweise:
Taste P/C drücken, das Programm-Menü blendet
sich ein.
Ń
!
Achtung – in AV-Stellung nicht möglich.
Mit Taste
ņ – oder + ŀ die gewünschte Position
wählen.
Unter »PR« mit P+ oder P- zu belegenden Pro-
grammplatz wählen.
" »CH« Kanalzahl eingeben, (bei Sonderkanal
mit Taste P+ oder P- anstatt
»C« ein »S«).
Wird eine der Tasten P+ oder P-
gedrückt gehalten, startet der Kanalsuchlauf. Der Kanalsuchlauf stoppt bei
jedem Programm, das Sie empfangen
können.
" »DEC«Wird auf diesen Programmplatz ein
verschlüsseltes Programm gelegt und
ein entsprechender Descrambler
(Decoder) angeschlossen, dann ist
»ON« zu wählen.
" »FT« Ist nach dem Belegen Feinabstimmen
notwendig, dann
Taste P+ oder P- drücken und damit
besten Bild- und Toneindruck wählen.
Mit Taste OK die veränderten Werte speichern.
Die Programm-Daten des nächsten Programmplatzes werden eingeblendet.
Mit Taste
ǺǺ
zurück zum Fernsehbetrieb.
Ń
!
Wird auf einen Programmplatz Kanal 00 eingegeben, können mit den Tasten P+ oder P- alle nachfolgenden Programmplätze nicht mehr angewählt
werden.
4
3
2
PR CH DEC FT
22 S06 ON 00
0–9
ɶɶʺʺ
ɼɦ OK i
1
Ķ
3
Programmplätze belegen
ĵ
Die Dialogzeile
Page 4
Ķ
4
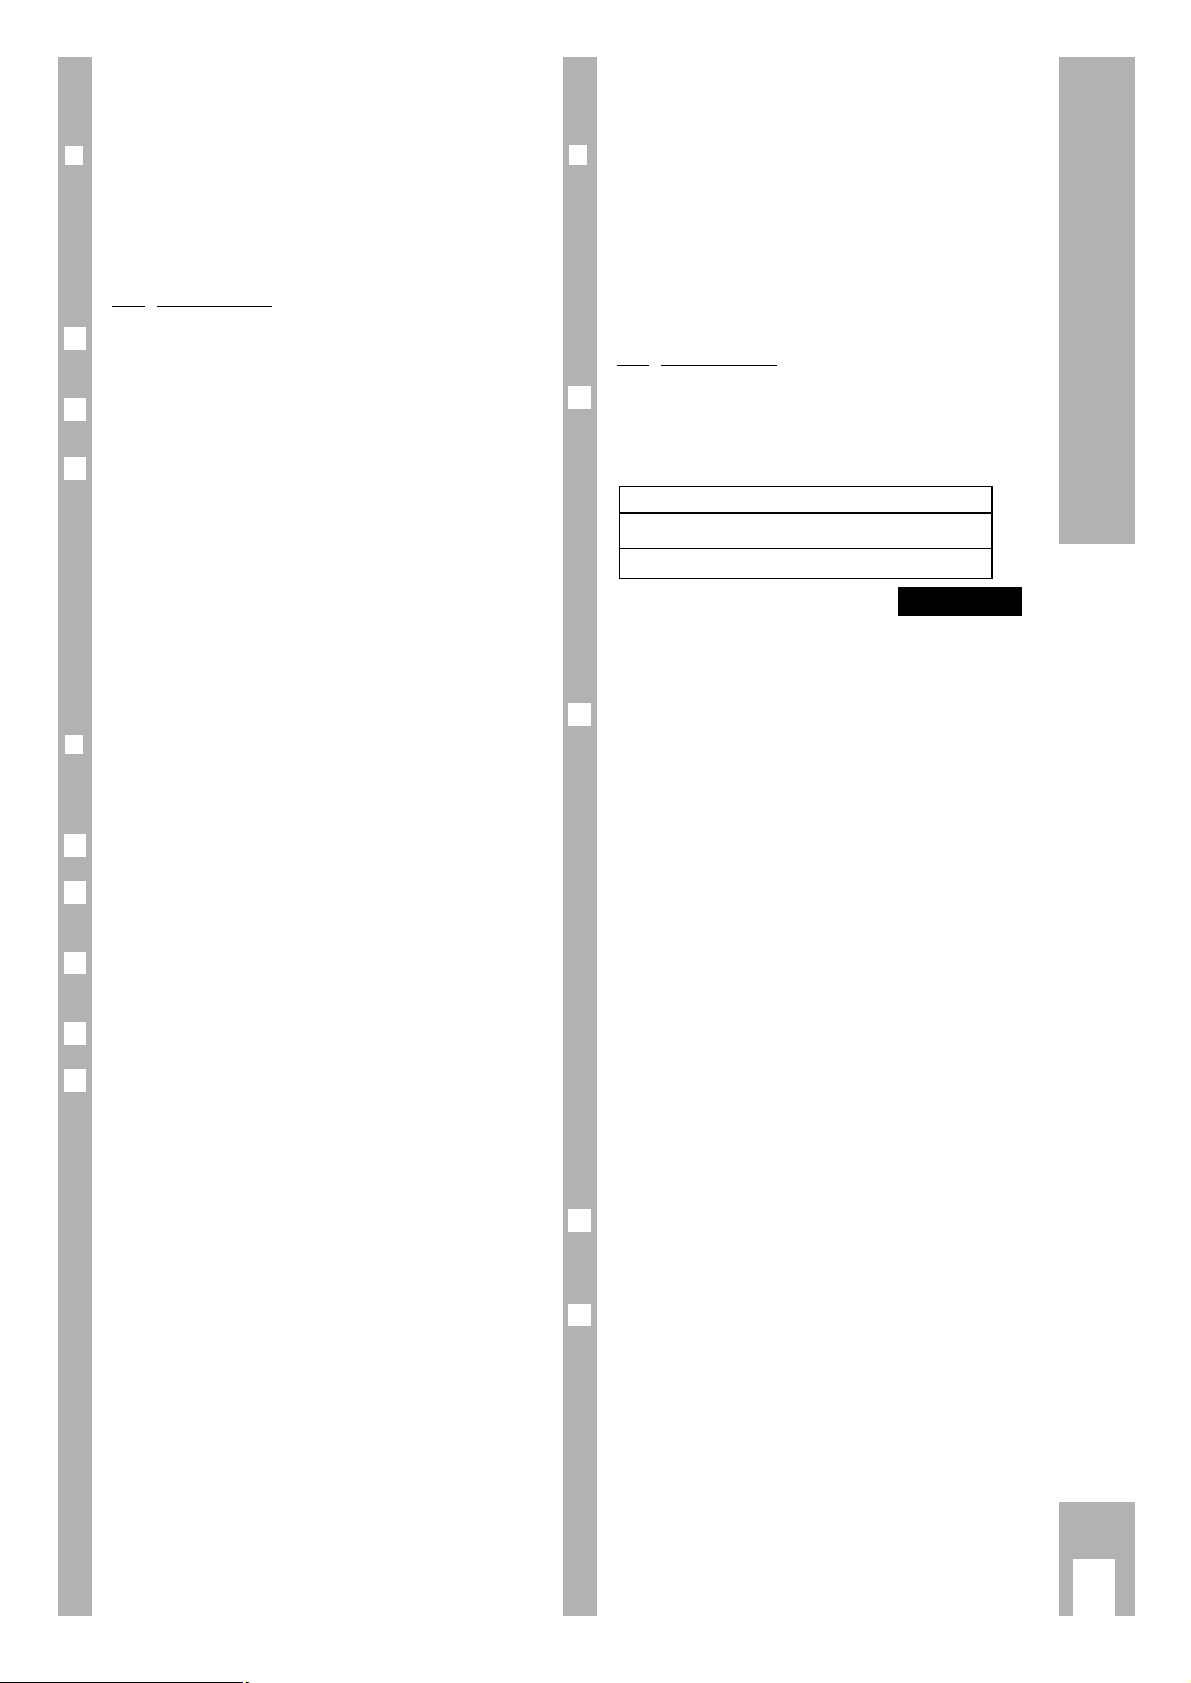
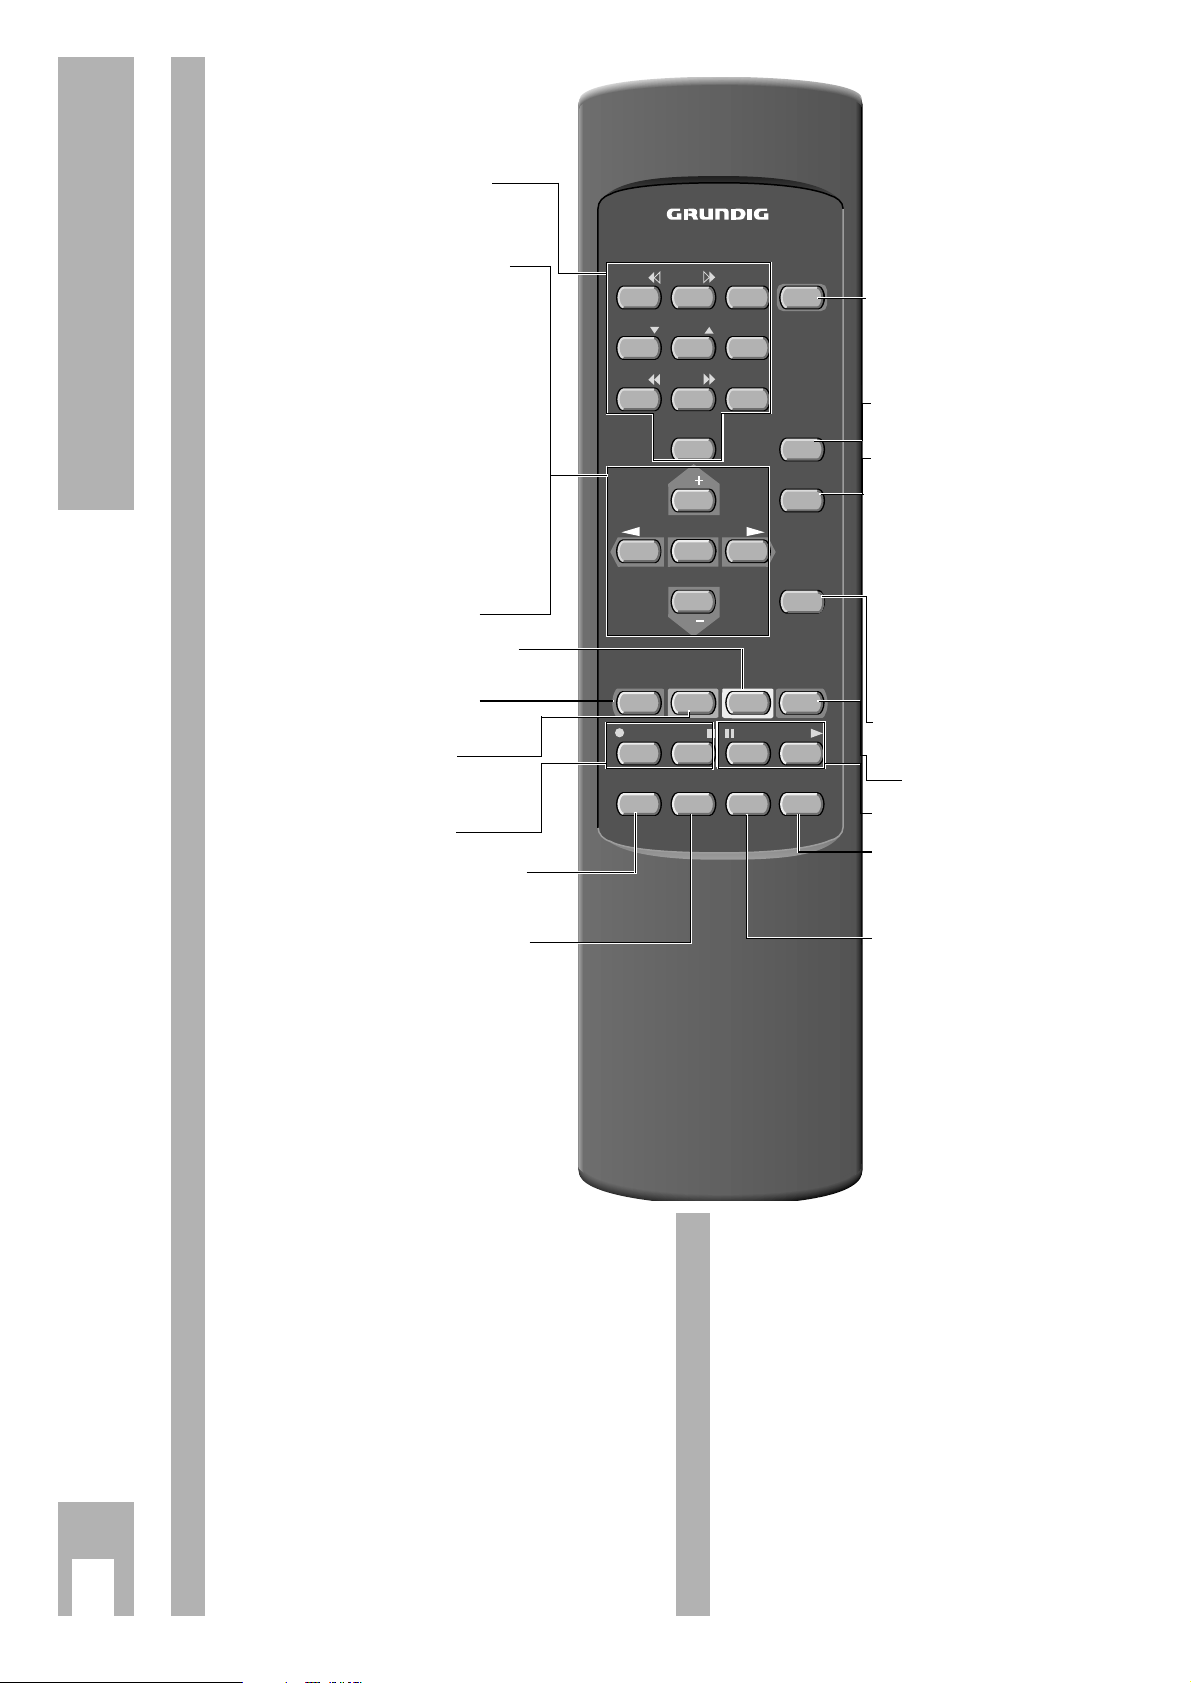
Die Fernbedienung
Ń
!
Jeder veränderte Wert wird automatisch nach
ca. 8 Sekunden oder durch Schalten in Stand-by
gespeichert.
Ń
!
Das Fernsehgerät wurde mit maximalem Kontrast
getestet. Abhängig vom Gerätestandort und der
Raumhelligkeit ist es jedoch sinnvoll, den Kontrast
etwas zu reduzieren um den subjektiv besten Bildeindruck zu erhalten.
Ń
!
Möchten Sie den Programmplatz ständig eingeblendet haben, drücken Sie die Taste ǺǺ.
Ausblenden durch erneutes Drücken der Taste
ǺǺ
.
1…9 Programmplatz wählen
(am Gerät – P +) und
0/AV Gerät einschalten aus der
Bereitschaft (Stand-by);
oder AV-Stellung wählen.
P+ / P– Programmplätze schrittweise
weiterschalten: P+ : (1, 2, 3 …),
P– : (…3, 2, 1) oder
P+ : aus Stand-by einschalten auf
zuletzt gewählten Programmplatz.
Cursor (Schreibmarke) –
Bewegung nach oben beziehungsweise nach unten.
OK
Ändern und Aktivieren
verschiedener Funktionen. Taste
OK
zweimal drücken – OptimalwertEinstellung.
ņ–,+ ŀ Lautstärke oder Cursor (Schreib-
marke) – Bewegung nach links
oder rechts
Videotext: Nächste 10er Seite.
Videotext: Aktuelle
Seitennummer -1 Seite
Ȅ
Uhrzeit ein/aus.
Videotext: Aktuelle
Seitennummer +1 Seite
i
+/– Farbkontrast ändern.
VIDEO Videorecorder fernbedienen
(dazu Taste VIDEO gedrückt
halten).
AUX Videotext: Dialogzeile aufrufen
Ǽ
In Bereitschaft schalten (Standby) und einschalten auf zuletzt
gewählten Programmplatz.
ʀ
Ton ein/aus (stummschalten).
Ǻ Programm-Nummer ein-/
ausblenden (Status-Seite).
Ändern SW Kontrast:
Ǻ, OK,
ņ – oder + ŀdrücken.
Sleep Timer (Ausschaltzeit
01…99 Min.) eingeben:
Ǻ, OK, Ǻ, und Ziffern-Tasten
0…9 drücken.
Automatische Frequenznachstimmung ein/aus:
Ǻ, OK, Ǻ, Ǻ, ņ – oder + ŀ.
Audio-Menü aufrufen: Ǻ, ʀ
TXT Videotext/Teletext-Betrieb
ɫ TV-Betrieb.
Videotext: Nächste 100er Seite.
v
+/– Helligkeit ändern.
SAT Satelliten-Receiver
fernbedienen (dazu Taste SAT
gedrückt halten)
P/C Programmdaten aufrufen.
Taste 4 Sekunden gedrückt
halten: ATS aufrufen.
TP 712
123
456
89
7
AV
0
P
OK
–
+
P
Ǽ
ʀ
Ǻ
TXT
Ȅ
+
–
iv
VIDEO AUX P/C SAT
+
–
Page 5
Ķ
5
Ton ändern, Videotext-Betrieb
Das Audio-Menü
❒
Audio-Menü aufrufen
Die Taste ǺǺund danach Tasteʀdrücken; die Seite
»Audio-Menü« wird eingeblendet.
Stereo, Mono, Zweiton –
Stereobreite –
Höhen –
Bässe –
Balance –
Dialogzeile –
Ń
!
Das »Audio-Menü« können Sie nach jeder Einstellung mit Taste ǺǺausblenden.
❒
Stereo-, Mono- und Zweiton-Sendung
Empfängt das Gerät Zweiton-Sendungen, – z. B.
einen Spielfilm mit Originalton auf Tonkanal 2
(DUAL B) und die synchronisierte Fassung auf
Tonkanal 1, – (DUAL A) – so können Sie den
Tonkanal wählen.
Mit der Taste P+ oder P- die erste Zeile anwählen.
Mit den Tasten
ņ –, + ŀ den Tonkanal wählen.
Empfängt das Gerät Stereo-Sendungen, schaltet es
automatisch auf Stereo-Tonwiedergabe.
Ń
!
Bei schlechter Stereo-Tonwiedergabe können Sie
mit den Tasten ņ –, + ŀ auf Ton »Mono« schalten
Ń
!
Die Einstellung »Mono« kann durch drücken
der Taste OK programmplatzbezogen gespeichert
und wieder gelöscht werden.
Anzeige der Tonübertragungsart
Immer wenn vom Sender die Tonübertragungsart
gewechselt wird (z. B. von Mono in Stereo) erfolgt
ca 4 Sek. die entsprechende Anzeige.
Sie erfolgt auch bei Programmwechsel, jedoch nur
bei Ton-Übertragungsarten die von Mono abweichen.
❒
Stereobreite
Verbreitert bei Stereo-Sendungen das Klangbild
und verbessert es bei Mono-Sendungen.
Mit der Taste P+ oder P- die entsprechende Zeile
anwählen.
Ändern mit Taste
ņ – oder + ŀ (Die Einstellung der
Stereobreite bleibt auch nach einem Programmwechsel erhalten).
❒
Höhen, Bässe, Balance
Die Einstellungen dieser Funktionen sind nach
Bedarf korrigierbar.
Mit den Taste P+, P- die entsprechende Zeile
anwählen.
Korrigieren mit der Taste
ņ – oder + ŀ.
2
1
2
1
2
1
STEREO MONO
ʀǁ ʀ…ǁ
ɦ
ɼ
f
ɶʺ < > Ǻ
1
Der Videotext-Betrieb
❒
Videotext aufrufen
Taste TXT drücken.
❒
Seiten anwählen
Seiten mit Tasten 0…9direkt anwählen
(Vorhandene Seiten: 100-899)
❒
Übersichtseite aufrufen
Taste ǺǺdrücken.
❒
Dialogzeile aufrufen
Taste AUX drücken.
= Zeichenhöhe vergrößern
= Wartezeit überbrücken (Aktuell-Betrieb).
= Unterseite direkt abrufen
= Antwortfreigabe
= Seiten-STOP
Funktionen mit Taste
ņ – oder + ŀ anwählen und
mit Taste OK aufrufen.
Die Funktionen , , und können auch
ohne Aufrufen der Dialogzeile folgendermaßen ausgeführt werden.
Zeichenhöhe vergrößern: Die Taste + i drücken.
Unterseiten direkt abrufen: Die Taste –
i drücken.
Antwort-Freigabe: Die Taste +
ŀ drücken.
Seiten-Stop: Die Taste
ņ – drücken.
❒
Seiten mittels Cursor anwählen
(Page Catching),
d.h. Seiten wählen ohne die Seitennummer einzutippen. Mittels Cursor können Sie die gewünschte
Videotext-Seite aus Übersichts-Seiten (Seiten, in
denen sich dreistellige Seitennummern befinden)
direkt anwählen.
Taste P+ oder P- drücken.
Am oberen Bildrand wird »Page Catching« einge-
blendet.
Bei der ersten bzw. letzten Seitennummer der Übersicht blinkt ein rechteckiger Lichtpunkt (Cursor).
Mit den Tasten P+ oder P- den Cursor zur
gewünschten Seitennummer bringen.
Taste OK drücken.
Die Seite erscheint im Bildschirm.
3
2
1
5
4
3
1
5431
5
4
3
2
1
54321
ķ
ʄʄ
ķX /00 ķ? STOP
Page 6

Ķ
6
Anschlußmöglichkeiten
Anschluß eines Video-Recorder
oder Satelliten-Receiver
❒
Anschließen
Video-Recorder oder Satelliten-Receiver mit AVKabel an die Buchse AV anschließen.
❒
Bedienen des Video-Recorders
Taste 0AV drücken.
Wiedergabe des Video-Recorders starten.
Am Bildschirm sehen Sie die Recorder-Wiedergabe.
Video-Recorder fernbedienen
Mit der Fernbedienung dieses Fernsehgerätes können Sie auch Grundig-Video-Recorder fernbedienen. Welche hierzu geeignet sind, sagt Ihnen Ihr
Fachhändler.
Taste VIDEO drücken und gedrückt halten.
Damit schalten Sie die Fernbedienung auf Video-
Recorder-Betrieb.
Anschließend die gewünschte Taste drücken.
Entnehmen Sie der folgenden Aufstellung, mit welchen Tasten die Recorderfunktionen ausgelöst werden können.
ĵķ (Ziffern-Taste 1) = Bildsuchlauf rückwärts
ĶŁ (Ziffern-Taste 2) = Bildsuchlauf vorwärts
● (Taste – i) = Aufnahmestart
■ (Taste i +) = Stop
ĵĵ (Ziffern-Taste 7) = schneller Rücklauf
ŁŁ (Ziffern-Taste 8) = schneller Vorlauf
ll ll (Taste – v) = Pause
ı (Taste
v
+) = Wiedergabestart
Ľ (Ziffern-Taste 4) = Programmplatz –
Ń (Ziffern-Taste 5) = Programmplatz +
1
EURO-AV
AUDIO
Anschluß eines Descrambler
(Decoder) oder eines externen
Gerätes (Videorecorder)
Einige Sender – deren Programme über Kabelanlagen oder Satelliten-Receiver zugeführt werden –
verschlüsseln ihre Sendungen. Bild und Ton sind
damit unkenntlich. Mit einem Decoder können Sie
derartige Programme entschlüsseln.
V
orgehensweise:
Schließen Sie den Decoder/Videorecorder an der
EURO-AV-Buchse an.
Decoder:
Wählen Sie den Programmplatz, mit dem das
verschlüsselte Programm belegt ist.
Videorecorder:
Wählen Sie den Programmplatz, auf dem Sie die
Wiedergabe des Videorecorders sehen wollen.
Die Taste P/C drücken.
Mit der Taste
ņ – oder + ŀ DEC anwählen.
Taste P+ oder P- drücken, um auf ON zu schalten.
Einen für Decoderbetrieb vorbereiteten Programm-
platz erkennen Sie am Punkt nach dem P bei Programmwechsel.
Mit der Taste OK speichern.
Menü mit der Taste
ǺǺ
verlassen.
5
4
3
2
1
Page 7

Anschluß eines Kopfhörers
❒
Anschließen
Kopfhörer (3,5 mm ø Klinke) mit Buchse m verbinden (die Lautsprecher sind abgeschaltet).
❒
Kopfhörer-Lautstärke verändern
Verändern mit Tasten ņ –, + ŀ
.
1
Anschluß eines Camera-Recorders
(VHS, Video 8)
❒
Anschließen
Anschluß des Bildsi
gnales
Verbinden Sie die Buchse VIDEO IN mit der
entsprechenden Bild-Buchse des Camera-Recorders.
Anschluß desTonsignales
Verbinden Sie die Buchsen L AUDIO IN R mit den
Tonbuchsen des Camera-Recorders. Bei MonoWiedergabe ist die Buchse L AUDIO IN mit der
entsprechenden Tonbuchse am Camera-Recorder
zu verbinden.
❒
Bedienen des Camera-Recorders.
Taste 0AVdrücken.
Wiedergabe des Camera-Recorders starten.
Am Bildschirm sehen Sie die Recorder-Wiedergabe.
(Kein Überspielen zur Euro-AV-Buchse möglich!)
1
P
+
_
g
+
_
m
VIDEO IN L– AUDIO IN – R
Ķ
7
Anschlußmöglichkeiten
_
+
P
VIDEO IN L– AUDIO IN – R
m
Page 8

❒
Netzspannung:
220-240V, 50/60 Hz
(Regelbereich des Netzteiles 165 … 265 V)
»Das Gerät darf nur mit dem beiliegenden
Netzkabelset betrieben werden. Es verhindert
Störungen aus dem Netz und ist Bestandteil der
Gerätezulassung.
Für Ersatzzwecke bestellen Sie bitte bei einer
Kundendienst-Stelle nur das Netzkabelset mit der
Bezeichnung GWN 9.22/Sachnummer 8290.991316«.
❒
Aufnahme:
ca. 80 W
In Bereitschaft (stand by) 8 W
❒
Empfangsbereiche:
C01 … C99
Sonderkanäle S01 … S41
❒
Tonendstufe:
2 x 8 W Musikleistung (2 x 4 W Sinus)
Das Gerät entspricht den VDE-Sicherheitsbestim-
mungen und den Vorschriften der Deutschen Bundespost (Zulassungs-Zeichen siehe Typenaufkleber
auf der Geräterückseite), ferner der Verordnung
über den Schutz vor Schäden durch Röntgenstrahlen. Die Röntgenstrahlung – verursacht durch die
Bildröhre – ist ausreichend abgeschirmt und darum
völlig ungefährlich. Beschleunigungsspannung
max. 27kV/mittlerer Strahlstrom 1,5mA.
Unsachgemäße Eingriffe, insbesondere Verändern
der Hochspannung oder Einbau eines anderen
Bildröhrentyps, können dazu führen, daß Röntgenstrahlung in erheblicher Stärke auftritt. So
veränderte Geräte entsprechen nicht mehr dieser
Zulassung und dürfen nicht betrieben werden.
Änderungen und Irrtümer vorbehalten!
❒
Kontaktbelegung EURO-AV-Buchse
Wenn Sie an das Fernsehgerät Zusatzgeräte anschließen wollen (z. B. Computer, Verstärkeranlage),
dann kann Ihr Fachhändler anhand der folgenden
Anschlußtabelle eine normgerechte Verbindung
herstellen:
Stift Signal
11 = Audio Ausgang rechts
12 = Audio Eingang rechts
13 = Audio Ausgang links
14 = Audio Masse
15 = Blau Masse
16 = Audio Eingang links
17 = RGB Blau Eingang
18 = Schaltspannung
19 = Grün Masse
10 = –
11 = RGB Grün Eingang
12 = –
13 = Rot Masse
14 = Masse
15 = RGB Rot Eingang
16 = RGB Schaltspannung
17 = Video Masse
18 = RGB Schaltspannung Masse
19 = Video Ausgang
20 = Video Eingang
21 = Abschirmung/Masse
❒
GRUNDIG Kundenberatungszentrum
Haben Sie Fragen?
Unser Kundenberatungszentrum steht Ihnen werk-
tags stets von 8.00 – 19.00 Uhr zur Verfügung.
Ķ
8
Technische Daten
montags bis freitags
von 8.00 – 19.00 Uhr
* Gebührenpflichtig –
in Deutschland und
Österreich möglich
STETS FÜR SIE DA!
DEUTSCHLAND
01 80/5 30 21 22*
ÖSTERREICH
06 60/66 99*
GRUNDIG
KUNDENBERATUNGS-
ZENTRUM
220
21
119
Page 9

ķ
9
Safety and Installation
Inserting the Battery into the
Remote Control Handset
Insert the battery supplied. Make sure it is inserted
correctly (markings in the battery compartment).
Ń
!
When the battery is dead, the message
” BATTERY” appears on the picture screen.
Remove the dead battery immediately.
We assume no responsibility for damage resulting
from battery leakage.
Dead batteries must be disposed of properly.
Connecting the TV Set
Insert the plug of the aerial lead into the aerial
socket É of the TV set.
Insert the plug of the mains lead into a wall outlet.
Switching the TV Set On/Off
Press the
¢
IO
button on the unit.
Ń
!
If you do not use the TV set for extended periods of
time (e.g. at night), turn it off with this button.
This helps you to save energy.
The dialogue line as user’s guide
Ń
!
The line which is displayed at the bottom of the
menus shows you which buttons on the remote
control handset are to be used to change settings..
The
>, <,
ʺʺ, ɶɶ
signs on the picture screen are
symbols for the following buttons on the remote
control handset:
ʺʺ, ɶɶ
= P+ and P– buttons. Cursor movement
up/down for function selection.
<, > = ņ – and + ŀ buttons: Cursor move-
ment left/right for function selection.
In the following text, the buttons instead of the
symbols will be shown.
1
2
1
1
Additional Information for Units sold in Great Britain
Units sold in GB are suitable for operation from a 240 V AC, 50 Hz mains supply.
In case this appliance is supplied with a Safet
y Standard Approved mains lead fitted with a non-rewireable 13 Amp mains plug which, if unsuitable for your
socket, should be cut off and an appropriate plug fitted by a
qualified electrician. The fuse and fuse holder must be removed from the plug as
accidental insertion of the redundant plug into a 13 Amp socket is likely to cause
an electrical hazard.
Note: The severed plug must be destroyed to avoid a possible shock hazard
should it be inserted into a 13 Amp socket elsewhere.
If it is necessary to change the fuse in the non-rewireable plug, the correct type
and rating (5 Amp ASTA or BSI approved BS 1362) must be used and the fuse
cover must be refitted. If the fuse cover is lost or damaged the lead and plug must
not be used until a replacement is obtained. Replacement fuse covers should be
obtained from your dealer.
If a non-rewireable plug or a rewireable 13 Amp (BS 1363) plug is used, it must
be fitted with a 5 Amp ASTA or BSI approved BS 1362 fuse. If any othe type of
plug is used it must be protected by a 5 Amp fuse either in the plug or at the distribution board.
Important:
The wires in the mains lead are coloured in accordance with the follow-ing code:
BLUE – NEUTRAL
BROWN – LIVE
As the colours of the wires in the mains lead of your appliance may not correspond with the coloured marking identifying the terminals in your plug, proceed
as follows:
Connect the BLUE coloured wire to plug terminal marked with the letter "N" or
coloured black.
Connect the BROWN coloured wire to the plug terminal marked with a letter "L" or
coloured red.
In no circumstance must any of the wires be connected to the terminal marked
with a letter "E", earth symbol , coloured green or green and yellow.
Replacement mains lead can be obtained from your dealer.
Ń
!
When setting up your television, select a location
where as little light as possible falls on the screen.
Ń
!
The ideal viewing distance is five times the diagonal
width of the screen.
Ń
!
If the television is to be built into a compartment or
similarly enclosed, minimum distances must be
maintained.
Ń
!
Do not cover the ventilation openings on the back.
Ń
!
The heat exchange inside the unit generates an air
circulation which attracts dust particles (carpet and
curtain fibres and home dust). These particles
accumulate inside the ventilation slots obstructing
these over the years and causing a build-up of heat.
Heat build-up can reduce the service life of your
television, and can also be dangerous.
For your own safety, let remove the dust deposits
by a specialist from time to time.
Ń
!
Never set up speakers next to the unit.
Ń
!
When setting up and using this unit, please make
sure that the mains connection wire is free and not
jammed in order to avoid damage.
Ń
!
Never place the television near heat sources.
Ń
!
Even if your television is switched off, it can still be
damaged by lightning striking the mains and/or
aerial cables.
For this reason, you should always disconnect your
television from the mains and the aerial system
during electrical storms.
Ń
!
Never expose the unit to moisture.
Ń
!
Do not insert foreign objects into the ventilation
openings on the back.
Caution! High voltage!
10
cm
20
cm
20 cm
10
cm
Page 10

ķ
10
Programme Position Allocation
1st Possibility
❒
The Automatic Tuning System ATS
This automatic tuning system scans the entire
reception range and automatically stores the
channels found in memory.
How to pr
oceed:
Switch the TV set on from standby with one of the
buttons 1 ...9.
Press for approximately 4 seconds on the P/C
button to display the ATS menu.
Press the
OK
-button to start the search function.
The search can last longer than one minute. When it
has stopped, setting of the TV set is completed.
If you do not like the order in which the programmes are stored on the programme positions, you
can change this according to your preferences.
Ń
!
The search can be aborted using the ǺǺbutton.
❒
Changing the Programme Order
Example: you wish to move the programme stored
on position 2 to position 5.
Select programme position 2.
Press the P/C button. The programme menu is
displayed.
Under ”PR”, enter the new programme position
number 05 as two digits with the buttons 1 ...9.
Press the OK-button to terminate the adjustment.
Press the
ǺǺ
button to return to TV mode.
5
4
3
2
1
3
2
1
2nd Possibility
❒
Direct Channel Entry
For this, you need to know the channel numbers of
the TV prgrammes.
Ń
!
If you have already assigned the programmes to the
programme positons with the help of the ATS function, this procedure is not required.
How to
proceed:
Press the P/C-button to display the programme
menu.
Ń
!
Attention – this is not possible in the AV position.
Press the
ņ – or + ŀ button to select the desired
item.
Under ”PR” press P+/P- to select the desired pro-
gramme position.
" "CH" enter channel number, (for special
channel, press P+ or P- to select ”S”
instead of ”C”).
Hold down P+ or P- to start the channel search. This stops at each programme being received.
" "DEC" If an encrypted prgramme is allo-
cated to the programme position and
a corresponding decoder connected,
select ”ON”.
" "FT" If fine tuning should be necessary
after programme allocating, then
press P+ or P- until the best picture
and sound quality is obtained.
Press OK to store the modified settings.
The programme data of the next programme position is displayed.
Press
ǺǺ
to return to the television picture.
Ń
!
If the channel number 00 is entered with P+ or P-
on one programme position, all following programme positions can no longer be selected.
4
3
2
PR CH DEC FT
22 S06 ON 00
0-9
ɶɶʺʺ
ɼɦ OK i
1
ĵ
Dialogue line
Page 11

ķ
11
The Remote Control Handset
1…9 Select programme position
(– P + on set) and
0/AV switch the TV set on from
standby
or select AV position.
P+ / P– Select programme positions step
by step: P+ : (1, 2, 3 …),
P– : (…3, 2, 1) or
P+ : switch on from standby with
last selected programme position.
Move cursor up or down.
OK
Modify and activate various
functions. Press
OK-
button twice:
optimum setting.
ņ –,+ ŀSet volume or move cursor to the
left and to the right.
Teletext: current page number
+ 10 pages.
Teletext: current page number – 1
Ȅ
Time on/off.
Teletext: current page number + 1
i
+/– Colour contrast.
VIDEO Video recorder remote control
(press and hold down VIDEO button).
AUX Teletext: call up dialogue line.
Ǽ
Switch to standby and switch
on with last selected programme position.
ʀ
Sound on/off (mute).
Ǻ
Display/suppress programme
number (status page).
Set b/w contrast: press
Ǻ, OK,
ņ – or + ŀ.
Set Sleep Timer (switch-off
time 01…99 min: press
Ǻ, OK,
Ǻ, and numeric buttons 1…9.
Automatic frequency control
on/off: press
Ǻ, OK, Ǻ, Ǻ, ņ –
or + ŀ.
Call up Audio menu: Ǻ, ʀ
TXT Teletext ɫ TV mode
Teletext: next hundreds page.
v
+/– Brightness.
SAT Satellite receiver remote
control (press and hold down
SAT button).
P/C Call up programme data.
Keep pressed for 4 seconds:
call up ATS.
Ń
!
Every changed value is stored after 8 seconds automatically or when switching to standby.
Ń
!
This television was tested with maximum contrast.
It is advisable to turn down the contrast to offer you
the best picture quality depending on lighting conditions or on the location where your TV is set up.
Ń
!
If you wish to have the programme position number permanently displayed, press the Ǻ button.
To supress the display, press the
Ǻ button once
again.
TP 712
123
456
89
7
AV
0
P
OK
–
+
P
Ȅ
Ǽ
ʀ
Ǻ
TXT
+
–
iv
VIDEO AUX P/C SAT
+
–
Page 12

ķ
12
Adjusting the Sound, Teletext
The Audio Menu
❒
Calling Up the Audio Menu
Press the
ǺǺ
and then theʀbutton to display the
Audio menu.
Stereo, mono, two-channel–
Stereo expansion –
Treble –
Bass –
Balance –
Dialogue line –
Ń
!
After any adjustment, the Audio menu can be exited
by pressing the ǺǺbutton.
❒
Stereo, Mono and Two-channel Sound
Broadcasts
If your television receives two-channel sound transmissions, for example, when a film is broadcast in
the original sound track on sound channel 2 (DUAL
B) and the synchronized version is broadcast on
sound channel 1 (DUAL A), you can select the
desired channel.
Press P+ or P- to select the first menu line.
Press
ņ –, + ŀ to select the desired sound
channel.
If a stereo broadcast is received, the set switches
automatically to stereo sound.
Ń
!
If the stereo sound is poor (weak signal), press
ņ –, + ŀto switch to mono.
Ń
!
The mono setting can be stored separately for every
programme position by pressing the OK-button.
Indication of the sound mode
Each time the station changes the sound transmission mode (e.g. from mono to stereo), the mode is
displayed for approx. 4 seconds.
This indication takes also place when changing the
programme, however only if the mode differs from
the mono mode.
❒
Stereo Expansion
This function improves the acoustic pattern during
stereo broadcasts and improves the sound of mono
broadcasts.
Use the P+ or P- button to select the corresponding
menu line.
Adjust with the
ņ – or + ŀ button (the set stereo
expansion is retained even when changing the programme position).
❒
Treble, Bass, Balance
The settings of these functions can be corrected as
required.
Use the P+ or P- button to select the corresponding
menu line.
Adjust with the P+ or P- button.
2
1
2
1
2
1
STEREO MONO
ʀǁ ʀ…ǁ
ɦ
ɼ
f
ɶʺ < > Ǻ
1
Teletext
❒
Call up Teletext: press the TXT button.
❒
Select pages directly with the
1…9
buttons.
(Available pages: 100-899)
❒
Calling up contents page
Press ǺǺbutton.
❒
Call up dialogue line: press the AUX button.
= Enlarge character height
= Bypass waiting times (actual mode).
= Directly call up subpage
= Reveal answer
= Stop page
Select the functions with the
ņ – or + ŀ button and
call them up with the OK-button.
The functions 1, 3, 4, and 5 can also be selected
without calling up the dialogue line:
Enlarge character height: press the +
i button.
Directly call up subpage: press the –
i button.
Reveal answer: press the +
ŀ button.
Stop page: press the
ņ – button.
❒
Selecting Pages by Means of the Cursor
(Page Catching)
i.e. without entering the page numbers. Move the
cursor to the desired Teletext page in an overview
page (pages containing three-digit page numbers).
Using this function, you need not type in the threedigit page numbers.
Press the P+ or P- button.
"Page Catching" is displayed on the top screen
border.
A light spot (cursor) is flashing on the first or last
page number of the overview page.
Use the P+ or P- button to move the cursor to the
desired page number.
Press the OK-button.
The page appears on the picture screen.
3
2
1
5
4
3
1
5
4
3
2
1
54321
ķ
ʄʄ
ķX /00 ķ? STOP
Page 13

ķ
13
Connection Possibilities
Connecting a Video Recorder or
Satellite Receiver
❒
Connection
Connect the video recorder or satellite receiver with
an AV lead to the AV socket.
❒
Operating the Video Recorder
Press the 0AV button.
Start playback on the video recorder.
The video playback is visible on the TV set.
Remote Control of a Video Recorder
The remote control handset of your television enables also remote control of Grundig video
recorders. Your specialized dealer can tell you
which video recorders are suited for this.
Press and hold down the VIDEO button.
This switches the remote control handset into the
video recorder mode.
Then press the desired function button.
The following table shows you which buttons are
to be used for the different recorder functions.
ĵķ
(Numeric button 1) = Reverse picture search
ĶŁ
(Numeric button 2) = Forward picture search
•
( – i button) = Start recording
■
( i + button) = Stop
ĵĵ
(Numeric button 7) = Fast rewind
ŁŁ
(Numeric button 8) = Fast forward wind
II
( – v button) = Pause
ı
( v + button) = Start playback
Ľ
(Numeric button 4) = Programme position –
Ń (Numeric button 5) = Programme position +
1
EURO-AV
AUDIO
Connecting a Descrambler
(Decoder) or an External Unit
(Video Recorder)
Some providers which offer their programmes via
the cable TV system ”scramble” the picture and
sound signals so that you need a pay-TV decoder
(descrambler) if you wish to receive these programmes in a normal way.
How to
proceed:
Connect the decoder/video recorder to the EUROAV socket.
Decoder:
Select the programme position on which the
encrypted programme is received.
Video recorder:
Select the programme position on which you wish
to see the video playback.
Press the P/C-button.
Press the
ņ – or + ŀ button to select DEC.
Press the P+ or P- button to select ON.
A programme position prepared for decoder operation can be recognized at a fullstop appearing after
the P when changing the programme position.
Press OK to store the setting.
Press
ǺǺ
to exit the menu.
5
4
3
2
1
Page 14

ķ
14
Connection Possibilities
Connecting a Headphone
❒
Connection
Connect the headphone (3.5 mm ø jack) with the m
socket (the speakers of the TV set ar switched off).
❒
Adjusting the Headphone Volume
Adjust with the ņ –, + ŀ
buttons.
1
Connecting a Camcorder
(VHS, Video 8)
❒
Connection
Connectin
g the video signal
Connect the VIDEO IN socket with the corresponding video socket on the camcorder.
Connecting the audio signal
Connect the L AUDIO IN R sockets with the audio
sockets on the camcorder. For mono playback,
connect the L AUDIO IN socket with the corresponding audio socket on the camcorder.
❒
Operating the Camcorder
Press the 0
AV
button.
Start playback on the camcorder.
The video playback is visible on the TV set.
(It is not possible to copy to the Euro-AV socket!)
1
P
+
_
g
+
_
m
VIDEO IN L– AUDIO IN – R
_
VIDEO IN L– AUDIO IN – R
+
P
m
Page 15

ķ
15
Specification
❒
Mains voltage:
220-240V, 50/60 Hz
(power supply control range 165 … 265 V)
This unit may only be operated with the power
supply cable set which has been supplied. It prevents interference from the mains, and is considered an obligatory component of this unit.
For a replacement, contact the nearest customer
service center and order only the power supply
cable set with the following designation:
GWN 9.22/article number 8290.991-316.
❒
Power consumption:
approx. 80 W
Standby: 8 W
❒
Channel coverage:
C01 … C 99
Special channels S01 … S 41
❒
Sound output:
2 x 8 W music power (2 x 4 W sine power)
This unit conforms to VDE safety regulations and
directives of the Deutsche Bundespost (German
Federal Post Office; see certification mark on the
type sticker on the rear of the unit), as well as all
relevant ordinances governing X-ray emissions.
The picture tube, which emits X-rays, is sufficiently
shielded and therefore represents no danger.
Accelerating voltage is max. 27kV with a mean
beam current of 1.5mA.
Unauthorized tampering with the unit, in particular
making adjustments to the high voltage system, or
installing a different picture tube, can considerably
increase X-ray emissions. Units so altered no
longer conform to applicable safety regulations and
may not be operated.
Subject to alterations. E. and O.E.
❒
Pin Assignment of EURO-AV Socket
If you want to connect other devices to your television (for example, a computer or amplifier), your
dealer can provide you with a normed standard
connection by means of the following table:
Pin Signal
1 = Audio output right
2 = Audio input right
3 = Audio output left
4 = Audio, earth
5 = Blue, earth
6 = Audio input left
7 = RGB blue input
8 = Switching voltage
9 = Green, earth
10 = –
11 = RGB green input
12 = –
13 = Red, earth
14 = Earth
15 = RGB red input (chroma for SVideo)
16 = RGB switching voltage
17 = Video, earth
18 = RGB switching voltage, earth
19 = Video output
20 = Video input
21 = Shielding/earth
220
21
119
Page 16

GRUNDIG AG ••D-90762 FÜRTH Printed in Germany
0 1 2 3 4 5 6 7 8 9
21682-941.01
Ķ = Seite 2-8
ķ = Page 9-15
 Loading...